

Page 1
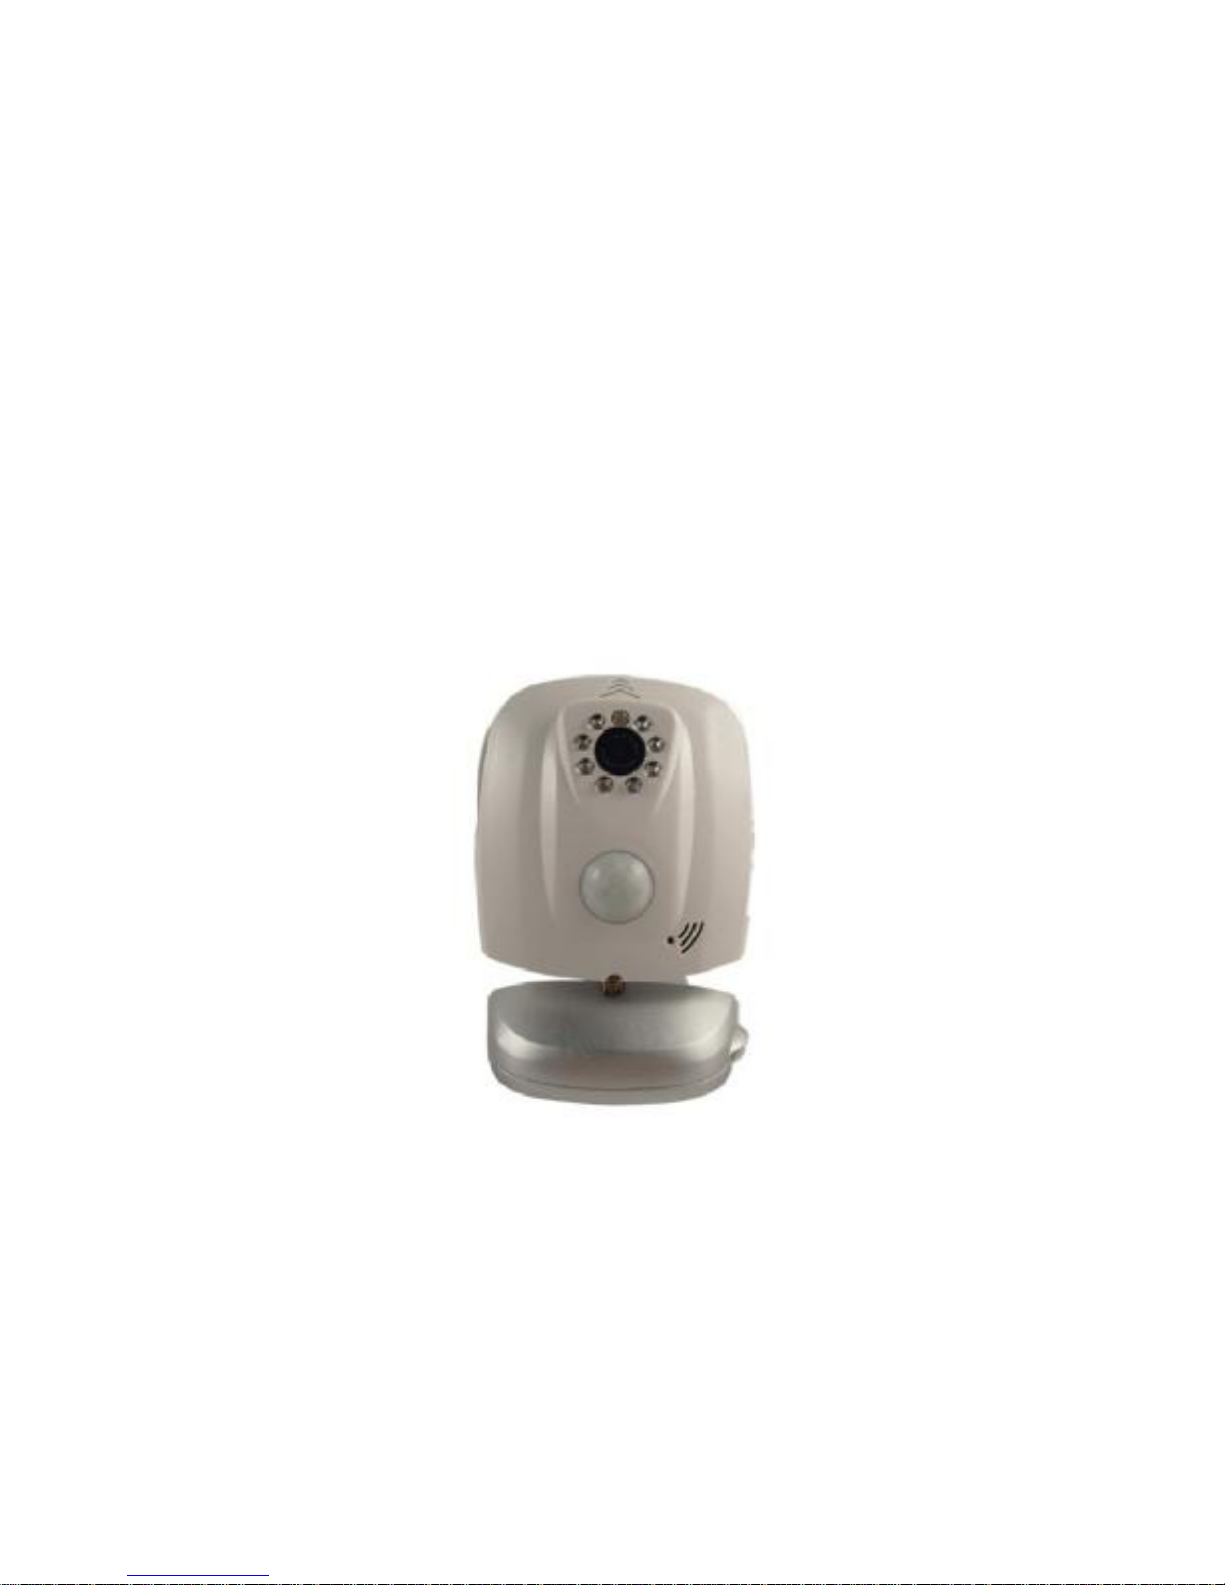
3G REMOTE CAMERA User Manual
1
HC-6100 3G REMOTE CAMERA
User Manual
Page 2

2
Contents
Chapter 1. Product Features ………………………………………………….5
Chapter 2. Terms Explanation ………………………………………………..6
1.User Authorization Level: …………………………………………….6
2.Arming/ Automatic alarm …………………………………………….7
3.Disarming ……………………………………………………………..7
4.Incoming video call and Talkback………………………………….... 7
5.Setting………………………………………………………………... 7
6.Reset ……………………………………………………………….…7
Chapter 3. Remote controller and remote handle illustration ……………..…8
Chapter 4. Indicator light working Status Instruction …………………….…8
Chapter 5. Installation ………………………………………………………..9
Chapter 6. Quick Start……………………………………………………….. 11
1. Power on/ off …………………………………………………………11
2. Start Remote camera …………………………………………………11
3. Binding wireless remote controller …………………………………..11
4. Arming …………………………………………………………...…12
5.Disarming…………………………………………………………… 12
6. Incoming video call ………………………………………………...12
7. Press the emergency key to trigger an alarm: ………………………错
误!未定义书签。11
Chapter 7. Advanced Operation …………………………………………….12
1.Activate remote camera ……………………………………………..12
2. Modify the password ………………………………………………..13
3. Modify the telephone number of master …………………………....13
4. Add/delete the telephone number of normal users ……………….....13
5. The operation illustration of wireless remote controller ……………14
6. Built-In PIR Sensor ON/ Off (Default: OFF) ……………………....16
7. Wireless sensor ……………………………………………………..16
Page 3

3
8. Infrared light……………………………………………………….. 18
Turn on infrared light: ………………………………………………....18
9. Take photos ………………………………………………………..18
10. Video recording …………………………………………………....18
11. Automatic alarm …………………………………………………...19
12.ON/OFF Live voice amplifier、volume adjustment、digital zoom 19
13. Getting help …………………………………………………….....20
14. Reset the camera …………………………………………………..20
Chatpter 8. Maintenance…………………………………………………….20
Chapter 9. Common malfunction solutions ………………………………...21
Chapter 10. Main Technical Parameters …………………………………....22
Chapter 11. Appendix: SMS command list ………………………………....23
Page 4

4
Thank you for purchasing the 3G Remote Camera. The user manual illustrates
how to operate this product so please read the user manual carefully before
using it.
With this high-tech wireless equipment, you can monitor anywhere at anytime
by dialing video calls with 3G mobile phone. The 3G remote camera can be
widely used in house、school、shop、moving cars、trains or take care of elders
and children as long as WCDMA network is available.
Modern design 3G Remote camera matches excellent 2.0 mega pixels camera,
you can send SMS command to make images and videos store in the camera.
With built-in several pcs high-light infrared lights, the camera can shoot clear
film even in darkness.
The Remote camera is compatible with normal 315 MHz or 433 MHz wireless
sensor in the market, such as wireless infrared motion detector, door sensor,
smoke detector etc, and all of them are wireless, easy to use. You can also select
any kind of sensor mentioned to work with our product. You or your family or
your guards can receive the alarm message with your preset ways such as
SMS,voice call, video call which are stored as evidence when the wireless
sensor was triggered.
All services and functions needs to be supported by the network and USIM card.
Detailed operation and product functions, please refer to this brochure.
Page 5

5
For Your Safety
The product complies with the relevant Chinese standard about
electromagnetic compatibility. However, please keep away from
electronic equipment which is likely to interfere by the wireless signal,
to avoid the signal interruption.
Switch off this product in any area marked "Explosive", "might
explode", "closed wireless transceiver devices" etc.
Do not dispose the product in a fire; otherwise, it may cause the
battery explosion.
Only use the power adaptor approved by the product manufacturer.
The use of any other types may damage the product
Keep the product and the accessories out of the reach of children.
Declaration
We operate a policy of continuous development. We reserve the right
to make changes and improvements to any of the products described
in this document without prior notice.
For latest product information, We don’t guarantee for the document
veracity, reliability or any content except regulate in proper laws.
Including no guarantee for product suitable market or suitable area
promise.
Under no circumstances should be responsible for any loss of data or
income or any special, incidental, consequential or indirect damages
howsoever caused.
Product supply may vary with the area,please check with our nearest
authorized agency.
Use only this product legally. do not monitor other one’s private places.
we don’t take any charge for the illegal use of this product.
Chapter 1. Product Features
² This product uses USIM card, supporting WCDMA 3G network..
² Built-in CMOS camera and infrared light, it supports real-time wireless
video monitoring in 24 hours.
² You can send SMS to control camera remotely and check anywhere
secretly and safely.
² Multimode alarm: Camera can send alarm messages by SMS, video call,
voice call.
² Sensor detection: Max 15 wireless alarm sensors can be added.
² Support to record the alarming image to the camera
² Up to 10 telephone numbers can be pre-stored in the system.
² Matching wireless remote controller: Arming,disarming or emergency
alarm.
Page 6
6
² Special Camera: 2.0 mega pixels CMOS camera.
² Complete wireless connection.,easy installation:the product can be
installed at any place you wanted.
² Built-in replaceable Lithium battery: rechargeable battery ensuring
operation in case of external power failure.
² Real-time video: you can call the video phone to check the image of
monitoring area anytime and anywhere.
² Application: taking care of the elders and children, in house, school,
monitoring shop, bus, ship, and train etc.
Chapter 2. Terms Explanation
Any mobile phone compatible with WCDMA can see the monitoring area by
dialing video call.
Any mobile phone with SMS function can control the remote camera with SMS
command.
Make sure to remember the product’s password and USIM number. Don’t
disclose to others to ensure your privacy safety.
1.User Authorization Level:
There are two levels remote camera user with different authority:
Administrator (Master): Only one,master needs to store his/ her mobile
number into the camera first. Otherwise, all the functions of the remote
camera are disabled;Only one master mobile number can be set in the
remote camera. The camera will send the alarm to master’s mobile
number and normal user numbers set by the master;Master should
clearly remember the password and USIM number; Only master has the
authority to change the camera password and the user numbers,and enjoy
all the service the product provided.
Normal user(family):Max 10,normal users’ members have the right to access to
video call, add the sensor and remote controller,and allow to send SMS
to set this product; normal user’s numbers are set by the master.
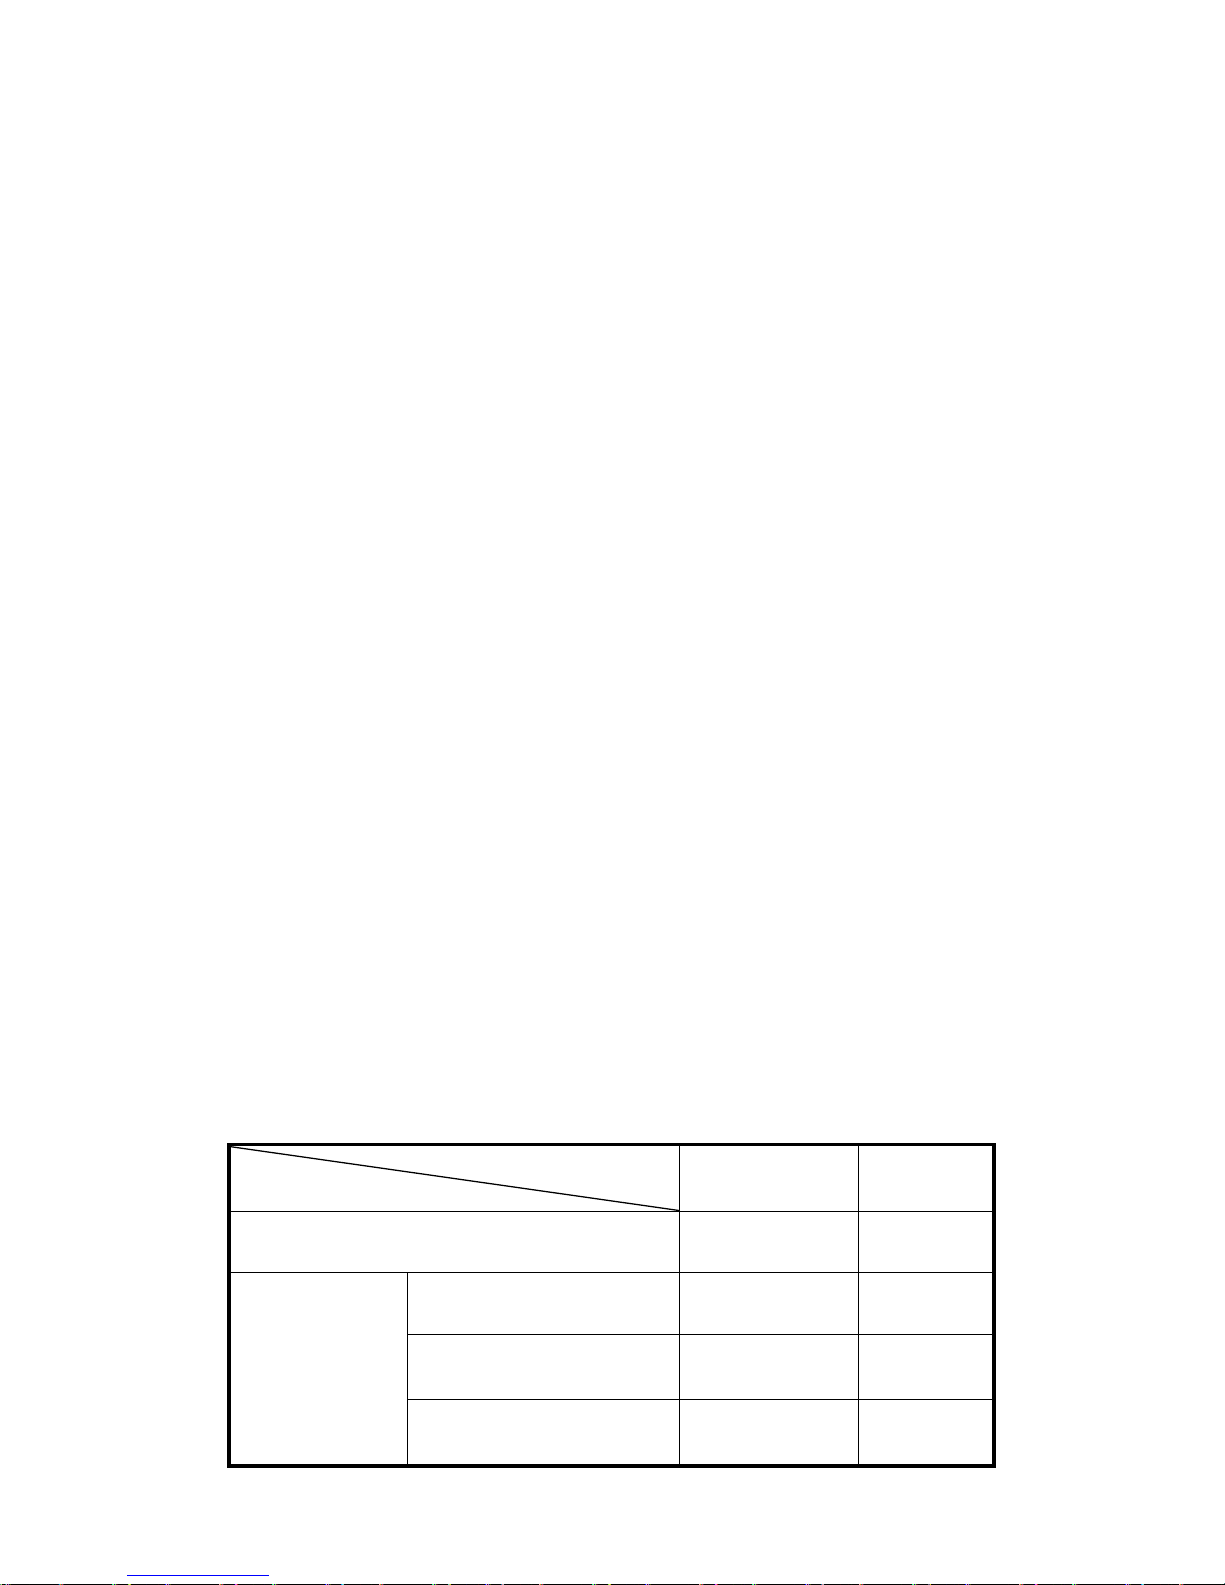
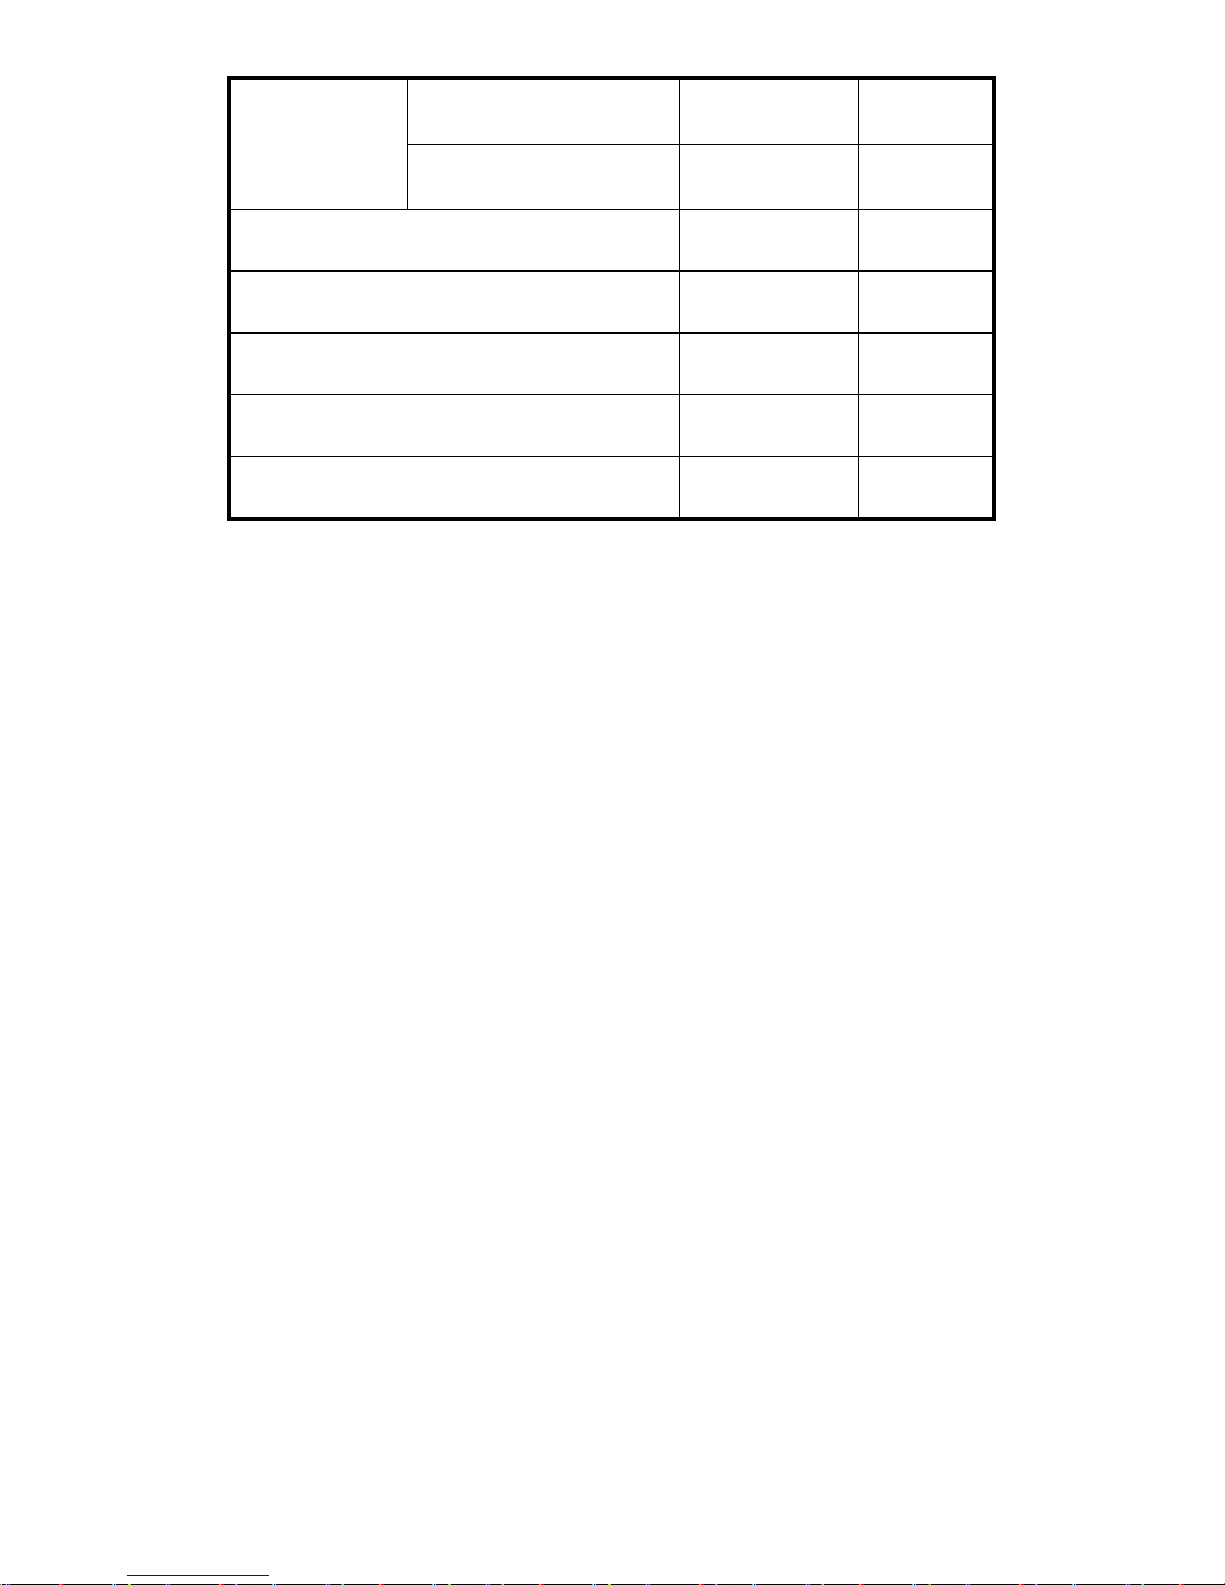
Difference authority between Master and normal users:
User Type
Function
Administer
Normal
users
Change normal user list √ ×
Receive SMS √ ×
Receive voice alarm
calling
√ √
Automatic
Alarm
Receive video alarm
calling
√ √
Page 7
7
Monitor by dialing
voice call
√ √
Dial the
phone
number
Monitor by dialing
video call
√ √
Set sending SMS command √ √
Add、modify、delete sensor √ √
Bind wireless remote handle √ √
Change password √ ×
System Recovery √ ×
2.Arming/ Automatic alarm
Arming is to make the remote camera in working status. In this status, all
connected wireless sensor are in working.
Under the arming, if any wireless sensor is activated, camera will send SMS or
Video call or voice call to master to inform alarm immediately. If the master
doesn’t answer the call, it will dial the next preset numbers until answered. This
process will repeat three times, then exit dialing mode automatically if none of
the preset numbers answered.
3.Disarming
Disarming is to deactivate the remote camera. All connected wireless sensors are
in non-working status,the camera will not alarm automatically unless pressing
the emergency key.
4.Incoming video call and Talkback
Real-time video can be turned on when master or normal users call the camera,at
this time,press ”3” key of phone button, turn on the Live voice amplifier,can
shout on site.turn off the amplifier,please press “4” key of phone button.
5.Setting
All the set to this product can be completed by sending SMS command.
6.Reset
Press and hold the SET key,and push the ON/OFF key to ON position, 5 seconds
later , the camera will automatic reset after you heard two “tick..”sound from the
Page 8
8
buzzer.
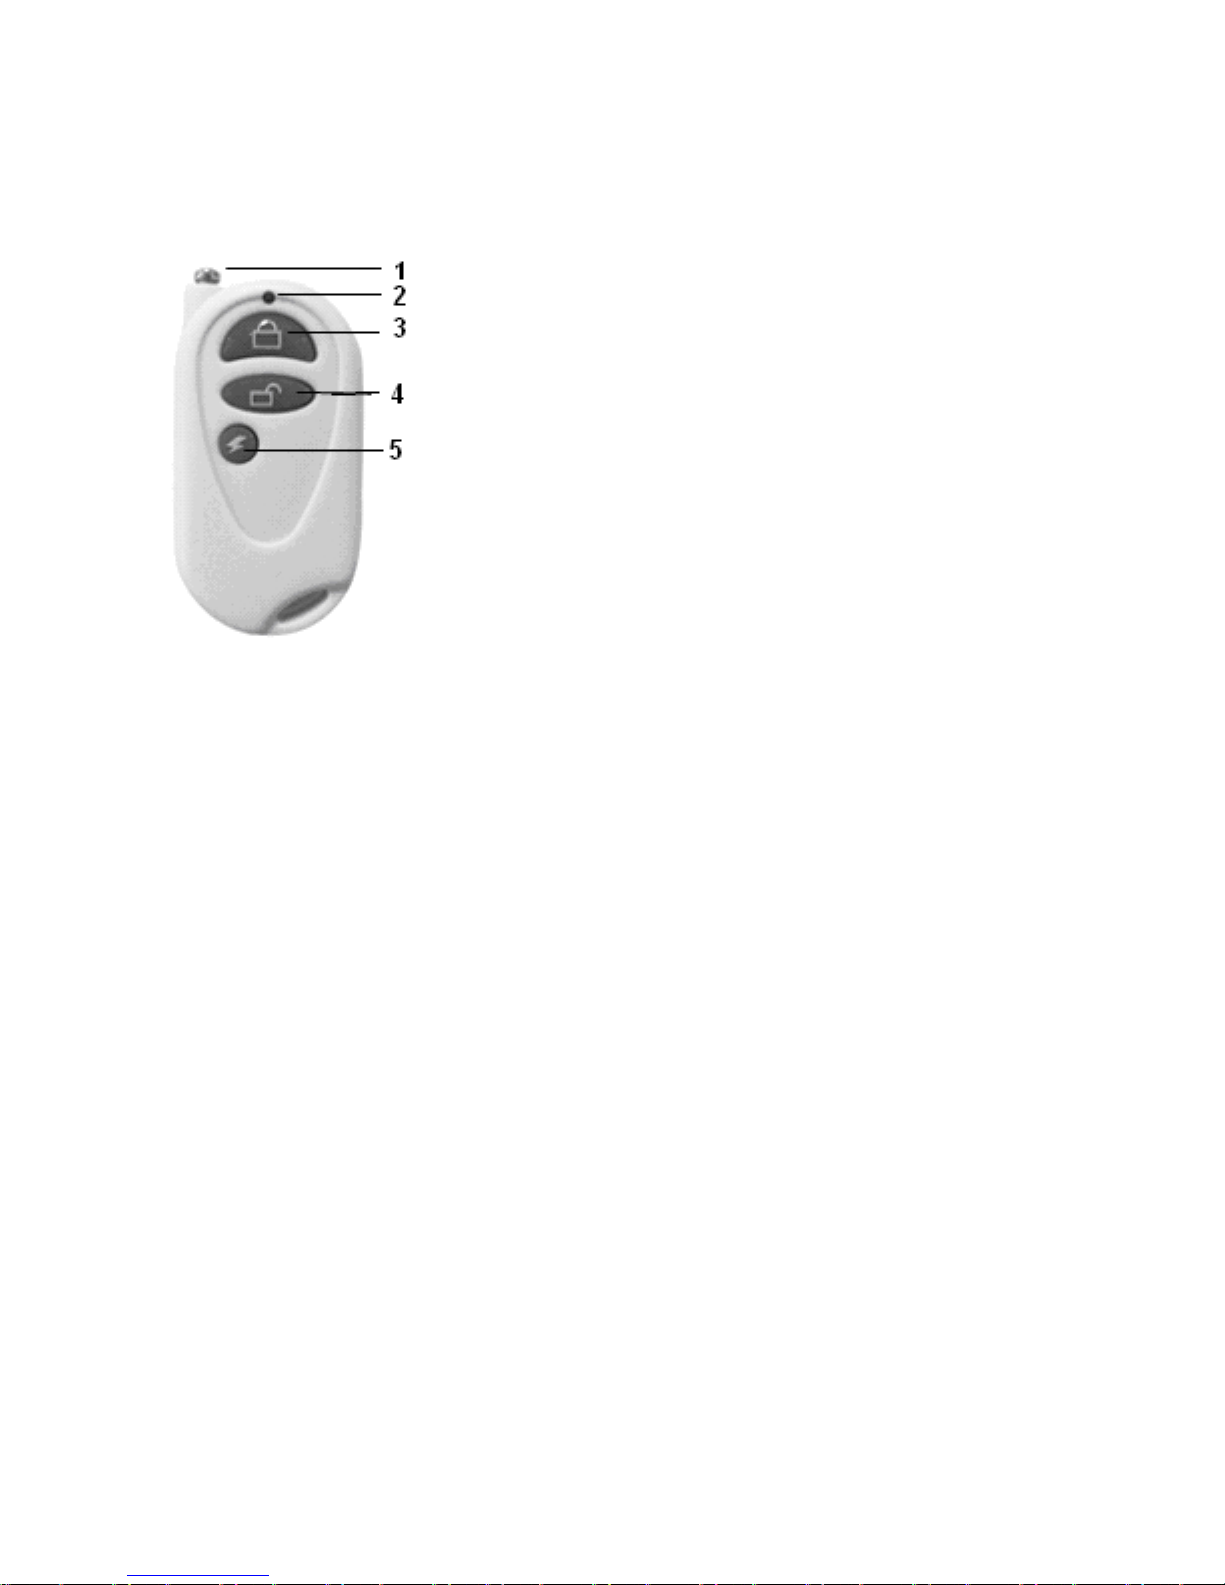
Chapter 3. Remote control illustration
Picture 2: Remote control Instructions
1. Antenna 2.Indicator light
3. Arming key 4. Disarming Key
5. Emergency key
Chapter 4. Indicator light working Status Instruction
Page 9

9
Action Status
Flash slowly Searching the network.
Flash
quickly
Sensor alarming.
LED
Continuously
on
Not installed SIM card, or the remote camera
damaged.
Continuously
on
Arming, Open the auto-alarm function.
Flash slowly Disarming. Close the auto-alarm function.
LED
Flash
quickly
Processing data.
Flash Wait to load remote control.
Chapter 5. Installation
1. Install the USIM card
Remove the rubber cover from the left side of camera. Open the USIM card slot
by pressing the small dot beside the USIM card slot with the tip of a pencil, and
pop-up the slot. Insert the USIM card into the slot then push the slot back to its
place, get back the rubber cover.
2 The use methods of base board or bracket.
2.1 Extend camera base board
Hold the two sides of the camera and pull the head of it, and the slot buckle will
be opened. Stand the head of the camera now and move it at any direction.
2.2 Install the host in the bracket(you can fix the bracket with screw then install
Page 10

10
the host)
Connect the adapter to an AC power, and connect the mini-USB plug to the
power interface of the camera.
The product has a built-in rechargeable Lithium battery. The camera will notify
you when the power supply changed. For example, if the power adapter is
disconnected or the AC power is cut off, it will show “AC power off”. If the
power adapter is connected again, it will show “AC power recovered”.
2. Fix base board (bracket)
Fix the base board or bracket on the wall with the screws or located at suitable
flat place, having the camera opposite the monitoring area you need.
Choose the Installing position:
For better image quality, avoid the bright light irradiated directly into
the lens of the camera.
It is suggested to located the camera at the place where can look
down the monitoring place with the minimum angel 30°.To prevent to
be stolen, it is suggested that the camera is located at the place above
the ground more than 2.2 meters.
n If 3G network is weak, the system will change to GSM network and
video call prohibited; Therefore, the camera should be located at the
place where strong network signal available.
After installation, try to dial video call with 3G cell phone to check the
video image, Re-locate the remote camera and adjust the camera’s
angle to get best image.
Page 11

11
Chapter 6. Quick Start
Tips:Assure that USIM doesn’t activate the caller transferring function and in
coming call display,close the PIN code as well.
1.Power on/ off
Power on: turn the power switch to upside “On” position. The indicator light
will be on continuously with red color for 3-5 seconds, then change to flash
slowly. After about 35 seconds, the indicator light changes to green color and
flashes slowly (indicates disarming status) or green color lighted continuously
(indicates arming status), which indicates that the camera has found the network
and begun to work. At this moment, a sound of “tick” can be heard from the
camera. More information of the status please refers to indicator light status
instruction.
Power off: Turn the power switch to downside “Off” position.
2. Start Remote camera
Dial a voice call to the camera by your mobile,it automatic default your mobile
number as authorized Number after getting through.
After successful start, your mobile phone will get a reply SMS: “welcome to use
3G remote camera,the password is 1234!”
At this moment, your mobile phone has been set as authorized Master number..
Note:Make sure that no authorized number set before performing above
operation,if the camera has set before,please delete the old authorized mnumber
or reset (hardware reset/SMS reset)the camera,then set new authorized number.
3. Active remote control
After starting, press and hold the “Set” key at the rear board of the camera for 2
seconds. The indicator light changes to flash with orange color indicating that
the camera has switched to loading status. Then press any key of the remote
control to send signal to the camera, the indicator light of the remote control will
turn on. After receiving the new remote control signal successful, a “tick…”can
be heard from the camera. Press “Set” key again to exit the loading status.
Otherwise, it will automatically exit after 30 seconds.
Page 12

12
4. Arming
Press“Arming key”directly on the remote control.
If successful set, a“tick”sound can be heard from the camera and the indicator
light of the camera will turn on continuously with green color
5.Disarming
Press“Disarming key”directly on the remote control.
If successful set, a “tick”sound can be heard from the camera and the indicator
light of the camera will flash in green color.
6. Incoming video call
Master and normal users who dial the camera with 3G mobile phone can watch
the monitoring area after two ringing sound.
Unauthorized access can not get through when dialing.
7.Press the emergency key to trigger an alarm :
Press the emergency key on the remote control, the camera will firstly send SMS
to master to inform SOS and then dial the phones of master or users members
one by one. However, if the 3G network not available, the camera will dial the
voice call until getting through.
Chapter 7. Advanced Operation
1.Activate remote camera
(Authority: Master)
When first time using or after resetting the remote camera, it needs to set the
master number to activate the camera so that it can automatic send alarm
message to the master.
Master should dial a voice call to the camera,the camera will default master
mobile No as a authorized No.
After success activating the camera, it will reply you: “Welcome to use remote
camera, the password is 1234”.at this time,you mobile No already set as
authorized No.
If the camera has been activated before, the old master number will be saved in
it ,when you dial again,the camera will not get through,or you can send
Page 13

13
following SMS command to the camera:
#master#
After success activating the camera, it will reply you: “Welcome to use remote
camera, the password is 1234”
Note: If the camera has been activated before, the old master number will be
saved in it, If you try to activate it again, it will reply SMS “Master already
exists”.
2. Modify the password
(Authority: Master)
Modify the password of the camera after power on to ensure operation safety.
Only master can change the password. master can send following SMS
command to camera to change the password:
#password# old password # new password #
The password is a 4-digit number. The default password is 1234. After succeed
to change the password, the camera will send SMS to you: “The password has
been successfully changed. The new password is ****”. If others send above
SMS command to camera, it will reply “Sorry, you are prohibited to request this
command”.
3. Modify the telephone number of master
(Authority: Master)
Only the master can modify the telephone number of master. master can send
following SMS command to camera to change the master
“#newmaster#new master telephone number #”
After successful set, the old master will receive the SMS “The Master number
have been successfully changed”,Old master number didn’t have the authority to
control the camera any more.
4. Add/delete the telephone number of normal users
Only the master can add or delete the telephone number of normal users. Or
others will receive the message “Sorry,you are prohibited to request this
command.”
4.1. Add the telephone number of normal users
(Authority: Master)
To be a normal user’s member, the master can send following SMS to the
camera,and store the normal user’s cell phone number into the camera.
Maximum 10 user’s numbers can be stored.
Add the telephone number of normal users,the format as following:
#adduser# normal users members telephone number#
After successfully set,the camera will reply:“ The user number ****** has been
successfully added”.
”If you add more than 10 telephone numbers,the camera will send the following
SMS to your mobile“The user number full!”. Please delete numbers before you
add new ones. ” If you set the same telephone number the second time, the
Page 14

14
camera will send the following SMS to your mobile“user number already
exists”.
4.2. Delete the telephone number of normal users:
(Authority: Master)
The master send a SMS to the camera and delete certain telephone number of
users’ members
Delete single user’s mobile number,the format is as followed:
# deluser#normal users members telephone number #
Delete all the normal users members’ telephone numbers,the format is as
followed:
# deluser #
After successful deletion of phone number,the camera will send the following
SMS“User number ******** deleted successfully”, or reply“Fail to delete user
number *******”;
If the format of users members is incorrect in SMS,the camera will send the
SMS“The user number ****** is invalid, please check and try again”.
5. The operation illustration of wireless remote control
3 keys:Arming, emergency key, Disarming .
When press the Arming key, the camera indicator will turn on green, and the
camera enter into the defense state. If the wireless detector is activated by
intrusion the camera will alarm and dial out video call, voice call, and send
SMS.
When press the Emergency key, the camera indicator will turn to green and flash
quickly. The camera will dial the master number and the emergency numbers
orderly. Live voice can be heard by answering the calling. It will call master and
all user numbers three times till answered, then exit dialing automatically.
When press the Disarming key, the camera indicator will turn green and flash
slowly. The camera will be out of defense state. In this state, the camera can
alarm only by pressing the Emergency key.
A “tick…” sound can be heard from the camera by pressing any remote control
key.
5.1 Add wireless remote control
Press the set key on the rear board and the indicator light turns to flash slowly
Page 15

15
with orange color. Then press any key of the remote control. When the host
receives the new wireless remote control signal, a “tick …” sound will be heard
and the indicator light will turn green for 2 seconds then turn to orange, and
flash slowly. User can continue to add other more remote controls at this
moment. The camera will automatically exit from the loading status after 15
seconds, or press the set key to exit directly.
Max 5 remote controls can be added.
5.2 Delete remote control
(Authority: Master, normal users)
Master or normal users can send following SMS to camera:
#delre#
Camera will reply “All remote controls deleted successfully”. If guest send
above SMS command to camera, it will reply “Sorry, you do not have the right
to operate”.
5.3 Arming
(Authority: Master, normal Users)
If the camera indicator light shows in green color and flashes, it indicates that
the defense status has been canceled (no alarming status). To recover the
defense/arming state, you can do following operation:
Method 1: send following SMS to camera.
Master and normal users: #arm#
Method 2: Press the “Arming” key on the remote control directly and you can
hear “tick …” sound indicating successful operation.
The camera will reply you SMS “Arming successfully” ,and the indicator light
on the camera will turn green and keep on continuously.
5.4 Disarming
(Authority: Master, Users)
Page 16

16
In disarming status, camera will not alarm (Unless press the emergency key on
the remote control).
All connected wireless sensors do not work.
Method 1: send following SMS command to camera:
Master and normal users: #disarm#
Method 2: press the key of “Disarming” on the remote control. You can hear
“tick…” sound if operation successful. And receive “Disarming successfully”
SMS. Then the indicator light turns green and flashes.
6. Built-In PIR Sensor ON/ Off (Default: OFF)
(Authority: Master, Normal Users)
Only built-in PIR sensor to open and the camera on the Arming status, all the
moving objects in the detected distance of the PIR sensor will trigger the camera
alarm.PIR alarm SMS: “Inside PIR Alarm!!!”
PIR Sensor ON:
Master or Normal User send following SMS to the camera:
#pir#1#
After set successfully,the camera will reply SMS “Inside PIR open”;
PIR Sensor Off (Default “Off”)
Master or Normal User send following SMS to the camera:
#pir#0#
After set successfully, the camera will reply SMS “Inside PIR close”.
7. Wireless sensor
(Authority: Master, normal Users)
Any 315MHz (or 433MHz) wireless sensor, such as infrared motion detector
wireless door magnet, wireless smoke sensor etc, can be set as alarm sensor of
the camera.
Add wireless sensor:
1) Power on the wireless sensor.
2) Master or normal users send following SMS command to camera and
Page 17

17
the camera will enter into the state to add new wireless sensors:
status:#add sensor#sensor name#
The sensor name should be English or Arabic number, Max 50 letters. It is
named by Master to identify different alarm in the future.
For example: #addsensor#door#
If the SMS doesn’t contain the name of sensor,you can send #addsensor# to
the camera.
After receiving the SMS command, the camera will sound “tick…” sound and
the indicator light will flash with red and green alternately. Then send SMS
“Waiting to add/learn sensors. Trigger the sensor to send signal immediately”
How to trigger sensor to send signal? For example, for wireless door magnet,
make it open and close once to send the signal to the camera. If the sensor added
successfully, the camera will sound “tick…” sound, then exit the learning status,
and reply “Adding sensor successfully”.
If the camera fails to load the sensor or no sensor exists, the indicator light of the
camera will flash with red and green alternately for about one minute, then the
camera will exit the loading status automatically and back to the previous
arming or disarming status.
Max 15pcs wireless sensors can be added to the remote camera. If reaching its
max number, the camera will send SMS: “The sensors are full. Please delete old
sensors before add new ones.”
If the sensor description invalid, the camera will reply “Sensor name invalid,
please rename the sensor”.
Delete all wireless sensors:
Master or users send following SMS to camera:
#delsensor#
Page 18

18
After successful deletion, it will reply “All sensors deleted successfully”
Guest is forbidden to do this operation. If guest send above SMS command to
camera, it will reply “Sorry, you do not have the right to operate”.
8. Infrared light
(Authority: Master, Normal users)
Infrared light enable the camera to have a real time video clearly in dark night.
Camera can control the infrared light automatically. However, if AC power
failure and user wants to close the infrared light to save the battery power,
master or normal users members can send SMS command to control the infrared
light.
Turn off infrared light:
Master or normal user can Send the following SMS to camera: #ir#0#
After successful set, it will reply “Infrared light closed”.
Once turn off the infrared light, it can’t take clear video in dark night. User
needs to send SMS to start the infrared light.
Turn on infrared light: (default setting)
Master or normal user can Send the following SMS to camera:#ir#1#
After successful set, it will reply “Infrared light activated ”.
9. Take photos
(Authority: Master,Normal users)
After receiving SMS command of taking photos, the camera begins to capture
images. The imagine quantity is decided by the SMS command, max 9 photos.
Send the following SMS to camera:#shot#image quantity#
System begins to take photos according to the quantity in the SMS and store
them in the camera
After set successfully , camera will reply “take a picture successfull”
10. Video recording
(Authority: Master, Normal users)
Start Video Recording:
After receiving SMS command of recording video, the camera begins to record
video.
Send the following SMS to camera:#record#1#
After succeed setting, camera will reply “set up video record successfull,start
recording”
Stop Video Recording:
Send the following SMS to camera:#record#0#
After succeed setting, camera will reply “video record finish!”
Page 19

19
Record video when taking a video call:
When wireless sensor or infrared motion detector triggered, the camera system
will start to dial video call orderly and record it into TF card when the video call
answered. Users also can take out the TF card,and read the video document from
computer by connecting with the card reader.
11. Automatic alarm
Master or normal user can send following SMS command to set the automatic
alarm method
(Authority: Master, Normal users)
11.1 Open buzz alarm:
If it necessary to get the Alarm Live Voice, Master and normal users send
following SMS:
#beep#1#
After successful set, the camera will sound“tick..tick”when automatic alarm.
11.2 Close buzz alarm (Default):
If it isn’t necessary to get the Live alarm voice, Master and normal users
send SMS:
#beep#0#
11.3 Not send SMS when automatic alarm:
#sms#0#
After successful set, camera will reply “Set alarm without SMS successfully.”
11.4 Send SMS when automatic alarm (Default):
#sms#1#
After successful set, camera will reply “Set alarm with SMS successfully.”
11.5 Call voice phone when automatic alarm:
#call#0#
After successful set, camera will reply “Set alarm with voice calling
successfully. ”
11.6 Call video phone when automatic alarm:( default)
#call#1#
After successful set, camera will reply “Set alarm with video calling
successfully.” If you set alarm with video cell phone dialing but no 3G network
available, the camera will automatically converts to Voice call
12.ON/OFF Live voice amplifier、volume adjustment、digital zoom
(Authority: Master, normal users)
Master and normal users can activate the real-time video by dialing voice phone
with 3G cell phone; meanwhile, it can also set image focus and volume.
The operation definition of the correspondent key in video call as following
“1” volume up
“2” volume down
“3” Amplifier On
“4” Amplifier Off
Page 20

20
“5” Zoom In
“6”Zoom Out
13. Getting help
Get normal command help:
(Authority: Master, Normal users, guest)
Master or Normal User send following SMS command to camera:
#help#
Once success, the camera will reply users all the operating command.
14. Reset the camera
(Authority: Master)
If the remote camera setting is wrong, or fail to work even after restarting the
camera, The following methods will enable the remote camera recover to
original settings (clear of all users’ setting,incuding master’s number), and back
to regular working status:
Using the master’s phone to send the following SMS to camera:
#begin#password#
After the successful factory default setting,:
“restoring factory setting successfully”
Tips :
This SMS command must add password#,or the camera will reply the SMS
“order wrong”,Only the Master have the right to make the camera recover to
original setting;The others who send this command will receive the SMS “Sorry,
you do not have the right to operate”
Chatpter 8. Maintenance
1. Store and use the remote camera in suitable temperature. Too high or too low
temperature may damage the device.
2. Try to keep the Host and all its accessories dry. Do not store and use it in the
bathroom, or other place with high humidity. Do not allow water or other liquids
into the camera, otherwise, it might cause malfunctions.
3. Do not store and use the camera in dusty environment.
4. Do not use alcohol, acetone and other similar solvents to clean it. Wipe it with
soft-wet cloth.
5. Do not attempt to open it randomly. If the camera does not work normally, try
to resolve it as the guide of the "general troubleshooting", or the problem can not
be solved, contact the dealer immediately.
6. Charge the battery at least 12 hours at the first time after power off to achieve
the full performance of the battery. To increase the life-span of the battery,
connecting the camera Host to the power supply to automatically charge the
built-in Lithium battery for 4 hours every 3 months, if the camera does not use
for long time.
Page 21

21
Chapter 9. Common malfunction solutions
No
Trouble
description
Possible Reason Solution
1
Can’t start
camera
(Indicator light
works)
Other master already set
in the camera.
Recover to original default
setting.
2
All functions
disable
(Indicator light
works)
Calling line presentation
or MMS functions of the
USIM card does not
active, insufficient fee
of the USIM card.
Contact network
provider to active USIM
card function. Pay for
the card.
3
Indicator light
is constantly in
red color.
Can’t find or identify
the USIM card;
USIM card not install
properly: Power off the
camera and check it again.
4
Camera didn’t
response to any
operation.
Camera work
abnormally.
Switch off the power,
check USIM card, or reset
to factory setting.
Network signal weak or
network busy.
Place the camera at other
place with strong signal
and try again.
PIN code of USIM card
active.
Close the PIN code.
5
After starting
the camera,
indicator light
flashes in red
color and can
not turn to
green.
USIM card invalid.
Contact with local
operator to check of it.
Camera low power.
Connect external power to
recharge the battery
6
Remote control
can’t work. Or
work slowly. Or
Remote control low Change remote control
Page 22

22
No
Trouble
description
Possible Reason Solution
battery. battery.
Didn’t pull out the
antenna.
Pull out remote control
antenna.
operating range
shortened.
Didn’t pull out the
antenna.
Try only one remote
control.
The remote control or
sensor already exists
Exit the loading status.
The sensor quantity
already reaches its max
number.
Delete old sensors before
add new sensor.
7
Can not add
new remote
control or
wireless sensor
Didn’t set master
number
Set master number before
add sensor.
8
Can’t start the
camera after
long time
supplied with
the battery only.
Battery runs out of
power.
Connect the camera to
external AC power and
charge for at least one
hour, then, restart camera.
If the above operations can not solve the problem you meet, please contact local
distributor.
Chapter 10. Main Technical Parameters
Power adaptor: Input 100V~240V/50Hz Output: DC 5.5V/2A
Work temperature: -10℃~+45℃
Store temperature: -20℃~+60℃
Relative Humidity: 10-90%,without condensation
Working frequency: HSDPA/UMTS 900/2100 Mhz or 850/1900 Mhz
EDGE/GPRS/GSM 850/900/1800/1900 MHz
Page 23
23
Wireless sensor receiving code: ASK
Wireless sensor receiving frequency: 315/433 MHz
Wireless sensor baud rate: 500-2500bps
Max wireless sensor: 15unites
Effective distance of the
wireless remote control: 100 Meters (wide area)
video format: MP4
Camera pixel 2.0 Mega pixels
Camera Shooting angel: 60 degree(horizontally), 60degree(vertically)
Best shooting distance in night: ≤6 meter
Lithium battery: 800mAh
Battery standby time 24 hours(infrared light:off)
Chapter 11. Appendix: SMS command list
User Function SMS Command
#master#
Master
Activate
Refer to Chapter 6. Quick Start 2.Start
remote camera.
#password#old password#new password#
Modify password
Refer to Chapter 7. Advanced operation, 2.
Modify the password
#newmaster#newmaster number #
Modify Master
number
Refer to Chapter 7. Advanced operation, 3.
Modify the telephone number of master
number.
#adduser#normal users number#
Master
Add normal users
number
Refer to Chapter 7. Advanced operation, 4.1
Add the telephone number of normal users .
Page 24
24
#deluser# normal users number#
Delete users
number
Refer to Chapter 7. Advanced operation,
4.2.Delete the telephone number of normal
users.
#arm#
Arming
Refer to Chapter 7. Advanced operation,5.3
Arming
#disarm#
Master
and
normal
users
Disarming
Refer to Chapter 7. Advanced operation, 5.4
Disarming
#addsensor#
Add or modify
sensor
Refer to Chapter 7. Advanced operation, 8.
wireless sensor.
#delsensor#
Delete sensor
Delete all sensor, refer to Chapter 7.
Advanced operation, 8. wireless sensor.
#delre#
Master
and
normal
users
Delete remote
controller
Refer to Chapter 7.Advanced operation,
5.2.Delete wireless remote controller.
#pir#1# Built-In PIR Sensor ON
Master
and
normal
users
Built-In PIR Sensor
ON/OFF
#pir#0# Built-In PIR Sensor OFF
#ir#0#
Turn off infrared
light
Refer to Chapter 7、advanced operation,9、
infrared light
Master
and
normal
users
Turn on Infrared
light(Default)
#ir#1#
Page 25
25
Refer to Chapter 7、advanced operation,9、
infrared light
#shot#i(mage quantity)#
Master
and
normal
users
Take photos
image quantity(1 to 9), Refer to Chapter 7.
Advanced operation,10 Take photos
#record#1# Video Record Start
Master
and
normal
users
Video record
#record#0# Video Record End
No SMS when
alarm
#sms#0#
Master
and
normal
users
Send SMS when
alarm(default)
#sms#1#
Dial voice phone
when alarm
#call#0#
Dial video Call
when alarm
#call#1#
#help#
Master
and
normal
users
Getting help
Refer to Chapter 7、advanced operation,14、
Getting help
“#begin#password#”
Master
Reset the camera
Refer to Chapter 7、advanced operation,15、
Reset the camera
 Loading...