

Page 1
TEKSCOPE MICROSCOPE
Models N2 Series
USER’S MANUAL
Page 2

Contents N2 SERIES
Before use………………………………………………1
1.Nomenclature.……………………………………………2
2.Operation…………………………………………………4
2-1 Angle of
observation……………..………………………4
2-2 Set the specimen
slide…………..………………………4
2-3 Set illumination………………………………………4
2-4 Adjust
focus…………………………………………………4
2-5 Adjust diopter of binocular
head………………………5
2-6 Adjust
condenser…………………………………………5
2-7 Adjust
diaphragm………………………………………5
2-8 Choose the
objective……………………………………5
2-9 Change the
lamp………………………………………6
3.General
specification………………….………………………7
Page 3

4.Configuration
drawing………………..………………………8
5.Parameter/technical terms……………..…………………9
6.Troubleshooting………………………………………………
…11
Before use N2 SERIES
1、 Operation
(1) As the microscope is a precision instrument, always handle
it with care, avoiding impact or abrupt movement during
transportation.
(2) Do not let the microscope emerge in the sun directly. Keep
it in a dry and clean place. Avoid high temperature and
acute shake. Following environment is required: Indoor
temperature: 0℃~40℃, Max relative humidity: 85%.
(3) Avoiding impact the definition of the image, do not leave
feculence or fingerprints on the lens surfaces.
(4) Before using, examine to ensure the power supply voltage
is consistent with the rating voltage.
2、 Maintenance
Page 4

(1) All glass surfaces must always be kept clean. Fine dust on
the optical surface should be blown off by means of a hand
blower or gently wiped off with a soft lens tissue. Carefully
wipe off oil or fingerprints on the lens surfaces with tissue
moistened with a small amount of 3:7 mixture of alcohol
and ether.
(2) Do not use organic solution to wipe the surface of the other
components. These parts, especially the plastic parts,
should be cleaned with a neutral detergent.
(3) Do not take down or assemble it yourself.
(4) After use, cover the microscope with the dustcover
provided, and keep it in a dry and clean place for
preventing rust.
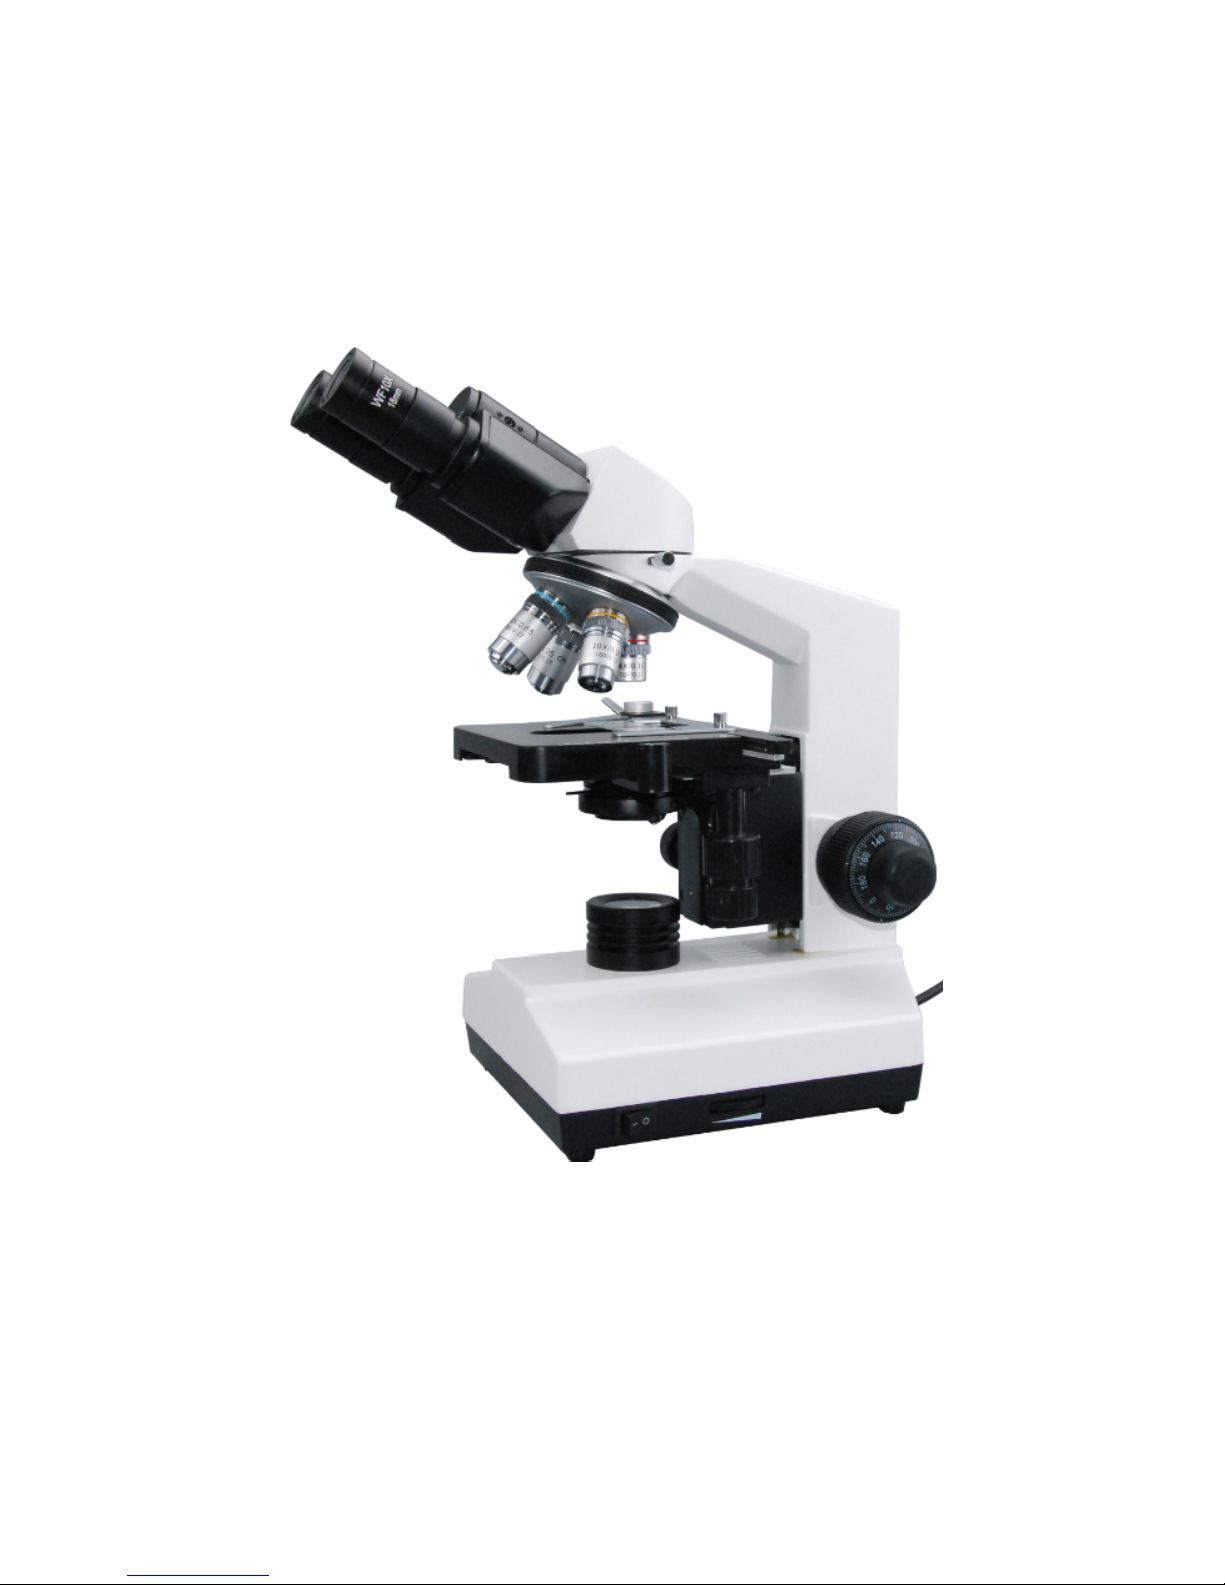
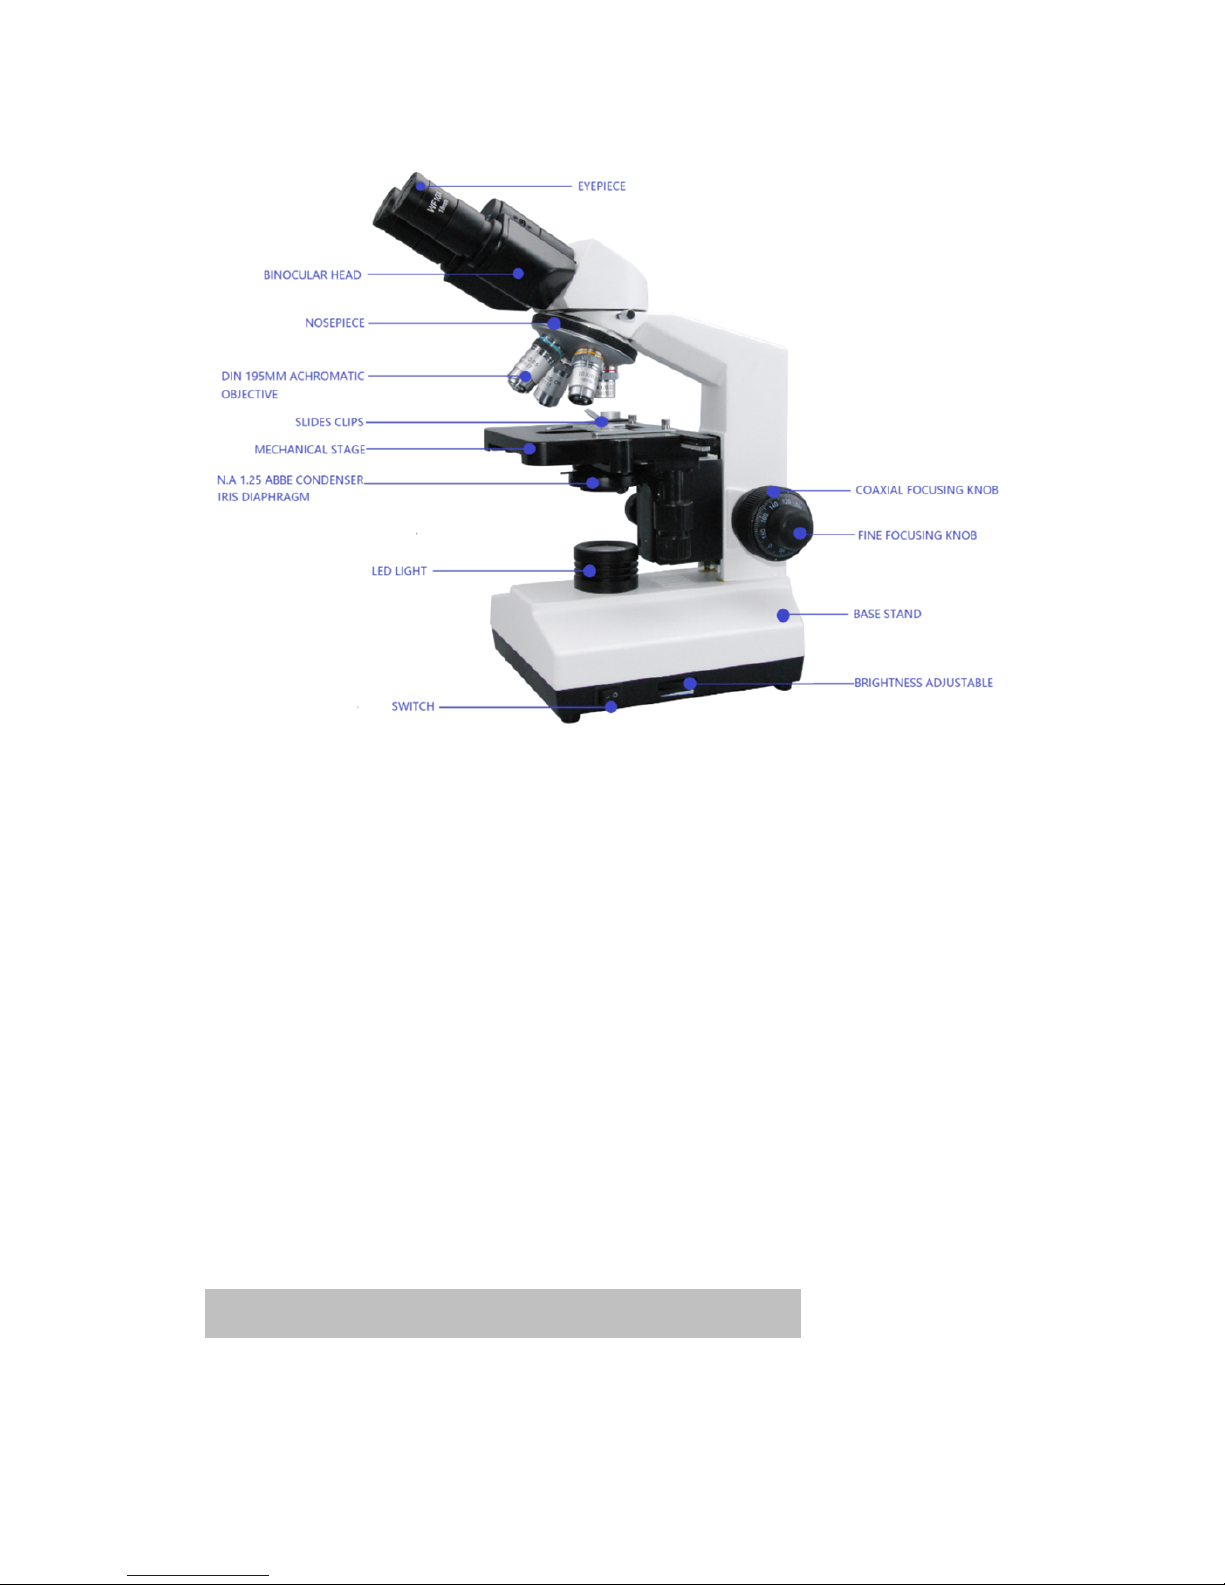
1. Nomenclature N2 SERIES
Page 5
2.Operation N2 SERIES
The microscope is housed in a molded styrofoam container.
Page 6

First take the container out of the carton, and lay the container
on its side. Open the container carefully and don’t let the
optical items drop down, avoiding them being damaged.
Check carefully to ensure the arm and accessories are well.
Second put the monocular head or binocular head onto the top
of the arm, and tighten the head-lock-screw. Install the
objective into the microscope nosepiece from the lowest
magnification to the highest, in a clockwise direction from
the rear. Insert the eyepiece into the eyepiece tube.
2-1 Angle of observation
Loosen the head-lock-screw and turn the monocular head or
binocular head to a comfortable position for observation.
Then lock the head-lock-screw.
2-2 Set the specimen slide
Place a specimen to be studied on a glass slide, and fix it by
the slide-holders of the mechanical stage. Turn the stage
knob to make certain that the specimen is centered over the
stage opening.
2-3 Set illumination
For the microscope only with mirror, turn the mirror to get
the field of view illuminated.
For the microscope with built-in electrical illuminator, insert
the plug of the main cable into the power socket and turn on
the power switch to get the specimen illuminated. Then turn
the brightness-adjustmentknob slowly to get the brightness suitable.
2-4 Adjust focus
Loosen the limit-stop-knob, and adjust the coarse-focusing-
knob to bring the slide into focus. Then lock the limit-stopknob to avoid impact between the objective and slide. Adjust
the fine focusing knob
Page 7

2.Operation N2 SERIES
to get the image clear.
For binocular head microscope, we also should do some
more adjustments:
(1)Hold the two ends of the head-cover and adjust the
interpupillary distance by pushing or pulling the cover, until
one circle of light can be seen.
(2)After finishing the interpupillary adjustment, look at the
graduation value in the middle of the head-cover. Turn the
two diopter-ring and aim the same graduation value at the
graduation line on the eyetube.
Avoiding decline of the stage, rotate the tension knob in a
clockwise direction to give a suitable force to the stage. If
we need to reduce the tension, rotate the tension knob in an
anti-clockwise direction.
2-5 Adjust diopter of binocular head
If the diopter of the two eyes is not same, binocular head
microscope has compensating function.
Turn the nosepiece to choose the objective 4X, and use the
left eye to observe the left eyepiece. Adjust fine-focusingknob and focus correctly. Use right eye to observe the right
eyepiece. Gain the clear image by turning the diopter-ring
up and down.
2-6 Adjust condenser
Turn the condenser-adjustment-knob to make the condenser
move up or down to concentrate light and to get the image
brightness suitable for observation.
2-7 Adjust diaphragm
Adjust the aperture of the iris diaphragm to get the
background brightness suitable.
Page 8

2-8 Choose the objective
Turn the nosepiece to choose the objective. The objective
selected should be set vertically right to the slide. Generally,
first use the
2.Operation N2 SERIES
objective 4X to focus to reveal general structural image.
Then use the higher power objective to reveal smaller
details.
When using the oil objective 100XR, a little of immersion
oil must be put between the objective and the cover glass.
2-9 Change the lamp or put on the mirror
Before changing the lamp, first pull the plug out off the
electrical socket and wait for a while until the lamp cools
down to avoid being burnt. Loosen the door-screw on the
bottom to open the small door. Then you can see the lamp
and lamp holder. Pull the lamp out and insert a new one into
the holder. Close the door by tightening the screw.
While changing the mirror, screw off the base-lens or mirror
and screw on a new mirror.
Page 9

3.General specifications N2 SERIES
Install
Model
Parts
Specifications
N2-1A
N2-1A-
EC300
N2-1A-
EC500
EC300 digital camera
●
Digital
camera
EC500 digital camera
●
WF10X/18mm
●(x2)
●(x2)
●(x2)
WF10X/18mm with pointer
WF10X/18mm with reticle
WF15X/13mm
WF
eyepiece
WF20X/10mm
●(x2)
●(x2)
●(x2)
4X/0.10
●●●
10X/0.25
●●●
40XS/0.65
●●●
60XS/0.85
195
objectives
100XS/1.25(oil)
●●●
Monocular head 360°rotating
Binocular head 360°rotating
●●●
45°viewing
head
Trinocular head 360°rotating
Coaxial
focusing
system
The arm stand with ascending and
descending stage
●●●
Triple nosepiece
Nosepiece
Quadruple nosepiece
●●●
Stage
Built in mechanical stage 130mmX140
mm(moving range:50mmx76mm)
●●●
Condenser
AbbeN.A.1.25
●●●
Diaphragm
Iris diaphragm
●●●
Built in halogen illuminator with a
continuous adjustment of brightness
●●●
Light
ф50mm mirror
Lamp
LED
●●●
Filter
blue
●●●
Page 10

N2 Series Biological Microscope general specifications (For
option)
4.Configuration drawing N2 SERIES
CCD
VIDEO
CAMERA
XS
GP
H
XSG
TH30
R
XSG
TH45
L
XSGB
H30R
XSG
BH4
5L
XSGPC
M50
XSGCD1.25(XSPID)
XS
GNI3XS
GNI
4
XS
GF
1
OP100s OP40s OP10 OP4
OA100s OA60s
OA40s OA10
OA4
EWF10X18 EWF10X18p
EWF15X16 EWF20X10
EP5 EP10 EP16
Page 11

5.Parameter/technical terms N2 SERIES
5-1 Objective
5-2Eyepiece
5-3Electrics
Type
Magnification
Numerical
aperture(
N.A)
Medium
Parfocal
distance
(mm)
Magnificati
on
market
(color
ring)
4X
0.10
Air45Red
10X
0.25
Air45Yellow
40X
0.65
Air
45
Light blue
60X
0.85
Air
45
Deep blue
DIN
achromatic
objective
195mm
100X
1.25
Cedar
oil
45
White
4X
0.10
Air
45
Red
10X
0.25
Air
45
Yellow
40X
0.65
Air
45
Light blue
Plan
objective
195mm
100X
1.25
Cedar
oil
45
White
Type
Wide field eyepiece
Plan eyepiece
Magnification
10X
15X
20X5X10X
16X
Field of
view(mm)
ф18
ф13
ф11
ф18
ф18
ф15
XSG
MH4
5
XSG
SGM
XS
GC
C
Page 12

The electrics are assembled according to customer’s order.
There are two kinds for option.
220V~240V power supply : 220V~240V±10%, 50/60Hz
Lamp: 6V/20W Halogen lamp
The electrics have gained the CE and GS certification.
100V~120V power supply : 100V~120V±10%, 50/60Hz
Lamp: 6V/20W Halogen lamp
The electrics have gained the UL certification.
5.Parameter/technical terms N2 SERIES
5-4 Parameter
(1) Total magnification: 20X~2000X
(2) Field of view: ф0.8mm~ф4.5mm
(3) Mechanical tube length: 160mm
(4) Object to primary image distance: 195mm
(5) Fine focusing sensitivity: 0.002mm
5-5 Technical terms
(1) Total magnification=(magnification of objective) X (magnification
of eyepiece)
(2) Field of view=(line field of view of the eyepiece selected)
÷(magnification of the objective selected)
(3) N.A.=n·sinα (max), N.A.is very important parameter which marks
the features of the objective and condenser. The “n” is the refractive
index of the medium (air or immersion oil) between the cover glass
of the objective and the specimen. The “α” is the half of the aperture
angle. The N.A.is bigger, the resolution of the objective is higher.
(4) Object to primary image distance: the distance between the object
plane to the primary image plane. The conjugate distance is fixed.
(5) Mechanical tube length: The distance between the objective shoulder
and the ocular shoulder.
Page 13

Page 14

6.Troubleshooting N2SERIES
Symptom
Cause
Remedy
Optics
The nosepiece is not in the right
position.
Turn the nosepiece into
the right position.
(1)The side of the
field of view is dark
or not even.
Stain or dust has accumulated on
the condenser, objective,
eyepieces, base lens. .
Clean the lens.
Stains have accumulated on the
specimen.
Clean the specimen.
(2)Stain or dust is
observed in the field
of view.
Stains have accumulated on the
lens.
Clean the lens.
No cover glass on the specimen
slide.
Add the cover glass.
The cover glass is not standard.
Use a standard cover glass
with thickness 0.17mm.
The specimen faces down.
Make it face up.
The immersion oil has
accumulated on the dry objective.
Clean thoroughly.
The immersion oil is not used for
oil objective 100XR.
Use immersion oil.
Air bubble in the immersion.
Get rid of the air bubble.
Use wrong immersion oil.
Use a correct one.
The aperture is not opened to
correct size.
Adjust the iris diaphragm.
Stain or dust has accumulated on
the lens in the inlet of the head.
Clean the lens.
(3)Unclear image
The condenser is not in the right
position.
Adjust the condenser.
The specimen slide is not fixed.
Fix with clips.
(4)One side of the
field of view is dark
or the image moves
while focusing.
The nosepiece is not in the right
position.
Turn the nosepiece into
the right position.
The iris diaphragm is not big
enough.
Adjust the iris diaphragm.
The condenser is not in the right
position.
Adjust the condenser.
(5)The field of view
is not bright enough.
Stain or dust has accumulated on
the condenser, objective,
eyepieces, base lens.
Clean the lens.
Page 15

6.Troubleshooting N2 SERIES
Symptom
Cause
Remedy
Optics
The brightnessadjustmentknob is not in the right
position.
Adjust the brightnessadjustment-knob.
(6)The image color is
not true.
No filter is used.
Use correct filter.
Mechanics
The cover glass faces
down.
Put the cover glass to face up.
(1)The image is not
focused while using
high power objective.
The cover glass is not
standard.
Use a standard cover glass with
thickness 0.17mm.
The cover glass faces
down.
Put the cover glass to face up.
(2)The objective
touches the cover glass
while turning the
nosepiece.
The cover glass is not
standard.
Use a standard cover glass with
thickness 0.17mm.
The slide is not fixed
correctly.
Adjust it correctly.
(3)Can not move the
slide smoothly.
The movable specimen
holder is not fixed
properly.
Tighten it.
(4)Focus-knob is not
flexible.
Tension knob is too
tight.
Loosen it a little.
(5)The stage declines
itself to make the
image unclear.
Tension knob is too
loose.
Tighten it a little.
(6)When focusing up,
the coarse-focusingknob can not rotate.
Limit-stop–knob
locked.
Loosen the limit-stop-knob and
lock it after refocusing.
Electrics
No power supply.
Check the connection of the
power cable.
The bulb is not inserted
correctly.
Insert it correctly.
The bulb burnt out.
Replace it.
(1)The bulb does not
work.
The fuse burnt out.
Replace it.
The voltage is too high.
Use correct power supply.
(2)The bulb burnt out
usually.
Use a wrong bulb.
Replace with a correct one.
Page 16

6.Troubleshooting N2 SERIES
Symptom
Cause
Remedy
Electrics
(3)The fuse burnt out
usually.
The voltage is too high.
Use correct power supply.
The bulb will burn out
soon.
Replace with a new one.
(4)The bulb flickers or
the brightness is not
stable.
The wire doesn’t
connect all right.
Connect correctly.
 Loading...