

Page 1

Mouse Editor Software
User Manual
Model: TM
Page 2
THIS DEVICE COMPLIES WITH PART 15 OF THE FCC RULES. OPERATION IS SUBJECT TO FOLLOWING
TWO CONDITIONS: (1) THIS DEVICE MAY NOT CAUSE HARMFUL INTERFERENCE AND (2) THIS DEVICE
MUSTACCEPTANYINTERFERENCE RECEIVED, INCLUDING INTERFERENCE THAT MAY CAUSE
UNDESIRED OPERATION.
Federal Communications Commission Requirements
The equipment has been tested and found to comply with the limits for Class B Digital Device, pursuant to part 15 of the FCC Rules.
These limits are designed to provide reasonable protection against harmful interference in a residential installation. This equipment
generates uses and can radiate radio frequency energy and, if not installed and used in accordance with the instruction, may cause
harmful interference to radio communication. However, there is no guarantee that interference will not occur in a particular installation.
If this equipment does cause harmful interference to radio or television reception, which can be determined by turning the equipment off
and on, the user is encouraged to try to correct the interference by one or more of the following measures:
z Reorient of relocate the receiving antenna.
z Increase the separation between the equipment and receiver.
z Connect the equipment into an outlet on a circuit different from that to which the receiver is connected.
z Consult the dealer or an experienced radio/TV technician for help.
THE CHANGES OR MODIFICATIONS NOT EXPRESSLY APPROVED BY THE PARTY RESPONSIBLE FOR
COMPLIANCE COULD VOID THE USER’S AUTHORITY TO OPERATE THE EQUIPMENT.
This device complies with Part 15 of the FCC Rules. Operation is subject to the following two conditions:
(1) This device may not cause harmful interference, and
(2) This device must accept any interference received, including interference that may cause undesired operation.
FOR LASER MOUSE
REGULATORY INFORMATION:
Tested to comply with FCC (U.S. Federal Communications Commission) Standards. For home or office use. Not intended for use in
machinery, medical or industrial applications. Any changes or modifications not expressly approved by Tek-Republic could void the
user's authority to operate this device.
INFORMATION ABOUT LASER DEVICES:
This device complies with International Standard IEC 60825-1:2001-08 for a Class 1 laser product. This device also complies with 21
CFR 1040.10 and 1040.11 except for deviations pursuant to Laser Notice No.50, dated July 26, 2001.
- This device emits a collimated (parallel) beam of infrared light (invisible to the user).
- Peak Wavelength range: 832~865 nanometers.
1). Uninstall any previousmouse software before installing this software.
2). Insert the enclosed CD to start installation, and follow the on-screen steps to
finish software installation.
3). When you successfully installed Mouse Editor Software, the shortcut icon “
will appear on the taskbar screen.
”
Page 3
Hardware Installation
r
Plug into any USB Port on yourcompute
·
· Install the Software. The software is required for advanced mouse features
Software Installation
(Note: The software is applicable to Windows XP/ Vista/ 7)
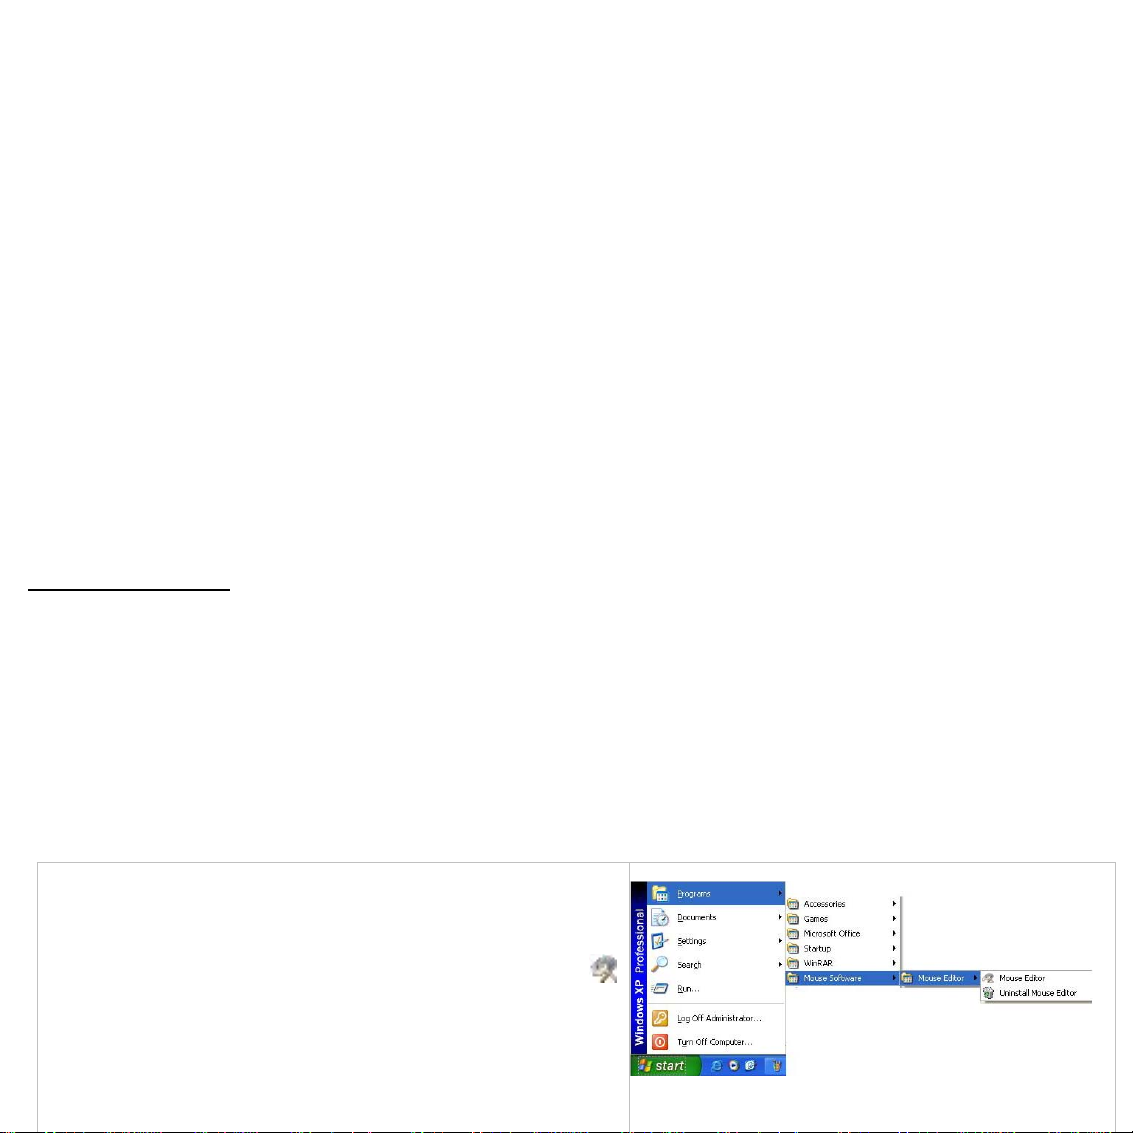
From STARTÆPROGRAMÆ“Mouse”ÆMouse EditorÆ“Uninstall Mouse Editor”
To remove the driver, follow the steps:
Configure Functions
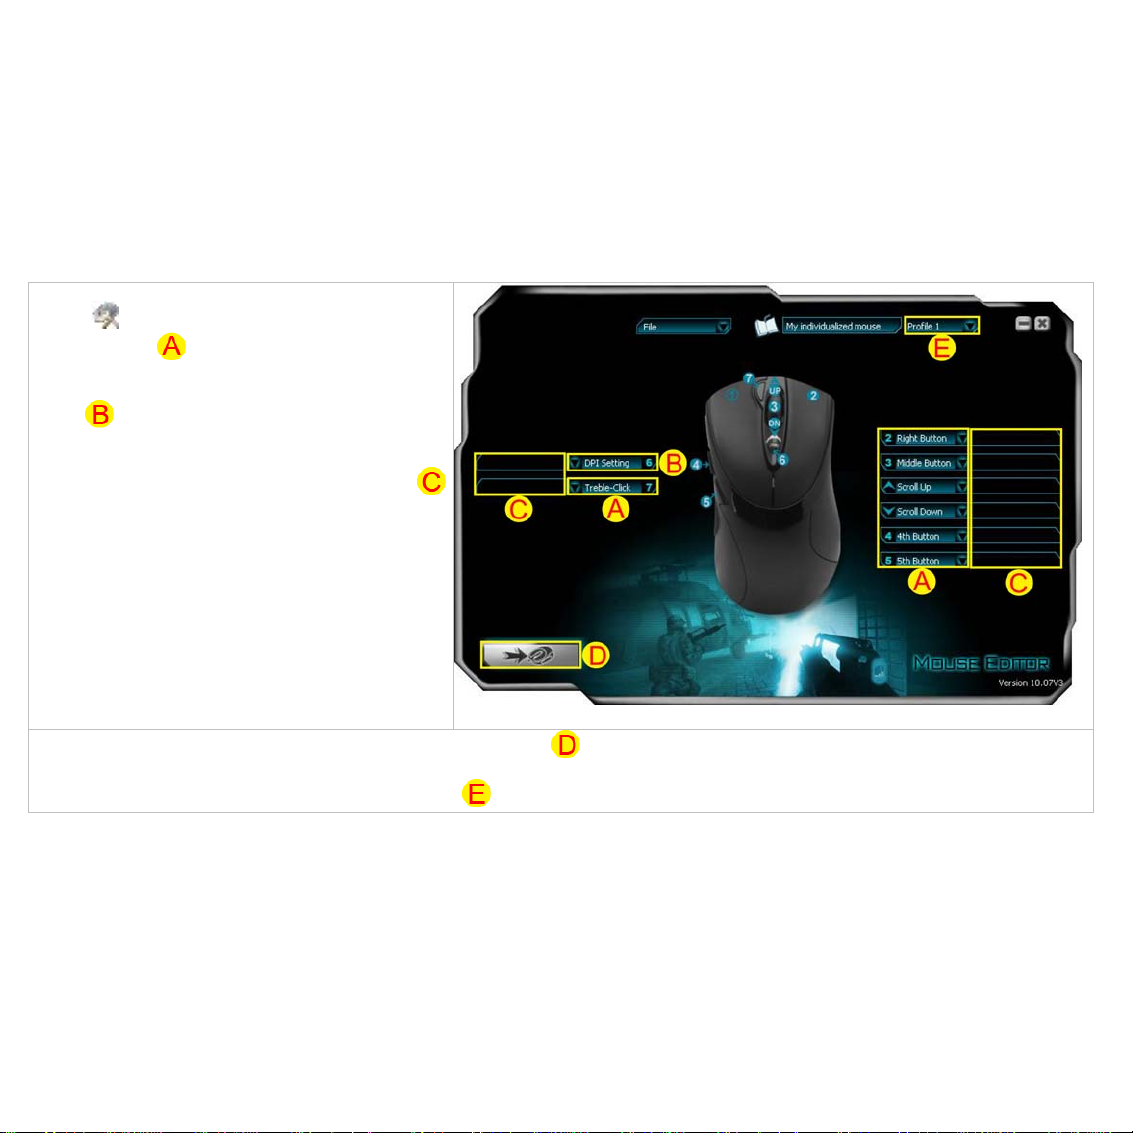
Step 1: Open the "Mouse Editor Main Menu" by double
clicking "
Step 2: Click the "
the keyboard, mouse, Internet or multimedia according to
your needs.
In the "
3,600 DPI by clicking it.
(Note: You can rename the setting on the functions for
easier recognition by left-clicking the mouse in the
area.)
" icon on the taskbar.
" area to configure the commands of
" area, set the 6-level sensitivity among 100-
Mouse Editor Main menu
Step 3: Store your 2 profile-settings which you have set by clicking the " " area. Then you can bring the mouse settings anywhere and use it on
any computer.
Step 4: You can switch your 2 profile-settings by clicking the "
" area or Pressing the "Scroll Lock" key on your keyboard.
Page 4

16-in-1 Mouse Gesture
16 preset functions are integrated in any one of mouse butto n except Scroll Up,Scroll Down and DPI Setting button.
On the button definition area of Main menu, click the “ ” , you will see the “Gesture 16-in-1” on the function listing as shown on the right.
Select “Gesture 16-in-1 Setting” from the listing; the setup screen will pop up as shown on the right.
The “Gesture 16-in-1” offers customizable 16 functions in 1 c lick with gesture button. You may setup 16 most-frequently-used commands to the button
from 6 categories, more than 30 commands, including Keyboard, Mouse, Hyperlink, Office, Text,Multimedia, Internet and Key Setting Reminder. Using
the mouse to draw the lines as any of 16 preset directions, the corresponding command will be executed immediately. It adds powerful and handy tools
in Windows operation, and increases your working efficiency dramatically.
Usage
Press and hold the gesture button to draw any of 16 lines and directions as shown on the right, then release the button. The
corresponding commands will be executed immediately,including Keyboard, Mouse, Hyperlink, Office, Text, Multimedia,
Internet and Key Setting Reminder, which can be preset and store to your receiver memory.
Example 1:
Using
file…etc, just pressing the “Gesture Button” and draw the line as shown below, then release the button, the picture or the document will be zoomed in
immediately.
as “Zoom In” command by default, when you are viewing a picture with ACDSee, or browsing a PPT file in the Office, or Reading a PDF
Diagrams of 16 mouse
gestures
Page 5

Example 2
See the contrast in EXCEL after drawing the line.
Now let's take "
1. Select "
2. Click " " to close the setup screen.
3. Click “
4. Draw the line in Excel.
" as example to show you how to use these functions:
" icon to represent "Zoom In" as shown:
” to save to receiver’s memory.
Original After drawing the line, the column has been enlarged
a. Start: Press the "Gesture Button"
b. Track of the drawing line: Draw the line as the
c. End: Release "Gesture Button"
Then the picture has been zoomed in.
arrow direction
Draw the line in Windows Picture and Fax Viewer
Original After drawing the line, the column has been enlarged
Page 6

Execute Program
One click to open a program file or a document. You may setup any of the mouse buttons 2, 3, 4, 5, 7, wheel up(UP) and wheel down(DN) with the
“Execute Program” function.
Usage:
1). Select the “Execute Program” from the pull-down button menu shown in
Figure 1
2). A screen of file listings will pop up shown in Figure 2.
3) Select one of the files that you would like to open with the associated
button and click “Open”.
4) Now you will see the file you selected has been assigned to the button.
5) Click “
” to save the new button setting.
Figure 1 Figure 2
Example:
While in a session of a meeting or teaching, it is embarrassing to keep others waiting due to searching for a document, or looking up for a program or
a shortcut. With the “Execute Program” function, you may have a better way to resolve this issue.
Set mouse's button response time
Step 1: Right click the mouse icon atthe bottom right corner of your
system tray, and select “Button Response Time”.
Step 2: Select the responding time you desire and click "OK" to apply it.
Launching the 4D Wheel
The mouse wheel can scroll 4 directions to improve efficiency, eliminating the need for tilt.
Step 1: Right click the mouse on the icon atthe bottom right corner
of your system tray, and select “4D Wheel”.
Addition: When the Microsoft Standard Wheel option is selected, the mouse wheel will perform the function normally. In this condition, the 4D Wheel
won't be launched. Microsoft Standard Wheel is used in some special working environments such as games or webpages that need it.
Step 2: Read the instructions on the pop-up 4D Wheel window to learn
on how to execute vertical and horizontal scrolling.
Page 7

Set Function Reminders for Each Mouse Button DPI Setting
The mouse provides DPI shift capability with color indication. You can set-up your own sensitivity levels (DPI) within the software.
There are
1. By default setting, just press the "DPI Setting Button" with the color indicator on the
mouse to change the DPI among 400-800-1,200-1,600-2,000 and 3,600 DPI.
Note: Please describe each button's function in your own words on the "Mouse EditorMain Menu" before launching this
function.
two ways to change the mouse’s DPI mode to obtain suitable mouse moving speed:
Right-click the mouse on the "
to annotate the function name for each mouse key, which will be displayed on the screen when it is activated for easier
identification.
2. You may customize your own DPI range and sensibility by clicking "Mouse
Editor Main Menu".
" icon at the bottom right corner of your system tray and select "Function / Key Reminder
DPI Levels & Color Indicator
DPI Levels (Default) Indicator Color Recommended for:
DPI 1: 400DPI No light The normal speed and normal accuracy user 800×600
DPI 2: 800DPI Green The medium-speed and average accuracy required user 1024×768
DPI 3: 1,200DPI Yellow The fast-speed and above average accuracy required user 1152×864
DPI 4: 1,600DPI Red The high-speed and pinpoint accuracy required user 1280×960
DPI 5: 2,000DPI Red & Yellow The extra high-speed and pinpoint accuracy required user 1280×1024
DPI 6: 3,600DPI Yellow & Green The extra high-speed and pinpoint accuracy required user 1280×1024
Click the “DPI Setting” Button to quickly shift from 400, 800, 1200, 1600, 2000 to as high as 3600 DPI.
Suitable Resolution of display
(Recommended)
Page 8

Setting the Mouse’s Report Rate
Note: The mouse offers 4 selectable report rates: 125/250/500/1,000Hz, which can be preset to use with a
variety of office, drawing and gaming applications. The default is fixed at only 125Hz.
Adjust the mouse's report rate by right-clicking the "
and select " Report Rate Setting".
You can select some preset Macro flies to upgrade your mouse for games by
clicking "
Select "Select Macro File" allows you to select the preset Macro file for each button
according to your needs (except the DPI Setting button). Then save your settings
by clicking the "
launched when the button you selected is pressed.
" "MouseEditor Main Menu".
" area. The function which the Macro file is defined will be
" icon at the bottom right corner of your system tray
Upgrade your mouse for Games
Main Menu
CAUTION
Use of controls or adjustments or performance of procedures other than those specified here in may result in hazardous radiation
exposure.
- Do not disassemble the device.
 Loading...