

Page 1

USER’S GUIDE
Rev. 1.0 11/98
Page 2

M205 PRO User's Manual
nn nn nn FCC NOTICE
This equipment has been tested and found to comply with limits for a Class B digital device, pursuant to
Part 15 of the FCC rules. These limits are designed to provide reasonable protection against harmful
interference in residential installations. This equipment generates, uses, and can radiate radio frequency
energy, and if not installed and used in accordance with the instructions, may cause harmful interface to
radio communications. However, there is no guarantee that interference will not occur in a particular
installation. If this equipment does cause interference to radio or television equipment reception, which
can be determined by turning the equipment off and on, the user is encouraged to try to correct the
interference by one or more of the following measures:
Reorient or relocate the receiving antenna
Move the equipment away from the receiver
Plug the equipment into an outlet on a circuit different from that to which the receiver is connected
Consult the dealer or an experienced radio/television technician for additional suggestions
Only equipment certified to comply with Class B should be attached to this equipment, and must have
shielded interface cables.
The FCC requires the user to be notified that any change or modifications to the equipment by the user
not expressly approved by the grantee or manufacturer could void the user’s authority to operate such
equipment.
Each M205 PRO is equipped with an FCC compliance label which shows only the FCC Identification
number: FCC ID: KHAM205 PRO.
This device complies with Part 15 of the FCC rule. Operation is subjected to the following two
conditions:
1. This device may not cause harmful interference and
2. This device must accept any interference received, including interference that may cause undesired
operation.
nn nn nn DISCLAIMER
The manufacturer (MFR) reserves the right to make changes to this document and the products which it
describes without notice. The MFR shall not be liable for technical or editorial errors or omissions made
herein; nor for incidental or consequential damages resulting from the furnishing, performance, or use of
this material.
The MFR makes no representation that the interconnection of products in the manner described herein
will not infringe on existing or future patent rights, nor do the descriptions contained herein imply the
granting of license to make, use or sell equipment constructed in accordance with this description.
Features and specifications are subject to change without notice. Trademarks and/or registered
trademarks are the properties of their respective owners:
Page 2
M205 PRO User’s Manual
Page 3

M205 PRO User’s Manual
nn nn nn CONTENTS
INTRODUCTION.........................................................................................5
n KEY FEATURES.........................................................................................5
Television on your PC!........................................................................................5
Live Video Display..............................................................................................5
Image Capture.....................................................................................................5
The VideoCapture Utility .................................................................................... 6
Closed captioning (NTSC only)........................................................................... 6
n MINIMUM SYSTEM REQUIREMENTS ..........................................................6
HARDWARE INSTALLATION..................................................................7
n COMPONENTS IN THE PACKAGE ................................................................7
n HARDWARE INSTALLATION.......................................................................8
Installing the Capture Card .................................................................................8
Connectors and Jumpers on the M205 PRO Card ................................................8
Connecting the IR Sensor....................................................................................9
Connecting to External Video Sources (RCA jack)............................................10
Connecting to External Video Sources (S-video)................................................10
Connecting to Speakers or Headphones .............................................................11
Connecting to a Sound Card..............................................................................11
SOFTWARE INSTALLATION .................................................................12
n INSTALLING THE WINDOWS 95 DEVICE DRIVERS.....................................12
n INSTALLING THE WINDOWS 98 DEVICE DRIVERS.....................................13
n THE AUTORUN SCREEN ..........................................................................14
n INSTALLING THE VIDEOCAPTURE UTILITY ................................................ 15
VIDEOCAPTURE UTILITY .......................................................................16
n APPLICATION WINDOW ...........................................................................16
n CONTROL PANEL ....................................................................................17
n VIDEO DISPLAY ......................................................................................18
M205 PRO User’s Manual
Page 3
Page 4

M205 PRO User's Manual
Selecting the Video Source and Adjusting the Picture Properties .......................18
Selecting Overlay / Preview Mode ..................................................................... 19
Setting the Video Display Size and Format ........................................................19
Selecting View/Capture Mode ...........................................................................20
Creating New Palette......................................................................................... 20
Displaying Close Captioned Text....................................................................... 21
n VIDEO CAPTURE .....................................................................................22
Changing the Settings for Video Capture........................................................... 22
Selecting the Audio Format...............................................................................23
Selecting the Video Compressor........................................................................24
Allocating Memory Space..................................................................................24
Specifying the File Name for Motion Video Capture..........................................25
Capturing Motion Video....................................................................................26
Capturing a Still Image .....................................................................................26
Copying to the Clipboard...................................................................................26
n THE TV TUNER ......................................................................................27
Show / Hide Control Panel ................................................................................27
Selecting Antenna / Cable Input........................................................................27
Auto Scanning for TV Channels........................................................................27
Editing the Channel List....................................................................................27
Selecting a Channel...........................................................................................28
Fine Tuning a Channel ......................................................................................28
Adjusting the Volume........................................................................................ 28
Viewing in a Window/Full Screen.....................................................................28
On Top ..............................................................................................................28
Channel Browsing............................................................................................. 29
THE REMOTE CONTROL.......................................................................30
n USING THE REMOTE CONTROL................................................................30
TROUBLESHOOTING..............................................................................31
n n n APPENDIX.......................................................................................32
n DIRECTX 5 INSTALLATION FOR MICROSOFT WINDOWS 95 ......................32
Page 4
M205 PRO User’s Manual
Page 5

nn nn nn
Congratulations on your purchase of the CaptureTV M205 PRO, the video capture and
TV tuner card! The M205 PRO is actually two cards in one:
• A built-in TV tuner brings television to your computer screen, allowing you to
work and watch TV at the same time.
• The Video and Still Image Capture function gives you the ability to capture video
from various sources, such as your VCR or camcorder, and compose your own
movies or still photos.
INTRODUCTION
1
nn Key Features
Television on your PC!
The CaptureTV M205 PRO virtually turns your computer into a television set,
complete with an infra-red Remote Control! You can watch TV in a window while
working in other applications, or switch to full screen mode (up to 1024×768×16bit
color) for leisure viewing. Catch your favorite programs without leaving your
computer! Keep up with the news or stock prices throughout the day! The M205
PRO’s remote control allows you to switch between PC and TV mode, adjust the
channel, volume and more.
Live Video Display
Plug in your camcorder, VCR or laser disk player! The M205 PRO allows you to
monitor multiple video sources on your computer full screen (640×480) or in a
window. The following video sources are supported and software selectable:
• The Internal TV Tuner (full screen up to 1024×768×16bit color)
• Composite video: NTSC, and PAL
• S-video: NTSC, and PAL
Image Capture
The M205 PRO allows still image capture as well as full-motion capture. Capture
images from any supported video source to use in pictures, presentations, movies and
more! Make your own home movies and capture your favorite scenes!
M205 PRO User’s Manual
Page 5
Page 6

INTRODUCTION
The VideoCapture Utility
Lets you watch up to 125 cable television channels and 70 antenna channels in
smooth, full-motion video in a window or full screen. You can capture still frames and
movie clips, channel surf, or create your own TV transcripts. Composite Video and SVideo inputs support VCRs, video cameras, laser-disc players, video game consoles,
etc. Still image and live video capturing is easy with a simple mouse click.
Closed captioning (NTSC only)
Support including transcript creation and Hot Words that alert you when M205 PRO
application program is broadcasting information that you want to watch.
nn Minimum System Requirements
• 32-bit PCI Local Bus system (with PnP)
• CPU 486DX 33Mhz or higher, Pentium CPU recommended
• 16MB System RAM or more and 1GB hard disk recommended for motion video
capture
• Windows 95/98
• VGA display in 32K, 64K or 16.7M color mode with hardware assisted video
playback acceleration and DirectDraw support
• DirectX 6.0 installed (included in the Tekram Multimedia Drivers & Utilities CD)
Please refer to page 32 for installation procedure.
• Sound card and speakers required for audio support
Page 6
M205 PRO User’s Manual
Page 7
nn nn nn
HARDWARE INSTALLATION
2
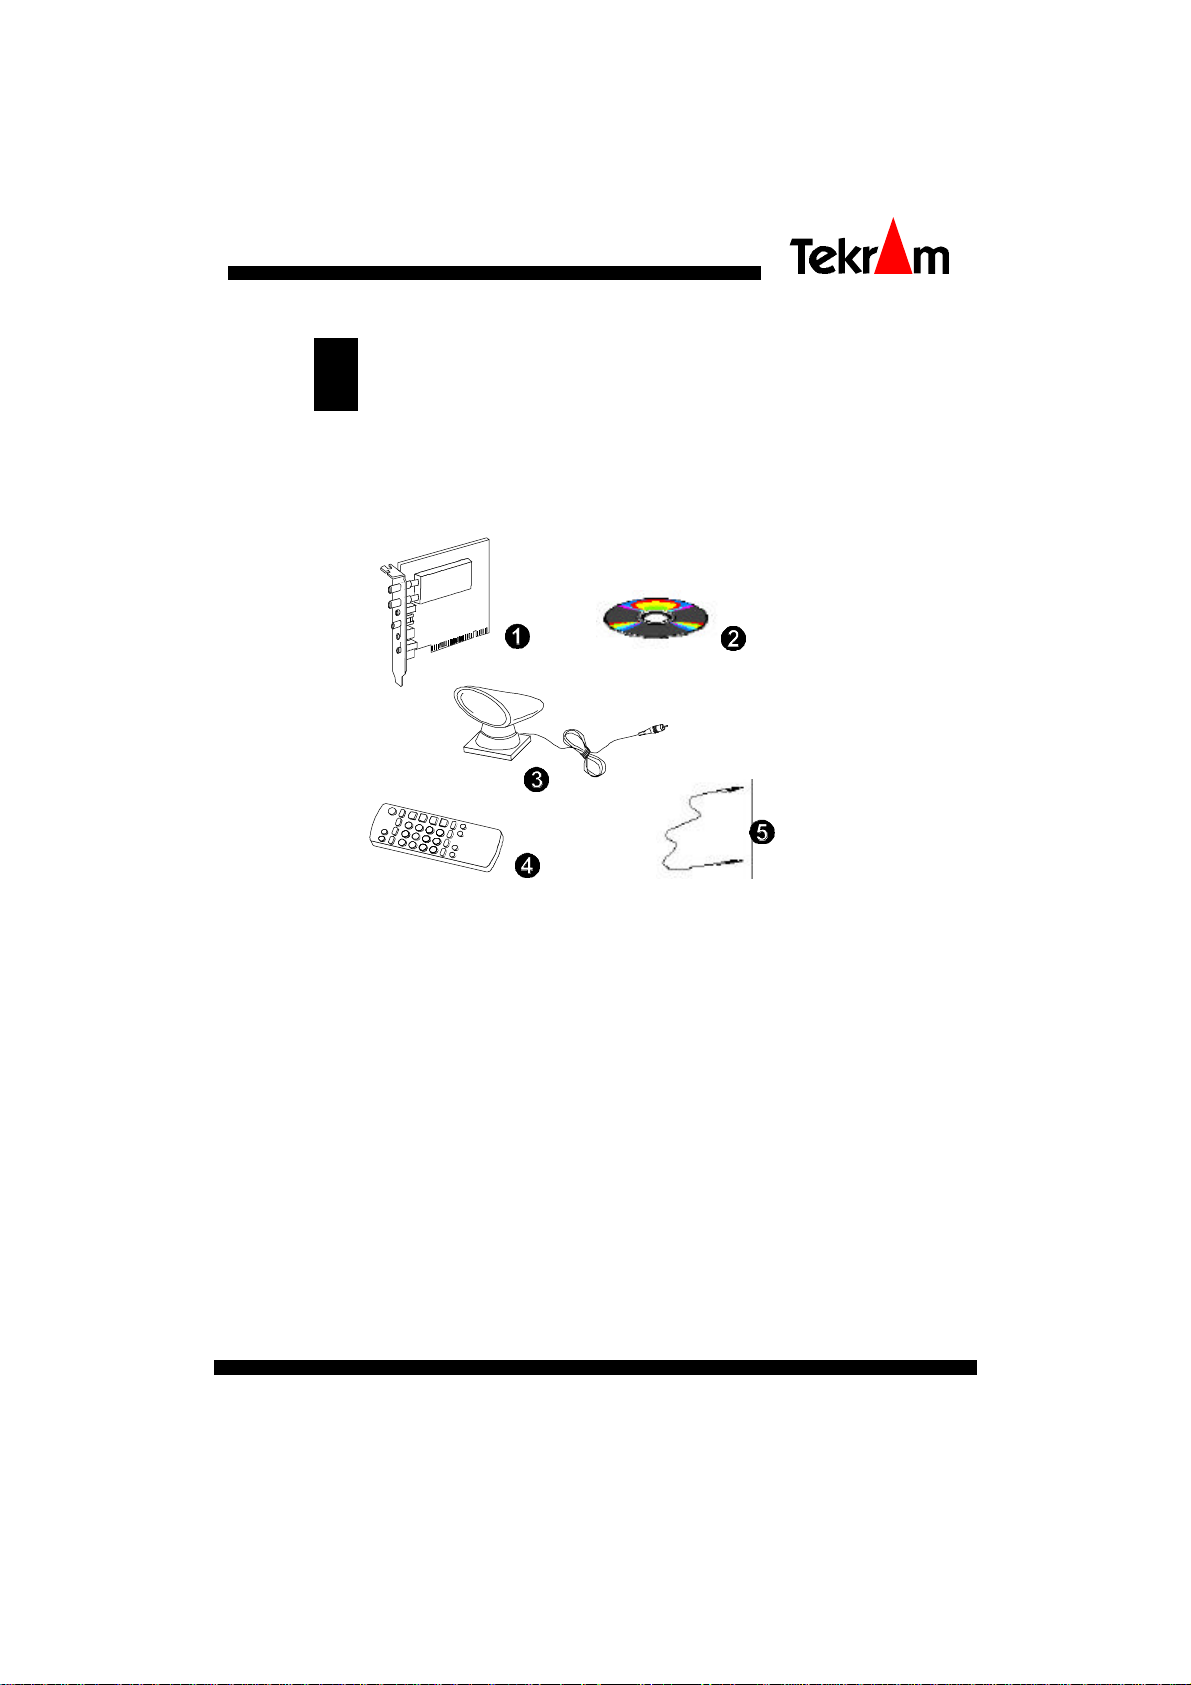
nn Components in the Package
The following components should be included in your CaptureTV M205 PRO box:
1. CaptureTV M205 PRO board 6. (Optional) NICAM Daughter Board
2. “Tekram Multimedia Drivers &
Utilities” CD-ROM
3. IR Sensor
4. Remote Control
5. Audio Cable (for Sound card)
Make sure all of the above components are accounted for before you begin the
installation.
M205 PRO User’s Manual
7. (Optional) S-video Adaptive Cable
Page 7
Page 8
HARDWARE INSTALLATION
nn Hardware Installation
Installing the Capture Card
Important: Handle circuit boards by the edges or bracket. Touch the bare metal of
your computer case before handling any circuit boards to prevent static discharge
damage.
1. Turn OFF all power to your system, including any peripherals (printer, external
drives, modem, etc.).
2. Disconnect the power cord and the monitor cable from the back of the computer.
3. Remove the computer cover. Refer to your system user’s manual for instructions.
4. Align the gold-fingered edge on your card with an empty PCI expansion slot and
gently insert it into place. You may need to remove the cover from the rear of the
PCI expansion slot that you selected.
5. Replace the screws to secure the card retaining bracket in place.
6. Replace the computer cover.
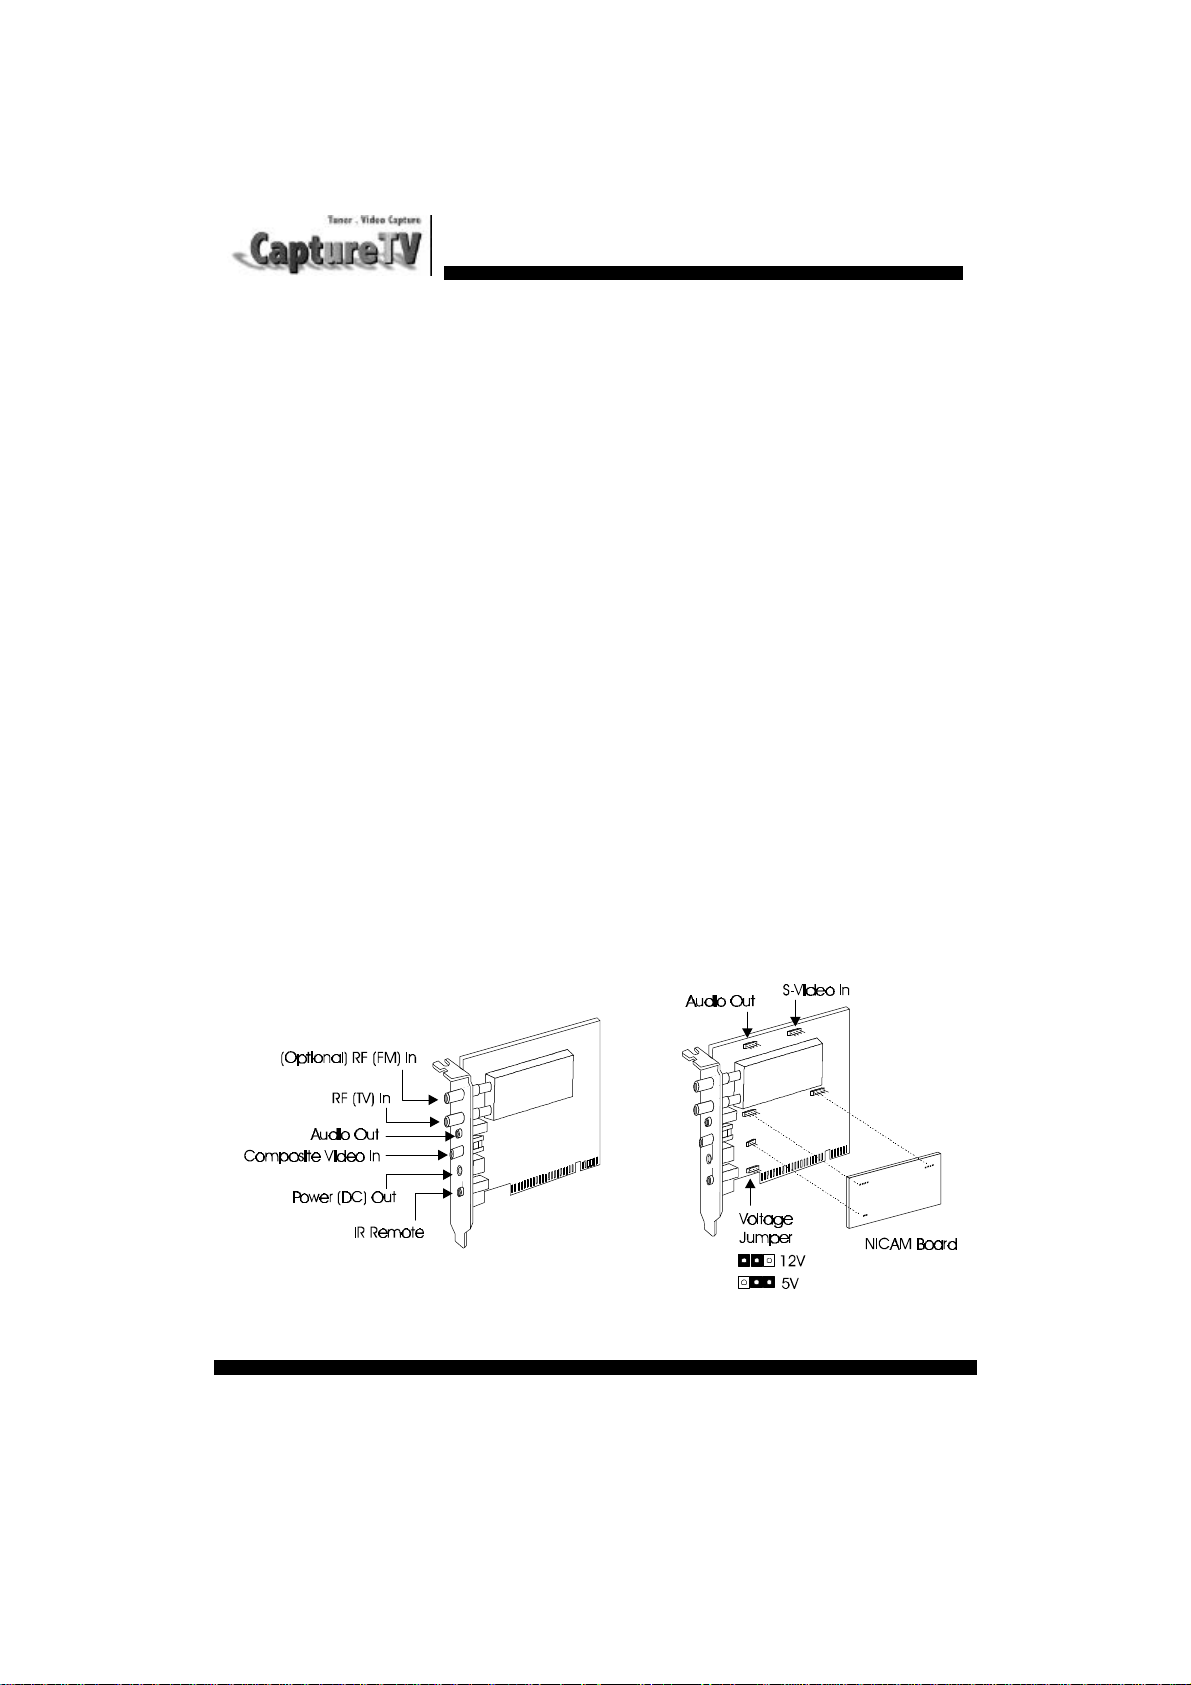
Connectors and Jumpers on the M205 PRO Card
Refer to the diagram below while making the connections that follow.
External Connectors Internal Connectors and Jumpers
Page 8
M205 PRO User’s Manual
Page 9
HARDWARE INSTALLATION
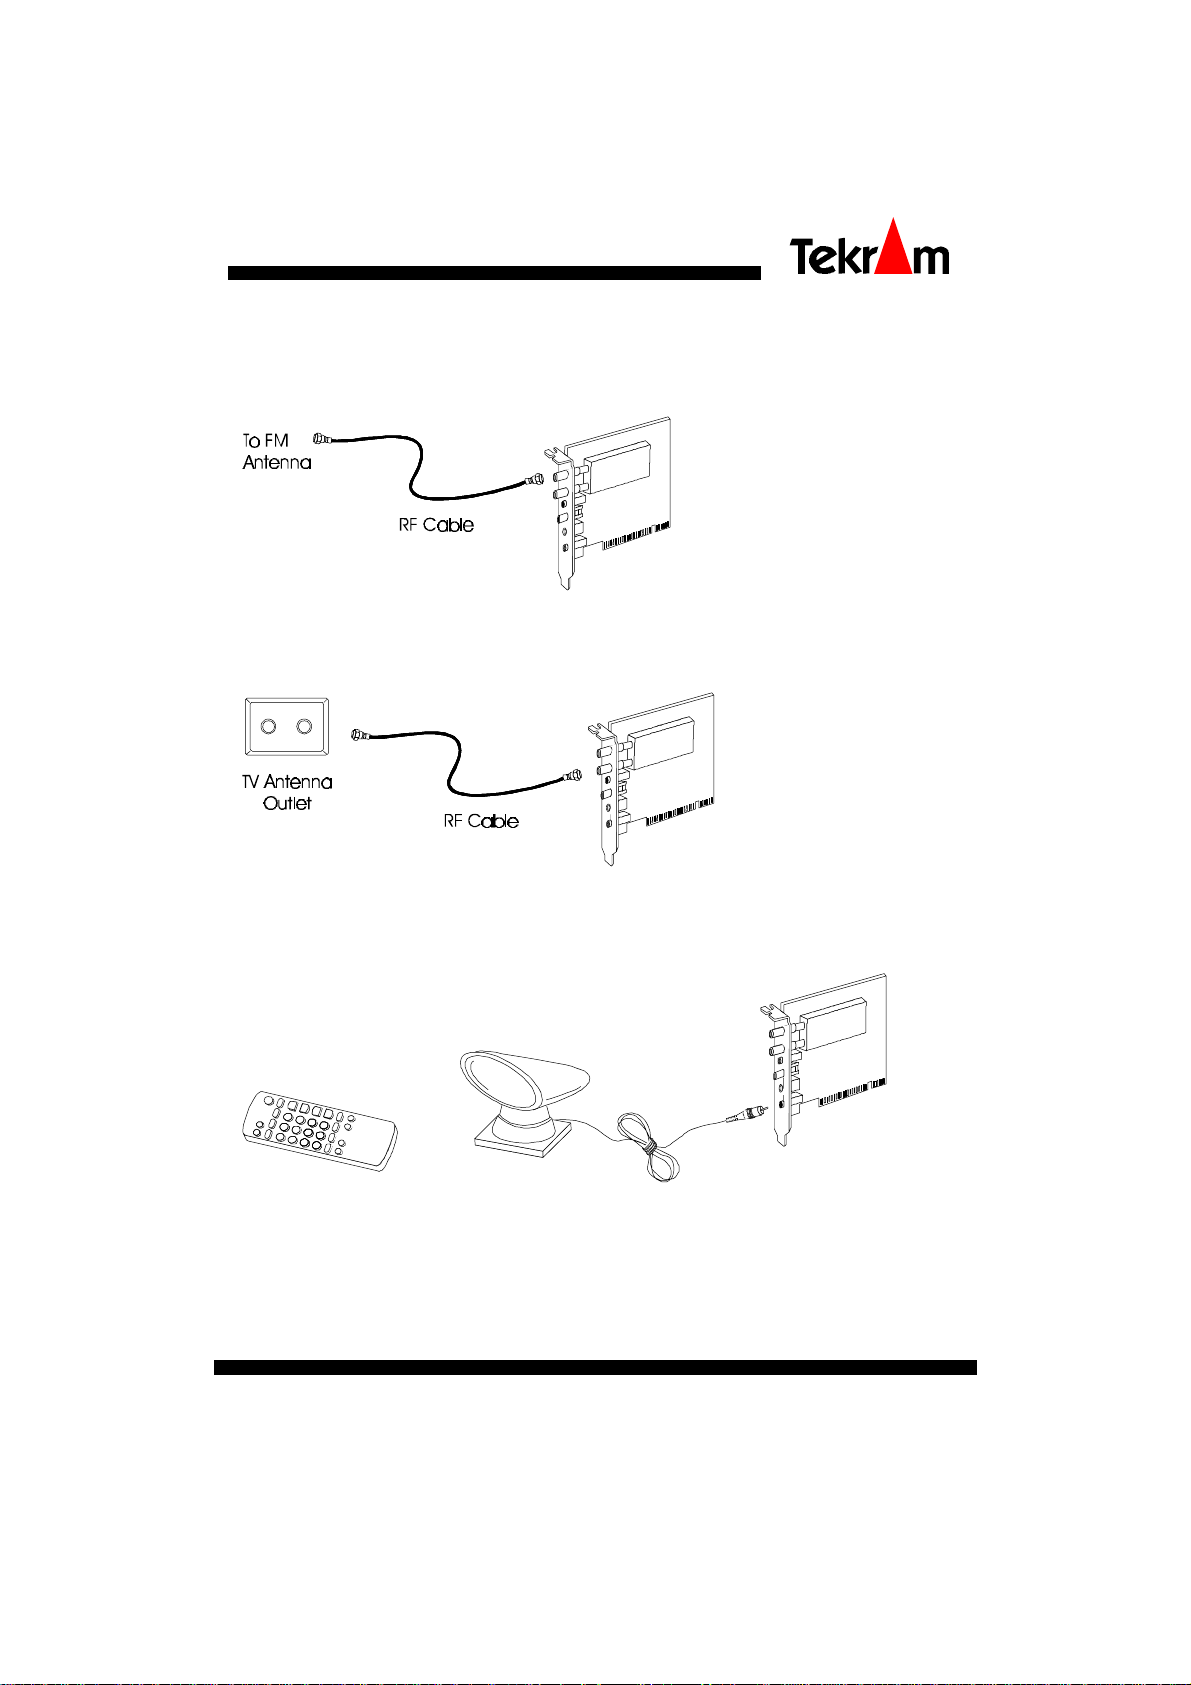
Connecting to FM antenna (Optional)
Connecting to Cable TV or Antenna
Connecting the IR Sensor
M205 PRO User’s Manual
Page 9
Page 10
HARDWARE INSTALLATION
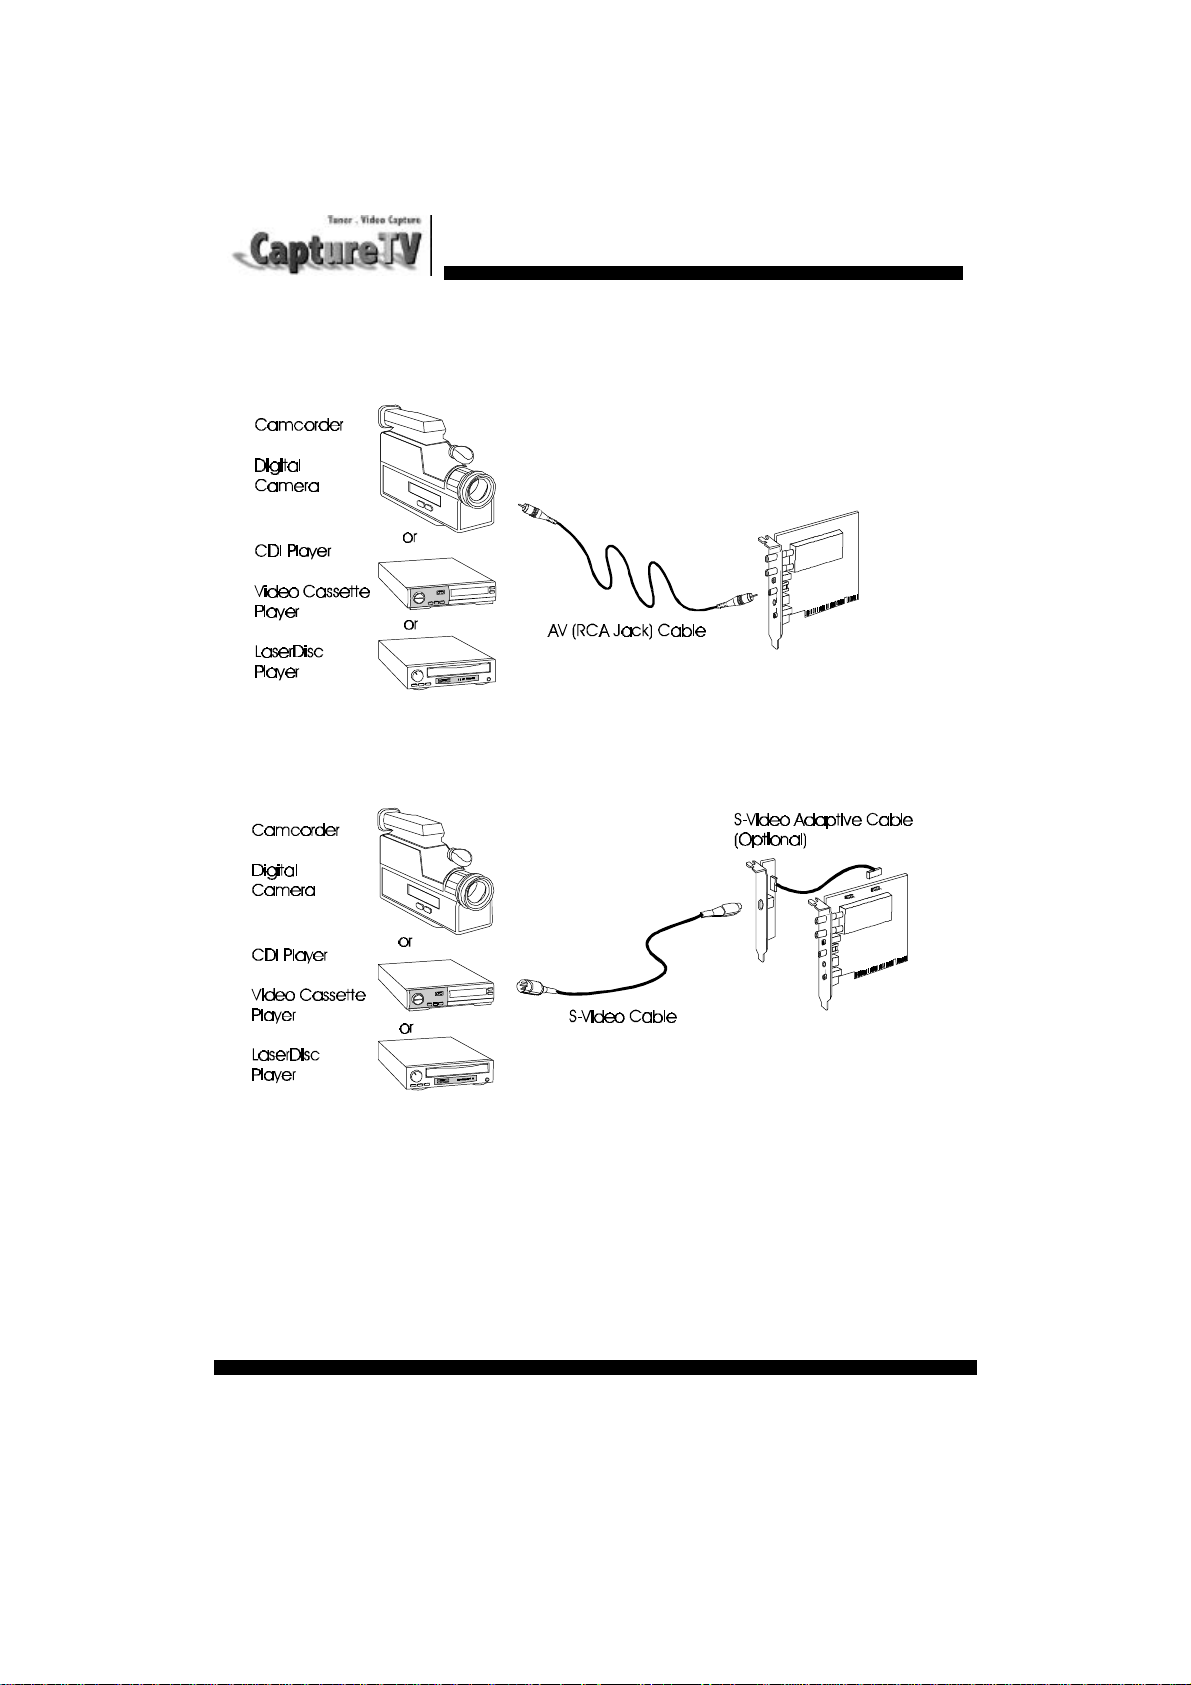
Connecting to External Video Sources (RCA jack)
Connecting to External Video Sources (S-video)
Page 10
M205 PRO User’s Manual
Page 11

HARDWARE INSTALLATION
Connecting to Speakers or Headphones
NOTE: The CaptureTV M205 PRO audio output jack is a low-gain output suitable for
headphones and powered speakers, as well as an input into stereo systems or other
types of amplifiers. It is not suitable for driving unpowered external speakers alone.
If your system already has a sound card, hook the CaptureTV M205 PRO card’s audio
output to your sound card’s audio input, usually marked “LINE-IN” with a 1/8” stereo
cord, as shown below.
Connecting to a Sound Card
Or you may connect M205 Pro to the sound card
internally:
M205 PRO User’s Manual
Page 11
Page 12

nn nn nn
SOFTWARE INSTALLATION
3
nn Installing the Windows 95 Device Drivers
After the capture card is properly installed in the system, power on your system.
Windows 95 will automatically detect the card as a Multimedia Device upon boot-up,
and display a “New Hardware Found” screen like the one shown below. Click on
“Driver Disk from Manufacturer”, insert the Tekram Multimedia Drivers & Utilities
CD into your floppy drive, specify the path D:\M205_PRO (D: is your CD-ROM
drive) and follow the on-screen instructions to install the drivers for the capture card.
After the required files are copied, the system will ask if you wish to restart your
computer. Select YES to restart.
Note: The Windows 95 setup screen on your system may look different than the one
shown above if you have OSR2 / Windows 95 (B) installed.
Page 12
M205 PRO User’s Manual
Page 13

SOFTWARE INSTALLATION
nn Installing the Windows 98 Device Drivers
1. After the capture card is properly installed in the system, power on your system.
Windows 98 will automatically detect the card as a PCI Multimedia Video Device
upon boot-up, and display a “New Hardware Found” screen, then “Add New
Hardware Wizard” dialog box will appear like the one shown below.
2. Then select “Search for the best drive for your device. (Recommended).”
3. Next select “Specify a location” then type in D:\M205_PRO
4. Follow the on-screen instructions to complete the driver installation.
M205 PRO User’s Manual
Page 13
Page 14

SOFTWARE INSTALLATION
nn The Autorun Screen
After rebooting, insert the “Tekram Multimedia Utilities & Drivers” CD-ROM into the
CD-ROM drive. The Autorun screen will show up. If it does not appear, run
D:\AUTORUN (where D: is your CD-ROM drive).
Double-clicking the appropriate product model name M205 PRO brings up the
“Function Selector” submenu.
Page 14
M205 PRO User’s Manual
Page 15

SOFTWARE INSTALLATION
nn Installing the VideoCapture utility
1. Select Install Application on the Autorun Screen. The following dialog box appears:
2. In the Installation Directory, type the drive and directory where you want the
software installed. The default path is C:\CapTV.
3. Click Continue to start copying of the files.
4. Click on the Exit button after the installation is complete. The “CapTV” program
group is added to your Windows desktop, containing the application icons as
shown:
Use the Uninstall program when you want to remove this application program.
M205 PRO User’s Manual
Page 15
Page 16

nn nn nnnn nn nn
VideoCapture UTILITY
4
The VideoCapture Utility lets you watch television and playing video in a window or
full screen. This application is also used for capturing still images and full-motion
video from TV or a video device.
The VideoCapture utility saves the captured still image as DIB file format. The video
is saved as AVI file format.
Note : This application program cannot run under 256 or lower color mode.
Double-click the CAPTV icon from the “CapTV” program group to start the program.
The application window and the control panel will appear:
nn Application Window
Title &
Information Bar
Menu Bar
Display Area
• Title and Information Bar: Contains the program name, the standard Windows
Minimize, Maximize and Exit buttons. Also displays information about actions
taking place in the window.
• Menu Bar: Lists the six menus of the program.
• Display Area: The “screen” where your media plays.
To exit from the program, either click the Exit button on the Title Bar or choose Exit
from the File menu.
Page 16
M205 PRO User’s Manual
Page 17

VideoCapture UTILITY
nn Control Panel
To show/hide the control panel, check Show Panel from the TV menu.
1. POWER: Quits the M205 PRO
VideoCapture application.
2. PC/TV: Switches between viewing in a
window and full screen. (*)
3. ICONIC: minimize the program to an
icon.
4. CAPTURE MOTION: Captures
motion video.
5. CAPTURE STILL: Captures still
image. (*)
6. SETUP: Brings up the setup options
dialog box.
7. ONTOP: Enable/disable the video
display window always on the top
layer.
8. STYLE: Show/hide the caption board
and menu bar of the display window.
The following buttons are for TV tuner use
only. They are not active when using other
video source.
a. AIR/CABLE: Switches between cable TV and antenna (Air) input.
b. MUTE: Turn off/resume the TV audio.
c. RECALL: Changes to the previously selected channel.
d. ENTER: After pressing the numeric keys, press ENTER to complete the channel
selection.
e. BROWSE: Displays all available channels. (*)
f. SCAN: Scans all active channels.
g. VOLUME: Volume up (right arrow button) and down (left arrow button).
h. CHANNEL: Channel up (up arrow button) down (down arrow button).
E Press the Esc key on your keyboard to return to viewing in a window, resume
playing the video, or stop browsing the TV channels. Please refer to the
subsequent sections for details.
M205 PRO User’s Manual
Page 17
Page 18

VideoCapture UTILITY
nn Video Display
Selecting the Video Source and Adjusting the Picture Properties
From the Options menu, choose Video Source. The Video Source dialog box appears:
• Video Connector: Select video input source (TV, Composite or S-video).
• Video System: Select video system type for the current input source. For proper
operation, you must make sure that the Video System is correctly set for any given
Video Source. For instance, your CCD camera may be a PAL device, whereas a
camcorder or VCR may be a NTSC device.
∗ Changing the video system type brings up the Video Format dialog box. For
Video Format settings, please refer to later section.
• Color: Drag the slide bars to adjust the brightness, contrast, saturation and hue of
the displayed video.
Page 18
M205 PRO User’s Manual
Page 19

VideoCapture UTILITY
Selecting Overlay / Preview Mode
Select Overlay or Preview mode from the Options menu. In
Overlay mode, video is transferred directly from the capture
card to the memory of the display card without using any CPU
resources. This results in better on-screen viewing. However,
the capturing operation automatically uses the Preview mode,
therefore, the quality of the captured image or video is the
same regardless of the setting.
Setting the Video Display Size and Format
From the Options menu, choose Video Format. The Video Format dialog box appears:
• Image Dimension: Selects the image display size. Options are 160 x 120 pixels
(1/4), 320 x 240 pixels (1/2), and 640 x 480 pixels (Full).
• Image Format: Select the image type and the amount of colors it will contain.
Note: The higher the number of colors and the bigger the window size, the larger the
size of the AVI file. It is recommended that you keep the image size at the default and
colors not higher than 16 bits.
M205 PRO User’s Manual
Page 19
Page 20

VideoCapture UTILITY
Selecting View/Capture Mode
To display video only, select the View Mode from the Options
menu. In this mode, you can display video full screen or in a
scalable window, but capture is not allowed. In the Capture
Mode, you can only display the video in the size you specify in
the Video Format dialog box described above.
Creating New Palette
If the image type of the displayed video is 256 colors (8-bit color) or less, setting a new
color palette may improve the picture dramatically.
From the Options menu, choose Make Palette to create a new palette. The following
dialog box appears:
• Colors: Specify the number of colors to be contained in the palette.
• Frame: Specify how many frames from which the color is to be selected for the
palette.
Page 20
M205 PRO User’s Manual
Page 21

VideoCapture UTILITY
Displaying Close Captioned Text
If you are watching TV in NTSC standard or playing an NTSC videotape containing
closed captioned material, you can enable the close captioned text to be displayed with
the video. Choose Video Display from the Options menu. The following dialog box
appears:
• Enable CC: Check this box to display the close captioned text. The text overlays
the video as in standard TV. Select Channel 1 or Channel 2 for the source of the
close captioned text.
• File Name: Specify the text file name for the transcribed closed captioned text.
• Alert Token: Type in this field the word that the program will detect for
transcribing automatically.
M205 PRO User’s Manual
Page 21
Page 22

VideoCapture UTILITY
nn Video Capture
Note: Make sure that you have selected the Capture Mode under the Options menu.
Please refer to page 20.
Changing the Settings for Video Capture
Choose Capture Settings from the Capture menu to change the preferences for video
capturing. The dialog box appears:
* All the values will return to default after exiting the program.
• Frame Rate: Number of still video frames that can be captured and converted to
digital format in one second. A lower frame rate will produce less fluid motion, but
will result in a smaller AVI file.
• Video Buffers: If the memory capacity allowed, more buffers will result in higher
video transfer rate. It is recommended that you leave it at the default value.
• Enable Capture Time Limit: Check this box to specify the maximum recording
time.
• Capture Audio: Check this box to capture audio with the video.
• Key to Abort Capture: Select the key to be used for ending video capture.
Page 22
M205 PRO User’s Manual
Page 23

VideoCapture UTILITY
• Mouse to Abort Capture: Select the mouse button to be used for ending video
capture.
• Hit OK to Capture: By default the
capturing begin as soon as you choose the
capture command from the Capture menu.
Click this check box to have a dialog box
appear before the capturing start for reconfirmation.
• Use DOS Memory: With this option
enabled, the program will try to use the DOS
memory for faster performance. However, the memory capacity is limited to under
1 Megabyte.
Selecting the Audio Format
With the Capture Audio option enabled (See the previous section), the Audio Format
command from the Options menu allows you to specify the format of sound you will
record with your video. The following dialog box will appear:
Enhancements like Stereo Sound will result in less bandwidth being used for Video
Recording. Therefore, unless sound is important, keep the settings low or capture only
the video.
M205 PRO User’s Manual
Page 23
Page 24

VideoCapture UTILITY
Selecting the Video Compressor
From the Options menu, choose Compression to select the video compression
algorithm. The dialog box appears:
• Compressor: Selects the compressor to be used.
• Compression Quality: Sets the compression rate. The higher number will result in
less distortion but bigger AVI file.
• Key Frame: The bigger the interval between the key frames, the more the
distortion will be.
• Configure: Configures the settings for the selected compressor.
Allocating Memory Space
Digital video takes up a large amount of
hard disk space. Before you start to
capture a movie, check out the available
hard disk space and set aside a memory
size for the captured file by selecting
Allocate File Space from the File menu.
Page 24
M205 PRO User’s Manual
Page 25

VideoCapture UTILITY
Specifying the File Name for Motion Video Capture
Before capturing a motion video, you should first decide the name of the captured file
and the location on the hard drive that the image will be stored in, or the file will be
saved to the default name and path c:\capture.avi
Choose Set Capture File from the File menu. The following dialog box appears:
M205 PRO User’s Manual
Page 25
Page 26

VideoCapture UTILITY
Capturing Motion Video
Click Capture Video under the Capture menu to initiate video capture. After the
movie is saved to disk, you will be shown the amount and percentage of dropped
frames. After the capturing is complete, the video display will remain still. Click
Preview or Overlay from the Options menu to resume the playing.
Capturing a Still Image
Click Capture Frame from the Capture menu to freeze the motion video. Then click
Save As DIB File from the File menu to capture the current frame. The captured
image is saved to the hard disk with the default path and filename:
c:\tekcap.dib.
To resume playing the video, press the Esc key on your keyboard.
Copying to the Clipboard
To copy the displayed image onto the Clipboard, choose Copy from the Edit menu.
The image is captured as a bitmap and can be pasted to any application supporting the
Windows software Clipboard.
Page 26
M205 PRO User’s Manual
Page 27

VideoCapture UTILITY
nn The TV Tuner
Show / Hide Control Panel
From the TV menu, check Show Panel to display/hide the
control panel (See page 17). The functions described below
may also be operated from the control panel.
Selecting Antenna / Cable Input
From the TV menu, click on Air or Cable to select antenna
(air) or cable input.
Auto Scanning for TV Channels
When you click on Auto Scan, the TV Tuner scans for all
active channels and stores them to a list.
Editing the Channel List
To add/delete a channel from the channel list, click on
Channel List. The Channel List dialog box will appear:
The Scanned List contains all active channels picked up by the Auto Scan function.
To delete a channel, select it from the Preferred List then click Delete. The channel
number will disappear from the Preferred List. To add it back to the Preferred List,
select it again from the Scanned List, then click Add.
Note: After you exit the application, the Scanned List will no longer retain the
deleted channels. In this case if you want to add a channel back, you will need to
rescan the channels.
M205 PRO User’s Manual
Page 27
Page 28

VideoCapture UTILITY
Selecting a Channel
You can directly select a channel by clicking on Set Channel, the following dialog box
appears:
Key in the desired channel number and
click OK.
For channel up/down, click on Channel Forward / Channel Backward.
Fine Tuning a Channel
To fine tune the signal of a selected
channel, click on Fine Tune. Drag the
slide bar on the Fine Tune dialog box.
Adjusting the Volume
Click on Volume Up / Volume Down to adjust the volume. To temporarily stop playing
the sound, click Mute. Click Mute again to resume playing the sound.
Viewing in a Window/Full Screen
To watch TV in a full screen, click on TV Mode, press the Esc key to return to
Windows.
Note: M205 PRO supports full screen viewing up to 1024×768×16bit color VGA
setting, however, some problem may occur with certain VGA cards. If you find the
image centered to the left of the screen and has image residue when refreshing, enable
the option Max 640×480 to solve the problem.
On Top
Enable/disable the M205 PRO application window to be always on the top layer.
Page 28
M205 PRO User’s Manual
Page 29

VideoCapture UTILITY
Channel Browsing
To view all channels simultaneously, click Channel Browsing. The option is then
toggled to Exit Browsing. To stop browsing, click Exit Browsing or press the Esc key
on you keyboard.
You may select the channel while browsing by clicking on the desired channel.
M205 PRO User’s Manual
Page 29
Page 30

nn nn nn
THE REMOTE CONTROL
5
nn Using the Remote Control
Included with your CaptureTV package is an infrared remote control. To use the
remote, you must first hook up the IR Sensor, as shown on Chapter 2. You must aim
the remote at the IR Sensor during use, so it’s recommended that you place the sensor
near your monitor.
Following is a summary of the Remote Control’s
major function buttons:
• POWER:
Activates/Quits the VideoCapture software.
• SOURCE:
Switches between TV, S-video and composite
video sources.
• PC/VIDEO:
Switches between full screen and window.
• STILL:
Freezes the video.
• :
Activates / Stops Channel Browsing.
• AIR / CABLE:
Switches between cable TV and antenna (Air).
• MUTE:
Stops / Resumes playing the sound.
• VOL:
Volume up/down
• CH/TK:
Channel up/down
• RECALL:
Changes to the previously selected channel.
Page 30
* Reserved for future function expansion.
M205 PRO User’s Manual
Page 31

nn nn nn
The following troubleshooting tips may help you if you experience problems. Contact
your dealer for more advanced troubleshooting information.
Basic Troubleshooting Tips
• Check that the card is seated properly in its expansion slot. If the problem still
exists, try a different PCI expansion slot.
• Ensure the monitor cable is securely fastened to the card.
• Make sure that the monitor and computer are plugged in and receiving power.
• Disable any built-in graphics capabilities on your mainboard. For more
information, see your computer documentation.
• Make sure that you selected the appropriate monitor when you install your VGA
enhanced driver.
• Because a typical computer system consists of many different parts, difficulties
may arise from a combination of items. Check the following list and find a
symptom that's similar, then try the suggested solution.
Video is unstable
• Check that you're using the correct broadcast standard format (NTSC, PAL, or
SECAM).
• Check the quality of your incoming TV signal on another receiver; bad reception
may be the cause.
TROUBLESHOOTING
6
Video is in black and white only
• Check the connectors setting to make sure you've selected the correct input
(CATV, Composite, or S-Video) for your video source device.
No video or audio
• Check that the audio and video connectors are securely plugged into the correct
jacks.
• Check that the Tekram Video Player card is securely seated in its slot.
• Check that the VGA enhanced driver is installed.
• Check the audio cables to make sure all connectors are securely plugged into the
correct jacks.
• Ensure that another Windows audio program is not muting the sound.
• Check the mixer line input selling in the audio software provided with your
sound card.
M205 PRO User’s Manual
Page 31
Page 32

n n n APPENDIX
nn DirectX 6.0 Installation for Microsoft Windows 95
1. Ensure that Windows 95 is up and running properly.
2. Insert the Tekram Multimedia Drivers & Utilities CD-ROM into your CD-ROM
drive.
3. Under Start… Run of the task bar, TYPE in X:\DIRECTX6\DXSETUP (X is the
letter of your CD-ROM drive). The following dialog box will appear:
4. Check “Direct 3D Hardware Acceleration Enabled” option and then click the
“ReInstall DirectX” button.
5. Restart Windows 95 to complete installation.
Page 32
M205 PRO User’s Manual
 Loading...