

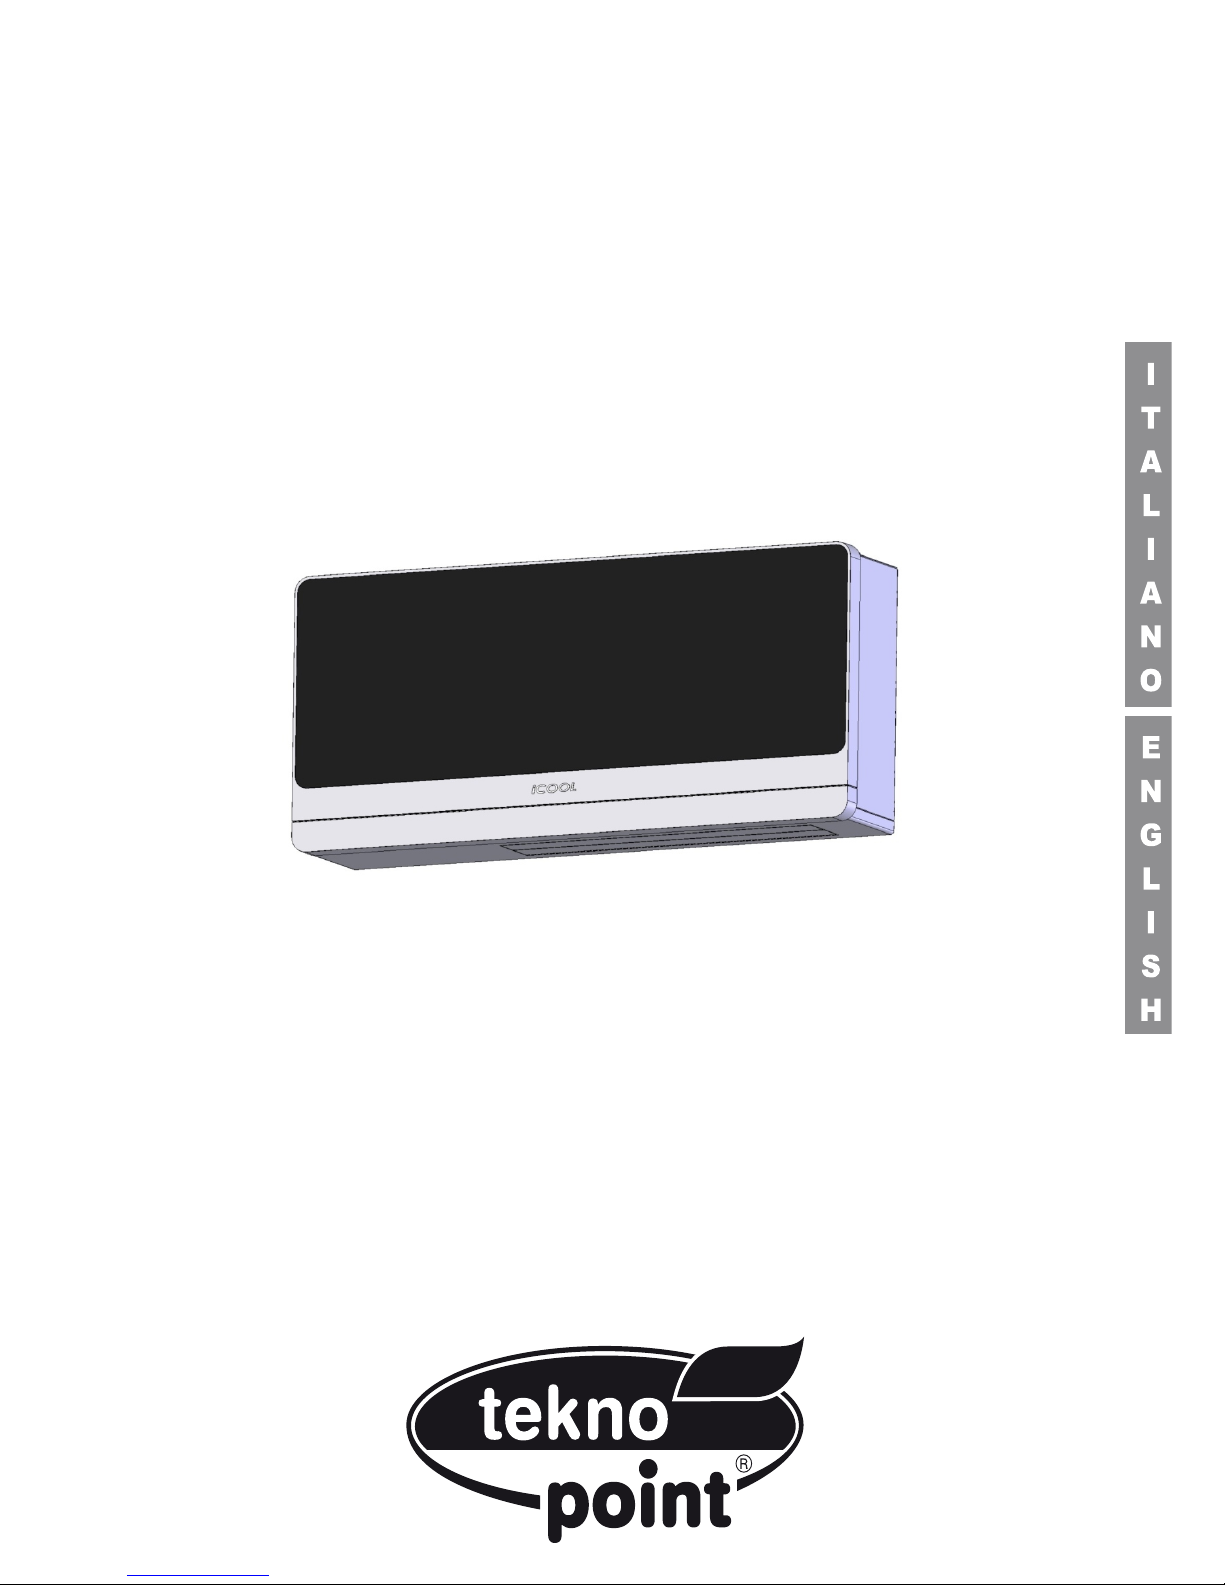
Climatizzatore Monoblocco a parete
Manuale installatore
Installation manual
IC-24

I prodotti elettrici ed elettronici di eventuale scarto dovranno essere disposti con i normali rifiuti domestici, ma
smaltiti a norma di legge RAEE in base alle direttive Europee 2002/96/CE e successive modifiche 2003/108/CE,
informandosi presso il Comune di residenza o presso il rivenditore nel caso in cui il prodotto venga sostituito
con uno analogo.
Possible wasted electrical or electronic devices/products should not be located together with normal
domestic waste, but disposed according to the current WEEE law in compliance with the European
Directive 2002/96/EC and following modifications 2003/108/EC. Please inform yourself at your local

ITALIANO
4
2
5
INCLINAZIONE 3/5°
Reali
SCARICO CONDENSA
6
NOTA BENE:
Nel funzionamento prolungato in modalità
riscaldamento, in condizioni di elevata umidità
esterna è possibile la formazione di condensa
sulla griglia di espulsione dell’aria. E’ possibile
inoltre che parte della condensa fuoriesca dal
tubo di espulsione aria per effetto di trascinamento dell’aria o di difficoltà di smaltimento
dall’eventuale tubo di diametro 30mm.
7
8
8
9
10

3.1 ICONE DEL TELECOMANDO
Auto
Orologio
Riscaldamento
Raffreddamento
Deumidificazione
Ventilazione
Significato
Velocita' ventilatore
Direzione aria
Timer off
Timer on
Notturno
Non in uso
3. USO E MANUTENZIONE
Significato
3.2 FUNZIONI DEL TELECOMANDO
ITALIANO
11
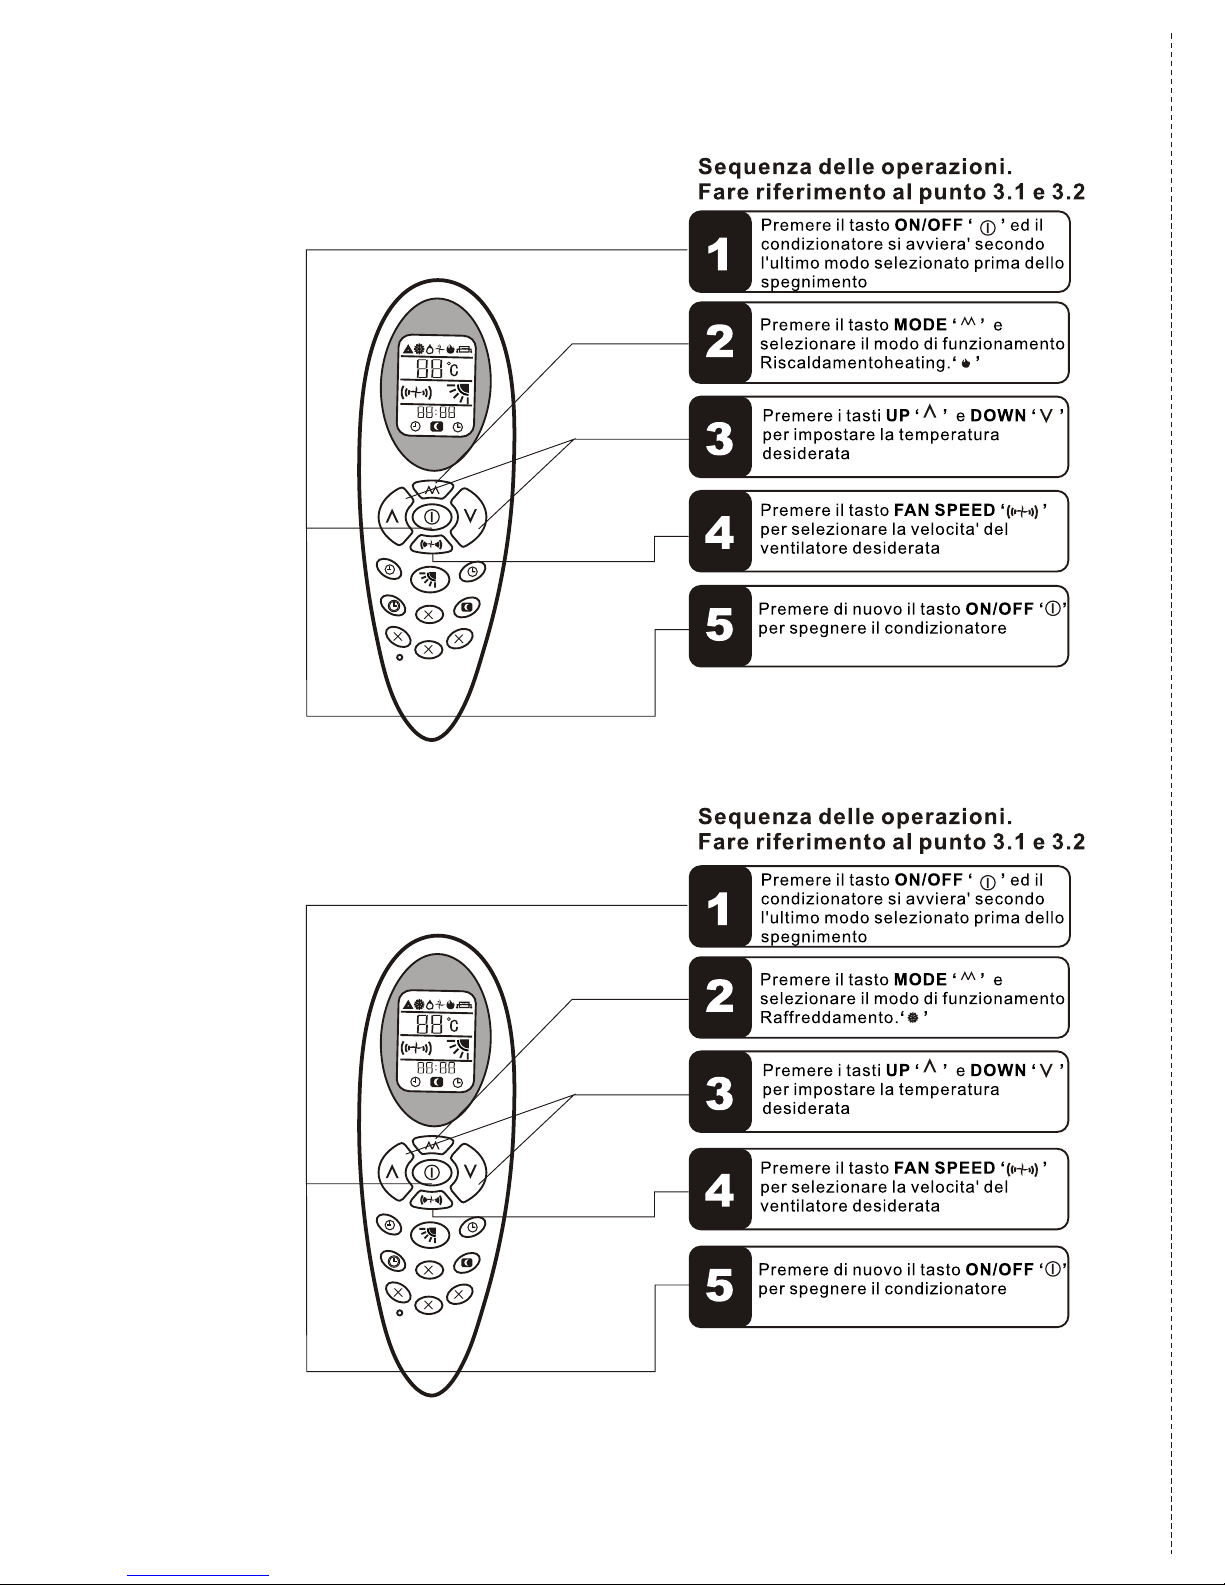
3.3 MODO RISCALDAMENTO
3.4 MODO RAFFREDDAMENTO
3. USO E MANUTENZIONE
ITALIANO
12

3.5 MODO DEUMIDIFICAZIONE
3.6 MODO VENTILAZIONE
3. USO E MANUTENZIONE
ITALIANO
13

3.7 MODO NOTTURNO
3.8 MODO AUTOMATICO
21
3. USO E MANUTENZIONE
ITALIANO
14

3.9 SPEGNIMENTO CON IL TIMER
3.10 ACCENSIONE CON IL TIMER
3. E
Sequenza delle operazioni.
Fare riferimento al punto 3.1 e 3.2
Sequenza delle operazioni.
Fare riferimento al punto 3.1 e 3.2
1
2
3
4
5
2
1
15

3. 16 SOLUZIONE PROBLEMI 3. 16 SOLUZIONE PROBLEMI
16

ENGLISH

Do not attempt to repair or adjust any
electrical or mechanical functions on this air
conditioner as this may void warranty,
contact your service engineer.
This air conditioner is not intended for use in
wet or damp locations.
Do not place the air conditioner near an
open flame, cooking or heating appliance,
or hot surface.
Do not let the power cord hand over the
edge of a table or counter. Arrange the
power cord away from an area where it may
be tripped over.
Never place the power cord under a carpet
or rug. Do not operate the air conditioner
in areas where petrol, paint, or other
flammable liquid are used or stored.
Do not carry out any cleaning or maintenance
or access internal parts until the air
conditioner has been disconnected from the
mains electricity supply.
Do not alter the safety or regulating devices
without the permission and instructions of
the air conditioner manufacturer.
Do not pull, remove or twist the electric
cable connected to the air conditioner, even
if disconnected from the mains electricity
supply avoid prolonged direct contact with
the flow of the air from the air conditioner
and the room being closed with no
ventilation for a long period of time.
Repair or maintenance work must be carried
out by a service engineer or by qualified
technicians in compliance with the instructions
given in this booklet. Do not alter the
appliance, since hazardous situations could
be created while the manufacture of the
appliance will not be liable for any damage
or injury caused.
This instruction booklet is an integral part of
the appliance and should therefore be
carefully preserved and always accompany
the appliance in the event of transfer to
another owner or user or another installation
engineer. Should the booklet be damaged or
lost, please request an additional.
Always operate the product from a power
source of the same voltage, frequency and
rating as indicated on the product
identification plate.
1. 1 INTRODUCTION
Please note: Don' t dispose of any packaging
until the installation of the air conditioner is
completed.
After having removed the packing,check that
all the content is intact and complete. ( See
list of accessories) . In the event of missing
parts, contact your retailer.
This air conditioner has been designed to cool
or heat the air of a room and should only be
used for this purpose.
Don' t switch on before having tot ally assembled
the a ir cond itioner and before installing in its
correct operating pos ition.
Before starting the appliance, c heck that it is
correctly ea rthed, according to the l egislation
in force in the co untry concerned.
Don' t place objects on the products or allow
objects to obstruct the inlet or outlet
openings. Extreme care should be taken
when any product is used by, or near children
and pets, and whenever the products is left
operating and unattended.
Before operating the product, remove the air
conditioner from its packaging and check if it
is in good condition.
Do not operate any products with a damaged
cord or plug, or after the air conditioner
malfunctions, has been dropped, or damaged in
any manner.
Do not let child play with the package, for
example the plastic bags.
Please note:
When using electrical appliance, basic safety
precautions should always be followed:
1. 2 IMPORTANT SAFETY
INSTRUCTIONS
The manufacture can not be held liable for
damage caused to property or injury to persons
or animals due to incorrect installation,
regulation and maintenance or improper use.
This air conditioner contains R410A refrigerant,
at the end of its life, the disposal of this air
conditioner must be accordance with the strict
regulation governing the recycling of this
product, please operate with caution during the
disposal. Please contact your local authority
for regulation advice.
service centre for examination and repair to
avoid a hazard.
Return the air conditioner to an authorised

8
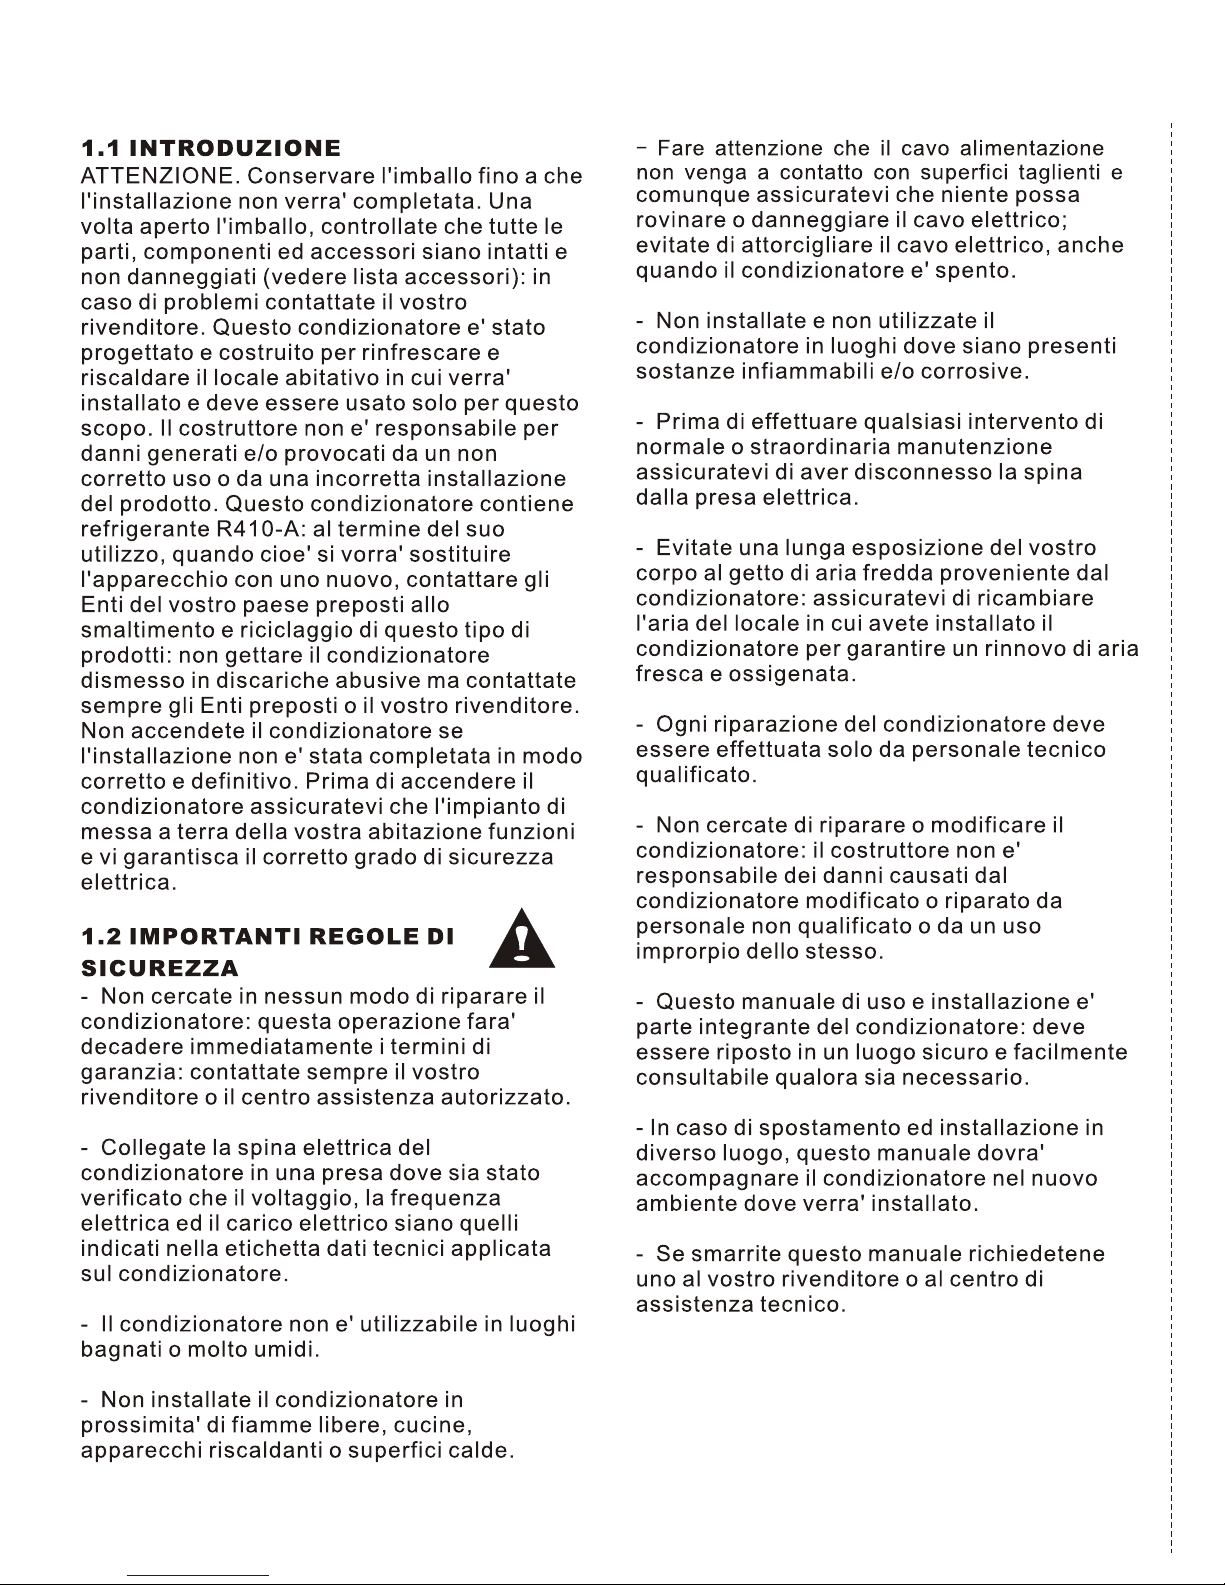
1
2
4
5
5
7
P0
3
6
(SEE PAGE)
The air conditioner is delivered in a
protective packaging and is accompanied by
an instruction manual. This manual is an
integral part of the air conditioner and should
therefore be carefully read and preserved.
When the air conditioner is unpacked, please
check that the air conditioner and accessory
packed are complete and undamaged.
Be fully aware of the weight of the air
conditioner before attempting to lift it. Take
all necessary precautions to avoid damaging
the product or causing personal injury. It is
advisable to remove the packaging only when
the air conditioner has been located in the
point of installation. Carefully remove the
adhesive strips positioned on the air
conditioner. Packaging components must be
tidied up correctly and not left within reach
of children, since they are hiding of danger.
This product has been manufactured to
comply with 2006/ 95/EC and with
amendments 92/ 31/ EEC and 93/ 68/EEC.
DISPOSAL: Do not dispose this product as
unsorted municipal waste. Collection of such
waste separately for special treatment is
necessary.
Any batteries used in the remote control
contain materials, which are hazardous to
the environment. T hey must b e r emoved
from the remote control when the y reac h the
end of their life and di sposed of responsibly.
INSTRUCTION MANUAL
iCOOL 2.3 can be connected only to a supply
wi t h sy s t e m imp e da n c e no mo r e th a n
0.216 ohm. In case necessary, please consult
your supply authority for system impedance
information.

W
P1
2346( 8000)
2346( 8000)
973
40
1900
Net weight ( Kg)
900
350
4. 35
4. 0
50
43/ 95/ 19.5
12. 5
iCOOL 2. 3iCOOL 2. 3
Installation bracket
Condenser outlet fan
Condenser inlet fan
Fron panel
Air inlet area
P2
The display will sh ow both setting
temperature and ambient temperature. After
adjusting the setting temperature, the setting
temperature will flash 15 times on the
display, then the display will show the
ambient temperature for 70 seconds. After
that, the display will be off until next
adjustment.
Fuse ( T6. 3A)
2m
P3
2m
2- 2. 2m
Outdoor
Indoor
P4
P5
spirit level
To maintain the best performance from your
air conditioner, prevent breakdowns or
hazards, you must position it correctly.Please
follow the guidelines and instruction below in
full, as failure to do so could cause potential
installation problems.
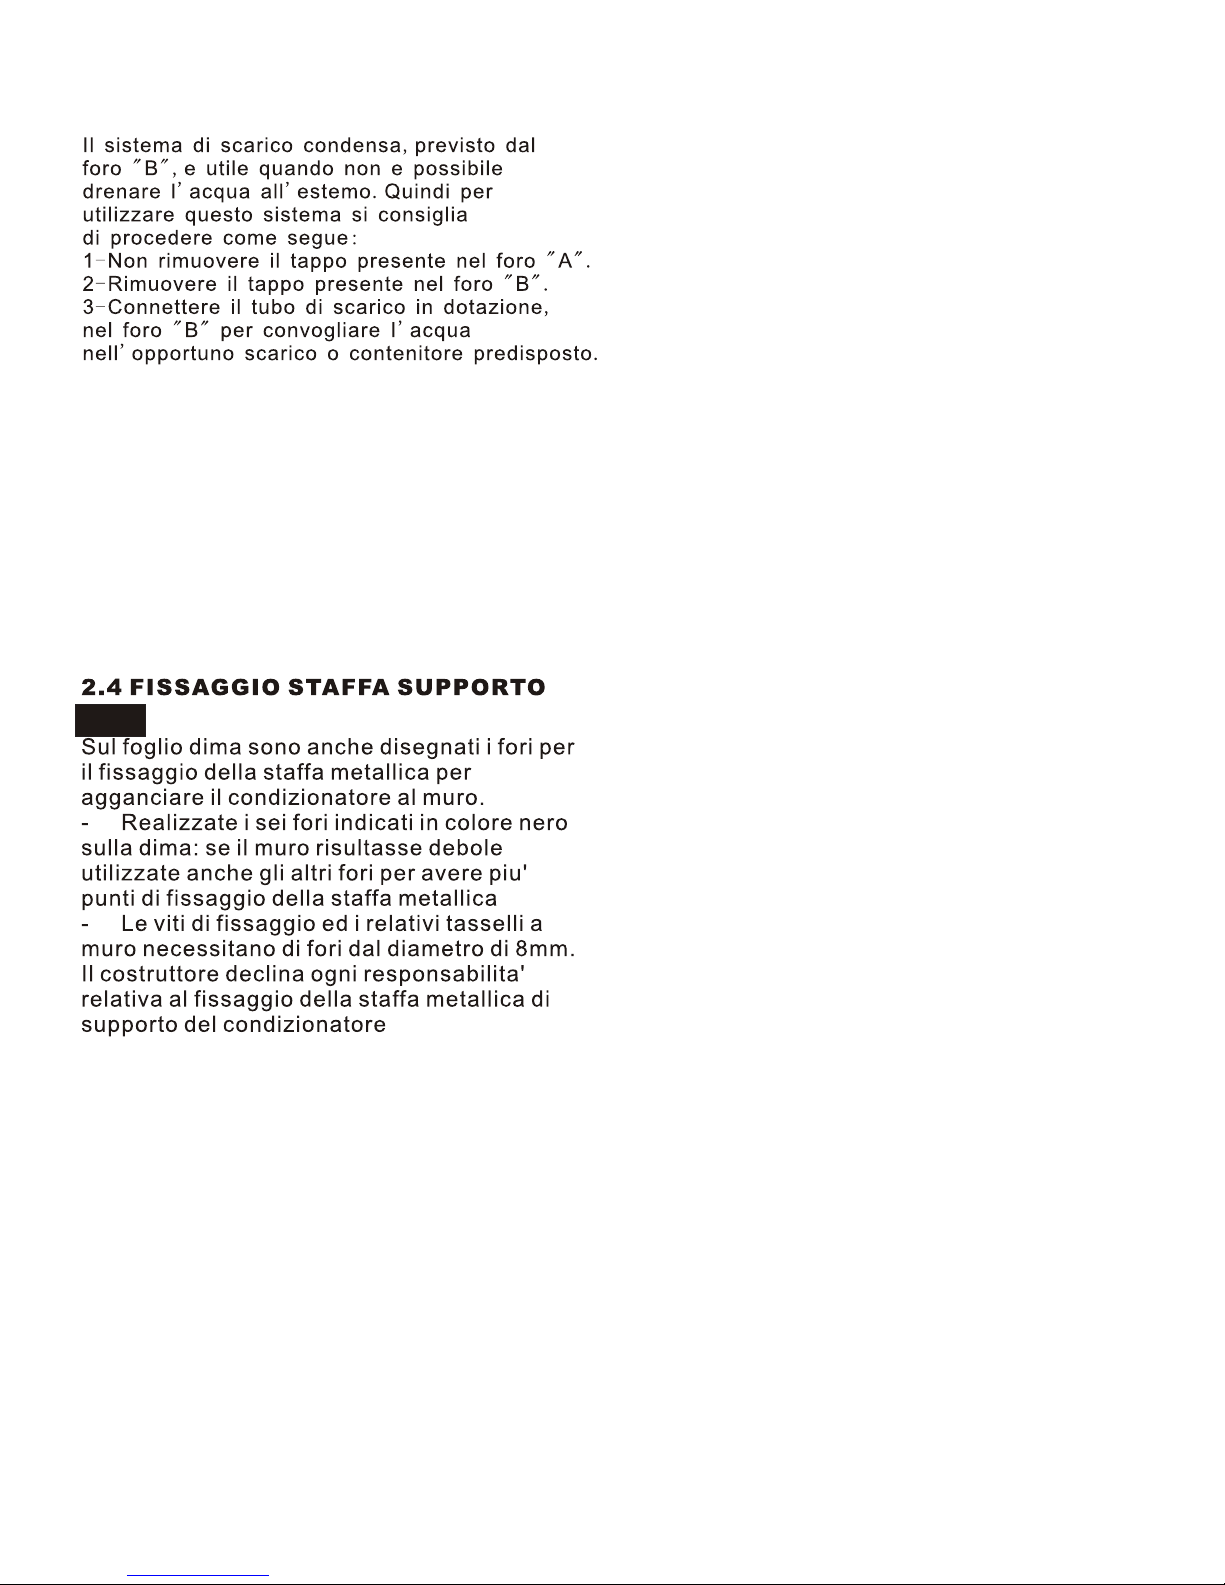
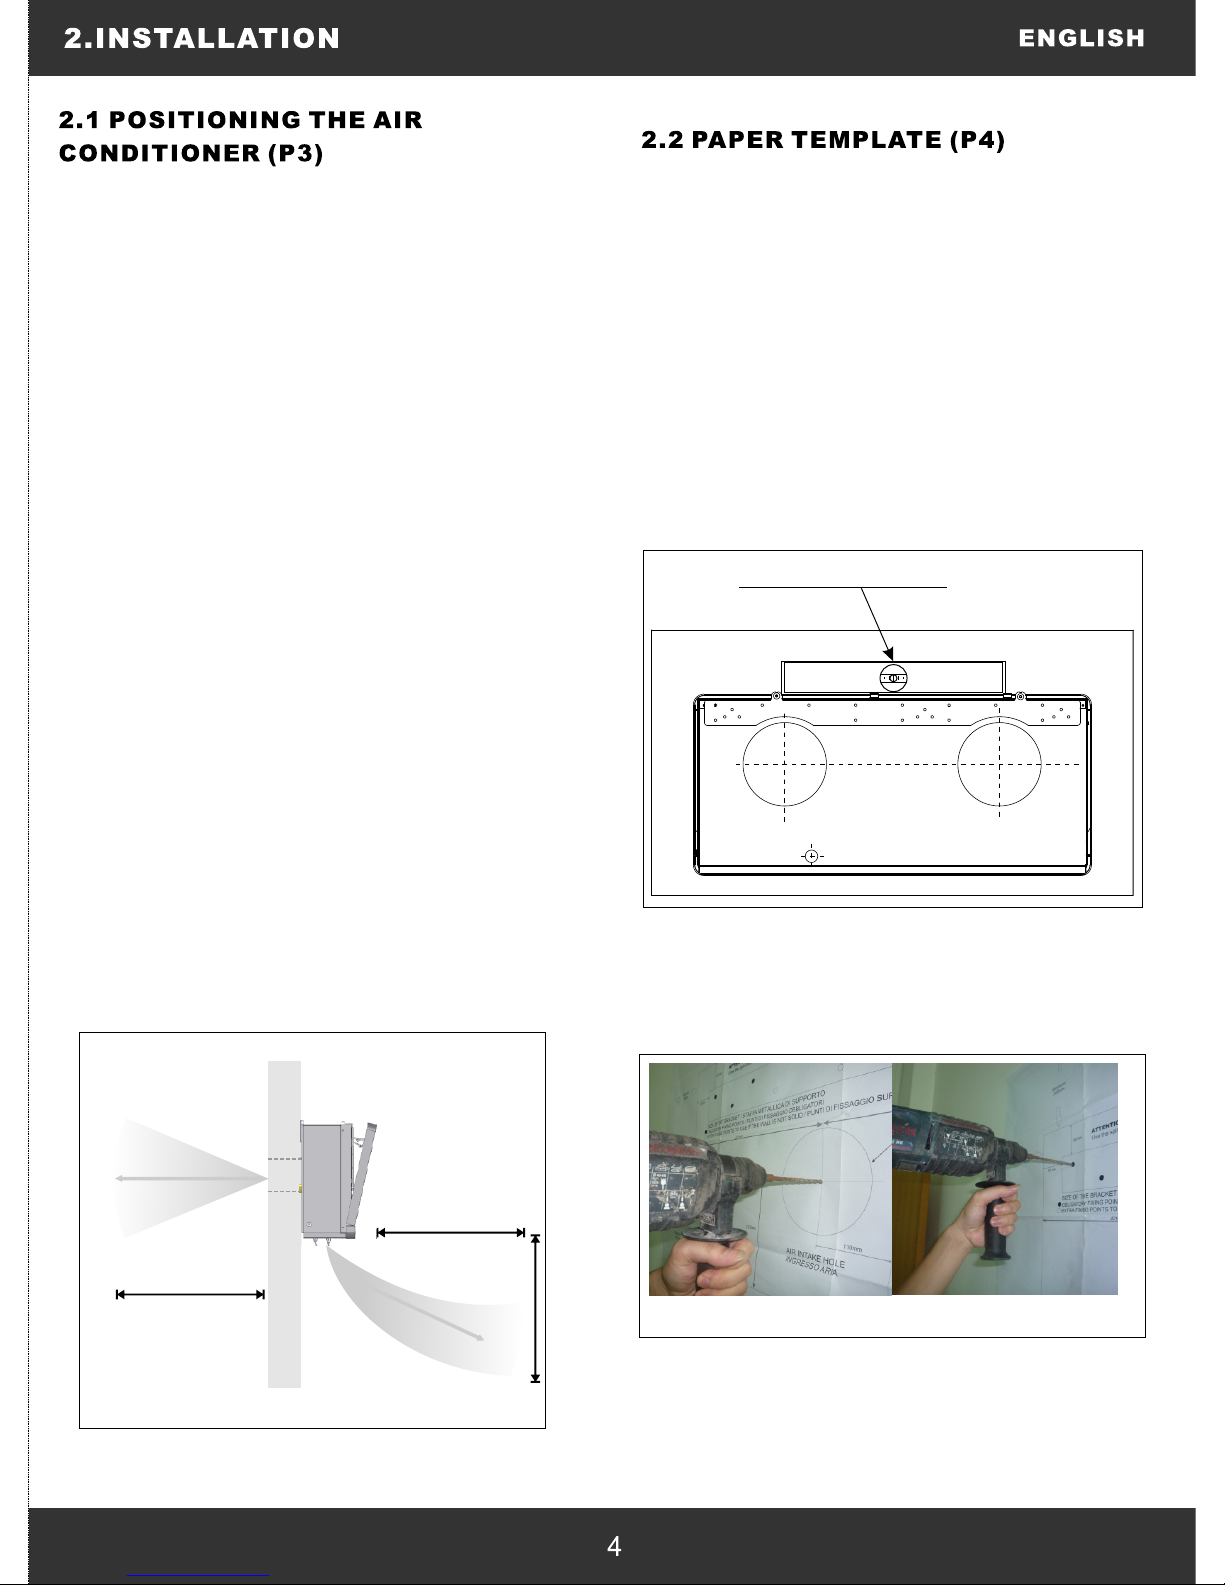
The air conditioner must be installed on an
exterior wall that has access to the out side
with a minimum of 2 meters clearance to the
outside. (See image P3)
After determining the best place for
installation as described above, please check
to ensure that the wall can be drilled in the
chosen area without interfering with other
structures or installations (beams, piers,
pipes, wires, etc. ) .
Please also ensure that there are no
obstacles on the outside of the wall, which
may obstruct air circulation through the drilled
holes, for example: ( plants and their leaves,
slats or panelling, drain pipes, overflows and
gratin gs, etc . ) . An y obst ructi on co uld
interfere with the correct performances of the
air conditioner.
The wall on which the air conditioner is
installed must be sturdy and able to withstand
the weight fo the air conditioner.
The air conditioner must be fitted leaving
room all around as illustrated in the paper
template.
Fasten the template to the wall once the
following guidelines have been thoroughly
checked.
Ensure that a spirit level is used, as the air
conditioner must be level.
Follow the installation instructions in full.
Do not drill any holes until you are
completely confident that there are no
obstacles in the area you wish to drill and
there are no obstructions, which could be
hidden by the construction of the wall, for
example: electrical wiring, water& gas pipes
or supporting lintels or beams.
Fasten the template to the wall taking care to
check the distance from the floor or ceiling.
Use a pilot drill to mark the centre of each
core hole to be drilled.( See image P5)

46m m
515 mm
955 mm
585 mm
220 mm
168 mm
435 mm
220 mm
22m m
40m m
283 mm
203 mm
203 mm
2000mm 2000mm
FLOOR FLOOR
65x 28mm
OB BLI GAT ORI O
Cut bac k insul ating mater ial in t his pos ition t o
con nect th e machi ne with out pow er plug , o r for
MOD B US conn ectio n ( Optio nal )
Tagli are l 'isolan te po steri ore del la ma cchin a in
que sta posi zione pe r a llacc iare la mac china al la
ret e elett rica se nza l'u tiliz zo dell a spi na shuk o ,
e per l a conne ssion e alla re te MOD BU S ( optio nal )

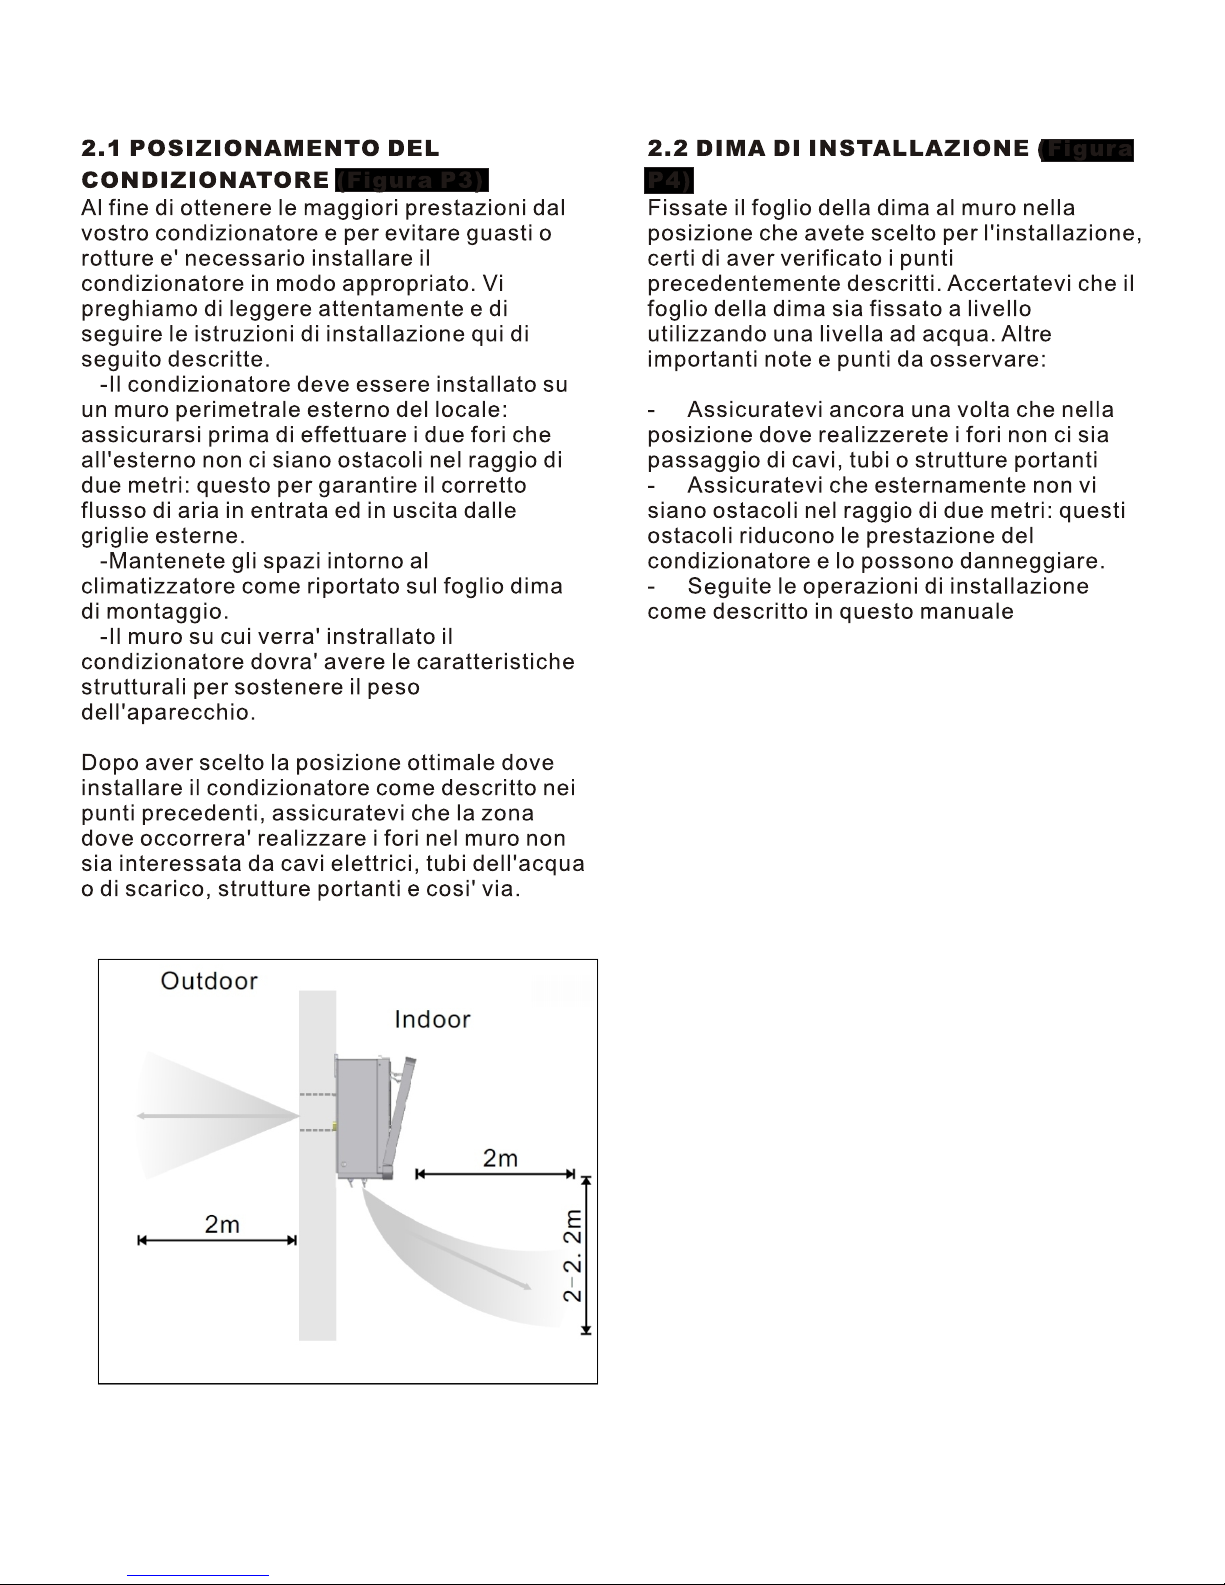
P7
3° INCLINATION
This air conditioner has a system to drain the
condensate moisture automatically. Please
read carefully the following instruction.
Drill a hole through the wall measuring 30mm
in diameter in the position shown in the
paper template, marked the center before.
Drainage occurs by gravity. For this reason,
it is essential for the drain line to have a
minimum downward inclination at least 3
degrees throughout its length. With this
solution, you can drain the condensate
moisture to a suitable place to do not cause
any problems to your neighbours.
This drainage method is more common use,
and the discharge pipe goes outside where
there is no problem to connect or to
discharge it, this solution is OK for hot
country and normal cold temperature outside.
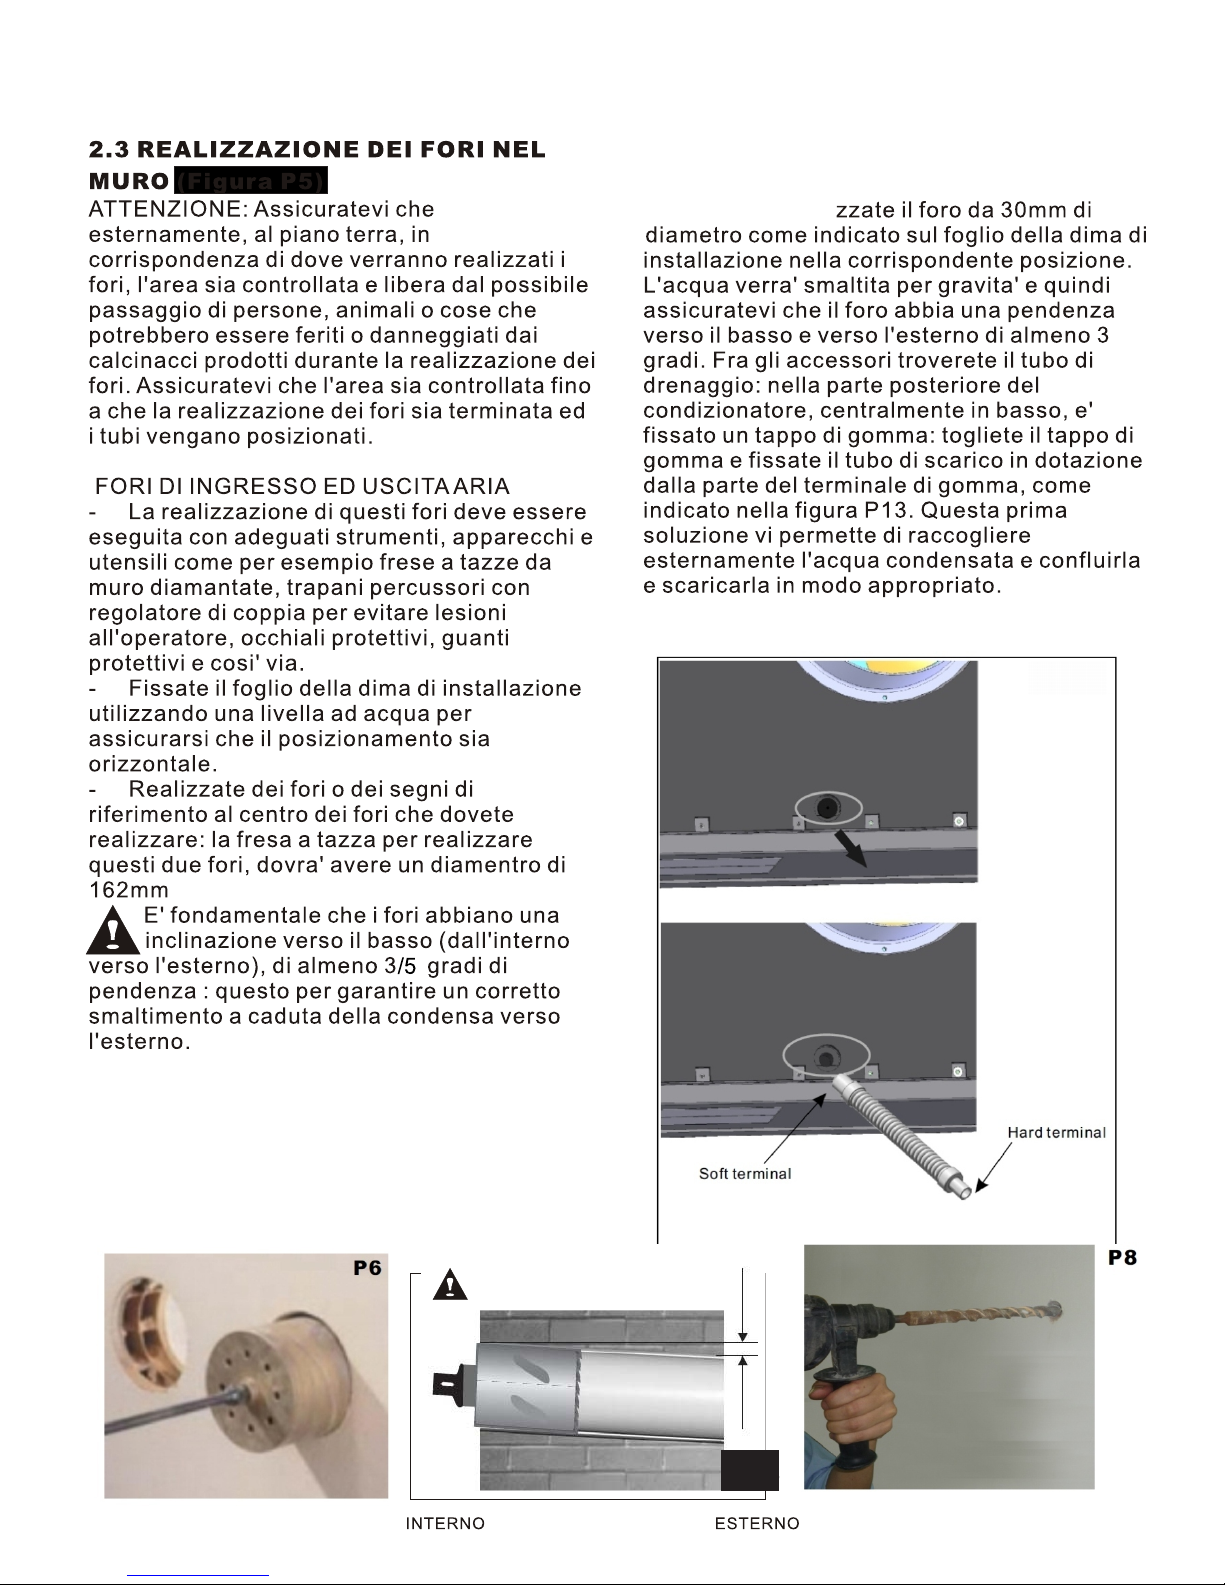
DRAINAGE HOLE (P8)
WALL BRACKET HOLES ( P9)
P6,7 , 8, 9
Please note: If you are drilling the hole above
ground floor level, please ensure that an
area has been secured and while the holes
are drilled the outside area is supervised,
until drilling has been completed.
INTAKE AND OUTLET HOLES( P6)
This operation should be carried out using
the proper tools ( diamond tip or core borers
drills with high twisting torque and adjustable
rotation speed) .
Find the holes center drilled before, use a
core boring head having a diameter of
200mm to drill the two holes for intake
and outlet the air.
P6
P8
P9
(See image P7)
Drill the holes for anchoring the fastening
bracket to the wall using preferably the 26
holes with 8mm diameter showed in black on
the paper template. As the unit is installed on
high wall,it is recommended that all the holes
should be fixed with anchor bolts.

If the wall is built with empty brick, and it is
empty inside the wall.
If the wall is built with full brick or stone, and
the wall is full.
With this kind of solid wall, it is recommended
that using a special waterproof paint on the
hole surface to protect the wall.
Before the painting, the hole surface should
be cleaned by dry cloth or vacuum,and keep
the hole clean.
2.4 M O I S T U R E P ROTECTING WALL
P10
P11
For this kind of wall, it is necessary to use
insulating film with tar or bitumen like P11.
This film is flexible and with waterproof
function, is used when building the roof where
need to close from water leakage , it must
positioned inside the wall ,and conformed with
round shape, of course the length must be less
than the wall thickness.Usually the thickness
of this tar or bitumen film could be 2 mm.
EMPTY WALL PROTECTION(P10, 11,12)
SOLID WALL PROTECTION(P13, 14)
P12
P13
P14

P15
After drilling the holes, the plastic gratings
supplied with air conditioner need to be fitted on
the wall.
1.When gratings is easy accessibility, you could
fix the gratings from outside, it is recommended
to fasten it to the wall with wall plugs and screws
with a diameter of 6mm, and keep the fins in
ve r tical position. (See image P16 )
2. When the air conditioner is installed in the
high space, and impossible to reach the
gratings from outdoor side, you could fix the
gratings from inside.
P16
15
Insert the plastic rings into the holes for wall
bracket, and keep them same surface with the
wall. Then fix the screws one by one. And do
not fix the two screws on the top.
The anchor bolts provided require a
8mm holes; the wall should be inspected
to determine if provided bolts are useful
or if it is necessary to use a different
anchorage. The manufacture is not liable
in case of underestimation of the
structural consistency of the anchorage
made at the time of installation.
This two holes would be fixed later.
2.6
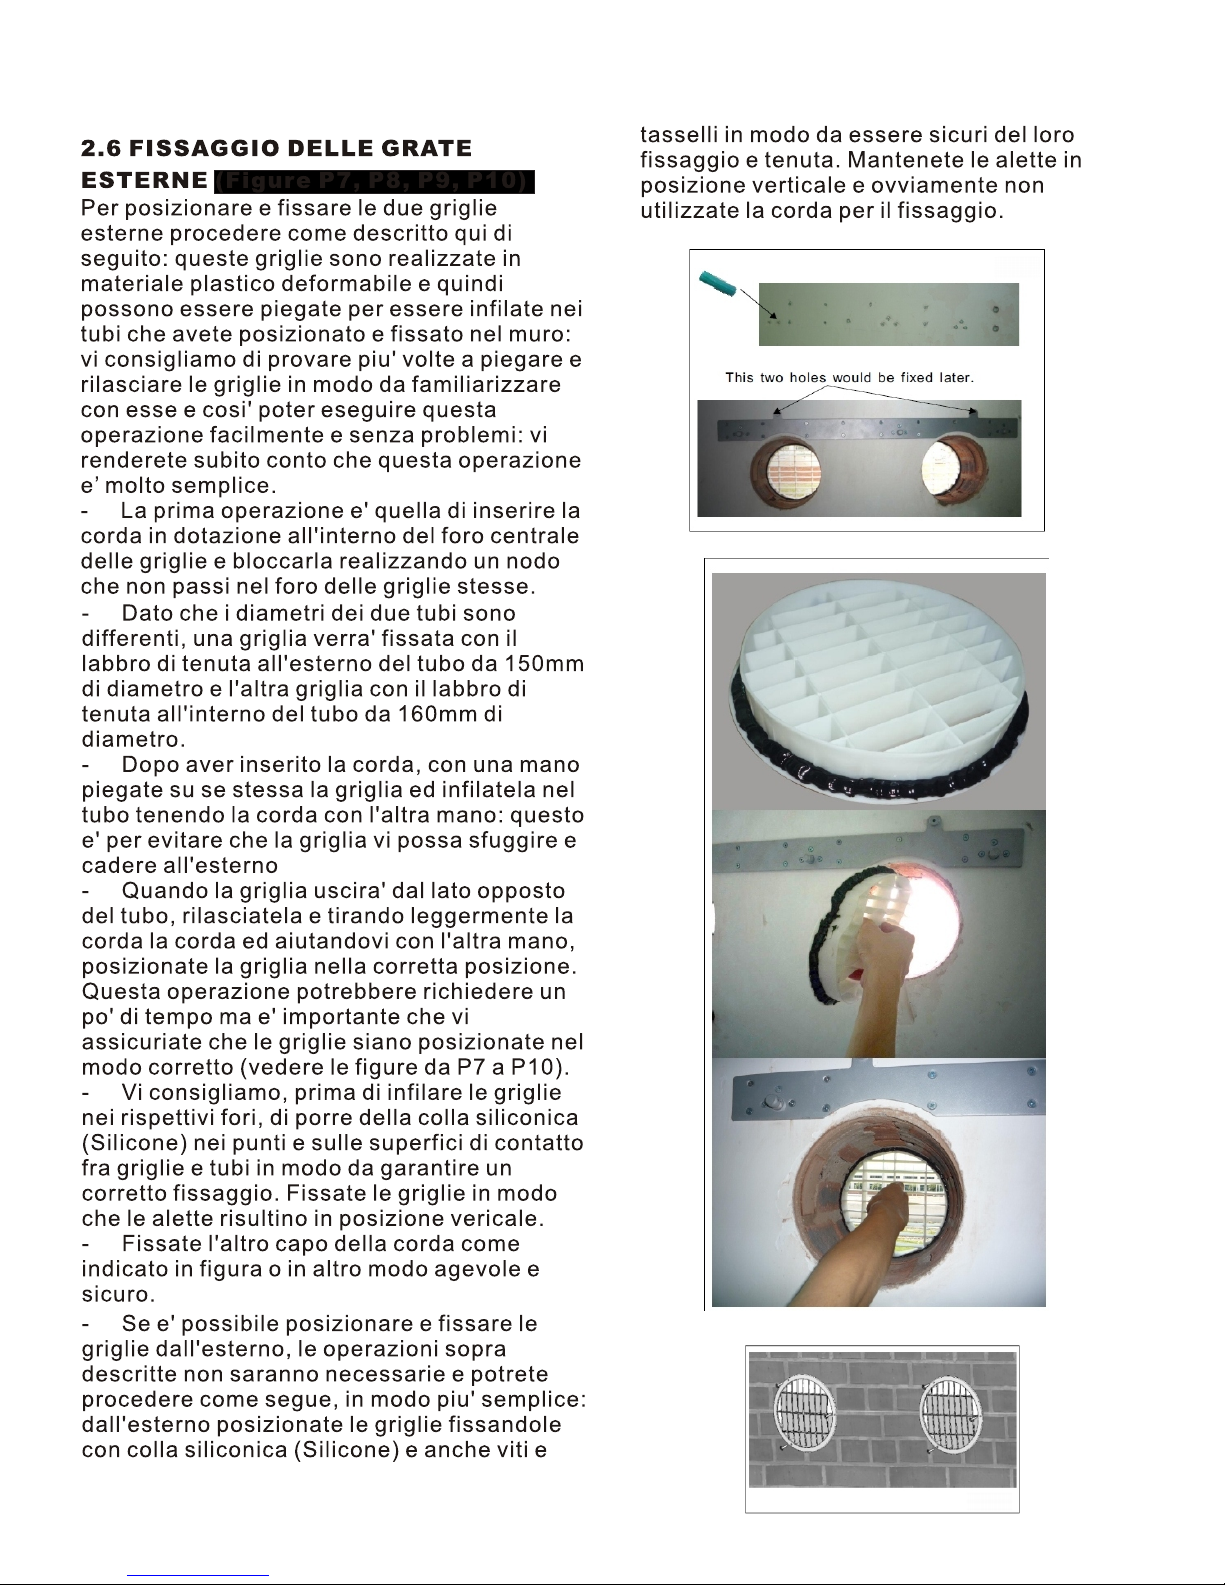
Put the silicon gel around of the soft grating,
like Fig17.Then fold the outer grating in half,
insert your arm inside the hole with the grating.
Let the grating unfold and pull the grating
to w a r d yo u . With a li t t l e pa t ienc e an d
manipulation, the 2 gratings will fit the end of
the holes. (P 17,18,19)
P17
P18
P19

After fixing the outside grating, we could
inject more gel inside the space between the
grating and wall. (See P20, 21)
The black silicon gel is just for reference,
we could use white or transparent color gel
to fix the outdoor grille. ( P22)
The above installation solution is just for
solid wall.
P20
P21
P22
Connect the drain pipe( from rubber terminal)
to the air conditioner ( back side) after
unplugged the black rubber cup ( see P23) .
With this solution, you can drain the
condensate moisture to a suitable place to do
not cause any problems to your neighbours.
7
CONNECTING D R A I N AGE PIPE
Soft terminal
Hard terminal
P23
P24
1. When the machine is installed in normal
climate or hot area, we can connect the
drainage pipe to outside, with a proper place.
(See P24)
Outdoor
Indoor
Drainage pipe

2. For aesthetic purpose during the
installation, we could change the power cord
connection solution with another way.
1. For every unit, there would be a power
cord on the left side( P26) . Connect the plug
with the socket, and operate the unit.
-- Remove the 4 pcs screws on both sides
of the unit. ( See P27)Then remove the front
panel.
-- Remove the 4 pcs screws on the left side
metal plate. (See P28)
-- Open the left plate with the arrow direction,
and you can see the power cord terminal
block.( See P28,29)
-- On the back of the unit,
there is a hole for the wire
connection, you can cut the
back insulation material, then
connect the additional wire
accordingly. Just be careful
with the operation and do not
damage the wires. About the
hole dimension, you can check
the paper template.
-- After the operation, please
assemble the components
again.
P27
P26
P28 P29
P30
Power cord
Power cord
Screw
Screw
Terminal block
Screw
8
POW E R CORD CONNECT I O N
P25
2. When the machine is installed in very cold
area, the water in drainage pipe is frozen
easily in winter, we could connect the
drainage pipe inside the wall, and connect
with a proper place.
Outdoor
Indoor
Drainage pipe

After checking again that the fastening
bracket is securely fastened to the wall,
and that any necessary preparations for
electric connection and condensate drainage
have been made, fasten the air conditioner
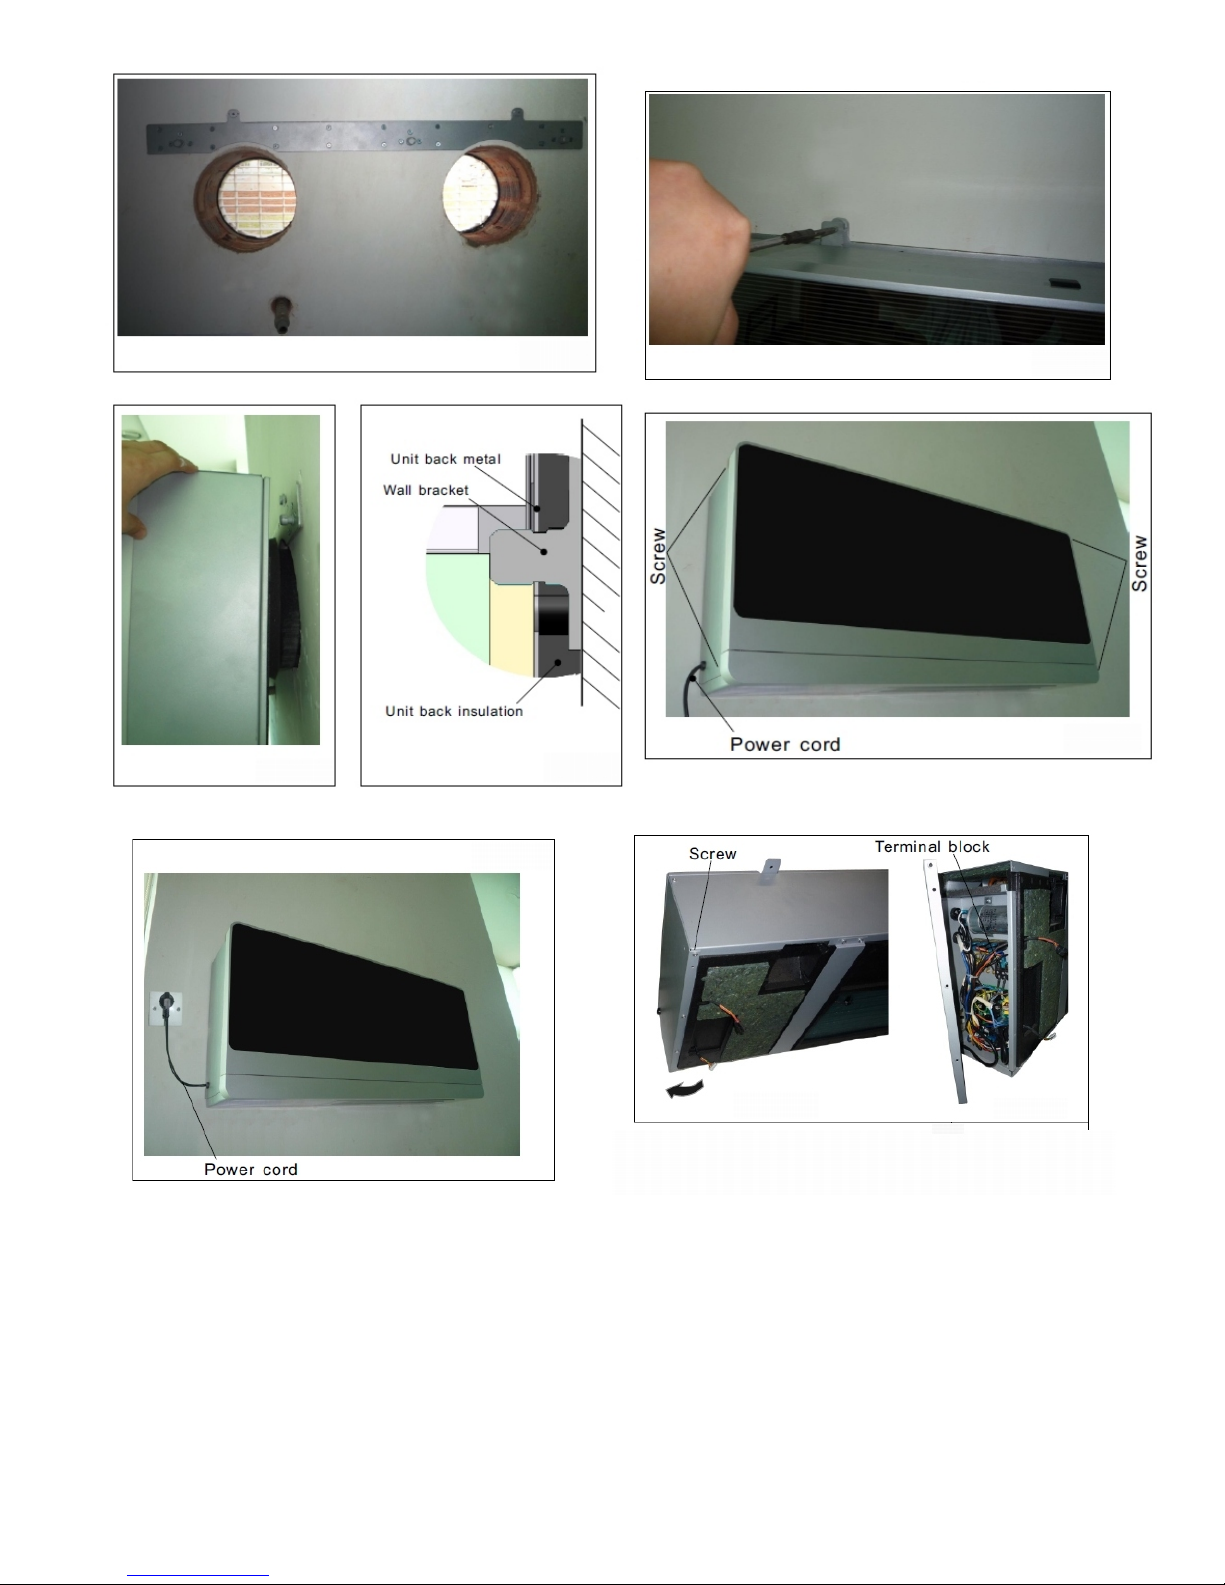
to its supporting bracket. ( See P31)
Lift it up by holding the sides at the bottom,
slightly insert the outside fan rings into the
two big holes on the wall. ( See P32) The
air conditioner can now be pushed firmly
against the wall, then lift the unit and make
sure the wall bracket and unit match well.
(See P33)
Inspect carefully the installation to make
sure that the insulating back panel must fit
firmly against the wall and there are no
fissures at the back of the air conditioner.
Fixing two screws with top of the machine,
to make sure the unit is installed well.
(See P34, 35)
Wall bracket
Unit back insulation
Unit back metal
The appliance shall not be installed the
laundry.
The appliance must be positioned so that
the plug is accessible.
The appliance shall be installed in accordance with national wiring regulations.
P31
P32 P3 3
P34
P35
9


3.3 H E AT I N G M O D E
3.4 C O O L I N G M O D E

Press the ON/ OFF button " " , switch on the
air conditioner, it will run by memory mode.
Press the MODE button " " set up t he
mode to fan " " , the air conditioner will
run in fan.
Press UP " " or DOWN " " button, to
adjust the setting up temp erature.
Press the FAN SPEED button " " , set up
the fan speed. is low speed, is middle
speed, is high speed, (flashing) is auto
speed.
Fan auto fan, the speed is cho osen by the
differen ce of room temperature and setting
temperature.
Room temperature-setting temperature>5℃,
high speed.
Room temperature-setting temperature>3℃,
middle speed.
Room temperature-setting temperature>1℃,
low speed.
Press the ON/ OFF button " " , switch off
the air conditioner. Nex t time when this
button is pressed, the air c onditioner will
operates in this mode by mem ory.
3.6 FAN MODE
3.5 D RY M O D E

3.7 S L E E P M O D E
3.8 AUTO M O D E

3.9 T I M E R O F F F U N C T I O N
3.1 0 T I M E R O N F U N C T I O N
16

3.1 1 F R O N T PANEL F U N C T I O N
3.1 2 I N S TA L L A ND CHANGE
THE BAT T ERY
When the unit starts working, the
front panel would be open first for
about 15- 20 seconds, then fan
and compressor would work again.
During the opening period, if you
find that there is no air come out
from the air conditioner, please do
not worry about it.
P36
P37
Insert the battery ( AAA, 2pcs) , the
positive must be same with the
mark on the plastic surface.
Reinstall the cover of battery.
Inspection: If press ON/ OFF button
" ", no icons are displayed, please
install the battery again.
Open the cover of battery,hold the
hook and lightly pull up.

3.1 3 M A I N T E NANCE ( P 3 8 , 39, 4 0 )
P38
P39
P40
P41
Filter holder
The filter should be regularly cleaned to
keep the air conditioner running efficiently.
Clean the filters every two weeks.
-- Disconnect the air conditioner from the
electrical supply.
-- Open the front panel by hand.
-- Take the filter holder ( See P38) , take out
the filter grating from the slot. ( See P39) .
-- Proceed to wash them ( not hot water)
and only when they are dried replace them
in the same way. ( See P40)
How to proceed:
ATTENTION: Do not use the air conditioner
without filters as it could seriously damage
the air conditioner.
-- Disconnect the air conditioner from the
electrical supply.
-- Wipe external surfaces clean with a damp
cloth only.
-- Do not use an abrasive cloth or solvents,
as this may damage the surfaces.
-- Do not use excessively wet cloths or
sponges, as water stagnation could damage
the air conditioner and compromise safety.
AC T I V E C A R B O N F I LT E R ( O P T I O NAL)
(P 4 1 )
The unit maybe includes active carbon filter,
which not only has the function of eliminating
su s p end e d m a tte r s t hat a co mm o n
mechanical filter has, but also can eliminate
foreign matters such as free chlorine, odors,
colors and toxic matters that are difficult to
filter out by using conventional approaches.
With active carbon filter, the room air would
be fresh and good for the body health.
Is advisable to change them every three
months,because it is not possible to wash or
clean them.

3.1 4 P ROBLEM SOLV I N G
PRO B L E M P O S S I B L E C AUSES
POSSIBLE SOLU T I O N S
-The air conditioner does not work.
1. Wrong setting of the timer/Check it.
-The air conditioner does not refrigerate the
room.
2. Problems on the power supply/Call the
service center.
-Strange smell in the room. Water drips from
the air conditioner.
3. The filter could be dirty/ Clean it.
4. The room temperature is too high/ Wait
until the temperature goes down.
5. The temperature is not properly set/Check
it.
6. The grids could be obstructed/ Check and
remove the eventual obstacles.
-Dampness in the room, coming from walls,
carpets, furnishing or similar.
-Wrong installation of the air conditioner.
-Wrong connection of the drainage pipe.
-Exhausted batteries.
-Wrong insertion of the batteries inside the
remote control.
-Protection of the conditioner. Wait for 3 min
and the air conditioner will start to work again.
If the supply cord damaged, it must be
replaced by manufacturer or its service agent
or a similarly qualified person in order to
avoid a hazard.
-The remote control does not work.
-The air conditioner does not work for 3 min
when switched on.
The max operation temperature for the air
conditioner: (max cooling: outdoor DB43℃/
WB26℃,indoor DB32℃/WB23℃; min heating:
outdoor DB- 5℃/WB- 6℃, indoor Db20℃)
This appliance is not intended for use by
persons ( including children) with reduced
physical, sensory or mental capabilities, or
lack of experience and knowledge, unless
they have been given supervision or
instruction concerning use of the appliance
by a person responsible for their safety.
Children should be supervised to ensure
that they do not play with the appliance.

20


46mm
515mm
955mm
585mm
220mm
168mm
435mm
220mm
22mm
40mm
283mm
203mm
203mm
2000mm 2000mm
FLOOR FLOOR
65x28mm
OBBLIGATORIO
Cut back insulating material in this position to
connect the machine without power plug , or for
MOD BUS connection ( Optional )
Tagliare l'isolante posteriore della macchina in
questa posizione per allacciare la macchina alla
rete elettrica senza l'utilizzo della spina shuko ,
e per la connessione alla rete MOD BUS ( optional )

TEKNO POINT
www.teknopoint.com
tecnico@teknopoint.com
klima@teknopoint.com
 Loading...