

1
811107 811207 811208
DIGITAL ALARM CLOCK
USER MANUAL
BEFORE OPERATING THIS PRODUCT, READ, UNDERSTAND, AND FOLLOW
THESE INSTRUCTIONS. BE SURE TO SAVE THIS BOOKLET FOR FUTURE
REFERENCE.
THE EXCLAMATION POINT
WITHIN AN EQUILATERAL
TRIANGLE IS INTENDED TO
ALERT THE USER OF THE
PRESENCE OF IMPORTANT
OPERATING AND
MAINTENANCE (SERVICING)
INSTRUCTIONS IN THE
LITERATURE ACCOMPANYING
THE APPLIANCE.
The Lightning flash with
arrowhead symbol, with an
equilateral triangle is intended to
alert the user of the presence of
uninsulated dangerous voltage
within the product’s enclosure that
may be of sufficient magnitude to
constitute a risk of electric shock to
persons.
CAUTION: TO REDUCE THE RISK
OF ELECTRIC SHOCK, DO NOT
REMOVE COVER (OR BACK). NO
USER SERVICEABLE PARTS
INSIDE. REFER SERVICING TO
QUALIFIED SERVICE
PERSONNEL.
CAUTION: TO PREVENT ELECTRIC SHOCK, MATCH WIDE BLADE OF PLUG. TO WIDE
SLOT, FULLY INSERT.
WARNING: TO REDUCE THE RISK OF FIRE OR ELECTRIC SHOCK, DO NOT EXPOSE THE
APPLIANCE TO RAIN OR MOISTURE.
2
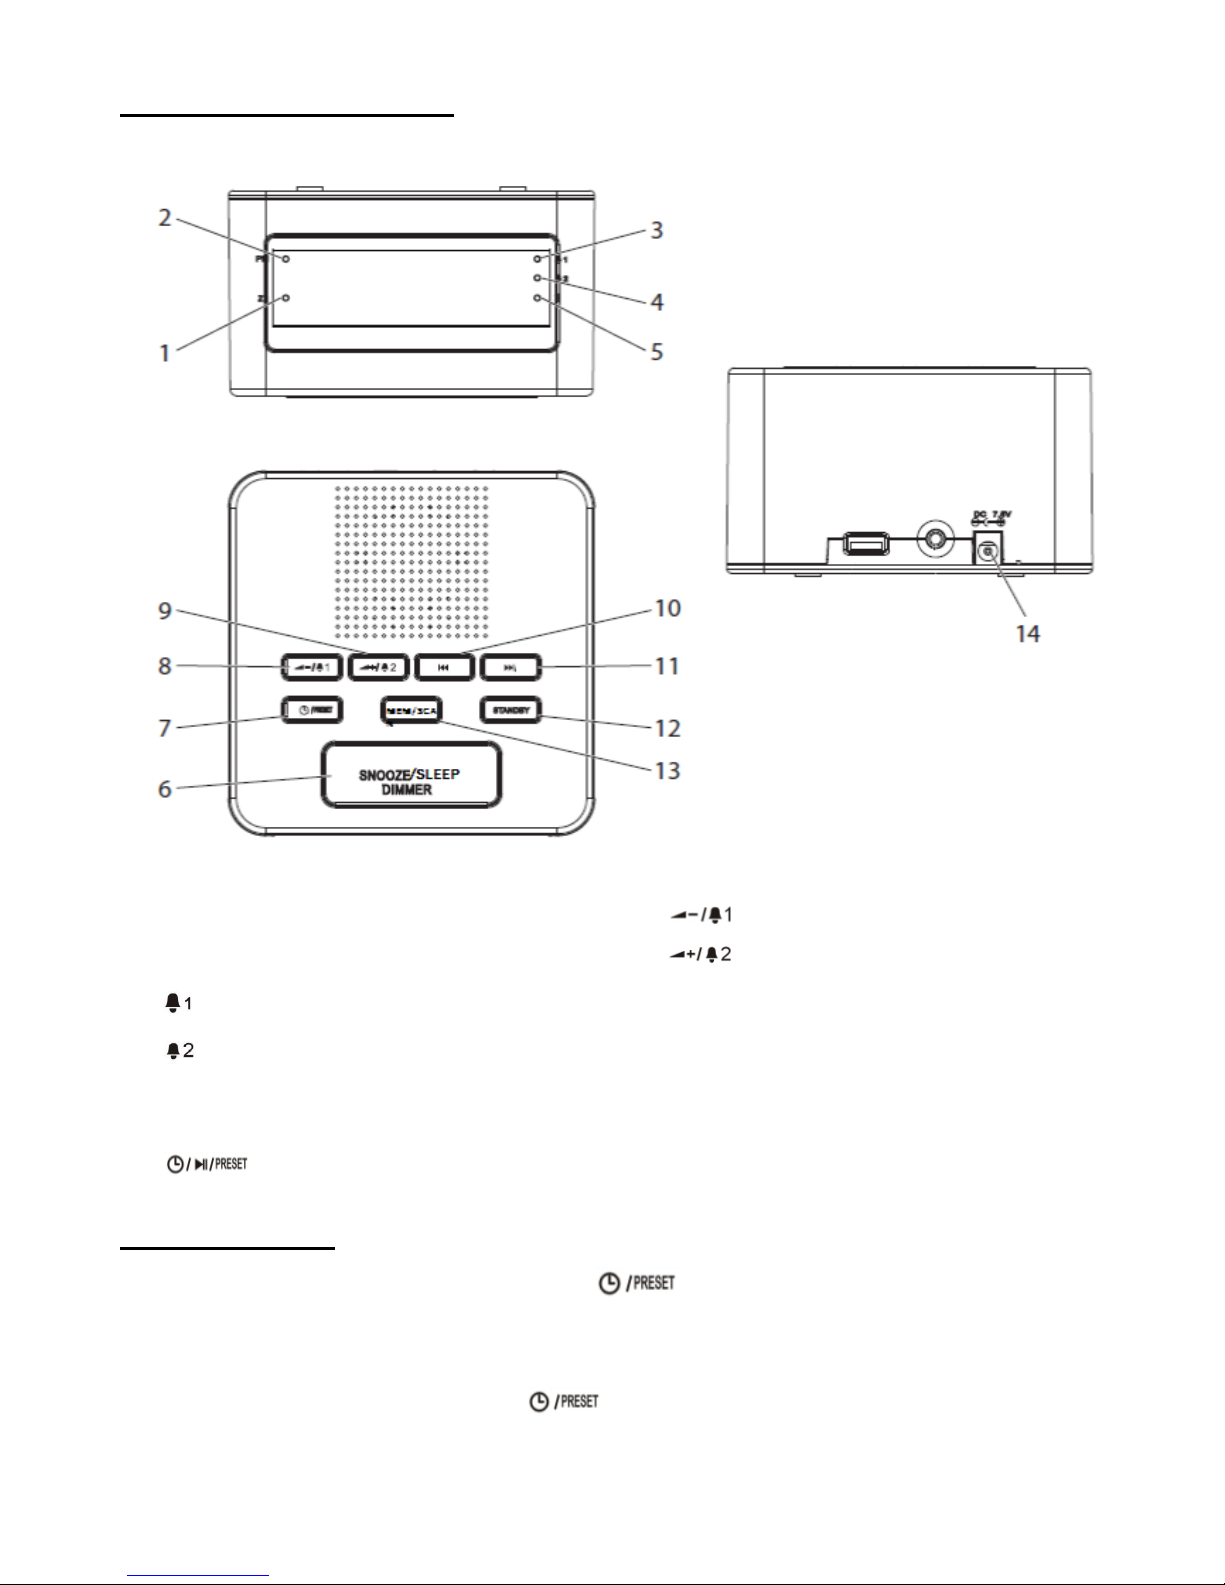
LOCATION OF CONTROLS
1. Zz LED indicator
2. PM LED indicator
3. LED indicator
4. LED indicator
5. FM LED indicator
6. SNOOZE/DIMMER button
7. button
8. button
9. button
10. │◄ ◄ button
11. ►►│ button
12. STANDBY button
13. MEM/SCAN button
14. DC Jack
CLOCK SETTING
1. In STANDBY OFF mode, press and hold the Button, the LED will blink on the display.
2. Press │◄ ◄ Button to set the desired hour.
3. Press ►►│ button to set the desired minute.
4. After the desired time has set, press button to confirm.
3
ALARM 1 SETTING
1. Keep the unit in STANDBY OFF mode.
2. Press and hold the button, indicator and LED will blink on the display.
3. Press │◄ ◄ button to set the desired alarm hour.
4. Press ►►│ button to set the desired alarm minute.
5. Press button again, then press the │◄ ◄ button or the ►►│ button to choose the
alarm sound (Buzzer/FM).
6. Then press the button to confirm, the indicator will light up.
ALARM 2 SETTING
Process is the same as Alarm 1 setting. But press the button instead of button.
SNOOZE FUNCTION
If you want to snooze a few more minutes, pressing the SNOOZE button will deactivate the alarm
sound for 9 minutes.
SHUT OFF ALARM
1. When alarm goes on, press the STANDBY button to turn off alarm. The alarm will reset for
next day (24 hours later).
2. To turn off the alarm completely (not reset for next day), press the or button
repeatedly until the / indicators disappear.
DIMMER FUNCTION
In normal status (not in alarm status), press and hold the SNOOZE/DIMMER button to set the
brightness level of the LED segments as desired.
RADIO OPERATION
1. Press STANDBY button to turn on the unit.
2. Press the FUNC button repeatedly until the FM frequency will appear on the display.
3. To search for the previous/next available radio station, press and hold the │◄ ◄ or ►►│
buttons until the displayed frequency starts running, then release the button. (When a radio
station is found, the frequency on display will stop running and start playback automatically).
To stop during searching, press the │◄ ◄ or ►►│ button again. (If reception is not good,
press the │◄ ◄ or ►►│ button repeatedly to fine tune).
4. Adjust the volume to the desired level by pressing or button
5. When finished listening, press the STANDBY button to turn the unit to off (standby) mode.

4
RADIO STATIONS PRESETTING & RECALL MEMORY
1. This works under the radio operation procedure previously explained.
2. Press & hold the MEM/SCAN button, “P XX” will blink on the display. Press the │◄ ◄ or
►►│ button repeatedly to select the program number (P01-P20) you want stored to. Then
press the MEM/SCAN button again to store it.
3. Repeat the same procedures until all the desired radio stations were stored into the program
list.
4. After settings, press the button to select 1 to 20 stored radio station as desired.
NOTE: As stored frequencies can only be stored for long time with the power supplying. The
station you stored will be lost and cannot be recalled in case that you cut off the power.
WARRANTY
This product is covered by our warranty of one year. For implementation of the warranty or after
sales service, you should contact your dealer with your proof of purchase. Our warranty covers
defects in materials or assembly due to the manufacturer with the exception of any damage from
non-compliance with instructions for use or tampering with the product (such as dismantling,
exposure to heat or humidity).
Note: please keep this manual, it contains important information.
MADE IN RPC
©2014 TEKNOFUN ALL RIGHTS RESERVED
©2014 MADCOW ENTERTAINMENT FRANCE ALL RIGHTS RESERVED
WWW.TEKNOFUN-ENTERTAINMENT.COM

5
811107 811207 811208
RADIO RÉVEIL DIGITAL
GUIDE UTILISATEUR
AVANT D'UTILISER CE PRODUIT VEUILLEZ LIRE LES INSTRUCTIONS
CI-DESSOUS. VEILLEZ A ENREGISTRER CETTE BROCHURE POUR
REFERENCE FUTURE.
Le symbole de l'éclair fléché dans
un triangle équilatéral est destiné à
alerter l'utilisateur de la présence
de tension dangereuse et non isolé
dans l'enceinte du produit qui peut
être d'une ampleur suffisante pour
constituer un risque
d'électrocution.
ATTENTION
RISQUE D’ELECTROCUTION
NE PAS OUVRIR
ATTENTION : POUR RÉDUIRE LE
RISQUE DE CHOC ÉLECTRIQUE,
NE PAS RETIRER LE COUVERCLE
(OU LE PANNEAU ARRIÈRE).
AUCUNE PIÈCE RÉPARABLE PAR
L'UTILISATEUR. CONFIEZ
L'ENTRETIEN À UN PERSONNEL
QUALIFIÉ.
LE POINT D'EXCLAMATION
DANS UN TRIANGLE
ÉQUILATÉRAL EST DESTINÉ À
ALERTER L'UTILISATEUR DE LA
PRÉSENCE D'INSTRUCTIONS
D'EMPLOI ET D'ENTRETIEN
IMPORTANTES DANS LA
DOCUMENTATION
ACCOMPAGNANT L'APPAREIL.
ATTENTION : POUR EVITER LES RISQUE D’ELECTROCUTION, ASSUREZ VOUS QUE LE
CABLE ELECTRIQUE EST BIEN BRANCHÉ A LA PRISE MURALE.
ATTENTION : POUR EVITER LES RISQUES DE FEU OU DE CHOCS ELECTRIQUES, NE PAS
EXPOSER L’APPAREIL A LA PLUIE OU A L’HUMIDITE.

6
COMPOSANTS DE L’APPAREIL
1. Indicateur Zz LED
2. Indicateur PM LED
3. Indicateur LED
4. Indicateur LED
5. Indicateur LED FM
6. Bouton SNOOZE/DIMMER
7. Bouton
8. Bouton
9. Bouton
10. Bouton │◄ ◄
11. Bouton ►►│
12. Bouton STANDBY (mise en veille)
13. Bouton MEM/SCAN
14. Prise Jack
RÉGLAGE DU RADIO RÉVEIL
1. En mode STANDBY OFF (mise en veille éteint), appuyez sur la touche , l’indicateur
LED se met à clignoter sur l'afficheur.
2. Appuyez sur le bouton │◄ ◄ pour régler l' heure.
3. Appuyez sur bouton ►►│ pour régler les minutes.
4. Une fois que l’heure souhaitée est réglée, appuyez sur le bouton pour confirmer.

7
RÉGLAGE DE L'ALARME 1
1. Gardez le radio réveil en mode STANDBY OFF (mise en veille éteint).
2. Appuyez et maintenez le bouton , l’indicateur LED clignote sur l'affichage.
3. Appuyez sur le bouton │◄◄ pour régler l'heure d’alarme souhaitée.
4. Appuyez sur bouton ►►│ pour régler les minutes d’alarme souhaitées.
5. Appuyez de nouveau sur le bouton , puis appuyez sur le bouton ◄ ◄│ ou le bouton
►►│ pour choisir le son de l'alarme (Buzzer/FM).
6. Appuyez sur le bouton pour confirmer, l’indicateur LED s'allume.
RÉGLAGE DE L'ALARME 2
Même processus que l'alarme 1. Mais cette fois-ci, appuyez sur le bouton au lieu du
bouton .
FONCTION DE RAPPEL D’ALARME (SNOOZE)
Si vous souhaitez décaler l’alarme quelques minutes plus tard appuyez sur le bouton SNOOZE, il
désactivera le son de l'alarme pendant 9 minutes.
DÉSACTIVER L'ALARME
1. Lorsque l'alarme se déclenche, appuyez sur le bouton STANDBY (mise en veille) pour
éteindre l'alarme. L'alarme est réinitialisée pour le jour suivant (24 heures plus tard).
2. Pour désactiver complètement l'alarme (ne pas réinitialiser pour le jour suivant), appuyez sur
le bouton ou plusieurs fois jusqu'à ce que les indicateurs /
disparaissent.
FONCTION DIMMER (Réglage éclairage)
En condition normale (pas en état d'alarme), appuyez et maintenez enfoncé le bouton
SNOOZE/DIMMER pour régler le niveau de luminosité des éclairages LED comme désiré.
FONCTIONNEMENT DE LA RADIO
1. Appuyez sur le bouton STANDBY pour allumer le radio réveil.
2. Appuyez sur le bouton FUNC plusieurs fois jusqu'à ce que la fréquence FM apparaisse sur
l'affichage.
3. Pour rechercher la station radio suivante/précédente disponible, appuyez et maintenez
enfoncé le bouton │◄ ◄ ou ►►│ jusqu'à ce que la fréquence affichée commence à
fonctionner, puis relâchez le bouton. (Lorsqu'une station de radio est trouvée, la fréquence
de l'affichage s'arrête et démarre la lecture automatiquement). Pour arrêter une recherche

8
en cours, appuyez à nouveau sur les boutons ◄ │◄ ou ►►│. (Si la réception n'est pas
bonne, appuyez sur la touche ◄ │◄ ou ►►│ plusieurs fois pour affiner le réglage).
4. Réglez le volume au niveau souhaité en appuyant sur les boutons ou .
5. Lorsque vous avez terminé, appuyez sur le bouton STANDBY pour mettre l'appareil en
mode mise en veille.
STATIONS DE RADIO PREREGLEES & RAPPEL DE MÉMOIRE
1. Cela fonctionne sur le mode radio (procédure de fonctionnement expliqué précédemment).
2. Appuyez sur & maintenez le bouton MEM/SCAN, "P XX" clignote sur l'affichage. Appuyez
sur la touche ◄ │◄ ou ►►│ plusieurs fois pour sélectionner le numéro de programme
(P01-P20) que vous voulez stocker. Appuyez ensuite sur le bouton MEM/SCAN à nouveau
pour le mémoriser.
3. Répétez la même procédure jusqu'à ce que toutes les stations de radio souhaitées soient
stockées dans la liste des programmes.
4. Après les réglages, appuyez sur le bouton pour sélectionner 1 à 20 stations de radio
stockées comme désiré.
REMARQUE: Les fréquences enregistrées peuvent uniquement être stockées pour longtemps
avec l'approvisionnement d’énergie. Les stations de radio que vous avez enregistré seront
perdues et ne pourront pas être utilisées dans le cas où vous coupez l’alimentation.
GARANTIE
Ce produit est couvert par notre garantie d’un an. Pour toute mise en œuvre de la garantie ou du
service après-vente, vous devez vous adresser à votre revendeur muni de votre preuve d’achat.
Notre garantie couvre les défauts de matériaux ou d’assemblage causées par le fabricant à
l’exclusion de toute détérioration provenant de non-respect de la notice d’utilisation ou toute
intervention intempestive sur le produit (telle que démontage, exposition à la chaleur ou à
l’humidité).
Note : veuillez garder ce mode d’emploi, il contient d’importantes informations.
FABRIQUE EN RPC
© 2014 TEKNOFUN TOUS DROITS RÉSERVÉS
© 2014 MADCOW ENTERTAINMENT FRANCE TOUS DROITS RÉSERVÉS
WWW.TEKNOFUN-ENTERTAINMENT.COM
 Loading...