

Page 1

DAB-109F
Owner’s
Handbook
DAB Digital Radio with dual alarms
Page 2

Page 3

IMPORTANT SAFETY INFORMATION
CAUTION!
RISK OF ELECTRIC SHOCK
DO NOT OPEN
TO REDUCE THE RISK OF ELECTRIC SHOCK
DO NOT REMOVE COVER (OR BACK)
This symbol indicates that there are important operating and maintenance instructions
in the literature accompanying this unit.
This symbol indicates that dangerous voltage
constituting a risk of electric shock is present
within this unit.
Read these instructions.
Keep these instructions.
Heed all warnings.
Follow all instructions.
Do not use this apparatus near water.
Clean only with a slightly damp cloth.
Do not block any ventilation openings.
Install in accordance with the manufacturer’s
instructions.
Do not install or operate near any heat sources such
as radiators, stoves, or other apparatus that produce
heat.
Unplug this apparatus during lightning storms or when
unused for long periods of time.
Refer all servicing to qualied ser vice personnel.
Servicing is required when the apparatus has been
damaged in any way, such as the power-supply cord
or plug is damaged, liquid has been spilled or objects
have fallen into the apparatus, the apparatus has been
exposed to rain or moisture, does not operate normally,
or has been dropped.
Warning: To reduce the risk of re or electrical shock,
do not expose this product to rain or moisture. The
product must not be exposed to dripping and splashing
and no object lled with liquids such as a vase of
owers should be placed on the product.
No naked ame sources such as candles should be
placed on the product.
Caution: Changes or modications not expressly
approved by the manufacturer could void the user’s
authority to operate this device.
Caution: Usage of controls or adjustments or
performance of procedures other than those specied
herein may result in hazardous exposure.
IMPORTANT
This equipment generates, uses and can radiate radio
frequency energy and, if not installed and used in
accordance with the instructions, may cause harmful
interference to radio communication. However, this
is no guarantee that interference will not occur in a
particular installation. If this equipment does cause
harmful interference to radio or television reception,
which can be determined by turning the equipment
o and on, the user is encouraged to try to correct the
interference by one of the following measures:
- Reorient or relocate the receiving antenna.
- Increase the separation between the equipment
and receiver.
- Connect the equipment into an outlet on a
circuit dierent from that to which the receiver is
connected.
- Consult the dealer or an experienced radio/TV
technician for help.
ELECTRICAL INFORMATION
Mains Supply: The mains operating voltage of this unit
is marked on a rating plate on the rear of the unit.
The means of disconnecting this appliance from
the mains supply is the mains plug. This should be
unobstructed and readily operable at all times.
1
Page 4

INDEX
INDEX
Introduction ............................................................2
Unpacking ...............................................................2
Controls & connections ............................................ 3
Display features .......................................................5
Fitting batteries .......................................................5
AC mains operation .................................................6
Battery operation ....................................................6
Getting started ........................................................6
Station tuning .........................................................7
FM reception ............................................................7
Presets ..................................................................... 7
Alarm functions .......................................................8
Sleep mode..............................................................9
Scanning ................................................................. 9
Manual tuning ......................................................... 9
Display modes .......................................................10
Headphones ..........................................................11
System reset .......................................................... 11
Care & Maintenance...............................................11
Specications ........................................................11
Warranty ...............................................................11
Introduction
DAB (Digital Audio Broadcasting) technology allows many
more radio stations compared to FM. DAB transmissions do
away with problems of hiss and fade that plague AM and
FM broadcasts and are less likely to be aected by adverse
weather conditions or other sources of interference. In
addition to speech and music DAB transmissions carry high
levels of data - far greater than the limited RDS information
available on FM stations.
Unlike FM, DAB is broadcast on many frequencies. Many
countries in Europe, including the UK use Band III (174-230
MHz); others, France for example, use the L-Band (14521492 MHz). Germany uses both bands.
Your radio can tune Band III. Countries in Europe that use
Band III include: Belgium, Denmark, Holland, Italy, Norway,
Portugal, Spain, Sweden, Switzerland. Your radio will tune
stations in all these countries.
Your radio cannot receive French or German stations
broadcasting in the L-Band though FM services are available
all over Europe.
Being digital, DAB transmissions can have a wider frequency
range and greater dynamics than that available with FM
technology.
FM reception is available on the DAB-109 for use in those
locations where there is no usable DAB service.
A headphone output is provided for personal listening.
PRELIMINARIES INTRODUCTION
UNPACKING
Carefully unpack the unit. If it is damaged, please return it to
your nearest Tesco store for replacement. Remember to take
your purchase receipt with you.
Retain the User Handbook. If you pass the unit on to a third
party make sure you pass on the handbook.
We suggest you retain the packaging. If you dispose of it, do
so having regard to any recycling regulations in your area.
CONTENTS
The carton should contain:
The DAB-109F digital radio•
Power cord•
Operating Manual•
If any items are missing or damaged, contact your nearest
TESCO store for a replacement. Have your receipt ready when
you call. Retain the packaging. If you dispose of it, do so
having regard to any recycling regulations in your area.
LOCATION
Place the unit on dry stable surface away from heat and
damp and where it is unlikely to fall or be knocked over.
2
Page 5
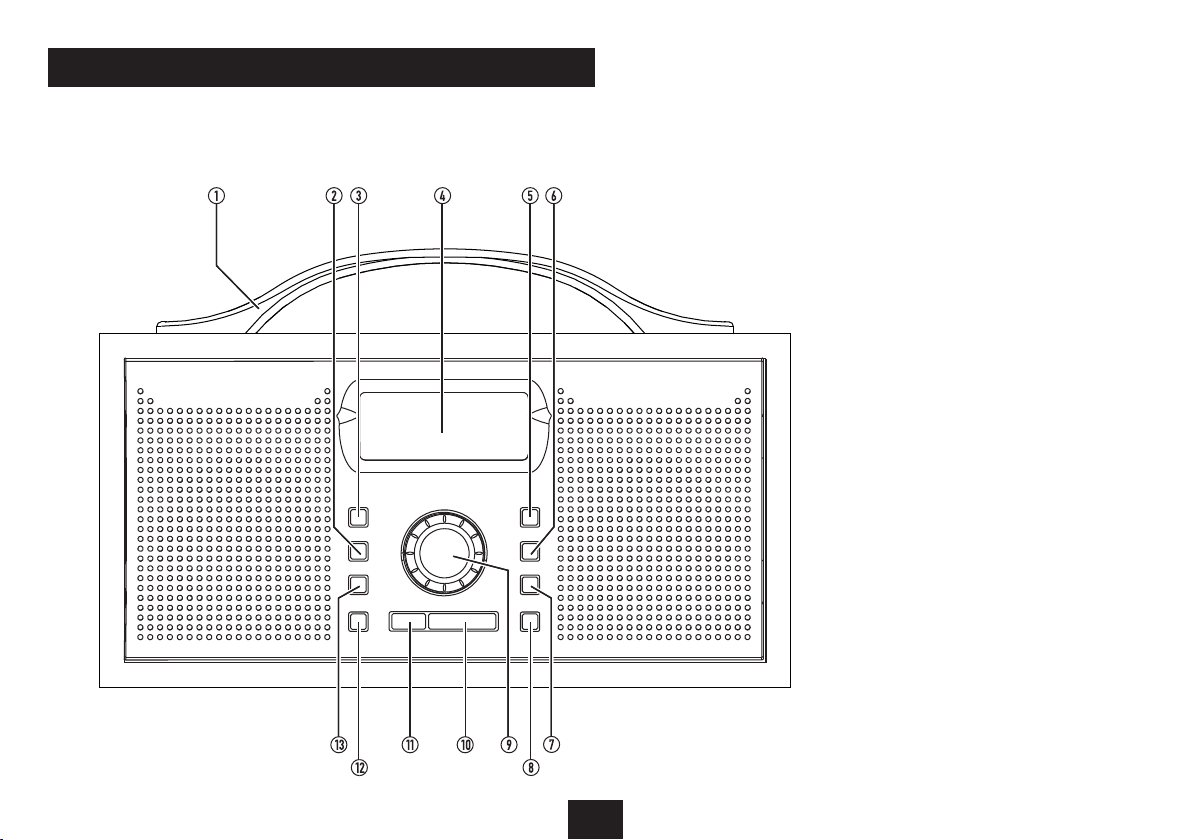
CONTROLS AND CONNECTORS
FRONT VIEW
a Handle
b Presets button
c Jog mode/Select button
d Display
e Alarm 1 button
f Alarm 2 button
g Sleep button
h Info button
i Volume/Select knob
1) Snooze button
1! Standby/On button
1@ DAB/FM button
1# Menu button
3
Page 6
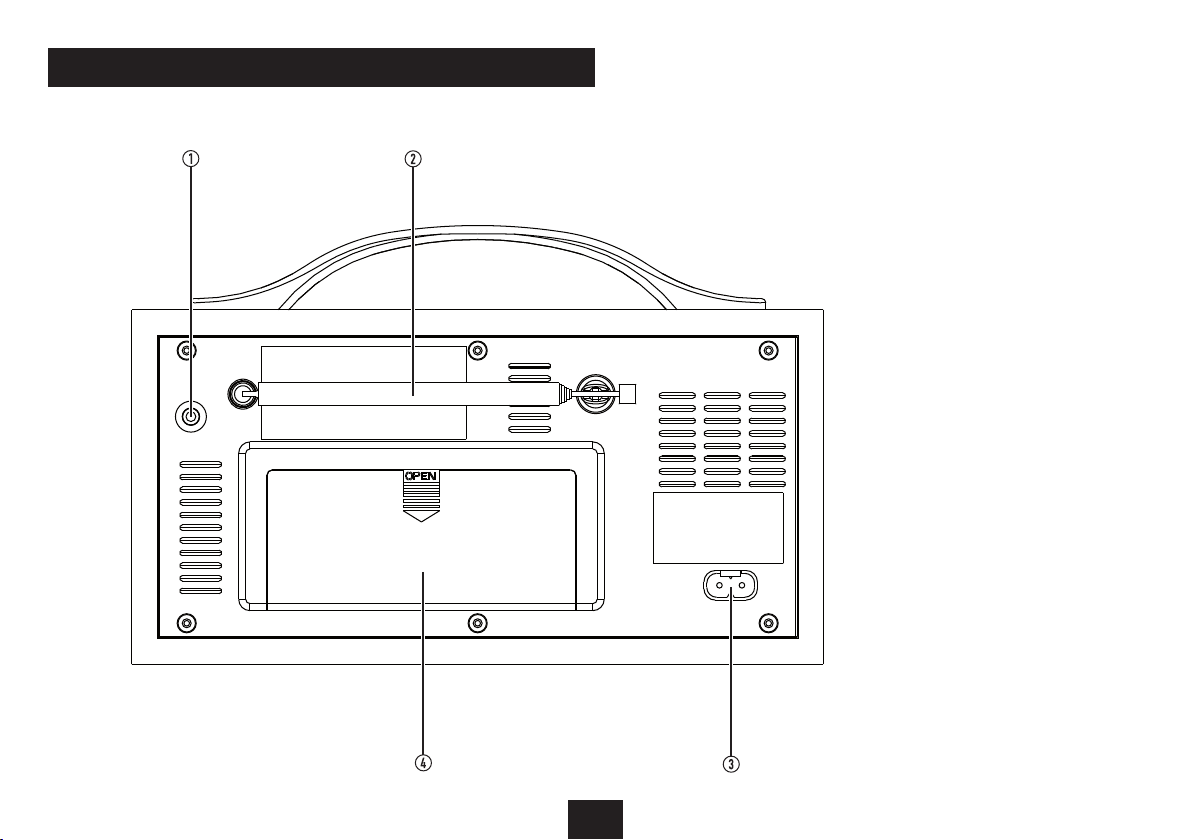
CONTROLS AND CONNECTORS
BACK VIEW
a b
a Headphone jack
b DAB/FM aerial
c AC Inlet
d Battery compartment
d
c
4
4
Page 7
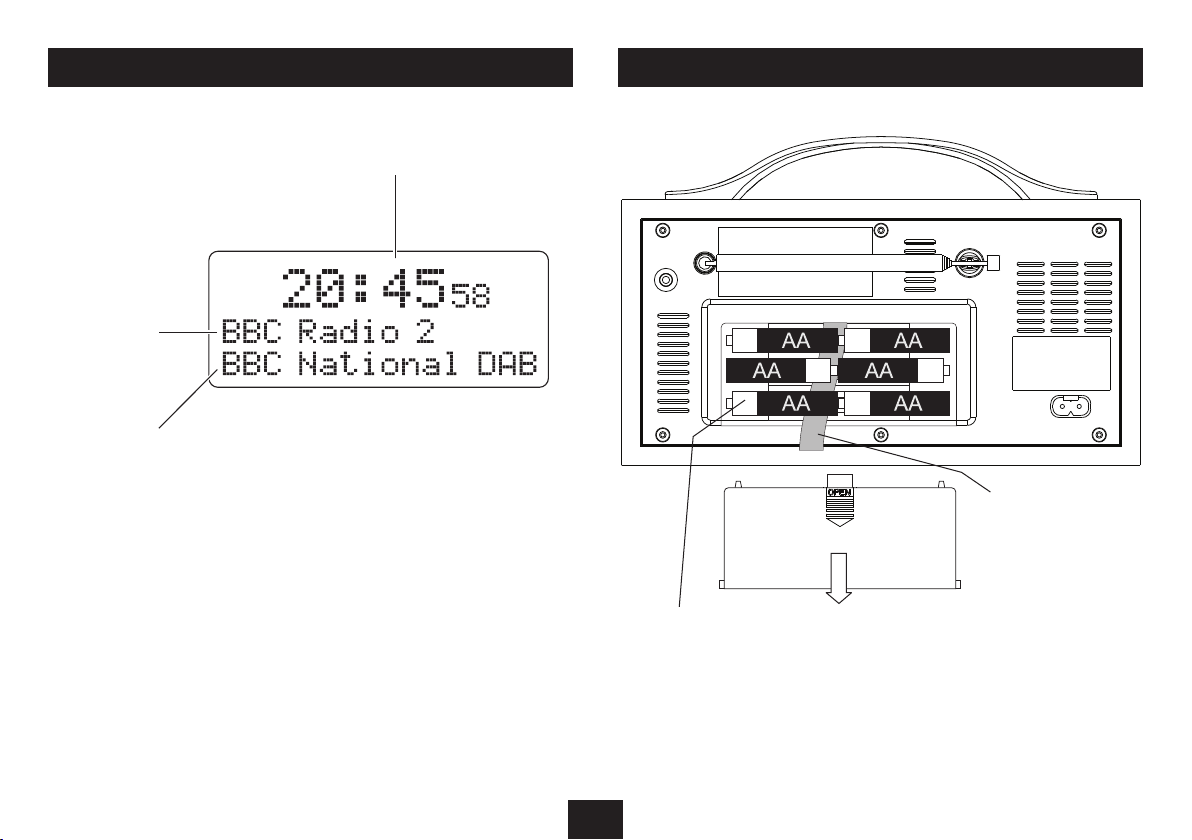
DISPLAY FEATURES FITTING BATTERIES
Time display
Station/fre quenc y
display
Information display
b Lay the ribbon across the
battery compartment (this
will assist with removing the
batteries when exhausted).
c Fit 6 x AA batteries,
observing polarity
as shown.
5
a Slide the battery cover o in
the direction indicated
d Slide the battery cover back
into position on the radio.
Page 8

AC MAINS OPERATION
BATTERY OPERATION GETTING STARTED
CONNECTING POWER
Check that the mains voltage marked on the rating plate •
on the back panel is the same as the voltage in your
area.
Plug the AC power cord into the AC inlet•
Plug the mains plug into the wall socket and switch the •
mains power on.
STANDBY CONTROL
To turn the radio on:
Press the • STANDBY/ON button.
The display will light and the radio will tune to the last station
used. If the power has been disconnected, the clock will set.
To turn the power o:
Press the • STANDBY/ON button.
The radio and display light will switch o. The clock will
continue to run whilst mains power is connected.
LOW POWER STANDBY
If preferred, you can change the standard Standby mode to
‘Low Power’ standby. In Low Power Standby mode the power
consumption of your radio will be reduced to less than 1W
when set to Standby.
NOTE:- When Low Power Standby mode is set the display will
switch o completely when set to Standby and Alarm and
Sleep functions are disabled.
To change to low-power Standby mode:
Press the • STANDBY/ON button for at least ve
seconds.
To return to normal Standby mode:
Press the • STANDBY/ON button for at least ve
seconds.
FITTING BATTERIES
Referring to the diagram on the previous page, t 6 x AA
batteries into the battery compartment. Alkaline batteries
are recommended for best performance.
POWER CONTROL
To turn the radio on:
Press the • STANDBY/ON button.
The display will light, the radio will tune to the last station
used, and the clock will set.
To turn the power o:
Press the • STANDBY/ON button.
The radio and display will switch o.
NOTE:- The STANDBY/ON button functions as a Power On/
O button during battery operation - the display will switch
o completely when set to Standby and Alarm and Sleep
functions are disabled.
BATTERY DISPOSAL
Dispose of used batteries with regard to the recycling
regulations in your area. Do NOT short circuit batteries or
throw them into water, the general rubbish or in a re.
Weak batteries can leak and damage the remote control.
Replace them in good time!
DAB/FM AERIAL
Before using your radio for DAB or FM reception, always
unclip and fully extend the aerial. The aerial has a rotating
base to enable adjustment for maximum signal strength.
SETTING THE CLOCK
The clock on your radio is automatically set when rst used
from the time signal broadcast with DAB radio stations.
The clock is not set by the user.
INITIAL SCAN
When your radio is used for the rst time:
The radio scans all usable stations (full scan) and stores them
alphanumerically -1 Radio, 2 Radio, AA Radio, AB Radio...
The initial scan will take a few minutes. After the scan, the
number of stations found will be displayed, the clock will be
set, the radio will display the rst station in the sequence and
begin playing at the default system volume of 10.
Note: If no stations are found after the scan, ‘0 Services Found’,
then ‘Service N/A’ will be displayed. If this happens, switch
the radio o and move it to a location with a stronger signal.
When you switch the radio back on it will automatically
repeat the scan process.
ADJUSTING THE VOLUME
To increase the volume:
Turn the • VOLUME/SELECT knob clockwise.
To decrease the volume:
Turn the • VOLUME/SELECT knob anti-clockwise.
6
Page 9

SELECTING A DAB STATION
FM RECEPTION STATION PRESETS
The stations are stored in an alphanumeric list.
To select another station
Press the • JOG MODE/SELECT button to switch to tuning
mode.
‘Station List’ appears on the display.
Turn the • VOLUME/SELECT knob to browse through the
list of station names on the display.
When you nd the station name you want to listen to, •
press the JOG MODE/SELECT button.
Your radio can also receive FM band radio stations.
To change to the FM band
Press the • DAB/FM button.
To auto-tune to FM stations
Press and • hold the JOG MODE/SELECT button to tune to
the next station in the band.
Searching... will appear on the display and the radio will start
to search. Tuning will stop automatically when the station is
reached.
To manually tune to FM stations
Press the • JOG MODE/SELECT button briey to select
manual FM tuning mode.
<TUNING> appears on the display.
Turn the • VOLUME/SELECT knob to tune manually up or
down the band and search for a station.
STEREO/MONO RECEPTION
You can set your radio to switch automatically between stereo
and mono FM reception (AUTO mode) or to receive in mono
only (MONO mode). Setting to mono mode may improve
sound quality in areas where a weak aerial signal results in
a high level of background noise.
To switch between FM AUTO and MONO modes
Press the• MENU button.
The legend ‘Auto’ or ‘Mono’ will be displayed to indicate which
mode is set.
DAB and FM presets
Your radio can store up to 10 of your favourite stations as
presets on both the DAB and FM bands for quick recall.
To store a preset
Tune to the station you want to store as a preset.•
Press and • hold the PRESETS button.
A preset number will be displayed on the bottom line of the
display.
To choose a preset location to store your station, turn •
the VOLUME/SELECT knob to nd your preferred preset
number, then press the JOG MODE/SELECT button.
When you store a preset, the display will read ‘PRESET SAVED’
to conrm the number you selected.
NOTE: You can choose a preset number that is already in use.
The new station details will over-write the stored station.
To recall a preset
Press the • PRESETS button.
Turn the• VOLUME/SELECT knob to nd the preset
number you want.
When you nd the preset station you want, stop •
browsing the preset list and the radio will tune to the
selected station.
NOTE:- Your radio may have been pre-programmed with a
selection of DAB station presets. If so, these stations will be
listed on a label xed to the front panel.
7
Page 10
ALARM FUNCTIONS
Your radio includes a dual alarm function. The two alarms,
ALARM 1 and ALARM 2 can be set with dierent wake-up
times, then you can set either or both alarms to wake you. You
can also choose to be woken by a beep sound, a DAB station
preset or an FM station preset. Before using the alarms, you
must store your preferred wake-up settings.
STORING PREFERRED WAKE-UP SETTINGS:
Press and • hold the ALARM 1 or ALARM 2 button to
choose the alarm you want to set.
The display will conrm which alarm (ALARM 1 or ALARM 2)
you selected. The alarm time will be shown with the hours digits
ashing.
Turn the • VOLUME SELECT control to set the hours digits.
Press the • JOG MODE/SELECT button to conrm the hours
setting.
The minutes digits will ash.
Turn the • VOLUME SELECT control to set the minutes
digits.
Press the • JOG MODE/SELECT button to conrm the
minutes setting.
The display will now show a DAB preset number .
Turn the • VOLUME/SELECT control to choose a DAB preset
station to wake to.
Press the • JOG MODE/SELECT button to conrm.
The display will now show an FM preset number .
Turn the • VOLUME/SELECT control to choose an FM preset
station to wake to.
Press the • JOG MODE/SELECT button to conrm.
The display will now show a buzzer tone number.
Turn the • VOLUME/SELECT control to choose from buzzer
tone 1 or 2 for this alarm.
Press the • JOG MODE/SELECT button to conrm.
NOTE:- Refer to the previous page (STATION PRESETS) for
information on how to store preset stations. If you choose an
unassigned ‘free’ preset number in error, the alarm will default
to the BEEP wake-up setting.
The display will now show the legend ‘VOLUME’ .
Turn the • VOLUME/SELECT control to choose your
preferred wake-up volume level.
Press the • JOG MODE/SELECT button to conrm the
wake-up volume setting.
NOTE:- Ensure that the wake-up volume settings are set at a
high enough level to wake you.
ACTIVATING THE ALARMS:
Once you have stored your preferred wake-up settings, you can
activate either or both of the alarms to wake you.
To activate your chosen alarm:
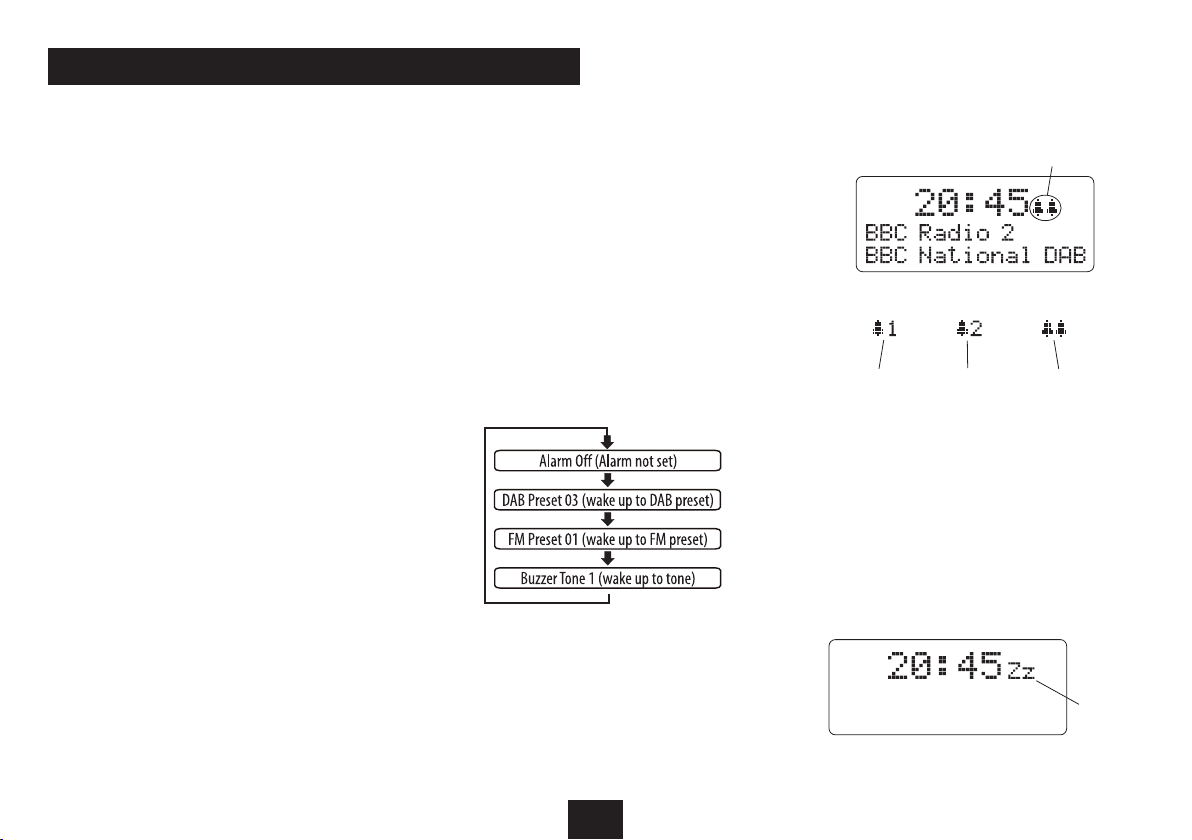
Press the • ALARM 1 or ALARM 2 button repeatedly to
cycle through the wake up options you can choose from
the list as shown below-
Set the radio to Standby before going to sleep.•
NOTE:- The above examples show DAB preset 3, FM preset 1
and Buzzer tone 1 as preferred wake-up settings.
If either of the alarms have been set to wake you, the ALARM
symbols will be displayed in the position shown below.
Alarm symbol position
The three symbols are shown below, indicating which alarm
is set.
Alarm 1 set
WHEN THE ALARM SOUNDS
The alarm will continue to sound for one hour before switching
o automatically.
To switch o the alarm before this time
Press the • ALARM 1 or ALARM 2 button to switch o the
alarm that is sounding.
To extend the alarm for a further 5 minute ‘snooze’.
Press the • SNOOZE button to switch o the alarm that is
sounding.
The alarm will switch o for a 5 minute period, and the ‘z’ symbol
will show on the display to indicate ‘snooze’ mode.
Alarm 2 set Alarms 1 & 2 set
Snooze
symbol
NOTE:- The snooze function can be selected repeatedly until
the alarm switches o after one hour.
8
Page 11
SLEEP MODE
SCANNING
MANUAL TUNING
THE SLEEP FUNCTION
The Sleep function allows you to program your radio to
switch itself o after a set period of 90, 80, 70, 60, 30 or 10
minutes.
To activate the Sleep function:
Press the • SLEEP button.
The display will show Sleep Timer 90 minutes.
Now press the • SLEEP button repeatedly until your
required sleep time appears on the display.
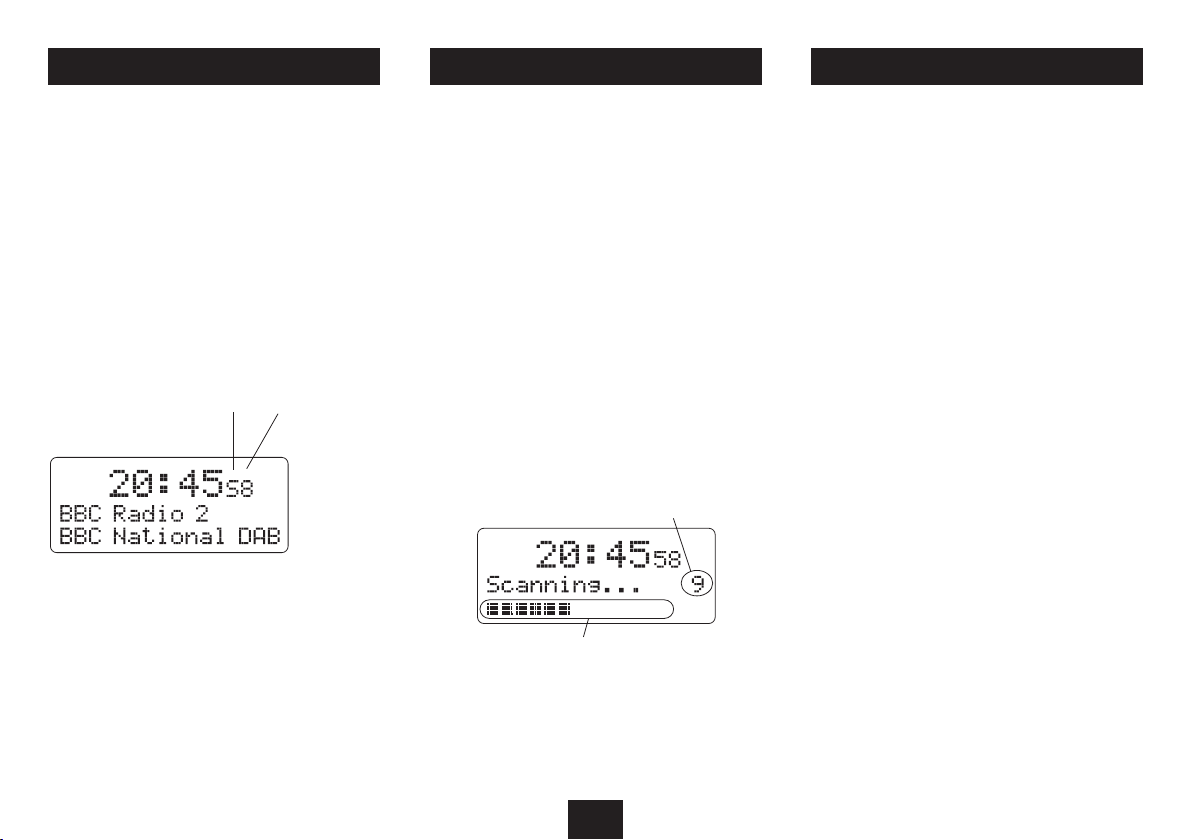
After a few seconds the Sleep display will disappear and the
‘SLEEP’ symbol will appear on the display with conrmation of
the sleep minutes you set (8=80 minutes, 6=60 minutes etc).
Sleep symbol Sleep minutes symbol
Your radio will continue to play, then will set to Standby
when the sleep time expires.
To cancel the Sleep function once set:
Press the • SLEEP button during Sleep mode.
When rst used, your radio scanned the DAB band for
available stations. The station services found were then
stored in your radio’s memory.
You can re-scan the band at any time if you move to a dierent
area or just to refresh the stored list of available stations.
Two types of scan are available, a Local Scan that scans UK
DAB bands for available services and a Full Scan, that scans
all bands.
TO START A SCAN
Switch on the radio and select the DAB band.•
Press the • MENU button briey.
The radio will now display the legend ‘Manual tune’.
Rotate the • VOLUME/SELECT knob to display your choice
of scan - Autoscan local or Autoscan full.
Press the • JOG MODE/SELECT button to start the scan.
The scanning display will be shown while the scan takes place.
Number of stations found
Progress bargraph
A bargraph shows scan progress and the number of services
found is displayed.
If preferred, you can also tune DAB stations manually.
To Manually tune:
Press the • MENU button briey.
The radio will now display the legend ‘Manual tune’.
Press the • JOG MODE/SELECT button to select manual
tuning.
Rotate the • VOLUME/SELECT knob to browse the DAB
multiplex channels.
Press the • JOG MODE/SELECT button to display
information about a multiplex channel.
If a station multiplex is located on the selected channel, the
multiplex name and frequency will be displayed above a signal
strength bargraph.
9
Page 12
DISPLAY MODES
DAB DISPLAY MODES
When playing a DAB station you can change the information
on the display by changing the display mode.
To change the display mode from the default of
Scrolling station text information:
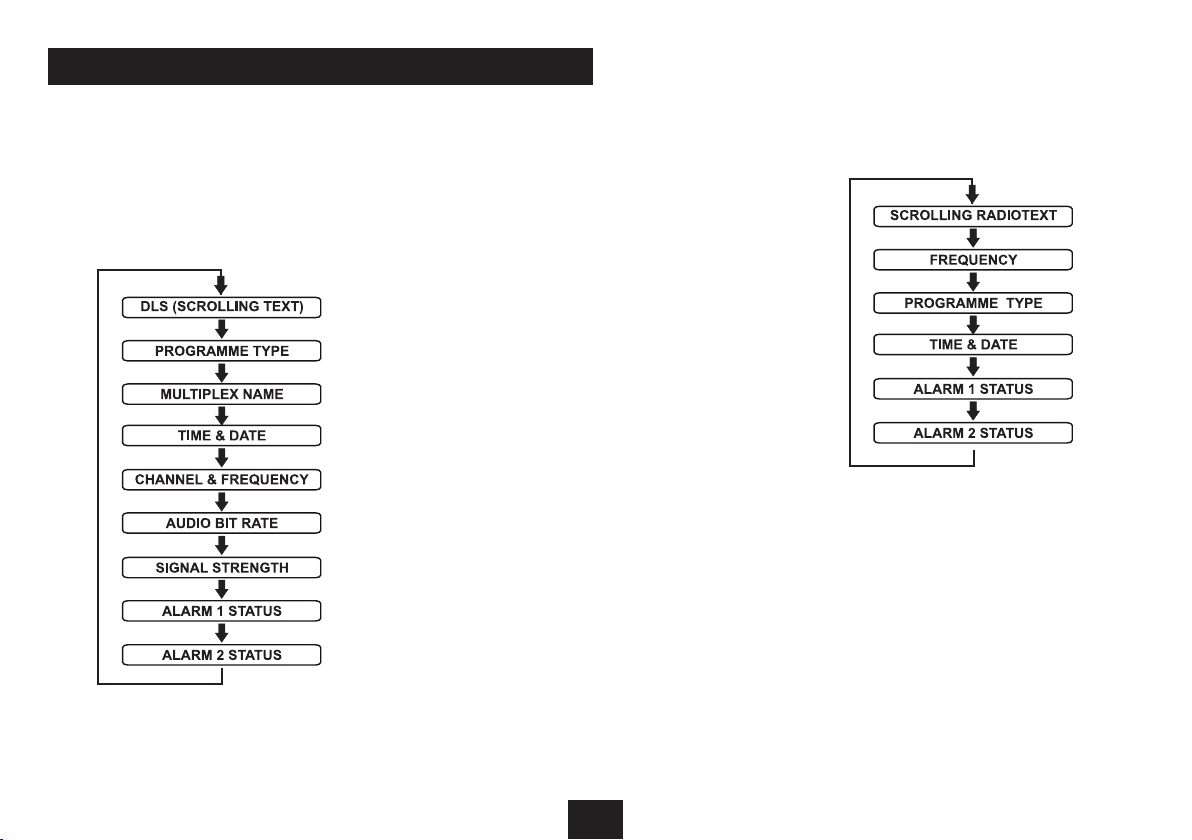
Press the • INFO button repeatedly to cycle through the
options listed in the chart below.
DLS (SCROLLING TEXT): This is a scrolling message giving
real-time information - song titles, news headlines, etc.
PROGRAMME TYPE: This describes (when available) the style
of the programme being broadcast.
MULTIPLEX NAME (GROUP NAME): is the name of the DAB
Multiplex that is currently tuned.
TIME & DATE: Shows the current time and date. Time and
date are updated by broadcasted information.
CHANNEL & FREQUENCY: The multiplex channel number and
frequency are displayed.
AUDIO BIT RATE: DAB allows broadcasters to vary the BIT RATE
(or the amount by which an audio signal can be compressed)
depending on the type of broadcast. This enables the amount
of stations on a multiplex to be maximised. Speech and News
are often broadcast at a lower Bit Rate; music needs a higher
Bit Rate for good delity.
SIGNAL STRENGTH: This bargraph indicates the quality of
the signal being received. The maximum signal strength
displayed is indicated by 8 bar segments.
In low signal areas, adjusting the aerial to increase the signal
strength indication will improve reception quality.
ALARM 1 STATUS: Briey displays the status of ALARM 1, then
returns to display scrolling text.
ALARM 2 STATUS: Displays the status of ALARM 2, then
returns to display scrolling text.
FM DISPLAY MODES
Pressing the INFO button repeatedly when in FM mode will
cycle the display through the available FM display options.
RDS (SCROLLING TEXT): This is a scrolling message giving
real-time information - song titles, news headlines, etc.
FREQUENCY: The station frequency is displayed.
PROGRAMME TYPE: This describes (when available) the style
of the programme being broadcast.
TIME & DATE: Shows the current time and date. Time and
date are updated by broadcasted information.
ALARM 1 STATUS: Briey displays the status of ALARM 1, then
returns to display scrolling text.
ALARM 2 STATUS: Displays the status of ALARM 2, then
returns to display scrolling text.
10
Page 13
HEADPHONES
SOFTWARE VERSION
SPECIFICATIONS
There is a headphone output socket on the back panel of the
radio. If headphones are connected to this socket for private
listening, the speakers will cut out automatically.
SYSTEM RESET
DAB is a terrestrial system and frequencies in dierent areas
vary. If you move the radio to another part of the country
performing a Full Scan may not be enough to re program the
radio you may need to reset the radio.
To restore the factory settings:
Press and • hold the MENU button until the display shows
‘Press SELECT to conrm reset’.
Press the • JOG MODE/SELECT button to conrm reset.
‘Restarting’ will appear on the display.
The Radio will now search the DAB broadcast stations in your
area.
After reset all settings are returned to the factory defaults
and any stored presets are erased.
You can display the version of software used in your radio.
This will only be necessary as an aid for technicians should
your radio ever need service.
To display the software version:
Press and • hold the INFO button.
The software version will appear on the display.
CARE AND MAINTENANCE
AFTER USING YOUR RADIO
Set to Standby.•
Switch the unit o at the mains and unplug it if you are •
leaving it unattended for a long period (holidays etc).
CARE AND CLEANING
All care and cleaning operations should be carried out with
the unit unplugged from the mains power.
Occasionally wipe the cabinet with a lint free duster. Never
clean the unit with liquids or solvents.
SPECIFICATIONS
Supply Voltage, AC mains : ...220-240 V~, 50Hz
Supply Voltage, Battery : ......9 V (AA/UM3 x 6)
Max. Power Consumption ....10 W
DAB: .....................................174 -240 MHz
FM: ....................................... 87.5-108 MHz
Net Weight: ..........................1.53 kg
Class II construction double insulated.
This product must not be connected to earth.
WARRANTY
Your Tesco appliance is covered by a warranty for 12 months
from the date of purchase. If a fault develops during this
period, please contact the TESCO electrical help line on 0845
456 6767. Please have your original purchase receipt with
you when you call. This warranty in no way aects your consumer rights.
UK: Waste electrical products /batteries should
not be disposed of with household waste.
Separate disposal facilities exist, for your nearest facilities. See ww w.recycle-more.co.uk or
in-store for details.
ROI: Produced after 13th August 2005. Waste
electrical products/batteries should not be disposed of with household waste. Please recycle
where facilities exist. Check with your Local Authority or retailer for recycling advice.
11
Page 14

Page 15

Page 16

Te sco Stores Ltd,
Delamare Road, Cheshunt, Herts, EN8 9SL
Technika Helpline: 0845 456 6767 (Calls cost up to 4p per minute from a BT landline, other providers may vary)
DAB-109F V0.1
 Loading...