


1
METAL DETECTOR
MODEL NO.: GC1035

2
This metal detector is a professional metal detector. As a sophisticated electronic device,
the most difficult aspects in metal detecting have been automated.
If you are fresh in using metal detector, we highly recommended you:
1. Set the sensitivity to a low level in the event of false signals. Always begin at a
reduced sensitivity level when using. After you have become familiar with the
detector, you may try it at full sensitivity.
2. This detector is for outdoor use only. Do not use indoors. Many home appliances
can emit electromagnetic wave, and will interfere with the detector. For indoor
testing, turn the sensitivity down and keep the search coil away from facilities such
as microwave ovens, computers and TVs. If your detector beeps erratically, turn off
the electronic appliances and lights, especially those with dimmer switches.
3. Read this manual. Most importantly, review the BASIC OPERATION.

3
1.TERMINOLOGY
The following terms are used throughout the manual, and are standard terminology
among detectorists.
ELIMINATION - Reference to a metal being "eliminated" means that the detector
will not emit a tone, nor light up an indicator, when a specified object passes through the
coil’s detection field.
DISCRIMINATION - When the detector emits different tones for different types of
metals, and when the detector "eliminates" certain metals, we refer to this as the
detector "discriminating" among different types of metals. Discrimination is an important
feature of professional metal detectors. Discrimination allows the user to ignore trash
and otherwise undesirable objects.
NOTCH - Notching is the elimination of an item, or range of items, within the
metallic spectrum. We “notch-out” an object, or objects, selectively.
AUTO NOTCH - It eliminates trash metals automatically and keep the detection for
most coins. AUTO NOTCH range is preset in the factory and not adjustable..
RELIC - A relic is an object of interest by reason of its age or its association with
the past. Many relics are made of iron, but can also be made of bronze or precious
metals.
IRON - Iron is a common, low-grade metal that is an undesirable target in certain
metal detecting applications. Examples of undesirable iron objects are old cans, pipes,
bolts, and nails. Sometimes, the desired target is made of iron. Property markers, for
instance, contain iron. Valuable relics can also be composed of iron; cannon balls, old
armaments, and parts of old structures and vehicles can also be composed of iron.
FERROUS - Metals which are made of, or contain, iron.
GND TRAC - Ground Track is the process of finding the exact location of a buried
object. Long-buried metals can appear exactly like the surrounding soil, and can
therefore be very hard to isolate from the soil
PULL-TABS - Discarded pull-tabs from beverage containers are the most
bothersome trash items for treasure hunters. They come in many different shapes and
sizes. Pull-tabs can be eliminated from detection, but some other valuable objects can
have a magnetic signature similar to pull-tabs, and will also be eliminated when
discriminating out pull-tabs.
GND BAL - Ground Balancing is the ability of the detector to ignore, or "see
through," the earth’s naturally occurring minerals, eliminates false signals from severe
ground conditions, and only sound a tone when a metal object is detected.
SURF ELIM - Surface Elimination can improve the accuracy of detection result in
soil with mass trash metal. It restrains the signal from trash metal in soil surface layer,
and balance the signal from large target.
4
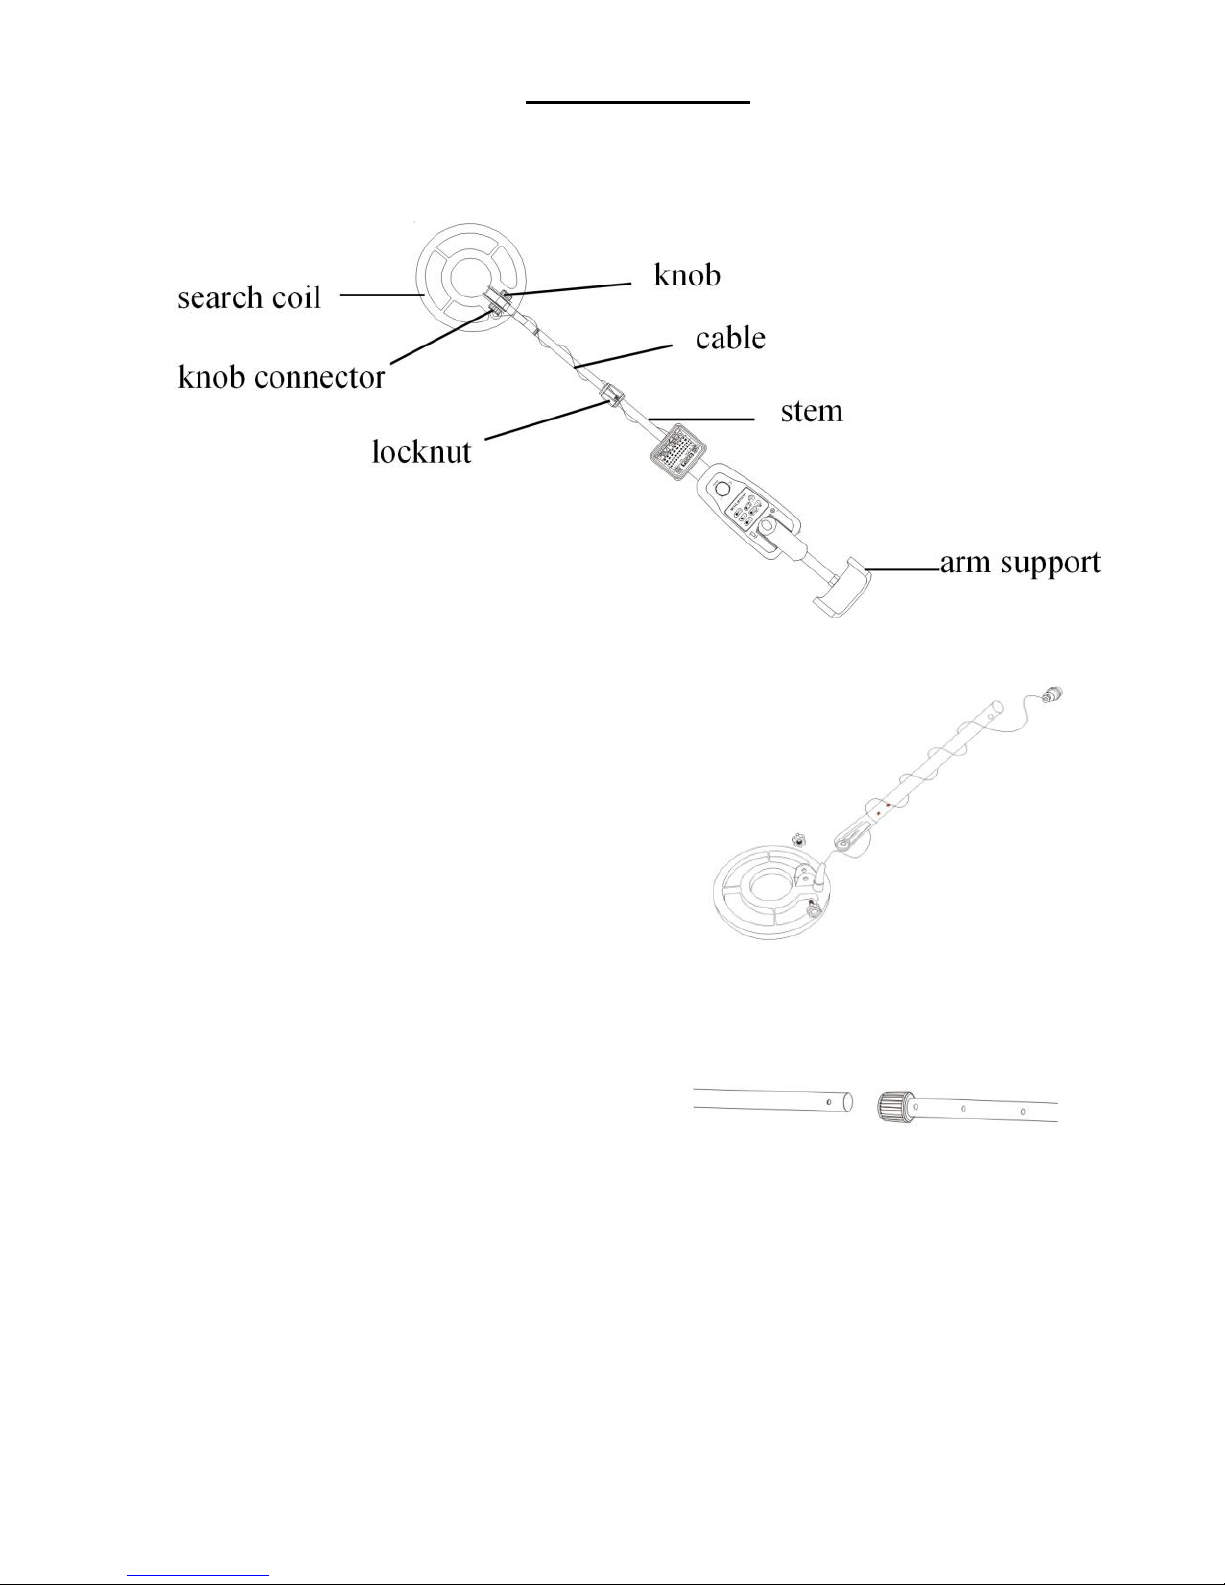
2.ASSEMBLY
2.1 ASSSEMBLY
Assembly is easy and requires no tools:
1. Open the packing, and take out all parts.
2. Join the search coil and the lower
stem (fiberglass-made, in black
color),then tighten the bolt.
3. Press the silver button on the upper
end of the lower stem, and slide the
lower stem into the upper stem.
Adjust the stem to a length that you
feel comfortable when you stand upright with the detector in your hand, and the
search coil is level with the ground with your arm relaxed at your side. Then
counter-clockwise rotate to tighten the
lock cam.
4. Wind the search coil cable around the
stem. Insert the search coil’s plug into
the search coil jack on the detector’s control housing.
Caution:
Do not over-tighten the search coil or use tools such as pliers to tighten it.
The search coil’s plug fits into the connector only in one way. Do not force the plug
and also do not pull on the cable or you could damage it.
5. Assembly of the arm support: Insert the aluminum stem on the arm support into the
stem at the end of the main box and tighten the fixing screw properly.
5
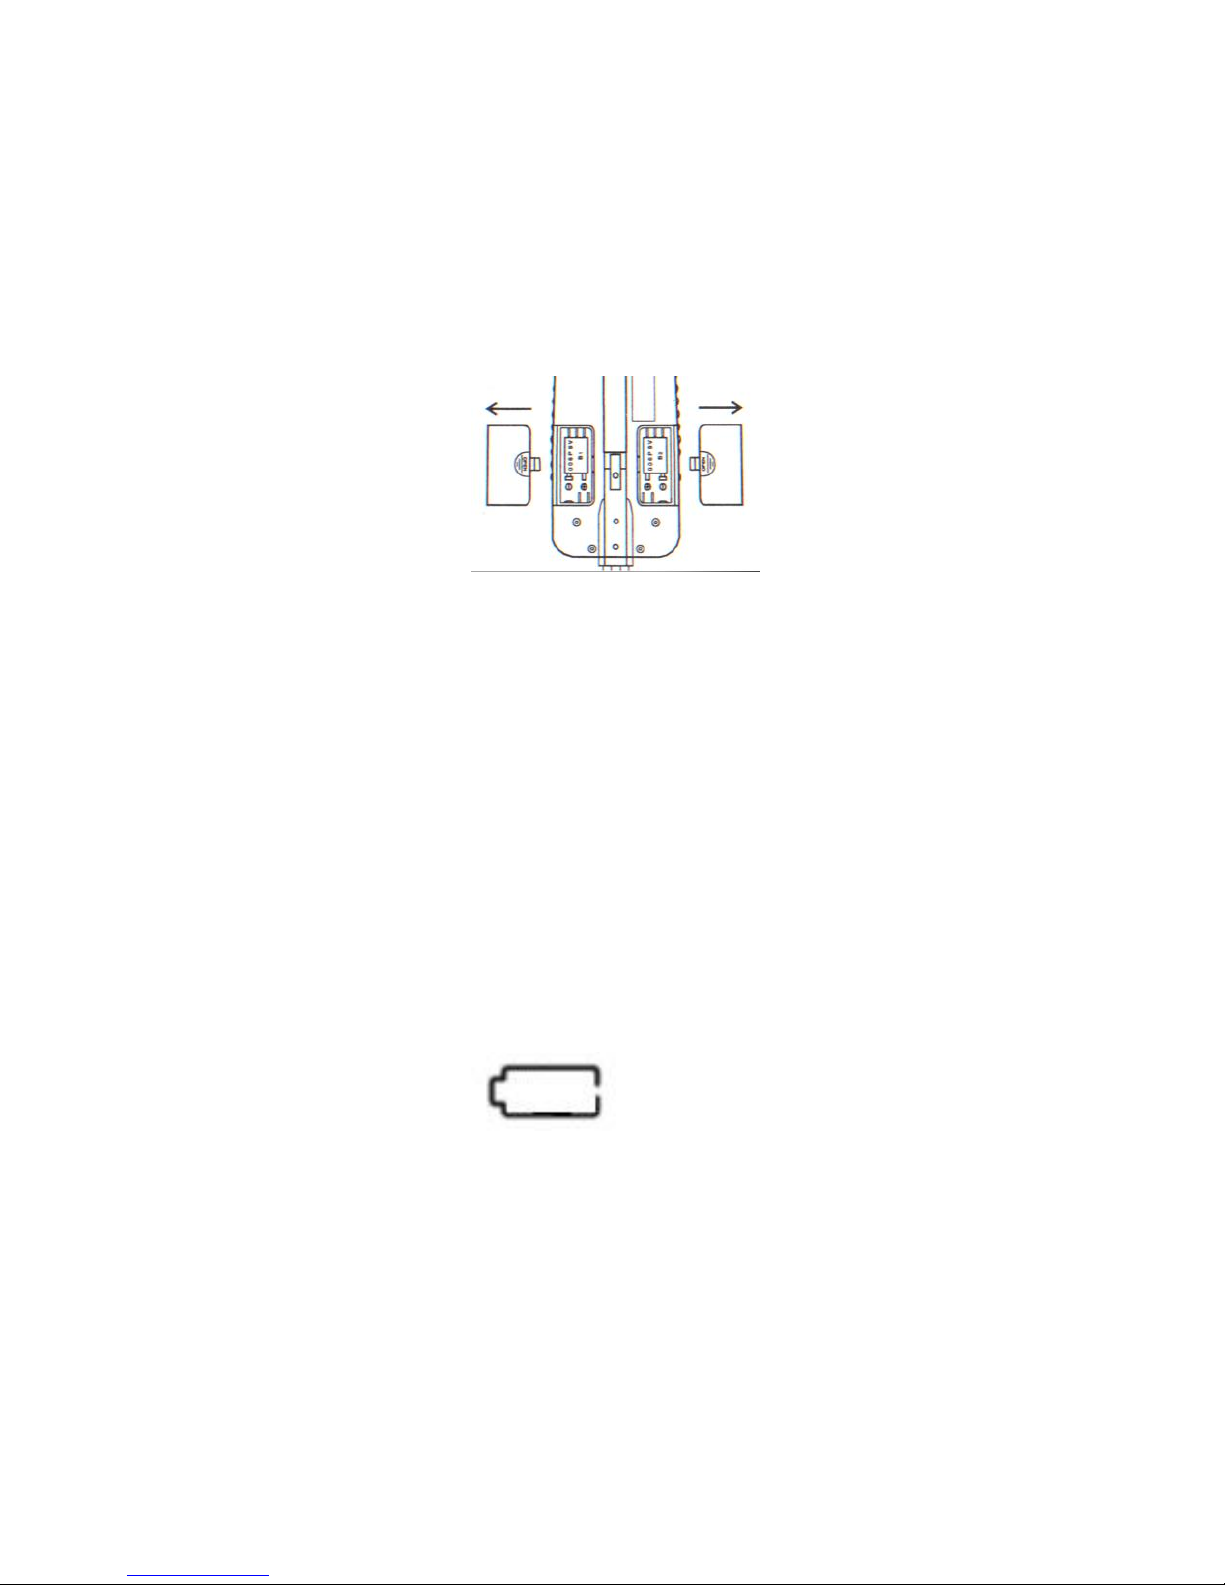
2.2 BATTERIES
Caution:
· This metal detector is powered by two 9-Volt alkaline batteries (not supplied).
· Only fresh and proper type of alkaline batteries is recommended
· Do not mix the old and new batteries or different types of batteries.
Installation
1. Be sure the power switch is at off-position.
2. Slide the battery cover off in the direction of the arrow.
3. Take out two battery connectors from the compartment。
4. Join the battery polarities with the connectors.
5. Re-install the battery cover.
Warning:
Dispose of old batteries promptly and properly, do not bury or burn the batteries.
Note:
· If you don’t plan to use the unit for a week or more time, remove the batteries. Batteries
can leak chemicals that can destroy electronic parts.
·To extend the battery lift, exchange the left and right battery after 3-4hours of operation.
· “LOW BATT” icon will display on bottom right corner of the LCD when the batteries are
needed to be changed.
6
3.Control Panel
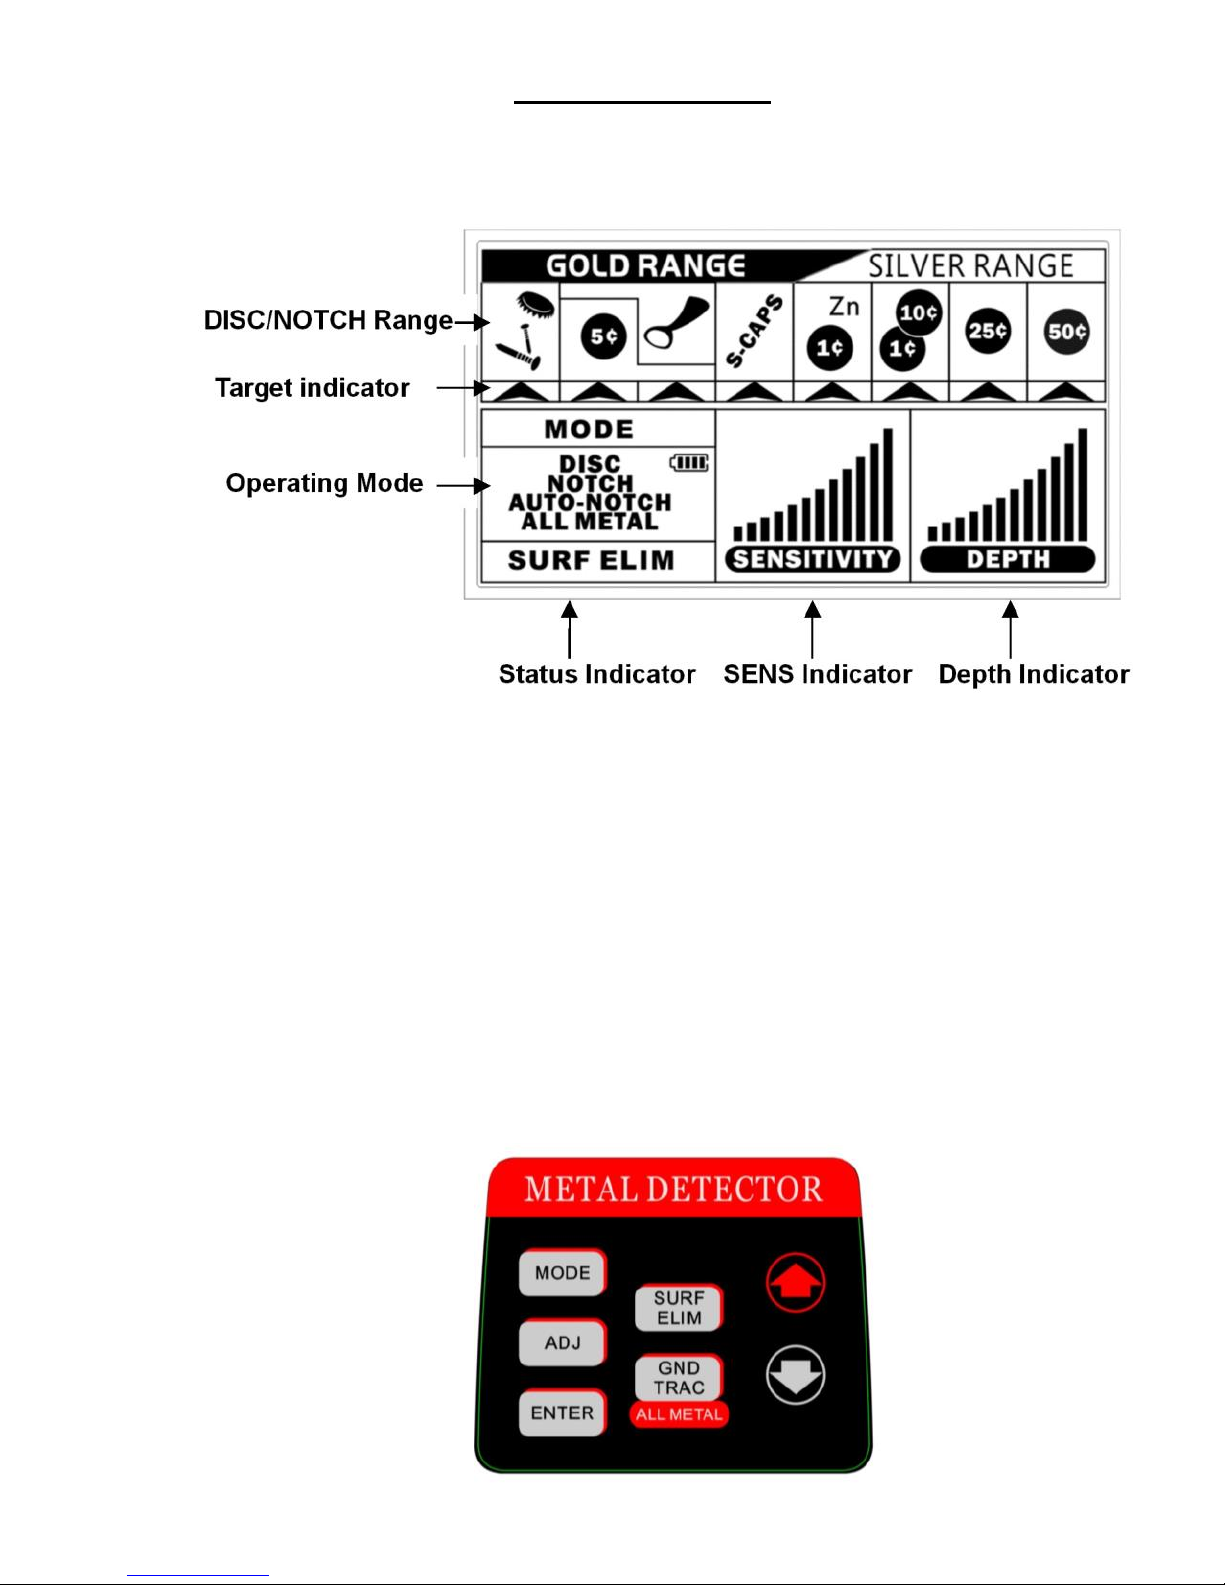
3.1 LCD Indicators:
Operating Mode Indicator:shows current operating mode, among the 4 operating
modes the detector has:DISC,ALL METAL, NOTCH, AUTO-NOTCH.
Status Indicator:shows current status(SENS adjustment, DISC range adjustment or
NOTCH range adjustment), SURF-ELIM selected or not,and low-battery or not.
Sensitivity Indicator(SENS):indicates current sensitivity degree of the machine.
Depth Indicator:shows target depth
DISC/NOTCH Range Indicator:indicates current DISC/NOTCH range settings.
Target Indicator:shows the target category
3.2 Controls’ Quick Introductions
(Details see BASIC OPERATION)

7
1. MODE — interchanging the operating mode.
2. ADJUST,+,—,ENTER — adjusts the sensitivity, DISC or NOTCH range.
3. ENTER—it is used to accept or reject the target in NOTCH mode
(it works with +or -).
4. SURF ELIM — sets the detector to surface elimination mode.
5. GND TRAC,GND BAL — sets ground balance in ALL METAL mode and pinpointing
a target.
6. VOL control — adjusts the volume level.
7. POWER —turns on or off the unit.
4.BASIC OPERATION
4.1 Motion and Non-motion Modes
1. ALL METAL Mode is a non-motion mode:In this mode, target is detected with the
coil motionless over it, and the detector emits continuous sound (no need to move the
coil from side to side). In ALL METAL Mode, adjust GND BAL controller and then press
GND TRAC several times to eliminate ordinary minerals and ores. The detector sounds
a medium tone to all targets detected.
2.DISC,NOTCH and AUTO-NOTCH Modes are motion modes:There’re 3 tones to
identify different metals in these modes. Detector can work in auto-ground balance.
Sensitivity is adjustable, while GND BAL is not available in these modes. To reject the
trash metal, you may adjust DISC or NOTCH range. Motion mode means the coil must
be in continuous motion, otherwise target cannot be detected.
4.2 Power On
Clockwise rotate the VOL knob from off-position to power on the detector. The machine
runs a self-test first(All display segments will illuminate,and the detector sounds high,
medium and low tones respectively.), then stays in DISC mode after 2~3seconds.
4.3 Four Operating Modes
Interchange among 4 operating modes: DISC, ALL METAL, AUTO-NOTCH,
NOTCH.
Press MODE touch pad to change the operating modes in following order: DISC→ALL
METAL→AUTO-NOTCH→NOTCH→DISC……The operating mode displays at bottom
left corner of the LCD.
1. DISC mode—Power on the detector, it enters into the default mode DISC
automatically. In this mode, the detector can eliminate unwanted objects from the left of

8
the DIS/NOTCH range to the right. DISC/NOTCH indicator shows detector’s current
discrimination range, and an object’s probable identification is indicated by the arrows at
the top of the display. SENS shows current sensitivity level. While DEPTH reads out the
estimated target depth. Each time a target is detected, DEPTH indicator will illuminate.
DEPTH indicator shows the relative depth of the target, the larger the reading is, the
farther the target away from the coil.
Adjusting DISC Range:
Press ADJ, the display bar of DISC/NOTCH range will blink. Now you can adjust
DISC/NOTCH range. Press“+” to increase the range of discrimination, press “-” to
decrease it.
2.ALL METAL Mode— Press MODE to enter into ALL METAL mode, the detector now
is in non-motion mode. In this mode, the detector emits only a monotone sound when it
finds a target, and DEPTH indicates relative target signal strength. The stronger the
signal is, the louder the tone is. GND TRAC is used to locate a coin-sized object
precisely. To move the coil above or near the target area, target will be found soon.
Please make sure the detector is well ground balanced before using ALL METAL mode.
(Please refer to Ground Balancing and PINPOINTING in Non-motion mode.)
Target identification is useless in ALL METAL mode. To see target identification and
depth, please change the detector into relative motion mode.
3.NOTCH Mode— To selectively eliminate one or several metals from the categories,
you can use NOTCH mode. DISC/NOTCH indicator shows current target discrimination
range, and the probable target identification is indicated by the arrows at the top of the
display. SENS shows current sensitivity level. While DEPTH indicates the probable target
depth.
Adjusting Target NOTCH Range : In NOTCH mode, press ADJ to enter into
DISC/NOTCH range setting status. LCD display bar blinks. Press + or - touch pad , one
of the arrows in target indicator will flash, press ENT to accept or reject the
corresponding metal target. Press again + or -, its right or left arrow will flash, then press
ENT to accept or reject another metal target which the current arrow pointing to. Same as
the others…
4.AUTO-NOTCH Mode— When the detector is working in AUTO-NOTCH mode(LCD
shows “AUTO-NOTCH” at the bottom), it eliminates trash metals automatically and keep
the detection for coins. Eliminated trash metals include: Bottle caps, S-CAPS,
IRON/FOIL, Pull Tab. DISC/NOTCH range(not adjustable)displays current target
identification range. And an object’s probable identification is indicated by the arrows at
the top of the display. SENS shows current sensitivity level. While DEPTH indicates the
probable target’s depth.

9
4.4 Sensitivity Adjustment
Adjusting Sensitivity in DISC,NOTCH and AUTO-NOTCH MODE:
Press ADJ to enter into sensitivity setting status. The display bar of “SENS” flashes.
Press + to increase the sensitivity level. Press – to decrease it.
Note:Sensitivity is not adjustable in ALL METAL mode
ELECTROMAGNETIC INTERFERENCE
The principle use for the Sensitivity Control is to eliminate electromagnetic interference.
This metal detector is an extremely sensitive device. The search coil creates its own
magnetic field and acts like an antenna. If your detector beeps erratically, probably it
detects another electromagnetic field. Common sources of the electromagnetic
interference are electric power lines, both suspended and buried, motors, and household
appliances like computers and microwave ovens. Some indoor electronic devices, such
as dimmer switches used on household lighting, produce severe EMI and can cause the
detector to beep erratically. Other metal detectors also produce their own
electromagnetic fields. So if you are detecting with a friend, keep two metal detectors at
least 6 meters apart.
SEVERE GROUND CONDITIONS
Another use for the Sensitivity Control is to reduce false detection signals caused by
severe ground conditions. Although this metal detector has specially designed circuit to
reduce the ground mineralization, the ground conditions in field cannot be anticipated.
Highly magnetic soils found in mountainous area can cause the detector to emit tones
when metal objects are not present. High saline content soils and sands can sometimes
cause false signal. If the detector emits false, non-repeatable, signals, REDUCE THE
SENSITIVITY.
MULTIPLE TARGETS
If you suspect the presence of a deeper target beneath a shallower target, reduce the
sensitivity to eliminate the detection of the deeper target, in order to properly locate and
identify the shallower target.
4.5 Surface Elimination
Press SURF ELIM to enter into or quit Surface Elimination mode.
SURF ELIM only works in DISC/NOTCH mode. SURF ELIM can improve the accuracy of
detection result in soil with mass trash metal. It restrains the signal from trash metal in
soil surface layer, and balances the signal from large target. But detector’s sensitivity is
decreased in this mode.
4.6 Headphone Jack

10
Using headphones(not supplied) makes it easier to identify subtle changes in the
threshold levels for better detection results. Also reduces battery consumption. The metal
detector has a stereo headphone jack located at the control panel. We recommend you
using headphones in noisy enviroment.
Caution:
⑴ To protect your hearing, set the volume to the lowest setting before you begin
listening.
⑵ Extended high volume listening can lead to permanent hearing loss.
4.7 ATI(Audio Target Identification)
Though the LCD can display the buried object , user in the field does not always keep the
display screen in his vision. Therefore, we have incorporated an audio feedback to alert
the user the nature of buried objects. This audio feedback system first alerts the user the
presence and classification of objects, whose nature and location can be confirmed by
the LCD display.
The 3-tone audio target identification system functions only in the motion modes of
DISC, NOTCH or AUTO-NOTCH. In ALL METAL mode, the detector will emit only a
monotone sound.
The detector can sound three different tones, depending on the object detected.
LOW TONE
Bottle caps, nickel coins(5¢)small gold objects will induce a low tone.
MEDIUM TONE
Pull-Tabs, S-CAPS, zinc coins, Newer pennies (post-1982), gold objects will induce
medium tone.
HIGH TONE
1¢(1950), 10¢, 25¢ and 50¢ will cause high tone.

11
5.IN THE FIELD TECHNIQUE
5.1 READING THE DISPLAY
1.Target Indicator
The LCD shows the probable type of the target, as well as the probable depth of the
target. The detector will register a repeating, unchanging target identification when a
buried target has been located and identified. If the search coil repeatedly passes over
the same spot, the target identification reads inconsistently, the target is probably a trash
item, or oxidized metal. With practice, you will learn to unearth only the place with
repeatable signals out. Also, the greater the distance between the target and the coil, the
less accurate the target identification.
GOLD - Gold objects will register on the left side of the LCD scale and will register
depending on its size. The smaller the gold object, the further to the left it will register.
Gold foil will register on the far-left side (same as Iron), Large gold items will register in
S-cap or Zinc.
IRON - Ferrous objects will register on the far-left side of the target scale. Objects in this
category could be worthless scrap, or more valuable iron relics.
5¢ - Nickel and new pull tabs will register here.
Pull-Tabs - Pull-tabs of older beverage cans will register here. Few new pull-tabs will
also register here. Many gold rings will also register here.
S-CAPS - Bottle caps with whorl and some small gold will register here.
1¢ - 1¢(post-1982) or copper coin registers here.
SILVER
10¢/1¢ - 1¢(pre-1982), 10¢ or aluminum coin will register here .
25¢ - indicates the target may be 25¢, some small silver coins, or large aluminum coins
50¢ - target may be 50¢, or some large silver coins
Note: The target indications are visual references. Many other types of metal can fall in
any of these categories. The detector can indicate the presence of most common metal
objects. It is impossible to classify all buried objects accurately.
2.Depth Indicator
The Depth Indicator is accurate for coin-sized objects. It indicates the relative depth of
the target. Large and irregularly-shaped objects will yield less reliable depth readings.
When passing over an object, the depth indicator will light up and stay illuminated until
another object is scanned. Repeated indication at the same depth level indicates an
accurate target detector. If the depth indication varies with each sweep, try sweeping at
different angles; there may be more than one target present. With practice, you will learn

12
the difference between accurate readings, multiple targets, and highly erratic readings
which evidence trash or irregularly shaped objects.
NOTE:Depth value indication of same target in air is different from that of under the
ground.
5.2 INDOOR TEST
Supplies Needed
• A Nail
• A Quarter
• A 1¢(post-1982)
1. Turn on the detector.
2. Place the detector on a wooden or plastic table, take off the watch, ring or other metal
objects on your hand or arm.
3. Adjust the search coil so the flat part points upwards.
4. When in DISC, NOTCH or AUTO-NOTCH mode, evenly sweep the nail 10-12cm
above the flat face of the search coil. The detector will emit a low tone when detects the
sample, and the arrow pointing to nail in target indicator illuminates. The DEPTH
indicator also displays corresponding value. Repeat the above test with a1¢ (post-1982).
Detector sounds medium tone this time, and target indicator arrow points to 1¢. While In
the test of 25¢, detector emits high tone and arrow points to 25¢.
NOTE:When the sample is a coin, better let the flat side of the coin parallel with the flat
face of the search coil, and sweep it evenly, so that the detector can find the target more
easily. Sweeping with the side of the coin parallel with the search coil will cause test error,
and target arrow might be flash and jump.
5. In ALL METAL Mode, move a test sample over the flat side of search coil at a higher
location (above than 1 foot) slowly close to the search coil. The detector emits a tone
when detects the target, and DEPTH indicator shows relative value. All samples sound
one tone in this mode.
5.3 OUTDOOR TEST AND PRACTICE
PINPOINTING(non-motion mode)
Accurate pinpointing takes practice and is best
accomplished by crossing sweep the target area.
1. Once a buried target is indicated by a clear tone
response, continue sweeping the coil over the target in
a narrowing side-to-side motion.

13
2. Take visual note of the place on the ground where the “beep” sounds.
3. Stop the coil directly over this spot on the ground.
4. Now move the coil straight forward and straight back towards you a couple of times.
5. Again make visual note of the spot on the ground at which the “beep” sounds.
6. If needed, cross sweep the target in “X” pattern at different angles to “zero in” on the
exact spot on the ground at which the “beep” sounds.
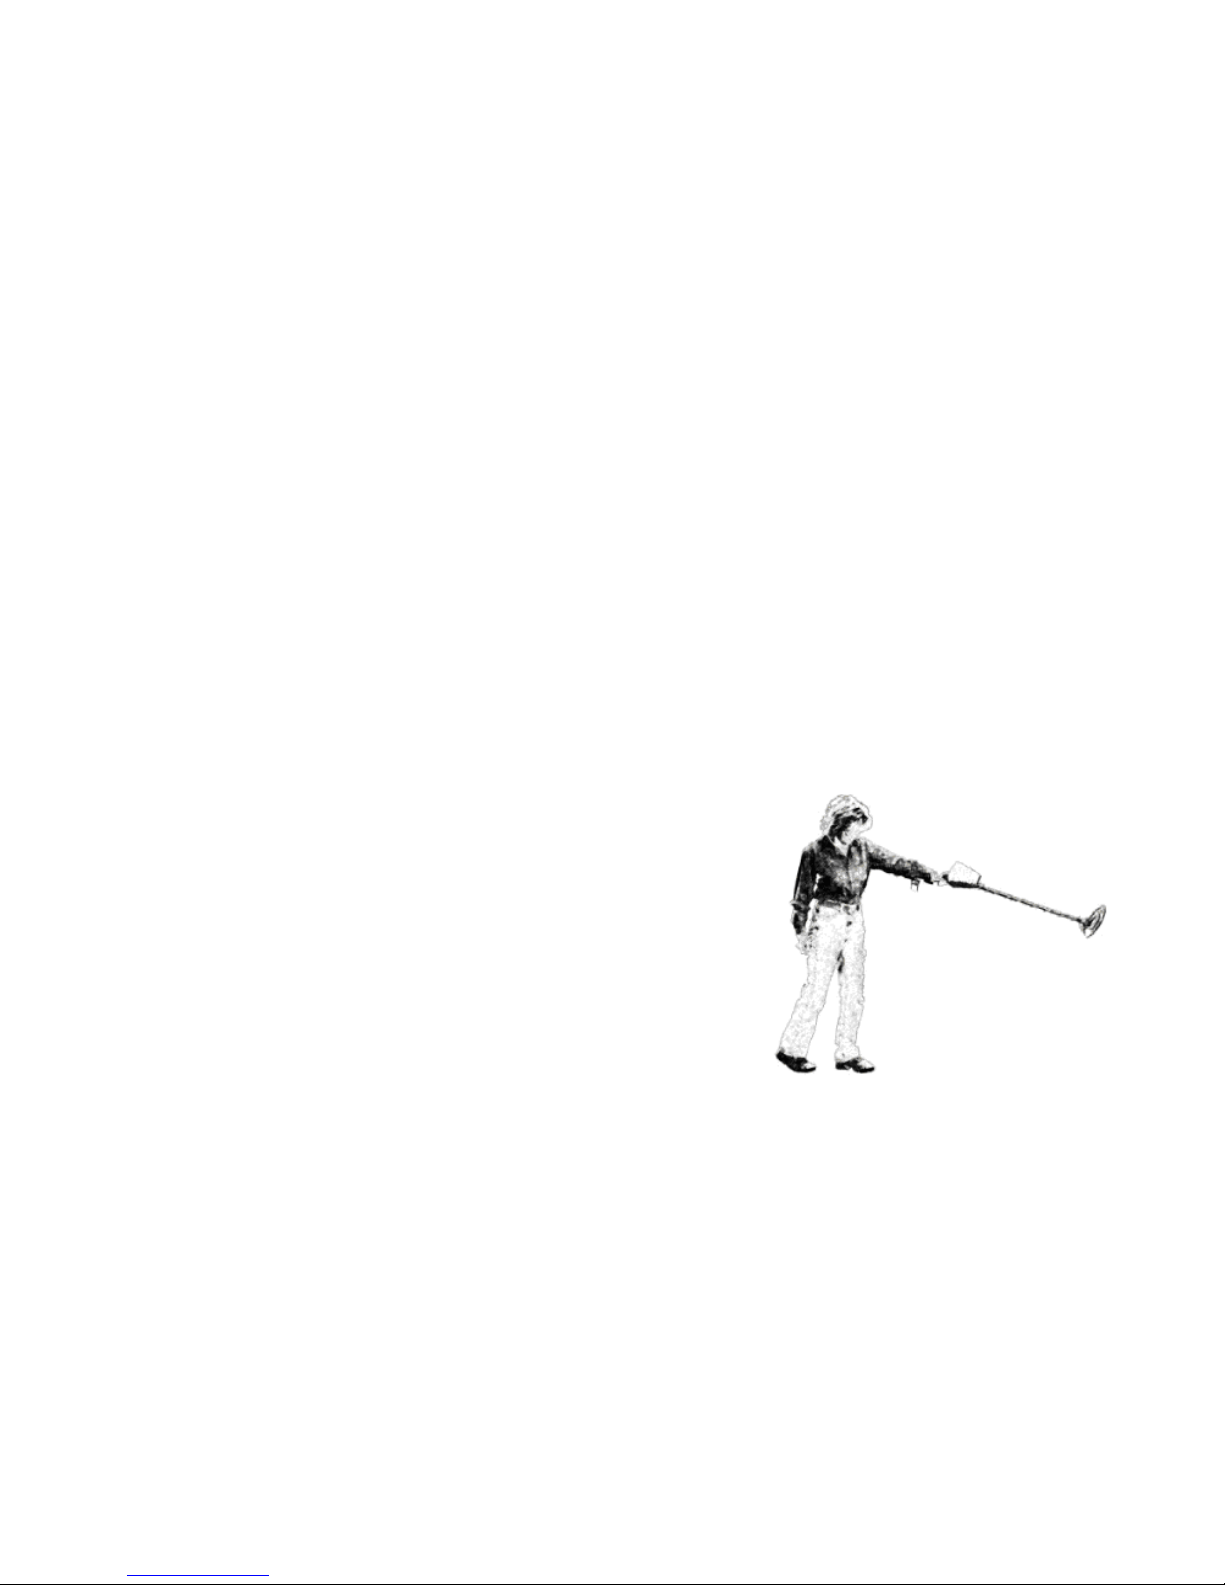
COIL MOVEMENT
When swinging the coil, be careful to keep it level
with the ground about 1-1.5cm from the surface.
Never swing the coil like a pendulum. Raising the
search coil while sweeping or at the end of a sweep
will cause false reading.
When searching, it’s better you sweep the search
coil from side to side in an arc line of 7-8cm motion.
Swing the search coil slowly, overlapping each
sweep as you move forward. It is important to
sweep the coil at a consistent speed over the
ground as you search. After identifying a target,
your sweep technique can help in identifying both
the location and the nature of the target. If you
encounter a weak signal, try moving the coil in short,
rapid sweeps over the target zone. Such a short rapid sweep may provide a more
consistent target identification.
Most valuable objects will respond with a repeatable tone. If the signal does not repeat
after sweeping the coil directly over the suspected target a few times, it is more than likely
trash metal.
Crossing the target zone with multiple intersecting sweeps at multiple angles is another
way to verify the repeatability of the signal, and the potential of the buried target. To use
this method, walk around the target area in a circle, sweeping the coil across the target
repeatedly, every 30 to 40 degrees of the circle, about ten different angles as you walk
completely around the target. If a high-tone target completely disappears from detection
at a given angle, chances are that you are detecting oxidized ferrous metals, rather than
a silver or copper object. If the tone changes at different angles, you may have
encountered multiple objects. If you are new to the hobby, you may want to dig all targets
at first. With practice in the field, you will learn to better discern the nature of buried
objects by the nature of the detector’s response.
You may encounter some false signals as you proceed. False signals occur when the
Correct
Wrong
14
detector beeps without target being present. False signals can be induced by
electromagnetic interference, oxidation, or highly mineralized ground soils. If the detector
beeps once, but does not repeat the signal with several additional sweeps over the same
spot, there is probably no target present.
When searching very trashing ground, it is best to scan small areas with slow, short
sweeps. You will be surprised just how much trash metal and foil you will find in some
areas. The trashiest areas have been frequented by the most people, and frequently hold
the most promise for finding the most lost valuables.
5.4 GROUND BALANCING
Before using the ALL METAL mode, it is necessary to “Ground Balance” your detector,
this ground balancing adjustment offsets the effects of minerals and salts in the ground.
To GROUND BALANCE your detector:
1. Use the ALL METAL mode to find a patch of ground which is free of metal objects.
You will use this section of ground to test the detector. The presence of any metal
objects in this area will interfere with this procedure.
2. Lift the search coil waist high in the air.
3. Begin with the ground balance (GND BAL) KNOB in the P position. Rotate slightly the
GND BAL knob from P counter clockwise.
4. Press GND TRAC.
5. Lower the search coil to the ground, maintaining it
elevated about 1-1.5cm above the surface (be sure
that this ground does not contain metal).
If the detector emits sound with the search coil
1-1.5cm over the ground, repeat the above
steps 3 and 4.
If the detector remains silent with the search
coil 1-1.5cm over the ground, no further adjustment is necessary; the detector is
“GROUND BALANCED”. Otherwise, you have to adjust the sensitivity.
It is important to rotate the GND BAL knob in small increments in order to find the first
setting ( clockwise) at which the detector remains silent. To insure yourself of the optimal
adjustment, rotate the knob slightly clockwise from a silent-adjusted position to check for
the most clockwise silent position possible. If the KNOB is over-adjusted in the clockwise
direction, the detector can lose sensitivity.
As you search in different areas, it is necessary to verify the ground balance setting
periodically following the above procedure. Even in a geographical area, ground

15
conditions can be different. Varying elevations, proximity to water, and concentrations of
rock, sand or clay can all affect ground condition and sometimes require recalibration
with the ground balance knob.
5.5 PINPOINTING (non-motion mode)
Coil sweep technique is not important in this mode. Rather, user’s retuning is critical.
The detector does not automatically adjust t as ground and environmental conditions
changing. The operator is required to make the adjustment by himself.
RETUNING
Keep the coil still, just above the ground surface. Make sure that the spot on the ground
you chose for tuning does not contain metal; pass over the area with the coil again to
insure that the detector does not emit a tone and LCD does not display any signal.
Detection Field
The detection field depends on the size of the target.
Large Objects
After a target is detected, LCD displays sensitivity level and a medium tone beeps. If you
lift the coil to a distance around 2cm above the ground, the signal displayed on the LCD is
almost same and the tone does not fade, you may have detected a large or irregularly
shaped object. Further lift the coil off, increments on LCD decreases obviously and the
tone level reduces rapidly. Outline the object with slow coil movements at the same
height.
Small Objects
After detecting a target, LCD displays a low sensitivity level and the speaker emits a faint
sound. While maintaining the coil at this height above the ground, move the coil from
side-to-side. Note the spot where the tone is loudest, and the sensitivity level is largest
(usually increments on LCD changes more sensitive than the sound changes). Then
move the coil toward the ground to zero-in on the target’s location. A coin-size object will
be detected when the object enters the range of the inner coil.

16
5. CARE and MAINTENANCE
The following suggestions will help you care for your metal detector so you can enjoy it
for years.
Trouble Shootings:
1. Detector emits false signal in field use.
Sensitivity is set too high, please lower the sensitivity till the false signal disappears.
Move the search coil slowly. Oxidized metal may cause the false signal. If the signal is
not repeatable when search coil swept over a target, the target usually is a trash.
2. LCD displays multiple target categories or emits several sounds at one time.
There might be over one kind of metal, or the detector cannot identify the target.
Sometimes, oxidized metal also cause the excursion of target arrow and tone. Too high
sensitivity is another probable reason.
3. Detector works unstable or read by mistake.
There might be another metal detector working or electric line nearby.
Handle the detector gently and carefully. Dropping it can damage circuit
boards and cases and can cause the detector to work improperly.
Use the detector only in normal temperature environments. Temperature extremes
can shorten the life of electronic devices, damage the cases of the detector.
Keep the detector away from dust and dirt, which can cause premature wear of
parts.
Wipe the detector with a damp cloth occasionally to keep it looking new.
Do not use harsh chemicals, cleaning solvents, or strong detergents to
clean the detector.
CAUTION:
· The search coil is water proof, and it can be completely under the fresh water or sea
water. Please be careful to avoid the water enter into machine body. Sea water may
erode the search coil. Please always use fresh water to clean the search coil after
detection in sea water.
· Change or damage the inner components will cause the detector fault, and such fault is
not within our warranty.

17
 Loading...