

Teknema Internet TV, Internet TV Set-Top Box User Manual

TeknemaTeknema
Teknema, Inc.
Internet TVInternet TV
Set-Top BoxSet-Top Box
User’s GuideUser’s Guide

SAFETY INFORMATION
WARNING: To prevent fire or shock hazard, do not expose the Internet TV Set-Top Box to rain
or moisture.
CAUTION: Accessories connected to this product should bear a UL mark, or if purchased in
Canada, a CSA certifications notice. The accessories should be free of modifications intended to
defeat their safety features. To prevent electrical shock, all polarized AC power plugs should be
properly plugged into polarized wall sockets or polarized extension cords. (One of the blades of a
polarized plug is wider than the other, it should be plugged into the wide slot on the receptacle.)
Surge Protection: To prevent electrical surges from damaging equipment, a UL rated surge
protector (a polarized power strip) is recommended for the Internet TV Set-Top Box and its
accessories. The unit should be unplugged during electric storms, as lightning can create a power
surge that can damage the box.
Telephone Line: Do NOT use the set-top box in a digital PBX, as this can damage the internal
modem. Also, to prevent damage from electrical discharges and lighting strikes, a telephone line
isolation unit is recommended. Alternatively the telephone line should be unplugged from the
Internet TV Set-Top Box when not in use. Similarly the Internet TV Set-Top Box should not be
used during electrical storms.
Cable TV Installer Note: This reminder is to call your attention to Article 820-40 of the National
Electrical Code (Section 54 of the Canadian Electrical Code, Part 1), which gives the guidelines
for proper grounding and, in particular, specifies that the cable ground shall be connected to the
grounding system of the building as close to the point of cable entry as practical.
Owner Note: Never let anyone insert foreign objects into the Smart Card slot or accessory ports
of the Internet TV Set-Top Box. Also, make sure you review any other safety information
included with this product.
Information in this document is subject to change without notice.
Teknema and Internet TV are trademarks of Teknema, Inc.
Copyright 1997 by Teknema, Inc. All rights reserved.
Part # 700000 – Rev. B
First Edition: September 10, 1997
Last Update: January 10, 1998
Teknema, Inc.
2656 East Bayshore Road
Palo Alto, CA 94303
USA
Phone +1 (650) 855-0500
Fax +1 (650) 855-0524
info@teknema.com
www.teknema.com
For support information, please contact your Service Provider or Reseller:
II

TABLE OF CONTENTS
1. Introducing the Teknema Internet TV Set-Top Box................................................................................. 1
2. Package Contents................................................................................................................................ 2
3. Connecting your Internet TV Set-Top Box..............................................................................................3
Phone Line Connection......................................................................................................................3
Audio/Video Connection.....................................................................................................................3
S- Video Connection....................................................................................................................... 4
Composite Video Connection.......................................................................................................... 4
SCART Connection (for European countries only)...........................................................................5
Television without an S-Video or Composite Video Jack.................................................................. 5
Power Adapter Connection................................................................................................................. 6
Printer Connection (optional).............................................................................................................. 6
Summary...........................................................................................................................................7
4. Getting started...................................................................................................................................... 8
The Infrared Remote Control.............................................................................................................. 8
Powering Up the System...................................................................................................................10
The Set-Up Procedure......................................................................................................................10
The On-screen Keyboard..................................................................................................................10
The Main Menu.................................................................................................................................11
5. The Web Browser................................................................................................................................12
Remote Control specific functions......................................................................................................12
Scrolling........................................................................................................................................12
History..........................................................................................................................................13
Fast Go To....................................................................................................................................13
The Options Menu............................................................................................................................13
Go To...............................................................................................................................................13
Search..............................................................................................................................................14
Favorite pages..................................................................................................................................14
Saving a Favorite page address.....................................................................................................14
Retrieving, Deleting, or Renaming Favorite Pages..........................................................................15
Fast Go To....................................................................................................................................15
Forms...............................................................................................................................................15
Frames.............................................................................................................................................16
6. Electronic Mail.....................................................................................................................................17
Reading Email messages..................................................................................................................18
Sending Email messages..................................................................................................................18
Customizing Email folders.................................................................................................................19
7.Reference............................................................................................................................................20
Set-Up..............................................................................................................................................20
Internet.........................................................................................................................................20
Email............................................................................................................................................21
User..............................................................................................................................................22
Dialer............................................................................................................................................22
Printer...........................................................................................................................................23
The Optional Infrared Keyboard.........................................................................................................23
Using the keyboard with the Web Browser.....................................................................................23
Using the keyboard with Electronic Mail.........................................................................................24
Function keys................................................................................................................................24
8.Consumer Information..........................................................................................................................27
Limited Warranty...............................................................................................................................27
Software License Agreement.............................................................................................................27
Consumer Information and FCC Requirements..................................................................................28
Service Requirements.......................................................................................................................29
FCC Warning Statement...................................................................................................................30
9.Index. ..................................................................................................................................................31
III

IV

1. Introducing the Teknema Internet TV Set-Top Box.
The Teknema Internet TV Set-Top Box converts your television set into a complete and
stand-alone Internet access device.
By connecting it through a regular telephone line to an Internet Service Provider with its built-in
modem, the Internet TV Set-Top Box allows you to navigate the Word Wide Web (WWW or Web)
and manage your Electronic Mail, the two most useful and entertaining services offered by the
Internet today.
The Web navigation is performed by the Internet TV Web Browser, a simple point and click
graphical interface. All its functions are controlled with the supplied infrared remote control, or
with on-screen buttons.
The Email functions allow you to manage up to four different electronic mail accounts, each one
independent from the others, and to perform basic functions such as writing a new message,
replying to an incoming mail, and storing your messages.
A third-party Internet Service Provider (ISP) provides you with an Internet account and Email
address(es), a local phone number for dial-up access and the services required to communicate
over the Internet. The provider usually charges a flat monthly rate for this service.
This manual will not teach you what the Internet is or how to maximize your fun and profit from
using it: there is plenty of excellent literature available on the topic, but your direct and hands-on
experience on the Internet will be the most valuable training. This manual will only cover the
Internet TV Set-Top Box functions, and how to easily get online with it. If you have the optional
infrared keyboard, its use is covered in the Reference section.
Please note: In this manual, the word “key” refers to one of the push buttons located on the
Infrared Remote Control, e.g., the Go To key. The term "button" refers to a selection button of
the on-screen user interface, e.g., the Go To button on the Web Browser menu bar.
Introducing the Teknema Internet TV Set-Top Box 1
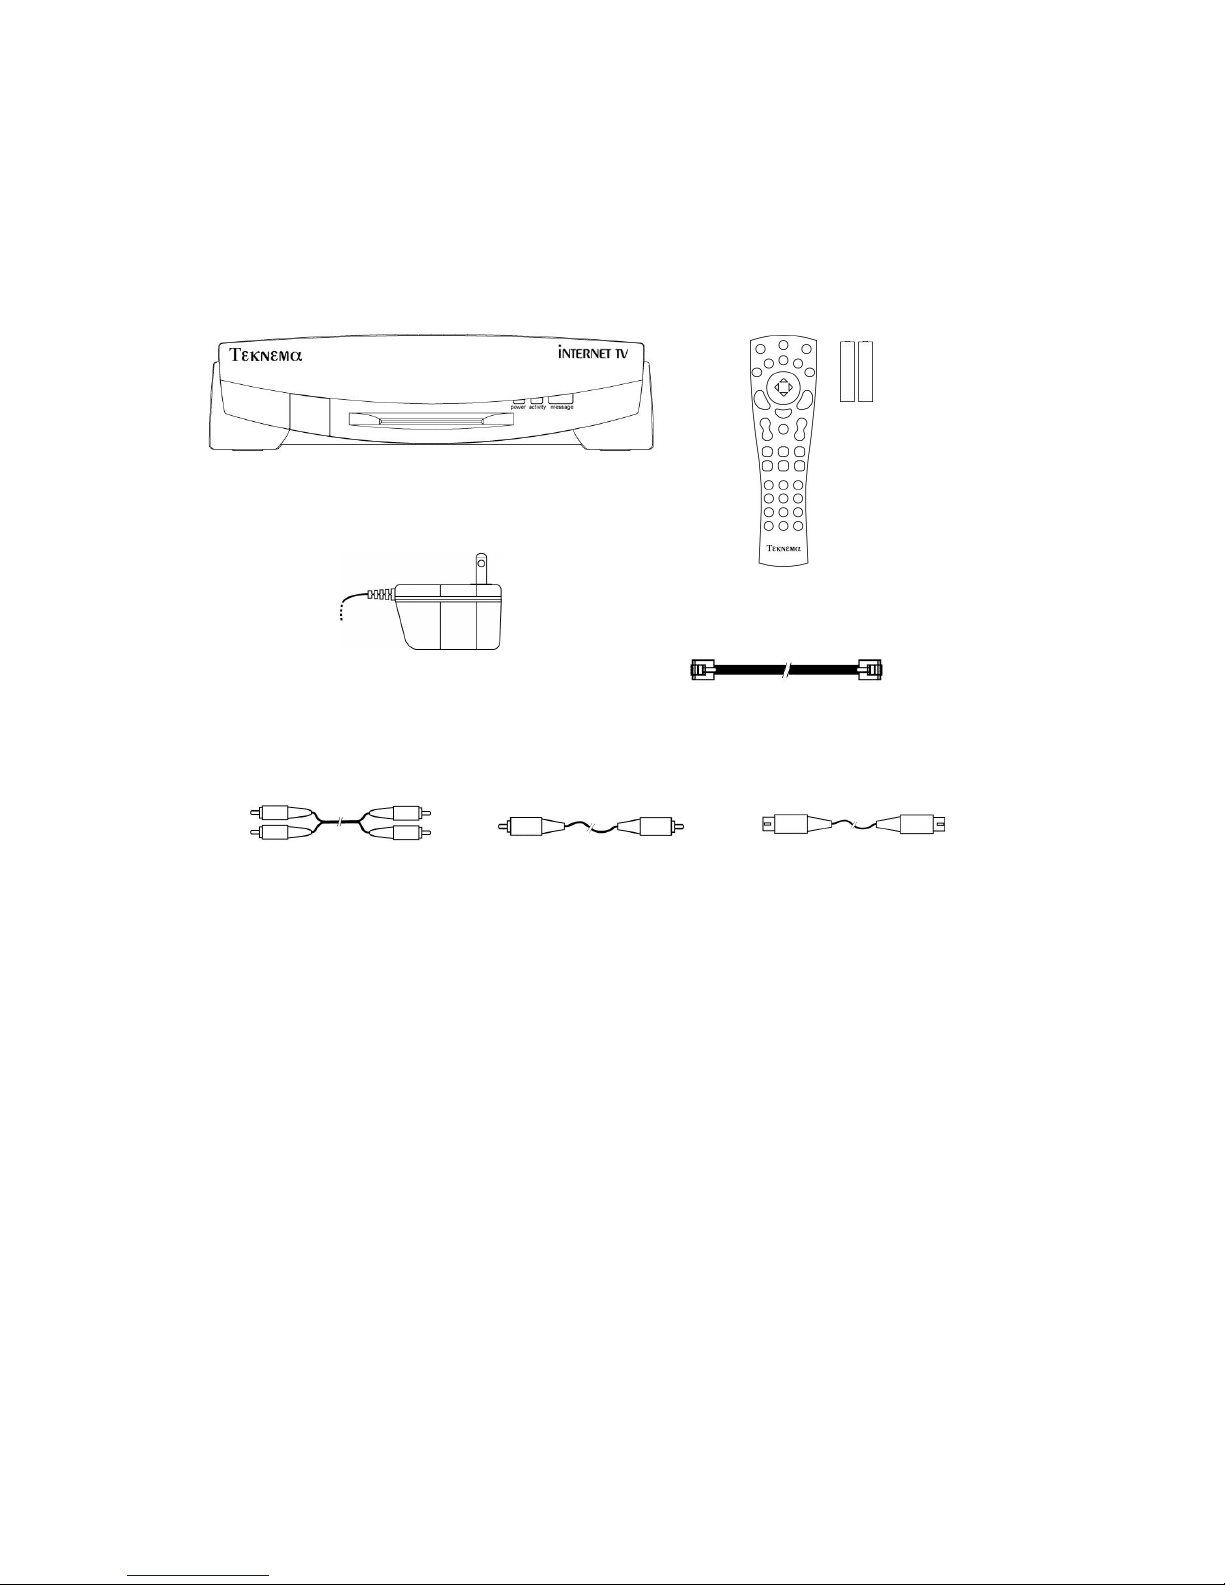
2. Package Contents.
The following items are supplied with the Teknema Internet TV Set-Top Box.
Internet TV Set-Top Box
Power Adapter
Telephone cord
Audio Cable
(Red and White plugs)
For customers outside the USA the package also includes a telephone adapter and for European
countries, a SCART adapter is also supplied for the audio/video connection.
Please make sure you have all of them before connecting the unit.
Video Cable
(Yellow plug)
Remote Control
and AA batteries
S-Video Cable
(Black plug)
If you have the optional Infrared Keyboard, it has been shipped with its AAA batteries.
2 Package Contents
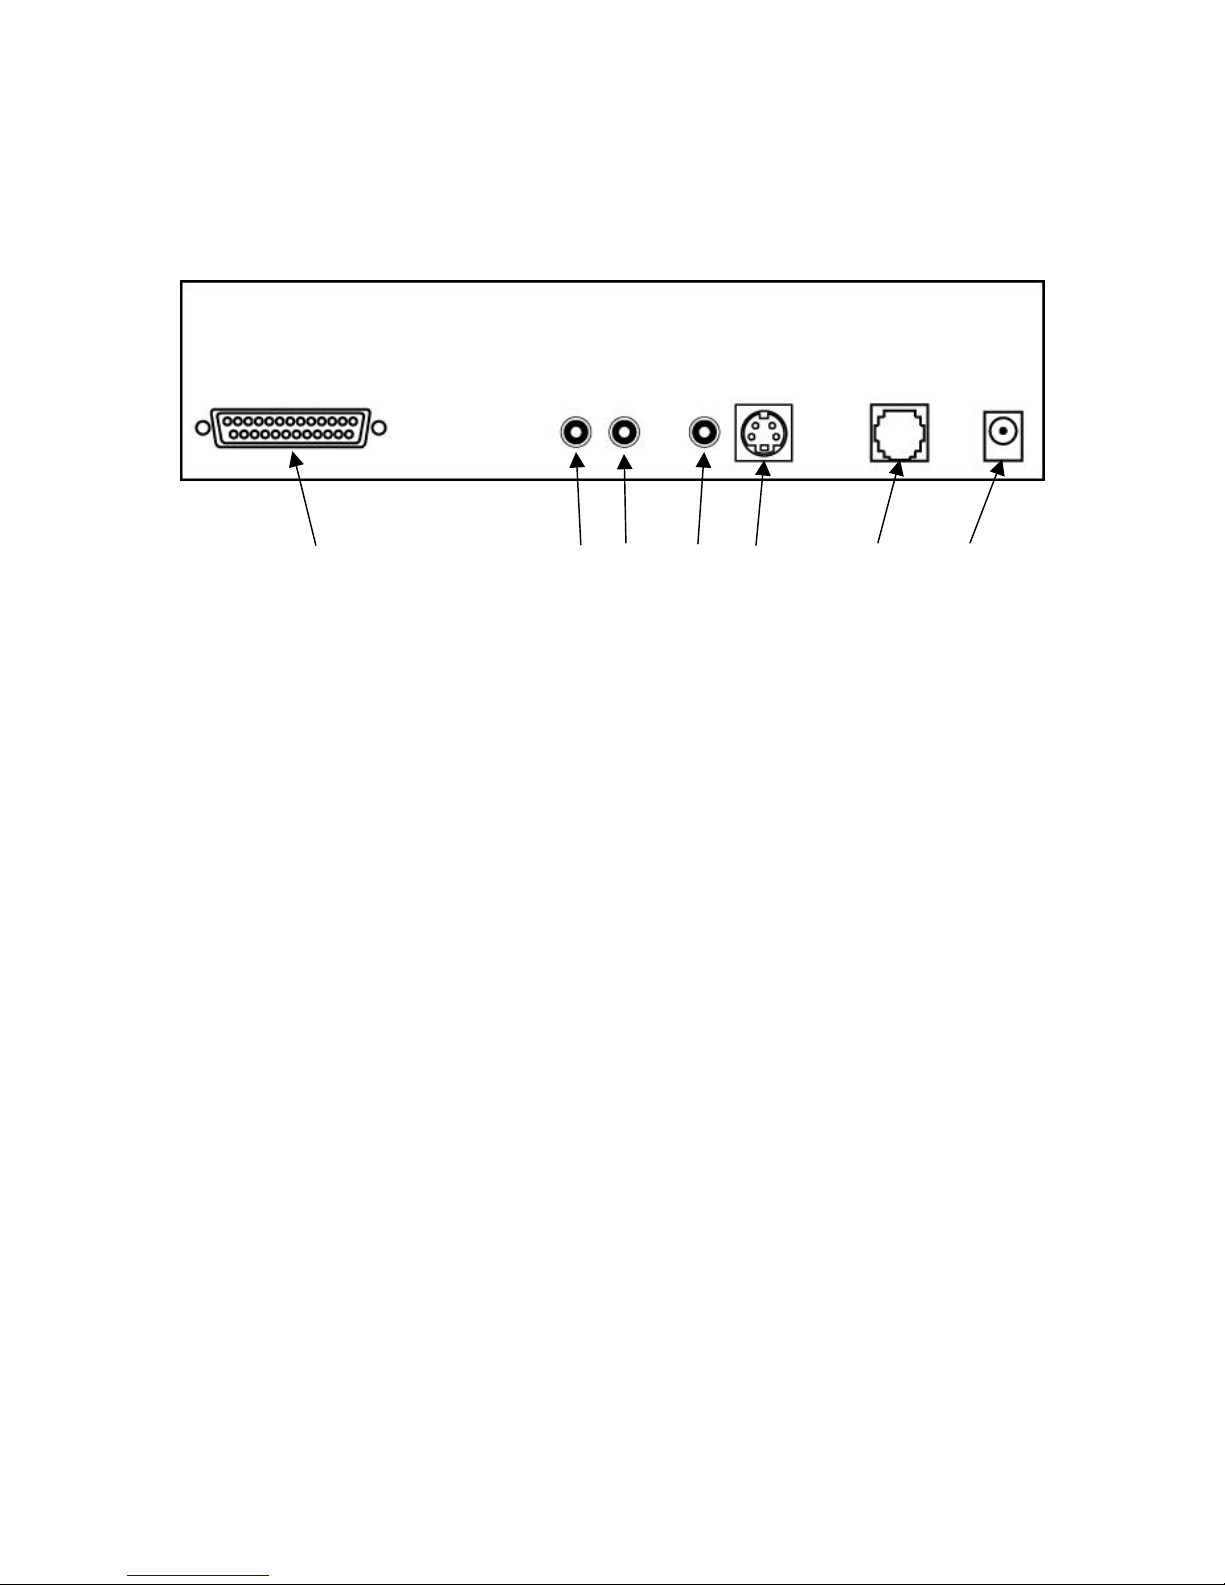
3. Connecting your Internet TV Set-Top Box.
AUDIO TELEPHONE
Rear panel:
PRINTER LEFT RIGHT VIDEO S-VIDEO LINE POWER
1 2 3 4 5 6 7
1. Printer - standard parallel port 5. S-Video - S-Video Out
2. Left Audio - Audio Out (left channel) 6. Phone Line - To telephone wall jack
3. Right Audio - Audio Out (right channel) 7. Power - Input socket for Power Adapter
4. Video - Composite Video Out
Phone Line Connection
Use the supplied phone cord to connect the telephone company wall jack to the Phone Line
socket (item 6 above.) If you live outside the USA, you need to plug the supplied telephone
adapter into your wall socket first, then insert the phone cord in it.
Audio/Video Connection
If you already have a VCR connected to your television set, you can safely connect the Internet
TV Set-Top Box directly to the VCR.
Please note: to operate the Internet TV Set-Top Box, your "TV/Video" switch must be set to the
Video mode. Please refer to your TV or VCR manual for more information on operating the TV in
the video mode.
If your TV or VCR does not support stereo audio, connect only the Right audio channel (red plug).
Connecting your Internet TV Set-Top Box 3
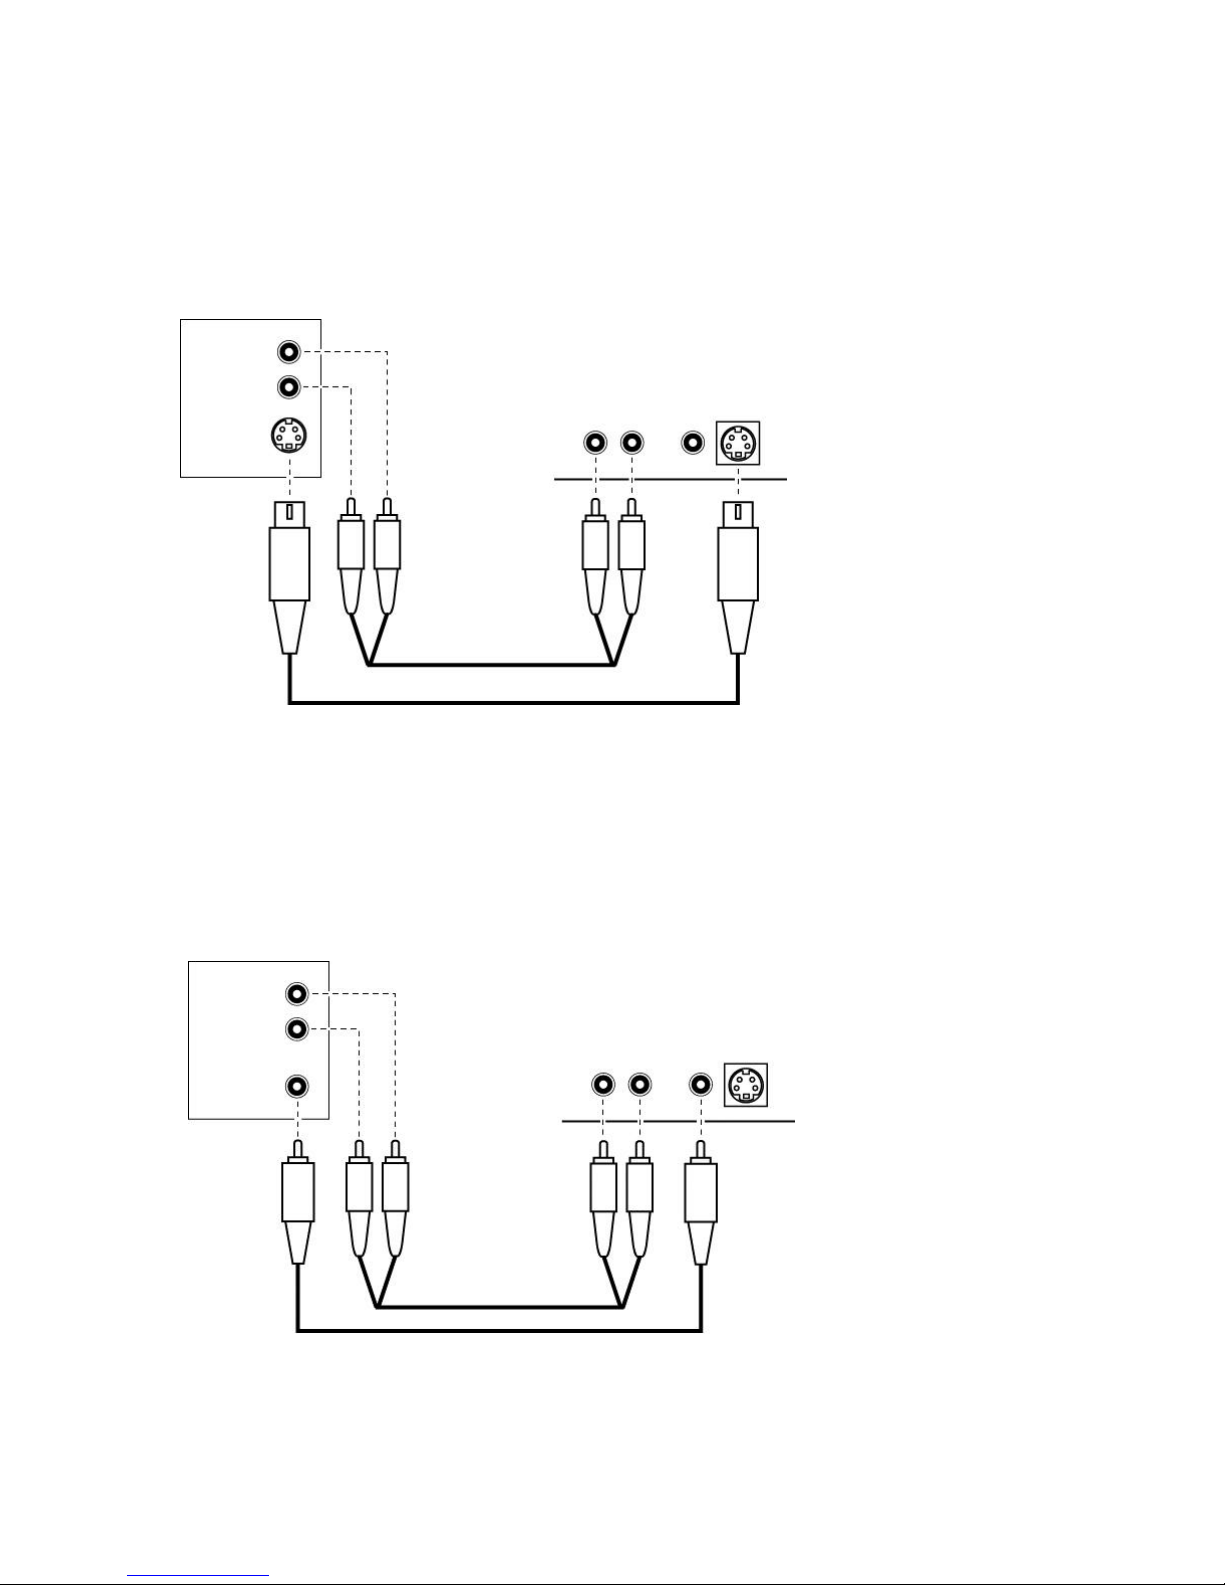
S- Video Connection
Left
Audio Cable
S-Video is the preferred way of making a connection as it gives the best image quality. If your TV
or VCR is equipped with a video input jack marked "S-Video" (or S-VHS), connect the S-Video
Out of your Internet TV Set-Top Box (item 5 in the rear panel illustration) to the S-Video (or SVHS) input jack on the rear of your TV or VCR with the supplied S-Video cable.
TV or VCR
(example)
Right
Audio
INPUT
S-Video
Left
W R W R
Audio Cable
S-Video Cable
Internet TV Set-Top Box
rear panel
AUDIO
LEFT RIGHT VIDEO S-VIDEO
Connect the Internet TV Set-Top Box Left and Right Audio output (items 2 and 3) to your TV or
VCR Left and Right audio input with the supplied Audio cable.
Composite Video Connection
If your TV or VCR is only equipped with a jack marked "Video INPUT" (or “Video IN”), connect the
Video output of your Internet TV Set-Top Box (item 4 in the rear panel illustration) to the Video
input jack on the rear of your TV or VCR with supplied Video cable (yellow plug.)
TV or VCR
(example)
Audio
INPUT
Video INPUT
Right
Y R W
Video Cable
Internet TV Set-Top Box
rear panel
AUDIO
LEFT RIGHT VIDEO S-VIDEO
W R Y
Connect the Internet TV Set-Top Box Left and Right Audio output (items 2 and 3) to your TV or
VCR Left and Right audio input with the Audio cable.
4 Connecting your Internet TV Set-Top Box

SCART Connection (for European countries only)
If your TV has a SCART connector, follow the directions of the Composite Video Connection
section to connect the Audio and Video cables to the input jacks of supplied SCART adapter,
then plug the latter into the SCART input in the back of your TV.
Television without an S-Video or Composite Video Jack
If your TV is not a recent model, it probably does not have a "Video" or "S-Video" jack connection.
In this case, we recommend connecting your Internet TV Set-Top Box to your TV through a VCR
(see the previous pages for instructions). If you do not have a VCR, you will have to purchase a
special adapter before you can connect the Set-Top Box to your television set. Because of
variations in signal strength, not all adapters will work with all televisions.
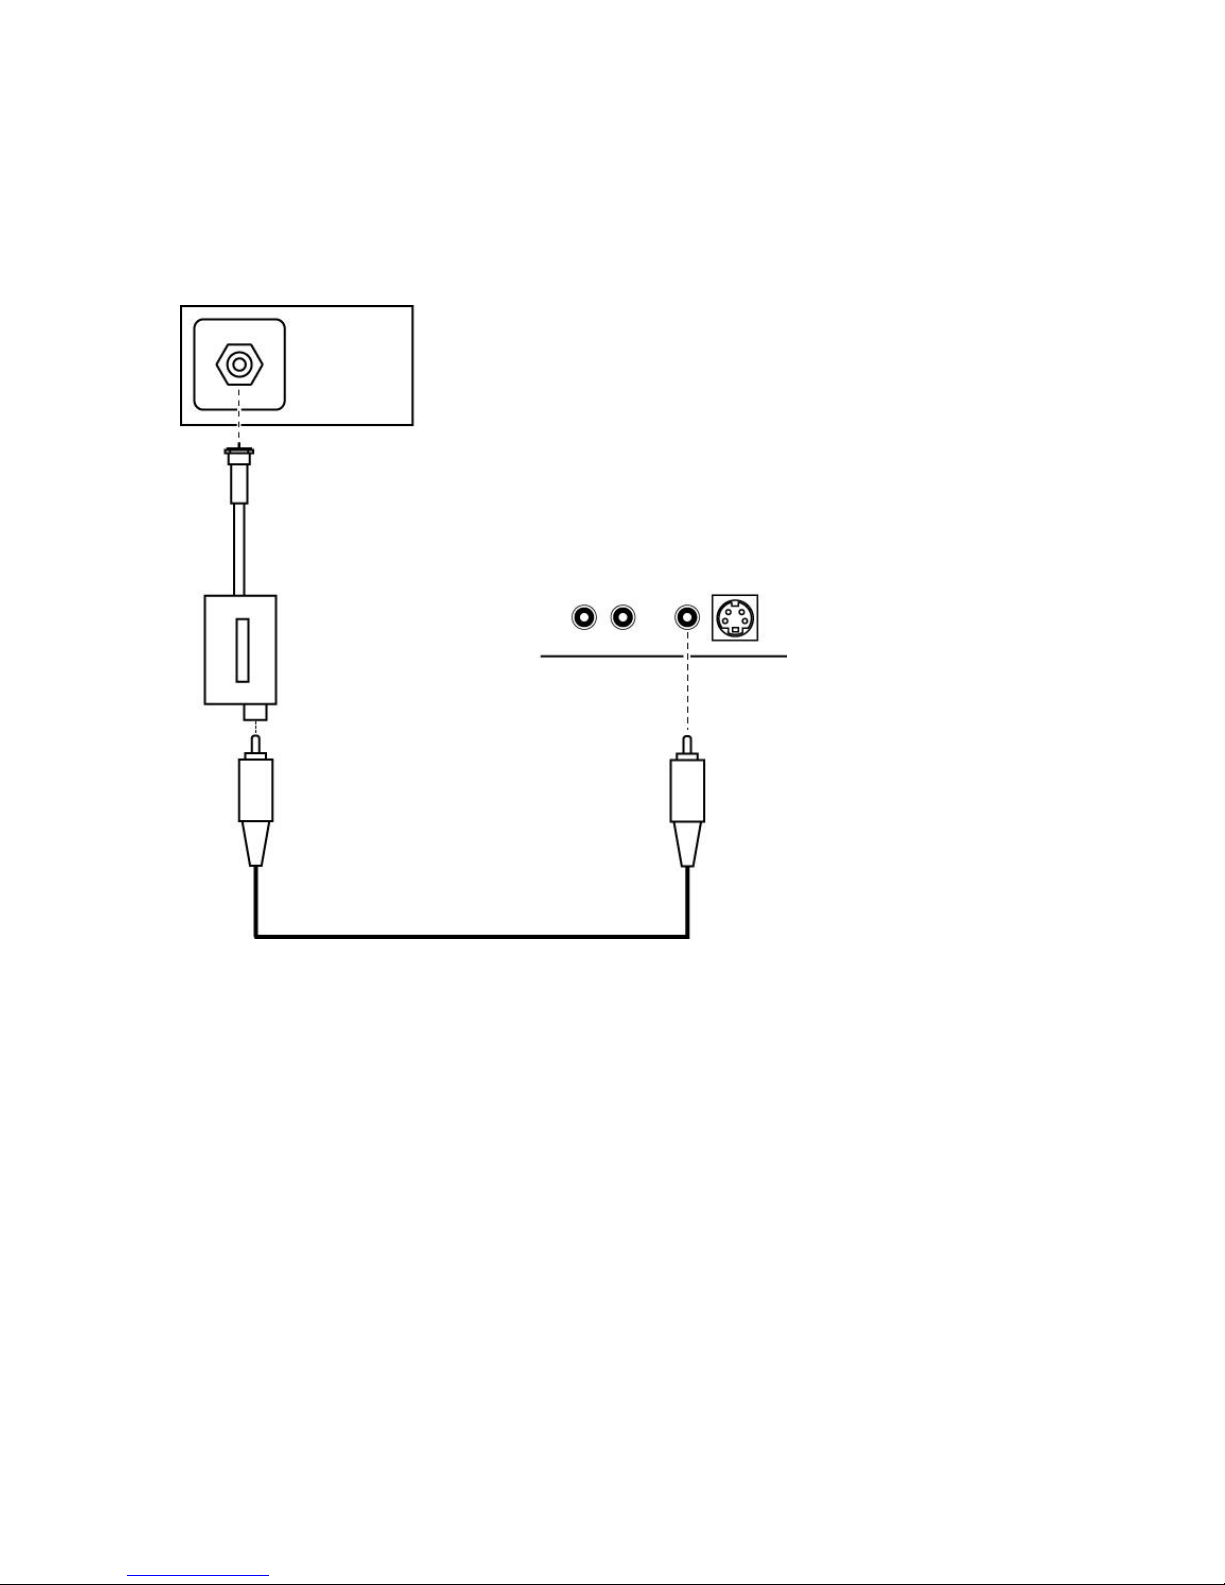
300 Ohm Flat Wire Antenna: If you have UHF/VHF terminal post connectors at the back of your
TV, you can purchase a game adapter and connect through the Video of your Internet TV SetTop Box (item 4 in the rear panel illustration) with the supplied Video cable, as illustrated below.
An audio signal will not be received with this setup.
Television
UHF
VHF
rear panel
Video Adapter
Y
Video Cable
Internet TV Set-Top Box
rear panel
AUDIO
LEFT RIGHT VIDEO S-VIDEO
Y
Connecting your Internet TV Set-Top Box 5
75 Ohm Cable TV Antenna: if your TV only has a 75-Ohm coaxial connector, you may purchase
an adapter from an electronics store (e.g., Radio Shack 15-1269C) to make the following video
connection through the Video of your Internet TV Set-Top Box (item 4 in the rear panel
illustration) with the supplied Video cable, as illustrated below. An audio signal will not be
received with this setup.
Television
Cable
Antenna
Video Adapter
rear panel
Internet TV Set-Top Box
rear panel
AUDIO
LEFT RIGHT VIDEO S-VIDEO
Y
Video Cable
Y
Power Adapter Connection
Connect the supplied Power Adapter to the unit Power input jack (item 7.) Plug the Power
Adapter into a power strip (surge protector) connected to a wall socket. This will turn the unit on.
Put it in stand-by mode by pressing the Power key on the remote.
Printer Connection (optional)
If you have one of the printers supported by the Internet TV Set-Top Box, connect it to the Printer
port (item 1.) For the complete list of supported printers, please refer to the “Reference: Set-Up”
section of this manual.
6 Connecting your Internet TV Set-Top Box

Summary
Here’s a synthesized list of the required steps to connect your Internet TV Set-Top Box.
1) Insert the AA batteries in the Remote Control
2) Connect the telephone line socket (item 6 of the picture on page 3) to a phone wall jack
3) Connect the unit audio and video outputs (items 2,3, and 4 or 5) to the appropriate TV set
inputs
4) Turn your TV set on and switch it to “Video” mode
5) Connect the power adapter, first to the unit (item 7) and then to a power strip
You will now see the Power LED on the front panel of the unit briefly blink, and the image of the
Main Menu will appear on the screen. Please continue to the following chapter, “Getting Started”.
If the light doesn’t blink, double check the power supply connection. If the light blinks but no
image appears, make sure that the audio and video cables are properly connected to both the
Internet TV Set-Top Box and your TV, and that the latter is set to display the external video
source signal.
Connecting your Internet TV Set-Top Box 7
4. Getting started.
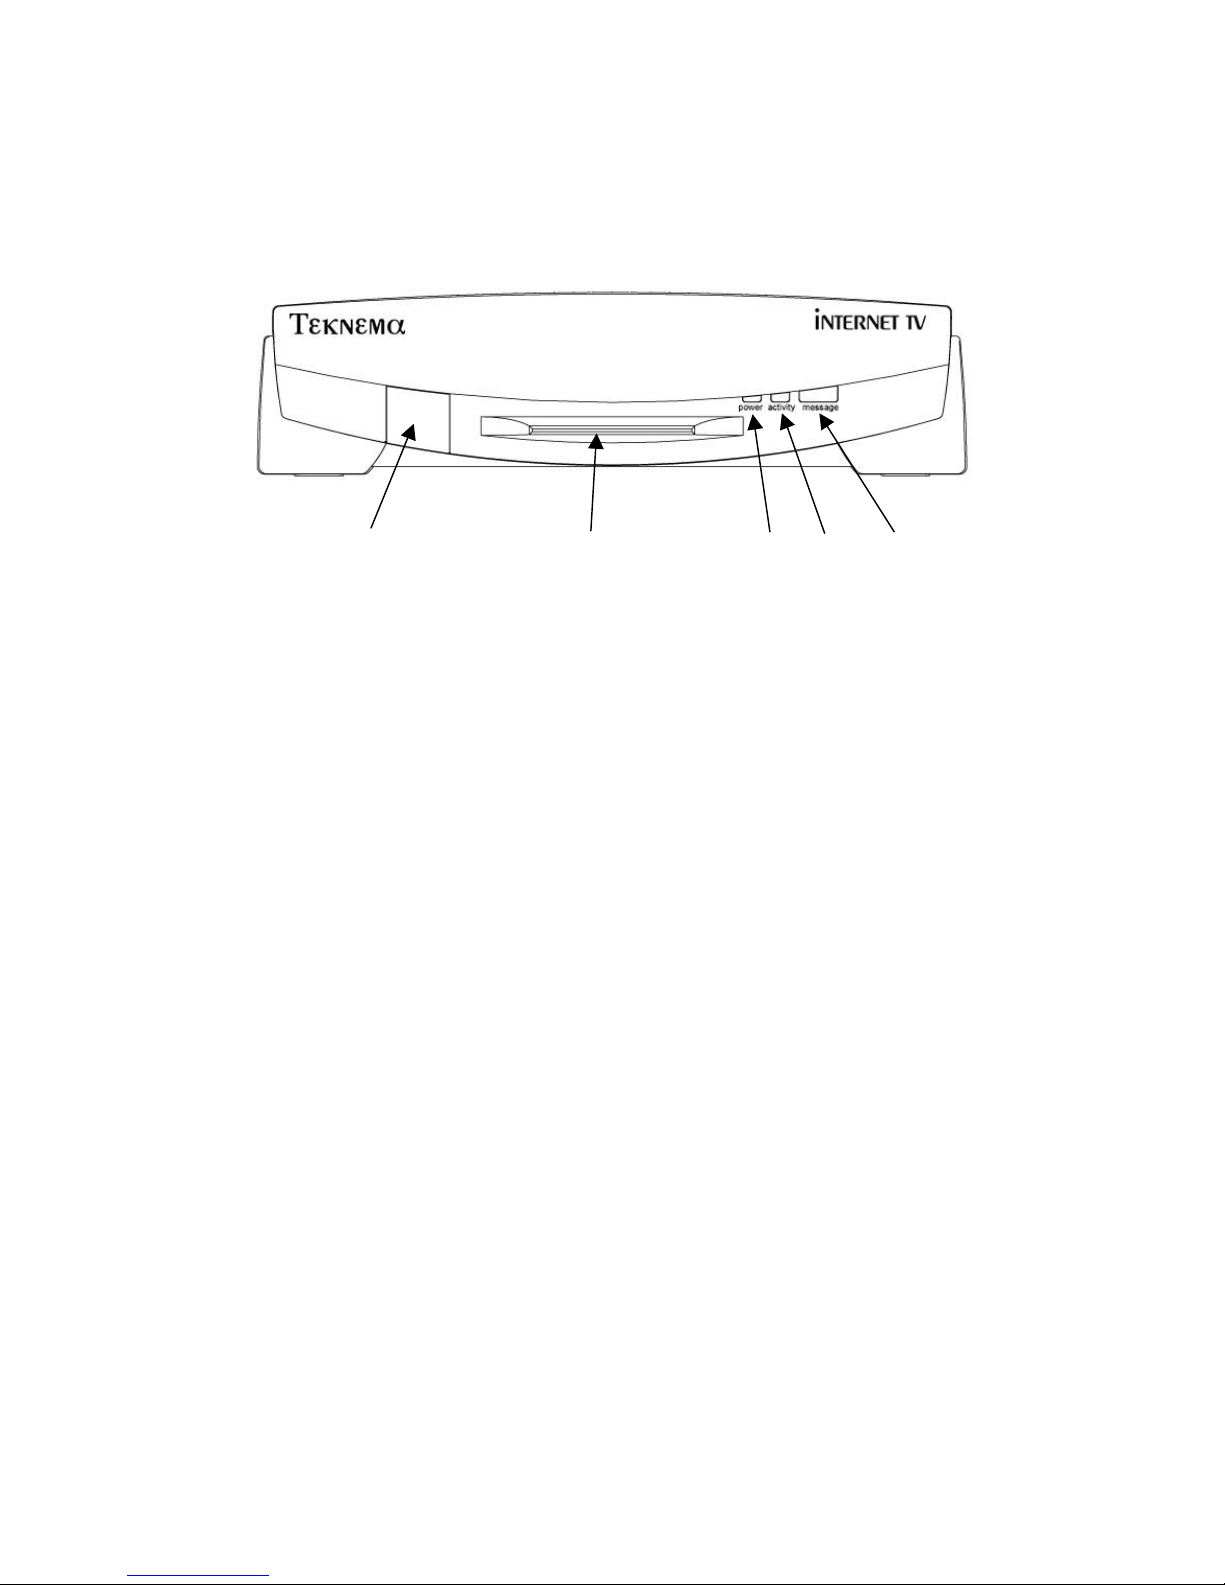
Front panel:
1 2 3 4 5
The front panel of the Teknema Internet TV Set-Top Box has three lights:
• Power (item 3 above) - this is lit when the unit is powered on.
• Activity (item 4) - it is off if the unit is disconnected from the Internet; it is on if the unit is
online and blinks while the modem is sending or receiving data.
• Message (item 5) - it is on if there are new email messages.
The Infrared Window (item 1 above) receives signals from the Remote Control and the optional
keyboard . A Smart Card Slot (item 2) will be used in the future for secure commercial
transactions, identification procedures and so on, as service and content providers start offering
those services over the Internet.
The Infrared Remote Control
Before using the Remote Control for the first time, open its back, and insert the supplied batteries.
Pay attention to the plus and minus polarity marks inside the remote. Make sure the + sign
printed on the battery matches up with the + sign shown inside the case.
If you later notice batteries need replacement, use only high-quality AA alkaline type batteries
from a major manufacturer. Avoid mixing batteries of different brands.
The Remote Control gives you full control over your Teknema Internet TV Set-Top Box with its
extensive set of function keys. Although it might seem intimidating, you can actually begin using
the Internet TV Set-Top Box with only a few keys of the remote, since most functions are also
available through on-screen buttons. Later, as your experience grows, you can become familiar
with the other keys in order to move faster between the functions of your Internet TV Set-Top
Box.
The basic functions performed by the remote control are:
• controlling the on-screen pointer
• making selections
• scrolling the pages
8 Getting Started
 Loading...