

Page 1
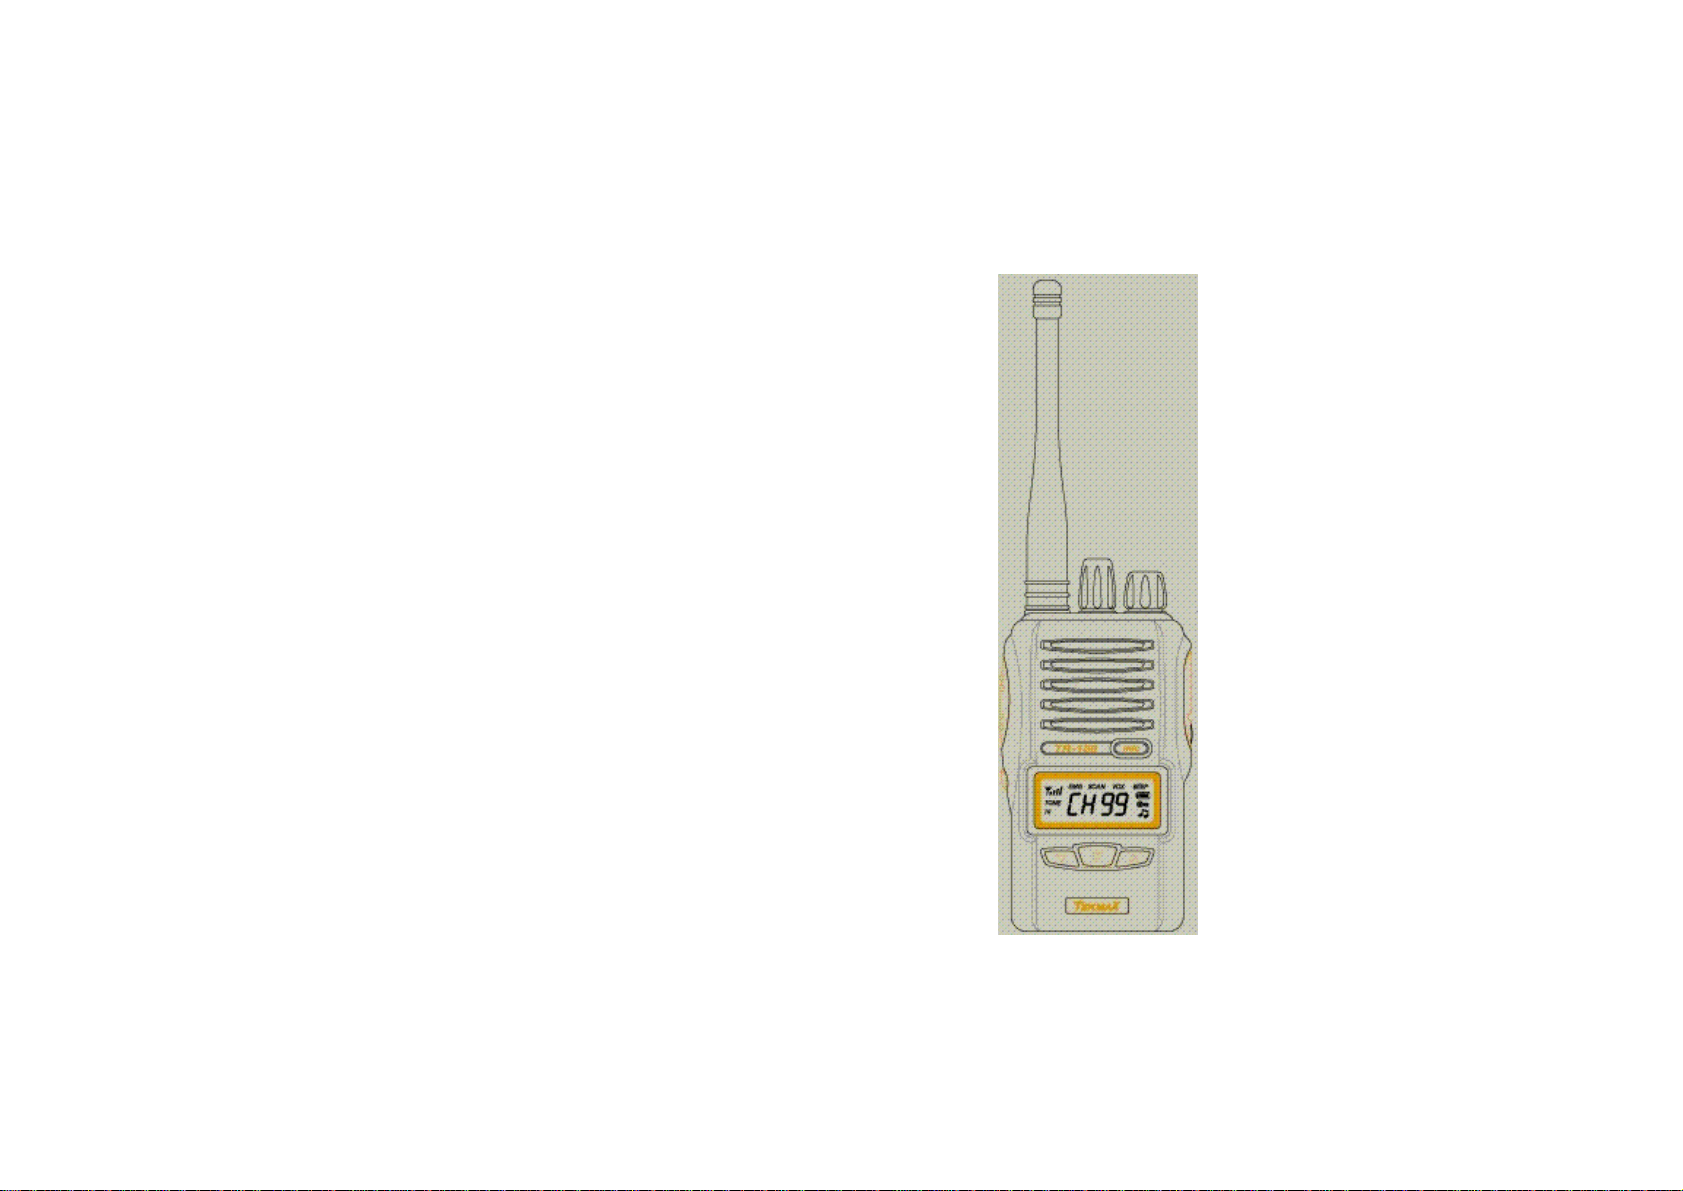
TR-450H
USER MANUAL
TR-450H
1
TEKMAX TELCOM CO., LTD.
Page 2
Thank you for choosing Tekmax Telecom for your
ransceivers is prohibited by law in the areas
Safety Information
professional portable radio applications. This transceiver is
convenient for you to use and designed to maximize its
efficiency for everyone.
TEKMAX TELECOM TR series transceiver will meet and
surpass your every day working demand by its quality and
functionality combined with the latest technoloy.
Manual is for:
TR-450H :UHF FM TRANSCEIVER
Notice :
o Operating unlicensed radio t
under government control.
o Illegal operation can be punished by fine or imprisonment.
o Call for service to the qualified Tekmax technicians only.
1) Warning
o Do not hold the radio in such a manner that the antenna is
next to, or touching, exposed parts of the body, while
transmitting.
o Do not let children to operate transmitter ? equipped radio
equipment.
2) Caution
Do not operate the radio near unshielded electrical
blasting caps or in an explosive atmosphere unless it
is a type especially designed and qualified for such
use.
Do not press and hold the transmit switch(P-T-T)
when not actually wishing to transmit.
Never use the radio in an aircraft
Safety : Users should understand hazards common to
the operation of transceivers.
2
Never use the radio near to sensitive medical
equipment or in areas where instructed not to do so,
e.g. Petrol filling stations
When used in a vehicle, do not mount the radio unit
on or near the Airbag or Airbag activating device.
The use of an accessory not recommended or
supplied by Tekmax Telecom may cause damage to
equipment or injury to personnel, and will invalidate
Page 3

warranty.
When using any of the charging accessories, the
mains socket-outlet must be installed near the
equipment.
The outlet must not be obstructed and must be easily
accessible at all times.
Never attempt to disassemble, modify or repair the
CONTENTS
1. GENERAL FEATURES
2. PACKAGE
3. CONTROLS AND OPERATING BASICS
unit unless the work is carried out by a Tekmax
Telecom approved Dealer.
Incorrect assembly, modification or repair may cause
irreparable damage to your unit and will invalidate
warranty.
For service or repair always return your radio to an
authorized Tekmax Telecom Dealer.
4. SPECIFICATIONS
5. WARRANTY
6. DECLARATION OF CONFORMITY
3
Page 4

1. GENERAL FEATURES
1) Ultra compact and light
2) Frequency programmable
3) 128 channels
4) CTCSS / DCS
5) Output control on the transceiver
6) VOX built-in
7) Rechargeable & Separable Li-ion battery
8) Battery charging indicator
9) Display Icons on LCD
10) Emergency alert
11) Comply to IP-54 & Mil-std 810F
12) CE/FCC approval
1. Usage of the equipment
This FM handheld radio transceiver is designed to
communicate between users through RF carrier by pressing
the PTT button to talk and releasing the PTT button to
receive a voice. And this equipment is widely used
everywhere both in-door and out-door communication
purpose
2. FCC Regulations
Your FM Handheld Transceiver generates RF
electromagnetic energy during transmit mode.
This radio is designed for and classified as Controlled
Exposure/Occupation Environment, meaning it must be
used only during the course of employment by individuals
aware of hazards and the ways to minimize such hazards.
This radio is NOT intended for use by the General
Population/ Uncontrolled Environment.
This radio complies with FCC RF radiation exposure limits
set forth for a controlled environment.
This radio should be installed and operated with a minimum
distance of 2.5cm between the radio and your body.
Therefore, to ensure that your exposure to RF
electromagnetic energy is within the FCC allowable limits for
occupational use, always follow below information.
Do not operate the radio without a proper antenna as
this may damage the radio and may also cause you
to exceed FCC RF exposure limits.
A proper antenna is the antenna supplied with this
radio by the manufacturer or an antenna specifically
authorized by the manufacturer for use with this radio.
4
Page 5
Do not transmit for more than 50% of total radio use
time(50% duty cycle). Transmitting more than 50%
of the time can cause FCC RF exposure compliance
requirements to be exceeded.
Always use TEKMAX supplied accessories
(antennas, batteries, belt clips, speaker/MIC, etc.).
Use of unauthorized accessories can cause the FCC
RF exposure compliance requirements to be
exceeded.
Always keep the radio at least 15cm away from the
face when transmitting and only use the belt-clip
when attaching the radio to your belt, etc., to ensure
FCC RF exposure compliance requirement are not
exceeded.
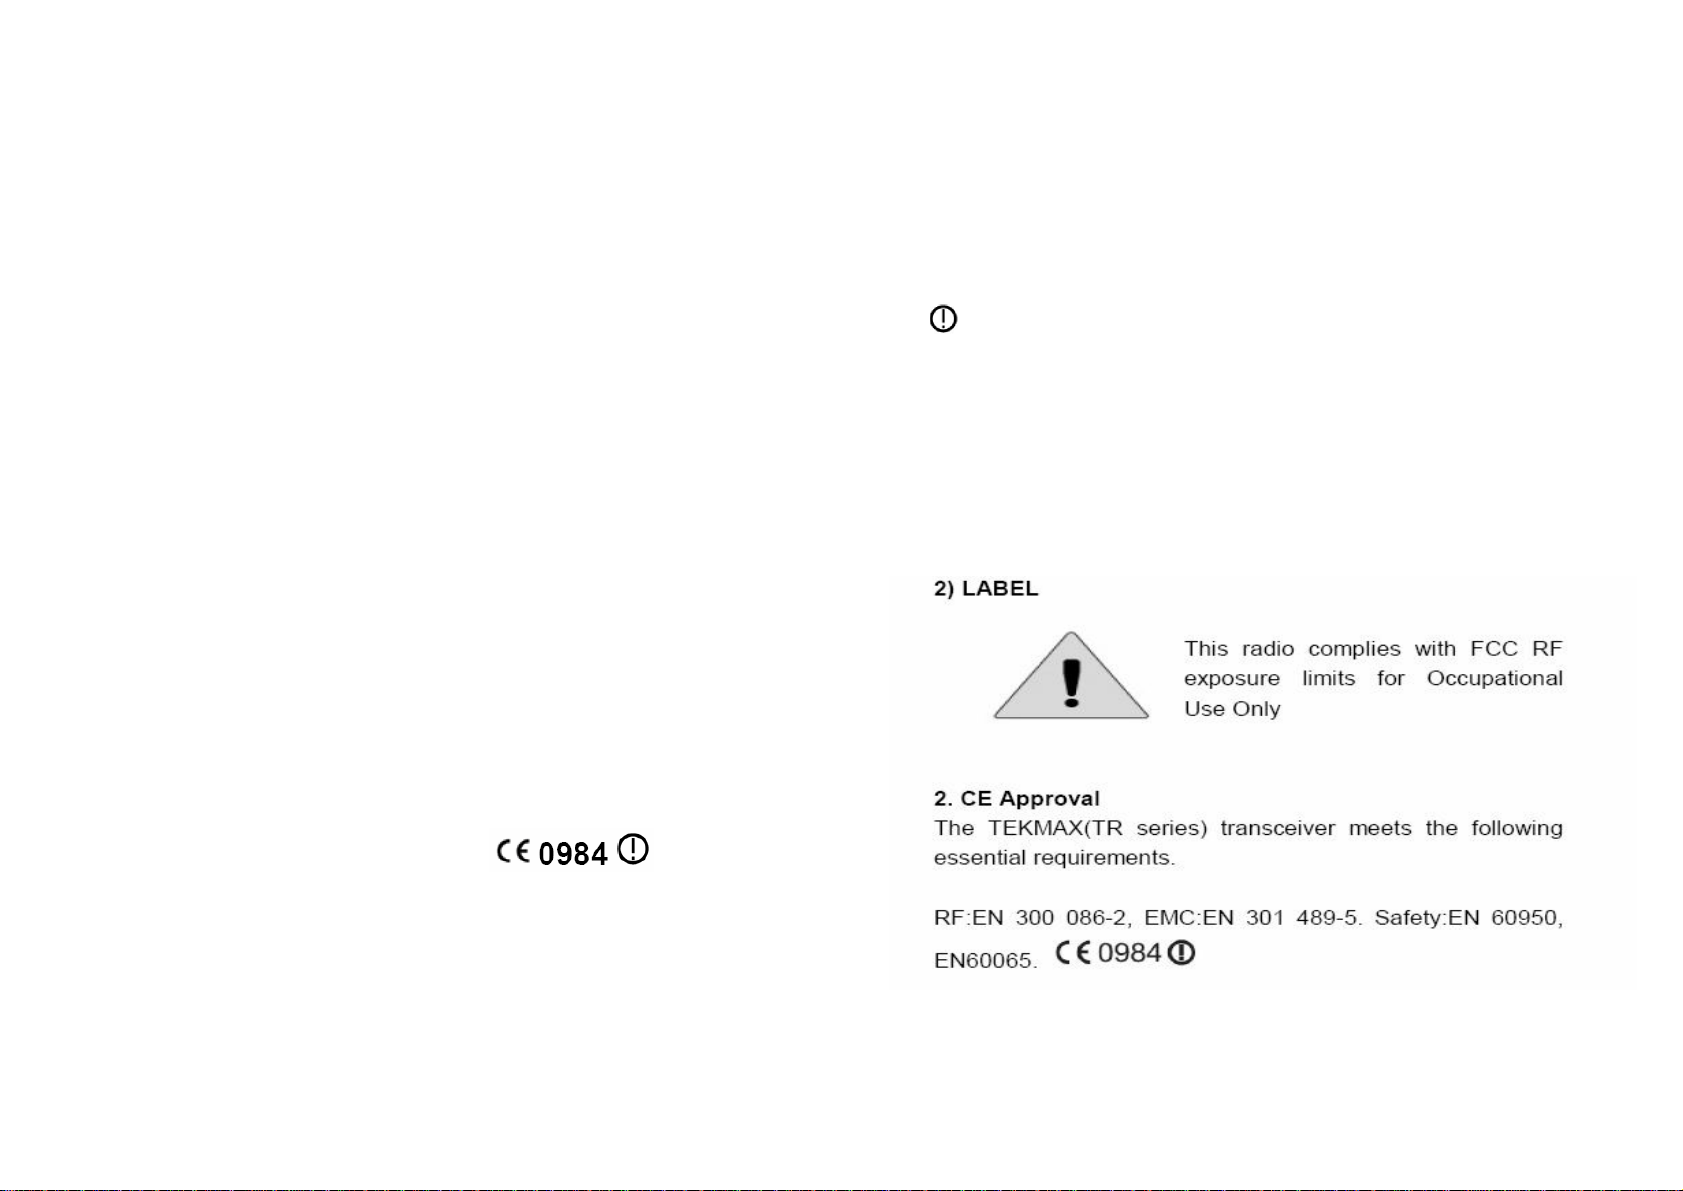
This radio complies with FCC RF exposure limits for
occupational use only.
3) CE Regulations
Hereby, TEKMAX TELECOM, declares that this equipment
complies with the essential requirements and other relevant
provisions of Directive 1999/5/EC.
This equipment is marked with the symbol
and can be used throughout the European community.
This indicates compliance with the R&TTE Directive
1999/5/EC and meets the relevant parts of following
technical specifications:
This equipment can be used for both Indoor and outdoor
voice communication purpose. And the maximum power 5W
for the 136-174MHz frequency band ranges.
Each channel frequencies is to be PC Programmable and
the channel frequencies are allocated by individual
government authorities independently.
Caution : Exposure to Radio Frequency Radiation
To comply with RF exposure compliance requirements, for
mobile configurations, a separation distance of at least 25
cm must be maintained between the antenna of this device
and all persons.
EN300 086 v1.1.1(Radio Spectrum)
EN301 489-5 v1.3.1(EMC)
EN60950-1 & EN50360(SAFETY)
5
Page 6
2. PACKAGE
o Preparation before use
Unpack the transceiver carefully. We recommend you to
check the following items in the table before discarding the
packing materials. In case of absence or damage of items
during shipment, inform the carrier immediately.
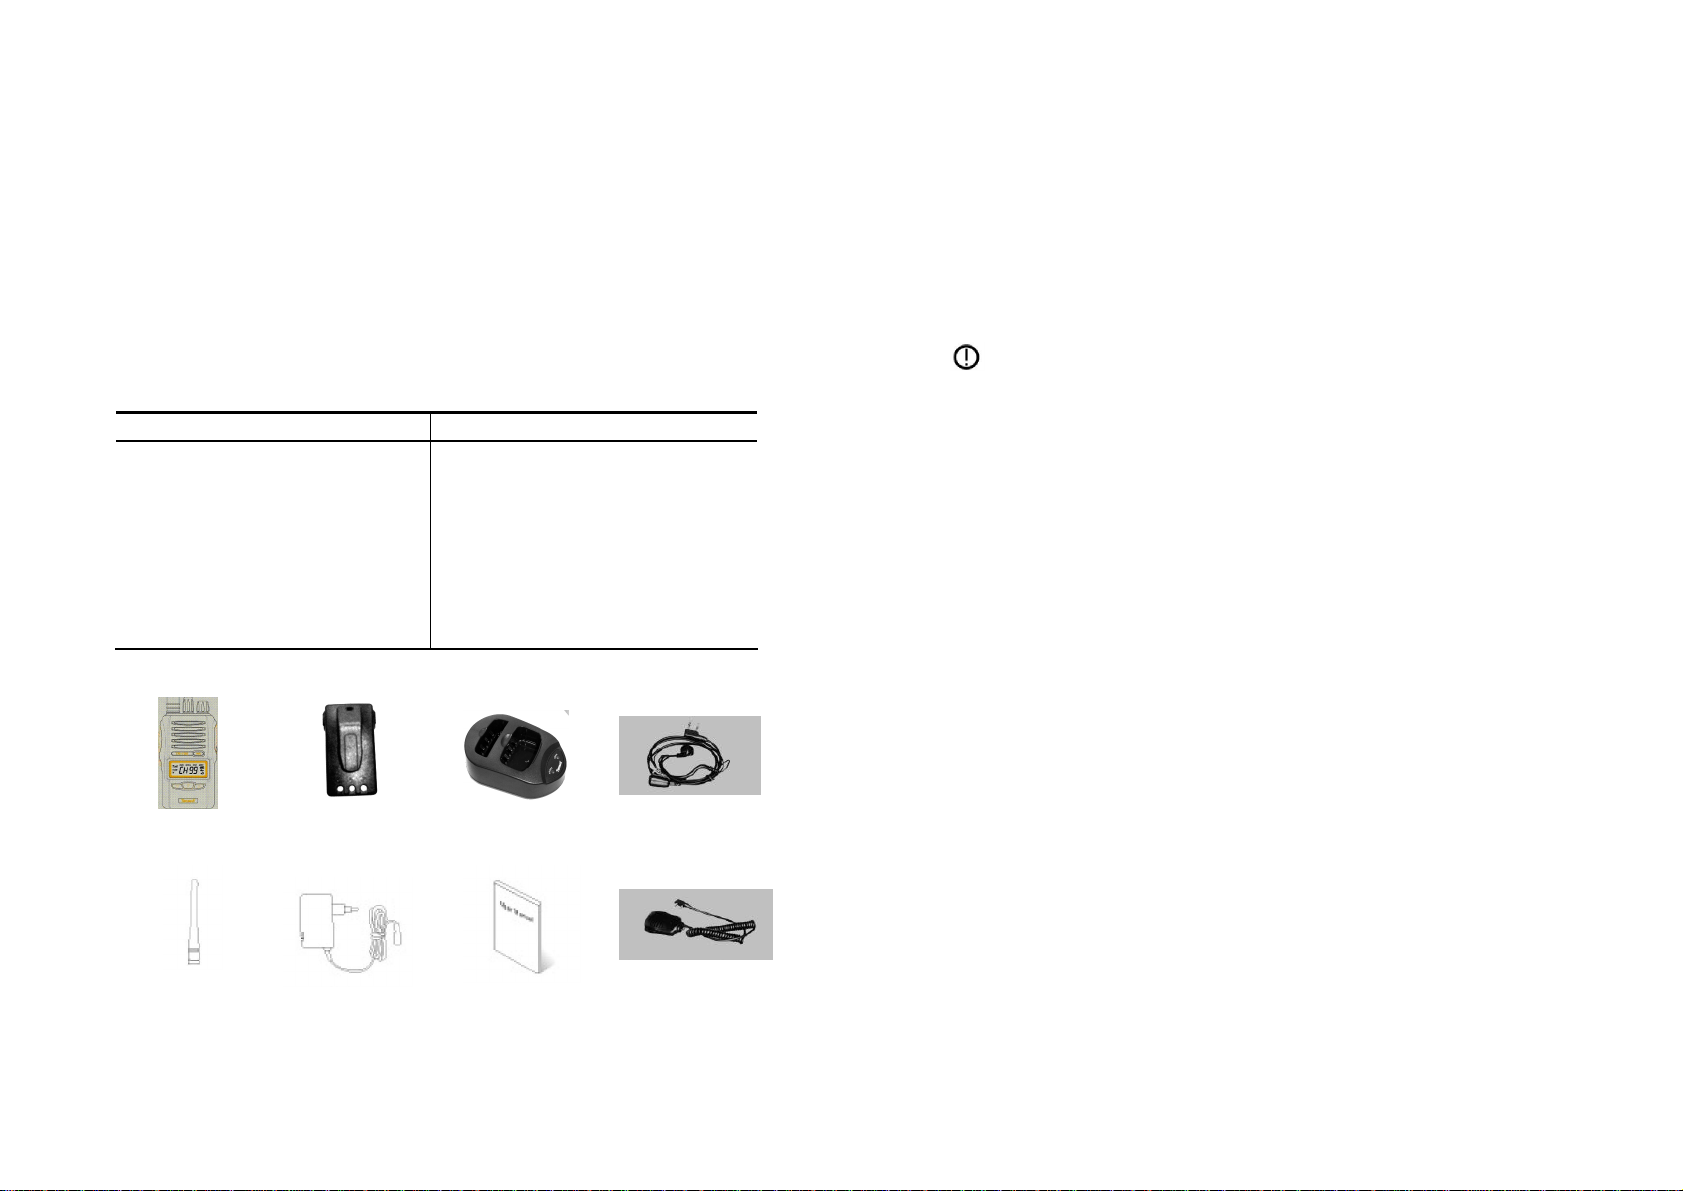
o Accessaries
Supplied Accessories Optional Accessories
Transceiver
Battery 1EA Speaker MIC
Adapter 1EA
Charger 1EA
Belt Clip 1EA
User Manual
1EA Microphone 1EA
1EA
Antenna 2PCS
1EA
Transceiver
Battery
with Belt Clip
Charger
Microphone
Antenna
Adapter
User Manual
Speaker MIC
Installing Antenna
Screw the antenna into the connector clockwise until
secured, do not over tighten.
Caution
- Never hold by the antenna when carrying the
transceiver.
- Transmitting without an antenna may damage the
transceiver.
Installing Belt clip
Insert belt clip into the groove of battery pack.
Push it downward until TICK sound heard.
To separate it from the pack, pull the LOCK knob by your
finger nail and push it upward.
Installing & removing battery pack
Insert the 3 latches on the bottom of battery pack into the
3 receptor holes on the bottom of radio body.
Push the top of the battery pack toward the
radio body until a CLICK sound is heard.
To separate the battery pack from the radio, push the 2
side knobs downward simultaneously and pull the battery
pack away from the body of the radio.
6
Page 7
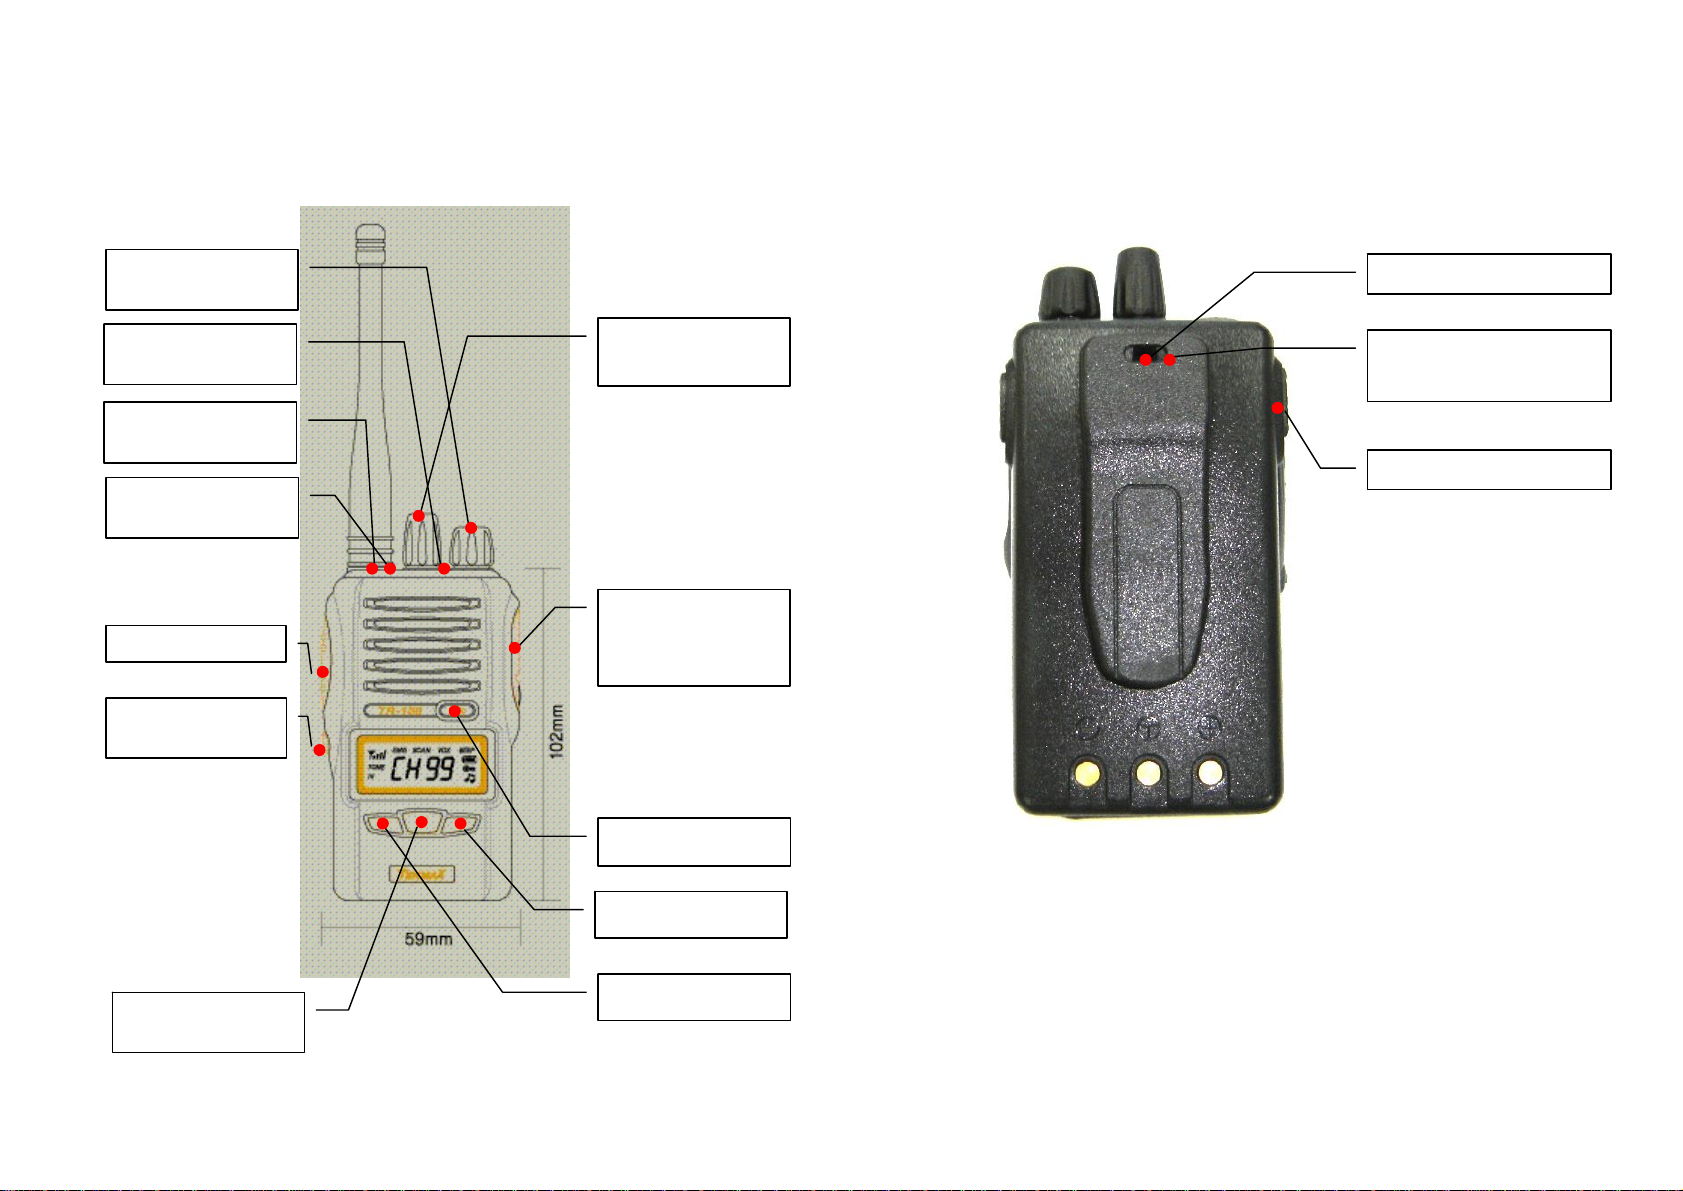
3. CONTROLS & OPERATING BASICS
Channel
Switch
2) Emergency
Button
) Antenna
Connector
button
External
9) PTT button
Monitor
button
o Controls & Description
1)Power/Volume
3
4) LED Lamp
10)
8)
Switch
6)
EAR/MIC/PCProgramming
7) MIC Hole
13) Hand Strap Hole
14) Belt Clip
Lock-Unlock
15) Battery Lock Knob
5) ¡F¡ (MENU)
7
<FRONT>
12) ¡B¡ button
11) ¡A¡ button
< BACK >
Page 8
1) Power/Volume Switch : Turn it clockwise to switch ON
10) Monitor button : Press this button to remove squelch or
the transceiver and rotate it to adjust the volume.
To switch OFF the transceiver, turn it counter-clockwise
fully until a CLICK is heard, do not over wind the switch
beyond the CLICK.
2) Emergency Button : Press this key when you are faced
with emergency.
3) Antenna Connector: Connect the supplied antenna here.
4) LED Lamp :
RED ON Transmitting
GREEN ON Receiving, Monitoring
RED/GREEN ON DTMF Transmitting
5) ¡ F¡(menu) button : To enter menu setting mode, press
this button. To enter the Selective Call mode, hold down
this button for more than 3 seconds.
6) External EAR/MIC/PC-Programming: Open the cap and
connect the external EAR/MIC to use Microphone,
Earphone and PC-programming.
7) MIC Hole
8) Channel Switch : Turn this clockwise or counter
clockwise to select the channels or change the setting of
functions.
9) PTT(Push To Talk) button : Press this button to transmit,
release it to receive.
tone squelch.
11) ¡ A¡ Button: Press it quickly to switch over transmitting
output(High-Low), press it longer time for channelscanning.
12) ¡B¡ Button : Press it quickly to save the setting of
functions, press it longer time for key-lock,
13) Hand Strap Hole
14) Belt Clip Lock-Unlock
15) Battery Lock Knob
8
Page 9
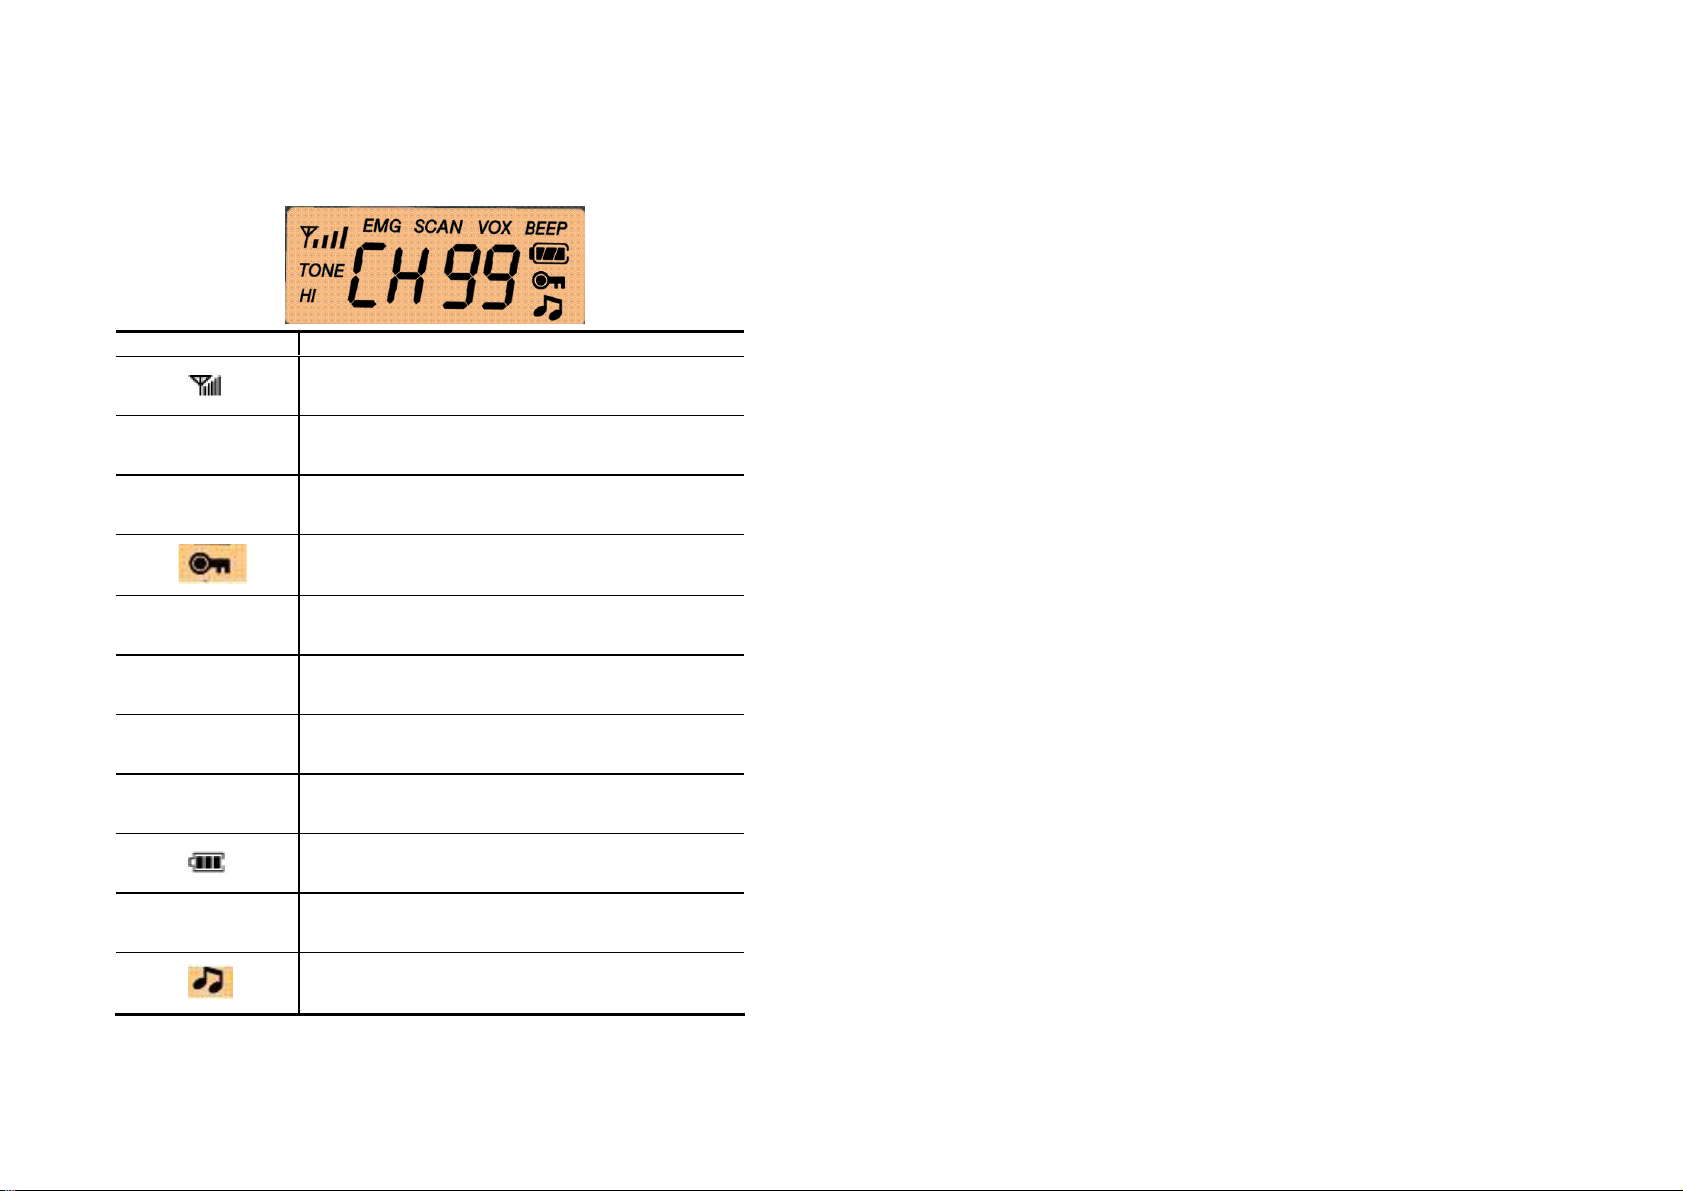
LCD display & Icon
Display
Details
e signal strength while receiving /
Operating Basics
1. Power On/Off
1) Turn the Power switch clockwise to turn the radio power
ON and turn the switch counter clockwise to turn the radio
Indicates th
transmitting
power OFF.
2) If you turn on the radio power, all the icons will be
displayed on the LCD with backlight in orange with
beep sound.
TONE
Appears when tone is set up
3) The latest saved channel is displayed on LCD.
HI Low
Indicates intensity of transmit output power
2. Transmitting
Appears when buttons are locked
1) Select the desired channel by turning the Channel Switch.
2) Hold down the PTT button for duration of TALK and
BEEP
Indicates beep sound ¡on¡ when a key pressed.
speak in to the MIC.(Keep the radio 3~4cm away from your
mouth for clear voice communication.)
EMG
VOX
Emergency
VOX
3) The LED lights red and antenna bar icon is displayed on
the LCD according to the output power of being transmitted.
4) Release the PTT button to receive.
TOT
CHXX/XXX
9
Time-Out Timer
Battery level indication
Channel
Indicates the receiving of Selective Call.
(NOTE)
1) When DTMF tone is set up as ON mode, DTMF tone
activates when you press the PTT button and the voice is
transmitted to the receiving radios after DTMF tone.
2) When BCLO is set up as ON mode, PTT does not work
while receiving.
3) When TOT is set up as ON mode by PC programming, If
the programmed transmitting time is over, it turns to the
Page 10

receiving mode automatically. At this time, release the PTT
6. Selective Call mode
button and then press it again for re-transmitting.
3. Receiving
1) Select the desired channel to receive by Channel Switch.
2) The LED lights green while receiving.
3) If the sub-tone (CTCSS/DCS) of the incoming call doesn¡t
match your sub-tone, you cannot hear the voice.
4) The LED lights green and the strength of receiving signal
is displayed on the LCD.
(Note)
If you need to receive all the signals, press the M(Monitor)
button (M). Noise is heard and if you press it for about 3
seconds, monitoring function will be kept with beep sound. If
you press the M(monitoring) button once more, monitoring
function will be released.
4. Changing channels
Select the desired channel using the Channel Switch.
5. Key Lock
This function prevents users from changing the channel
inadvertently.
You can send a call individually to the registered IDs
programmed by PC.
1) Press ¡F¡ button for more than 3 seconds to enter
selective call mode.
2) Select the desired channel using Channel Switch
(C001~C999)
3) Press ¡F¡ button short to transmit and calling sound
is generated.
4) The caller¡s ID is displayed on the receiver¡s LCD
and press the PTT button to talk.
5) To escape from the CALL mode, press the ¡B¡ button.
USER SELECTABLE MENUS
(These are Tekmax dealer programmable)
1) Press ¡F¡ button to enter MENU and press it one by
one to move to the desired MENU.
2) Change the settings using Channel Switch.
3) Press ¡B¡ button to save the settings.
1) Press ¡B¡ button for more than 3 seconds to lock,
2) Key lock icon appears on the LCD when the keys are
locked and press it for more than 3 seconds to
unlock keys, it disappears on the LCD when the keys
unlocked.
10
Page 11
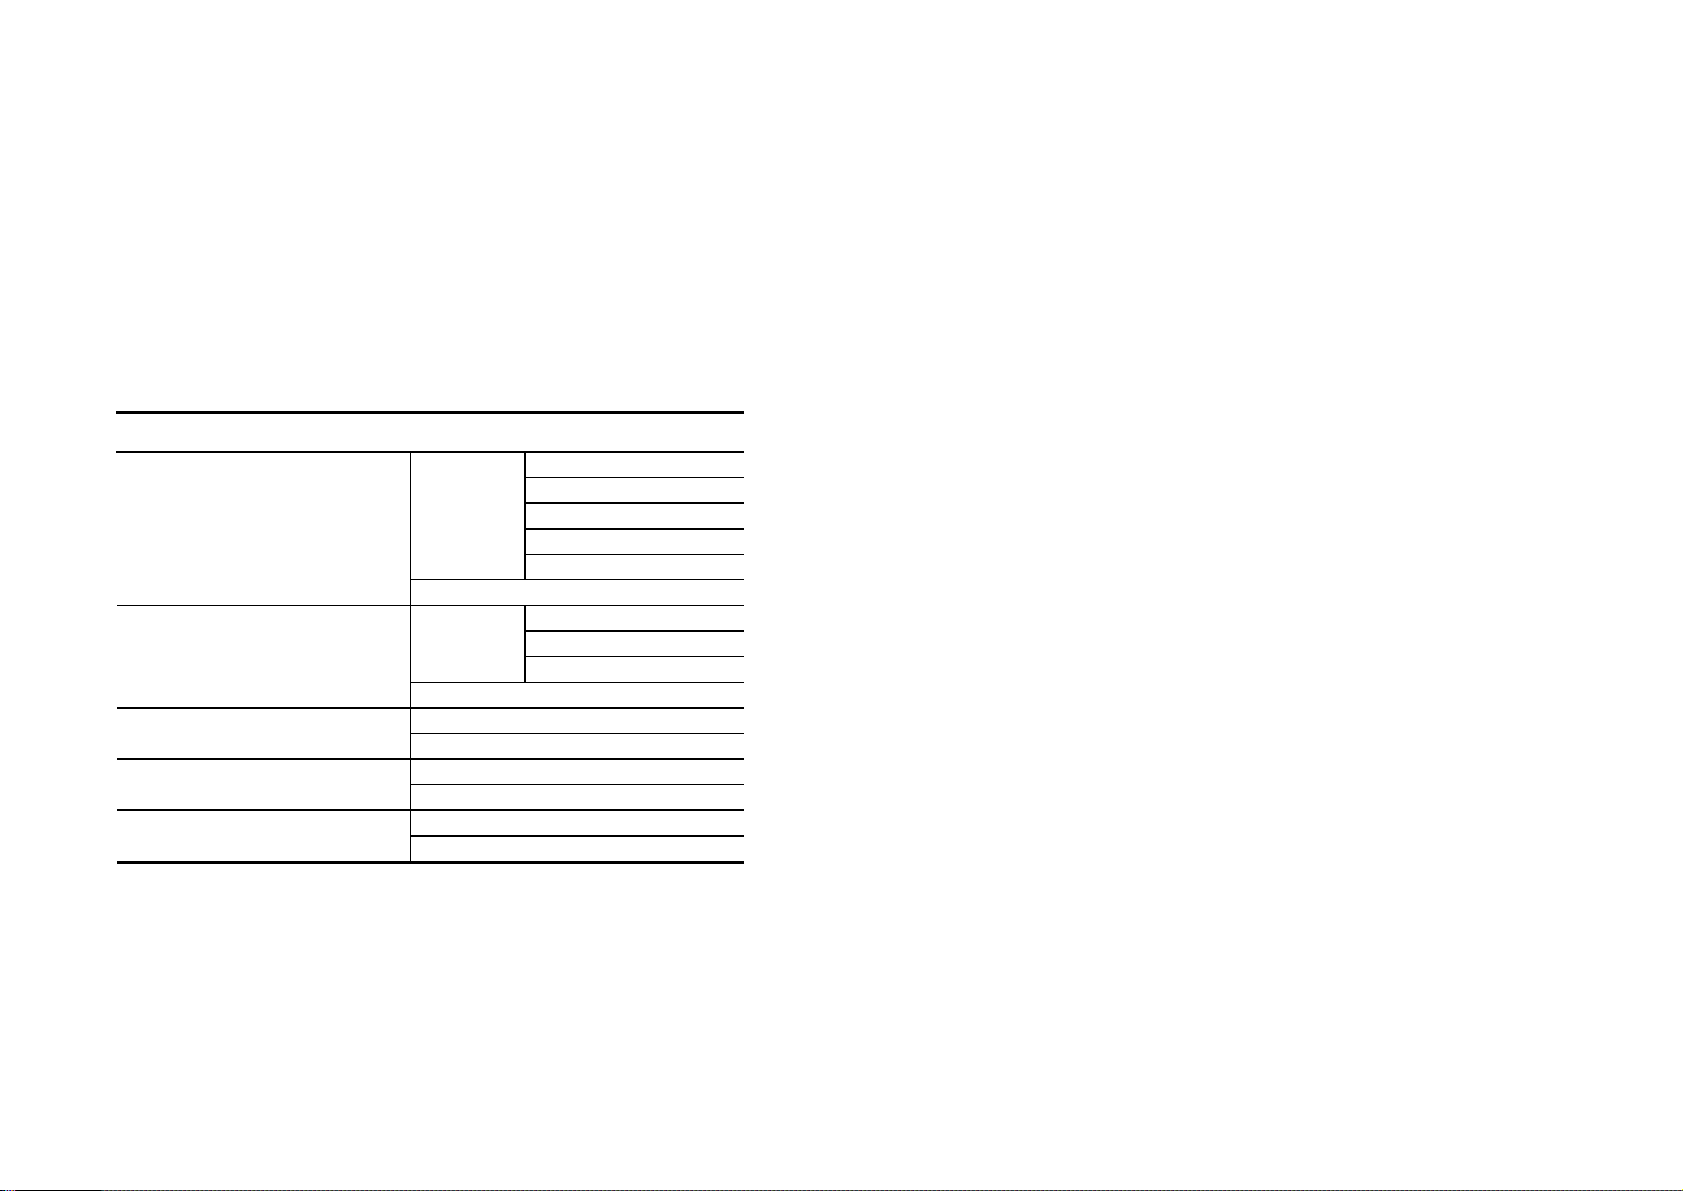
MENU SETTINGS
(BUSY CHANNEL LOCK
-
OUT)
tAOF
1. VOX
Press ¡F¡ button to enter menu setting mode, then you can
set the following functions. If you do not select any menu for
over 15 seconds, it will turn back to the stand by mode for
receiving signal. Some of these functions may be
programmed out by your Tekmax dealer and as such not
available to you through your menu setting mode.
MENU
LE01
LE02
VOX
BEEP
DTMF
TA(TALK AROUND)
ON
ON
LE03
LE04
LE05
OFF
bt01
bt02
bt03
OFF
dtON
dtOF
bLON BCLO
bLOF
tAON
Internal Voice Operated Transmit allows you to talk without
pressing the PTT button. Voice transmission automatically
activates by your voice when VOX is on.
VOX ON
1) Press ¡F¡ button to find VOX icon.
2) Select On using Channel Switch.
3) Press ¡F¡ button again and ¡LEXX¡ appears on the
LCD.
4) Select the voice level(LE01~LE05) using Channel
Switch.
5) Press ¡B¡ button to save the setting.
VOX OFF
1) Press ¡F¡ button to find VOX icon.
2) Select Off using Channel Switch.
3) Press ¡B¡ button to save the setting.
(Note)
LE01 : Very sensitive to voice level
LE03 : Standard level
LE05 : Not sensitive to voice level
※ If you need to go to the next menu, press ¡F¡ button.
Otherwise, save the current setting using ¡B¡ button to
return to the initial screen.
11
Page 12

2. BEEP melody
interfering with other parties who may be using the same
You can select the levels of beep tone being activated when
you press a button.
BEEP ON
1) Press ¡F¡ button to find BEEP icon.
2) Select On using Channel Switch.
3) Press ¡F¡ button again and ¡BtXX¡ appears on the
LCD.
4) Select the BEEP melody type (Bt01~Bt03) using
Channel Switch.
5) Press ¡B¡ button to save the setting.
BEEP OFF
1) Press ¡F¡ button to find BEEP icon.
2) Select Off using Channel Switch.
3) Press ¡B¡ button to save the setting.
3. DTMF
If you set this function at ON mode, your specific DTMF
tones are generated when you press the PTT button. By
detecting specific DTMF, the base station can monitor radio
users.
1) Press ¡F¡ button to find DtON/OFF icon.
channel you selected.
1) Press ¡F¡ button to find bLON/OFF icon.
2) Select ON/Off using Channel Switch.
3) Press ¡B¡ button to save the setting.
5. TA(Talk Around)
You may experience an occasional communication
interruption being caused by a power failure or problems in
the repeater system. When such a case occurred, you can
continue communication by using the Talk-Around feature. If
you set this feature at ON mode, Talk-Around allows you to
communicate directly with other transceivers without
passing through the repeater. However, the communication
range without the aid of repeater system will be limited to
the transceiver¡s individual coverage.
1) Press ¡F¡ button to find tAON/OFF icon.
2) Select ON/Off using Channel Switch.
3) Press ¡B¡ button to save the setting.
6. Channel Scanning
If you enter the channel scan mode, you can monitor the
2) Select ON/Off using Channel Switch.
3) Press ¡B¡ button to save the setting.
4. BCLO(Busy Channel Lock-Out)
If you set its function at ¡ON¡ mode, it prevents you from
12
other channels.
1) Press the ¡A¡ button for more than 3 seconds for
Channel Scanning.
2) Press the ¡B¡ button to stop scanning.
Page 13

Additional Functions
4. CTCSS / DCS TONE Frequency Table
1. Emergency Call
When you are placed under an emergency situation, press
the Emergency button(Orange button on the top) over 1
second.
2. Low Battery Warning
When the remaining battery capacity falls below a certain
level, the Battery icon will blink with a warning sound. In this
case, it is recommended that you either change or recharge
the battery pack as early as possible.
3. TOT(Time-Out Timer)
This feature limits the continuous transmission time on a
channel. If the TOT function is programmed by PC, the
transmission is automatically terminated according to the
programmed TOT and return to the stand by mode.
.
* Lone worker
This feature is PC programmable by your Tekmax Dealer. The lone
worker feature will ensure that any person at risk and alone will have
to regularly reset their radio¡s lone worker operational time by
pressing the PTT with a preset pre-alarm period (normally 10 to 60
seconds). If the person at risk or alone does not press the PTT
during the pre-alarm period, the radio will send an emergency toned
call indentifying the radio number to other radio net users.
o CTCSS Table
No
1 67.0 14 107.2 27 167.9
2 71.9 15 110.9 28 173.8
3 74.4 16 114.8 29 179.9
4 77.0 17 118.8 30 186.2
5 79.7 18 123.0 31 192.8
6 82.5 19 127.3 32 203.5
7 85.4 20 131.8 33 210.7
8 88.5 21 136.5 34 218.1
9 91.5 22 141.3 35 225.7
10
11
12
Frequency No Frequency No Frequency
13 103.5 26 162.2
94.8 23 146.2 36 233.6
97.4 24 151.4 37 241.8
100 25 156.7 38 250.3
13
Page 14
o DCS Table
UHF
TR-450
No Code
No Code
No Code
No Code
4. Specifications
Model
1 023 22 143 43 315 64 532
2 025 23 152 44 331 65 546
3 026 24 155 45 343 66 565
4 031 25 156 46 345 67 606
5 032 26 162 47 351 68 612
6 043 27 165 48 364 69 624
7 047 28 172 49 365 70 627
8 051 29 174 50 371 71 631
9 054 30 205 51 411 72 632
10 065 31 223 52 412 73 654
11 071 32 226 53 413 74 662
12 072 33 24 54 423 75 664
13 073 34 244 55 431 76 703
14 074 35 245 56 432 77 712
15 114 36 251 57 445 78 723
16 115 37 261 58 464 79 731
17 116 38 263 59 465 80 732
18 125 39 265 60 46 81 734
GENERAL
Frequency Range
400~430(L)
440~470(H)
Number of Channels 128 CH
Temperature Range -20 ~ +60
Operation Voltage 7.4V DC
Battery life 8 hours
Size 59mmx102mmx32mm (Including battery)
Weight 250 g (w/ Battery, Antenna, Belt clip)
Transmitter
Channel Bandwidth 12.5KHz / 25KHz
Modulation Type 8K50F3E / 16K0F3E
Output 1W / 5W 1W / 4W
Frequency Stability 0.00025%
Spurious emission - 65dBc
Hum & Noise < -45dB
Max Deviation 2.5KHz at 12.5KHz / 5KHz at 25KHz
Audio Distortion < 5% at 1KHz 60% deviation
Audio Response +1 ~ -3dB
Receiver
Sensitivity < 0.25uV
19 131 40 271 61 503 82 743
20 132 41 306 62 506 83 754
21 134 42 311 63 516
Inter-Modulation Rejection < -60dB
Squelch Sensitivity < 0.2uV
Audio Distortion < 5% at 1KHz 60% deviation
Audio Output < 500mW
14
Page 15
5. Warranty
This indicates compliance with the R&TTE Directive
Tekmax Telecom Co., Ltd. Warrants that each Tekmax
products is free from detects in both material and
workmanship, and that Tekmax will repair or replace, at
Tekmax¡s sole option any parts which are determined by
Tekmax to be defective in material or workmanship. This
Limited Warranty will cover the period from the date of
delivery to the original purchaser from our initial
distributor/dealer for a term of 12 months.
However, in any events, the Limited warranty will not exceed
13 months from the date of bill of landing. This Limited
Warranty does not cover any defects which result from
misuse, improper repairs, unauthorized alteration or
modification of circuital/mechanical parts or liquid damage
etc which adversely affects the performance and/or
durability of the radio.
6. DECLARATION OF CONFORMITY
Hereby, Tekmax Telecom declares that this equipment
complies with the essential requirements and other relevant
provisions of Directive 1999/5/EC.
1999/5/EC and meets the relevant parts of following
technical specifications :
EN300 086 v1.1.1(Radio Spectrum)
EN301 489-5 v1.3.1(EMC)
EN60950-1(SAFETY)
EN50360
Marking by the symbol indicates that usage
restrictions apply.
This equipment is intended for use in -
Austria, Belgium, Cyprus, Czech Republic, Denmark,
Estonia, Finland, France, Germany, Greece, Hungary,
Ireland, Italy, Japan, Latvia, Lithuania, Luxembourg, Malta,
Netherlands, Poland, Portugal, Slovakia, Slovenia, Spain,
Sweden, United Kingdom, Iceland, Liechtenstein, Norway,
Switzerland, Bulgaria, Romania, Turkey & USA
This equipment is marked with the
symbol and can be used throughout the European
community.
15
 Loading...