

Page 1

DOC--OEMCS6--Net--US--23/10/00
Network Information Guide
Page 2

The information in this documentation is not contractual in
nature. It is subject to modification without notice.
The software described in this manual is supplied under a
user license. Its use, duplication, or reproduction on any
media whatsoever, except as provided for under the terms
of the license, is not authorized.
No part of the manual may be copied, reproduced or
transmitted by any means whatsoever (unless it is for the
purchaser’s personal use) without the written permission of
Teklynx International.
E 2000 Teklynx International Co.
All rights reserved
Windowstttt is a registered trademark of Microsoftâ Corpora-
tion.
IBM, PC, AT PS/2 are registered trademarks of International
Business Machines,Inc.
Page 3

Table of Contents
About This Manual vii........................................
Welcome! vii............................................
Documents supplied vii...............................
Typographical conventions viii.........................
About your product viii................................
Installation Chapter 1 - 1...........................................
Installation options Chapter 1 - 1...................................
Centralized installation Chapter 1 - 1............................
Local installation Chapter 1 - 2..................................
Product description Chapter 1 - 3...................................
System requirements Chapter 1 - 3.................................
Installation procedure Chapter 1 - 4.................................
Before you start Chapter 1 - 4...................................
Server installation Chapter 1 - 5.................................
Workstation installation Chapter 1 - 6............................
Installing the software protection key Chapter 1 - 7..............
Workstation uninstall Chapter 1 - 8..............................
Server uninstall Chapter 1 - 8...................................
Using the Network Version Chapter 2 - 11..........................
Managing users Chapter 2 - 11.......................................
License Manager Chapter 2 - 11..................................
The License service Chapter 2 - 14................................
Maximum number of users Chapter 2 - 18........................
Managing shared resources Chapter 2 - 19...........................
Individual configuration files Chapter 2 - 19.......................
Shared document files Chapter 2 - 19.............................
1
2
Page 4

Network Information Guideii
Shared global v ariables Chapter 2 - 19............................
Shared printing log file Chapter 2 - 20............................
Shared printers Chapter 2 - 20...................................
Shared file timeout Chapter 2 - 21................................
Printing Chapter 2 - 21...........................................
Notes for the attention of the network administrator Chapter 2 - 22...
Folders Chapter 2 - 22............................................
Configuration file Chapter 2 - 24..................................
File for shared printers Chapter 2 - 25............................
Example of sharing a p rinter Chapter 2 - 26..........................
Sharing a printer in Windows Chapter 2 - 26......................
Displaying the status of current print jobs Chapter 2 - 27..........
Index Chapter 3 - 28.................................................
3
Page 5

About This Manual
Welcome!
Congratulations, you have just purchased the world’s leading
automatic identification software package!
This label design software allows you to create and edit complex
labels fast, and is capable of integrating all the electronic data
from across your company, guaranteeing the full integrity of
your systems.
The application meets all your automatic identification needs,
and fits perfectly into your production process.
It is quite simply the MOST USER-FRIENDLY AND INTUITIVE
SOLUTION on the market today for any company involved in
complex barcode data entry, collection and editing in real time.
Complete documentation is provided to help you make full use of
all the resources offered by your label design software.
The Network Information Guide provides all the information
necessary for installing and making optimum use of your
network version.
The Quick Start Guide takes you through the installation process
and provides an introduction to the basic f unctions of the
software interface.
The User’s Guide presents the basic concepts involved, helping
you to get the very most from your software. A wealth of
examples enables you to put the ideas covered straight into
practice.
Documents
supplied
Page 6

viii
Network Information Guide
The documentation has been designed to be used in conjunction
with the integrated Online Help.
This manual distinguishes between different types of information
by using the following conventions:
S terms taken from the inte rface itself, such as commands,
appear in bold;
S keys appear in small caps, as in the following example:
”Press the
SHIFT key”;
S numbered lists mean there is a procedure to follow;
S when the conjunction ”OR” appears next to a paragraph, it
means there is the choice of another procedure for carrying
out a given task ;
S When a menu command contains submenus, the menu name
followed by the command to select appears in bold. Thus,
”Choose File Open” means choose the File menu, then the
Open command.
This symbol highlights important information about how a particular command or procedure works.
Following this symbol you will find hints and tips for optimizing
tasks, speeding up commands, and so on.
This symbol indicates an introductory exercise for you to work
through.
Some of the functions described in this manual may not be
available in your product.
For the complete list of specific features and functions available
in your software, refer to the specifications sheet provided with
the product.
Typographical
conventions
About your
product
Page 7
Installation
Installation options
The network version can be installed in one of two ways:
S Centralized installation: the software is installed on the
network file server, thus reducing the amount of disk space
required on each workstation.
S Local installation: the software is installed on each individ-
ual workstation with only shared files and the installation
program being copied to the server. This option reduces the
volume of data exchange across the network.
One workstation on the network must be chosen to act as the
server for the label design software.
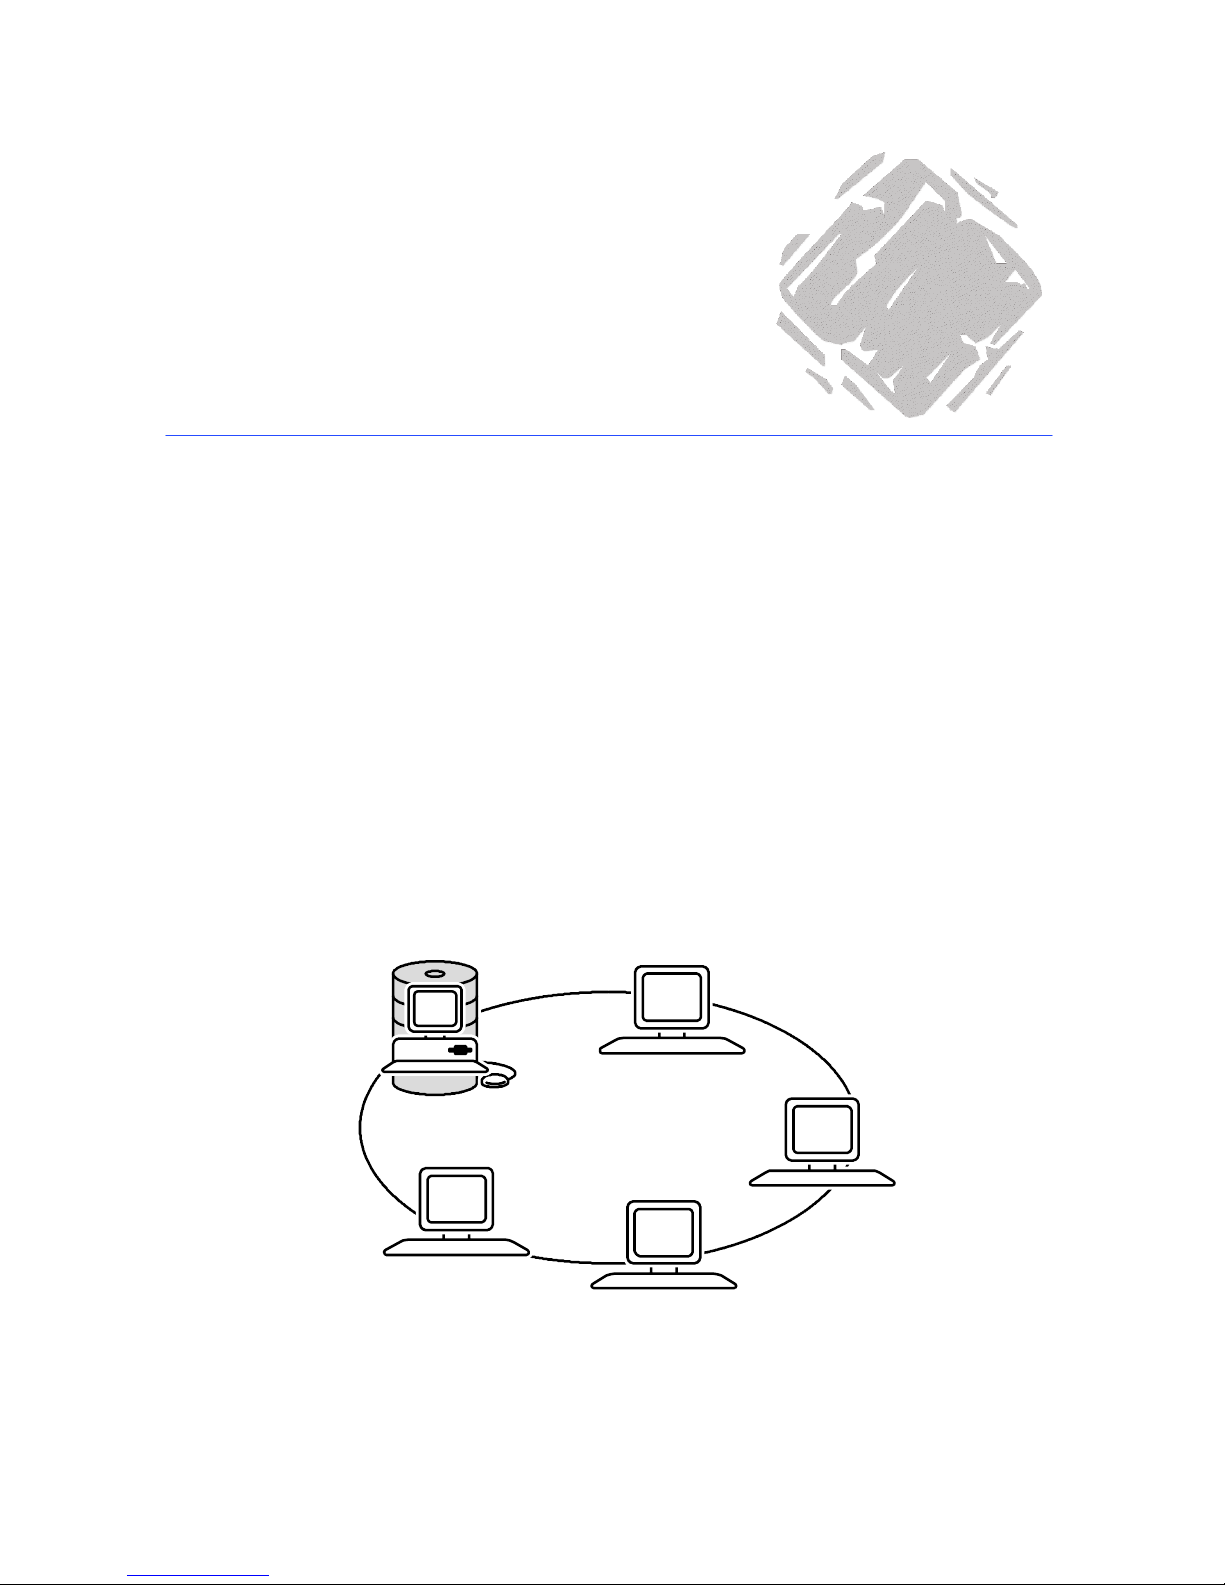
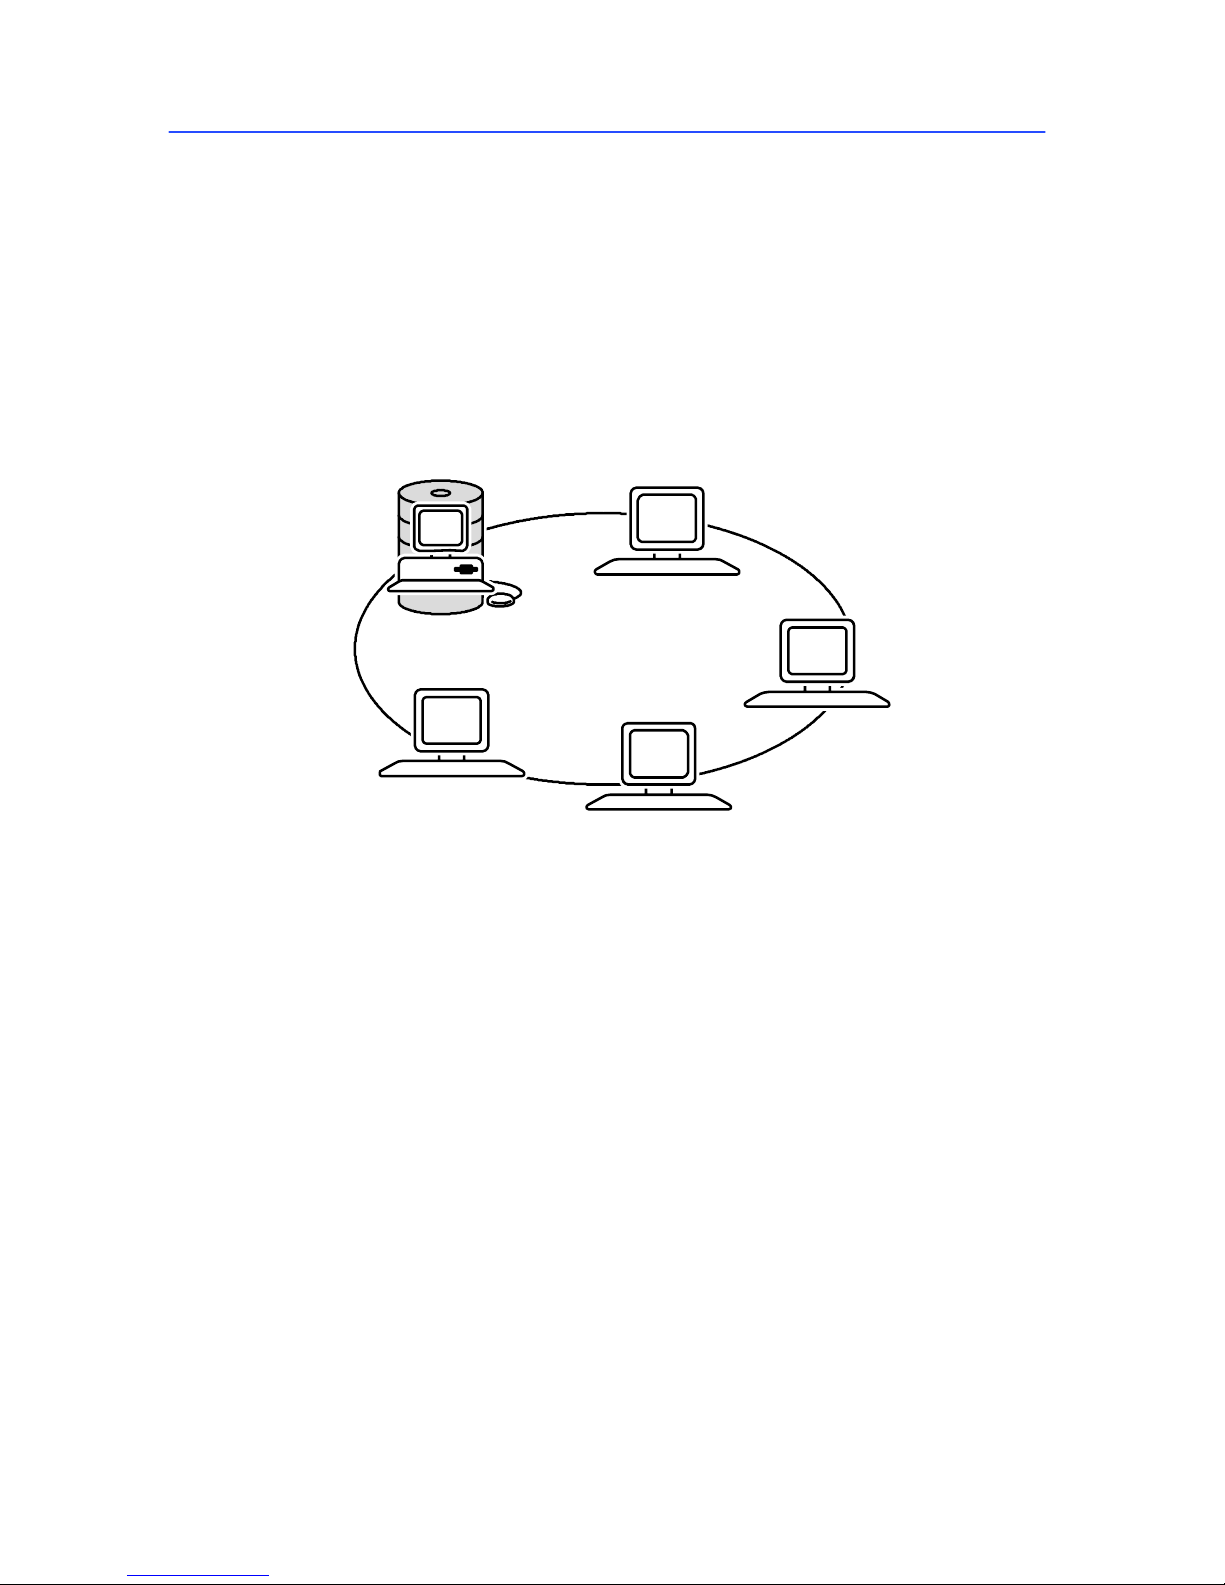
Workstation installation: the software is installed on the workstations using
the
SETUP.EXE program located in the shared folder on the server on which the
centralized installation was carried out. Workstation installation is simply a
case of establishing the links to server.
Workstation
Workstation
Workstation
Workstation
Server
installation:
installing the
network
version of the
software on
the server
Figure 1 Centralized installation
Centralized
installation
1
Page 8
Chapter 1 -- 2
Network Information Guide
"""" Advantages and disadvantages
This installation option reduces the amount of disk space taken
up on each workstation as only the links to server are installed.
However, your server must be capable of handling a high
volume of data transfer.
One workstation on your network must be chosen to act as the
shared file server for the label design software.
Installation
of shared
files
Workstation installation: full installation of the label
design software on each workstation.
Workstation
Workstation
Workstation
Workstation
Figure 2 Local installation
"""" Advantages and disadvantages
This installation option considerably reduces the amount of
congestion on the network as only the links to the license server
are running. However, each workstation must have enough free
disk space for a full installation of the label design software.
Local
installation
Page 9

Chapter 1 -- 3
Installation
Product description
The software is design to run on any IBM-compatible PC
operating on Microsoft
Ò
Windows
tttt
95, Windows
tttt
98,
Windows
tttt
ME, Windows
tttt
2000 or Windows
tttt
NT 4
.
Your product includes the following components:
S ACD-ROM;
S Complete documentation;
S A license agreement and registration card;
S A software protection key.
Note
The Readme.txt and Releasus.txt files contain last-minute
information on the software, superseding that contained in this
manual.
System requirements
The basic software and hardware requirements needed to run
the application are similar to those of most applications running
on Windows
tttt
:
S An IBM compatible PC operating on Windows
tttt
95, Win-
dows
tttt
98, Windows
tttt
ME, Windows
tttt
2000 or Windows
tttt
NT 4;
S Windows
tttt
95 with 16MB RAM (32MB recommended);
Windows
tttt
98 or ME with 32MB RAM (64MB recom-
mended);
Windows
tttt
NT or 2000 with 64M B RAM (128MB recom-
mended);
S A VGA monitor or better;
S A hard drive with at least 130MB free disk space ;
S ACD-ROMdrive.
Page 10

Chapter 1 -- 4
Network Information Guide
Installation procedure
For both centralized and local installation, before installation can
begin the network administrator must first define the user group
network, specifically:
S define the workstation that will act as the server on which
the label design software (centralized installation) or the
shared files (local installation) are to be installed;
S define the license server on which License Manager and the
software protection key will be installed.
S define the workstations, i.e. the client workstations that will
use the label design software.
"""" Description of the installation stages
1 Server installation:
- Centralized: installs the label design software on the
server will the option of installing License Manager if the
server is supporting the software protection key.
OR
- Local: installs the label design software shared files on the
server with the option of installing License Manager if the
server is supporting the software protection key.
2 Workstation installation:
- Centralized: installs the links to server on the client
workstations with the option of installing License Manager
on the workstation supporting the software protection key .
OR
- Local: installs the label design software on the workstations with the option of installing License Manager on the
workstation supporting the software protection key.
Note
If you decide to install License Manager on the server, you
will need to carry out a workstation installation on the server in
order for the software protection key to be recognized.
"""" Access rights required for installation
You will need all access rights to the folder on the server in
which the software is to be installed. In the same way, you will
also need administrator rights on one of the workstations. If you
do not have administrator rights, your network administrator will
first need to create the [base] folder and give you full access
rights to it.
Note
[base] refers to the folder in which you install the label design
software. You can rename it as required.
Before you
start
Page 11

Chapter 1 -- 5
Installation
The software must be installed on the server first. This creates a
[base] folder into which all the shared items will be copied. This
folder will be referred to as [base] throughout the rest of the
text.
The [base] folder must be a shared folder or be located within a
shared folder. For the purposes of this manual, the term ”shared
resource” will refer to the share name of the shared folder.
Server installation is carried out on the workstation previously
defined as the labe l design software server. Ensure that you
have all the necessary access rights defined above in
Chapter 1 - 4.
"""" To share the installation folder
1 Using Windows Explorer, select the folder in which the soft-
ware is to be installed.
2 Choose File Properties, click on the Sharing tab and enter
the share name.
"""" Installing the label design software
1 Insert the CD-ROM in the drive.
Note
If the installation program does not autostart, d ouble-click on
the
CDSETUP.EXE program in the CD-ROM root.
The installation window appears.
2 Choose the product you wish to install then click on the
Install button.
A window entitled Network installation type appears.
3 Check the required installation option: Centralized installa-
tion or Local installation then click on Next.
A message appears asking whether you also wish to install
License Manager on the server.
4 Check the required option then click on Next.
If you checked this option, License Manager will be installed
on the server, which must also support the sof tware protection key. However, before plugging the software protection
key in you will need to carry out a workstation installation
(see Chapter 1 - 6: Workstation installation)onthe
server in order for the software protection key to be recognized.
If you did not check this option, you will need to install
License Manager on one of the workstations. The workstation on which License Manager is installed must also support the software protection key.
Server installation
Page 12

Chapter 1 -- 6
Network Information Guide
Note
If you chose to install License Manager on a workstation running on Windows NT or 2000, it will automatically be installed
as a service entitled SLicense. This means that License Mana-
ger will run as a background task once the workstation is started up.
If the computer on which you are installing the label design
software is running on Windows 95, 98 or ME, each time you
use the label design software you will first need to launch
License Manager (see: Launching License Manager).
5 In the dialog box, select the shared folder in which the soft-
ware is to be installed, then click on Next.
Once the product is installed, don’t forget to post off the completed registration card. Registering your product gives you
access to technical support from your supplier and pre-release
information on new products.
Once the server installation is complete, you will need to run the
workstation installation program on each workstation that will be
using the label design software. This installation will copy the
required files to the workstation’s Windows\System folder and
create the icon group.
"""" Installing the program on a workstation
1 Double-click on the
SETUP.EXE file, located in the [BASE]\SYS-
TEM\INSTALL\ folder on the server.
A message appears asking whether you also wish to install
License Manager.
2 Check the required option then click on Next.
If you checked this option, License Manager will be installed
on the workstation, which must also support the software
protection key.
Workstation
installation
Page 13

Chapter 1 -- 7
Installation
Note
If you chose to install License Manager on a workstation running on Windows NT or 2000, it will automatically be installed
as a service. This means that License Manager will run as a
background task once the workstation is started up.
3 Follow the rest of the instructions on screen.
The software protection key must be installed on the computer
(serverorworkstation)onwhichLicense Manager is installed.
This computer must be running Windows (95, 98, ME, 2000 or
NT) and have a parallel port into which the software protection
key can be plugged.
The software protection key must be installed before License
Manager can be launched.
Parallel port/DB25 female connector
PC
Software Protection Key
PC
Figure 3 Connecting the software protection key to your PC
Without the software protection key, the programme will run in
’evaluation’ mode. You will not be able to save your labels, ’e’
will be replaced with ’x’, ’5’ with ’0’ and images will be crossed
when printing .
Note
When you launch the program, if the software protection key
does not correspond to the product version, a dialog box will
appear providing the necessary instructions.
If you need to use a printer on the same parallel port, simply
plug it into the software protection key. You may need to switch
the printer on in order for the software protection key to be recognized.
Installing the
software
protection key
Page 14

Chapter 1 -- 8
Network Information Guide
S On each workstation, launch the uninstall program located in
the program group of your label design software.
OR
Choose Start Settings Control panel and double-click on
the Add/Remove programs icon.
S Launch the uninstall program located in the program group of
your label design software.
OR
Choose Start Settings Control paneland double-click on the
Add/Remove programs icon.
Workstation
uninstall
Server uninstall
Page 15

Using the Network
Version
Managing users
Whether you have carried out a centralized installation or a
local installation, License Manager must be installed on the
workstation supporting the dongle.
If License Manager has been installed as an NT service, it will
be launched automatically when the workstation is started up
and will continue to run as a background task.
"""" Launching License Manager
S Click on the
icon.
OR
Double-click on the
LICENSE6.EXE file located in the [base]
folder.
If you wish License Manager to start up automatically each
time a user logs on to Windows, copy the program shortcut to
the Wind ows Start menu Programs Startup folder.
"""" How License Manager works
License Manager starts up and ap p e ars as a icon on the
Windows taskbar. It must be active whenever the label design
software is being used by one or more users.
If License Manager encounters a problem when starting up, it
will open in window mode and display an error message (the
software protection key not recognized, for example). See
Chapter 2 - 13, Troubleshooting.
License Manager
2
Page 16

Chapter 2 -- 12
Network Information Guide
"""" Description of the License Manager main window
Once License Manager is running, the main window looks like
this:
Figure 4 The License Manager main window
The License Manager main window displays a list containing
the login names of all users running the label design software at
any given moment.
The toolbar
Button Use
Closes the program. Note that the program should
only be closed once all users have logged off. If
you attempt to close the program while one or
more users are still connected, a warning message
will appear.
Displays the About dialog box that gives the version number of the program.
Refreshes the display: certain events, such as a
workstation being dead halted (pressing ”reset” or
the
ALT + CTRL + DEL keys), may mean the list of
users is not updated.
The status bar
Located on the lower edge of the window, the status bar displays
the maximum number of users that can be connected at any
given moment for your version of the program.
Page 17

Chapter 2 -- 13
Using the Network Version
"""" Troubleshooting
Two types of error message may appear. The following table lists
the problems and describes the procedure for resolving them.
Message Remedy
Could not find the
key
- the software protection key has not been
connected.
- the software protection key has been
connectedtothewrongport(serialport,
for example).
- a printer is connected to the software
protection key and is switched off.
Cannot create the
license file
The license file could not be created in the
[BASE]\SYSTEM\LICENSE folder. This means that
the user launching License Manager on a
workstation does not have the access
rights required for writing to this folder.
The network administrator will thus need to
assign the necessary rights (read/write/delete and change if need be).
"""" Changing License Manager’s standard settings
Using the command line
License Manager’s standard behavior can be changed using a
parameter in the program’s command line.
1 Choose Start Run in the Windows main menu.
2 Enter the access path to the [base] folder or use the
Browse button.
3 Select license6.exe then press the spacebar and enter /X
(upper case).
License Manager will now start in window mode and not
icon mode.
Page 18

Chapter 2 -- 14
Network Information Guide
Using the CS.ini file
The
CS.INI file contains a paragraph entitled ”license” with the
two comment lines allowing you to change License Manager’s
standard behavior.
The line:
S ”License Path=\system\license” allows you to change the
access path to the label design software’s user authorization
files. The folder names and file names must not exceed eight
characters.
S ”EnableClosingWhileInUse=1” authorizes or prevents
license6.exe being closed while users are still connected. 1 =
authorize, 0 = prevent.
Modifying the
CS.INI file is a delicate operation that may lead to
the program malfunctioning if errors are introduced. The operation should only be attempted by experienced users.
1 Using a text editor, open the
CS.INI file located in the
[BASE]\SYSTEM\USERS folder.
2 Delete the values in the lines to be modifie d.
3 Make the necessary changes then save the file.
This module is only available if you have installed License Manager on a Windows NT workstation. License Manager is thus
installed as a service called SLicense and runs automatically
once the workstation is started up.
A plug-in, available in the
SLICENSECTRL.EXE icon group, allows you
to control the way the serv ice functions and to change License
Manager’s standard behavior. For example, you can:
S Start or stop the service,
S Display the list of users connected to the label design soft-
ware.
The License
service
Page 19

Chapter 2 -- 15
Using the Network Version
"""" Description of the License Service window
S To launch License Service Control, choose the Network
License command in the label design software program
group.
The License Service Control window looks like this:
Toolbar
Indicator panel
Frame reserved for
status or error
messages
List of users
connected to the
label design software
Figure 5 License Manager main window
The License Manager window displays a list containing the login
names of all users running the label design software at any
given moment.
The toolbar
Button Use
Stops the service.
Starts the service
Refreshes the display: certain events, such as a
workstation being dead halted (pressing ”reset” or
the
ALT + CTRL + DEL keys), may mean the list of
users is not updated.
Page 20

Chapter 2 -- 16
Network Information Guide
Button Use
Accesses the License Service settings dialog box.
This button is only available when the service is
stopped.
Displays the About dialog box that gives the version number of the program.
The indicator panel
The indicator panel displays the current status of the service.
Red light:
the service is
stopped.
Amber light:
the service is
starting up.
Green light:
the service is
active.
"""" The settings dialog box
Accessing the settings dialog box:
S Click on
.
The Settings dialog box appears.
Figure 6 The Settings dialog box
Page 21

Chapter 2 -- 17
Using the Network Version
Changing settings:
If
SLICENSE.EXE has not been installed in the [base] folder, you
will need to specify the access path to the license file.
1 Enter the new access path to the license file, or click on the
Browse... button.
2 If you wish to allow the service to be closed while users are
still logged on, check the Enable stopping while users are
connected option.
3 IfyouwishtochangeLicense Service’s display language,
select the required language in the Language list.
4 Click on OK in the dialog box to update the changes.
"""" Modifying the service’s behavior
By default, License Service is launched automatically when the
workstation is started up. However, it is possible to change the
service’s behavior using the Services dialog box in the Windows
NT Control panel. Refer to the Microsoft documentation.
Changing the service startup type
1 Select SLicense in the list of services.
2 Click on Startup...
3 Check the required startup option. By default, SLicense is
configured to start up automatically.
Selecting a user account
1 Select This account in the Log on as box.
2 Enter and confirm the password thenclickonOKintheSer-
vice dialog box.
Page 22

Chapter 2 -- 18
Network Information Guide
Your network version is limited to a maximum number of users,
i.e. a license for ten users allows ten users to log on to the label
design software at any given time.
If an eleventh user attempts to log on, an error message will
appear stating that the maximum number of users has been
reached. S/he must therefore wait until one of the connected
userslogsoff.
You can install the software on as many workstations as you
wish, the limitation on the number of users only affects the number actually connected at a given time.
Moreover, if a number of users are logged on at the same time
via one workstation, License Manager counts this as one single
user.
Maximum
number of
users
Page 23

Chapter 2 -- 19
Using the Network Version
Managing shared resources
Your label design software generates a configuration file for each
user. The filename is based on the user’s login name and the
files are stored in the
[BASE]\SYSTEM\USERS\*.INI folder.
A document can only be opened in ”read/write” mode by a single
user. When the same d ocument is opened by other users, it is
opened as read only. This means that only the first user can
modify and save the document in question.
Note that documents can still be printed in read only mode.
To improve networking security, it is possible to define the way
documents can be opened. Using the Options dialog box
Document tab, check the ”Open documents as read only
mode by default” option.
The License Manager plug-in provided with your label design
software allows you to manage user accounts by assigning them
individual rights. This makes managing your organization’s networking much simpler (see User Manager in the User’s Guide).
Your label design software allows you to manage global variables
whose values are shared by different users. These variables are
saved in the
[BASE]\SYSTEM\GLOBVAR\GLOBVAR.DAT folder.
If a user does not wish these variables to be available to other
users, s/he simply needs to define a personal folder to save
them in.
"""" Defining a new folder
1 Choose Tools Options...
2 Click on the Default folders tab.
3 Enter the new access path for saving global variables in the
Shared variables (*.dat) line.
Individual
configuration
files
Shared document files
Shared global
variables
Page 24

Chapter 2 -- 20
Network Information Guide
The printing log file is extremely useful for tracking print jobs
andisconfiguredusingthePrinting log file dialog box.
Generating a printing log file
1 Choose Tools Log file...
2 Enter the access path and filename for the printing log file
and select a text editor.
3 Check the required options in the Options tab. For f urther
information on the printing log file, refer to the Online Help.
Note
As with shared v ariables, any number of users working on the
same file will be covered by the printing log file, which will
trace all print jobs generated by each one. However, it is also
possible for users to generate individual files, the print rep orts
on which will thus be individual.
In a network configuration, a number of users can share the
same printer. Certain printers, such as thermal printers, allow
print speed to be optimized by transferring image data just one
time. Your label design software is capable of managing image
data transferred by a number of users to a single printer by
using a printer memory status file.
"""" Configuring the printer
1 Open the shared printer’s Settings box.
2 Click on Network... (this option is only available for printers
supporting this type of transfer).
The Network settings dialog box appears.
3 Check the Shared option in the Printer memory manage-
ment box.
Shared printing log file
Shared printers
Page 25

Chapter 2 -- 21
Using the Network Version
With this configuration, a file describing the printer’s memory
status is created and updated constantly. A file should be
created for each printer and all users with access to this printer
must use it. The Edit field allows you to enter the share filename
(maximum of eight characters) or to select an existing name
from the list. To make it easier to identify files, each filename in
the list is followed by the name of the port and the workstation
to which the printer is connected.
For further information on printer configuration parameters, refer
to the Online Help. Each printer driver comes with an individual
Online Help that can be accessed using the Help buttoninthe
Printer settings dialog box.
Once a shared file such as the shared variables file is opened by
a user, all other users are prevented from accessing it and must
wait until it becomes free. After a timeout (defined as required),
a message appears asking the user whether s/he wishes to continue waiting or cancel the request.
"""" To define the timeout
1 Choose Tools Options...
2 Click on the Others tab.
3 Enter a value in the Shared files access timeout (ms) box.
The print status dialog box displays a flashing colored light indicating the status of the current print job:
S Green: printing in progress,
S Amber: another user is currently using a shared resource
(printer or variable),
S Red: error.
Shared file
timeout
Printing
Page 26

Chapter 2 -- 22
Network Information Guide
Notes for the attention of the network
administrator
A number of folders are created within the [base] folder during
installation. It is important that each user has read/write access
to the
SYSTEM folder and its subfolders. All other folders can be
write protected.
The table below describes each folder and the required access
rights.
Folder Rights Use
[BASE] Read Main folder containing the program files.
[BASE]\BIN Read
[BASE]\FONTLOAD Read
[BASE]\HELP Read Online Help files
[BASE]\LAB Read
Write
Change
Create
Saved documents
[BASE]\PRINT Read
Write
Change
Create
Saved print files
[BASE]\SAMPLES Read
Write
Change
Create
Example files
[BASE]\SAM-
PLES\DATA
Read
Write
Change
Create
Data
[BASE]\SAM-
PLES\DSC
Read
Write
Change
Create
Data describer files (ASCII merge)
Folders
Page 27

Chapter 2 -- 23
Using the Network Version
Folder Rights Use
[BASE]\SAM-
PLES\IMAGES
Read
Write
Change
Create
Image files
[BASE]\SAM-
PLES\LABELS
Read
Write
Change
Create
Example d ocuments
[BASE]\SAMPLES\QUERY Read
Write
Change
Create
Query files
[BASE]\SYSTEM Read
Write
Change
Delete
Create
Shared system data
[BASE]\SYSTEM\GLOB-
VAR
Read
Write
Change
Delete
Create
Storingsharedvariables
[BASE]\SYS-
TEM\LICENSE
Read
Write
Change
Delete
Create
Storing the license file created by
License Manager
[BASE]\SYSTEM\PRINT-
ERS
Read
Write
Change
Delete
Create
Storingsharedprinterdata
Page 28

Chapter 2 -- 24
Network Information Guide
Folder Rights Use
[BASE]\SYS-
TEM\USERS
Read
Write
Change
Create
Storing user configuration files
[BASE]\TOOLS Read
Write
Change
Create
Reserved for the plug-in tools provided
with your label design software. For further
information, refer to your application’s
Online Help.
This folder includes a subfolder for each
plug-in installed with the label design software.
[BASE]\TUTORIAL Read
Write
Change
Create
Contains the data needed for carrying out
the introductory exercises in the User’s
Guide.
The first time each new user launches the label design software,
a personal configuration file is created automatically in the
[BASE]\SYSTEM\USERS folder.
This file is obtained by copying the
USER.INI file located in the
[BASE] folder.
"""" Customizing the user.ini configuration file
The administrator simply creates a default user.ini configuration
file:
1 Connect using your own login.
2 Log on to the label design software.
The
YOURLOG.INI file is created.
3 Make any necessary changes such as customizing the inter-
face, changing display options, and so on.
4 Exit the label design software.
The
YOURLOG.INI file has saved the changes made.
5 Copy the file and paste it into the
[BASE] folder. Rename it
USER.INI.
The changes made in this file will come into effect the next time
a user logs on to the label design software.
The location of these files is defined in cs.ini, [general] heading,
Printers section. There must only be one file for each shared
printer. These files carry the LGL extension.
Configuration
file
File for shared
printers
Page 29

Chapter 2 -- 25
Using the Network Version
Example of sharing a printer
According to the different types of network and the needs of
your organization, a number of configurations are possible. This
section gives an example of sharing a printer in a Windows
environment.
The following example looks at how a thermal transfer printer
can be shared between a number of users working in a Windows
95, 98 or ME environment.
"""" Sharing a printer
The procedure involves two stages.
1 Install a printer on one of the workstations on the network
(see Online Help, Printing heading, To add a printer sec-
tion) with shared access rights (see Chapter 2 - 20).
Note
When adding a printer, do not check the Direct access option
as this prevents a printer from being shared.
2 Choose Start Settings Control panel in the Windows main
menu.
3 Double-click on Network.
The Windows Network dialog box appears.
4 Click on File and printer sharing.
The File and printer sharing dialog box appears.
5 Check the Iwanttobeabletoallowotherstoprintto
my printer(s) option then click on OK.
6 Choose Start Settings Printers in the Windows main menu.
The Windows Printers dialog box appears. You will notice
that the thermal transfer printer y ou added app e ars in the
list as THT followed by the name of the port to which it is
connected.
7 Select this printer then click on
or choose Properties...
in the context menu.
The printer’s properties dialog box appears.
8 Click on the Sharing tab.
9 Check the Shared As option, enter a share name for this
printer and, if necessary, a comment.
Note
According to the type of access control defined, the Properties
dialog box may include different functions. For further information, refer to the Microsoft documentation.
Sharing a
printer in
Windows
Page 30

Chapter 2 -- 26
Network Information Guide
"""" Installing a shared printer
In order to use a printer installed on another workstation on the
network, the user must first add the printer on h is/her own
workstation (see Online Help, Printing heading, To add a
printer section).
1 Choose File Select printer...
2 Click on Add....
The Add printer dialog box appears.
3 Click on Network printers...
The Browse for printer dialog box appears.
4 Select the shared printer on the network.
5 Click on OK.
The network address of the shared printer appears in the
Port list.
6 Se le ct a printer model in the Model list then select the net-
work address of the shared printer in the Port list.
7 Click on OK.
It is possible to display the status of current print jobs on the
workstation to which the printer is connected.
1 Choose Start Settings Printers in the Windows main menu.
2 Double-click on the printer for which you wish to view the
status of print jobs.
The Windows Print Manager window appears and displays
the list of all print jobs in progress.
Displaying the
status of current print jobs
Page 31

Index
A
Access rights, Chapter 1 - 4
C
Centralized, Chapter 1 - 4
Centralized installation, Chapter 1 - 1, Chap-
ter 2 - 11
Configuration file, Chapter 2 - 24
CS.ini file, Chapter 2 - 14
F
File for shared printers, Chapter 2 - 25
I
Individual configuration files, Chapter 2 - 19
Installation, Chapter 1 - 1
Centralized installation , Chapter 1 - 1
Local installation, Chapter 1 - 1
Installation of shared files, Chapter 1 - 2
Installation options, Chapter 1 - 1
Installing the software protection key, Chap-
ter 1 - 7
L
License Manag er, Chapter 1 - 4, Chapter 1 - 5,
Chapter 1 - 6, Chapter 1 - 7, Chapter 2 - 11,
Chapter 2 - 15
License service, Chapter 2 - 14
License Service Control, Chapter 2 - 15
Local, Chapter 1 - 4
Local installation, Chapter 1 - 2, Chapter 2 - 11
M
Managing users, Chapter 2 - 11
Maximum number of users, Chapter 2 - 18
N
Network installation type, Chapter 1 - 5
Network License, Chapter 2 - 15
Network settings, Printer, Chapter 2 - 20
P
Password, Chapter 2 - 17
Printer memory management, Chapter 2 - 20
Printing, Chapter 2 - 21
Product description, Chapter 1 - 3
3
Page 32

Chapter 3 -- 28 Network Information Guide
S
Server installation, Chapter 1 - 1, Chapter 1 - 4,
Chapter 1 - 5
Server uninstall, Chapter 1 - 8
Service, modifying behavior, Chapter 2 - 17
Shared, Chapter 2 - 20
Shared document files, Chapter 2 - 19
Shared file timeout, Chapter 2 - 21
Shared global variables, Chapter 2 - 19
Shared printers, Chapter 2 - 20
Shared printing log file, Chapter 2 - 20
Shared resources, Chapter 2 - 19
SLicense, Chapter 2 - 14
Standard settings, changing, Chapter 2 - 13
System requir ements, Chapter 1 - 3
T
Timeout, Chapter 2 - 21
Troubleshooting, Chapter 2 - 13
U
User account, Chapter 2 - 17
W
Workstation installation, Chapter 1 - 1, Chap-
ter 1 - 2, Chapter 1 - 6
Workstation uninstall, Chapter 1 - 8
 Loading...