

Tekk BCH 220 User Manual

Content
Brief Introduction
Thank you for buying scanning receiver. The goal is to provide cost-effective communication
equipment for a variety of business sites and the amateur and supply all fast-paced walks of life
with perfect communication solutions.
This product uses amateur frequency ,you need to apply for use to radio management
institution of the provinces, cities or autonomous regions .
please read this manual carefully in order to know how to properly operate the radio before
use.
Unpacking and Checking Equipment
Welcome to use radios, before using we suggest you:
·Please check the packing box of this product and see if there are signs of damage.
·Please open the packing box carefully. We recommend that you identify the items listed in the
following packing list. if you find that our product and its accessories in handling are lost or
damaged during the shipment. Please immediately contact dealers.
Parts List
Item Quantity
Rubber Antenna 1
Li-ion Battery Pack 1
Desktop Charger 1
Power Adapter 1
Belt Clip 1
User’s Manual 1
Warranty Card 1
Hand Strap 1

Preparation
Charging the Battery
1. Using the battery
The battery is not completely charged at the factory, please charge it before using.
To extend the battery life time, please power off the battery when you don't use two way
radio, and save battery in a cool (temperature less than 25 )and dry place.℃
2 Precautions of Charging Equipment
1. Do not expose the charger to rain or snow.
2. Do not operate the charger if it has received a sharp blow, or has been dropped or damaged
in any way.
3. Do not disassemble the charger if it has received a sharp blow, or has been dropped or
damaged in any way.
4. Never alter the AC cord or plug provided with the unit. If the plug will not fit the outlet,
have the proper outlet installed by a qualified electrician. An improper condition can result
in a risk of electric shock.
5. To reduce the risk of damage to the cord or plug, pull the plug rather than the cord when
disconnecting the charger from the AC receptacle.
6. To reduce the risk of electric shock, unplug the charger from the outlet before attempting
any maintenance or cleaning.
7. Use of an attachment not recommended or sold by JUSTON may result in a risk of fire,
electric shock, or personal injury.
8. Make sure the cord is located so it will not be stepped on, tripped over, or subjected to
damage or stress.
9. An extension cord should not be used unless absolutely necessary. Use of an improper
extension cord could result in a risk of fire and/or electric shock. If an extension cord must
be used, make sure that:
•The pins on the plug of the extension cord are the same number, size, and shape as those
on the plug of the charger.
•The extension cord is properly wired and in good electrical condition.
•The cord size is 18 AWG for lengths up to 100 feet, and 16 AWG for lengths up to
150feet.
10. Do not replace charger's power cord. If the power cord damages, you must stop using
charger immediately.
3. Charging the Battery
Please use the battery charger designated by to charge battery. After purchase or extended
storage (more than two months), the first time to charge battery cannot make battery reach
its normal operating capacity. After repeating charge /discharge it two or three times, the
operating capacity will increase to its normal capacity.

4. Please Charge the Radio According to Operation Steps as Follows:
1. Insert power adapter into power supply socket.
2. Insert output terminal of power adapter into DC jack behind the charging kit, now the
charging orange indicator lights about 2 seconds then goes out.
3. Insert the battery or radio equipped with battery into the charging kit.
4. Confirm the battery and charging kit terminal contact reliably, when charging indicator
light turns into red and charging starts.
5. After completion of charge (charging time about 5 hours), light turns to be green.
5. Indicators Display As Following:
Status Indicator
Power Connected Orange light is on about 2 seconds then goes out
No battery(temperature end judges) All go out
Charge normally Red light is on
The battery is fully charged Green light is on
Fault (over temperature, battery short
circuit or over discharge state)
Note: Before charging, please turn off radio power equipped with battery. When
charging, using radio will interfere with normal charge of battery and receiver effect.
Red light flashes
Basic operations
Power On/Off
Turn the power switch knob clockwise to turn on radio power; to turn it off ,turn
the power switch knob counter-clockwise.
Vol u me C on t rol
RX
When radio receiving information ,green LED lights .
1) Only same signaling and CTCSS setting can receive information .
2) May not receive any calling if radio is at lower signal and set high level SQL.
3) Local dealer maybe program your radio with CTCSS/DCS . Users can receive the same
signaling information if chosen channel with CTCSS/DCS . Or it can not get any calling .
Turn the volume switch knob clockwise to increase volume; to decrease the
volume, rotate the volume switch knob counter-clockwise.
asppr
L
0
1
2
l
h
o
i
/
t
n
o
a
n
f
m
g
h
t
aKFNa
F
g
t
n
R
dio with CT
ecial channe
ogrammed t
CSS/DCS w
for CTCSS
e same CTC
ll help you t
DCS ,radio
SS /DCS .
ignore inef
lso can com
ective callin
unicate wit
. Although
other radio
here seems
which
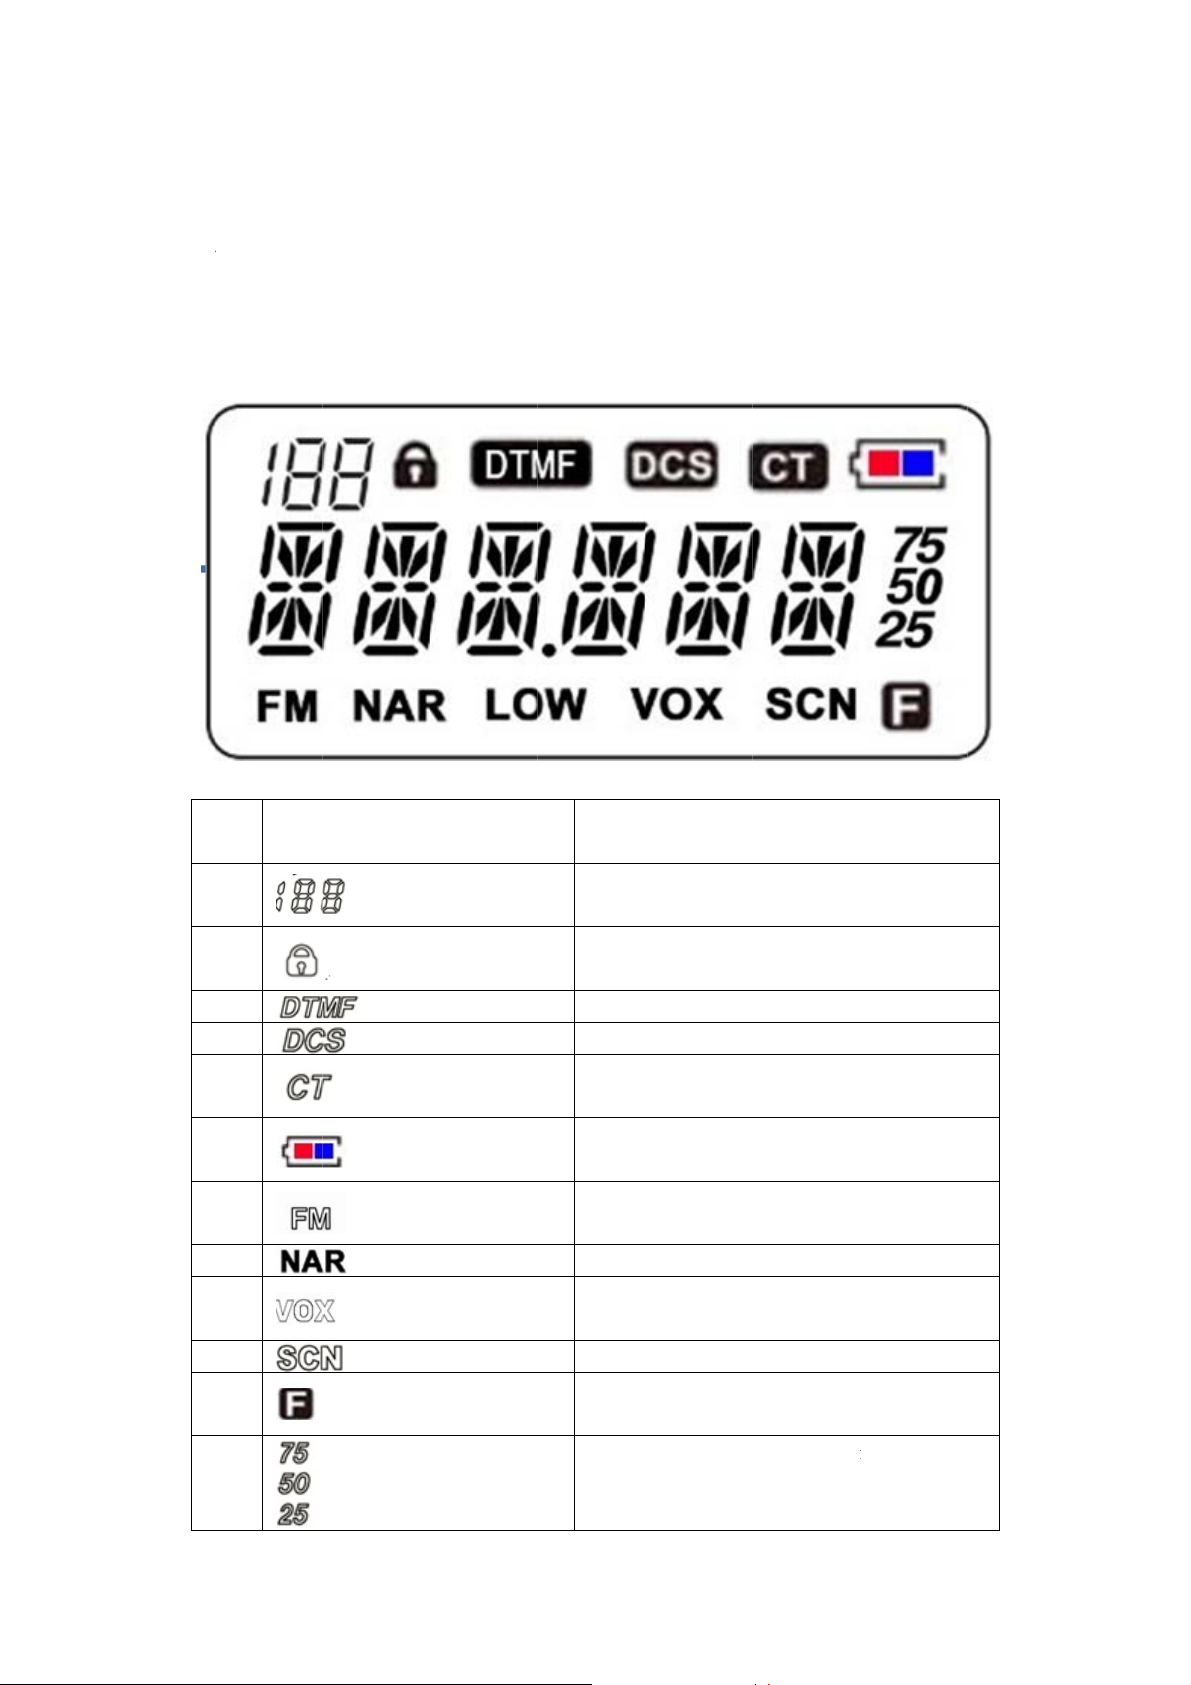
CD Ic
1
2
ns Ins
Ico
ructio
s
Ins
Ch
ructions
nnel/Menu
ey Lock
3
4
5
6
7
8
9
1
1
1
Last Di
DTMF
DCS
CTCSS
Battery
M Radio
rrow Band
VOX
Scan
unction
its at Freque
cy

Program Settings
Radio Basic Information
1) Frequency
Please type in desired frequency value.
2) Back to factory default settings
You can initialize factory default settings by program software.
3) Delete Channel Group
You can delete the chosen channel by program software .
4) Turn On SP
Turn on speaker, you can hear sound from radio when it receives correct signaling.
Optional Items
1)Alarm before TOT
You can set an alert tone sounds from the speaker before TOT is cut.
2)Voice Report
Your radio can choose different languages voice report : English ,Chinese ,Off .
1) Beeper of Radio Power On
Choose desired beeper to sound when turn on the radio .
2) SQL
The purpose of the squelch is to mute the speaker when no signals are present. With the squelch
level ( 0-9) correctly set , you will hear sound only while actually receiving signal. The higher
the selected squelch level, the stronger the signals must be when receive. The appropriate
squelch level depends on ambient RF noise conditions.
3) Key Lock
1.Long press this key with lock icon .
2.Auto-lock: Set time to active auto-lock .It will be invalid when turn on radio again .
3.Auto-lock + memory : Set time to active auto-lock .It will be valid when turn on radio
again.

4) Working Mod e
Frequency: LCD display frequency value.
Channel: LCD display channel No.
Frequency +Channel: LCD display both modes .
5)Frequency Step
There are 2.5K ,6.25K .........100K for selectable.
7)Back Light
Choose to turn on/off backlight and set lighting duration.
9)Channel Name Display
Only available at channel mode .
Tick √: Display
Not tick √: No Display
10)Beeper
Turn beeper on/off . If turn off beeper ,key tone and power on tone will not be available .
11)Decode Tail Elimination by Frequency Without CTCSS/DCS Decode
Tail tone elimination by frequency at channel without CTCSS/DCS decode .
12)Encode Tail Elimination by Frequency Without CTCSS/DCS Encode
Tail tone elimination by frequency at channel without CTCSS/DCS encode .
13)Key Lock
Enable the key lock function.
14)UP/DOWN Lock
Enable UP/DOWN lock function.
15)Support Non-standard CTCSS and DCS
Your radio can set any desired non-standard CTCSS and DCS
Scan
Scan Mode
According to chosen scan mode ,radio stops or continues to scan.
1)Time Mode: Your radio stops scanning when detecting a signal for some while(approximately
5 seconds).and then continues to scan even if the signal is still present.
2)Carrier Mode: Your radio stops scanning when detecting a signal and remains on the same
channel until the signal drops out.
3)Search Mode : Radio stops at the scanned frequency or channel when detecting a signal.

Delay Time Between RX and Scanning
You can set the time of radio automatically back to scanning after RX .
Scanning Beeper On/Off
Your radio can turn on/off scanning beeper.
Scan Indicator
Turn on green light flashes when scanning.
Battery
Battery Save
The battery saver function decreases the amount of power used when a signal is not being
received and no operations are being performed ( no keys are being and no switches are being
turned ). But when your radio receives information first time ,the delay time will be longer .
Low Battery Beeper Type
You can choose the desired beeper for low battery alert.
Low Battery Alert Interval
Set the interval by every low battery alert .
APO
Radio will automatically turn off power if there is no operation within 5 minutes and alarm at
interval time before APO .Under APO mode, user can active radio by operating it again.
Off : Turn off APO function
APO Time : Turn on this function and set the time to auto power off as requested .
Low Battery Voice Report
Radio will report low battery state if active this function
APO at High Voltage
Radio automatically power off if the voltage higher than pre-set voltage value.
APO at Low Voltage
Radio automatically power off if the voltage lower than pre-set voltage value.
Emergency Call
1) Emergency Call Type
Local Emergency : Alert from radio .
Local Emergency + Remote Emergency: Alert from radio ,same as other radios with the same
frequency and same signaling .
 Loading...