

Page 1

TEKDIVISION S.R.O.
MinioN
Personal vaporizer
User manual
Page 2

Let’s get started.
1. Insert battery
Remove top cap whit negative contact screw. Insert battery. !!! Mind the polarity!!!
Put everything back together. Don’t over stress the thread on negative contact screw.. It’s not
necessary. Insert atomizer in 510 connection. 510connection has magnetic auto adjusting center
pin to guarantee perfect connection for any atomizer.
Press few times the Fire button to turn the chip on.
2. Maintenance
The body of the Minion box mod is made of non-corrosive aluminium alloy. Doesn’t need special
treatment, however avoid contact whit aggressive liquids like: corrosive house hold cleaners
(anticalc) , long exposure with acids ( juice from citrus type or pineapple fruit).
To clean use humid and dry cloth.
The 510 connection contact pin and negative contact screw are made of brass so they can
corrode after time. For cleaning just use metal cleaner.
3. Charging
For fast charging you will need mini USB cable and USB charger whit 5.5V 1Amp output.
Thank you purchasing our product. If you have any question or you need technical
help, or for resolving problems, please contact us on: tek-division@gmail.com
Page 3
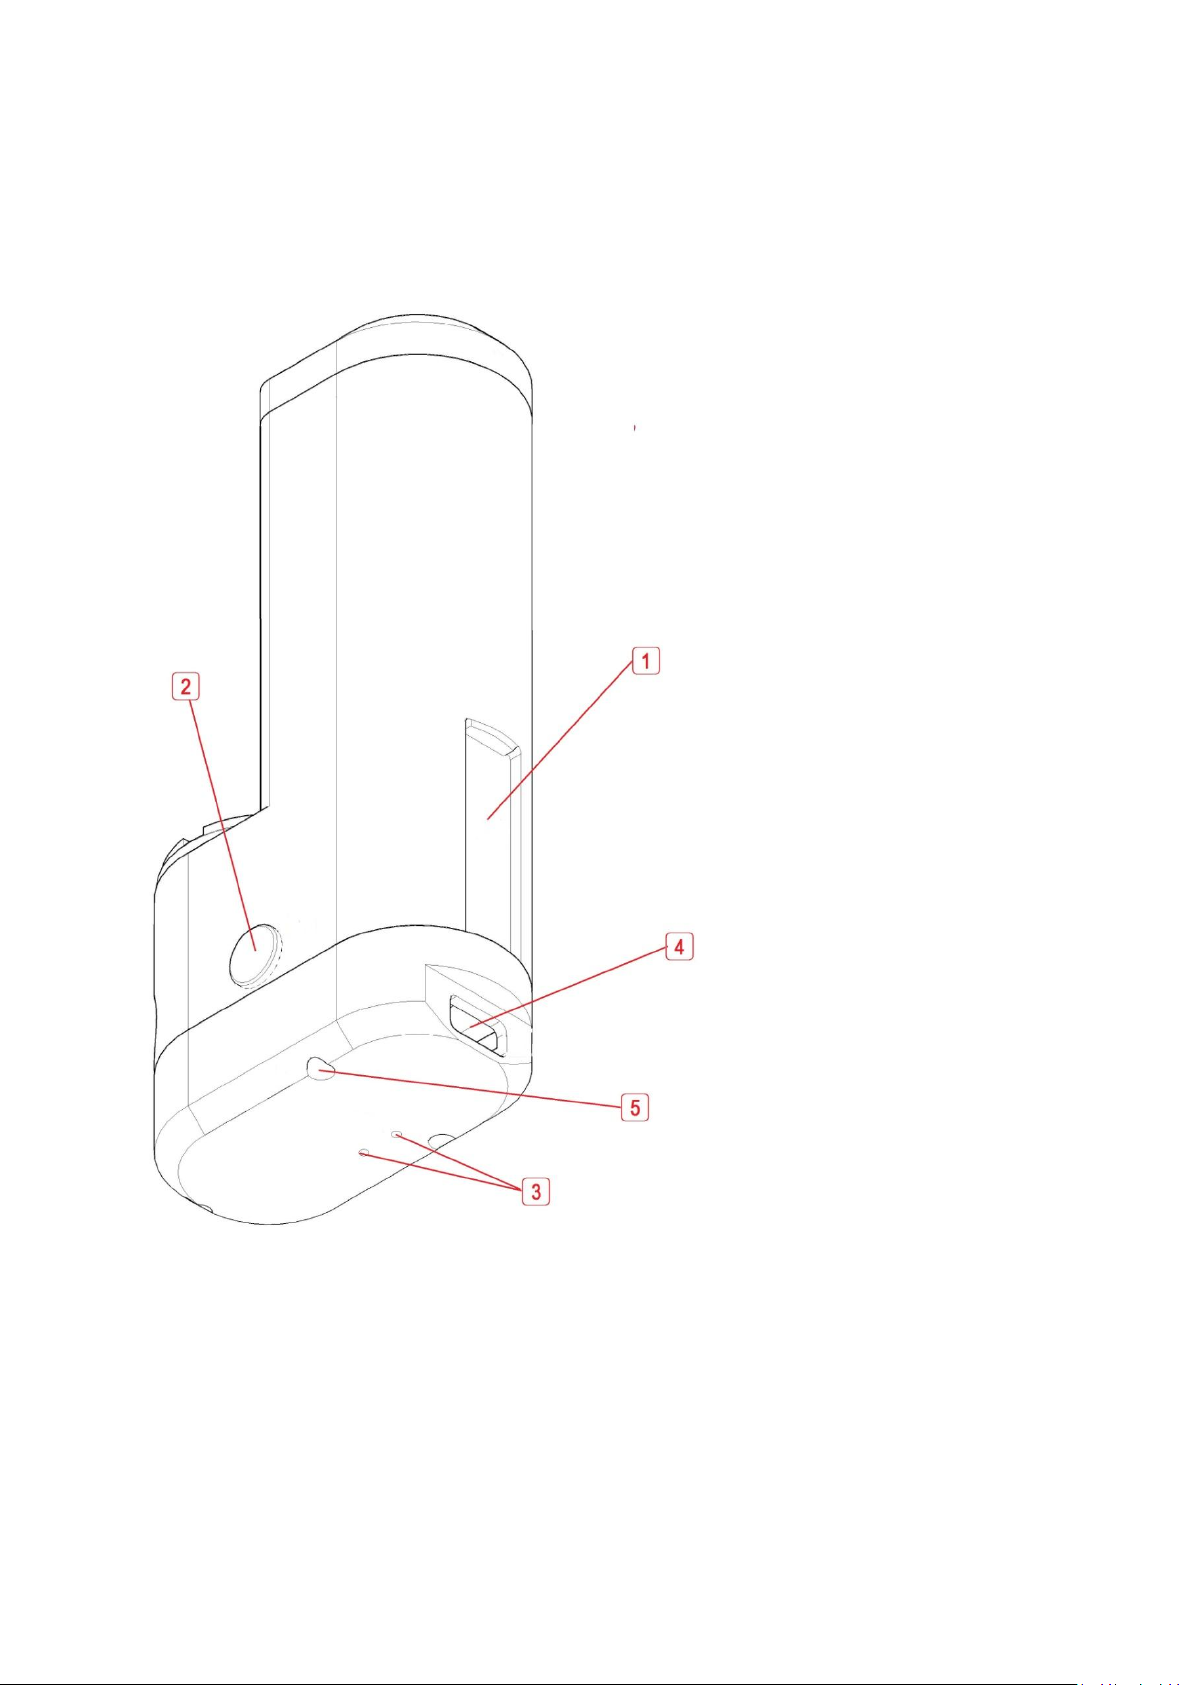
1. Display
2. FIRE button
3. Charging led indicators
RED- Charging
BLUE- Charging completed
4. Mini USB 1Amp charging port
5. !!!Warranty sealing!!!
Page 4

2. Negative contact screw
3. 510 atomizer contact
4. DOWN button
5. UP button
Page 5

Minimum
Typical
Maximum
Output Power
1 Watt
40 Watt
Output Voltage
1 Volt
9.0 Volts
Output Current, continous
16.0 Amps
Output Current, instantaneous peak
23.0 Amps
Atomizer Resistance, standard wire
0.16 Ohm
0.7 Ohm
2.0 Ohms
Atomizer Resistance, temp. sensing wire
0.10 Ohm
0.4 Ohm
1.0 Ohm
Input Voltage
3.1 Volts
3.7 Volts
4.3Volts
Temperature limit
200°F
450°F
600°F
Input Current
0.5 Amps
8.0 Amps
16.0 Amps
Efficiency
92%
Charging USB current 5.5V
1 Amp
Chip specifications / Evolv Dna 40
Temperature Protection
The Dna 40 is the first power supply for electronic cigarettes to directly measure
and limit the temperature of the heating coil during operation. By preventing the
coil from becoming too hot regardless of fluid, wicking or airflow, a variety of
undesirable situations can be prevented. For example, appropriate temperature
settings will prevent the wicking material from charring, which compromise taste
and introduces unintended chemicals into the vapor. Appropriate temperature
settings will also reduce the breakdown of flavoring and base liquid components,
which could impact taste or safety.
Evolv’s Temperature Protection Technology requires a heating coil made from
Nickel 200 alloy, rather than Nickel Chromium or Kanthal alloys. Nickel 200 is
commercially pure nickel. It is often sold in vapor shops and online as
”non-resistance wire”. If the temperature reaches the maximum value, the wattage
applied to the atomizer coil is reduced to prevent overheating. Please note that the
temperature reading is the average temperature of the atomizer coil, and care
should taken to construct the heating coil so that the temperature is uniform,
without hot or cold spots. Ensure that the coil does not short to itself.
Page 6

Because wattage, not temperature controls vapor volume, large vapor volumes
can be produced without unnecessarily high temperatures. Temperature Protection
is most helpful if the atomizer begins to dry out, the user pauses during a puff, the
beginning or end of the puff, or if the wattage setting is inappropriate for the
attached atomizer.
In normal operation, when the device is not firing the maximum temperature
setting is displayed on the screen. When device is firing, the actual average
temperature of the coil is displayed on the screen.
By default, the Temperature Protection setting is 450°F. To change the limit
1. Lock the device by pressing the Fire button five times.
2. Hold down the Up and Down adjust buttons for two seconds.
3. After two seconds, the maximum temperature will be displayed, and the
UP and Down buttons should be released.
4. Use the UP and Down buttons to adjust the maximum temperature
5. When the display shows the desired maximum temperature, press the Fire
button to exit temperature adjust mode.
The maximum temperature is adjustable between 200°F and 600°F. To disable
the temperature protection entirely, adjust the limit up to 600°F, then press the
UP button on additional time. The temperature limit will read OFF. This will also
disable the prompt when a new atomizer is attached.
Preheat
When the Dna 40 is used with a temperature sensing atomizer, an additional
feature called Preheat is activated. No vapor is produced when the temperature
is below the boiling point of the liquid. Preheat applies extra power until the
heating coil is up to operating temperature to shorten the delay between
pressing the fire button and generating vapor. Because the preheat is
temperature based, it will not overheat or burn the vapor.
Attaching a New Atomizer
Page 7

The Dna 40 uses the resistance of the atomizer to calculate the temperature of
the heating coil.
It continually looks to see whether a new or changed atomizer has been
connected. If you are using temperature protection, be careful to only attach new
atomizers that have cooled to room temperature to the device. If a new atomizer
is attached to the Dna 40 before it has cooled down, the temperature may read
and protect incorrectly until the new atomizer cools.
When you connect a new atomizer or disconnect a reconnect your existing
atomizer, the Dna 40 will prompt you to confirm this change. When you fire the
first time, before activating the Dna 40 will prompt “ New Coil? UP YES/DOWN
NO”. When you see this prompt, if you have attached a new atomizer, press the
UP button. If you have disconnected and reconnected the same atomizer, press
the DOWN button.
Operation
Basic operation of the Dna 40 is as follows. To wake the device from power off
state, tap the Fire button. To generate vapor, press the Fire button. To change
the wattage setting for more or less vapor, click or hold the UP and DOWN
buttons.
Display
The normal and special operating modes shown on display are discussed
below. The Dna 40 will automatically detect whether a temperature sensing
(Nickel 200) or standard Kanthal etc) coil is attached.
Temperature Protected
Watt setting: The power level currently set on the Dna 40
Page 8

Battery indicator: The current state of charge of the battery.
Temperature display: When not firing, the maximum heating coil temperature
setting. While firing, the actual temperature of the heating coil is displayed.
Ohms display: The resistance of atomizer attached to the device. This is measured
only when the unit is supplying power to the atomizer. At other times, it shows
the most recent measurement.
Non-temperature Protected
Watt setting: The power level currently set on the Dna 40.
Battery indicator: The current state of charge of the battery.
Volts display: The output voltage being supplied to the atomizer.
Ohms display: The resistance of atomizer attached to the device. This is
measured only when the unit is supplying power to the atomizer. At other times,
it shows the most recent measurement.
Modes
Locked mode: Pressing the Fire button five times with less then0.7 seconds
between presses will cause the device to enter Locked mode. In locked mode, the
device will not fire and the output power will not adjust accidentally. While in
Locked mode, the screen will be off, except that pressing a button will show
“Locked, Click 5x”. To exit locked mode, press the fire button 5 times.
Stealth mode: While locked, holding the Fire and DOWN buttons simultaneously
for 5 seconds will switch to stealth mode. In this mode the display is off. It will still
exit power locked mode the Fire and DOWN buttons simultaneously for 5
Page 9

seconds. This setting is stored to internal flash memory, and remains if power is
removed.
Right mode and Left mode: While locked, holding the Fire and UP buttons
simultaneously for 5 seconds flips the display. This allows for accommodating to
left or right handed use. This setting is stored to internal flash memory, and
remains if power is removed.
Power Locked mode: Holding down both the UP and DOWN buttons for 2 seconds
will place the device in Power Locked mode. In this mode, the mod will operate
normally, but you will not be able to change to power setting. This mode prevents
accidental power level change due to the buttons being pressed while in a pocket.
To exit Power Locked mode, hold UP and DOWN buttons for 2 seconds.
Maximum Temperature Adjust: From Locked mode, holding down both the UP
and DOWN buttons for 2 seconds will place the device in Max Temperature
Adjust mode. Once this mode is entered, the max temperature will be displayed.
The UP and DOWN buttons are used to adjust the max temperature. To save the
new temperature setting and exit, press the Fire button.
Error Messages:
The Dna 40 will indicate a variety of error states.
Check Atomizer: The Dna 40 does not detect an atomizer, the atomizer has
shorted out, or the atomizer resistance is incorrect for the power setting.
Shorted: The atomizer or wiring are shorted circuited.
Weak Battery: The battery needs to be charged, or a higher rate battery needs to
be used. If this happens, the Dna 40 will continue to fire the atomizer, but will not
be able to provide the desired wattage. The Weak Battery message will continue
to flash for few seconds after end of puff.
Temperature protection: The heating coil reached the maximum allowed
temperature during the puff. If this happens, the Dna 40 will continue to fire, but
will not be able to provide the desired wattage.
Page 10

Ohms Too High: The resistance of the atomizer coil is too high for the current
wattage setting. If this happens, the Dna 40 will continue to fire, but will not be
able to provide the desired wattage. The Ohms Too High message will continue to
flash for a few seconds after the end of puff.
Ohms Too Low: The resistance of the atomizer coil is too low for the current
wattage setting. If this happens, the Dna 40 will continue to fire, but will not be
able to provide the desired wattage. The Ohms Too Low message will continue to
flash for a few seconds after the end of puff.
Too Hot: The Dna 40 has onboard temperature sensing. It will shut down and
display this message if the internal board temperature becomes excessive.
Auto power down:
The screen will be at full brightness while firing. After 10 seconds with no button
presses, the screen will dim. 30seconds after the last button press, the screen will
fade out and the device will go into sleep mode. To wake the device, press the
Fire button.
 Loading...