

Page 1
OWNER’S MANUAL
TP-318 (US Version)
September 8, 2000
INTRODUCTION
Your F RS r adi o is a lightweight radio that you can carry almost any where. Use it a t shopping malls,
amusement parks , or sports ev ents to co ntac t family a nd friends, o r in a neighborhood watch for
vital communications.
Yo u ca n st art usi ng yo ur FR S ra dio immedia te ly wi tho ut any li ce nse re quir ed! Y our ra dio c omes
with 14 channels and you can talk with another person who has a FRS radio and is on the same
channe l and privacy code that you a re using.
Your radio also offers a multifunctional liquid crystal display with backlight, auto-squelch which
eliminates noise between transmission, power saving, built-in modulation limiter circuit which
automatically adjust the radio for a wide variety of voice levels to ensure a clear transmission,
automatic shut off timer, memory retention, low battery indication and keypad lock.
USING THE RADIO
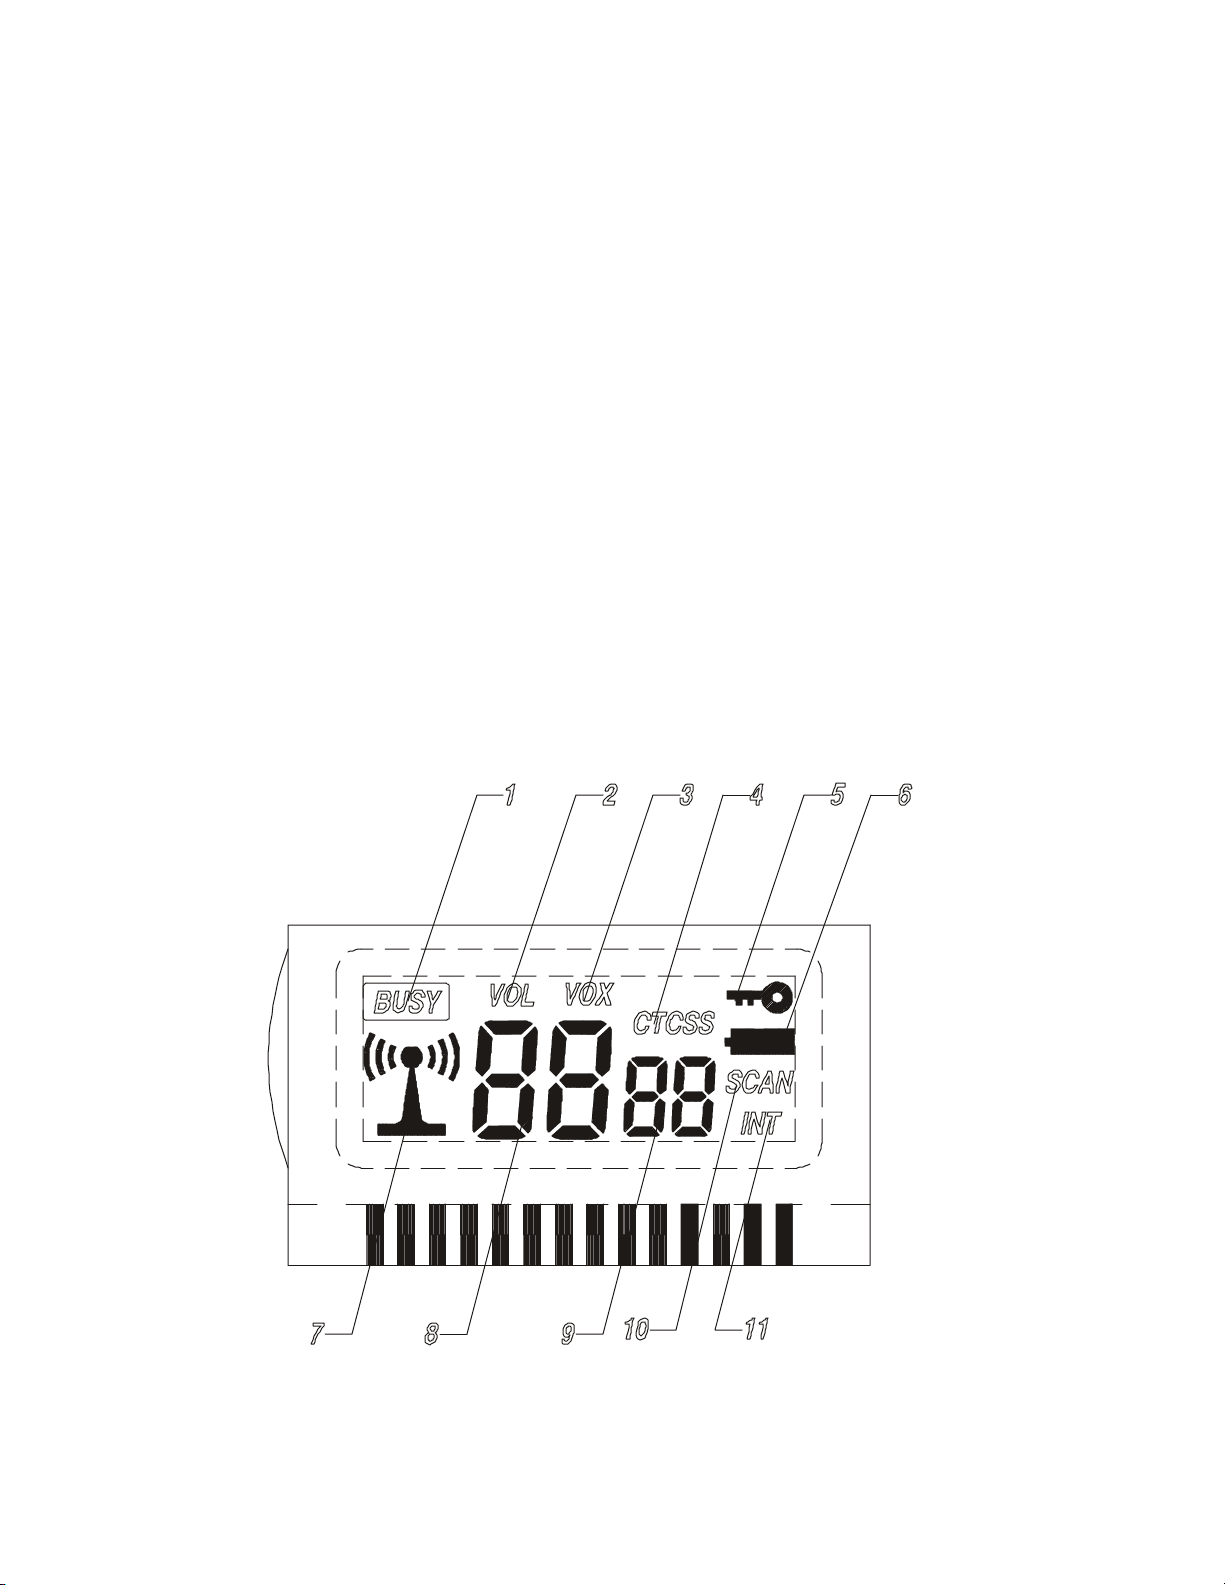
A. DISPLAY
Your radio comes with a multifunctional backlight display. By pressing any button
except the CALL and PTT, the backlight will illuminate for 7 seconds. The liquid
crys tal disp lay has b een enlarged to sh ow all of the oper ating mod es .
TEKCOM Industries Limited
Page 1 of 6
Page 2
1. “
2.
BUSY”:
“VOL” :
Displayed when a call is being received.
Displayed the current volume.
3.
4.
5.
6.
“VOX” :
Displayed when the
“CTCSS”:
“
“
”:
”:
When this symbol is visible, it indicates the batteries are low. Replace the batteries
Displayed when the
Displayed when the keypad lock has been activated.
VOX
is enabled.
CTCSS
privacy mode is enabled.
after this indicator is o n.
7. “ ”
Displayed when your radio is transmitting or the
:
8. Shows the selected channel number.
9. Shows the selected
“SCAN”:
10.
11.
“INT”:
Displayed when the transceiver scans through all the channels.
Displayed when the intercom is enabled.
CTCSS
code numbe r.
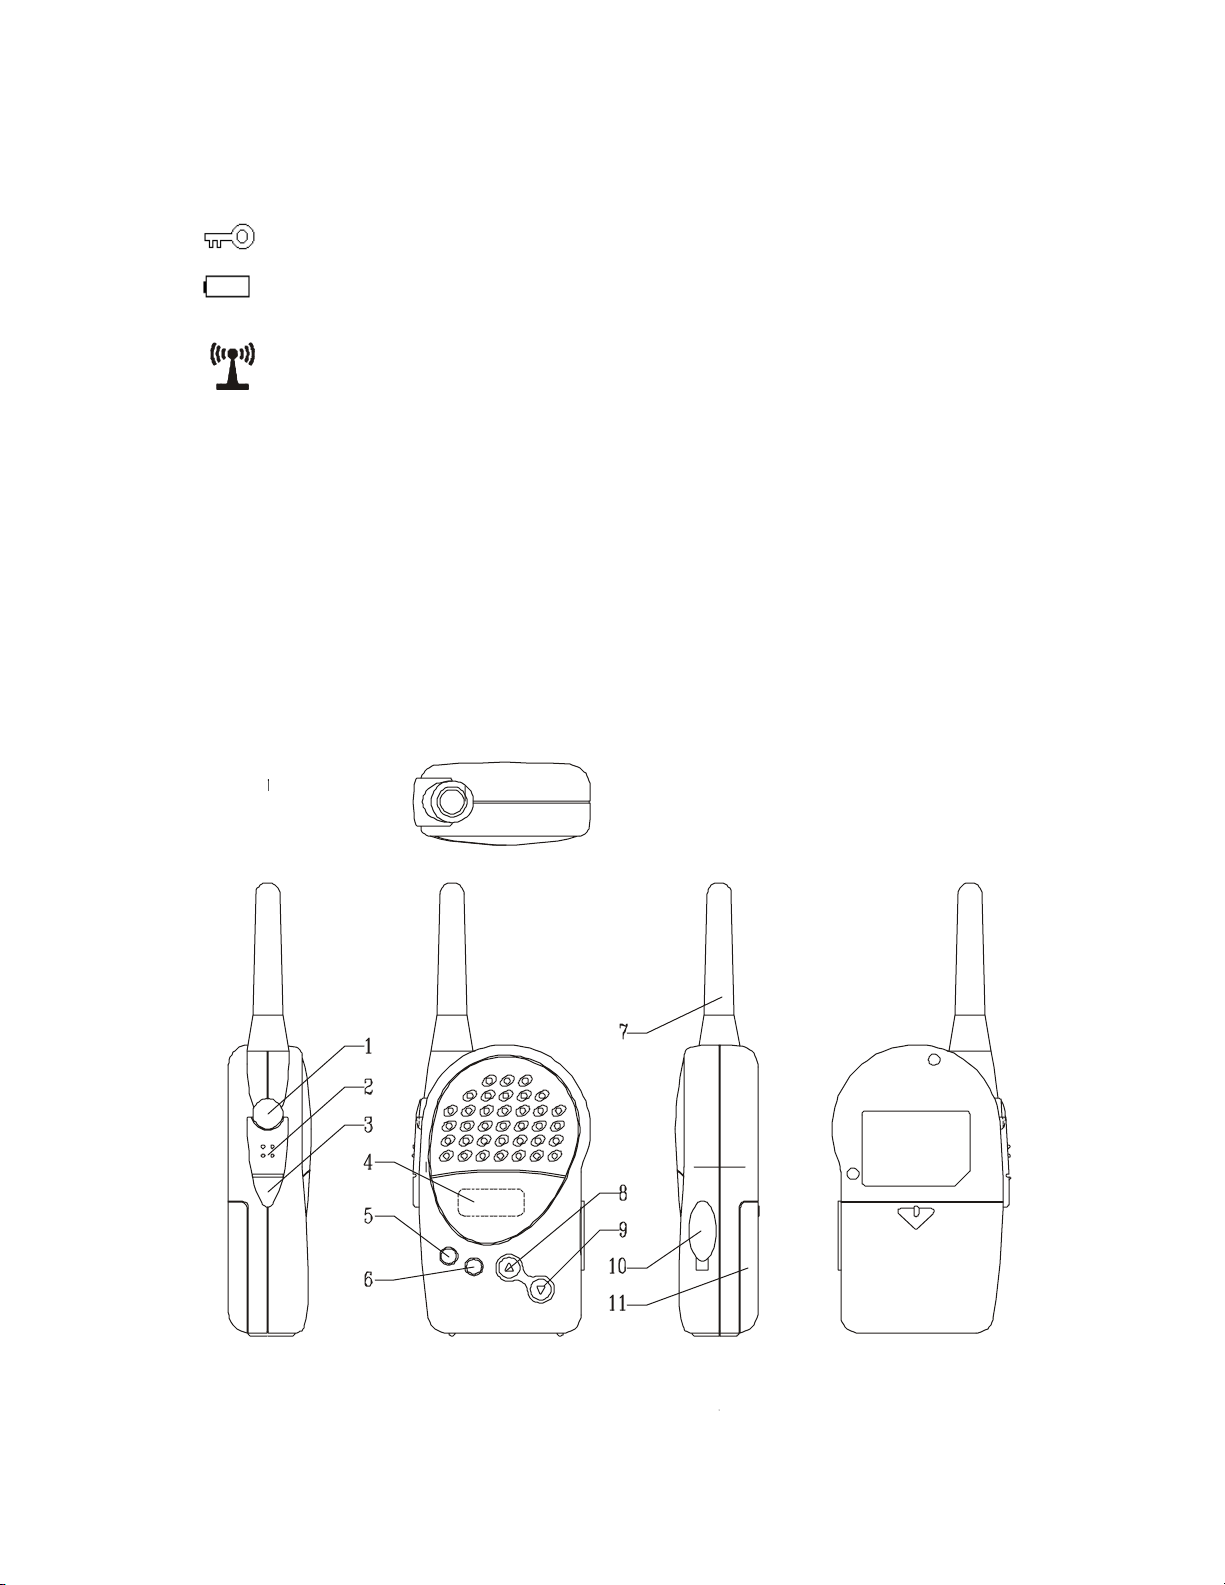
B. FUNCTION AND LOCATION OF THE CONTROLS
CALL
button is pressed.
TEKCOM Industries Limited
Page 2 of 6
Page 3

1. CALL Button
You can c ause a ringer sound o n all radi os tuned to the same F RS channel a nd/or the priv acy co de
as your ra dio . To send a page, press and hold down the
CALL
button. At this time, the speaker
rings a bell, a nd the
icon is displayed and the outer (( )) icon flashes.
2. Push-To-Talk button
To talk, hold down
icon is displayed. When you finish speaking, release
Push-To-Talk
. Speak into the microphone in a normal tone of voice when the
Push-To-Talk
button.
3. MON button
Pr es s t hi s but to n t o o pe n the a ut o mati c s que lc h a nd a llo w ba c kgr o und no is e t o be he ar d. Re le a s e
MON button
In addition,
to turn the auto-squelch back on.
MON button
is a lso a double-functio n button
a) MON + Power
Aft er inser ti ng the M icrophone /Speaker plug into the jack, press a nd hold
POWER
press
button to enable or disable the intercom function.
MON
button, then
b) MON + MODE
Press and hold
MON
button, then press
MODE
button to enable or disable the
CTCSS
privacy mode operation.
To de t e r min e
CTCSS
fo r tw o s ec o nds unt i l
∆∆∆∆
∇∇∇∇
press
or
butt o n to s e le c t the de s i r ed c o de a mong 1 a nd 3 8 . P re s s
pri v a c y c o de s e t t i ng. P r es s a nd ho ld
CTCSS
ic on di spla ys and t he be low pr iv ac y c ode s i ndic at or f las hes ,
MON
, then press
MODE
MODE
button
butt o n o nc e
to confirm a nd exit the setting mode and your radio is now i n the privacy mode operation.
c) MON +
Pr ess and hold
det e rmi ne VOX se tt ing, pre ss and ho ld
until VOX icon di splays a nd the be low VOX codes indicator flashes. Press
des ired co de among 1 and 3. W hile pres sing a nd holding
∆∆∆∆
MON
button, then press
∆∆∆∆
button to enable or disable the VOX function. To
MON
butt on, then pr es s
∆∆∆∆
button for two seconds
∇∇∇∇
MON
button, press
to select the
∆∆∆∆
button
once to confirm and exit the setting mode and your ra dio is now in the VOX operation. 3 is
the most easy to a ctivate transmit and 1 is the most difficult to activa te .
d) MON +
∇∇∇∇
You can activate or deactivate the key pad lock to avoid accidental pressing of keys.
Pr ess and hold
MON
button, then press
∇∇∇∇
button to activate/deactiv a te the keypad lock.
4. LCD Display
Your t ransceiv er has a multifunctional liquid crys ta l display with back light.
5. Power button
Yo u ca n pres s
POWER
button to turn on the unit. Pressing the button again will turn off the unit.
Please take out the batters if you don't use the unit for a long time.
6. Mode button
Press
MODE
button and display the current mode you can press
∆∆∆∆
comfortable volume.
TEKCOM Industries Limited
Page 3 of 6
or
∇∇∇∇
button to obtain the
Page 4

7. Antenna
Provides excellent reception.
∆∆∆∆
8.
button
∆∆∆∆
Press
To Oper ate the Scan
Pr ess and hold
the channels. If a valid signal is present, the radio will stop on the active channel and remain
st o ppe d fo r 5 se c o nds . If no butt o n is pr e s s e d, the s c a n mode wi ll t he n i mmedia t ely r e s ume f o r t he
next c hanne l af ter the s ignal disappea rs within 5 seconds or a fter 5 seconds have elapsed.
If no signal is found on a channel, the unit will immediately continue to scan when no button is
pressed.
During scan, if
displa yed channel.
In two cases, pressing
current displayed channel.
9.
button to move one channe l up. Releas e when y ou rea ch t he desired channel.
∇∇∇∇
or
∆∆∆∆
∆∆∆∆
∇∇∇∇
/ Automatic Shut Off Button
button fo r tw o s ec o nds a llo ws t he uni t to be gi n s c a nni ng up or do wn t hr o ugh
∇∇∇∇
or
button is pressed, the unit will exit scan mode and stop at the current
PTT, CALL,
MON button
and
s will cause the scan to turn off and stop at the
∇∇∇∇
Press
The timer automatically turns off the unit if it is idle for 2 hours. Hold
enable or disable the timer. ON or OF (off) appears briefly.
Then, if the radio is idle for 2 hours, OF appears steadily. Press any button to operate the radio
again. OF disappears and the last selected channel appears.
10. External Microphone/Speaker Jack
Connect a s pecial spea ker /microphone or earphone (supplie d).
In addition, you can recharge Ni-Cd batteries using an optional battery charger of DC 6V 60Ma (not
supplie d). After t urn off the unit, plug the c harger barrel plug into the Mic jack on the side of the uni t,
then connect the charger to a standard AC outlet.
For Ni-Cd batt, the charging time is about 7-8 hours; For Ni-MH batt, the charging time is 14-15
hours.
11. Battery Compartment
Pr ess and pus h back the battery do or to relea se.
C. OPERATION
1. Insert three alkaline or Ni-Cd batteries into the battery compartment, noting polarity.
to move one channel down. Release when you reach the desired channel.
∇∇∇∇
while turning on the radio to
Ni-Cd batteries must be charged for a minimum of 10 hours before initial use.
(Alkaline batteries are not rechargeable. Do not connect to external power or
charger when using alkaline batteries).
2. To set the privacy code or time out timer, check the function instructions.
3. Press
normal listening level.
POWER
button to turn the unit on. Press the “
TEKCOM Industries Limited
Page 4 of 6
MON
” but ton, and a djust the vo lume for a
Page 5
4. Select the desired channel a nd/or
CTCSS
privacy code.
5. Press
6. To receive, simply release
Note
CTCSS
Push-To-Talk
button to transmit o r
Push-To-Talk
: You can only communicate with another radio that is using the same c hannel and/or the sa me
privacy code as yo ur radio.
CALL
button to ca use a page.
button.
TE CHNICAL SPECIFICATIONS
Frequency Range.................................................................…………....467.5625~467.7125 MHz
462.5625~462.7125 MHz
Channels.........................................................................................……………......................14
Powe r supply.....................................................................….........……………....3 AAA Alk aline
Sensitivity at 1 2 dB Sinad...........................................................……............………….......0.5µV
Adjacent Channel Rejection.................................................……………….........................45dB
Audio Distortion .............................................................………………..................................7%
RF Output Power.....................................................……………..……. 300mW ERP@ 4.5VDC
Harmonic Emissions..............................................…………….........................Less than 45dB
Dimensions (HWD)................................................…..………….................….…..57×97×27mm
Wei ght (without batteries)...........................................………...........…………..… approx. 82g
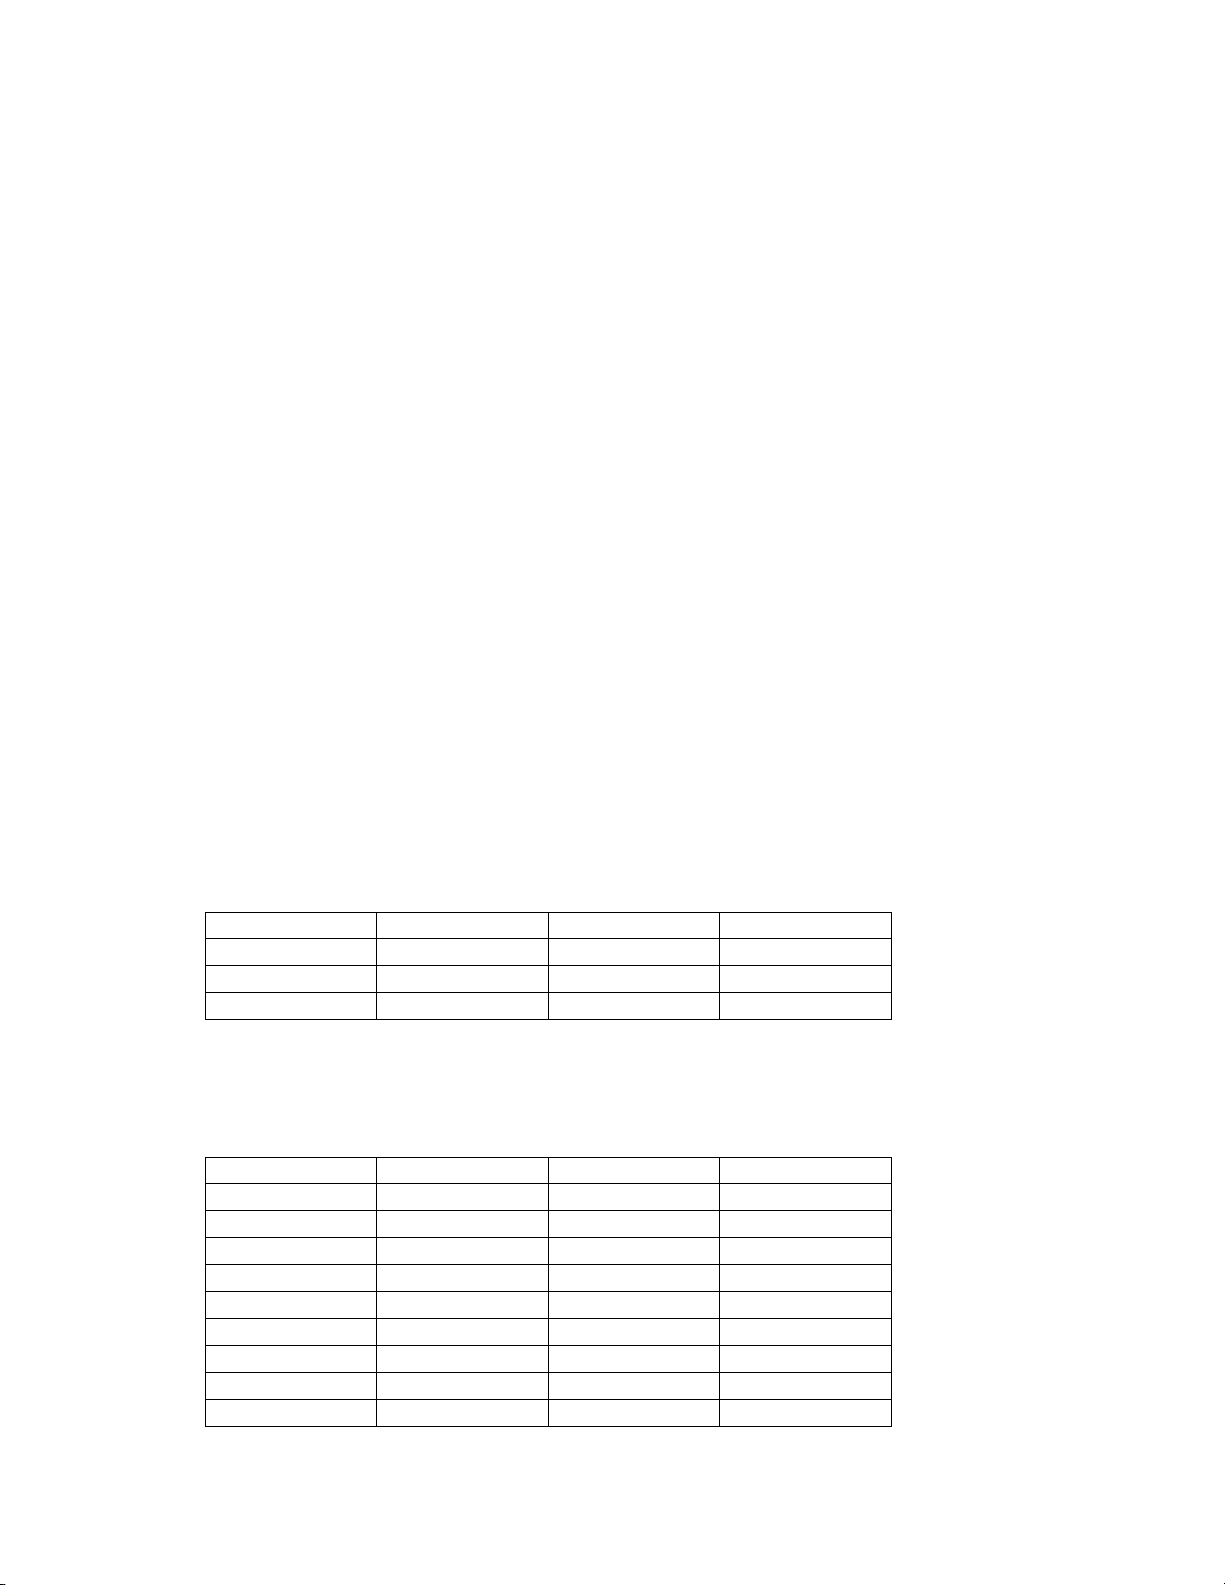
CHANNEL FREQUENCIE S
Frequency: MHz
01=462.5625 05=462.6625 09=467.5875 13=467.6875
02=462.5875 06=462.6875 10=467.6125 14=467.7125
03=462.6125 07=462.7125 11=467.6375
04=462.6375 08=467.5625 12=467.6625
CTCSS PRIVACY CODES
Frequency: Hz
01=67.0 11=97.4 21=136.5 31=192.8
02=71.9 12=100.0 22=141.3 32=203.5
03=74.4 13=103.5 23=146.2 33=210.7
04=77.0 14=107.2 24=151.4 34=218.1
05=79.7 15=110.9 25=156.7 35=225.7
06=82.5 16=114.8 26=162.2 36=233.6
07=85.4 17=118.8 27=167.9 37=241.8
08=88.5 18=123.0 28=173.8 38=250.3
09=91.5 19=127.3 29=179.9
10=94.8 20=131.8 30=186.2
TEKCOM Industries Limited
Page 5 of 6
Page 6

TEKCOM Industries Limited
Page 6 of 6
 Loading...