

Page 1

www.teka.com
ES Guía de Uso
EN
Models
QUADRO DLV 980
Page 2

ENGLISH
Before using your device for the first time, please carefully read the installation and
maintenance instructions that come with it.
Por favor, antes de utilizar su aparato por primera vez, lea atentamente las
instrucciones de instalación y mantenimiento incluidas en su aparato.
ESPAÑOL
Page 3

ES
Instrucciones de seguridad
Antes de instalar y utilizar el aparato, lea atentamente las
instrucciones facilitadas. El fabricante no se hace responsable de
los daños y lesiones causados por una instalación y uso
incorrectos. Guarde siempre las instrucciones junto con el
aparato para futuras consultas.
Seguridad de niños y personas vulnerables
Este aparato puede ser utilizado por niños de 8 años en
adelante y por personas cuyas capacidades físicas,
sensoriales o mentales estén disminuidas o que carezcan de
la experiencia y conocimientos suficientes para manejarlo,
siempre que cuenten con la supervisión de una persona que
se responsabilice de su seguridad.
No deje que los niños jueguen con el aparato.
Evite que un niño lleve a cabo la limpieza y el mantenimiento
de usuario sin la supervisión adecuada.
Para México: Este aparato no se destina para utilizarse por
personas (incluyendo niños) cuyas capacidades físicas,
sensoriales o mentales sean diferentes o estén reducidas o
carezcan de experiencia o conocimiento, a menos que dichas
personas reciban una supervisión o capacitación para el
funcionamiento del aparato por una persona responsable de
su seguridad.
Seguridad general
La habitación debe disponer de ventilación adecuada si se
utiliza la campana extractora a la vez que electrodomésticos
que quemen gas u otros combustibles (no aplicable a
aparatos que solo vuelven a descargar el aire en la
habitación).
No flamear debajo de la campana.
Page 4

ATENCION: Las partes accesibles pueden calentarse cuando
se utiliza con aparatos de cocción.
Instalación
El sistema eléctrico debe estar equipado con un medio de
desconexión, con una separación de contacto en todos los
polos que proporcione completa desconexión en la categoría
de sobretensión III.
Si la conexión eléctrica se hace con clavija, entonces esta
debe ser accesible después de la instalación.
El aire no debe descargarse a un conducto de humos
utilizado para extraer humos de aparatos que queman gas u
otros combustibles (no aplicable a aparatos que solo vuelven
a descargar el aire en la habitación).
La parte inferior de la campana deberá colocarse a una altura
mínima de 65 cm de la encimera de gas y 60 eléctrica. Si las
instrucciones de instalación de cocinas de gas indican una
distancia superior, debe tenerse en cuenta.
Antes de instalar esta campana consulte los Reglamentos y
Disposiciones locales vigentes respecto a la normativa
vigente de aire y humos.
Cuando la campana de cocina se ponga en funcionamiento al
mismo tiempo que otros aparatos alimentados por una
energía distinta de la eléctrica, la presión de salida de aire no
debe ser superior a 4 Pa (4x10 -5 bar).
Antes de conectar la campana a la red eléctrica, compruebe
que la tensión y la frecuencia de la red se corresponden con
la indicada en la etiqueta de características de la campana,
situada en la parte interior de la misma.
Para obtener un rendimiento óptimo, la longitud de la tubería
de evacuación exterior no deberá ser superior a CUATRO
metros, ni tener más de dos ángulos (codos) de 90º.
Aunque lo recomendable es la evacuación de gases al
exterior, puede instalarse un filtro de carbón activado que
Page 5

ES
permite que los gases puedan devolverse a la cocina a través
del tubo de salida.
NOTA: Para obtener más información sobre la instalación,
consulte el final de este manual del usuario.
Limpieza
Existe riesgo de incendio si la limpieza no se lleva a cabo
siguiendo las instrucciones.
No permitir la acumulación de grasa en ninguna parte de la
campana, especialmente en el filtro. OCASIONA RIESGO DE
INCENDIO.
La limpieza de filtros debe efectuarse, como mínimo una vez
al mes, dependiendo de la utilización de la campana. Se debe
tener en cuenta que al cocinar hay deposición de grasas en la
campana y en el filtro aunque aquella no se ponga en
funcionamiento.
Le recomendamos usar guantes y extremar la precaución
cuando limpie el interior de la campana.
Reparación
Si el cable eléctrico sufre algún daño, el fabricante, su servicio
técnico autorizado o un profesional tendrán que cambiarlo
para evitar riesgos.
No ponga la campana en funcionamiento si el cable de
alimentación eléctrica está deteriorado o presenta cortes, o si
el aparato muestra síntomas de deterioros visibles en la zona
de los mandos.
Si el módulo de LED no funciona correctamente, debe ser
reemplazado por el fabricante, su servicio técnico o personas
que dispongan de una cualificación similar para evitar riesgos.
Si la campana deja de funcionar o lo hace de modo anormal,
desconéctela de la red y comuníquelo al Servicio de
Asistencia Técnica.
Page 6

Para cualquier reparación debe dirigirse al Servicio de
Asistencia Técnica cualificado más cercano, usando siempre
repuestos originales. Las reparaciones o modificaciones
realizadas por otro personal pueden ocasionar daños al
aparato o un mal funcionamiento, poniendo en peligro su
seguridad.
Page 7

ES
Pulsando el mando que indica la figura 1
podrá controlar las funciones de la campana
Para conseguir una mejor aspiración le
recomendamos poner en funcionamiento la
campana unos minutos antes de cocinar
(entre 3 y 5 minutos) para que el flujo de aire
sea continuo y estable al momento de aspirar
los humos.
De igual modo, mantenga la campana
funcionando unos minutos después de
cocinar para el total arrastre de humos y
olores al exterior.
1- Temporizador
2- Disminución de la función elegida
3- Display
4- Aumento de la función elegida
5- Luz
Programación tiempo de aspiración
1) Encienda la campana y elija la velocidad de
aspiración deseada.
2)
3) Escoja el tiempo de programación deseado
-
en 1 minuto (Min. = 1 min., máx. = 99 min.).
4) Se visualiza el tiempo programado restante.
sólo manualmente y pasará a velocidad 2
transcurridos 7 min.
Cuando el indicador de saturación de
filtros se encienda, proceda a la limpieza
de los mismos.
-
segundos y el indicador se apagará.
Antes de efectuar cualquier operación de
limpieza y mantenimiento, asegúrese que el
aparato está desconectado de la red.
Para realizar labores de limpieza y
mantenimiento, cumpla con las Instrucciones
de Seguridad.
Existe riesgo de incendio en caso de que la
limpieza no se efectúe conforme a las
instrucciones.
Limpieza del filtro
Para extraer los filtros de sus alojamientos
actúe sobre los dispositivos de enclavamiento.
Proceda a su limpieza, bien introduciéndolo en
el lavavajillas, (ver observaciones) o dejándolo
sumergido en agua caliente el tiempo
necesario para facilitar la eliminación de
grasas, o si lo desea, mediante el uso de
sprays específicos (protegiendo las partes no
metálicas). Finalizada la limpieza proceda a su
secado.
Atención: la campana no funcionará hasta
que se vuelva a instalar el filtro principal.
Observaciones: La limpieza en lavavajillas con
detergentes agresivos, puede ennegrecer la
superficie metálica sin que afecte a su
capacidad de retención de grasas.
Atención: La limpieza de filtros debe
efectuarse, como mínimo una vez al mes,
dependiendo de la utilización de la campana.
Se debe tener en cuenta que al cocinar hay
deposición de grasas en la campana y en el
filtro aunque aquella no se ponga en
funcionamiento.
Page 8
Limpieza del cuerpo de la campana
Se recomienda la utilización de agua
jabonosa, a 40ºC aproximadamente. Se
utilizará un paño humedecido en dicha agua
para la limpieza de la campana, incidiendo
especialmente en las rendijas. Posteriormente
se secará utilizando un paño que no
desprenda pilosidades.
Atención:
No use nunca estropajos metálicos ni
productos abrasivos que puedan dañar la
superficie.
No realice raspaduras con objetos duros,
como cuchillos, tijeras, etc.
Filtro de carbón activo
Para colocar el filtro de carbón, se hará
coincidir el anclaje del motor con el
anclaje del filtro de carbón activado y
girarlo en el sentido horario.
La duración del filtro de carbón activado
es de tres a seis meses, dependiendo de
uso.
El filtro de carbón activo no es lavable ni
regenerable. Una vez agotado, proceda a
la sustitución del mismo.
Para reemplazar los filtros gastados por
otros nuevos, procederemos en sentido
inverso al de su montaje.
Dimensiones:
Ancho = 900 mm
Fondo = 450 mm
Alto = 590/ 965 mm
Características eléctricas
VER ETIQUETA DE CARACTERÍSTICAS
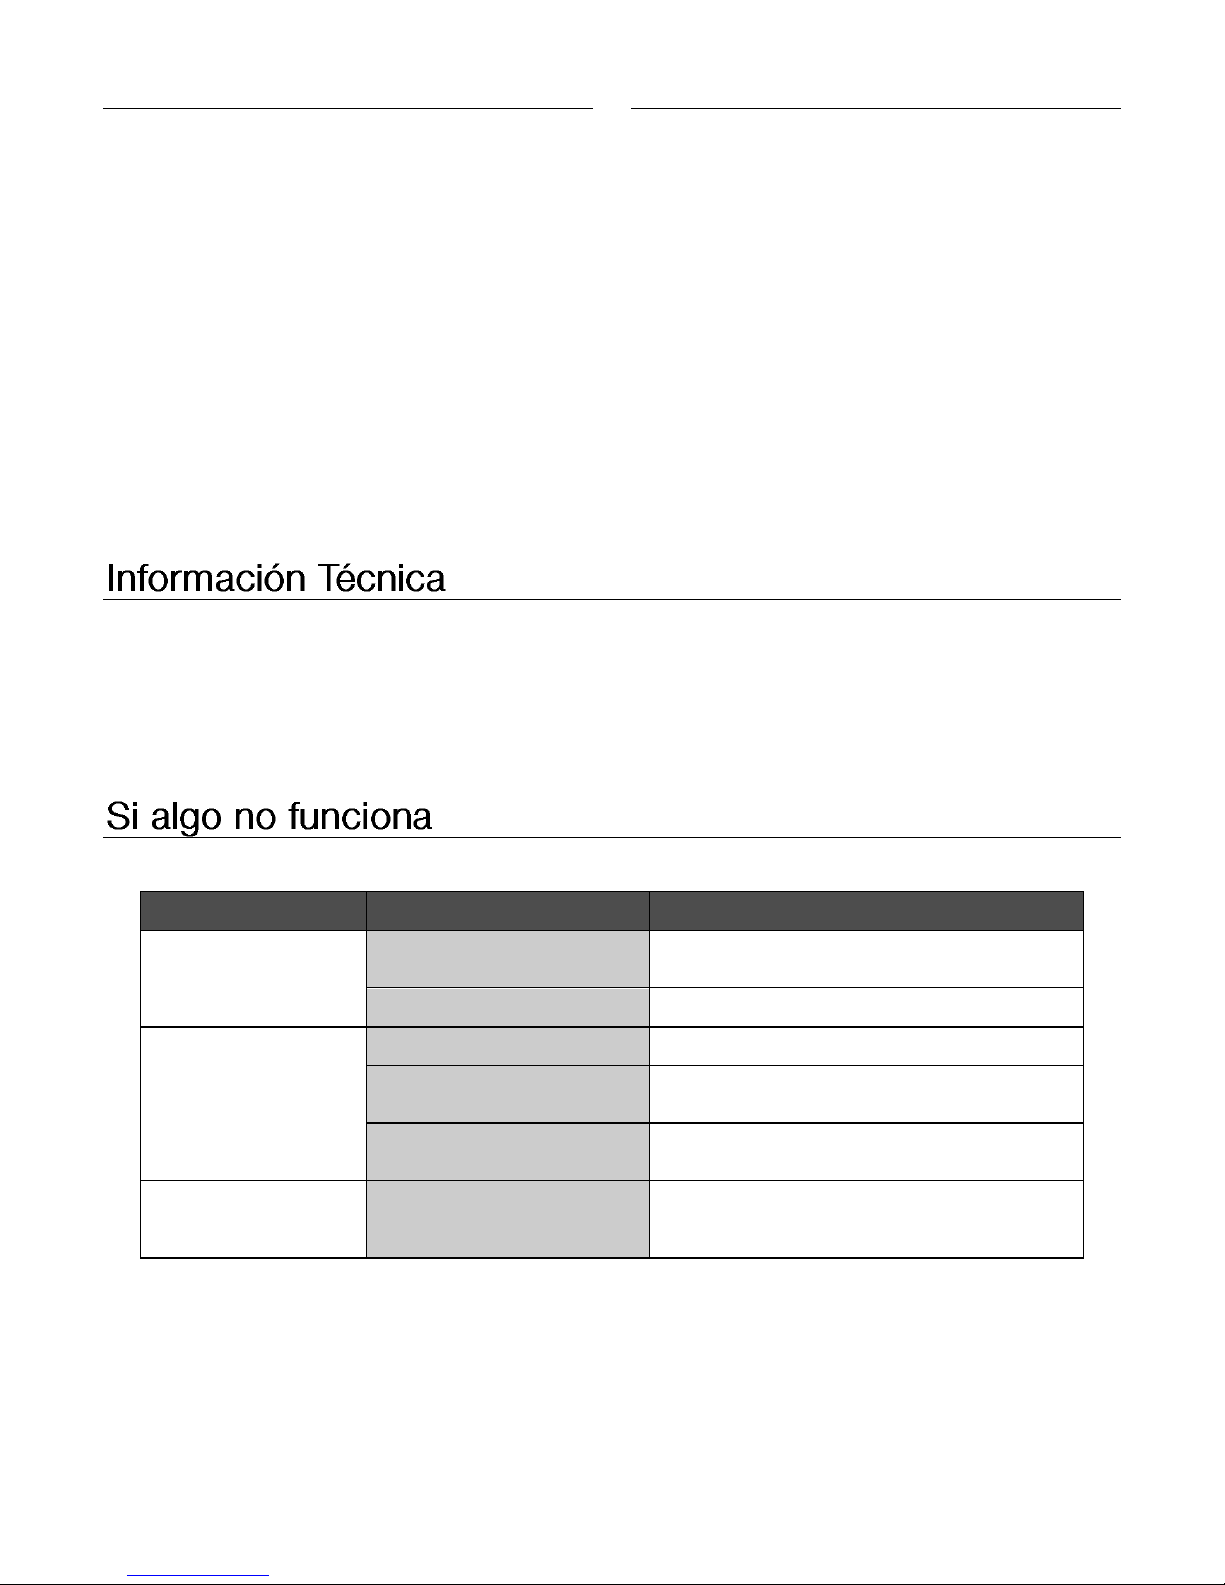
Antes de solicitar el servicio de reparaciones, haga las comprobaciones indicadas a continuación:
Defecto
Posible causa
Solución
La campana no
funciona
El cable de red no está
conectado
Conectar el cable de red
No llega tensión al enchufe
Proceder a revisar/reparar la red eléctrica
La campana no aspira
suficiente o vibra
Filtro saturado de grasa
Proceda a la limpieza o sustitución del filtro
Obstrucción del conducto de
salida de aire
Elimine las obstrucciones
Conducto de aire inadecuado
Contacte con el instalador y siga las
instrucciones de este manual
Las lámparas no
iluminan
Lámparas fundidas
Contacte el Servicio de Atención al Cliente
ILCOS D Code: DSL-9-S-500
Page 9

ES
Eliminación del embalaje
El embalaje está marcado con el Punto
Verde. Para eliminar todos los materiales de
embalaje, como el cartón, poliuretano y las
películas, utilice contenedores adecuados.
Así se garantiza la reutilización de los
materiales de embalaje.
Eliminación de aparatos fuera de uso
En base a la Norma europea 2012/19/UE de
Residuos de Aparatos Eléctricos y
Electrónicos (RAEE), los electrodomésticos
viejos no pueden ser arrojados en los
contenedores municipales habituales; tienen
que ser recogidos selectivamente para
optimizar la recuperación y reciclado de los
componentes y materiales que los
constituyen, y reducir el impacto en la salud
humana y el medioambiente.
El símbolo del cubo de basura tachado se
marca sobre todos los productos para
recordar al consumidor la obligación de
separarlos para la recogida selectiva.
El consumidor debe contactar con la
autoridad local o con el vendedor para
informarse en relación a la correcta
eliminación de su electrodoméstico viejo.
Antes de eliminar su aparato, inutilícelo. Tire
el cable de alimentación, córtelo y elimínelo.
Page 10

Safety Instructions
Carefully read the instructions before installing and using the
equipment. The manufacturer is not liable for improper
installation and use of the equipment that may cause injuries
and damage. Always keep the instructions at hand, so they can
be easily referred to during use.
Children and Vulnerable people safety
This appliance is not intended for use by persons (including
children) with reduced physical, sensory or mental
capabilities, or lack of experience and knowledge, unless
they have been given supervision or instruction concerning
use of the appliance by a person responsible for their safety.
Children should be supervised to ensure that they do not
play with the appliance.
General Safety
There shall be adequate ventilation of the room when the
range hood is used at the same time as appliances burning
gas or other fuels (not applicable to appliances that only
discharge the air back into the room).
Do not flambé under the range hood.
CAUTION: Accessible parts may become hot when us ed
with cooking appliances.
Installation
The electric system must be equipped with a means for
disconnection, with a contact separation in all poles that
provides full disconnection under overvoltage category III
conditions, in accordance to the wiring rules.
If a plug is used for the electric connection, then it must be
accessible after installation.
The air must not be discharged into a flue that is used for
exhausting fumes from appliances burning gas or other fuels
Page 11

EN
(not applicable to appliances that only discharge the air back
into the room).
The lower part of the extractor must be located at a
minimum height of 6 0 cm above the hob for electric cook ers
and 65 cm for gas cookers. If the instructions of a gas
cooker indicate a greater distance these must be observed.
Before installing the extractor consult the local rules and
regulations in force with respect to the discharge of air and
fumes.
When the extractor is working at the same time as other
non-electrical cooking equipment, the outlet air pressure
must not exceed 4 Pa (4x10⁻⁵ bar).
Before connecting the extractor to the mains, check that
both the voltage and the frequency conform to that shown
on the characteristics label located inside the extractor.
To achieve optimum performance the length of the outlet
hose should not exceed 4 meters, or include more than two
90º angles (elbows).
Although venting to the outside is recommended, activated
carbon filter may be used to allow the gas to be returned to
the kitchen through the outlet pipe.
NOTE: For more Installation information, refer to the end
of this user manual.
Cleaning
There is a fire risk if cleaning is not carried out in accordance
with the instructions.
Do not allow grease to accumulate in any part of the
extractor, especially in the grease filters as this COULD
PRODUCE A FIRE RISK!
The grease filters and the internal part of the extractor must
be cleaned at least once a month depending on how often
Page 12

the extractor is used. Note that grease is deposited in the
extractor when cooking, whether it is switched on or not.
We recommend the use of gloves and caution when cleaning
the inside of the extractor.
Repairs
If the supply cord is damaged, it must be replaced by the
manufacturer, its service agent or similarly qualified persons
in order to avoid a hazard.
Do not switch on the extractor if the supply cord is worn or
has cuts or if there are signs of deterioration around the
control panel.
If the LED module is malfunctioning, it must be replaced by
the manufacturer, its service agent or similarly qualified
persons in order to avoid a hazard.
If the extractor stops working or functions abnormally,
unplug it from the mains and contact the technical service.
Please contact the nearest Qualified Technical Assistance
Service for any rep airs always using original spare parts.
Repairs and modifications carried out by others could
damage the extractor or cause it to malfunction and cause
safety risks.
By pressing the button shown in the figure 1,
you will be able to control the functions of the
extractor.
To achieve better extraction, we recommend
switching on the extractor a few minutes
before starting to cook (3 - 5 minutes) so that
the air flow is continuous and stable when
extracting the fumes.
Likewise, keep the extractor switched on for a
few minutes when cooking is complete to
allow all fumes and odours to be expelled.
1- Timer
2- Reduce fan speed
3- Display
4- Increase fan speed
5- Light
Page 13

EN
Program the working time
1) Switch on the cooker hood and choose the
required aspiration speed.
3) Select the required programming time from
-
4) The display will show the remaining
can only be selected manually and will be
changed automatically to the second speed
level after 7 minutes.
on, the filters should be cleaned.
After cleaning the filters, simultaneously
-
whereupon the sign will be switched off.
Before carrying out any cleaning or
maintenance activities, ensure that the
extractor is disconnected from the mains.
To carry out cleaning and maintenance, follow
the Safety Instructions.
Fire risk exists in case that cleaning does not
take place according to the instructions.
Filter cleaning
To withdraw the filters from their locations
release the anchoring points. Clean the filter,
either by putting it in the dishwasher (see
notes) or leaving it standing in hot water to
simplify the removal of grease or, if wished, by
means of special sprays (protecting the non
metallic parts). Once clean, leave it to dry.
Attention: the cooker hood will not work until
the main filter was reinstalled.
Notes: cleaning in the dishwasher with
aggressive detergents may blacken the
surface of metallic parts, without this affecting
its gas retaining properties.
N.B. The filter must be cleaned at least once a
month depending on how often the extractor
is used. It must be remembered that grease is
deposited in the extractor when cooking,
whether it is switched on or not.
Cleaning of the extractor body
The use of warm (40ºC approx.) soapy water
is recommended. A cloth moistened in this
water is used for cleaning the extractor, paying
special attention to the grids. Afterwards, dry it
using a lint-free cloth.
Note:
Never use metallic scouring pads or
abrasive products that could damage the
surface.
Do not use scrapers with metallic surfaces
such as knives, scissors etc.
Activated charcoal filter
To install the charcoal filter, the motor
anchorage is made to coincide with the
anchor points of the activated charcoal
filter and turn it clockwise.
The carbon filter lasts from three to six
months depending on the particular
conditions of use.
The activated carbon filter can neither be
washed nor regenerated. Once it is
exhausted, it must be changed.
To replace exhausted filters with new
ones, withdraw the old one in the reverse
order to that of installation.
Page 14

Dimensions:
Width = 900 mm
Depth = 450 mm
Height = 590/ 965 mm
Electrical characteristics:
REFER TO RATING PLATE
Before seeking technical assistance carry out the following checks first:
Defect
Possible cause
Solution
The extractor does not
work
The cable is not connected
Connect the mains cable
No current is reaching the plug
Revise/repair the electricity circuit
The extractor does not
blow enough or vibrates
Filter saturated with grease
Clean or substitute the filter
Outlet obstructed
Eliminate obstructions
Inadequate air conduit
Contact the installer and follow instructions of
this manual
The lamps do not light
Lamp broken
Contact the Customer Service
ILCOS D Code: DSL-9-S-500
Height above gas hob: 75 mm minimum.
NEVER PLACE THE COOKER HOOD OVER
AN EYE-LEVEL GRILL.
This appliance must be connected by a
competent person, using fixed wiring via a
DOUBLE POLE SWITCHED FUSED SPUR
OUTLET.
This appliance is not intended for use by
young children or infirm persons without
supervision.
Young children should be supervised to
ensure that they do not play with the
appliance.
We recommend that the appliance is
connected by a qualified electrician, who is a
member of the N.I.C.E.I.C. and who will
comply with the I.E.E. and local regulations.
Should the colour of the wires in the mains
lead for the appliance not correspond with the
coloured markings identifying the terminal in
your spur box proceed as follows:
The wire which is coloured blue must be
connected to the marked N (Neutral) or
coloured Black.
The wire which is coloured brown must be
connected to the marked L (Live) or couloured
Red
Where avialable (see installation), the wire
which is coloured yellow/green must be
Page 15

EN
connected to the marked or coloured
Yellow/Green.
If the cooker hood is installed for use above a
gas appliance then the provision vor ventilation
must be in accordance with the Gas Safety
(Installation & Use) Regulations 1984 and the
relevant Building Regulations. Detailed
recommendations are contained in the
following British Standard Codes of Practice
BS6172, BS5440 and BS6891 Current
Edition.
Disposal of the packaging
The packaging bears the Green Point mark.
Dispose of all the packaging materials such
as cardboard, expanded polystyrene and
plastic wrapping in the appropriate bins. In
this way you can be sure that the packaging
materials will be re-used.
Disposal of equipment no longer used
According to European Directive
2012/19/EU on the management of waste
electrical and electronic equipment (WEEE),
home electrical appliances should not be put
into the normal systems for disposal of solid
urban waste.
Outdated appliances should be collected
separately to optimise component material
recovery and re-cycling rates and to prevent
potential harm to human health and the
environment. The symbol of a rubbish
container superimposed by a diagonal cross
should be put on all such products to remind
people of their obligation to have such items
collected separately.
Consumers should contact their local
authorities or point of sale and request
information on the appropriate places to
leave their old home electrical appliances.
Before disposing of your appliance, render it
non-usable by pulling out the power cable,
cutting this and disposing of it.
Page 16

Page 17

ČEŠTINA
Page 18

Page 19

ČEŠTINA
Page 20

Page 21

ČEŠTINA
Page 22

Page 23

ČEŠTINA
Page 24

1130274-a
 Loading...