

Bedienungsanleitung
User Manual
Manual de Usuario
Mode d’Emploi
Manuale d’Uso
Instrukcja obsługi
คู่มือการใช้
用户手册
Bedienungsanleitung
User Manual
Manual de Usuario
Mode d’Emploi
Manuale d’Uso
Instrukcja obsługi
คู่มือการใช้
用户手册
GARANTIE
Sealant
STEP1 STEP2 STEP3 STEP4
D
Für Herstellungs- und Materialfehler haftet der Hersteller innerhalb einer Garantiezeit von 10 Jahren.
Wenn solche Mängel festgestellt werden, geben Sie bitte Ihre Spüle an den Verkäufer zurück. Bewahren Sie die
Kaufdokumente während der gesamten Garantiezeit auf und legen Sie sie der zurückgegebenen Spüle bei. Die Garantie erstreckt sich nicht auf Ersatzteile oder Zubehör, die im Spülbecken-Set enthalten sind. Diese Garantie erstreckt
sich nicht auf Mängel, die sich aus unsachgemäßer und nicht ordnungsgemäßer Verwendung, Wartung oder Installation ergeben.
VERPACKUNGEN:
Die Verpackungselemente (Plastikbeutel, Styropor usw.) sollten nicht in Reichweite von Kindern bleiben, da sie potenzielle Gefahrenquellen darstellen.
MONTAGEANWEISUNGEN:
EINBAU:
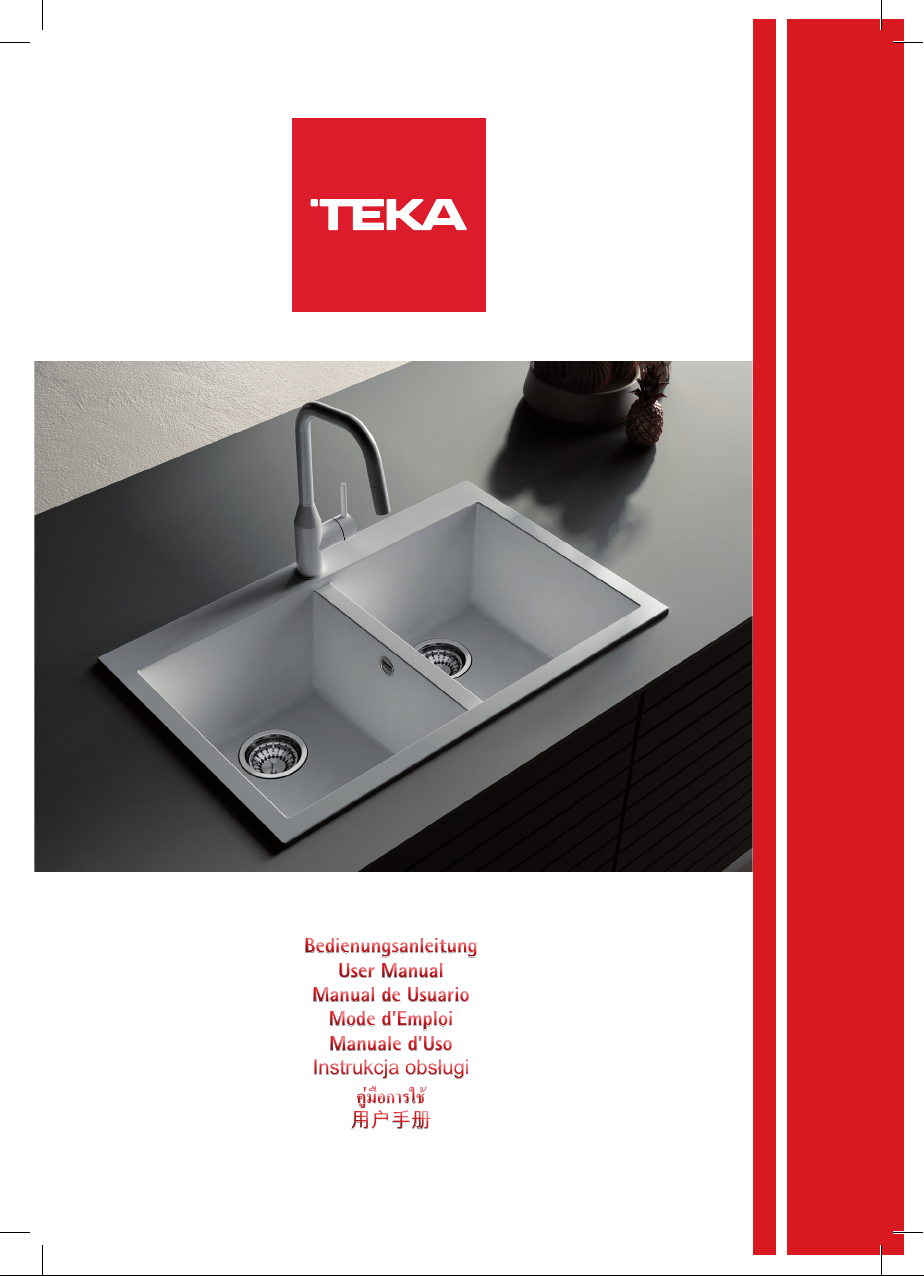
1. BOHRUNGEN FÜR DIE ARMATUREN:
Die Spüle ist für die Montage des Wasserhahns auf beiden Seiten mit je einem
vorgebohrten Loch von 0,35 mm versehen. Dadurch kann die entsprechende
Positionierung für die Installation gewählt werden. Nachdem die Seite gewählt
wurde, kann die Fertigstellung des Lochs mit einem 0,35 mm Tassenschneider
(in jedem Baumarkt erhältlich) erfolgen, der auf einem Handbohrer montiert ist.
Es ist darauf zu achten, dass von der nicht sichtbaren Seite gearbeitet wird.
2. BOHREN DER ARBEITSFLÄCHE FÜR DAS EINSETZEN DER SPÜLE:
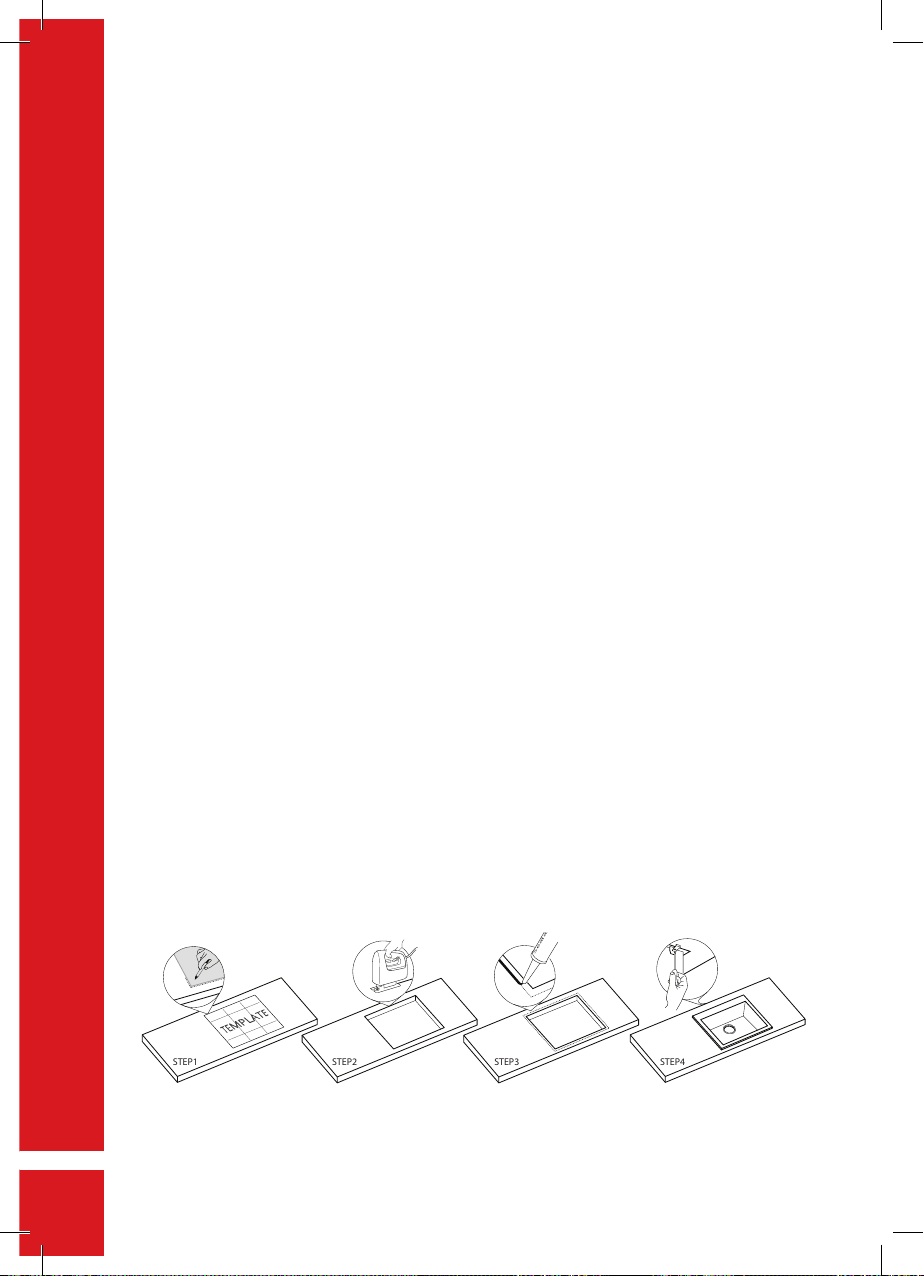
Stellen Sie die Spüle kopfüber auf die Arbeitsfläche, wo sie eingesetzt werden soll. Markieren Sie den Umfang der
Spüle auf der Oberseite mit einem Bleistift und verwenden Sie die Spüle selbst als Schablone. Entfernen Sie die Spüle
und zeichnen Sie eine gestrichelte Linie innerhalb der gerade gezogenen Umrisslinie in einem Abstand von 1 cm.
Schneiden Sie mit geeigneten Werkzeugen entlang der gestrichelten Linie.
3. EINBAU DER SPÜLE IN DIE ARBEITSFLÄCHE
Alle unsere Spülen sind mit vorinstallierten Montageklemmen ausgestattet. Für eine korrekte Installation gehen Sie
wie folgt vor: Tragen Sie eine transparente Silikondichtungsmasse auf dem gesamten Umfang der Spüle auf, der mit
der Arbeitsfläche in Kontakt kommt. Überprüfen Sie, ob alle Bügel der Klemmen nach innen zeigen.
Setzen Sie die Spüle in das Loch der Arbeitsfläche ein und achten Sie darauf, dass sie zentriert ist, und ziehen Sie
dann die Klemmen mit den Einstellschrauben an, beginnend von der Mitte nach außen in überkreuzter Reihenfolge.
4. INSTALLATION DES ABLAUFS (ABFLUSSABDECKUNGEN UND SIPHONS)
Beachten Sie die Bedienungsanleitung, die dem Ablaufzubehör beiliegt. Schneiden Sie mit geeigneten Werkzeugen
und verwenden Sie die gezeichnete Linie als Bezugslinie.
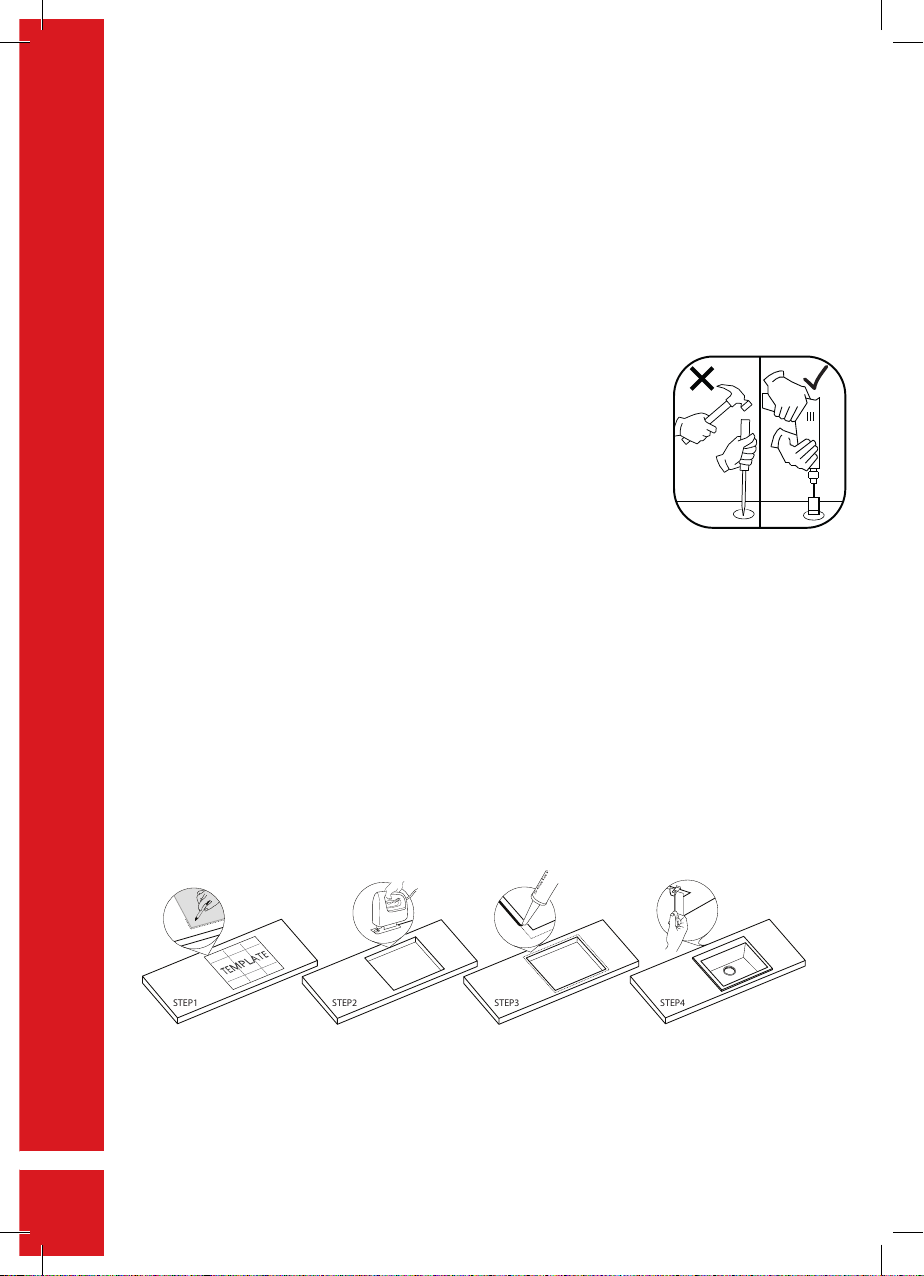
UNTERBAU:
1. BOHRUNGEN FÜR DIE ARMATUREN:
Die Bohrung ist direkt auf der Arbeitsfläche durchzuführen.
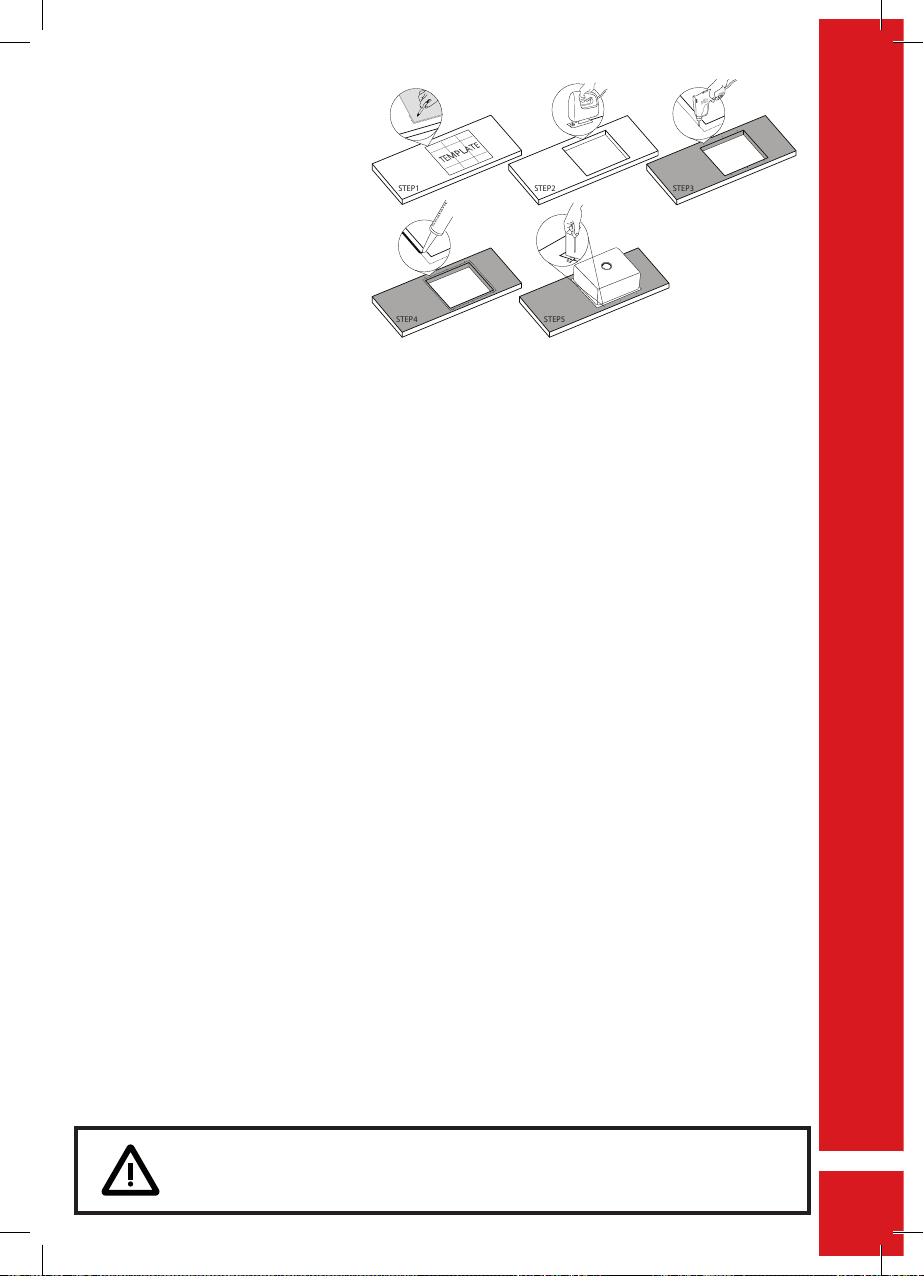
2. BOHREN DER ARBEITSFLÄCHE FÜR DAS EINSETZEN DER SPÜLE:
Platzieren Sie die SCHABLONE auf der Arbeitsfläche. Markieren Sie den Umfang auf der Arbeitsfläche mit einem
Bleistift entsprechend der SCHABLONE.
2

3. EINBAU DER SPÜLE IN DIE
Sealant
STEP1 STEP2 STEP3
STEP4 STEP5
UNDER MOUNT
ARBEITSFLÄCHE
Bohren Sie die Löcher für die
Buchsen in einer Entfernung von
27 mm vom Umfang des Lochs,
in das die Spüle eingesetzt werden
soll, und setzen Sie die Buchsen
ein. Tragen Sie eine transparente
Silikondichtungsmasse auf dem
gesamten Umfang der Spüle auf,
der mit der Arbeitsfläche in
Kontakt kommt. Setzen Sie die
Spüle in das Loch der Arbeitsfläche
ein und achten Sie darauf, dass sie
zentriert ist, und ziehen Sie dann
die Klemmen mit den Schrauben
an, beginnend von der Mitte nach
außen in überkreuzter Reihenfolge.
4. INSTALLATION DES ABLAUFS (ABFLUSSABDECKUNGEN UND SIPHONS)
Beachten Sie die Bedienungsanleitung, die dem Ablaufzubehör beiliegt.
PFLEGE UND WARTUNG
Die Lebensdauer Ihrer Spüle kann bei sachgemäßer Pflege verlängert werden, dadurch bleibt auch das ästhetische
Erscheinungsbild langfristig erhalten.
1. ORDENTLICHE WARTUNG
Die beste Art, die Spüle zu reinigen, ist die Verwendung eines weichen Tuches oder Schwammes und die Verdünnung
der üblichen Reinigungsmittel mit lauwarmem Wasser. Verwenden Sie keine aggressiven Reinigungsmittel.
Es wird empfohlen, die Oberfläche der Spüle mit Wasser zu spülen und die nassen Teile mit einem schwammigen
Tuch zu trocknen. All diese Maßnahmen tragen dazu bei, die Bildung von Kalkflecken zu vermeiden, insbesondere bei
dunkelfarbigen Spülen.
D
2. ENTFERNUNG HARTNÄCKIGER FLECKEN
Spuren von hartnäckigem Schmutz können mit einem Tuch entfernt werden, das mit verdünntem Bleichmittel, mit
Alkohol oder im Extremfall mit Aceton getränkt ist. Spülen Sie die Oberfläche nach der Anwendung sorgfältig mit
Wasser ab.
3. AUSSERORDENTLICHE EINGRIFFE
Die Spüle besteht aus einer Mischung mit einem hohen Anteil an inerten Füllstoffen, die das Produkt sehr hart und
langlebig machen. Diese besondere Eigenschaft kann durch das ständige Reiben von Metallpfannen zu
Streifenbildung führen. Die Streifen entstehen durch die Freisetzung von kleinen Metallpartikeln, die mit einer
Bürste (wie Scotch Brite) entfernt werden können, zusammen mit handelsüblichen Reinigungsmitteln.
4. WEITERE TIPPS
Verwenden Sie keine hochalkalischen Produkte wie Ammoniak oder Natronlauge.
Stellen Sie keine Töpfe oder Kaffeekannen direkt auf die Spüle, sobald sie vom Herd genommen wurden (in einigen
Fällen erreichen sie 500°C).
Gießen Sie kein siedendes Öl ein, da die Abläufe verformt werden könnten.
Schneiden Sie keine Lebensmittel direkt auf der Spüle, wir empfehlen die Verwendung von Schneidebrettern.
Kalkrückstände werden mit Essig oder Essigsäure entfernt
.
Stellen Sie keine Töpfe oder Kaffeekannen direkt auf die Spüle, sobald
sie vom Herd genommen wurden (in einigen Fällen erreichen sie 500°C)
3

GB
Sealant
STEP1 STEP2 STEP3 STEP4
WARRANTY
Manufacturer is responsible of manufacturing and material defects within a warranty period of 10 years. In case of
detecting such defects, return your sink to the seller. Keep purchasing documentation during the whole warranty
period and attach it to the sink returned.
The warranty doesn’t cover any spare part or accessory, enclosed into the sink kit.
This warranty does not cover defects resulting from improper or unreasonable use, maintenance or installation.
PACKAGING:
All packaging materials (plastic bags, polystyrene foam, etc.) are potentially dangerous and should be kept away from
children.
INSTALLATION INSTRUCTIONS
INSET:
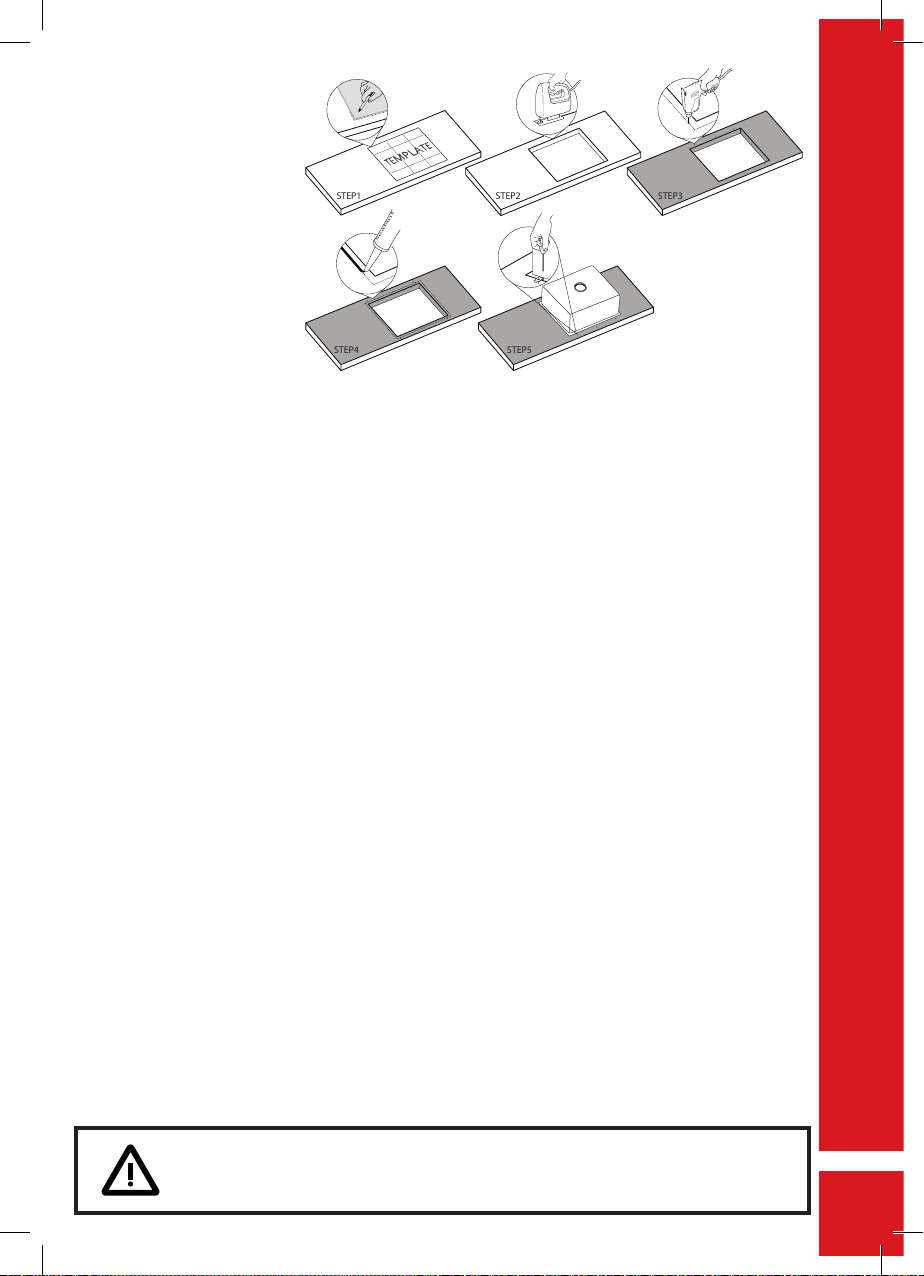
1. HOLES FOR THE TAP CONNECTIONS
The sink comes with prepared pre-drilled holes of Ø 35 mm on both sides.
This lets you choose the side where you prefer to install the tap.
After deciding which side you want to use, the hole can be completed using a
DIAMOND CORE installed on a manual drill, taking care to work from the
non-visible side.
2. OPENING THE WORK SURFACE FOR INSERTING THE SINK
Place the sink upside-down on the work surface where it is to be installed.
Trace around the outer edge of the sink using a pencil.
Now move the sink and draw a dotted line 1 cm. inside the one you have just drawn using the sink as a template.
Cut along the dotted line using the appropriate tools.
3. FITTING THE SINK INTO THE WORK SURFACE
All our sinks come equipped with pre-installed mounting clamps. The following steps explain how to install the
sink correctly:
Apply a special transparent sealant around the outer edge of the sink, wherever it will come into contact with the
work surface when the installation is complete.
Make sure that all the clamps of the fastenings are facing inwards.
Insert the sink into the cut-out area of the work surface making sure it is centred. Tighten the fastenings using the
adjusting screws, starting from the centre and working in a criss-cross order.
5. INSTALLING THE FITTING ELEMENTS AND SIPHON
Follow the instructions provided with the waste kit.
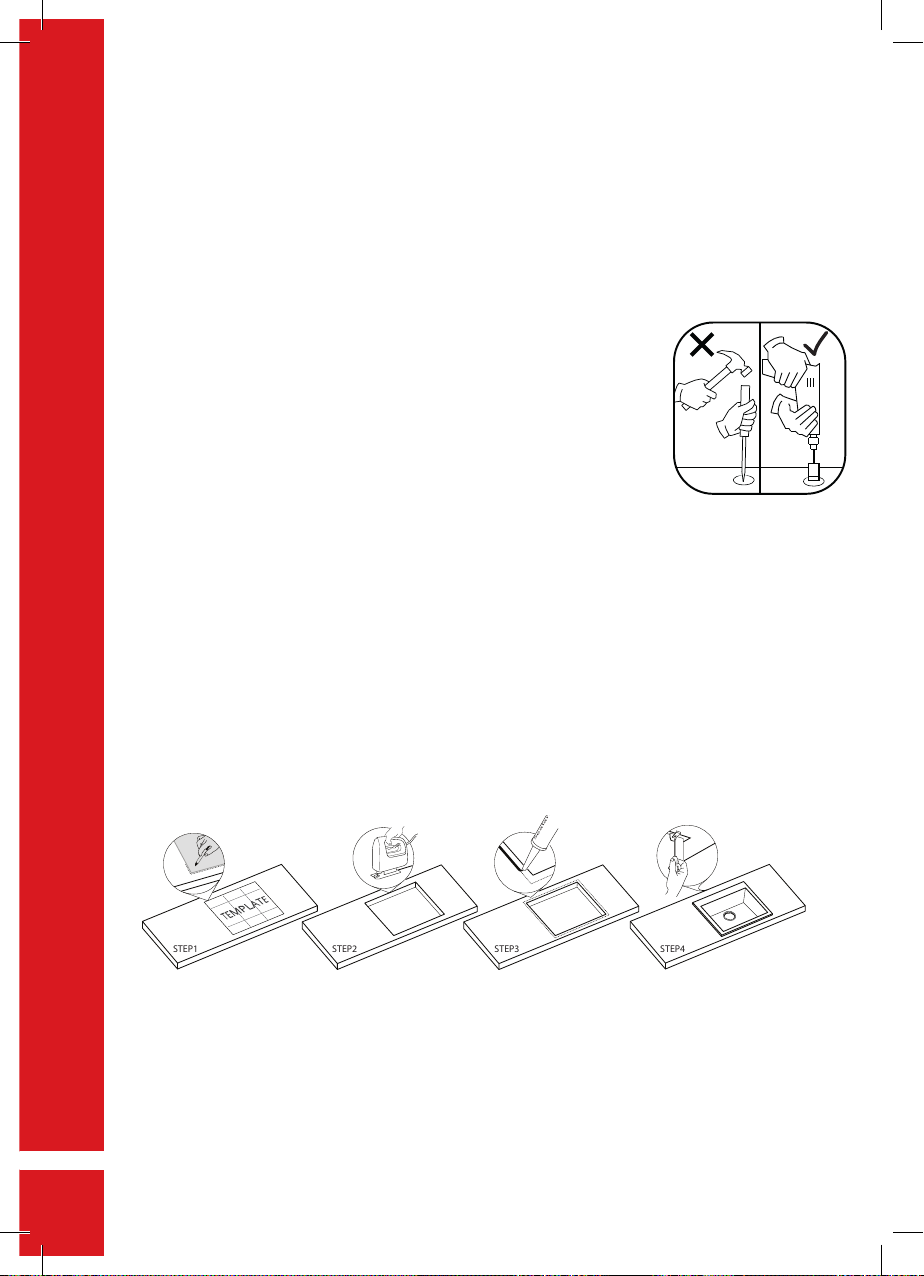
UNDERMOUNT:
1. . HOLES FOR THE TAP CONNECTIONS
The drilling will be done directly on the work surface.
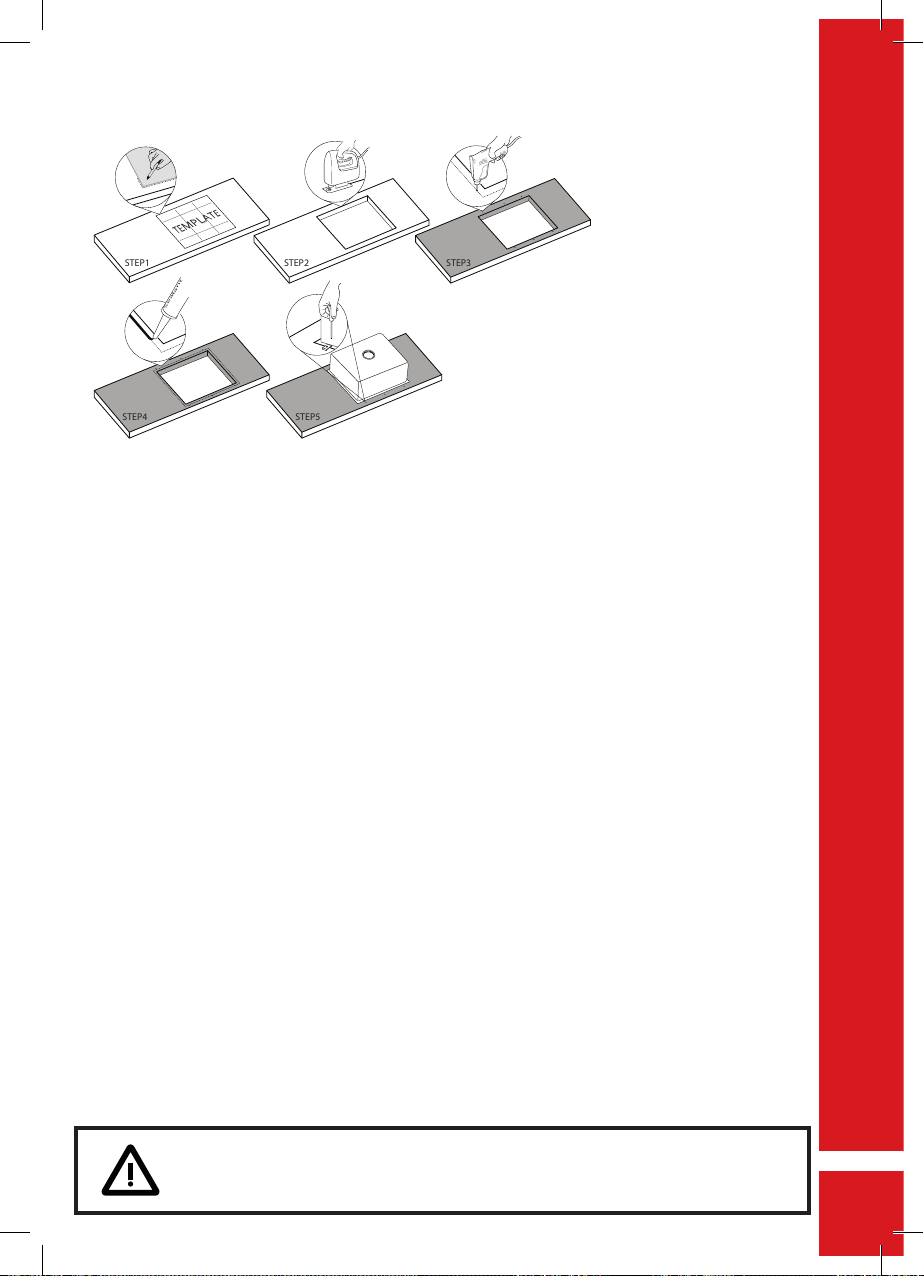
2. OPENING THE WORK SURFACE FOR INSERTING THE SINK
Place the template on the kitchen worktop; mark on it with a pencil the perimeter as indicated on the template.
3. FITTING THE SINK INTO THE WORK SURFACE
Drill the holes for the bushings 27 mm from the perimeter of the hole in which the sink will be placed, insert the
4
bushings. Apply a special transparent sealant around the outer edge of the sink Insert the sink into the cut-out area
of the worktop surface making
Sealant
STEP1 STEP2 STEP3
STEP4 STEP5
UNDER MOUNT
sure it is centered. Tighten the
fastenings using the adjusting
screws, starting from the center
and working in a criss-cross order.
5. INSTALLING THE FITTING
ELEMENTS AND SIIPHON
Follow the instructions provided
with the waste kit.
CARE AND MAINTENANCE
Your sink will last longer if it is taken care of properly. Correct care also helps to keep it looking attractive for a long
time.
1. DAILY CARE
The best way to clean the sink is to use a soft cloth or sponge, with commonly available detergents diluted in warm
water. Strong detergents should not be used.
The surface of the sink should be washed with water, drying the damp parts with a spongy cloth.
This will help prevent the formation of limescale marks, especially on dark-coloured sinks.
2. REMOVING STUBBORN MARKS
Traces of stubborn dirt can be removed with a cloth soaked in diluted bleach or alcohol or, in extreme cases, with
acetone.
After this, rinse the surface well with water.
GB
3. SPECIAL CLEANING
The sink is composed of a mixture of quartz particles with a high percentage of inert fillers that make the product
very hard and resistant. This particular characteristic may cause streaking due to the continual rubbing of metal pans.
The streaks are due to the release of small particles of metal, which can be removed with a brush (like Scotch Brite),
together with commonly used detergents.
4. FURTHER RECOMMENDATIONS
Do not use highly alkaline substances like ammonia or caustic soda.
Do not put pans or coffee-pots that have just been taken off the heat (which sometimes reach 500°C) directly in
the sink.
Do not pour boiling oil into the sink, as this could deform the drain pipes.
Do not cut food directly in the sink. Chopping boards should be used for this purpose.
Limescale residue can be removed with vinegar or acetic acid.
Do not put pans or coffee-pots that have just been taken off
the heat (which sometimes reach 500°C) directly in the sink.
5

E
Sealant
STEP1 STEP2 STEP3 STEP4
GARANTIA
Durante el período de garantía de 10 años, el fabricante asumirá la responsabilidad ante defectos de material u otros
defectos de fabricación. En caso de descubrir algún defecto de fabricación, por favor devuelva el fregadero a su vendedor junto con los documentos de compra.
La garantía no cubre otras piezas y accesorios del fregadero.
Esta garantía no será válida en caso de un mantenimiento inadecuado o un uso indebido del producto.
EMBALAJE:
Los elementos del embalaje (bolsas de plástico, poliestireno (expandido, etc.) no deben dejarse al alcance de los niños,
ya que constituyen potenciales fuentes de peligro.
INSTRUCCIONES PARA EL MONTAJE
ENCASTRE:
1. PERFORACIÓN PARA LA GRIFERÍA:
El fregadero está predispuesto para la instalación del grifo en ambos lados con
un pre-orificio de Ø 35mm. Esto permite elegir el sentido de colocación cuando
se efectúe la instalación. Una vez haya determinado el sentido del fregadero,
puede terminar de hacer el orificio con una sierra de corona de Ø 35mm
(que podrá hallar sin problemas en cualquiera ferretería) montada en un taladro
manual, teniendo cuidado de actuar por el lado que no esté a la vista.
2. PERFORACIÓN DE LA MESA DE TRABAJO PARA INSERCIÓN DEL FREGADERO:
Coloque el fregadero al revés en el tablero de trabajo donde tendrá que empotrarse; marque en la superficie con
un lápiz el perímetro del fregadero utilizando como horma el mismo fregadero. Quite el fregadero y trace una línea
de puntos, dentro de la línea marcada previamente, a una distancia de 1 cm. Realice el corte con las herramientas
correspondientes utilizando como referencia la línea de puntos.
3. COLOCACIÓN DEL FREGADERO EN EL ORIFICIO DE LA ENCIMERA
Todos los fregaderos se suministran con grapas pre-montadas. Para instalarlo correctamente haga lo que se indica a
continuación: distribuya masilla impermeable transparente por todo el perímetro del fregadero que estará en contacto con la superficie; controle que todas las abrazaderas de los ganchos miren hacia el interior; coloque el fregadero
en el orificio de la superficie asegurándose de que esté centrado y luego apriete los ganchos con los tornillos de
regulación del centro hacia el exterior en orden cruzado.
4. INSTALACIÓN DE LOS ELEMENTOS DE FIJACIÓN Y DEL SIFÓN
Siga las instrucciones de uso que se adjuntan con el kit de válvulas.
BAJOENCIMERA:
1. AGUJEROS PARA GRIFERÍA
La perforación se realizará directamente sobre la mesa de trabajo.
2. PERFORACIÓN DE LA MESA DE TRABAJO PARA INSERCIÓN DEL FREGADERO
Colocar la plantilla sobre la mesa de trabajo; marcar con un lápiz sobre la misma el perímetro como se indica en la
plantilla.
6

3. COLOCACIÓN DEL
Sealant
STEP1 STEP2 STEP3
STEP4 STEP5
UNDER MOUNT
FREGADERO EN EL ORIFICIO
DE LA ENCIMERA
Perfore los orificios para los
casquillos a 27 mm del perímetro
del orificio en el que se colocará el
fregadero. Inserte los casquillos.
Aplique el pegamento transparente
especial alrededor del borde
exterior del fregadero.
Coloque el fregadero en
el área recortada de la superficie de
la encimera asegurándose que está
centrado. Apriete las grapas con los
tornillos de ajuste, comenzando
desde el centro y trabajando en un
orden cruzado.
4. INSTALACIÓN DE LOS ELEMENTOS DE FIJACIÓN Y DEL SIFÓN
Siga las instrucciones de uso que se adjuntan con el kit de válvulas.
CUIDADO Y MANTENIMIENTO
Un mantenimiento correcto permite prolongar la vida de su fregadero para favorecer que se mantenga su aspecto
estético con el paso del tiempo.
1. MANTENIMIENTO DIARIO
El mejor sistema para limpiar el fregadero consiste en utilizar un paño o una esponja suave diluyendo los detergentes
que se utilicen normalmente con agua templada. Se recomienda no utilizar detergentes agresivos. Es aconsejable
enjuagar la superficie del fregadero con agua y secar las partes húmedas con un paño esponjoso. Todas estas medidas
contribuirán a que se evite la formación de manchas de cal, sobre todo en los fregaderos de color oscuro.
E
2. ELIMINACIÓN DE MANCHAS RESISTENTES
Los restos de suciedad resistente pueden eliminarse con un paño impregnado de lejía diluida con agua, con alcohol
o en casos extremos con acetona.
Una vez finalizada la operación enjuague con cuidado la superficie con agua.
3. SITUACIONES EXTRAORDINARIAS
El fregadero está compuesto por una mezcla de partículas de cuarzo con un porcentaje alto de cargas inertes que
hacen que el producto resulte muy duro y resistente. Esta característica podría causar la formación de rayas como
consecuencia del continuo frotamiento de las cazuelas metálicas. Las rayas son la liberación de pequeñas partículas
de metal y pueden eliminarse con estropajos (tipo Scotch Brite) junto con detergentes utilizados normalmente.
4. OTROS CONSEJOS
No utilice sustancias altamente alcalinas como amoníaco o sosa cáustica.
No apoye directamente en el fregadero ollas o cafeteras que acabe de retirar del fuego (en algunos casos alcanzan
una temperatura de 500°C).
No vierta aceite hirviendo, los desagües podrían deformarse.
No corte alimentos directamente en el fregadero, se aconseja utilizar una tabla de corte apropiada.
Los restos de cal se eliminan con vinagre o ácido acético
No apoye directamente en el fregadero ollas o cafeteras que acabe de
retirar del fuego (en algunos casos alcanzan una temperatura de 500°C)
7

GARANTIE
Sealant
STEP1 STEP2 STEP3 STEP4
F
Le Producteur est responsable de la fabrication et des défauts matériels jusqu’à la fin de la période de garantie de
10 ans. Si vous relevez des défauts matériels, veuillez retourner votre évier au vendeur. Conservez la preuve d’achat
pendant toute la période de garantie et joignez-la à l’évier retourné. La garantie ne couvre pas les pièces détachées ni
les accessoires inclus dans le kit de l’évier. Elle ne couvre pas non plus d’éventuels défauts découlant de son
utilisation, de son entretien ou d’une installation inappropriée et incorrecte.
EMBALLAGES :
Les éléments d’emballage (sachets en plastique, polystyrène expansé, etc.) représentent une source de danger potentielle et doivent donc être mis hors de la portée des enfants.
INSTRUCTIONS POUR LE MONTAGE
STANDARD:
1. PERÇAGE POUR LA ROBINETTERIE:
L’évier est équipé pour une installation du robinet des deux côtés, avec
un trou pré-percé de 0,35 mm. Cela permet de choisir son orientation au
moment de l’installation. Après avoir choisi l’orientation de l’évier, le trou
peut être fini de percer à l’aide d’une fraise à tasse 0,35 mm (facile à se
procurer auprès de n’importe quelle quincaillerie) montée sur une perceuse
manuelle, en faisant bien attention de percer du côté non visible.
2. PERÇAGE DU PLAN DE TRAVAIL POUR L’ENCASTREMENT DE L’ÉVIER:
Poser l’évier renversé sur le plan de travail où il devra être encastré ; marquer au crayon le périmètre de l’évier sur
le plan de travail en utilisant le profil de l’évier. Enlever l’évier et tracer une ligne pointillée à l’intérieur de la ligne
précédemment tracée, à une distance d’1 cm. Effectuer une découpe avec des instruments appropriés, en utilisant la
ligne pointillée comme référence.
3. ENCASTREMENT DE L’ÉVIER DANS LE LOGEMENT PRATIQUÉ DANS LE PLAN DE TRAVAIL
Tous les éviers sont équipés de crochets prémontés ; pour une bonne installation, procéder de la façon suivante :
Placer un joint de silicone transparent tout le long du périmètre de l’évier qui sera en contact avec le plan ;
Vérifier que tous les supports de crochet soient orientés vers l’intérieur ;
Poser l’évier dans le logement pratiqué dans le plan et vérifier qu’il soit bien centré, puis serrer les crochets à l’aide
des vis de réglage, en partant du centre et en allant vers l’extérieur, dans un ordre croisé.
4. INSTALLATION DU VIDAGE (BONDES ET SIPHONS)
Suivre le mode d’emploi joint aux accessoires de vidage. Effectuer une découpe avec des instruments appropriés,
en utilisant la ligne tracée comme référence.
SOUS LE PLAN SUPÉRIEUR:
1. PERÇAGE POUR LA ROBINETTERIE:
Le perçage devra être effectué directement sur le plan supérieur.
2. PERÇAGE DU PLAN DE TRAVAIL POUR L’ENCASTREMENT DE L’ÉVIER :
Poser le GABARIT de profilage sur le plan de travail ; marquer au crayon sur le plan le périmètre résultant du GABARIT.
8

3. ENCASTREMENT DE L’ÉVIER
Sealant
STEP1 STEP2 STEP3
STEP4 STEP5
UNDER MOUNT
DANS LE LOGEMENT PRATIQUÉ
DANS LE PLAN DE TRAVAIL
Percer les trous pour les douilles à
27 mm du périmètre du logement
où sera placé l’évier, puis insérer
les douilles. Placer un joint de
silicone transparent tout le long
du périmètre de l’évier qui sera en
contact avec le plan ; Poser l’évier
dans le logement pratiqué dans le
plan et vérifier qu’il soit bien
centré, puis serrer les crochets à
l’aide des vis, en partant du centre
et en allant vers l’extérieur, dans
un ordre croisé.
4. INSTALLATION DU VIDAGE (BONDES ET SIPHONS)
Suivre le mode d’emploi joint aux accessoires de vidage
SOIN ET ENTRETIEN
La vie de votre évier peut être prolongée si vous l’entretenez correctement : vous contribuerez ainsi à préserver son
aspect esthétique au fil du temps.
1. ENTRETIEN ORDINAIRE
Le meilleur moyen de nettoyer l’évier, c’est d’utiliser un chiffon ou une éponge douce et vos détergents habituels
dilués avec de l’eau tiède. Nous vous conseillons de ne pas utiliser de détergents agressifs.
Il est conseillé de rincer la surface de l’évier à l’eau, puis de sécher les parties humides avec un chiffon éponge. Tous
ces soins contribueront à éviter la formation de taches de calcaire, notamment sur les éviers de couleur foncée.
2. ÉLIMINATION DES TACHES OBSTINÉES
Les traces de saleté obstinées peuvent être éliminées à l’aide d’un chiffon imprégnée d’eau de javel diluée avec de
l’eau, ou bien d’alcool ou, dans les cas les plus extrêmes, d’acétone ;
Puis, rincer soigneusement la surface à l’eau.
F
3. ENTRETIEN EXTRAORDINAIRE
L’évier est constitué d’un mélange à forte teneur en charges inertes, qui rendent le produit particulièrement dur
et résistant. Cette caractéristique peut engendrer la formation de stries dues au frottement continu des casseroles
métalliques. Les stries sont le fait de petites particules de métal, qui peuvent être éliminées à l’aide de brosses (type
Scotch Brite) combinées aux détergents habituels.
4. CONSEILS SUPPLÉMENTAIRES
Ne pas utiliser de substances hautement alcalines comme l’ammoniac ou la soude caustique ;
Ne pas poser directement sur l’évier de casseroles ou de cafetières venant d’être retirées du feu (leur température
peut atteindre 500°C) ;
Ne pas verser d’huile bouillante dans l’évier, cela pourrait déformer les tuyaux d’évacuation ;
Ne pas couper d’aliments directement sur l’évier. Nous vous conseillons d’utiliser une planche à couper.
Les résidus de calcaire peuvent être éliminés avec du vinaigre ou de l’acide acétique.
Ne pas poser directement sur l’évier de casseroles ou de cafetières
venant d’être retirées du feu (leur température peut atteindre 500°C)
9
IT
Sealant
STEP1 STEP2 STEP3 STEP4
GARANZIA
Il Produttore è responsabile della fabbricazione e dei difetti materiali entro un periodo di garanzia di 10 anni.
In caso di rilevazione di detti difetti, restituisca il Suo lavello al venditore. Mantenga la documentazione di acquisto
durante tutto il periodo di garanzia e La alleghi al lavello reso. La garanzia non copre nessun ricambio o accessorio
inclusi nel kit del lavello. Questa garanzia non copre eventuali difetti che derivino da uso, mantenimento o
installazione impropria ed incorretta.
IMBALLAGGI:
Gli elementi dell’imballaggio (sacchetti in plastica, polistirolo espanso, ecc.) non devono essere lasciati alla portata
dei bambini in quanto potenziali fonti di pericolo.
ISTRUZIONI PER IL MONTAGGIO
STANDARD:
1. FORATURA PER LA RUBINETTERIA:
Il lavello è predisposto per l’installazione del rubinetto su entrambi i lati con
un preforo di Ø 35 mm. Ciò consente di scegliere il verso di posizionamento al
momento dell’installazione. Dopo aver individuato il verso del lavello il
completamento del foro può essere realizzato per mezzo di una fresa a
tazza Ø 35 mm (facilmente reperibile presso una qualsiasi ferramenta)
montata su un trapano manuale, avendo cura di agire dal lato non a vista.
2. FORATURA DEL PIANO DI LAVORO PER L’INSERIMENTO DEL LAVELLO:
Porre il lavello capovolto sul piano di lavoro dove dovrà essere inserito; segnare sul piano con una matita il perimetro
del lavello usando come sagoma il lavello stesso. Togliere il lavello ed eseguire una linea tratteggiata, all’interno della
linea precedentemente segnata, ad una distanza di 1 cm. Eseguire il taglio con gli appositi strumenti, utilizzando
come riferimento la linea tratteggiata.
3. INSERIMENTO DEL LAVELLO NEL FORO DEL PIANO
Tutti i lavelli sono forniti di ganci pre-montati; per una corretta installazione procedere come segue:
Disporre un sigillo di silicone trasparente su tutto il perimetro del lavello che andrà a contatto con il piano;
Controllare che tutte le staffe dei ganci siano rivolte verso l’interno;
Porre il lavello nel foro del piano e assicurarsi che sia centrato, successivamente serrare i ganci mediante le viti di
regolazione, partendo dal centro verso l’esterno in ordine incrociato.
4. INSTALLAZIONE DELLO SCARICO (PILETTE E SIFONI)
Attenersi alle istruzioni per l’uso allegate agli accessori di scarico. Eseguire il taglio con gli appositi strumenti,
utilizzando come riferimento la linea racciata.
SOTTOTOP:
1. FORATURA PER LA RUBINETTERIA:
La foratura andrà effettuata direttamente sul top.
2. FORATURA DEL PIANO DI LAVORO PER L’INSERIMENTO DEL LAVELLO:
Porre la DIMA sul piano di lavoro; segnare sul piano con una matita il perimetro come da DIMA.
3. INSERIMENTO DEL LAVELLO NEL FORO DEL PIANO
Effettuare i fori per le boccole a 27 mm dal perimetro del foro sul quale andrà posto il lavello, inserire le boccole.
10

Disporre un sigillo di silicone
Sealant
STEP1 STEP2 STEP3
STEP4 STEP5
UNDER MOUNT
trasparente su tutto il perimetro
del lavello che andrà a contatto
con il piano; Porre il lavello nel
foro del piano e assicurarsi che
sia centrato, successivamente
serrare i ganci mediante le viti,
partendo dal centro verso l’esterno
in ordine incrociato.
4. INSTALLAZIONE DELLO
SCARICO (PILETTE E SIFONI)
Attenersi alle istruzioni per l’uso
allegate agli accessori di scarico.
CURA E MANUTENZIONE
La vita del suo lavello può essere prolungata con una corretta manutenzione: ciò al fine di favorire il mantenimento
dell’aspetto estetico nel tempo.
1. MANUTENZIONE ORDINARIA
Il miglior sistema per pulire il lavello è quello di utilizzare un panno o una spugna morbida diluendo i detergenti usati
comunemente con acqua tiepida. Si raccomanda di non utilizzare detergenti aggressivi.
È consigliato il risciacquo della superficie del lavello con acqua, asciugando le parti umide con un panno spugnoso.
Tutte queste attenzioni contribuiranno ad evitare la formazione di macchie di calcare, soprattutto sui lavelli di colore
scuro.
2. RIMOZIONE DI MACCHIE OSTINATE
Tracce di sporco ostinato possono essere rimosse con un panno imbevuto di candeggina diluita con acqua, oppure con
alcool o in casi estremi con dell’acetone;
Dopo l’operazione sciacquare attentamente la superficie con acqua.
IT
3. INTERVENTI STRAORDINARI
Il lavello è composto da una miscela con un’alta percentuale di cariche inerti che rendono il prodotto molto duro e
resistente.
Questa caratteristica può causare la formazione di striature a seguito dello sfregamento continuo dei tegami metallici.
Le striature sono il rilascio di piccole particelle di metallo e possono essere eliminate con spazzole (tipo Scotch Brite)
in combinazione con detersivi comunemente usati.
4. ULTERIORI CONSIGLI
Non usare sostanze altamente alcaline come ammoniaca o soda caustica;
Non appoggiare direttamente sul lavello pentole o caffettiere appena tolte dal fuoco (in alcuni casi raggiungono i
500°C);
Non versare olio bollente, gli scarichi potrebbero subire delle deformazioni;
Non tagliare vivande direttamente sul lavello, si consiglia l’uso di appositi taglieri;
Residui di calcare si tolgono con aceto o acido acetico.
Non appoggiare direttamente sul lavello pentole o caffettiere
appena tolte dal fuoco (in alcuni casi raggiungono i 500°C)
11
GWARANCJA
Sealant
STEP1 STEP2 STEP3 STEP4
PL
Gwarancja na zlewozmywak zostanie udzielona przez producenta po zarejestrowaniu produktu na stronie www.tekaserwis.com.pl i wydrukowaniu karty gwarancyjnej.
Okres oraz warunki gwarancji zgodne z informacjami dostępnymi na stronie www.tekaserwis.com.pl
W przypadku wykrycia wady widocznej/estetycznej należy niezwłocznie zgłosić do sprzedawcy, przed
zamontowaniem produktu. Należy przechowywać dowód zakupu przez cały okres gwarancji i w razie
potrzeby, dołączyć go do zwracanego zlewozmywaka.
Gwarancja nie obejmuje części zamiennych ani akcesoriów dołączonych do zestawu.
Niniejsza gwarancja nie obejmuje wad wynikających z niewłaściwego lub nieuzasadnionego
użytkowania, konserwacji lub instalacji.
Opakowanie: wszystkie materiały opakowaniowe (folia, styropian itp.) są potencjalnie niebezpieczne i
powinny być trzymane z dala od dzieci.
INSTRUKCJA MONTAŻU:
ZLEWOZMYWAKI DO WBUDOWANIA W BLAT:
1. OTWORY DO MONTOWANIA BATERII
Zlewozmywak dostarczany jest z wstępnie przygotowanymi, w pół wyfrezowanymi otworami Ø 35 mm
po obu stronach.
Pozwala to na montaż baterii po wybranej stronie zlewozmywaka. Do wykonania otworu zaleca się użyć
otwornicy diamentowej zainstalowanej na wiertarce, dostępnej w sklepach z narzędziami. Czynność ta
powinna być wykonana na niewidocznej stronie zlewozmywaka.
2. WYCINANIE OTWORU MONTAŻOWEGO W BLACIE
Należy umieścić zlewozmywak do góry dnem na blacie. Następnie obrysować kształt zlewozmywaka
przy pomocy ołówka. Zdjąć zlewozmywak. Po wewnętrznej stronie powstałej linii w odległości 1 cm
narysować linię przerywaną. Otwór montażowy należy wycinać wzdłuż przerywanej linii przy pomocy
odpowiednich narzędzi.
3. MONTAŻ ZLEWOZMYWAKA W BLACIE
Wszystkie nasze zlewozmywaki są fabrycznie wyposażone w zaczepy montażowe. Poniżej znajdą
Państwo wskazówki co do prawidłowego montażu zlewozmywaka:
Umieścić przezroczysty silikon wokół całego obwodu zlewu, który będzie w kontakcie z blatem.
Należy upewnić się czy klamra zaczepu montażowego jest skierowana do dołu. Umieścić zlewozmywak
w wyciętym otworze wyśrodkowując go. Dokręcić mocowania za pomocą śrub regulacyjnych, zaczynając
od środka i pracując w kolejności krzyżowej.
4. MONTAŻ ARMATURY PRZELEWOWO-ODPŁYWOWEJ
Postępować zgodnie z instrukcją załączoną do kompletu odpływowego.
12
ZLEWOZMYWAKI PODWIESZANE:
Sealant
STEP1 STEP2 STEP3
STEP4 STEP5
UNDER MOUNT
1. OTWORY POD INSTALACJĘ
BATERII
Otwory będą wykonywane
bezpośrednio w blacie.
2. WYCINANIE OTWORU
MONTAŻOWEGO W BLACIE
Umieścić szablon na blacie kuchennym;
zaznaczyć na nim ołówkiem
obwód wskazany na szablonie.
3. MONTAŻ ZLEWOZMYWAKA
W BLACIE
Nawiercić otwory pod zaczepy,
27 mm od obwodu otworu, w którym zostanie umieszczony zlewozmywak. Nałożyć silikon na zewnętrzną
krawędź zlewozmywaka. Przyłożyć zlewozmywak do wyciętego obszaru powierzchni blatu, upewniając
się, że jest wyśrodkowany. Dokręcić mocowania zaczepów za pomocą śrub regulacyjnych, zaczynając
od środka i pracując w kolejności krzyżowej.
4. MONTAŻ ARMATURY PRZELEWOWO-ODPŁYWOWEJ
Postępować zgodnie z instrukcją załączoną do kompletu odpływowego
UTRZYMANIE I KONSERWACJA
Właściwa konserwacja zlewozmywaka pomoże dłużej utrzymać jego atrakcyjny wygląd.
1. CODZIENNA PIELĘGNACJA
Najlepszym sposobem czyszczenia zlewozmywaka jest użycie miękkiej ściereczki lub gąbki, z
powszechnie dostępnymi detergentami rozcieńczonymi w ciepłej wodzie. Nie należy używać silnych
detergentów.
Powierzchnię zlewozmywaka należy umyć wodą, następnie osuszyć gąbką lub miękką ściereczką.
Pomoże to zapobiec powstawaniu plam z osadów wapiennych, szczególnie na ciemnych zlewozmywakach.
PL
2. USUWANIE UPORCZYWYCH ZABRUDZEŃ
Ślady uporczywych zabrudzeń, które nie dają się wyczyścić za pomocą takich środków czyszczących,
jak mleczko czyszczące lub proszek, można usunąć stosując mleczko do czyszczenia z dodatkiem
proszku do pieczenia lub sody.
Można też zastosować tabletki do zmywarki. W tym celu należy wlać do komory zlewozmywaka
niewielką ilość ciepłej wody, rozpuścić w niej 1-2 tabletki do zmywarki i pozostawić na kilka godzin lub
na noc. Następnie wyczyścić zlewozmywak mleczkiem i spłukać wodą.
3. USUWANIE SMUG
Ponieważ powierzchnia zlewozmywaków kompozytowych jest twardsza od metalu, metalowe garnki
mogą pozostawiać na powierzchni smugi. Należy usuwać je przy pomocy gąbki z użyciem powszechnie
dostępnych detergentów.
4. DALSZE ZALECENIA
Nie należy używać silnie zasadowych substancji, takich jak amoniak lub soda kaustyczna. Nie wlewać
wrzącego oleju do zlewozmywaka, ponieważ może to spowodować odkształcenie armatury przelewowoodpływowej.
Nie kroić produktów spożywczych bezpośrednio w zlewozmywaku. W tym celu należy użyć deski do
krojenia.
Osad wapienny można usunąć za pomocą octu lub kwasu octowego.
Nie należy stawiać na powierzchni zlewozmywaka rozgrzanych
garnków i naczyń, których temperatura może sięgać 500°C
13

TH
Sealant
STEP1 STEP2 STEP3 STEP4
การรับประกัน
ผู้ผลิตจะรับผิดชอบเฉพาะความบกพร่องด้านการผลิต และความบกพร่องของวัสดุภายในระยะเวลารับประกัน 10 ปี ในกรณี
ที่ตรวจพบข้อบกพร่องดังกล่าวให้นำาอ่างล้างจานของคุณจัดส่งคืนสู่ผู้ขาย เก็บเอกสารการจัดซื้อตลอดช่วงเวลาการรับประกัน
ทั้งหมดแนบส่งมาพร้อมกับอ่างล้างจานที่ส่งคืน
การรับประกันไม่ครอบคลุมถึงอะไหล่ หรืออุปกรณ์เสริมใด ๆ ที่มากับชุดอ่างล้างจาน การรับประกันนี้ไม่ครอบคลุมถึงความ
บกพร่องที่เกิดจากการใช้งาน, การบำารุงรักษา หรือการติดตั้งที่ผิดพลาด หรือไม่เหมาะสม
บรรจุภัณฑ์:
วัสดุบรรจุภัณฑ์ทั้งหมด (ถุงพลาสติก,โฟมโพลีสไตรีน ฯลฯ )
อาจเป็นอันตราย และควรเก็บไว้ห่างไกลเด็ก
คำาแนะนำาในการติดตั้ง
การติดตั้งบนเคาน์เตอร์ท็อปครัว
1. การเจารูเพื่อติดตั้งอุปกรณ์ก๊อกน้ำาอ่างล้างจาน
อ่างล้างจานมาพร้อมกับรูเจาะล่วงหน้าที่เตรียมไว้มีเส้นผ่าศูนย์กลาง ขนาด Ø 35 มม. ทั้งสองด้าน
ซึ่งจะช่วยให้คุณเลือกด้านที่คุณต้องการติดตั้งก๊อกน้ำา
หลังจากตัดสินใจเลือกด้านใดที่ต้องการติดตั้งก๊อกน้ำาได้แล้ว สามารถเจาะหลุมทำาได้โดยใช้ DIAMOND CORE ที่ติดตั้งกับ
สว่านมือ โดยระวังจากการเจาะจากด้านที่มองไม่เห็นเพื่อความปลอดภัยและป้องกันอ่างแตกร้าว
2. การเจาะพื้นผิวของเคาน์เตอร์ท็อปสำาหรับการติดตั้งอ่างล้างจาน
วางอ่างคว่ำาลงบนพื้นผิวที่ต้องการจะติดตั้ง
ร่างเส้นเส้นรอบขอบด้านนอกของอ่างโดยใช้ดินสอ
ยกอ่างล้างจานออก และวาดเส้นประ 1 ซม. เข้ามาภายในเส้นที่คุณเพิ่งวาดโดยใช้อ่างล้างจานเป็นแม่แบบ
เจาะตัดตามเส้นประ โดยใช้เครื่องมือที่เหมาะสม
3. การติดตั้งอ่างล้างจานเข้ากับเคาน์เตอร์ท็อป
อ่างล้างจานของเรามาพร้อมกับอุปกรณ์ยึดที่ติดตั้งไว้ล่วงหน้า ขั้นตอนต่อไปนี้จะอธิบายวิธีการติดตั้งอ่างล้างจานอย่างถูกต้อง:
ใช้กาววัสดุยาแนวชนิดโปร่งใสพิเศษ ยาโดยรอบขอบอ่างล้างจานด้านนอก ตรวจดูว่าอ่างล้างจานวางแนบสนิทกับเคาน์เตอร์
ท็อปเมื่อติดตั้งเสร็จสิ้น
ตรวจดูให้แน่ใจว่าหัวยึดทั้งหมดของตัวยึดหันเข้าหาด้านใน
ใส่อ่างล้างจานในบริเวณที่ตัดเคาน์เตอร์ท็อปออก ให้แน่ใจว่าวางอ่างอยู่ตรงกลาง ขันตัวยึดให้แน่นโดยใช้สกรูปรับตั้งโดยเริ่ม
จากตรงกลาง และทำาไล่ไปตามลำาดับ
4. การติดตั้งอุปกรณ์ และท่อน้ำาทิ้ง
ปฏิบัติตามคำาแนะนำาที่ให้มาพร้อมกับชุดอุปกรณ์
การติดตั้งแบบใต้เคาน์เตอร์ท็อปครัว
1. การเจารูเพื่อติดตั้งอุปกรณ์ก๊อกน้ำาอ่างล้างจาน
การเจาะรูเพื่อติดตั้งอุปกรณ์ก๊อกน้ำา ทำาโดยเจาะบนพื้นผิวเคาน์เตอร์ท็อปครัว
14

2. การเจาะพื้นผิวเคาน์เตอร์ท็อปเพื่อติดตั้งอ่างล้างจาน
Sealant
STEP1 STEP2 STEP3
STEP4 STEP5
UNDER MOUNT
วางแม่แบบลงบนเคาน์เตอร์ท็อปครัว ทำาเครื่องหมายด้วยดินสอด้านนอกตามที่ระบุไว้ในแม่แบบ
3. การติดตั้งอ่างล้างจานเข้ากับเคาน์เตอร์ท็อปครัว
เจาะรูสำาหรับใส่พุกขนาด 27 มิลลิเมตร บริเวณรอบขอบอ่างด้านนอกของหลุมเจาะไว้ วางพุกในช่องที่เจาะ ใช้กาววัสดุ
ยาแนวชนิดโปร่งใสพิเศษยาโดยรอบขอบด้านนอกของอ่างล้างจาน ใส่อ่างล้างจานในบริเวณที่ตัดเคาน์เตอร์ท็อปออก ให้
แน่ใจว่าวางอ่างอยู่ตรงกลาง ขันตัวยึดให้แน่นโดยใช้สกรูปรับตั้งโดยขันตัวยึดให้แน่นโดยใช้สกรูปรับตั้ง โดยเริ่มจากตรง
กลาง และทำาไล่ไปตามลำาดับ
4. การติดตั้งอุปกรณ์ และท่อน้ำาทิ้ง
ปฏิบัติตามคำาแนะนำาที่ให้มาพร้อมกับชุดอุปกรณ์
การดูแลและบำารุงรักษา
อ่างล้างจานของคุณจะมีอายุการใช้งานยาวนานยิ่งขึ้นหากได้รับการดูแลอย่างถูกต้อง การดูแลอย่างถูกต้องยังช่วยให้อ่าง
ล้างจานของคุณ ดูดี สวยงามยาวนาน
1. การดูแลประจำาวัน
วิธีที่ดีที่สุดในการทำาความสะอาดอ่างล้างจานคือ การใช้ผ้านุ่ม หรือฟองน้ำาโดยใช้น้ำายาล้างจานทั่วไป ที่เจือจางด้วยน้ำาอุ่น
ไม่ควรใช้น้ำายา หรือผงซักฟอกชนิดเข้มข้น พื้นผิวของอ่างล้างจานควรล้างด้วยน้ำาเปล่า เช็ดด้วยผ้าฟองน้ำา หรือผ้าชุบน้ำา
วิธีนี้จะช่วยป้องกันไม่ให้เกิดคราบตระกรันโดยเฉพาะอย่างยิ่งกับอ่างล้างจานที่มีสีเข้ม
TH
2. การทำาความสะอาดคราบฝังแน่น
ร่องรอยของสิ่งสกปรกที่ฝังแน่น สามารถถอดเช็ดได้ด้วยผ้าชุบน้ำาสารฟอกขาวเจือจาง หรือแอลกอฮอล์ หรือในกรณีที่ฝัง
แน่นมากๆ สามารถใช้อะซิโตน หลังจากนั้นให้ล้างออกด้วยน้ำาสะอาด
3. การทำาความสะอาดพิเศษ
อ่างล้างจานประกอบด้วยส่วนผสมของอนุภาคของควอร์สที่มีเปอร์เซ็นต์ฟิลเลอร์สูงมาก ซึ่งทำาให้ผลิตภัณฑ์มีความแข็งแรง
และทนทาน ลักษณะเฉพาะนี้อาจทำาให้เกิดริ้วรอยจากการถูกโลหะปลายแหลมขีดข่วน รอยนี้เกิดจากอนุภาคขนาดเล็กของ
โลหะซึ่งสามารถขัดออกได้ด้วยแปรง (เช่น Scotch Brite) ร่วมกับน้ำายาล้างจานที่ใช้ทั่วไป
4. คำาแนะนำาเพิ่มเติม
ห้าม ใช้สารประเภทด่าง เช่น แอมโมเนีย หรือโซดาไฟ
ห้าม วางกระทะ, หม้อกาแฟ หรือภาชนะที่เพิ่งยกลงจากเตาซึ่งมีความร้อนสูง (ซึ่งบางครั้งภาชนะมีความร้อนถึง 500 ° C)
วางลงโดยตรงบนอ่างล้างจาน ห้าม เทน้ำามันที่ร้อนจัดลงในอ่างล้างจาน ซึ่งอาจทำาให้ท่อระบายน้ำาทิ้งเสียรูปได้
ห้าม หั่น ตัด หรือสับ อาหารบนอ่างล้างจานโดยตรง ควรใช้เขียงรองในการทำาอาหาร
คราบตะกรันสามารถกำาจัดได้ด้วยน้ำาส้มสายชู หรือกรดอะซิติก
ห้าม วางกระทะ, หม้อกาแฟ หรือภาชนะที่เพิ่งยกลงจากเตาซึ่งมีความร้อนสูง
(ซึ่งบางครั้งภาชนะมีความร้อนถึง 500 ° C) วางลงโดยตรงบนอ่างล้างจาน
15

PRC
Sealant
STEP1 STEP2 STEP3 STEP4
保修
制造商负责在10年保修期内因为制造和材料的缺陷。
如果发现这些缺陷,请将水槽退回销售方。在整个保修期内要保存好采购文件,并将其附在退回的水槽上。保修不包括水
槽套件中的任何零件或附件。本保修不包括因使用、维护或安装不当和不正确造成的任何缺陷。
包装:
包装材料(塑料袋、发泡聚苯乙烯等)不得放在儿童可以拿到的地方,因为它们潜在危险。
安装说明
标准:
1. 水龙头安装孔洞:
水槽两侧设计有直径为0.35毫米的预备孔,这允许在安装时选择水龙头的位置。
在确定水龙头位置后,可以用装着0.35毫米圆孔锯(在任何五金店都可以买到)
的手动钻机钻孔,注意在不外露的一侧进行操作。
2. 在厨房台面上切口以安装水槽:
将翻转的水槽放在要插入的厨房台面上;用水槽做模板,
用铅笔标记水槽的长度和宽度。取下水槽,在先前标记线内1厘米处画一条虚线。
用正确的工具沿着虚线切割。
3. 把水槽安装到厨房台面切口上
我们的水槽配有预装紧固件;要正确安装水槽,请按以下步骤进行:
在水槽外缘与厨房台面接触的地方涂上一层透明密封硅胶;
检查紧固件的所有卡箍都朝内;
将水槽放入台面的切口内,确保水槽居中,然后使用调整螺钉按十字形从中间向外扣紧紧固件。
4.安装排水管组件(下水器和虹吸管)
请遵循与排水管组件一起配套的使用说明。使用适当的工具沿着标记线切割。
下沉水槽:
1. 水龙头安装孔洞:
直接在厨房台面上打孔。
2. 在厨房台面上切口以安装水槽:
将模板放在厨房台面上;用铅笔在台面上标出模板所示的周长。
3. 把水槽安装到台面切口上
在四周距水槽放置切口27毫米处切割衬套孔,插入衬套。
在水槽外缘与台面接触的四周涂上透明密封硅胶;把水槽放入台面切口并确保居中,
然后用螺钉按十字形从中间向外拴紧紧固件。
16
4. 安装排水管组件(下水器和虹吸管 )
Sealant
STEP1 STEP2 STEP3
STEP4 STEP5
UNDER MOUNT
请遵循与排水管组件一起配套的使用说明
保养和维护
水槽可以通过恰当的维护延长使用寿命:
长时间也可以保持其外观。
1. 日常维护
清洗水槽的最佳方法是使用软布或海绵,沾着用温水稀释的常用清洁剂清理。不建议使用腐蚀性强的清洁剂清洁。
建议用清水彻底冲洗水槽表面,然后用海绵布擦干潮湿部分。所有这些注意事项将有助于避免水垢痕迹的形成,
尤其是在深色水槽上。
PRC
2. 污迹清除
顽固污垢的痕迹可以用沾有用水稀释的漂白剂的布或用酒精或在极端情况下用丙酮去除;
操作后用清水仔细冲洗水槽表面。
3. 特殊清洁
水槽板材由高比例惰性填料混合物制成,这使产品非常坚硬且耐腐蚀。由于与金属容器的连续摩擦,
这种特性可能导致条纹的形成。
这些条纹是由于金属微粒留下而造成的,微粒可以用刷子(如思高百洁刷)和常用的清洁剂清除。
4. 其他建议
不要使用高碱性物质,如氨或苛性钠清洁;
不要直接把刚从火上取出的锅或咖啡壶放在水槽里(在某些情况下温度可能达到500摄氏度);
不要往水槽倒入滚烫的热油,会导致排水管变形;
不要在水槽内切食品,建议使用合适的切菜板;
石灰石污垢可用醋或醋酸清除。
注意! 不要直接把刚从火中取出的锅或咖啡壶放在水槽里
(在某些情况下温度可能达到500摄氏度)
17

NOTE


Code: GARTEKA
ACQUIRENTE
ACQUIRENT
ACQUIREN COMPRADOR EINKÄUFER
MODEL - MODEL - MODELO - MODÈLE - MODELLO
- MODEL -
แบบ - 型号
ACQUIRENTE - ACQUIRENT - ACQUIREN - COMPRADOR
EINKÄUFER - КЛИЕНТ - 买方 - KUPUJĄCY - KUPUJÍCÍ - MÜŞTERI
NAME - NAME - NOMBRE -PRENOM - NOME - IMIĘ - ชื่อ- 名字
COLOR FARBE - COLOR - COLOR - COULEUR
COLORE
- KOLOR - ส - 颜色ี
KUPUJĄCY
ผู้ซื้อ
买方
____________________________________________________________________________________________________
NACHNAME - SURNAME - APELLIDOS - NOM - COGNOME - NAZWISKO
นามสกุล - 姓氏 __________________________________________________________________________________________
ADRESSE - ADDRESS - DIRECCIÓN - ADRESSE - RECAPITO - ADRES -
_____________________________________________________________________________________________________
DATUM - DATE - FECHA -
SERIEN - SERIES - SERIE - SÉRIE - N° SERIE - SERIA ____________________________________________________________________________________________________
VERKÄUFER - SELLER - REVENDEDOR - VENDEUR - RIVENDITORE
DETALISTA -
ร้านค้าปลีก - 销售商
DATE - DATA - DATA - วันที่ - 日期 ____________________________________________
หมายเลขประจำาเครื่อง - 序列号
ที่อยู่ - 地址
IT 01600830598
2013
SERIAL NUMBER
www.teka.com
Declaration Of
Performance
N° DOP
UNI EN 13310.2004
 Loading...