

Tehnologistic Shine Plus Maxi Digi User Manual
Shine Plus family
Shine Plus Maxi Digi User Manual
- version 0.0.9 –
by
Shine Plus Maxi Digi
User Manual
Version
0.0.9
Page 2 of 64
© Copyright 2014 Tehnologistic Ltd.
All rights reserved
No part of this publication may be reproduced or transmitted in any
form or by any means, electronic or mechanical, including
photocopying, without the written permission of
Tehnologistic Ltd.
Subject to technical modification
Please read this manual carefully before carrying out the
installation!!! Although our products are very robust, incorrect
wiring may destroy the module!
During the operation of the device the specified technical parameters
shall always be met. At the installation the environment shall be fully
taken into consideration. The device must not be exposed to moisture
and direct sunshine.
A soldering tool may be necessary for the installation and/or
mounting of the devices, which requires special care.
During the installation it shall be ensured that the bottom of the
device should not contact with a conductive (e.g. metal) surface!

Shine Plus Maxi Digi
User Manual
Version
0.0.9
Page 3 of 64
Content
1. Features ...................................................................................... 4
2. Package Content ........................................................................ 4
3. Technical parameters ................................................................. 4
4. Cutting to size ............................................................................ 5
5. Installation and connection ........................................................ 5
6. The function decoder outputs .................................................... 8
7. Connecting the anti-flickering capacitor ................................. 12
8. Advanced features ................................................................... 14
9. Address programming ............................................................. 15
10. Decoder reset .......................................................................... 16
11. Function and Output mapping ................................................ 16
12. Dimming, Fade and Effects .................................................... 17
13. Analog Operation .................................................................... 19
14. Consist operation .................................................................... 19
15. Secondary address (decoder lock) .......................................... 20
16. User data ................................................................................. 21
17. Other functions ....................................................................... 21
18. CV table .................................................................................. 22

Shine Plus Maxi Digi
User Manual
Version
0.0.9
Page 4 of 64
1. Features
- 14 low current high brightness white LED lighting module
- Suitable for carriage, platforms or building’s interior lighting.
- On board DCC function decoder with 14+2 outputs.
- DCC and DC operation
- User adjustable length in 4 additional steps, max 275, min 195 mm.
- Function mapping F0, F1-F16
Available versions:
Shine Plus Maxi Digi Warm White order code tOm 02070314
Shine Plus Maxi Digi Cool White order code tOm 02070315
Shine Plus Maxi Digi Yellow order code tOm 02070316*
(* only on special order)
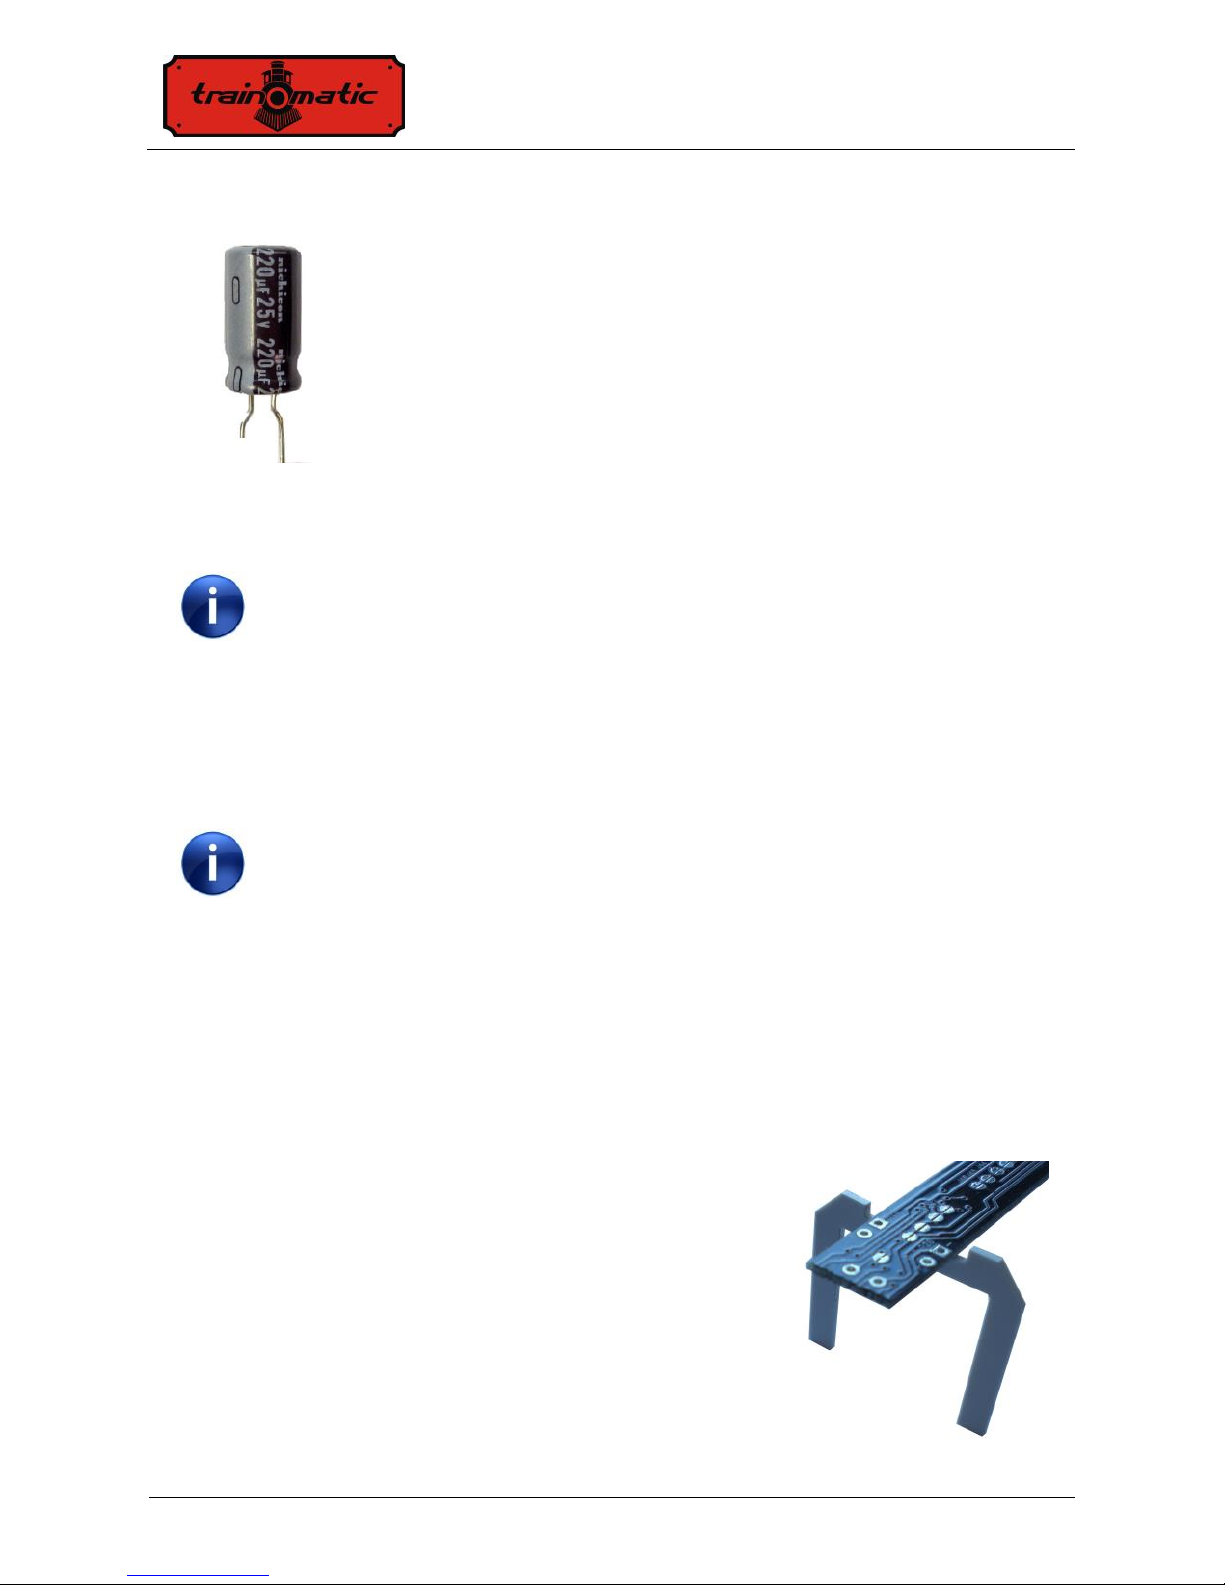
2. Package Content
The Shine Plus Maxi Digi lighting modules are supplied in
transparent plastic bags or blister packs. Check when unpacking the
product if the following parts are present: 1 x Shine Plus Maxi Digi
(Cool White or Warm White), 2x 220uF/25V capacitors.
3. Technical parameters
- 14 LEDs each of them connected to a function output
- 2 extra outputs of the on board decoder available for external use
- Size LxWxH: 275 mm x 11mm x 3mm
- Maximum current consumption @16Vdc max 40mA
(all LEDs ON)
- Supply voltage: 6-24 Vdc or standard DCC signal
Shine Plus Maxi Digi
User Manual
Version
0.0.9
Page 5 of 64
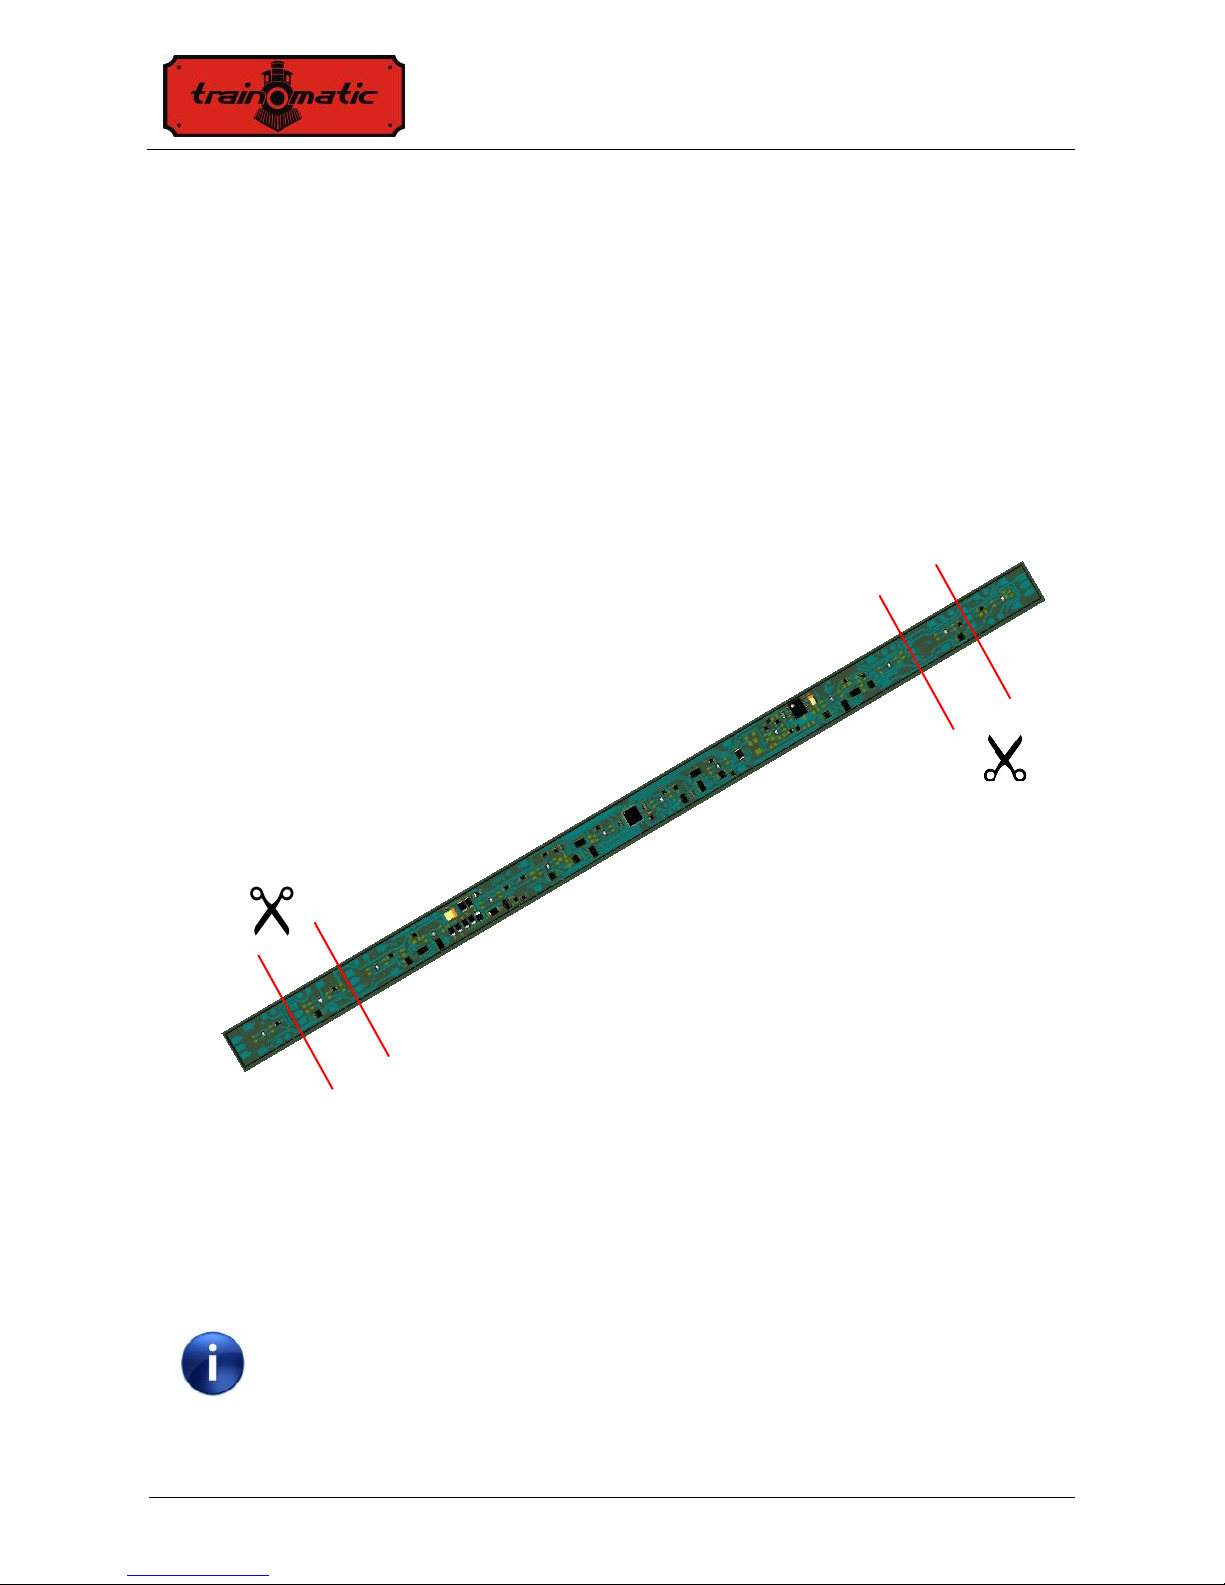
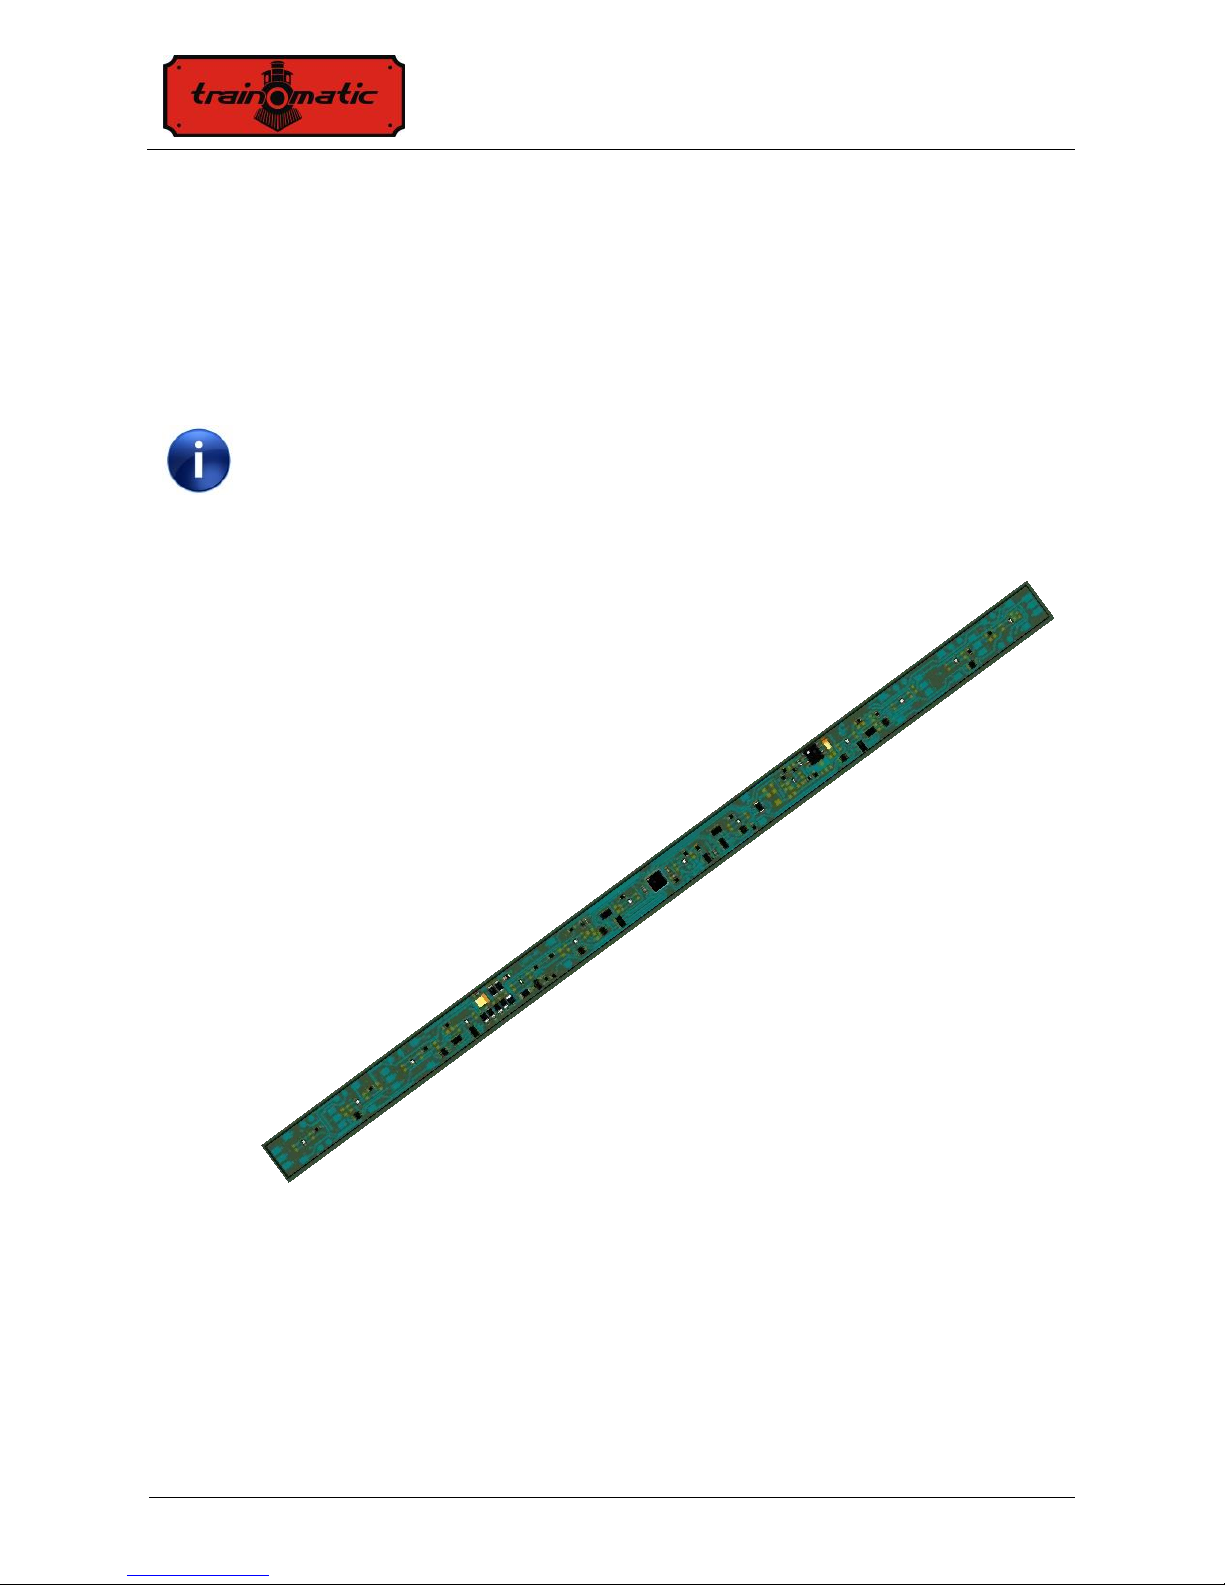
4. Cutting to size
The operation can be performed at the points indicated in the below
illustration. The cutting lengths are ~ 20 mm long, and marked with
drilled holes in the substrate material. Care shall be taken to not
damage the circuit. Use a cutting plier and straight, firm movements
for cutting. Clean the debris at the edges of the pcb after the cutting,
to avoid short circuits.
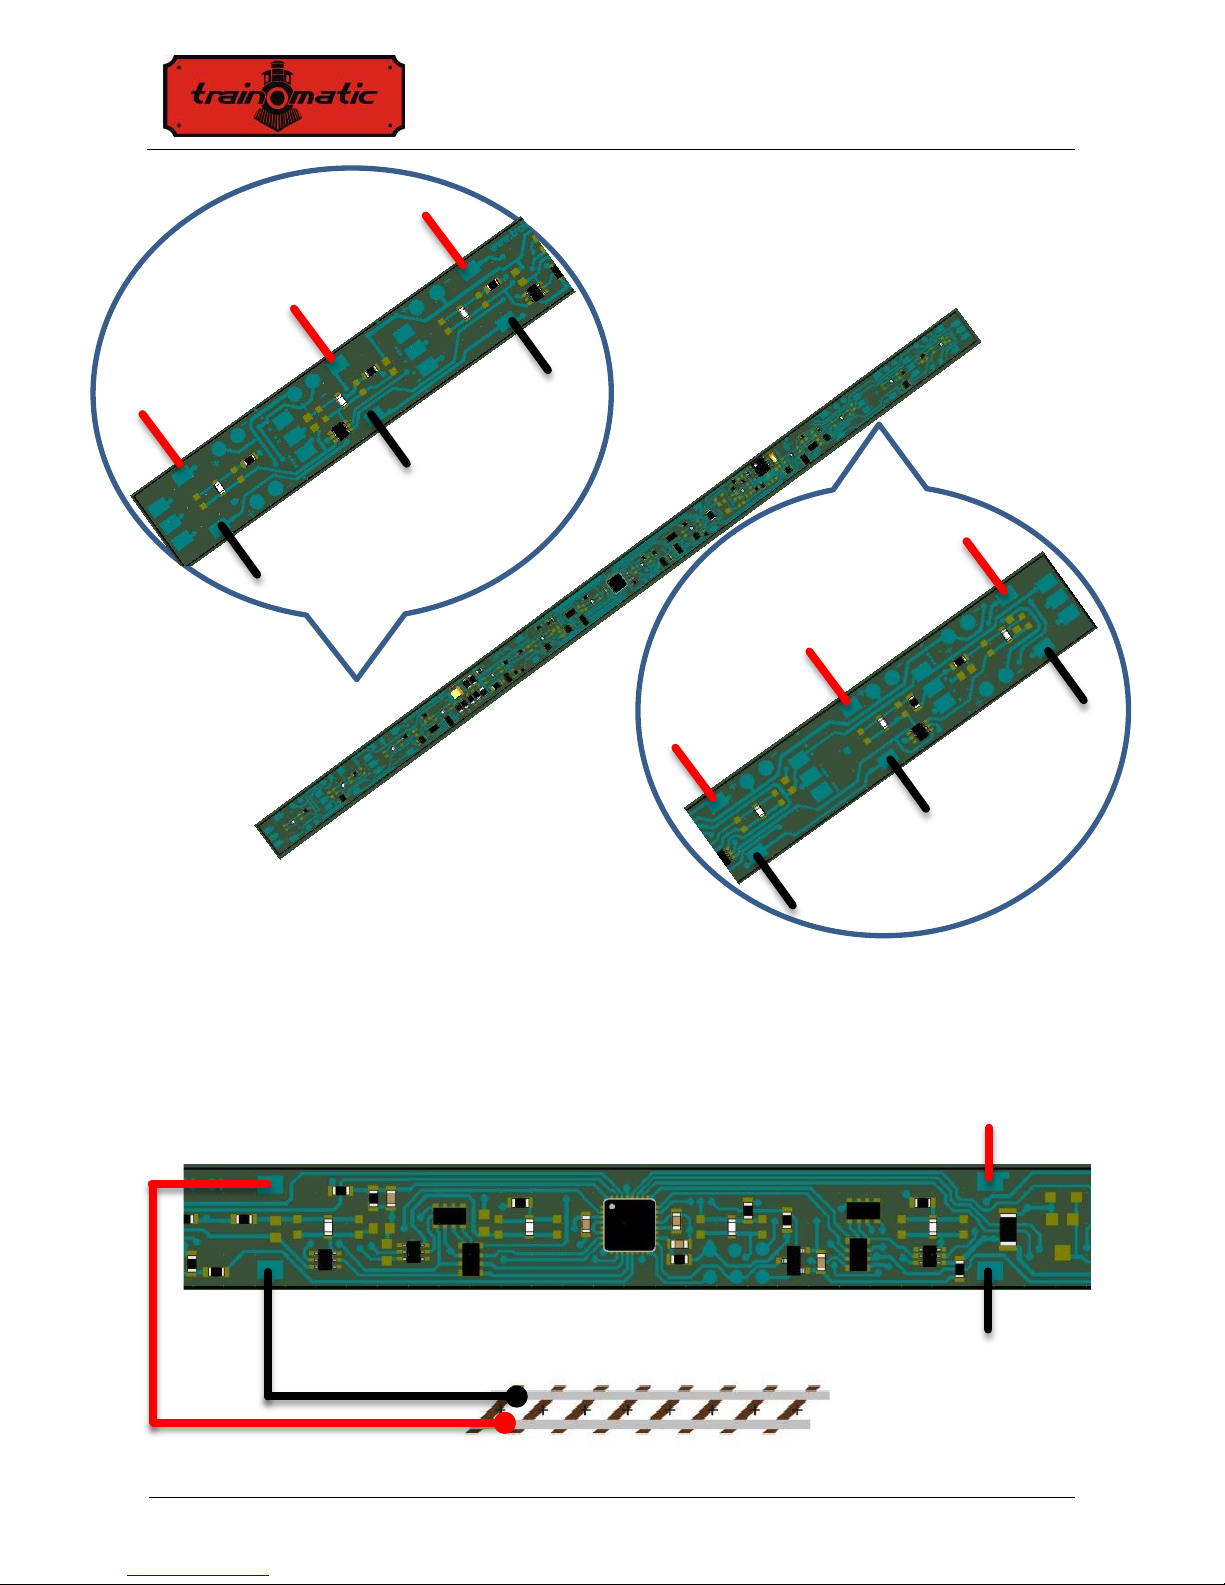
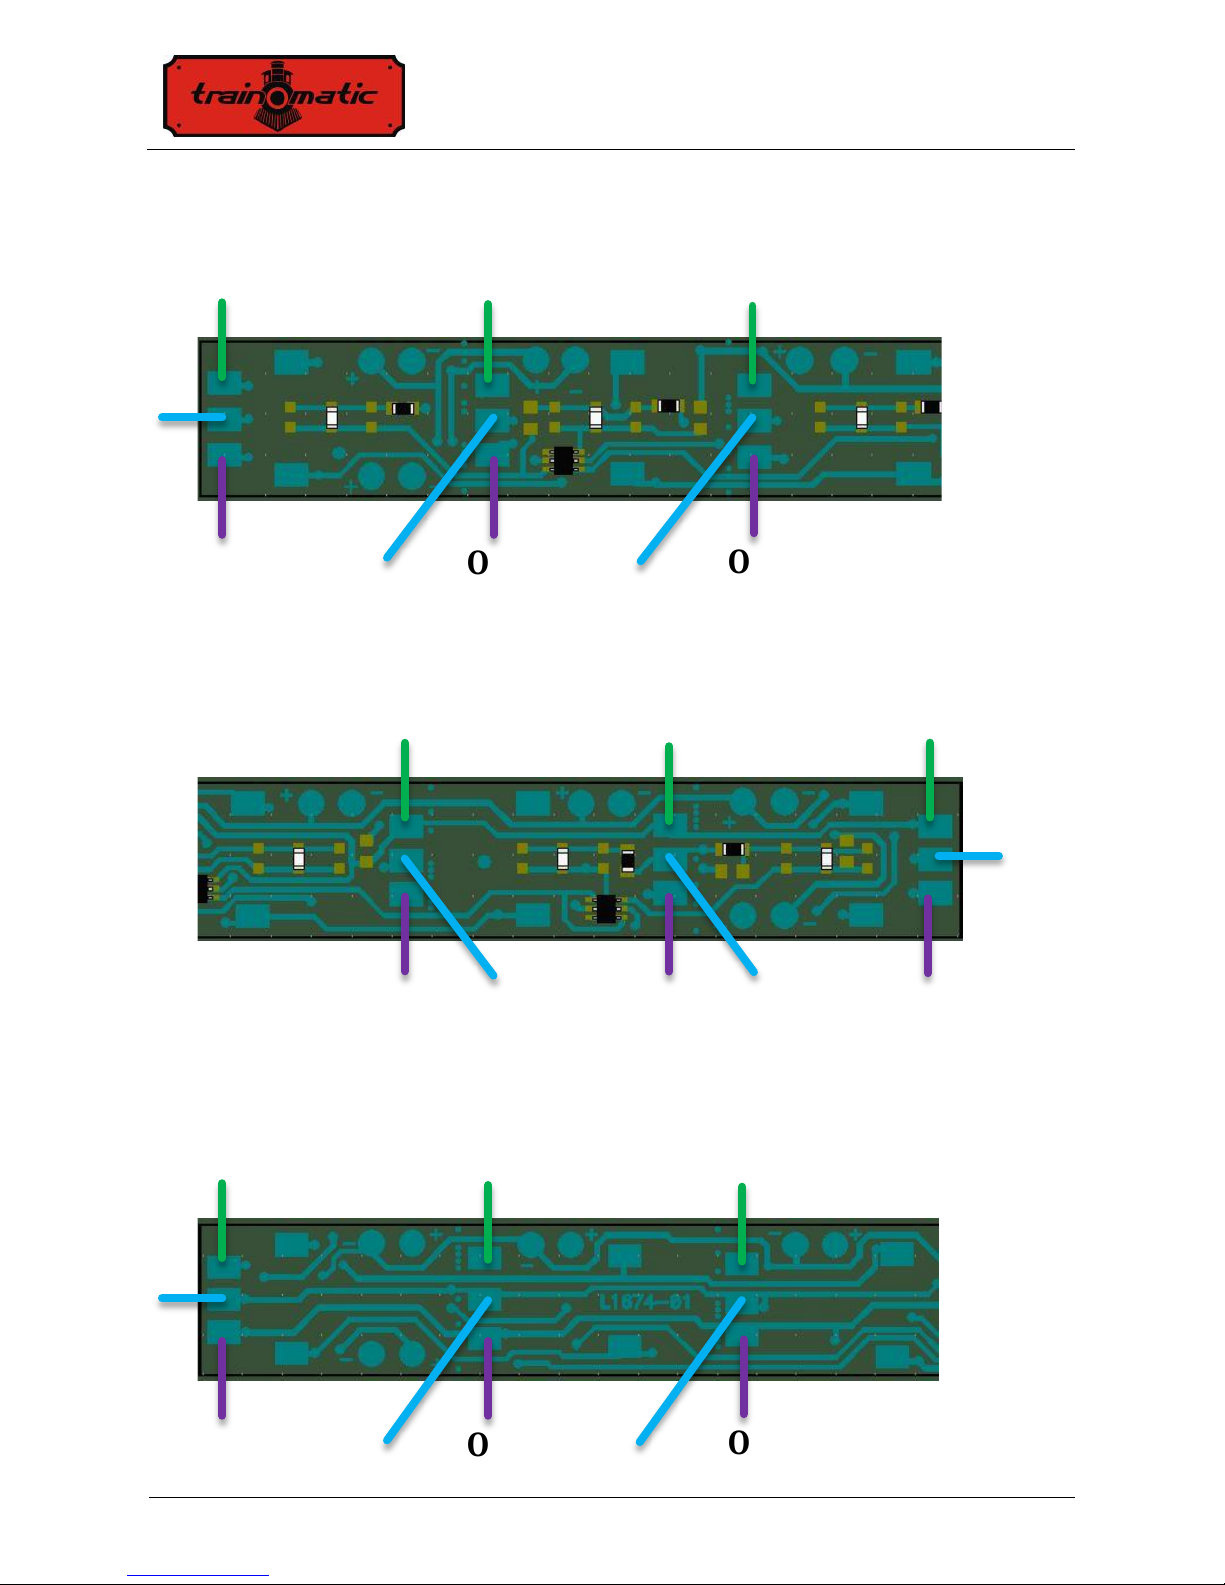
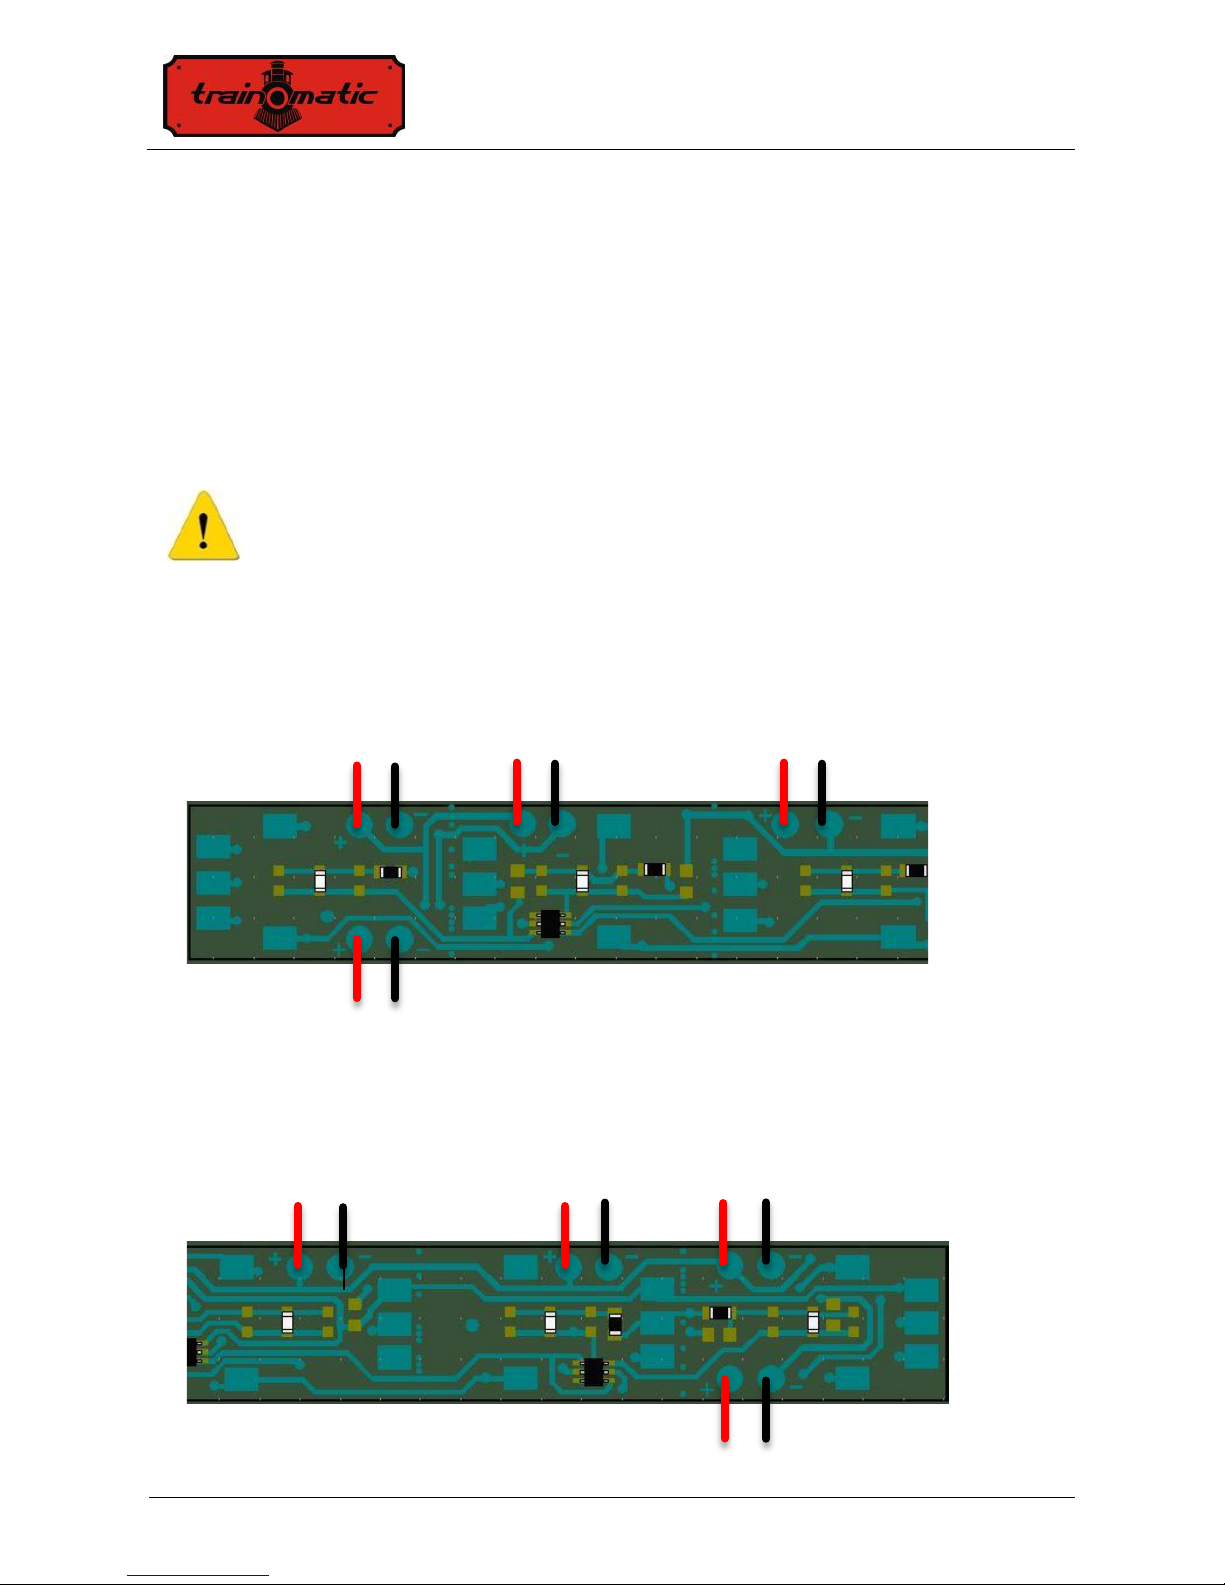
5. Installation and connection
The track connections are available in multiple points on both sides
of the boards. Please refer to the following illustrations.
The track polarity has no influence on the lighting module
functionality. We marked however the right track with red
color and the left track with black color to be consequent with the
NMRA recommendations.
Shine Plus Maxi Digi
User Manual
Version
0.0.9
Page 6 of 64
Component side connections
The connections marked with 1 and 2 have to be connected to the
DC/DCC track voltage. The connections are available also in center
area of the module (the board is considered to be assembled faced
down in the carriage).
2
DC/DCC
1 1 1
2
2
1 1 1 2 2 2 2
2 1 1

Shine Plus Maxi Digi
User Manual
Version
0.0.9
Page 7 of 64
Solder side connections
One pair of track connection must be used, please choose that
one which is the most convenient for the carriage /application.
In some cases it is more suitable to solder the wire connections to the
solder side of the board. The connections are illustrated on the above
and below figures on this page.
1 2 2 2 1 1
2 2 2 1 1 1 1
2
Shine Plus Maxi Digi
User Manual
Version
0.0.9
Page 8 of 64
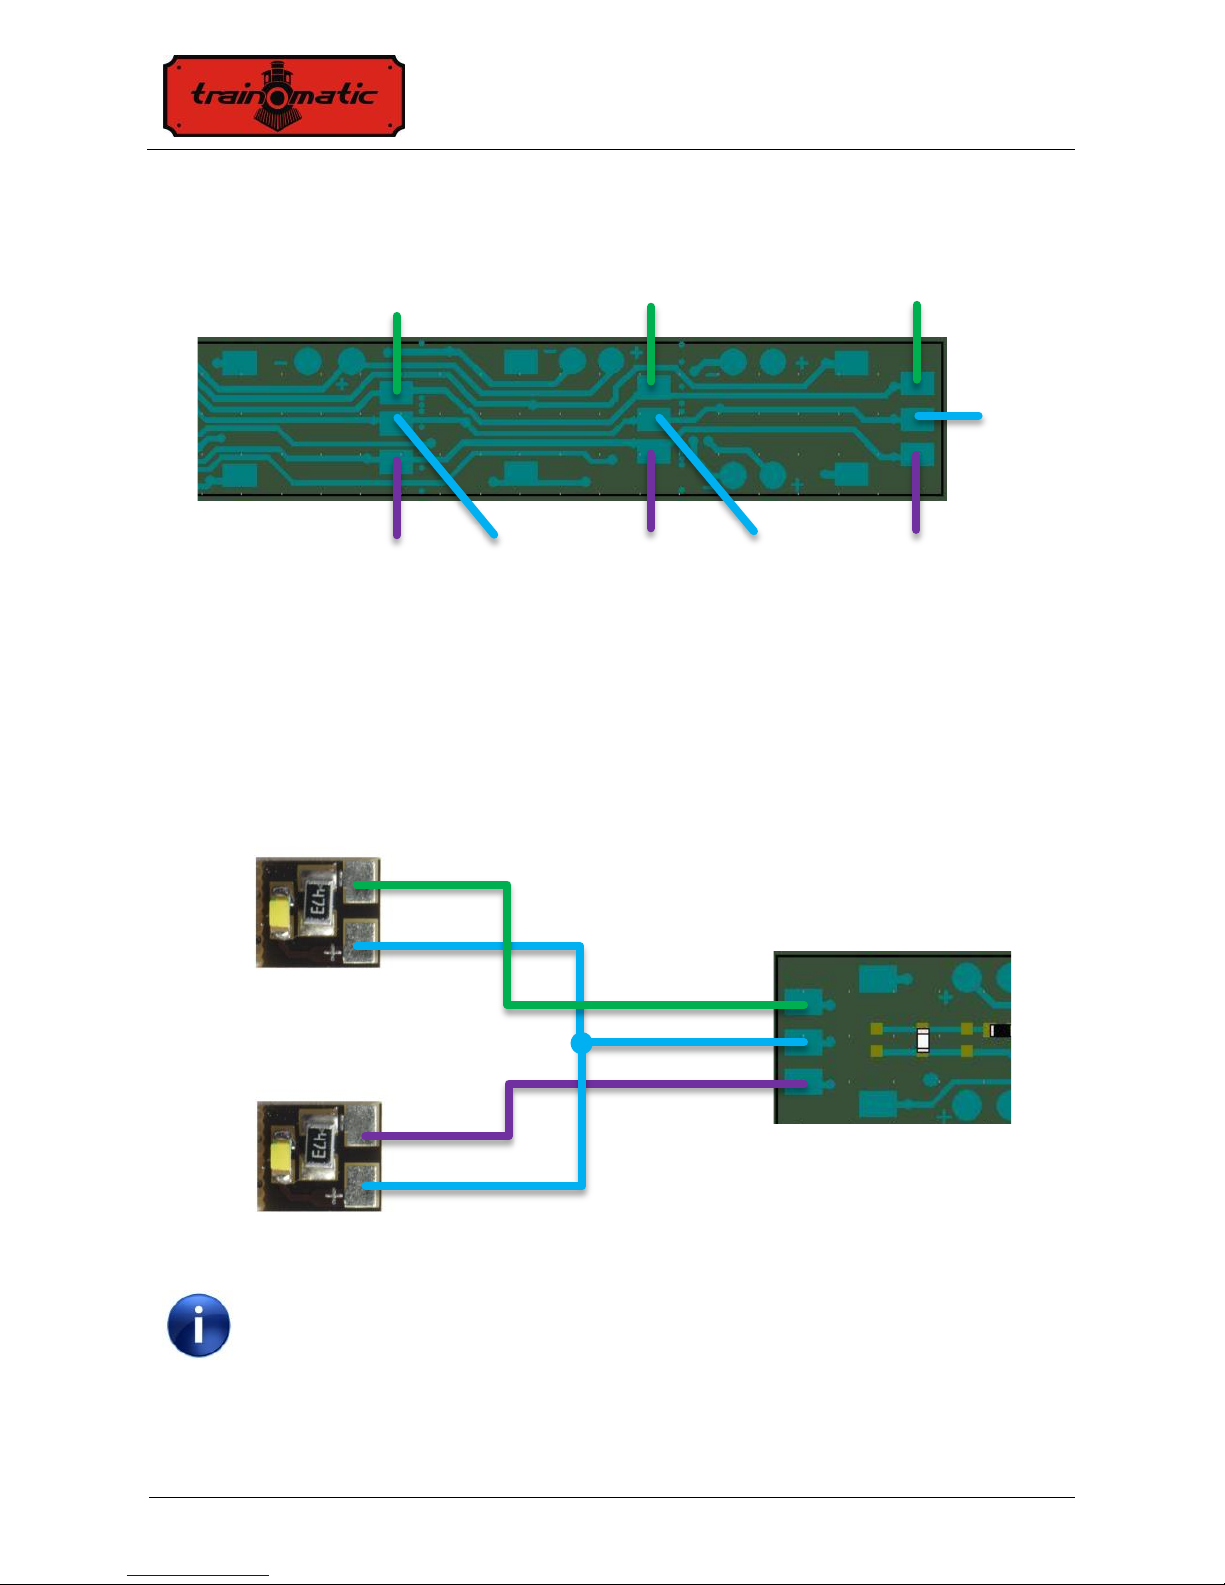
6. The function decoder outputs
The first 14 outputs of the function decoder are connected to the 14
LEDs marked on the below illustration L1 thru L14.
Shortening the lighting board will eliminate L1, L2, L13 and
L14, please use the mapping of the functions taking this in
consideration.
The Out15 and Out16 of the on board function decoder together with
the common (positive ) terminal is available at both ends of the
board. Please consult the illustrations on the next page for connecting
them (O15 represents the Out15, O16 the Out16 and C the common
terminal).
L13
L9
L4
L3
L2
L1
L10
L5
L6
L11
L12
L7
L8
L14
Shine Plus Maxi Digi
User Manual
Version
0.0.9
Page 9 of 64
Left side connections (component side)
Right side connections (component side)
Left side connections (solder side, board flipped horizontally)
O15
C
O16
O15
O15
O16
O16
C
C C
O16
O16
O16
C
C
C
O16
O16
O16
C C O15
O15
O15
O15
O15
O15
Shine Plus Maxi Digi
User Manual
Version
0.0.9
Page 10 of 64
Right side connections (solder side, board flipped horizontally)
The outputs are available for connection of other lighting modules,
for example Shine Micro for cockpit lighting, or Shine FDT as
taillight.
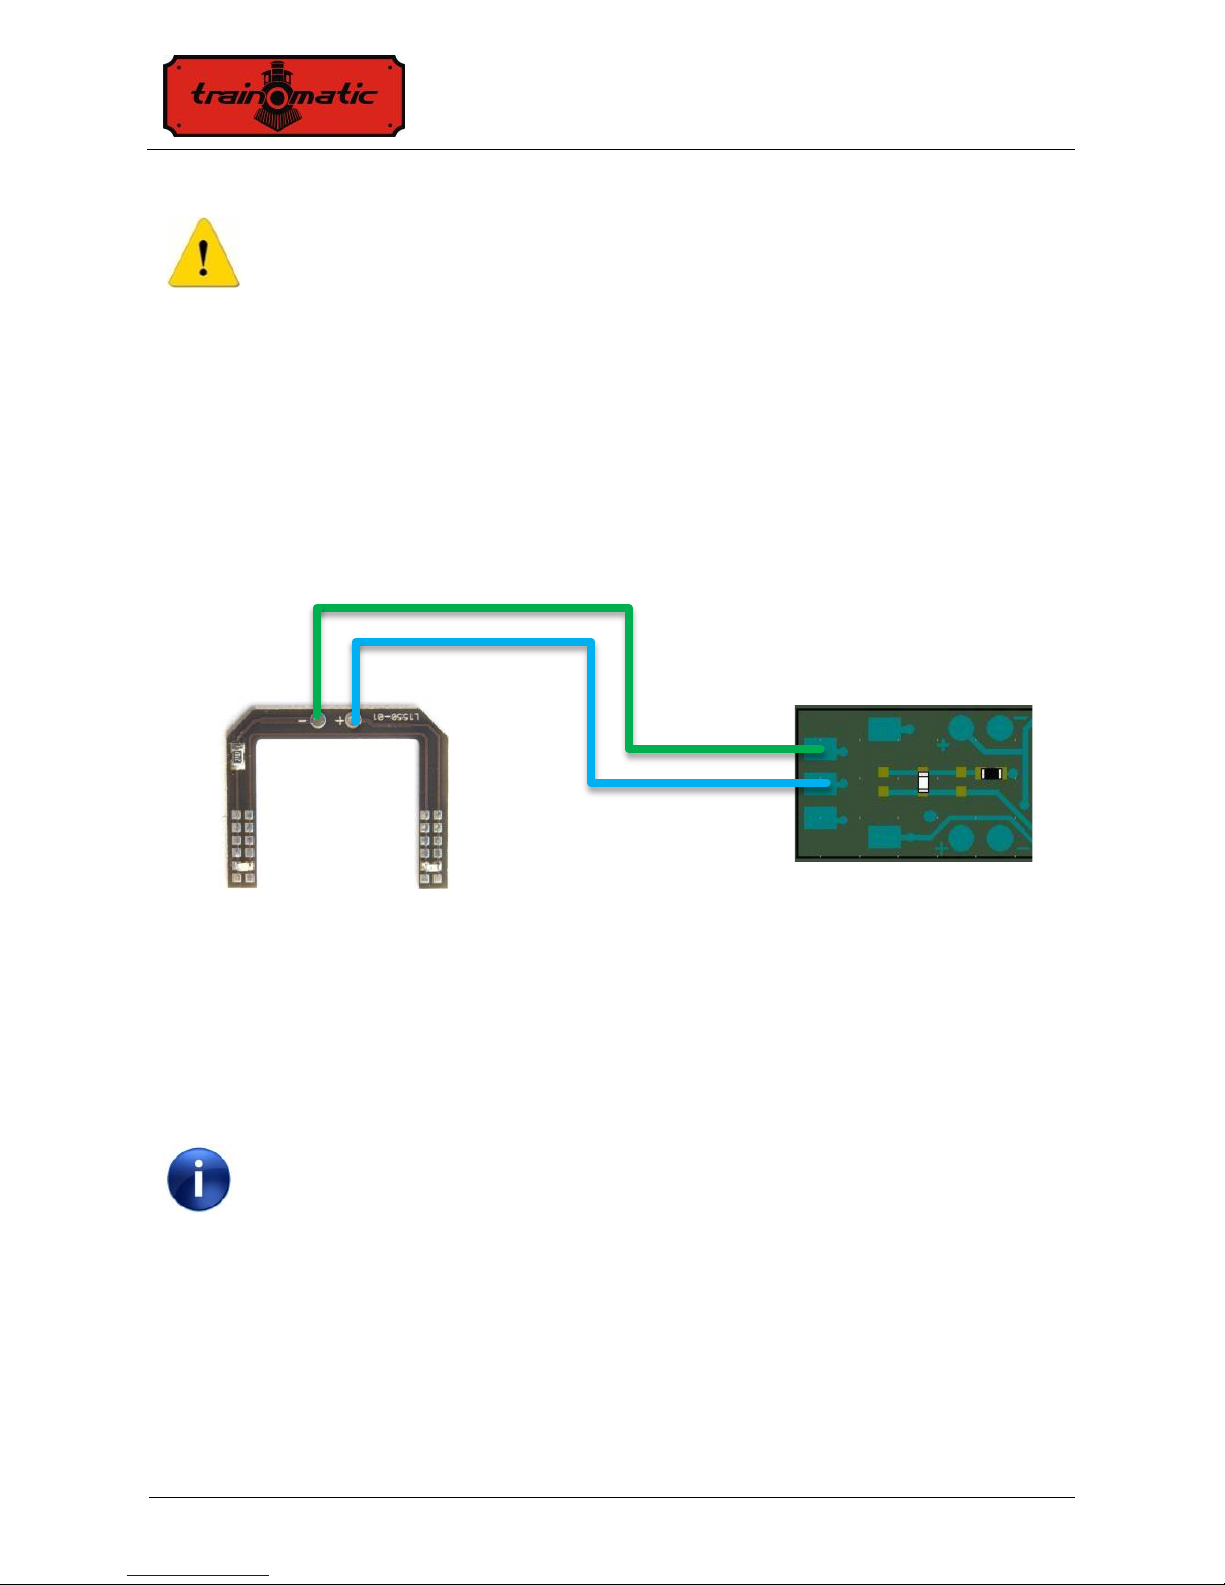
If polarized devices are connected to the outputs, please
connect the positive terminal (Anode) to the common
terminal of the on board decoder (C) and the negative
terminal (Cathode) to the output of the decoder (O15/O16).
Cockpit connection example
Shine Micro
C
O16
O16
O16
C C O15
O15
O15
Shine Plus Maxi Digi
User Manual
Version
0.0.9
Page 11 of 64
If LEDs (Light Emitting Diodes) are used the presence of the
current limiting resistor connected in series with the LED is
mandatory. Connecting directly an LED to the output of the function
decoder can damage the LED !
The onboard decoder has an overcurrent/short circuit
protection included. In case that a short circuit/overcurrent
occurred, the internal circuit cuts off the corresponding
output, and the value of CV30 will be set to 1 (please see
page 26 in the CV table in chapter 17).
Taillight connection example
Shine
FDT
Shine Plus Maxi Digi
User Manual
Version
0.0.9
Page 12 of 64
7. Connecting the anti-flickering capacitor
On both ends of the module, there are available several connections
for the anti-flickering capacitors. Please solder the supplied
capacitors in most convenient position.
The capacitors are polarized electronic devices. Please respect
the polarity as indicated! Soldering the capacitors with wrong
polarity can damage the module, or/and the capacitors!
+ + + + - - -
-
Left
End
Right
End
+ + + + -
-
-
-
Shine Plus Maxi Digi
User Manual
Version
0.0.9
Page 13 of 64
+
The positive terminal of the capacitor has to be
connected to any of the connections marked with
while the negative terminal to the connection points
marked with
The capacitor connection pads have metallized connections
to the solder side of the boards. If required, the capacitors can
be soldered also to the solder side of the board. Please respect
the corresponding polarity.
The lighting board has a charge/discharge circuit included, so
additional resistor and diode connections are not required.
The module can be fixed to the ceiling of the carriage frame by
double-sided adhesive tape, or can be held in place with the help of
the Shine Pastic Supports (PS Shine).
+ - -
Shine Plus Maxi Digi
User Manual
Version
0.0.9
Page 14 of 64
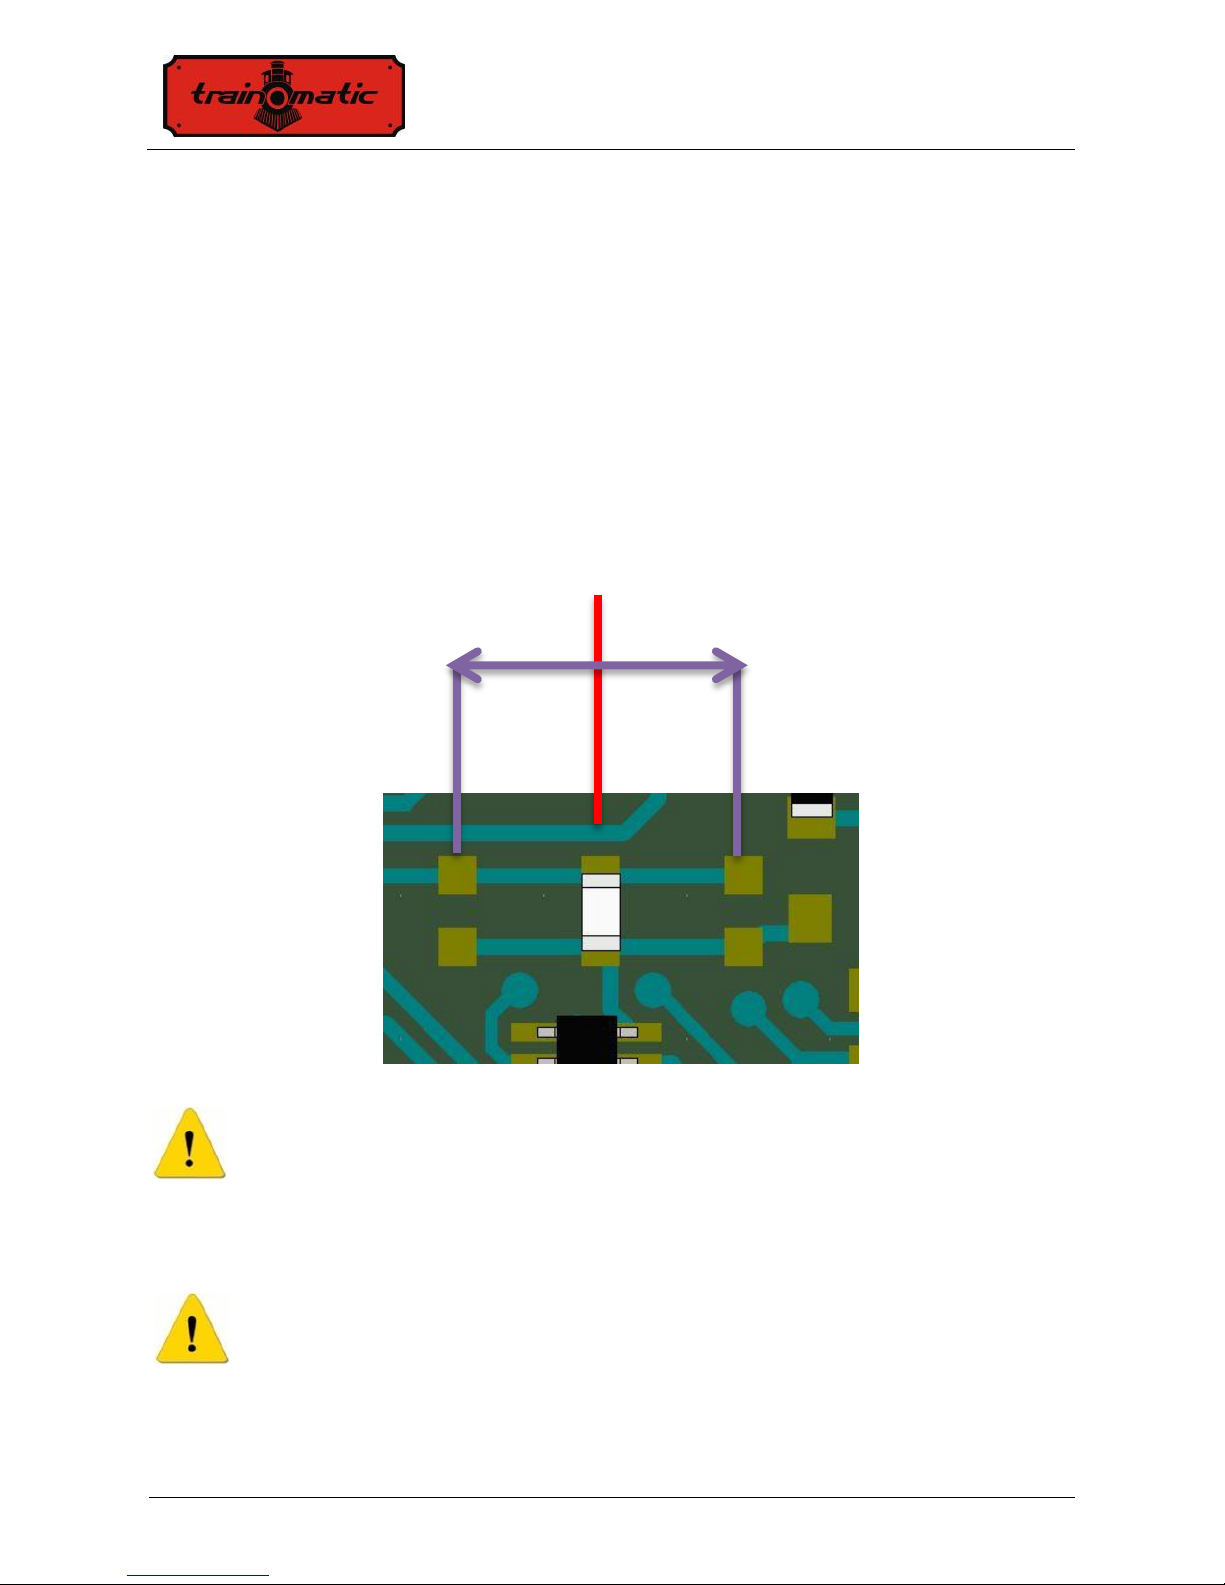
8. Advanced features
The PCB layout of the Shine Plus Maxi Digi module allows the
repositioning of the LEDs which results in a better fit in the
carriages. Each LED can be shifted left and right in two positions
with a ~ 3 mm pitch by resoldering, as illustrated below.
For the soldering operations a proper soldering station and
soldering skills are required. Incorrect soldering can damage or
destroy the module. We recommend these operations only for
advanced users!
The LEDs are polarized electronic devices, please do not
change their polarity during the resoldering!
Factory default position
Alternate positions

Shine Plus Maxi Digi
User Manual
Version
0.0.9
Page 15 of 64
9. Address programming
The on board function decoder of Shine Plus Maxi Digi can be used
either with short addresses (1-127) or long addresses (1-9999). The
factory default is short addressing (bit 5 of CV29 is 0), with the
address 3 (CV1=3).
The address can be changed by placing the decoder on the
Programming Track (PT), and changing the CV1 value, according to
the instructions of your Command Station.
If long addressing is needed, the addressing mode has to be changed
in the configuration CV of the decoder (bit 5 of CV29). Changing the
bit5 value of CV29 to 1 will activate the long addressing mode, and
the decoder will respond to the long address specified in CV17 and
CV18. Bit5 has a decimal value of 32, so changing bit5 to binary 1 is
equivalent with the adding of 32 to the decimal value of CV29
(CV29 has a factory default value of 6, activating bit 5 means, to add
32 to this value, 6+32 = 38, the new value for CV29 will be 38).
The long addresses will be calculated with the following algorithm
(in our example we will consider the long address 2000)
-divide the desired long address with 256 (in our example 2000/256=
7, remainder = 208)
-add 192 to the result and program it in CV17 (7+192=199, program
the value of 199 in CV17)
-program the value of the remainder of the division in CV18
(program the value of 208 in CV18)

Shine Plus Maxi Digi
User Manual
Version
0.0.9
Page 16 of 64
After programming CV29, CV17 and CV18 to the mentioned values,
the decoder can be accessed with the address 2000. To switch back to
short addressing, the bit5 of CV29 has to be deactivated.
10. Decoder reset
The Shine Plus Maxi Digi is delivered in factory configuration, with
the CV values specified in the column "Default value" in the CV
table (see chapter 17). At any time, the decoder can be restored to
the default values by performing a reset. The reset procedure consists
of programming any numerical value to CV8.
11. Function and Output mapping
Each function (from F0 to F16) can be used to activate/deactivate
one or more outputs (from the total of 16 outputs) of the on board
decoder. The correspondence between functions and outputs is called
Function Mapping. The mapping is performed by programming the
corresponding bits in CV33-62, and CV160-167.
Since the decoder has a total of 16 outputs, for each function
mapping 2 CVs are required (low byte for outputs 1-8 and high byte
for outputs 9-16). For the functions F0 (generally called light
function) and F1 the mapping can be defined separately for each
direction of travel, and 4 CVs are used. The other functions (F2-F16)
do not depend on the direction of travel. To each physical output of
the on board decoder, a bit value is assigned in the 2 CV that maps
the function (4 CVs for F0 and F1).
If the function activates the corresponding physical output, the
decimal values in brackets for each bit (powers of 2) will be
considered. If the function does not use the corresponding output, the
bit value will be considered zero. The mapping CV will be

Shine Plus Maxi Digi
User Manual
Version
0.0.9
Page 17 of 64
programmed with the sum of the decimal values of each active
output.
For example, if you want to use function F2 to activate output 4,
CV41 and CV42 will be used for mapping (which configures / maps
F2). Bit3 is used to activate Output 4, its decimal value is 8, so CV41
will be programmed with the value 8, and CV42 with the value of 0.
If we want to use F2 to activate Output3 too, we will add to the
previously determined value the corresponding value for Output3
(bit2, with a decimal value of 4). CV41 will be programmed with the
sum of 4+8 which is 12. If Outputs 13 and 14 will be used with F2,
the corresponding bits are bit4 and bit5 in Cv42, with the values of
16 and 32, thus CV42 will be programmed with the value 16+32=48.
For functions F0 and F1, 4 CVs are used for mapping, two for each
direction of travel. F0 is factory configured in such a way that all
outputs are activated for both directions. F1 is factory configured to
activate Output1 for both directions (see the CV table in chapter17).
12. Dimming, Fade and Effects
The light intensity of the LEDs connected to the outputs of the
onboard decoder can be changed individually by dimming using
CV120 thru C135. The factory default value for each of them is the
decimal value 127 (half intensity). Programming the 255 value in any
of these CVs, result in a continuous output at maximum intensity
level of the corresponding output.
There are several effects available (which can be extended with
further firmware upgrades) their parameters are globally defined in
CVs 112-117.
CV112 and CV113 define the progressive On and Off time if the
Fade effect is used. In CV114 the on delay is defined for the neon

Shine Plus Maxi Digi
User Manual
Version
0.0.9
Page 18 of 64
effect. In CV116 the flickering period is given for the flickering lamp
effect. The Defective Neon effects repetition time can be set in
CV117.
The effects are configured for each of the outputs in CVs 136-152. In
the current firmware version (V3) the CVs has to be programmed
with the following values:
0 Continuous outputs
1 Fade effect
2 Fluorescent (neon) effect
3 Flickering effect
4 Defective Neon effects
The modules are delivered with the outputs configured for
continuous operation (CV120 thru CV135 are set to value 0 ).
A pseudo random sequence generator function is also available,
activating this for an output, it will switch on and off without the
need of switching on and off a function. To select an output for the
random sequence, the value of 128 must be added to the effect values
(values in the range of 0-4) given in CV136-152. The switching
period of the random sequence is defined in CV115 in the range of 1255 seconds. As a result, after each elapse of the random period, the
state of the outputs which have the random effect activated will
change to a new on/off state, which is random based. It gives a very
realistic effect to a carriage, when rolling on the track, and some of
the compartment lights are switched on, or off.
The number of random states increases dramatically with the
increase of the outputs selected for this function. We
recommend the use of 2-4 of the outputs with the random
sequence to get an efficient visual effect.

Shine Plus Maxi Digi
User Manual
Version
0.0.9
Page 19 of 64
13. Analog Operation
The onboard function decoder of the Shine Plus Maxi Digi is
delivered with analog DC operation enabled, and F0 activated for
both travel direction (bit 2 is set in CV29 and CV14 is enabled for
use of F0 function in both directions of travel. CV14 = 1 +3 = 4).
Connecting the board to an analog voltage, will activate all outputs
of the on board function decoder. If you want to activate other
functions in analog DC mode, they have to be defined in CV13 and
CV14. Prior to this, the mapping of the function has to be defined in
Chapter 10.
Only functions F0, F1-F14 can be used in analog DC mode.
14. Consist operation
The on board function decoder of the Shine Plus Maxi Digi lighting
board can use the Advanced Consist functions. To activate this
feature, the consist address has to be set in CV19. When the content
of CV19 differs from 0, the decoder will perform functions that are
defined in CV21 and CV22 only if they are transmitted to the consist
address. All other functions will be performed while they are sent to
the base address (defined in CV1 or CV17/18).
Functions declared in CV21, CV22 will not be performed while they
are transmitted to the base address.
Consists is useful if we want to run two or more engines in the same
train (this means several mobile decoders), as well as multiple
traction and want to perform some of the functions individually for
each decoder, and other functions globally for all of the decoders.
Speed and direction commands will be sent to all decoders within the
same consist. In this way the headlights (of locomotives) and tail

Shine Plus Maxi Digi
User Manual
Version
0.0.9
Page 20 of 64
light of carriages can be turned on and off, based on the direction
commands sent to the consist addresses, while the interior lights in
different carriages can be turned on and off based on their individual
base addresses.
Only functions F0, F1-F12 can be used in consist mode. The
speed steps setting in CV29 must match the speed step setting
of the command station for both base and consist addresses.
15. Secondary address (decoder lock)
When using multiple decoders within the same housing, it is useful
to use a secondary address that will allow the selection of the
decoder in question. In this way any of the decoders that are inside
the same housing (carriage body) can be programmed on the
Programming Track without removing it. The secondary addresses
are programmed into CV16 before the decoders (in our case the
Shine Plus Maxi Digi with the onboard decoder) is being assembled
in their housing. The ranges of secondary addresses are 1-7 (value of
0 means that secondary addressing is not used). This permits the use
of maximum 7 decoders in the same carriage or locomotive housing,
which is more than enough.
If the value of CV16 is not equal to zero, the decoders will accept
programming commands only if the secondary address of decoder
that is intended to be programmed is programmed prior in CV15, and
it matches the value in CV16 (it should be the same as CV16 of the
decoder in question).
WARNING: even CV16 can be programmed only if the
correct value is programmed in CV15.
Using secondary addressing is important to know that the only CV
that can read and written without knowing the secondary address is
 Loading...