

-1-
GB NL FR D
USER’S MANUAL
----Manual/StereoboommWood-box Plus/10-2018/V01----

-2-
-3--3-
DECLARATION OF CONFORMITY
Hereby, / Par la présente,
Company: / Entreprise: TE-GROUP nv
Address: / Adresse: Kapelsestraat 61, 2950 Kapellen - BELGIUM
declare that the following equipment: /
déclare que le dispositif suivant :
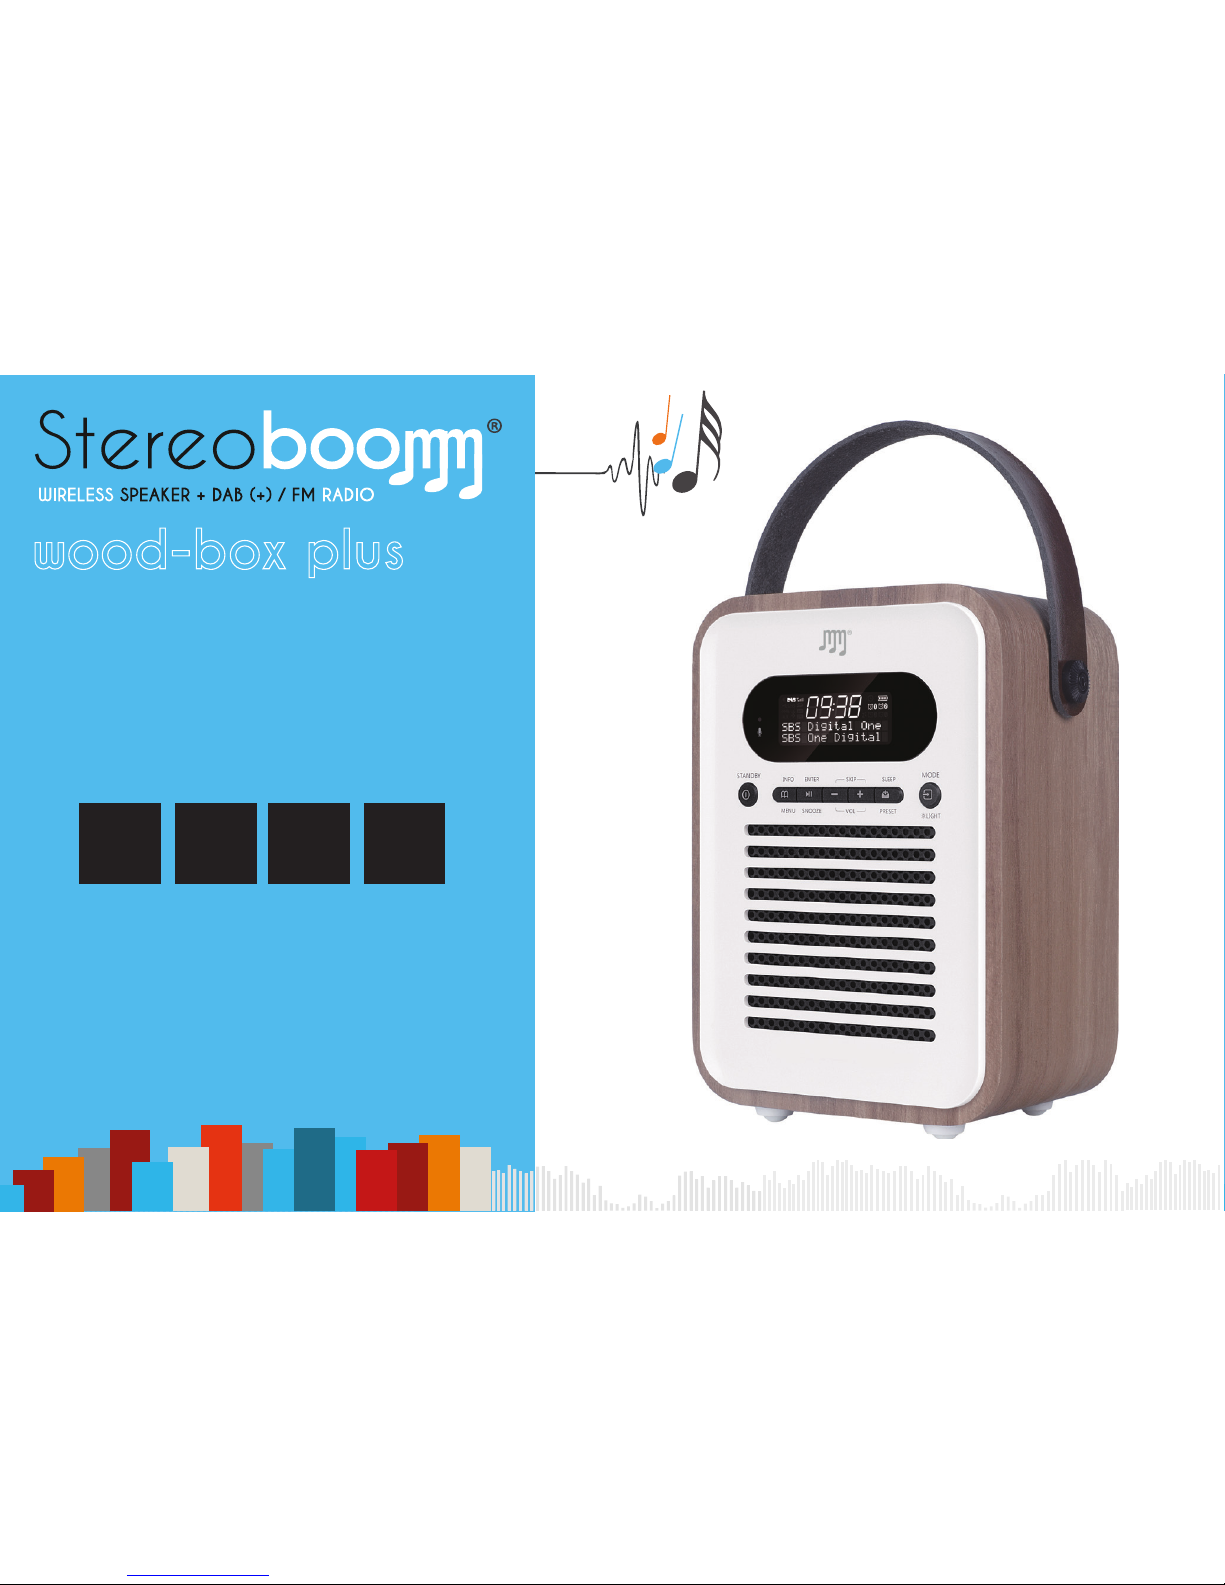
Product name: / Nom du produit: Stereoboomm WOODBOX PLUS
Product type: / Type de produit: Wireless Bluetooth Speaker with DAB(+)/FM Radio
conforms with the following safety requirements of the directives 2014/53/EU, 2011/65/EU, 2015/863/EU. Conformity is guaranteed by the CE-
symbol. This product has been tested against following standards and specications, applying versions valid on the date is was issued.
est conforme aux exigences de sécurité des directives 2014/53/EU, 2011/65/EU, 2015/863/EU. La conformité est garantie par le symbole CE. Ce
produit a été testé par rapport aux normes et spécications suivantes, appliquant les versions valables à la date de sa délivrance.
EN 62479:2010, EN 60065:2014
EN 301489-17 V3.2.0:2017, EN 301 489-1 V2.2.0:2017
EN 55032:2015, EN 55035:2017
EN 61000-3-2:2014, EN 61000-3-3:2013
EN 300328 V2.2.0:2017, EN 303345 V1.1.7:2017
Authorized signature
J. Van Os, TE-Group NV
Product Manager
Kapellen, November 2018
-4-
HOW TO USE THE STEREOBOOMM WOOD-BOX PLUS?
How to use the
Stereoboomm Woodbox Plus?
The SB Woodbox Plus can be
used in 3 ways:
- With adapter (not included)
- Stand-alone, using the
rechargeable battery
The SB Woodbox Plus is:
- DAB / DAB+ / FM Radio
- Bluetooth ® Speaker
- Music player with AUX /
USB / TF-Input
- Alarm Clock & Calendar
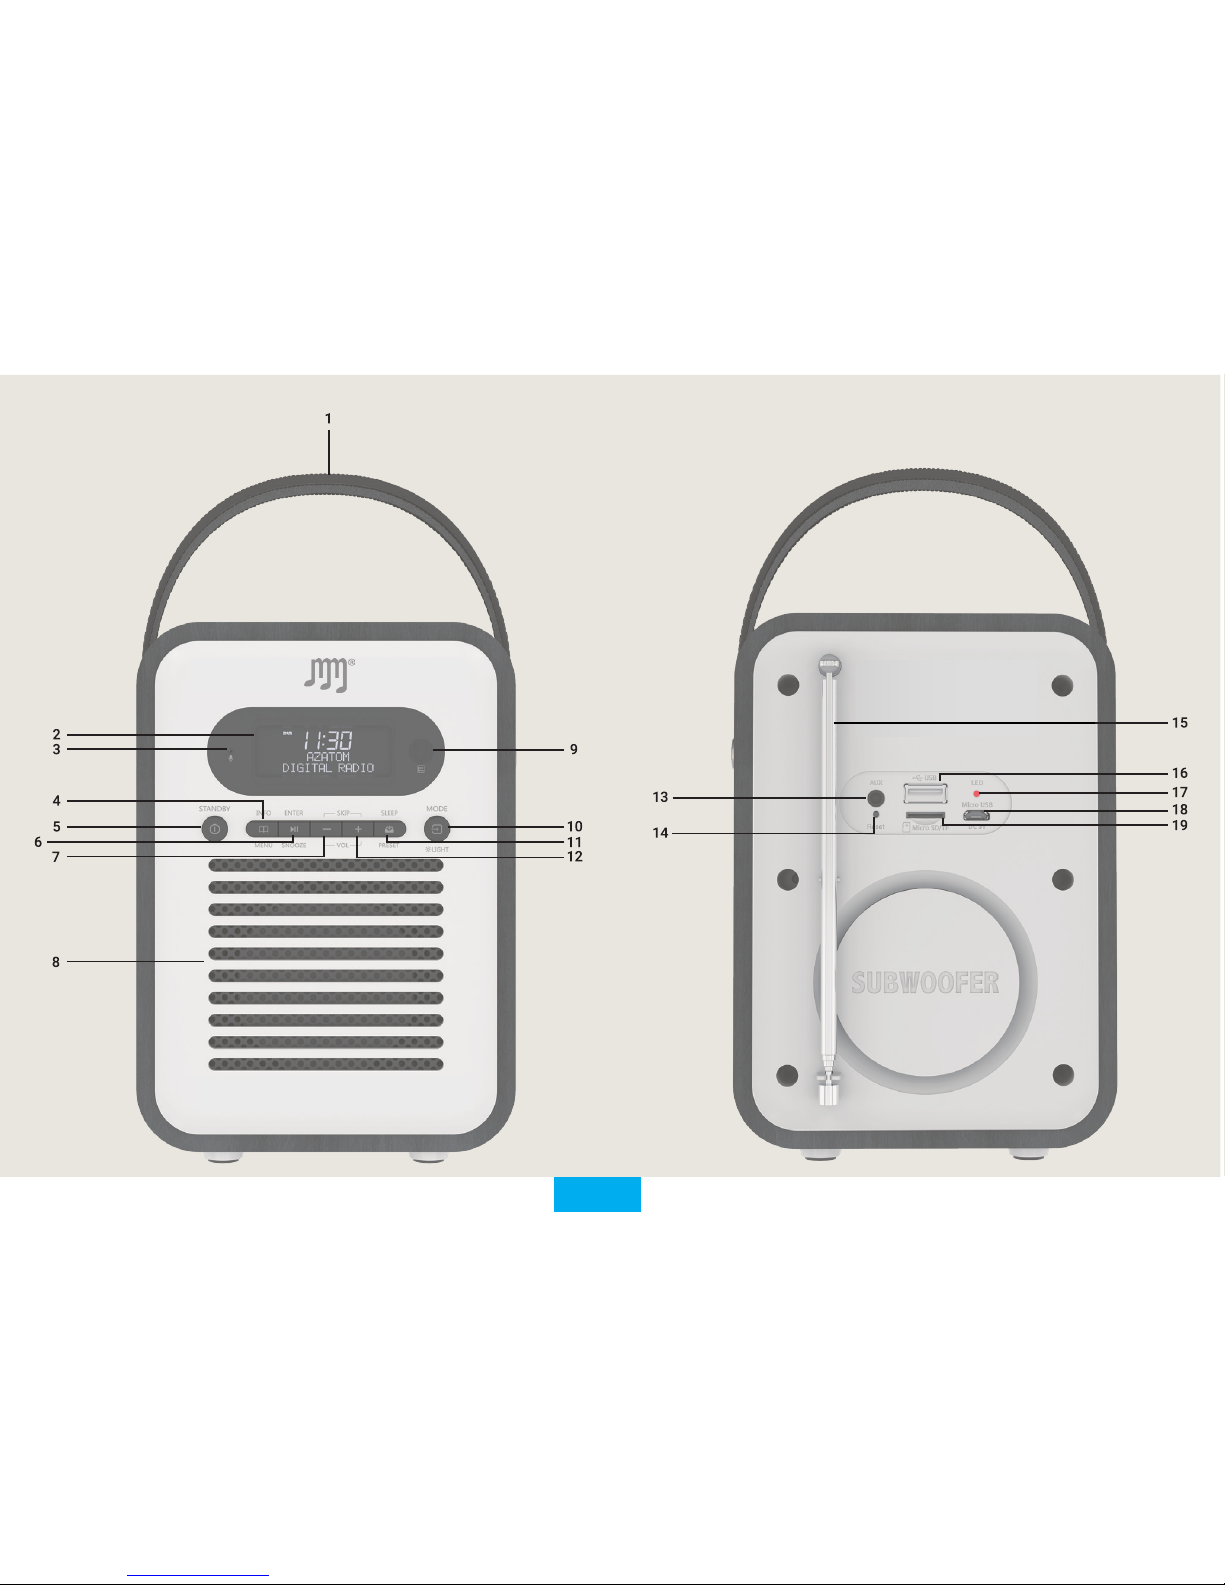
1. Handle
2. LED Display
3. Microphone
For Handsfree calling
4. Info / Menu
Short press: Show information
Press and hold: Enter the menu and settings
Press and hold again to exit the menu and settings
PARTS & BUTTONS
GB
5. Standby
Standby status:
Short press: Enter into working mode / standby mode
Press and hold: Power ON or Power Off
Alarm status:
Short press: Cancel the alarm to enter standby mode
6. Enter / Snooze
FM Mode: Press and hold for Auto-Station-Search
USB/TF/BT Mode: Short press: Play / Pause
DAB Mode: Short Press: Select station – Press and hold:
Automatic Station Search
Alarm Mode: Short press: Enter snooze settings & snooze time
7. Previous Track / Skip - / Volume –
8. Speaker
9. IR Receiver (for use with remote control - not included)
10. Mode / Light
Short press switches between DAB / FM / BT / USB / SD / AUX
Press and hold to change display brightness
11. Sleep / Preset
DAB/FM Mode: Short Press: open presets menu – Press and
hold to store current station as a preset
12. Next Track / Skip + / Volume +
13. AUX Audio Input
14. Reset button
15. FM / DAB Radio Antenna
16. USB OUT charging port / USB Player
17. LED Charging indicator
18. Micro USB IN Charging Port
19. Micro SD Card Slot
-5-

-6-
CHARGING THE BATTERY
! We recommend you to fully charge the SB Woodbox Plus before
its rst use !
1. Plug the Micro USB Cable into the micro USB Charging Port
(18) and plug the other end of the cable into a USB adapter
with minimum 1A Power charge. Plug the adapter into a
power socket.
2. The red LED indicator (17) will light up indicating that the
Woodbox Plus is now charging
3. When the LED indicator (17) turns green, the device is fully
charged.
When the device is in need of charge, the battery icon on the LED
Display (2) will be illuminated. If you do not plug in the device,
“Low Power, Please Charge!” will be displayed on the LED Display (2).
! ATTENTION: The SB Woodbox Plus has a power saving
function in Bluetooth mode: When there is no music playing
and no buttons have been pressed for 15 minutes, the device will
automatically enter Standby mode. !
TURNING THE DEVICE ON/OFF
You can turn the device ON or OFF by long pressing the Standby
button (5). When the device is ON and you want to go to Standby
Mode, short press the Standby button (5). When the device is in
Standby Mode and you want to turn it ON again, short press the
Standby Button (5).
MODE SELECTION
There are 6 available modes: DAB / FM / BT / USB / SD / AUX.
To switch between the modes, short press the Mode button (10).
1. DAB Mode:
Select the DAB Mode by short pressing the Mode button (10).
Press and hold the Enter button (6) to start an automatic station
search. Once this search is complete, all found stations will be saved.
Short press the Preset button (11) to display the saved stations,
use Skip – (7) or Skip + (12) to choose between stations and the
Enter button (6) to select and play the station.
Short press the Menu / Info button (4) for information about
the station. To adjust the volume, long press the Volume – (7) or
Volume + (12) buttons.
2. FM Mode:
Select the FM Mode by short pressing the Mode button (10).
Press and hold the Enter button (6) to start an automatic station
search. Once this search is complete, all found stations will be saved.
Short press the Preset button (11) to display the saved stations,
use Skip – (7) or Skip + (12) to choose between stations and the
Enter button (6) to select and play the station.
For netuning: Short press Skip – (7) or Skip + (12) to increase or
decrease the current frequency with 0.05MHZ.
Short press the Menu / Info button (4) for information about
the station. To adjust the volume, long press the Volume – (7) or
Volume + (12) buttons.
3. Bluetooth ®
Select the Bluetooth® Mode by short pressing the Mode button (10).
Open the Bluetooth®-settings of your Bluetooth® device
(Smartphone, Tablet, MP3 player,…) and scan for nearby devices.
Select “SB W-box Plus” in the list and press connect on your
Bluetooth® device. Once the devices are paired the display on the

-7-
SB Woodbox Plus will show “Connected”.
Press Skip – (7) or Skip + (12) to skip between your songs.
Short press the Enter button (6) to pause or play your music.
To adjust the volume, long press the Volume – (7) or Volume + (12)
buttons.
In the Bluetooth® Mode, you can also make handsfree calls. When
receving a call, short press the Enter button (6) to answer or hang
up. To reject a call, short press the Preset button (11).
To cancel the Bluetooth® connection, you can cancel the
connection on your Bluetooth® device or by long pressing the
Enter button (6).
4. USB Mode
Select the USB Mode by short pressing the Mode button (10).
Insert a USB Stick with audio-les in MP3 format into the USB
OUT charging port / USB Player (16).
Short press the Enter button (6) to start playing the music.
Press Skip – (7) or Skip + (12) to skip between your songs.
Short press the Enter button (6) to pause or play your music.
To adjust the volume, long press the Volume – (7) or Volume + (12)
buttons.
To choose a different play mode, long press the Preset button (11)
to switch between: REPEAT ALL (ALL) – REPEAT SINGLE (SING) –
RANDOM (RAND).
5. SD / TF Mode
Select the SD / TF Mode by short pressing the Mode button (10).
Insert a Micro SD Card with audio-les in MP3 format into the
Micro SD Card Slot (19).
Short press the Enter button (6) to start playing the music.
Press Skip – (7) or Skip + (12) to skip between your songs.
Short press the Enter button (6) to pause or play your music.
To adjust the volume, long press the Volume – (7) or Volume + (12)
buttons.
To choose a different play mode, long press the Preset button (11)
to switch between: REPEAT ALL (ALL) – REPEAT SINGLE (SING) –
RANDOM (RAND).
6. AUX Mode
Select the AUX Mode by short pressing the Mode button (10).
Connect the 3.5mm AUX cable to the AUX Input (13) and the other
end to your music device.
We suggest you to keep the volume on your music device around
half volume, as the SB Woodbox Plus has its own volume controls.
To adjust the volume, long press the Volume – (7) or Volume + (12)
buttons.
DATE & TIME SETTINGS
1. Setting the time
Make sure that the device is ON in any play mode. Press and
hold the Info / Menu button and use the Skip – (7) or Skip
+ (12) button to select “Main Menu”. Press Enter (6) to enter
the menu and press enter again to enter the “Time Setup”
submenu. Press Enter (6) When “Set Clock” is on the display
and use the Skip – (7) or Skip + (12) to set the hour, press
Enter (6) again and use Skip – (7) or Skip + (12) to set the
minutes. Conrm with the Enter button (6).

-8-
2. Setting the date
In the “Time Setup” submenu you can use Skip – (7) or Skip
+ (12) to go to “Set Date”. Press Enter (6) to set the date
by using the Skip – (7) and Skip + (12) buttons. To switch
between day, month & year; use the Enter button (6). Conrm
with the Enter button (6).
3. Auto Update
You can have the date and time updated automatically with
the transmitted radio-data. You can also adjust the setting to
receiving no updated time and date. Conrm with the Enter
button (6).
4. 12/24 hour
In the “Time Setup” submenu you can use Skip – (7) or Skip
+ (12) to go to “12/24 hour”. Press Enter (6) to change the
time notation by using the Skip – (7) and Skip + (12) buttons.
Conrm with the Enter button (6).
ALARM CLOCK FUNCTION
The SB Woodbox Plus can have up to 4 alarms. Make sure that
the device is ON in any play mode. Press and hold the Info / Menu
button and use the Skip – (7) or Skip + (12) button to select “Main
Menu”. Press Enter (6) to enter the menu and press enter again to
enter the “Alarm” submenu.
Choose which alarm you want to set (1, 2, 3 or 4) and press Enter
(6) to conrm.
You can now set the hour for the alarm by using the Skip – (7) and
Skip + (12) buttons, to conrm or switch from hour to minutes, use
the Enter button (6).
You can also change the duration (15, 30, 60, 90, 120). Conrm by
using the Enter button (6).
You can also select the desired sound notication:
USB/SD: plays music from your USB or SD card
Buzzer: “Beep Beep” sound notication
FM: plays music from FM radio
DAB: plays music from DAB radio
You can now select the alarm calendar:
Once: Your alarm will go off once, set the date of alarm by using
the the Skip – (7) and Skip + (12) buttons. Press Enter (6) to
conrm.
Weekends: Alarm will go off every weekend day (Saturday, Sunday).
Press Enter (6) to conrm.
Weekdays: Alarm will go off every weekday (Mo, Tu, We, Thu, Fr).
Presse Enter (6) to conrm.
Daily: Alarm will go off every day. Press Enter (6) to conrm.
After setting the alarm calendar, you can also change the alarm
volume by pressing the Skip – (7) and Skip + (12) buttons and
using Enter (6) to conrm.
After adjusting the volume settings, you can choose to enable or
disable the alarm. Use the Skip – (7) and Skip + (12) buttons to
switch between ON / OFF and use Enter (6) to conrm.
! Attention, if your alarm is set to the same source as the current
play mode; the alarm sound will automatically be “Buzzer” !
To snooze the alarm (for 5, 10, 15 or 30 minutes), shortly press the
Snooze button (6). To stop the alarm go back into the menu and
disable the alarm (such as described in the steps above).
SYSTEM SETTINGS
To enter the System Settings, long press the Info/Menu button (4).

-9-
Short press Skip – (7) or Skip + (12) to choose the function sub-menu
and short press the Enter button (6) to open the selected sub-menu.
Conrm with the Enter button (6).
1. Sleep Function
The device has an automated Sleep function (Auto-OFF). You
can choose between:
OFF – 15 – 30 – 45 – 60 – 90 minutes. Conrm with the Enter
button (6).
2. Alarm Function
The Alarm function has four groups of alarms with 5 Sound
options that you can choose from here:
- USB (plays music from USB)
- SD (plays music from SD Card)
- Buzzer (buzzer sound)
- DAB (plays music from DAB Radio)
- FM (plays music from FM Radio)
3. Clock Function
The clock function setting has three kinds of backlight
brightness levels that you can set here.
4. EQ-settings
You can adjust your Equalizer preferences here.
5. Language setting
You can choose your preferred language here.
6. Factory reset
You can bring the device back to factory settings with this
function.
7. Firmware version
You can check your rmware version here.
RESET
To reset the device, use a paperclip or small pin to press the Reset
Button (14).
Please note that when resetting the device, all saved stations will
be deleted and automatic scans need to be repeated.
CUSTOMER SUPPORT
For more information, technical questions and return requests
concerning this product, you should contact support@
stereoboomm.be.
GUARANTEE
Copyright® Stereoboomm. Stereoboomm® is a registered
trademark of TE-Group NV. Stereoboomm® brand stands for
superior quality products and excellent customer service.
Therefore Stereoboomm® warrants this product to be free from
defects in materials and workmanship for a period of two (2) years
from the original purchase date of the product. The terms of this
guarantee and the extent of responsibility of Stereoboomm®
under this warranty can be downloaded from the website:
www.stereoboomm.com.
-10-
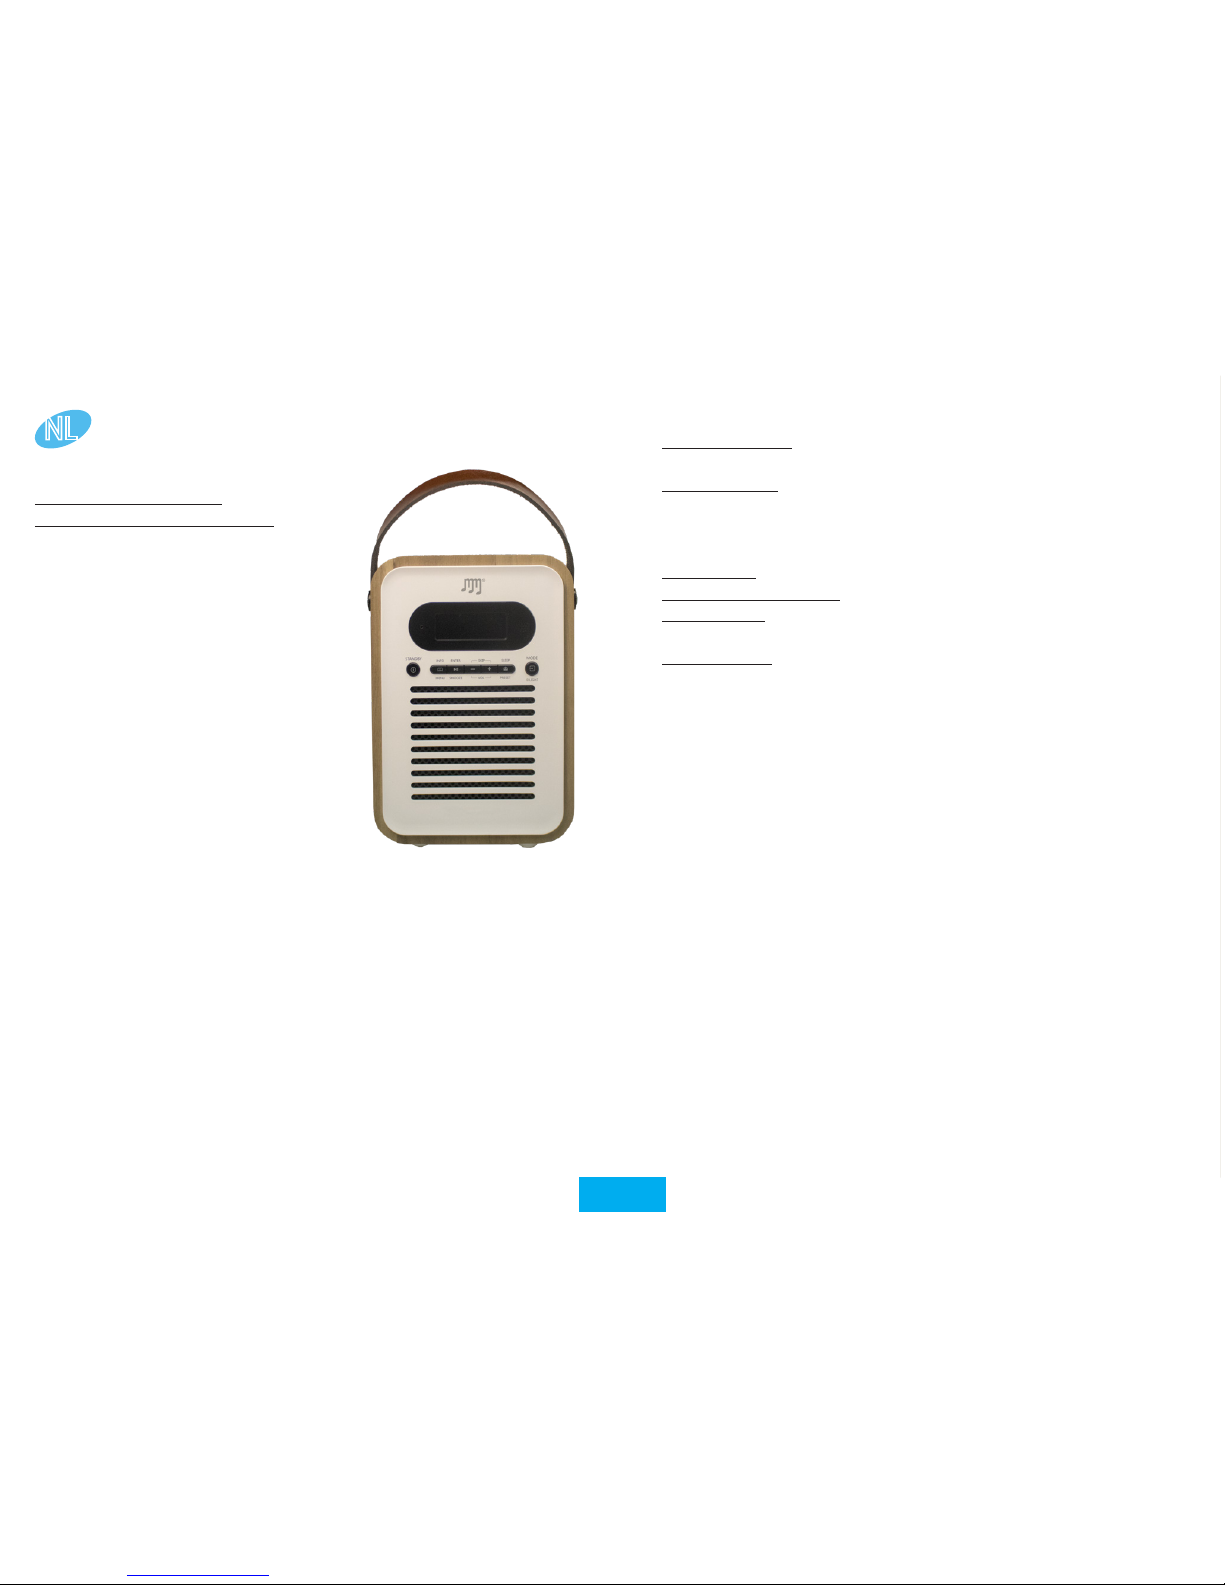
HOE DE STEREOBOOMM WOOD-BOX PLUS GEBRUIKEN?
Hoe de Stereoboomm
Woodbox Plus te gebruiken?
De SB Woodbox Plus kan op 2
manieren worden gebruikt:
- Met adapter (niet inbegrepen)
- Stand-alone, met behulp van
de oplaadbare batterij
De SB Woodbox Plus is:
- DAB / DAB + / FM-radio
- Bluetooth®-luidspreker
- Muziekspeler met AUX / USB /
TF-invoer
- Wekker & kalender
1. Handvat
2. LED-display
3. Microfoon
Voor handsfree bellen
4. Info / Menu
Kort indrukken: informatie weergeven
Ingedrukt houden: open het menu en de instellingen
Houd opnieuw ingedrukt om het menu en de instellingen te
sluiten
NL
ONDERDELEN & TOETSEN
5. Stand
Standby-status: Kort indrukken: ga naar werkmodus / standby-
modus. Ingedrukt houden: inschakelen of uitschakelen
Alarm status: Kort indrukken: het alarm annuleren om de
standby-modus te activeren
6. Enter / Snooze
FM-modus: houd ingedrukt voor Auto-Station zoeken
USB / TF / BT-modus: kort drukken: afspelen / pauzeren
DAB-modus: kort indrukken: zender kiezen - Ingedrukt houden:
automatisch zoeken op zender
Alarmmodus: kort indrukken: voer de snooze-instellingen en
snoozetijd in
7. Vorige nummer / overslaan - / volume -
8. Speaker
9. IR-ontvanger (voor gebruik met afstandsbediening - niet
inbegrepen)
10. Modus / Licht
Kort indrukken schakelt tussen DAB / FM / BT / USB / SD / AUX
Houd ingedrukt om de helderheid van het display te wijzigen
11. Slaap / preset
DAB / FM-modus: kort indrukken: menu Voorinstellingen
openen - Ingedrukt houden om de huidige zender als
voorkeuzezender op te slaan
12. Volgende track / overslaan + / volume +
13. AUX Audio-invoer
14. Reset-knop
15. FM / DAB-radioantenne
16. USB OUT-laadpoort / USB-speler
17. LED-laadindicator
18. Micro USB IN-laadpoort
19. Micro SD-kaartsleuf

-11-

-12-
DE BATTERIJ OPLADEN
! We raden u aan de SB Woodbox Plus voor het eerste gebruik
volledig op te laden!
1. Sluit de micro usb-kabel aan op de micro usb-oplaadpoort
(18) en sluit het andere uiteinde van de kabel aan op een usbadapter met minimaal 1 ampère voeding. Steek de adapter in
een stopcontact.
2. De rode LED-indicator (17) gaat branden om aan te geven dat
de Woodbox Plus nu wordt opgeladen
3. Wanneer de LED-indicator (17) groen wordt, is het apparaat
volledig opgeladen.
Wanneer het apparaat moet worden opgeladen, brandt het
batterijpictogram op het LED-display (2). Als u het apparaat niet
aansluit, wordt “Low Power, Please Charge!” Weergegeven op het
LED-display (2).
! LET OP: De SB Woodbox Plus heeft een energiebesparingsfunctie
in de Bluetooth modus: wanneer er gedurende 15 minuten geen
muziek wordt afgespeeld en er geen knoppen worden ingedrukt,
schakelt het apparaat automatisch over naar de stand-bymodus !
HET APPARAAT AAN / UIT ZETTEN
U kunt het apparaat in- of uitschakelen door lang op de standbyknop (5) te drukken. Wanneer het apparaat is ingeschakeld en u
naar de standby-modus wilt gaan, drukt u kort op de knop Stand-by
(5). Wanneer het apparaat in de standby-modus staat en u wilt het
opnieuw inschakelen, drukt u kort op de stand-byknop (5).
MODUS SELECTIE
Er zijn 6 beschikbare modi: DAB / FM / BT / USB / SD / AUX. Als u
tussen de modi wilt schakelen, drukt u kort op de knop Mode (10).
1. DAB Modus:
Selecteer de DAB-modus door kort op de knop Mode (10) te
drukken. Houd de knop Enter (6) ingedrukt om een automatische
zenderzoekopdracht te starten. Zodra deze zoekopdracht is voltooid,
worden alle gevonden stations opgeslagen.
Druk kort op de Preset-knop (11) om de opgeslagen stations weer
te geven, gebruik Skip - (7) of Skip + (12) om tussen stations te
kiezen en de Enter-knop (6) om het station te selecteren en af te
spelen.
Druk kort op de Menu / Info-knop (4) voor informatie over het station.
Om het volume aan te passen, drukt u lang op de knoppen Volume
- (7) of Volume + (12).
2. FM Modus:
Selecteer de FM-modus door kort op de modusknop (10) te drukken.
Houd de knop Enter (6) ingedrukt om een automatische
zenderzoekopdracht te starten. Zodra deze zoekopdracht is voltooid,
worden alle gevonden stations opgeslagen.
Druk kort op de Preset-knop (11) om de opgeslagen stations weer
te geven, gebruik Skip - (7) of Skip + (12) om tussen stations te
kiezen en de Enter-knop (6) om het station te selecteren en af te
spelen.
Voor jnafstemming: druk kort op Skip - (7) of Skip + (12) om de
huidige frequentie met 0,05 MHZ te verhogen of te verlagen.
Druk kort op de Menu / Info-knop (4) voor informatie over het station.
Om het volume aan te passen, drukt u lang op de knoppen Volume
- (7) of Volume + (12).
3. Bluetooth ®
Selecteer de Bluetooth®-modus door kort op de modusknop (10)
te drukken.
Open de Bluetooth®-instellingen van uw Bluetooth®-apparaat
(smartphone, tablet, mp3-speler, ...) en scan naar apparaten in de

-13-
buurt. Selecteer “SB W-box Plus” in de lijst en druk op verbinden op
uw Bluetooth®-apparaat. Nadat de apparaten zijn gekoppeld, wordt
op het scherm van de SB Woodbox Plus “Verbonden” weergegeven.
Druk op Skip - (7) of Skip + (12) om tussen uw nummers te springen.
Druk kort op de knop Enter (6) om uw muziek te pauzeren of af te
spelen. Om het volume aan te passen, drukt u lang op de knoppen
Volume - (7) of Volume + (12).
In de Bluetooth®-modus kunt u ook handsfree bellen. Wanneer u
een oproep ontvangt, drukt u kort op de knop Enter (6) om op te
nemen of op te hangen. Om een oproep te weigeren, drukt u kort
op de voorkeuzetoets (11).
Om de Bluetooth®-verbinding te annuleren, kunt u de verbinding
op uw Bluetooth®-apparaat annuleren of door lang op de knop
Enter te drukken (6).
4. USB Modus
Selecteer de USB-modus door kort op de modusknop (10) te drukken.
Plaats een USB-stick met audiobestanden in MP3-formaat in de
USB OUT-laadpoort / USB-speler (16).
Druk kort op de knop Enter (6) om de muziek af te spelen.
Druk op Skip - (7) of Skip + (12) om tussen uw nummers te springen.
Druk kort op de knop Enter (6) om uw muziek te pauzeren of af te
spelen. Om het volume aan te passen, drukt u lang op de knoppen
Volume - (7) of Volume + (12).
Om een andere afspeelmodus te kiezen, drukt u lang op Preset (11)
om te schakelen tussen: REPEAT ALL (ALL) - REPEAT SINGLE (SING)
- RANDOM (RAND).
5. SD / TF Modus
Selecteer de SD / TF-modus door kort op de knop Mode (10) te
drukken.
Plaats een Micro SD-kaart met audiobestanden in MP3-indeling in
de Micro SD-kaartsleuf (19).
Druk kort op de knop Enter (6) om de muziek af te spelen.
Druk op Skip - (7) of Skip + (12) om tussen uw nummers te springen.
Druk kort op de knop Enter (6) om uw muziek te pauzeren of af te
spelen. Om het volume aan te passen, drukt u lang op de knoppen
Volume - (7) of Volume + (12).
Om een andere afspeelmodus te kiezen, drukt u lang op Preset (11)
om te schakelen tussen: REPEAT ALL (ALL) - REPEAT SINGLE (SING)
- RANDOM (RAND).
6. AUX Modus
Selecteer de AUX-modus door kort op de modusknop (10) te
drukken.
Sluit de 3,5 mm AUX-kabel aan op de AUX-ingang (13) en het
andere uiteinde op uw muziekapparaat.
We raden u aan om het volume op uw muziekapparaat ongeveer
halfvol te houden, omdat de SB Woodbox Plus zijn eigen
volumeregelaars heeft.
Om het volume aan te passen, drukt u lang op de knoppen Volume
- (7) of Volume + (12).
DATUM- EN TIJDINSTELLINGEN
1. De tijd instellen
Zorg ervoor dat het apparaat is ingeschakeld in elke
afspeelmodus. Houd de Info / Menu-knop ingedrukt en gebruik
de Skip - (7) of Skip + (12) knop om “Hoofdmenu” te selecteren.
Druk op Enter (6) om het menu te openen en druk nogmaals op
enter om het submenu “Time Setup” te openen. Druk op Enter
(6) Wanneer “Klok instellen” op het display staat en gebruik
Skip - (7) of Skip + (12) om het uur in te stellen, druk nogmaals
op Enter (6) en gebruik Skip - (7) of Skip + ( 12) om de minuten
in te stellen. Bevestig met de knop Enter (6).

-14-
2. De datum instellen
In het submenu “Tijdinstelling” kunt u Skip - (7) of Skip + (12)
gebruiken om naar “Datum instellen” te gaan. Druk op Enter (6)
om de datum in te stellen met de knoppen Skip - (7) en Skip
+ (12). Om te schakelen tussen dag, maand & jaar; gebruik de
knop Enter (6). Bevestig met de knop Enter (6).
3. Auto Update
U kunt de datum en tijd automatisch laten bijwerken met de
verzonden radiogegevens. U kunt de instelling ook aanpassen
om geen bijgewerkte tijd en datum te ontvangen. Bevestig met
de knop Enter (6).
4. 12/24 Uur
In het submenu “Tijdinstelling” kunt u Skip - (7) of Skip + (12)
gebruiken om naar “12/24 uur” te gaan. Druk op Enter (6) om
de notatie te wijzigen met behulp van de knoppen Skip - (7) en
Skip + (12). Bevestig met de knop Enter (6)
WEKKERFUNCTIE
De SB Woodbox Plus kan tot 4 alarmen bevatten. Zorg ervoor dat
het apparaat is ingeschakeld in elke afspeelmodus. Houd de Info /
Menu-knop ingedrukt en gebruik de Skip - (7) of Skip + (12) knop
om “Hoofdmenu” te selecteren. Druk op Enter (6) om het menu te
openen en druk nogmaals op enter om het submenu “Alarm” te
openen.
Kies welk alarm u wilt instellen (1, 2, 3 of 4) en druk op Enter (6)
om te bevestigen.
U kunt nu het uur voor het alarm instellen met behulp van
de knoppen Skip - (7) en Skip + (12), om te bevestigen of om te
schakelen van uur naar minuten, gebruik de knop Enter (6).
U kunt ook de duur (15, 30, 60, 90, 120) wijzigen. Bevestig met de
knop Enter (6).
U kunt ook de gewenste geluidsmelding selecteren:
USB / SD: speelt muziek af van uw USB- of SD-kaart
Buzzer: geluidssignaal “Beep Beep”
FM: speelt muziek af van FM-radio
DAB: speelt muziek af van DAB-radio
U kunt nu de alarmkalender selecteren:
Eenmaal: uw alarm gaat één keer af, stel de alarmdatum in met
behulp van de knoppen Skip - (7) en Skip + (12). Druk op Enter (6)
om te bevestigen.
Weekends: het alarm gaat elke weekenddag (zaterdag, zondag) af.
Druk op Enter (6) om te bevestigen.
Weekdagen: het alarm gaat elke weekdag af (Mo, Tu, We, Thu, Fr).
Druk op Enter (6) om te bevestigen.
Dagelijks: het alarm gaat elke dag af. Druk op Enter (6) om te
bevestigen.
Nadat u de alarmkalender hebt ingesteld, kunt u ook het
alarmvolume wijzigen door op de knoppen Skip - (7) en Skip + (12)
te drukken en met Enter (6) te bevestigen.
Nadat u de volume-instellingen hebt aangepast, kunt u ervoor
kiezen het alarm in of uit te schakelen. Gebruik de Skip - (7) en Skip
+ (12) knoppen om te schakelen tussen ON / OFF en gebruik Enter
(6) om te bevestigen.
! Let op, als uw alarm is ingesteld op dezelfde bron als de huidige
afspeelmodus; het alarmgeluid wordt automatisch “Buzzer”!
Om het alarm te sluimeren (voor 5, 10, 15 of 30 minuten), drukt u
kort op de knop Snooze (6). Om het alarm te stoppen, keert u terug
naar het menu en schakelt u het alarm uit (zoals beschreven in de
bovenstaande stappen).

-15-
SYSTEEM INSTELLINGEN
Om de systeeminstellingen in te voeren, drukt u lang op de Info /
Menu-knop (4).
Druk kort op Skip - (7) of Skip + (12) om het submenu van de functie
te kiezen en druk kort op de knop Enter (6) om het geselecteerde
submenu te openen. Bevestig met de knop Enter (6).
1. Slaapfunctie
Het apparaat heeft een automatische slaapfunctie (Auto-OFF).
U kunt kiezen tussen:
UIT - 15 - 30 - 45 - 60 - 90 minuten. Bevestig met de knop Enter
(6).
2. Alarmfunctie
De alarmfunctie heeft vier alarmgroepen met 5 geluidsopties
waaruit u kunt kiezen:
- USB (speelt muziek vanaf USB)
- SD (speelt muziek van SD-kaart)
- Zoemer (zoemer geluid)
- DAB (speelt muziek van DAB-radio)
- FM (speelt muziek af van FM-radio)
3. Klokfunctie
De klokfunctie-instelling heeft drie soorten helderheidniveaus
voor de achtergrondverlichting die u hier kunt instellen.
4. EQ-instellingen
Je kunt hier je Equalizer-voorkeuren aanpassen.
5. Taalinstelling
U kunt hier uw voorkeurstaal kiezen.
6. Fabrieksreset
U kunt het apparaat met deze functie terugzetten naar de
fabrieksinstellingen.
7. Firmwareversie
U kunt hier uw rmwareversie controleren.
RESET
Om het apparaat opnieuw in te stellen, gebruikt u een paperclip of
een kleine pen om op de resetknop (14) te drukken.
Houd er rekening mee dat bij het resetten van het apparaat alle
opgeslagen stations worden verwijderd en dat automatische scans
moeten worden herhaald.
KLANTENONDERSTEUNING
Voor alle productgerelateerde vragen kunt u zich wenden tot onze
supportafdeling: support@stereoboomm.be
GARANTIE
STEREOBOOMM is een gedeponeerd handelsmerk van TEGroup NV. Het merk STEREOBOOMM staat voor producten van
superieure kwaliteit en een uitstekende klantenservice. Daarom
garandeert STEREOBOOMM dat dit product vrij is van materiaalen fabricagefouten gedurende een periode van twee (2) jaar na de
oorspronkelijke aankoopdatum van het product.

-16-
FR
COMMENT UTILISER LE STEREOBOOMM WOOD-BOX PLUS?
COMMENT UTILISER LE
STEREOBOOMM WOOD-BOX PLUS?
Le SB Woodbox Plus peut être
utilisé de 2 façons:
- Avec adaptateur (pas inclus)
- Autonome, sans chargeur,
en utilisant la batterie
rechargeable
Le SB Woodbox Plus est:
- Radio DAB / DAB+ / FM
- Enceinte Bluetooth®
- Lecteur de musique avec
entrées AUX / USB / TF
- Réveil et calendrier
ÉQUIPEMENT & TOUCHES
1. Poignée
2. Écran LED
3. Microphone
Pour la function mains libres
4. Info / Menu
Appui court: Afcher les informations
Maintenir enfoncé: entrer dans le menu et les paramètres
Maintenir enfoncé à nouveau pour quitter le menu et les
paramètres
5. Veille:
Mode veille:
Appui court: Entrer en mode de fonctionnement / mode veille
Maintenir enfoncé: Allumer ou éteindre
Mode Alarme:
Appui court: Annuler l’alarme pour passer en mode veille
6. Entrée / Snooze
Mode FM: maintenir enfoncé pour la recherche automatique de
stations
Mode USB / TF / BT: Appui court: Lecture / Pause
Mode DAB: Appui court: sélection de la station - Appui prolongé:
recherche automatique de stations
Mode Alarme: Appui court: entrer les paramètres de répétition
et la durée de répétition
7. Piste précédente / Skip - / Volume –
8. Haut-parleur
9. Récepteur IR (pour utilisation avec télécommande - non inclus)
10. Mode / Lumière
Appui court pour changer entre DAB / FM / BT / USB / SD / AUX
Maintenir enfoncé pour changer la luminosité de l’écran
11. Sommeil / préréglage
Mode DAB / FM: Appui court: ouvrir le menu des préréglages -
Maintenir enfoncé pour enregistrer en tant que préréglage
12. Piste suivante / Skip + / Volume +
13. Entrée audio AUX
14. Bouton de réinitialisation
15. Antenne Radio FM / DAB
16. Port de chargement USB OUT / Lecteur USB
17. Indicateur de charge à LED
18. Port de charge micro USB IN
19. Emplacement pour carte Micro SD

-17-

-18-
CHARGER LA BATTERIE
! Le SB Wood-Box Plus doit être entièrement chargée avant la
première utilisation !
1. Branchez le câble micro USB dans la prise de recharge micro
USB (182). Branchez l’autre extrémité du câble USB dans un
adaptateur USB avec une charge minimale de 1A.
2. Le témoin lumineux LED rouge (17) s’allume et votre appareil
se met en charge.
3. Lorsque la batterie est complètement chargée, le témoin
lumineux (17) passe au vert.
Lorsque la capacité de la batterie est faible, une icône de batterie
vide s’allume sur l’écran LED (2). Si vous ne branchez pas l’appareil,
«Low Power, Please Charge!» s’afchera sur l’écran LED (2).
! ATTENTION: Le SB Woodbox Plus dispose d’une fonction
d’économie d’énergie en mode Bluetooth: lorsqu’il n’y a pas de
musique en lecture et qu’aucune touche n’a été appuyée pendant
15 minutes, l’appareil passe automatiquement en mode veille !
ALLUMER / ÉTEINDRE
Vous pouvez allumer ou éteindre l’appareil en appuyant sur le
bouton Veille (5). Lorsque l’appareil est allumé et que vous souhaitez
passer en mode veille, appuyez brièvement sur le bouton Veille
(5). Lorsque l’appareil est en mode veille et que vous souhaitez le
rallumer, appuyez brièvement sur le bouton Veille (5).
SÉLECTION DU MODE
Il existe 6 modes disponibles: DAB / FM / BT / USB / SD / AUX.
Pour basculer entre les modes, appuyez brièvement sur le bouton
Mode (10).
1. Mode DAB:
Sélectionnez le mode DAB en appuyant brièvement sur le bouton
Mode (10). Appuyez sur le bouton Entrée (6) et maintenez-le enfoncé
pour lancer une recherche automatique de stations. Une fois cette
recherche terminée, toutes les stations trouvées seront sauvegardées.
Appuyez brièvement sur le bouton de préréglage (11) pour afcher
les stations enregistrées, utilisez les options de Skip - (7) ou de Skip
+ (12) pour choisir entre les stations et sur le bouton Entrée (6) pour
sélectionner et écouter la station.
Appuyez brièvement sur le bouton Menu / Info (4) pour obtenir
des informations sur la station. Pour régler le volume, appuyez
longuement sur les boutons Volume - (7) ou Volume + (12).
2. Mode FM
Sélectionnez le mode FM en appuyant brièvement sur le bouton
Mode (10). Appuyez sur le bouton Entrée (6) et maintenez-le enfoncé
pour lancer une recherche automatique de stations. Une fois cette
recherche terminée, toutes les stations trouvées seront sauvegardées.
Appuyez brièvement sur le bouton de préréglage (11) pour afcher
les stations enregistrées, utilisez les options Skip - (7) ou de Skip +
(12) pour choisir entre les stations et sur le bouton Entrée (6) pour
sélectionner et écouter la station.
Pour un réglage plus précis: appuyez brièvement sur Skip - (7) ou
Skip + (12) pour augmenter ou diminuer la fréquence actuelle avec
0,05 MHz.
Appuyez brièvement sur le bouton Menu / Info (4) pour obtenir
des informations sur la station. Pour régler le volume, appuyez
longuement sur les boutons Volume - (7) ou Volume + (12).
3. Bluetooth®
Sélectionnez le mode Bluetooth® en appuyant brièvement sur le
bouton Mode (10).
Ouvrez les paramètres Bluetooth® de votre appareil Bluetooth®

-19-
(smartphone, tablette, lecteur MP3, ...) et recherchez les appareils à
proximité. Sélectionnez «SB W-box Plus» dans la liste et connectez
votre appareil Bluetooth®. Une fois les appareils appariés, le
message «Connected» apparaît sur l’écran du SB Woodbox Plus.
Appuyez sur Skip - (7) ou sur Skip + (12) pour basculer entre vos
chansons.
Appuyez brièvement sur le bouton Entrée (6) pour mettre en pause
ou lire votre musique.
Pour régler le volume, appuyez longuement sur les boutons Volume
- (7) ou Volume + (12).
En mode Bluetooth®, vous pouvez également faire des appels
mains libres. Lorsque vous recevez un appel, appuyez brièvement
sur le bouton Entrée (6) pour répondre ou raccrocher. Pour rejeter
un appel, appuyez brièvement sur le bouton de préréglage (11).
Pour annuler la connexion Bluetooth®, vous pouvez annuler la
connexion sur votre appareil Bluetooth® ou en appuyant sur le
bouton Entrée (6).
4. Mode USB
Sélectionnez le mode USB en appuyant brièvement sur le bouton
Mode (10).
Insérez une clé USB contenant des chiers audio au format MP3
dans le port de chargement USB OUT / lecteur USB (16).
Appuyez brièvement sur le bouton Entrée (6) pour lancer la lecture
de la musique.
Appuyez sur Skip - (7) ou sur Skip + (12) pour passer d’une chanson
à l’autre.
Appuyez brièvement sur le bouton Entrée (6) pour mettre en pause
ou lire votre musique. Pour régler le volume, appuyez longuement
sur les boutons Volume - (7) ou Volume + (12).
Pour choisir un autre mode de lecture, appuyez sur le bouton de
préréglage (11) pour basculer entre: REPEAT ALL (ALL) - REPEAT
SINGLE (RING) - RANDOM (RAND).
5. Mode SD / TF
Sélectionnez le mode SD / TF en appuyant brièvement sur le
bouton Mode (10).
Insérez une carte Micro SD contenant des chiers audio au format
MP3 dans la fente pour carte Micro SD (19).
Appuyez brièvement sur le bouton Entrée (6) pour lancer la lecture
de la musique.
Appuyez sur Skip - (7) ou sur Skip + (12) pour passer d’une chanson
à l’autre.
Appuyez brièvement sur le bouton Entrée (6) pour mettre en pause
ou lire votre musique. Pour régler le volume, appuyez longuement
sur les boutons Volume - (7) ou Volume + (12).
Pour choisir un autre mode de lecture, appuyez sur le bouton de
préréglage (11) pour basculer entre: REPEAT ALL (ALL) - REPEAT
SINGLE (RING) - RANDOM (RAND).
6. Mode AUX
Sélectionnez le mode AUX en appuyant brièvement sur le bouton
Mode (10).
Connectez le câble AUX de 3,5 mm à l’entrée AUX (13) et l’autre
extrémité à votre appareil de musique.
Nous vous conseillons de maintenir le volume de votre appareil
de musique à environ la moitié du volume, car la SB Woodbox Plus
possède ses propres contrôles de volume.
Pour régler le volume, appuyez longuement sur les boutons Volume
- (7) ou Volume + (12).
PARAMÈTRES DE DATE ET HEURE
1. Réglage de l’heure
Assurez-vous que l’appareil est allumé quel que soit le mode
de lecture. Maintenez enfoncé le bouton Info / Menu et utilisez
les boutons Skip - (7) ou Skip + (12) pour sélectionner «Main

-20-
menu». Appuyez sur Entrée (6) pour accéder au menu et
appuyez à nouveau sur Entrée pour accéder au sous-menu «
Time Setup». Appuyez sur Entrée (6). «Set Clock» est afché.
Utilisez Skip - (7) ou Skip + (12) pour régler l’heure, appuyez à
nouveau sur Entrée (6) et utilisez Skip - (7) ou Skip + ( 12) pour
régler les minutes. Conrmez avec la touche Enter (6).
2. Réglage de la date
Dans le sous-menu «Time Setup», vous pouvez utiliser Skip - (7)
ou Skip + (12) pour atteindre «Set Date». Appuyez sur Entrée
(6) pour régler la date à l’aide des touches Skip - (7) et Skip +
(12). Pour basculer entre jour, mois et année; utilisez le bouton
Entrée (6). Conrmez avec la touche Enter (6).
3. Mise à jour automatique
Il est possible de mettre à jour la date et l’heure
automatiquement en utilisant les données radio transmises.
Vous pouvez également régler le paramètre de sorte que les
infos ne sont pas mis à jour automatiquement. Conrmez avec
la touche Enter (6).
4. 12/24 heures
Dans le sous-menu «Time Setup», vous pouvez utiliser Skip - (7)
ou Skip + (12) pour aller à «12/24 hours». Appuyez sur Entrée
(6) pour modier l’heure à l’aide des touches Skip - (7) et Skip +
(12). Conrmez avec le bouton Entrée (6).
FONCTION RÉVEIL
Le SB Woodbox Plus peut avoir jusqu’à 4 alarmes. Assurez-vous que
l’appareil est allumé quel que soit le mode de lecture. Maintenez
enfoncé le bouton Info / Menu et utilisez les boutons Skip - (7)
ou Skip + (12) pour sélectionner «Main menu». Appuyez sur Entrée
(6) pour accéder au menu et appuyez de nouveau sur Entrée pour
accéder au sous-menu «Alarm».
Choisissez l’alarme que vous souhaitez régler (1, 2, 3 ou 4) et
appuyez sur Entrée (6) pour conrmer.
Vous pouvez maintenant régler l’heure de l’alarme à l’aide des
touches Skip - (7) et Skip + (12). Pour conrmer ou passer de l’heure
aux minutes, utilisez la touche Enter (6).
Vous pouvez également modier la durée (15, 30, 60, 90, 120).
Conrmez en utilisant le bouton Entrée (6).
Vous pouvez également sélectionner la notication sonore souhaitée:
USB / SD: lire la musique de votre clé USB ou carte SD
Buzzer: Notication sonore «Beep Beep»
FM: jouer la musique de la radio FM
DAB: jouer la musique de la radio DAB
Vous pouvez maintenant sélectionner le calendrier des alarmes:
Once: Votre alarme sonnera une fois, dénissez la date à l’aide des
touches Skip - (7) et Skip + (12). Appuyez sur Entrée (6) pour conrmer.
Weekends: l’alarme retentit tous les jours du week-end (samedi,
dimanche). Appuyez sur Entrée (6) pour conrmer.
Weekdays: l’alarme retentit tous les jours de la semaine (lundi,
jeudi, jeudi, vendredi). Appuyez sur Entrée (6) pour conrmer.
Daily: l’alarme retentit tous les jours. Appuyez sur Entrée (6) pour
conrmer.
Après avoir réglé le calendrier des alarmes, vous pouvez également
modier le volume de l’alarme en appuyant sur les touches Skip - (7)
et Skip + (12), puis en appuyant sur la touche Entrée (6) pour conrmer.
Après avoir réglé les paramètres de volume, vous pouvez choisir
d’activer ou de désactiver l’alarme. Utilisez les boutons Skip - (7) et
Skip + (12) pour basculer entre ON / OFF et appuyez sur Entrée (6)
pour conrmer.
! Attention, si votre alarme est réglée sur la même source que le
mode de lecture actuel, le son de l’alarme sera automatiquement

-21-
“Buzzer”!
Pour suspendre l’alarme (pendant 5, 10, 15 ou 30 minutes), appuyez
brièvement sur le bouton Snooze (6). Pour arrêter l’alarme, retournez
dans le menu et désactivez l’alarme (comme décrit dans les étapes
ci-dessus).
PARAMÈTRES DU SYSTÈME
Pour entrer les paramètres du système, appuyez longuement sur le
bouton Info / Menu (4).
Appuyez brièvement sur Skip - (7) ou Skip + (12) pour choisir le
sous-menu de fonctions, puis appuyez brièvement sur le bouton
Entrée (6) pour ouvrir le sous-menu sélectionné. Conrmez avec la
touche Enter (6).
1. Fonction de sommeil (Sleep)
L’appareil dispose d’une fonction de veille automatique (arrêt
automatique). Vous pouvez choisir entre:
OFF - 15 - 30 - 45 - 60 - 90 minutes. Conrmez avec la touche
Enter (6).
2. Fonction d’alarme (Alarm)
La fonction Alarme comporte quatre groupes d’alarmes avec 5
options de son parmi lesquelles vous pouvez choisir:
- USB (joue de la musique depuis USB)
- SD (joue la musique de la carte SD)
- Buzzer (son de sonnerie)
- DAB (joue la musique de la radio DAB)
- FM (joue la musique de la radio FM)
3. Fonction d’horloge (Clock)
Le réglage de la fonction d’horloge comporte trois types de
niveaux de luminosité du rétroéclairage.
4. Réglages EQ (EQ settings)
Vous pouvez ajuster vos préférences d’égaliseur ici.
5. Réglage de la langue (Language)
Vous pouvez choisir votre langue préférée ici.
6. Réinitialisation (reset)
Vous pouvez rétablir les paramètres d’usine de l’appareil avec
cette fonction.
7. Version du rmware
Vous pouvez vérier la version de votre rmware ici.
RÉINITIALISER
Utilisez un trombone ou petite épingle pour appuyer sur le bouton
de réinitialisation (14) pour réinitialiser l’appareil.
Veuillez noter que lors de la réinitialisation de l’appareil, toutes
les stations enregistrées seront supprimées et les analyses
automatiques devront être répétées.
SUPPORT
Pour toute question relative au produit, veuillez contacter:
support@stereoboomm.be
GARANTIE
STEREOBOOMM est une marque déposée de TE-Group NV. La
marque de STEREOBOOMM est synonyme de produits de qualité
supérieure et d’un service après-vente excellent. C’est la raison pour
laquelle STEREOBOOMM garantit ce produit contre tout défaut
de matériel ou de fabrication pour une période de deux (2) ans à
compter de la date d’achat initiale.

-22-
D
BENUTZUNG DES STEREOBOOMM WOOD-BOX?
Wie benutzt man die
Stereoboomm Woodbox Plus?
Die SB Woodbox Plus kann auf 2
Arten verwendet werden:
- Mit Adapter (nicht im
Lieferumfang enthalten)
- Stand-alone, mit dem Akku
Die SB Woodbox Plus ist:
- DAB / DAB + / UKW-Radio
- Bluetooth® Lautsprecher
- Musik-Player mit AUX / USB
/ TF-Eingang
- Wecker und Kalender
TEILE UND KNÖPFE
1. Griff
2. LED-Anzeige
3. Mikrofon
Für Freisprechen
4. Info / Menü
Kurz drücken: Informationen anzeigen
D
rücken und halten: Geben Sie das Menü und die Einstellungen ein
Drücken und halten Sie erneut, um das Menü und die
Einstellungen zu verlassen
5. Standby
Standby-Status: Kurzes Drücken: Betritt den Arbeitsmodus /
Standby-Modus
Drücken und halten: Einschalten oder Ausschalten
Alarmstatus: Kurz drücken: Alarm abbrechen, um in den
Standby-Modus zu gelangen
6. Geben Sie / Schlummer
FM-Modus: Drücken und halten Sie für die Auto-Station-Suche
USB / TF / BT-Modus: Kurz drücken: Wiedergabe / Pause
DAB-Modus: Kurz drücken: Sender wählen - Drücken und
halten: Automatische Sendersuche
Alarm-Modus: Kurz drücken: Schlummer-Einstellungen und
Schlummer-Zeit eingeben
7. Vorheriger Titel / Überspringen - / Lautstärke -
8. Lautsprecher
9. IR-Empfänger (zur Verwendung mit Fernbedienung - nicht im
Lieferumfang enthalten)
10. Modus / Licht: Kurzes Drücken schaltet zwischen DAB / UKW /
BT / USB / SD / AUX um
Drücken und halten, um die Bildschirmhelligkeit zu ändern
11. Schlaf / Voreinstellung
DAB / FM-Modus: Kurz Drücken: Voreinstellungsmenü öffnen
- Gedrückt halten, um den aktuellen Sender als Voreinstellung
zu speichern
12. Nächster Titel / Überspringen + / Lautstärke +
13. AUX-Audioeingang
14. Reset-Taste
15. FM / DAB-Radioantenne
16. USB OUT-Ladeanschluss / USB-Player
17. LED Ladeanzeige
18. Micro USB IN Ladeanschluss
19. Micro SD-Kartensteckplatz

-23-

-24-
DIE BATTERIE AUFLADEN
! Wir empfehlen Ihnen, die SB Woodbox Plus vor dem ersten
Gebrauch vollständig aufzuladen!
1. Schließen Sie das Micro-USB-Kabel an den Micro-USBLadeanschluss (18) an und stecken Sie das andere Ende des
Kabels in einen USB-Adapter mit mindestens 1A Ladekapazität.
Stecken Sie den Adapter in eine Steckdose.
2. Die rote LED-Anzeige (17) leuchtet auf, um anzuzeigen, dass
die Woodbox Plus jetzt geladen wird
3. Wenn die LED-Anzeige (17) grün leuchtet, ist das Gerät
vollständig geladen.
Wenn das Gerät geladen werden muss, leuchtet das Batteriesymbol
auf dem LED-Display (2) auf. Wenn Sie das Gerät nicht anschließen,
wird “Low Power, Please Charge!” Auf dem LED-Display (2) angezeigt.
! ACHTUNG: Die SB Woodbox Plus verfügt über eine
Energiesparfunktion im Bluetooth Modus: Wenn keine Musik
gespielt wird und 15 Minuten lang keine Tasten gedrückt wurden,
wechselt das Gerät automatisch in den Standby-Modus. !
EIN- / AUSSCHALTEN DES GERÄTS
Sie können das Gerät durch langes Drücken der Standby-Taste (5)
ein- oder ausschalten. Wenn das Gerät eingeschaltet ist und Sie
in den Standby-Modus wechseln möchten, drücken Sie kurz die
Standby-Taste (5). Wenn sich das Gerät im Standby-Modus bendet
und Sie es wieder einschalten möchten, drücken Sie kurz die
Standby-Taste (5).
MODUSAUSWAHL
Es gibt 6 verfügbare Modi: DAB / UKW / BT / USB / SD / AUX.
Um zwischen den Modi zu wechseln, drücken Sie kurz die ModeTaste (10).
1. DAB Mode:
Wählen Sie den DAB-Modus durch kurzes Drücken der Mode-Taste (10).
Halten Sie die Enter-Taste (6) gedrückt, um eine automatische
Sendersuche zu starten. Sobald diese Suche abgeschlossen ist,
werden alle gefundenen Stationen gespeichert.
Drücken Sie kurz die Preset-Taste (11), um die gespeicherten
Sender anzuzeigen, verwenden Sie Skip - (7) oder Skip + (12), um
zwischen Sendern zu wählen, und die Enter-Taste (6), um den
Sender auszuwählen und abzuspielen.
Drücken Sie kurz die Menü / Info-Taste (4), um Informationen zum
Sender zu erhalten. Um die Lautstärke einzustellen, drücken Sie
lange auf die Tasten Volume - (7) oder Volume + (12).
2. FM Mode
Wählen Sie den FM-Modus durch kurzes Drücken der Mode-Taste (10).
Halten Sie die Enter-Taste (6) gedrückt, um eine automatische
Sendersuche zu starten. Sobald diese Suche abgeschlossen ist,
werden alle gefundenen Stationen gespeichert.
Drücken Sie kurz die Preset-Taste (11), um die gespeicherten
Sender anzuzeigen, verwenden Sie Skip - (7) oder Skip + (12), um
zwischen Sendern zu wählen, und die Enter-Taste (6), um den
Sender auszuwählen und abzuspielen.
Zur Feinabstimmung: Kurzes Drücken von Skip - (7) oder Skip +
(12), um die aktuelle Frequenz mit 0,05 MHZ zu erhöhen oder zu
verringern.
Drücken Sie kurz die Menü / Info-Taste (4), um Informationen zum
Sender zu erhalten. Um die Lautstärke einzustellen, drücken Sie
lange auf die Tasten Volume - (7) oder Volume + (12).
3. Bluetooth ®
Wählen Sie den Bluetooth®-Modus durch kurzes Drücken der
Mode-Taste (10).
Öffnen Sie die Bluetooth®-Einstellungen Ihres Bluetooth®-Geräts

-25-
(Smartphone, Tablet, MP3-Player, ...) und suchen Sie nach Geräten
in der Nähe. Wählen Sie “SB W-box Plus” in der Liste und drücken
Sie auf Ihrem Bluetooth®-Gerät die Verbindungstaste. Sobald die
Geräte gekoppelt sind, zeigt das Display der SB Woodbox Plus
“Verbunden” an.
Drücken Sie Skip - (7) oder Skip + (12), um zwischen Ihren Songs
zu wechseln. Drücken Sie kurz die Eingabetaste (6), um Ihre Musik
anzuhalten oder abzuspielen. Um die Lautstärke einzustellen,
drücken Sie lange auf die Tasten Volume - (7) oder Volume + (12).
Im Bluetooth®-Modus können Sie auch Freisprechen tätigen.
Drücken Sie kurz die Eingabetaste (6), um zu antworten oder
aufzulegen. Um einen Anruf abzulehnen, drücken Sie kurz die
Preset-Taste (11).
Um die Bluetooth®-Verbindung abzubrechen, können Sie die
Verbindung auf Ihrem Bluetooth®-Gerät oder durch langes Drücken
der Enter-Taste (6) abbrechen.
4. USB Mode
Wählen Sie den USB-Modus durch kurzes Drücken der Mode-Taste (10).
Stecken Sie einen USB-Stick mit Audiodateien im MP3-Format in
den USB OUT-Ladeanschluss / USB-Player (16).
Drücken Sie kurz die Eingabetaste (6), um mit dem Abspielen der
Musik zu beginnen.
Drücken Sie Skip - (7) oder Skip + (12), um zwischen Ihren Songs
zu wechseln.
Drücken Sie kurz die Eingabetaste (6), um Ihre Musik anzuhalten
oder abzuspielen. Um die Lautstärke einzustellen, drücken Sie
lange auf die Tasten Volume - (7) oder Volume + (12).
Um einen anderen Wiedergabemodus zu wählen, drücken Sie lange
auf die Preset-Taste (11), um zwischen den folgenden Einstellungen
zu wechseln: REPEAT ALL (ALLE) - REPEAT SINGLE (SING) - RANDOM
(RAND).
5. SD / TF Mode
Wählen Sie den SD / TF-Modus durch kurzes Drücken der Mode-Taste (10).
Legen Sie eine Micro SD-Karte mit Audiodateien im MP3-Format in
den Micro SD-Kartensteckplatz (19) ein.
Drücken Sie kurz die Eingabetaste (6), um mit dem Abspielen der
Musik zu beginnen.
Drücken Sie Skip - (7) oder Skip + (12), um zwischen Ihren Songs
zu wechseln.
Drücken Sie kurz die Eingabetaste (6), um Ihre Musik anzuhalten
oder abzuspielen. Um die Lautstärke einzustellen, drücken Sie
lange auf die Tasten Volume - (7) oder Volume + (12).
Um einen anderen Wiedergabemodus zu wählen, drücken Sie lange
auf die Preset-Taste (11), um zwischen den folgenden Einstellungen
zu wechseln: REPEAT ALL (ALLE) - REPEAT SINGLE (SING) - RANDOM
(RAND).
6. AUX Mode
Wählen Sie den AUX-Modus durch kurzes Drücken der Mode-Taste (10).
Verbinden Sie das 3,5-mm-AUX-Kabel mit dem AUX-Eingang (13)
und das andere Ende mit Ihrem Musikgerät.
Wir empfehlen Ihnen, die Lautstärke auf Ihrem Musikgerät etwa auf
halber Lautstärke zu halten, da die SB Woodbox Plus über eigene
Lautstärkeregler verfügt. Um die Lautstärke einzustellen, drücken
Sie lange auf die Tasten Volume - (7) oder Volume + (12).
DATUMS- UND UHRZEITEINSTELLUNGEN
1. Einstellen der Uhrzeit
Stellen Sie sicher, dass das Gerät in jedem Wiedergabemodus
eingeschaltet ist. Halten Sie die Taste Info / Menu gedrückt
und wählen Sie mit den Tasten Skip - (7) oder Skip + (12)
“Hauptmenü”. Drücken Sie die Eingabetaste (6), um das Menü

-26-
aufzurufen, und drücken Sie erneut die Eingabetaste, um das
Untermenü “Zeiteinstellung” zu öffnen. Drücken Sie Enter (6)
Wenn “Set Clock” auf dem Display ist und verwenden Sie die
Skip - (7) oder Skip + (12) um die Stunden einzustellen, drücken
Sie erneut Enter (6) und benutzen Skip - (7) oder Skip + ( 12) um
die Minuten einzustellen. Bestätigen Sie mit der Enter-Taste (6).
2. Einstellen des Datums
Im Untermenü “Time Setup” können Sie mit Skip - (7) oder Skip
+ (12) zu “Set Date” gehen. Drücken Sie die Eingabetaste (6), um
das Datum mit den Tasten Skip - (7) und Skip + (12) einzustellen.
Um zwischen Tag, Monat und Jahr zu wechseln; Verwenden Sie
die Enter-Taste (6). Bestätigen Sie mit der Enter-Taste (6).
3. Automatische Aktualisierung
Sie können Datum und Uhrzeit automatisch mit den
übertragenen Funkdaten aktualisieren lassen. Sie können die
Einstellung auch anpassen, um keine aktualisierte Uhrzeit und
Datum zu erhalten. Bestätigen Sie mit der Enter-Taste (6).
4. 12/24 Uhr
Im Untermenü “Time Setup” können Sie mit Skip - (7) oder Skip
+ (12) zu “12/24 hour” wechseln. Drücken Sie Enter (6), um die
Zeitnotation mit den Tasten Skip - (7) und Skip + (12) zu ändern.
Bestätigen Sie mit der Enter-Taste (6)
WECKER FUNKTION
Die SB Woodbox Plus kann bis zu 4 Alarme haben. Stellen Sie
sicher, dass das Gerät in jedem Wiedergabemodus eingeschaltet
ist. Halten Sie die Taste Info / Menu gedrückt und wählen Sie mit
den Tasten Skip - (7) oder Skip + (12) “Hauptmenü”. Drücken Sie
die Eingabetaste (6), um das Menü aufzurufen, und drücken Sie die
Eingabetaste erneut, um das Untermenü “Alarm” zu öffnen.
Wählen Sie den gewünschten Alarm (1, 2, 3 oder 4) und bestätigen
Sie mit der Eingabetaste (6).
Mit den Tasten Skip - (7) und Skip + (12) können Sie nun die Stunde
für den Alarm einstellen, um zu bestätigen oder von Stunde zu
Minute zu wechseln, verwenden Sie die Enter-Taste (6).
Sie können auch die Dauer ändern (15, 30, 60, 90, 120). Bestätigen
Sie mit der Enter-Taste (6).
Sie können auch die gewünschte Soundbenachrichtigung auswählen:
USB / SD: spielt Musik von Ihrer USB- oder SD-Karte ab
Buzzer: Signalton “Beep Beep”
FM: Wiedergabe von Musik vom UKW-Radio
DAB: spielt Musik von DAB-Radio
Sie können jetzt den Alarmkalender auswählen:
Einmal: Ihr Alarm wird einmal ausgelöst und das Datum des Alarms
mit den Tasten Skip - (7) und Skip + (12) eingestellt. Drücken Sie die
Eingabetaste (6) zur Bestätigung.
Wochenenden: Der Alarm wird an jedem Wochenende (Samstag,
Sonntag) ausgelöst. Drücken Sie die Eingabetaste (6) zur
Bestätigung.
Wochentage: Der Alarm wird an jedem Wochentag (Mo, Di, Mi, Do,
Fr) ausgelöst. Drücken Sie Enter (6) zur Bestätigung.
Täglich: Alarm wird jeden Tag ausgelöst. Drücken Sie die
Eingabetaste (6) zur Bestätigung.
Nach dem Einstellen des Alarmkalenders können Sie auch die
Alarmlautstärke ändern, indem Sie die Tasten Skip - (7) und Skip +
(12) drücken und mit Enter (6) bestätigen.
Nachdem Sie die Lautstärkeeinstellungen angepasst haben,
können Sie den Alarm aktivieren oder deaktivieren. Verwenden Sie
die Tasten Skip - (7) und Skip + (12), um zwischen ON / OFF zu
wechseln und bestätigen Sie mit Enter (6).

-27-
! Achtung, wenn Ihr Alarm auf die gleiche Quelle wie der aktuelle
Wiedergabemodus eingestellt ist; Der Alarmton wird automatisch
“Summer”!
Um den Wecker zu dösen (für 5, 10, 15 oder 30 Minuten), drücken
Sie kurz die Schlummertaste (6). Um den Alarm zu stoppen, gehen
Sie zurück in das Menü und deaktivieren Sie den Alarm (wie in den
obigen Schritten beschrieben).
SYSTEMEINSTELLUNGEN
Um in die Systemeinstellungen zu gelangen, drücken Sie lange die
Taste Info / Menu (4).
Drücken Sie kurz Skip - (7) oder Skip + (12), um das FunktionsUntermenü zu wählen, und drücken Sie kurz die Enter-Taste (6),
um das ausgewählte Untermenü zu öffnen. Bestätigen Sie mit der
Enter-Taste (6).
1. Schlaf-Funktion
Das Gerät verfügt über eine automatische Schlaffunktion
(Auto-OFF). Sie können wählen zwischen:
OFF - 15 - 30 - 45 - 60 - 90 Minuten. Bestätigen Sie mit der Enter-
Taste (6).
2. Alarmfunktion
Die Alarmfunktion hat vier Alarmgruppen mit 5 Soundoptionen,
die Sie hier auswählen können:
- USB (spielt Musik von USB)
- SD (Musik von SD-Karte abspielen)
- Summer (Summerton)
- DAB (spielt Musik von DAB Radio)
- FM (spielt Musik vom FM-Radio)
3. Uhr Funktion
Die Uhrfunktionseinstellung hat drei Arten von Hintergrund-
helligkeitsstufen, die Sie hier einstellen können.
4. EQ-Einstellungen
Sie können hier Ihre Equalizer-Einstellungen anpassen.
5. Sprache einstellen
Sie können hier Ihre bevorzugte Sprache auswählen.
6. Zurücksetzen auf Werkseinstellungen
Mit dieser Funktion können Sie das Gerät auf Werkseinstellungen
zurücksetzen.
7. Firmware-Version
Sie können Ihre Firmware-Version hier überprüfen.
ZURÜCKSETZEN
Um das Gerät zurückzusetzen, drücken Sie die Reset-Taste (14) mit
einer Büroklammer oder einem kleinen Stift.
Bitte beachten Sie, dass beim Zurücksetzen des Geräts alle
gespeicherten Sender gelöscht und automatische Scans wiederholt
werden müssen.
KUNDENDIENST
Für alle produktbezogenen Fragen wenden Sie sich bitte an
unseren Support: support@stereoboomm.be
GARANTIE
STEREOBOOMM ist ein eingetragenes Warenzeichen der TEGroup NV. Die Marke STEREOBOOMM steht für hochwertige
Produktqualität und herausragenden Kundendienst. Aus diesem
Grund bietet STEREOBOOMM für dieses Gerät eine Garantie auf alle
Schäden an Material und fachlichen Arbeiten für einen Zeitraum
von zwei (2) Jahren ab dem Datum des Originalkaufs des Produktes.

-28-
 Loading...