

Page 1
1
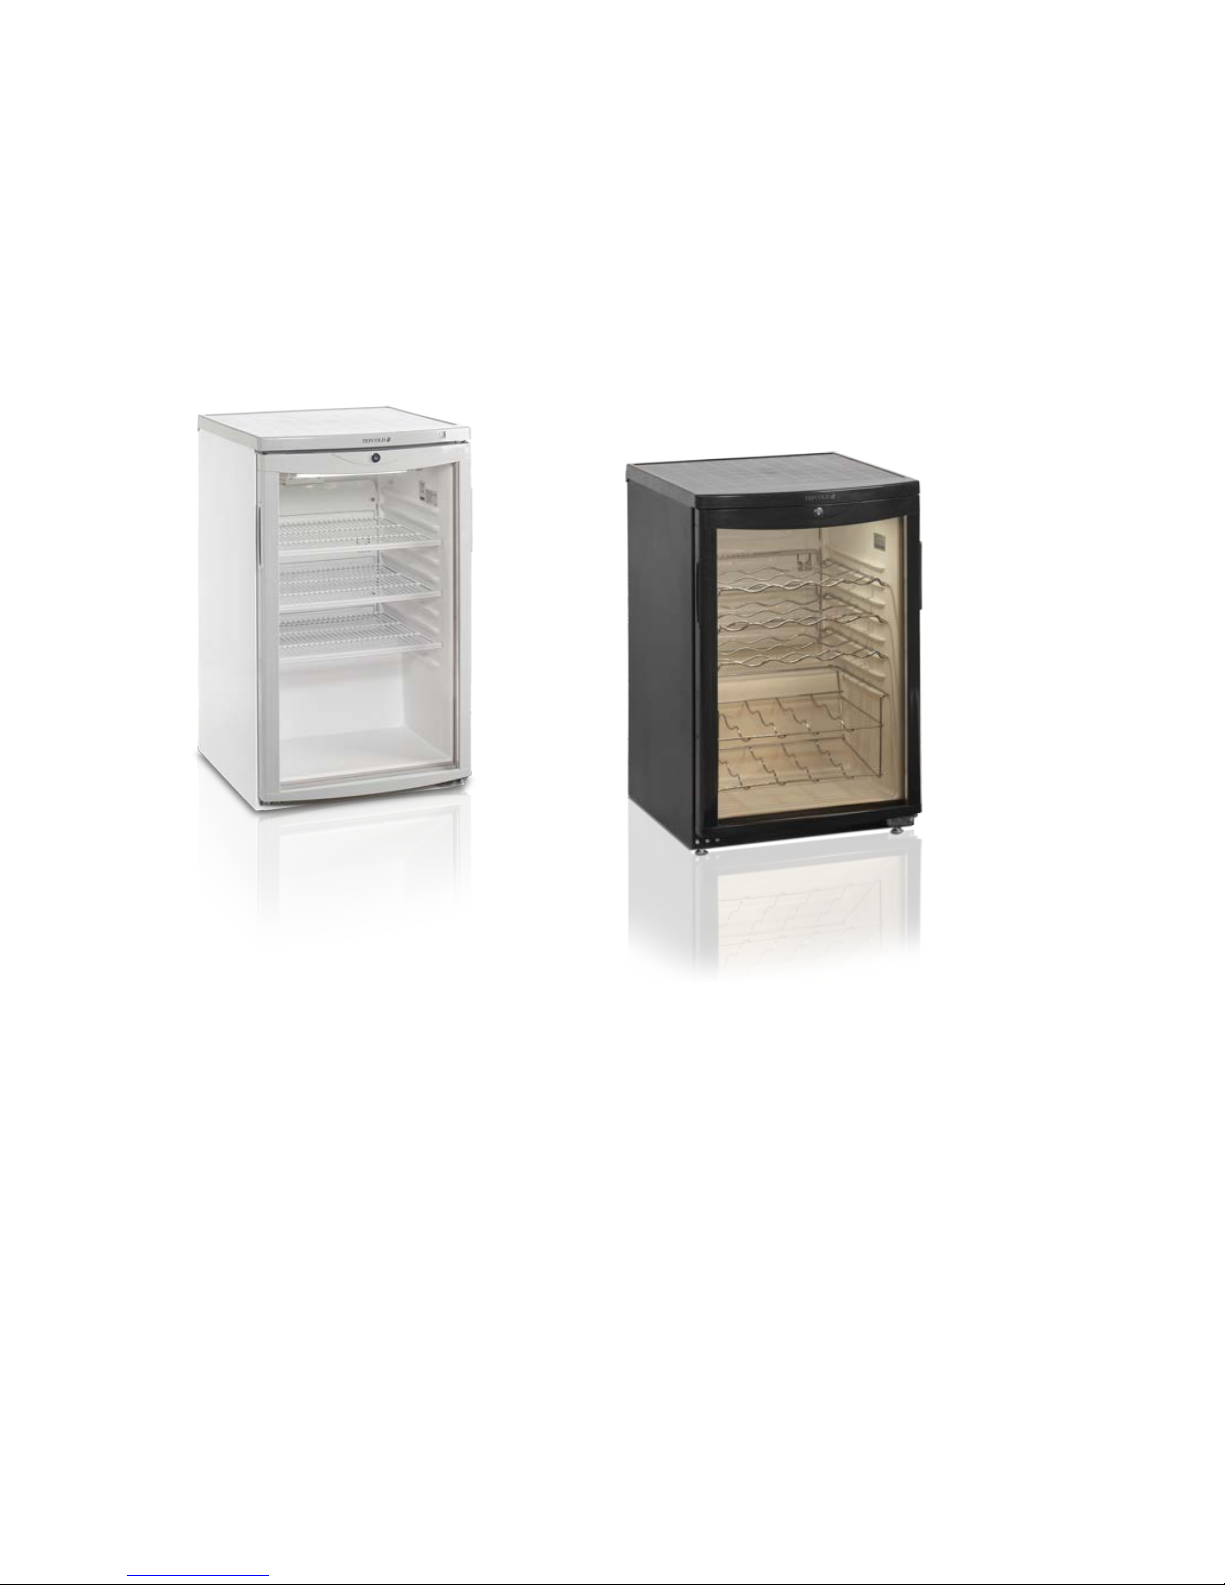
Model:
BC85I-BC85I W/F-BC145I-BC145I W/F-SC85I-SC145I
Users manual
UK
4
Bedienungsanleitung
DE
10
Manuel d’utilisation
FR
16
Manual de Instrucciones
E
22
Manual de Instruções
PT
29
161105-rfj
Page 2

2
TABLE OF CONTENTS
Introduction 4
Reference Information 4
Important Safety Precautions 5
Installation 5
Product Parts and Features 6
How to Operate 6
Reversing the Door 7
Proper Bottle cooler Care and Cleaning 8
Warranty 8
Circuit Diagram 9
INHALTSVERZEICHNIS
Einleitung 10
Informationen zur späteren Bezugnahme 10
Wichtige Vorsichtsmaßnahmen 11
Aufstellung 11
Einzelteile und Ausstattungsmerkmale 12
Betrieb 12
Türanschlag wechseln 13
Korrekte Handhabung und richtige Reinigung des Flaschenkühlschranks 14
Garantie 14
Schaltplan 15
TABLE DES MATIÈRES
Introduction 16
Informations de référence 16
Consignes de sécurité importantes 17
Installation 17
Pièces et caracteristiques du produit 18
Comment faire fonctionner l’armoire réfrigérée pour bouteilles 19
Inversion de la porte (En option) 19
Entretien et nettoyage adéquats de l’armoire réfrigérée pour bouteilles 20
Garantie limitée 20
Schéma de connexions 21
Page 3

3
ÍNDICE
Introducción 23
Información de referencia 23
Precauciones de seguridad importantes 24
Instalación 24
Partes y características del producto 25
Cómo manejar el dispositivo 25
Inversión de la puerta 26
Conservación y limpieza adecuadas del refrigerador de botellas 27
Garantía 27
Diagrama de circuitos 28
ÍNDICE
Introdução 29
Informação de Referência 29
Precauções de Segurança Importantes 30
Instalação 30
Peças e Funcionalidades do Produto 31
Modo de Operação 31
Inversão da Posição da Porta 32
Manutenção e Limpeza do Refrigerador de Garrafas 33
Garantia 33
Diagrama de Circuito 34
Page 4

4
INTRODUCTION
Thank you for choosing our bottle cooler. This unit is designed to improve your living and entertaining
comfort. With its silent operation and unique design, you will enjoy the convenience and comfort for years to
come.
IMPORTANT SAFETY PRECAUTIONS
Before you use your cooler please read this instruction manual carefully.
This appliance can be used by children aged from 8 years and above and persons with reduced physical,
sensory or mental capabilities or lack of experience and knowledge if they have been given supervision or
instruction concerning use of the appliance in a safe way and understand the hazards involved. Children shall
not play with the appliance. Cleaning and user maintenance shall not be made by children without
supervision.
The instructions concerning persons (including children) with reduced physical, sensory or mental
capabilities or lack of experience and knowledge and children playing with the appliance are not required.
Do not store explosive substances such as aerosol cans with a flammable propellant in this appliance.
WARNING: Keep clear of obstruction all ventilation openings in the appliance enclosure or in the structure
for building-in.
WARNING: Do not use mechanical devices or other means to accelerate the defrosting process, other than
those recommended by the manufacturer.
WARNING: Do not damage the refrigerant circuit.
WARNING: Do not use electrical appliances inside the food storage compartments of the appliance, unless
they are of the type recommended by the manufacturer.
The refrigerant is R-600a and insulation blowing gases is cyclopentane, servicing and disposal of appliance
should be done by qualified person.
The LED light only must be replaced by the manufacturer.
Appliance information
1) Climatic class: 4, the user should use the appliance below 32℃.
2) The max load for each shelf is 30 kg.
3) The A-weighted emission sound pressure level is below 70 dB(A).
This Symbol means risk of fire and flammable materials used in appliance.
UK
Page 5

5
1) Repair or replace immediately, all electric service cords that have become frayed or otherwise damaged.
Do not use a cord that shows cracks or abrasion damage along its length, the plug or the connector end.
2) Unplug your cooler before cleaning or before making any repairs.
NOTE: If for any reason this product requires service, we strongly recommend that a certified technician
perform the service.
3) Do not operate your cooler in the presence of explosive fumes.
4) The power supply must be properly grounded.
5) Do not use an adapter plug or extension cord.
6) Do not use the unit in the immediate surroundings of a bath, shower or swimming pool.
7) Before discarding or storing, we recommend that you remove the door and leave the shelves in place. This
will reduce the possibility of dang e r to ch i ldren.
8) Do not store food in cooler as the interior temperature may not be cool enough to prevent spoilage.
INSTALLATION
It is advisable to clean the inside of the cooler with lukewarm water using a mild detergent, and then
to dry it thoroughly prior to use.
The temperature in the appliance will depend on:
The temperature in the room
The frequency and duration of periods when the door is open
How many items there are in the cooler.
It may therefore be necessary to adjust the thermostat from time to time.
The refrigeration system o f the cabinet is designed to operate with the cabinet located on a flat surface.
Avoid tilting the cabinet side.
If the cabinet must be tilted on an angle for handling or moving purposes, allow it to sit in an upright position
20 to 30 minutes prior to plugging it in and starting the cooling of the storage compartment.
Grounding plug and socket should be provided in accordance with local regulations. The cable-size should
meet the cooler’s requirements. The unit must be connected to proper electrical network, which is shown on
the nameplate, through an omnipolar circuit-breaker. To assure the proper function of the cooler, please
observe the following recommended.
1) To ensure the circulation, the unit should be kept at 2 cm, away from the wall.
2) Locate the unit away from direct sunlight. This will enable you to obtain the best performance and save
energy.
3) Under no circumstances should the top grid be covered by any object. It will preclude the warm air from
circulating.
Page 6
6
Unpaking Your Cooler
1. Remove all packing material. This includes the foam base and all adhesive tape.
2. Inspect and remove any remains of packing, tape or printed materials before powering on the cooler.
Leveling Your Cooler
1. There are four leveling legs which are located in the front and rear corners of your cooler. After properly
placing your cooler in its final position, you can level your cooler.
2. Leveling legs can be adjusted by turning them clockwise to raise your cooler or by turning them
counterclockwise to lower your cooler. The cooler door will close easily when the leveling legs are
extended.
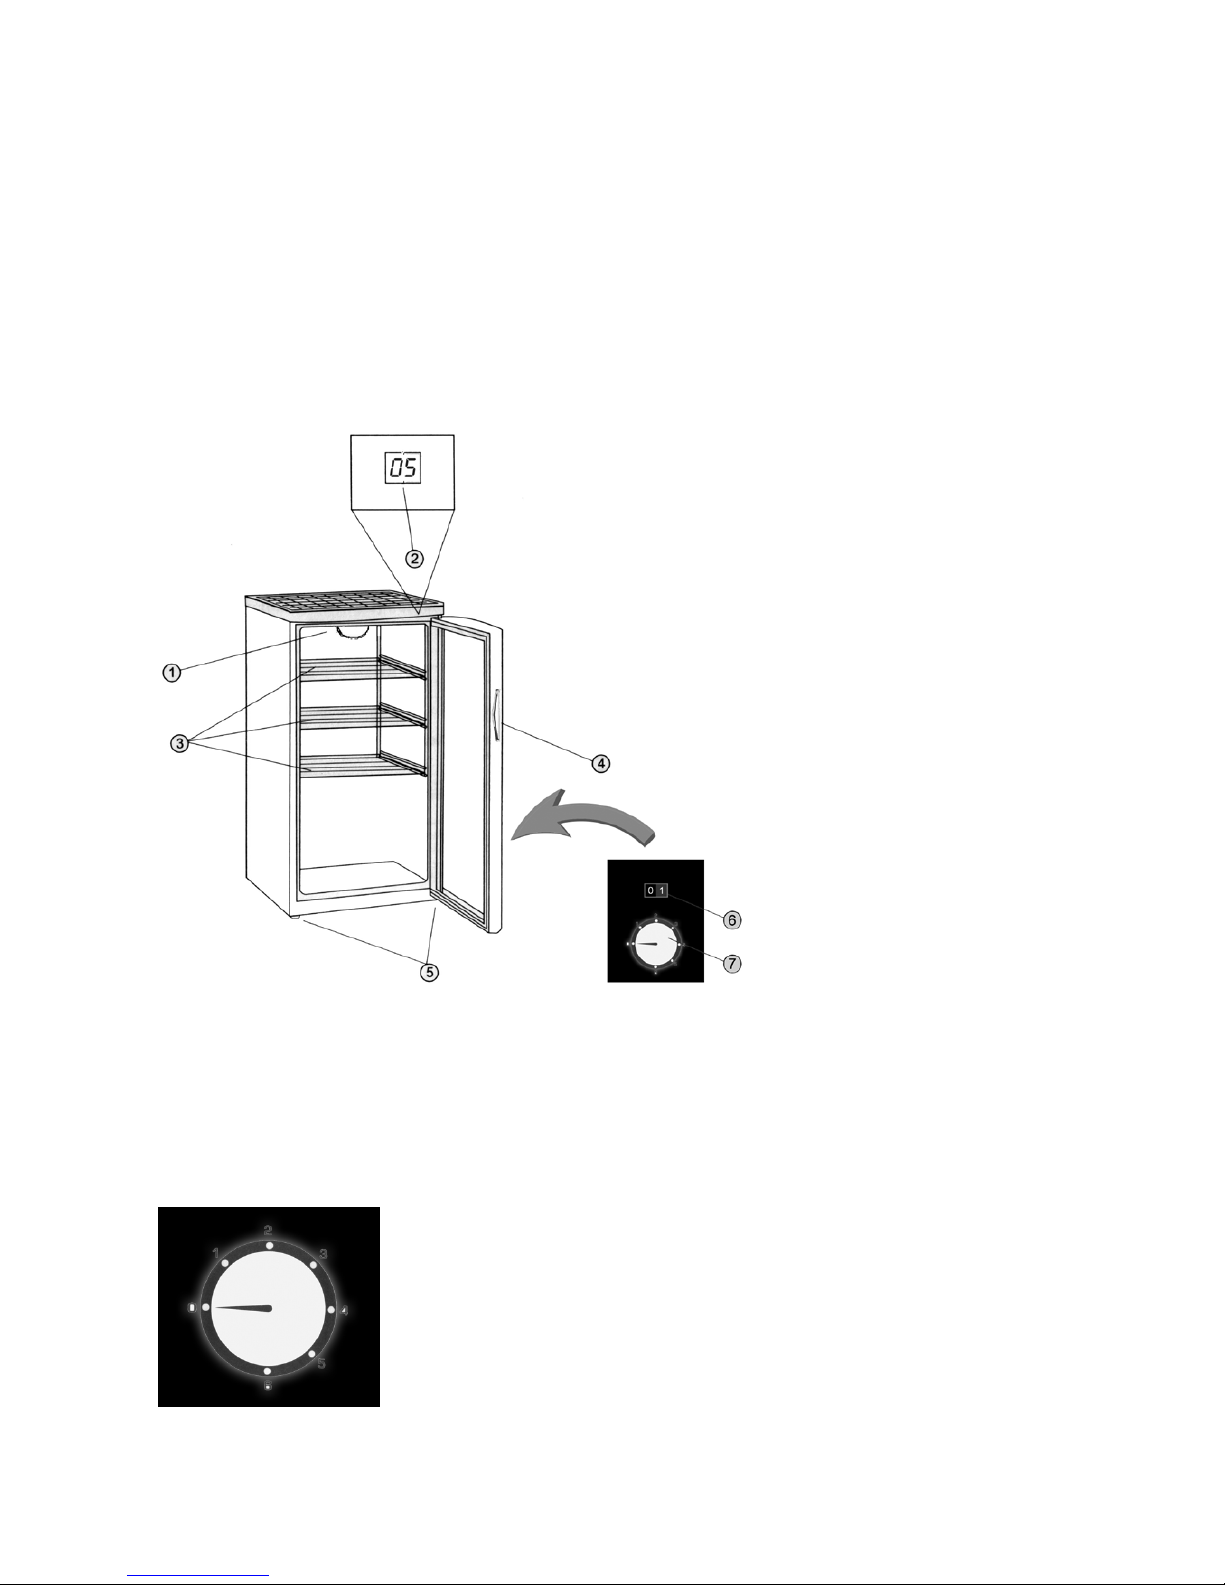
PRODUCT PARTS AND FEATURES
HOW TO OPERATE BOTTLE COOLER
1. Insert the power plug into wall outlet.
2. To adjust the temperature turn thermostat knob at the back of the cabinet.
Temperature Control
The inner temperature ranges from 0 °C to 10 °C. You can turn the
thermostat knob to have your desired temperature. Turn the knob
clockwise; which the position varies from 1 to 6, you can get a lower
temperature inside. Turn the position to 0; you will switch off your
appliance.
① LED Light
② Thermometer
③ Shelves
④ Handle
⑤ Leveling legs
⑥ Light switch
⑦ Thermostat
Page 7
7
Interior light
To compliment the look of your collection, a LED light has been built into the bottle cooler. Simply turn the
switch button and the light comes on, turn again counteractively for off. For maximum energy efficiency,
leave light off when not viewing your collection.
Normal Operating Sounds you may hear
Boiling water, gurgling sounds or slight vibrations is due to the refrigerant circulating through the cooling
coils.
The thermostat control will click when it cycles on and off.
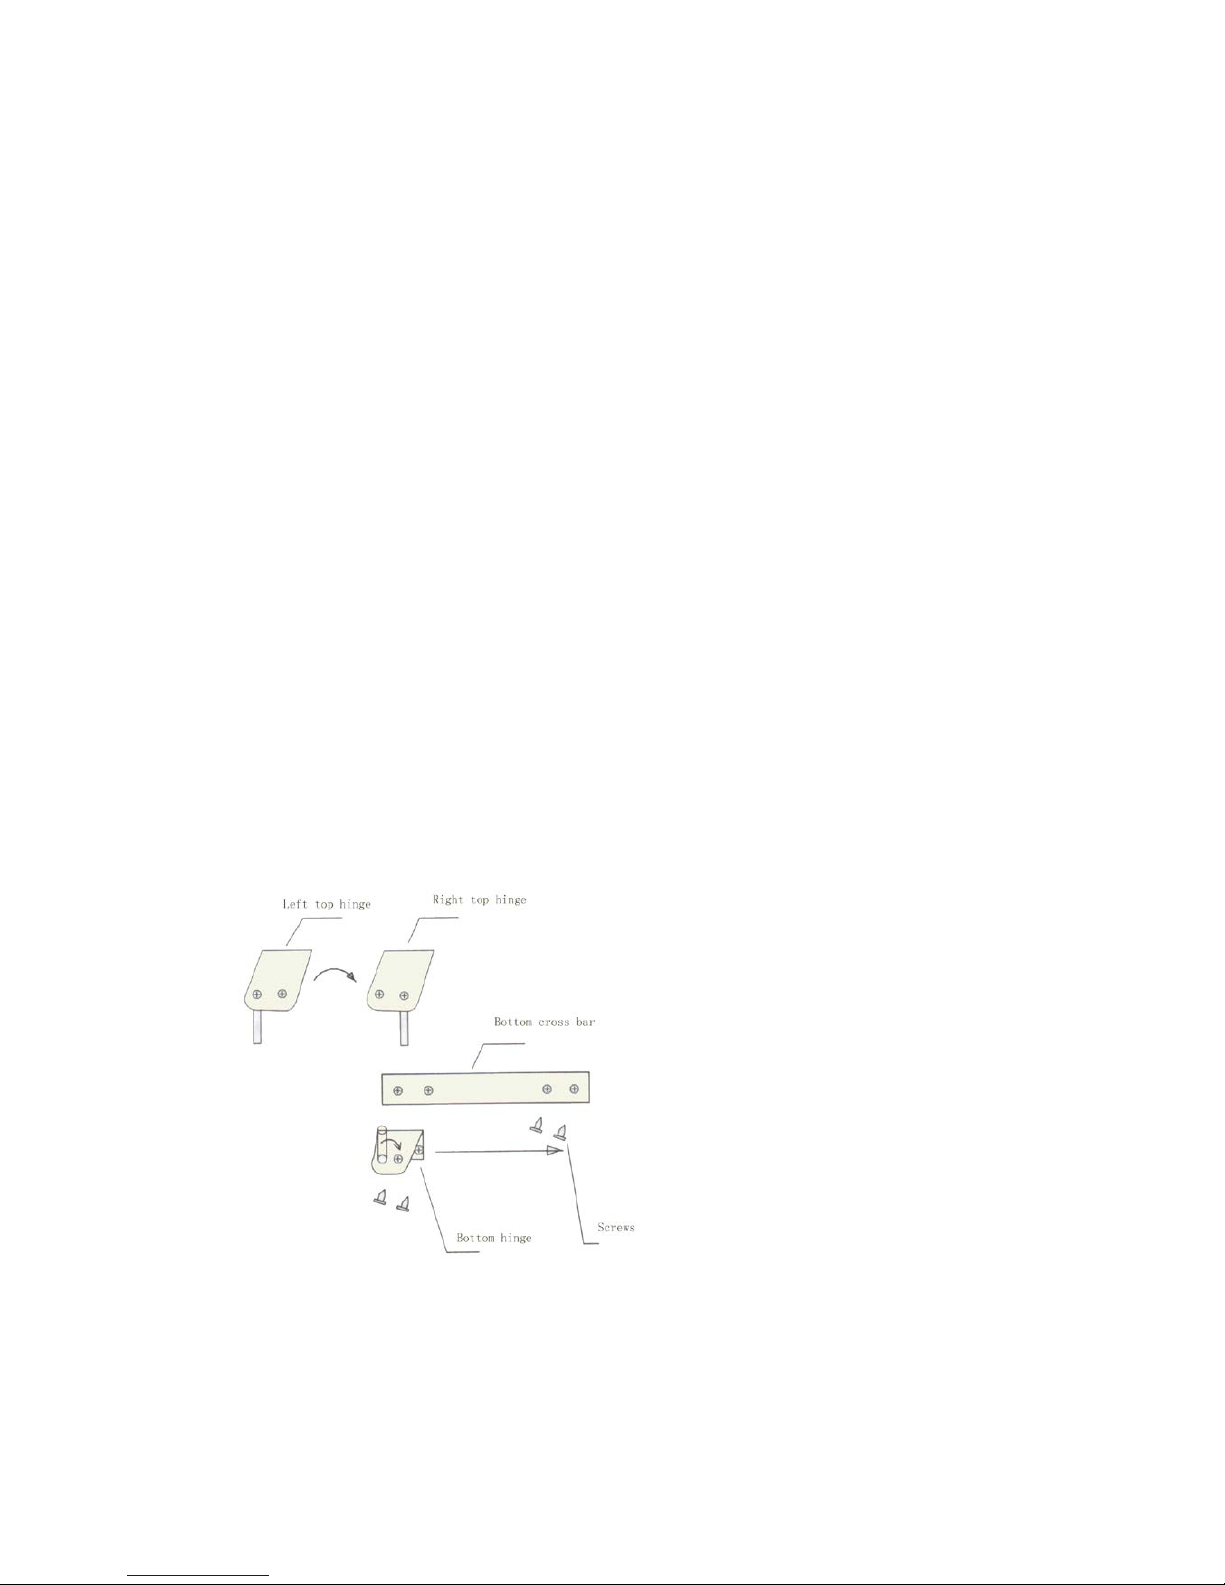
REVERSING THE DOOR (OPTION)
How to reverse the door
Remove the lower hinge by loosening and removing the screws with screwdriver.
Carefully lower the door and remove it.
Move the pivot pin to the opposite hole on the lower hinge.
Move the pivot pin from the left top hinge to the opposite hole on the right top hinge.
Remove the two screws from the right holes in the bottom cross bar.
Take the door. Insert the lower hinge axle into the right bottom hole of the door; make the right hole of
the door into the right top hinge axle.
Adjust the door; make it straight and in alignment with the cabinet.
Fix the lower hinge with two screws.
Cover the left holes in the bottom cross bar with two screws.
Note: As the door gasket gets pressed-in during shipment, after reversing the door the gasket might have to
be reset. This will be good for seal to avoid any air escaping. If there is a gap between the cabinet and the
door gasket, set the gasket by gently pulling it out to seal the gap. If necessary, you are recommended also to
use a hairdryer to warm the gasket to get rid of the gap.
Page 8

8
PROPER BOTTLE COOLER CARE AND CLEANING
Warning: To avoid electric shock always unplug you cooler before cleaning. Ignoring this warning may
result in injury .
General: Do not use harsh chemicals, abrasiv es, ammonia, chlorine bleach, concentrated detergents, solvents
or metal scouring pads. SOME of these chemicals may dissolve, damage and/or discolor your cooler.
1) Remove the contents of the appliance
2) Wipe the inside and outside surfaces with a damp cloth. The addition of vinegar to the
water is good for the prevention of mold and fungus.
3) Wipe all parts thoroughly after the cleaning.
IMPORTANT:
When the cooler is not in use it must be completely dry inside to avoid mold growth (if possible have the
door open).
LIMITED WARRANTY
As a condition to any warranty service obligation, the consumer must present this Warranty Certificate along
with a copy of the original purchase invoice.
THIS WARRANTY DOES NOT COVER:
1) Damage, accidental or otherwise, to the cooler while in the possession of a consumer not caused by a
defect in material or workmanship.
2) Damage caused by consumer misuse, tampering, or failure to follow the care and special handling
provisions in the instructions.
3) Damage to the finish of the case, or other appearance parts caused by wear
4) Damage caused by repairs or alterations of the cooler by anyone other than those authorized by the
manufacturer.
5) Freight and Insurance cost for the warranty service
ALL WARRANTIES, INCLUDING ANY IMPLIED WARRANTY OF MERCHANT-ABILITY ARE
LIMITED TO CLAIMED DURATION. THE MANUFACTURER DISCLAIMS ANY LIABILITY FOR
CONSEQUENTIAL OR INCIDENTAL DAMAGES.
Page 9
9
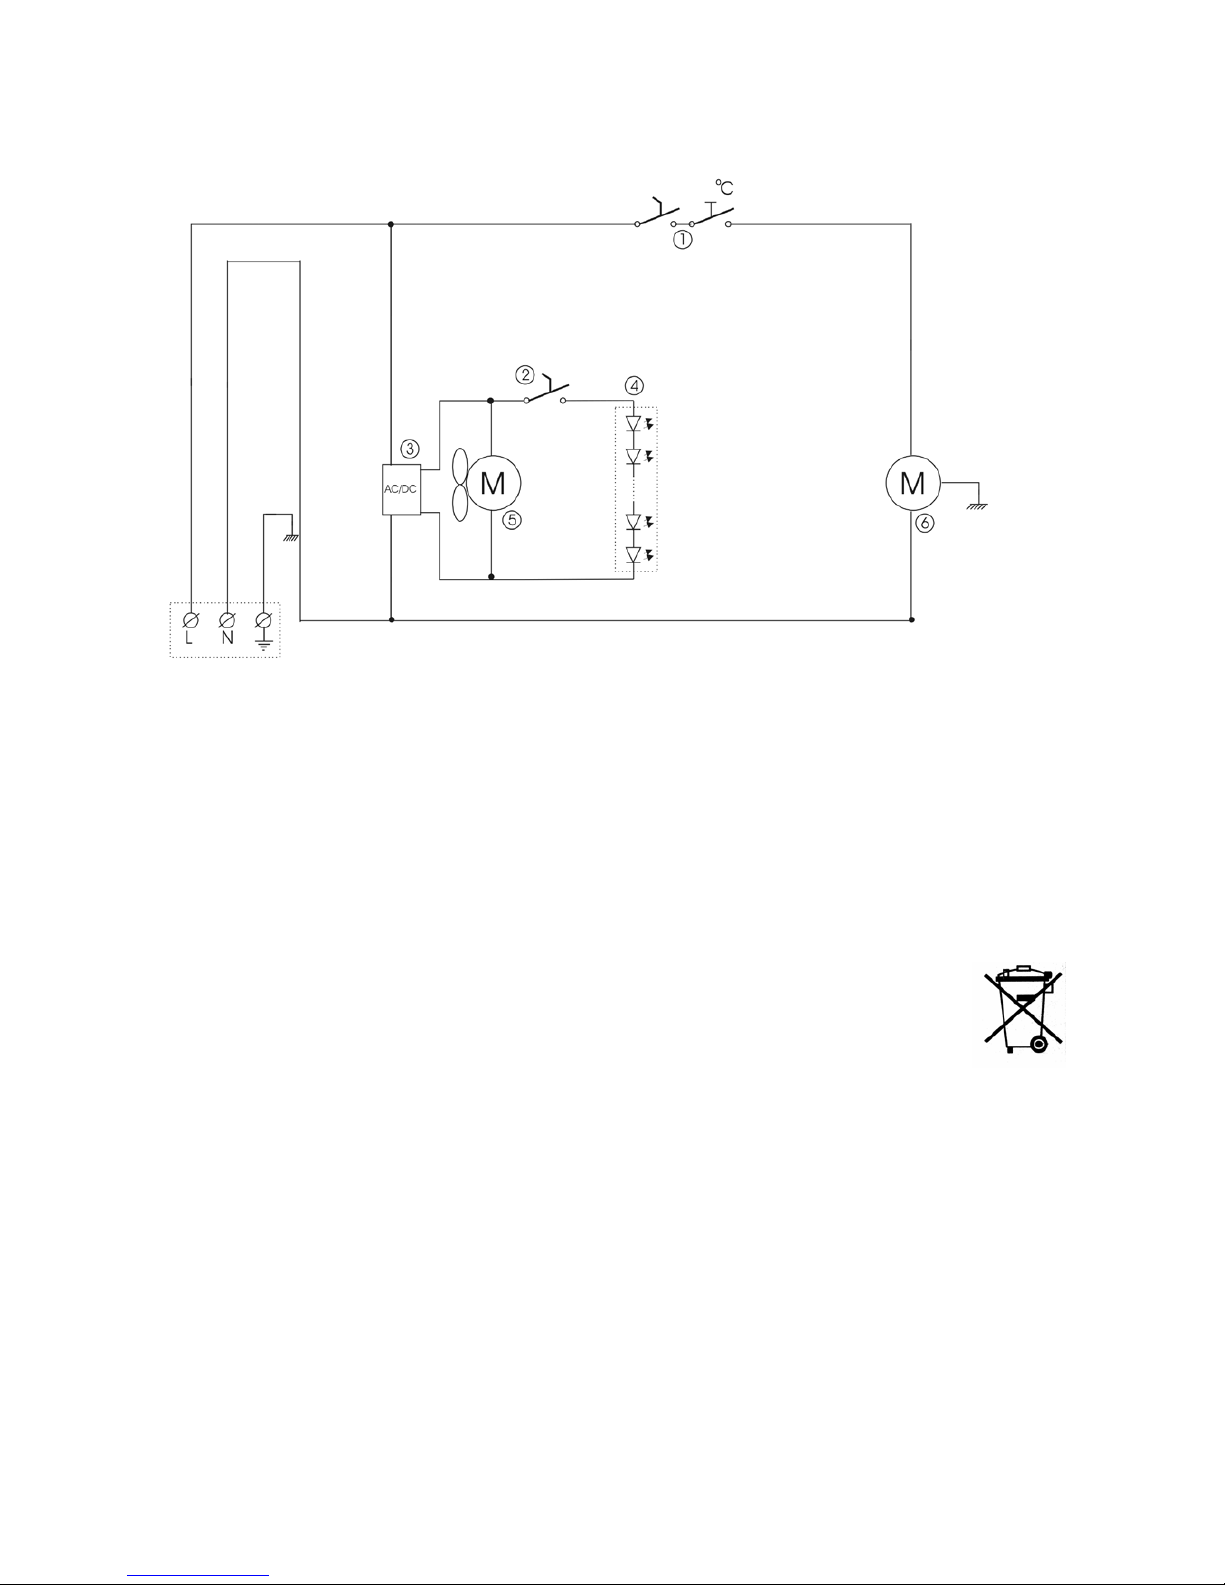
CIRCUIT DIAGRAM
① Thermostat
② Light switch
③ LED power supply
④ LED light
⑤ Fan (BC145WF only)
⑥ Compressor
Disposal
Disposal of the cabinet must take place in an environmentally correct way. Please note existing regulation on
disposal. There may be special requirements and conditions which must be observed.
Page 10

10
EINLEITUNG
Wir bedanken uns, dass Sie sich für unseren Flaschenkühlschrank entschlossen haben. Bei diesem Gerät
stand der Gedanke an Ihren Lebens- und Bewirtungs-Komfort im Vordergrund. Durch seinen geräuschlosen
Betrieb sowie sein einzigartiges Design werden Sie jahrelang Freude an der leichten Handhabung und dem
Komfort Ihres Flaschenkühlschranks haben.
Bitte lesen Sie diese Hinweise vor Inbetriebnahme des Geräts genau durch. Treffen Sie immer grundlegende
Vorsichtsmaßnahmen bei der Benutzung dieses Geräts.
Diese benutzerfreundliche Bedienungsanleitung wird Sie bei der optimalen Nutzung Ihres
Flaschenkühlschranks unterstützen.
INFORMATIONEN ZUR SPÄTEREN BEZUGNAHME
Bitte füllen Sie die folgenden Informationen zur späteren Bezugnahme aus. Sie benötigen diese, um
Garantieleistungen zu erhalten.
Modellbezeichnung*: __________________________________
Seriennummer*: __________________________________
Kaufdatum: __________________________________
Kaufort: _________________________________
*Die oben genannten Informationen befinden sich auf dem Typenschild, das sich auf der Innenseite des
Kühlschranks befindet. Bewahren diese Bedienungsanleitung zusammen mit Ihrer Quittung als
Kaufnachweis auf.
D
Page 11

11
WICHTIGE VORSICHTSMASSNAHMEN
Bevor Sie den Flaschenkühlschrank in Betrieb nehmen, lesen Sie bitte sorgfältig die
Bedienungsanleitung.
Benutzen Sie dieses Gerät nur für den in dieser Bedienungsanleitung beschriebenen Gebrauchszweck.
Dieser Flaschenkühlschrank muss vor Inbetriebnahme entsprechend den Installationsanweisungen korrekt
installiert werden.
Ziehen Sie den Netzstecker des Flaschenkühlschranks nie durch Ziehen am Stromkabel heraus. Halten Sie
den Netzstecker immer gut fest und ziehen Sie ihn gerade aus der Steckdose.
1) Reparieren oder ersetzen Sie sofort alle Elektrokabel, die durchgescheuert oder anderweitig beschädigt
sind. Benutzen Sie kein Netzkabel, das Bruch- oder Abriebstellen entlang der Länge, am Stecker oder
Anschlussende aufweist.
2) Ziehen Sie den Stecker des Flaschenkühlschranks erst heraus, bevor Sie diesen reinigen oder reparieren.
HINWEIS: Falls dieses Produkt aus irgendeinem Grund repariert werden muss, empfehlen wir dringend,
diese Reparatur von einem geprüften Techniker durchführen zu lassen.
3) Betreiben Sie Ihren Flaschenkühlschrank nicht in Gegenwart von explosiven Dämpfen.
4) Der Netzanschluss muss ordnungsgemäß geerdet sein.
5) Benutzen Sie keinen Zwischenstecker und kein Verlängerungskabel.
6) Benutzen Sie das Gerät nicht in unmittelbarer Nähe einer Badewanne, Dusche oder eines Schwimmbades.
7) Bevor Sie das Gerät entsorgen oder lagern, empfehlen wir, die Tür abzubauen und die Regale eing ebau t
zu lassen. Hierdurch wird die Möglichkeit einer Gefahr für Kinder verringert.
8) Bewahren Sie keine Lebensmittel im Flaschenkühlschrank auf, da die Innentemperatur unter Umständen
nicht niedrig genug ist, um sie vor Verderb zu schützen.
AUFSTELLUNG
Es ist empfehlenswert, den Flaschenkühlschrank mit lauwarmem Wasser unter Verwendung eines
milden Reinigungsmittels von innen zu reinigen und ihn vor Gebrauch gründlich abzutrocknen.
Die Temperatur im Gerät hängt von Folgendem ab:
der Raumtemperatur
der Häufigkeit und Zeit, wenn die Tür auf ist
wie viele Flaschen und andere Dinge sich im Flaschenkühlschrank befinden.
Deshalb muss der Temperaturregler also unter Umständen von Zeit zu Zeit neu eingestellt werden.
Das Kühlsystem des Schranks wurde für den Betrieb auf einer ebenen Unterlage konstruiert.
Vermeiden Sie, den Kühlschrank seitlich zu kippen.
Falls der Kühlschrank bei der Handhabung oder beim Versetzen auf die Seite gekippt werden muss, lassen
Sie ihn 20 bis 30 Minuten lang aufrecht stehen, bevor Sie ihn einstecken und mit der Kühlung des Kühlfachs
beginnen.
Schukostecker und Steckdose müssen gemäß örtlichen Vorschriften vorgesehen sein. Der Kabelquerschnitt
muss den Anforderungen des Flaschenkühlschranks entsprechen. Das Gerät muss an ein dafür zugelassenes
Stromnetz, das auf dem Typenschild angegeben ist, über einen mehrpoligen Leistungsschutzschalter
angeschlossen werden. Um eine ordnungsgemäße Funktion des Flaschenkühlschranks zu gewährleisten,
beachten Sie bitte die folgenden Empfehlungen.
1) Um für Luftzirkulation zu sorgen, muss das Gerät 2 cm von der Wand abgerückt werden.
2) Setzen Sie das Gerät nicht direkter Sonneneinstrahlung aus. Hierdurch erzielen Sie optimale Leistung
und sparen Strom.
3) Unter keinen Umständen darf das obere Gitter durch etwas abgedeckt werden. Ansonsten kann die
Warmluft nicht mehr zirkulieren.
Page 12

12
Auspacken des Flaschenkühlschranks
1) Entfernen Sie das gesamte Verpackungsmaterial. Hierzu gehören der Schaumstoffboden und das
Klebeband.
2) Schauen Sie nach verbliebenem Verpackungsmaterial, Klebeband oder gedruckten Materialien und
entfernen Sie diese, bevor Sie den Flaschenkühlschrank einschalten.
Nivellierung Ihres Flaschen küh lsch rank s
1) Der Flaschenkühlschrank hat vier höhenverstellbare Stellfüße, die sich an den vorderen und hinteren
Ecken befinden. Nachdem Sie Ihren Flaschenkühlschrank sachgemäß in die Endposition gebracht
haben, können Sie den Flaschenkühlschrank nivellieren.
2) Sie können Ihren Flaschenkühlschrank durch Drehen der höhenverstellbaren Stellfüße im
Uhrzeigersinn anheben oder durch Drehen gegen den Uhrzeigersinn senken. Die Tür des
Flaschenkühlschranks lässt sich leicht schließen, wenn die höhenverstellbaren Stellfüße etwas
rausgeschraubt sind.
EINZELTEILE UND AUSSTATTUNGSMERKMALE
BETRIEB DES FLASCHENKÜHLSCHRANKS
1. Stecken Sie den Netzstecker in die Steckdose.
2. Zur Temperaturregelung drehen Sie den Temperaturregler.
Temperaturregelung
Die Innentemperatur reicht von 0 °C bis 10 °C. Sie können den
Temperaturregler auf Ihre gewünschte Temperatur einstellen. Drehen
Sie den Regler im Uhrzeigersinn, wobei die Innentemperatur sinkt. Es
gibt 6 Einstellungsstufen. Wenn Sie den Regler auf 0 stellen, schalten
Sie das Gerät dadurch aus.
① LED licht
② Thermometer
③ Regale
④ Griff
⑤ Stellfüße
⑥ Lichtschalter
⑦
Temperaturregler
Page 13

13
Innenbeleuchtung
Um die Ästhetik Ihrer Sammlung zu unterstreichen, wurde eine LED Beleuchtung in Ihren
Flaschenkühlschrank integriert. Drehen Sie den Schalterknopf einfach und das Licht geht an. Drehen Sie ihn
wieder zurück und das Licht geht aus. Für maximale Energieeffizienz lassen Sie das Licht aus, wenn Sie
Ihre Sammlung nicht präsentieren.
Normale Betriebsgeräusche, die Sie unter Umständen hören könnten
Kochendes Wasser, glucksende Geräusche oder Vibrationen entstehen durch das Kältemittel, das durch die
Kühlschlangen zirkuliert.
Der Temperaturregler klickt, wenn er sich ein- und ausschaltet.
TÜRANSCHLAG WECHSELN (OPTION)
Wechseln des Türanschlags
Nehmen Sie das untere Scharnier ab, indem Sie die Schrauben mittels eines Schraubendrehers
herausdrehen.
Senken Sie die Tür behutsam und nehmen Sie sie ab.
Stecken Sie den Drehzapfen ins entgegengesetzte Loch auf dem unteren Scharnier.
Stecken Sie den Drehzapfen des linken oberen Scharniers ins entgegengesetzte Loch auf dem rechten
oberen Scharnier.
Entfernen Sie die zwei Schrauben aus den rechten Löchern der unteren Querleiste.
Nehmen Sie die Tür. Stecken Sie die untere Gelenkachse in das rechte untere Loch der Tür. Machen Sie
das rechte Loch der Tür zur rechten oberen Gelenkachse.
Stellen Sie die Tür ein, machen Sie sie gerade und richten Sie sie am Kühlschrank aus.
Befestigen Sie das untere Scharnier mit zwei Schrauben.
Schrauben Sie zwei Schrauben in die linken Löcher der unteren Querleiste, um die Löcher abzudecken.
Hinweis: Da die Türdichtung beim Transport eingedrückt wird, kann es sein, dass nach dem Wechsel des
Türanschlags, die Dichtung wieder richtig eingesetzt werden muss. Dies ist gut für die Dichtung, damit keine
Luft entweicht. Falls zwischen Kühlschrank und Türdichtung ein Spalt besteht, korrigieren Sie diesen, indem
Sie die Dichtung vorsichtig ein wenig herausziehen, um den Spalt zu schließen. Gegebenenfalls empfehlen
wir die Benutzung eines Föhns, um die Dichtung zu erwärmen, damit sich der Spalt schließt.
Page 14

14
KORREKTE HANDHABUNG UND RICHTIGE REINIGUNG DES FLASCHENKÜHLSCHRANKS
Warnung: Um einen Stromschlag zu vermeiden, ziehen Sie immer erst den Stecker des
Flaschenkühlschranks heraus, bevor Sie ihn reinigen. Eine Nicht-Beachtung des Warnhinweises kann zu
Verletzungen führen.
Allgemeines: Verwenden Sie keine aggressiven Chemikalien, Schleifmittel, Ammoniak, Chlorbleiche,
Reinigungsmittelkonzentrate, Lösungsmittel oder Stahlwolle-Pads. EINIGE dieser Chemikalien können die
Oberfläche Ihres Flaschenkühlschranks angreifen, beschädigen bzw. verfärben.
1) Nehmen Sie den Inhalt aus dem Gerät
2) Wischen Sie die Innen- und Außenseite mit einem feuchten Tuch ab. Die Hinzugabe von Essig ins Wasser
beugt dem Entstehen von Schimmel und Pilzen vor.
3) Alle Teile nach der Reinigung gründlich abwischen.
WICHTIG:
Wenn der Flaschenkühlschrank nicht benutzt wird, muss er innen ganz trocken sein, um eine
Schimmelbildung zu vermeiden (nach Möglichkeit die Tür auflassen).
BESCHRÄNKTE GARANTIE
Als Voraussetzung für eine Verpflichtung zu Garantieleistungen muss der Verbraucher diese
Garantieurkunde zusammen mit einer Kopie der Originalrechnung vorlegen.
VON DER GARANTIE IST AUSGESCHLOSSEN:
1) Schaden am Flaschenkühlschrank, ob unbeabsichtigt oder anderweitig, während sich dieser im Besitz
eines Verbrauchers befindet, wobei dieser nicht auf Material- oder Verarbeitungsfehler zurückzuführen ist.
2) Schaden durch falsche Benutzung, Veränderungen oder Nichtbefolgen der Pflege- und besonderen
Handhabungshinweise in dieser Anleitung.
3) Schaden an der Gehäuselackierung oder anderen Sichtteilen, die durch Abnutzung entstehen.
4) Schaden, der durch Reparaturen oder Änderungen des Flaschenkühlschranks entsteht, die von anderen als
den vom Hersteller autorisierten Technikern durchgeführt wurden.
5) Fracht- und Versicherungskosten für die Garantieleistungen
ALLE GEWÄHRLEISTUNGEN EINSCHLIESSLICH DER IMPLIZITEN GARANTIE DER
MARKTREIFE BESCHRÄNKEN SICH AUF DIE ANGEGEBENE DAUER. DER HERSTELLER
SCHLIESST ALLE MITTELBAREN ODER UNMITTELBAREN SCHÄDEN VON DER HAFTUNG
AUS.
Page 15

15
SCHALTBILD
① Temperaturregler
② Lichtschalter
③ LED Stromversorgung
④ LED licht
⑤ Lüfter (Nur BC145WF)
⑥ Kompressor
Entsorgung
Wenn der Schrank ausgedient hat, muss die Entsorgung durch eine anständig umweltmäßige Wiese
vorgenommen werden. Beachten Sie die Vorschriften für Entsorgung. Es gibt z.B. Spezialforderungen und
Bedingungen zu beachten.
Page 16

16
INTRODUCTION
Merci d’avoir choisi notre armoire réfrigérée pour bouteilles. Ce réfrigérateur est conçu pour améliorer votre
confort de vie et mieux recevoir vos amis. Grâce à son fonctionnement silencieux et sa conception unique,
vous apprécierez sa commodité et son confort pendant des années.
Veuillez lire attentivement ces instructions avant d'utiliser cet appareil. Lorsque vous utilisez cet appareil,
suivez toujours des consignes de sécurité de base.
Ce manuel simple à utiliser vous guidera afin de tirer le meilleur parti de votre armoire réfrigérée pour
bouteilles.
INFORMATIONS DE RÉFÉRENCE
Veuillez nous communiquer les informations suivantes à titre indicatif. Vous en aurez besoin pour
bénéficier du service de garantie.
Nom du modèle* : __________________________________
Numéro de série* : __________________________________
Date d’achat : __________________________________
Lieu d’achat : ___________________________ ______
*Les informations ci-dessous figurent sur la plaque signalétique à l'intérieur de l’armoire. Veuillez conserver
ce manuel d’utilisation avec votre reçu en tant que preuve d’achat permanente.
FR
Page 17

17
CONSIGNES DE SÉCURITÉ IMPORTANTES
Avant d’utiliser votre réfrigérateur, veuillez lire attentivement ce manuel d'utilisation.
Utilisez cet appareil uniquement dans le cadre de l’usage pour lequel il a été conçu, comme indiqué dans ce
manuel d’utilisation.
Avant d'être utilisé, ce réfrigérateur do it être correc tement installé, conformément aux instructions
d’installation.
Ne débranchez jamais votre réfrigérateur en tirant sur le cordon d’alimentation. Saisissez toujours la fiche
fermement et tirez dessus sans la tordre afin de la dégager de la prise.
1) Réparer ou remplacez immédiatement tous les cordons électriques en service qui sont effilochés ou
endommagés. N’utilisez pas de cordon présentant des fissures ou des dommages dus à l’abrasion sur sa
longueur, sur la prise ou à l’extrémité du connecteur.
2) Débranchez votre réfrigérateur avant de le nettoyer ou d’effect uer des rép ara tions.
REMARQUE : Si, pour une raison quelconque, ce produit a besoin d’être réparé, nous vous
recommandons fortement de faire appel à un technicien certifié pour effectuer ces réparations.
3) Ne faites pas fonctionner votre réfrigérateur en présence d’émanations explosives.
4) L’alimentation électrique doit être correctement mise à la terre.
5) N'utilisez pas de fiche d’adaptation ou de rallonge électrique.
6) N’utilisez pas l’a pp a re i l à prox imité immédiate d’une baignoire, d’une douche ou d’une piscine.
7) Avant de mettre au rebut ou de stocker l’appareil, nous vous recommandons de retirer la porte et de laisser
les rayonnages en place. Cela limitera les risques pour les enfants.
8) Ne stockez pas d’aliments dans le réfrigérateur car il se peut que la température à l’intérieur ne soit pas
assez fraîche et que vos aliments soient gâchés.
INSTALLATION
Nous vous recommandons de nettoyer l’intérieur du réfrigérateur à l’eau tiède avec un détergent
doux, puis de le sécher complètement avant de l’utiliser.
La température de l’appareil dépend de :
La température de la pièce
La fréquence et la durée des périodes d’ouver ture de la porte
La quantité de bouteilles qui se trouvent dans le réfrigérateur
Par conséquent, il peut être nécessaire de régler le thermostat de temps à autre.
Le système de réfrigération de l’armoire est conçu pour fonctionner lorsque l’armoire se trouve sur
une surface plane. Évitez de pencher l’armoire sur le côté.
Si vous devez incliner l’armoire à un certain angle afin de la manipuler ou de la déplacer, laissez-la reposer à
la verticale pendant 20 à 30 minutes avant de la brancher et de commencer à réfrigérer le compartiment de
stockage.
La fiche de mise à la terre et la prise doivent est fournies conformément aux réglementations locales. La
taille du câble doit répondre aux exigences du réfrigérateur. L’appareil doit être raccordé à un réseau
Page 18

18
électrique adéquat, conforme à celui indiqué sur la plaque signalétique, par le biais d’un disjoncteur
omnipolaire. Afin de garantir un bon fonctionnement du réfrigérateur, veuillez respecter les
recommandations suivan tes.
1) Afin de garantir la circulation, l’appareil doit être positionnée à 2 cm du mur.
2) Placez l’appareil à l’abri de la lumière directe du soleil. Cela vous permettra d’obtenir une
performance optimale et d’économiser de l’énergie.
3) La grille du haut ne doit en aucun cas être recouverte par un objet. Cela empêcherait l’air chaud de
circuler.
Déballage de votre réfrigérateur
1) Retirez tout le matériel d'emballage. Cela inclut la base en mousse et toutes les bandes adhésives.
2) Inspectez et retirez tous les restes d’emballage, d'adhésif ou les documents écrits avant de mettre en route
votre réfrigérateur.
Nivelage de votre réfrigérateur
1) Il y a quatre pieds réglables situés dans les coins avant et arrière de votre réfrigérateur. Après avoir
correctement mis votre réfrigérateur dans sa position finale, vous pouvez mettre à niveau votre
réfrigérateur.
2) Vous pouvez ajuster les pieds réglables en les faisant tourner dans le sens des aiguilles d’une montre
pour élever votre réfrigérateur ou dans le sens inverse des aiguilles d’une montrer pour l'abaisser. La
porte du réfrigérateur se fermera facilement une fois que les pieds réglables seront allongés.
PIÈCES ET CARACTERISTIQUES DU PRODUIT
① LED lumière
② Thermomètre
③ Etagères
④ Poignée
⑤ Pieds régables
⑥ Interrupteur de lumière
⑦ Thermostat
Page 19

19
COMMENT FAIRE FONCTIONNER L'ARMOIRE RÉFRIGÉRÉE POUR BOUTEILLES
1. Branchez la fiche d’alimentation dans la prise murale.
2. Pour régler la température, faites tourner le bouton du thermostat à l’intérieur de l’armoire.
Contrôle de la température
Lumière intérieure
Pour mettre en valeur vos bouteilles, une lumière douce a été intégrée dans l’armoire réfrigérée pour
bouteilles. Il vous suffit de faire tourner l'interrupteur pour que la lumière s'allume, puis de le faire tourner
dans le sens inverse pour qu'elle s'éteigne. Pour un rendement énergétique optimal, laissez la lumière éteinte
lorsque vous n’avez pas besoin de voir vos bouteilles.
Bruits de fonctionnement normaux que vous pouvez entendre
Les bruits d’eau qui bout, les gargouillements ou les légères vibrations sont dus au produit réfrigérant qui
circule dans les serpentins de refroidissement.
Le contrôle du thermostat émet un clic lorsqu'il se met en marche et qu'il s'éteint.
INVERSION DE LA PORTE (EN OPTION)
Comment inverser la porte :
Retirez la charnière inférieure en dévissant et en retirant les vis à l’aide d’un tournevis.
Abaissez soigneusement la porte et retirez-la.
Transférez la goupille d’articulation dans le trou opposé sur la charnière du bas.
Transférez la goupille d’articulation de la charnière supérieure gauche dans le trou opposé sur la
charnière supérieure droite.
Retirez les deux vis des trous à droite dans la barre transversale inférieure.
Prenez la porte. Insérez l'axe de la charnière inférieur e dans le trou in fér ieu r droit de la porte et faite s du
trou droit de la porte l'axe de la charnière supérieure droite.
Ajustez la porte afin qu’elle soit bien droite et alignée avec l’armoire.
Fixez la charnière inférieure avec deux vis.
Couvrez les trous de gauche dans la barre transversale inférieure avec deux vis.
La température interne va de 0°C à 10°C. Vous pouvez régler le bouton
du thermostat pour obtenir la température souhaitée. Faites tourner le
bouton dans le sens des aiguilles d’une montre (les réglages vont de 1
à 6) pour obtenir une température plus froide à l’intérieur. Mettez-vous
sur la position 0 pour éteindre votre appareil.
Page 20

20
Remarque : Étant donné que le joint d’étanchéité de la porte est comprimé pendant l’expédition, il se peut
que vous deviez le remettre en forme après avoir inversé la porte. Cela permettra d’éviter que de l’air ne
s’échappe. S’il y a un espace entre l’armoire et le joint d’étanchéité de la porte, redonnez sa forme au joint en
tirant dessus afin de combler l'espace. Au besoin, nous vous recommandons également d’utiliser un sèchecheveux pour réchauffer le joint d’étanchéité et ne plus avoir d’espace entre le joint et l’armoire.
ENTRETIEN ET NETTOYAGE ADÉQUATS DE L’ARMOIRE RÉFRIGÉRÉE POUR
BOUTEILLES
Avertissement : Pour éviter les chocs électriques, débranchez toujours votre réfrigérateur avant de le
nettoyer. Sinon, vous risquez de vous blesser.
Généralités : N’utilisez pas de produits chimiques puissants, des abrasifs, de l'ammoniaque, de l’eau de javel,
des détergents concentrés, des solvants ou des tampons à récurer métalliques. CERTAINS de ces produits
chimiques peuvent dissoudre, endommager et/ou décolorer votre réfrigérateur.
1) Videz l’appareil de son contenu.
2) Essuyez les surfaces intérieures et extérieures avec un chiffon humide. Il est recommandé d’ajouter du
vinaigre dans l’eau afin de prévenir l’apparition de moisissures.
3) Essuyez complètement toutes les pièces après le nettoyage afin qu’elles soient sèches.
Page 21

21
IMPORTANT :
Lorsque vous n’utilisez pas le réfrigérateur, celui-ci doit être complètement sec à l’intérieur afin de prévenir
l’apparition de moisissures (si poss ib le, laissez la porte ouverte ).
GARANTIE LIMITÉE
Afin de bénéficier de l'obligation du service de garantie, le client doit présenter ce Certificat de garantie
accompagné d’une copie de la facture d’achat d’origine.
CETTE GARANTIE NE COUVRE PAS :
1) Les dommages, accidentels ou autres, causés au réfrigérateur une fois que celui-ci a été acheté par le client
et ne provenant pas d’un défaut de fabrication ou de matériel.
2) Les dommages causés par des abus, l’altération de l’appareil ou le non-respect des consignes d'entretien et
de manipulation particulière figurant dans le manuel d’utilisation.
3) Les dommages causés aux finitions de l’armoire ou aux autres éléments de décoration dus à l’usure.
4) Les dommages causés par les réparations ou les altérations du réfrigérateur effectuées par une personne
non agréée par le fabricant.
5) Les coûts de transport et d’assurance pour le servic e de garan tie.
TOUTES LES GARANTIES, Y COMPRIS LES GARANTIES IMPLICITES DE QUALITÉ
MARCHANDE, SONT LIMITÉES À LA DURÉE CONVENUE. LE FABRICANT DÉCLINE TOUTE
RESPONSABILITÉ CONCERNANT LES DOMMAGES INDIRECTS OU ACCESSOIRES.
Page 22

22
SCHÉMA DE CONNEXIONS
① Thermostat
② Interrupteur de lumière
③ LED alimentation
④ LED lumière
⑤ Ventilateur (BC145WF seulement)
⑥ Compresseur
Élimination:
Quand l’armoire usée doit être éliminée, il doit se passer d’une manière qui ne compromet pas
l’environnement. Veuillez prendre note des règles d’élimination et examiner s’il existe des demandes et
conditions spécifiques qu’il faut respecter.
Page 23

23
INTRODUCCIÓN
Gracias por elegir nuestro refrigerador de botellas. Esta unidad está diseñada para mejorar la comodidad su
vida y sus momentos de ocio. Con su funcionamiento silencioso y su diseño único disfrutará de su
conveniencia y comodidad durante muchos años.
Lea detenidamente estas instrucc ione s an tes de poner en funcio namiento este dispositivo. Cuando utilice
este dispositivo, tome siempre precauciones básicas de seguridad.
Este manual de fácil uso le guiará para aprovechar al máximo su refrigerador de botellas.
INFORMACIÓN DE REFERENCIA
Complete la siguiente información para su consulta futura. La necesitará
para obtener el servicio de garantía.
Nombre del modelo*: __________________________________
Número de serie*: __________________________________
Fecha de compra: __________________________________
Lugar de compra: _________________________________
*La información anterior está escrita en la placa de identificación dentro del armario. Conserve este Manual
del Propietario con su recibo de venta como un registro permanente de su compra.
E
Page 24

24
PRECAUCIONES DE SEGURIDAD IMPORTANTES
Antes de utilizar su refrigerador, lea detenidamente este manual de instrucciones.
Utilice este dispositivo únicamente para su uso previsto según lo descrito en este manual del propietario.
Este refrigerador debe estar correctamente instalado de acuerdo con las instrucciones de instalación antes de
su uso.
Nunca desenchufe su refrigerador tirando del cable de alimentación eléctrica. Agarre siempre firmemente el
enchufe y retírelo de la toma de pared.
1) Repare o sustituya inmediatamente todos los cables eléctricos que se hayan deshilachado o dañado de otro
modo. No utilice un cable que presente grietas o daños por abrasión en su longitud, el enchufe o el extremo
del conector.
2) Desenchufe el refrigerador antes de lim piarlo o reali z ar cualqui er reparación.
NOTA: Si por algún motivo este producto necesita repararse, recomendamos encarecidamente que un
técnico certificado realice el servic io.
3) No haga funcionar su refrigerador en presencia de humos explosivos.
4) La alimentación eléctrica debe estar correctamente puest a a tierra.
5) No utilice un enchufe adaptador o un cable de prolongación.
6) No utilice la unidad cerca de un baño, ducha o piscina.
7) Antes de desechar o almacenar la unidad recomendamos que extraiga la puerta y que de je los estan tes en
su sitio. Esto reducirá la posibilidad de peligro para niños.
8) No conserve comida en el refrigerador, ya que la temperatura interior puede no ser lo suficientemente fría
para impedir el deterioro.
INSTALACIÓN
Se recomienda limpiar el interior del refrigerador con agua tibia y detergente suave y luego secarlo a
fondo antes del uso.
La temperatura en el dispositivo dependerá de:
La temperatura amb iental
La frecuencia y la duración de los periodos en los que la puerta está abierta
El número de elementos que haya en el refrigerador.
Por tanto, puede resultar necesario ajustar ocasionalmente el termostato.
El sistema de refrigeración del armario está diseñado para funcionar con el armario colocado sobre
una superficie plana. Evite inclinar el lado del armario.
Si el armario debe inclinarse en un ángulo para fines de manejo o traslado, deje que permanezca en una
posición vertical durante 20-30 minutos antes de enchufarlo e iniciar la refrigeración del compartimento de
almacenamiento.
El enchufe y la toma de puesta a tierra deben proporcionarse de acuerdo con las normas locales. El tamaño
del cable debe satisfacer las exigencias del refrigerador. La unidad debe estar conectada a una red eléctrica
adecuada, la cual se indica en la placa identificadora, a través de un disyuntor omnipolar. Para garantizar el
funcionamiento correcto del refrigerador, observe las siguientes recomendaciones.
1) Para garantizar la circulación, la unidad debe mantenerse a una distancia de 2 cm respecto a la pared.
2) Aleje la unidad de la luz solar directa. Ello le permitirá obtener el mejor rendimiento y ahorrar energía.
3) La rejilla superior no debe cubrirse bajo ninguna circunstancia con un objeto. Ello evitará que circule el
aire caliente.
Page 25

25
Desembalaje del refrigerador
1) Retire todo el material de embalaje. Ello incluye la base de espuma y toda la cinta adhesiva.
2) Inspeccione y retire todos los restos de embalaje, cinta o materiales impresos antes de encender el
refrigerador.
Nivelación del refrigerador
1) Hay cuatro patas de nivelación que se encuentran en las esquinas delanteras y traseras de su refrigerador.
Después de colocar correctamente el refrigerador en su posición final puede nivelarlo.
2) Las patas de nivelación pueden ajustarse girándolas en sentido de las agujas del reloj para elevar el
refrigerador o en sentido contrario a las agu jas del relo j para descende r su refr igera do r. La puerta del
refrigerador se cerrará de forma sencilla cuando las patas de nivelación estén extendidas.
PARTES Y CARACTERÍSTICAS DEL PRODUCTO
CÓMO MANEJAR EL REFRIGERADOR DE BOTELLAS
1. Introduzca el enchufe de alimentación eléctrica en la toma de pared.
2. Para ajustar la temperatura, gire la manija del termostato dentro del armario.
Control de temperatura
La temperatura interior varía desde 0º C a 10º C. Puede girar la manija
del termostato para tener su temperatura deseada. Si gira la manija en
sentido de las agujas del reloj, cuya posición varía de 1 a 6, puede
obtener una temperatura inferior en el interior. Si gira la posición a 0,
desactivará su dispositivo.
① LED luz
② Termómetro
③ Estantes
④ Mango
⑤ Patas de nivelación
⑥ Interruptor de luz
⑦ Termostato
Page 26

26
Luz interior
Para mejorar el aspecto de su selección de botellas se ha integrado una luz tenue en el refrigerador de
botellas. Si gira simplemente el interruptor la luz se encenderá y si la gira nuevamente en sentido contrario se
apagará. Para una eficiencia energética máxima, deje la luz apagada cuando no vaya a ver su selección de
botellas.
Sonidos normales de funcionamiento que pueden oírse
Los sonidos de agua en ebullición, borboteos o ligeras vibraciones se deben al refrigerante que circula por
los serpentines de enfriamiento.
El control del termostato emitirá un chasquido cuando se activa y desactiva.
INVERSIÓN DE LA PUERTA (OPCIONAL)
Cómo invertir la puerta
Extraiga la bisagra inferior aflojando y soltando los tornillos con un destornillador.
Descienda cuidadosam ente la puerta y retírela.
Mueva el pasador de pivote hacia el agujero opuesto en la bisagra inferior.
Mueva el pasador de pivote desde la bisagra super ior izquie rda al agu jero opu es to en la bisag ra super ior
derecha.
Extraiga los dos tornillos de los agujeros dere cho s en la barra transv ers al inf erior.
Agarre la puerta. Introduzca el eje de la bisagra inferior en el agujero inferior derecho de la
puerta, pase el agujero derecho de la puerta por el eje de la bisagra superior derecha.
Ajuste la puerta, hágalo de forma recta y alineada con el armario.
Fije la bisagra inferior con dos tornillos.
Cubra los agujeros izquierdos en la barra transversal inferior con dos tornillos.
Nota: dado que la empaquetadura de la puerta se comprime durante el envío, después de invertir la puerta
puede que deba reajustarse la empaquetadura. Esto será bueno para el sellado a fin de evitar cualquier escape
de aire. Si existe un espacio de separación entre el armario y la empaquetadura de la puerta, coloque la
empaquetadura tirando ligeramente de ella hacia afuera para sellar el espacio de separación. En caso
necesario se le recomienda emplear también un secador de pelo para calentar la empaquetadura y eliminar el
espacio de separación.
Page 27

27
CONSERVACIÓN Y LIMPIEZA ADECUADAS DEL REFRIGERADOR DE BOTELLAS
Advertencia: para evitar descargar eléctricas desenchufe siempre su refrigerador antes de limpiarlo. Ignorar
esta advertencia puede tener como consecuencia lesiones.
Generalidades: no utilice sustancias químicas duras, abrasivos, amoniaco, blanqueador clorado, detergentes
concentrados, disolventes o estropajos metálicos. ALGUNAS de estas sustancias químicas pueden disolver,
dañar y/o decolorar su refrigerador.
1) Saque el contenido del dispositivo
2) Frote las superficies interiores y exteriores con un paño húmedo. La agregación de vinagre al agua es
buena para prevenir moho y hongos.
3) Frote a fondo todas las partes después de la limpieza.
IMPORTANTE:
Cuando el refrigerador no se utiliza debe estar completamente seco en el interior para evitar el crecimiento
de moho (a ser posible, deje la puerta abierta).
GARANTÍA LIMITADA
Como condición para cualquier obligación de reparación en garantía, el consumidor debe presentar este
certificado de garantía junto con una copia de la factura de compra original.
ESTA GARANTÍA NO CUBRE:
1) Daños, accidentales o de otro modo, al refrigerador mientras éste se encuentra en la posesión de un
consumidor, no causados por un defecto de material o mano de obra.
2) Daños causados por uso incorrecto, manipulación o no observancia por parte el consumidor de las
disposiciones de manejo especiales en las instrucciones.
3) Daños al acabado del bastidor u otras partes del acabado causados por desgaste
4) Daños causados por reparaciones o alteraciones del refrigerador realizadas por personas distintas a
aquellas autorizadas por el fabricant e.
5) Coste de transporte y seguro para el servicio de garantía
TODAS LAS GARANTÍAS, INCLUIDA CUALQUIER GARANTÍA IMPLÍCITA DE
COMERCIABILIDAD, ESTÁN LIMITADAS A LA DURACIÓN RECLAMADA. EL FABRICANTE
RENUNCIA A TODA RESPONSABILIDAD POR DAÑOS INDIRECTOS O INCIDENTALES.
Page 28

28
DIAGRAMA DE CIRCUITOS
① Termostato
② Interruptor de luz
③ LED transformador
④ LED luz
⑤ Ventilador (BC145WF)
⑥ Compresor
Como deshacerse del aparato
Cuando se tenga que deshacer del aparato, deberá hacerlo teniendo en cuenta las normas al respecto. Puede
que haya unas exigencias y condiciones que se deban cumplir.
Page 29

29
INTRODUÇÃO
Muito obrigado por escolher o nosso refrigerador de garrafas. Esta unidade foi concebida com o intuíto de
melhorar o seu conforto. Com um design exclusivo e uma operação silenciosa, desfrutará do conforto que lhe
proporcionará durante anos.
Por favor leia atentamente este manual de instruções antes de colocar este aparelho em operação. Na
utilização de este dispositivo observe sempre as precauções de segurança elementares
Este manual, de fácil consulta, permitir-lhe-á tirar partido de todas as vantagens que o seu refrigerador de
garrafas proporciona.
INFORMAÇÃO DE REFERÊNCIA
Por favor preencha os seguintes campos para consulta futura. Será necessária para a
obtenção de um serviço de garantia.
Nome do Modelo*: __________________________________
Número de Série*: __________________________________
Data de Aquisição: __________________________________
Local de Aquisição: _________________________________
*Esta informação encontra-se na placa de identificação no interior do compartimento. Guarde este Manual
juntamente com a factura de compra, como registo histórico da mesma.
PT
Page 30

30
PRECAUÇÕES DE SEGURANÇA IMPORTANTES
Leia atentamente este manual antes de proceder à operação do refrigerador de garrafas.
Utilize este aparelho apenas para o fim a que se destina, tal como descrito neste manual.
Antes de ser colocado em funcionamento, este refrigerador deverá ser devidamente instalado de acordo com
as instruções de instalação.
Nunca desligue o seu refrigerador da alimentação puxando o cabo de alimentação. Agarre com firmeza a
ficha eléctrica, puxando-a da tomada de alimentação.
1) Repare ou substitua qualquer cabo eléctrico que apresentem estrias ou outros sinais de danificação. Não
utilize cabos que exibam fissuras ou sinais de abrasão em toda a sua extensão, na ficha ou nos conectores.
2) Desconecte o seu refrigerador da alimentação antes de proceder a trabalhos de limpeza ou reparação.
NOTA: No caso de, por um qualquer motivo, este produto necessitar de uma intervenção de manutenção,
recomenda-se que tal seja realizado por um técnico qualificado.
3) Não opere o refrigerador na presença de gases explosivos.
4) A alimentação eléctrica deverá incluir uma ligação de terra adequada.
5) Não utilize um adaptador de ficha eléctrica ou cabo de extensão eléctrica.
6) Não utilize a unidade nas imediações de uma casa de banho, chuveiro ou piscina.
7) Antes de proceder à eliminação ou armazenamento do aparelho, recomenda-se a remoção da porta e a
manutenção das prateleiras nas suas posições. Tal reduzirá o risco de lesão em crianças.
8) Não armazene comida no refrigerador, uma vez que a sua temperatura interior poderá ser insuficiente para
a conservação da mesma.
INSTALAÇÃO
Na limpeza do interior do refrigerador, recomenda-se a utilização de água tépida com um detergente
ligeiro e uma secagem cuidadosa antes da colocação em utilização.
A temperatura no interior do dispositivo dependerá de:
A temperatura no local de operação
A frequência e duração dos períodos em que a porta se encontra aberta
A quantidade de itens que se encontrem no interior do refrigerador.
Poderá ser necessário proceder à regulação esporádica do termóstato.
O sistema de refrigeração do compartimento foi concebido para operação em superfície plana. Evite
inclinar o lado do compartimento.
No caso de ser necessário inclinar o compartimento para a sua movimentação, aguarde cerca e 20 a 30
minutos com este na sua posição vertical antes de proceder à sua reconexão à alimentação eléctrica e reinício
de operação de refrigeração.
No local de instalação deverá existir uma tomada eléctrica com ligação de terra que esteja conforme com os
regulamentos locais. O comprimento do cabo deverá ser adequado às necessidades de instalação do
refrigerador. A unidade deverá estar conectada a uma rede eléctrica com características adequadas, a quais se
encontram descritas na placa de identificação, e protegida por um disjuntor omnipolar. Para garantir o
correcto funcionamento do refrigerador, por favor observe as seguintes recomendações.
1) Para assegurar uma circulação de ar adequada, mantenha a unidade a uma distância de 2cm da parede.
2) Coloque a unidade em local isento de exposição solar directa. Tal permitirá a obtenção de uma economia
de energia e desempenho máximos.
3) Em circunstância alguma se deverá tapar a grade superior com um qualquer objecto. Tal impedirá a
circulação de ar.
Page 31

31
Desempacotamento do Refrigerador
1) Remova a totalidade dos materiais de embalagem. Tal inclui a base de esferovite e a totalidade das fitas
adesivas.
2) Inspeccione e remova quaisquer remanências de materiais de embalagem, fita ou materiais impressos
antes de proceder à ligação do refrigerador.
Nivelamento do Refrigerador
1) Existem quarto pernas de nivelamento, as quais se encontram localizadas nos cantos posterior e anterior
do refrigerador. Uma vez colocado o refrigerador na sua posição de operação, poderá proceder ao seu
nivelamento.
2) As pernas de nivelamento poderão ser ajustadas rodando no sentido horário para subir e no sentido anti-
horário para descer. A porta do refrigerador fechará com facilidade quando as pernas de niv elam en to se
encontrarem estendidas.
PEÇAS DO PRODUTO E FUNCIONALIDADES
MODO DE OPERAÇÃO DO REFRIGERADOR DE GARRAFAS
1. Insira a ficha na tomada eléctrica da parede.
2. Para proceder à regulação da temperatura, rode o manípulo do termóstato sito no interior do
compartimento.
Controlo de Temperatura
A temperatura interior varia entre os 0 ℃ e os 10 ℃. A temperatura
desejada poderá ser regulada no manípulo do termóstato. Rodando o
manípulo no sentido horário, entre as posições 1 e 6, poderá reduzir a
temperatura interna. Na posição 0 o aparelho es tar á des ligad o.
① LED luz
② Termómetro
③ Prateleiras
④ Maníupulo
⑤ Pernas de nivelamento
⑥ Interruptor da luz
⑦ Termóstato
Page 32

32
Iluminação interna
Para a iluminação dos seus produtos, foi incluída uma luz de tonalidade uave no interior do refrigerador de
garrafas. A luz poderá ser ligada e desligada no respectivo interruptor. Para maxima eficiência energética,
desligue a luz quando desnecessária.
Sons Normais de Operação
Os ruídos de água em ebulição, a borbulhar ou a ocorrência de vibrações ligeiras devem-se à circulação do
líquido de refrigeração através das serpentinas de refrigeração.
O controlo do termóstato emitirá um estalido ao ligar e desligar.
INVERSÃO DA POSIÇÃO DA PORTA (OPCIONAL)
Procedimento de inversão da porta
Remova o suporte inferior desapertando e removendo os parafusos com uma chave de fendas.
Baixe lentamente a porta e remova-a.
Mova o pino pivot para o orifício oposto no suporte inferior.
Mova o pino pivot do suporte superior esquerdo para o orifício oposto no suporte superior direito.
Remova os dois parafusos dos orifícios direitos na barra transversal inferior.
Pegue na porta. Insira o eixo do suporte inferior no orifício inferior direito da porta, coloque o orifício
direito da porta no eixo do suporte superior.
Ajuste a porta, colocando-a na posição vertical e devidamente alinhada com o compartimento.
Fixe o suporte inferior com dois parafusos.
Cubra os orifícios esquerdos da barra transversal inferior com dois parafusos.
Nota: A selagem da porta será sujeita a compressão durante o transporte do equipamento, pelo que poderá
ser necessário proceder à reinicialização da mesma após a inversão da sua posição. Tal será necessário para
garantir uma selagem eficiente e, assim, evitar a fuga de ar. Caso exista uma folga entre o compartimento e a
selagem da porta, ajuste a selagem, puxando-a delicadamente para a zona da folga. Caso necessário,
recomenda-se ainda que, com recurso a um secador de cabelo, se aqueça a selagem por forma a eliminar a
folga.
Page 33

33
MANUTENÇÃO E LIMPEZA DO REFRIGERADOR DE GARRAFAS
Aviso: Para evitar electrocussões, desconecte sempre o refrigerador antes de proceder à sua limpeza. O
incumprimento desta regra poderá resultar em ferimentos.
Geral: Não utilize químicos agressivos, abrasivos, amoníaco, soluções de branqueamento à base de cloro,
detergentes concentrados, s olv en tes ou peças de rasp agem metálicas. ALGUNS destes químicos poderão
dissolver, danificar e/ou descolorar o refrigerador.
1) Remova o conteúdo do aparelho
2) Limpe as superfícies interior e exterior com um pano húmido. A adição de vinagre à
água é boa medida para a prevenção de acumulação de fungos.
3) Limpe cuidadosamente todas as peças após a sua limpeza.
IMPORTANTE:
Quando o refrigerador não se encontrar em utilização , o seu inter ior dev erá encontrar-se completamente
seco, por forma a evitar a acumulação de humidade (manter a porta aberta, se possível).
GARANTIA LIMITADA
A apresentação do Certificado de Garantia e de uma cópia original da factura de compra é requisito
estritamente necessário ao usufruto dos direitos previstos na garantia.
ESTA GARANTIA NÃO ABRANGE:
1) Danos, acidentais ou não, do refrigerador que não originem num defeito material ou de fabrico.
2) Danos causados por uma utilização indevida, alterações realizadas no aparelho ou incumprimento das
instruções de utilização do mesmo.
3) Danos nos acabamentos das superfícies ou outras peças expostas, causadas por desgaste.
4) Danos causados por intervenções de reparação ou de introdução de alterações realizadas por pessoal não
autorizado pelo fabricante.
5) Custos de transporte e de Seguro pelo serviço de garantia
TODAS AS GARANTIAS, INCLUINDO QUALQUER GARANTIA IMPLÍCITA DE
EXPLORABILIDADE, ESTÃO LIMITADAS À DURAÇÃO PREVISTA. O FABRICANTE NÃO
ASSUME QUALQUER RESPONSABILIDADE POR DANOS DIRECTOS OU INDIRECTOS.
Page 34

34
DIAGRAMA DE CIRCUITO
① Termóstato
② Interruptor da luz
③ LED transformador
④ LED luz
⑤ Ventilação (BC145WF)
⑥ Compresor
Eliminação
A eliminação da arca deverá efectuar-se de modo ambientalmente correcto. Aquando da eliminação, tenha
em consideração a legislação existente. Poderá haver requisitos e condições especiais a serem observados.
 Loading...