

Page 1
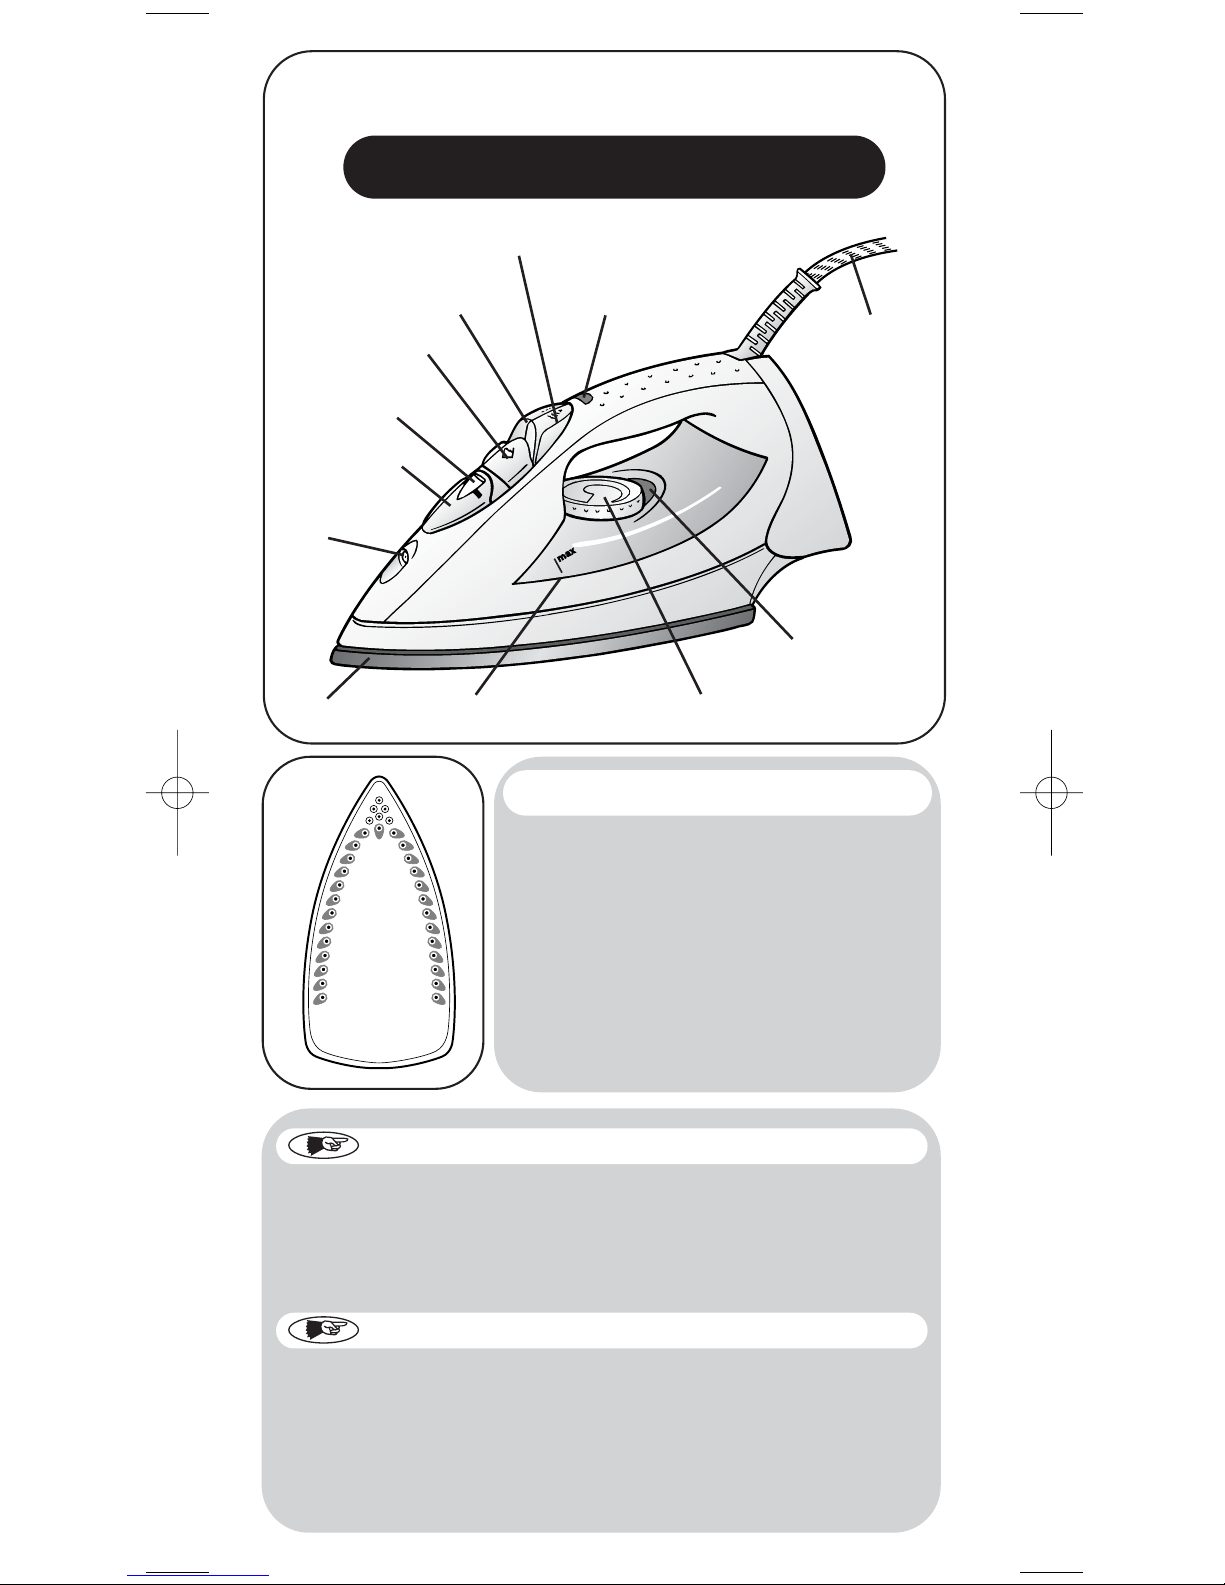
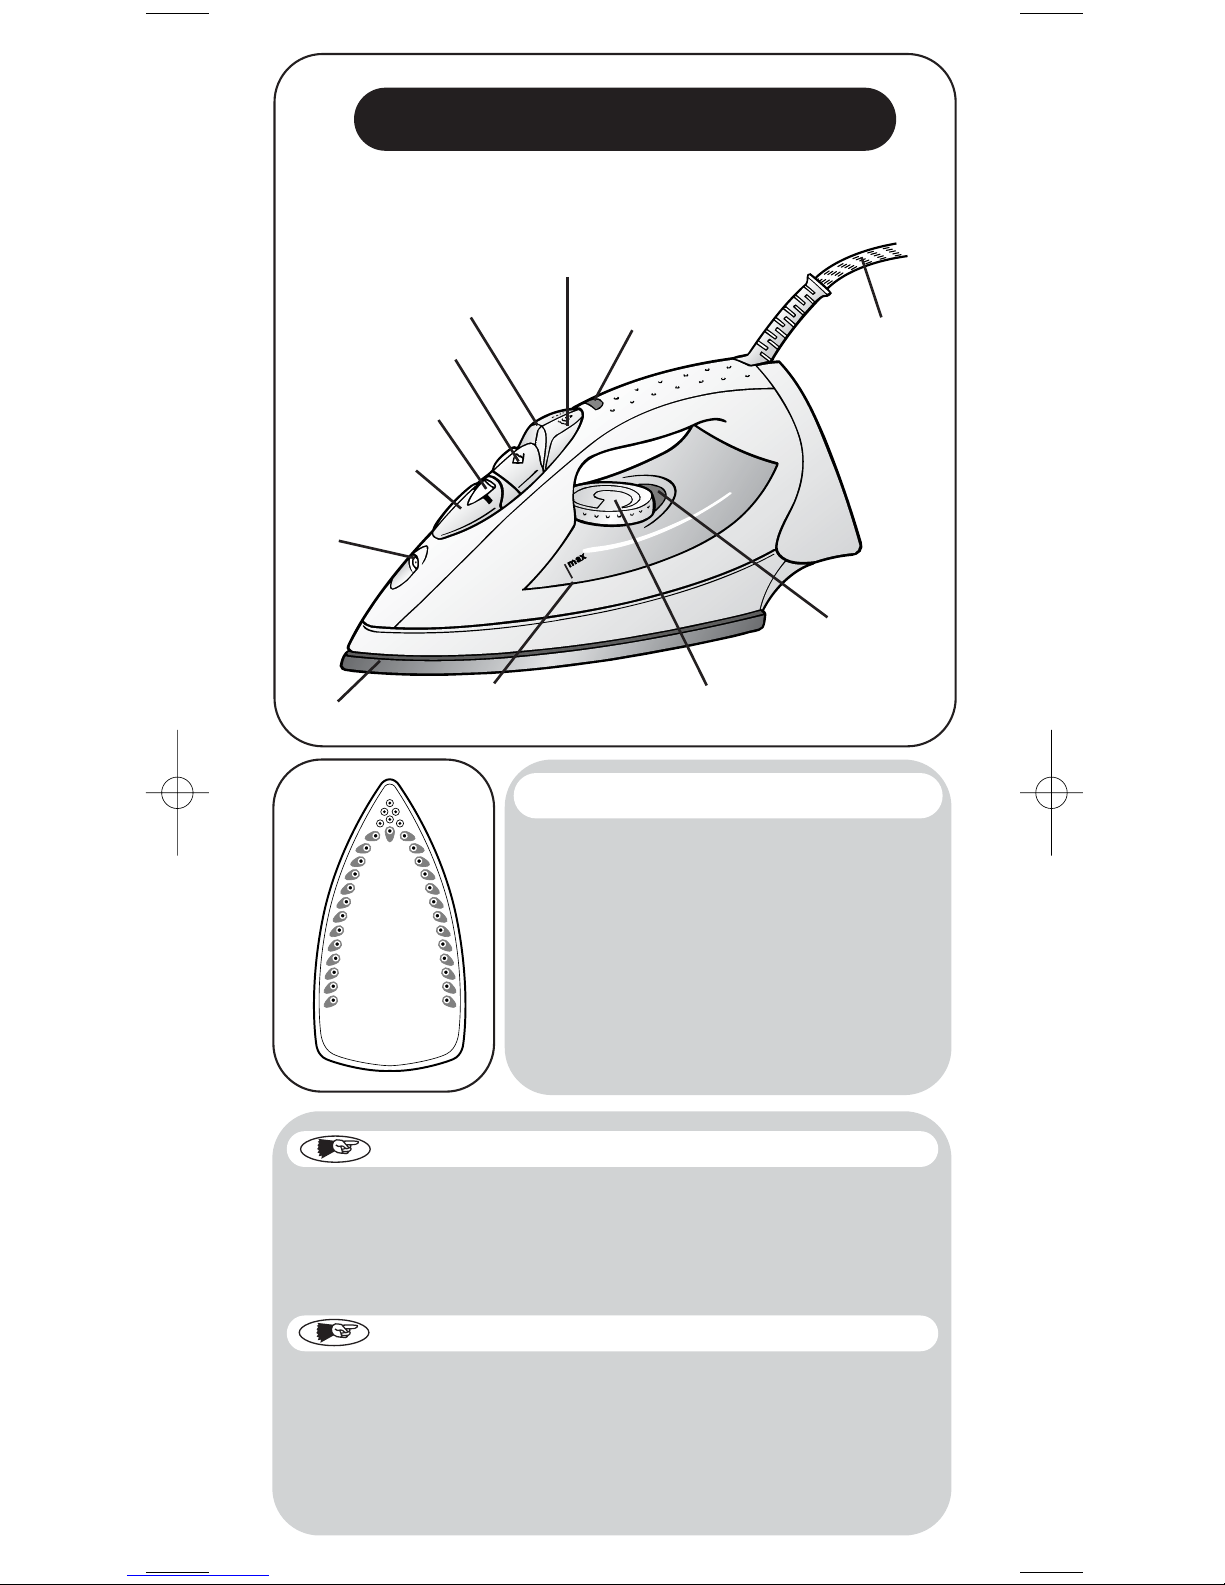
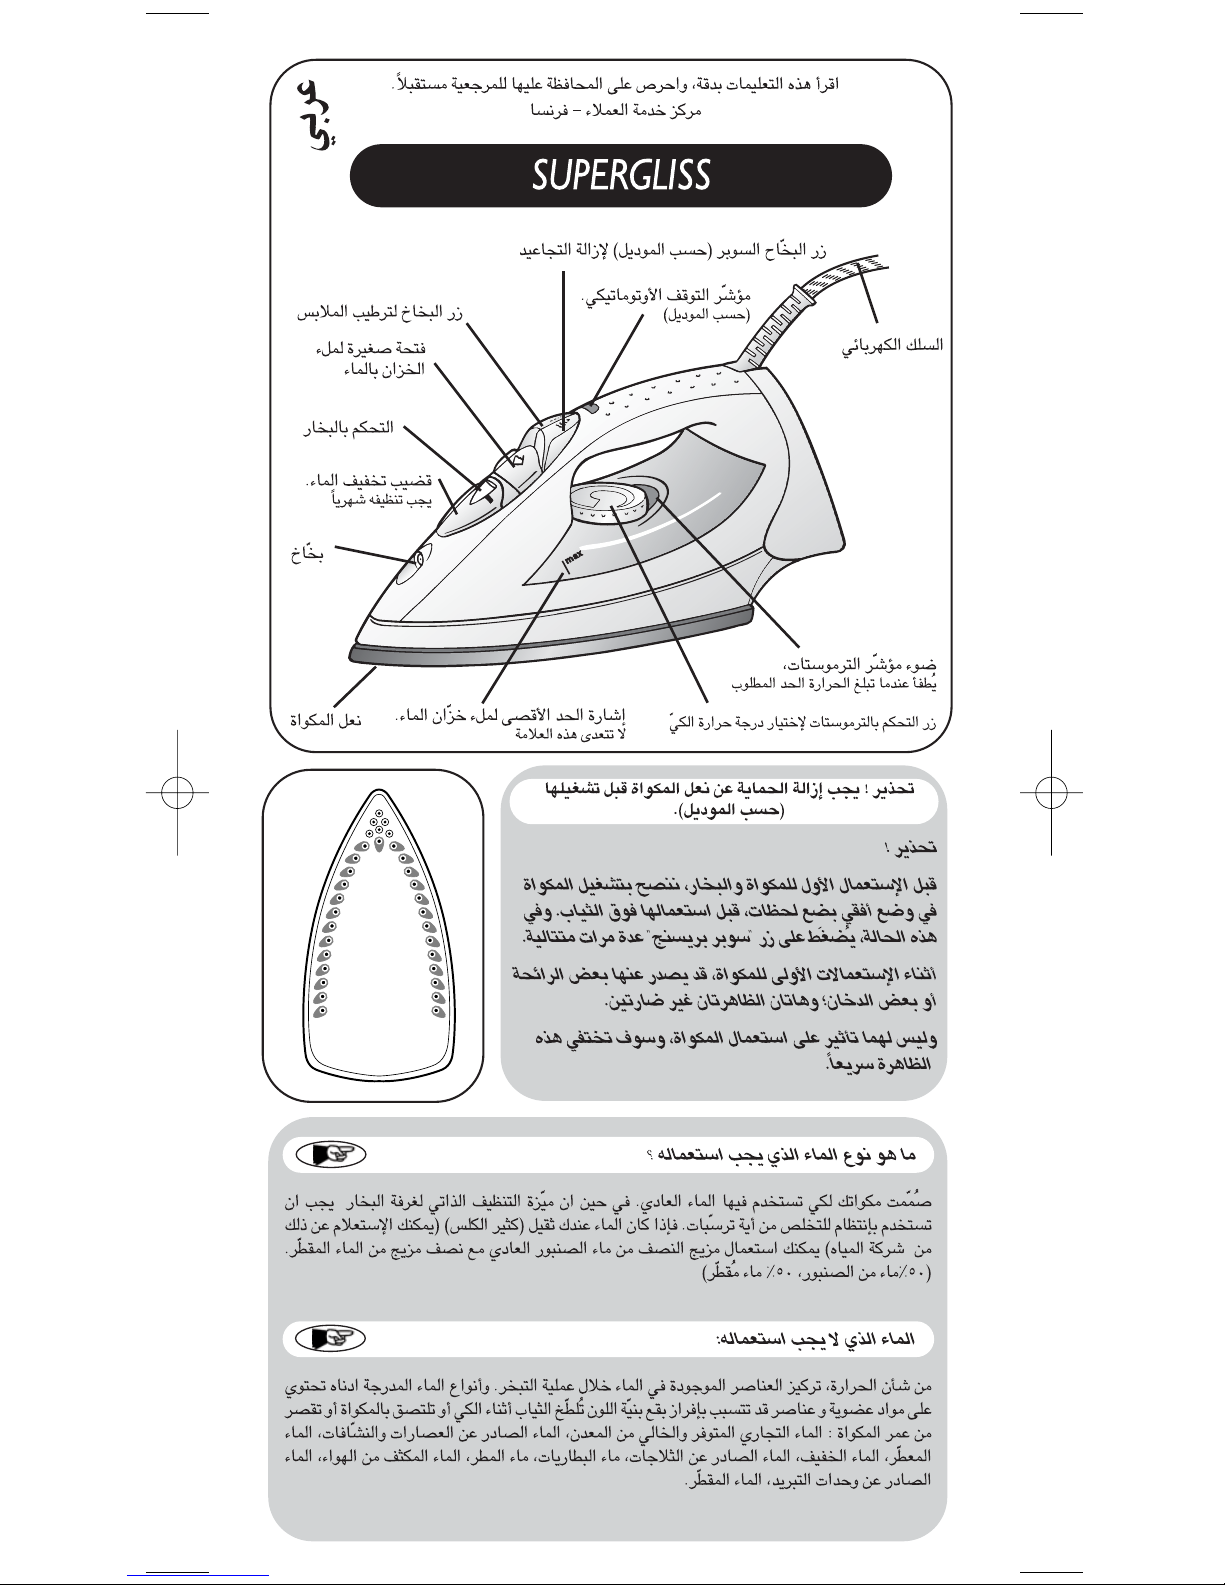
Spray
Anti-calc valve
To be cleaned once
per month
Steam control
Water tank filler
cover
Shot of Steam Button (depending on model)
for removing wrinkles
Spray Button to moisten linen
Auto-Stop safety warning light
(depending on model)
Thermostat indicator light.
Goes out when the temperature has
been reached.
Thermostat control
For choosing the ironing temperature
English
033101 - 10/04
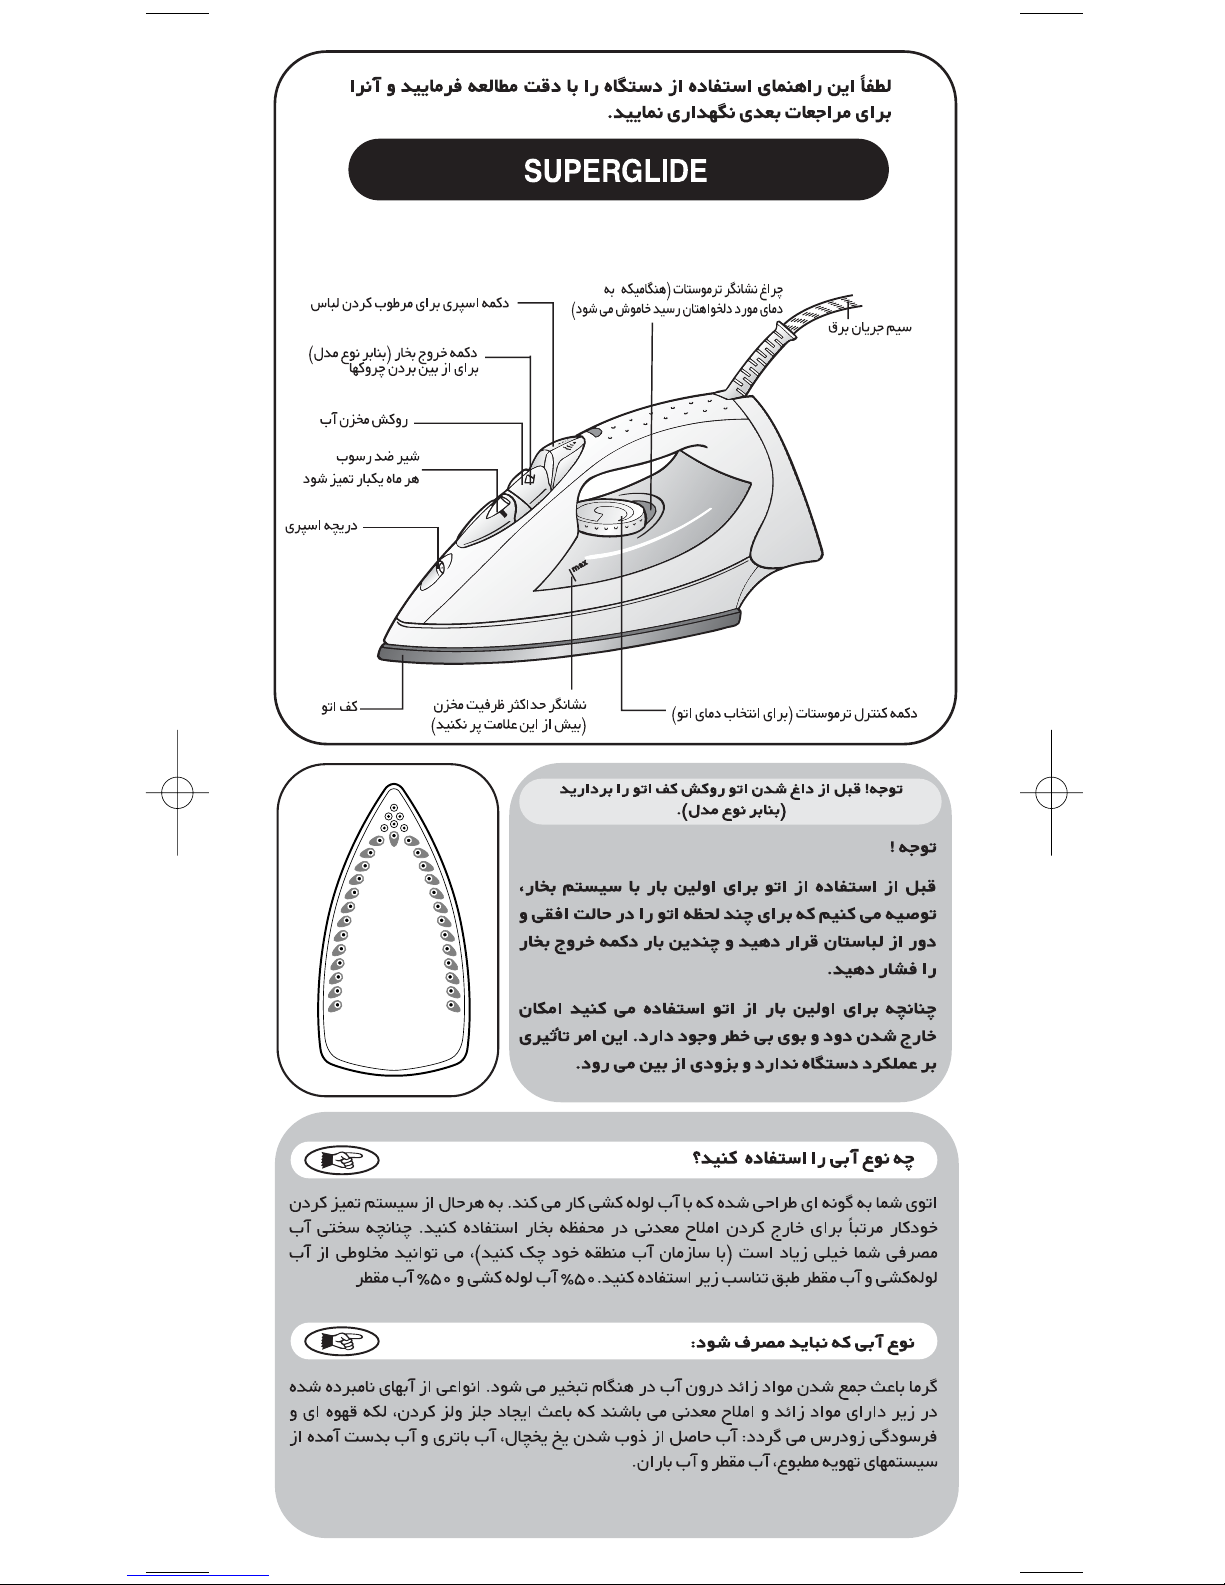
Please read these instructions carefully
and keep for future reference.
SUPERGLIDE
What water to use ?
Your appliance has been designed to function with tap water. However, it is necessary to
operate the Self-Clean function regularly in order to eliminate hard water deposits. If
your water is very hard (check with your water authority),it is possible to mix tap water
with store-bought demineralized water in the following proportions :
50% tap water, 50% demineralized water.
Types of water not to use :
Heat concentrates the elements contained in water during evaporation. The types of
water listed below contain organic waste or mineral elements that can cause spitting,
brown staining, or premature wear of the appliance: water from clothes dryers, scented
or softened water, water from refrigerators, batteries, or air conditioners, pure distilled
water, or rain water.
Electric power
cord
Water tank maximum fill line
Do not exceed this limit
Sole plate
Warning !
Before using your iron with the steam function
for the first time, we recommend that you
operate it in horizontal position for a few
moments, away from your linen, ie press several
times on the shot of steam button.
During the first few uses, a harmless odour and
smoke may be given off.This has no effect on
the use of the iron and will disappear quickly.
Warning ! Remove the sole plate protector before
heating up the iron (depending on the model).
Page 2
D E
A
B
C
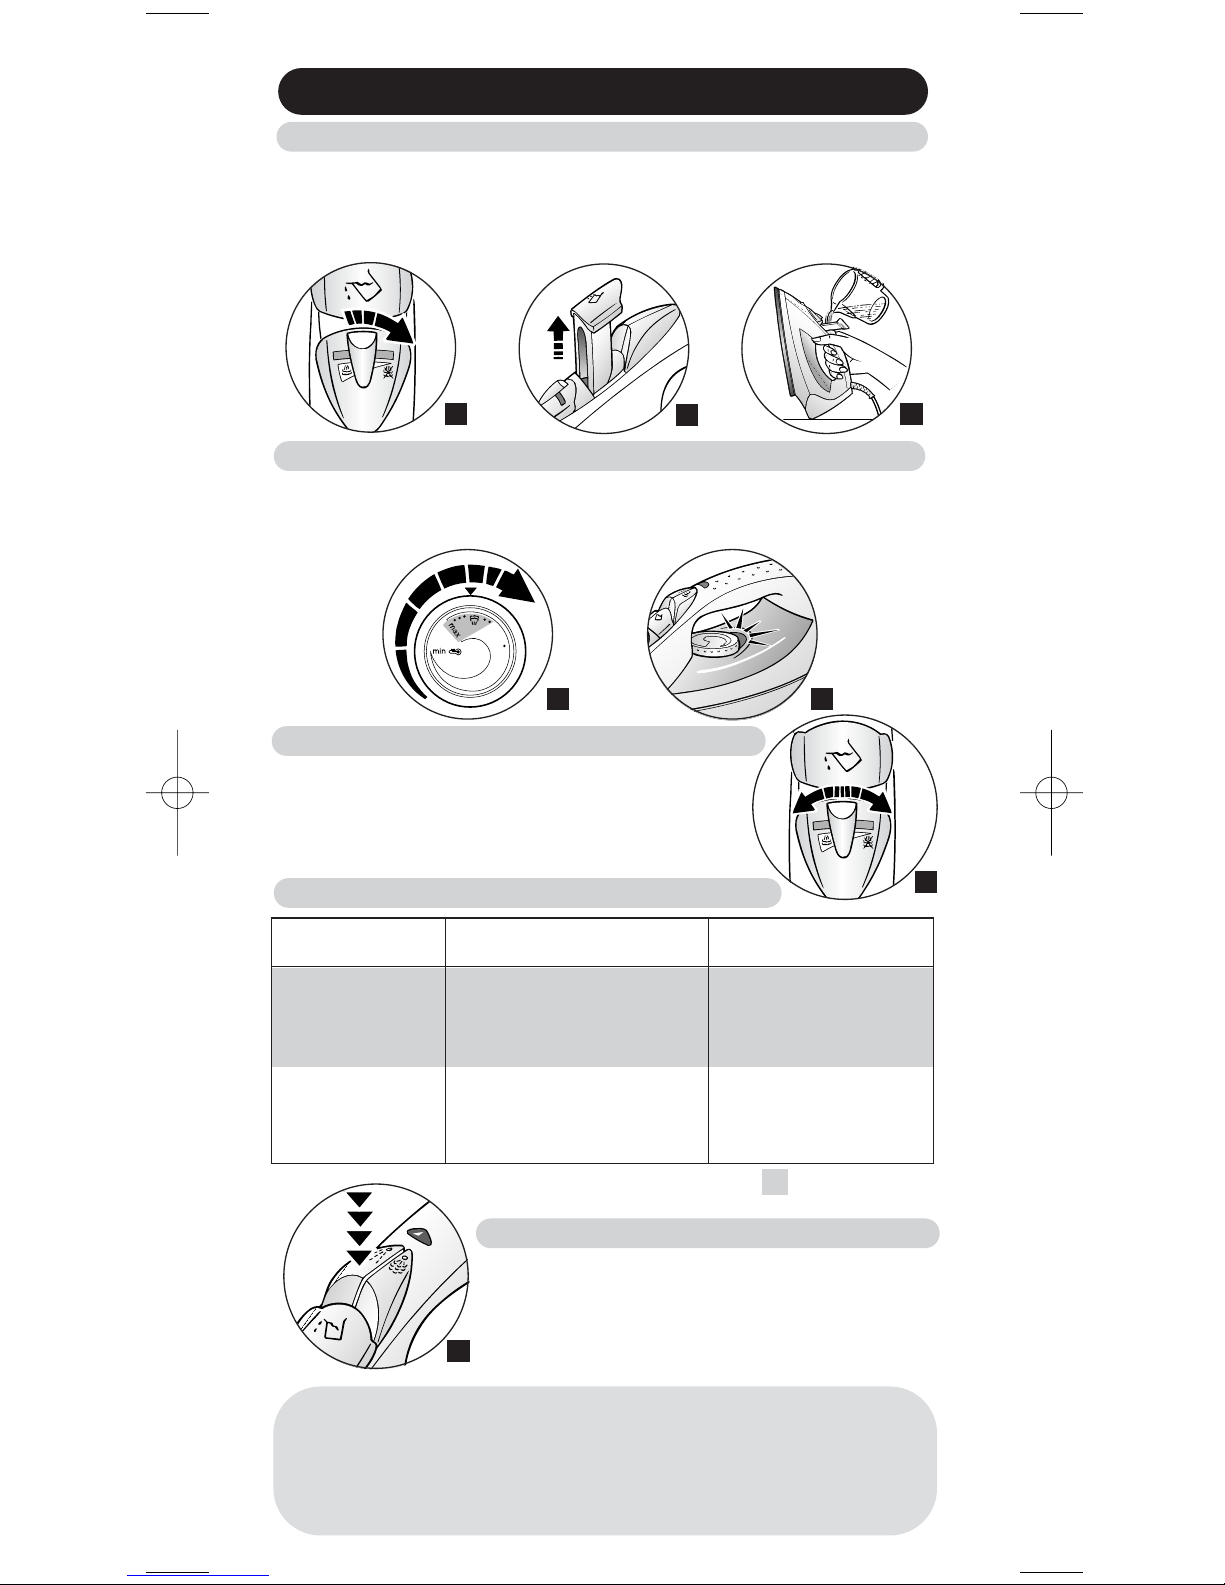
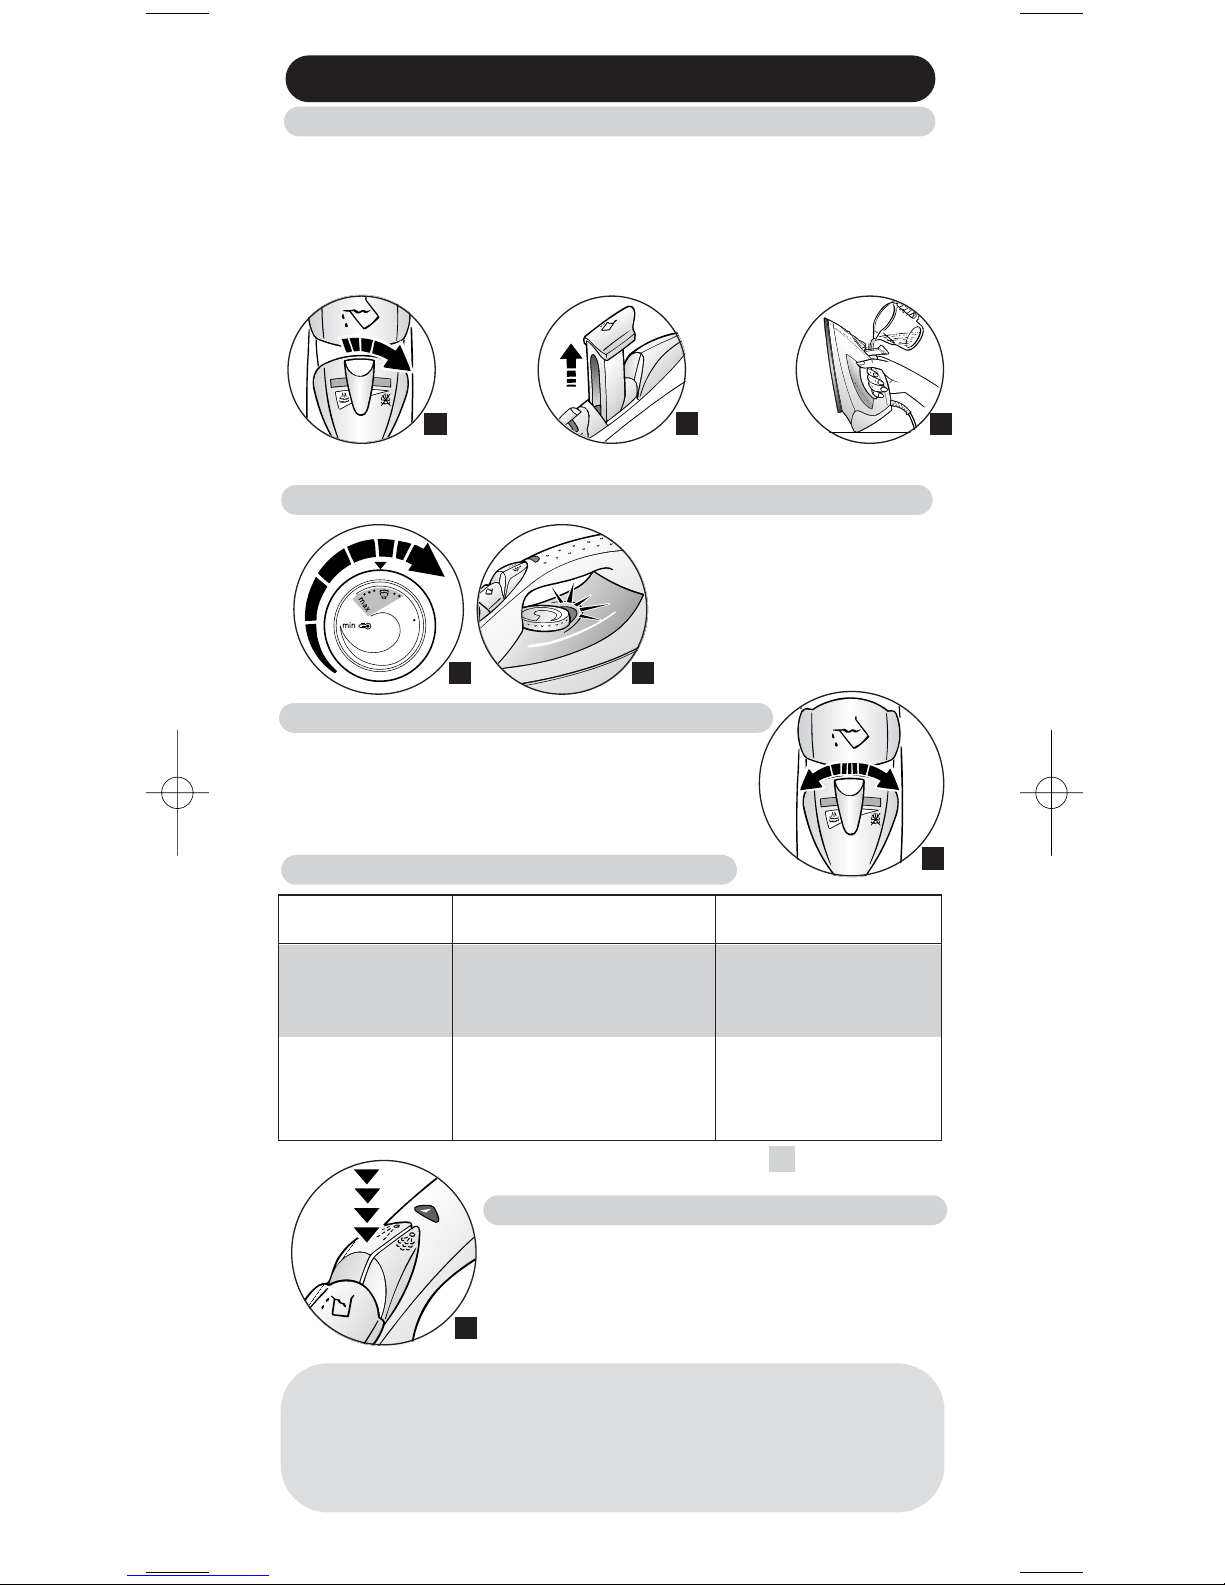
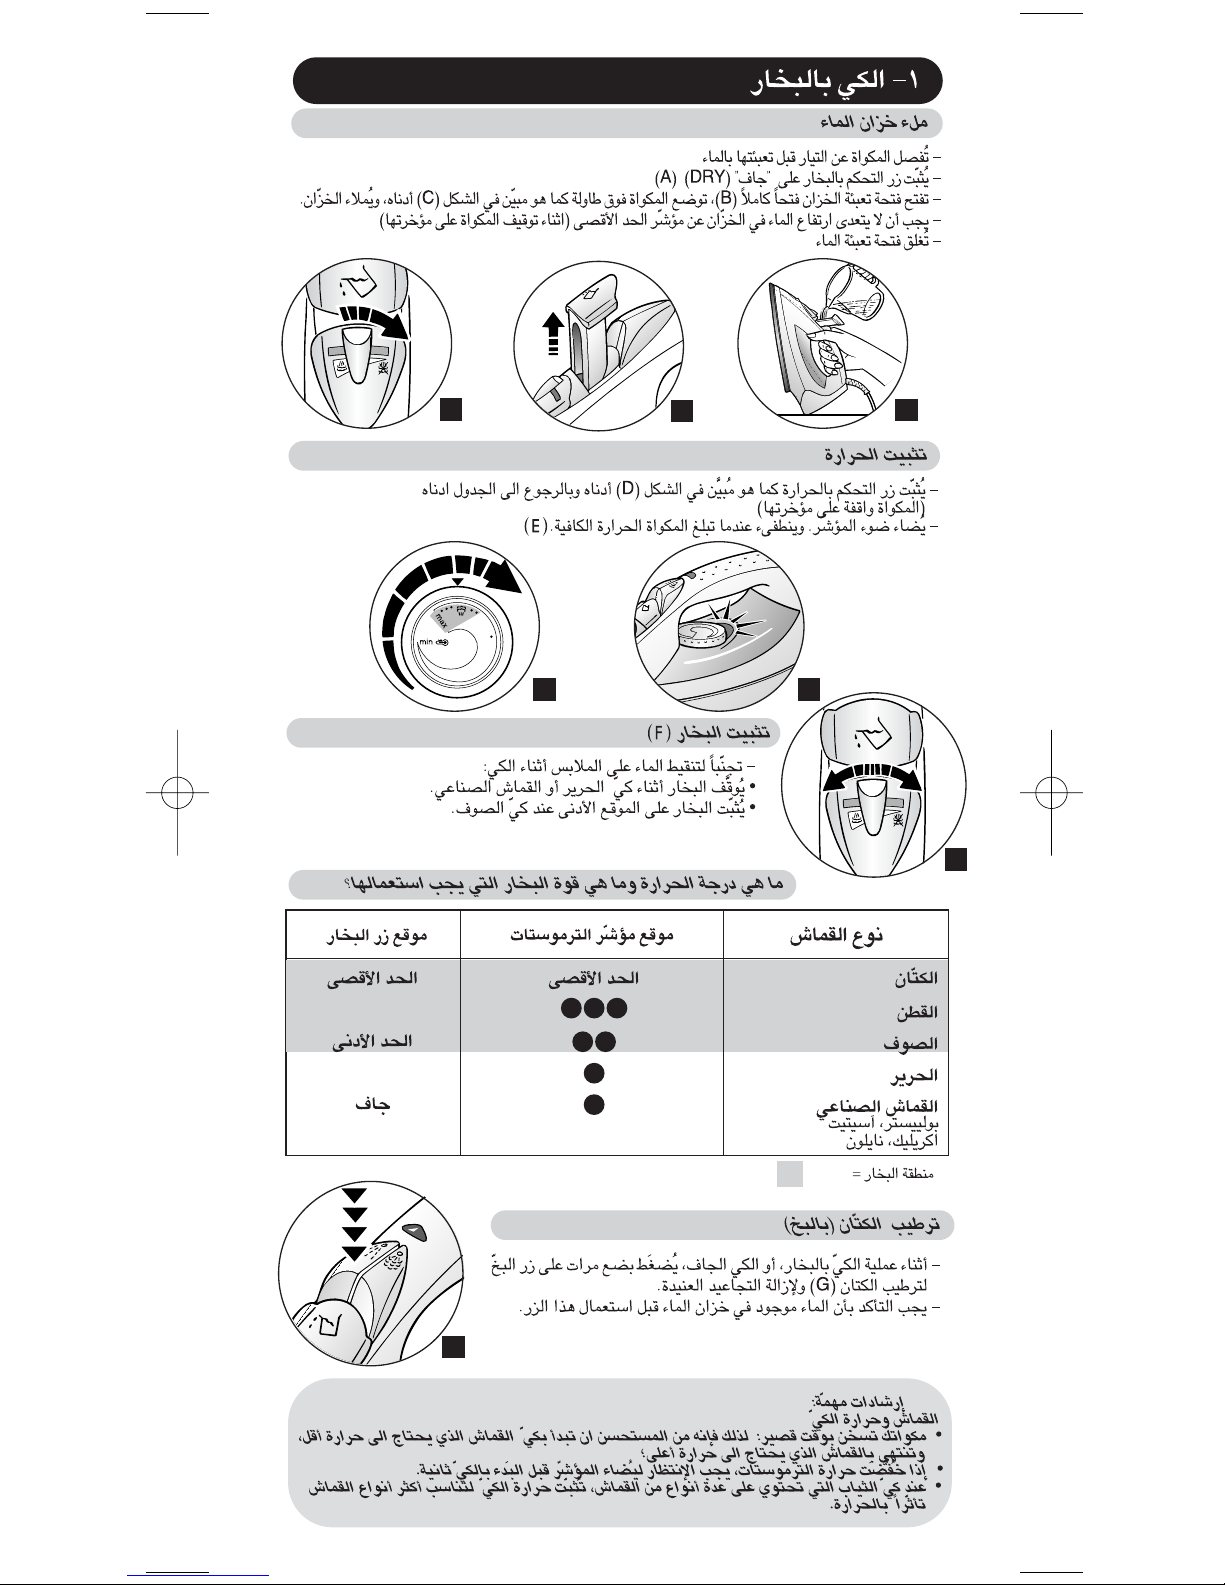
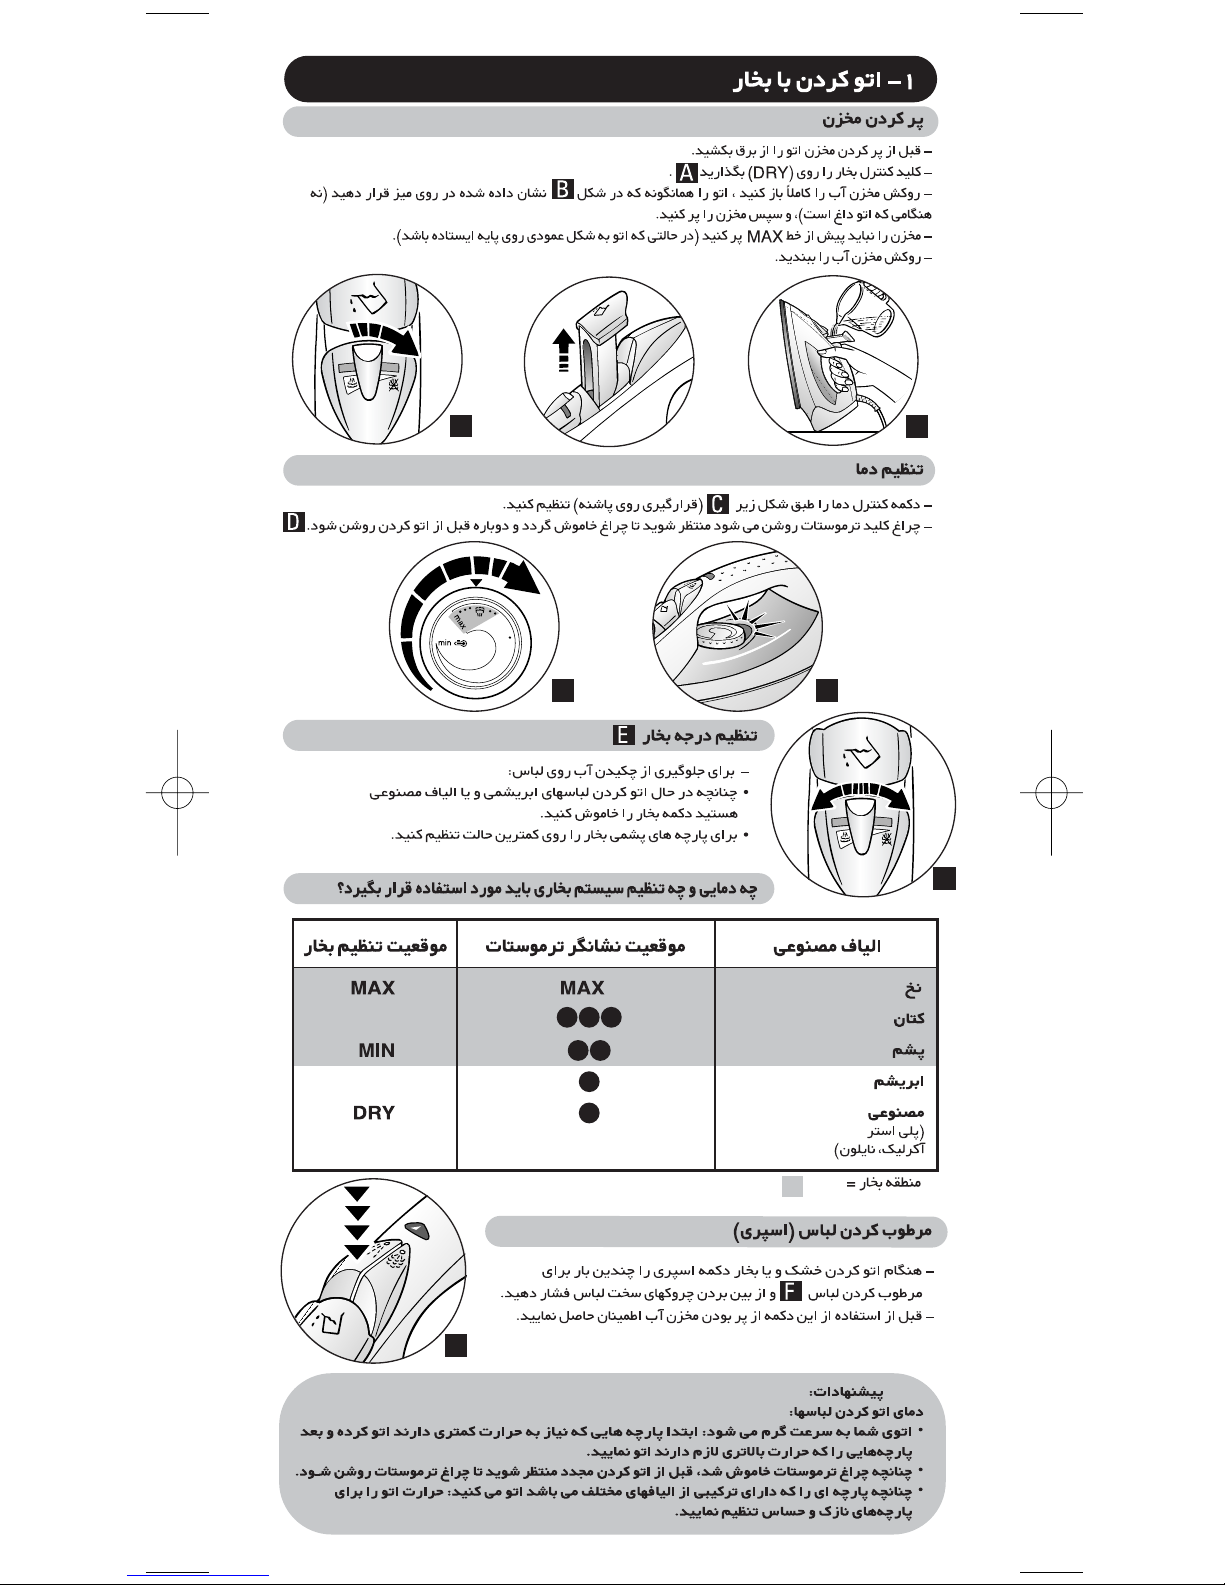
- Set the temperature control shown in the diagram below (D) referring to the table
below (or on the heel).
- The thermostat light comes on. Wait for the light to go off and come on again before
you start ironing (E).
1- STEAM IRONING
- Unplug your iron before filling it.
- Set the steam control on DRY (A).
- Open the water tank filler cover completely (B), set the iron on a table (not when the iron is
hot) shown in the diagram (C) below, and fill the tank.
- Do not exceed the MAX line indicated on the water tank (with the iron set on its heel).
- Close the water tank filler cover.
Filling the water tank
FABRIC
POSITION OF
THERMOSTAT CURSOR
STEAM SETTING
POSITION
COTTON
WOOL
SILK
SYNTHETIC
Polyester,Acetate,
Acrylic, Nylon
MIN
DRY
●●●
●●
●
●
= STEAM ZONE
Recommendations:
Fabrics and ironing temperatures:
• Your iron heats up quickly: begin by ironing those fabrics that are ironed at low
temperatures, then go on to those requiring a higher temperature;
• If you turn down the thermostat, wait until the thermostat light comes back on
before beginning to iron again.
• When ironing fabrics with mixed fibres, set the ironing temperature for the most
delicate of the fibres.
- In order to avoid water dripping from the iron onto the
linen:
• Turn off the steam when ironing silk or synthetic fabrics.
• Set it at the minimum position for wool.
F
G
- When steam or dry ironing, press several times on the
Spray Button to moisten the linen (G) and to remove
stubborn creases.
- Make sure that there is water in the tank before using
this button.
What temperature and which steam setting to use ?
Setting the steam level (F)
Moistening the linen (Spray)
Setting the temperature
LINEN
MAX
MAX
Page 3
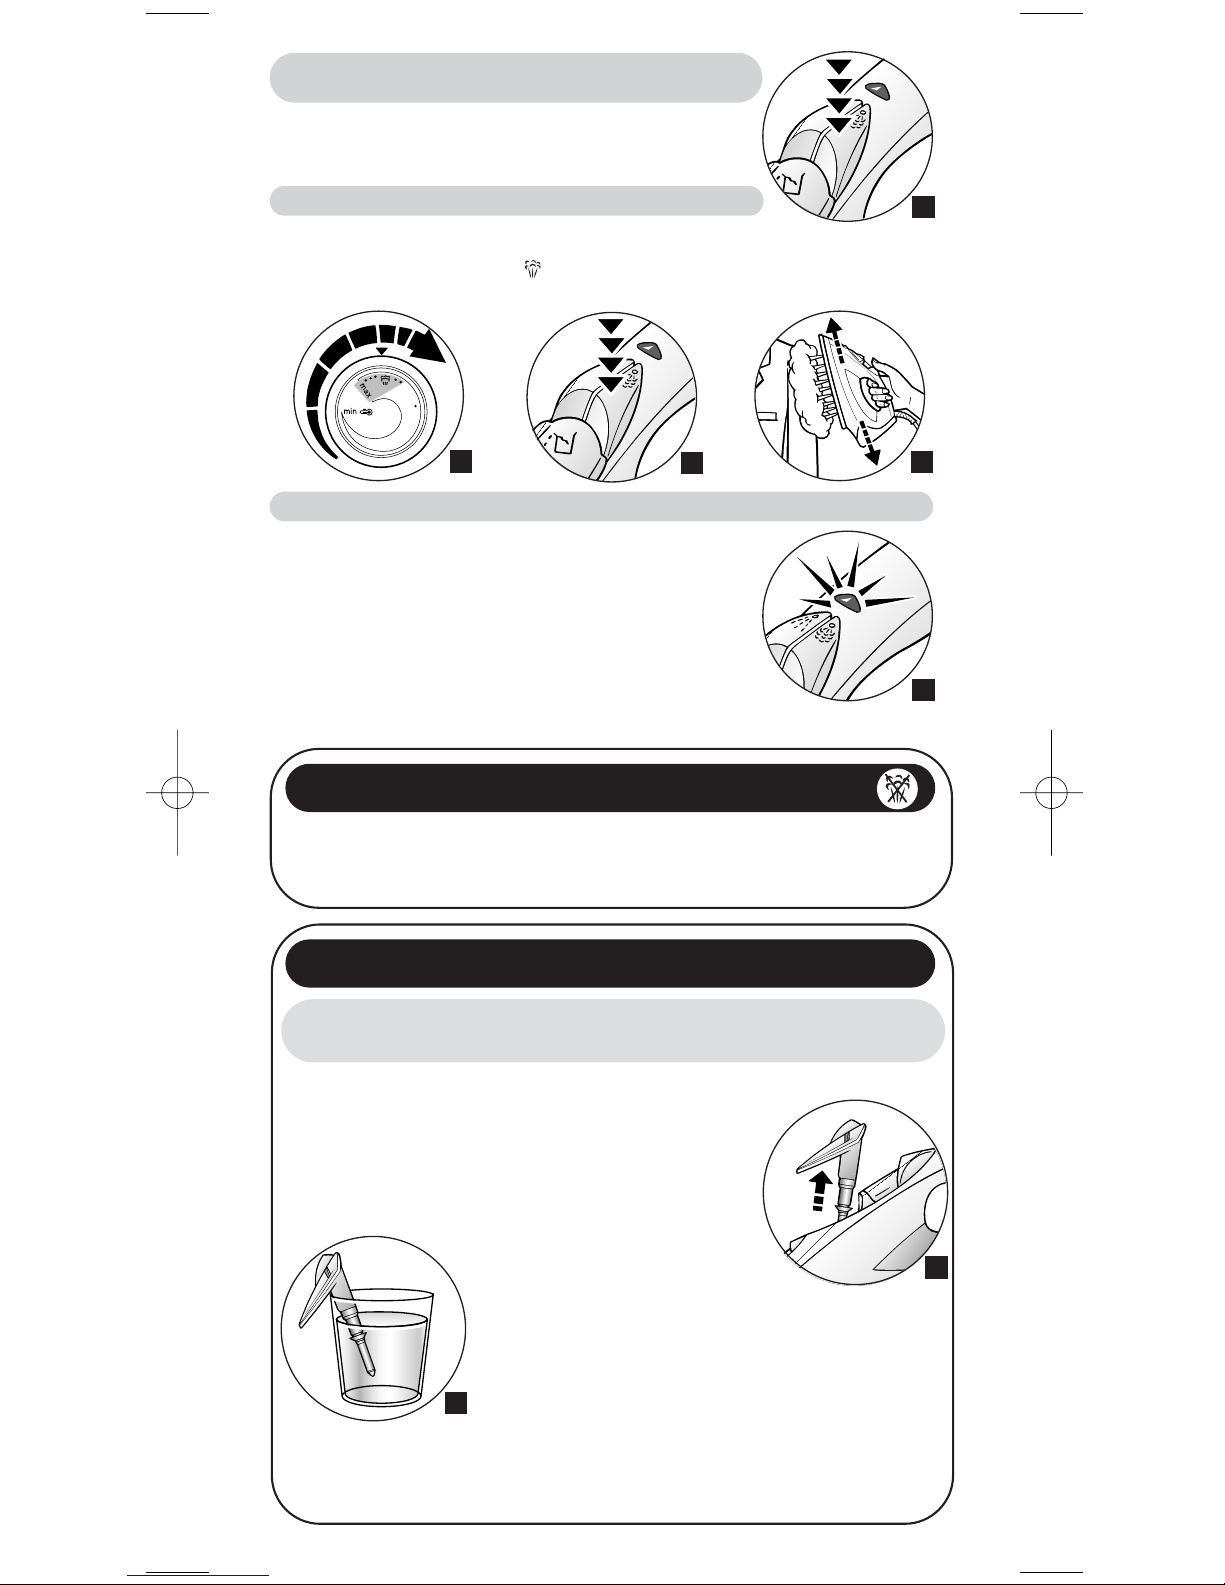
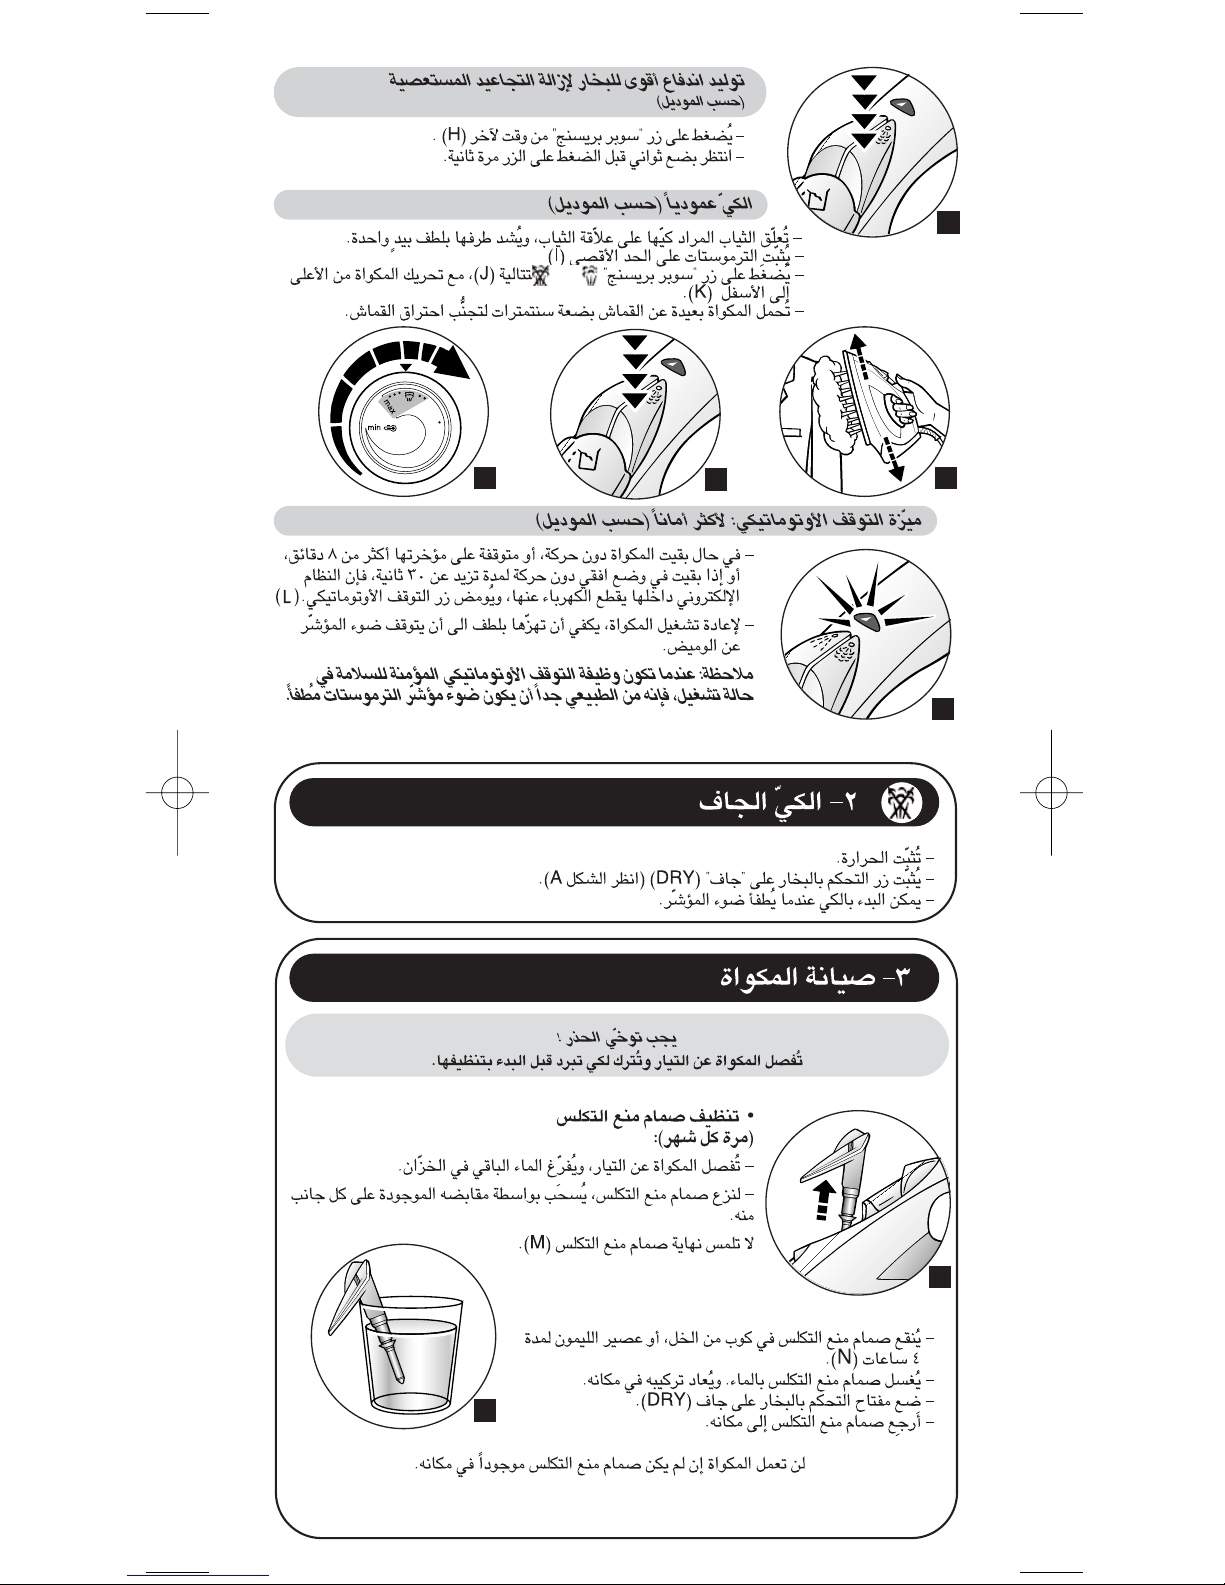
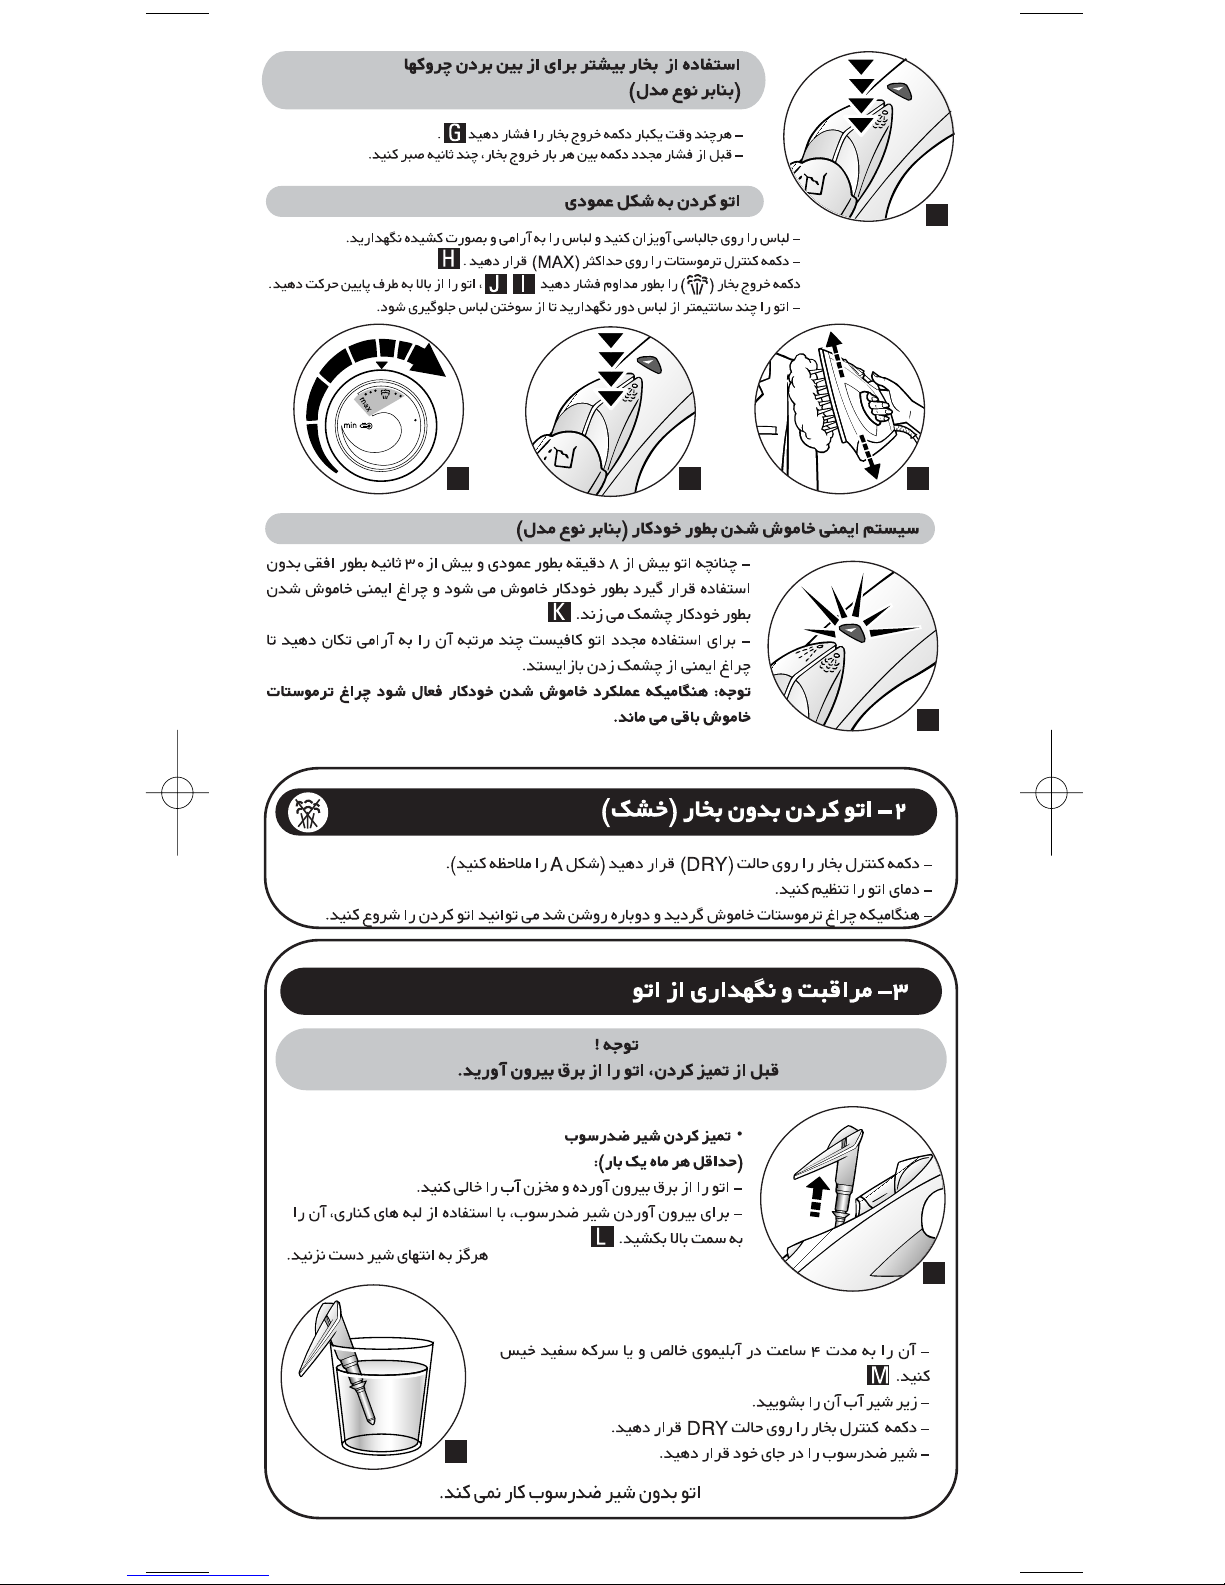
- Hang up the garment on a hanger and hold the fabric slightly taut with one hand.
- Set the thermostat control on MAX (I).
- Press the shot of steam button ( ) repeatedly (J), moving the iron from top to bottom (K).
- Hold the iron a few centimetres from the fabric to avoid burning delicate fabrics.
I
J
K
- Press the shot of steam button from time to time (H).
- Wait a few seconds between each shot before pressing
the button again.
H
- The electronic system cuts off the electric power and the AutoStop warning light flashes if the iron is left vertically
on its heel for more than 8 minutes, or in a horizontal
position for more than 30 seconds (L).
- To restart the iron, just move it gently until the warning light
stops flashing.
Note :When the Auto-Stop warning light is on, it is normal
for the thermostat light to be off.
L
2- DRY IRONING
- Set the steam control on DRY (see diagram A).
- Set the temperature.
- You may start ironing when the thermostat light goes out and comes on again.
3- MAINTAINING YOUR IRON
BE CAREFUL !
Unplug your iron and let it cool off before cleaning it.
• CLEANING THE ANTI-CALC VALVE
(Once per month) :
- Unplug your iron and empty the water tank.
- To remove the anti-calc valve, pull it up using the tabs
located on each side (M).
NEVER TOUCH THE END OF THE VALVE.
- Soak the valve in a cup of white spirit vinegar or plain lemon
juice for 4 hours (N).
- Rinse the valve in tap water.
- Place the steam control on dry.
- Replace the anti-scale valve.
THE IRON WILL NOT FUNCTION WITHOUT THE ANTI-CALC VALVE
M
N
Obtaining more steam for removing wrinkles
(depending on the model)
Auto-Stop safety feature
(depending on the model)
Vertical steam ironing
(depending on the model)
Page 4
• USING THE SELF-CLEANING FUNCTION :
In order to extend the life of your iron, use the Self-Cleaning function once per
month.
- Unplug your iron and set the steam control on DRY .
- Fill the water tank up to the limit (see recommendations for the types of water to use).
- Leave water tank filler cover open until the end of the operation.
- Place your iron on its heel and set the thermostat control on MAX.
- Plug in your iron and wait until the thermostat light goes out.
- Unplug the iron and hold it over a sink in the horizontal position.
- Place the steam control on MAX.
- Raise the anti-calc valve without removing it completely.
- Shake the iron gently, over the sink,until all of the water in the water tank (with the
impurities) has flowed out via the sole plate.
- At the end of the operation, push the anti-calc valve back into position.
- Turn the iron back on for 2 minutes, setting it on its heel, to dry the sole plate.
- Unplug the iron, and when the soleplate is just warm, wipe it with a soft cloth.
• CLEANING THE SOLE PLATE:
- While the soleplate is still just warm, clean it by rubbing it with a moist, non-metallic pad.
Recommendation :
The self-cleaning function helps to delay the scaling of your iron.
3- MAINTAINING YOUR IRON (continued)
4- STORING YOUR IRON
- Unplug it and wait until the sole plate has cooled off.
- Empty the water tank and set the steam control to DRY.
- Store the iron on its heel.
GUARANTEE (U.K. ONLY)
Details of the guarantee are shown on the guarantee card enclosed with
the appliance.This guarantee does not affect your statutory rights.
Should service or further information be required please contact the Tefal
Customer Relations Department (see Helpline or enclosed Service
Information leaflet).
Do not attempt to dismantle the appliance yourself – this will negate the
guarantee.
In line with a policy of continuous product improvement,Tefal reserves the
right to change product specifications without prior notice.
Page 5
If you have any problems or queries, please call our Customer Relations
Team first for expert help and advice :
0845 602 1454 - UK
(01) 4751947 - IRELAND
Or consult our web site : www. tefal.co.uk
HELPLINE
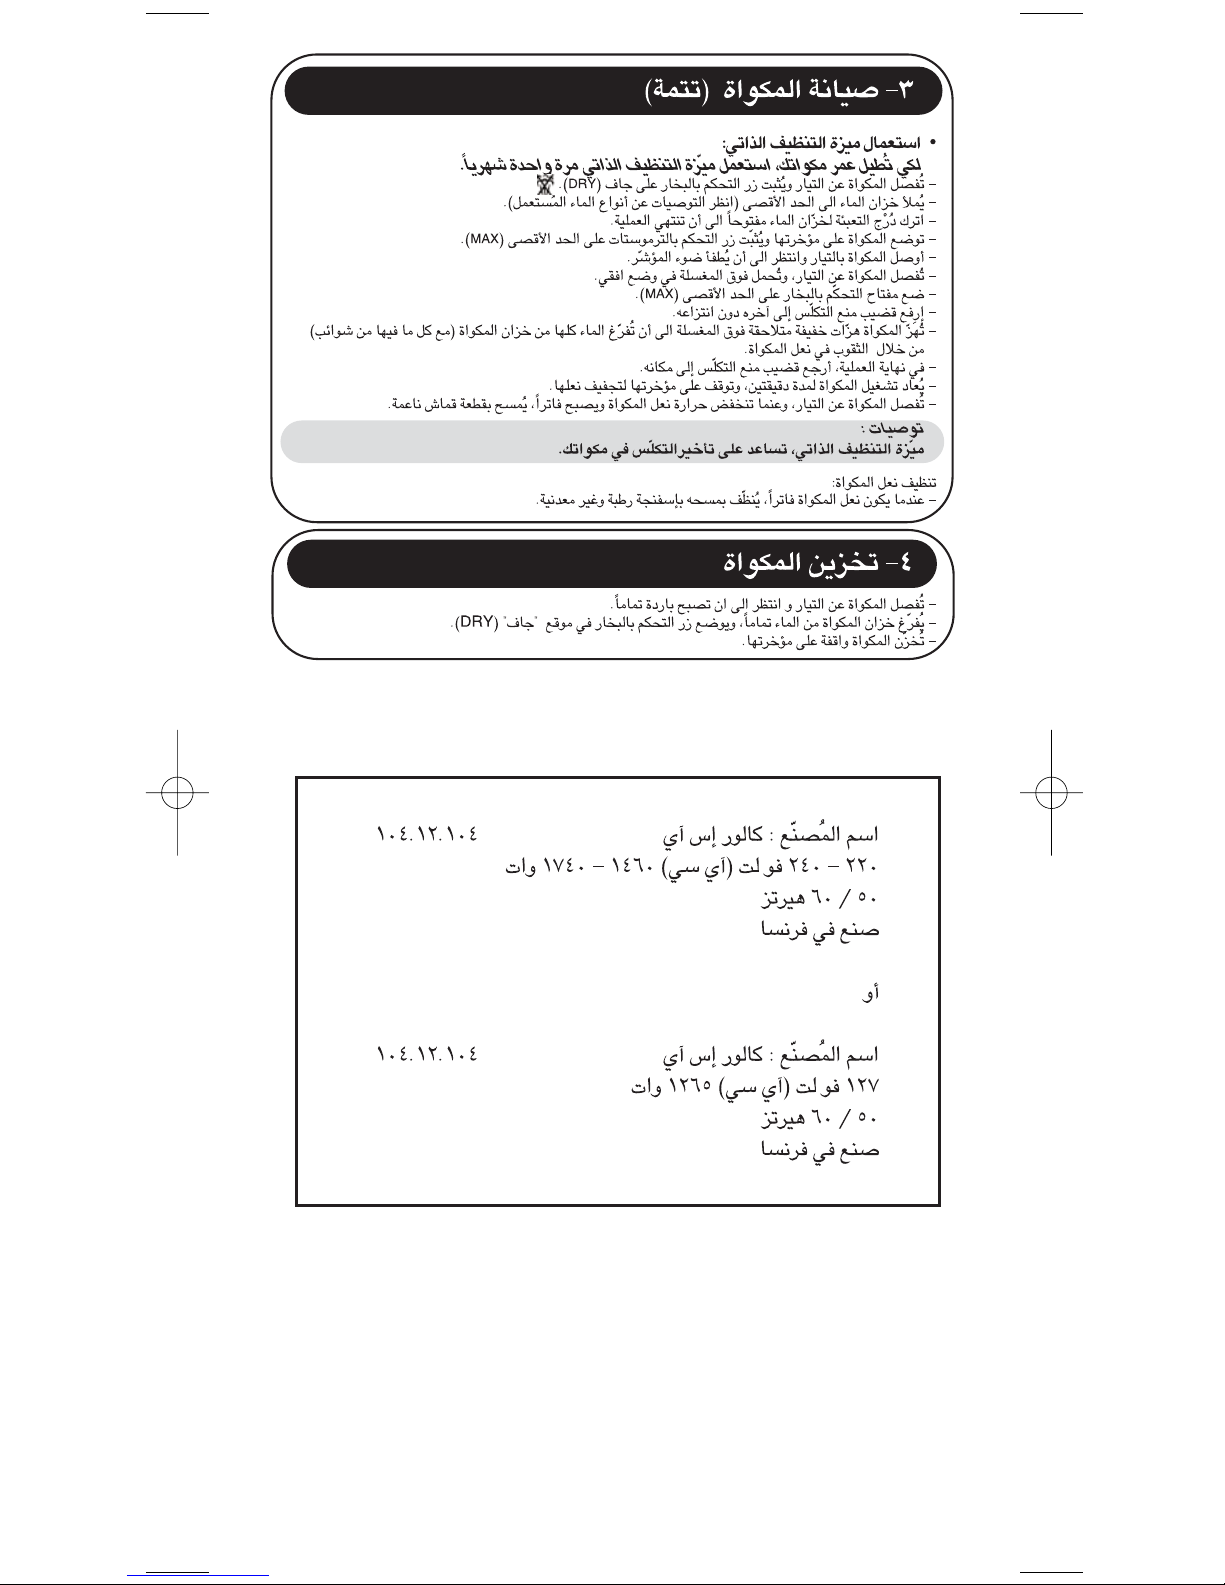
Name of manufacturer : CALOR S.A.S 3.12.104
220 - 240 V a.c. 1460 - 1740 W
50 / 60 Hz
Made in France
OR
Name of manufacturer : CALOR S.A.S 3.12.104
127 V a.c. 1265 W
50 / 60 Hz
Made in France
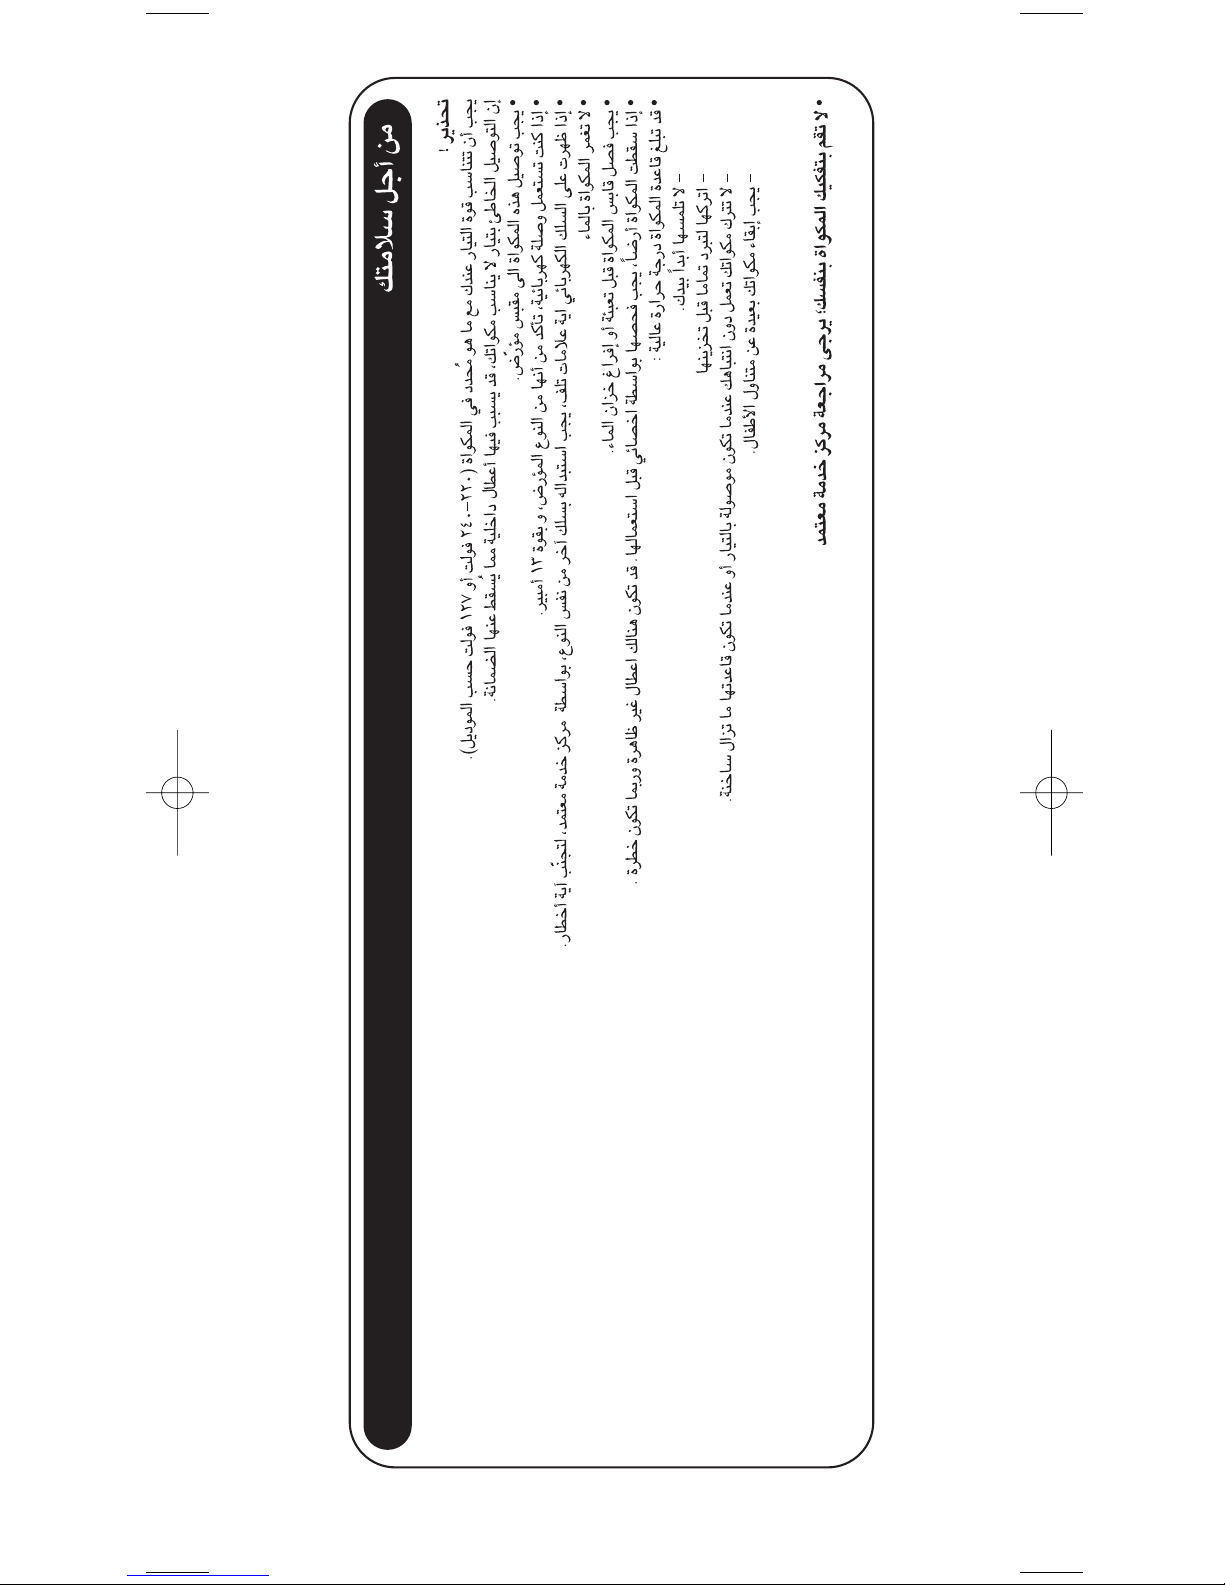
FOR YOUR SAFETY
• Warning! The voltage of your electrical installation must correspond to that of
the iron (220V-240V or 127 V depending on the model). Connecting to the
wrong voltage may cause irreversible damage to the iron and will invalidate the
guarantee.
• This iron must always be plugged into an earthed socket.
• If using a mains extension lead, ensure that it is correctly rated (10 A or 13 A
for UK only), with an earth.
• If the electrical cord becomes damaged, it must be immediately replaced by an
Approved Service Centre to avoid any danger.
• Never immerse your iron in water!
• The appliance must be unplugged before filling or emptying the water tank.
• If the appliance falls, have it checked by a professional before using it again;
unseen damage may be dangerous.
• The sole plate may be very hot:
- Never touch it.
- Always let it cool off before putting it away.
- Never leave your iron unattended when it is plugged in or while the
soleplate is still hot.
- Always keep your iron out of the reach of children.
• NEVER DISMANTLE YOUR IRON ; ALWAYS CONTACT AN
APPROVED SERVICE CENTRE.
This product has been designed for domestic use only.
Any professional use, inappropriate use or failure to comply with the
instructions, the manufacturer accepts no resposibility and the
guarantee will not apply.
Page 6
If you have any problem or queries, please contact our Customer
Relations team first for expert help and advice.
5- IS THERE A PROBLEM ?
Problems Possible causes Solutions
• The iron does not heat up.
• Water drips from the holes in the sole plate.
• Brown streaks come through the holes in the sole plate
and stain the linen.
• The sole plate is dirty or brown and can stain the linen.
• There is little or no steam.
• The sole plate is scratched or damaged.
• The auto-stop safety switch has operated
• Thermostat control not correctly positioned
• The chosen temperature is too low and does not allow for the
formation of steam.
• You are using steam while the iron is not hot enough.
• You are using the shot of steam button too often.
• The steam flow is too high.
• You have stored the iron horizontally, without emptying it and
without setting it to DRY.
• You are using chemical descaling agents.
• You are using pure distilled water.
• Fabric fibres have accumulated in the holes of the sole plate and
are burning.
• Your linen is not rinsed sufficiently or you have ironed a new
garment before washing it.
• You are using too high a temperature.
• You are using starch.
• The water tank is empty.
• The anti-calc valve is dirty.
• Your iron has a build-up of scale.
• You iron has been used dry for too long.
• You have placed your iron flat on a metallic rest-plate.
• You have ironed over a zip.
• Restart the iron by lightly moving it.
• Set the thermostat control to the required fabric to be ironed.
• Set the thermostat in the coloured zone (from ●● to MAX).
• Wait until the thermostat light goes out.
• Wait a few seconds between each use of the button.
• Reduce the steam flow.
• See the section "Storing your iron".
• Do not add any descaling agents to the water in the water tank.
• Do a self-cleaning and use tap water or 50 % tap water and 50 %
demineralized water.
• Do a self-cleaning.
• Clean the sole plate with a non-metallic sponge.
Vacuum the holes of the sole plate from time to time.
• Ensure linen is rinsed thoroughly to remove any soap deposits or
chemicals on new garments which have been sucked up by the iron.
• Clean the sole plate as indicated above. See the temperature table to
correctly set the thermostat.
• Clean the sole plate as indicated above. Always spray starch onto the
reverse side of the fabric to be ironed.
• Fill it with tap water.
• Clean the anti-calc valve.
• Clean the anti-calc valve and do a self-cleaning.
• Do a self-cleaning.
• Always set your iron on its heel.
• Try to avoid ironing over zips which may have rough edges.
Page 7
Spray
Tige anti-calcaire
A nettoyer une fois
par mois
Commande vapeur
Tiroir de remplissage
du réservoir
Touche Super Pressing
(selon modèle)
Pour défroisser
Touche Spray
Pour humidifier le linge
Voyant Auto-Stop
(selon modèle)
Voyant de thermostat
S’éteint quand la
température est atteinte
Commande du thermostat
Pour choisir la température de
repassage
Français
Lisez attentivement ce mode d’emploi et conservez-le.
SUPERGLISS
Quelle eau utiliser ?
Votre appareil a été conçu pour fonctionner avec l’eau du robinet. Il est cependant
nécessaire de procéder régulièrement à l’auto-nettoyage de la chambre de vaporisation,
afin d’éliminer le calcaire libre. Si votre eau est très calcaire (ceci est vérifiable auprès
de votre mairie ou du service des eaux), il est possible de mélanger l’eau du robinet avec
de l’eau déminéralisée du commerce dans les proportions suivantes :
- 50% d’eau du robinet, - 50% d’eau déminéralisée.
Quelles eaux éviter ?
La chaleur concentre les éléments contenus dans l’eau, lors de l’évaporation. Les eaux
ci-dessous contiennent des déchets organiques ou des éléments minéraux qui peuvent
provoquer des crachements, des coulures brunes ou un vieillissement prématuré de
votre appareil :eau déminéralisée du commerce pure, eau des sèche-linges, eau parfumée,
eau adoucie, eau des réfrigérateurs, eau des batteries, eau des climatiseurs, eau distillée,
eau de pluie.
Cordon
d’alimentation
Repère maxi du réservoir
Ne dépassez pas cette limite
Semelle
Attention !
Avant la première utilisation de votre fer en
position vapeur, nous vous recommandons de le
faire fonctionner quelques instants en position
horizontale et en dehors de votre linge. Dans
les mêmes conditions, actionner plusieurs fois la
commande Super Pressing.
Durant les premières utilisations, il peut se
produire un dégagement de fumée et une odeur
sans nocivité. Ce phénomène sans conséquence
sur l’utilisation disparaîtra rapidement.
Attention ! Retirez le protecteur de semelle
avant de faire chauffer le fer (selon modèle).
Page 8
1- REPASSER A LA VAPEUR
- Débranchez votre fer avant de le remplir.
- Placez la commande vapeur sur SEC (A).
- Tirez le tiroir de remplissage du réservoir au maximum (B), posez le fer sur une table
suivant le schéma (C) ci-dessous et remplissez le.
- Ne dépassez pas le repère “MAX” indiqué sur le réservoir (le fer sur son talon).
- Refermez le tiroir de remplissage du réservoir.
A
B
C
Remplissez le réservoir
D E
TISSUS
POSITION DU CURSEUR
DU THERMOSTAT
POSITION RÉGLAGE
VAPEUR
COTON
LAINE
SOIE
SYNTHETIQUE
Polyester, Acétate,
Acrylique, Polyamide
MIN
SEC
●●●
●●
●
●
= ZONE VAPEUR
Notre conseil :
Tissus et température de repassage :
• Votre fer chauffe vite : commencez d’abord par les tissus qui se repassent à basse
température, puis terminez par ceux qui demandent une température plus élevée;
• Si vous baissez le thermostat, attendez que le voyant se rallume avant de repasser à
nouveau
• Si vous repassez un tissu fait de fibres mélangées : réglez la température de
repassage sur la fibre la plus fragile
- Afin de ne pas risquer de goutter sur le linge :
• Couper la vapeur pour repasser de la soie
ou des synthétiques.
• Réglez-la au niveau mini pour la laine.
F
G
- Quand vous repassez à la vapeur ou à sec, appuyez
plusieurs fois de suite sur le bouton Spray pour humidifier
le linge (G) et enlever les plis résistants.
- Vérifiez s’il y a de l’eau dans le réservoir avant d’utiliser ce
bouton.
Quelle température et quelle vapeur utiliser ?
Réglez la vapeur (F)
Humidifiez le linge (spray)
Réglez la température
LIN
MAX
MAX
- Réglez la commande du thermostat
en fonction du schéma ci-contre (D),
en vous reportant au tableau ci-après
(ou au talon).
- Le voyant s’allume. Il s’éteindra quand
la semelle sera suffisamment chaude (E).
Page 9
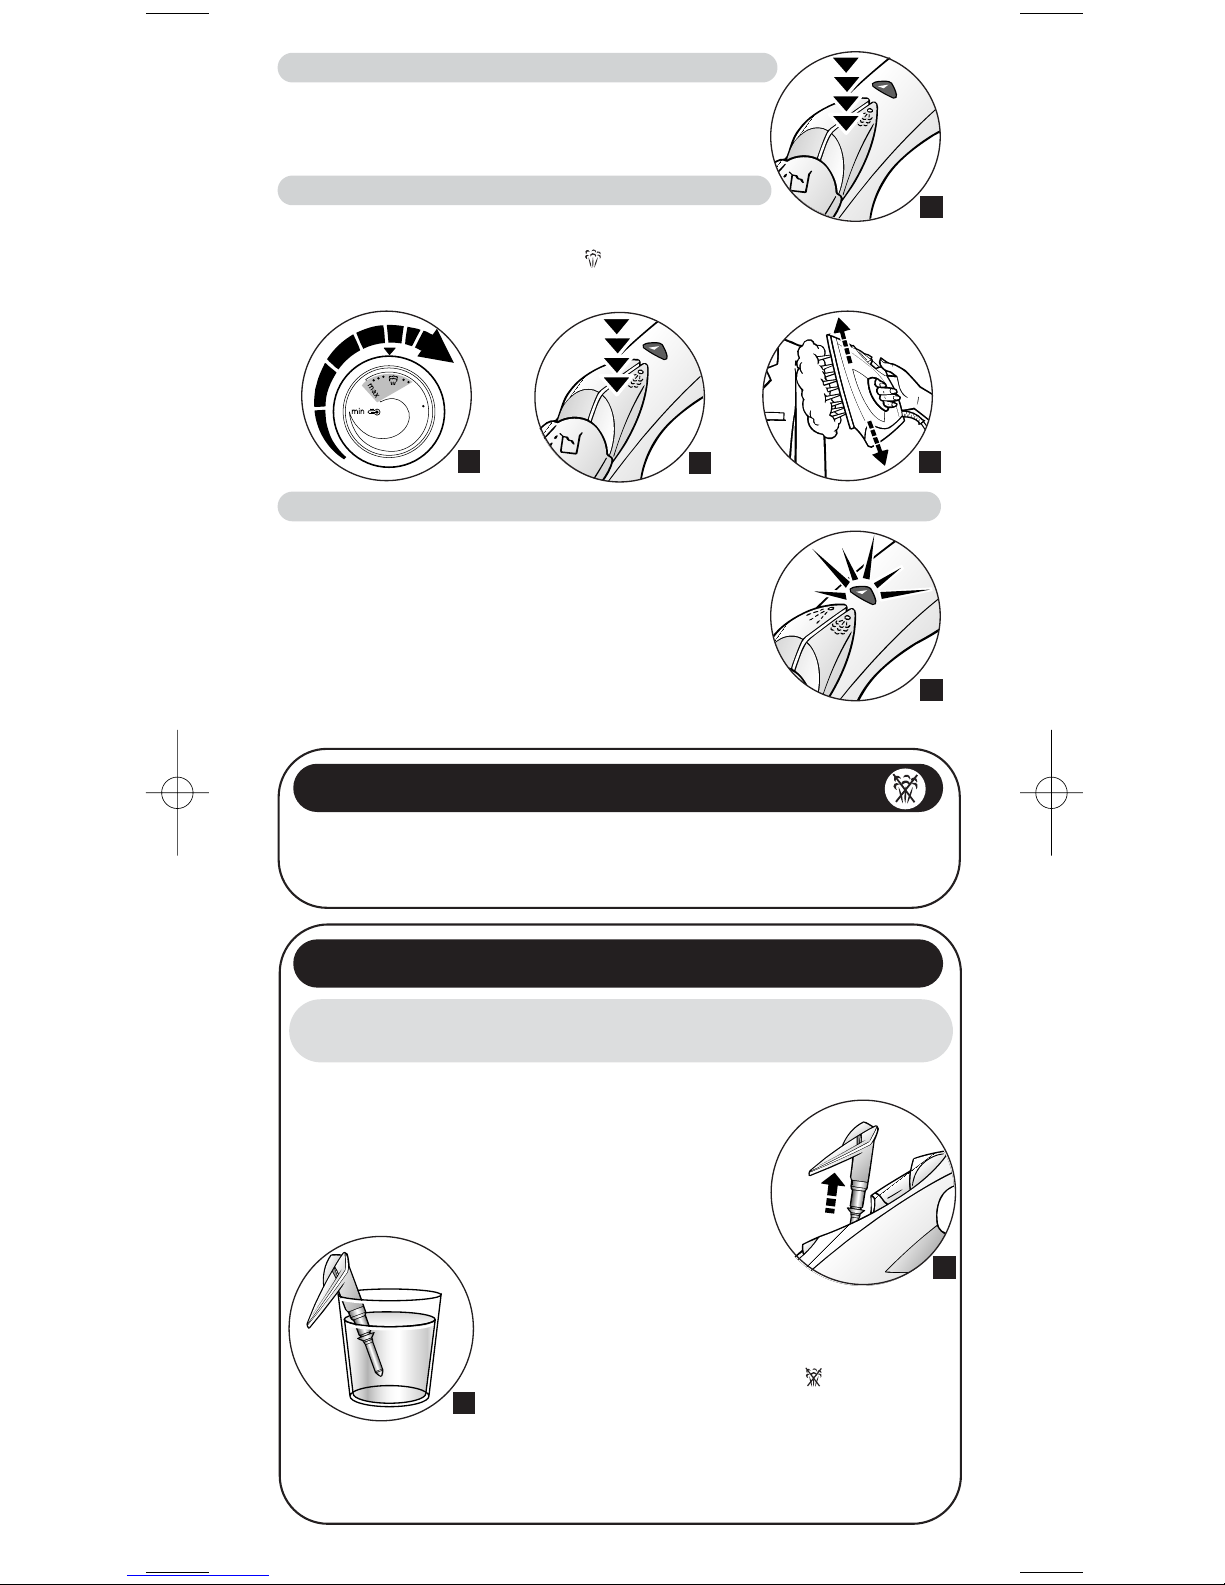
• NETTOYEZ LA TIGE ANTI-CALCAIRE
(une fois par mois) :
- Débranchez votre fer et videz le réservoir.
- Pour ôter la tige anti-calcaire, tirez-la vers le haut grâce aux
préhensions situées de chaque côté (M).
NE JAMAIS TOUCHER L’EXTREMITE DE LA TIGE.
- Laissez tremper la tige pendant 4 heures dans
un verre de vinaigre d’alcool blanc ou bien du jus de citron
nature (N).
- Rincez la tige sous l’eau du robinet.
- Positionnez la commande vapeur sur sec .
- Remettez la tige anti-calcaire en place.
LE FER NE FONCTIONNE PAS SANS LA TIGE ANTI-CALCAIRE.
- Suspendez le vêtement à un cintre et tendez le tissu
- Placez la commande de thermostat sur MAX, (I)
- Appuyez sur la touche Super Pressing ( ) par impulsions(J) et effectuez un mouvement
de haut en bas.Visuel (K)
- Maintenez le fer à quelques centimètres du tissu pour ne pas brûler les textiles délicats.
I
J
K
- Appuyez de temps en temps sur la touche Super Pressing (H)
- Respectez un intervalle de quelques secondes entre deux
appuis.
H
- Le système électronique coupe l’alimentation et le voyant
de l’auto-stop clignote si le fer reste plus de 8 minutes
immobile sur le talon ou plus de 30 secondes posé à
plat.
- Pour remettre le fer en marche, il suffit de l’agiter légèrement
jusqu’à ce que le voyant ne clignote plus.
NB : Quand la sécurité auto-stop fonctionne, il est normal
que le voyant de thermostat reste éteint.
L
2- REPASSER A SEC
- Réglez la température.
- Placez la commande vapeur sur SEC (voir dessin A)
- Vous pouvez repasser lorsque le voyant est éteint.
3- ENTRETENIR VOTRE FER
ATTENTION !
Débranchez et laissez refroidir votre fer avant de le nettoyer.
M
N
Obtenir plus de vapeur pour défroisser (selon modèle)
Défroisser verticalement (selon modèle)
Sécurité Auto-Stop (selon modèle)
Page 10
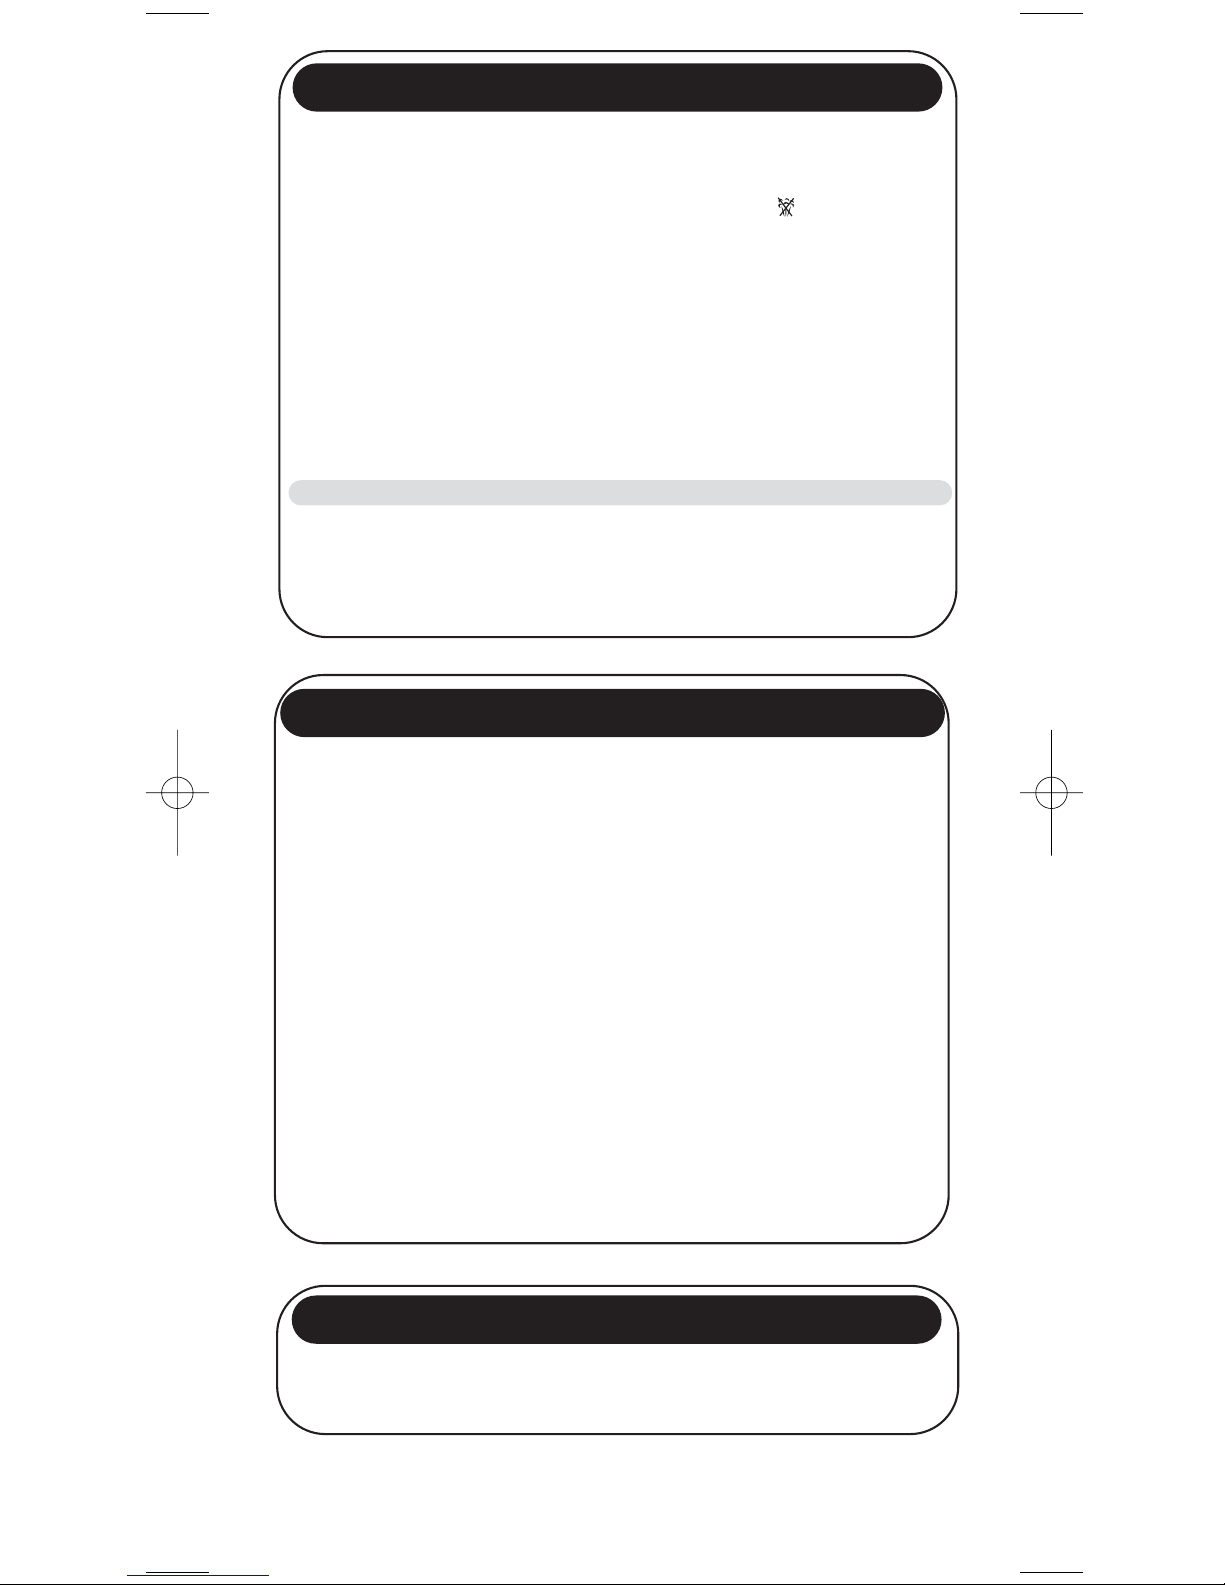
• FAITES FONCTIONNER L’AUTO-NETTOYAGE :
Pour prolonger la durée de vie de votre fer, faites fonctionner l’auto-nettoyage
une fois par mois.
- Débranchez votre fer et placez la commande vapeur sur SEC .
- Remplissez le réservoir jusqu’à la limite (voir nos conseils sur l’eau à utiliser).
- Laissez le tiroir de remplissage du réservoir ouvert jusqu’à la fin de l’opération.
- Posez votre fer sur son talon et placez la commande du thermostat sur MAX.
- Branchez votre fer et attendez que le voyant s’éteigne.
- Débranchez le fer et placez-le au dessus d’un évier à l’horizontale.
- Placez la commande vapeur sur MAX
- Soulevez la tige anti-calcaire jusqu’au point dur, sans l’extraire.
- Secouez le fer légèrement, au-dessus d’un évier, jusqu’à ce que toute l’eau du réservoir
(avec les impuretés) soit écoulée par la semelle.
- A la fin de l’opération, repoussez la tige anti-calcaire en position.
- Rebranchez votre fer 2 minutes sur son talon pour sécher la semelle.
- Débranchez votre fer et lorsque la semelle est tiède, essuyez-la avec un chiffon doux.
• NETTOYEZ LA SEMELLE :
- Lorsque la semelle est encore tiède, nettoyez-la en la frottant avec un tampon
non-métallique humide.
Notre conseil : L’auto-nettoyage permet de retarder l’entartrage de votre fer
3- ENTRETENIR VOTRE FER (suite)
POUR VOTRE SECURITE
• Attention! la tension de votre installation électrique doit correspondre à
celle du fer (220-240V).Toute erreur de branchement peut causer un
dommage irréversible au fer et annule la garantie.
• Ce fer doit être obligatoirement branché sur une prise de courant avec
terre.
Si vous utilisez une rallonge, vérifiez qu’elle est de type bipolaire (10A) avec
conducteur de terre.
• Si le câble d’alimentation est endommagé, il doit être immédiatement
remplacé par un Centre Service Agréé, afin d’éviter un danger.
• Ne plongez jamais le fer dans l’eau !
• L’appareil doit être débranché avant le remplissage ou la vidange du réservoir.
• En cas de chute du fer, faites-le vérifier par un professionnel avant de le
remettre en marche : des dégâts invisibles peuvent être dangereux pour
votre sécurité.
• La semelle du fer peut être très chaude :
- Ne la touchez jamais.
- Laissez toujours refroidir votre fer avant de le ranger.
- Ne laissez jamais votre fer sans surveillance lorsqu’il est branché ou
lorsque la semelle est encore chaude.
- Ne laissez jamais votre fer à la portée des enfants.
• NE DEMONTEZ JAMAIS VOTRE FER ;
ADRESSEZ-VOUS TOUJOURS A UN CENTRE SERVICE AGREE.
4- RANGER VOTRE FER
- Débranchez-le et attendez que la semelle se refroidisse.
- Videz le réservoir et placez la commande de repassage sur SEC.
- Rangez le fer sur son talon.
Page 11
Pour tout problème, adressez-vous à un centre service agréé
pour faire vérifier votre fer.
5- UN PROBLEME AVEC VOTRE FER
Problèmes Causes possibles Solutions
• L’eau coule par les trous de la semelle.
• Des coulures brunes sortent de la semelle et
tâchent le linge.
• La semelle est sale ou brune et peut tâcher
le linge.
• Votre fer produit peu ou pas de vapeur.
• La semelle est rayée ou abîmée.
• La température choisie ne permet pas de faire de la vapeur.
• Vous utilisez la vapeur alors que le fer n’est pas assez chaud.
• Vous utilisez la commande Super Pressing trop souvent.
• Le débit de vapeur est trop important.
• Vous avez rangé le fer à plat, sans le vider et sans placer la
commande sur SEC.
• Vous utilisez des produits détartrants chimiques.
• Vous utilisez de l’eau déminéralisée pure.
• Des fibres de linge se sont accumulées dans les trous de
la semelle et se carbonisent.
• Vous utilisez une température trop élevée.
• Votre linge n’est pas suffisamment rincé ou bien vous utilisez de
l’amidon.
• Le réservoir est vide.
• La tige anti-calcaire est sale.
• Votre fer est entartré.
• Votre fer a été utilisé trop longtemps à sec.
• Vous avez posé votre fer à plat sur un repose-fer métallique.
• Placez le thermostat sur la zone colorée (de ●● à MAX)
• Attendez que le voyant s’éteigne.
• Attendez quelques secondes entre chaque utilisation.
• Réduisez le débit.
• Consultez le chapitre «Ranger votre fer».
• N’ajoutez aucun produit détartrant à l’eau du réservoir.
• Faites fonctionner l’auto-nettoyage et utilisez l’eau du robinet.
• Faites fonctionner l’auto-nettoyage.
Nettoyez la semelle avec une éponge non métallique.
Aspirez de temps en temps les trous de la semelle.
• Nettoyez la semelle comme indiqué plus haut.
Consultez le tableau des températures pour régler le thermostat.
• Nettoyez la semelle comme indiqué plus haut.
Pulvérisez l’amidon à l’envers de la face à repasser.
• Remplissez-le avec de l’eau du robinet.
• Nettoyez la tige anti-calcaire
• Nettoyez la tige anti-calcaire et faites fonctionner
l’auto-nettoyage.
• Faites fonctionner l’auto-nettoyage.
• Posez toujours votre fer sur son talon.
Page 12
Page 13
Page 14
Page 15
I
J
K
H
L
M
N
Page 16
D E
A
B
C
F
G
Page 17
Page 18
Page 19
Page 20
Page 21
K
L
M
G
H I J
Page 22
C D
A
B
E
F
Page 23
Page 24

033101 - 10/04
 Loading...