

Page 1
1
2
4
6
17
18
8
9
10
11
12
13
14
15
7
5
3
16
Page 2

2
ENG
Protection of the environment
•Your equipment has been designed to work for many years. However, when finally you
decide to replace your deep fryer, do not forget to think of what you can do to help to
protect the environment by disposing of it at your local waste disposal centre.
• Before throwing away your deep fryer, the timer battery must be removed by an approved
Service Centre.
• Approved Service Centres will take back your used equipment in order to destroy it while
respecting the environment.
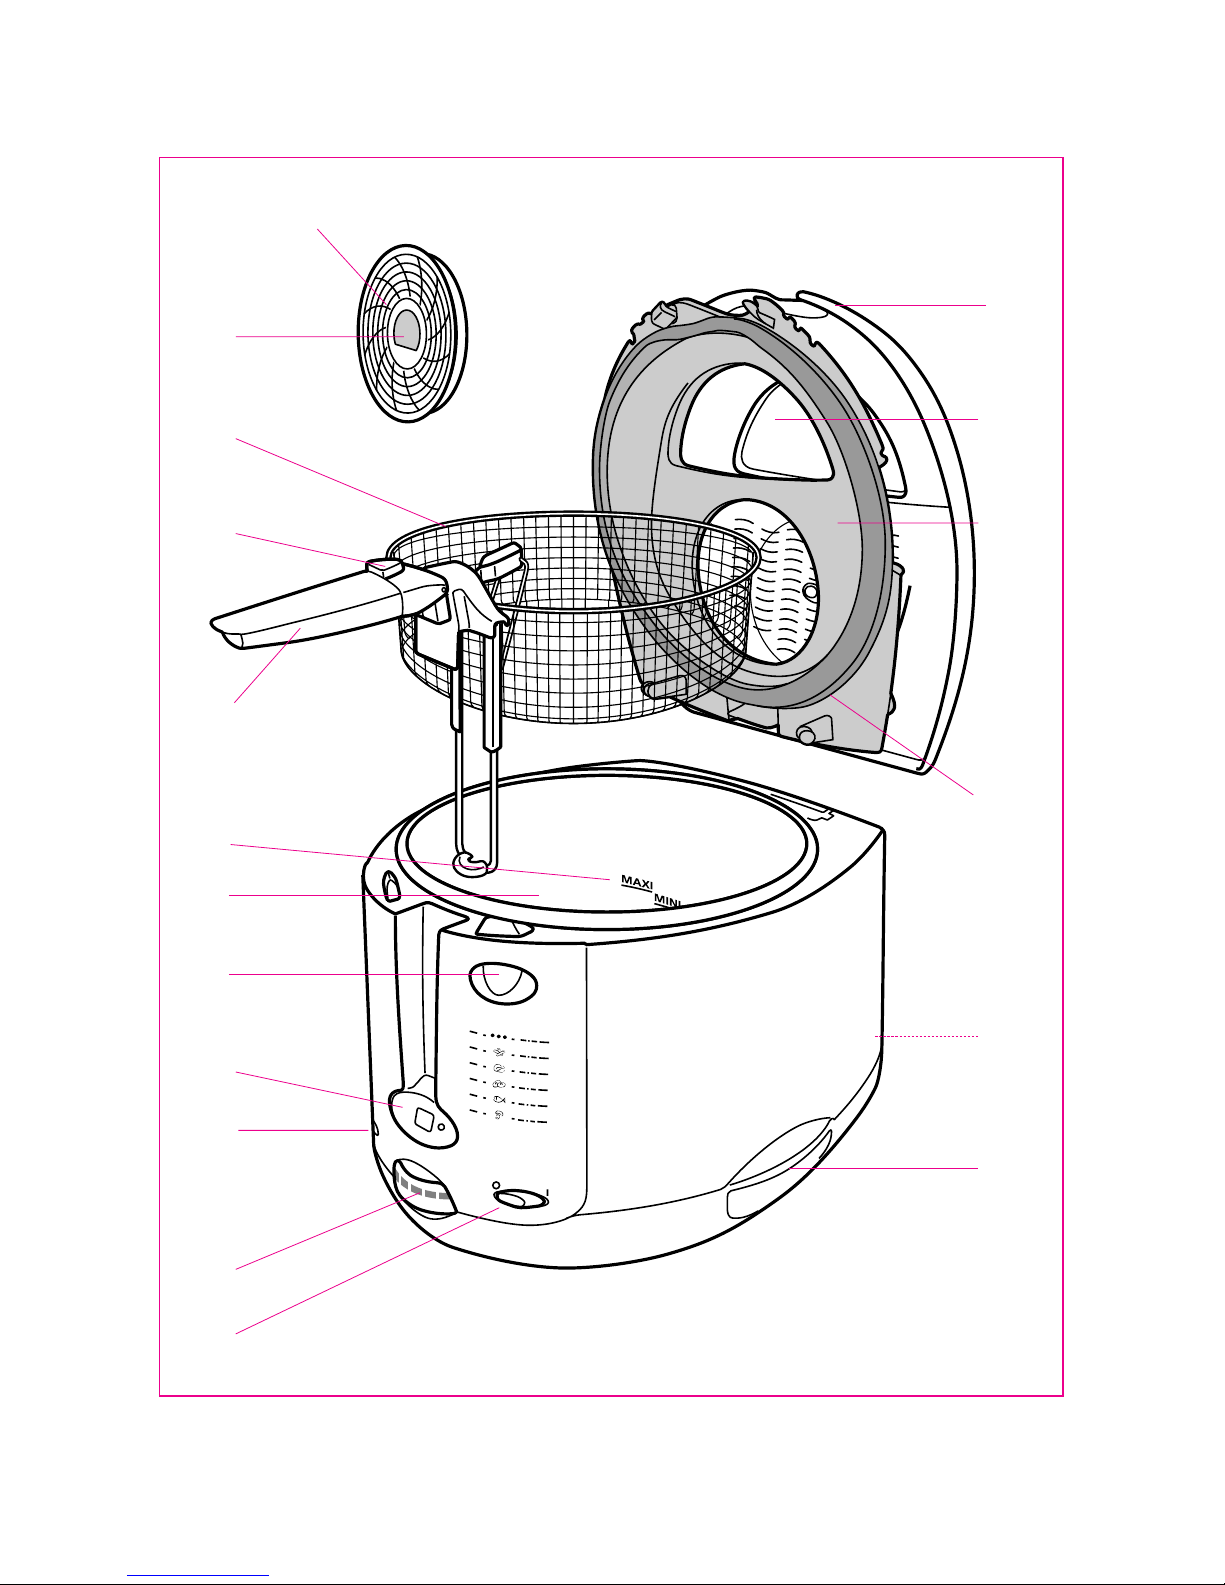
Description
1. Lid
2. Window
3. Removable steam guard
4. Anti-odour filter cartridge
5. Cartridge’s saturation indicator
6. Seal
7. Basket
8. Locking button on the basket
raising/lowering handle
9. Basket raising
and lowering handle
10. Min. and Max. bowl-filling
markers
11. Bowl (with non-stick coating
depending on model)
12. Lid opening button
13. Timer (depending on model)
14. Temperature indicator light
15. Adjustable thermostat
16. On-off switch
(depending on model)
17. Carrying handle
18. Power lead drum
Page 3
3
ENG
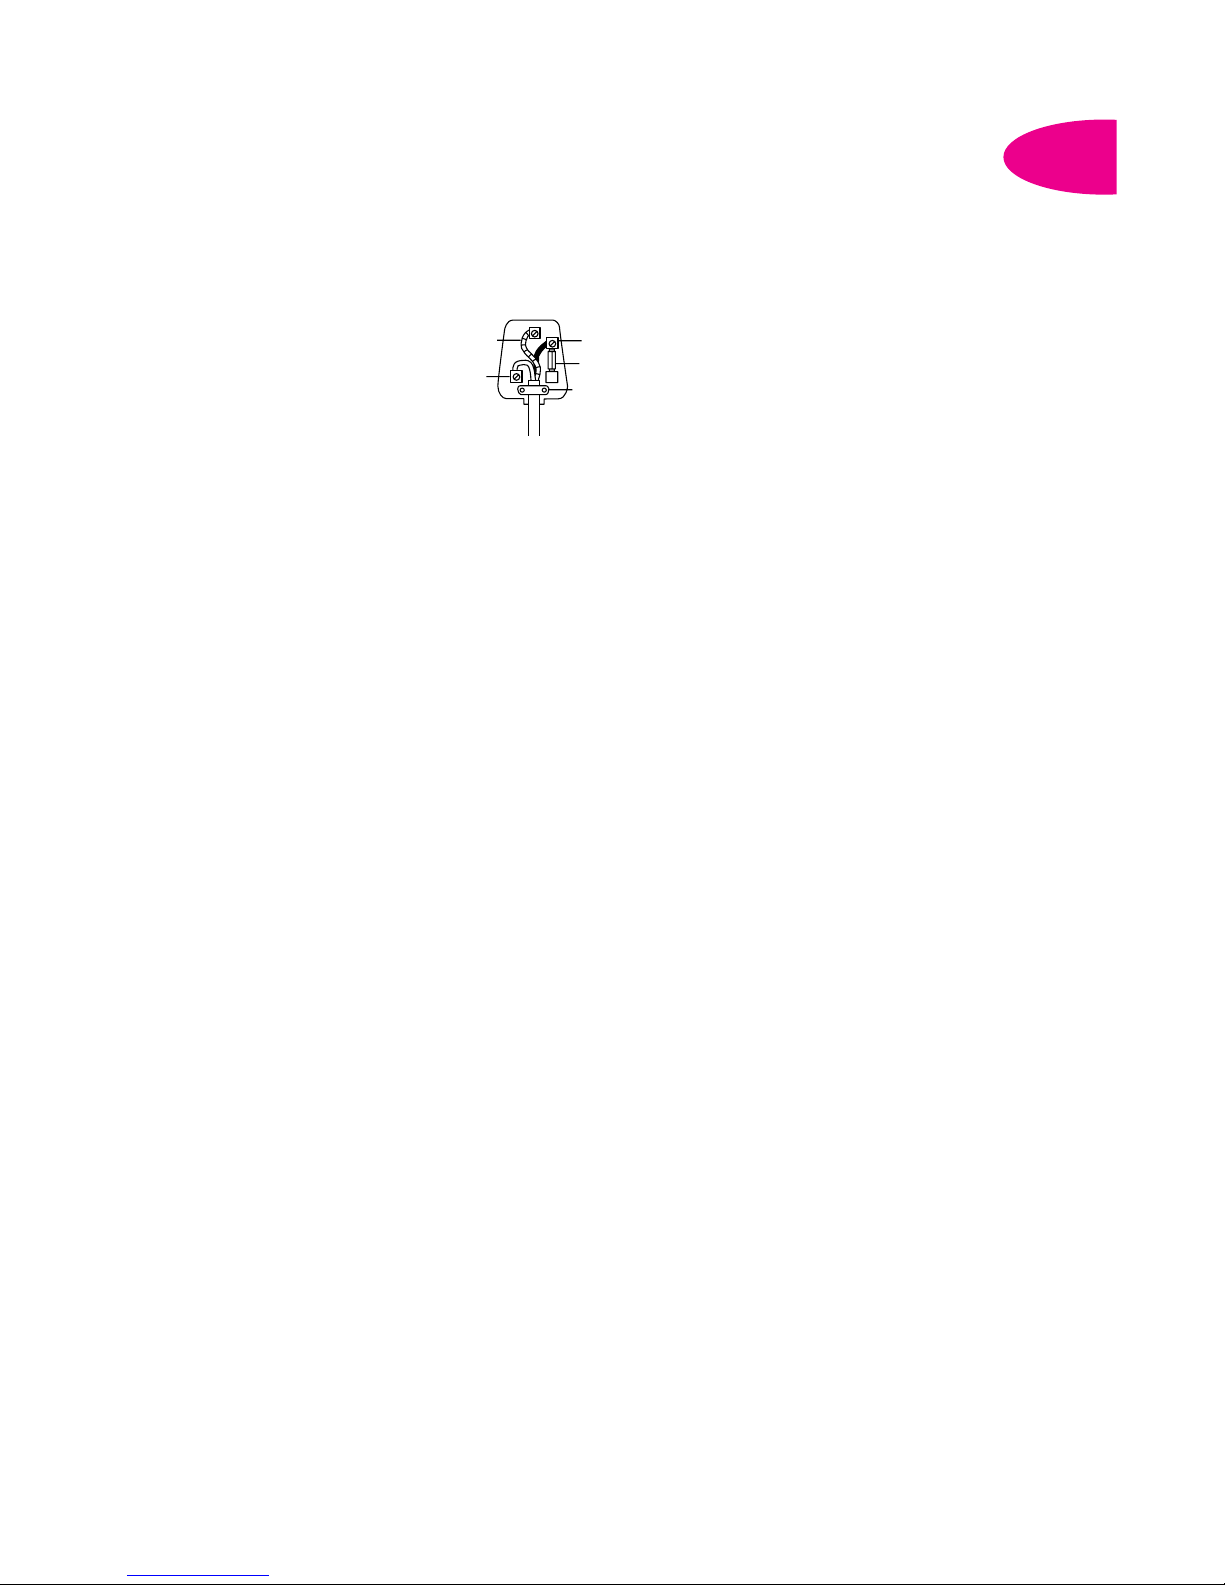
For UK users only - Wiring instructions
Warning:
this appliance
must be earthed.
Important:
the wire in this lead are
coloured in accordance with
the following codes :
Green and Yellow: Earth
Blue: Neutral
Brown: Live
• Connect the Green/Yellow wire to the terminal in
the plug marked “E” (or by the earth symbol) or
coloured Green or coloured Green and Yellow.
Connect the Brown wire to the terminal in the plug
marked “L” or coloured Red. Connect the Blue wire
to the terminal in the plug marked “N” or coloured
Black. A 13 amp fuse should be fitted when the
appliance is connected to a BS 1362 plug. Seek
professional advice if you are unsure of the correct
procedure of the above.
Voltage
• This appliance is designed to run on 230-240 volts
only. Check that the mains supply corresponds to
that shown on the rating plate of the appliance. If
the appliance is to be used in any country other
than that of purchase, it should be checked by an
approved Service Dealer. Standards can vary from
country to country.
About your factory fitted plug.
FOR UK ONLY
(supplied with certain models only)
• The lead is already fitted with a plug incorporating
a 13 amp fuse. If the plug does not fit your socket
outlet, see next paragraph.
• Should you need to replace the fuse in the plug
supplied, a 13 amp approved BS 1362 fuse must
be used.
• The fuse cover is an important part of the plug.
Please ensure that it is always refited. If you lose
this cover please do not use the plug. You may
contact TEFAL for a replacement.
• If the plug supplied does not fit your socket outlet,
it should be removed from the mains lead and
disposed of safety. The flexible cord insulation
should be stripped back as appropiate and a
suitable alternative plug fitted. The replacement
plug must be equipped with a 13 amp fuse.
Important:
if the electrical cord of this appliance is damaged, it
must only be replaced by an authorised Service Dealer.
The safety of this appliance complies with the technical
regulations and standards in force.
• This equipment complies with current safety
regulations and requirements as well as
directives:
- 89/336/CEE modified by 93/68/CEE
- 73/23/CEE modified by 93/68/CEE
• This electrical equipment operates at high
temperatures which may cause burns. Although
this deep fryer offers a high level of thermal
protection, do not touch metal parts that are
visible after opening the lid.
• Do not leave the equipment switched on while
unattended.
• Always plug in the equipment at an earthed
power socket.
• Do not use an extension lead. If you accept
liability for doing so, only use an extension lead
which is in good condition, has an earthed plug,
and is suited to the power of the equipment.
• Check that the mains voltage corresponds with
that shown on the equipment (alternating current
only).
• If the equipment is used in a country other than
that of purchase, have it checked by an approved
Service Centre.
• Never use or plug in your equipment if:
- its power lead is faulty or damaged,
- the equipment has been dropped,
- it has visible damage or operating faults.
• In such cases, to avoid any danger contact your
nearest approved Service Centre to have the
equipment repaired, as special tools are needed.
Never disassemble the equipment yourself.
• If the power lead is damaged, it must be replaced
by the manufacturer, its after-sales service or
someone similarly qualified, in order to avoid any
danger.
• In the event of fire, never try to extinguish the
flames with water. Close the lid. Smother the
flames with a damp cloth.
• Do not switch on the equipment near to
inflammable materials (blinds, curtains, etc.) or
close to an external heat source (gas stove,
hotplate, etc.)
• This equipment has been designed for domestic
use only. Any professional use which is
inappropriate or does not comply with the
instructions for use disengages the manufacturer
from his liability or guarantee.
Safety instructions
Green and
yellow
or green
E
L
Blue or
black
Brown
or red
Fit correct
fuse
Use cable
gripper
N
Page 4
4
ENG
ENG
Never plug in the
deep fryer when it
is empty.
Do not mix different
types of fats.
The fat level must
always be between
the Min. and Max.
markers. Check this
each time before
cooking, and add
some of the same
type of fat if
necessary.
Place the deep
fryer:
- on a steady
surface,
- out of the reach of
children,
- away from water
splashes or heat
sources.
Do not leave
the deep fryer
unattended.
Do not let the
power lead hang
down.
Fat quantity
Mini 2,4 l 2125 g
Maxi 2,6 l 2250 g
Preparation for use
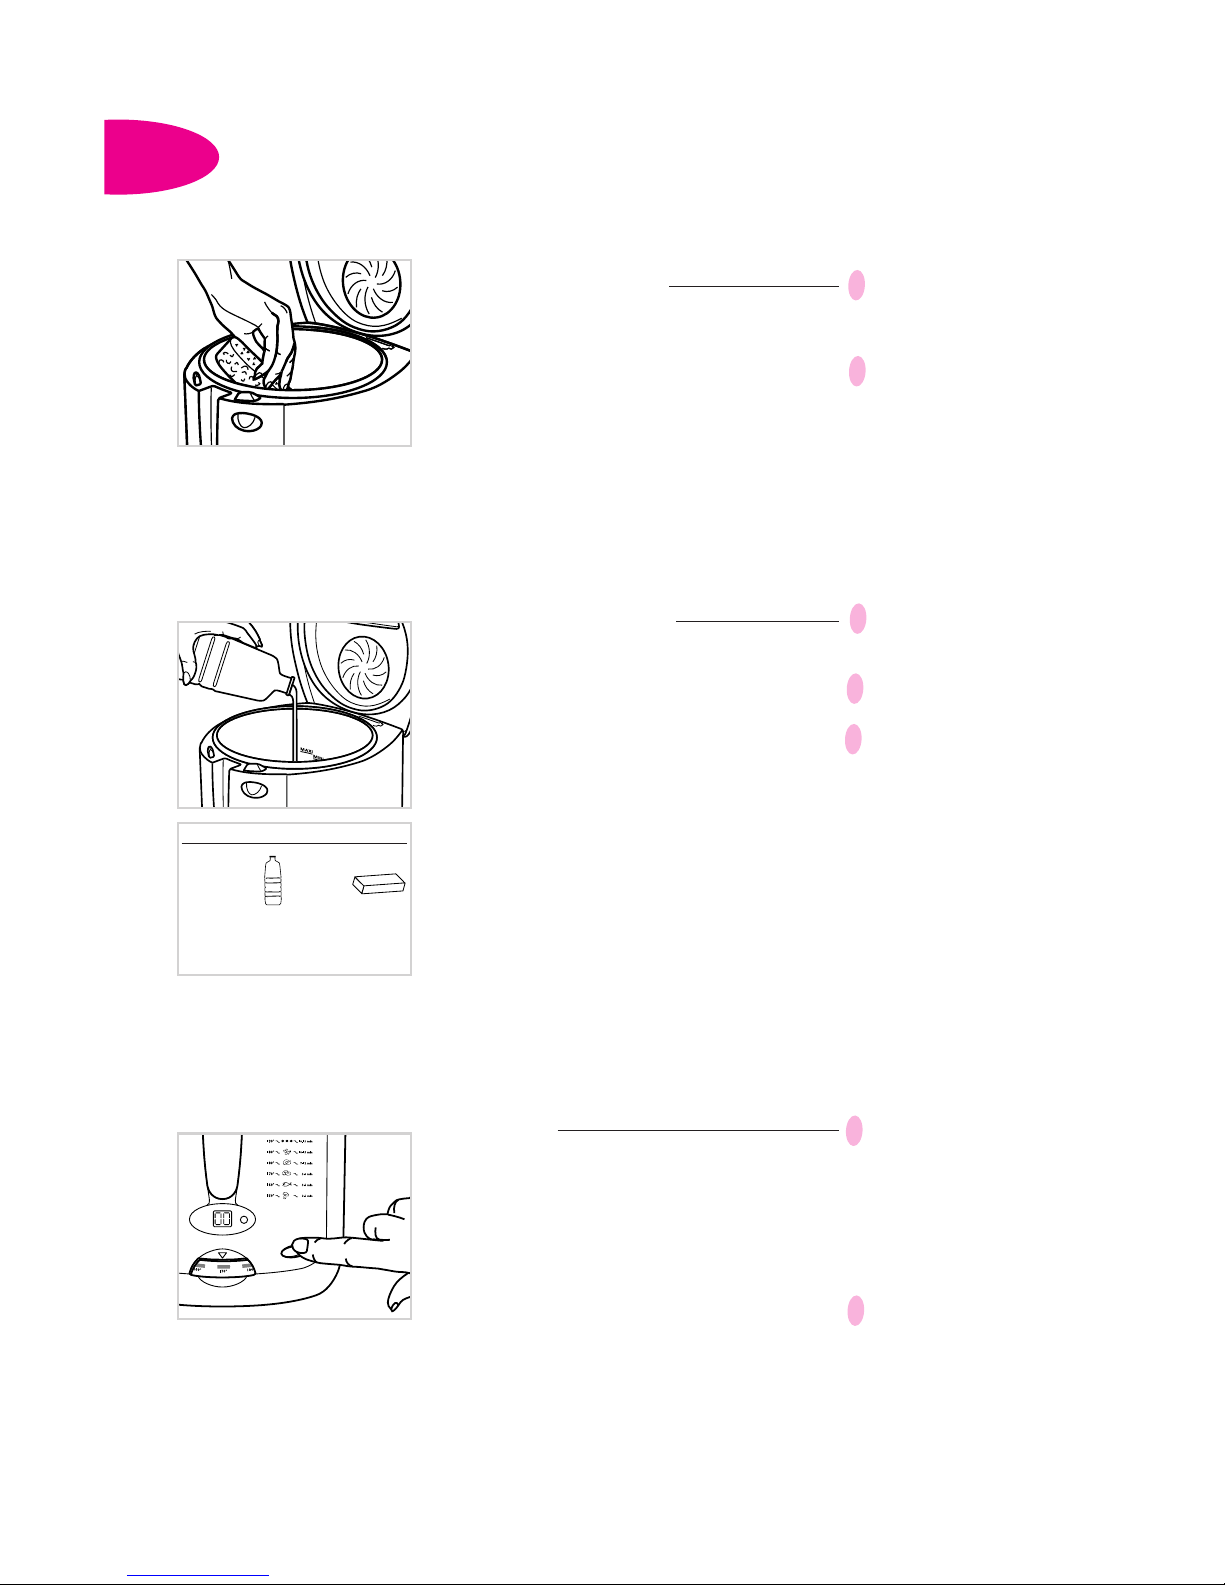
Before using your deep fryer
for the first time
• Clean the lid, steam guard, bowl and
basket with a sponge and washing-up
liquid. Dry.
• The anti-odour filter is already inserted
in the lid. On first use, wipe the lid and
the viewing window with a soft sponge
and lemon juicz.
Filling the bowl
• Use a food fat recommended for frying:
sunflower, groundnut, vegetable. If
using sunflower oil ensure the oil is
changed after every 5 uses.
• If you use solid fat:
- Cut it into pieces and place it at the
bottom of the bowl (never in the
basket).
•
Never exceed 150° to melt it, then
follow the manufacturer’s cooking
recommendations.
Preheat
•
Close the lid.
•
Plug in the deep fryer.
•
Set the on-off switch to the Iposition
(depending on model).
•
Set the thermostat (see tables, p.8).
The deep fryer should begin to work.
1 l
500 g
If you wish to put
the lid in the
dishwasher, remove
the filter first.
Do not wet the
filter.
!
!
!
!
!
!
!
Page 5
5
ENG
1
2
Never exceed the
quantity safety
limit.
- Cut the foods into
like-sized pieces so
that they cook
evenly,
- Avoid using pieces
that are too thick.
The timer signals
that the cooking
time is complete,
but does not stop
the deep fryer.
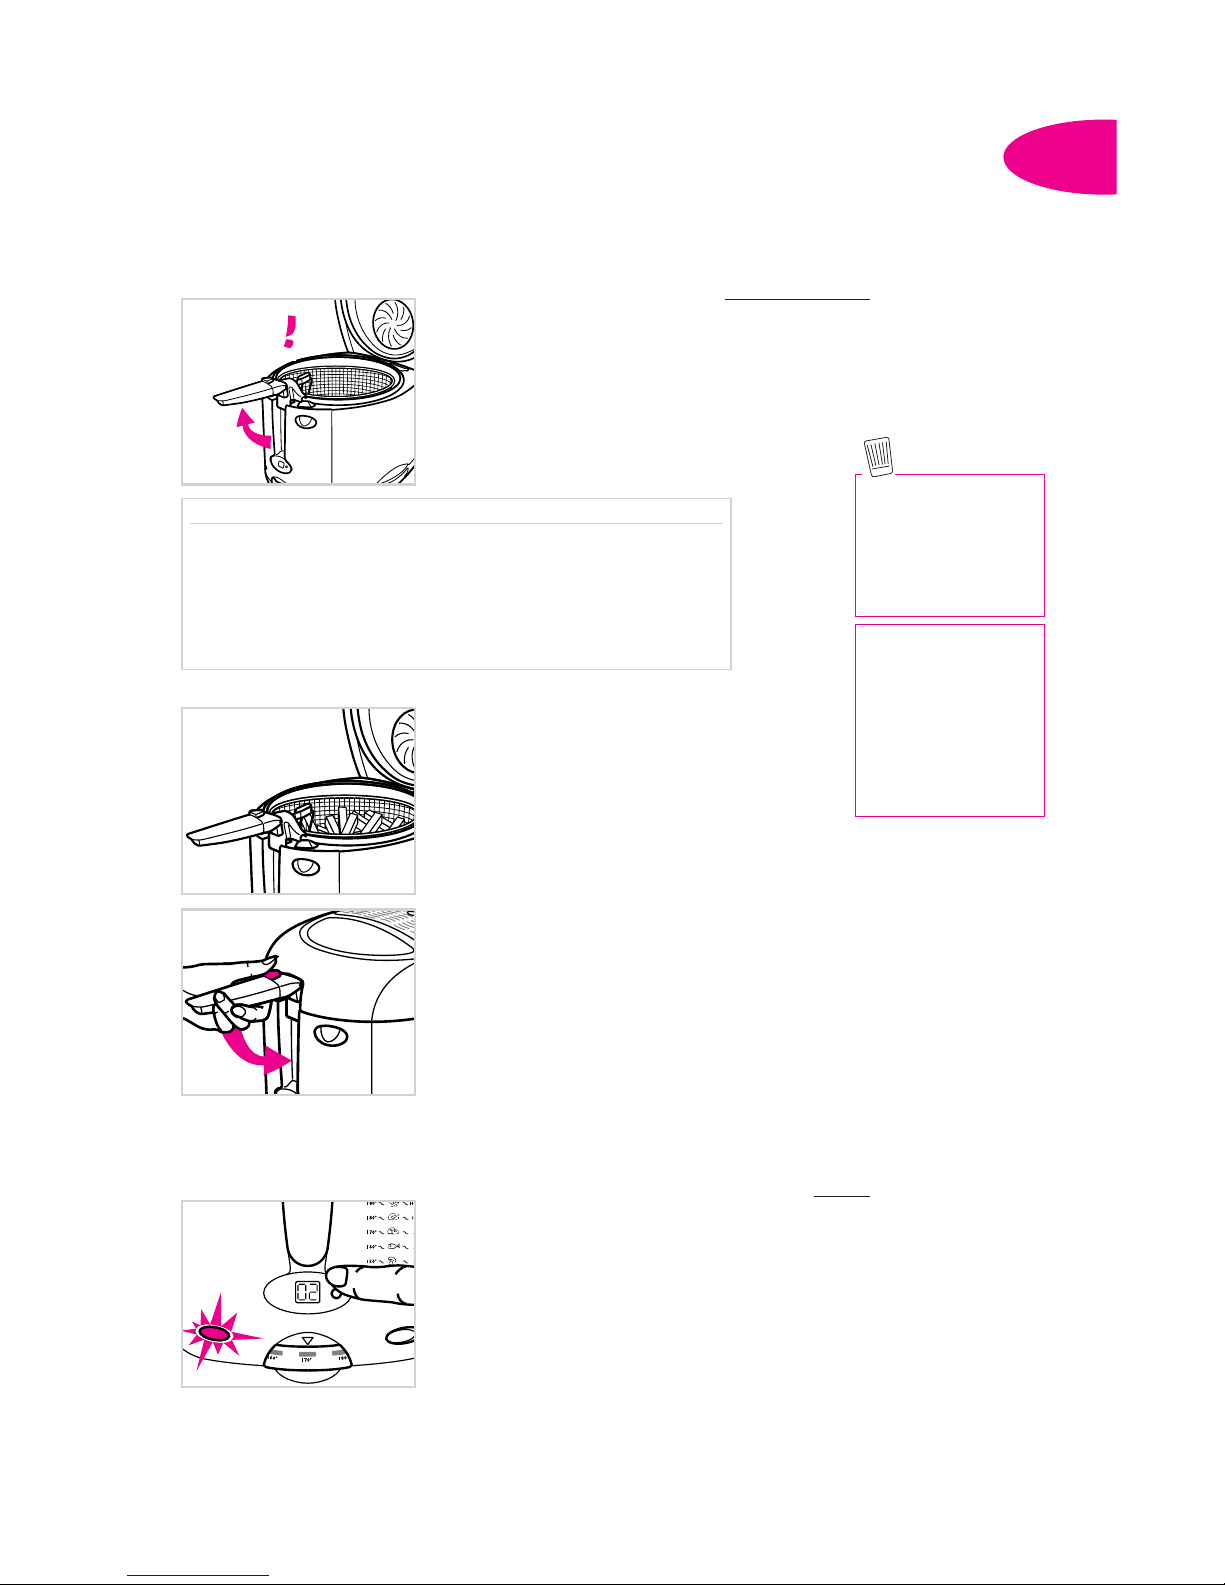
Preparation for use
Preparing the basket
•
Raise the basket handle until you hear a
“click” as it locks.
•
Dry the foods.
•
Fill the basket.
•
Reduce the quantities for frozen foods.
Lowering the basket
•
Place the basket in position on the edge
of the bowl.
•
Close the lid.
•
After the temperature indicator light has
gone out, press the locking button on the
basket raising/lowering handle (
1).
•
Fold back the handle slowly and fully
into its housing (
2).
Set the timer (depending on model)
•
Press the button to set the time, minute
by minute.
•
Release the button. The time displayed is
selected and the countdown begins.
•
If you make a mistake, or want to cancel
the time selected, press the button for 2
seconds.
•
To stop the timer alarm, press the
button.
- Shake frozen
foods to detach
pieces of ice away
from the deep fryer.
- Not all frozen
foods are ready to
use. Check the
manufacturer’s
instructions.
Fresh potato chips Frozen potato chips
Styléa 1250
Quantity safety limit 1250 g 900 g
Maximum recommended quantity 670 g 500 g
Styléa 1000
Quantity safety limit 1000 g 750 g
Maximum recommended quantity 550 g 400 g
c
lick
Page 6
6
ENG
Warning: do not
place your hand
above the filter or on
the window. The
steam and glass are
very hot.
Add salt and pepper
away from the deep
fryer to conserve the
fat.
To prepare to use a
second time:
- wait for the
temperature
indicator light to go
out before lowering
the foods into the oil.
- adjust the oil level
according to the
quantity of food to
be fried.
Keep an eye
on the cooking
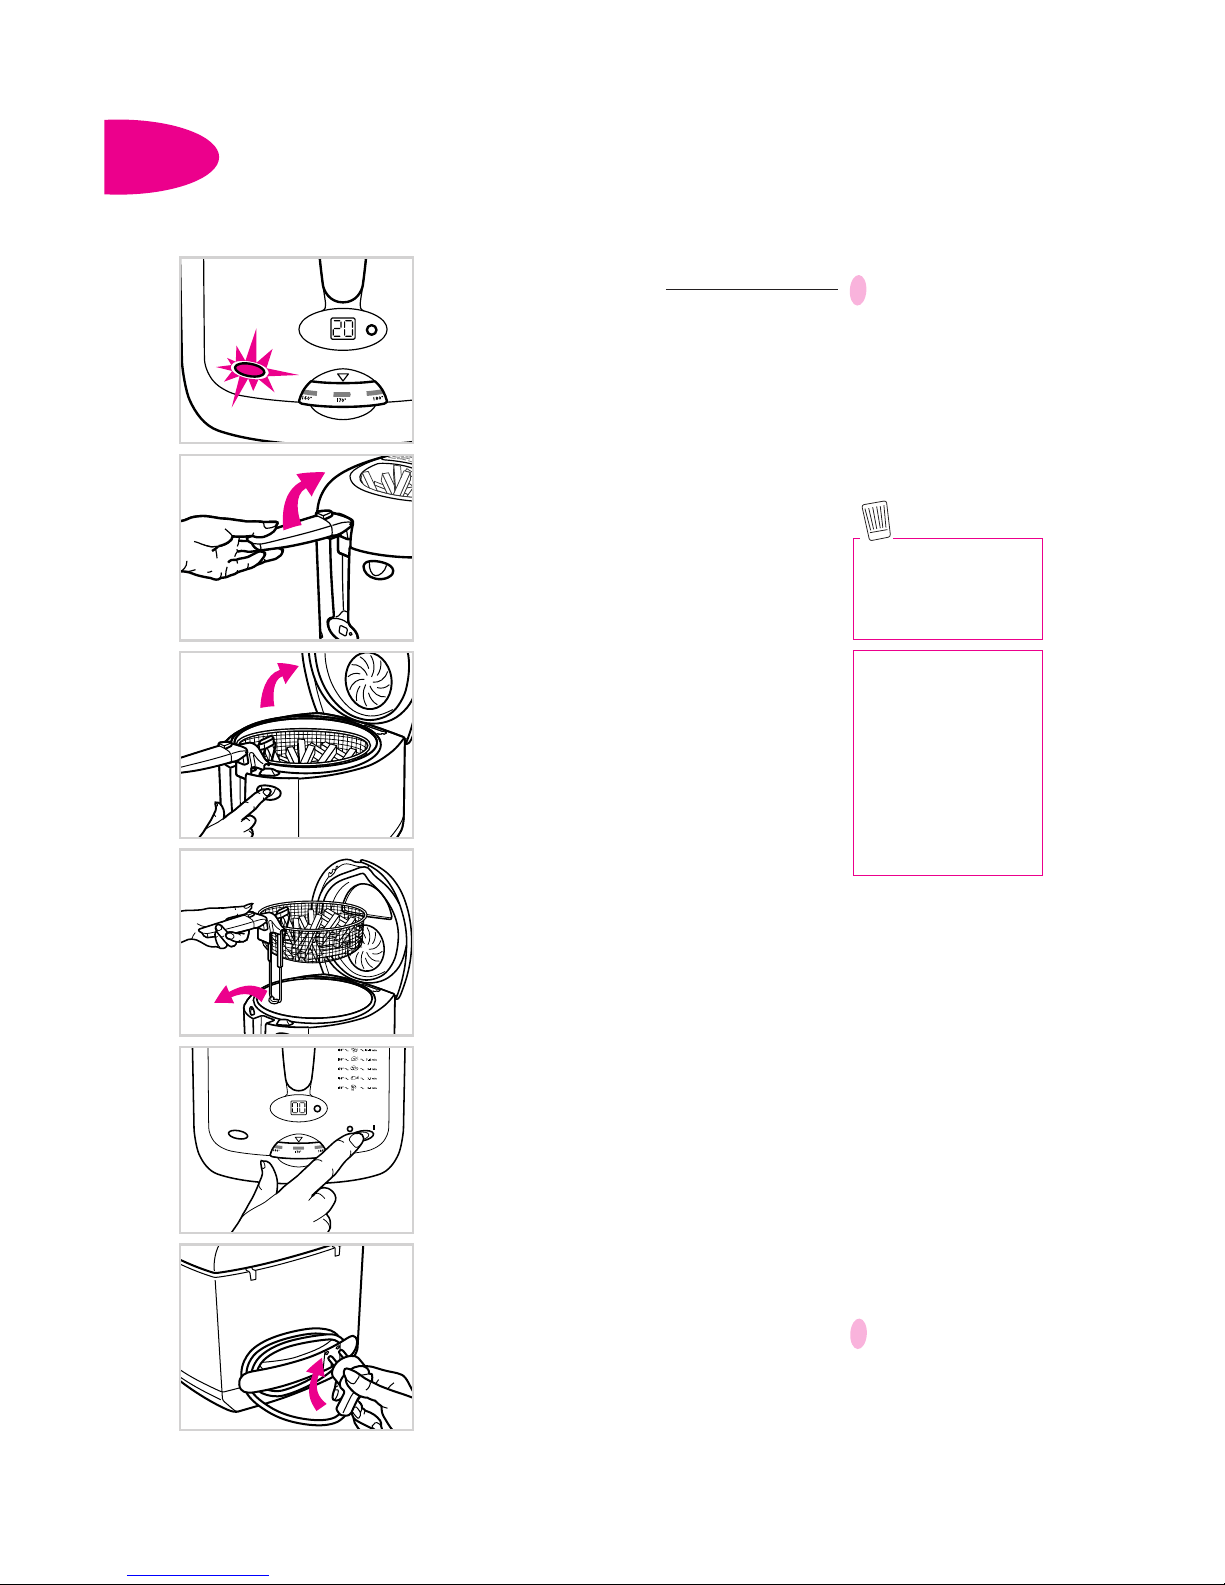
•
During cooking, it is normal for the
temperature indicator light to light up
and go out.
Removing the food
•
Lift the handle horizontally to raise the
basket until you hear a “click” as it
locks.
•
Open the lid.
•
Drain the food.
•
Remove the basket, making sure that the
rod comes completely out of the bowl.
•
Serve.
Switching off the deep fryer
•
When you have finished frying foods,
set the on-off switch to the 0 position
(depending on model).
•
Unplug the deep fryer.
•
Leave the deep fryer to cool
(1 to 2 hours).
•
Roll up the power lead and clip the plug
into position (depending on country).
•
Only use the carrying handles to move
the deep fryer.
Cooking
Never move your
deep fryer with hot
fat inside.
ENG
!
!
Page 7
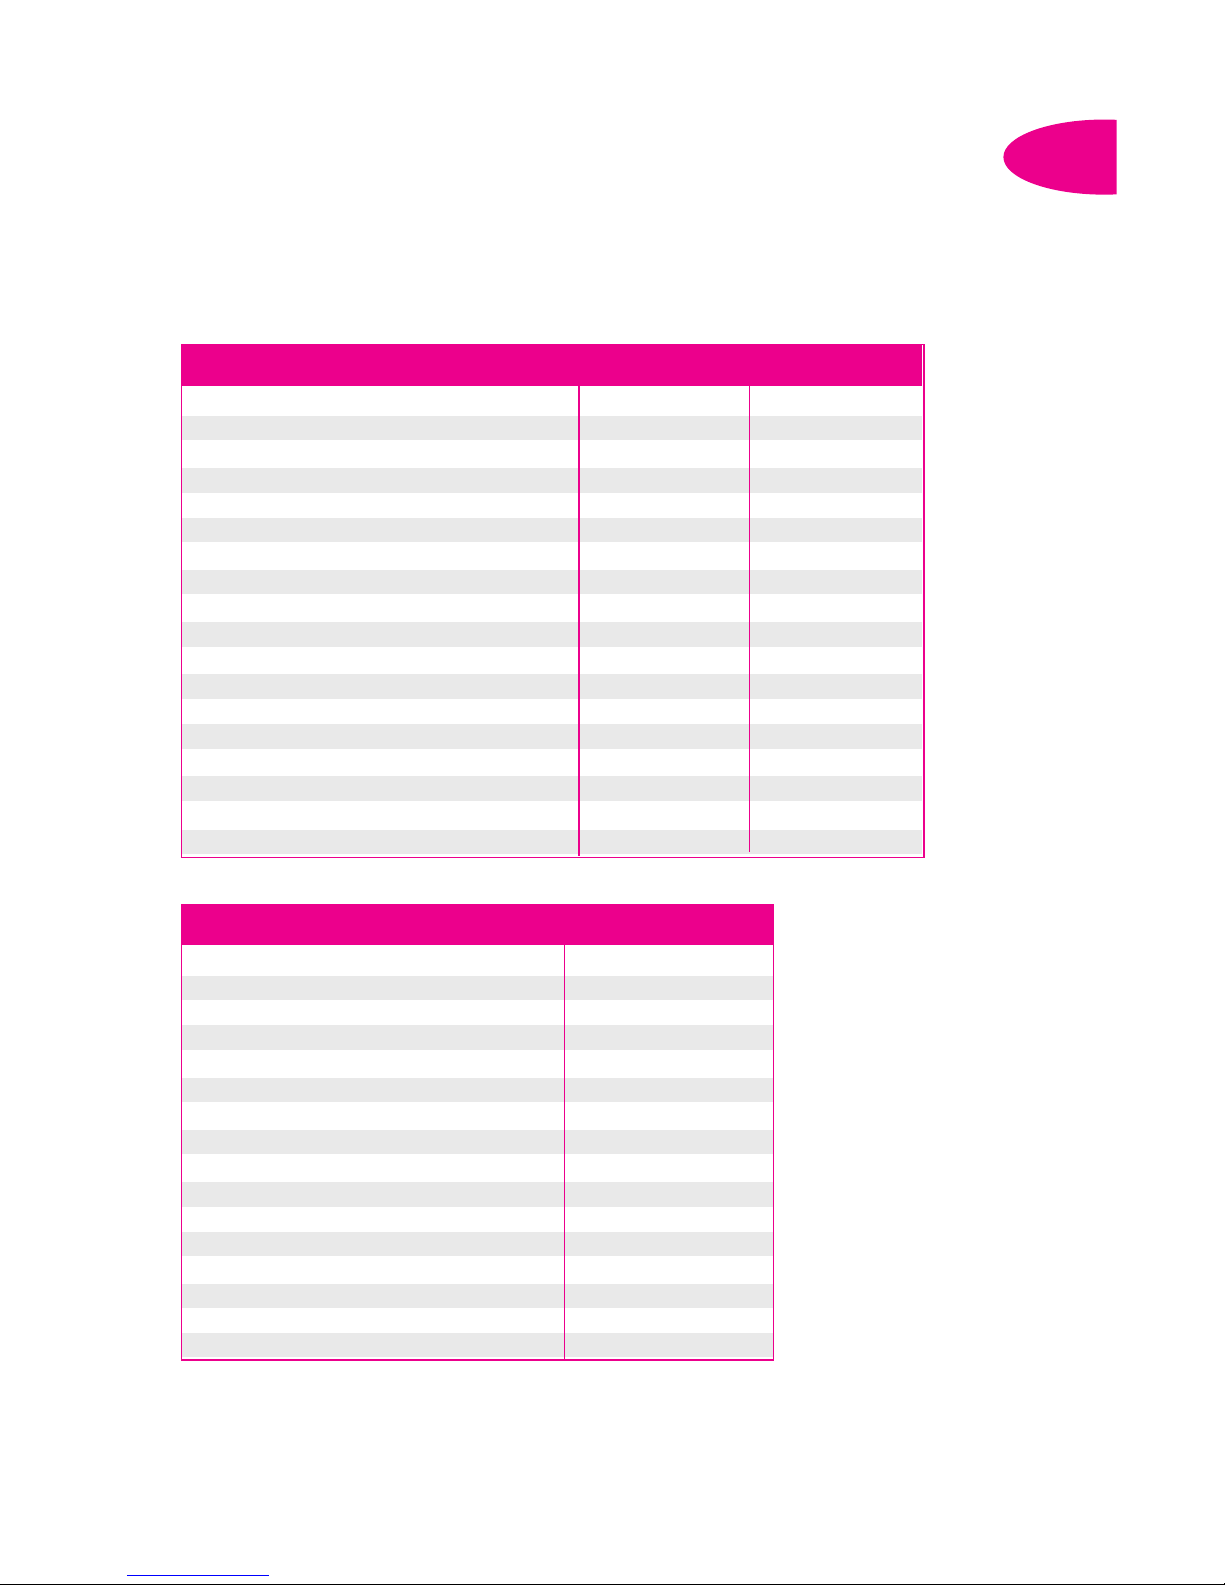
Cooking tables
The cooking times are given as an indication only.
They may vary depending on quantities and personal tastes.
Cooking
Fresh foods
Frozen foods
7
ENG
ENG
Temperature Cooking time
Potato chips (1.25 kg) 190° 15-16 min.
Potato chips (1 kg) 190° 11-14 min.
Potato chips (670 g) 190° 9-10 min.
Potato chips (550 g) 190° 7-9 min.
Potato chips (400 g) 190° 4-5 min.
Dauphine potatoes (10-12 190° 7-9 min.
Soufflé potatoes 190° 6-8 min.
Poultry croquettes (8-10 p) 190° 8-9 min.
Potato croquettes (8-10 p) 190° 8-9 min.
Stuffed veal escalopes (8 p) 180° 10-12 min.
Quarter of fried chicken (8 p) 180° 12-15 min.
Thin pork slices 180° 5-6 min.
Apple fritters (7-8 p) 170° 4-6 min.
Vegetable fritters (aubergines) (10-12 p) 170° 9-11 min.
Fritters (12-15 p) 170° 6-9 min.
Aubergine napolitaine (6 p) 170° 6-7 min.
Sea bream, hake, sole, skate (4 p) 160° 6-8 min.
Mushrooms (200 g) 150° 4-6 min.
Cooking time at 190°
Potato chips (pre-cooked) (900 g) 11-13 min.
Potato chips (pre-cooked) (750 g) 9-12 min.
Potato chips (pre-cooked) (500 g) 6-8 min.
Potato chips (pre-cooked) (400 g) 4-7 min.
Noisette potatoes (50 p) 5-6 min.
Potato croquettes (8-10 p) 5-6 min.
Breaded cod (10 p) 4-6 min.
Frittered fish fillets (8 p) 4-6 min.
Battered plaice fillets (3 p) 5-6 min.
Fishcakes in breadcrumbs (8 p) 4-6 min.
Prawn fritters (12 p) 4-5 min.
Squid fritters (12-15 p) 4-5 min.
Apple fritters (7-8 p) 5-6 min.
Breaded veal rissolettes (12-15 p) 7-9 min.
Breaded pork rissolettes (12-15 p) 7-9 min.
Beef meatballs (15-18 p) 7-9 min.
Page 8
8
ENG
The fat must be
filtered regularly.
Scraps that break
away from foods
tend to burn and
cause the fat to
change more
rapidly, as well as
risking igniting over
time.
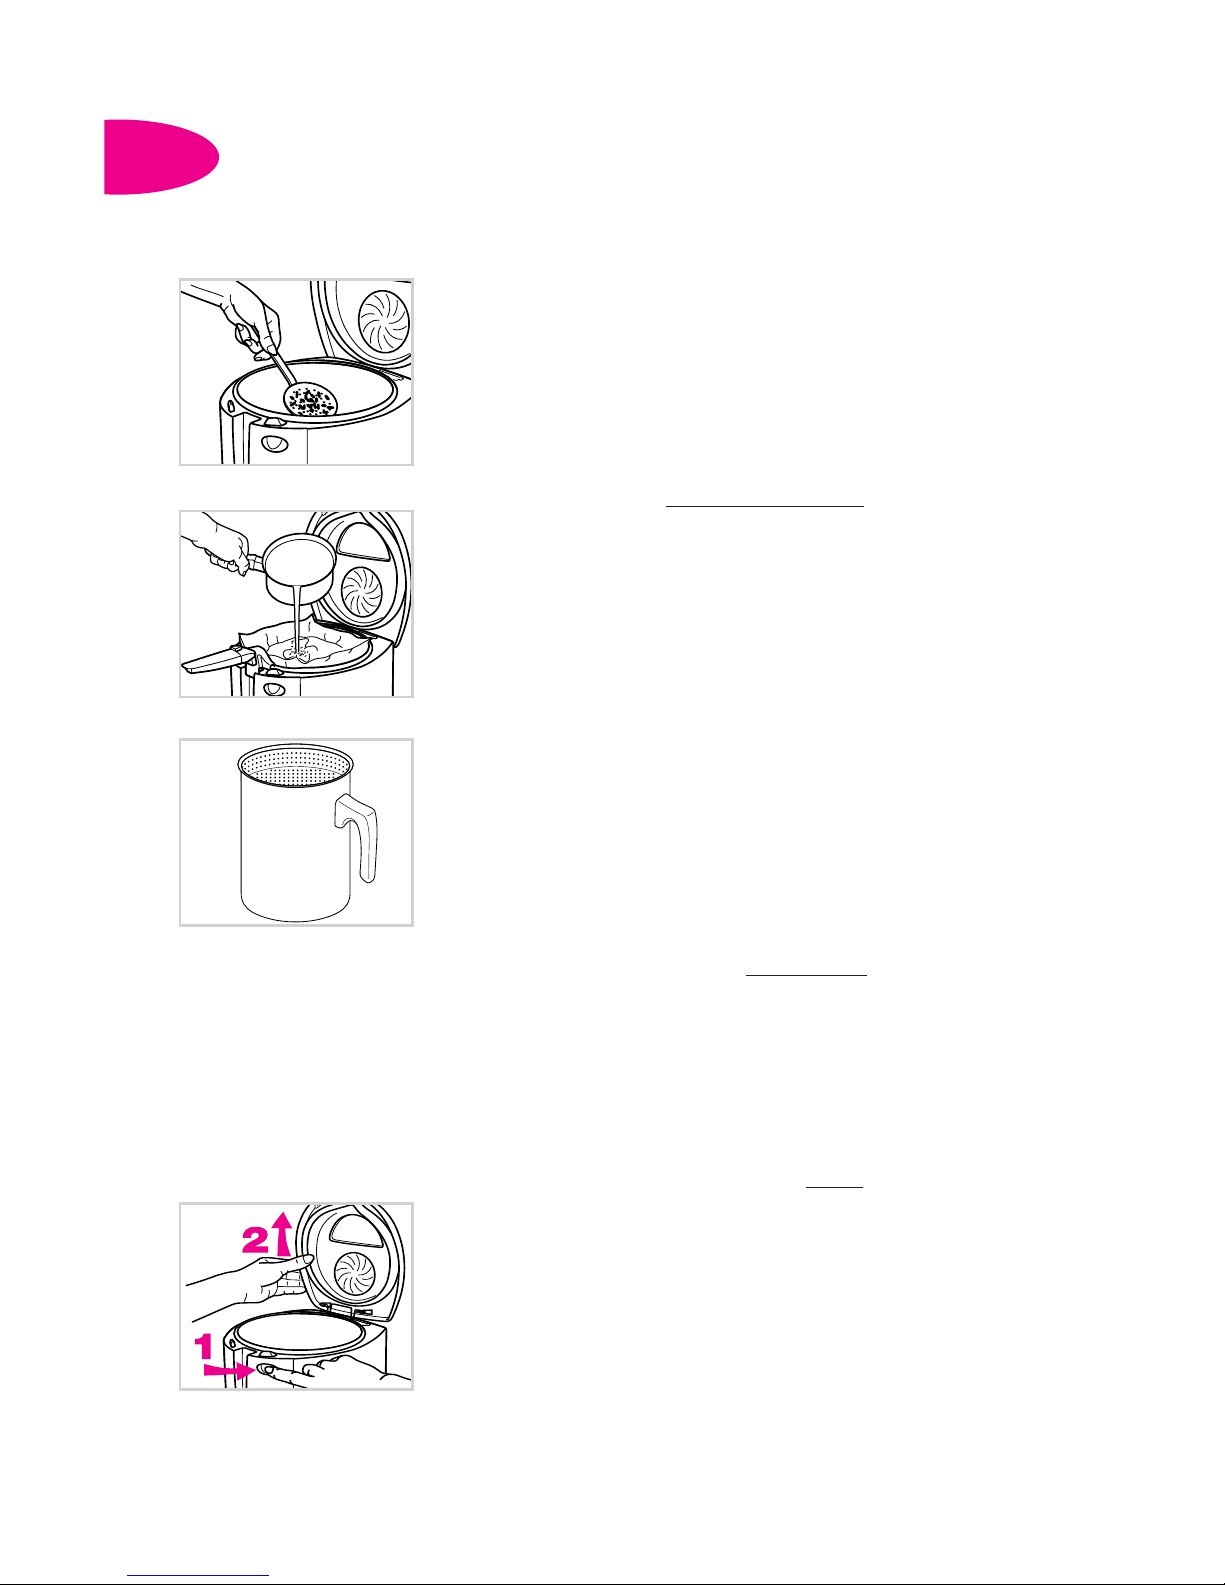
Storing the fat
•
With a sieve, collect the small pieces of
food left in the fat.
•
Store the fat in the deep fryer, or keep it
in the fridge in a separate container
(recommended if you do not use the
deep fryer often).
Filtering the fat
With a filter paper (available from
approved Service Centres).
•
Wait for the fat to become lukewarm.
•
Empty the fat gently into a pan.
•
Place a filter paper in the bottom of the
basket.
•
Clean inside the bowl.
•
Place the basket and filter paper into the
deep fryer (handle in the upper
position).
•
Pour the fat carefully back into the bowl.
•
Throw the filter paper away and clean
the basket.
With a filtering container
maximum capacity: 2.4 l (available from
approved Service Centres - for certain
countries only).
Maintenance
Change the fat after
being used for a
maximum of 8 to 12
times each time.
“Clean” fat keeps
the flavour and
lightness of foods.
Changing the oil/fat
•
Do not pour used fat into the sink.
Leave it to cool and throw it away with
the household waste.
Change the cartridge
each time the deep
fryer has been used a
maximum of 30 to 40
times.
Replace
the Anti-odour cartridge
(available from approved
Service Centres)
• When the saturation indicator on the
filter has turned deep red, change the
filter.
• Open the lid (1). Remove the lid by
pulling it upwards (2).
• Place the black side of the lid towards
you.
ENG
Page 9
9
ENG
ENG
Maintenance
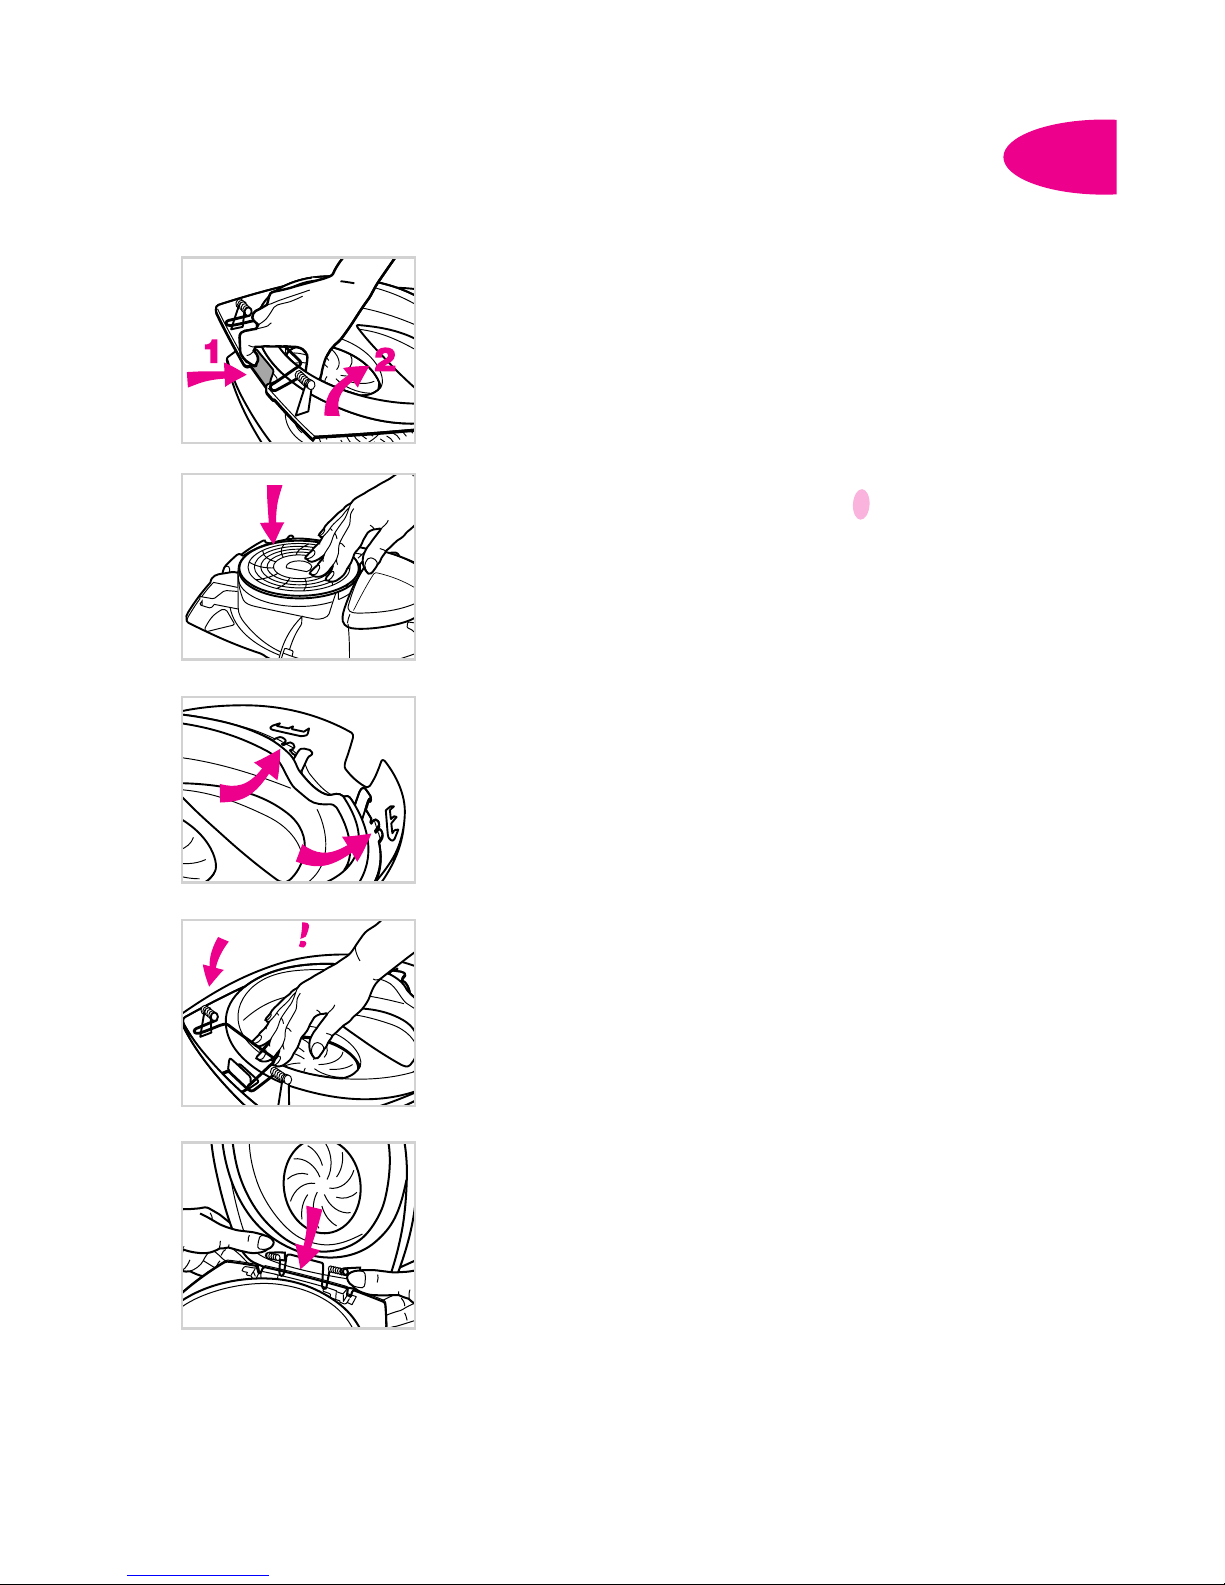
•From under the hinge, unclip the black
steam guard from the white lid
•Take out the filter.
• Replace the anti-odour filter (saturation
indicator face down).
•Press down on the filter in order to
ensure that it is firmly in place.
• Replace the steam guard.
• Insert the hooks of the steam guard into
the notches in the lid.
•Press down firmly on the steam guard,
in the area where the hinges of the lid
are situated, until you hear it click into
place.
•To replace the lid:
Slightly tilt the lid towards you so that
the two hinges can be slotted into place.
Let the lid fall back into place.
Check that the clip
is locked before
replacing the lid.
click
!
Make sure that the
cartridge is well
fixed under the
three clips.
Page 10
ENG
ENG
Cleaning
Remove and wipe
the cartridge before
washing it.
Clean the window
each time the deep
fryer has been used
8 to 12 times.
Never replace the
lid’s seal.
Never place the
equipment in water.
Do not use
aggressive or
abrasive products.
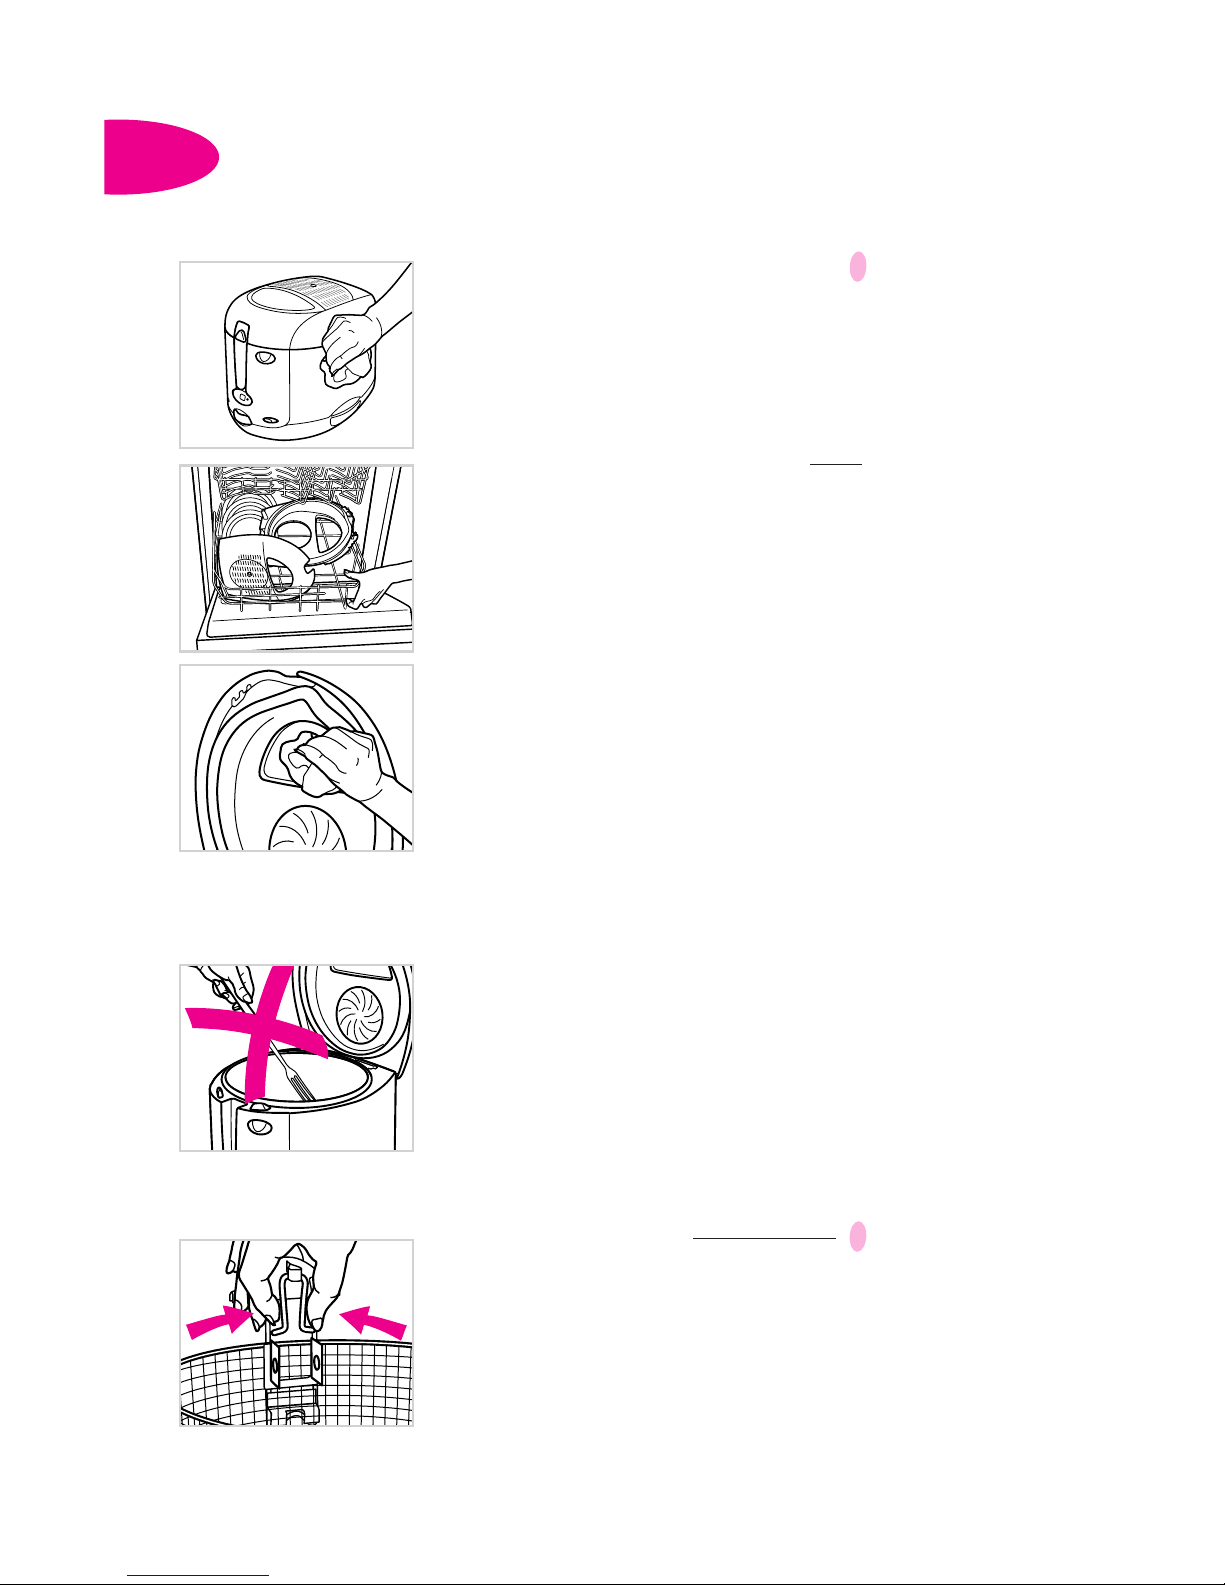
Clean the lid and the
window
•
Remove the lid.
•
Separate the cover from the steam
guard and remove the cartridge.
•
You can clean the lid and steam guard
in a dish-washer.
•
Dry the lid, before replacing it and the
cartridge in the fryer.
•To ensure good visivility, clean the
viewing window by wiping it with a
sponge and lemon juice.
• Allow the window to dry at room
temperature or dry with a clean cotton
cloth.
To preserve the deep
fryer’s non-stick
properties longer, do
not use any metal
tools.
Cleaning the bowl
•
Clean the bowl with a sponge and some
liquid detergent. Dry thoroughly.
BOWL WITH NON-STICK COATING
(Depending on model)
•
Browning and scratches that may
appear after prolonged use do not
cause any problems.
•
We guarantee that the non-stick coating
COMPLIES WITH REGULATIONS
regarding materials coming into contact
with foodstuffs.
If your basket is
misshapen, have it
replaced by your
nearest approved
Servicing Centre.
Cleaning the basket
•
Separate the basket and handle.
•
Wash the basket with large quantities of
water.
•
Dry it.
•
Clean the outside of the deep fryer with a
damp cloth. Dry it carefully.
•
Clean the other parts using a damp
sponge with some washing-up liquid.
10
!
!
Page 11
11
ENG
ENG
If your deep fryer does not work properly
Problem and possible causes
The deep fryer does not work.
• The equipment is not plugged in.
• The on-off switch is not set to
I
(depending on model).
Unpleasant odours.
• The Anti-odour cartridge is saturated.
• The fat has deteriorated.
• Unsuitable fat has been used.
Steam escapes from around the lid.
• The lid is not closed properly.
• The seal is defective.
The frying oil overflows.
• The Anti-odour cartridge is saturated.
• The Max. marker for filling the bowl has
been exceeded.
• The basket is misshapen.
•Mixture of different oils and fats.
• Oil emulsifies violently.
The foods do not become golden,
and remain soft.
• They are too thick and contain a lot of
water.
•Too much food is being cooked at the
same time and the cooking oil is no
longer at the right temperature.
• The frying oil temperature may not be
high enough; the thermostat is set
incorrectly.
The timer no longer works.
• The battery is worn.
Solutions
• Plug in the equipment.
• Set the on-off switch to
I and check that the
temperature indicator light lights up.
• Replace the filter cartridge (see page 8).
• Renew the frying oil (maximum 8 to 12 uses).
• Use a vegetable fat for top-quality frying of food.
• Check that the lid is properly clicked shut.
• Contact your nearest approved Service Centre.
• Change the filter cartridge (see page 8).
• Check the oil level (Max.), and remove the
excess.
• Check that the basket is not overfilled.
• Change your basket.
• Empty and clean the bowl. Refill the bowl with
only one type of fat.
•Lower the basket very slowly.
OR
Remove theparticles of ice from frozen
foodsand dry the foods thoroughly.
• As a test, try a longer cooking time.
•Fry the foods in small quantities (particularly
frozen foods).
• Set the thermostat to the recommended
temperature.
• Have it replaced at an approved Service Centre.
If the problem remains, check with your stockist or an approved Service Centre.
Any repairs must only be carried out by an approved Servicing Centre with the
manufacturer’s own replacement parts.
For spares or repairs telephone your nearest TEFAL Service Centre (calls charged
at local rate): 0845 725 8588.
!
 Loading...