

Page 1
VITAFRUIT
F
GB
D
NL
I
www.groupeseb.com
Page 2
min
H
m
in
H
a
b
g
i
h
c
d
e
e
1
e
2
f
Page 3
a
c
d
min
H
e
f
fig. 2
a
b
d
min
H
e
f
fig. 3
fig. 1
Page 4

Safety instructions
• Your appliance is an electrical appliance that must be used in accordance with these instructions of use. This
product has been designed for domestic use only. Any commercial use, inappropriate use or failureto comply
with the instructions, the manufacturer accepts no responsibility and the guarantee will not apply.
• Read the instructions carefully before using your appliance. The manufacturer cannot be held responsible for
any use that does not comply with the instructions.
• An electrical appliance is not a toy, use it out of the reach of children and do not allow the power cord to
dangle over the edge of the work surface..
• This appliance is not intended for use by persons (including children) with reduced physical, sensory or mental
capabilities, or lack of experience and knowledge, unless they have been given supervision or instruction
concerning use of the appliance by a person responsible for their safety.
• Children should be supervised to ensure that they do not play with the appliance.
• The appliance must only be put away when it has cooled down.
• The appliance must be unplugged and have cooled down before it is cleaned or serviced.
• When operating, certain parts of this appliance become very hot and can cause burns. Hold the appliance by
the non-metallic parts (such as the plastic body and handles). We recommend the use of oven gloves..
• Your appliance gives off steam which can cause burns.
• Always fit the lid during juice extraction and cooking to avoid any scalding due to splashes. However, it is
preferablenot to fit the lid during the cooking time when making jelly to increase evaporation (when to remove
the lid is explained in detail in the instructions for the programmes in question).
• Do not immerse the motor unit of the appliance in water.
• Always use on a flat, stable, heat resistant work surface away from water splashes and any sources of heat.
• An electrical appliance should not be used if:
- the power cord has been damaged or altered,
- the appliance has been dropped or has been visibly damaged. In this case, the appliance must be
checked by an Authorised Service Centre.
• TEFAL cannot be held responsible for any use that is not covered by these instructions.
• The safety of the appliances complies with the technical standards and regulations in force.
• Only use AC voltages. Check that the voltage of your electrical system matches that indicated on the rating
plate of the appliance.
• Plug the appliance into a socket with an earth connection. If you use an extension lead, check that the socket
has an earth connection.
• Do not unplug the appliance by pulling on the power cord.
• If the power cord has been damaged, it must be replaced by an AuthorisedService Centre to avoid any danger.
• Do not leave unattended whilst plugged in and switched on.
GB
13
Page 5

GB
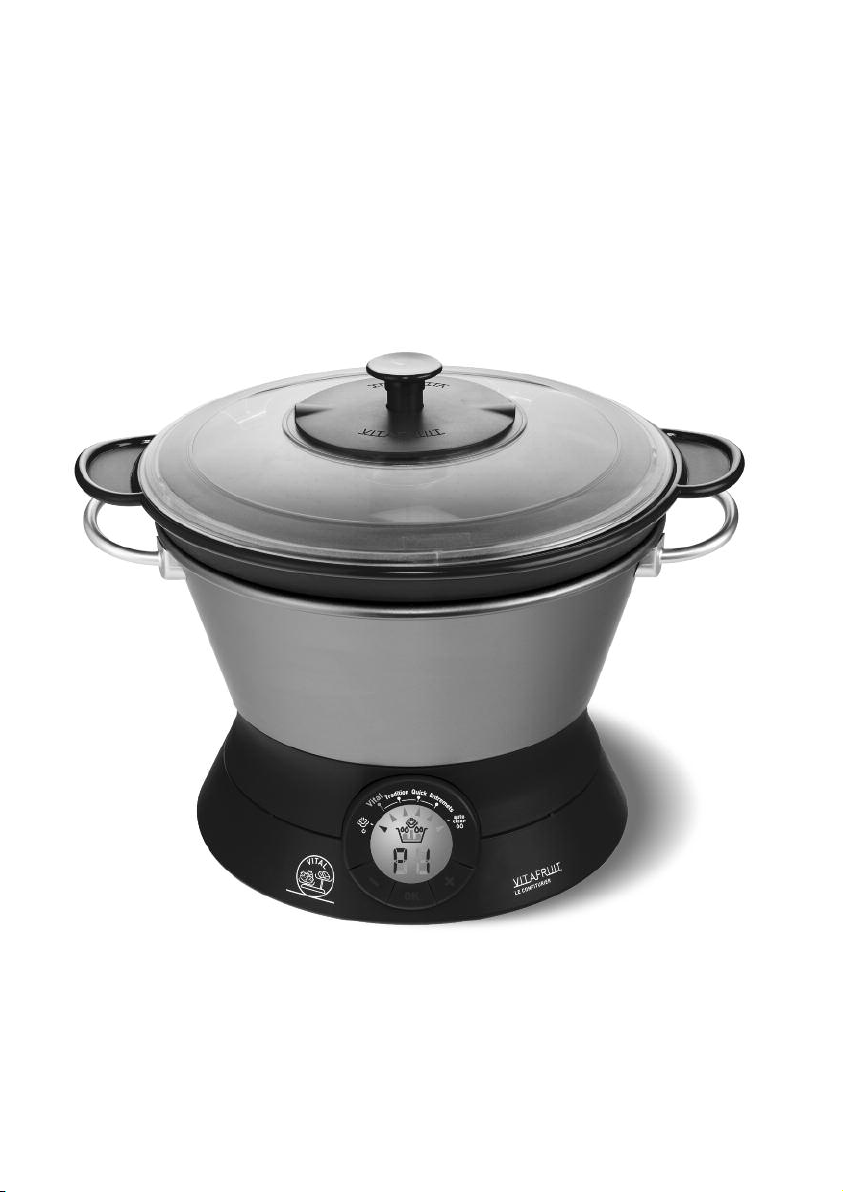
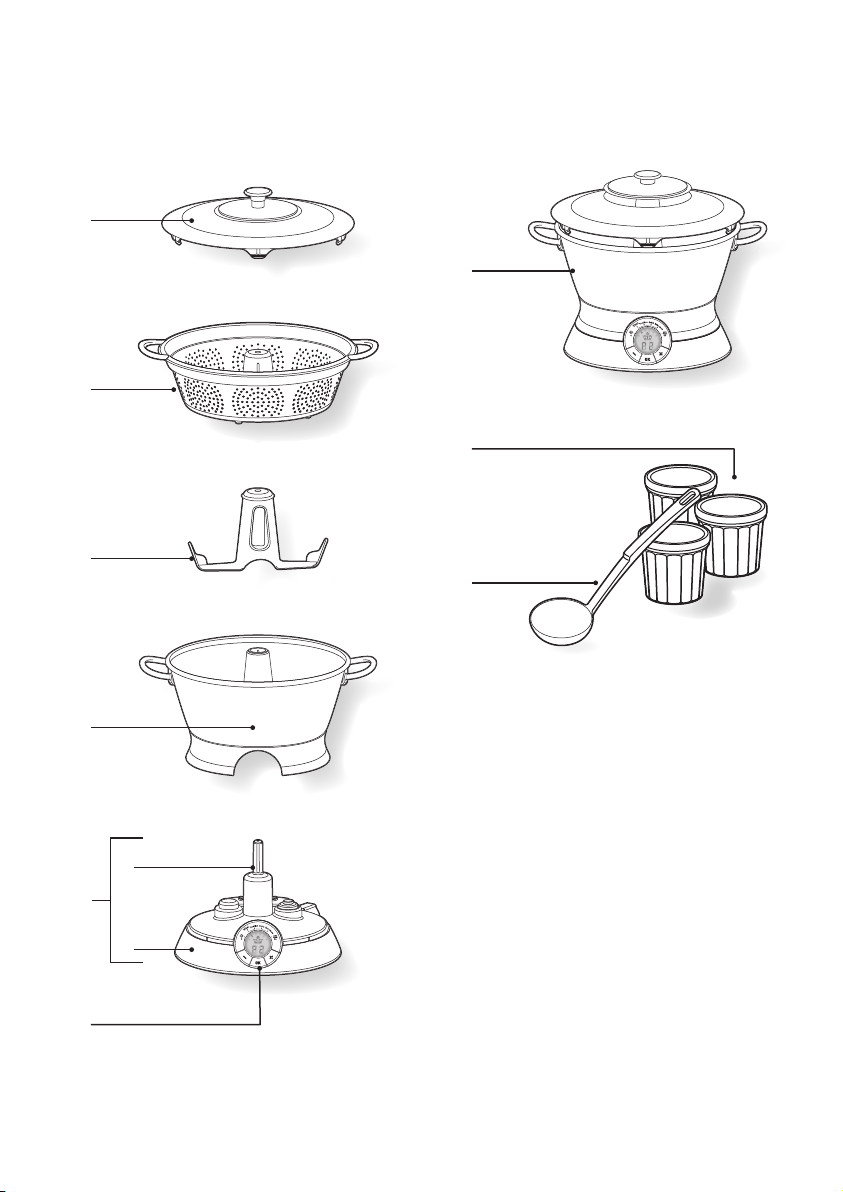
Description
a Lid with steam diffuser knob (dual position)
Open - to release steam when lid resting
on paddle
Closed - to retain steam when lid resting
on strainer)
b Strainer
c Paddle
d Non-stick bowl with maximum filling level
mark
e Motor unit (e
) with drive spindle (e2)
1
f Control panel
g Lid in steam release position
h 3 jam jars with 3 lids
i Ladle
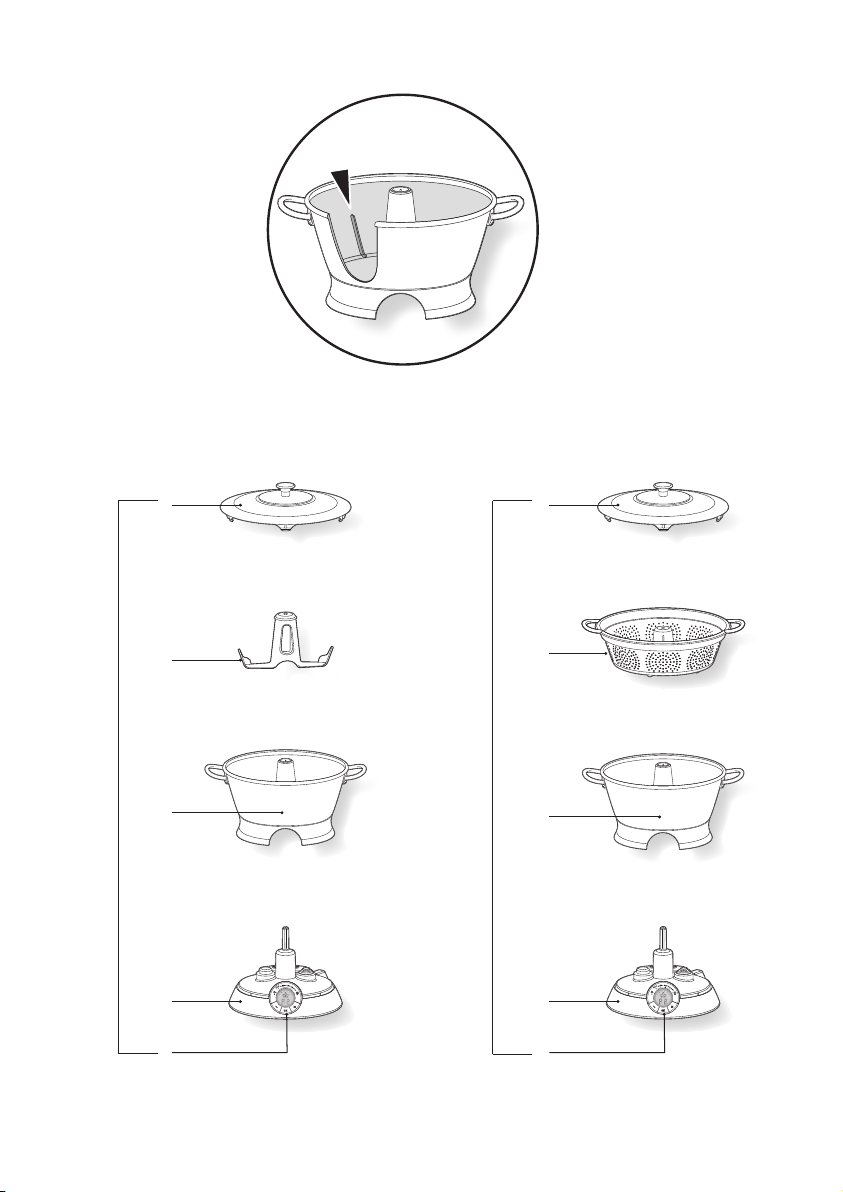
Figure 1: maximum filling level of bowl
Figure 2: assembly when making preserves or desserts (programmes P2, P3, P4, P5)
Figure 3: assembly when extracting juice (programme P1) and making jelly
(programme P1)
Use
Fitting the knob onto the lid
• Remove the screw from the knob, fit the knob onto the lid and tighten the screw into the knob from the
underside of the lid.
Fitting the bowl
• Place the bowl on the motor unit. The bowl must be positioned correctly on the motor unit so that it
can operate.
Positioning the paddle and the lid
• Fit the paddle on the central tube in the non-stick bowl, checking that it is
completely lowered.
• Put the lid on the bowl. To prepare preserves/desserts (fig.g), the steam
diffuser must be up in the open position.
Do not fill above the
maximum level mark
in the bowl (two raised
lines) to avoid any
overflows during
cooking, as certain
fruits swell up and
froth significantly
during cooking.
Important to Note
• The appliance is designed to detect boiling: it only starts the countdown when boiling point is reached.
• The lid has two steam outlets under the knob. When operating, do not place your hand above these outlets.
• The longest cooking cycle is one and a half hours. This is considerably longer than the time required for any
cooking preparations.
• Take extreme care when removing the lid as hot steam escapes from the jam and hot condensed water may
form under the lid which can cause scalds.
• If an error message is displayed on the screen (E2, E3, E4), the appliance has detected a problem:
E2 : no ingredients in the bowl.
E3 or E4: internal problem in the appliance.
• To clear the error message, unplug the appliance for at least 30 seconds and then plug it in again. If the
problem continues contact an Authorised Service Centre.
• If the bowl symbol flashes on the screen and you cannot move onto the next step, this means that the motor
14
Page 6

unit has not detectedthe bowl. Try refitting the bowl. If the fault persists, your appliance has a defect. Contact
min
H
an Authorised Service Centre.
• Your applianceis fitted with a device to protectagainstoverheating in the eventof a problem occurring during
use (preparation that is too dry, etc.). In this case, the appliance will stop operating and sound an alarm.
Unplug it, discard the ingredients and clean it, and your appliance will be ready to use again.
• Before using for the first time, wash all the parts in contact with food, as well as the lid.
• Do not use an abrasive scourer to clean the lid or non-stick interior to avoid damaging the surface.
• If you usually cut up the ingredients before making jam, do not chop, cut or use a hand blender inside the bowl
as this will damage the non-stick interior.
• If you usually soak the fruit in alcohol or fruit syrup, such as grenadine, before making jams, do not use the
Vitafruit bowl to do this.
• Before putting your jam, jelly or marmaladeintojars,somefruits may need to be skimmed with a metal slotted
spoon to remove any scum.
• After using your jam maker, wait for 30 minutes before making another preparation.
• After prolonged use fine hairline marks on the interor may be noticeable, caused by the sugar being stirred in
the bowl. This is normal and does not affect the non-stick perfromance.
Auto clean (P6)
The lid, strainer and
paddle are all
dishwasher safe.
Warning: On the
Auto-clean programme
water gets hot.
Take care when handling
the bowl to avoid scalds.
The drive spindle (e2) is
non-removable. If it
becomes dirty, unplug
the appliance and wipe
the drive spindle with a
damp cloth.
This programme is for pre-washing the bowl.
Select the Auto clean programme using the and buttons.
• Fill the bowl to ¾ full with cold water and a little washing-up liquid.
• Select programme P6 then start the pre-washing by pressing the OK button.
• When the cycle is complete, the appliance will stop and beeps. Press OK to
stop the beeping sound.
• Using oven gloves to protect your hands, carefullyremove the bowl and take
to the sink. Loosen any sticky residue on the sides of the bowl and paddle
with a long handled washing-up brush. Empty out the hot water.
• Rinse the bowl under the tap (do not use an abrasive scourer to clean the
lid interior or exterior.
GB
The programmes
Control panel
• P1 Juice extraction
• P2 Vital
• P3 Tradition
• P4 Quick
• P5 Desserts (labelled in French as Entremets)
• P6 Auto clean
YOUR APPLIANCE HAS 3 BUTTONS AND A DIGITAL DISPLAY SCREEN
• When you plug in your appliance, first select the programme you wish to use.
• To select a programme, press the and buttons to move the arrow so that it is aligned with the desired
programme. Then validate the programme using the OK button.
• The appliance starts operating. If the screen flashes, this means that the appliance is waiting for information:
15
Page 7

GB
programme the time using the and buttons. Validate by pressing the OK button.
• When the programme is running, you can stop the appliance at any time by pressing the OK button.
• If you have selected the wrong programme, or if you wish to exit a programme at the end of the cycle, press
the OK button again and hold down for a few seconds to return to the "select programme" menu.
The different programmes
uice extraction: your appliance allows you to
J
xtract the juice from fruits by steam cooking.
e
P1
(Maximum extraction time: 1 1/2 hours)
Vital: this programme allows you to make jams and
jelly with a reduced sugar content. The jam is made
P2
in 2 stages; first sugar, water and lemon are made
into a syrup and secondly the fruit is added and
boiled until cooked.
(Maximum cooking time: 1 1/2 hours)
Tradition : this programme allows you to make
traditional jams, jelly and marmalade.
P3
(Maximum cooking time: 1 1/2 hours)
uick : this programme allows you to make jams
Q
uickly with the addition of jam sugar which has
q
added pectin. The Quick programme is not
P4
recommended for making jelly.
(Maximum cooking time 1 hour)
Desserts labelled Entremets: this programme is
especially for making desserts such as rice pudding.
Also used for making chutney and precooking some
P5
fruit such as oranges for marmalade making.
(Maximum cooking time: 1 1/2 hours)
Auto Clean: this programme allows you to pre-wash
P6
the bowl. (Auto Clean time: 12 min)
Jam with reduced sugar content
Vital programme (P2)
1. Prepare the fruits according to the recipe chosen.
2. In the bowl (fitted with the paddle) place the sugar (refer to the recipe for the quantities required),
150 ml of water and ¼ of an unwaxed lemon with its peel on. Fit the lid.
3. Select the Vital programme P2 using the and buttons.
4. Press the OK button to start cooking the syrup (granulated sugar + water + lemon).
The display shows "– –". Do not add the fruit.
5. When the appliance beeps (after around 15 to 20 minutes), press OK. Add the fruit and any other
ingredients from the recipe.
6. Programme the cooking time for the recipe using the and buttons and validate by pressing
the OK button. When the contents reach boiling temperature, after about 10 minutes, the timer starts to
countdown and the cooking time begins.
7. When cooking is complete, the jam maker stops and beeps. Press OK to stop it beeping.
8. Test to see if the jam is cooked (see page 19).
9 While the jam is still hot, put the jam in the sterilized jars (see the frequently asked questions in the
recipe book about sterilizing jars) using the ladle supplied, then tighten the metal lid. Alternatively, seal
with wax coated jam papers and cellophane covers straightaway. If using metal lids, immediately after
filliing invert the jar and leave to cool upside down for a better seal and to improve the storage time.
10. If the test is not OK, the jam needs to be cooked for longer. Increase the cooking time using the
and buttons. Press OK to start cooking again. Return to step 7 and follow the instructions.
Traditional jam - Tradition programme (P3)
1. Prepare the fruits according to the recipe chosen.
2. In the bowl (fitted with the paddle) place the granulated sugar, fruit and other ingredients (refer to the
recipe for the quantities required) and 200 ml of water. Fit the lid.
3. Select the Tradition programme P3 using the and buttons and validate by pressing the OK button.
4. Programme the cooking time for the recipe using the and buttons and validate by pressing
the OK button.
5. When cooking is complete, the jam maker stops and beeps. Press OK to stop it beeping.
6. Test to see if the jam is cooked (see recipe book on how to sterilize jars).
16
Page 8

7. If the test is OK, while the jam is still hot, ladle the jam into sterilized jars (see recipe book about how to
sterlize jars) , then tighten the metal lid. Alternatively, seal with wax coated jam papers and cellophane
covers straightaway. If using metal lids, immediately after filling invert the jar and leave to cool upside
down for a better seal and to improve the storage time.
8. If the test is not OK, the jam needs to be cooked for longer. Increase the cooking time using the
and buttons. Press OK to start cooking again. Return to step 5 and follow the instructions.
Quick jam - Quick programme (P4)
1. Prepare the fruits according to the recipe chosen.
2. In the bowl (fitted with the paddle) place the fruit cut into pieces (refer to the recipe for the quantities
required) and 200 ml of water. Fit the lid.
3. Select the Quick programme P4 using the + and – buttons and validate by pressing the OK button.
4. Programme the pre-cooking time for the recipe using the and buttons and validate by pressing
the OK button.
5. When pre-cooking is complete, the jam maker stops and beeps. Press OK to stop it beeping.
6. Add the jam sugar to the bowl (refer to the recipe for the quantities required) and press the OK button.
7. The 7-minute cycle is programmed automatically and is displayed. You can increase or reduce this time
using the and buttons. Start the cooking cycle using the OK button.
8. When cooking is complete, the jam maker stops and beeps. Press OK to stop it beeping.
9. Test to see if the jam is cooked (see page 19).
10. If the test is OK, while the jam is still hot, ladle the jam into sterilized jars (see recipe book on how to
sterilize jars) , then tighten the metal lid. Alternatively, seal with wax coated jam papers and cellophane
covers straightaway. If using metal lids, immediately after filling invert the jar and leave to cool upside
down for a better seal and to improve the storage time.
11. If the test is not OK, the jam needs to be cooked for longer. Increase the cooking time using the
and buttons. Press OK to start cooking again. Return to step 8 and follow the instructions.
Jelly with reduced sugar content
GB
Juice extraction programme (P1) + Vital programme (P2)
1. Prepare the fruits according to the recipe chosen.
2. Add 750 ml of cold water to the bowl (without the paddle).
3. Fit the strainer with the fruit inside into the bowl (refer to the recipe for
the quantities required) then fit the lid.
IMPORTANT: the
recommended quantity
of sugar in the recipes is
for 1 litre of extracted
juice, therefore the
amount of sugar needs
to be adjusted in
proportion to the
quantity of juice
extracted.
For example if you have
less than 1 litre, then use
less sugar than stated in
the recipe and
conversely if you have
more than 1 litre, use
more sugar than stated
in the recipe.
4. Select the Juice Extraction programme P1 using the and
buttons and validate by pressing the OK button.
5. Programme the extraction time for the recipe using the and
buttons and validate by pressing the OK button.
6. When the extraction time is complete, the jam maker stops and beeps.
Press OK to stop it beeping.
7. If you wish to continue the extraction, you can add time using the
and buttons and validate by pressing the OK button.
8. During extraction and when you consider that the extraction is
complete, you can stir and press the fruit with the ladle to extract the
maximum amount of the juice. Discard the fruit in the strainer unless
being used in the recipe.
9. Pour the juice into a measuring jug and retain.
10. Measure or weigh the quantity of juice extracted in order to use the
correct quantity of granulated sugar in the recipe.
11. In the bowl (fitted with the paddle) add the sugar (refer to the recipe
for the quantities required), 150 ml of water and ¼ of an unwaxed
lemon with its peel on. Do not fit the lid to increase evaporation.
17
Page 9

GB
12. Select the Vital programme P2 using the and buttons.
13. Press the OK button to start cooking. The display shows "– –". Do not
add the extracted juice.
14. When the appliance beeps (after about 15 - 20 minutes), press OK. Add
the juice for the extraction and any other ingredients from the recipe.
15. Programme the cooking time for the recipe using the and
buttons and validate by pressing the OK button.
16. When the extraction time has finished, the jam maker stops and beeps.
Press OK to stop it beeping.
17. Test to see if the jam is cooked (see page 19).
18. If the test is OK, while the jelly is still hot, ladle the jelly into sterilized
jars (see recipe book on how to sterilize jars) , then tighten the metal lid.
Alternatively, seal with wax coated jam papers and cellophane covers
straightaway.
If using metal lids, immediately after filling invert the jar and leave to
cool upside down for a better seal and to improve the storage time.
19. If the test is not OK, the jelly needs to be cooked for longer. Increase
the cooking time using the and buttons. Press OK to start
cooking again. Return to step 16 and follow the instructions.
Traditional jelly Juice extraction
programme (P1) + Tradition programme (P3)
1. Prepare the fruits according to the recipe chosen.
2. Add 750 ml of cold water to the bowl (without the paddle).
3. Fit the strainer with the fruit inside into the bowl (refer to the recipe for
the quantities required) then fit the lid.
4. Select the Juice Extraction programme P1 using the and
buttons and validate by pressing the OK button.
5. Programme the extraction time for the recipe using the and
buttons and validate by pressing the OK button.
6. When the extraction time is complete, the jam maker stops and beeps.
Press OK to stop it beeping.
7. If you wish to continue the extraction, you can add time using the
and buttons and validate by pressing the OK button.
8. During extraction and when you consider that the extraction is
complete, you can stir and press the fruit with the ladle to extract the
maximum amount of the juice. Remove the fruits from the strainer.
9. Pour the juice into a measuring jug and retain.
10. Measure or weigh the quantity of juice extracted in order to use the
correct quantity of granulated sugar in the recipe.
11. in the bowl (fitted with the paddle) add the sugar (refer to the recipe for
the quantities required) and the juice. Do not fit the lid to increase
evaporation.
12. Select the Tradition programme P3 using the and buttons and
validate by pressing the OK button.
13. Programme the cooking time for the recipe using the and
buttons and validate by pressing the OK button.
14. When the cooking time has finished, the jam maker stops and beeps.
Press OK to stop it beeping.
15. Test to see if the jelly is cooked (see page 19).
16. If the test is OK, while the jelly is still hot, ladle the jelly into sterilized
jars (see recipe book on how to sterilize jars) , then tighten the metal lid.
Alternatively, seal with wax coated jam papers and cellophane covers
straightaway.
IMPORTANT: the
recommended quantity
of sugar in the recipes is
for 1 litre of extracted
juice, therefore the
amount of sugar needs
to be adjusted in
proportion to the
quantity of juice
extracted.
For example if you have
less than 1 litre, then use
less sugar than stated in
the recipe and
conversely if you have
more than 1 litre, use
more sugar than stated
in the recipe.
18
Page 10

If using metal lids, immediately after filling invert the jar and leave to
cool upside down for a better seal and to improve the storage time.
17. If the test is not OK, the jelly needs to be cooked for longer. Increase
the cooking time using the and buttons. Press OK to start
cooking again. Return to step 14 and follow the instructions.
Desserts - Desserts programme (P5) (labelled Entremets)
1. Placethe ingredients into the bowl fittedwiththe paddle (refer to the recipefor the quantities required) then
fit the lid.
2. Select the Desserts programme P5 (labelled Entremets) using the and buttons and validate by
pressing the OK button.
3. Programme the cooking time for the recipe using the and buttons and validate by pressing the
OK button.
4. When the cooking time is complete, the jam maker stops and beeps. Press OK to stop it beeping.
5. If you wish to continue the cooking,youcanadd time usingthe and buttons and validate by pressing
the OK button. Return then to step 4.
Testing for a set for jam/jelly/marmalade
This test allows you to determine how the jam, jelly or marmalade will set and its final consistency.
• Place 1 teaspoon of hot mixture onto a cold saucer and allow to cool for 2 minutes.
• Push the surface with your fingertip, and if the surface wrinkles, setting point is reached. If not, cook for an
extra 5 minute and re-test.
• Alternatively, remove some hot mixture with a wooden spoon, then after 2 seconds tilt it so that the jam
drips. If the jam is set, the drops run together to form large flakes which break off sharply.
Tips when making preserves
• When preparing fruit, cut them into quite small pieces.
• When making jam and jelly, taste the fruit to assess its sweetness and adjust the quantity of sugar if
necessary.
• When programming the cooking time of the preserve, programme the recommended time and then add
extra time if the preserve is too runny after the setting test. We advise retesting in 5-minute intervals.
• You can find answers to questions frequently asked by consumers, in the recipe book supplied with the
Vitafruit jam maker in the section "Frequently Asked Questions.
If you have any problems or queries contact our Customer Relations Team first
for expert help and advice:
Helpline: 0845 602 1454 - UK
(01) 677 4003 - ROI
or consult our web site: www.tefal.co.uk
GB
Disposal of the appliance and its packaging
• The packaging only contains materials that are not harmful to the environment, that may be
disposed of in compliance with recycling regulations.
To dispose of the appliance, contact your local civic waste collection centre.
Disposal of electronic or electrical appliances
Help protect the environment
Your appliance contains many materials that may be recycled or recovered.
Take it to a local civic waste collection centre.
19
 Loading...