

Page 1
EN
ZH
MS
TH
Page 2
k
g
c
d
h
i
e
j
f
b
l
a
m
Page 3
1
2
1
2
1
1
2
3
MAX
1,5l
1
1a
1
33
3
2
1b/c
2
1d
1e
2
2a
2b/c
Page 4
2d
1
2
1
2
1
3a
2
3b
3c
4
Page 5

THE ACCESSORIES CONTAINED IN THE MODEL YOU HAVE BOUGHT ARE
REPRESENTED ON THE LABEL LOCATED ON THE TOP OF THE PACKAGING.
You can customise your appliance and obtain the accessories described
in these instructions from your usual retailer or an approved service centre.
SAFETY INSTRUCTIONS
• Read the instructions for use carefully
before using your appliance for the
first time. This product has been
designed for domestic use only. Any
commercial use, inappropriate use
or failure to comply with the
instructions, the manufacturer
accepts no responsibility and the
guarantee will not apply.
• Check that the power voltage for
your appliance corresponds to that
of your mains installation.
Any connection error renders the
•
guarantee inval id.
designed for household use inside
the house.
• This appliance is not intended for
use by persons (including children)
with reduced physical, sensory or
mental capabilities, or lack of
experience and knowledge, unless
they have been given supervision or
instruction concerning use of the
appliance by a person responsible
for their safety.
• Children must be supervised to
ensure that they do not play with the
appliance.
• Always use your appliance on a flat,
stable, heat-resistant work surface.
• Do not leave your appliance
unattended whilst in operation.
• Always unplug your appliance from
the mains as soon as you have
finished using it (even in the event of
a power outage) and when you
clean it.
• Do not use your appliance if it is not
operating correctly or if it has been
damaged. If this occurs, contact an
authorised service centre (see list in
service booklet).
• All repair work other than cleaning
This appliance is
and basic maintenance by the
customer must be done by an
approved centre (see list in service
booklet).
• Never put the appliance, the power
cord or the plug in water or any other
liquid.
• Do not leave the power cord within
reach of children.
• The power cord must never be close
to or in contact with the hot parts of
your appliance or close to a heat
source or a sharp edge.
• If the power cord or the plug is
damaged, do not use your
appliance. To avoid any danger, it is
imperative that you have them
replaced by an approved service
centre (see list in the service
booklet).
• For your safety, only use accessories
and spare parts that correspond to
your appliance, sold by an approved
service centre.
• Handle the chopping blade
blender blade
coffee/spices grinder blade (m) very
carefully: they are extremely sharp.
• You must necessarily place the knife
(e) inside the chopping bowl (f)
before filling the latter with the
ingredients you want to mix. You must
also remove the knife (e) before
emptying the chopping bowl (f)
once the ingredients are mixed.
• Do not activate your appliance while
it is empty.
• Do not use the chopper accessory to
make liquid recipes.
• Always use the blender
(h)
.
on
• Never touch moving parts, wait for
the blender to stop completely
(i)
(e)
, and the
(i)
with its lid
EN
, the
1
Page 6

before removing the accessories.
• Do not use the accessories as a
container (freezing – cooking – heat
sterilisation).
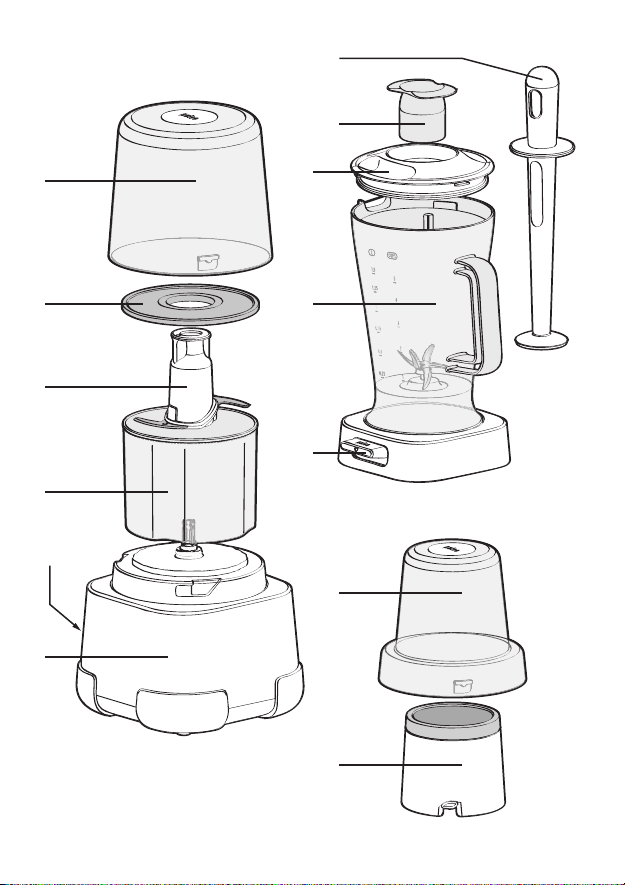
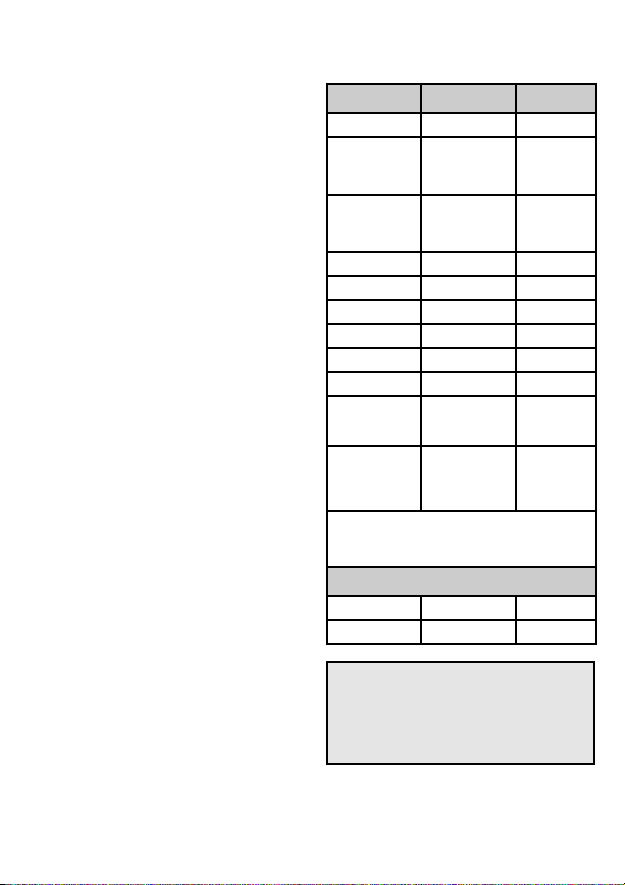
DESCRIPTION
Motor unit
a
Motor unit
b
Power and storage
Chopping unit
c
Lid
d
Seal cover
e
Chopping blade
f
Chopper bowl
USING FOR THE FIRST TIME
Before using your appli ance for the
•
first tim e, remove the plastic
protect ion from the chopping bl ade
(e) which is very sharp and wash all
the accessory parts in warm so apy
water. Rinse and dry.
• Use the motor unit
surface that is flat, clean and dry.
• Do not plug in your Chopping Unit until
all of the accessories have been
assembled.
The numbers for each para graph
match the numbers o f the d iag rams.
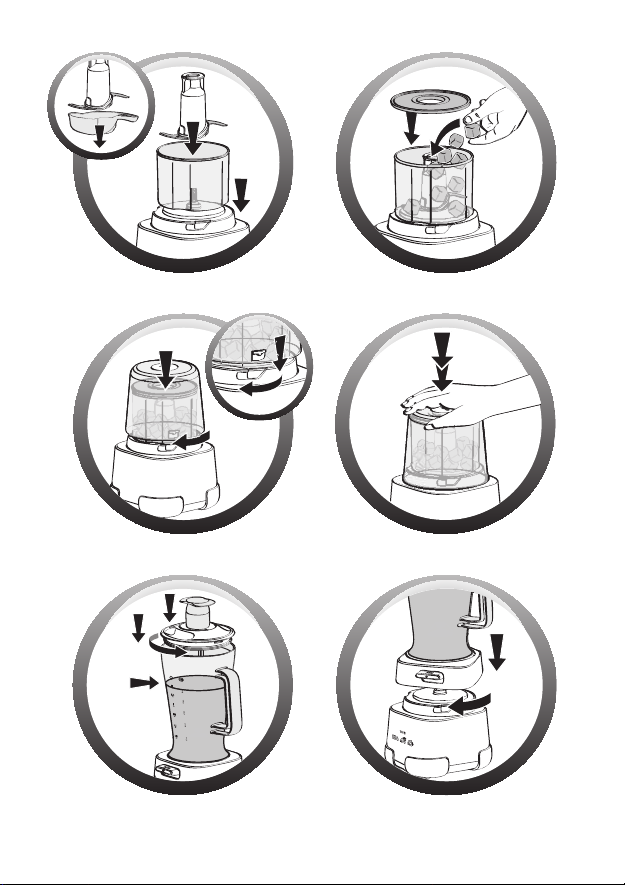
1 - CHOPPING FUNCTION
• Place the chopper bowl
motor unit
• Remove the plastic protection around
the knife blades (e), then place them
inside the chopper bowl (f) making
sure to secure them safely
Handl e th e blade extremely caref ully.
It is very sharp.
• Then place the food, cut into 2-cm
pieces, in the chopper bowl
1.b)
(a)
.
(a)
on a work
(f)
.
on the
(Fi g. 1.a)
(f) (Fig.
• Do not place the accessories in a
microwave oven.
• Do not allow long hair, scarves, ties,
etc. to dangle over the blender
while it is working.
Blender unit
g
Measuring cap
h
Lid
i
Blender jug
j
Starting button (Pulse)
k
Pestle
(dependi ng on model )
Spice/coffee grinder unit
(depending on mo del)
l
Lid
m
Bowl with stainless steel tub
• To avoid any spillages (semi-liquid
mixtures, foods to be reduced to
powder, etc), place the seal cover
over the chopper bowl
When making semi-liquid mixtures, fill
your chopper bowl only half full.
• Place the lid
(f)
and turn it slightly to the left to lock it
(Fig. 1.d)
• Now you can plug in your Chopper Unit
to the mains.
• For your safety, your device is equipped
with an anti-overheating system. If the
appliance is used in excess of its
capacity (with too many ingredients of
for too long a time) it will stop
automatically. Unplug the appliance
from the mains, let it cool for about 30
minutes and then continue using it
making sure to decrease the amount
of ingredients in the bowl and to
.
respect the use times indicated in the
performance table.
• Press on the lid
appliance
• To stop the appliance, stop pressing the
(c)
lid
automatically.
(c)
.
(Fig. 1.e)
: the appliance switches off
(f) (Fig. 1.c)
on the chopper bowl
(c)
to start the
.
2
(d)
.
Page 7
• Never remove the lid
has completely stopped.
(e)
• Unplug the appliance after each use
until the blade
(c)
and before cleaning it.
• Your blade is fitted with a self-locking
system. To remove the blade
rotate it holding it at its top, and then
pull it upwards, while maintaining the
chopper bowl
• You can now safely empty your
chopper bowl
Practi cal advice:
Impor tant:
better if you operate the appliance in
with the other hand.
(f)
.
(f)
you will chop your food
(e)
, gently
brief pulses.
• Depending on how fine you want it
chopped, vary the amount of time you
press.
• For a finer mince or slice, use the
spatula to remove the food sticking to
the walls and distribute it evenly inside
the chopper bowl
• The blade
prolonged use. For the best results, don't
(e)
.
(f)
can get blunter after
hesitate to replace it.
• After use, leave the appliance to cool
down for 2 minutes.
• Do not use when empty.
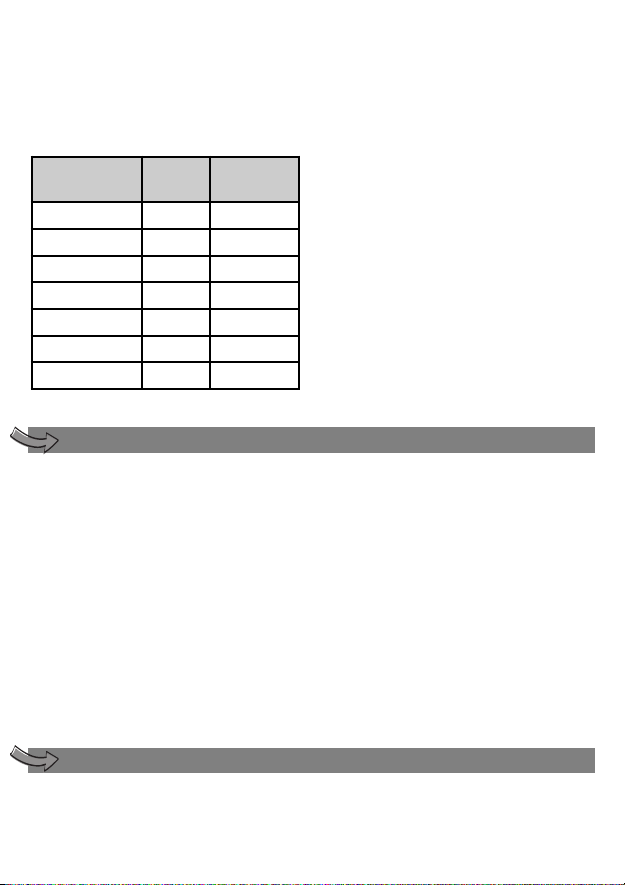
Recommended processing times for
Chopping the performances of your
blender:
Ingredients
Parsley
Onion s
Shall ots
Garl ic
Rusks
Almon ds
Hazel nuts
Walnuts
Parmesan
Tender meat
(piec es o f first
catego ry)
Tough me at
(piec es o f thir d
catego ry or
cheap cuts)
For better results, mix the ingredients
manually with a spatula during the cycle.
Semi- liquid mix tures
Stewed fru it
Baby food
Max. quan tity
30 g
300 g
250 g
200 g
85 g
300 g
300 g
250 g
100 g
350 g
300 g
260 g 12 s
230 g
Max. time
8 s
14 s
(using
pulses)
14 s
(using
pulses)
12 s
15 s
12 s
14 s
12 s
10 s
12 s
12 s
15 s
• For very hard meat as shoulder,
please use 200 g per cycle of 10
s.
• Wait 2 min between each cycle.
3
Page 8

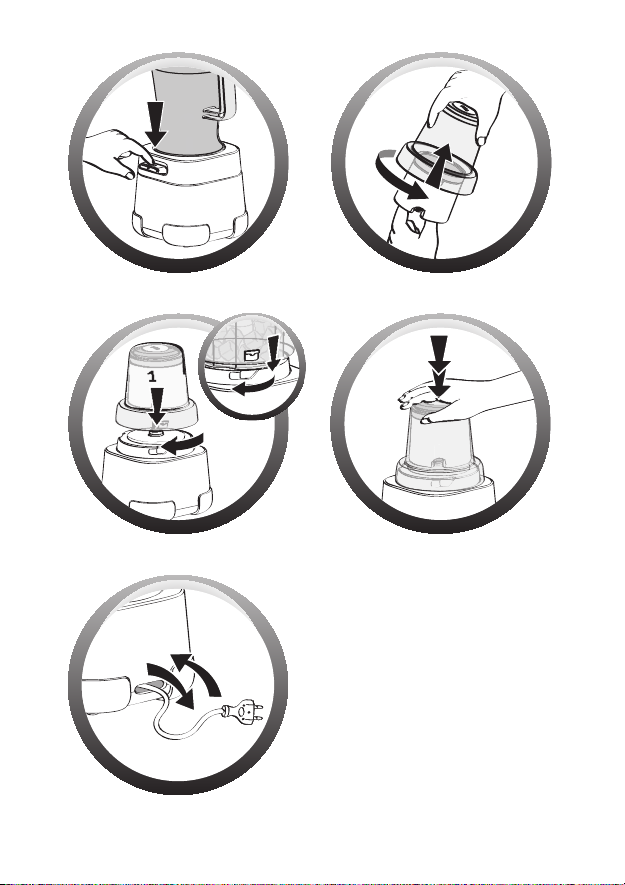
2 - BLENDER FUNCTION
(depending on model)
• Place the blender jug
Whenever handling the appliance, the
blender jug must always be set on the
table, never on the motor unit
• Place the ingredients you wish to mix
inside the blender bowl (i) pouring first
the liquids and then the solid
ingredients, without exceeding the
maximum level:
- 1.5 ℓ for thick mixtures.
- 1 ℓ for liquid mixtures.
• Put on the lid
measuring cap
turning it anticlockwise
• Place the blender jug
(a)
, positioning the "Pulse" button
unit
(j)
slightly to the right of the front of the
motor unit panel
blender jug
need to align the square base of the
blender jug
motor unit
• Plug in the appliance and switch it on
by pressing the Pulse button
2.d)
• To stop the appliance, release the Pulse
button
stopped spinning completely before
removing the blender jug
motor unit
• Never fill the blender jug
boil ing liquid.
cool before processing. Caution: when
blending hot food, keep your hands
away from the lid and cap to avoid any
risk of burns.
• Always use the blender jug
lid on
• Do not use the blender jug
products only (hazelnuts, almonds,
peanuts, sugar etc.).
• To add ingredients while the appliance
is working, remove the measuring cap
(g)
ingredients through the feeder hole.
(i)
(i)
(a) (Fig. 2.c)
.
(j)
. Wait until the blades have
(a)
(h)
.
from the lid and add the
(i)
on the table.
(a)
.
(h)
, fitted with the
(g)
, and lock it by
(Fig. 2.a)
(i)
(a) (Fig. 2.b)
clockwise to lock it: you
with square base of the
.
Allow boiling liquids to
.
on the motor
. Turn the
.
(j) (Fig.
(i)
from the
(i) wi th a
(i)
with its
(i)
with dry
Tips:
• When mixing, if the ingredients stick to
the sides of the jug, stop the machine
and unplug it. Remove the blender jug
(i)
from the motor unit
spatula, scrape the mixture onto the
blade. Never put your hands or fingers
into the jug or near the blade.
You can:
- prepare finely blend smooth soups,
creams, stewed fruit, milkshakes,
cocktails.
- prepare all kinds of liquid mixtures
(pancakes, doughnuts, clafoutis,
batters).
(k)
• The pestle
mixtures smoother and pack them
down (in particular thick mixtures, e.g.:
hummus, guacamole), in the blender
jug. To use the pestle, push it through
the central hole in the lid
blender jug. While the appliance is
working, push the food towards the
blades using the pestle.
makes it possible to make
(a)
. Using a
(h)
ATTENTION: Never use the pestle (k)
without the lid (h) or it could touch
the blades.
3 - COFF EE/SPICE GRINDER
FUNCTION (depending on
model)
• Add the ingredients to be ground into
the coffee/spice grinder bowl
• Position the bowl
and lock it by turning it clockwise. When
you hear a click, the unit is properly
(Fig. 3.a)
locked
• Place the bowl + lid unit on the motor
(a)
and turn it slightly to the left to
unit
(Fig. 3.b)
lock it
• Now you can plug your appliance in.
• Press down on the lid
(Fig. 3.c)
• To stop the grinder, stop pressing on the
(l)
: the appliance switches off
lid
automatically.
• Never remove the lid
has completely stopped.
(m)
.
.
.
(l)
(m)
under the lid
(l)
to start it up
until the blade
4
of the
.
(l)
Page 9
• Unlock the coffee/spice grinder from
the motor unit
right and lift it off the motor unit
(a)
by turning it to the
(a)
.
• To empty the coffee/spice grinder
bowl, unlock it by turning it to the left
while at the same time holding the lid
(l)
down with the other hand.
10 g
60 g
20 g
20 g
10 g
20 g
Proces sing
Time
(using pulses)
5 sec
35 sec
30 sec
40 sec
30 sec
35 sec
35 sec
Ingredients
Dried apricot s
Star a nis e
Coffee beans
Cardam om
Cumin
Papri ka pepper
Peppe rcorns
Quantity
120 g
CLEANING
• Unplug the appliance.
• For easier cleaning, rinse the
accessories quickly after use.
• Wash and dry the accessories: they are
all dishwasher safe or can be washed
by hand with warm water and washing
up liquid, with the exception of the
motor unit
wiped with a damp sponge.
• Pour hot water with a few drops of
washing-up liquid into the blender jug
(i)
cap
unit
"Pulse" button
Rinse the bowl.
(a)
. The motor unit should be
. Close the lid
(g)
(a)
(h)
with the measuring
. Place the bowl on the motor
and press a few times on the
(j)
. Unplug the device.
4 - CORD LENGTH ADJ USTMENT
For more comfortable use or easy
storage, you can reduce the length of
the power cord by pushing it inside the
motor unit
the back
The blade s are extremely sharp
-
acc essor ies. Handle them with
(a)
through the opening at
(b) (Fig. 4)
.
care.
Tip:
In the event that your accessories
are coloured by the food (carrots,
oranges, etc.), rub them with a cloth
dipped in a little sunflower oil and then
clean them as usual.
STORAGE
Do not store your blender in a damp environment.
5
Page 10
WHAT DO I DO IF MY APPLIANCE DOESN'T WORK?
If your appliance does not work,
check:
• that it is properly plugged in.
• that each accessory is locked.
Your appliance still isn't working?
Contact an approved service centre
(see the list in the service booklet).
DISPOSAL OF THE APPLIANCE AND ITS PACKAGING
MATERIALS
The packaging is comprised
exclusively of materials that
present no danger for the
environment and which
may therefore be disposed
of in accordance with the recycling
measures in force in your area.
For disposal of the appliance itself,
please contact the appropriate
service of your local authority.
END OF LIFE ELECTRICAL AND ELECTRONIC PRODUCTS
Environmental protection first!
Your appliance contains a lot of recoverable or recyclable
material.
Leave it at a local civic waste collection point so that it can
be recycled.
ACCESSORIES
You can customise your appliance
and obtain the following accessories
from your usual retailer or an
approved service centre:
- Chopping blade
- Blender jug
- Pestle
- Coffee/spice grinder
6
Page 11

包裝頂部的標籤顯示您購買的型號的配件。
您可以按需要向一般零售商或認可服務中心購買本說明書提述的配件。
安全事項
ZH
• 第一次使用本產品之前請先仔細閱讀
使用說明書。本產品只設計作家居用
途。若您將本產品用作商業或不適當
的用途或不遵照說明書的指示,製造
商將不負任何責任,保用亦不適用。
• 請核對本產品的電壓是否跟您家的電
路相符。
• 若有任何電路連接失誤,保用將會撤
銷。本產品只擬作戶內的家居用途。
• 本產品並非供身體、感官或智力弱能
者或 缺乏有關 經驗和知 識的人(包括
兒童 )使 用,除非 他們是在 負責其安
全的人士監督下使用或上述人士已就
本產品的使用給予指示。
• 請監督兒童,以免其將本產品用作戲
耍。
• 必須將攪拌器放在防熱的穩固平面上
。
• 攪拌器操作期間切勿置之不顧。
• 每次使用後或清潔時必須盡快拔掉插
頭 (即使停電亦然)
• 若攪拌器操作不正常或損毀,切勿使
用。若有此情況,請跟認可服務中心
絡(認可 服務中心 名單請參 閱服務冊
)。
• 除清潔和一般保養可以由用戶進行外
,任何維修均須由認可服務中心進行
(認可服務中心名單請參閱服務冊)。
• 切勿將攪拌器、電源線或插頭浸入水
或任何液體中。
• 切勿將電源線放在兒童觸及的地方。
• 不得放近或接觸攪拌器的發熱部分、
其他發熱源或尖角。
• 若電源線或插頭損毀,切勿使用。為
免發生危險,必須由認可服務中心更
換電 源線(認可服 務中心名 單請參閱
服務冊)。
• 為確保安全,只能使用認可服務中心
出售您購買的型號的配件和零件。
• 處理碎料刀(e)、攪拌刀(i)和咖啡豆/
香料研磨刀(m)時必須小心:因為刀
邊十分銳利。
• 在碎料碗(f)放入要攪拌的材料之前先
將刀(e)放在碗 的適當 位置。 攪拌好
材料要清倒碎料碗(f)時亦須先移除刀
(e)。
• 沒有放入材料時切勿啟動攪拌器。
• 切勿使用碎料配件備製液體材料。
• 必須將蓋放妥在(h) 之上才使用攪拌
裝置(i)。
• 必須等攪拌器完全停頓才可以觸摸活
動部分或移除配件。
• 切勿 將攪拌壼 用作容 器(例如急 凍、
煮食或消毒容器)。
• 切勿將配件放入微波爐。
• 攪拌器操作時切勿讓長髮或圍巾等等
懸垂在攪拌器之上。
7
Page 12

說明
馬達座
a 馬達
b 電源線和儲存箱
碎料裝置
c 蓋
d 蓋封
e 碎料刀
f 碎料碗
首次使用
• 首次 使用之 前先移 除鋒利 碎料刀 (e)
的塑料保護包裝,以肥皂水清洗所有
配件,徹底沖淨然後吹乾。
• 必須 將 攪 拌 器 放 在 防 熱的穩固 平 面
上。
• 將馬 達座(a)放 在清潔 的乾爽平面上
使用。
• 必須先組裝所有配件才將碎料裝置接
上電源。
每段的數字跟圖的數字相符
1 -
碎料功能
• 將碎料碗(f)放在馬達座(a)上。
• 移除刀(e) 的塑料保護包裝,然後將
刀放在碎料碗(f)內,必須小心將刀放
置穩 妥 (圖 1.a)。處 理 刀 時須小心 ,
因為刀邊十分銳利。
• 接著在碎料碗(f)內放入食材。食材必
須切成每片2公分長(圖1.b)。
• 為免材 料溢出(例如 半液體混 合材料
或要 研磨成粉 的食材),必 須在碎料
攪拌壼組合(視乎型號)
g 蓋塞
h 蓋
i 攪拌壼
j 啟動鈕(脈衝)
k 碾槌
香料/咖啡豆研磨裝置 (視乎型號)
l 蓋
m 不銹鋼斗容碗
(f)上套上蓋(d) (圖 1.c)。備製半
碗
液體混合材料時,材料只可放至碎料
碗的一半容量。
• 將蓋 (c)放在碎料碗 (f)上,然後向 左
稍轉以鎖緊 (圖1.d)。
• 現在可以將碎料裝置接上電源。
• 為確保安全,本產品有防過熱系統。
若負 荷過重(在過 長的時間 內處理太
多食 材),攪拌器 會自動停 止。請拔
掉電源線,將攪拌器放涼約30分鐘才
繼續使用,但必須減少碗內的食材份
量,並且遵照功能表內所列的處理時
間。
• 將蓋(c)向下壓便可啟動攪拌器 (圖
1.e)。
• 停止將蓋(c)向下壓便可停止操作: 攪
拌器會自動關掉。
• 必須等攪拌刀(e)完全停頓才將蓋(c)
移離。
• 每次 使 用 後 或 清 潔 時 必須先拔 掉 插
頭。
8
Page 13

• 攪拌刀有自動鎖緊系統。要移除攪拌
刀(e),請用一隻 手扶穩碎料 碗(f),
再用另一隻手抓著攪拌刀的頂部輕輕
旋動,再往上拉。
• 移離後便可以安全地清倒碎料碗(f)內
的食材。
實用建議:
注意 : 利 用 短 脈 衝可以更妥當切 碎 食
材。
根據 食 材 需 切 至 的幼細程度來調 節 處
理時間。
請用 抹 刀 將 黏 附 在碗邊的免治材 料 或
薄片取出,再 平均放在碎 料碗(f)內。
攪拌刀(e)會經長時間 使用而變鈍,要
妥當切碎材料 必須更換新 刀。
使用後請將攪 拌器放涼至 少2分鐘。
沒有放入材料 時切勿啟動 攪拌器。
切碎不同食材 建議採用的 時間:
食材
歐芹
洋蔥
青蔥
大蒜
烤麵包
杏仁
榛子
胡桃
巴馬乾 酪
嫰質肉
(一級 肉類)
最多份量
30 克
300 克
250 克
200 克
85 克
300 克
300 克
250 克
100 克
350 克
最長時間
14秒
(利用 脈衝)
14秒
(利用 脈衝)
12 秒
15 秒
12 秒
14 秒
12 秒
10 秒
12 秒
8 秒
粗質肉 (三級
肉類或 平價肉)
300 克
為達致更佳效果,請在攪拌過程中以人手
用抹刀混和食材。
半液體食材
煮爛的 水果
嬰兒食 品
260 克 12 秒
230 克
• 肩肉等硬 質肉每次碎 肉請以10秒
200克的肉 。
• 每次碎肉 請相隔2分 鐘。
9
12 秒
15 秒
Page 14

2 -
攪拌功能 ( 視乎型號)
• 將 攪 拌 壼 (i)放 在 桌 上 。 每 次 處 理 攪
拌器時,攪拌壼必須放在桌面 , 切
勿放在馬達座 (a)上。
• 將 要 攪 拌 的 材 料 放 在 攪 拌 壼 (i)內 ,
必須先倒入液體材料才放入固 體 材
料,切勿超過 最高容量水 平:
• 稠濃材料不得超過 1.5 公 升。
• 液體材料不得超過 1公升。
• 放 上蓋(h), 然 後插上蓋塞 (g),再作
反時針方向旋 動以鎖緊 (圖2.a)。
• 將 攪拌 壼 (i) 放 在 馬 達座 (a)上 , 將
“脈衝” 鈕扭至馬達 座標示板(a)前
的稍右方(圖2.b)。將攪 拌壼(i)作 順
時針方向旋動以鎖緊:必須將 攪 拌
壼(i)的 方 形 底 部跟 馬 達 座(a) 的方
形底部配合(圖2.c)。
• 插 上插頭 ,按動脈 衝鈕(j)(圖2.d)以
啟動攪拌器。
• 將 脈 衝 鈕 (j)釋 回 原 位 便 可 停 頓 攪 拌
器。必須等刀葉完全停止轉動 才 將
攪拌壼(i)移離馬 達座(a)。
• 切 勿 將 滾 熱 液 體 倒 入 攪 拌 壼 (i), 請
將滾熱液體放涼再倒入。警告 : 攪
拌熱食材時,雙手必須跟蓋和 蓋 塞
保持距離,以 防灼傷。
• 必 須將蓋 放妥在 (h)之上才 使用攪拌
裝置(i)。
• 切 勿用攪拌壼(i)單單處理乾食 材(例
如榛子、杏仁 、花生和糖 )。
• 攪 拌 器 操 作 期間若要加添材料,請
拔掉蓋塞(g)再從 進料孔放入 食材。
提示:
• 攪 拌 時 若 有 食材黏附在攪拌壼邊,
請先停機、拔掉插頭,並將攪 拌 壼
(i)移離馬達座(a), 再用抹刀刮掉攪
拌刀上的混合材料。切勿將手 或 手
指放入攪拌壼 或放近攪拌 刀。
您可以:
- 用攪 拌 器 備製 出 幼 滑的 湯 、奶 油 、
燉水果、奶昔 和雞尾酒。
- 用攪 拌 器 備 製 各種液體混合 材 料 (例
如薄 煎 餅 、油 炸 圈 餅、 黑 霉批 皮 或
糊)。
• 利 用碾 槌
豆 芝 麻或 鱷梨 沙 拉醬 ) 更 幼滑 再壓
混 入攪 拌壼 。方 法是 從 攪 拌 壼 蓋
(h)中央的孔將 碾槌推 入。讓攪 拌器
保持操作,利用碾槌將食材推 向 攪
拌刀 。
(k)令混 合 材料 ( 例 如 鷹嘴
注意:若沒有放上蓋(h)切勿使用
碾槌
(k) ,否則碾槌可能會觸及攪
拌刀。
3 -
咖啡豆/香料 研磨功能( 視乎型號)
• 將 要研磨的材 料放入 咖啡豆/香 料研
磨碗 (m)。
• 將 研磨 碗 (m)放在 蓋(l) 之 下 ,作 順
時針方向旋動以鎖緊。聽見一 聲 啪
響即表示裝置 已經鎖緊(圖3.a)。
• 將 碗連蓋放在 馬達座(a)上,稍稍向
左旋動以鎖緊 (圖3.b)。
• 現在可以插上插頭 。
• 將 蓋(l)向 下 壓 便可 啟 動研 磨 器 (圖
3.c)。
• 停止將蓋(l)向下壓便可停止操作: 攪
拌器會自動關 掉。
• 必 須 等 攪 拌 刀 完 全 停 頓 才 將 蓋 (l)移
除。
• 要 將咖 啡 豆/ 香 料研 磨器 從馬 達 座
(a)解鎖,請 將研磨器向 右旋動 ,便
可以從馬達座 (a)提起。
• 清 倒咖啡豆/ 香料研磨碗時請先 解鎖
。方法是用一隻手按下蓋(l),再用
另一隻手將研 磨器向左旋 動。
10
Page 15

乾杏
八角
咖啡豆
小豆蔻
小茴香
辣椒
乾胡椒
清潔
材料
份量
120 克 5 秒
10克 35秒
60克 30秒
20克 40秒
20克 30秒
10克 35秒
20克 35秒
處理時間
(利用脈衝)
4 -
調節電源線的 長度
將電源從攪拌器背面的孔(b)推入馬達
座(a),以縮短電源線的長度,方便使
用或存放(圖4)。
• 拔掉插頭。
• 為 易 於 清潔, 使 用 後 在 水 龍頭下 快
速沖洗各配件 。
• 清洗及風 乾配件 :除馬 達座(a)之外
,所有配 件 均 可 用 洗碗機 清 洗 , 也
可以用人 手 以 暖 水 和清潔 液 清 洗 。
馬達座可用濕 海綿抹淨。
• 將 熱 水 和 數滴 清 潔 液 倒入 攪 拌 壼
(i)。插 入 蓋塞 (g)將 蓋(h)封 好 ,然
後 將 容碗 放在 馬達 座(a)上 ,按 動
脈衝鈕(j)數次 。 拔 掉 插 頭 , 沖洗容
碗。
存放
切勿將攪拌器 存放在潮濕 的環境。
• 攪拌刀非常銳利,請小 心處理。
• 提示:若配 件染了食物 的色素(例如
胡蘿蔔 或 橙 ) ,可 以 用 布 沾少 許 葵
花籽油擦拭, 再如常清潔 。
11
Page 16

攪拌器不操作怎麼辦﹖
若攪拌器不操 作,請檢查 :
• 插頭是否 已插妥。
• 每項配件 是否已鎖緊 。
棄置攪拌器和包裝物料部件
包裝物料全部 不會危害環 境
,可以按照當 地的循環再 造
的現行規例棄 置。
配件
您可以按需要 向一般零售 商或認可服
務中心購買本 以下配件:
若攪 拌 器 仍 不 操 作,請跟認可服 務 中
心 絡 ( 認 可服 務中 心名 單請 參閱 服務
冊) 。
若要棄掉攪拌 器,請向當 地的有關
當局查詢。
- 碎料刀
- 攪拌壼
- 碾槌
- 咖啡豆/ 香料研磨器
12
Page 17

AKSESORI YANG TERDAPAT DALAM MODEL YANG ANDA BELI DITUNJUKKAN
DALAM LABEL YANG TERLETAK DI BAHAGIAN ATAS BUNGKUSAN.
Anda boleh menyuai padan peralatan anda dan mendapatkan aksesori
yang diterangkan dalam arahan ini daripada peruncit biasa anda atau pusat
perkhidmatan berdaftar.
ARAHAN KESELAMATAN
• Baca arahan penggunaan dengan teliti
sebelum menggunakan peralatan
anda buat pertama kali. Produk ini telah
direka untuk penggunaan domestik sahaja. Pengilang tidak akan bertanggungjawab ke atas sebarang
penggunaan komersil, penggunaan
yang tidak wajar atau kegagalan untuk
mematuhi arahan dan jaminan tidak
akan terpakai.
• Pastikan bahawa voltan kuasa untuk
peralatan anda sepadan dengan soket
utama anda.
Sebarang ralat sambungan menye-
•
babkan jaminan tidak sah.
ini direka untuk penggunaan isi rumah
di dalam rumah.
• Peralatan ini bukan untuk digunakan
oleh orang (termasuk kanak-kanak)
yang kekurangan keupayaan fizikal,
deria atau mental, atau kurang pengalaman dan pengetahuan, kecuali
mereka telah diberikan pengawasan
atau arahan mengenai penggunaan
peralatan oleh orang yang bertanggungjawab ke atas keselamatan
mereka.
• Kanak-kanak mesti diawasi bagi memastikan mereka tidak bermain dengan peralatan.
• Sentiasa gunakan peralatan anda di
atas permukaan yang rata, stabil dan
tahan haba.
• Jangan tinggalkan peralatan anda
tanpa pengawasan sewaktu ia sedang
beroperasi.
• Sentiasa cabut palam peralatan anda
daripada soket utama sebaik sahaja
anda selesai menggunakannya
(walaupun jika bekalan elektrik terputus)
dan ketika anda membersihkannya.
• Jangan menggunakan peralatan anda
jika ia tidak berfungsi dengan betul atau
jika ia telah rosak. Jika ini berlaku,
hubungi pusat perkhidmatan berdaftar
Peralatan
(sila lihat buku kecil perkhidmatan).
• Semua kerja-kerja permbaikan selain
daripada mencuci dan penyenggaraan asas oleh pelanggan mestilah
dilakukan oleh pusat berdaftar (lihat
senarai dalam buku kecil perkhidmatan).
• Jangan sesekali meletakkan peralatan,
kord tenaga atau palam di dalam air
atau sebarang cecair lain.
• Jangan meninggalkan kord tenaga di
tempat yang boleh dicapai oleh kanakkanak.
• Kord tenaga tidak harus sama sekali berada berdekatan atau bersentuh dengan bahagian peralatan anda yang
panas atau berdekatan dengan sumber
haba atau sisi yang tajam.
• Jika kord tenaga atau palam rosak, jangan menggunakan peralatan anda.
Untuk mengelakkan sebarang bahaya,
adalah amat mustahak untuk anda
membawanya ke pusat perkhidmatan
berdaftar untuk diganti (lihat senarai
dalam buku kecil perkhidmatan).
• Untuk keselamatan anda, hanya gunakan aksesori dan alat ganti yang
sepadan dengan peralatan anda, dijual
oleh pusat perkhidmatan berdaftar.
• Kendalikan mata bilah pemotong
mata bilah pengisar
pengisar kopi/rempah
berhati-hati: ianya amat tajam.
• Anda mestilah meletakkan pisau
dalam mangkuk pemotong
mengisikannya dengan ramuan yang
ingin anda bancuh. Anda juga mesti
mengeluarkan pisau
gosongkan mangkuk pemotong
apabila ramuan telah diadun.
• Jangan mengaktifkan peralatan anda
sewaktu ianya kosong.
• Jangan menggunakan aksesori pemotong untuk membuat resepi cecair.
(i), dan mata bilah
(m) dengan
(f) sebelum
(e) sebelum men-
13
(e),
(e) di
MS
(f)
Page 18

• Sentiasa gunakan pengisar (i) dengan
tutupnya terpasang
• Jangan sesekali menyentuh bahagian
yang bergerak, tunggu sehingga
pengisar telah berhenti sepenuhnya sebelum mengeluarkan aksesori.
• Jangan menggunakan aksesori seba-
(h).
gai bekas (membeku – memasak –
pensterilan haba).
• Jangan memasukkan aksesori ke
dalam ketuhar gelombang mikro.
• Jangan biarkan rambut yang pan-
jang, skarf, tie, dsb. terjuntai di atas
pengisar sewaktu ianya berfungsi.
PENERANGAN
Unit motor
a
Unit motor
b
Kuasa dan penyimpanan
Unit pemotong
c
Penutup
d
Penutup kedap
e
Mata bilah pemotong
f
Mangkuk pemotong
MENGGUNAKAN BUAT PERTAMA KALI
• Sebelum menggunakan peralatan
anda buat pertama kali, buang pembungkus plastik daripada mata bilah
pemotong (e) yang amat tajam dan
basuh semua barang aksesori menggunakan air suam bersabun. Bilas dan
keringkan.
• Gunakan unit motor
kaan kerja yang rata, bersih dan kering.
• Jangan menghidupkan Unit Pemotong
anda sehingga semua aksesori telah dipasang.
Nombor pada setiap perenggan sepadan dengan nombor pada gambar
rajah.
(a) di atas permu-
1 - FUNGSI MEMOTONG
• Pasangkan mangkuk pemotong (f)
pada unit motor (a).
• Buang pembungkus plastik yang mem-
bungkus mata bilah pisau
pasangkannya ke dalam mangkuk pe-
(f), pastikan ia dipasang dengan
motong
betul (Gambar rajah
Kendalikan mata bilah dengan berhatihati. Ia amat tajam.
(e), kemudian
1.a).
• Kemudian masukkan makanan, dipotong dalam kepingan 2 cm, ke dalam
mangkuk pemotong
1.b).
• Untuk mengelakkan sebarang tumpahan (bancuhan separa cecair, makanan yang akan dijadikan serbuk, dsb),
pasangkan penutup kedap
mangkuk pemotong
1.c). Apabila membuat bancuhan se-
para-cecair, isikan mangkuk pemotong
anda hanya separuh bahagian.
• Pasangkan penutup
kuk pemotong
kiri sedikit untuk menguncikannya (Gambar rajah
• Sekarang anda boleh memasang
palam Unit Pemotong anda kepada
soket utama.
• Untuk keselamatan anda, peralatan
anda dilengkapi dengan sistem antipemanasan lampau. Jika peralatan digunakan melebihi daripada kapasitinya (dengan ramuan yang terlampau
banyak untuk masa yang amat panjang) ia akan berhenti secara automa-
14
Unit pengi sar (bergantung pada
model)
g
Tudung penyukat
h
Penutup
i
Jag pengisar
j
Butang mula (Pulse)
k
Alu
Unit pengisar rempah/kopi
(berga ntung pada model)
l
Penutup
m
Mangkuk dengan tab keluli
tahan karat
(f) (Gambar rajah
(d) di atas
(f) (Gambar rajah
(c) pada mang-
(f) dan pusingkannya ke
1.d).
Page 19

tik. Cabut palam peralatan daripada
soket utama, biarkannya sejuk untuk
lebih kurang 30 minit dan kemudian
sambung penggunaan, pastikan anda
mengurangkan jumlah ramuan di
dalam mangkuk dan mematuhi masa
penggunaan yang dinyatakan dalam
jadual penggunaan.
• Tekan penutup
peralatan (Gambar rajah
• Untuk memberhentikan peralatan, berhenti menekan penutup
akan mati secara automatik.
• Jangan sesekali membuka penutup
sehingga mata bilah (e) telah berhenti
(c) untuk memulakan
1.e).
(c): Peralatan
(c)
sepenuhnya.
• Cabut palam peralatan selepas setiap
penggunaan dan sebelum mencucinya.
• Mata bilah anda dilengkapi dengan sistem kunci-sendiri. Untuk membuka mata
(e), pegang bahagian atas sambil
bilah
memusingkannya dengan perlahan,
dan kemudian tariknya ke atas, dan
mengekalkan mangkuk pemotong
dengan sebelah tangan lagi.
• Anda sekarang boleh mengosongkan
mangkuk pemotong anda
selamat.
(f)
(f) dengan
Nasihat praktikal:
Penting:
anda boleh memotong makanan anda dengan lebih baik jika anda
mengendalikan peralatan anda secara
denyut pendek.
• Bergantung kepada berapa halus anda
mahukannya dipotong, pelbagaikan
tempoh masa anda menekan.
• Untuk kisaran atau potongan yang lebih
halus, gunakan spatula untuk mengeluarkan makanan yang melekat pada
dinding dan agihkannya sama rata di
dalam mangkuk pemotong
• Mata bilah
(e) boleh menjadi tumpul
(f).
setelah digunakan untuk beberapa
lama. Untuk hasil terbaik, jangan raguragu untuk menggantikannya.
• Selepas menggunakannya, biarkannya
peralatan menyejuk untuk 2 minit.
• Jangan menggunakannya ketika ia ko-
song.
Masa pemprosesan yang disyorkan
unt uk menjalankan pros es Mem otong bagi pengisar anda:
Bahan-
bahan
Parsli
Bawang
Bawang me rah
Bawang pu tih
Biskut ru sk
Badam
Kacang hazel
Kacang walnut
Parmesan
Daging yan g
lembut
(kepin gan
darip ada kategori
pertam a)
Daging yan g
liat
(kepin gan
darip ada kategori
ketiga atau
potong an yang
murah)
Untuk hasil yang lebih baik, adun semua
bahan secara manual dengan
menggunakan spatula sewaktu kitaran.
Bancuhan sep ara-cecair
Stu b uah
Makanan ba yi
Kuantiti
maks.
30 g
(menggunakan
300 g
250 g
200 g
85 g
300 g
300 g
250 g
100 g
350 g
300 g
260 g 12 s
230 g
denyut)
(menggunakan
denyut)
maks.
• Untuk daging yang amat keras
seperti daging bahagian bahu,
sila gunakan 200 g untuk setiap
kitaran 10 s.
•Tunggu 2 minit di antara setiap
kitaran.
15
Masa
8 s
14 s
14 s
12 s
15 s
12 s
14 s
12 s
10 s
12 s
12 s
15 s
Page 20

2 - FUNGSI PENGIS AR
(bergantung pada model)
• Letakkan jag pengisar (j) di atas meja.
Apabila mengendalikan peralatan, jag
pengisar mestilah sentiasa diletakkan di
atas meja, berdekatan dengan unit
motor (a).
• Masukkan bahan-bahan yang anda
ingin adun ke dalam mangkuk pengisar
(i), masukkan bahan cecair terlebih
dulu dan kemudian bahan pepejal,
tanpa melebihi paras maksimum:
- 1.5 ℓ untuk bancuhan pekat.
- 1 ℓ untuk bancuhan cecair.
• Pasang penutup (h), dilengkapi den-
gan tudung penyukat (g), dan kuncikannya dengan memusingnya ke arah
lawan jam.
• Pasangkan jag pengisar
motor (a), dengan butang “Pulse” (j) sedikit ke kanan pada hadapan panel unit
motor (a) (Gambar rajah 2b). Pusing
jag pengisar (i) mengikut arah jam
untuk menguncinya: anda perlu menjajarkan tapak segi empat jag pengisar (i)
dengan tapak segi empat unit motor
(a) (Gambar rajah 2.c).
• Masukkan palam peralatan ke soket
dan hidupkannya dengan menekan butang Pulse (j) (Gambar rajah 2.d).
• Untuk memberhentikan peralatan, lepaskan butang Pulse (j). Tunggu sehingga mata bilah telah berhenti
berpusing sepenuhnya sebelum mengeluarkan jag pengisar (i) daripada
unit motor (a).
• Jangan sesekali mengisi jag pengisar (i)
dengan cecair yang panas menggelegak. Biarkan cecair yang panas menggelegak menyejuk sebelum
memprosesnya. Amaran: apabila mengadun makanan yang panas, jauhkan
tangan anda daripada penutup dan tudung untuk mengelakkan sebarang risiko melecur.
• Sentiasa jag gunakan pengisar (i) den-
gan penutupnya terpasang
• Jangan menggunakan jag pengisar
dengan hanya produk kering sahaja
(kacang hazel, badam, kacang, gula
dsb.).
• Untuk menambah bahan semasa peralatan sedang berfungsi, buka tudung
(i) pada unit
(h).
(i)
penyukat
bahkan bahan melalui lubang suapan.
Tip:
• Ketika mengadun, jika bahan-bahan terlekat pada sisi jag, matikan peralatan
dan cabut palamnya. Keluarkan jag
pengisar daripada unit motor (a). Dengan menggunakan spatula, kaup bancuhan dan masukkan ke atas mata
bilah. Jangan sesekali memasukkan tangan atau jari anda ke dalam jag atau
berdekatan mata bilah.
Anda boleh:
- menyediakan sup yang licin dan diadun
halus, krim, stu buah-buahan, susu kocak,
koktel.
- menyediakan semua jenis bancuhan
cecair (penkek, donut, clafoutis, bater).
• Alu
jadi lebih licin dan sebati (khususnya
bancuhan pekat, spt.: Hummus, guacamole), dalam jag pengisar. Untuk menggunakan alu, masukkannya melalui
lubang tengah pada penutup (h) jag
pengisar. Ketika peralatan berfungsi,
tolak makanan ke arah mata bilah dengan menggunakan alu.
PERHATIAN: Jangan sesekali menggunakan alu (k) tanpa penutup (h)
atau membiarkannya bersentuhan
dengan mata bilah.
3 - FUNGSI PENGISAR KOPI/REMPAH
• Tambah bahan-bahan yang akan dikisarke dalam mangkuk pengisar
kopi/rempah (m).
• Pasangkan mangkuk (m) ke bawah pe-
nutup (l) dan kuncikannya dengan me-
musingnya mengikut arah jam. Apabila
anda mendengar bunyi klik, unit telah dikunci dengan betul (Gambar rajah
3.a).
• Pasangkan unit mangkuk + penutup
pada unit motor (a) dan pusingkannya
sedikit ke kiri untuk menguncinya (Gambar rajah 3.b).
• Sekarang anda boleh memasukkan
palam peralatan anda ke soket.
• Tekan penutup ke bawah (l) untuk menghidupkannya (Gambar rajah 3.c).
• Untuk memberhentikan pengisar, ber-
(g) pada penutup dan tam-
(k) membolehkan bancuhan men-
(bergantung pada model)
16
Page 21

henti menekan penutup
akan mati secara automatik.
• Jangan sesekali membuka penutup (c)
sehingga mata bilah telah berhenti sepenuhnya.
• Buka pengisar kopi/rempah daripada
unit motor
nya ke kanan dan alihkannya daripada
unit motor (a).
• Untuk mengosongkan mangkuk pengisar kopi/rempah, buka kuncinya dengan memusingkannya ke kiri sambil
memegang menekan penutup
bawah dengan sebelah lagi tangan.
(a) dengan memusingkan-
(l): peralatan
(l) ke
MENCUCI
• Cabut palam peralatan.
• Untuk pencucian yang lebih mudah,
bilas aksesori dengan cepat selepas
menggunakannya.
• Basuh dan keringkan aksesori:
semuanya selamat untuk dimasukkan ke
dalam mesin basuh pinggan mangkuk
atau boleh dibasuh dengan tangan
dengan air suam dan cecair pencuci,
kecuali unit motor (a). Unit motor
hendaklah dilap dengan span lembap.
• Masukkan air panas dengan beberapa
titik cecair pencuci ke dalam jag
pengisar
tudung penyukat
(i). Tutup penutup (h) dengan
(g). Pasang mangkuk
Masa
Bahan-bahan
Apriko t kering
Bunga lawang
Biji kopi
Buah pelaga
Jintan put ih
Lada paprika
Lada biji
Kuantiti
120 g
10 g
60 g
20 g
20 g
10 g
20 g
Pemprosesan
Menggunakan
denyut)
5 saat
35 saat
30 saat
40 saat
30 saat
35 saat
35 saat
4 - PELARAS AN KEPANJANGAN KORD
Untuk penggunaan yang lebih selesa
atau penyimpanan yang mudah, anda
boleh memendekkan kord kuasa dengan
memasukkanya ke unit motor (a) melalui
lubang pada bahagian belakang (b)
(Gambar rajah 4).
pada unit motor
"Pulse" (j) beberapa kali. Cabut palam
peralatan. Bilas mangkuk.
Mata bilah adalah aksesori yang
-
amat tajam. Kendalikannya
dengan cermat.
Sekiranya warna makanan melekat
Tip:
pada aksesori anda (lobak merah, oren,
dsb.), lap dengan menggunakan kain
yang dibasahkan dengan sedikit minyak
bunga matahari dan kemudian cucinya
seperti biasa.
(a) dan tekan butang
PENYIMPANAN
Jangan menyimpan pengisar anda dalam persekitaran yang lembap.
17
Page 22

APA YANG PATUT SAYA LAKUKAN JIKA PERALATAN
SAYA TIDAK BERFUNGSI?
Jika peralatan anda tidak berfungsi,
pastikan:
• bahawa palamnya telah dimasukkan
dengan betul ke soket.
• bahawa setiap aksesori telah dikunci.
Peralatan anda masih tidak berfungsi?
Hubungi pusat perkhidmatan berdaftar
(lihat senarai dalam buku kecil
perkhidmatan).
PELUPUSAN PERALATAN DAN BAHAN PEMBUNGKUSANNYA
Pembungkus mengandungi
sepenuhnya bahan-bahan
yang tidak berbahaya kepada
alam sekitar dan oleh itu boleh
dilupuskan mengikut langkahlangkah kitar semula yang dikuat kuasakan di kawasan
anda.
Untuk melupuskan peralatan itu sendiri,
sila hubungi perkhidmatan pihak berkuasa tempatan anda yang sewajarnya.
TEMPOH HAYAT PRODUK ELEKTRIK DAN ELEKTRONIK
Utamakan perlindungan alam sekitar!
Peralatan anda mengandungi banyak bahan yang boleh
diperoleh semula atau dikitar semula.
Tinggalkannya di pusat pengumpulan bahan buangan sivik
tempatan anda supaya ia boleh dikitar semula.
AKSESORI
Anda boleh menyuai padan
peralatan anda dan mendapatkan
aksesori berikut daripada peruncit
biasa anda atau pusat perkhidmatan
berdaftar.
- Mata bilah pemotong
- Jag pengisar
- Alu
- Pengisar kopi/rempah
18
Page 23

อุปกรณ์เสริมสำหรับรุ่นที่คุณซื้อแสดงไว้บนฉลากด้านบนของบรรจุภัณฑ์
คุณสามารถเลือกใช้ได้ตามความเหมาะสมและใช้อุปกรณ์เสริมดังอธิบายไว้ในคำแนะนำจากผู้จำหน่ายหรือ
ศูนย์บริการที่ได้รับการรับรอง
คำแ นะนำด้านความปลอดภัย
• อ่านคำแนะนำการใช้งานอย่างละเอียดก่อนใช้
เค รื่องครั้งแรก
ผลิตภัณฑ์นี้ออกแบบมาเพื่อใช้ในอาคารเท่านั้
น
บริษัทผู้ผลิตไม่รับผิดชอบและรับประกันต่อก
ารใช้เพื่อการค้า การใช้ไม่เหมาะสม
หรือการไม่ปฏิบัติตามคำแนะนำ
• ตรวจสอบแรงดันไฟฟ้าของเครื่องใช้ว่าตรงกับ
แรงดั นไฟหลักในบ้าน
• การเชื่อมต่อที่ไม่ถูกต้องทำให้การรับประกันเ
ป็นโม ฆะ
เครื่องนี้ออกแบบสำหรับการใช้งานในครัวเรือ
นภายในบ้านเท่านั้น
• ไม่ควรให้บุคคล (รวมทั้งเด็กเล็ก)
ที่มีสภาพร่างกายไม่แข็งแรงหรือสภาพจิตใจไ
ม่ปกติ
หรือขาดประสบการณ์และความรู้ความเข้าใจ
นำอุปกรณ์นี้ไปใช้งาน
เว้นแต่จะอยู่ในการควบคุมดูแลหรือได้รับคำแ
นะนำในการใช้งานโดยผู้ที่รับผิดชอบในด้านค
วามปลอดภัย
• เด็กเล็กควรได้รับการดูแลเพื่อป้องกันไม่ให้เด็
กนำอุ ปกรณ์นี้ไปเล่น
• วางเครื่องบนพื้นผิวที่เรียบ มั่นคง
ทนต่อความร้อน
• อย่าวางเครื่องทิ้งไว้ขณะกำลังทำงาน
• ถอดปลั๊กเครื่องจากสายไฟหลักทันทีที่ใช้งาน
เสร็จ (แม้ในช่วงที่ไฟฟ้าดับ)
และขณะทำความสะอาด
• อย่าใช้เครื่องหากทำงานผิดปกติหรือเสียหาย
ให้ติดต่อศูนย์บริการที่ได้รับการรับรอง
(ดูรายชื่อในคู่มือให้บริการ)
• การซ่อมบำรุงทั้งหมดนอกเหนือจากการทำ
ความส
ะอาดและการบำรุงรักษาพื้นฐานของลูกค้า
ต้องดำเนินการโดยศูนย์บริการที่ได้รับการรับร
อง (ดูรายชื่อในคู่มือให้บริการ)
• อย่าวางเครื่อง สายไฟ
หรือปลั๊กในน้ำหรือของเหลวอื่นๆ
• วางสายไฟให้พ้นจากมือเด็ก
• อย่าวางสายไฟใกล้หรือสัมผัสกับส่วนของเ
ครื่องที่ร
้อนหรือใกล้กับแหล่งความร้อนหรือขอบที่ค
ม
• ห้ามใช้เครื่องหากสายไฟหรือปลั๊กชำรุด
เพื่อหลีกเลี่ยงอันตราย
จำเป็นต้องนำไปให้ศูนย์บริการที่ได้รับการรั
บรองเปลี่ยน
(ดูรายการก่อนนำอุปกรณ์เสริมออก)
• อย่าใช้อุปกรณ์เสริมเป็นภาชนะที่นอกเหนื
อจากการ ใช้งานปกติ (เช่นแช่แข็ง –
ประกอบอาหาร – ฆ่าเชื้อโดยใช้ความร้อน)
• อย่าวางอุปกรณ์เสริมในเตาอบไมโครเวฟ
• อย่าให้ผม ผ้าพันคอ เน็คไท ฯลฯ
อยู่เหนือเครื่องปั่นขณะกำลังทำงาน
TH
19
Page 24

คำอ ธิบาย
ชุดมอเตอร์
a ชุดมอเตอร์
b สายไฟและที่จัดเก็บ
ชุดบดสับ
c ฝา
d ที่ครอบผนึก
e ใบมีดบดสับ
f โถสับ
การใช้งานครั้งแรก
โถปั่น (เฉพาะรุ่น)
g ฝาครอบมีสเกลวัด
h ฝา
i โถปั่น
j ปุ่มเปิดเครื่อง (เป็นจังหวะ)
k ที่บด
ชุดบดเครื่องเทศ/กาแฟ (เฉพาะรุ่น)
l ฝา
m โถพร้อมท่อสแตนเลส
• ก่อนใช้งานครั้งแรก
เอาพลาสติกหุ้มที่ใบมีดบดสับ (e)
ซึ่งมีความคมมากออกแล้วล้างชิ้นส่วนทั้งห
มดด้วยน้ำสบู่อุ่นๆ ล้างและเช็ดให้แห้ง
• วางชุดมอเตอร์ (a) บนพื้นผิวที่เรียบ
สะอาด และแห้ง
• อย่าเสียบปลั๊กชุดสับจนกว่าจะประกอบอุป
กรณ์เสร็จ
ประกอบให้เลขแต่ละย่อหน้าตรงกับเลขในแ
ผนภาพ
1 - การสับ
• วางโถบดสับ (f) บนชุดมอเตอร์ (a)
• เอาพลาสติกหุ้มรอบใบมีด (e) ออก
จากนั้นวางในโถสับ (f) ยึดให้แน่น (รูปที่
1.a)
จับใบมีดด้วยความระมัดระวังอย่างมาก
เนื่องจากใบมีดคมมาก
• ใส่อาหารซึ่งตัดเป็นชิ้นขนาด 2 ซม.
ลงในโถสับ (f) (รูปที่ 1.b)
• อย่าให้ส่วนผสม (ส่วนผสมกึ่งของเหลว
อาหารที่ต้องการบดเป็นผง ฯลฯ) หก
วางที่ครอบผนึก (d) บนโถบดสับ (f)
(รูปที่ 1.c)
เตรียมส่วนผสมกึ่งของเหลวโดยใส่ลงไปเพี
ยงครึ่งของโถบดสับ
• วางฝา (c) บนโถบดสับ (f) แล้วค่อยๆ
หมุนไปทางซ้ายเพื่อล็อก (รูปที่ 1.d)
• สามารถเสียบปลั๊กชุดสับได้แล้ว
• เครื่องมีระบบป้องกันความร้อนเกินเพื่อคว
ามปลอดภัย หากใช้เครื่องหนักเกินไป
(มีส่วนผสมมากเกินและใช้เป็นเวลานานเกิ
นไป) เครื่องจะหยุดทำงานอัตโนมัติ
ถอดปลั๊กเครื่อง
ปล่อยให้เย็นเป็นเวลาประมาณ 30 นาที
แล้วค่อยใช้ต่อ
เพื่อให้แน่ใจว่าปริมาณส่วนผสมในโถลดลง
และเพื่อปฏิบัติตามเวลาที่ระบุไว้ในตารางใช้
งาน
• กดฝา (c) เพื่อเริ่มทำงาน (รูปที่ 1.e)
• หยุดเครื่องโดยการหยุดกดฝา (c):
เครื่องปิดโดยอัตโนมัติ
• อย่าเอาฝา (c) ออกจนกว่าใบมีด (e)
จะหยุดสนิท
• ถอดปลั๊กเครื่องหลังใช้งานทุกครั้งและก่อ
นทำความสะอาด
• ใบมีดประกอบด้วยระบบล็อกตัวเอง
เอาใบมีด (e) ออก โดยค่อยๆ
20
Page 25

หมุนด้านบน แล้วดึงขึ้น
ใช้มืออีกข้างหนึ่งจับโถบดสับ (f)
• เอาของออกจากโถสับ (f)
คำแนะนำในการใช้งาน:
สำคัญ: จะปั่นอาหารได้ดีขึ้นหากกดเป็นระย
ะสักคร
• กดตามเวลาที่ต้องการขึ้นอยู่กับว่าต้องการ
ความละเอียดขนาดไหน
• บดหรือตัดได้ดีขึ้นหากใช้ไม้พายเขี่ยอาหา
รที่ติดผนังโถออกให้อยู่ในโถสับ (f)
• ใบมีด (e) อาจทื่อได้หลังใช้เป็นเวลานาน
เพื่อให้ได้ผลดีควรเปลี่ยนใบมีด
• หลังใช้งาน ปล่อยให้ใบมีดเย็นลง 2 นาที
• อย่าเปิดเครื่องหากโถว่าง
เวลาที่แนะนำสำหรับการสับโดยใช้เครื่องปั่น:
ส่วนผสม
าร์สเลย์
พ
หัวหอม
หอมหัวแดง
กระเทียม
ขนมปังกรอบ
อัลมอนด์
ฮาเซลนัท
วอลนัท
พาเมซาน
เนื้อนุ่ม
(ประเภทแรก)
ปริมาณสูงสุด
0 ก.
3
300 ก.
250 ก.
200 ก.
85 ก.
300 ก.
300 ก.
250 ก.
100 ก.
350 ก.
เวลาสูงสุด
วินาที
8
14 วินาที
(กดเป็นระยะ)
14 วินาที
(กดเป็นระยะ)
12 วินาที
15 วินาที
12 วินาที
14 วินาที
12 วินาที
10 วินาที
12 วินาที
เนื้อเหนียว
(ประเภทที่สามหรือ
ราคาถูก)
เพื่อให้ได้ผลดี
ผสมส่วนผสมด้วยไม้พายระหว่างการปั่นแต่ละครั้ง
ส่วนผสมกึ่งของเหลว
สตูว์ผลไม้ 260
อาหารเด็ก
300 ก.
ก.
230 ก.
• สำหรับอาหารที่แข็ง ให้ปั่นรอบละ 200 ก.
10 วินาที
• พักช่วงละ 2 นาที
21
12 วินาที
12 วินาที
15 วินาที
Page 26

2 - การปั่น (เฉพาะรุ่น)
• วางโถปั่น (i) บนโต๊ะ เมื่อใช้เครื่อง
ให้เตรียมโถปั่นบนโต๊ะเสมอ
อย่าเตรียมบนชุดมอเตอร์ (a)
• ใส่ส่วนผสมที่ต้องการผสมในโถปั่น (i)
เติมของเหลวเป็นอันดับแรกแล้วตามด้วยส่ว
นผสมที่เป็นของแข็ง อย่าให้ถึงระดับสูงสุด:
- 1.5 ลิตรสำหรับส่วนผสมที่หนา
- 1 ลิตรสำหรับส่วนผสมที่เป็นของเหลว
• ปิดฝา (h)
ประกอบเข้ากับฝาครอบที่มีสเกลวัด (g)
แล้วล็อกโดยหมุนทวนเข็มนาฬิกา (รูปที่
2.a)
• วางโถปั่น (i) บนชุดมอเตอร์ (a) กดปุ่ม
"Pulse" (j)
ด้านขวาที่ด้านหน้าของแผงควบคุมชุดมอเต
อร์ (a) (รูปที่ 2.b) หมุนโถปั่น (i)
ตามเข็มนาฬิกาเพื่อล็อก
ต้องวางฐานสี่เหลี่ยมของโถปั่น (i)
ให้ตรงกับฐานสี่เหลี่ยมของชุดมอเตอร์ (a)
(รูปที่ 2.c)
• เสียบปลั๊กเครื่องแล้วกดปุ่ม Pulse (j) (รูปที่
2.d)
• หยุดเครื่องโดยปล่อยปุ่ม Pulse (j)
รอจนกว่าใบมีดหยุดหมุนสนิทก่อนเอาโถปั่
น (i) ออกจากชุดมอเตอร์ (a)
• อย่าใส่ของเหลวที่เดือดลงในโถปั่น (i)
ปล่อยให้ของเหลวที่เดือดเย็นลงก่อน
คำเตือน: ขณะที่ปั่นอาหารร้อน
วางมือให้ห่างจากฝาและฝาครอบเพื่อหลีกเลี่
ยงความเสี่ยงในการลวก
• ใช้โถปั่น (i) เมื่อปิดฝา (h)
• อย่าใช้โถปั่น (i) เฉพาะกับอาหารแห้ง
(ฮาเซลนัท อัลมอนด์ ถั่วลิสง น้ำตาล ฯลฯ)
• เพิ่มส่วนผสมขณะเครื่องทำงานอยู่
โดยเอาฝาครอบที่มีสเกลวัด (g)
ออกจากฝาแล้วเติมส่วนผสมผ่านช่องป้อนอ
าหาร
เคล็ดลับ:
• ขณะผสม หากส่วนผสมติดด้านข้างโถ
ให้หยุดเครื่องแล้วถอดปลั๊ก เอาโถปั่นออก
(i) จากชุดมอเตอร์ (a)
ใช้ไม้พายขูดส่วนผสมลงบนไปมีด
อย่าใส่มือหรือนิ้วลงในโถหรืออยู่ใกล้ใบมีด
คุณสามารถ:
- เตรียมซุบ ครีม สตูว์ผลไม้ นมปั่น
ค็อกแทลที่ปั่นละเอียดได้
- เตรียมส่วนผสมที่เป็นของเหลวได้ทุกชนิด
(แพนเค้ก โดนัท คลาฟูติ แบทเทอร์)
• ที่บด (k)
สามารถทำให้ส่วนผสมเรียบขึ้นได้และอัดให้
แน่น (ในส่วนผสมที่มีความหนามาก เช่น
ฮูมุส กัวคาโมเล) ในโถปั่น
ใช้ที่บดกดส่วนผสมผ่านช่องตรงกลางของฝ
า (h) ของโถปั่น ขณะเครื่องทำงาน
กดอาหารลงไปที่ใบมีดโดยใช้ที่บด
ระวัง: อย่าใช้ที่บด (k) โดยไม่มีฝา (h)
เนื่องจากอาจโดนใบมีดได้
3 - การบดกาแฟ/เครื่องเทศ (เฉพาะรุ่น)
• ใส่ส่วนผสมลงโถบดกาแฟ/เครื่องเทศ (m)
• วางโถ (m) ใต้ฝา (l)
แล้วล็อกโดยหมุนตามเข็มนาฬิกา
จนได้ยินเสียงกริ๊ก (รูปที่ 3.a)
• วางโถและฝาบนชุดมอเตอร์ (a) แล้วค่อยๆ
หมุนไปทางซ้ายเพื่อล็อก (รูปที่ 3.b)
• สามารถเสียบปลั๊กเครื่องได้แล้ว
• กดฝา (l) เพื่อเริ่มทำงาน (รูปที่ 3.c)
• หยุดการทำงานของเครื่องปั่น
โดยหยุดกดฝา (l): เครื่องจะปิดโดยอัตโนมัติ
• อย่าเอาฝา (l) ออกจนกว่าใบมีดจะหยุดสนิท
• ปลดล็อกโถบดกาแฟ/เครื่องเทศออกจากชุ
ดมอเตอร์ (a)
โดยหมุนไปทางวาและยกออกจากชุดมอเตอ
ร์ (a)
22
Page 27

• เอาของออกจากโถบดกาแฟ/เครื่องเทศ
ปลดล็อกโดยหมุนไปทางซ้ายพร้อมกับดึงฝา
(l) ลงโดยใช้มืออีกข้างหนึ่ง
ส่วนผสม
แอพริคอทห้ง
Star anise
Coffee beans
Cardamom
Cumin
Paprika pepper
Peppercorns
ปริมาณ
120 กรัม
10 กรัม
60 กรัม
20 กรัม
20 กรัม
10 กรัม
20 กรัม
เวลาทำงาน
(กดเป็นระยะ)
5 วินาที
35 วินาที
30 วินาที
40 วินาที
30 วินาที
35 วินาที
35 วินาที
การทำความสะอาด
• ถอดปลั๊กเครื่อง
• เพื่อให้ง่ายต่อการทำความสะอาด
ล้างอุปกรณ์เสริมทันทีหลังใช้
• ล้างและเช็ดอุปกรณ์เสริมให้แห้ง:
สามารถใช้ได้กับเครื่องล้างจานหรือล้างด้วย
มือกับน้ำอุ่นและน้ำยาทำความสะอาด
ยกเว้นส่วนที่เป็นมอเตอร์ (a)
ควรเช็ดชุดมอเตอร์ด้วยฟองน้ำหมาดๆ
• ผสมน้ำยาทำความสะอาดสองสามหยดกับ
น้ำอุ่นลงในโถปั่น (i) ปิดฝา (h)
ด้วยฝาครอบที่มีสเกลวัด (g)
วางโถบนชนชุดมอเตอร์ (a) แล้วกดปุ่ม
“Pulse” (j) ถอดปลั๊กเครื่อง
ล้างโถให้สะอาด
4 - การปรับความยาวสายไฟ
เพื่อให้ไช้อย่างสะดวกสบายหรือจัดเก็บง่าย
คุณสามารถลดความยาวองสายไฟได้โดยดันไ
ว้ในชุดมอเตอร์ (a) ผ่านทางช่องด้านหลัง
(b) (รูปที่ 4)
- ใบมีดมีความคมมาก
จับด้วยความระมัดระวัง
เคล็ดลับ:
ในกรณีที่เครื่องเปลี่ยนสีเนื่องจากอาหาร
(แครอท ส้ม ฯลฯ)
ให้ใช้ผ้าชุบน้ำมันทานตะวันเล็กน้อยถูแล้วทำ
ความสะอาดตามปกติ
การจัดเก็บ
อย่าจัดเก็บเครื่องปั่นในที่ชื้น
23
Page 28

ต้องทำอย่างไรหากเครื่องไม่ทำงาน
หากเครื่องไม่ทำงาน ให้ตรวจสอบว่า:
• เสียบปลั๊กถูกต้องหรือไม่
• อุปกรณ์เสริมแต่ละชิ้นถูกล็อกหรือไม่
หากเครื่องยังคงไม่ทำงาน
ให้ติดต่อศูนย์บริการที่ได้รับการรับรอง
(ดูรายการในคู่มือให้บริการ)
การกำจัดเครื่องและวัสดุที่เป็นบรรจุภัณฑ
บรรจุภัณฑ์ประกอบด้วยวัสดุเฉพา
ะที่ไม่เป็นอันตรายต่อสิ่งแวดล้อมแ
ละสามารถกำจัดได้ตามมาตรการรีไ
ซเคิลที่บังคับใช้ในพื้นที่ของคุณ
ในการกำจัดเครื่องด้วยตนเอง
กรุณาติดต่อบริการที่เหมาะสมของหน่วยงาน
ในพื้นที่
สิ้นสุดอายุการใช้งานของผลิตภัณฑ์ไฟฟ้าและอิเล็กทรอนิกส
รักษาสิ่งแวดล้อมเป็นอันดับแรก!
เครื่องของคุณประกอบด้วยวัสดุที่สามารถนำมาใช้ใหม่หรือรีไซเคิลได้
นำไปทิ้งที่จุดเก็บขยะในพื้นที่เนื่องจากสามารถนำไปรีไซเคิลได้
ACCESSORIES
คุณสามารถปรับเครื่องได้ตามความเหมาะสมแ
ละหาอุปกรณ์เสริมเต่อไปนี้ได้จากร้านขายปลีก
ทั่วไปหรือศูนย์บริการที่ได้รับการรับรอง:
- ใบมีดสับ
- โถปั่น
- ที่บด
- เครื่องบดกาแฟ/เครื่องเทศ
24
Page 29

Page 30

Page 31

Page 32

Page 33

Page 34

EN
p. 1 - 6
ZH
MS
TH
p. 7 - 12
p. 13 - 18
p. 19 - 24
Ref. 0828743
 Loading...