

Page 1
p. 1 - 7
FRESH EXPRESS MAX
www.tefal.com
EN
TR
1
2
!!
E
D
B
A
C
E1
E4
E5a E5b
E2 E3
F
EN
p. 8 - 14
TR
9/2012 - Réf. 2506280
Page 2
1
2
3
4
5
6
3
1
!! 2
7
8
9
10
11 12
1
2
E5a
E5b
"click"
1
2
Page 3
13
14
1615
"click"
"click"
Page 4

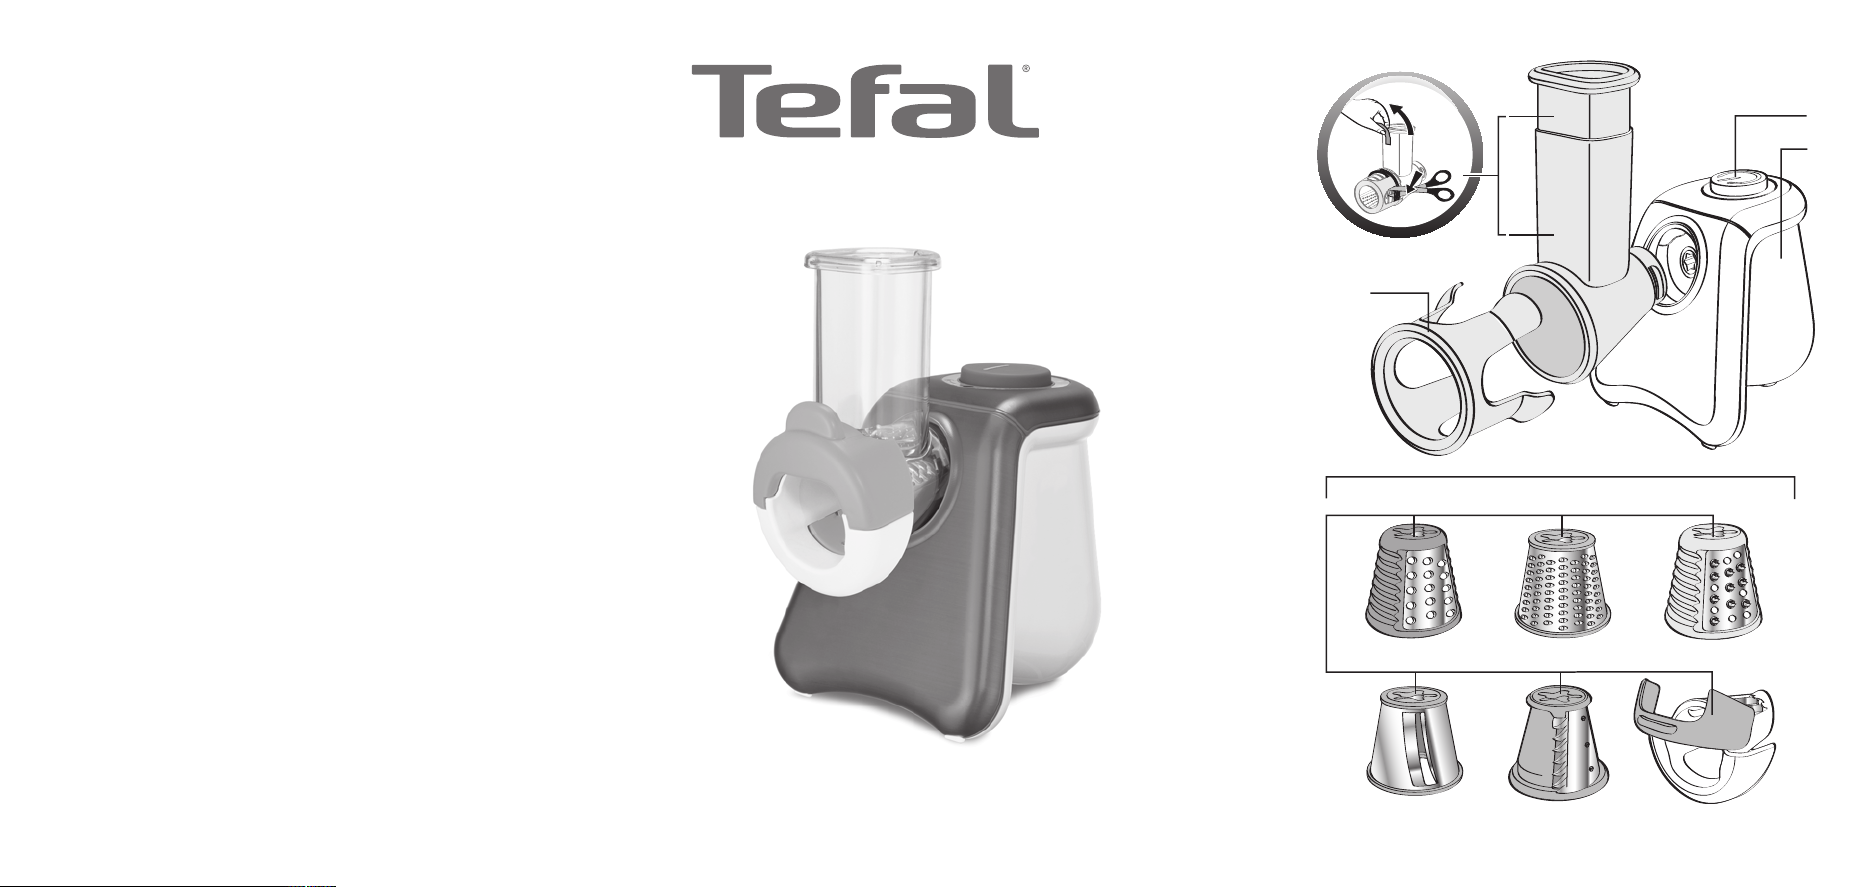
1. APPLIANCE DESCRIPTION
A - Motor unit
B - On/off button and speed selector dial
C - Pusher
D - Cone holder/feed tube
E - Cones
E1 - Coarse grating cone (red)
E2 - Fine grating cone (metal with
orange rim)
E3 - Extra fine grating cone (yellow)
E4 - Thin slicing cone (metal with dark
green edge)
E5a - Dicing cone (light green)
E5b - Dicing ring (light green/white)
F - Storage accessory
2. SAFETY INSTRUCTIONS
• Read the instructions for use carefully before using your appliance for the first time: the manufacturer shall not accept any liability in the event of any use that does not comply with the
instructions.
• This appliance is not intended for use by persons (including children) with reduced physical,
sensory or mental capabilities, or lack of experience and knowledge, unless they have been
given supervision or instruction concerning use of the appliance by a person responsible for
their safety.
• Children should be supervised to ensure that they do not play with the appliance.
• To avoid accidents and damage to the appliance, always keep hands and kitchen utensils away
from the moving blades and cones.
• Never introduce food using your hands, always use the pusher.
• This appliance conforms to the applicable technical regulations and standards.
• Before using the appliance for the first time, check the voltage of your mains electrical supply
corresponds to the voltage given on the rating plate on the appliance.
• Do not place or use this appliance on a hotplate or near to a naked flame (gas cooker).
• Only use the appliance on a flat, stable, heat-resistant work surface away from water.
• Do not operate the appliance empty or with any of the cones stored.
• Do not mince meat.
• Never remove the cones before the motor has come to a complete stop.
• Do not use the appliance for food with too thick a consistency: e.g. sugar, meat.
• The appliance should be unplugged:
- If there is any malfunction when it is operating
- Before cleaning or maintenance
- After each use.
• Never unplug the appliance by pulling on the lead.
• If it is necessary to use an extension lead ensure that is in perfect condition, has a socket
outlet with an earth connection and that it is suited to the power rating of the appliance.
• No domestic appliance should be used if:
- It has been dropped on the floor
- If the cones are damaged or incomplete.
• Always unplug the appliance if you are to leave it unattended and before you fit or remove the
cones.
• If the power cord is damaged, it must be replaced by the manufacturer, a Tefal Approved Service
EN
1
Page 5

Centre in order to avoid any danger.
• Do not use cones or spare parts other than those provided by the approved after-sales centres.
• For all other foods you can use either slow speed (left position) or turbo speed.
• Do not operate your appliance for more than 10 min in one go.
• This appliance is designed for domestic use. In the event of any commercial use, inappropriate
use or failure to comply with the instructions, the manufacturer accepts no responsibility and
the guarantee will not apply.
3. BEFORE USING FOR THE FIRST TIME
• Wash the accessories (cones, cone holder and pusher) with soapy water. Rinse and then dry carefully.
WARNING: The cone blades especially on the dicing cone are extremely sharp, handle the cones
carefully always holding them by the plastic part.
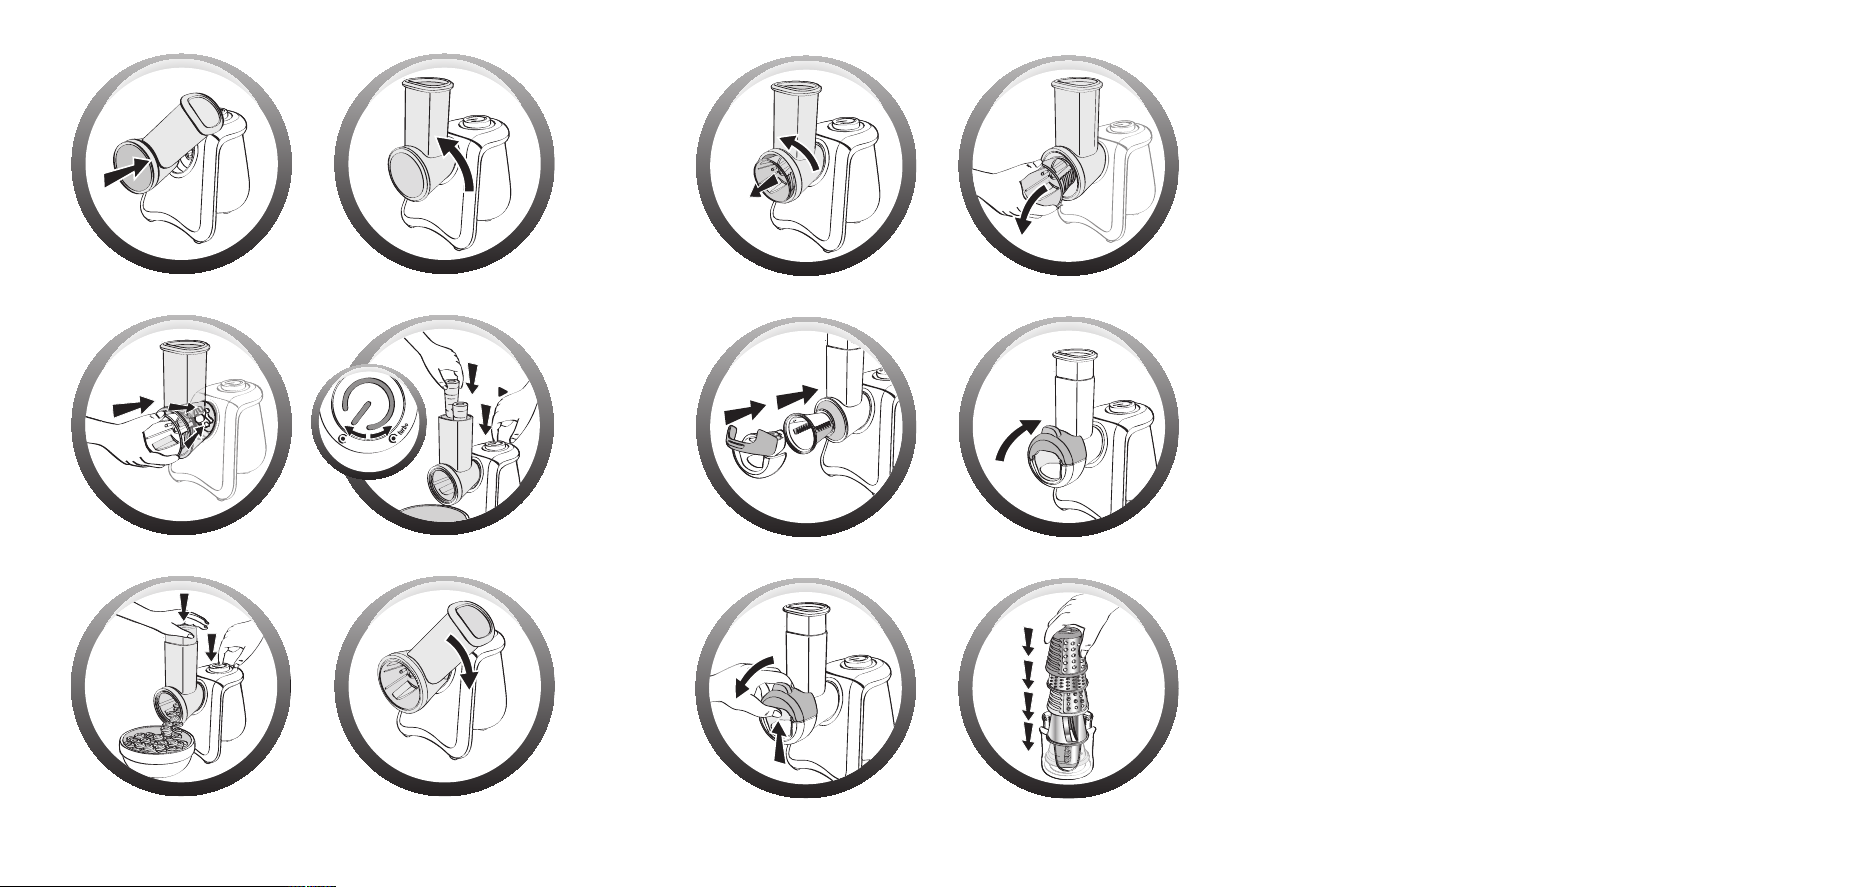
4. USE
• Choose the cone that corresponds to the required use.
• Fit the cone holder (D) on the motor unit (A) with the feed tube positioned slightly to the
right. Turn it a quarter turn to the left (fig. 1 & 2) until it locks in place with the feed tube in
a vertical position.
• Place the chosen cone into the opening at the front of the holder (D), the cone should be
correctly positioned all the way into the drive (fig. 3). Holding the rim of the cone, turn
the cone a quarter turn to the right to lock it into place.
• Plug in the appliance by turning the on/off button.
• Select the required speed (slow (left position) or turbo) and then press the on/off button (fig.
4) to fix the cone in place.
WARNING: before preparing food, always make sure that the cone is perfectly positioned on the
motor drive unit (fig. 3) the On/Off button before inserting food into the feeder tube (fig. 4) so
that the cone locks in place.
• Cut the food to fit the feed tube. Remove the pusher, press the On/Off button first before inserting food into the feed tube. Insert food in the feed tube, hold down the On/Off button
continuously while gently pushing down the food using the food pusher (C) (fig. 5).
TIP: There is no need to press down hard on the pusher to obtain good results; this type of use will
slow down the motor; simply ensure that the food remains in contact with the cone.
• To change or remove the cone, turn the holder (D) a quarter turn to the right (fig. 6), then re-
turn it to the upright position (fig. 7) which will release the cone. Remove the cone (fig. 8).
RECOMMENDATIONS FOR USE
The slow speed (left position) is intended for hard foods (e.g. parmesan, chocolate).
The slow speed is also recommended for soft or delicate foods (cucumber, cooked beetroot).
For all other foods you can use either the slow (left position) or the turbo speed.
Fitting the dicing accessory:
Always handle the dicing cone with care, the blades are extremely sharp.
• Place the dicing cone in the opening at the front of the holder (D), the cone should be correctly
positioned all the way into the drive (fig. 3).
• Then position the dicing ring (E5b) with the safety flap open, centring the safety hinge on the
cone holder tube (fig. 9).
• Check that the dicing ring is correctly attached to the base of the cone holder.
• Close the safety hinge over the cone holder (fig. 10).
• Use the dicing function by inserting the food through the feed tube. Push the food down gently
using the pusher (C).
• Remove the dicing accessory by pulling the tab positioned at the top of the safety hinge
(fig. 11).
Tip: to unlock the safety hinge E5b more easily, move it upwards with one finger while simultaneously pulling the tab forw ard (fig.11).
F.A.Q.
Questions Answers
• "The Cone is not properly held in
place in the holder, or does not
fully engage".
• "I can't remove the cone after
use".
• "The cone holder is quite hard to
fit and remove, is this normal?"
Simply make sure that the cone is slotted all the way
into the cone holder (fig. 3). Press the on/off button
first before inserting food into the feed tube to ensure
the cone is correctly locked into place (fig. 4).
To remove the cone after use, unlock it by turning it a
quarter turn to the right (fig. 6), then return it to the
upright position (Fig.7) which will release the cone
(fig. 8).
Yes when the appliance is new it can be quite stiff.
With use it will become easier to install and remove.
ENEN
2
3
Page 6

Use the cone recommended for each type of food:
Only use raw vegetables and fruit and in your appliance.
Coarse
Fine Grating
Carrots • • • • turbo
Courgettes/Zucchini • • • • turbo
Potatoes • • • • turbo
Cucumber • • • • left position
Pepper/Capsicum • • turbo
Onions • • turbo
Beetroot • • left position
Celery • • • turbo
Horseradish • • • turbo
Cabbage
(white/red)
Apples • • turbo
Parmesan • left position
Cheese • • • • turbo
Chocolate • • • left position
Dry bread/
Biscuits
(for crushing)
Hazelnuts/
walnuts/
almonds
Coconut (fresh) • • left position
Grating
cone E1
(red)
cone E2
(metal with
orange rim)
Extra Fine
(yellow)
Thin Slicing
Grating
cone E3
cone E4
(metal with
dark green
edge)
• turbo
• left position
• left position
Dicing
cone
E5a/E5b
(light green)
Tips for good results:
The ingredients you use must be firm and fresh quality to get satisfactory results and avoid accumulation of food in the holder. Do not use the appliance to grate or slice food that is too hard
such as sugar or pieces of meat.
Cut the food to make it easier to feed through the feeder tube.
4
Recommended
position for:
On/off button
and speed
selector
RECIPES
CONES PREPARATION INGREDIENTS TIPS
Red
cone
COARSE
GRATING
(E1)
Metal cone
with orange
edge
FINE
GRATER
(E2)
Yellow
cone
EXTRA FINE
GRATING
(E3)
Summer Gratin
(serves 6)
Coleslaw
(serves 4)
Apple
and Almond
Gratin
(serves 4-6)
– 6 small courgettes
/ zucchini
(about 800g)
– 2 potatoes
– 1 onion
– 1 cup cooked
white rice (about
75g raw rice)
– 1 egg
– 1 glass milk
– 150 g gruyere or
other cheese (grated
using Fine Grating
cone E2)
– butter
– 1/4 white
cabbage (about
150 g)
– 2 small carrots
– 1/2 small onion
(optional)
– 3 tablespoons
mayonnaise
– 3 tablespoons
double cream
– 1 teaspoon white
wine vinegar
– 1/4 teaspoon
caster sugar
– 6 Braeburn
apples
– 60 g brown sugar
– 50 g butter
– 50 g whole
almonds
– 200 ml double
cream
– 1 teaspoon
cinnamon
Grate the courgettes/zucchini and potatoes with the coarse grater cone (E1).
Slice the onion using the thin slicing
cone (E4). Fry all the vegetable in oil or
butter in a frying pan until just soft." In
an ovenproof dish, place alternating
layers of vegetables cooked rice, vegetables, cooked rice etc. Add the milk
beaten together with the egg, salt and
pepper.
Sprinkle with grated cheese and a few
knobs of butter.
Place in the oven at 180°C for
20-30 min.
Slice the white cabbage using the Thin
Slicing cone (E4) and grate the carrots
using the Fine Grating cone (E2) or
Coarse Grating Cone (E1), depending
on your preference. Mix them in a
bowl. Prepare the dressing by mixing
the mayonnaise, cream, vinegar and
sugar. Mix the grated vegetables with
the dressing, stir, cover and leave to
chill for 1 hour in the refrigerator.
For a healthier dressing combine 6
tablespoons plain yogurt. 1/2 teaspoon
Dijon mustard or coarse grain mustard
and 2 tablespoons mayonnaise.
Peel, seed and cut the apples into
quarters. Slice using the Thin Slicing
cone (E4) and brown them with 40 g
butter. Lightly butter an oven dish
and arrange the caramelised apples at
the bottom. Grind the almonds to a
powder using the Extra Fine Grating
cone (E3). In a bowl, mix the ground
almonds, cream and cinnamon. Pour
the mixture over the apples and
sprinkle with brown sugar. Bake for
45-55 min (if necessary, increase to
180 C for the last 10 min to melt the
sugar topping).
ENEN
5
Page 7

CONES PREPARATION INGREDIENTS TIPS
– 1 cucumber
(peeled)
Metal cone
with dark
green edge
THIN SLICING
(E4)
Light green
cone/ring
DICING
(E5a/E5b)
Greek salad
(serves 4)
Mixed
vegetables
(serves 4)
– 2 large tomatoes
(deseeded)
– 1 red pepper /
capsicum
– 1 green pepper /
capsicum
– 1 medium white
onion
– 200 g feta cheese
– 50 g black olives
(optional)
– 4 tablespoons oil
– 2 tablespoons
lemon juice
– 30 g fresh herbs
(choose one:
basil, parsley,
mint, coriander)
– 400 g red
beetroot
– 300 g carrots
– 400 g potatoes
– 200 g cucumber
– 150 g onions
– 100 g peas
– salt
– 2 tablespoons oil
Slice the cucumber into thin slices
using the Thin Slicing cone (E4).
Cut the pepper/capsicum in half,
remove the seeds and white parts.
Slice the peppers and onion using
the Thin Slicing Cone (E4).
Cut the tomatoes and feta cheese
into small cubes. Mix all the
ingredients in a large bowl and add
the olives. Prepare the dressing by
mixing the oil with the lemon
juice. Mix gently and pour over the
salad. Sprinkle the salad with
chopped fresh herbs.
Dice the beetroot, carrots and
potatoes; steam until cooked and
leave to cool. Peel and dice the
cucumber and onions. Add all
vegetables to a bowl; add salt and
oil. Leave to chill for 1 hour in
refrigerator.
blades are sharp). This will help dislodge any food.
• Handle the cones with care because the cone blades are extremely sharp. The outside of the dicing
cone is extremely sharp we would advise cleaning this cone carefully from inside.
• Should the plastic parts become stained with foodstuffs such as carrots and beetroot, rub them
with a cloth dipped in a little cooking oil and then clean as usual.
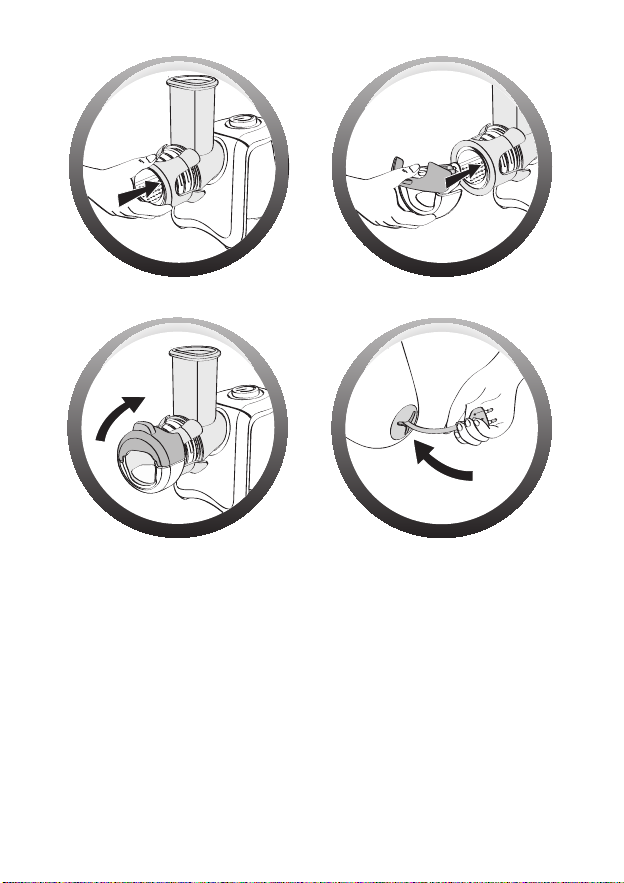
6. STORAGE
• All cones (E1, E2, E3, E4, E5a), the dicing ring (E5b) can be stored on the appliance.
Stack the five cones (fig. 12) and position them in the opening at the front of the holder (D).
The storage accessory (F) clips onto the opening at the front of the holder (D) (fig. 13). The
dicing ring (E5b) clips onto the storage accessory (F) (fig. 14 and 15).
• Storing the power cord: push the cord into the cavity provided for this purpose (CORD STORAGE)
(fig. 16).
7. RECYCLING
END-OF-LIFE ELECTRONIC PRODUCT
Your appliance is designed to operate for many years.
However, the day you plan to replace it, do not throw it away with normal household rubbish or
in a landfill but take it to a suitable collection point.
Think of the environment!
Your appliance contains valuable materials which can be recovered or recycled.
Leave it at a local council waste collection point.
ENEN
5. CLEANING YOUR APPLIANCE
• Always unplug the appliance before cleaning the motor unit (A).
• Do not immerse the motor unit in water or place it under running water. Wipe the motor unit
down with a damp cloth. Dry carefully.
• The holder (D), pusher (C), cones (E1, E2, E3, E4, E5a), dicing ring (E5b) and storage accessory
(F) can go in the dishwasher in the upper basket using the "ECO" or LIGHT SOIL" programme.
• In the event of difficulty in cleaning the dicing cone (E5a) or food becomes embedded in the
blades, it is advisable to use a brush and clean the cone from the inside (not the outside as the
6
7
Page 8

1. CİHAZIN TANITIMI
A - Motor bloğu
B - Açma/kapama düğmesi ve hız seçme
düğmesi
C - İtme aparatı
D - Besleme ağzı
E - Bıçaklar
E1 - Kalın rendeleme bıçağı (kırmızı)
E2 - İnce rendeleme bıçağı (turuncu
kenarlı metal)
E3 - Kazıma bıçağı (sarı)
E4 - Dilimleme bıçağı (açık yeşil kenarlı
metal)
E5a - Dalgalı dilimleme bıçağı (koyu
yeşil)
E5b - Küp yapma aparatı (koyu
yeşil/beyaz)
F - Muhafaza aksesuarı
2. GÜVENLİK TALİMATLARI
• Cihazınızı ilk defa kullanmadan önce, kullanım kitapçığını dikkatli bir şekilde okuyun: Kullanım
kitapçığına uygun olmayan kullanımdan doğacak sorunlardan imalatçı hiçbir şekilde sorumlu
tutulamaz.
• Bu cihaz, gözetim altında olmadıkları veya güvenliklerinden sorumlu bir kişi tarafından cihazın
kullanımı ile ilgili talimat almadıkları sürece, fiziksel, duyusal veya zihinsel kapasiteleri zayıf
veya tecrübe veya bilgi yetersizliği olan kişiler tarafından (çocuklar dahil) kullanılmak üzere tasarlanmamıştır.
• Çocukların cihazla oynamamasına dikkat edilmelidir.
• Kazalardan ve cihazın maddi hasara maruz kalmasından kaçınmak için, ellerinizi ve mutfak ge-
reçlerini hareket halinde olan koniler ve bıçaklara yaklaştırmayın.
• Besinleri asla elleriniz ile itmeyin, daima itme aparatını kullanın.
• Bu cihaz yürürlükte bulunan teknik düzenleme ve normlara uygundur.
• Bu cihaz sadece alternatif akımla çalışacak şekilde tasarlanmıştır. İlk kullanım öncesinde şebeke
geriliminin cihazın veri föyünde belirtilen değere uygun olduğunu kontrol etmenizi rica ediyoruz.
• Bu cihazı elektrikli ocak üzerine veya ateş kaynağı (gazlı mutfak ocağı) yakınına yerleştirmeyin.
• Cihazı yalnızca sağlam bir zemin üzerinde ve su sıçramasına maruz kalmayacağı bir alanda kul-
lanın.
• Cihazı boş olarak ve tüm aksesuarları yerleştirilmiş iken kullanmayın.
• Et kıymak için kullanmayın.
• Bıçakları asla motor tamamen durmadan yerlerinden çıkarmayın.
• Ürünü aşırı koyu kıvamda besinler ile birlikte kullanmayın: (şeker, et).
• Aşağıdaki hallerde cihazın fişinin prizden çıkarılması gerekmektedir:
- Çalışma sırasında normal olmayan bir durumla karşılaşılması halinde,
- Her temizlik veya bakım öncesinde,
- Her kullanım sonrasında.
• Cihazı asla elektrik kordonundan çekerek taşımayın.
• Yalnızca bir adet uzatma kablosu kullanın, kullanmadan önce durumunun iyi olduğundan emin
olun.
• Aşağıdaki hallerde elektrikli ev aletinin kullanılmaması gerekir:
- Yere düştüyse,
- Bıçaklar hasar görmüş veya eksik ise,
8
• Başından ayrılacağınız zaman ve aksesuarlarını çıkarmadan/ takmadan önce cihazın fişini
daima prizden çıkarın.
• Kordon hasar görmüşse, her türlü tehlikenin önlenmesi için satış sonrası destek servisi veya
yetkili herhangi bir şahıs tarafından değiştirilmesi gerekmektedir.
• Yetkili satış sonrası servisi tarafından tedarik edilenler dışında yedek parça veya bıçaklar
kullanmayın.
• Cihazı asla 10 dakikadan uzun süreli kullanmayın.
• Bu ürün ev içi kulanım için tasarlanmıştır. Ticari amaçla kullanımı, uygunsuz veya kullanım ki-
tapçığında belirtilenlere aykırı bir şekilde kullanımı halinde, üreticinin garantisi ve sorumluluğu
sona ermektedir.
3. İLK KULLANIM ÖNCESİ
• Aksesuarları (bıçaklar,bıçak haznesi ve itme aparatı) sabunlu su ile temizleyin. Özenli bir şekilde
durulayın ve kurutun.
DİKKAT: Bıçaklar son derece keskindir; bıçaklara müdahalede bulunurken son derece
dikkatli olun, daima plastik kısımlarından tutun.
4. KULLANIM
• Arzu edilen kullanıma uygun bıçağı seçin.
• Bıçak haznesini (D) motor bloku üzerine (A) ¼ tur sola doğru çevirerek yerleştirin (Şekil 1 &
2).
• Seçilen bıçağı haznenin ön kısmında bulunan açıklığa (D) yerleştirin, bıçak hareket ettirici me-
kanizmanın tabanına dek, düzgün bir şekilde yerleştirilmiş olmalıdır (Şekil 3).
• Cihazın fişini prize takın.
• Arzulanan hızı seçin (yavaş veya turbo hız) ve ardından açma/kapama düğmesine basın (Şekil
4).
DİKKAT: Cihazı çalıştırmadan önce bıçağın hareket ettirici (Şekil 3) üzerine düzgün bir
şekilde yerleştirildiğinden emin olun, ardından besinleri besleme boğazından
doldurmadan önce, açma/kapama düğmesine basın (Şekil 4).
• Besinleri besleme ağzından içeri doldurun (D) ve ittirme aparatı yarımıyla hafifçe ittirin (C)
(Şekil 5).
İP UCU: Kesme işleminden iyi sonuç elde etmek için itme aparatı üzerine güçlü bir şekilde
bastırmanız gerekmez, bu tip bir kullanım motoru frenleyecektir, aksine malzemenin
bıçak ile temas etmesine dikkat edilmesi yeterlidir.
• Bıçağı değiştirmek için, hazneyi (D) ¼ tur sağa doğru çevirin (Şekil 6), ardından dikey pozisyona getirin (Şekil 7). Koniyi çıkarın (Şekil 8).
TRTR
9
Page 9

KULLANIM ÖNERİLERİ
Yavaş hız E3 bıçağı (sarı) ile rendelenecek sert besinler için kullanılır (örn. parmesan, çikolata).
Yavaş hızın kullanımı ayrıca hassas veya yumuşak besinler için de tavsiye edilir (armut, kırmızı
pancar, avokado).
Dalgalı dilimleme montajı:
• Dalgalı dilimleme bıçağını haznenin ön kısmında bulunan açıklığa (D) yerleştirin, bıçak hareket
ettirici mekanizmanın tabanına dek, düzgün bir şekilde yerleştirilmiş olmalıdır (Şekil 3).
• Ardından emniyet sürgüsü açık olarak, küp yapma aparatını yerleştirin, emniyet sürgüsünü
bıçak haznesinin borusuna ortalayın (Şekil 9).
• Küpyapma aparatı bıçak haznesinin altına doğru bir şekilde klipslendiğini kontrol edin.
• Bıçak haznesi üzerindeki emniyet sürgüsünü kapatın (Şekil 10).
• Malzemeleri bıçak haznesinin besleme ağzından sokarak, dalgalı dilimleme fonksiyonunu ger-
çekleştirin.
• Emniyet kilidinin üst kısmına yerleştirilmiş dili çekerek, dalgalı dilimleme bıçağını çıkarın (Şekil
11).
İp ucu: E5b emniyet kilidini daha kolay açmak için, aynı anda bir parmakla yukarı doğru
hareket ettirin ve dili yukarı doğru çekin (Şekil 11).
SIK SORULAN SORULAR
Sorular Cevaplar
• "Bıçak hazne içindeki yerinde
sağlam durmuyor, "klik" sesini
duymuyorum".
• "Kullanım sonrasında aksesuarı
çıkaramıyorum".
• "Bıçak haznesi oldukça zor takılıp,
çıkarılıyor, normal mi? "
Bıçağın yerine tamamen yerleştiğinden emin olun
(Şekil 3). Ardından, besinleri doldurmadan önce cihazın çalıştırılması, bıçağın yerine düzgün bir şekilde
yerleştirilmesini sağlar (Şekil 4).
Kullanım sonrasında bıçağı çıkarmak için, kilidi açın
(Şekil 6), ardından hazneyi yeniden sürgüleyin (Şekil
7), hazne kendiliğinden düşer (Şekil 8).
Evet, ürün yeni olduğunda normaldir. Kullanıldıkça,
takılıp, çıkarılması kolaylaşacaktır.
Her yiyecek tipi için tavsiye edilen koniyi kullanın:
Havuç
Kabak
Patates
Salatalık
Dolmalık biber
Soğan
Pancar
Kereviz
Kara pancar
Lahana (beyaz
lahana/kara lahana)
Elma
Parmesan
Gruyer
Çikolata
Kuru ekmek /
peksimet
Fındık/
ceviz/
badem
Hindistan cevizi
Bıçak
Kalın
rende
E1
(Kırmızı)
• • •
• • •
• • •
• • •
• •
• •
• • •
• • •
Bıçak
İnce rende
(Turuncu
kenarlı
metal)
Bıçak
Peynir
E2
rendesi
E3 (Sarı)
• •
•
•
•
• •
Bıçak
İnce
dilimleme
E4
(Açık yeşil
kenarlı metal)
•
•
•
•
Bıçak
Söğüş
E5a/E5b
(Koyu yeşil)
•
(sadece çiğ)
•
(sadece çiğ)
•
(sadece çiğ)
•
(sadece çiğ)
•
(sadece çiğ)
•
(sadece çiğ)
•
(sadece çiğ)
•
(sadece çiğ)
•
(sadece çiğ)
•
(sadece çiğ)
TRTR
10
İyi sonuç elde edilmesine yönelik tavsiyeler:
Tatminkar sonuçlar elde edebilmeniz için, kullandığınız malzemelerin gevşek olmamaları gerekir,
ayrıca hazne içinde malzeme birikiminden kaçının. Cihazı şeker veya et parçaları gibi aşırı sert
besinleri rendelemek veya dilimlemek için kullanmayın.
Hazne besleme borusu içinden daha kolay geçmeleri için malzemeleri kesin.
11
Page 10

TARİFLER
BIÇAKLAR HAZIRLANIŞI MALZEMELER TAVSİYELER
İri rendeleme bıçağı (E1) ile
kabakları ve patatesleri rendeleyin.
Dilimleme bıçağı (E4) ile soğanı
dilimleyin. Tüm sebzeleri yağ içinde
diriltin. Bir graten tabağı içine bir
kat sebze, bir kat pilav, bir kat sebze
şeklinde doldurun. Süt, tuz ve
karabiber ile çırpılmış sütü ekleyin.
Üzerine rendelenmiş gruyer serpin
ve fındık büyüklüğünde tereyağı
sürün.
180°C fırında fırınlayın.
Doğrama bıçağı (E4) ile beyaz
lahanayı doğrayın ve İnce
rendeleme (E2) bıçağı ile havuçları
rendeleyin. Hepsini bir salata
tabağı içinde karıştırın. Mayonez,
krema, sirke ve şeker ile sosu
hazırlayın.
Rendelenmiş sebzeler üzerine
hazırladığınız sosu dökün ve
karıştırın, 1 saat buzdolabında
dinlendirin.
Elmaların kabuklarını soyun,
çekirdeklerini çıkarın ve çeyrek
dilimler halinde kesin. Dalgalı
bıçağı (E4) ile şeritler halinde kesin,
30 g tereyağı içinde diriltin. Bir
graten tabağını hafifçe yağlayın,
tabanını karamelleşen elmalarla
örtün. Peynir rendesi (E3) ile
bademleri toz halinde getirin. Bir
salata tabağı içinde, badem
tozlarını, kremayı ve tarçını
karıştırın. Elde ettiğiniz karışımı
elmalar üzerine boşaltın ve üzerine
şeker serpin.
160°C fırında fırınlayın.
Rende
Kırmızı
İRİ
RENDE
(E1)
Rende
Turuncu
kenarlı metal
İNCE
RENDE
(E2)
Bıçak
sarı
PEYNİR
RENDESİ
(E3)
Graten
(6 kişilik)
Coleslaw
(4 kişilik)
Bademli elmalı
graten
(4 kişilik)
– 6 küçük boy
kabak
– 2 patates
– 1 soğan
– 1 tas pilav
– 1 yumurta
– 1 bardak süt
– 150 g gruyer
peyniri
– tereyağı
– ¼ beyaz lahana
– 2 havuç
– 3 yemek kaşığı
mayonez
– 3 yemek kaşığı
krema
– 2 yemek kaşığı
sirke
– 2 yemek kaşığı
toz şeker
– 6 elma
– 60 g şeker
– 50 g tereyağı
– 50 g bütün
badem
– 20 cl krema
– 1 çay kaşığı
tarçın
12
BIÇAKLAR HAZIRLANIŞI MALZEMELER TAVSİYELER
– 1 salatalık
– 2 iri domates
– 1 kırmızı dolmalık
biber
Bıçak
Açık yeşil
kenarlı
metal
DİLİMLEME
(E4)
Bıçak/Koyu
yeşil halka
Dalgalı
dilimleme-küp
yapma
(E5a/E5b)
Yunan usulü
salata
(4 kişilik)
– 1 yeşil dolmalık
biber
– 1 orta boy beyaz
soğan
– 200 g beyaz
peynir
– 50 g siyah zeytin
(damak tadına
göre)
– 4 yemek kaşığı
sıvı yağ
– 1 limon
– 30 g kuru baharat
(Arzuya göre:
Fesleğen,
maydanoz, nane,
kişniş)
– 400 g kırmızı
pancar
– 300 g havuç
– 400 g Patates
– 200 g salatalık
– 150 g soğan
– 100 g Bezelye
– tuz
– 2 yemek kaşığı
sıvı yağ
Salatalıkları Dalgalı bıçak ile (E4)
ince dilimler halinde kesin.
Dolmalık biberleri ikiye kesin,
içlerini çıkarın. Dolmalık biberleri ve
soğanları kıyın.
Beyaz peynir ve domatesleri küpler
halinde kesin. Bir salata tabağı
içinde, tüm malzemeleri karıştırın
ve zeytinleri ekleyin. Sıvı yağ ve
limonu karıştırarak sosu hazırlayın.
Yavaşça salatanın üzerinde gezdirin
ve üzerini baharatlarla süsleyin.
Patatesleri, pancarları, havuçları,
soğanları ve salatalıkları
dalgalı dilimleme ve küp yapma
aparatı (E5a/E5b) yardımıyla küpler
halinde kesin.
Patatesleri, pancarları ve havuçları
buharda pişirin.
Hepsini karıştırın ve bezelyeleri,
soğanları ve salatalığı ekleyin.
Tuz ve sıvı yağ ilave edin.
1 saat boyunca buzdolabında
dinlendirin.
5. CİHAZIN TEMİZLENMESİ
• Motor bloğunu temizlemeye başlamadan önce cihazın fişini daima prizden çıkarın (A).
• Motor bloğunu suya batırmayın, su altına tutmayın. Motor bloğunu nemli bir bez kullanarak
temizleyin. Özenli bir şekilde kurulayın.
• Hazne (D), itme aparatı (C), bıçaklar (E1, E2, E3, E4, E5a), küp yapma aparatı (E5b) ve muha-
faza aksesuarı (F)bulaşık makinesinin üst sepetinde, "EKONOMİK" veya "HAFİF KİRLİ" programı
kullanılarak yıkanabilir.
TRTR
13
Page 11

• Dalgalı dilimleyiciyi temizlik sırasında zorlukla karşılaşmanız halinde, fırça kullanmanızı tavsiye
ederiz.
• Bıçaklar temizlerken dikkatli olun, konilerin bıçakları son derece keskindir.
• Plastik kısımların havuç gibi besinler tarafından boyanması halinde, gıda yağına batırılmış bir
bezle silin ve ardından alışıldığı gibi yıkayın.
TR
6. CİHAZIN MUHAFAZA EDİLMESİ
• Tüm bıçaklar (E1, E2, E3, E4, E5a), küp yapma aparatı (E5b) cihaz üzerinde muhafaza edi-
lebilir.
5 bıçağı birbirleri içine geçirin (Şekil 12) ve haznenin ön girişine yerleştirin (D). Muhafaza ak-
sesuarı (F) haznenin ön girişine klipslenir (D) (Şekil 13). küp yapma aparatı (E5b) muhafaza
aksesuarı üzerine klipslenir (F) (Şekil 14 & 15).
• Kordonun muhafazası: Kordonu bu amaçla öngörülen boşluğa ittirin (KORDON SAKLAMA)
(Şekil 16).
GARANTİ BELGESİ
GARANTİ İLE İLGİLİ OLARAK DİKKAT EDİLMESİ GEREKEN HUSUSLAR
Groupe Seb İstanbul tarafından verilen bu garanti, ürünün kullanma kılavuzunda yer alan
hususlara aykırı kullanılmasından doğacak arızaların giderilmesini kapsamadığı gibi, aşağıdaki
durumlar garanti dışıdır.
1. Kullanma hatalarından meydana gelen hasar ve arızalar.
2. Hatalı elektrik tesisatı kullanılması nedeniyle meydana gelebilecek arıza ve hasarlar.
3. Tüketici ürünü teslim aldıktan sonra, dış etkenler nedeniyle (vurma, çarpma, vs.) meydana
gelebilecek hasarlar.
4. Garantili onarım için yetkili servise başvurulmadan önce Groupe Seb yetkili personeli veya
yetkili servis personeli dışında birinin, cihazı onarım veya tadiline kalkışması durumunda.
5. Üründe kullanılan aksesuar parçalar. Yukarıda belirtilen arızaların giderilmesi ücret karşılığı
yapılır.
7. GERI DÖNÜŞÜM
KULLANIM ÖMRÜNÜ TAMAMLAMIŞ OLAN ELEKTRİKLİ VEYA ELEKTRONİK ÜRÜNLER
Cihazınız uzun yıllar boyunca kullanılmak üzere tasarlanmıştır.
Bununla birlikte, cihazınızı kullanım sonuna geldiğinde, yenisiyle değiştirmeyi arzuladığınızda,
belediyeniz tarafından öngörülen toplama alanlarına götürünüz (yoksa bir atık merkezine).
Çevreyi koruyun!
Cihazınız çok sayıda yeniden üretilebilen veya geri dönüştürülebilen parça
içerir.
Lütfen atık geri dönüştürme merkezlerine götürün.
14
GARANTİ ŞARTLARI
Bu ürün ev kullanımı için tasarlanmıştır. Profesyonel kullanım için uygun değildir.
1. Garanti Süresi, ürünün teslim tarihinden itibaren başlar ve 2 yıldır.
2. Ürünün bütün parçaları dahil olmak üzere tamamı firmamızın garantisi kapsamındadır.
3. Ürünün garanti süresi içinde arızalanması adurumunda, tamirde geçen süre garanti süre-
sine eklenir.
4. Ürünün tamir süresi en fazla 30 iş günüdür. Bu süre, ürünün servis istasyonuna, servis istasyonunun olmaması durumunda, ürünün satıcısı, bayii, acentası, temsilciliği, ithalatçısı veya
imalatçısından birine bildirim tarihinden itibaren başlar.
5. Sanayi ürününün arızasının 15 iş günü içerisinde giderilmemesi halinde, imalatçı veya ithalatçı; ürünün tamiri tamamlanıncaya kadar, benzer özelliklere sahip başka bir sanayi ürününü tüketicinin kullanımına tahsis etmek zorundadır.
6. Ürünün garanti süresi içerisinde, gerek malzeme ve işçilik, gerekse montaj hatalarından
dolayı arızalanması halinde, işçilik masrafı, değiştirilen parça bedeli ya da başka herhangi
bir ad altında hiçbir ücret talep etmeksizin, tamiri yapılacaktır.
7. Ürünün:
- Teslim tarihinden itibaren garanti süresi içinde kalmak kaydıyla bir yıl içerisinde, aynı
arızayı ikiden fazla tekrarlaması veya farklı arızaların dörtten fazla veya belirlenen garanti
süresi içerisinde farklı arızaların toplamının altıdan fazla olması unsurlarının yanı sıra, bu
arızaların üründen yararlanmamayı sürekli kılması,
- Tamiri için gereken azami sürenin aşılması,
- Servis istasyonunun mevcut olmaması halinde sırasıyla satıcısı, bayii, acentası, temsilciliği,
ithalatçısı veya imalatçısından birinin düzenleyeceği raporla arızanın tamirinin mümkün
bulunmadığının belirlenmesi durumlarında, ücretsiz olarak değiştirme işlemi yapılacaktır.
8. Ürünün kullanma kılavuzunda yer alan hususlara aykırı kullanılmasından kaynaklanan arıza-
lar garanti kapsamı dışındadır.
Page 12
9. Garanti süresi içerisinde, servis istasyonları tarafından yapılmasının zorunlu olduğu, imalatçı
veya ithalatçı tarafından şart koşulan periyodik bakımlarda; verilen hizmet karşılığında tüketiciden işçilik ücreti veya benzeri bir ücret talep edilemez.
10. Garanti belgesi ile ilgili olarak çıkabilecek sorunlar için T.C. Sanayi ve Ticaret Bakanlığı Tü-
keticinin ve Rekabetin Korunması Genel Müdürlüğü’ne başvurulabilir.
Bu Garanti Belgesi’nin kullanılmasına 4077 sayılı Kanun ile bu Kanun’a dayanılarak yürürlüğe
konulan Garanti Belgesi Uygulama Esaslarına Dair Tebliğ uyarınca, T.C. Sanayi ve Ticaret Bakanlığı Tüketicinin ve Rekabetin Korunması Genel Müdürlüğü tarafından izin verilmiştir.
İMALATÇI VEYA İTHALATÇI FİRMANIN:
Ünvanı : Groupe SEB İstanbul Ev Aletleri Tic. A.Ş.
Adresi : Beybi Giz Plaza Dereboyu Cad. Meydan sok. No:28 Kat:12 34398 Maslak/İstanbul
DANIŞMA HATTI: 444 40 50
FİRMA YETKİLİSİNİN:
MALIN:
Markası : Tefal
Cinsi : Mutfak Robotu
Modeli : QA400, QA401
Belge İzin Tarihi : 08.04.2009
Garanti Belge No : 67728
Azami Tamir Süresi : 30 iş günü
Garanti Süresi : 2 yıl
Kullanım Ömrü : 7 yıl
SATICI FİRMANIN
Ünvanı :
Adresi :
Tel-Telefax :
Fatura Tarih ve No :
Teslim Tarihi ve Yeri :
TARİH-İMZA-KAŞE :
Size en yakın servisimizi 444 40 50 numaralı Tüketici Danışma Hattımızdan öğrenebilirsiniz.
Page 13

Page 14

Page 15

Page 16

 Loading...