

Page 1
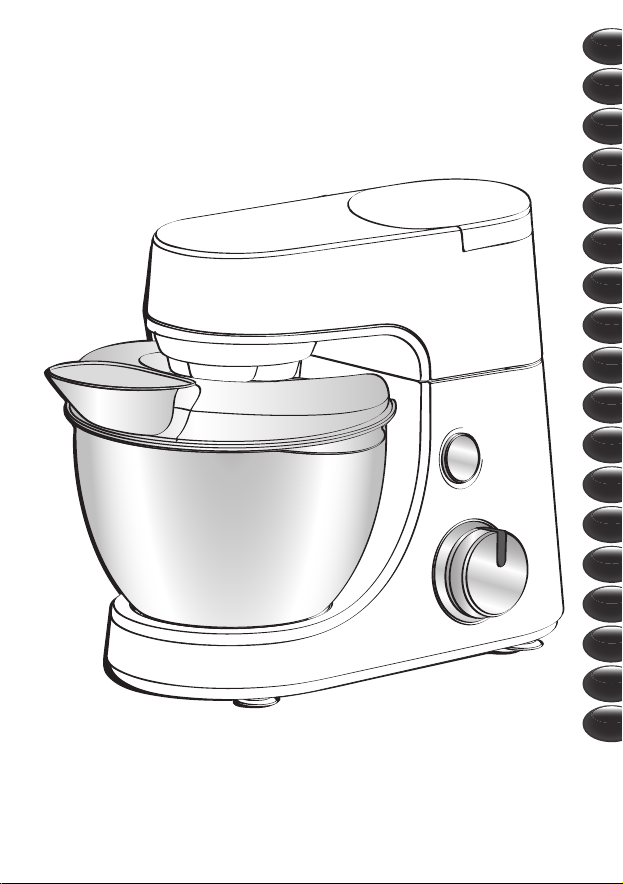
Masterchef Gourmet
Masterchef Gourmet +
EN
NL
ES
TR
PL
ET
LT
LV
BG
BS
CS
HU
HR
RO
SK
SL
SR
UK
Page 2
7
8
7
8
MAX
7
8
PULSE
STOP
max
max
max
PULSE
STOP
MAX
L6
L5
L4
L3
L2
L1
B
A
B2
A5
A7
A4
A3
A6
A2
A1
C1
C2
C3
D3
D2
D1
C D L
B1
B1
F
F7
F8
F5
E
NH
H1
H5
F4
H3
H2
F6
H4
H6
G
G2
G1
G6
G5
G4
G3
N1
N2
F3 F2 F1
Page 3
E
F
F7
F8
F5
F4
F6
F3 F2 F1
G
G6
G5
G4
G3
G1
G2
H4
H6
H3
H2
H1
NH
N1
N2
H5
Page 4
1.1 1.31.2
1
2
3
1
3
2
2
1
3
4
2
1
D
L1
G3
N2
1.4 2.22.1
L
2.3
3.1
4.13.3
3.2
4.2
Page 5
3
5.1
2
1
2
1
D
L1
G3
N2
F3
2
1
5.2
5.3
6.1
10
5.55.4
6.2
5.6
9
Page 6

Warning : please read the safety instructions carefully
EN
before initial use.
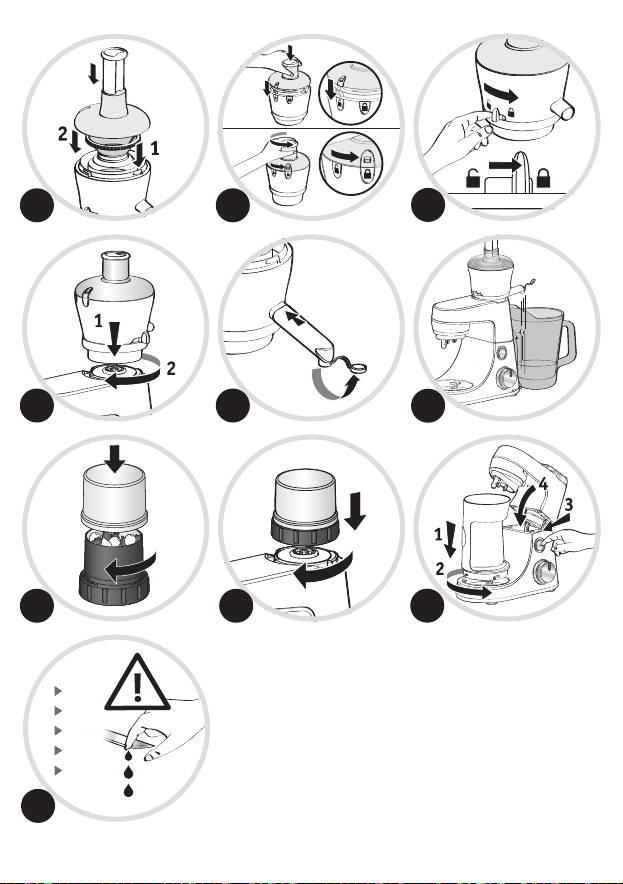
BEFORE FIRST USE
• Before using for the first time, wash all accessory parts in soapy water
(except for the attachment (E): see § Cleaning) Rinse and dry.
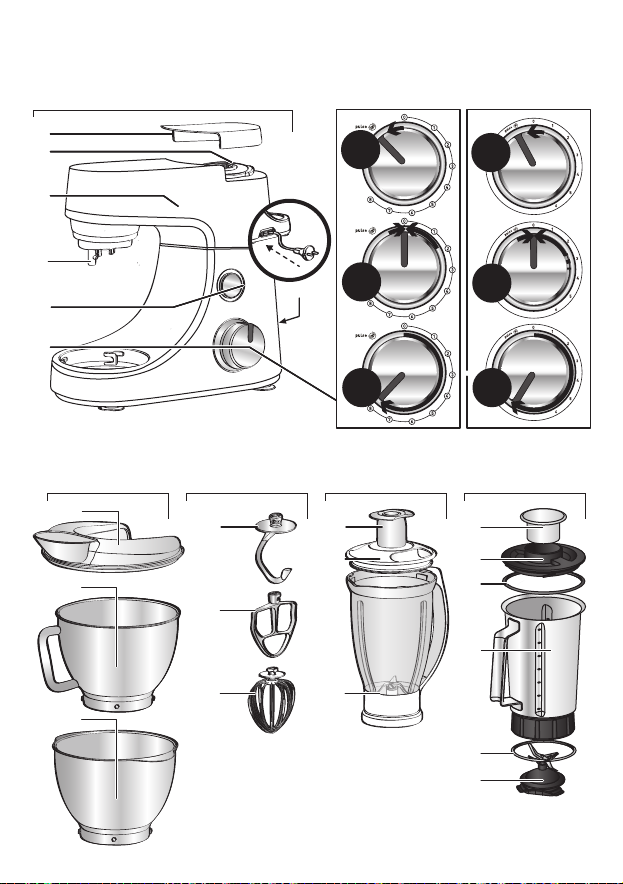
• Place the appliance on a flat, clean and dry surface. Make sure that the selector button (A1) is
in «0» position and plug in your appliance.
• You have several options for starting your appliance: (see diagram A1) :
- Intermittent operation (pulse):
Turn the selector button (A1) to the «pulse» position. Using a succession of pulses can
give you better control when preparing certain foods.
- Continuous operation:
Turn the selector button (A1) to the desired position from «1 to 8/max», depending on the
food you are preparing. You can change it as required during preparation.
• To stop the appliance, turn the button (A1) to «0».
Important: The appliance will start only if the cover (A5) and the head (A3) are locked. The
appliance will stop immediately if you unlock the cover (A5) and/or the head (A3) during
operation. Lock the cover and/or the head, turn the control button (A1) to the «0» position,
and then start the appliance normally by selecting the desired speed.
1 - MIXING / KNEADING / BEATING / EMULSIFYING / WHISKING
You can prepare up to 1.8 kg light dough and heavy dough made with up to 500 g flour using the
stainless bowl (B1) and its lid (B2) depending on the food.
ACCESSORIES USED : Stainless steel bowl (B1), Lid (B2), Kneader (C1) or mixer (C2) or balloon
whisk (C3).
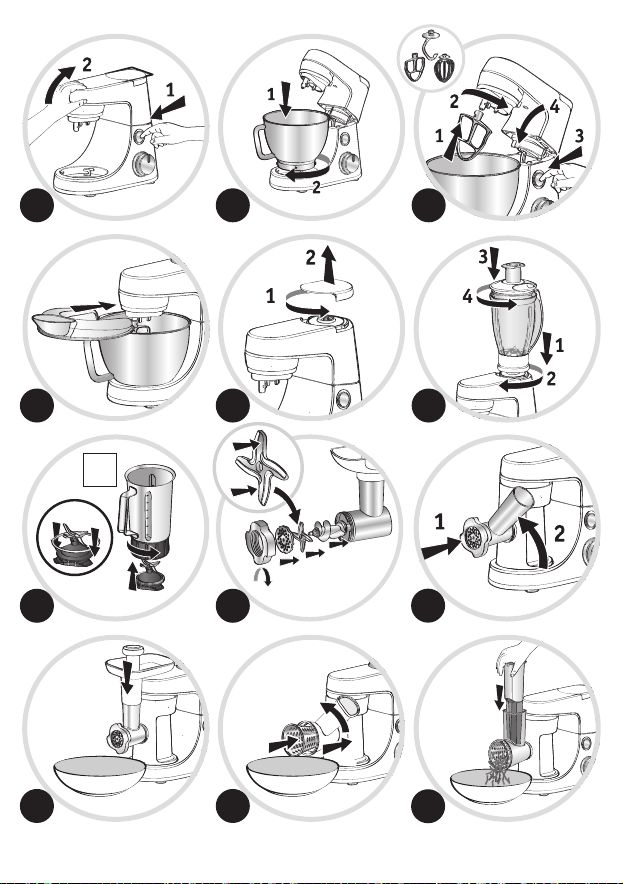
1.1 - ASSEMBLING THE ACCESSORIES
Follow the diagrams from 1.1 to 1.4.
1.2 - USAGE, TIPS AND DISMANTLING
• Start by turning the selector button (A1) to the desired position according to the recipe.
• You can add food through the hole in the lid (B2) during preparation.
• To stop the appliance, turn the button (A1) to «0».
Tips :
KNEADING (Maximum time of use: 13 minutes)
- Use the kneader accessory (C1) at speed «1». You can knead up to 500 g of flour (e.g. white
bread, grain bread, short crust pastry, etc.).
MIXING (Maximum time of use: 13 minutes).
- Use the mixer (C2) at speed «1 to 8/max».
- You can mix up to 1,8 kg of light dough (light cake mixture, sponge cake, biscuit or cookie dough).
-
Never use the mixer (c2) to knead heavy dough
bigoli, etc.).
- BEATING / EMULSIFYING / WHISKING (Maximum time of use: 10 minutes).
- Use the balloon whisk (c3) at speed «1 to 6/max» or «1 to 8» (depending on model).
and fresh pasta dough (lasagne, rigatoni,
1
Page 7

- You can prepare: mayonnaise, aioli, sauces, whisked egg whites (up to 10 egg whites),
whipped cream (up to 500 ml), meringues etc.
- Never use the balloon whisk (C3) to knead heavy dough or mix light dough.
Dismantling the accessory: Wait for the appliance to come to a complete stop and proceed
in the reverse order of the assembly. diagrams from 1.4 to 1.1.
2 - BLENDING / MIXING (DEPENDING ON MODEL)
Depending on the nature of the food, you can use the blender (D) to prepare up to 1.5 L of thick
mixtures and 1.25 L of liquid mixtures.
ACCESSORIES USED : Blender jug (D ou L).
2.1 - ASSEMBLING THE ACCESSORIES
Follow the diagrams from 2.1 to 2.3 and 10.
2.2 - USAGE, TIPS AND DISMANTLING (Maximum time of use: 3 minutes).
• Start by turning the selector button (A1) to the desired position (from speed «7 to 8» or «pulse»)
according to the recipe. Use the «Pulse» position for better mixing control and for a better blending
of your preparation.
• You can add food through the hole in the measuring cap (D2, L5) during preparation.
Tips :
• You can prepare :
- finely blended soups, cream soups, stewed fruit, milkshakes and cocktails.
- liquid batter (pancake, fritters, Yorkshire pudding, waffles, clafoutis and custard flans).
• If ingredients stick to the sides of the bowl when mixing, stop the appliance and wait until the
blades have stopped completely. Remove the blender and push the food down onto the blades
using a spatula, and put your blender back on the appliance to continue processing..
Dismantling the accessory : Wait for the appliance to come to a complete stop before removing
the blender jug and proceed in the reverse order of the assembly, diagrams from 2.3 to 2.1 and 10.
3 - MINCING (DEPENDING ON MODEL)
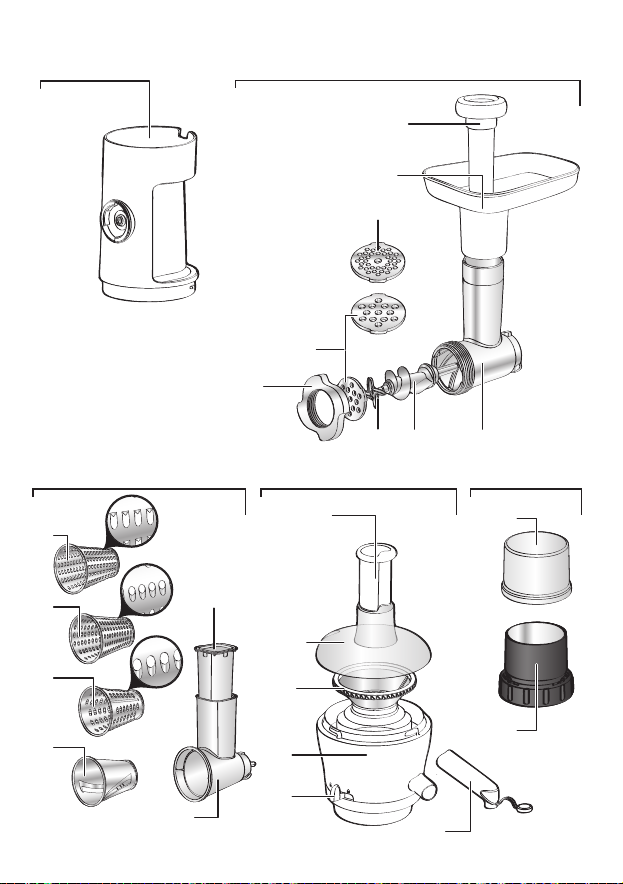
ACCESSORIES USED : Attachment holder (E), Assembled mincer head (F)
3.1 - FITTING THE MINCER ATTACHMENT
Follow the diagrams 9, 10, and then from 3.1 to 3.3.
3.2 - USAGE, TIPS AND DISMANTLING
• Run the appliance by turning the selector (A1) to speeds «5 to 7».
• Push the meat, piece by piece, down the feed tube, using the pusher (F7). Never push the
ingredients down the feed tube with your fingers or any other utensil.
- You can chop up to 3 kg of meat, Maximum time of use: 10 minutes.
Tips :
- Prepare all of the foodstuffs to be minced (for meat, remove the bones, gristle and tendons
and cut it into pieces of approximately 2 x 2 cm).
- Make sure that frozen meat is thoroughly thawed.
EN
2
Page 8

Dismantling the accessory : Wait for the appliance to come to a complete stop and proceed
EN
in the reverse order of the assembly diagrams 10, from 3.3 to 3.1 and then 9.
4 - GRATING / SLICING (DEPENDING ON MODEL)
ACCESSORIES USED : Attachment holder (E), Assembled vegetable slicer (G), Drums (depending on model)
4.1 - ASSEMBLING THE ACCESSORIES
Follow the diagrams 10, 9 and then from 4.1 to 4.2.
4.2 - USAGE, TIPS AND DISMANTLING
• Run the appliance by turning the selector (A1) to speed «5» to slice and to speed «7» to grate.
• Place the food in the feed tube on the body and press down with the pusher (G2).
Never push the ingredients with your fingers or any other utensil.
• You can prepare up to 2 kg of food, maximum time of use : 10 min.
• Use the drums to:
- Grate coarsely (G4) / grate finely (G5) : carrots, celery, potatoes, cheese, etc.
- Slice thickly (G3) : potatoes, carrots, cucumbers, apples, beetroot, etc.
- Potato shredder (G6): potatoes, parmesan, etc.
Dismantling the accessory : Wait for the appliance to come to a complete stop and proceed
in the reverse order of the assembly, diagrams 10, 4.2, 4.1 and 9.
5 - EXTRACTING JUICE FROM FRUIT AND VEGETABLES (DEPENDING ON MODEL)
ACCESSORIES USED : Assembled juice extractor (H)
5.1 - ASSEMBLING THE JUICE EXTRACTOR
Follow the diagrams from 5.1 to 5.6.
5.2 - USAGE, TIPS AND DISMANTLING (maximum time of use: 10 minutes.)
• Cut the fruits and/or vegetables into pieces.
• Run the appliance by turning the selector (A1) to speed «5».
• Insert the ingredients down the feed tube in the lid (H2) push them slowly using the pusher (H1).
•
Do not process 500 g of food more than 5 times continuously, without allowing your appliance
to cool down completely
• Important : clean the filter (H3) and the juice collector (H4) after every 300g of ingrédients.
Tips :
- You can make juice from: carrots, tomatoes, apples, grapes, raspberries, etc. but it is
not possible to extract juice from certain fruits and vegetables: bananas, avocado pears,
blackberries, some varieties of apples, etc…
- Peel fruits with thick skins; remove stones and the core of pineapples.
- Drink the juices immediately after preparation.
Dismantling the accessory : Wait for the appliance and rotary filter to come to a complete stop
before removing the accessory from the appliance. Proceed in the reverse order of the assembly,
diagrams from 5.6 to 5.1.
3
Page 9

6 - FINELY CHOPPING SMALL QUANTITIES (DEPENDING ON MODEL)
ACCESSORIES USED :
6.1 - ASSEMBLING THE ACCESSORIES
Follow the diagrams 10, 6.1 and 6.2.
6.2 - USAGE, TIPS AND DISMANTLING
• You can finely chop with the mini chopper :
- fresh herbs : 10g max. / 10secs max. / speed «7»
- dried fruits / Beef (boneless and trimmed meat) : 100g max. / 10secs max. / speed «1»
- vegetable puree : 150g max. / 20secs max. / «pulse» or speed «1»
• This grinder is not designed for hard products like coffee beans, hard spices nor liquids.
Dismantling the accessory : Wait for the appliance to come to a complete stop and proceed
in the reverse order of the assembly, diagrams 10, 6.2 and 6.1.
Mini chopper lid (N1), Mini chopper bowl (N2)
7 - ADJUSTING THE CORD LENGTH (see A7)
EN
8 - ROUGH CHOPPING SMALL QUANTITIES
(DEPENDING ON MODEL)
ACCESSORIES USED : Assembled grinder.
Chop in a few seconds by pulsing: dried figs, dried apricots, etc. Quantity / max time : 100g / 5s
-
CLEANING
• Unplug the appliance.
• Do not immerse the motor unit (A) or the attachment (E) in water or under running water. Wipe
them with a dry or slightly damp cloth.
• Disassemble completely and rinse the accessories quickly after use.
Handle the blades with care to prevent injury. (diagram 10).
• Wash, rinse and dry the accessories: they are dishwasher-safe, except for all the metal components
in the mincer head: body (F), the kneader (C1) and the mixer (C2).
WHAT TO DO IF YOUR APPLIANCE DOES NOT WORK
please refer to the chapter «before first use».
Your appliance still does not work? Contact an authorised service centre (see the list in the
service booklet).
AVAILABLE ACCESSORIES
See page 91 and visit the brand website.
Caution: this booklet contains instructions for additional accessories. Please keep safe for
future reference. Please contact the Customer Service for further information on how to
purchase accessories.
4
Page 10

Waarschuwing :
Gelieve vóór het eerste gebruik het boekje met
de «veiligheidsvoorschriften» en de instructies nauwkeurig
NL
te lezen.
VÓÓR HET EERSTE GEBRUIK
• Was voor het eerste gebruik alle accessoires in water met afwasmiddel (behalve onderdeel (E):
zie § Reinigen.) Afspoelen en afdrogen.
• Zet het apparaat op een vlakke, schone en droge ondergrond. Zorg ervoor dat de
snelheidskeuzeschakelaar (A1) op «0» staat en steek de stekker in het stopcontact.
• Het apparaat kan op verschillende manieren worden opgestart : (zie afbeelding A1)
- Onderbroken werking (impulsen):
zet de snelheidskeuzeschakelaar (A1) op «pulse». Door het gebruik van achtereenvolgende
impulsen hebt u een betere controle bij het bereiden van bepaalde gerechten.
- Continuwerking:
zet de snelheidskeuzeschakelaar (A1) op de gewenste stand, van «1 tot 8/max», afhankelijk
van de voeding die u bereidt. U kunt de stand van de snelheidskeuzeschakelaar tijdens de
bereiding naar wens wijzigen.
• Zet de schakelaar (A1) op «0» om het apparaat stop te zetten.
Belangrijk: Het apparaat start alleen als de kap (A5) en de arm (A3) zijn vergrendeld.
Het apparaat stopt onmiddellijk als u tijdens het gebruik de kap (A5) en/of de arm (A3)
ontgrendelt. Vergrendel de kap en/of de arm, zet de snelheidskeuzeschakelaar (A1) op «0», en
start het apparaat daarna op de gebruikelijke manier door de gewenste snelheid in te stellen.
1 -
MENGEN / KNEDEN / KLOPPEN / EMULGEREN / KLUTSEN
U kunt max. 1,8 kg licht deeg bereiden met de roestvrijstalen mengkom (B1) en het deksel (B 2),
afhankelijk van de voeding.
GEBRUIKTE ACCESSOIRES : Roestvrijstalen mengkom (B1), Deksel (B2), Deeghaak (C1) of
klopper (C2) of garde (C3).
1.1 - MONTEREN VAN DE ACCESSOIRES
Volg de afbeeldingen 1.1 tot en met 1.4.
1.2 - GEBRUIK
• Begin door de snelheidskeuzeschakelaar (A1) in de gewenste stand te zetten, afhankelijk van het recept.
• Tijdens de bereiding kunt u voedsel door het gat in het deksel (B2) toevoegen.
• Zet de schakelaar (A1) op «0» om het apparaat stop te zetten.
Tips :
KNEDEN (De maximumtijd van gebruik: 13 minuten).
- Gebruik de kneedhaak (C1) op snelheid «1». U kunt max. 500 g bloem kneden (bijv.
witbrood, granenbrood, korstdeeg, kruimeldeeg, enz.).
MENGEN (De maximumtijd van gebruik: 13 minuten).
- Gebruik de klopper (C2) op snelheid «1 tot 6/max» of «1 tot 8» (afhankelijk van het model).
- U kunt max. 1,8 kg licht deeg mengen (roombotercake, koekjes, enz.).
- Gebruik de mixer (c2) nooit voor zwaar deeg en vers pastadeeg (lasagne, rigatoni, bigoli enz.).
5
Page 11

- KLOPPEN / EMULGEREN / KLUTSEN (De maximumtijd van gebruik: 10 minuten).
- Gebruik de garde (C3) op snelheid «1 tot 8/max».
- U kunt het volgende bereiden: mayonaise, aioli, sauzen, opgeklopt eiwit (max. 10
eiwitten), slagroom (max. 500 ml), enz.
-
Gebruik de garde (C3) nooit voor het kneden van zwaar deeg of het mengen van licht
deeg.
Demonteren van de accessoires : Wacht tot het apparaat volledig tot stilstand is gekomen
en ga in de omgekeerde volgorde van de montage te werk (van afbeelding 1.4 tot en met 1.1).
2 - MIXEN / MENGEN (AFHANKELIJK VAN HET MODEL)Depending on the nature
of the food, you can use the blender (D) to prepare up to 1.5 L of thick mixtures and 1.25 L of
liquid mixtures.
GEBRUIKTE ACCESSOIRES : Blender jug (D ou L).
2.1 - MONTEREN VAN DE ACCESSOIRES
Volg de afbeeldingen 2.1 tot en met 2.3 en 10.
2.2 - GEBRUIK (De maximumtijd van gebruik: 3 minuten).
• Begin door de snelheidskeuzeschakelaar (A1) in de gewenste stand te zetten (van snelheid «4 tot
8/Max» of «Pulse»), afhankelijk van het recept. Gebruik de «pulse» stand voor een betere controle
over het mengen en voor een fijner resultaat.
• Tijdens de bereiding kunt u voedsel toevoegen door (D2, L5) het gat in de maatdop.
Tips :
• U kunt het volgende bereiden:
- Fijn gepureerde soepen, veloutés, vruchtenmoes, milkshakes en cocktails.
- Vloeibaar beslag (pannenkoeken, beignets, clafoutis en puddingtaart).
•
Als de ingrediënten aan de wand van de mengkom blijven plakken tijdens het mengen. Zet het
apparaat dan stop. Wacht tot het apparaat volledig gestopt is. Verwijder de blender en duw het
voedsel naar beneden met behulp van een spatel. Plaats de blender terug op het apparaat en ga
verder met de bereiding.
Demonteren van de accessoires: Wacht tot het apparaat volledig tot stilstand is gekomen
vooraleer de mengbeker te verwijderen en ga in de omgekeerde volgorde van de montage te werk
(van afbeelding 2.3 tot en met 2.1 en ten slotte 10).
NL
3 - MALEN (AFHANKELIJK VAN HET MODEL)
GEBRUIKTE ACCESSOIRES :
kop van de gehaktmolen (F)
3.1 - AANBRENGEN VAN DE GEHAKTMOLEN
Volg de afbeeldingen 9, 10 en vervolgens 3.1 tot en met 3.3.
3.2 - GEBRUIK, TIPS EN DEMONTEREN
• Zet het apparaat aan door de snelheidskeuzeschakelaar (A1) op snelheid «5 tot 7» in te stellen.
• Duw de stukken vlees een voor een in de aanvoerbuis naar beneden met de stamper (F7). Duw de
ingrediënten nooit met uw vingers of enig ander voorwerp naar beneden in de aanvoerbuis.
- U kunt tot 3 kg vlees hakken, De maximumtijd van gebruik: 10 minuten.
Hulpstuk voor het gebruik van diverse accessoires (E), Geassembleerde
6
Page 12

Tips :
- Bereid alle ingrediënten voor die in de gehaktmolen worden geplaatst (botten, kraakbeen en
zenuwen van het vlees verwijderen en het vlees in stukken snijden van ongeveer 2 x 2 cm).
NL
- Zorg ervoor dat het vlees helemaal is ontdooid.
Demonteren van de accessoires : Wacht tot het apparaat volledig tot stilstand is gekomen
en ga in de omgekeerde volgorde van de montage te werk (eerst afbeelding 10, dan van 3.3 tot
en met 3.1 en ten slotte 9).
4 - RASPEN / SNIJDEN (AFHANKELIJK VAN HET MODEL)
GEBRUIKTE ACCESSOIRES : Hulpstuk voor het gebruik van diverse accessoires (E), Geassembleerde
groentemolen (G), Accessoires (afhankelijk van het model)
4.1 - MONTEREN VAN DE ACCESSOIRES
Volg de afbeeldingen 10, 9 en vervolgens 4.1 tot en met 4.2.
4.2 - GEBRUIK
• Zet het apparaat aan door de snelheidskeuzeschakelaar (A1) op snelheid «5» om plakken te
snijden en op «7» om te raspen.
• Duw het voedsel in de aanvoerbuis naar beneden met de stamper (G2). Duw de ingrediënten
nooit met uw vingers of enig ander voorwerp naar beneden.
• U kunt tot 2 kg voedingsmiddelen voorbereiden, De maximumtijd van gebruik: 10 minuten.
• Gebruik de accessoires voor het volgende :
- Grof raspen (G4) / fijn raspen (G5) : wortels, selderij, aardappel, kaas, enz.
- Dikke plakken snijden (G3) : aardappel, wortel, komkommer, appel, rode biet, enz.
- Reibekuchen (G6): aardappels, Parmezaan, enz.
Demonteren van de accessoires : Wacht tot het apparaat volledig tot stilstand is gekomen
en ga in de omgekeerde volgorde van de montage te werk (eerst afbeelding 10, dan 4.2, 4.1 en
ten slotte 9).
5 - SAP PERSEN UIT VRUCHTEN EN GROENTEN (AFHANKELIJK VAN HET MODEL)
GEBRUIKTE ACCESSOIRES :
5.1 - MONTEREN VAN DE SAPCENTRIFUGE
Volg de afbeeldingen 5.1 tot en met 5.6.
5.2 - GEBRUIK (De maximumtijd van gebruik: 13 minuten)
• Snijd de vruchten en/of groente in stukken.
• Zet het apparaat aan door de snelheidskeuzeschakelaar (A1) op snelheid «5» in te stellen.
• Plaats de vruchten en/of groente in de aanvoerbuis in het deksel (H2) en duw ze langzaam naar
beneden met de stamper (H1).
• Verwerk 500 g voedsel niet meer dan 5 keer continue, zonder het apparaat volledig te laten afkoelen.
• Belangrijk : reinig het filter (H3) en de opvangbeker voor het sap (H4) na elke 300g ingrediënten.
Tips :
- U kunt sap maken van: wortels, tomaten, appels, druiven, frambozen, enz. maar het is niet
mogelijk sap te persen uit bepaalde vruchten en groenten zoals bananen, avocado’s, bramen,
sommige soorten appels, enz.
- Drink het sap direct na de bereiding.
Geassembleerde sapcentrifuge (H)
7
Page 13

Demonteren van de accessoires : Wacht tot het apparaat en de roterende filter volledig
tot stilstand zijn gekomen voordat u het accessoire van het apparaat haalt. Ga in de omgekeerde
volgorde van de montage te werk (van afbeelding 5.6 tot en met 5.1).
6 - FIJN HAKKEN VAN KLEINE HOEVEELHEDEN
(AFHANKELIJK VAN HET MODEL)
GEBRUIKTE ACCESSOIRES : Mini-hak/snij-apparaat: deksel (N1), mengkom (N2).
6.1 - MONTEREN VAN DE ACCESSOIRES
Volg de afbeeldingen 10, 6.1 en 6.2.
6.2 - GEBRUIK
• U kunt met het mini-hak/snij-apparaat het volgende fijnhakken:
- verse kruiden: max. 10g / max. 10s / snelheid
- gedroogd fruit / rundvlees (zonder bot en schoongemaakt): max. 100g / max. 10s / snelheid «1»
- groentepuree: max. 150g / max. 20s / pulsestand of snelheid «1»
• Deze maler is niet geschikt voor harde producten zoals koffiebonen.
Dismantling the accessory : Wacht tot het apparaat volledig tot stilstand is gekomen en ga in
de omgekeerde volgorde van de montage te werk (eerst afbeelding 10, dan 6.2 en ten slotte 6.1).
«7»
7 - AANPASSEN VAN DE SNOERLENGTE (zie A7)
8 - GROF HAKKEN VAN KLEINE HOEVEELHEDEN (AFHANKELIJK VAN HET MODEL)
GEBRUIKTE ACCESSOIRES : Geassembleerde maler.
-
Enkele seconden te hakken met impulsen: gedroogde vijgen, gedroogde abrikozen, enz.
Hoeveelheid/max. duur: 100 g / 5 s
REINIGING
• Haal de stekker van het apparaat uit het stopcontact.
• ompel het motorblok (A) of de accessoire (E) nooit onder in water en houd ze niet onder de kraan.
Droog ze af met een droge of licht bevochtigde doek.
• Demonteer volledig en spoel de accessoires meteen na gebruik af.
Wees voorzichtig met het mes om letsel te voorkomen (afbeelding 10).
Wassen, spoelen en drogen van de accessoires: ze zijn vaatwasserbestendig, met uitzondering van de
•
metalen onderdelen. in de hakmolen: houder (F), deeghaak (C1) en mixer (C2).
NL
WAT TE DOEN ALS UW APPARAAT NIET WERKT?
- Gelieve het hoofdstuk «Vóór het eerste gebruik» te raadplegen
Werkt het apparaat nog steeds niet ? Neem contact op met een erkend servicecentrum (zie de
lijst in het serviceboekje).
ACCESSOIRES
Zie pagina 91 en raadpleeg de website van het merk.
Opgelet: dit boekje bevat instructies voor aanvullende accessoires. Gelieve dit goed te bewaren
voor later. Gelieve contact op te nemen met ons servicecentrum voor verdere informatie over
de aankoop van accessoires.
8
Page 14

Advertencia : Lea detenidamente el folleto «indicaciones de
seguridad» y las instrucciones antes del primer uso.
PUESTA EN MARCHA
ES
• Antes de utilizar el aparato por primera vez, lave todas las piezas de los accesorios con agua
y jabón (excepto el adaptador (E): consulte § limpieza) Aclárelos y séquelos.
• Coloque el aparato sobre una superficie plana, limpia y seca, compruebe que el botón regulador
(A1) esté en la posición “0” y, a continuación, conéctelo.
• Para la puesta en marcha, dispone de varias posibilidades: (véase el diagrama A1):
- Marcha intermitente (pulse):
Gire el botón regulador (A1) hacia la posición “pulse”, impulsos sucesivos, para conseguir un
mejor control de las preparaciones.
- Marcha continua:
Gire el botón regulador (A1) hacia la posición deseada de “1 a 8/max” según las
preparaciones que realice. Se puede modificar durante la preparación.
• Para detener el aparato, devuelva el botón (A1) a la posición “0”.
Importante: el aparato sólo se pondrá en marcha si la tapa de seguridad (A5) y el cabezal (A3)
están acoplados. Si durante el funcionamiento desacopla la tapa (A5) y/o el cabezal (A3), el
aparato se detendrá inmediatamente. Vuelva a acoplar la tapa y/o el cabezal, gire el botón
regulador (A1) hasta la posición “0” y, a continuación, prosiga normalmente con la puesta
en marcha del aparato seleccionando la velocidad deseada.
1 - MEZCLAR / AMASAR / BATIR / EMULSIONAR / BATIR CON LAS VARILLAS
Según la naturaleza de los alimentos, el vaso de acero inoxidable (b1) y la tapa (b2) le permitirán
preparar hasta 1,8 kg de pasta ligera.
ACCESORIOS UTILIZADOS: Vaso de acero inoxidable (B1), Tapa (B2), Amasador (C1), batidor
(C2) o varilla de múltiples aspas (C3).
1.1 - MONTAJE DE LOS ACCESORIO
Siga los diagramas 1.1 - 1.4.
1.2 - PUESTA EN MARCHA
• Ponga en marcha el aparato girando el botón regulador (A1) hasta la posición deseada según la
receta.
• Puede añadir los alimentos por el orificio de la tapa (B2) durante la preparación.
• Para detener el aparato, devuelva el botón (A1) a la posición “0”.
Consejos :
AMASAR (Tiempo máximo de utilización: 13 minutos.)
- Utilice el accesorio amasador (C1) a la velocidad “1”. Puede amasar hasta 500 g de harina
(por ejemplo: pan blanco, pan de cereales, pasta brisa, pasta sablée, …).
MEZCLAR (Tiempo máximo de utilización: 13 minutos.).
- Utilice el mezclador (C2) de la velocidad “1 a 6/max” o “1 a 8” (según modelo).
- Puede mezclar hasta 1,8 kg de pasta ligera (bizcocho de cuatro partes, galletas, etc.).
- Nunca utilice la mezcladora (c2) para amasar masa pesada y masa de pasta fresca (lasaña,
rigatoni, bigoli, etc.).
9
Page 15

- BATIR / EMULSIONAR / BATIR CON VARILLAS (Tiempo máximo de utilización: 10 minutos.).
- Utilice la varilla de múltiples aspas (C3) de la velocidad “1 a 6/max” o “1 a 8” (según modelo)
- Puede preparar: mayonesa, alioli, salsas, claras a punto de nieve (hasta 10 claras de huevo),
chantillí (hasta 500 ml)...
Nunca utilice la varilla de múltiples aspas (C3) para amasar pastas pesadas o mezclar pastas
-
ligeras.
Desmontaje de los accesorios: Espere a que el aparato se haya parado completamente y
proceda en orden inverso al montaje. Diagramas 1.4 - 1.1.
2 - HOMOGENEIZAR / MEZCLAR / BATIR (SEGÚN MODELO)
Según la naturaleza de los alimentos, el vaso mezclador (D) permite preparar hasta 1,5 l de mezclas
espesas y 1,25 l de mezclas líquidas.
ACCESORIOS UTILIZADOS: Vaso mezclador (D ou L).
2.1 - MONTAJE DE LOS ACCESORIO
Siga los diagramas 2.1 - 2.3 y 10.
2.2 - PUESTA EN MARCHA (Tiempo máximo de utilización: 3 minutos.).
• Ponga en marcha el aparato girando el botón regulador (A1) hasta la posición deseada (desde
la velocidad de “7 a 8” o “Pulse”) según la receta. Para un mejor control de la mezcla y una mejor
homogeneización de la preparación, utilice la posición “Pulse”.
• Puede añadir los alimentos por el orificio del tapón dosificador (D2, L5) durante la preparación.
Consejos:
• Puede preparar:
- sopas con una textura muy suave, cremas, compotas, batidos de leche, cócteles.
- pastas ligeras (crepes, buñuelos, clafoutis, flanes, etc.).
•
Si, durante la mezcla, los ingredientes se quedan pegados en la pared del vaso, detenga el aparato,
esperar al apagado total del aparato y retire el vaso mezclador, haga caer los ingredientes encima de
las hojas usando una espátula, y vuelva a colocar el vaso mezclador para continuar con la preparación.
Desmontaje de los accesorios: Espere a que el aparato se haya parado completamente antes
de retirar la jarra de la mezcladora y proceda en orden inverso al montaje, diagramas 2.3 - 2.1 y 10.
3 - PICAR (SEGÚN MODELO)
ACCESORIOS UTILIZADOS: Adaptador (E), Cabezal picador montado (F)
3.1 - COLOCAR EL ADAPTADOR PICADOR
Siga los diagramas 9, 10 y luego 3.1 - 3.3.
3.2 - PUESTA EN MARCHA
• Ponga el aparato en marcha girando el botón regulador (A1) a la velocidad “5 a 7”.
• Introduzca la carne troceada por el tubo de alimentación con la ayuda del embutidor (F7). Nunca
apriete los ingredientes con los dedos o con otro utensilio por el tubo.
- Usted puede cortar hasta 3 kg de carne, tiempo máximo de utilización: 10 minutos.
Consejos:
- Prepare la cantidad de alimentos que desee picar (para la carne, elimine los huesos, cartílagos
y nervios y córtela en trozos de unos 2 x 2 cm).
- Compruebe que la carne esté bien descongelada.
10
ES
Page 16

Desmontaje de los accesorios: Espere a que el aparato se pare completamente y luego proceda
en orden inverso a los diagramas de montaje 10, de 3.3 a 3.1 y a continuación 9.
4 - RALLAR / CORTAR (SEGÚN MODELO)
ACCESORIOS UTILIZADOS:
ES
4.1 - MONTAJE DE LOS ACCESORIO
Siga los diagramas 10, 9 y posteriormente 4.1 - 4.2.
4.2 - PUESTA EN MARCHA
• Ponga el aparato en marcha girando el botón regulador (A1) a la velocidad “5” para cortar y a
la velocidad “4 o 7” para rallar.
• Introduzca los alimentos por el tubo del depósito y guíelos con la ayuda del embutidor (G2).
Nunca apriete los ingredientes con los dedos o con otros utensilios.
• Usted puede preparar hasta 2 kg de alimentos, Tiempo máximo de utilización: 10 minutos
• Puede prepararse con los tambores:
- Rallar ingredientes de forma gruesa (G4) / rallar ingredientes finos (G5): zanahorias, apiorábano,
patatas, queso, etc.
- Cortar ingredientes gruesos (G3): patatas, zanahorias, pepinos, manzanas, remolacha, etc.
- Reibekuchen (G6): patatas, parmesano, etc.
Desmontaje de los accesorios: Espere a que el aparato se pare completamente y proceda luego
en orden inverso al montaje, diagramas 10, 4.2, 4.1 y 9.
5 - CENTRIFUGAR FRUTAS Y VERDURAS
ACCESORIOS UTILIZADOS:
5.1 - MONTAJE DE LA LICUADORA
Siga los diagramas 5.1 - 5.6.
5.2 - PUESTA EN MARCHA (Tiempo máximo de utilización: 10 minutos.)
• Trocee las frutas y/o las verduras.
• Ponga el aparato en marcha girando el botón regulador (A1) a la velocidad “5” .
• Introdúzcalas por el tubo de la tapa (H2) y guíelas con la ayuda del embutidor (H1).
•
No procese más de 5 veces seguidas 500 g de alimentos, sin dejar reposar el aparato completamente.
•
Importante : limpie el filtro (H3) y el recogedor de zumo (H4) después de cada 300 g de ingredientes.
Consejos:
- Puedes licuar: zanahorias, tomates, manzanas, uvas, frambuesas, etc. pero no es posible
extraer zumo de ciertas frutas y verduras: plátanos, aguacates, moras, algunas variedades de
manzanas, etc.
- Pele las frutas con piel gruesa, retire los huesos, retire la parte central de las piñas.
- Consuma rápidamente los zumos después de su preparación.
Desmontaje de los accesorios: Espere a que el aparato y el filtro giratorio se hayan detenido
completamente antes de retirar el accesorio del aparato. Proceda en orden inverso al montaje,
diagramas 5.6 - 5.1.
Adaptador (E), Corta-verduras montado (G), Tambores (según modelo)
(SEGÚN MODELO)
Licuadora montada (H)
11
Page 17

6 - PICAR FINAMENTE PEQUEÑAS CANTIDADES (SEGÚN MODELO)
ACCESORIOS UTILIZADOS:
6.1 - MONTAJE DE LOS ACCESORIO
Siga los diagramas 10, 6.1 y 6.2.
6.2 - PUESTA EN MARCHA
• Con la minipicadora puede triturar de manera muy fina:
- hierbas frescas: 10 g máx. / 10 s máx. / velocidad “4 o 7” (según modelo)
- frutos secos / carne de ternera (carne deshuesada y cortada): 100 g máx. / 10 s máx. / velocidad «1»
-
puré de verduras: 150 g máx. / 20 s máx. / «pulse» (impulso) o velocidad «1».
• Este molinillo no se ha diseñado para productos como el café.
Dismantling the accessory : Espere a que el aparato se pare completamente y proceda en orden
inverso al montaje, diagramas 10, 6.2 y 6.1.
Tapa de la minipicadora (N1), cuenco de la minipicadora (N2)
7 - ADAPTAR LA LONGITUD DEL CABLE (véase A7)
ES
8 - PICAR PEQUEÑAS CANTIDADES GROSSO MODO
ACCESORIOS UTILIZADOS:
Picar en pocos segundos por impulsos: higos secos, albaricoques secos, etc. Cantidad / tiempo
máximo: 100 g / 5 seg
Assembled grinder.
(SEGÚN MODELO)
LIMPIEZA
• Desconecte el aparato.
• No sumerja el bloque motor (A) ni el adaptador (E) en el agua o debajo de agua corriente.
Límpielos con un trapo seco o un poco húmedo.
• Desmonte completamente y enjuague los accesorios rápidamente después del uso.
Maneje las cuchillas con cuidado para evitar lesiones. (Diagrama 10).
Lave, enjuague y seque los accesorios: pueden lavarse en el lavavajillas, salvo todos los componentes
•
de metal en la cabeza de picadora: cuerpo (F), la amasadora (C1) y la mezcladora (C2).
¿QUÉ HACER SI EL APARATO NO FUNCIONA?
- consulte el capítulo «antes del primer uso»
¿Su aparato sigue sin funcionar? Diríjase a un centro de servicio oficial (consulte la lista del
folleto de servicio).
ACCESORIOS
Consulte la página 91 y visite el sitio web de la marca.
Precaución: este folleto contiene instrucciones para accesorios adicionales. Consérvelo en
un lugar seguro para su consulta futura. Póngase en contacto con el servicio de atención al
cliente para obtener más información sobre cómo comprar accesorios.
12
Page 18

Uyarı: PLütfen ilk kullanımdan önce "güvenlik talimatları"
kitapçığını dikkatlice okuyun.
İLK KULLANIMDAN ÖNCE
• İlk kez kullanmadan önce tüm aksesuar parçalarını ılık ve sabunlu suyla yıkayın ((E) takma ünitesi
dışında: bkz. Temizleme) durulayın ve kurutun.
TR
• Cihazınızı düz, temiz ve kuru bir yüzeye yerleştirin. Seçme düğmesinin (A1) "0" konumunda
olduğundan emin olun ve cihazınızı fişe takın.
• Cihazınızı çalıştırmak için birçok seçeneğe sahipsiniz: (bkz. şema A1) :
- Aralıklı çalıştırma (anlık çalıştırma):
Seçme düğmesini (A1) "pulse" konumuna getirin. Bazı yiyecekleri hazırlarken art arda anlık
çalıştırma daha iyi bir kontrol sağlayabilir.
- Sürekli çalıştırma:
Hazırladığınız yiyeceğe göre seçme düğmesini (A1) "1 konumundan 8/max" konumu arasında
istenilen bir pozisyona getirin. Hazırlama sırasında istediğiniz gibi değiştirebilirsiniz.
• Cihazı durdurmak için düğmeyi (A1) "0" konumuna getirin.
Önemli: Kapağın (A5) ve başlığın (A3) kilitlenmesi koşuluyla cihaz çalışmaya başlar.
çalışırken kapağın (A5) ve/veya başlığın (A3) kilidini açarsanız cihaz hemen duracaktır.
Başlığı ve/veya kapağı kilitleyin, kontrol düğmesini (A1) "0" konumuna getirin ve
istediğiniz hızı seçerek cihazı normal olarak çalıştırın.
1 - KARIŞTIRMA / YOĞURMA / ÇIRPMA / AKICI HALE GETİRME
Yiyeceğin türüne uygun paslanmaz çelik hazneyi (B1) ve kapağını (B2) kullanarak 1,8 kg hafif hamur
ve 500 gram sert hamur hazırlayabilirsiniz.
KULLANILAN AKSESUARLAR: Paslanmaz çelik hazne (B1), Kapak (B2), Yoğurucu (C1) mikser
(C2) veya çırpıcı (C3).
1.1 - AKSESUARLARIN MONTE EDİLMESİ
1.1 -1.4 arasındaki şemaları izleyin.
1.2 - KULLANIM
• Tarife göre hız seçme düğmesini (A1) istenilen konuma getirerek başlayın.
•
Cihaz hemen çalışmaya başlar. Hazırlama işlemi boyunca kapaktaki (B2) delikten yiyecek
ekleyebilirsiniz.
• Cihazı durdurmak için düğmeyi (A1) "0" konumuna getirin.
İpuçları:
YOĞURMA (Maksimum kullanım süresi: 13 dakika).
- Yoğurma aksesuarını (C1) "1" hızında kullanın. 500 gr unu yoğurabilirsiniz (örn. beyaz ekmek,
tahıllı ekmek, tart hamuru, turta hamuru, vs.).
KARIŞTIRMA (Maksimum kullanım süresi: 13 dakika).
- Mikser aparatını (C2) "1 konumundan 8/max" konumu arasında kullanın.
- En fazla 1,8 kg ağırlığında yumuşak hamur (kek, kurabiye, vs.) karıştırabilirsiniz.
- Sert hamur yoğurmak için asla mikser aparatını (C2) kullanmayın.
- ÇIRPMA / AKICI HALE GETIRME (Maksimum kullanım süresi: 10 dakika).
13
Page 19

- Çırpıcıyı (C3) "1 konumundan 8/max" konumu arasında kullanın.
- Şunları hazırlayabilirsiniz: mayonez, soslar, çırpılmış yumurta beyazı (en fazla 8 yumurta
beyazı), kremşanti, (en fazla 500 ml), vs.
- Balon çırpıcıyı (C3) asla sert hamur yoğurmak veya yumuşak hamur karıştırmak için
kullanmayın.
Aksesuarlari sökme: Cihazın tamamen durmasını bekleyin ve montaj adımlarını 1.4 - 1.1
arasındaki şemalara göre tersi sırayla gerçekleştirin.
2 - BLENDER / KARIŞTIRMA (MODELE GÖRE DEĞİŞİR)
Yiyeceğin yapısına göre 1,5 L yoğun ve 1,25 L akıcı karışım hazırlamak için blender (D) aparatını
kullanabilirsiniz.
KULLANILAN AKSESUARLAR: Blender haznesi (D ou L).
2.1 - AKSESUARLARIN MONTE EDİLMESİ
2.1 -2.3 arasındaki ve 10 numaralı şemaları izleyin.
2.2 - KULLANIM (Maksimum kullanım süresi: 3 dakika).
• Tarife göre hız seçme düğmesini (A1) istenilen konuma getirerek başlayın (hız "7 konumundan
8" veya Pulse). Karışımı daha iyi kontrol edebilmek ve daha iyi karıştırmak için "Pulse" kademesini
kullanın.
• Hazırlık sırasında ölçekli kapaktaki (D2, L5) delikten malzeme ekleyebilirsiniz.
İpuçları:
• Şunları hazırlayabilirsiniz:
- blender'dan geçirilmiş çorbalar, soslar, kompostolar, milkshake ve kokteyller.
- sıvı hamur (pancake, kızartma hamuru ve krem karameller).
• Karıştırma sırasında malzemeler haznenin kenarlarına yapışırsa cihazı durdurun. Bıçakların tam
olarak durması için bekleyin. Blender haznesini çıkarın, yiyeceği bir spatula yardımıyla bıçaklara
doğru itin, blender haznesini yerine takın ve hazırlık işlemine devam edin.
Aksesuarlari sökme: Blender haznesini çıkarmadan önce cihazın tamamen durmasını bekleyin
ve montaj adımlarını 2.3 - 2.1 arasındaki ve 10 numaralı şemalara göre tersi sırayla gerçekleştirin.
3 - KIYMA (MODELE GÖRE DEĞİŞİR)
KULLANILAN AKSESUARLAR:
3.1 - ADAPTÖRÜ TAKMA
9, 10, ve sonra 3.1 - 3.3 arasındaki şemaları izleyin.
3.2 - KULLANIM
• Seçicinin (A1) hızını "5 konumundan 7" kademesine getirerek cihazı çalıştırın.
• İticiyi (F7) kullanarak parçalara ayırdığınız eti besleme borusundan itin. Malzemeleri besleme
borusundan iterken asla parmaklarınızı veya herhangi başka bir nesne kullanmayın.
- 3 kg'a kadar et kıyabilirsiniz (kıkırdak, sinirler ve kemiği alınmış), Maksimum kullanım süresi: 10 dakika.
İpuçları:
- Kıyılacak tüm yiyecekleri hazırlayın (etin kemiklerini, kıkırdaklarını ve sinirlerini ayırın ve
yaklaşık 2 x 2 cm boyunda kesin).
- Etin tamamen çözüldüğünden emin olun.
Aksesuar tutucu (E), Monte edilmiş kıyma başlığı (F)
TR
14
Page 20

Aksesuarlari sökme: Cihazın tamamen durmasını bekleyin ve montaj adımlarını 10, 3.3 - 3.1
arasındaki ve sonra 9 numaralı şemalara göre tersi sırayla gerçekleştirin.
4 - RENDELEME/DİLİMLEME (MODELE GÖRE DEĞİŞİR)
KULLANILAN AKSESUARLAR:
(modele göre değişir).
4.1 - AKSESUARLARIN MONTE EDİLMESİ
TR
10, 9, ve sonra 4.1 - 4.2 arasındaki şemaları izleyin.
4.2 - KULLANIM
•
Hız seçim düğmesini (A1) dilimlemek için “5” ve rendelemek için “7” konumuna getirerek cihazı çalıştırın.
• Gövdedeki besleme borusuna yiyeceği koyun ve iticiyle (G2) aşağı itin.
Malzemeleri kesinlikle parmaklarınızı veya başka bir aleti kullanarak itmeyin.
• 2 kg'a kadar yiyecek hazırlayabilirsiniz, Maksimum kullanım süresi: 10 dakika.
• Silindirleri şu işlemler için kullanabilirsiniz:
- Kalın rendeleme (G4) / ince rendeleme (G5): havuç, kereviz, patates, peynir, vs.
- Kalın dilimleme (G3): patates, havuç, salatalık, elma, pancar, vs.
- Patates rendeleme (G6): patates, parmesan, vs.
Aksesuarlari sökme: Cihazın tamamen durmasını bekleyin ve montaj adımlarını 10, 4.2, 4.1 ve
9 numaralı şemalara göre tersi sırayla gerçekleştirin.
5 -
MEYVE VE SEBZE SUYU SIKMA
KULLANILAN AKSESUARLAR:
5.1 - KATI MEYVE SIKACAĞINI MONTE ETME
5.1 -1.4 arasındaki şemaları izleyin.
5.2 - UKULLANIM (Maksimum kullanım süresi: 10 dakika)
• Cut the fruits and/or vegetables into pieces.
• Run the appliance by turning the selector (A1) to speed "5".
• Parçaları kapaktaki (H2) besleme borusundan içeri atın ve iticiyi (H1) kullanarak yavaşça itin.
• 500 gr. yiyeceği 5 defadan fazla cihazınızın tamamen soğumasına izin vermeden, durmaksızın işlemeyin.
• Önemli: Filtreyi (H3) ve meyve suyu haznesini (H4) her 300g malzeme kullandıktan sonra
temizleyin.
İpuçları:
- Sıkabileceğiniz sebzeler/meyveler: havuç, domates, elma, üzüm, frambuaz vs. Sıkması
mümkün olmayan sebzeler/meyveler: muz, avokado, armut, böğürtlen, bazı elma türleri vs.
- Kalın kabuklu meyvelerin kabuğunu soyun ve çekirdeklerini çıkarın.
- Meyve/Sebze suyunu hazırladıktan hemen sonra için.
Aksesuarlari sökme: Aksesuarı cihazdan çıkarmadan önce cihazın ve döner filtrenin tamamen
durmasını bekleyin. 5.6 - 5.1 arasındaki şemalara göre montaj işleminin tersini gerçekleştirin.
Aksesuar tutucu (E), Monte edilmiş sebze dilimleyici (G), Silindirler
(MODELE GÖRE DEĞİŞİR)
Monte edilmiş katı meyve sıkacağı (H).
15
Page 21

6 - KÜÇÜK MİKTARLARDA KESME (MODELE GÖRE DEĞİŞİR)
KULLANILAN AKSESUARLAR:
6.1 - AKSESUARLARIN MONTE EDİLMESİ
10, 6.1 ve 6.2 numaralı çizimleri izleyin.
6.2 - KULLANIM
• Mini doğrayıcı ile ince doğrayabileceğiniz malzemeler:
- taze yeşillikler: 10g maks. / 10sn. maks. / hız seviyesi “7”
- kuru meyveler / dana eti (kemiksiz ve ayıklanmış) : 100g maks. / 10sn. maks. / hız seviyesi «1»
- sebze püresi: 150g maks. / 20sn. maks. / «pulse» veya hız seviyesi «1»
• Bu öğütücü, kahve veya sert baharatlar gibi sert ürünler veya sıvılar için tasarlanmamıştır.
Aksesuarlari sökme: Cihazın tamamen durmasını bekleyin ve montaj adımlarını 10, 6.2 ve
6.1 numaralı şemalara göre tersi sırayla gerçekleştirin.
Mini doğrayıcı kapağı (N1), Mini doğrama haznesi (N2)
7 - KABLO BOYUNU AYARLAMA (bkz. A7)
8 - AZ MİKTARDAKİ MALZEMEYİ UFAK DOĞR AMA (MODELE GÖRE DEĞİŞİR)
KULLANILAN AKSESUARLAR:
- Anlık çalıştırarak birkaç saniyede şunları kıyabilirsiniz: kuru incir ve kuru kayısı, vs. Miktar / maks.
süre: 100 gr. / 5 s
Monte edilmiş öğütücü.
TEMİZLEME
• Cihazı fişten çekin.
• Motor ünitesini (A) veya takma ünitesini (E) suyun içinde yıkamayın veya akan suya tutmayın.
Bunları kuru veya nemli bir bezle silin.
• Kullandıktan sonra aksesuarları hemen tümüyle sökün.
Yaralanmayı engellemek için bıçakları tutarken dikkatli olun. (şema 10).
• Aksesuarları temizleme, durulama ve kurulama: Kıyma başlığındaki metal bileşenler, gövde (F),
yoğurucu (C1) ve mikser (C2), dışındaki tüm parçalar bulaşık makinesinde yıkanabilir.
CİHAZINIZ ÇALIŞMIYORSA NE YAPMANIZ GEREKİR?
Lütfen «ilk kullanımdan önce» bölümüne başvurun.
Cihazınız hâlâ çalışmıyor mu? Yetkili ser vis ile iletişim kurun (servis kitapçığındaki listeye bakın).
TR
AKSESUARLAR
See page 91 and visit the brand website.
Caution: this booklet contains instructions for additional accessories. Please keep safe for
future reference. Please contact the Customer Service for further information on how to
purchase accessories.
16
Page 22

Uwaga : Przed pierwszym użyciem dokładnie przeczytać
instrukcję i broszurę „wskazówki dotyczące bezpieczeństwa”.
URUCHOMIENIE
• Przed pierwszym użyciem, należy umyć wszystkie części akcesoriów w wodzie z płynem do mycia
(z wyjątkiem przejściówki (E): Patrz § Czyszczenie) Opłukać i wysuszyć.
• Umieścić urządzenie na płaskiej, czystej i suchej powierzchni sprawdzić, czy pokrętło do regulacji
(A1) jest w położeniu „0” następnie podłączyć urządzenie.
• Uruchomienie można wykonać na kilka sposobów: (zob. schemat A1):
PL
- praca przerywana (pulse):
Obrócić pokrętło do regulacji (A1) w pozycję „pulse” Powtarzanie czynności kilkakrotnie
daje lepszą kontrolę podczas przygotowywania niektórych pokarmów.
- Praca ciągła:
Obrócić pokrętło do regulacji (A1) w wybraną pozycję od „1 do 8/max” zależnie od
przygotowywanego produktu. Pozycję można zmieniać w trakcie pracy.
• Aby wyłączyć urządzenie, należy ustawić pokrętło (A1) w pozycji „0”.
Ważna uwaga: Urządzenie można uruchomić tylko gdy pokrywa (A5) i głowica (A3) są
zablokowane. Po odblokowaniu pokrywy (A5) i/lub głowicy (A3) w czasie działania,
urządzenie wyłącza się. Zablokować ponownie pokrywę i/lub głowicę, ustawić w pozycji „0”
pokrętło do regulacji (A1), następnie postępować w normalny sposób w celu uruchomienia
urządzenia ustawiając wybraną prędkość.
1 - MIESZANIE / WYRABIANIE CIASTA / UBIJANIE / EMULGOWANIE /
ROZTRZEPYWANIE
Zależnie od rodzaju produktów, pojemnik ze stali nierdzewnej (B1) i pokrywa (B2) umożliwiają
przygotowanie do 1,8 kg lekkiego ciasta.
STOSOWANE AKCESORIA: Pojemnik ze stali nierdzewnej (B1) Pokrywa (B2) Hak do wyrabiania
ciasta (C1) lub mieszadło (C2) lub trzepaczka (C3).
1.1 - MONTAŻ AKCESORIÓW
Postępować zgodnie ze schematami od 1.1 do 1.4.
1.2 - URUCHOMIENIE
• Uruchomić obracając pokrętło do regulacji (A1) w wybraną pozycję w zależności od przepisu.
• Urządzenie uruchamia się. Przez otwór w pokrywie (B2) można dodawać składniki w trakcie
przyrządzania.
• Aby wyłączyć urządzenie, należy obrócić pokrętło (A1) w pozycję „0”.
Wskazówki:
WYRABIANIE CIASTA (Maksymalny czas pracy: 13 minut).
- Użyć haka do wyrabiania ciasta (C1) z prędkością od „1”.. Można wyrabiać do 500 g mąki (np.:
chleb biały, chleb pełnoziarnisty, ciasto kruche, ciasto piaskowe, …).
MIESZANIE (Maksymalny czas pracy: 13 minut).
- Użyć mieszadła (C2) z prędkością od „1 do 8/max”.
- Można wymieszać do 1,8 kg lekkiego ciasta (proszkowe, biszkoptowe…).
- Nigdy nie używać mieszadła (C2) do wyrabiania ciast ciężkich.
17
Page 23

- UBIJANIE / EMULGOWANIE/ ROZTRZEPYWANIE (Maksymalny czas pracy: 10 minut).
- Użyć trzepaczki (C3) z prędkością od „1 do 8/max”.
- Można przyrządzać: majonez, sos czosnkowy, sosy, pianę z białka (do 8 białek jajka), bitą
śmietanę (do 500 ml)…
-
Trzepaczki (C3) nigdy nie należy używać do wyrabiania ciężkich ciast albo mieszania ciast lekkich.
Demontaż akcesoriów: Zaczekać, aż urządzenie całkowicie się zatrzyma, i przystąpić do
wykonywania czynności w kolejności odwrotnej do montażu, schematy od 1.4 do 1.1.
2 - HOMOGENIZACJA/MIESZANIE/MIKSOWANIE
Zależnie od rodzaju potrawy w pojemniku (D) można przygotować do 1,5 litra gęstej mieszanki
i 1,25 l płynnej mieszanki.
(ZALEŻNIE OD MODELU)
STOSOWANE AKCESORIA: Pojemnik (D / L).
2.1 - MONTAŻ AKCESORIÓW
Postępować zgodnie ze schematami od 2.1 do 2.3 i 10.
2.2 - URUCHOMIENIE (Maksymalny czas pracy: 3 minuty).
• Uruchomić obracając pokrętło do regulacji prędkości (A1) w wybraną pozycję w zależności
od przepisu (z prędkością „7 do 8” lub Pulse). W celu zapewnienia idealnej kontroli miksowania i
dobrego rozmieszania potrawy należy używać pozycji „pulse”.
• Przez otwór na korek- dozownik (D2, L5) produkty można dodawać w trakcie przyrządzania.
Wskazówki:
• Można przyrządzać:
- zmiksowane zupy, kremy, musy, milk-shake i, koktajle.
- ciasta płynne (naleśniki, pączki, gofry, biszkopty...).
• Jeżeli składniki przykleją się do ścianek pojemnika podczas miksowania, należy wyłączyć
urządzenie, poczekać do całkowitego wyłączenia urządzenia. Zdjąć pojemnik, stosując łopatkę,
zsunąć składniki na noże i założyć pojemnik w celu kontynuowania miksowania.
Demontaż akcesoriów: Przed wyjęciem pojemnika blendera zaczekać, aż urządzenie
całkowicie się zatrzyma, i przystąpić do wykonywania czynności w kolejności odwrotnej do
montażu, schematy od 2.3 do 2.1 i 10.
3 - MIELENIE
(ZALEŻNIE OD MODELU)
STOSOWANE AKCESORIA: Przejściówka mocująca (E), Zmontowana końcówka do mielenia (F)
3.1 - MONTAŻ PRZEJŚCIÓWKI DO MIELENIA
Postępować zgodnie ze schematami 9, 10, a następnie od 3.1 do 3.3.
3.2 - URUCHOMIENIE
• Uruchomić ustawiając pokrętło (A1) w pozycji ”5 do 7”.
• Mięso należy wkładać po kawałku do komina i dociskać popychaczem (F7). Nigdy nie popychać
składników palcami lub innymi narzędziami w kominie.
- Możesz posiekać do 3 kg mięsa, maksymalny czas pracy: 10 minut.
Wskazówki:
- Przygotować wszystkie produkty przeznaczone do zmielenia (w przypadku mięsa usunąć
kości, chrząstki i ścięgna i pokroić mięso na kawałki o wielkości około 2x2 cm).
- Przed rozpoczęciem mielenia należy sprawdzić, czy mięso jest rozmrożone.
PL
18
Page 24

Demontaż akcesoriów: Zaczekać, aż urządzenie całkowicie się zatrzyma, i przystąpić do
wykonywania czynności w kolejności odwrotnej do montażu, schematy 10, od 3.3 do 3.1, a
następnie 9.
4 - TARCIE / KROJENIE
STOSOWANE AKCESORIA:
(zależnie od modelu)
(ZALEŻNIE OD MODELU)
Przejściówka mocująca (E), Zmontowana szatkownica (G), Bębny
4.1 - MONTAŻ AKCESORIÓW
Postępować zgodnie ze schematami 10, 9, a następnie od 4.1 do 4.2.
PL
4.2 - URUCHOMIENIE
• Uruchomić ustawiając pokrętło (A1) w pozycji „5” do krojenia i na prędkość „4 lub 7” (zależnie
od modelu) do tarcia.
• Produkty należy wkładać w kominek obudowy i dociskać lekko za pomocą popychacza (G2).
Nigdy nie popychać składników palcami lub innymi narzędziami.
• Możesz przygotować do 2 kg żywności, maksymalny czas pracy: 10 minut.
• Za pomocą bębnów można wykonać:
- Tarcie grube (G4) / tarcie drobne (G5): marchew, seler, ziemniaki, ser,…
- Krojenie grube (G3): ziemniaki, marchew, ogórki, jabłka, buraki,...
- Ucieranie (G6): ziemniaki, parmezan…
Demontaż akcesoriów: Zaczekać, aż urządzenie całkowicie się zatrzyma, i przystąpić do
wykonywania czynności w kolejności odwrotnej do montażu, schematy 10, 4.2, 4.1 i 9.
5 - WYCISKANIE SOKU Z OWOCÓW I WARZYW
(ZALEŻNIE OD MODELU)
STOSOWANE AKCESORIA: Zmontowana sokowirówka (H)
5.1 - MONTAŻ SOKOWIRÓWKI
Postępować zgodnie ze schematami od 5.1 do 5.6.
5.2 - URUCHOMIENIE (Maksymalny czas pracy: 10 minut).
• Pokroić owoce i/lub warzywa na kawałki
• Uruchomić ustawiając pokrętło (A1) w pozycji „5”.
• Włożyć składniki do podajnika w pokrywie (H2), popchnąć je delikatnie za pomocą popychacza (H1).
•
Nie przetwarzać więcej niż 5 porcji po 500 g produktów bez przerwy umożliwiającej całkowite
schłodzenie urządzenia.
• Ważne: po wyciśnięciu każdych 300 g składników wyczyścić filtr (H3) i zbiornik na sok (H4).
Wskazówki:
- Sok można wyciskać z: marchwi, pomidorów, jabłek, winogron, malin itp., lecz nie nadają się do
tego niektóre warzywa i owoce: banany, awokado, gruszki, jeżyny, niektóre odmiany jabłek itp.
- Należy obrać owoce z grubą skórką, usunąć pestki, usunąć środkową część ananasa.
- Wypić sok bezpośrednio po przygotowaniu.
Demontaż akcesoriów: Przed wyjęciem akcesorium z urządzenia poczekać, aż urządzenie
i obrotowy filtr całkowicie się zatrzymają. Postępować w kolejności odwrotnej do montażu,
schematy od 5.6 do 5.1.
19
Page 25

6 - DROBNE SIEKANIE MAŁYCH ILOŚCI
(ZALEŻNIE OD MODELU)
STOSOWANE AKCESORIA: Pokrywa mini-rozdrabniacza (N1), miska mini-rozdrabniacza (N2)
6.1 - MONTAŻ AKCESORIÓW
Postępować zgodnie ze schematami 10, 6.1 i 6.2.
6.2 - URUCHOMIENIE
• W mini-rozdrabniaczu można drobno posiekać:
- świeże zioła: 10 g maks. / 10 sek. maks. / prędkość „7”
- suszone owoce / wołowinę (bez kości i oczyszczoną): 100 g maks. / 10 sek. maks. / prędkość „1”
- przecier z warzyw: 150 g maks. / 20 sek. maks. / funkcja „pulsowanie” lub prędkość „1”
• Rozdrabniacz nie jest przeznaczony do twardych produktów, jak ziarna kawy, twarde przyprawy lub płyny.
Demontaż akcesoriów: Zaczekać, aż urządzenie całkowicie się zatrzyma, i przystąpić do
wykonywania czynności w kolejności odwrotnej do montażu, schematy 10, 6.2 i 6.1.
PL
7 - DOSTOSOWANIE DŁUGOŚCI PRZEWODU
(zob. A7)
8 - GRUBE SIEKANIE MAŁYCH ILOŚCI (ZALEŻNIE OD MODELU)
STOSOWANE AKCESORIA: Zmontowany rozdrabniacz.
- W ciągu kilku sekund posiekać w trybie pulse: suszone figi, suszone morele… Ilość / maks. czas: 100 g / 5 s
CZYSZCZENIE
• Odłączyć urządzenie.
• Nie zanurzać silnika (A), ani przejściówki (E) w wodzie i nie wkładać pod bieżącą wodę. Wytrzeć
suchą lub lekko wilgotną ścierką.
• Rozmontować całkowicie i szybko opłukać akcesoria po użyciu.
Posługiwać się nożami z zachowaniem ostrożności ze względu na ryzyko zranienia. (schemat 10).
• Umyć, opłukać i osuszyć akcesoria: można je bezpiecznie myć w zmywarce, z wyjątkiem
wszystkich metalowych komponentów w końcówce maszynki do mielenia: korpus (F), końcówka
do ugniatania (C1) i mikser (C2).
CO ROBIĆ, JEŻELI PAŃSTWA URZĄDZENIE NIE DZIAŁA?
Zob. rozdział „przed pierwszym użyciem”.
Twoje urządzenie wciąż nie działa? Skontaktuj się z autoryzowanym punktem serwisowym (zob.
listę w broszurze dotyczącej punktów serwisowych).
AKCESORIA
Zob. s. 91 i odwiedź stronę internetową marki.
Uwaga: niniejsza broszura zawiera instrukcje dotyczące dodatkowych akcesoriów. Należy
zachować ją na przyszłość. W celu uzyskania dalszych informacji na temat zakupu akcesoriów
proszę skontaktować się z Działem Obsługi Klienta.
20
Page 26

Hoiatus : Enne seadme esimest kasutamist lugege palun läbi
brošüür „ohutusjuhend”.
SEADME KASUTUSELEVÕTMINE
• Enne esmakordset kasutamist peske kõik tarvikud (v.a adapter (E) seebiveega: vt teemat
Puhastamine). Loputage ja kuivatage need.
• Pange seade tasasele, puhtale ja kuivale pinnale, kontrollige, et käivitusnupp (A1) oleks asendis
0 ja seejärel lülitage seade vooluvõrku.
• Masina käivitamiseks on mitu võimalust (vaadake diagrammi A1):
- Katkendlik töö (pulseerimine):
pöörake valikunupp (A1) asendisse "pulse", et käivitada masin pulseerivalt ja kontrollides nii
ET
segusid paremini.
- Pidev töörežiim:
pöörake valikunupp (A1) asendisse "1 kuni 8/max" vastavalt segatavale ainele. Võite seda
segu valmistamise ajal muuta.
• Masina peatamiseks seadke nupp (A1) asendisse 0.
Oluline: seade ei käivitu, kui kate (A5) ja otsik (A3) pole kinnitatud. Kui avate katte (A5) ja/või
otsiku (A3) seadme töö ajal, peatub seade kohe. Kinnitage kate ja/või otsik, seadke juhtnupp
(A1) asendisse 0 ja seejärel käivitage seade uuesti tavapäraselt, valides soovitud kiiruse.
1 - SEGAMINE / TAIGNA VALMISTAMINE / MIKSERDAMINE / EMULGEERIMINE
/ VAHUSTAMINE
Sõltuvalt koostisainetest saab kaanega (B2) kaetud roostevabast terasest anumas (B1) valmistada
kuni 1,8 kg kerget taignat
KASUTATUD TARVIKUD : Roostevabast terasest anum (B1), Kaas (B2), Segur (C1) või taignasegur
(C2) või mitmeharuline vispel (C3).
1.1 - TARVIKUTE ÜHENDAMINE
Järgige diagramme 1.1 kuni 1.4.
1.2 - TÖÖ ALUSTAMINE
• Käivitage seade, pöörates nupu (A1) soovitud asendisse vastavalt valmistatavale segule.
• Segu valmistamise ajal võite aineid lisada kaane ava (B2) kaudu.
• Masina peatamiseks seadke nupp (A1) asendisse 0.
Nõuanded:
SEGAMINE (Maksimaalne kasutusaeg: 13 minutit).
- Kasutage segurit (C1) kiirusel 1. Võite segada kuni 500 g jahu (nt saiataigen, teraleivataigen,
plaadikoogitaigen, liivataigen jne).
TAIGNA SEGAMINE (Maksimaalne kasutusaeg: 13 minutit).
- Kasutage taignasegurit (C2) kiirusel "1 kuni 8/max".
- Võite segada kuni 1,8 kg kerget taignat (biskviittaigen, keeksitaigen jne).
- Ärge kasutage taignasegurit (C2) tihkemate taignate segamiseks.
21
Page 27

- KLOPPIMINE / EMULGEERIMINE / VAHUSTAMINE (Maksimaalne kasutusaeg: 10 minutit).
- Kasutage mitmeharulist visplit (C3) kiirusel "1 kuni 8/max".
- Võite valmistada majoneesi, aiolit, kastmeid, vahustatud munavalgeid (kuni 8 munavalget),
vahukoort (kuni 500 ml).
- Ärge kasutage mitmeharulist visplit (C3) tihkete ega kergete taignate valmistamiseks.
Tarvikute eemaldamine: Oodake, kuni seade on täielikult peatunud ja järgige siis kokkupaneku
juhendit tagant poolt ette poole, diagrammid 1.4 kuni 1.1.
2 - ÜHTLUSTAMINE/SEGAMINE/MIKSERDAMINE (VASTAVALT MUDELILE)
Sõltuvalt ainetest saab mikserianumas (D) valmistada kuni 1,5 l tahket segu ja 1,25 l vedelat segu.
KASUTATUD TARVIKUD : Mikserianuma (D / L).
2.1 - TARVIKUTE ÜHENDAMINE
Järgige diagramme 2.1 kuni 2.3 ja 10.
2.2 - TÖÖ ALUSTAMINE (Maksimaalne kasutusaeg: 3 minutit).
• Käivitage seade, pöörates nupu (A1) soovitud asendisse vastavalt valmistatavale segule (kiirusest
"7 kuni 8"
• Segu valmistamise ajal võite aineid lisada lisamisava (D2, L5) kaudu.
Nõuanded:
• Võite valmistada:
• IKui ained mikserdamise ajal anuma seintele kinnituvad, peatage seade, ja oodake kuni terad
Tarvikute eemaldamine: Enne segamisnõu eemaldamist oodake, kuni seade on täielikult
peatunud ja järgige siis kokkupaneku juhendit tagant poolt ette poole, diagrammid 2.3 kuni 2.1 ja 10.
või Pulse). Segamise paremaks kontrollimiseks ja ühtlustamiseks valige funktsioon "Pulse".
- püreesuppe, kreeme, püreesid, jäätisekokteile, kokteile.
- vedelaid taignaid (pannkoogid, täidisega pannkoogid, vormikoogid).
on täielikult seiskunud. Eemaldage mikserianum, lükake toit spaatliga alla terade peale ja pange
mikserianum valmistamise jätkamiseks tagasi seadmele.
3 - HAKKIMINE (VASTAVALT MUDELILE)
KASUTATUD TARVIKUD : Tarvikuhoidja (E), Ühendatud hakkimisotsik (F)
3.1 - FITTING THE MINCER ATTACHMENT
Järgige diagramme 9, 10 ja siis 3.1 kuni 3.3.
3.2 - TÖÖ ALUSTAMINE
• Käivitage seade, seades nupu (A1) asendisse "5 kuni 7".
• Lisage liha tükkhaaval kanalisse lükkamistarviku (F7) abil. Ärge lükake toiduaineid kanalisse
sõrmede või söögiriistadega.
- Võite hakkida kuni 3 kg liha, maksimaalne kasutusaeg: 10 minutit.
Nõuanded:
- Valmistage ette kõik hakitavad ained (liha puhul eemaldage luud ja kõõlused ning lõigake liha
umbes 2x2 cm tükkideks).
- Veenduge, et liha poleks külmunud.
ET
22
Page 28

Tarvikute eemaldamine: Oodake, kuni seade on täielikult peatunud ja järgige siis kokkupaneku
juhendit tagant poolt ette poole, diagrammid 10, 3.3 kuni 3.1 ja siis 9.
4 - RIIVIMINE / VIILUTAMINE (VASTAVALT MUDELILE)
KASUTATUD TARVIKUD : Tarvikuhoidja (E), Ühendatud köögiviljalõikur (G), Salved (sõltuvalt mudelist)
4.1 - TARVIKUTE KINNITAMINE
Järgige diagramme 10, 9 ja siis 4.1 kuni 4.2.
4.2 - TÖÖ ALUSTAMINE
• Käivitage seade, seades nupu (A1) asendisse "5" viilutamise puhul või "4 või 7" (vastavalt
mudelile) riivimise puhul.
• Lisage toiduained salve kanalisse ja juhtige neid lükkamisseadmega (G2). Ärge lükake
ET
toiduaineid sõrmede või söögiriistadega.
• Võite valmistada kuni 2 kg toitu, maksimaalne kasutusaeg: 10 minutit.
• Pöördsalvega võite teha järgmist:
- Jämeriiv (G4) / peenriiv (G5): porgandid, juurseller, kartulid, juust jne.
- Viilutamisseade (G3): kartulid, porgandid, kurgid, õunad, peedid jne.
- Püreeriiv (G6): kartulid, parmesan jne.
Tarvikute eemaldamine: Oodake, kuni seade on täielikult peatunud ja järgige siis kokkupaneku
juhendit tagant poolt ette poole, diagrammid 10, 4.2, 4.1 ja 9.
5 - PUU- JA JUURVILJADE TSENTRIFUUG (VASTAVALT MUDELILE)
KASUTATUD TARVIKUD :
5.1 - TSENTRIFUUGI KOKKUPANEMINE
Järgige diagramme 5.1 kuni 5.6.
5.2 - TÖÖ ALUSTAMINE (Maksimaalne kasutusaeg: 10 minutit).
• Lõigake puu- või köögiviljad tükkideks.
• Käivitage seade, seades nupu (A1) asendisse "5".
• Sisestage koostisosad kaanes oleva söötetoru (H2) kaudu ja lükake neid kergelt vajutiga (H1).
•
Ärge töödelge järjest rohkem kui 5 korda 500 g toiduaineid, laskmata seadmel puhata.
• Tähtis: puhastage filter (H3) ja mahlanõu (H4) iga kord, kui olete töödelnud 300 g koostisosi.
Nõuanded:
- Te võite teha mahla porganditest, tomatitest, õuntest, viinamarjadest, vaarikatest jne., aga
teatud puuviljadest nagu banaanidest, avokaadodest, pamplitest, mõnedest õunasortidest jms.
ei saa mahla väljutada...
- Koorige puuviljad, eemaldage seemned ja südamik.
- Jooge mahl kohe pärast valmistamist ära.
Tarvikute eemaldamine: Oodake, kuni seadme keerlev filter on täielikult peatunud enne tarviku
eemaldamist seadme küljest. Järgige kokkupaneku juhendit tagant poolt ette poole, diagrammid
5.6 kuni 5.1.
Ühendatud tsentrifuugimisseade (H)
23
Page 29

6 - VÄIKESTE KOGUSTE VÄGA PEEN HAKKIMINE (VASTAVALT MUDELILE)
KASUTATUD TARVIKUD :
6.1 - TARVIKUTE ÜHENDAMINE
Järgige diagramme 10, 6.1 ja 6.2.
6.2 - TÖÖ ALUSTAMINE
• Minihakkijaga saate peeneks hakkida:
- värskeid maitserohelisi: maksimum 10 g / maksimum 10 sek / kiirus "7"
- kuivatatud puuvilju / loomaliha (kondita ja tükeldatud): maksimum 100g / maksimum 10 sek / kiirus „1”
- juurviljapüree koostisosi: maksimum 150g / maksimum 20 sek / „impulssrežiim” või kiirus „1”
• See peenestaja ei ole mõeldud kõvade asjade nagu kohviubade ja kõvade vürtside ega ka
vedelike töötlemiseks.
Tarvikute eemaldamine: Oodake, kuni seade on täielikult peatunud ja järgige siis
kokkupaneku juhendit tagant poolt ette poole, diagrammid 10, 6.2 ja 6,1.
Minihakkija kaas (N1), minihakkija kauss (N2)
7 - JUHTME PIKKUSE SOBIVAKS SEADMINE (vaadake A7)
8 - VÄIKESTE KOGUSTE TÜKELDAMINE JÄMEDALT (VASTAVALT MUDELILE)
KASUTATUD TARVIKUD : Kokkupandud hakkija.
- Hakkida mõne sekundi kestel pulseerivalt kuivatatud viigimarju, kuivatatud aprikoose jne
Maksimaalne kogus/aeg: 100g / 5s
PUHASTAMINE
• Ühendage seade vooluvõrgust lahti.
• Ärge tehke mootoriplokki (A) ega adapterit (E) märjaks ega pange neid voolava vee alla. Puhastage
neid kuiva või kergelt niiske lapiga.
• Võtke seade osadeks ja loputage tarvikud vahetult peale kasutamist.
Käsitsege terasid ettevaatlikult, kuna need võivad tekitada vigastusi (diagramm 10).
• Peske, loputage ja kuivatage tarvikud: neid võib panna nõudepesumasinasse, välja arvatud
peenestaja pea metallosad: seadme keha (F), taignasõtkuja (C1) ja mikser (C2).
MIDA TEHA TÕRGETE ESINEMISEL SEADME TÖÖS?
palun lugege peatükki „enne esmast kasutamist”.
Teie seade ikka ei tööta? Võtke ühendust volitatud teenindusfirmaga (nimekiri teenindusbrošüüris).
ET
TARVIKUD
Vaadake leheküljelt 91 ja külastage firma kodulehekülge.
Ettevaatust: see brošüür sisaldab instruktsioone ka lisatarvikute kohta. Palun hoidke see
tuleviku tarbeks alles. Palun võtke ühendust klienditeenindusega, et saada teada, kust osta
tarvikuid.
24
Page 30

Įspėjimas : Prieš pradedant naudoti prašome atsargiai
perskaityti „saugos gairės“ knygelę ir instrukcijas.
PARUOŠIMAS NAUDOTI
• Prieš naudodami pirmą kartą, išplaukite visus priedus muilinu vandeniu (išskyrus adapterį (E):
žr. skyrių „Valymas“). Nuskalaukite ir išdžiovinkite.
• Pastatykite aparatą ant lygaus, švaraus ir sauso paviršiaus, įsitikinkite, kad reguliatoriaus
mygtukas (A1) yra padėtyje „0“, tada įjunkite aparatą.
• Įjungti galite keliais būdais: (žr. A1 schemą):
- Nereguliari eiga (impulsas):
pasukite reguliatoriaus mygtuką (A1) į padėtį „pulse“ (impulsas) keliais impulsais iš eilės, kad
ruošiami patiekalai būtų geriau kontroliuojami.
- Nuolatinė eiga:
LT
pasukite reguliatoriaus mygtuką (A1) į pageidaujamą padėtį nuo „1 iki 8/maks“ atsižvelgiant
į ruošiamus patiekalus. Padėtį galite keisti ruošimo metu.
• Norėdami išjungti aparatą, vėl nustatykite mygtuką (A1) į padėtį „0“.
Svarbu: aparatą įjungti galima tik jei dangtelis (A5) ir galvutė (A3) yra užfiksuoti. Jei
atfiksuosite stoglangį (A5) ir (arba) galvutę (A3) veikimo metu, aparatas iš karto išsijungs.
Vėl užfiksuokite dangtelį ir (arba) galvutę, nustatykite valdymo mygtuką (A1) į padėtį „0“,
paskui įjunkite aparatą įprastu būdu, pasirinkdami pageidaujamą greitį.
1 - MAIŠYMAS / MINKYMAS / PLAKIMAS / EMULSIJOS RUOŠIMAS / PLAKIMAS
Atsižvelgiant į maisto produktų pobūdį, naudodami nerūdijančiojo plieno indą (B1) ir jo dangtį
(B2) galite paruošti iki 1,8 kg tešlos.
NAUDOJAMI PRIEDAI: Nerūdijančiojo plieno indas (B1), Dangtis (B2), Minkytuvas (C1),
maišytuvas (C2) arba kelių vijų plaktuvas (C3).
1.1 - PRIEDŲ MONTAVIMAS
Laikykitės 1.1–1.4 schemų.
1.2 - ĮJUNGIMAS
• Įjunkite pasukdami reguliatoriaus mygtuką (A1) ties pageidaujama padėtimi pagal receptą.
• Ruošimo metu galite dėti produktus pro dangtyje (B2) esančią angą.
• Norėdami išjungti aparatą, vėl nustatykite mygtuką (A1) į padėtį „0“.
Patarimai:
MINKYMAS (Didžiausias naudojimo laikas: 13 minučių).
- Naudokite minkymo priedą (C1) „1“ greičiu. Galite minkyti iki 500 g miltų (pvz., balta duona,
duona su grūdais, sluoksniuota tešla, trupininė tešla ir pan).
MAIŠYMAS (Didžiausias naudojimo laikas: 13 minučių).
- Naudokite maišytuvą (C2) greičiu nuo „1 iki 8/maks“.
- Galite maišyti iki 1,8 kg lengvos tešlos (biskvitams, sausainiams ir pan).
- Niekada nenaudokite maišytuvo (C2) sunkiai tešlai minkyti.
-
SUPLAKIMAS / EMULSIJOS RUOŠIMAS / PLAKIMAS
(Didžiausias naudojimo laikas: 10 minučių).
25
Page 31

- Naudokite kelių vijų plaktuvą (C3) greičiu nuo „1 iki 8/maks“.
- Galite ruošti: majonezą, česnakų padažą, padažus, plakti kiaušinių baltymus (iki 8 baltymų),
grietinėlę (iki 500 ml) ir pan.
-
Niekada nenaudokite kelių vijų plaktuvo (C3) sunkiai tešlai minkyti arba lengvai tešlai maišyti.
Priedų išmontavimas: Palaukite, kol prietaisas visiškai sustos, tada atvirkštine surinkimo tvarka
pagal 1.4–1.1 schemas.
2 - SUMAIŠYMAS / MAIŠYMAS / MAIŠYTUVAS (PAGAL MODELĮ)
Atsižvelgiant į produktų pobūdį, maišytuvo indu (D) galima paruošti iki 1,5 l tirštų mišinių ir 1,25
skystų mišinių.
NAUDOJAMI PRIEDAI: Maišytuvo indas (D / L).
2.1 - PRIEDŲ MONTAVIMAS
Laikykitės 2.1–2.3 ir 10 schemų.
2.2 - ĮJUNGIMAS (Didžiausias naudojimo laikas: 3 minučių).
• Įjunkite pasukdami reguliatoriaus mygtuką (A1) ties pageidaujama padėtimi pagal receptą
(nuo greičiu „7 iki 8“ ar “Pulsas“). Norėdami geriau kontroliuoti mišinį ir sumaišyti jį tolygiau,
naudokite padėtį „Impulsas“.
• Ruošimo metu galite dėti produktus pro dalytuvo kamštyje (D2, L5) esančią angą.
Patarimai:
• Galite ruošti:
- Kruopščiai sumaišytas daržovių sriubas, trintas sriubas, kompotus, pieno kokteilius, kokteilius.
- Lengvos tešlos produktus (blynus, plikytos tešlos pyragaičius, vaisių pyragą ir pan).
• Jei maišymo metu sudedamosios dalys lieka prilipusios prie indo dugno, išjunkite aparatą,
nuimkite indą, palaukite, kol įrenginys visiškai išsijungs, su mentele nustumkite sudedamąsias
dalis ant peilių, paskui vėl uždėkite maišytuvo indą ir tęskite ruošti produktus.
Priedų išmontavimas: Prieš išimdami trintuvo indą palaukite, kol prietaisas visiškai sustos,
tada atvirkštine surinkimo tvarka pagal 2.3–2.1 ir 10 schemas.
3 - SMULKINIMAS (PAGAL MODELĮ)
NAUDOJAMI PRIEDAI: Priedo laikiklis (E), Uždėta smulkintuvo galvutė (F)
3.1 - SMULKINTUVO ADAPTERIO UŽDĖJIMAS
Laikykitės 9, 10, tada 3.1–3.3 schemų.
3.2 - ĮJUNGIMAS
• Įjunkite pasukdami reguliatorių (A1) ties „5 iki 7“ greičiu.
• Įdėkite mėsą į kaminą po gabalėlį, stumdami stūmikliu (F7). Niekada nestumkite sudedamosios
dalies kamine pirštais arba stalo įrankiais.
- Jūs galite pjaustyti iki 3 kg mėsos, didžiausias naudojimo laikas: 10 minučių.
Patarimai:
- Paruoškite visą smulkinamų produktų kiek į (jei smulkinate mėsą, pašalinkite kaulus, kremzles
ir nervus, supjaustykite ją maždaug 2 x 2 cm gabalėliais).
- Patikrinkite, ar mėsa gerai atšildyta.
LT
26
Page 32

• Priedų išmontavimas: Palaukite, kol prietaisas visiškai sustos, tada atvirkštine surinkimo
tvarka pagal 10 ir 3.3–3.1, tada 9 schemas.
4 - TARKAVIMAS / PJAUSTYMAS SKILTELĖMIS (PAGAL MODELĮ)
NAUDOJAMI PRIEDAI:
4.1 - PRIEDŲ MONTAVIMAS
Laikykitės 10, 9, tada 4.1–4.2 schemų.
4.2 - ĮJUNGIMAS
• Įjunkite pasukdami reguliatorių (A1) ties „5“ greičiu, jei norite pjaustyti riekėmis, ir ties „4 ar 7“
(pagal modelį) greičiu, jei norite tarkuoti.
• Sudėkite produktus į dėtuvės kaminą ir stumkite juos stūmikliu (G2). Niekada nestumkite
sudedamosios dalies pirštais arba stalo įrankiais.
• Jūs galite paruošti iki 2 kg maisto, didžiausias naudojimo laikas: 10 minučių
• Naudojant būgnus galimas:
LT
- Stambus tarkavimas (G4) / smulkus tarkavimas (G5): morkos, salierai, bulvės, sūris ir pan.
- Pjaustymas storomis riekėmis (G3): bulvės, morkos, agurkai, obuoliai, burokėliai ir pan.
- Tarkuoti blynai (G6): bulvės, parmezano sūris ir pan.
Priedų išmontavimas: Palaukite, kol prietaisas visiškai sustos, tada atvirkštine surinkimo tvarka
pagal 10 ir 4.2, 4.1, tada 9 schemas.
Priedo laikiklis (E), Surinkta daržovių pjaustyklė(G), Būgnai (pagal modelį)
5 - VAISIŲ IR DARŽOVIŲ CENTRIFUGAVIMAS
(PAGAL MODELĮ)
NAUDOJAMI PRIEDAI: Surinkta centrifuga (H)
5.1 - CENTRIFUGOS SURINKIMAS
Laikykitės 5.1–5.6 schemų.
5.2 - ĮJUNGIMAS (Didžiausias naudojimo laikas: 10 minučių).
• Supjaustykite vaisius ir (arba) daržoves gabalėliais.
• Įjunkite pasukdami reguliatorių (A1) ties „5“ greičiu.
• Per dangtelį (H2) įdėkite ingredientus į maisto vamzdelį ir naudodami stūmiklį (H1) lėtai juos stumkite.
• Neapdorokite 500 g produktų daugiau kaip 5 kartus iš eilės, palaukite, kol aparatas iki galo atvės.
• Svarbu. Kas 300 g ingredientų valykite filtrą (H3) ir sulčių rinktuvę (H4).
Patarimai:
Sultis galite spausti iš: morkų, pomidorų, obuolių, vynuogių, aviečių, ir t. t., tačiau iš tam tikrų
vaisių ir daržovių sulčių spausti negalima, pavyzdžiui: bananų, avokadų, kriaušių, gervuogių,
kai kurių rūšių obuolių, ir t. t...
- Nulupkite storą vaisių odą, išimkite kauliukus, išpjaukite centrinę ananaso dalį.
- Sultis gerkite iš karto jas išspaudę.
Priedų išmontavimas: Prieš išimdami prietaiso priedą palaukite, kol prietaisas ir sukamasis
filtras visiškai sustos. Atlikite veiksmus atvirkštine surinkimo tvarka pagal 5.6–5.1 schemas.
27
Page 33

6 - LABAI SMULKUS NEDIDELIŲ KIEKIŲ TARKAVIMAS (PAGAL MODELĮ)
NAUDOJAMI PRIEDAI: Mini smulkintuvo dangtis (N1), mini smulkintuvo dubuo (N2)
6.1 - PRIEDŲ MONTAVIMAS
Laikykitės 10, 6.1 ir 6.2 schemų.
6.2 - ĮJUNGIMAS
• You can finely chop with the mini chopper :
- fresh herbs : 10g max. / 10secs max. / speed „7“
- dried fruits / Beef (boneless and trimmed meat) : 100g max. / 10secs max. / speed «1»
- vegetable puree : 150g max. / 20secs max. / «pulse» or speed «1»
• This grinder is not designed for hard products like coffee beans, hard spices nor liquids.
Priedų išmontavimas: Palaukite, kol prietaisas visiškai sustos, tada atvirkštine surinkimo tvarka
pagal 10, 6.2, ir 6,1 schemas.
7 - LAIDO ILGIO NUSTATYMAS (žr. A7)
8 - KAPOJIMAS MAŽAIS KIEKIAIS (PAGAL MODELĮ)
NAUDOJAMI PRIEDAI: Surinktas smulkintuvas.
- Per kelias sekundas susmulkinti impulsais: džiovintas figas, džiovintus abrikosus ir pan.
Kiekis / didž. laikas: 100 g / 5 sek.
VALYMAS
• Išjunkite aparatą.
• Nenardinkite variklio bloko (A) ir adapterio (E) į vandenį arba po tekančiu vandeniu. Šluostykite
juos sausu arba šiek tiek sudrėkintu skudurėliu.
• Tik baigę naudotis prietaisu, išimkite ir išplaukite visus priedus.
Visais peiliais naudokitės atsargiai, galite susižeisti. (10 schema).
• Nuplauk ite, nuskalaukite ir išdžiovinkite priedus: juos galima saugiai plauti indaplovėje, išskyrus
visas mėsmalės galvutės metalines dalis: korpusą (F), minkymo įtaisą (C1) ir maišytuvą (C2).
KĄ DARYTI, JEI APARATAS NEVEIKIA?
žr. skyrių „Prieš naudojant pirmą kartą“.
Jūsų prietaisas vis tiek neveikia? Susisiekite su įgaliotu techninio aptarnavimo centru (žr.
priežiūros knygelėje pateiktą sąrašą).
LT
PRIEDAI
Žr. 91 psl. ir apsilankykite mūsų svetainėje.
Dėmesio. Šioje knygelėje pateikiami nurodymai dėl papildomų priedų. Saugokite knygelę,
kad galėtumėte vėl ją perskaityti ateityje. Prašome susisiekti su klientų aptarnavimo
tarnyba, kuri suteiks daugiau informacijos apie tai, kaip įsigyti priedus
28
Page 34

Uzmanību : Pirms pirmās lietošanas reizes, lūdzu, rūpīgi
izlasiet drošības vadlīniju bukletu un norādījumus.
IEDARBINĀŠANA
• Pirms pirmās izmantošanas visus piederumus nomazgājiet ziepjūdenī (izņemot adapteri (E):
skatīt nodaļu par tīrīšanu). Noskalojiet un noslaukiet.
• Nolieciet iekārtu uz gludas, tīras un sausas virsmas, pārliecinieties, ka regulatora taustiņš (A1) ir
pozīcijā "0", pieslēdziet ierīci strāvai.
• Ir vairāki veidi, kā to iedarbināt (skatīt A1 diagrammu):
- Darbība ar pārtraukumiem (pulse):
Pagrieziet regulatora taustiņu (A1) pozīcijā "pulse", veicot secīgas darbības, lai labāk kontrolētu
gatavošanas procesu.
- Nepārtraukta darbība:
Pagrieziet regulatora taustiņu (A1) vēlamajā pozīcijā no "1 līdz 8/maks", ņemot vērā veicamo
darbību. Gatavošanas laikā jūs to varat mainīt.
• Lai apturētu ierīci, pagrieziet taustiņu (A1) "0" pozīcijā.
LV
Svarīgi: ıerīci var iedarbināt vienīgi tad, ja uzlika (A5) un uzgalis (A3) ir nostiprināti.
Ja darbības laikā noņemat uzliku (A5) un/vai uzgali (A3), ierīce uzreiz apstājas. No jauna
nostipriniet uzliku un/vai uzgali, vadības taustiņu (A1) pagrieziet "0" pozīcijā un veiciet
parastās darbības, lai iedarbinātu ierīci, izvēloties vajadzīgo ātrumu.
1 - MAISĪŠANA / MĪCĪŠANA / PUTOŠANA / EMULSIJAS GATAVOŠANA
/ KULŠANA
Atkarībā no sastāvdaļām nerūsējošā tērauda traukā (B1) ar vāku (B2) jūs varat sagatavot līdz pat
1,8 kg vieglas mīklas.
IZMANTOTIE PIEDERUMI: Nerūsējošā tērauda trauks (B1), Vāks (B2), Mīcītājs (C1), maisītājs
(C2) vai daudzzaru slotiņa (C3).
1.1 - PıEDERUMU UZSTĀDĪŠANA
Rīkojieties atbilstoši 1.1.–1.4. diagrammā sniegtajiem norādījumiem.
1.2 - IEDARBINĀŠANA
• Ieslēdziet ierīci, pagriežot regulatora taustiņu (A1) vēlamajā pozīcijā, saskaņā ar recepti.
• Jūs gatavošanas laikā varat pievienot produktus caur vāka (B2) atveri.
• Lai apturētu ierīci, pagrieziet taustiņu (A1) "0" pozīcijā.
Ieteikumi:
MĪCĪŠANAI (Maksimālais lietošanas laiks: 13 minūtes).
- Izmantojiet mīcīšanas piederumu (C1) ar "1" ātrumu. Jūs varat samīcīt līdz 500 g miltu
(piemēram: baltmaize, graudu maize, drupaču mīkla, smilšu mīkla u. c.).
MAISĪŠANAI (Maksimālais lietošanas laiks: 13 minūtes).
- Izmantojiet maisītāju (C2) ar ātrumu "1 līdz 8/maks".
- Jūs varat samaisīt līdz 1,8 kg vieglas mīklas (pīrāgiem, cepumiem utt.).
- Nekad neizmantojiet maisītāju (C2) smago mīklu mīcīšanai.
29
Page 35

- PUTOŠANAI / KULŠANAI / EMULSIJAS GATAVOŠANAI (Maksimālais lietošanas laiks: 10 minūtes.).
- Izmantojiet daudzzaru slotiņu (C3) ar ātrumu "1 līdz 8/max".
- Jūs varat sagatavot: majonēzi, ķiploku mērci, citas mērces, saputot olu baltumus (līdz astoņiem
olu baltumiem), putukrējumu (līdz 500 ml)...
-
Nekad neizmantojiet daudzzaru slotiņu (C3), lai mīcītu smagās mīklas vai maisītu vieglās mīklas.
Piederumu nonemsana: Pagaidiet, līdz ierīce ir pilnībā apstājusies, un pretējā secībā izpildiet
1.4.–1.1. diagrammā sniegtos montāžas norādījumus.
2 - VIENDABĪGAS MASAS VEIDOŠANAI / MAISĪŠANAI / SMALCINĀŠANAI
(ATKARĪBĀNO MODEĻA)
Atkarībā no produktu veida blendera traukā (D) jūs varat sagatavot līdz 1,5 l bieza maisījuma un
1,25 l šķidra maisījuma.
IZMANTOTIE PIEDERUMI: Blendera trauks (D / L).
2.1 - PıEDERUMU UZSTĀDĪŠANA
Rīkojieties atbilstoši 2.1.–2.3. un 10. diagrammā sniegtajiem norādījumiem.
2.2 - IEDARBINĀŠANA (Maksimālais lietošanas laiks: 3 minūtes).
• Ieslēdziet ierīci, pagriežot regulatora taustiņu (A1) vēlamajā pozīcijā, saskaņā ar recepti (No ātruma
līdz 8/Maks" vai «pulse»)
izmantojiet pozīciju "Pulse".
• Jūs gatavošanas laikā varat pievienot produktus caur dozēšanas noslēga (D2, L5) atveri.
Ieteikumi:
• Jūs varat sagatavot:
- Biezzupas, krēmus, kompotus, piena kokteiļus, kokteiļus.
- Vieglas mīklas (pankūkas, plāceņi, augļu pīrāgs, krēms brulē...).
• Ja jaukšanas laikā sastāvdaļas paliek pie trauka sienām, apturiet ierīci, gaidīt pilnīgu izslēgšanu
vienības, noņemiet blendera trauku, sabīdiet sastāvdaļas uz asmeņiem izmantojot lāpstiņu,
novietojiet blendera trauku atpakaļ un turpiniet gatavošanu.
Piederumu nonemsana: Pirms blendera krūzes noņemšanas pagaidiet, līdz ierīce ir pilnībā
apstājusies, un pretējā secībā izpildiet 2.3.–2.1. un 10. diagrammā sniegtos montāžas norādījumus.
vai Pulsa). Labākai smalcināšanas kontrolei un viendabīgas masas veidošanai,
"4
LV
3 - GAĻAS MALŠANAI
(ATKARĪBĀNO MODEĻA)
IZMANTOTIE PIEDERUMI: Piederumu turētājs (E), Salikts gaļasmašīnas uzgalis (F)
3.1 - GAĻASMAŠĪNAS ADAPTERA UZSTĀDĪŠANA
Rīkojieties atbilstoši 9. un 10. diagrammā un pēc tam 3.1.–3.3. diagrammā sniegtajiem norādījumiem.
3.2 - IEDARBINĀŠANA
• Iedarbiniet, regulatoru (A1) pagriežot līdz "5 līdz 7" ātrumam.
• Ar spiedes (F7) palīdzību caur padeves cauruli vienu pēc otra ievietojiet gaļas gabalus. Nekad
nebīdiet produktus padeves caurulē ar pirkstiem vai galda piederumiem.
- Jūs varat karbonāde līdz 3 kg gaļas, maksimālais lietošanas laiks: 10 minūtes.
Ieteikumi:
- Sagatavojiet visus maļamos produktus (gaļai izņemiet kaulus, skrimšļus un cīpslas un sagrieziet
to aptuveni 2x2 cm lielos gabalos).
- Pārliecinieties, ka gaļa ir kārtīgi atsaldēta.
30
Page 36

Piederumu nonemsana: Pagaidiet, līdz ierīce ir pilnībā apstājusies, un pretējā secībā izpildiet
10., 3.3.–3.1. un tad 9. diagrammā sniegtos montāžas norādījumus.
4 - RĪVĒŠANAI / GRIEŠANAI
(ATKARĪBĀNO MODEĻA)
IZMANTOTIE PIEDERUMI: Piederumu turētājs (E), Salikts dārzeņu griezējs (G), Cilindri (atkarībā
no modeļa)
4.1 - PıEDERUMU UZSTĀDĪŠANA
Rīkojieties atbilstoši 10. un 9. diagrammā un pēc tam 4.1. un 4.2. diagrammā sniegtajiem norādījumiem.
4.2 - IEDARBINĀŠANA
• Iedarbiniet, regulatoru (A1) pagriežot līdz "5" ātrumam griešanai un "4 vai 7" (atkarībāno modeļa)
ātrumam rīvēšanai.
• Ievietojiet produktus kārbas padeves caurulē un bīdiet tos ar spiedi (G2). Nekad nebīdiet
produktus ar pirkstiem vai galda piederumiem.
• Jūs varat sagatavot līdz 2 kg pārtikas, maksimālais lietošanas laiks: 10 minūtes.
• Izmantojot cilindrus, jūs varat:
- Rupji sarīvēt (G4)/smalki sarīvēt (G5): burkānus, selerijas sakni, kartupeļus, sieru...
LV
- Sagriezt biezās šķēlēs (G3): kartupeļus, burkānus, gurķus, ābolus, bietes,…
- Saberzt (G6): kartupeļus, parmezānu …
Piederumu nonemsana: Pagaidiet, līdz ierīce ir pilnībā apstājusies, un pretējā secībā izpildiet
10., 4.2., 4.1. un tad 9. diagrammā sniegtos montāžas norādījumus.
5 - AUGĻU UN DĀRZEŅU SULU SPIEŠANAI
(ATKARĪBĀNO MODEĻA)
IZMANTOTIE PIEDERUMI: Assembled juice extractor (H)
5.1 - SULU SPIEDES SALIKŠANA
Rīkojieties atbilstoši 5.1.–5.6. diagrammā sniegtajiem norādījumiem.
5.2 - IEDARBINĀŠANA (Maksimālais lietošanas laiks: 10 minūtes).
• Augļus un/vai dārzeņus sagrieziet gabaliņos.
• Iedarbiniet, regulatoru (A1) pagriežot līdz "5" ātrumam.
• Ievietojiet sastāvdaļas vāka (H2) iepildes caurulē un lēni spiediet tās, izmantojot spiedni (H1).
•
Vienmēr pēc tam, kad piecas reizes pēc kārtas ir ievietoti 500 g produktu, ļaujiet ierīcei pilnībā atdzist.
• Svarīgi: pēc katru 300 g sastāvdaļu ievietošanas iztīriet filtru (H3) un sulas tvertni (H4).
Ieteikumi:
- Jūs varat izspiest sulu no burkāniem, tomātiem, āboliem, vīnogām, avenēm utt., bet nav
iespējams izspiest sulu no noteiktiem augļiem un dārzeņiem, piemēram, banāniem, avokado,
bumbieriem, kazenēm, dažu šķirņu āboliem utt.
- Nomizojiet augļus ar biezu mizu, izņemiet kauliņus, ananāsam izņemiet serdi.
- Dzeriet sulu uzreiz pēc tās izspiešanas.
Piederumu nonemsana: Pirms piederumu noņemšanas no ierīces pagaidiet, līdz ierīce un
rotējošais filtrs ir pilnībā apstājušies. Pretējā secībā izpildiet 5.6.–5.1. diagrammā sniegtos montāžas
norādījumus.
31
Page 37

6 - NELIELA PRODUKTU DAUDZUMA SĪKAI SMALCINĀŠANAI
(ATKARĪBĀNO MODEĻA)
IZMANTOTIE PIEDERUMI: Mazais smalcināšanas vāks (N1), mazā smalcināšanas bļoda (N2)
6.1 - PıEDERUMU UZSTĀDĪŠANA
Rīkojieties atbilstoši 10., 6.1. un 6.2. diagrammā sniegtajiem norādījumiem.
6.2 - IEDARBINĀŠANA
• Ar mazo smalcinātāju jūs varat sīki sasmalcināt:
- svaigus augus: 10 g maks. / 10 sek. maks. / "7" ātrums;
- žāvētus augļus / liellopu gaļu (atkaulotu gaļu un fileju): 100 g maks. / 10 sek. maks. / 1. ātrums;
- dārzeņu biezeni: 150 g maks. / 20 sek. maks. / pulsveida kustība vai 1. ātrums.
• Šajā malšanas ierīcē nav paredzēts smalcināt tādus cietus produktus kā kafijas pupiņas, cietas
garšvielas, kā arī maisīt šķidrumus.
Piederumu nonemsana: Pagaidiet, līdz ierīce ir pilnībā apstājusies, un pretējā secībā izpildiet
10., 6.2. un 6.1. diagrammā sniegtos montāžas norādījumus.
7 - VADA GARUMA REGULĒŠANA (skatīt A7 diagrammu)
8 - NELIELA SASTĀVDAĻU DAUDZUMA RUPJA SMALCINĀŠANA
(ATKARĪBĀNO MODEĻA)
IZMANTOTIE PIEDERUMI: Saliktas dzirnaviņas.
-
Pāris pulsācijas sekundēs sasmalcināt: žāvētas vīģes, žāvētas aprikozes… Daudzums/maksimālais
laiks: 100g / 5s
TĪRĪŠANA
• Unplug the appliance.
• Do not immerse the motor unit (A) or the attachment (E) in water or under running water. Wipe
them with a dry or slightly damp cloth.
• Pēc lietošanas pilnībā demontējiet un ātri noskalojiet piederumus.
Ar visiem asmeņiem rīkojieties uzmanīgi, ar tiem jūs varat savainoties.( 10. diagramma)
•
Nomazgājiet, noskalojiet un noslaukiet piederumus; tos var mazgāt trauku mazgājamā mašīnā,
izņemot visas metāla daļas malšanas ierīces galviņā: galveno daļu (F), mīcītāju (C1) un maisītāju (C2).
KO DARĪT, JA JŪSU IERĪCE NEDARBOJAS?
Lūdzu, skatiet nodaļu „Darbības pirms pirmās lietošanas reizes“.
Vai jūsu ierīce joprojām nedarbojas? Sazinieties ar pilnvarotu apkopes centru (sarakstu skatiet
apkopes bukletā).
PIEDERUMI
Skatiet 91. lappusi un aplūkojiet zīmola tīmekļa vietni.
Uzmanību: šajā bukletā ir ietverti norādījumi par papildu piederumiem. Lūdzu, saglabājiet
bukletu turpmākai uzziņai. Lūdzu, sazinieties ar klientu apkalpošanas centru, lai iegūtu
sīkāku informāciju par piederumu iegādi.
32
LV
Page 38

Предупреждение : Моля, прочетете внимателно
ръководството „Насоки за безопасност“, както и
инструкциите преди първоначална употреба.
ИЗПОЛЗВАНЕ
• Преди първата употреба измийте всички части на приставките с топла сапунена вода (освен
адаптера (E): вижте § почистване). Изплакнете ги и ги подсушете.
• Поставете уреда на равна, чиста и суха повърхност, уверете се, че бутонът на превключвателя
(A1) е на позиция „0“, след което включете Вашия уред.
• За да го включите, имате няколко възможности: (вж. диаграма A1) :
- Работа на интервали (pulse):
Завъртете бутона на превключвателя (A1) на позиция „рulse“ на последователни импулси
за по-добър контрол при някои видове обработка.
- Непрекъсната работа:
Завъртете бутона на превключвателя (A1) на желаната позиция от „1 до 8/max“скорост
според извършваната обработка. Можете да промените това по време на обработката.
• За да спрете уреда, върнете бутона на (A1) на „0“.
Важно! Уредът може да бъде пуснат, само ако отделението (A5) и главата (A3) са
BG
фиксирани. Ако освободите отделението (A5) и/или главата (A3), докато уредът
работи, той веднага ще спре. Фиксирайте пак отделението и/или главата, върнете на
позиция „0“ бутона за управление (A1), след което пуснете по обичайния начин уреда,
като изберете желаната скорост.
1 - РАЗБЪРКВАНЕ/ МЕСЕНЕ/ БИЕНЕ / ЕМУЛГИРАНЕ/ РАЗБИВАНЕ
В зависимост от вида на хранителните продукти с купата от инокс (B1) и капака й (B2) можете
да приготвите до 1,8 кг рядко тесто.
ИЗПОЛЗВАНИ ПРИСТАВКИ: Купа от инокс (B1), Капак (B2), Приставка за месене (C1) или
бъркалка за разбъркване (C2) или многожилна бъркалка (C3).
1.1 - СГЛОБЯВАНЕ НА ПРИСТАВКИТЕ
Следвайте диаграмите от 1.1 до 1.4.
1.2 - ВКЛЮЧВАНЕ
•
Включете уреда, като завъртите бутона на превключвателя (A1) на желаната позиция според рецептата.
•
Можете да добавяте хранителни продукти през отвора на капака (B2) по време на обработката.
• За да спрете уреда, върнете бутона на (A1) на „0“.
Съвети:
МЕСЕНЕ (Максимален срок на ползване: 13 минути).
- Използвайте приставката за месене (C1) на скорост „1“. Можете да месите до 500 г брашно
(напр.: бял хляб, зърнен хляб, маслено тесто, многолистно тесто и др.).
РАЗБЪРКВАНЕ (Максимален срок на ползване: 13 минути).
- Използвайте бъркалката за разбъркване (C2) на скорост „1 до 8/max“скорост.
- Можете да разбъркате 1,8 кг рядко тесто (кекс, бисквити и др.).
- Никога не използвайте бъркалката за разбъркване (C2) за месене на гъсти теста.
33
Page 39

- БИЕНЕ / ЕМУЛГИРАНЕ/ РАЗБИВАНЕ (Максимален срок на ползване: 10 минути).
- Използвайте многожилната бъркалка (C3) на скорост „1 до 8/max“скорост.
- Можете да приготвите: майонеза, айоли, сосове, белтъци на сняг (до 8 белтъка), бита
сметана (до 500 мл)…
- Никога не използвайте многожилната бъркалка (C3) за месене на гъсти теста или
за разбъркване на редки теста.
Демонтиране на приставките :Изчакайте уредът да спре напълно и следвайте
диаграмите за монтаж в обратен ред от 1.4 до 1.1.
2 - ХОМОГЕНИЗИРАНЕ / РАЗБЪРКВАНЕ / МИКСИРАНЕ
В ЗАВИСИМОСТ ОТ МОДЕЛА
Според вида на хранителните продукти с каната-миксер (D) можете да приготвите до 1,5 л
гъста смес и 1,25 л течна смес.
ИЗПОЛЗВАНИ ПРИСТАВКИ: Кана-миксер (D / L).
2.1 - СГЛОБЯВАНЕ НА ПРИСТАВКИТЕ
Следвайте диаграми от 2.1 до 2.3 и 10.
2.2 - ВКЛЮЧВАНЕ (Максимален срок на ползване: 3 минути).
• Включете уреда, като завъртите бутона на регулатора (A1) на желаната позиция според
рецептата (от „7 до 8“ скорост или Pulse). За да имате по-голям контрол върху миксирането
и хомогенизирането на сместа, използвайте позицията „Pulse“.
• Можете да добавяте продукти през отвора на тапата с дозатор (D2, L5) по време на
приготвянето на сместа.
Съвети:
• Можете да приготвите:
- Фино миксирани зеленчукови супи, пюрета, компоти, млечни шейкове, коктейли.
- Редки теста (палачинки, бухти, плодови сладкиши, бретонски сладкиши и др.).
• По време на миксирането, ако съставките остават залепени по стените на каната, спрете
уреда, вдигнете каната-миксер, чакам за пълно изключване на уреда, изсипете съставките
върху остриетата, след което отново поставете каната-миксер, с помощта на шпатула, за
да продължите обработката.
Демонтиране на приставките : Изчакайте уредът да спре напълно, преди да свалите
каната на блендера, и следвайте диаграмите за монтаж в обратен ред от 2.3 до 2.1 и 10.
3 - МЕЛЕНЕ
ИЗПОЛЗВАНИ ПРИСТАВКИ: Прис тавка за закрепване на накрайниците(E), Сглобена месомелачка (F)
В ЗАВИСИМОСТ ОТ МОДЕЛА
3.1 - ПОСТАВЯНЕ НА АДАПТЕР ЗА ПРИСТАВКАТА ЗА МЕЛЕНЕ
Следвайте диаграми 9, 10 и след това от 3.1 до 3.3.
3.2 - ВКЛЮЧВАНЕ
• Включете уреда, като завъртите превключвателя (A1) на скорост „4“ скорост или „7“.
• Поставете месото във фунията парче по парче с помощта на буталото (F7). Никога не
поставяйте съставките във фунията с пръсти или с прибори.
- Можете да посегнат до 3 кг месо, Максимален срок на ползване: 10 минути.
BG
34
Page 40

Съвети:
- Пригответе цялото количество продукти (за месото отстранете костите, хрущялите и
сухожилията и го нарежете на парчета 2х2 см).
- Уверете се, че месото е напълно размразено.
Демонтиране на приставките : Изчакайте уредът да спре напълно и следвайте
диаграмите за монтаж в обратен ред, диаграми 10, от 3.3 до 3.1 и след това 9.
4 - НАСТЪРГВАНЕ / НАРЯЗВАНЕ
ИЗПОЛЗВАНИ ПРИСТАВКИ:
рязане на зеленчуци (G), Барабани (в зависимост от модела)
Приставка за закрепване на накрайниците(E), Cглобено ренде за
В ЗАВИСИМОСТ ОТ МОДЕЛА
4.1 - СГЛОБЯВАНЕ НА ПРИСТАВКИТЕ
Следвайте диаграми 10, 9 и след това от 4.1 до 4.2.
4.2 - ВКЛЮЧВАНЕ
• Включете уреда, като завъртите превключвателя (A1) на скорост „5“ за рязане или на скорост
„7“ (в зависимост от модела) за стъргане.
• Поставете продуктите във фунията на приставката и ги насочвайте с помощта на буталото
(G2). Никога не поставяйте съставките с пръсти или с прибори.
• Можете да приготвите до 2 кг храна, максимално време за употреба:10 мин.
• С барабаните можете да приготвите:
BG
- Едро настъргване (G4) / фино настъргване (G5): моркови, кореноплодна целина, картофи, кашкавал
и др.
- Едро нарязване (G3): картофи, моркови, краставици, ябълки, цвекло и др.
- Фино настъргване (G6): картофи, пармезан и др.
Демонтиране на приставките : Изчакайте уредът да спре напълно и следвайте
диаграмите за монтаж в обратен ред, диаграми 10, 4.2, 4.1 и 9.
5 - ИЗСТИСКВАНЕ НА ПЛОДОВЕ И ЗЕЛЕНЧУЦИ В ЗАВИСИМОСТ ОТ МОДЕЛА
ИЗПОЛЗВАНИ ПРИСТАВКИ: Сглобена сокоизстисквачка (H)
5.1 - СГЛОБЯВАНЕ НА СОКОИЗСТИСКВАЧКАТА
Следвайте диаграмите от 5.1 до 5.6.
5.2 - ВКЛЮЧВАНЕ (Максимален срок на ползване: 10 минути).
• Нарежете плодовете и/или зеленчуците на парчета.
• Включете уреда, като завъртите превключвателя (A1) на скорост „5“.
Поставете съставките в улея за подаване на капака (H2), натиснете ги бавно надолу като
използвате буталото (H1).
• Не обработвайте повече от 5 пъти по 500 г продукти продължително време, без да спирате и без да
оставите уреда в покой.
• Важно: почистете филтъра (H3) и съда за сок (H4) след всеки 300 g продукти.
Съвети:
- Можете да приготвяте сок от: моркови, домати, ябълки, грозде, малини и т.н., но не е
възможно извличането на сок от определени плодове и зеленчуци: банани, авокадо,
боровинки, някои сортове ябълки и т.н. …
-
Белете плодовете с дебела кожа, изваждайте костилките и махайте сърцевината на ананаса.
- Пийте соковете веднага след приготвянето.
35
Page 41

Демонтиране на приставките : Изчакайте уреда, както и въртящия се филтър да спрат
напълно, преди да свалите приставката от уреда. Следвайте диаграмите за монтаж в обратен
ред от 5.6 до 5.1.
6 - ФИНО МЕЛЕНЕ НА МАЛКИ КОЛИЧЕСТВА ПРОДУКТИ В ЗАВИСИМОСТ ОТ МОДЕЛА
ИЗПОЛЗВАНИ ПРИСТАВКИ: Капак на минимелачка (N1), купа на минимелачка (N2)
6.1 - СГЛОБЯВАНЕ НА ПРИСТАВКИТЕ
Следвайте диаграми 10, 6.1 и 6.2.
6.2 - ВКЛЮЧВАНЕ
• С минимелачката можете да накълцвате фино:
- свежи билки: макс. 10 g/макс. 10 сек./скорост «7»
- сушени плодове/телешко месо (без кост и нарязано) : макс. 100 g/макс. 10 сек./скорост «1»
- зеленчуково пюре: макс. 150 g./макс. 20 сек./«pulse» (пулсиране) или скорост «1»
• Тази мелачка не е предназначена за твърди продукти като кафени зърна, твърди подправки,
нито за течности.
Демонтиране на приставките : Изчакайте уредът да спре напълно и следвайте
диаграмите за монтаж в обратен ред, диаграми 10, 6.2 и 6.1.
7 - РЕГУЛИРАНЕ ДЪЛЖИНАТА НА КАБЕЛА
8 - ГРУБО НАКЪЛЦВАНЕ В МАЛКИ КОЛИЧЕСТВА
ИЗПОЛЗВАНИ ПРИСТАВКИ: Сглобена приставка за стриване.
-
Да смелите за няколко секунди с работа на интервали: сушени смокини, сушени кайсии...
Количество / макс. време: 100 г / 5 сек.
(вж. A7)
В ЗАВИСИМОСТ ОТ МОДЕЛА
ПОЧИСТВАНЕ
• Изключете уреда.
• Не потапяйте моторния блок (A) и адаптера (E) във вода, нито ги поставяйте под течаща
вода. Избърсвайте ги със суха или с леко влажна кърпа.
• Разглобете напълно и измийте приставките веднага след употреба.
Бъдете внимателни, когато боравите с остриетата, тъй като могат да Ви наранят. (диаграма 10).
• Измийте, изплакнете и подсушете приставките: те могат да се мият в миялна машина, с
изключение на всички метални компоненти на мелещата глава: корпуса (F), приставката
за месене (C1) и миксера (C2).
АКО УРЕДЪТ НЕ РАБОТИ?
Моля, вижте глава „Преди първа употреба“.
ят уред все още не работи? Свържете се с оторизиран сервизен център (вж. списъка в
сервизната книжка).
ПРИСТАВКИ
Вж. страница 91 и посетете интернет страницата на марката.
Внимание: тази книжка съдържа инструкции за допълнителни аксесоари. Моля,
пазете я за бъдещи справки. Моля, свържете се с отдела Обслужване на клиенти за
допълнителна информация как да закупите аксесоари.
36
BG
Page 42

Upozorenje : Molimo vas, pročitajte knjižicu „Sigurnosne
informacije" i uputstva za upotrebu prije prve upotrebe.
PRIJE PRVE UPOTREBE
• Prije prve upotrebe, operite sve dodatke u vodi sa deterdžentom (osim (E) dodatka : pogledajte
paragraf “Čišćenje”). Isperite i osušite.
• Aparat postavite na ravnu, čistu i suhu površinu. Provjerite da li je tipka (A1) u "0" poziciji i
uključite aparat u struju.
• Postoji nekoliko načina da pokrenete Vaš aparat: (pogledajte dijagram A1):
- Isprekidani rad (pulse):
Okrenite točkić za odabir (A1) u "pulse" poziciju. Upotreba “pulse" Vam omogućava ujednačenu
pripremu.
- Neprekidni rad:
Okrenite točkić (A1) na željenu poziciju od "1 do 8/max", ovisno o vrsti hrane koju pripremate.
Brzine možete mijenjati tokom pripreme.
• Da zaustavite aparat, točkić (A1) okrenite u položaj "0".
Važno: aparat će započeti sa radom samo ukoliko su poklopac (A5) i glava (A3) zaključani.
Aparat će automatski prestati sa radom ako skinete poklopac (A5) i/ili glavu (A3) tokom
rada. Zaključajte poklopac i/ili glavu, okrenite točkić (A1) na "0" poziciju i pokrenite aparat
odabirom željene brzine.
BS
1 - MIKSANJE/ MJEŠENJE / MUĆENJE / EMULZIRANJE / MIJEŠANJE
Možete pripremiti do 1,8 kg laganog tijesta uz pomoć posude od nehrđajućeg čelika (B1) i
poklopca (B2), ovisno o vrsti hrane.
NASTAVCI KOJI SE KORISTE: Posuda od nehrđajućeg čelika (B1), Poklopac (B2), Mješalica
(C1) ili mutilice (C2) ili metlica (C3).
1.1 - POSTAVLJANJE NASTAVAKA
Slijedite dijagrame od 1.1 do 1.4.
1.2 - UPOTREBA
• Započnite okretanjem točkića (A1) u željeni položaj ovisno o receptu.
• Sastojke ubacujte kroz otvor na poklopcu (B2) tokom pripreme.
• Da biste zaustavili aparat, okrenite točkić (A1) na "0".
Savjeti:
MJEŠENJE (Maksimalno vrijeme upotrebe: 13 minuta).
- Koristite mješalicu (C1) na brzini "1". Možete umijesiti 500 g brašna (npr. bijeli hljeb, integralni
hljeb, masno tijesto, prhko tijesto...).
MIKSANJE (Maksimalno vrijeme upotrebe: 13 minuta).
- Koristite mutilice (C2) na brzinama od "1 do 8/max".
- Možete izmiješati do 1,8 kg laganog tijesta (patišpanja, kolač…).
- Nikada nemojte koristiti ovaj dodatak (C2) za mješenje teških tijesta.
- MUĆENJE / EMULZIRANJE / MIJEŠANJE (Maksimalno vrijeme upotrebe: 10 minuta).
- Koristite mutilicu (C3) na brzinama od "1 do 8/max".
37
Page 43

- Možete pripremiti: majonezu, umake, umućena bjelanjca (do 8 bjelanjaca), šlag(do 500 ml), i sl.
- Nemojte koristiti metlicu (C3) za mješenje tijesta.
Odvajanje nastavaka: Sačekajte da se aparat potpuno zaustavi i nastavite redoslijedom
obrnutim od redoslijeda montaže, pridržavajte se postupaka opisanih na dijagramima od 1.4 do 1.1.
2 - MIKSANJE / MIJEŠANJE (OVISNO O MODELU)
Ovisno o vrsti namirnica, možete koristiti blender (D) za pripremu do 1.5 l čvrstih i 1.25 l tečnih
mješavina.
NASTAVCI KOJI SE KORISTE: Posuda blendera (D / L).
2.1 - POSTAVLJANJE NASTAVAKA
Slijedite postupke opisane na dijagramima od 2.1 do 2.3. i 10.
2.2 - UPOTREBA (Maksimalno vrijeme upotrebe: 3 minuta).
• Započnite okretanjem točkića (A1) na željenu poziciju, ovisno o receptu (od "7 do 8" brzina ili
pulse). Koristite "Pulse" poziciju za optimalno miksanje i za ujednačeniju smjesu.
• Sastojke možete dodavati tokom pripreme kroz otvor mjernog čepa (D2, L5).
Savjeti:
• Možete pripremiti:
- Fino miksane supe, umake, kompote, milkšejk i koktele.
- Tečne smjese (za palačinke, biskvite, kreme).
• Ukoliko sastojci ostanu zalijepljeni za zid posude, zaustavite aparat, čekati za potpuno
gašenje jedinice. Odvojite blender i sastružite sastojke sa zidova blendera na oštrice pomoću
špatule, i ponovo vratite blender na mjesto.
Odvajanje nastavaka: Sačekajte da se aparat potpuno zaustavi prije uklanjanja spremnika
blendera i nastavite redoslijedom obrnutim od redoslijeda montaže, pridržavajte se postupaka
opisanih na dijagramima 2.3 do 2.1 i 10.
3 - MLJEVENJE (OVISNO O MODELU)
NASTAVCI KOJI SE KORISTE: Držač za nastavke (E), Mašina za mljevenje (F)
3.1 - POSTAVLJANJE NASTAVKA ZA MLJEVENJE
Slijedite postupke opisane na dijagramima 9, 10, a zatim 3.1. do 3.3.
3.2 - UPOTREBA
• Pokrenite aparat okretanjem točkića (A1) na položaj "5 do 7".
• Uz pomoć potiskivača (F7) ubacujte meso, komadić po komadić. Nikada ne gurajte sastojke u
otvor prstima ili kuhinjskim priborom.
- Možete dodati kotlet do 3 kg mesa, maksimalno vrijeme upotrebe: 10 minuta.
Savjeti:
- Pripremite namirnice za mljevenje (za meso-odvojite kosti, hrskavicu i uklonite žilice i isjeckajte
ga na komadiće 2x2cm.)
- Provjerite da li je meso odmrznuto u potpunosti.
Odvajanje nastavaka: Sačekajte da se aparat potpuno zaustavi i nastavite redoslijedom
obrnutim od redoslijeda dijagrama montaže 10 od 3.3 do 3.1, a zatim 9.
BS
38
Page 44

4 - RENDANJE / REZANJE (OVISNO O MODELU)
NASTAVCI KOJI SE KORISTE:
4.1 - POSTAVLJANJE NASTAVAKA
Slijedite postupke opisane na dijagramima 10, 9, a zatim 4.1. do 4.2.
4.2 - UPOTREBA
• Pokrenite aparat okrećući točkić (A1) na brzinu "5" za rezanje i na "7" za ribanje.
• Hranu ubacite u otvor cijevi i gurnite potiskivačem (G2). Nikada ne gurajte sastojke u otvor
prstima ili kuhinjskim priborom.
• Možete pripremiti do 2 kg hrane, maksimalno vrijeme upotrebe: 10 minuta.
• Nastavke koristite za:
- Krupno rendanje (G4) / fino rendanje (G5): mrkvu, celer, krompir, sir,…
- Krupno rezanje (G3): krompir, mrkvu, krastavac, jabuke, cveklu,…
- Grubo rendanje (G6): krompir, parmezan …
Odvajanje nastavaka: Sačekajte da se aparat potpuno zaustavi i nastavite redoslijedom
obrnutim od redoslijeda montaže, pridržavajte se postupaka opisanih na dijagramima 10, 4.2, 4.1 i 9.
Držač za nastavke (E), Sjeckalica (G), Bubnjevi (ovisno o modelu)
5 - CIJEĐENJE SOKA IZ VOĆA I POVRĆA
(OVISNO O MODELU)
NASTAVCI KOJI SE KORISTE: Sokovnik (H)
5.1 - NASTAVAK KOJI SE KORISTI:
BS
Slijedite dijagrame od 5.1 do 5.6.
5.2 - UPOTREBA (Maksimalno vrijeme upotrebe: 10 minuta.)
• Izrežite voće/povrće na komadiće.
• Pokrenite aparat okretanjem točkića (A1) na brzinu "5".
• Umetnite sastojke kroz otvor za punjenje na poklopcu (H2) i polagano ih pritisnite pomoću
potiskivača (H1).
•
Ne premašujte količinu od 500 g hrane više od 5 puta istovremeno, bez da omogućite aparatu
da se ohladi.
• Važno: očistite filter (H3) i posudu za sakupljanje soka (H4) nakon svakih 300 g sastojaka.
Savjeti:
- Možete praviti sok od: mrkve, paradajza, jabuka, grožđa, malina itd., ali ne možete dobiti sok
od određenog voća i povrća: banana, avokado, kruška, kupina, nekih vrsta jabuka itd...
- Ogulite voće sa debljom korom; odvojite košpice i koru ananasa.
- Popijte sok odmah nakon pripreme.
Odvajanje nastavaka: Sačekajte da se aparat i rotacioni filter potpuno zaustave prije
uklanjanja dodatnog pribora sa aparata. Postupite redoslijedom obrtnutim od redoslijeda
montaže, pridržavajte se postupaka opisanih na dijagramima 5.6. do 5.1.
6 - FINO SJECKANJE MALIH KOLIČINA (OVISNO O MODELU)
NASTAVCI KOJI SE KORISTE: Poklopac male sjeckalice (N1), posuda male sjeckalice (N2)
6.1 - POSTAVLJANJE NASTAVAKA
Slijedite postupke opisane na dijagramima od 10, 6.1. i 6.2..
39
Page 45

6.2 - UPOTREBA
• Pomoću male sjeckalice možete sitno nasjeckati:
- svježe začinsko bilje: maks. 10 g / maks. 10 sek / brzina „7"
- suho voće / govedina (meso bez kosti i meso bez ovojnice): maks. 100g / maks. 10 sek / brzina „1"
- pasirano povrće: maks. 150 g / maks. 20 sek / „pulse" ili brzina „1"
• Ova mala sjeckalica nije predviđena za tvrde namirnice kao što su zrna kafe, tvrdi začini niti
please erase tečnosti.
Odvajanje nastavaka: Sačekajte da se aparat potpuno zaustavi i nastavite redoslijedom
obrnutim od redoslijeda montaže, pridržavajte se postupaka opisanih na dijagramima 10, 6.2 i 6.1.
7 - PODEŠAVANJE DUŽINE KABLA (pogledajte A7)
8 - GRUBO SJECKANJE MALIH KOLIČINA (OVISNO O MODELU)
NASTAVCI KOJI SE KORISTE: Mlin.
-
Sjeckanje u nekoliko sekundi: suhe smokve, suhe kajsije... Količina/vrijeme: 100g / 5s.
ČIŠĆENJE
• Isključite aparat iz utičnice.
• Blok motora (A) ili nastavak (E) nikada ne uranjajte u vodu i ne stavljajte ga pod mlaz vode.
Obrišite ih vlažnom ili suhom krpom.
• Aparat potpuno rastavite i isperite pribor odmah nakon upotrebe.
Oštricama rukujte pažljivo, kako biste izbjegli rizik od povreda (dijagram 10).
• Operite, isperite i osušite pribor: pribor se može prati u mašini za suđe, osim svih metalnih
dijelova u glavi za mljevenje: kućište (F), nastavak za miješanje tijesta (C1) i mikser (C2).
ŠTA UČINITI UKOLIKO VAŠ APARAT NE RADI ISPRAVNO?
Molimo pogledajte poglavlje „prije prve upotrebe".
Vaš aparat i dalje ne radi? Obratite se ovlaštenom servisnom centru (pogledajte listu u servisnoj
knjižici).
BS
NASTAVCI
Pogledajte stranicu 91 i posjetite internet stranicu tog proizvođača.
Oprez: ova knjižica sadrži uputstva za dodatni pribor. Sačuvajte je za kasniju upotrebu.
Za dodatne informacije o tome kako kupiti dodatni pribor, molimo obratite se Službi za
korisnike.
40
Page 46

Upozornění : Před prvním použitím si pečlivě pročtěte tuto
brožuru „bezpečnostních opatření“ a pokyny.
UVEDENÍ DO CHODU
• Před prvním použitím omyjte všechny díly příslušenství mýdlovou vodou (kromě adaptéru (E):
viz § čištění) Opláchněte a osušte.
• Postavte přístroj na rovnou, čistou a suchou plochu, zkontrolujte, zda tlačítko měniče (A1) je v
poloze "0" , poté přístroj zapojte.
• Pro uvedení do provozu máte několik možností: (viz schéma A1) :
- Přerušovaný chod (pulsní):
Pro lepší kontrolu připravovaných pokrmů otočte tlačítkem měniče (A1) do polohy "pulse"
několika za sebou jdoucími impulzy.
- Plynulý provoz:
Otočte tlačítkem měniče (A1) do požadované polohy od "1 do 8/max" podle prováděných
pokrmů. Při přípravě můžete provoz měnit.
• Při vypínání přístroje vraťte tlačítko (A1) na "0".
Důležité upozornění: Přístroj nemůže být uveden do provozu, jsou-li klapka (A5) a hlava (A3)
zablokované. Pokud za provozu odblokujete klapku (A5) a/nebo hlavu (A3), přístroj se ihned
zastaví. Zablokujte znovu klapku a/nebo hlavu, vraťte se do polohy "0" na ovladači (A1),
poté zvolte požadovanou rychlost a při spouštění přístroje postupujte obvyklým způsobem.
1 - MÍCHÁNÍ / HNĚTENÍ / TŘENÍ / EMULGOVÁNÍ / ŠLEHÁNÍ
CS
Nerezavějící mísa (B1) a její víko (B2) vám umožní připravit až 1,8 kg lehkého těsta podle
druhu surovin.
POUŽITÉ PŘÍSLUŠENSTVÍ: Mísa z nerezavějící oceli (B1), Víko (B2), Hnětač (C1) nebo šlehač
(C2) nebo metla (C3).
1.1 - MONTÁŽ PŘÍSLUŠENSTVÍ
Řiďte se diagramy 1.1 až 1.4.
1.2 - UVEDENÍ DO PROVOZU
• Spusťte přístroj otočením tlačítka měniče (A1) do požadované polohy podle receptu.
• Otvorem ve víku (B2) můžete přidávat suroviny během provozu.
• Při vypínání přístroje vraťte tlačítko (A1) na "0".
Doporučení:
HNĚTENÍ (Maximální doba provozu: 13 minut).
- Použijte příslušenství hnětač (C1) při rychlosti "1". Můžete hníst až 500g mouky (např: bílý
chléb, celozrnný chléb, máslové těsto, sušenkové těsto, ...).
MÍCHÁNÍ (Maximální doba provozu: 13 minut).
- Použijte šlehač (C2) při rychlosti "1 do 8/max".
- Můžete míchat až 1,8 kg lehkého těsta (bábovky, sušenky...).
- Nikdy nepoužívejte šlehač (C2) ke hnětení těžkých těst.
- TŘENÍ / EMULGOVÁNÍ / ŠLEHÁNÍ (Maximální doba provozu: 10 minut).
- Použijte balónovou šlehací metlu (c3) při rychlosti "1 do 8/max".
41
Page 47

- Můžete připravovat: majonézu, omáčku aïoli, omáčky, sníh z bílků (až z 8 vajec), šlehačku (až
500 ml)…
- Metlu na šlehání (C3) nikdy nepoužívejte ke hnětení hustého těsta, ani k míchání lehkého těsta.
Demontáž příslušenství: Vyčkejte, dokud se spotřebič zcela nezastaví, a pokračuje v opačném
pořadí instalace. Schémata 1.4 až 1.1.
2 - MÍCHÁNÍ/MIXOVÁNÍ (PODLE TYPU)
Podle druhu surovin je možno v mixovací míse (D) připravit až 1,5l hustých směsí a 1,25l tekutých směsí.
POUŽITÉ PŘÍSLUŠENSTVÍ: Mixovací mísa (D / L).
2.1 - MONTÁŽ PŘÍSLUŠENSTVÍ
Postupujte dle schémat 2.1 až 2.3 a 10.
2.2 - UVEDENÍ DO PROVOZU (Maximální doba provozu: 3 minut).
•
Spusťte přístroj otočením tlačítka měniče (A1) do požadované polohy podle receptu (od rychlosti
"4 do 8/Max" nebo Pulse). Pro lepší kontrolu mixování a lepší promíchání těsta použijte polohu
"Pulse".
• Otvorem v dávkovací zátce (D2, L5) můžete přidávat suroviny během provozu.
Doporučení:
• Můžete připravovat:
- Jemně mixované polévky, krémové polévky, kompoty, mléčné koktejly, koktejly,
- Lehká těsta (palačinky, koblihy, bublanina, třené...).
• Pokud během mixování suroviny zůstávají přilepené na stěnách mísy, vypněte přístroj,
počkejte, dokud se přístroj nezastaví, vyjměte mísu, přísady seškrábněte z nožů pomocí
špachtle, pak mísu znovu upevněte a pokračujte v přípravě.
Demontáž příslušenství: Před odstraněním nádoby mixéru vyčkejte, dokud se spotřebič
zcela nezastaví, a pokračuje v opačném pořadí instalace, schéma 2.3 až 2.1 a 10.
3 - SEKÁNÍ (PODLE TYPU)
POUŽITÉ PŘÍSLUŠENSTVÍ: Držák příslušenství (E), Sestavená hlavice mlýnku (F)
3.1 - UMÍSTĚNÍ ADAPTERU MLÝNKU
Postupujte dle schémat 9, 10 a poté postupně podle schémat 3.1 až 3.3.
3.2 - UVEDENÍ DO PROVOZU
• Zapněte přístroj otočením měniče (A1) na rychlost "5 do 7".
• Vkládejte do komínku postupně kousky masa pomocí pěchovátka (F7). Nikdy neposunujte
suroviny do komínku prsty nebo kuchyňskými nástroji.
- Můžete sekat až 3 kg masa, maximální doba provozu: 10 minut..
Doporučení:
- Předem si připravte všechny suroviny k mletí (z masa odstraňte kosti, šlachy a nervy a nakrájejte
maso na kostky o velikosti přibližně 2x2cm).
- Zkontrolujte, zda je maso zcela rozmrazené.
CS
42
Page 48

Demontáž příslušenství: Vyčkejte, dokud se přístroj zcela nezastaví, a pokračuje v opačném
pořadí instalace, schéma 10, schéma 3.3 až 3.1 a poté schéma 9.
4 - STROUHÁNÍ / KRÁJENÍ (PODLE TYPU)
POUŽITÉ PŘÍSLUŠENSTVÍ: Držák příslušenství (E), Sestavený kráječ zeleniny (G), Bubínky (podle typu)
4.1 - MONTÁŽ PŘÍSLUŠENSTVÍ
Postupujte dle schémat 10, 9 a poté postupně podle schémat 4.1 až 4.2.
4.2 - UVEDENÍ DO PROVOZU
• Zapněte přístroj otočením měniče (A1) na rychlost "5" pro krájení nebo "4 nebo 7" (podle typu)
pro strouhání.
• Vkládejte potraviny komínkem zásobníku a posunujte je pomocí pěchovátka (G2). Nikdy
neposunujte suroviny do komínku prsty nebo kuchyňskými nástroji.
• Můžete připravit až 2 kg potravin, maximální doba provozu: 10 minut.
• Pomocí bubínků můžete:
- Strouhat nahrubo (G4) / strouhat najemno (G5): mrkev, celer, brambory, sýr, ...
- Krájet na silné plátky (G3): brambory, mrkev, okurky, jablka, řepu, ...
- Strouhat brambory (G6), případně parmezán, ...
Demontáž příslušenství: Vyčkejte, dokud se spotřebič zcela nezastaví, a pokračuje v opačném
pořadí instalace, schémata 10, 4.2, 4.1 a 9.
5 - ODŠŤAVOVÁNÍ OVOCE A ZELENINY
POUŽITÉ PŘÍSLUŠENSTVÍ: Sestavený odšťavovač (H)
CS
(PODLE TYPU)
5.1 - SESTAVENÍ ODŠŤAVOVAČE
Postupujte podle schémat 5.1 až 5.6.
5.2 - UVEDENÍ DO PROVOZU (Maximální doba provozu: 10 minut).
• Nakrájejte ovoce / zeleninu na kousky.
• Zapněte přístroj otočením měniče (A1) na rychlost "5"
• Vkládejte přísady přes podávací trubku ve víku (H2), dovnitř je tlačte pomocí tlačníku (H1).
• Nezpracovávejte víc než 5 krát 500 g potravin najednou, aniž byste nechali přístroj odpočinout.
• Důležité: Vždy po vložení 300 g přísad vyčistěte filtr (H3) a nádobu na šťávu (H4).
Doporučení:
- Odšťavňovat lze: mrkve, rajčata, jablka, hrozny, maliny atd., ovšem některá ovoce a zeleninu
naopak odšťavňovat nelze: banány, avokáda, ostružiny, některé odrůdy jablek atd. …
- Ovoce oloupejte, vyjměte pecky a v případě ananasu jeho střed.
- Šťávu zkonzumujte ihned po přípravě.
Demontáž příslušenství: Před vyjmutím jakéhokoli příslušenství ze spotřebiče vždy vyčkejte,
dokud se spotřebič a rotační filtr zcela nezastaví. Postupujte v obráceném pořadí instalace,
schémata 5.6 až 5.1.
43
Page 49

6 - VELMI JEMNÉ SEKÁNÍ MALÉHO MNOŽSTVÍ (PODLE TYPU)
POUŽITÉ PŘÍSLUŠENSTVÍ: Víko mini kráječe (N1), miska mini kráječe (N2)
6.1 - MONTÁŽ PŘÍSLUŠENSTVÍ
Postupujte dle schémat 10, 6.1 a 6.2.
6.2 - UVEDENÍ DO PROVOZU
• Pomocí mini kráječe můžete na jemno krájet:
- čerstvé byliny: 10g max. / 10 sekund max. / rychlost „7“
- sušené ovoce / hovězí (vykostěné a oříznuté maso) : 100g max. / 10 sekund max. / rychlost „1“
- zeleninové pyré: 150g max. / 10 sekund max. / „impuls“ nebo rychlost „1“
• Tento drtič není určen pro tvrdé výrobky jako např. kávová zrna, tvrdá koření nebo tekutiny.
Demontáž příslušenství: Vyčkejte, dokud se spotřebič zcela nezastaví, a pokračuje v opačném
pořadí instalace, schémata 10, 6.2 a 6.1.
7 - ÚPRAVA DÉLKY NAPÁJECÍHO KABELU (viz A7)
8 - KRÁJENÍ MALÝCH MNOŽSTVÍ NA HRUBO (PODLE TYPU)
POUŽITÉ PŘÍSLUŠENSTVÍ: Kompletní drtič.
Nasekat za několik sekund pulzování: suché fíky, sušené broskve...Množství / max. čas: 100g / 5s
-
ČIŠTĚNÍ
• Odpojte přístroj.
• Neponořujte blok motoru (A) ani adaptér (E) do vody ani pod tekoucí vodu. Otřete suchým
nebo skoro suchým hadrem.
• Po použití zcela demontujte a okamžitě opláchněte příslušenství.
S ostrými díly zacházejte opatrně, mohou vás zranit. (schéma 10).
• Umyjte, opláchněte a vysušte příslušenství: lze je mýt v myčce na nádobí s výjimkou veškerých
kovových částí v hlavici drtiče: tělo (F), hnětač (C1) a mixér (C2).
CO DĚLAT, POKUD VÁŠ PŘÍSTROJ NEFUNGUJE?
viz kapitola „Před prvním použitím“.
Váš spotřebič stále nefunguje? Kontaktujte autorizovanou opravnu (viz seznam v servisní
příručce).
PŘÍSLUŠENSTVÍ
Viz strana 91; navštivte firemní internetovou prezentaci.
Pozor: tato brožura obsahuje pokyny pro dodatečná příslušenství. Uchovejte ji pro případ
potřeby v budoucnosti. Bližší informace o koupi příslušenství podá zákaznický servis.
44
CS
Page 50

Figyelmeztetés : Az első használat előtt feltétlenül olvassa
el a „Biztonsági útmutatót” és az utasításokat.
ÜZEMBE HELYEZÉS
• A legelső használat előtt mossa el a készülék különböző tartozékait mosogatószeres vízben
(kivéve az adaptert (E): ld. tisztítás §). Öblítse le és szárítsa meg.
• Helyezze a készüléket sík, tiszta és száraz felületre, győződjön meg róla, hogy a sebesség gomb
(A1) a „0” álláson van, majd dugja be a készüléket a hálózatba.
• A készülék bekapcsolása többféle módon is történhet: (lásd az A1 ábrát) :
- Szakaszos bekapcsolás (pulse):
Forgassa a sebesség gombot (A1) a „pulse” állásra, amely szakaszosan működteti a gépet, a
készítmények jobb ellenőrzése érdekében.
- Folyamatos járatás:
Forgassa a sebesség gombot (A1) a kívánt állásba, „1-től 8/max” jelzésig, a készítmény
jellegének megfelelően. A sebesség az étel elkészítése közben is változtatható.
• A készülék kikapcsolásához fordítsa vissza a gombot (A1) a „0” állásra.
Fontos: A készülék csak akkor működik, ha a biztonsági fedél (A5) és a fej (A3) rögzítve
vannak. Ha működés közben kioldja a biztonsági fedelet (A5) és/vagy a multifunkciós fejet
(A3), a készülék azonnal kikapcsol. Rögzítse újra a biztonsági fedelet és/vagy a fejet, állítsa
vissza a vezérlő gombot (A1) a „0” állásra, majd a készülék bekapcsolásához végezze el a
szokott műveletet, a megfelelő sebesség kiválasztásával.
1 - KEVERÉS / DAGASZTÁS / HABVERÉS / ELOSZLATÁS / HABOSÍTÁS
A hozzávalók jellegétől függően az inox edény (B1) és a fedő (B2) használata segítségével akár
1,8 kg könnyű tésztát is elkészíthet.
HU
ALKALMAZHATÓ TARTOZÉKOK: Inox edény (B1), Fedő (B2), Dagasztókar (C1) vagy
keverőlapát (C2) vagy szálas habverő (C3).
1.1 - A TARTOZÉKOK FELSZERELÉSE
Kövesse az 1.1.–1.4. ábrákat.
1.2 - ÜZEMBE HELYEZÉS
• Kapcsolja be a készüléket a sebesség gomb (A1) elforgatásával a recept által előírt állásba.
•
A készítmény elkészítése közben a fedő tölcsérnyílásán (B2) keresztül adagolhatja a hozzávalókat.
• A készülék kikapcsolásához fordítsa vissza a gombot (A1) a „0” állásra.
Tanácsok:
DAGASZTÁS (Maximális használati idő: 13 perc.)
- A dagasztókarhoz (C1) használja az „1”-es sebességet. A dagasztókarhoz max. 500 g lisztet
használjon (pl.: fehér kenyér, magvas kenyér, vajas tészta, linzertészta, …).
KEVERÉS (Maximális használati idő: 13 perc).
- A keverőlapáthoz (C2) használja az „1-től 6/max” vagy „1-től 8” (modell szerint)-ig sebességet.
- A keverőlapát segítségével max. 1,8 kg könnyű tésztát keverhet ki (piskóták, kekszek…).
- Soha ne használja a keverőlapátot (C2) nehéz tészták dagasztásához.
- HABVERÉS / ELOSZLATÁS / HABOSÍTÁS (Maximális használati idő: 10 perc.).
45
Page 51

- A szálas habverőhöz (C3) használja az „1-től 8/max” -ig sebességet.
- Elkészíthető ételek: majonéz, aioli mártás, szószok, tojásfehérje hab (max. 8 tojásfehérjével),
tejszínhab (max. 500 ml)…
- Soha ne használja a szálas habverőt (C3) nehéz tészták dagasztására vagy könnyű tészták
kikeverésére.
A tartozékok eltávolítása: Várja meg, amíg a készülék teljesen leáll, és hajtsa végre
fordított sorrendben az összeszerelési műveleteket, 1.4–1.1 ábra.
2 - ELDOLGOZÁS/KEVERÉS/TURMIXOLÁS
A hozzávaló jellegétől függően a turmix feltét (D) segítségével maximum 1.5 L sűrű keverék és
1.25 L folyékony keverék készíthető el.
(MODELL SZERINT)
ALKALMAZHATÓ TARTOZÉKOK: Turmix feltét (D / L).
2.1 - A TARTOZÉKOK FELSZERELÉSE
Kövesse a 2.1.–2.3. és 10. ábrát.
2.2 - ÜZEMBE HELYEZÉS (Maximális használati idő: 3 perc.).
• Kapcsolja be a készüléket a sebesség gomb (A1) elforgatásával a recept által előírt állásba (A
sebesség „4-től 8/max” vagy pulse). A keverés állapotának jobb ellenőrizhetősége és a készítmény
egyenletesebb állaga érdekében használja a „Pulse” állást.
•
A készítmény elkészítése közben a fedő tölcsérnyílásán (D2, L5) keresztül adagolhatja a hozzávalókat
Tanácsok:
• Elkészíthető ételek:
- Finomra eldolgozott krémlevesek, zöldségpürék, kompótok, milk-shake-ek, koktélok.
- Könnyű tészták (palacsinta, fánk, clafoutis, lepény, stb.).
• Ha keverés közben a hozzávalók az edény falához tapadnak, állítsa le a készüléket, várja meg
míg teljesen leáll, és a készülékről távolítsa el a turmixedényt, válassza le a hozzávalókat a
faláról egy spatula segítségével, majd helyezze vissza a turmixedényt a helyére, és folytassa
a készítmény elkészítését.
A tartozékok eltávolítása: A keverőedény kivétele előtt várja meg, amíg a készülék teljesen
leáll, és hajtsa végre fordított sorrendben az összeszerelési műveleteket, 2.3–2.1 és 10. ábra.
3 - DARÁLÁS
(MODELL SZERINT)
ALKALMAZHATÓ TARTOZÉKOK: Tartozéktartó (E), Összeszerelt daráló fej (F)
3.1 - A DARÁLÓFEJ ADAPTER ELHELYEZÉSE
Kövesse a 9., 10., majd a 3.1.–3.3. ábrát.
3.2 - ÜZEMBE HELYEZÉS
• Kapcsolja be a készüléket, a sebesség gombot (A1) használja „5 től 7” -es állásba állítva.
• Darabonként töltse be a ledarálni kívánt húst a tölcsérbe, a nyomórúd segítségével (F7). Soha
ne próbálja a darálnivalót az ujjával vagy más eszközzel belenyomni a tölcsérbe.
- Darálhat akár 3 kg húst, maximális használati idő: 10 perc.
Tanácsok:
- Készítse elő a teljes ledarálni kívánt mennyiséget (hús esetén távolítsa el a csontokat, inakat
és idegeket, és vágja fel kb. 2x2cm-es darabokra).
- Győződjön meg róla, hogy a hús nem fagyott állapotú.
HU
46
Page 52

A tartozékok eltávolítása: Várja meg, amíg a készülék teljesen leáll, és hajtsa végre fordított
sorrendben az összeszerelési műveleteket, 10., 3.3–3.1, majd a 9. ábra.
4 - RESZELÉS / SZELETELÉS
(MODELL SZERINT)
ALKALMAZHATÓ TARTOZÉKOK: Tartozéktartó (E), Összeszerelt zöldségaprító (G), Hengerek (modell
szerint)
4.1 - A TARTOZÉKOK FELSZERELÉSE
Kövesse a 10., 9., majd a 4.1.–4.2. ábrát.
4.2 - ÜZEMBE HELYEZÉS
• Kapcsolja be a készüléket, a sebesség gombot (A1) reszeléshez a „5” -ös, szeleteléshez a „7” -es
állásba állítva.
• Tegye bele a hozzávalókat a henger tölcsérbe, a nyomórúddal (G2) irányítva a műveletet. Soha
ne nyomkodja a hozzávalókat az ujjával vagy más eszközzel a tölcsérbe.
• Tud készíteni akár 2 kg élelmiszert, maximális használati idő: 10 perc.
• A hengerekkel lereszelhető hozzávalók:
- Durva reszelő (G4) / finom reszelő (G5): sárgarépa, zellergumó, burgonya, sajt,…
- Vastag szeletelő (G3): burgonya, sárgarépa, kígyóuborka, alma, karalábé,…
- Lángos henger (G6): burgonya, parmezán sajt…
A tartozékok eltávolítása: Várja meg, amíg a készülék teljesen leáll, és hajtsa végre fordított
sorrendben az összeszerelési műveleteket, 10., 4.2., 4.1. és 9. ábra.
5 - GYÜMÖLCS- ÉS ZÖLDSÉGCENTRIFUGA
(MODELL SZERINT)
ALKALMAZHATÓ TARTOZÉKOK: Összeszerelt centrifuga (H)
5.1 - A CENTRIFUGA ÖSSZESZERELÉSE
HU
Kövesse az 5.1.–5.6. ábrákat.
5.2 - ÜZEMBE HELYEZÉS (Maximális használati idő: 10 perc.)
• Vágja darabokra a gyümölcsöket és/vagy zöldségeket.
• Kapcsolja be a készüléket, a sebesség gombot (A1) a „5” -ös állásba állítva.
• Helyezze be a hozzávalókat a töltőcsőbe, a fedő alá (H2) és lassan nyomja le őket a tolórúddal (H1).
•
Egyszerre ne centrifugáljon 5-ször 500 g hozzávalónál többet a készülék megfelelő pihentetése
nélkül.
• Fontos: Minden 300 g hozzávaló feldolgozása után tisztítsa meg a szűrőt (H3) és a légyűjtőt (H4).
Tanácsok:
- Juice készíthető a következőkből: sárgarépa, paradicsom, alma, szőlő, málna stb., de egyes
gyümölcsök és zöldségek – banán, avokádó körte, szeder, bizonyos almafajták stb. – nem
préselhetők.
- A vastag héjú gyümölcsöket hámozza meg, távolítsa el a csonthéjas magokat, az ananász
közepét vágja ki.
- Rögtön a préselés után fogyassza el a juice-t.
A tartozékok eltávolítása: Várja meg, amíg a készülék és a forgószűrő teljesen leáll, mielőtt
leveszi a tartozékot a készülékről. Hajtsa végre fordított sorrendben az összeszerelési műveleteket,
5.6–5.1 ábra.
47
Page 53

6 - KIS MENNYISÉGEK EGÉSZEN FINOMRA DARÁLÁSA (MODELL SZERINT)
ALKALMAZHATÓ TARTOZÉKOK: Miniszeletelő-fedél (N1), miniszeletelő-edény (N2)
6.1 - A TARTOZÉKOK FELSZERELÉSE
Kövesse a 10., 6.1. és 6,2. ábrát.
6.2 - ÜZEMBE HELYEZÉS
• Végül szeletelhet a miniszeletelővel. A következők szeletelhetők:
- friss lágyszárú növények: max. 10g / max. 10 másodperc /„7” -es sebesség
- szárított gyümölcs / marhahús (csontozott és előkészített hús): max. 100g / max. 10 másodperc /
„1”-es sebesség
- zöldségpüré: max. 150g / max. 20 másodperc / „lökésszerűen” vagy „1”-es sebesség
• Ez a daráló nem alkalmas kemény élelmiszerek, például kávészemek, kemény növények őrlésére,
sem folyadékpréselésre.
A tartozékok eltávolítása: Várja meg, amíg a készülék teljesen leáll, és hajtsa végre fordított
sorrendben az összeszerelési műveleteket, 10., 6.2., és 6,1. ábra.
7 - A KÁBEL HOSSZÁNAK BEÁLLÍTÁSA
8 - KIS MENNYISÉGEK DURVA SZELETELÉSE
(lásd: A7)
(MODELL SZERINT)
ALKALMAZHATÓ TARTOZÉKOK: Összeállított daráló.
A pulse gomb néhány másodperces megnyomásával: szárított füge, szárított sárgabarack...
Mennyiség / max. idő: 100g / 5s.
TISZTÍTÁS
• Húzza ki a készüléket.
• Ne merítse sem a motorblokkot (A), sem az adaptert (E) vízbe, és ne tartsa vízsugár alá. Száraz
vagy alig nedves ronggyal törölje át.
• Használat után teljesen szerelje szét a készüléket és azonnal öblítse le a tartozékokat.
Minden éles szerszámmal bánjon óvatosan, mert sérülésveszélyesek. (10. ábra).
• Mossa el, öblítse le és szárítsa meg a tartozékokat: mosogatógépben elmoshatók, kivéve a
darálófej fém alkatrészeit, vagyis a törzset (F), a dagasztóegységet (C1) és a keverőt (C2).
MI A TEENDŐ, HA A KÉSZÜLÉK NEM MŰKÖDIK?
lásd „az első használat előtt” fejezetet.
Ha a készülék még ezek után sem működik: Lépjen kapcsolatba valamelyik hivatalos
márkaszervizzel (a szervizlistát lásd a külön brosúrában).
TARTOZÉKOK
Lásd a 91. oldalt, és látogassa meg a márka weboldalát.
Figyelmeztetés: ez a brosúra további tartozékokra vonatkozó előírásokat is tartalmaz.
Őrizze meg későbbi használat céljából. A tartozékok beszerzésével kapcsolatos további
információkat az ügyfélszolgálattól kaphat.
48
HU
Page 54

Upozorenje: Pažljivo pročitajte knjižicu sa „sigurnosnim
smjernicama” i upute prije prve uporabe.
PUŠTANJE U RAD
• Prije prve uporabe, sve dijelove pribora operite vodom i sredstvom za pranje posuđa (osim
priključka za nastavke (E): pogledajte odlomak o čišćenju) Isperite i osušite.
• Uređaj stavite na ravnu, čistu i suhu podlogu, uvjerivši se da je izbornik brzine (A1) u položaju
"0" zatim priključite uređaj na struju.
• Da biste ga pokrenuli, imate nekoliko mogućnosti: (vidi sliku A1):
- ulsni rad: (pulse):
Izbornik brzine (A1) okrenite u položaj "pulse" za bolju kontrolu prilikom pripreme nekih
namirnica.
- Kontinuirani rad:
Izbornik brzine (A1) okrenite u željeni položaj od "1 do 8/max" ovisno o pripremanim
namirnicama. Možete mijenjati položaj tijekom pripreme.
• Da biste zaustavili uređaj, tipku (A1) vratite na "0".
Važno: Uređaj se može pokrenuti jedino ako su poklopac (A5) i glava (A3) zaključani. Ako
otključate poklopac (A5) i/ili glavu (A3) tijekom rada, uređaj će se odmah zaustaviti. Ponovno
zaključajte poklopac/ili glavu, vratite se na položaj "0" pomoću izbornika brzine (A1), i zatim
ponovno pokrenite uređaj postavljajući izbornik na željenu brzinu.
1 - MIJEŠANJE / MIJEŠENJE TIJESTA / TUČENJE / EMULGIRANJE / MUĆENJE
Ovisno o prirodi namirnica, posuda od inoxa (B1) i njen poklopac (B2) dopuštaju vam da pripremite
1,8 kg lakog tijesta.
PRIBOR U UPORABI: Posuda od inoxa (B1), Poklopac (B2), Nastavak za kompaktna tijesta (C1)
ili nastavak za laka tijesta (C2) ili metlica (C3).
1.1 - SASTAVLJANJE PRIBORA
HR
Slijedite sličice od 1.1. do 1.4.
1.2 - STAVLJANJE U RAD
• Izbornik (A1) postavite na željeni položaj ovisno o receptu.
• Tijekom pripreme možete dodavati namirnice kroz otvor na poklopcu (B2).
• Da biste zaustavili uređaj, izbornik (A1) vratite na "0".
Savjeti:
MIJEŠENJE KOMPAKTNIH TIJESTA (Maksimalno vrijeme uporabe do: 13 min.)
- Rabite nastavak za miješenje kompaktnih tijesta (C1) na brzini "1". Možete mijesiti do 500 g
brašna (npr.: bijeli kruh, kruh sa žitaricama, prhko tijesto, tijesto za pitu, …).
MIJEŠENJE LAKIH TIJESTA (Maksimalno vrijeme uporabe do: 13 min.)
- Nastavak za miješenje lakih tijesta (C2) rabite na brzini od "1 do 8/max".
- Možete miješati do 1,8 kg lakog tijesta (quatre-quarts, biskvite…).
- Nastavak za miješenjenje lakih tijesta (C2) nemojte nikad rabiti za miješenje kompaktnih
tijesta.
49
Page 55

- TUČENJE / EMULGIRANJE / MUĆENJE (Maksimalno vrijeme uporabe do: 10 min.)
- Metlicu (C3) rabite na brzini od "1 do 8/max".
- Možete pripremiti: majonezu, majonezu sa češnjakom, umake, snijeg od bjelanjaka (do 8
bjelanjaka), chantilly umak (do 500 ml)…
- Metlicu (C3) nemojte nikada rabiti za miješenje kompaktnih i lakih tijesta.
Odvajanje pribora: Pričekajte da se uređaj u potpunosti zaustavi i nastavite redoslijedom
obrnutim od redoslijeda montaže prema sličicama 1.4. do 1.1.
2 - BLENDER / MIJEŠANJE
Ovisno o prirodi namirnica, posuda blendera (D) dopušta vam da pripremite do 1.5 L gustih smjesa
i 1.25 L tekućih smjesa.
(OVISNO O MODELU)
PRIBOR U UPORABI: Posuda blendera (D / L).
2.1 - SASTAVLJANJE PRIBORA
Slijedite sličice od 2.1. do 2.3. i 10.
2.2 - STAVLJANJE U RAD (Maksimalno vrijeme uporabe do: 3 min.).
• Izbornik brzine (A1) stavite u pogon i okrenite na željeni položaj ovisno o receptu (od brzine
do "7 do 8" ili puls). Zbog bolje kontrole miješanja i bolje homogenizacije pripravka, koristite
impulsni rad.
• Tijekom pripreme možete dodavati namirnice kroz otvor dozirnog čepa (D2, L5).
Savjeti:
• Možete pripremiti:
- Krem juhe, kaše, mliječne miješavine s voćem, koktele.
- Laka tijesta (palačinke, uštipci, wafli, kreme..).
•
Ako za vrijeme miješanja sastojci ostanu zalijepljeni za stijenke posude, zaustavite uređaj,
pričekajte da se uređaj u potpunosti zaustavi i skinite posudu blendera, pustite da sastojci padnu
na noževe uz uporabu lopatice, zatim vratite na mjesto svoju posudu blendera da biste nastavili
s pripremom.
Odvajanje pribora: Prije uklanjanja vrča za miješanje pričekajte da se uređaj u potpunosti
zaustavi i nastavite redoslijedom obrnutim od redoslijeda montaže prema sličicama od 2.3. do
2.1. i 10.
3 - MLJEVENJE
PRIBOR U UPORABI:
(OVISNO O MODELU)
Priključak za nastavke (E), Nastavak za mljevenje (F)
3.1 - POSTAVITE PRIKLJUČAK ZA NASTAVAK ZA MLJEVENJE/MULTIPRAKTIK
Slijedite sličice 9., 10., a zatim i one od 3.1. do 3.3.
3.2 - STAVLJANJE U RAD
• Stavite u rad i okrenite izbornik (A1) na brzinu "5 do 7".
• U otvor stavljajte meso komad po komad pomoću potiskivača (F7). Sastojke u otvor nikada
nemojte gurati prstima ili kuhinjskim priborom.
- Možete usitniti do 3 kg mesa, maksimalno vrijeme uporabe do: 10 min.
Savjeti:
- Pripremite ukupnu količinu namirnica za mljevenje (za meso, uklonite kosti, hrskavicu i žile i
režite na komade veličine 2x2cm).
HR
50
Page 56

- Uvjerite se da je vaše meso potpuno odmrznuto.
Odvajanje pribora: Pričekajte da se uređaj u potpunosti zaustavi i nastavite redoslijedom
obrnutim od redoslijeda montaže prema sličicama 10., od 3.3. do 3.1., a onda i 9.
4 - RIBANJE / REZANJE
(OVISNO O MODELU)
PRIBOR U UPORABI: Priključak za nastavke (E), Nastavak sjeckalice (G), Bubnjevi (ovisno o modelu)
4.1 - SASTAVLJANJE PRIBORA
Slijedite sličice 10., 9., a zatim i one od 4.1. do 4.2.
4.2 - STAVLJANJE U RAD
• Stavite u rad i okrenite izbornik (A1) na brzinu "5" za rezanje na kriške i na brzinu "4 illi 7" (ovisno
o modelu) za ribanje.
• Namirnice stavite otvor nastavka za bubnjeve i usmjerite ih pomoću potiskivača (G2). Sastojke
nikada nemojte gurati prstima ili kuhinjskim priborom.
• Možete pripremiti i do 2 kg hrane, maksimalno vrijeme uporabe do: 10 min.
• Rabite bubnjeve za:
- Krupno ribanje (G4) / sitno ribanje (G5): mrkve, celer, krumpir, sir, …
- Krupno rezanje (G3): krumpir, mrkva, krastavci, jabuke, cikla, …
- Usitnjavanje (G6): krumpir, parmezan…
Odvajanje pribora: Pričekajte da se uređaj u potpunosti zaustavi i nastavite redoslijedom
obrnutim od redoslijeda montaže prema sličicama 10., 4.2., 4.1. i 9.
5 - SOKOVNIK ZA VOĆE I POVRĆE
(OVISNO O MODELU)
PRIBOR U UPORABI: Sklop sokovnika (H)
5.1 - SKLAPANJE SOKOVNIKA
Slijedite sličice od 5.1. do 5.6..
5.2 - STAVLJANJE U RAD (Maksimalno vrijeme uporabe do: 10 min.)
HR
• Voće i/ili povrće narežite na komade.
• Stavite u rad i okrenite izbornik (A1) na brzinu "5".
• Stavite sastojke u otvor za punjenje u poklopcu (H2) i polako ih pritisnite koristeći potiskivač (H1).
• Ne možete obraditi više od 500 g namirnica 5 puta zaredom, a da ne dopustite da se vaš uređaj
potpuno ne ohladi.
• Važno: očistite filtar (H3) i posudu za skupljanje sokova (H4) nakon svakih 300 g sastojaka.
Savjeti:
- Sokove možete napraviti od: mrkvi, rajčica, jabuka, grožđa, malina itd., ali iz određenog voća
i povrća nije moguće iscijediti sok: banane, avokada, kruške, kupina, nekih sorti jabuka itd.
- Ogulite voće koje ima debelu koru, izvadite sjemenke, uklonite središnji dio ananasa.
- Sokove popijte odmah nakon pripreme.
Odvajanje pribora: Pričekajte da se uređaj i rotacijski filtar u potpunosti zaustave prije
uklanjanja pribora s uređaja. Nastavite redoslijedom obrnutim od redoslijeda montaže prema
sličicama od 5.6. do 5.1.
51
Page 57

6 - FINO SJECKANJE MANJIH KOLIČINA
PRIBOR U UPORABI:
Mini sjeckalica s poklopcem (N1), mini sjeckalica s posudom (N2)
(OVISNO O MODELU)
6.1 - SASTAVLJANJE PRIBORA
Slijedite sličice 10., 6.1. i 6.2.
6.2 - STAVLJANJE U RAD
• Možete sitno sjeckati s mini sjeckalicom:
- svježe začinsko bilje: maksimalno 10 g / maksimalno 10 sekundi / brzina „7”
- suho voće / govedina (bez kostiju i očišćeno meso) maksimalno 100 g / maksimalno 10 sekundi
/ brzina „1”
- pire od povrća: maksimalno 150 g / maksimalno 20 sekundi / brzina „1”
• Ovaj uređaj za mljevenje nije namijenjen za krute proizvode poput zrna kave, krutih začina, kao
ni za tekućine.
Odvajanje pribora: Pričekajte da se uređaj u potpunosti zaustavi i nastavite redoslijedom
obrnutim od redoslijeda montaže prema sličicama 10., 6.2. i 6.1.
7 - ODREĐIVANJE DULJINE PRIKLJUČNOG VODA
8 - GRUBO SJECKANJE MANJIH KOLIČINA
(vidi A7)
(OVISNO O MODELU)
PRIBOR U UPORABI: Sklop sjeckalice.
-
Za nekoliko sekundi impulsno nasjeckati: suhe smokve, suhe marelice... Količina / maksimalno
vrijeme: 100g / 5s
ČIŠĆENJE
• Uređaj isključite iz struje.
• Kućište uređaja (A) niti priključak (E) ne uranjajte u vodu niti stavljajte pod tekuću vodu.
Obrišite ga suhom ili vlažnom krpom.
• U potpunosti rastavite i isperite pribor odmah nakon uporabe.
Svim noževima rukujte uz mjere predostrožnosti, možete se ozlijediti. (diagram 10).
• Operite, isperite i osušite pribor: on je siguran za perilicu posuđa, osim svih metalnih dodataka
u glavi za mljevenje: kućište (F), nastavak za miješanje (C1) i mikser (C2).
AKO VAŠ UREĐAJ VIŠE NE RADI, ŠTO UČINITI ?
molimo pogledajte poglavlje „prije prve uporabe”.
Uređaj i dalje ne radi? Kontaktirajte s ovlaštenim centrom za servisiranje (vidi popis u knjižici s
uputama).
NASTAVCI
Pogledajte stranicu 91. i posjetite mrežnu stranicu robne marke proizvoda.
Pozor: knjižica sadrži upute za dodatni pribor. Čuvajte ju za buduće potrebe. Kontaktirajte
sa službom za korisnike radi daljnjih informacija o tome kako nabaviti pribor.
52
HR
Page 58

Avertizare: vă rugăm să citiți cu atenție instrucțiunile
privind siguranța înainte de utilizarea inițială.
PUNEREA ÎN FUNCŢIUNE
• Înainte de prima utilizare, spălați toate piesele accesoriilor cu apă și detergent de vase (cu
excepția adaptorului (E): vezi și Curățare). Clătiți şi ştergeți.
• Aşezați aparatul pe o suprafață plană, curată şi uscată, asigurați-vă că butonul variator (A1) este
pe poziția „0”, apoi conectați aparatul la priză.
• Aveți cateva opțiuni pentru pornirea aparatului (vezi diagrama A1):
- Funcţionare intermitentă Pulse (impulsuri):
Rotiți butonul variator (A1) pe poziția „pulse”, care presupune impulsuri succesive pentru un
mai bun control atunci când gătiți anumite preparate.
- Funcţionare continuă:
Funcționare continuă: Rotiți butonul variator (A1) pe poziția dorită de la „1 până la 8/max”, în
funcție de preparatele făcute. Puteți să o modificați în timpul preparării.
• Pentru a opri aparatul, readuceți butonul (A1) pe „0”.
Important: Aparatul nu va putea porni în cazul în care capacul (A5) şi capul (A3) nu sunt blocate.
Dacă deblocaţi capacul (A5) şi/sau capul (A3) în timpul funcţionării, aparatul se va opri imediat.
Blocaţi din nou capacul şi/sau capul, reveniţi pe poziţia „0” cu butonul de comandă (A1), apoi
procedaţi în modul obişnuit pentru punerea în funcţiune a aparatului, selectând viteza dorită.
1 - AMESTECARE / FRĂMÂNTARE / EMULSIONARE / AMESTECARE RAPIDĂ CU TELUL
În funcție de natura alimentelor, bolul de inox (B1) şi capacul său (B2) vă permit să preparați până
la 1,8 kg de aluat uşor.
ACCESORII UTILIZATE: bol din oțel inoxidabil (B1), Capac (B2), Cârlig pentru frământat (C1),
malaxor (C2) sau tel (C3).
1.1 - MONTAREA ACCESORIILOR
Urmăriți diagramele de la 1,1 la 1,4.
RO
1.2 - PUNEREA ÎN FUNCŢIUNE
• Începeți prin a roti butonul de selecție (A1) spre poziția dorită, conform rețetei.
• Puteți adăuga ingrediente în timpul preparării, prin orificiul special din capac.
• Pentru a opri aparatul, rotiți butonul (A) către "0".
Sfaturi:
FRĂMÂNTARE (Timp de utilizare maxim: 13 minute.)
- Utilizați cârligul pentru frământare (C1) pe viteza „1”. Puteți frământa până la 500 g de făină
(de ex.: pâine albă, pâine cu cereale, aluat etc.).
AMESTECARE (Timp de utilizare maxim: 10 minute.).
- Utilizați malaxorul (C2) pe o viteză de la „1 până la 8/max”.
- Puteți amesteca până la 1,8 kg de aluat uşor (checuri, biscuiți, etc.).
- Nu utilizaţi niciodată malaxorul (C2) pentru a frământa aluaturi tari.
53
Page 59

- BATERE / EMULSIONARE / BATERE RAPIDĂ CU TELUL (Timp de utilizare maxim: 10 minute.).
- Utilizați telul (C3) pe o viteză de la „1 până la 8/max”.
- Puteți prepara: maioneză, cremă de usturoi, sosuri, albuşuri spumă (până la 8 albuşuri de ou),
frişcă (până la 500 ml)…
- Nu utilizaţi niciodată telul (C3) pentru a frământa aluaturi tari sau pentru a amesteca
aluaturi uşoare.
Demontarea accesoriilor: Așteptați ca aparatul să se oprească complet si procedați în ordinea
inversă asamblării, diagramele de la 1.4 la 1.1.
2 - OMOGENIZARE / AMESTECARE / BLENDER (ÎN FUNCŢIE DE MODEL)
În funcție de natura alimentelor, bolul blender (D) vă permite să preparați până la 1,5 l de
amestecuri groase şi 1,25 l de amestecuri lichide.
ACCESORII UTILIZATE: bol blender (D / L).
2.1 - MONTAREA ACCESORIILOR
Folosiți diagramele de la 2.1 la 2.3 și 10.
2.2 - PUNEREA ÎN FUNCŢIUNE (Timp de utilizare maxim: 3 minute.).
• Porniți, rotind butonul variator (A1) pe poziția dorită, în funcție de rețetă (de la „7 până la 8” sau
pulse). Pentru un mai bun control asupra amestecării şi o mai bună omogenizare a preparatului,
utilizați poziția «Pulse».
• Puteți adăuga alimentele prin orificiul dopului dozator (D2, L5), în timpul preparării.
Sfaturi:
• Puteți prepara:
- Ciorbe mixate fin, supe creme, compoturi, milkshake-uri, cocktailuri.
- Aluaturi uşoare (de clătite, opărit pentru gogoşi, clafoutis, flan, etc.).
• În timpul mixării, dacă ingredientele rămân lipite de pereții bolului, opriți aparatul, așteptați
pentru oprirea completă a aparatul și scoateți bolul blender, dați jos ingredientele de pe pereți
pe lame folosind o spatulă, apoi puneți la loc bolul blender pentru a continua prepararea.
Demontarea accesoriilor: Așteptați ca aparatul să se oprească complet înainte de a
scoate bolul blender și continuați în ordinea inversă asamblării, diagramele de la
2,3 până la 2,1 și 10.
3 - TOCARE (ÎN FUNCŢIE DE MODEL)
ACCESORII UTILIZATE:
3.1 - MONTAREA ADAPTORULUI PENTRU TOCĂTOR
Urmați diagramele 9,10 și apoi 3.1 - 3.3.
3.2 - PUNEREA ÎN FUNCŢIUNE
• Puneți în funcțiune, rotind variatorul (A1) pe viteza „5 până la 7”
•
Introduceți carnea în tubul de alimentare, bucată cu bucată, cu ajutorul accesoriul pentru impins
(F7). Nu împingeți niciodată ingredientul cu degetele sau cu alte ustensile în tubul de alimentare.
- Puteți tăia până la 3 kg de carne, Timp de utilizare maxim: 10 minute.
Sfaturi:
- Pregătiți întreaga cantitate de alimente ce trebuie tocată (la carne eliminați oasele, zgârciurile
şi nervurile şi tăiați-o în bucățele de aproximativ 2 x 2 cm).
Adaptor pentru tocător (E), Accesoriu pentru tocat (F)
RO
54
Page 60

- Asigurați-vă că aceasta este decongelată complet.
Demontarea accesoriilor: Așteptați ca aparatul să se oprească complet și continuați în ordinea
inversă a diagramelor de asamblare 10, 3.3-3.1 și apoi 9.
4 - RĂZUIRE / FELIERE (ÎN FUNCŢIE DE MODEL)
ACCESORII UTILIZATE: Suport pentru ataşament (E), Dispozitiv de răzuit legume asamblat (G), Tamburi
(în funcție de model)
4.1 - MONTAREA ACCESORIILOR
Urmați diagramele 10, 9, 4.1 - 4.2.
4.2 - PUNEREA ÎN FUNCŢIUNE
• Puneți în funcțiune, rotind variatorul (A1) pe viteza „5” pentru feliere şi pe viteza „4 sau 7” (în
funcție de model) pentru răzuire.
• Introduceți alimentele în tubul de alimentare al suportului şi ghidați-le cu ajutorul accesoriului
pentru împins (G2). Nu împingeţi niciodată ingredientul cu degetele sau cu alte ustensile.
• Vă puteți pregăti până la 2 kg de alimente, timp de utilizare maxim: 10 minute.
• Puteți prepara cu tamburii:
- Pentru răzuire grosieră (G4) / răzuire fină (G5): morcovi, țelină, cartofi, brânză, etc.
- Pentru feliere grosieră (G3): cartofi, morcovi, castraveți, mere, sfeclă, etc.
- Pentru tăiat julien (G6): cartofi, parmezan, etc.
Demontarea accesoriilor: Așteptați ca aparatul să se oprească complet și continuați în ordinea
inversă a diagramelor de asamblare 10, 4.2 - 4.1 și apoi 9.
5 - STOARCEREA FRUCTELOR ŞI LEGUMELOR
(ÎN FUNCŢIE DE MODEL)
ACCESORII UTILIZATE: Storcător asamblat (H)
5.1 - ASAMBLAREA STORCATORULUI
Urmați diagramele 5.1 - 5.6.
5.2 - PUNEREA ÎN FUNCŢIUNE (Timp de utilizare maxim: 10 minute.)
• Tăiați fructele şi/sau legumele în bucățele.
RO
• Puneți în funcțiune, rotind variatorul (A1) pe viteza „5”.
• Introduceți ingredientele prin tubul de alimentare situat pe capac (H2) ajutându-vă de
dispozitivul de împingere (H1).
• Nu prelucrați 500 g de ingrediente mai mult de 5 ori în mod continuu, fără a permite aparatului să se
răcească complet.
• Important: Curățați filtrul (H3) și colectorul de suc (H4) după fiecare 300 g de ingrediente.
Sfaturi:
- Puteți face suc din: morcovi, roșii, mere, struguri, zmeură, etc., dar nu este posibil să se
extragă suc din anumite fructe și legume precum: banane, pere, avocado, mure, unele soiuri
de mere, etc.
- Decojiți fructele cu coajă groasă; îndepărtați sâmburii și miezul de ananas.
- Consumați sucurile imediat după preparare.
Demontarea accesoriilor: Așteptați ca aparatul și filtrul rotativ să se oprească complet și
continuați în ordinea inversă a diagramelor de asamblare 5.6 - 5.1.
55
Page 61

6 - TOCAREA FOARTE FINĂ PENTRU CANTITĂŢI FOARTE MICI
(ÎN FUNCŢIE DE MODEL)
ACCESORII UTILIZATE: Capac mini tocător (N1), bol mini tocător (N2)
6.1 - MONTAREA ACCESORIILOR
Urmați diagramele 10, 6.1 și 6.2.
6.2 - PUNEREA ÎN FUNCŢIUNE
• Puteți toca fin cu un mini tocător:
- Ierburi proaspete: max. 10g /max. 10 sec./ Viteza «7»
- Fructe uscate / Carne de vită (fără os și carne tăiată): max. 100g / max. 10 sec, / Viteza «1»
- Piure de legume: max. 150g / max. 20 sec. / «Puls» sau viteza «1»
• Acest accesoriu nu este proiectat pentru produse dure cum ar fi boabe de cafea, condimente
tari si nici lichide.
Demontarea accesoriilor: Așteptați ca aparatul și filtrul rotativ să se oprească complet și
continuați în ordinea inversă a diagramelor de asamblare 10, 6.2 și 6.1.
7 - STABILIREA LUNGIMII CABLULUI DE ALIMENTARE (vezi A7)
8 - MĂRUNŢIRE GROSIERĂ A UNOR CANTITĂŢI MICI (ÎN FUNCŢIE DE MODEL)
ACCESORII UTILIZATE:
Mărunțește în câteva secunde în modul pulse: smochine uscate, caise uscate, etc. Cantitate /
timp max.: 100 g / 5 s.
Accesoriu pentru mărunțire asamblat.
CURĂŢAREA
• Deconectați aparatul de la priză.
• Nu introduceți blocul motor (A), nici adaptorul (E) în apă sau sub apă curentă. Ştergeți-le cu o
cârpă uscată sau foarte puțin umezită.
• Dezasamblați complet și clătiți accesoriile rapid după utilizare.
Manipulaţi toate lamele cu grijă, acestea vă pot răni. (diagrama 10).
• Spălați, clătiți și uscați accesoriile: acestea sunt compatibile cu mașina de spălat vase, cu
excepția tuturor componentelor de metal din tocător: corp (F), malaxor (C1) și mixer (C2).
CE PUTEŢI FACE DACĂ APARATUL NU FUNCŢIONEAZĂ?
vă rugăm sa consultați capitolul "înainte de prima utilizare".
Aparatul dvs. încă nu funcţionează? Apelați la un centru de service autorizat (vezi lista din
broșura de service).
RO
ACCESSORII
A se vedea pagina 91 și vizitați site-ul nostru.
Atenţie!: Această broșură conţine instrucţiuni pentru accesorii suplimentare. Vă rugăm să
păstraţi în condiţii de siguranţă pentru consultarea viitoare. Vă rugăm să contactaţi Serviciul
Clienţi pentru informaţii suplimentare cu privire la posibilitatea de a cumpăra accesorii.
56
Page 62

Varovanie: Pred prvým použitím si pozorne prečítajte
brožúrku „bezpečnostné pokyny“ a návod na obsluhu.
UVEDENIE DO PREVÁDZKY
• Pred prvým použitím umyte všetky diely príslušenstva saponátovou vodou (okrem adaptéra (E):
pozri odsek „Čistenie“). Opláchnite vodou a osušte.
• Prístroj položte na rovnú, čistú a suchú plochu. Ubezpečte sa, že tlačidlo regulátora rýchlosti (A1)
sa nachádza v polohe „0“, a potom prístroj zapojte do elektrickej siete.
• Ak chcete začať , máte niekoľko možností (pozrite schému A1) :
- Prerušovaný chod („pulse“):
Tlačidlo regulátora rýchlosti (A1) pootočte do polohy „pulse“ a niekoľkokrát stlačte. Týmto
spôsobom môžete lepšie kontrolovať prípravu pokrmov.
- Plynulý chod:
Tlačidlo regulátora rýchlosti (A1) pootočte do požadovanej polohy (od „1 po 8/max“) podľa
druhu pripravovaného pokrmu. Rýchlosť počas prípravy môžete meniť.
• Prístroj vypnite pootočením tlačidla (A1) do polohy „0“.
Prístroj vypnite pootočením tlačidla (A1) do polohy „0“. Dôležité upozornenie: Prístroj je možné uviesť
do chodu len vtedy, ak je zaistený ochranný kryt (A5) a multifunkčná hlavica (A3). Ak ochranný kryt
(A5) a/alebo multifunkčnú hlavicu (A3) odistíte, keď je prístroj v činnosti, prístroj sa automaticky
vypne. V takom prípade ochranný kryt a/alebo multifunkčnú hlavicu opäť zaistite, ovládacie tlačidlo
(A1) vráťte do polohy „0“ a potom prístroj zapnite obvyklým spôsobom (zvoľte požadovanú rýchlosť).
1 - MIEŠANIE / HNETENIE / TRENIE / EMULGOVANIE / ŠĽAHANIE
V nerezovej pracovnej nádobe (B1) s vekom (B2) môžete pripraviť až 1,8 kg ľahkého cesta, v
závislosti od druhu použitých potravín.
POUŽITÉ PRÍSLUŠENSTVO: Nerezová pracovná nádoba (B1), Veko (B2), Hnetací nástavec (C1),
alebo miešací nástavec (C2) alebo šľahacia metlička (C3).
1.1 - MONTÁŽ PRÍSLUŠENSTVA
Postupujte podľa schém od 1.1 po 1.4.
1.2 - UVEDENIE DO PREVÁDZKY
• Prístroj zapnite pootočením tlačidla regulátora rýchlosti (A1) do požadovanej polohy, v
SK
závislosti od konkrétneho receptu.
• Potraviny môžete pridávať do pracovnej nádoby aj počas prípravy, cez plniaci otvor vo veku
(B2).
• Ak chcete prístroj vypnúť, tlačidlo (A1) pootočte do polohy „0“.
Rady:
HNETENIE (Maximálna doba prevádzky: 13 minút.)
- Hnetací nástavec (C1) používajte pri rýchlosti „1“. Na miesenie cesta môžete použiť až do 500
g múky (napr.: biely chlieb, celozrnný chlieb, maslové cesto, linecké cesto a pod.).
MIEŠANIE (Maximálna doba prevádzky: 13 minút.)
- Miešací nástavec (C2) používajte pri rýchlosti „1 po 8/max“.
- Tento prístroj umožňuje vymiešať až 1,8 kg ľahkého cesta (piškótové cesto, bisk vitové cesto a pod).
- Miešací nástavec (C2) nikdy nepoužívajte na hnetenie hustého cesta.
- TRENIE / EMULGOVANIE / ŠĽAHANIE (Maximálna doba prevádzky: 10 minút.)
57
Page 63

- Šľahaciu metličku (C3) používajte pri rýchlosti „1 po 8/max“.
- Možete pripraviť: majonézu, omáčku aioli, sneh z vaječného bielka (až do 10 vaječných bielok),
šlahačku (až do 500ml), pusinky, a iné.
- Šľahaciu metličku (C3) nikdy nepoužívajte na hnetenie hustého cesta, ani na miešanie ľahkého cesta.
Demontáž príslušenstva: Počkajte, kým sa spotrebič úplne nezastaví a postupujte v
obrátenom poradí montáže – schémy od 1.4 po 1.1.
2 - HOMOGENIZÁCIA / MIEŠANIE / MIXOVANIE (V ZÁVISLOSTI OD MODELU)
V pracovnej nádobe na mixovanie (D) môžete pripraviť až 1,5 l hustých zmesí a 1,25 l tekutých
zmesí, v závislosti od druhu použitých potravín.
POUŽITÉ PRÍSLUŠENSTVO: Pracovná nádoba na mixovanie (D / L).
2.1 - MONTÁŽ PRÍSLUŠENSTVA
Postupujte podľa schém od 2.1 po 2.3 a 10.
2.2 - UVEDENIE DO PREVÁDZKY (Maximálna doba prevádzky: 3 minút).
• Prístroj zapnite pootočením tlačidla regulátora rýchlosti (a1) do požadovanej polohy, v závislosti
od konkrétneho receptu (od „7 po 8“ rýchlosti alebo pulse). Aby ste počas prípravy mohli lepšie
kontrolovať mixovanie a dosiahli homogénnejšiu zmes, použite polohu „pulse“.
•
Potraviny môžete pridávať do pracovnej nádoby aj počas prípravy, cez otvor dávkovacieho uzáveru (D2, L5).
Rady:
• Pomocou tohto nástavca môžete pripraviť:
- Jemne mixované polievky, krémové polievky, ovocné pyré, mliečne kokteily, tradičné kokteily.
- Ľahké cestá (palacinky, placky, bublanina, nákyp a pod.).
• Ak počas mixovania ostanú na stenách pracovnej nádoby nalepené potraviny, prístroj vypnite
počkajte na úplné zastavenie prístroja a pracovnú nádobu na mixovanie vyberte. Steny
pracovnej nádoby očistite , pomocou špachtle, aby potraviny spadli na čepele. Pracovnú nádobu
na mixovanie opäť pripevnite na prístroj a môžete ďalej pokračovať v príprave pokrmu.
Demontáž príslušenstva: Pred zložením nádoby mixéra počkajte, kým sa spotrebič úplne
nezastaví a postupujte v obrátenom poradí montáže – schémy od 2.3 po 2.1 a 10.
3 - SEKANIE / MLETIE (V ZÁVISLOSTI OD MODELU)
POUŽITÉ PRÍSLUŠENSTVO:
3.1 - MONTÁŽ ADAPTÉRA NA MLYNČEK
Postupujte podľa schém 9, 10 a potom od 3.1. po 3.3.
3.2 - UVEDENIE DO PREVÁDZKY
• Prístroj zapnite pootočením tlačidla regulátora rýchlosti (A1) do polohy „5 po 7“.
• Kúsky mäsa vkladajte do plniaceho nástavca a zatláčajte pomocou prítlačného aplikátora (F7).
Prísady nikdy nezatláčajte do plniaceho nástavca prstami alebo pomocou kuchynského náradia.
- Môžete zomlieť až 3 kg mäsa, maximálna doba prevádzky: 10 minút.
Rady:
- Pripravte si celé množstvo potravín, ktoré chcete mlieť (z mäsa odstráňte kosti, chrupavky a
šľachy a nakrájajte ho na kúsky s rozmermi približne 2 cm x 2 cm).
- Používajte len úplne rozmrazené mäso.
Držiak príslušenstva (E), Zmontovaná hlavica mlynčeka(F)
SK
58
Page 64

Demontáž príslušenstva: Počkajte, kým sa spotrebič úplne nezastaví a postupujte v
obrátenom poradí montáže – schémy 10, od 3.3 po 3.1 a potom 9.
4 - STRÚHANIE / KRÁJANIE (V ZÁVISLOSTI OD MODELU)
POUŽITÉ PRÍSLUŠENSTVO:
Bubienkové krájače a strúhadlá (v závislosti od modelu)
4.1 - MONTÁŽ PRÍSLUŠENSTVA
Postupujte podľa schém 10, 9 a potom od 4.1 po 4.2.
4.2 - UVEDENIE DO PREVÁDZKY
• Prístroj zapnite pootočením tlačidla regulátora rýchlosti (A1) do polohy „5“, ak chcete krájať,
alebo do polohy „7“, ak chcete strúhať.
• Potraviny vkladajte do plniaceho nástavca zásobníka a zatláčajte ich pomocou prítlačného
aplikátora (G2). Prísady nikdy nezatláčajte prstami alebo pomocou kuchynského náradia.
• Môžete pripraviť až 2 kg potravín, maximálna doba prevádzky: 10 minút.
• Pomocou bubienkových krájačov/strúhadiel môžete pripraviť:
- Hrubé strúhadlo (G4) / jemné strúhadlo (G5): mrkva, zelerové hľuzy, zemiaky, syr…
- Hrubý krájač (G3): zemiaky, mrkva, uhorky, jablká, červená repa…
- Strúhadlo na zemiaky (G6): zemiaky, parmezán…
Demontáž príslušenstva: Počkajte, kým sa spotrebič úplne nezastaví a postupujte v
obrátenom poradí montáže – schémy 10, 4.2, 4.1 a 9.
Držiak príslušenstva (E), Zmontované strúhadlo na zeleninu (G),
5 - ODŠŤAVOVANIE OVOCIA A ZELENINY (V ZÁVISLOSTI OD MODELU)
POUŽITÉ PRÍSLUŠENSTVO:
5.1 - MONTÁŽ ODŠŤAVOVAČA
Postupujte podľa schém od 5.1 po 5.6.
5.2 - UVEDENIE DO PREVÁDZKY (maximálna doba prevádzky: 10 minút.)
• Ovocie a/alebo zeleninu pokrájajte na kúsky.
• Prístroj zapnite pootočením tlačidla regulátora rýchlosti (A1) do polohy „5“.
• Prísady vkladajte cez plniaci otvor vo veku (H2) a pomaly ich posúvačom tlačte nadol (H1).
•
Pomocou odšťavovača môžete bez prestávky spracovať najviac 5-krát 500 g potravín, potom
SK
prístroj musíte nechať úplne vychladnúť.
• Dôležité: vždy po spracovaní 300 g prísad vyčistite filter (H3) a zbernú nádobu na šťavu (H4).
Rady:
- Odšťavovať môžete: mrkvu, paradajky, jablká, hrozno, maliny atď., ale niektoré druhy ovocia a
zeleniny sa odšťavovať nedajú: banány, avokádo, černice, niektoré odrody jabĺk atď.
Ovocie s hrubou šupou najprv ošúpte, plody zbavte jadier. Taktiež odstráňte stredovú časť ananásu.
-
- Šťavu hneď po príprave skonzumujte.
Demontáž príslušenstva: Pred zložením príslušenstva zo spotrebiča počkajte, kým sa
spotrebič a rotačný filter úplne nezastavia. Postupujte v obrátenom poradí montáže – schémy
od 5.6 po 5.1.
Zmontovaný odšťavovač (H)
59
Page 65

6 - JEMNÉ SEKANIE MALÉHO MNOŽSTVA POTRAVÍN (V Z ÁVISLOSTI OD MODELU)
POUŽITÉ PRÍSLUŠENSTVO: Veko mini krájača (N1), miska mini krájača (N2)
6.1 - MONTÁŽ PRÍSLUŠENSTVA
Postupujte podľa schém 10, 6.1 a 6.2.
6.2 - UVEDENIE DO PREVÁDZKY
• Pomocou mini krájača môžete nadrobno nakrájať:
- čerstvé bylinky: 10 g max./10 s max./rýchlosť «7»
- sušené ovocie/hovädzie (vykostené a orezané mäso): 100 g max./10 s max./rýchlosť «1»
- zeleninové pyré: 150 g max./20 s max./«impulz» alebo rýchlosť «1»
• Tento mlynček nie je určený na tvrdé suroviny ako kávové zrná, tvrdé koreniny ani tekutiny.
Demontáž príslušenstva: Počkajte, kým sa spotrebič úplne nezastaví a postupujte v
obrátenom poradí montáže – schémy 10, 6.2 a 6.1.
7 - NASTAVENIE DĹŽKY NAPÁJACIEHO KÁBLA (pozrite A7)
8 - KRÁJANIE MALÝCH MNOŽSTIEV NAHRUBO
(V ZÁVISLOSTI OD MODELU)
POUŽITÉ PRÍSLUŠENSTVO: Zostava drviča.
- Za niekoľko sekúnd posekáme (v krokovom režime „pulse“): sušené figy, sušené marhule...
Množstvo/max. čas: 100 g / 5 s.
ČISTENIE
• Prístroj odpojte z elektrickej siete.
• Blok motora (A), ani adaptér (E) neponárajte do vody alebo pod tečúcu vodu. Utrite ich suchou
alebo mierne navlhčenou handričkou.
• Po použití úplne rozmontujte a príslušenstvo hneď opláchnite. So všetkými čepeľami
manipulujte opatrne, aby ste sa neporanili. (schéma 10).
• Príslušenstvo umyte, opláchnite a osušte: môže sa umývať v umývačke riadu s výnimkou všetkých
kovových súčastí hlavy mlynčeka: telo (F), miesič (C1) a mixér (C2).
ČO ROBIŤ, AK PRÍSTROJ NEFUNGUJE?
Pozrite kapitolu «pred prvým použitím».
Váš spotrebič stále nefunguje? Kontaktujte autorizované servisné stredisko (pozrite zoznam v
servisnej knižke).
PRÍSLUŠENSTVO
Pozrite stranu 91 a navštívte webovú stránku značky.
Upozornenie: táto brožúrka obsahuje pokyny pre ďalšie príslušenstvo. Uschovajte pre
prípad potreby v budúcnosti. Ďalšie informácie o nákupe príslušenstva vám poskytne
zákaznícke centrum.
60
SK
Page 66

Opozorilo: pred prvo uporabo pozorno preberite knjižico
„varnostne smernice“ in navodila.
VKLOP
• Pred prvo uporabo operite vse dele dodatkov s sredstvom za pomivanje (razen dodatka (E):
glejte poglavje čiščenje), ter jih nato splaknite in osušite.
• Postavite aparat na ravno, čisto in suho površino ter nato preverite ali je nastavitveni gumb (A1)
v položaju »0« in priklopite aparat.
• Aparat lahko vključite na več načinov: (glejte diagram A1) :
- Delovanje s prekinitvami (pulzno):
Obrnite nastavitveni gumb (A1) v položaj »pulse« pri čemer boste z zaporednimi impulzi lažje
nadzirali pripravo živil.
- Neprekinjeno delovanje:
Obrnite nastavitveni gumb (A1) v želeni položaj med oznakama »1 in 8/max« glede na zahteve
za pripravo živil. Delovanje lahko uravnavate tudi med pripravo.
• Aparat ustavite tako, da obrnete nastavitveni gumb (A1) v položaj »0«.
Pomembno: Aparat se ne bo vključil, če ni zaprta loputa (A5) in zataknjena glava (A3). Če med
delovanjem aparata odprete loputo (A5) in/ali snamete glavo (A3), se aparat takoj ustavi.
Ponovno zaprite loputo in/ali nataknite glavo, obrnite nastavitveni gumb (A1) v položaj
»0« ter nato nadaljujte z normalnim delovanjem tako, da nastavite aparat na želeno hitrost.
1 - MEŠANJE / GNETENJE / TOLČENJE / EMULGIRANJE / STEPANJE
Glede na vrsto živil lahko v posodi iz nerjavečega jekla (B1) s pokrovom (B2) pripravite do 1,8 kg
lahkega testa.
UPORABLJENI DODATKI: Posoda iz nerjavečega jekla (B1), Pokrov (B2), Kavelj (C1) ali mešalo
(C2) ali metlica z gostimi žicami (C3).
1.1 - NAMESTITEV DODATKOV
Sledite diagramom od 1.1 do 1.4.
1.2 - VKLOP
• Pričnite z nastavitvijo gumba (A1) na želeno mesto, glede na izbran recept.
• Skozi odprtino na pokrovu (B2) lahko namestite mešalno nogo.
• Za zaustavitev aparata, obrnite gumb (A1) v pozicijo "0".
SL
Nasveti:
GNETENJE (Maksimalni čas uporabe: 13 minut.)
- Uporabite nastavek za gnetenje (C1) pri hitrosti »1«. Gnetete lahko do 500 g moke (npr.: bel
kruh, polnozrant kruh, testo za pecivo, masleno testo itd.).
MEŠANJE (Maksimalni čas uporabe: 13 minut.)
- Uporabite mešalo (C2) pri hitrosti med »1 in 8/max«.
- Mešate lahko do 1,8 kg lahkega testa (testo za kolače, biskvit itd.)
- Nikoli ne uporabite mešalo (C2) za gnetenje težkega testa.
- TOLČENJE / EMULGIRANJE / STEPANJE (Maksimalni čas uporabe: 10 minut).
61
Page 67

- Uporabite metlico z gostimi žicami (C3) pri hitrosti med »1 in 8/max«.
- Pripravite lahko: majonezo, česnovo majonezo, omake, sneg iz beljakov (iz 8 beljakov), omako
chantilly (do 500 ml)…
- Nikoli ne uporabite metlice z veliko žicami (C3) za gnetenje težkega ali mešanje lahkega testa.
Odstranitev dodatkov: počakajte, da se aparat popolnoma ustavi, in nadaljujte v obratnem
vrstnem redu sestave; diagrami od 1.4 do 1.1.
2 - HOMOGENIZIRANJE/UMEŠANJE/MEŠANJE
Odvisno od narave sestavin lahko v posodi mešalnika (D) pripravite do 1,5 L goste in 1,25 L redke
mešanice.
(ODVISNO OD MODELA)
UPORABLJENI DODATKI: Posoda mešalnika (D / L).
2.1 - NAMESTITEV DODATKOV
Sledite diagramom od 2.1 do 2.3 in 10.
2.2 - VKLOP (Maksimalni čas uporabe: 3 minut.)
• Obrnite nastavitveni gumb (A1) v položaj, ki ustreza receptu (od »7 in 8« hitrost ali »Pulse«). Če
želite boljši nadzor pri mešanju in homogenizaciji uporabite položaj »Pulse«.
• Med pripravo lahko dodajate sestavine skozi odprtino v dozirnem pokrovu (D2, L5).
Nasveti:
• Pripravite lahko:
- kremne juhe, kreme, kompote, mlečne napitke, koktajle.
- tekoča testa (palačinke, krofi, sadni kolač, bretonska pita).
• IČe se pri mešanju sestavine oprijemajo sten posode, ustavite aparat, počakati na popolno
zaustavitev delu naprave, snemite posodo mešalnika in stresite sestavine proti rezilu mešalnika
z lopatico ter nato ponovno namestite posodo in nadaljujte s pripravo.
Odstranitev dodatkov: počakajte, da se aparat popolnoma ustavi, preden odstranite vrč
mešalnika, in nadaljujte v obratnem vrstnem redu sestave; diagrami od 2.3 do 2.1 in 10.
3 - SEKLJALNIK
(ODVISNO OD MODELA)
UPORABLJENI DODATKI: Držalo (E), Sestava glave sekljalnika (F)
3.1 - NAMESTITEV DODATKA ZA SEKLJANJE
Sledite diagramom 9, 10 in nato od 3.1 do 3.3.
3.2 - VKLOP
• Vklopite aparat tako, da obrnete nastavitveni gumb (A1) na hitrost »5 in 7«.
• Postopno dodajajte kose mesa v dovodni lijak in si pri tem pomagajte s potiskalnikom (F7).
Nikoli ne potiskajte živil v dovodni lijak s prsti ali drugimi pripomočki.
- Lahko sesekljajte do 3 kg mesa, maksimalni čas uporabe: 10 minut.
Nasveti:
- Pripravite celotno količino živil za sekljanje (pri mesu odstranite kosti, hrustance in tetive ter
ga narežite na kocke velike približno 2x2cm).
- Zagotovite, da bo meso pred pripravo dobro odtajano.
Odstranitev dodatkov: počakajte, da se aparat popolnoma ustavi, in nadaljujte v obratnem
vrstnem redu sestave; diagrami 10, od 3.3 do 3.1 in nato 9.
SL
62
Page 68

4 - STRGALNIK / REZALNIK
UPORABLJENI DODATKI:
(ODVISNO OD MODELA)
Držalo (E), Sestava rezalnika zelenjave (G), Bobni (odvisno od modela)
4.1 - NAMESTITEV DODATKOV
Sledite diagramom 10, 9 in nato od 4.1 do 4.2.
4.2 - VKLOP
• Vklopite aparat tako, da obrnete nastavitveni gumb (A1) na hitrost »5« za rezalnik ali »4 ali 7«
(odvisno od modela) za strgalnik.
• Stresite živila v dovodni lijak in si pri tem pomagajte s potisnikom (G2). Nikoli ne potiskajte
živil s prsti ali drugimi pripomočki.
• Lahko pripravite do 2 kg hrane, maksimalni čas uporabe: 10 minut.
• Z bobni lahko pripravite:
- Grobo ribanje C (G4) / fino ribanje D (G5): korenje, gomolj zelene, krompir, sir, ...
- Debelo rezanje A (G3): krompir, korenje, kumare, jabolka, pesa, ...
- Strganje E (G6): krompir, parmezan ...
Odstranitev dodatkov: počakajte, da se aparat popolnoma ustavi, in nadaljujte v obratnem
vrstnem redu sestave; diagrami 10, 4.2, 4.1 in 9.
5 - OŽEMALNIK ZA SADJE IN ZELENJAVO
(ODVISNO OD MODELA)
UPORABLJENI DODATKI: Sestava ožemalnika (H)
5.1 - SESTAVLJANJE OŽEMALNIKA
Sledite diagramom od 5.1 do 5.6.
5.2 - VKLOP (Maksimalni čas uporabe: 10 minut.)
• Narežite sadje in/ali zelenjavo na kose.
• Vklopite aparat tako, da obrnete nastavitveni gumb (A1) na hitrost »5«.
• Sestavine vstavite v dovodno cev na pokrovu (H2) in jih počasi potisnite navzdol z uporabo
pripomočka za potiskanje (H1).
• Ne ožemite naenkrat več kot 5 krat po 500 g živil, ne da bi pustili, da se vaš aparat pri tem
popolnoma ohladi.
• Pomembno: vsakič po vstavitvi 300 g sestavin očistite filter (H3) in posodo za sok (H4).
Nasveti:
- sok lahko pripravite iz: korenja, paradižnika, jabolk, grozdja, malin itd., vendar iz nekaterega
sadja in zelenjave ni mogoče pripraviti soka: banane, avokado, hruške, robide, nekatere sorte
SL
jabolk itd.
- Olupite sadje z debelo lupino, odstranite peške, izrežite srednji del ananasa.
- Sok zaužijte takoj po pripravi.
Odstranitev dodatkov: preden odstranite dodatke z aparata, počakajte, da se aparat in
rotacijski filter popolnoma ustavita. Nadaljujte v obratnem vrstnem redu sestave, diagrami od
5.6 do 5.1.
63
Page 69

6 - DODATEK ZA DROBNO SEKL JANJE MANJŠIH KOLIČIN (ODVISNO OD MODELA)
UPORABLJENI DODATKI: pokrov mini rezalnika (N1), posoda mini rezalnika (N2)
6.1 - NAMESTITEV DODATKOV
Sledite diagramom 10, 6.1 in 6.2.
6.2 - VKLOP
• Z mini rezalnikom lahko drobno sekljate:
- sveža zelišča: maks. 10 g / maks. 10 s / hitrost „7“
- suho sadje / govedino (brez kosti in odrezano meso): maks. 100g / maks. 10 s / hitrost „1“
- zelenjavni pire: maks. 150 g / maks. 20 s / „impulz“ ali hitrost „1“
• Ta aparat za mletje ni primeren za trde proizvode, kot so kava v zrnju in trde začimbe, niti za tekočine.
Odstranitev dodatkov: počakajte, da se aparat popolnoma ustavi, in nadaljujte v obratnem
vrstnem redu sestave; diagrami 10, 6.2 in 6.1.
7 - NASTAVITEV DOLŽINE KABLA
8 - GROBO SEKLJANJE MAJHNIH KOLIČIN
(glejte A7)
(ODVISNO OD MODELA)
UPORABLJENI DODATKI: Mlinček.
- Sekljate z nekaj sekundnimi impulzi: suhe fige in marelice ...Količina / maks. čas: 100 g / 5 s.
ČIŠČENJE
• Odklopite aparat.
• Ne potapljajte v vodo enote z motorjem (A) in vmesnika (E) in ju ne postavljajte pod tekočo vodo.
Obrišite ju s suho ali rahlo vlažno krpo.
• Takoj po končani uporabi v celoti razstavite in splaknite dodatke.
Z vsemi rezili ravnajte previdno, saj se lahko v nasprotnem primeru poškodujete. (diagram 10).
• Operite, splaknite in posušite dodatke: dodatki so primerni za pranje v pomivalnem stroju,
razen kovinskih delov v glavi mesoreznice: telo (F), dodatek za gnetenje (C1) in mešalnik (C2).
KAJ STORITI, ČE APARAT NE DELUJE?
Glejte poglavje „Pred prvo uporabo“.
Vaš aparat še vedno ne deluje? Obrnite se na pooblaščeni servis (glejte seznam v servisni
knjižici).
DODATKI
Glejte stran 91 in obiščite spletno stran podjetja.
Opozorilo: ta knjižica vsebuje navodila za dodatke. Shranite jo za morebitno kasnejšo
uporabo. Za več informacij o nakupu dodatkov se obrnite na storitve za kupce.
64
SL
Page 70

Upozorenje: Pažljivo pročitajte brošuru „Bezbednosne
mere“ i uputstva za upotrebu pre prve upotrebe.
AKTIVIRANJE APARATA
• Pre prve upotrebe aparata, operite sve dodatke toplom vodom i deterdžentom (osim adaptera
(E): pogledajte paragraf čišćenje.
• Stavite aparat na ravnu, čistu i suvu površinu, proverite da li se dugme regulatora (A1) nalazi u
položaju „0“, a zatim uključite aparat u struju.
• Imate nekoliko mogućnosti za puštanje aparata u rad: (pogledajte dijagram A1):
- Isprekidani rad (u intervalima):
Okrenite dugme regulatora (A1) na položaj „pulse“ za rad u intervalima za bolju kontrolu
pripremanja smese.
- Neprekidni rad:
Okrenite dugme regulatora (A1) u željeni položaj od „1 do 8/max“ u zavisnosti od smese koja
se priprema. Rad aparata možete menjati u toku pripreme.
• Za zaustavljanje aparata, vratite dugme (A1) u položaj „0“.
Važno: Aparat će moći da se aktivira samo ako su poklopac (A5) i glava (A3) blokirani. Ako
odblokirate poklopac (A5) i/ili glavu (A3) tokom rada, aparat će se odmah zaustaviti. Ponovo
blokirajte poklopac i/ili glavu, vratite dugme regulatora (A1) u položaj „0“, a zatim normalno
pustite aparat u rad biranjem željene brzine.
1 - MEŠANJE / MEŠENJE / MIKSIRANJE / EMULGOVANJE / MUĆENJE
U zavisnosti od vrste namirnica, posuda od nerđajućeg čelika (B1) i njen poklopac (B2) vam
omogućavaju da pripremite do 1,8 kg laganog testa.
KORIŠĆENI DODACI:
- Poklopac (B2), Dodatak za mešenje (C1) ili dodatak za mešanje (C2) ili dodatak za mućenje (C3).
1.1 - MONTIRANJE DODATAKA
Primenite postupke prikazane na dijagramima od 1.1 do 1.4.
1.2 - PUŠTANJE U RAD
• Pokrenite aparat okretanjem regulatora (A1) u željeni položaj, u zavisnosti od recepta.
• Možete dodavati namirnice kroz otvor na poklopcu (B2) tokom pripreme.
• Za zaustavljanje aparata, vratite regulator (a1) u položaj „0“.
Saveti:
MEŠENJE (Maksimalno vreme korišćenja : 13 minuta)
SR
- Koristite dodatak za mešenje (C1) sa brzinom „1“. Možete mesiti do 500 g brašna (npr. beli
hleb, integralni hleb, masno testo, sipko testo, …).
MEŠANJE (Maksimalno vreme korišćenja : 13 minuta)
- Koristite dodatak za mešanje (C2) sa brzinama od „1 do 8/max“.
- Možete mešati do 1,8 kg laganog testa (testo za keks...).
- Nikada ne koristite dodatak za mešanje (C2) za mešenje teških testa.
- MIKSIRANJE / EMULGOVANJE / MUĆENJE (Maksimalno vreme korišćenja : 10 minuta)
65
Page 71

- Koristite dodatak za mućenje (C3) sa brzinama od „1 do 8/max“.
- Možete pripremati: majonez, sos od belog luka i ostale soseve, možete mutiti belanca (do 8
belanaca), šlag (do 500 ml)…
-
Nikada ne koristite dodatak za mućenje (C3) za mešenje teških testa ili mešanje lakih testa.
Demontiranje dodataka: Sačekajte dok aparat u potpunosti ne prestane sa radom i rasklopite
ga redosledom obrnutim od redosleda montaže, primenjujući postupke prikazane na dijagramima
od 1.4 do 1.1.
2 - BLENDIRANJE/MEŠANJE/MIKSIRANJE (U ZAVISNOSTI OD MODELA)
U zavisnosti od vrste namirnica, blender (D) vam omogućava da pripremite do 1,5 l gustih smesa
i 1,25 l tečnih smesa.
KORIŠĆENI DODACI: Posuda blender (D / L).
2.1 - MONTIRANJE DODATAKA
Primenite postupke prikazane na dijagramima od 2.1 do 2.3 i 10.
2.2 - PUŠTANJE U RAD (Maksimalno vreme korišćenja : 3 minuta)
• Pokrenite aparat okrećući dugme regulatora (A1) u željeni položaj u zavisnosti od recepta (od
brzine „4 do 8/Max“ < ili "Pulse". Za bolju kontrolu miksiranja i bolje ujednačavanje smese, koristite
položaj „Pulse“.
• Tokom pripreme možete dodavati namirnice kroz otvor čepa za doziranje (D2, L5)
Saveti:
• Možete pripremati:
- dobro miksirane čorbe, krem čorbe, kompote, milkšejk i koktele.
- lagana testa (palačinke, uštipci, voćni kolač, puding, vafle...).
• Prilikom miksiranja, ako sastojci ostanu zalepljeni za zidove činije, zaustavite aparat, čekajte
potpuno zaustavljanje aparata, skinite posudu miksera, skinite sastojke sa sečiva, koristeći
špatule, a zatim vratite posudu miksera na mesto da biste nastavili sa pripremom.
Demontiranje dodatka: Sačekajte dok aparat u potpunosti ne prestane sa radom pre nego
što uklonite posudu za mešanje i rasklopite ga redosledom obrnutim od redosleda montaže,
primenjujući postupke prikazane na dijagramima od 2.1 do 2.3 i 10.
3 - MLEVENJE MESA (U ZAVISNOSTI OD MODELA)
KORIŠĆENI DODACI:
3.1 - POSTAVLJANJE ADAPTERA ZA MLEVENJE
Primenite postupke prikazane na dijagramima 9, 10, a zatim i od 3.1 do 3.3.
3.2 - PUŠTANJE U RAD
• Pokrenite aparat okretanjem regulatora (A1) na brzinu „5 do 7“.
• Ubacujte meso u cev komad po komad uz pomoć potiskivača (F7). Nikada ne potiskujte
hranu prstima ili kuhinjskim priborom.
- Možete da sameljete do 3 kg mesa, maksimalno vreme korišćenja : 10 minuta.
Saveti:
- Pripremite celu količinu namirnica koje treba samleti (kad se radi o mesu, skinite kosti,
hrskavicu i žile i isecite meso na komadiće od oko 2x2 cm).
- Proverite da li se meso dobro odmrzlo.
Držač dodataka (E), Mlin za meso (F)
SR
66
Page 72

Demontiranje dodataka: Sačekajte dok aparat u potpunosti ne prestane sa radom i
rasklopite ga redosledom obrnutim od redosleda montaže, primenjujući postupke prikazane na
dijagramima 10, od 3.3 do 3.1, a zatim i 9.
4 - RENDANJE / SECKANJE (U ZAVISNOSTI OD MODELA)
KORIŠĆENI DODACI:
4.1 - MONTIRANJE DODATAKA
Primenite postupke prikazane na dijagramima 10, 9, a zatim i 4.1 do 4.2.
4.2 - PUŠTANJE U RAD
• Pokrenite aparat okretanjem regulatora (A1) na brzinu „5“ za sečenje i na brzinu „4 ili 7“ (u
zavisnosti od modela) za rendanje.
• Ubacite namirnice kroz otvor i koristite potiskivač (G2). Nikada ne gurajte sastojak prstima
ili kuhinjskim priborom.
• Može se pripremiti do 2 kg hrane, maksimalno vreme korišćenja : 10 minuta.
• Pomoću dodataka možete pripremati:
- Krupno rendanje (G4) / sitno rendanje (G5): šargarepu, celer, krompir, sir,...
- Krupno seckanje (G3): krompir, šargarepu, krastavac, jabuke, cveklu,...
- Rendanje (G6): krompir, parmezan...
Demontiranje dodataka: Sačekajte dok aparat u potpunosti ne prestane sa radom i rasklopite
ga redosledom obrnutim od redosleda montaže, primenjujući postupke prikazane na dijagramima
10, 4.2, 4.1 i 9.
Držač dodataka (E), Seckalica za povrće (G), Dodaci (u zavisnosti od modela)
5 - SOKOVNIK ZA VOĆE I POVRĆE
KORIŠĆENI DODACI:
Sokovnik (H)
(U ZAVISNOSTI OD MODELA)
5.1 - MONTIRANJE SOKOVNIKA
Primenite postupke prikazane na dijagramima od 5.1 do 5.6.
5.2 - PUŠTANJE U RAD (maksimalno vreme korišćenja : 10 minuta)
• Isecite voće i/ili povrće na komade.
• Pokrenite aparat okretanjem regulatora (A1) na brzinu „5“.
• Unesite sastojke u kroz otvor na poklopcu (H2) i polako ih pritisnite potiskivačem hrane (H1).
• Nikada ne obrađujte više od 5 puta 500 g namirnica uzastopno, dok ne pustite aparat da se
potpuno odmori.
• Važno: očistite filter (H3) i posudu za sakupljanje soka (H4) nakon svakih 300 g sastojaka.
Saveti:
- Možete da napravite sok od šargarepa, paradajza, jabuka, grožđa, malina i sl., ali ne možete
SR
da cedite sok iz određenog voća i povrća, kao što su banane, avokado, kupine, neke vrste
jabuka itd.
- Oljuštite voće sa debelom korom, izvadite koštice, izrežite srednji deo ananasa.
- Popijte sok odmah nakon pripreme.
Demontiranje dodataka: Sačekajte da se aparat i rotirajući filter u potpunosti zaustave pre
nego što uklonite ovaj dodatak iz aparata. Rastavite aparat redosledom obrnutim od redosleda
montaže, primenjujući postupke prikazane na dijagramima od 5.6 do 5.1.
67
Page 73

6 - SITNO SECKANJE MALIH KOLIČINA NAMIRNICA (U ZAVISNOSTI OD MODELA)
KORIŠĆENI DODACI: Poklopac mini seckalice (N1), posuda mini seckalice (N2)
6.1 - MONTIRANJE DODATAKA
Primenite postupke prikazane na dijagramima 10, 6.1 i 6.2.
6.2 - PUŠTANJE U RAD
• Mini seckalicom možete sitno da iseckate:
- sveže začinsko bilje: maks. 10 g / maks. 10 s / brzina "7".
- suvo voće / govedinu (meso sa kog su uklonjene kosti i mleveno meso): maks. 100 g / maks. 10 s
/ 1. brzina
- pasirano povrće: maks. 150 g / maks. 20 s / Pulse funkcija ili 1. brzina
• Seckalica nije osmišljena za obradu tvrde hrane, kao što su zrna kafe ili tvrdi začini, niti za tečnosti.
Demontiranje dodataka: Sačekajte dok aparat u potpunosti ne prestane sa radom i rasklopite
ga redosledom obrnutim od redosleda montaže, primenjujući postupke prikazane na dijagramima
10, 6.2 i 6.1.
7 - PODEŠAVANJE DUŽINE KABLA (pogledajte A7)
8 - KRUPNO SECKANJE MALIH KOLIČINA SASTOJAKA (U ZAVISNOSTI OD MODELA)
KORIŠĆENI DODACI: Mini seckalica za krupno seckanje.
- Za nekoliko sekundi samleti impulsnim radom: suve smokve, suve kajsije... Količina/maksimalno
vreme: 100 g / 5 s.
ČIŠĆENJE
• Isključite aparat iz struje.
• Ne potapajte blok motora (A) ni adapter (A) u vodu, niti ih stavljajte pod tekuću vodu. Brišite ih
suvom ili navlaženom krpom.
• U potpunosti rastavite aparat i brzo isperite dodatke nakon upotrebe.
Pažljivo rukujte svim sečivima, jer vas mogu povrediti. (dijagram 10).
• Operite, isperite i osušite dodatke. Možete da ih operete u mašini za pranje sudova, osim metalnih
delova u glavi dodatka za mlevenje: kućište (F), dodatak za mešanje (C1) i mikser (C2).
AKO APARAT NE RADI, ŠTA DA RADITE?
Pogledajte poglavlje „Pre prve upotrebe“
Aparat i dalje ne radi? Obratite se ovlašćenom servisnom centru (pogledajte listu u servisnoj
knjižici).
DODACI
Pogledajte 91. stranu i posetite internet stranicu brenda.
Oprez: ova brošura sadrži uputstva za korišćenje dodataka. Sačuvajte je za kasniju upotrebu.
Obratite se Servisu za potrošače da biste dobili više informacija o kupovini dodataka.
68
SR
Page 74

ПРАВИЛА ТЕХНІКИ БЕЗПЕКИ ДЛЯ КУХОННОГО
КОМБАЙНА
Перед першим використанням пристрою уважно прочитайте інструкції
з використання: виробник не несе жодної відповідальності у випадку
використання пристрою з порушенням інструкцій.
• Цей пристрій не призначено для використання особами (зокрема дітьми)
з обмеженими фізичними, сенсорними або розумовими можливостями,
а також особами без необхідних знань чи попереднього досвіду, окрім
випадків, коли особи, відповідальні за їх безпеку, наглядають за ними
або попередньо проінструктували їх щодо використання пристрою. Не
допускайте, щоб діти гралися із пристроєм.
• Переконайтеся, що номінальна потужність пристрою відповідає
потужності електромережі. Будь-яке неправильне підключення
призводить до анулювання гарантії.
• Ваш пристрій призначений виключно для домашнього користування
всередині приміщень на висоті не вище 2000 м над рівнем моря.
• Щоб отримати інформацію про початкове та періодичне очищення
деталей, що контактують з харчовими продуктами, а також про
процедуру очищення і обслуговування приладу, прочитайте інструкцію
з експлуатації.
• Використовуйте прилад на рівній чистій сухій поверхні.
• Завжди від'єднуйте пристрій від живлення, якщо він залишається без
нагляду, а також перед збиранням, розбиранням та чищенням.
• Не використовуйте пристрій, якщо він працює неналежним чином або
його пошкоджено. Зверніться до авторизованого сервісного центру
(див. список у в інструкції щодо обслуговування).
• Будь-які процедури технічного обслуговування, окрім регулярного
чищення та догляду, що виконуються споживачами, мають
здійснюватися в авторизованому сервісному центрі (див. список в
інструкції щодо обслуговування).
• Не занурюйте пристрій, шнур живлення або штепсель у воду або будь-
яку іншу рідину.
UK
• Шнур живлення потрібно зберігати в недоступних для дітей місцях.
Забороняється розміщувати його біля гарячих деталей пристрою,
джерел тепла або гострих кутів.
• Не тягніть за шнур для відключення пристрою від розетки.
69
Page 75

• Не використовуйте пристрій, якщо шнур або штепсель пошкоджено. З
міркувань безпеки ці деталі необхідно замінювати в авторизованому
сервісному центрі (див. список в інструкції щодо обслуговування).
• З міркувань особистої безпеки використовуйте лише аксесуари та
запасні частини, призначені для цього пристрою, що продаються в
авторизованому сервісному центрі.
• Пам'ятайте, що ви можете отримати травму, якщо ви використовуєте
пристрій неправильно.
• Ножі в чашах для подрібнення, м’ясорубці, міні-м’ясорубці, блендері,
тримачах, на дисках для нарізки овочів, а також металевий ніж (в
залежності від моделі) дуже гострі.
• Перед вийманням вмісту з чаші (в залежності від моделі) необхідно
зняти металевий ніж за його тримач.
• Усі приладдя, що встановлюються на верхню частину робочої головки,
необхідно знімати перед натисканням на кнопку розблокування
робочої головки.
• Ніколи не торкайтесь рухомих частин і завжди чекайте повної зупинки
пристрою перед зніманням аксесуарів.
• Не торкайтеся вінчиків, збивателя або гака для тіста під час роботи
приладу.
• Не допускайте, щоб довге волосся, шарфи, краватки тощо звисали над
пристроєм під час його роботи.
• Не вставляйте кухонне приладдя (ложку, лопатку тощо), пальці або інші
предмети в отвори в кришках, корпусі, підставці або в роз’єм тримача
(G1) (приладдя в залежності від моделі). Для завантаження продуктів
обов’язково користуйтеся спеціальним проштовхувачем.
• Не використовуйте чашу для змішування без її кришки.
• Використовуйте одночасно тільки один аксесуар.
• Ніколи не наливайте у чашу для змішування воду, що кипить (понад
80°C, 176°F).
• Не використовуйте приладдя в режимі холостого ходу (без продуктів)
або з завантаженими в чашу твердими інгредієнтами.
• Ніколи не знімайте кришку, поки пристрій повністю не зупиниться.
• Під час використання чаші для змішування завжди спочатку кладіть
рідкі продукти, а потім тверді.
• Не використовуйте приладдя приладу в якості ємностей для
заморожування, приготування, стерилізації, нагрівання в
мікрохвильовій печі тощо.
UK
70
Page 76

• Ніколи не використовуйте пристрій не з продуктами харчування.
Щоб уникнути переповнення, ніколи не перевищуйте позначку
максимального рівня на чаші або максимально припустиму кількість,
що вказана в інструкції користувача.
• Не користуйтесь пристроєм, якщо обертове сито або захисна кришка
соковижималки (в залежності від моделі) пошкоджені або мають видимі
тріщини.
• Вимикайте пристрій та відключайте його від електромережі, перш ніж
замінювати аксесуари або наближатися до частин, які рухаються під
час експлуатації.
• Будьте обережні, якщо гаряча рідина потрапляє у кухонний комбайн
або блендер, вона може вийти з пристрою раптовою парою.
• Він не призначений для використання у наступних сферах застосування,
та гарантія не буде застосовуватися при користуванні:
– у кухонних приміщеннях для персоналу магазинів, офісів та інших
робочих приміщень;
– у фермерських приміщеннях;
– клієнтами в готелях, мотелях та інших закладах для проживання;
– у закладах типу "ночівля зі сніданком".
• Щоб отримати інформацію про встановлення приладдя на прилад і
його зняття, прочитайте інструкцію з експлуатації.
• Зверніться до інструкції користувача щодо управління швидкістю та
часом використання кожного аксесуара.
ТІЛЬКИ ДЛЯ ЄВРОПЕЙСЬКИХ РИНКІВ
• Для всіх аксесуарів крім вінчика та тертушок: Дітям забороняється
використовувати цей пристрій. Зберігайте прилад та його шнур у
недоступному для дітей місці.
• Дітям забороняється гратись з пристроєм.
• Цей пристрій можна використовувати особам з обмеженими фізичними,
сенсорними або розумовими можливостями, або з недостатніми
досвідом чи знаннями, за умови, що вони знаходяться під наглядом
або отримали інструкції щодо безпечного використання пристрою, та
усвідомлюють небезпеки.
UK
71
Page 77

• Таким приладдям, як вінчик, тертка і насадка для дерунів, можуть
користуватися діти від 8 років під наглядом дорослих за умови, що
діти ознайомлені з правилами безпечного використання приладу і
проінформовані про відповідні ризики.
Піклуйтеся про довкілля!
Пристрій містить велику кількість матеріалів, придатних для вторинної
переробки.
Здайте його в пункт прийому вторинної сировини або у схвалений центр
обслуговування у своєму місті.
Упаковку виготовлено лише з речовин, безпечних для навколишнього
середовища. Тому її можна утилізувати відповідно до правил утилізації, що
діють у вашому регіоні.
Щодо утилізації самого пристрою зверніться у відповідну службу.
Увага : Прочитайте брошуру «Вказівки з техніки безпеки» та
інструкцію перед початком використання.
ПЕРЕД ПЕРШИМ ВИКОРИСТАННЯМ
• Перед першим використанням промийте аксесуари в мильній воді (окрім насадки (E): див. розділ
«Чищення»), сполосніть і просушіть.
• Розташуйте пристрій на рівній, чистій і сухій поверхні. Переконайтеся, що перемикач (A1) установлено
в положення «0», та ввімкніть пристрій.
• Нижче наведено кілька варіантів запуску пристрою (див. схему A1):
- Переривчаста робота (імпульсний режим):
установіть перемикач (A1) у положення «Pulse» (Імпульсний режим). Імпульсний режим краще підходить
для приготування певних страв.
- Безперервна робота:
установіть перемикач (A1) у потрібне положення (від «1 до 8») залежно від продукту харчування, який
обробляється. За необхідності положення можна змінити під час обробки.
• Щоб зупинити пристрій, установіть кнопку (A1) у положення «0».
Важливо: Пристрій запуститься лише у випадку, якщо кришку (a5) і головку (a3)
заблоковано. Пристрій одразу зупиниться, якщо розблокувати кришку (a5) і/або головку
(a3) під час роботи. Заблокуйте кришку і/або головку, установіть кнопку управління (a1) у
положення «0», а потім запустіть пристрій у звичайному режимі, вибравши потрібну швидкість.
UK
72
Page 78

1 - ЗМІШУВАННЯ / ЗАМІШУВАННЯ / ЗБИВАННЯ / ЕМУЛЬСУВАННЯ / РОЗПУШУВАННЯ
Можна приготувати до 1,8 кг легкого тіста з використанням чаші з нержавіючої сталі (b1) і кришки (b2)
залежно від страви, яку ви бажаєте приготувати.
ВИКОРИСТОВУВАНІ АКСЕСУАРИ: Чаша з нержавіючої сталі (B1), Кришка (B2), Тістомішалка (C1) міксер
(C2) або вінчик (C3).
1.1 - УСТАНОВЛЕННЯ АКСЕСУАРІВ
Дотримуйтеся схем з 1.1 по 1.4.
1.2 - ВИКОРИСТАННЯ
• Запустіть пристрій, установивши перемикач (A1) у потрібне положення відповідно до рецепту.
• Можна додавати продукти через отвір у кришці (b2) під час приготування.
• Щоб зупинити пристрій, установіть кнопку (A1) у положення «0».
Поради:
ЗАМІШУВАННЯ (Максимальний час використання: 13 хвилин).
- Використовуйте тістомішалку (C1) на швидкості «1». Можна замішувати до 500 г борошна (наприклад,
для приготування тіста для пшеничного хліба, хліба з борошна грубого помолу, пісочного тіста, пухкого
здобного тіста тощо).
ЗМІШУВАННЯ (Максимальний час використання: 13 хвилин).
- Використовуйте міксер (C2) на швидкості від «1 до 8».
- Можна змішати до 1,8 кг легкого тіста (для кексів, печива тощо).
- Ніколи не використовуйте міксер (c2) для замішування густого тіста і свіжого тіста для макаронних
виробів (лазан'я, рігатоні, біголі і т.д.).
ЗБИВАННЯ / ЕМУЛЬСУВАННЯ / РОЗПУШУВАННЯ (Максимальний час використання: 10 хвилин).
- Використовуйте вінчик (C3) на швидкості від «1 до 8».
- Можна готувати: майонез, айолі, соуси, збиті яєчні білки (до 10), вершки (до 500 мл) тощо.
- Ніколи не використовуйте вінчик (C3) для замішування густого тіста або змішування легкого тіста.
Від'єднання аксесуарів : Зачекайте, доки прилад повністю зупиниться, і виконуйте дії в зворотному
порядку складання, від схеми 1.4 до 1.1.
2 - ПРИГОТУВАННЯ СУМІШЕЙ/ЗМІШУВАННЯ (ЗАЛЕЖНО ВІД МОДЕЛІ)
Залежно від виду продукту можна використовувати блендер (D) для приготування до 1,5 л густих сумішей
і 1,25 л рідких сумішей.
ВИКОРИСТОВУВАНІ АКСЕСУАРИ: Чаша блендера (D, L).
2.1 - УСТАНОВЛЕННЯ АКСЕСУАРІВ:
Дотримуйтеся схем з 2.1 по 2.3 і 10.
2.2 - ВИКОРИСТАННЯ (Максимальний час використання: 3 хвилин).
• Запустіть пристрій, установивши перемикач (A1) у потрібне положення відповідно до рецепту
UK
(вибравши швидкість від
(Імпульсний режим) для покращення управління змішуванням та ретельнішого розмелювання
суміші.
• Можна додавати продукти через отвір за допомогою вимірювального ковпачка (D3) під час
приготування. (D2, L5)
«7 до 8»
або Pulse (Імпульсний режим)). Використовуйте режим «Pulse»
73
Page 79

Поради:
• Можна готувати:
- однорідні супи, супи-пюре, компоти, молочні та класичні коктейлі;
- рідке тісто (млинці, оладки, клавуті та пудинги з заварним кремом).
• Якщо інгредієнти прилипають до бічних поверхонь чаші під час змішування, зупиніть пристрій. Зачекайте
повної зупинки пристрою. Зніміть блендер, проштовхніть продукти вниз за допомогою шпателя, на ножі,
та повторно встановіть блендер в робоче положення для продовження приготування.
Від'єднання аксесуарів : Дочекайтеся повної зупинки приладу, перш ніж виймати чашу блендера, і
виконуйте дії в зворотному порядку складання, від схеми 2.3 до 2.1 і 10.
3 - ПОДРІБНЕННЯ (ЗАЛЕЖНО ВІД МОДЕЛІ)
ВИКОРИСТОВУВАНІ АКСЕСУАРИ:
3.1 - ПРИЄДНАННЯ М’ЯСОРУБКИ
Дотримуйтеся схем 9, 10, а потім від 3.1 до 3.3.
3.2 - ВИКОРИСТАННЯ
• Запустіть пристрій, повернувши перемикач (A1) у положення швидкості «5 до 7».
• Завантажуйте м’ясо шматок за шматком у трубку завантаження за допомогою штовхача (F7). Ніколи не
проштовхуйте інгредієнти у трубку завантаження пальцями або іншим приладдям.
- Ви можете перемолоти до 3 кг м’яса. Максимальний час використання: 10 хвилин.
Поради:
- Підготуйте всі продукти, які потрібно перемолоти (що стосується м’яса, видаліть кістки, хрящі та прожилки
й поріжте його на шматки розміром приблизно 2 x 2 см).
- Переконайтеся, що м’ясо повністю розморожено.
Від'єднання аксесуарів : Дочекайтеся повної зупинки приладу і виконуйте дії в зворотному порядку
збирання: схеми 10, від 3.3 до 3.1, а потім 9.
Тримач насадок (E), Установлена головка м’ясорубки (F)
4 - ПОДРІБНЕННЯ/НАРІЗАННЯ (ЗАЛЕЖНО ВІД МОДЕЛІ)
ВИКОРИСТОВУВАНІ АКСЕСУАРИ:
моделі)
4.1 - УСТАНОВЛЕННЯ АКСЕСУАРІВ:
Дотримуйтеся схем 10, 9, а потім від 4.1 до 4.2.
4.2 - ВИКОРИСТАННЯ
• Запустіть пристрій, повернувши перемикач (A1) у положення швидкості «3 або 5» (залежно від моделі)
для нарізання і в положення «7» для подрібнення.
• Покладіть продукти у трубку завантаження та проштовхніть донизу за допомогою штовхача (G2).
Ніколи не проштовхуйте інгредієнти пальцями або іншим приладдям.
• Ви можете перемолоти до 2 кг їжі. Максимальний час використання: 10 хвилин.
Використовуйте барабани для:
- крупного подрібнення (G4) / дрібного подрібнення (G5): моркви, селери, картоплі, сирів тощо;
- тонкого нарізання (G3): картоплі, моркви, огірків, яблук, буряку тощо;
- барабан для дерунів (G6): для натирання картоплі, пармезану тощо.
Тримач насадок (E), Зібрана овочерізка (G), Барабани (залежно від
UK
74
Page 80

Від'єднання аксесуарів : Зачекайте, доки прилад повністю зупиниться, і виконуйте дії в зворотному
порядку складання: схеми 10, 4.2, 4.1 і 9.
5 - ВИЖИМАННЯ СОКУ ІЗ ФРУКТІВ І ОВОЧІВ (ЗАЛЕЖНО ВІД МОДЕЛІ)
ВИКОРИСТОВУВАНІ АКСЕСУАРИ:
5.1 - УСТАНОВЛЕННЯ СОКОВИЖИМАЛКИ
Дотримуйтеся схем з 5.1 по 5.6.
5.2 - ВИКОРИСТАННЯ (Максимальний час використання: 10 хвилин).
• Поріжте фрукти і/та овочі на шматки.
• Запустіть пристрій, повернувши перемикач (A1) у положення швидкості «5».
• Покладіть їх у трубку завантаження, розташовану на кришці (H2) і повільно проштовхуйте за допомогою
штовхача (H1). Ніколи не проштовхуйте інгредієнти пальцями або іншим приладдям.
• Не обробляйте 500 г продуктів більше 5 разів поспіль без повного охолодження пристрою.
• Важливо: чистите фільтр (H3) та місткість для косу (H4) після оброблення кожних 300 г інгредієнтів.
Поради:
- Можна зробити сік з моркви, помідорів, яблук, винограду, малини й т. ін., але є деякі типи фруктів і овочів,
з яких неможливо вичавити сік, наприклад, банани, авокадо, груші, ожина, деякі сорти яблук.
- Чистьте фрукти з товстою шкірою; видаляйте кісточки та серцевину ананасів.
- Пийте соки одразу після приготування
Від'єднання
та обертового фільтра. Виконуйте дії в зворотному порядку складання, від схеми 5.6 до 5.1.
аксесуарів :
Зібрана соковижималка (H)
Перш ніж зняти аксесуар із приладу, дочекайтеся повної зупинки приладу
6 - РЕТЕЛЬНЕ ПОДРІБНЕННЯ НЕВЕЛИКОЇ КІЛЬКОСТІ ПРОДУКТІВ
(ЗАЛЕЖНО ВІД МОДЕЛІ)
ВИКОРИСТОВУВАНІ АКСЕСУАРИ:
6.1 - УСТАНОВЛЕННЯ АКСЕСУАРІВ:
Дотримуйтеся схем 10, 6.1 і 6,2.
6.2 - ВИКОРИСТАННЯ
Ви можете дрібно нарізати за допомогою міні-подрібнювана:
- свіжі трави: мас. 10 г / мас. 10 с / швидкість «7»
- сухофрукти / яловичину (етиловане м’ясо без кісток): мас. 100 г / мас. 10 с / швидкість «1»
- овочеве пюре: мас. 150 г / мас. 10 с / швидкість «1»
• Цей млинок не призначений для обробки твердих продуктів на кшталт кави.
Від'єднання аксесуарів : Зачекайте, доки прилад повністю зупиниться, і виконуйте дії в зворотному
порядку складання: схеми 10, 6.2 і 6,1.
Кришка міні-подрібнювана (N1), чаша міні-подрібнювана (N2)
UK
75
Page 81

7 - РЕГУЛЮВАННЯ ДОВЖИНИ ШНУРА (див. A7)
8 - ПОДРІБНЕННЯ ВЕЛИКИМИ ШМАТОЧКАМИ В НЕВЕЛИКІЙ КІЛЬКОСТІ
(ЗАЛЕЖНО ВІД МОДЕЛІ)
ВИКОРИСТОВУВАНІ АКСЕСУАРИ:
- подрібнення впродовж кількох секунд в імпульсному режимі: сушеного інжиру, сушених абрикосів тощо.
Кількість / максимальна тривалість обробки: 100 г / 5 с
Зібраний млинок
ЧИЩЕННЯ
• Від’єднайте пристрій від електромережі.
• Не занурюйте блок мотора (A) або насадку (E) у воду та не розташовуйте їх під проточною водою.
Протирайте їх сухою або злегка зволоженою тканиною.
• Повністю розберіть і сполоснуть аксесуари відразу після використання.
Щоб не отримати травму, обережно поводьтеся з ножами. (схема 10).
• Вимийте, сполоснуть і висушіть аксесуари: їх можна мити в посудомийній машині за винятком
металевих компонентів головки подрібнювача: корпусу (F), тістомішалки (С1) і міксера (С2).
ЩО РОБИТИ, ЯКЩО ПРИСТРІЙ НЕ ПРАЦЮЄ
див. розділ «Перед першим використанням»
Пристрій усе ще не працює? Зверніться до авторизованого сервісного центру (див. список у буклеті
сервісного обслуговування).
АКСЕСУАРИ
Див. стор. 59 і відвідайте веб-сайт бренда.
Увага: ця брошура містить інструкції для додаткових аксесуарів. Збережіть для майбутнього
використання. Зверніться в службу підтримки клієнтів для отримання додаткової інформації про
те, як придбати аксесуари.
UK
76
Page 82

01 - 04
EN
05 - 08
NL
09 - 12
ES
TR
13 - 16
17 - 20
PL
21 - 24
ET
25 - 28
LT
29 - 32
LV
BG 33 - 36
37 - 40
BS
41 - 44
CS
45 - 48
HU
49 - 52
HR
53 - 56
RO
57 - 60
SK
61 - 64
SL
SR 65 - 68
UK 69 - 76
Ref. 8020002157
 Loading...