

Page 1
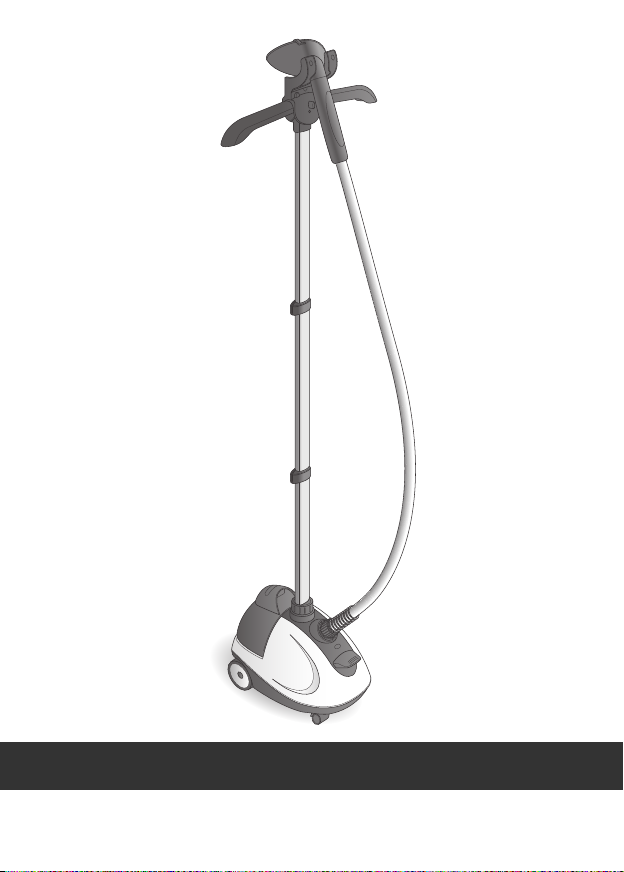
INSTANT STEAM
www.tefal.com
IT21XX
Page 2
1
5
6
9
3
4
2C*
13
14
12
11
7
8
10
2B*
2D*
2A*
* Depending on model
Page 3

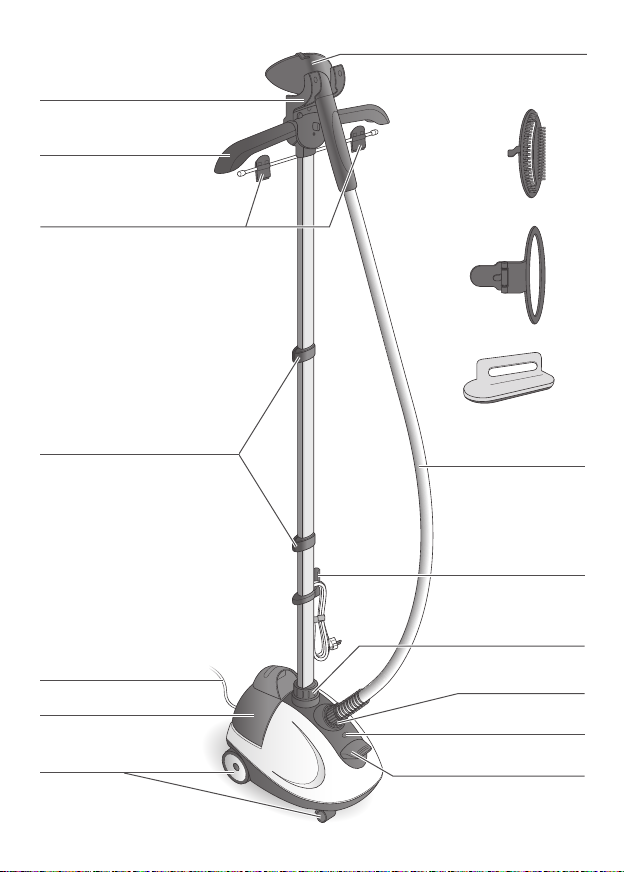
PRODUCT DESCRIPTION
1. Steam Head
2A*. Fabric Brush
2B*. Crease attachment
2C*. Pant Clips
2D*. Lint Pad
3. Steam head craddle
4. Foldable Hanger
5. Woven fabric steam hose
6. Power Cord Hook
7. Pole Fastener
8. Hose Connector & Lock
9. On/Off Indicator
10. On/Off Pedal
11. Pole Locks
12. Power cord
13. Water tank
14. Wheels
* Depending on model
Page 4

IMPORTANT SAFETY
INSTRUCTIONS
• When using your appliance, basic precautions should
always be followed, including the following:
• Read all instructions before using this product.
• This product has been designed for indoor, domestic
use only. Any commercial use, inappropriate use or
failure to comply with the instructions, the
manufacturer accepts no responsibility and the
guarantee will not apply.
• Always plug your appliance:
- into a mains circuit with voltage between 220 V and
240 V.
- into an earthed electrical socket.
Connecting to the wrong voltage may cause
irreparable damage to the appliance and will
invalidate your guarantee.
If using a mains extension lead, ensure that it is
correctly rated (16A) with an earth, and is fully
extended.
• Completely unwind the power cord before plugging
into an earthed socket.
• Use appliance for its intended use only.
• To reduce the risk of contact with hot water emitting
from steam vents, check appliance before each use by
holding it away from body and operating steam
button.
4
Page 5

• This appliance can be used by children aged from 8
years and above and persons with reduced physical,
sensory or mental capabilities or lack of experience
and knowledge if they have been given supervision or
instruction concerning use of the appliance in a safe
way and understand the hazards involved. Children
shall not play with the appliance. Cleaning and user
maintenance shall not be made by children without
supervision.
• Never pull on the cord to disconnect the appliance
from electrical outlet; instead, grasp plug and pull to
disconnect on the plug to disconnect the appliance.
• Do not allow cord to touch hot surfaces or come into
contact with rough or sharp edges. Let the appliance
cool completely down before putting away. Loop cord
loosely around appliance when storing.
• Always disconnect appliance from the electrical
supply when filling with water or emptying when
cleaning, when removing or refitting accessories and
when not in use.
• Care should be taken when using the appliance due
to the emission of steam.
• Do not operate appliance with a damaged cord or if
appliance has been dropped or damaged. To avoid the
risk of electric shock, do not disassemble or attempt
to repair the appliance.Take it to the nearest approved
service centre for examination and repair. Incorrect
reassembly or repair could cause a risk of fire,
5
Page 6

electrical shock or injury to persons when the
appliance is used.
• Close supervision is necessary for any appliance being
used by or near children.
• Never leave the appliance unattended when it is
connected to the mains. Before storing the appliance,
once it is unplugged, please wait until it has cooled
down (around 1 hour).
• Burns could occur from touching hot metal or plastic
parts, hot water or steam. Use care when you empty
a steam appliance. There may be hot water in the
reservoir.
• If an extension cord is absolutely necessary, a cord
with a 16A ampere rating shall be used. A cord rated
for less amperage can result in a risk of fire or electric
shock due to overheating. Care shall be taken to
arrange the cord so that it cannot be pulled or be
tripped over.
• To protect against a risk of electric shock, do not
immerse the appliance in water or other liquids.
• Do not direct steam at people, animals or clothes
while they are being worn.
• This appliance is not intended for use by persons
(including children) with reduced physical, sensory or
mental capabilities, or lack of experience and
knowledge, unless they have been given supervision
or instruction concerning use of the appliance by a
person responsible for their safety. Children should be
6
Page 7

supervised to ensure that they do not play with the
appliance.
• The use of accessory attachments other than those
provided by the manufacturer is not recommended
and may result in fire, electric shock or personal injury.
• The appliance must be rested on a stable surface.
When placing the appliance on its base, ensure that
the surface on which the base is placed is stable.
• The appliance must not be used if it has been
dropped, if there are visible signs of damage or if it is
leaking.
• Check the electrical power cord for sign and wear or
damage prior to use. If the electrical power cord is
damaged, it must be replaced at an approved service
centre to avoid any danger.
• Do not use other descaling products than the one cited
in the IFU.
Before first use
• When you first use the appliance, some smoke or a harmless odour may be produced
or there may be a small discharge of particles. This will not affect the use of the appliance
and will disappear quickly.
What water to use?
• Your appliance has been designed to use tap water.
If your water is very hard, mix 50% tap water and 50% bottled demineralised water.
Never use water containing additives (starch, perfume, aromatic substances, softeners,
etc.), or condensation water (for example water from tumble dryers, water from
refrigerators, water from air conditioning units, rainwater). This water contains organic
waste materials or minerals that concentrate under the effect of heat and cause spitting,
brown colouring or premature ageing of your appliance.
SAVE THESE INSTRUCTIONS
7
Page 8
1
2
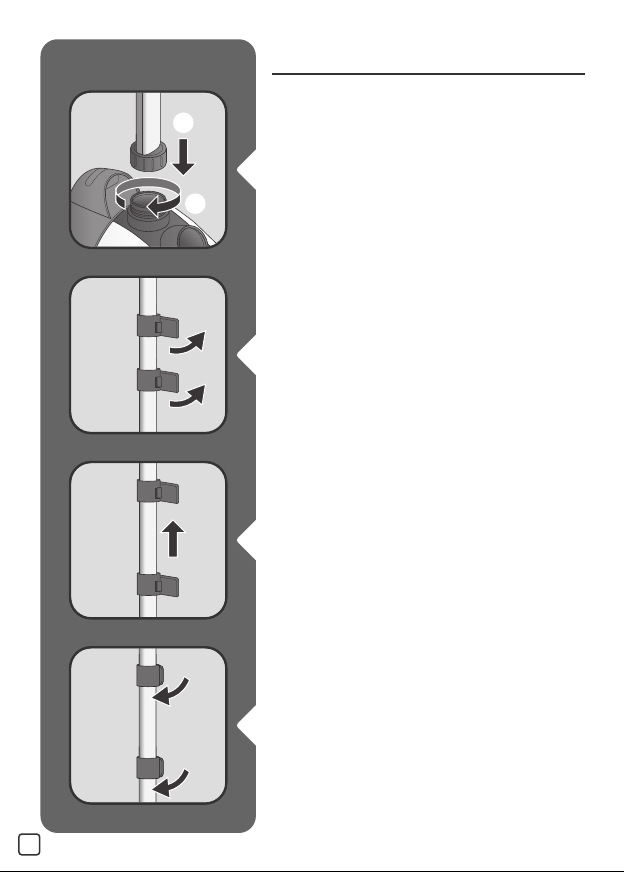
1. ASSEMBLY
Insert the pole in the housing & then
screw until lock.
Open the two pole locks.
Extend the pole fully.
Close the two locks.
8
Page 9
Click
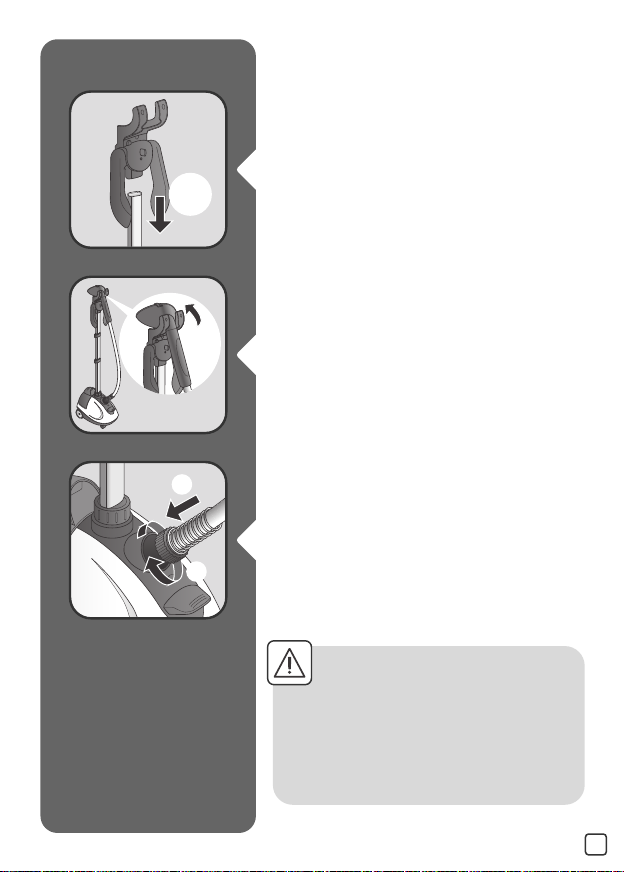
Fully insert the hanger vertically on top of
1
2
the pole.
Position the steam head on its craddle.
Fully insert the hose and then turn
clockwise until full locking by click sound.
Please pay attention to fully lock
the hose to its base to avoid hot
water spitting. Never release the
hose connection during use.
9
Page 10
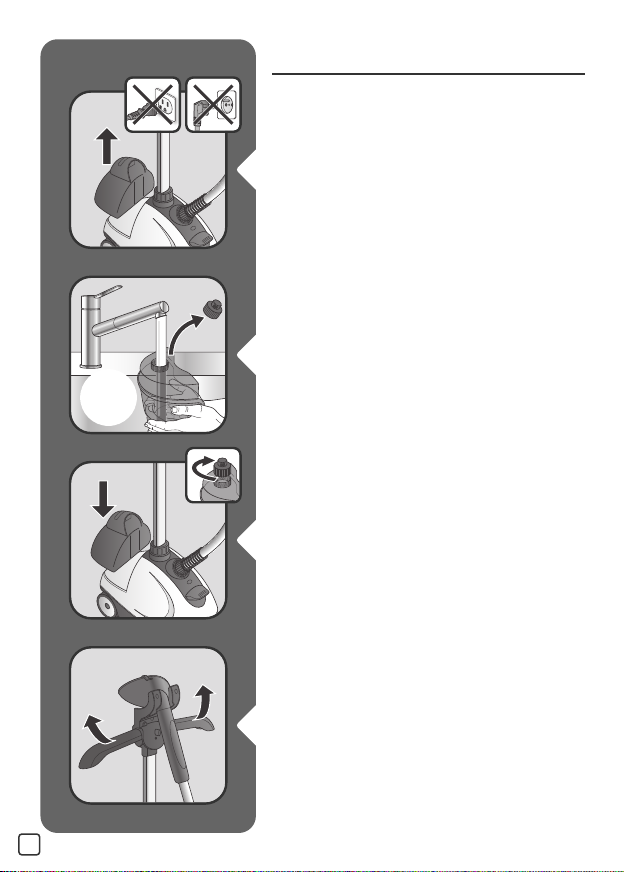
2. BEFORE USE
1,8L
60OZ
MAX
Remove the water tank.
Remove the cap then fill in the water tank.
Fully screw the water tank cap and insert
tank back in appliance.
10
Extend both sides of hanger.
Page 11

Add the clothe of your choice on the
hanger.
3. ACCESSORIES
Accessories must be settled
when appliance is cold and not
running.
The fabric brush opens the weaves of the
fabrics for better steam penetration.
Attach the fabric brush to the steam head
when appliance is unplugged.
11
Page 12
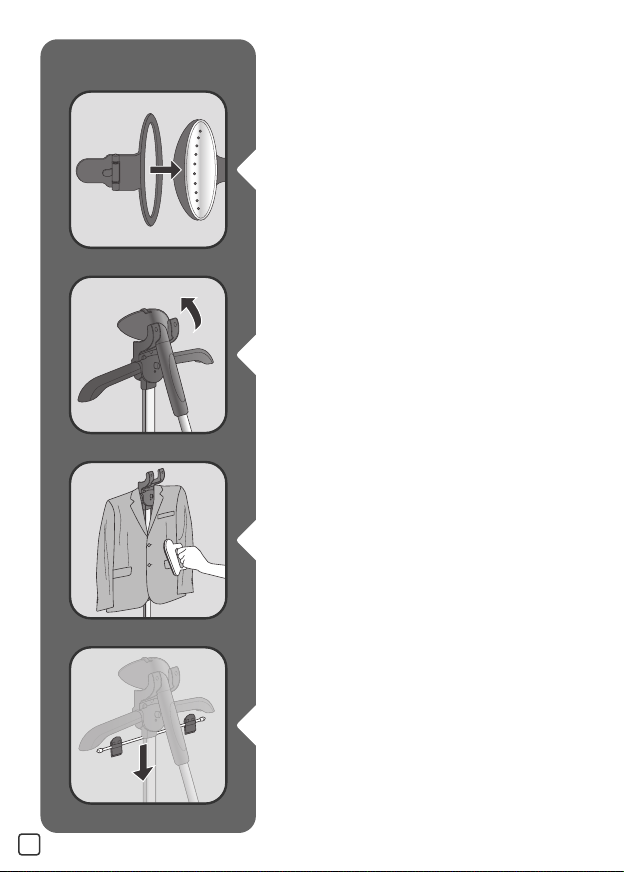
The crease attachment allows you to
create crease either on your pants or
jackets.
Position the steam head on its craddle.
Use the lint pad to remove hair, lint and
animal fur the lint pad must not be used
when attached to the appliance.
If your appliance is featured with
removable pant clips, you can use them
by inserting and pushing down.
12
Page 13

4. USE
60s
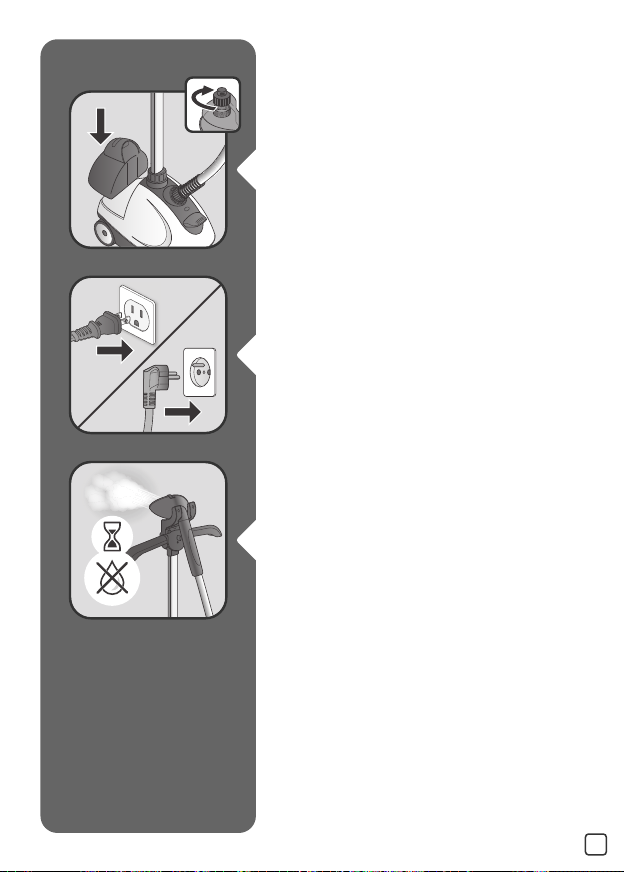
Appliance has to remain horizontally set
on ground floor.
Plug in the appliance.
Press once the ON/OFF pedal and check
that light is switching on. Wait for 60
seconds before steaming.
After 60 seconds approximately, steam
will come out.
13
Page 14

For optimal use, pass the steam jets on
your garment from top to bottom.
Never steam directly on people.
5. DURING USE
If steam is not coming out anymore, this
can be due to low water level in tank.
14
Page 15
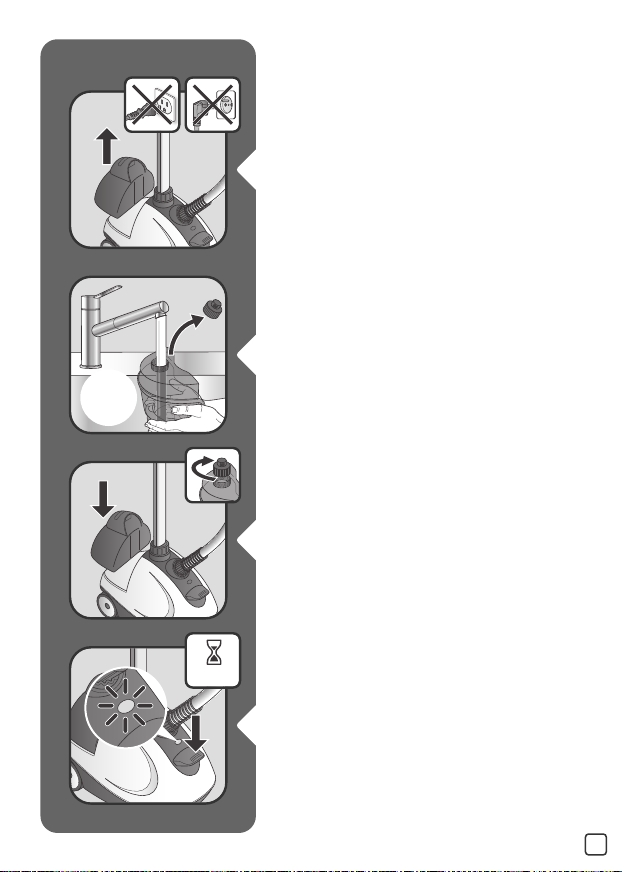
Remove the water tank.
1,8L
60OZ
MAX
60s
Remove the cap then fill in the water tank.
Fully screw the water tank cap and insert
tank back in appliance.
Press the ON/OFF pedal and check that
light is switching on. Wait for 60 seconds
before steaming.
15
Page 16
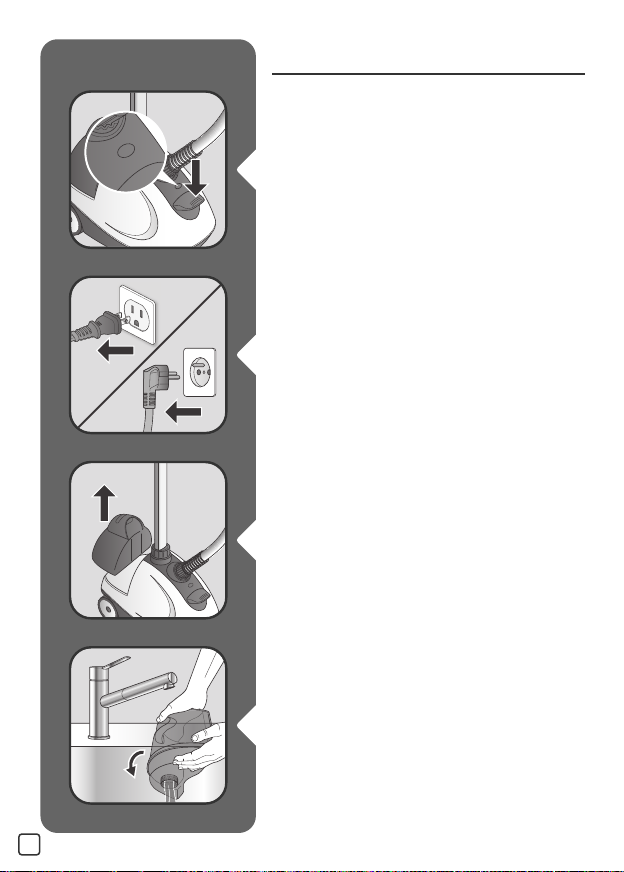
6. AFTER USE
Press the On/Off Pedal and check that light
is switched Off.
Unplug the appliance.
Remove the water tank.
Unscrew the cap and then empty the
water tank completely in a sink.
16
Page 17

Screw back the cap and place the water
1h
tank back to its appliance.
Press on the button located on the hanger
to bring down the arms.
Roll up the power cord and place it on its
hook.
Wait for an hour for your appliance to cool
before storing.
17
Page 18
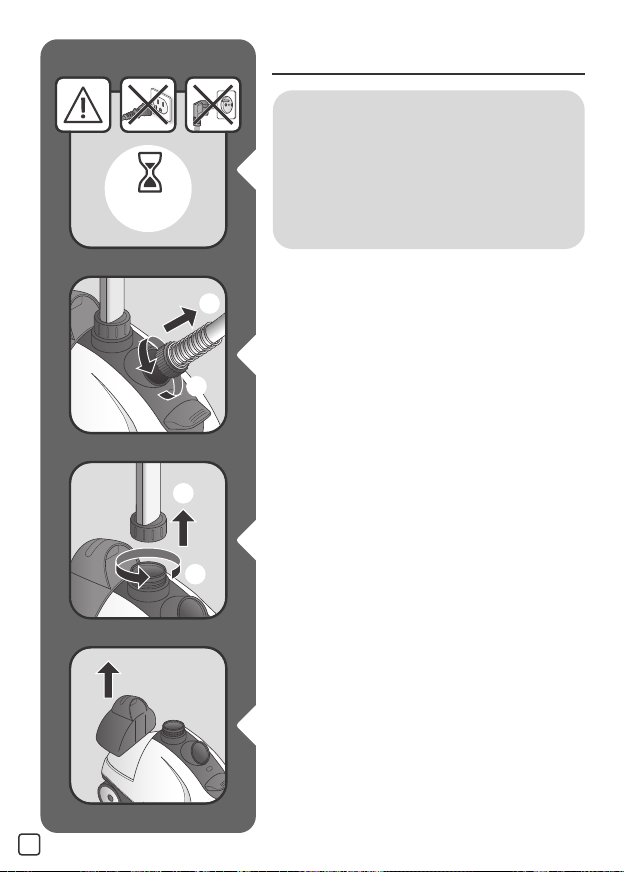
1h
7. DESCALING PROCEDURE
2
1
2
1
WARNING! Wait for an hour that
appliance completely cools down.
Ensure that hose is cold and Unlock anticlockwise. Disconnect the hose it from its
base and remove the steam head from its
craddle.
Unscrew the locker and pull out the pole.
18
Remove the water tank.
Page 19
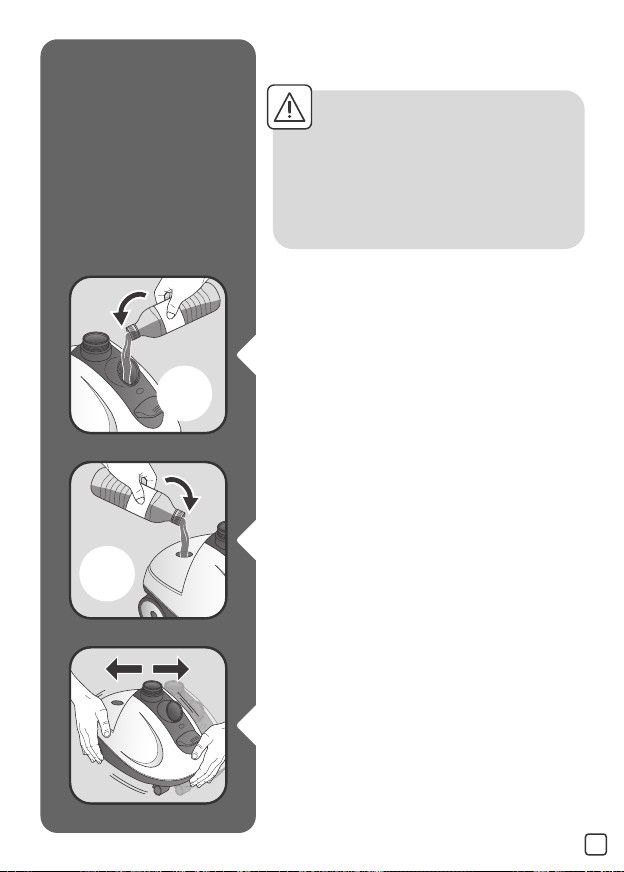
Water
0.5 L
17OZ
Water
0.5 L
17OZ
Never fill inside the pole
connection.
Fill in 0,5l of water in the appliance hose
connection.
Fill in 0,5l of water in the appliance tank
inlet.
Shake Gently the appliance to remove the
main particles.
19
Page 20
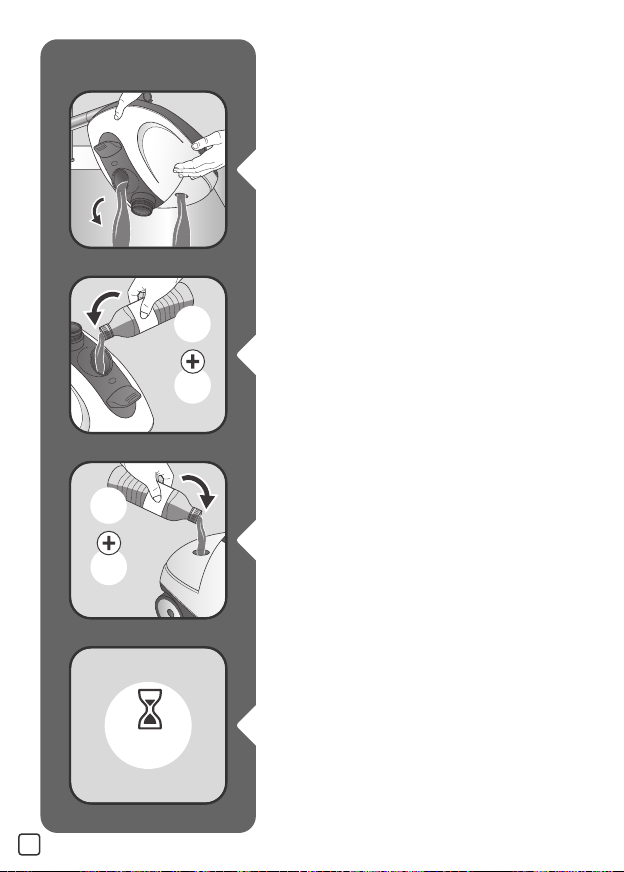
50%
WhiteWhite
VinegarVinegar
White
Vinegar
50%
WaterWaterWater
0.5 L
17OZ
50%
WhiteWhite
VinegarVinegar
White
Vinegar
50%
WaterWaterWater
0.5 L
17OZ
12h
20
Vertically tilt the appliance to empty water
in a sink.
Prepare a 1L mix of 0,5L of water & O,5l
of white vinegar only. Fill in 0,5l of mix in
the appliance hose connection.
Fill in 0,5L of mix in the appliance tank
inlet.
Wait for 12 hours minimum for mix
efficiency.
Page 21

Vertically tilt the appliance to empty mix
Water
0.5 L
17OZ
Water
0.5 L
17OZ
in a sink.
Fill in 0,5l of water in the appliance hose
connection.
Fill in 0,5l of water in the appliance tank
inlet.
Vertically tilt the appliance to empty water
in a sink.
21
Page 22
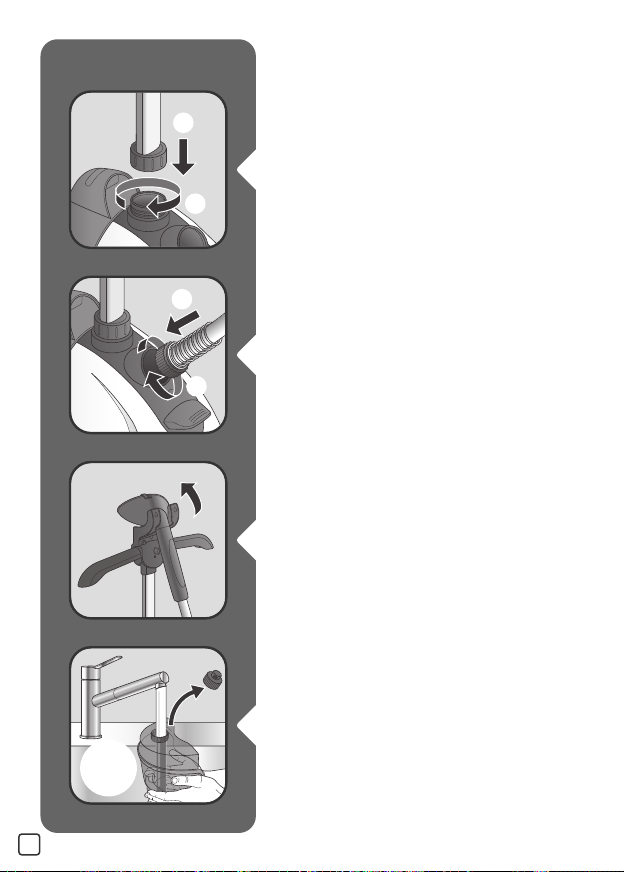
1
2
Insert the pole in the housing & then
1
2
1,8L
60OZ
MAX
screw until lock.
Fully insert the hose and then turn
clockwise until full locking by click sound.
Position the steam head on its craddle.
22
Remove the cap then fill in the water tank.
Page 23
Fully screw the water tank cap and insert
tank back in appliance.
Plug in the appliance.
Let the appliance run until water tank is
emptied completely.
23
Page 24
1h
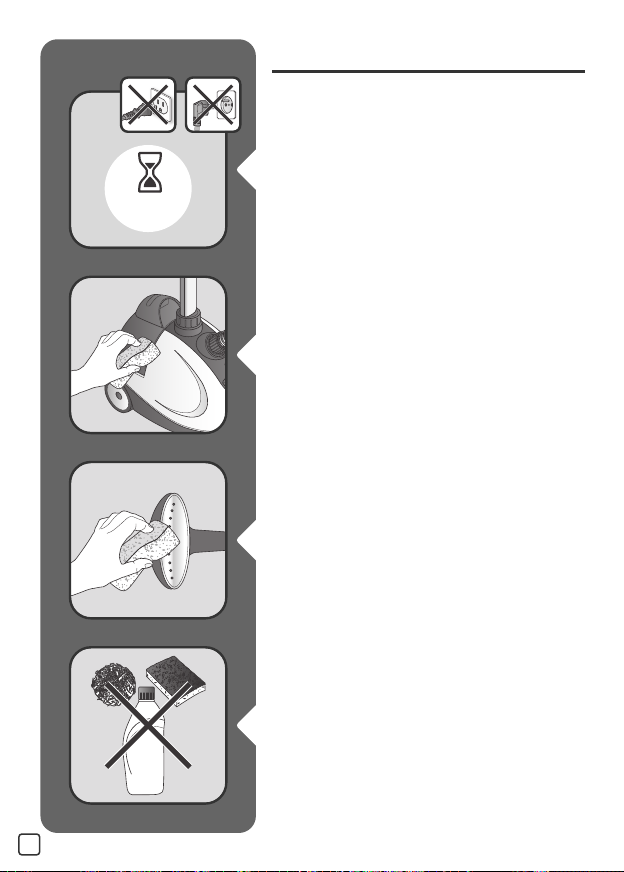
8. CLEANING
Wait an hour for complete cool down.
only use a sponge with water to clean the
basis.
Only use a sponge with water to clean the
steam head.
24
Never use liquids or detergents when
cleaning your appliance.
Page 25
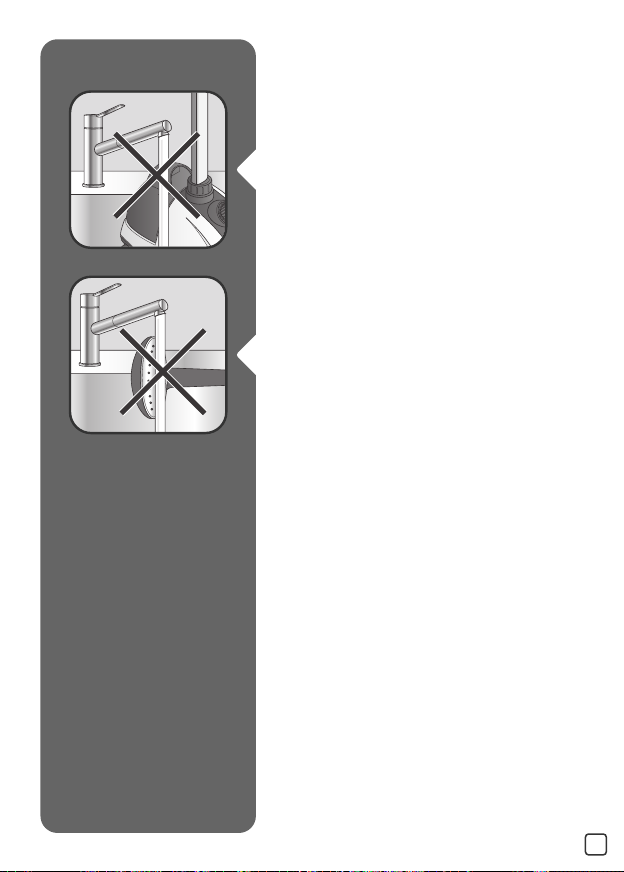
Never wash or rinse appliance directly
over a sink.
Never wash or rince the steam head
directly over a sink.
25
Page 26
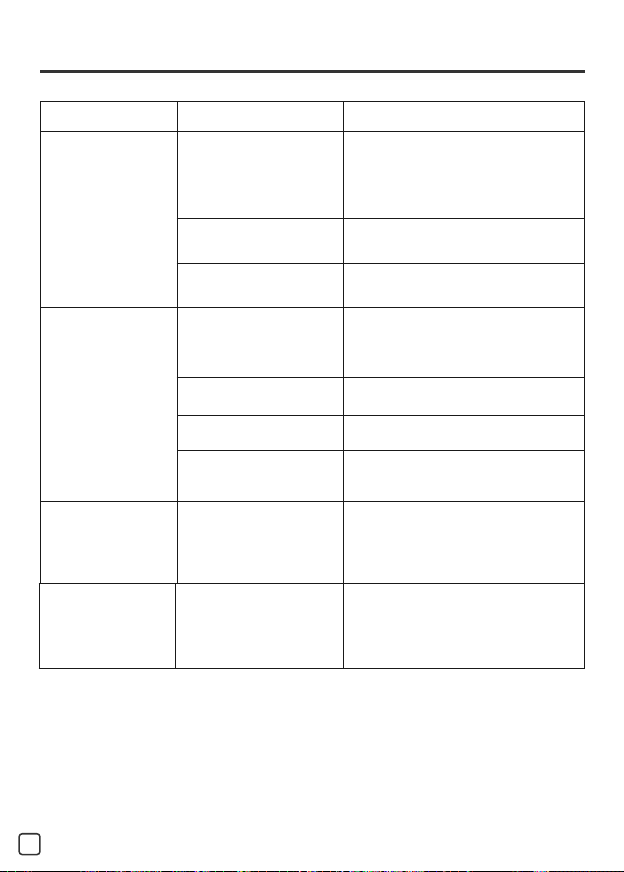
TROUBLESHOOTING
Problems Possible causes Solutions
There is no steam. The appliance has not
been turned on.
Check that the appliance has been
plugged in correctly. Next press the
On/Off pedal, the power indicator
light located at the front of the
appliance will come on.
The hose has been
obstructed.
Check that the hose is not bent or
twisted.
There is no water left in
the water tank.
Switch off the device and fill the
water tank.
The steam flow is
low.
Yo ur s te a me r h as a
build-up of scale
because it has not been
rinsed out regularly.
See descaling process (Cleaning
paragraph).
The hose has been
obstructed.
There is no water left in
the water tank.
The steam is not ready
yet.
Check that the hose is not bent or
twisted.
Switch off the appliance and fill the
water tank.
The appliance will produce steam
about 60 seconds after it has been
switched on.
Water run s
through the holes
of the steam head.
There is condensation
in the hose.
Never use a steamer in the
horizontal position. Hold the hose
vertically outstretched and wait for
the condensed water to return to
the steamer.
The steamer takes
a long time to heat
and/or ejects white
particles.
Yo ur s te a me r h as a
build-up of scale
because it has not been
descaled
regularly.
See descaling process
(Cleaning paragraph).
26
Page 27

9100020147-01 - 48/15
 Loading...