

Page 1

www.tefal.com
Page 2
Thank you for buying this appliance, which is intended for
domestic use only. Read the instructions in this leaflet carefully
and keep them within reach. They apply to every version
depending on the accessories that come with your appliance.
TEFAL has an ongoing policy of research and development and may modify
these products without prior notice.
Assembly
Before you use your appliance for the first time:
• Remove all packaging materials, stickers and accessories
from the inside and the outside of the appliance.
• Wash the grill plates and the two drip trays: follow the
instructions in the paragraph "After use/cleaning".
Ensure that all parts are completely dry before assembling them.
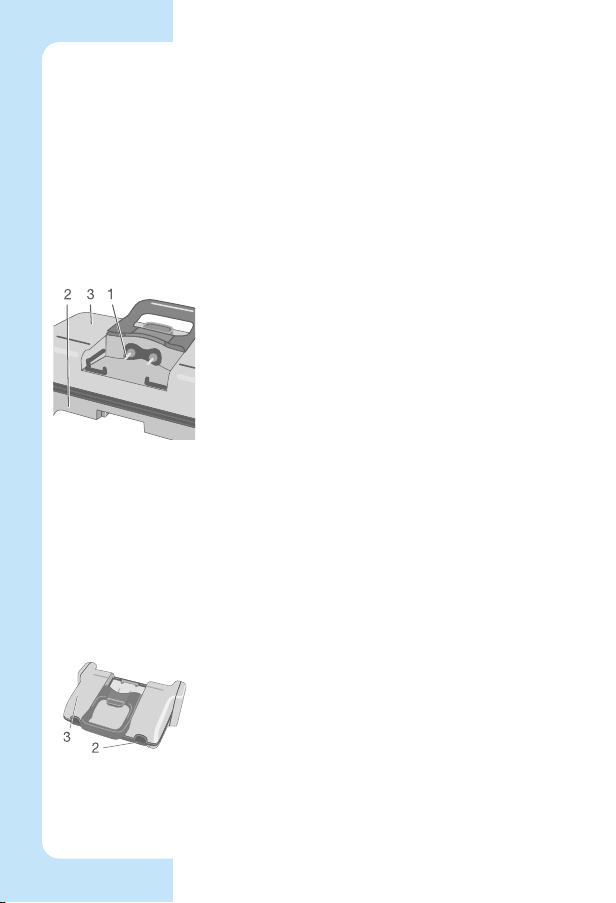
The heating element terminals (1) of the upper (2) and lower (3)
sections of the appliance must always be dried thoroughly
before using the appliance.
If the red waterproof caps on the element terminals (1) are
damaged (torn, cut…) and/or if the element terminals (1) are
damaged (bent…), they should be repaired by our authorised
service dealer or a similarly qualified person to avoid any
danger.
Place your appliance on a flat, stable and heat-resistant surface.
Avoid using it on a soft surface such as an oilcloth.
Never place the appliance directly on a fragile surface (glass
table, tablecloth, varnished furniture, etc.).
Never place the appliance under a cupboard attached to a wall
or a shelf or next to inflammable materials such as blinds,
curtains or wall hangings.
To prevent the appliance from overheating, do not place it in a
corner or against a wall.
Place the upper section (3) of the appliance flat onto the lower
section (2).
The two sections must be perfectly lined up, flat against each
other.
RC 301 520 920 – Ref. 2016231.240 – 10/04
Page 3

Place the upper electric unit (4) on the upper section (3) of the
appliance.
A safety system prevents the installation of the upper electric
unit (4) if the upper section (3) is not positioned on the lower
section (2).
Then place the lower electric unit (5) under the lower section (2)
of the appliance, with the earth contacts pointing upwards and
the power cord pointing downwards: the two sections then
become joined.
If the lower electric unit (5) is inserted the wrong way, the
appliance will not work.
Securely push in the electric units (4 and 5) before plugging in
the appliance.
Only use the electric units (4 and 5) supplied with your
appliance.
For the grill function
To grill food and make sandwiches, panini, etc.
Position the rectangular drip tray (6) by sliding it under the lower
grill plate (2).
The rectangular drip tray (6) collects any grease or drips during
cooking.
For the barbecue function
To grill meat and vegetables at the same time.
Set the thermostat according to the instructions in the cooking
table.
The thermostat can no longer be set once the appliance is in the
barbecue position.
Open the grill.
Grasp the handle (8), pull up vigorously on the upper section (3)
of the appliance, then push it backwards and slide it downwards
until it is open to 180°: the appliance is now completely open.
English
Page 4

Position the rectangular drip tray (6) by sliding it under the lower
grill plate (2).
Position the second drip tray (7) on the handle (8) of the
appliance, sliding it under the upper grill plate (3).
Make sure that the power cord and cable linking the two electric
units do not get in the way.
For the oven function (according to model)
To warm up cooked dishes whether fresh or frozen
(quiches, crêpes, sandwiches with cheese topping, etc.)
and grill fragile foods (such as fish, brochettes, etc.),
without crushing them.
Note: cooking pizzas and cheese-topped dishes is not
recommended.
Put the support wire (9) in place, by inserting it in the holes
located on each side of the lower section (2) of the appliance:
insert the longer end on the left, then the shorter one on the
right.
It is normal to have to slightly stretch the support wire (9) to
insert it into the lower section of the appliance (2).
Open the grill.
Swing the support wire (9) forward to lift up the lower section (2)
of the appliance: the grill plate is then in a horizontal position.
Grasp the handle (8), pull up vigorously on the upper section (3)
of the appliance, then pull it towards you until you can slide it
onto the front notch and close the appliance by letting the upper
section (3) rest on the support wire (9): the two grill plates are
now parallel; the appliance is in the oven position.
Connection and pre-heating
Fully unwind the power cord.
Make sure that the electric power supply is compatible with the
power rating and voltage indicated on the bottom of the
appliance.
Always plug the appliance into an earthed socket.
Page 5

If an extension cord is used:
- it must have an earth lead;
- take all necessary precautions to prevent anyone tripping
over it.
If the power supply cord is damaged, it must be replaced by the
manufacturer or its service agent or a similarly qualified
person in order to avoid a hazard.
Plug the cord into a mains socket: the indicator light (10) comes
on and the appliance starts to heat up.
Never leave the appliance plugged in when not in use, except
for pre-heating.
Never run the appliance empty.
The appliance might make a slight noise when first switched
on.
Set the thermostat to the position indicated in the cooking table.
The position of the thermostat during pre-heating is the same as
that used for cooking.
Pre-heat the appliance for about 5 minutes.
Pre-heating is over when the indicator light switches off.
To preserve the non-stick properties of the coating, avoid
excessive pre-heating with the appliance empty.
On first use, there may be a slight odour and a little smoke
during the first few minutes. This is normal.
Never leave the appliance unattended when in use.
Cooking
After pre-heating, the appliance is ready for use.
To preserve the non-stick properties of the coating:
- as a preference, use a wooden spatula to turn the food over;
- never cut food directly on the plates.
Do not put any cooking utensils on the appliance to heat up.
Do not touch the metal parts of the appliance (grill plates,
support wire and handle of the upper electric unit) when it is
heating or operating, as they are very hot: use the handle and
wear oven gloves if necessary.
Do not move the appliance when in use.
Be extra careful when the appliance is used in the presence of
children.
English
Page 6

For the grill function
Place the food on the lower grill plate (2).
Close the appliance, set the thermostat and let the food cook
according to the instructions in the cooking table.
The space between the two grill plates is adjusted automatically
(1 cm to 5 cm) depending on the thickness of the food to be
cooked.
For the barbecue function
Spread the food evenly on the two grill plates.
When only one cooking surface is used, as a preference use the
lower grill plate (2).
Let the food cook according to the instructions in the cooking
table.
For the oven function (according to model)
Place the food between the grill plates.
Disposable aluminium dishes can be placed directly between
the plates.
To close the appliance: grasp the handle (8), pull up vigorously
on the upper section (3) of the appliance, then pull it towards
you until you can slide it onto the front notch and close the
appliance by letting the upper section (3) rest on the support
wire (9).
Do not touch the lower grill plate (2) to close the appliance in
the oven position.
Set the thermostat and let the food cook according to the
instructions in the cooking table.
Position 1 is used to keep food warm.
After use/cleaning
Unplug the appliance.
Open the appliance.
If necessary, clean the grill plates with the scraper located on
either side of the drip tray (7) and on which is moulded the
shape of the handle of the appliance: grasp the handle of the
drip tray and scrape the plate holding the scraper flat.
Let the appliance cool down (approximately 1 hour) in the open
position.
Page 7

Once cooled down, close the appliance and turn it so its back is
towards you.
Press the eject button (11) (depending on model) then remove
the upper electric unit (4) by grasping the handle of the unit and
pulling it firmly towards you.
Then remove the lower electric unit (5) by pulling it towards you:
the two sections of the appliance (2 and 3) can then be
separated.
It is not necessary to turn the appliance over to remove the lower
electric unit (5).
Do not pull on the cord linking the two electric units (4 and 5).
The two sections (2 and 3) with their fixed grill plates and the two
drip trays (6 and 7) can be put in the dishwasher or washed with
a sponge, hot water and washing-up liquid.
Place the two sections of the appliance (2 and 3) vertically in the
dishwasher.
Do not use a metal scouring pad or scouring powder.
The electric units (4 and 5) can be cleaned with a damp cloth
then dried.
Never put the electric units (4 and 5) in the dishwasher.
Never immerse the appliance with its electric units (4 and 5)
and cord in water.
Storage
The appliance can be stored vertically.
English
MADE IN FRANCE
Type 1805
Page 8

Recipes
Cooking tables
Cooking times are given as an indication only: they can vary
according to quantity, personal taste, size of the pieces and type of
food.
Position 1 is used to keep food warm.
Meat and skewered kebabs
Thermostat Max
Function Cooking time
Beef rib steaks . . . . . . . . . . . . . . . . . . . . . . . grill . . . . . . . . . . . . 8 to 10 min
Beef fillets . . . . . . . . . . . . . . . . . . . . . . . . . . . grill . . . . . . . . . . . . 2 to 3 min
Tournedos . . . . . . . . . . . . . . . . . . . . . . . . . . . grill . . . . . . . . . . . . 4 to 5 min
Veal rib steaks . . . . . . . . . . . . . . . . . . . . . barbecue . . . . . . 6 to 7 min per side
Lamb chops . . . . . . . . . . . . . . . . . . . . . . .barbecue . . . . . . 5 to 6 min per side
Rump steak . . . . . . . . . . . . . . . . . . . . . . . . . . grill . . . . . . . . . . . . 2 to 3 min
Hamburger patties . . . . . . . . . . . . . . . . . . . . grill . . . . . . . . . . . . . . 5 min
Sausages . . . . . . . . . . . . . . . . . . . . . . . . . . . . grill . . . . . . . . . . . . 6 to 8 min
Lamb skewered kebabs . . . . . . . . . . . . . barbecue . . . . . . . . . 18 to 20 min
Liver/kidney skewered kebabs . . . . . . . barbecue . . . . . . . . . 18 to 20 min
Chicken skewered kebabs . . . . . . . . . . . barbecue . . . . . . . . . 18 to 20 min
Cocktail sausages . . . . . . . . . . . . . . . . . . barbecue . . . . . . . . . . 5 to 6 min
Fish
Thermostat 3
Function Cooking time
Sole . . . . . . . . . . . . . . . . . . . . . . . . . . . . . . barbecue . . . . . . 5 to 6 min per side
Grilled turbot . . . . . . . . . . . . . . . . . . . . . . barbecue . . . . . . 6 to 8 min per side
Sardine fillets . . . . . . . . . . . . . . . . . . . . . . barbecue . . . . . . 3 to 4 min per side
Salmon steaks . . . . . . . . . . . . . . . . . . . . . barbecue . . . . . . 3 to 4 min per side
Page 9

Recipes
Cooking tables
Vegetables
Thermostat Max
Function Cooking time
Mushrooms . . . . . . . . . . . . . . . . . . . . . . . barbecue . . . . . . 5 to 10 min per side
Tomatoes . . . . . . . . . . . . . . . . . . . . . . . . . barbecue . . . . . . 5 to 7 min per side
Courgettes . . . . . . . . . . . . . . . . . . . . . . . . barbecue . . . . . . 5 to 10 min per side
Aubergines . . . . . . . . . . . . . . . . . . . . . . . . barbecue . . . . . . 5 to 10 min per side
Sandwiches
Thermostat 3
Function Cooking time
Panini . . . . . . . . . . . . . . . . . . . . . . . . . . . . . . . grill . . . . . . . . . . . . 5 to 7 min
Pre-browned sandwich . . . . . . . . . . . . . . . . oven . . . . . . . . . . . 8 to 10 min
Reheating cooked dishes
Thermostat Max
Function Cooking time
Frozen dishes (about 500 g) . . . . . . . . . . . . oven . . . . . . . . . . . 30 to 45 min
Fresh products (about 500 g) . . . . . . . . . . . oven . . . . . . . . . . . 20 to 30 min
English
 Loading...