

Page 1
EN
User Guide
www.tefal.com
Page 2
1
3
2
4
5
6
7
11
9
Depending on model.
*
8
10
Page 3
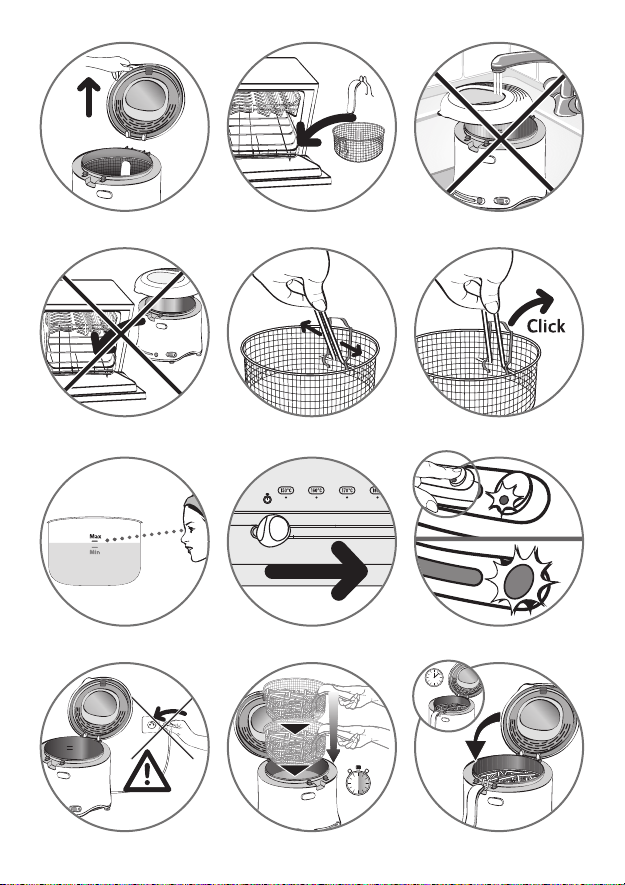
fig 1 fig 2
30 sec
1 min.
fig 3
fig 4
fig 5 fig 6
fig 7 fig 8 fig 9
0 L
fig 10 fig 11
fig 12
Page 4

Click X1
Click X15
1 Click =1min
3 sec
30 sec
Click
fig 12a fig 13 fig 14
fig 15
fig 18 fig 19 fig 20
fig 16
fig 21 fig 22 fig 22a
fig 17
Page 5
Environment protection first!
Your appliance contains valuable materials which can be recovered or
Leave it at a local civic waste collection point.
HELPLINE:
If you have any product problems or queries, please contact our Customer Relations
Team first for expert help and advice:
0845 602 1454 – UK
(01) 677 4003 – ROI
Page 6

Safety instructions
General instructions
• Read and follow the instructions for use. Keep them safe.
• This appliance is not intended to be operated using an external timer or separate
remote control system.
• For your safety, this appliance complies with the safety regulations and directives
in effect at the time of manufacture (Low-voltage Directive, Electromagnetic
Compatibility,Food Contact Materials Regulations, Environment…).
• Check that the power supply voltage corresponds to that shown on the appliance
(alternating current).
• Given the diverse standards in effect, if the appliance is used in a country other
than that in which it is purchased, have it checked by a Tefal Approved Service
Centre.
• This appliance is designed for indoor domestic household use only.
• In case of professional use, inappropriate use or failure to comply with the instructions, the manufacturer accepts no responsibility and the guarantee does
not apply.
• Remove all packaging materials and any promotional labels or stickers from your
deep fryer before use.
• Do not use the appliance if the appliance or the cord is damaged, if the appliance
has fallen or shows visible damage or does not work properly. In the event of the
above, the appliance must be sent to a Tefal Approved Service Centre. Do not
take the appliance apart yourself.
• For your own safety, use only accessories and spare parts which are suitable for
your appliance.
Connecting to the power supply
• Always plug the appliance into a power socket outlet with an earth connection.
• Do not use an extension lead. If you accept liability for doing so, only use an
extension lead which is in good condition, has a plug with an earth connection
and is suited to the power of the appliance.
• If the power supply cord is damaged, it must be replaced by the manufacturer or
a Tefal Approved Service Centre in order to avoid any danger.
• Do not leave the cord hanging. The power cord must never be in close proximity
to or in contact with the hot parts of your appliance, close to a source of heat or
rest on sharp edges.
• Do not unplug the appliance by pulling on the cord.
• Always unplug the appliance: immediately after use, when moving it, prior to
any cleaning or maintenance.
6
Page 7

Using
• This appliance is not designed to be used by people (including children) with a
physical, sensory or mental impairment, or people without knowledge or experience,
unless they are supervised or given prior instructions concerning the use of the
appliance by someone responsible for their safety.
• Children must be supervised to ensure that they do not play with the appliance.
• Use a flat, stable, heat-resistant surface, away from any water splashes.
• Never leave the appliance unattended when in use.
• This electrical equipment operates at high temperatures which may cause burns.
Do not touch the hot parts of the appliance (filter, window, metal walls (depending
on model), other apparent metal parts…). Be careful of hot steam and never put
your hands above the filtration zone.
• Do not switch on the appliance near to flammable materials (blinds, curtains….)
or close to an external heat source (gas stove, hot plate etc.).
• In the event of fire, never try to extinguish the flames with water. Close the lid.
Unplug the appliance.
• Smother the flames with a damp cloth.
• Do not move the appliance when it is full of liquids or hot food.
• Never immerse the appliance or the electrical control unit in water !
• Before throwing away your appliance, the timer battery must be removed by a
Tefal Service Centre (depending on model).
• Do not store your deep fryer outside. Store it in a dry and well ventilated area.
• It is essential that you wait until the oil has cooled down before storing the fryer.
Cooking
• Never plug in the deep fryer without oil or fat inside.
• The oil level must always be between the min and max markers.
• If you use solid vegetable fat, cut it into pieces and melt it over a slow heat (max
150°C) in a separate pan beforehand, then slowly pour it into the deep fryer
bowl. Never put solid fat directly into the deep fryer bowl or fryer basket as this
will lead to deterioration of the appliance.
• Do not mix different types of oil. Never add water to the oil or fat.
• Do not overfill the basket, never exceed the maximum capacity.
• Oils to use: For best results we recommend using a good quality blended vegetable
oil. If using Sunflower oil ensure the oil is changed after every 5 uses.
• Oils which should NOT be used under any circumstances and may cause overflowing/smoking/risk of fire are: ground nut oil, soya oil, olive oil, lard or dripping.
• If you have a removable anti-odour filter, change it after every 10 - 15 uses
(foam filter) or after 30 - 40 uses (cartridge with saturation indicator), or 80 uses
(carbon filter).
EN
7
Page 8

• Some models are equipped with a permanent metallic filter, which does not
need to be changed.
• No matter what the recipe, whether preparing fresh or frozen food, it must be
perfectly dry. Dry the food thoroughly with paper kitchen towel or a clean tea
towel before frying. This will prevent the oil from splattering and/or overflowing,
will extend the life of the oil and give crispier results.
• For frozen food, place the food into the basket and then shake the basket over
the sink to remove any excess ice crystals.
Recommendations
• Limit the cooking temperature to 190°C, especially for potatoes.
• Use the basket for chips.
• Check the cooking progress: Do not eat burnt food.
• Clean your oil after every use to avoid burnt crumbs and change it after every 8
to 10 uses (after every 5 uses if using Sunflower oil). Do not pour used oil/fat into
the sink.
• Leave it to cool and throw it away with household waste - according to the local
community regulations.
• Store your fresh potatoes in a room above 8°C.
• For best results and fast cooking, we recommend that you limit the quantity of
chips to 1/2 basket per frying.
• For larger quantities of food or potatoes the temperature of the oil drops very
fast just after having lowered the basket. This lowers the oil temperature
considerably and it is normal for the temperature to take a while to return to
190°C.
• Take great care when handling the food and use tongs.
• Gradually place the food in the hot oil, submerging it an inch at a time to prevent
it from sinking straightaway and any oil overflowing.
• For best results fry chips cut from fresh potatoes twice: A first fry at 170°C and a
second fry at 190°C.
8
Page 9

Description
1. Lid
2. Viewing window
3. Basket handle
4. Basket
5. Fryer bowl
6. Min. and Max. filling levels
7. Lid open button
8. Timer (depending on model)
9. On/Off switch with light (depending
on model)
10.Carry handles
11.Adjustable thermostat
Preparation
Before first use
• Press the button to unlock the lid and the lid will open.
• Remove the lid , the basket and the basket handle from
the fryer - fig 1.
• Wash the basket and the basket handle in the dishwasher
- fig 2.
• Wash the bowl and the lid with a sponge , warm water
and a little washing-up liquid.
• Carefully rinse and dry all items.
• Fit the handle to the basket, by squeezing the handle
together and fitting it into the notches on the basket.
Then release pressure on the handle and pull it back up
so it clicks in place - fig 5 and 6.
• Place the basket inside the fryer.
• Replace the fryer lid.
EN
Never immerse this
appliance or the lid in
water - fig 3.
Never put the
appliance body or the
lid in the dishwasher fig 4.
Your fryer should
always be used indoors.
Never mix different
types of oil or fat
because this could
cause the fryer to
overflow.
The oil/fat level should
always be between the
Min. and Max. levels
shown inside the bowl.
- fig. 7.
Check this before each
use and add the same
type of oil/fat as
required.
• Fill the bowl with oil.
Filling the bowl
• Never fill the bowl above the maximum level shown on
the bowl - fig 7.
Oil Solid vegetable fat
Max. 2.1 L 1910 g
Min. 1.9 L 1600 g
• Use an oil recommended for frying: blended vegetable
oil or sunflower oil. If using sunflower oil ensure the oil
is changed after every 5 uses. Oil which should not be
used under any circumstances and may cause overflowing/smoking/risk of fire are: ground nut oil, soya oil,
olive oil, lard or dripping.
9
Page 10

• If you use solid fat, chop it into pieces and then melt it
in a separate pan before pouring it into the bowl (never
melt solid fat in the basket or in the bowl).
• Never exceed 150°C to melt the fat that has solidified
in the bowl. For the cooking temperature follow the instructions (see cooking charts p.10).
• NEVER use animal fat such as lard or dripping as this
could cause overflowing, smoke or a fire hazard.
Pre-heating
• After filling the bowl with the fat, close the lid and plug
in your fryer without the basket
• Adjust the thermostat
be fried (see cooking charts p. 11).
• Press the On/Off switch. The indicator will light up - fig 9.
• When the temperature indicator switches off, press
the lid unlock button to open the lid and allow the
steam to escape.
- fig 8 depending on the food to
Loading the basket
Never exceed the
maximum safety limit
– fresh products
frozen 900 g. To avoid
overflowing and extend
the life of the oil, dry
the food carefully before
cooking it.
1200 g,
• Dry the food to remove any excess water or ice.
• Fill the basket before placing it in the fryer.
• Do not overfill the basket.
• Reduce quantities for frozen food.
• Tip: Cut food to the same sized pieces so that it cooks
evenly. Avoid pieces that are too thick.
Place the fryer:
- on a secure surface
- out of the reach of
children
- away from any
sources of water
splashes or heat.
Never plug the fryer in
when it is empty
(without any oil or fat)
- fig 10.
Cooking
Lowering the basket
• After the temperature indicator light goes out, very
gently lower the basket into the oil - fig 11. Lowering it
too quickly could cause the fryer to overflow - Wait for
one minute with the lid open - fig 12 then close the lid
- fig 12a.
10
Page 11

• Set the cooking time (depending on model): for models
with timer, press the button to adjust the time minute
by minute. The selected time is displayed and the
countdown begins - fig 14 to fig 18.
• You can stop the countdown, during the cooking by
pressing the timer button for 3 seconds.
• During cooking, it is normal for the temperature light
to switch on and off.
At the end of cooking
The timer (depending
on model) signals the
end of the cooking
time, but does not stop
the appliance.
For crispy fried food,
open the lid as soon as
you have finished
cooking to prevent
steam from softening
the food.
The lid cannot be
closed while the basket
is hooked on the edge
of the bowl.
• The timer emits a sound (depending on model), indicating
that the programmed cooking time has ended. To stop
the timer alarm, press the button.
• Set the thermostat to the minimum position.
• Press the On/Off button.
Press the lid unlock button to open and allow the steam
•
to escape for around 30 seconds - fig 19. Open the lid.
• Raise the basket and hook it onto the edge of the bowl.
Leave to drain for 30 seconds - fig 20.
• Close the lid when the fryer is not in use.
• To cook more food, add oil/fat as required, set the thermostat to the required temperature, press the On/Off
switch and then wait until the temperature light comes
on before placing the new food in the oil.
Table of cooking times
• The cooking times are a guide only; they may vary
depending on the size of the food and the amount of
food and individual preferences. Thicker food may
require turning halfway through frying to ensure even
cooking on both sides.
• Cooking tips: For best results, use the traditional French
method of frying homemade chips:
- first frying at 170 °C
- second frying at 190 °C
• When cooking battered food and doughnuts, remove
the wire basket to prevent food sticking to it and use
tongs to slowly lower the food into the hot oil.
Do not place your hand
above the filter system fig. 13, or over the
viewing window.
The steam and the glass
will be hot. Do not touch
the fryer walls which
may also be hot.
When cooking battered
food and doughnuts,
take great care when
handling the food and
use tongs. Gradually
place the food into the
hot oil, submerging it
an inch at a time to
prevent it from sinking
immediately.
EN
11
Page 12

Fresh food Volume
Chips
Chips
Weight/
quantity
1200 g
1000 g 190°C 13-14 min.
170°C 9-10 min.
190°C 6-7 min.
Chips
Fried chicken
(drumsticks)
Breaded fish fillets
Fried whole breaded
mushrooms
Vegetable fritters
Battered calamari
Apple fritters
Frozen food Volume
Frozen chips
Frozen chips
Breaded onion rings
Chicken nuggets
Breaded fish fillets
SWITCHING OFF THE FRYER
When you have finished frying, press the ON/OFF switch.
Unplug the fryer.
Leave the fryer and the oil/fat inside to cool completely (approx 2 hours).
600 g 190°C 11-16 min.
8 180°C 14-16 min.
1-2 170°C 6-8 min.
8 150°C 5-7 min.
10-12 180°C 6-8 min.
500 g 180°C 5-6 min.
4 180°C 5-6 min.
Weight/
quantity
900 g 190°C 10-12 min.
450 g 170°C 9-13 min.
6-8 190°C 3-4 min.
900 g 190°C 7-9 min.
8 190°C 5-7 min.
12
Page 13

Cleaning
Filtering and Storing the oil
• You may store the oil in the fryer, or in a separate airtight
container.
• If you use solid vegetable fat, we advise you to store it
separately from the fryer.
• Crumbs that break away from foods tend to burn and
alter the quality of the oil more rapidly. Over time, this
increases the risk of catching fire. For this reason, filter
the oil regularly.
Changing the oil
We recommend changing
the oil/fat after a maxi-
8 uses. - fig.21.
mum of
• Do not pour used oil/fat into the sink. Leave it to cool,
and throw it away with household waste-according to
the local community regulations - fig 22 and fig 22a.
Cleaning the fryer
• Always unplug your fryer and leave it to cool completely
before cleaning it (approx. 2 hours).
• Remove the lid and the basket.
Put the basket and basket handle in the dishwasher or
•
wash them with a sponge, warm water and a little
washing-up liquid.
• Do not immerse the lid in water, instead wipe the lid
with a sponge soaked in warm water and a little washing-up liquid. We recommend cleaning the viewing
window after each use by wiping it with a sponge and
fresh lemon juice. Allow the window to dry at room temperature or dry with a clean cotton cloth.
• Dry all items carefully before replacing them.
• Put the lid back on the fryer for storage.
• If you do not keep the oil in your fryer, you can store the
basket and the basket handle inside the fryer.
• The lid is fitted with a permanent metallic filter, you
don't need to change it.
EN
Leave the fryer with the
oil in the bowl to cool
completely before
filtering the oil (2 hours).
You cannot remove the
metallic filter located in
the lid when washing
the lid.
Never immerse your
appliance or the lid in
water and never wash it
under running water.
Never wash the
appliance body in the
dishwasher.
Do not use aggressive or
abrasive cleaning
products.
Do not store your deep
fryer outside, store it in
a dry and well-ventilated
area.
13
Page 14

Problems and solutions
Problems and possible causes Solutions
The deep fryer does not work.
The appliance is not plugged in. Plug in the appliance.
Unpleasant odours.
The oil/fat has deteriorated.
Replace the frying oil/fat (after 8 uses
max.), or more frequently depending on
the type of oil/fat used.
The oil/fat is unsuitable.
Steam escapes from around the lid.
The lid is not closed properly.
Food is wet or contains too much water
(frozen food).
Different types of oil have been mixed.
Vision through the viewing window is not clear.
Not cleaning the window often enough
or using an inappropriate cleaning
method.
14
Use a good quality blended vegetable
oil/fat. (see p.7).
Check that the lid is properly closed and
the hinge is clean.
Remove any ice and dry the food
thoroughly. Lower the basket slowly (see
p.8).
Empty and clean the bowl. Refill the bowl
with one type of oil.
To ensure good visibility, clean the
viewing window by wiping it with a
sponge and lemon juice.
Allow the window to dry at room
temperature or dry with a clean cotton
cloth.
Page 15

Problems and possible causes Solutions
The frying oil overflows.
The Max. marker for filling the bowl has
been exceeded.
The frying basket has been overfilled
with food.
Food is wet or contains too much water
(i.e. frozen food).
Wrong oil or different types of oil/fat
have been mixed.
Unsuitable oil/fat has been used.
Food does not become golden and remains soft.
Pieces are too thick and contain too
much water.
Too much food is being cooked at the
same time and the cooking oil/fat is no
longer at the right temperature.
The temperature of the frying oil/fat may
not be high enough: the temperature is
set incorrectly.
Chips stick together.
Potatoes have not been washed before
immersed in hot oil/fat.
Too much food is being cooked at the
same time.
The timer no longer works (depending on model)
The battery is low.
Check the level (Max.) and remove the
excess of oil after the fryer is cool.
Check that the basket is not too full.
Remove any ice and dry the food
thoroughly before frying.
Empty and clean the bowl. Refill the bowl
with one type of oil/fat.
Use a good quality blended vegetable
oil/fat (see p. 7).
Experiment by lengthening the cooking
time or by cutting food smaller and
thinner.
Respect the recommended quantities of
food (see table of cooking p.10).
Set the thermostat selector to the
recommended temperature.
Cut the potatoes and wash them well to
remove starch and then dry them
thoroughly.
Respect the recommended quantities of
food (see table of cooking p.10).
Have it replaced by an approved Service
Centre.
EN
15
Page 16

Page 17

Page 18

Page 19

Page 20

Page 21

Page 22

Réf. NC00114907
02/2013
ESPACE GRAPHIQUE
 Loading...