

Page 1

000
750
2502005
2
m
BG
BS
CS
HU
1750
1500
1250
1
l
RO
SK
SL
SR
HR
ET
LV
LT
PL
EN
NL
TR
ES
Page 2

C6
0
000
7
250
0
l
0
P
r
o
g
r
a
m
h
s
u
r
C
e
c
B2
B
B1
B3
I
e
i
h
t
o
o
m
S
A
u
t
o
C
l
e
a
n
M
i
n
Max
C5
50m
C
C4
150
125
1
50
C3
C2
C1
A
B
Page 3
0
0
0
000
1750
1500
1250
1
250
50
50
250
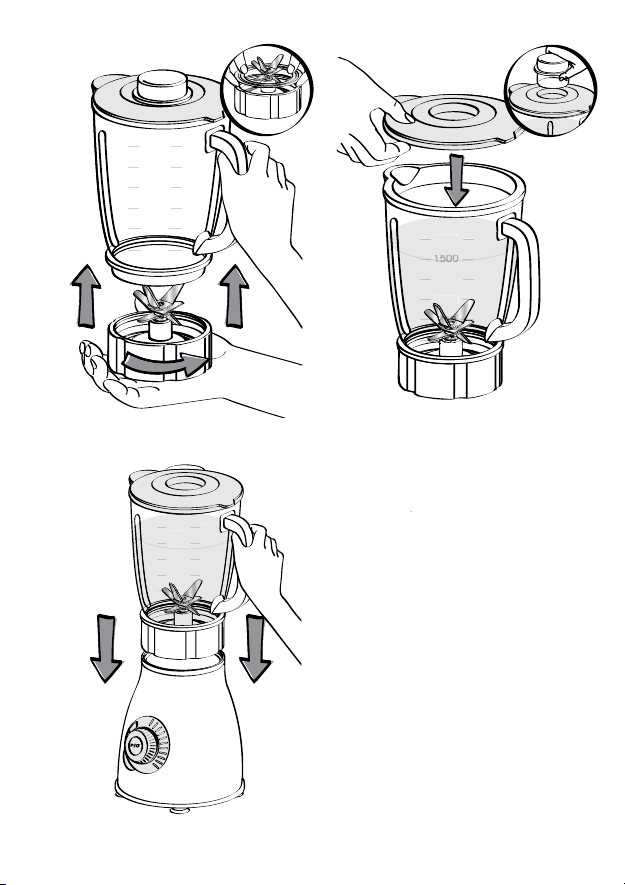
Fig.1
50ml
50
25
Fig.2
Fig.3
Page 4

Page 5

DESCRIPTION OF THE APPLIANCE
A Motor unit
B Control panel
B1 On/off button
B2 Function button
B3 Auto Clean Button
C Blender jug assembly
C1 Locking ring
C2 Blade holder
C3 Seal
C4 Graduated glass jug
C5 Lid
C6 Cap
CAUTION: the safety precautions are part of the
appliance. Read them carefully before using your
new appliance for the first time. Keep them in a place
where you can find and refer to them later on.
SAFETY LOCKING
The appliance can run only when
the blender jug assembly (C) is
correctly positioned on the motor
unit (A).
USING FOR THE FIRST TIME
• Before using your appliance for the
first time, clean all the accessories (C)
in warm soapy water, except for the
motor unit (A, B). ATTENTION: DO NOT
IMMERSE THE MOTOR UNIT/CONTROL
PANEL (A,B) OR PUT IT UNDER WATER
OR ANY OTHER LIQUID. Clean with a
damp cloth then dry it carefully.
CAUTION: The blades are
extremely sharp; handle them
with caution when using or
cleaning the appliance.
• Make sure all the packaging has
been removed before operating
the appliance.
• The appliance will only start if
the blender jug or accessory are
correctly positioned on the motor
unit (A).
• Do not operate the blender if the
lid and cap (C5 + C6) are not in
place.
66
Page 6

USING YOUR APPLIANCE
• Moisten the seal (C3) and position
it correctly onto the blade unit
(C1).
• Place the assembly (C1+C3) on
the base of the jug (C4). Lock it
by rotating the blade unit through
a quarter turn in the anticlockwise
direction. (Fig. 2).
• Place the ingredients into the
assembled jug without exceeding
the maximum level indicated:
* 1,75 litres
• Fit the lid (C5) on the jug. Place the
measuring cap (C6) in its recess
on the lid.
• Place the blender jug assembly
(C) on the motor unit (A).
• Make sure that the appliance has
been switched off and position
the jug on the motor unit so that
the notches of the jug engage
with the grooves on the motor unit.
Check that the jug is positioned
horizontally and the appliance
is on a flat, stable, heat-resistant
surface away from sources of heat
or water splashes.
• The blender motor runs the blades
at high speed in order to ensure
thorough mixing. Consequently,
it is important that the blender is
always placed on a flat, dry surface
before it is operated. Check that
the jug is positioned correctly on
the motor unit. If not, the blender
will not operate.
• Never use the blender for more
than 3 minutes at a time. Let the
blender rest for 1 minute before you
operate it again (in order to avoid
overheating).
Caution: leaks can occur if the
jug is not locked correctly.
• Plug in the appliance and turn the
function selector to “program”,
and the indicator lights of the on/
off button and the function buttons
start flashing. Choose the optional
program function by means of the
buttons “ice crush”, “smoothie” or
“auto-clean”. Each function has
a programed processing time
(see more under the different
functions), but blending can be
stopped manually by pressing the
on/off button in the middle of the
function selector. The blender also
has a variable speed selector that
is activated by turning the function
button to setting min-max.
• Your appliance is equipped with
a thermal cut-out. In case of
overheating your appliance will turn
off automatically. Disconnect the
appliance and let it cool down for
about 30 minutes, then resume use.
Functions of the blender:
Ice crush: Put max 200 g of ice
cubes in the jug. The blender works
in pulse intervals for approx. 1 minute
unless it is switched off manually by
means of the on/off button or by
pressing the ice crush button.
Smoothie: The blender works at
various speeds alternating for
approx. 1 minute unless it is switched
off manually by means of the on/ off
button or by pressing the smoothie
button.
Auto Clean: This function allows
you to clean the jug. Add 1250ml of
warm water and a drop of washing
up liquid inside the blender jug. Press
Autoclean button.
The blender works at various speeds
alternating for 45 seconds, unless it is
switched off manually by means of
the on/off button or by pressing the
Autoclean button again. Then rinse
thoroughly.
67
EN
Page 7

Min- max speed: The blender has
a variable speed setting. Start at a
low speed and increase if needed.
Note that ice crush, smoothie and
the auto clean functions cannot be
activated, when you use the variable
speed function. Turn the function
selector to the required speed and
start the blending by means of the
on/off button. Switch off the blender
by pressing the on/off button in the
middle of the function button and
turn the function button back to 0.
• We recommend that you
experiment to find the speed that is
best for the ingredients to be mixed.
Always check on the mixing and
switch off the appliance, when the
desired result has been obtained.
Always unplug after use.
• Never remove the glass jug while
the motor is on.
NOTE! Do not operate the blender
with only dry ingredients (e.g.
nuts) in the jug, as this may
damage the blender. Always add
a small amount of liquid before
you operate the appliance.
Mixing of hot liquid
• The glass jug can withstand hot
ingredients and hot liquids/ soups.
Be careful if hot liquid is poured into
the blender as it can be ejected
out of the appliance due to a
sudden build up of steam. In order
to avoid this, proceed as follows:
1. The temperature of the liquid in
the blender should not exceed
80°C.
2. Fill the jug half way up with
the desired ingredients (e.g.
vegetables, etc.).
3. Operate the blender at MIN
setting and pour the liquid
(hot stock, cream or similar)
slowly through the opening in
the lid. Do not switch off the
blender while doing this. If the
blender is switched off when
the jug contains hot liquid and
is restarted, pressure from the
bottom may cause the lid to
eject due to the high rotation of
the motor.
• If the blender has been switched
off during the above process and
needs to be restarted, place a
towel, oven glove or similar over
the jug and hold it down with your
hand. When operating the blender
remember that hot liquid may be
ejected.
• Hot liquids alone must not be
processed in the blender, since the
pressure in the jug will be too high.
Important! We do not
recommend that you mix only
frozen berries/frozen fruit alone
as they may freeze to a lump and
block the blades.
• If you want to add more ingredients
or liquid during use, you can do so,
but make sure that the blades have
stopped before you remove the
cap or the entire lid. Make sure that
the ingredients to be added are
not too viscous or too dry or heavy
for the motor to process. You may
add some additional liquid through
the hole in the lid if the mixture
seems heavy or you could scrape
the mixture towards the blade using
a rubber spatula.
MAKE SURE THAT THE LID AND
CAP HAVE BEEN REFITTED BEFORE
YOU RESTART THE BLENDER!
Important! After blending ice
cubes the glass jug should only
be cleaned in lukewarm water, as
the jug will have cooled, and hot
water may cause thermal shock
to the glass and make it shatter.
68
Page 8

• Recipe
Carrot and Cumin Soup:
Ingredients:
– 700 g carrots, cut into cubes of
15 mm x 15 mm
– 1050 ml cold water or stock
– 1 teaspoon ground cumin
– salt and freshly ground black
pepper
CLEANING YOUR APPLIANCE
• Unplug the appliance and remove
the blender jug assembly (C).
• Handle the blender unit (C1) with
caution: the blades on the blender
jug are sharp.
• Remove the jug and rinse it and
the lid under running water.
• To clean the motor unit (A), use a
damp cloth. Dry it carefully.
• Never immerse the motor unit (A)
in running water.
• For easy cleaning, to wash the
removable parts in water and a
little washing-up liquid immediately
after use. Alternatively, use the Auto
Clean program (see page 67).
Put the carrot pieces in the glass
jug and add the water or stock.
Process on max speed for 3 minutes
maximum. Turn off the appliance.
Pour the mixture into a saucepan,
add the cumin and simmer for
about 30 min. You can add water
during cooking for a thinner soup.
Add salt and pepper according
your taste.
• To clean the blender jug (C) easily,
unlock the blade unit (C1) by
rotating it through a quarter turn
in the clockwise direction. Remove
the seal (C3). Clean the locking
ring (C1), blade holder (C2) and
seal (C3) under running water or in
the dishwasher on the upper rack
using the “ECO” program (except
the the seal - C3 which is not
dishwasher safe).
• The glass jug (C4) can be cleaned
in the dishwasher on the upper
rack - use the ‘ECO’ or ‘LOW SALT’
program..
69
EN
Page 9

WHAT TO DO IF YOUR APPLIANCE DOES NOT WORK ?
Problems Causes Solutions
Product does not work.
Excessive vibrations.
Leak from the lid.
Leak from the base of the
blender jug.
The blade does not turn
easily.
Impossible to lock the
blade unit with the seal
(C1-C2 + C3) on the jug
(C4).
The plug is not fitted
correctly into the socket.
The jug or accessory is not
correctly positioned or
locked on the motor unit.
The product is not placed
on a flat, stable, heatresistant surface.
Volume of ingredients is
too high.
Volume of ingredients is
too high.
The lid is not correctly
positioned.
The blender jug seal (C3) is
not positioned correctly or
is missing.
Pieces of food too large or
too hard.
The seal (C3) is not
positioned correctly.
Plug the appliance into a
socket and switch on.
Check that the jug or
accessories are correctly
positioned and locked
onto the motor unit as
shown in the diagram in
the manual.
Place the product on a flat
surface.
Reduce the quantity of
ingredients processed.
Reduce the quantity of
ingredients processed.
Fit the lid correctly on the
blender jug.
Reposition the seal and
lock the blade holder
correctly.
Reduce the size or quantity
of ingredients processed.
Add liquid.
Reposition the seal.
Your blender still does not work?
Contact an approved service centre
(see list in service booklet).
70
Page 10

BESCHRIJVING VAN HET APPARAAT
A Motoreenheid
B Bedieningspaneel
B1 Aan/uit-knop
B2 Functieknop
B3 Zelfreinigingsknop
C Blenderkan
C1 Vastzetring
C2 Meshouder
C3 Pakking
C4 Glazen kan met
maatverdeling
C5 Deksel
C6 Vulstop
OPGELET: De veiligheidsinstructies maken deel uit
van het apparaat. Lees ze zorgvuldig door voordat
u uw nieuw apparaat in gebruik neemt. Bewaar de
gebruiksaanwijzing op een veilige plaats voor latere
raadpleging.
VEILIGHEIDSVERGRENDELING
Dit apparaat werkt alleen wanneer
de blenderkan (C) juist op de
motoreenheid (A) is vastgemaakt.
VOOR INGEBRUIKNAME
• Voordat u uw apparaat in gebruik
neemt, reinig alle accessoires (C)
in een warm sopje, uitgezonderd
de motoreenheid (A, B).
OPGELET: De messen zijn zeer
scherp. Wees voorzichtig
wanneer u het apparaat gebruikt
of reinigt.
• Zorg dat al het verpakkingsmateriaal
is verwijderd voordat u het apparaat
gebruikt.
• Het apparaat werkt alleen als de
kan of het accessoire juist op de
motoreenheid is vastgemaakt.
• Gebruik de blender niet als
het deksel (C5+C6) niet juist is
aangebracht.
71
NL
Page 11

UW APPARAAT GEBRUIKEN
• Maak de pakking (C3) vochtig en
plaats deze juist op het mes (C1).
• Breng het geheel (C1+C3) aan
op het voetstuk van de kan (C4).
Zet het vast door het mes een
kwartslag tegen de klok in te
draaien. (Fig. 2).
• Doe de ingrediënten in de in
elkaar gezette kan zonder het
aangegeven maximum niveau te
overschrijden:
* 1,75 liter
• Maak het deksel (C5) vast op de
kan. Plaats de vulstop (C6) in de
opening van het deksel.
• Breng de blenderkan (C) aan op
de motoreenheid (A).
• Zorg dat het apparaat is
uitgeschakeld en plaats de kan
op de motoreenheid waarbij de
inkepingen op de kan zich in de
groeven van de motoreenheid
bevinden. Controleer of de positie
horizontaal en stabiel is.
• De motor van de blender
laat de messen op een hoge
snelheid draaien om uitstekende
mengprestaties te leveren. Het is
aldus belangrijk dat de blender
altijd op een vlak en droog
oppervlak staat voordat het
apparaat wordt ingeschakeld.
Controleer of de kan juist op de
motoreenheid is geplaatst, anders
kan de blender niet worden
ingeschakeld.
• Gebruik de blender nooit meer
dan 3 minuten ononderbroken.
Laat de blender 1 minuut rusten
voordat u het opnieuw inschakelt
(om oververhitting te vermijden).
Opgelet: de kan kan lekken
wanneer het niet juist is
vastgemaakt.
• Steek de stekker in het stopcontact
en draai de functieregelaar naar
“program” (programma) en de
controlelampjes van de aan/
uit-knop en de functieknoppen
knipperen. Kies de optionele
programmafunctie via de knoppen
“ice crush” (ijs crushen), “smoothie”
of “auto clean”. Elke functie
heeft een geprogrammeerde
verwerkingstijd (meer informatie
onder de verschillende functies).
U kunt de ingrediënten tevens
handmatig mixen door de aan/
uit-knop in het midden van de
functieregelaar in te drukken.
De blender bestaat tevens uit
een snelheidsregelaar die wordt
geactiveerd door de functieknop
naar een optionele min-max
instelling te draaien.
• Uw apparaat is uitgerust met
een thermische uitschakeling.
In geval van een oververhitting,
wordt uw apparaat automatisch
uitgeschakeld. Haal de stekker
uit het stopcontact en laat het
apparaat circa 30 minuten
afkoelen voordat u het opnieuw
gebruikt.
Functies van de blender:
Ijs crushen: Doe maximaal 200 g
ijs in de kan. De blender werkt in
pulsintervallen van circa 1 minuut,
tenzij u het apparaat handmatig
in- en uitschakelt met behulp van de
aan/uit-knop.
Smoothie: De blender werkt circa 1
minuut op verschillende snelheden,
tenzij u het apparaat handmatig
in- en uitschakelt met behulp van de
aan/uit-knop.
72
Page 12

Automatische reiniging: Deze
functie stelt u in staat om de kan
te reinigen. Doe 1250ml water en
een druppel afwasmiddel in de
blenderkan. Druk op de knop Auto
Clean.
De blender werkt circa 45 seconden
op verschillende snelheden, tenzij u
het apparaat handmatig uitschakelt
met behulp van de aan/uit-knop
of de knop Auto Clean. Spoel
vervolgens grondig.
Min- max snelheid: De blender
is voorzien van een trapsgewijze
snelheidsregelaar. Start op een lage
snelheid en verhoog, indien nodig.
Opgelet: De functies ijs crushen,
smoothie en auto clean kunnen
niet worden geactiveerd wanneer
u de van snelheidsfunctie gebruikt.
Draai de functieregelaar naar de
gewenste snelheid en start met
mengen met behulp van de aan/uitknop. Schakel de blender uit door op
de aan/uit-knop in het midden van
de functieknop te drukken en draai
de functieknop opnieuw naar 0.
• Blijf proberen totdat u de ideale
snelheid hebt gevonden voor
het mixen van uw ingrediënten.
Houd altijd toezicht op de blender
wanneer in werking en schakel het
uit zodra het gewenste resultaat is
verkregen. Haal de stekker na elk
gebruik uit het stopcontact.
• Haal de glazen kan nooit af
wanneer de motor draait.
OPMERKING! Gebruik de blender
niet wanneer er zich enkel droge
ingrediënten (bijv. noten) in de
kan bevinden, de blender kan
worden beschadigd. Voeg altijd
een kleine hoeveelheid vloeistof
toe voordat u het apparaat
inschakelt.
Warme vloeistoffen mixen
• De glazen kan is bestand tegen
warme ingrediënten en warme
vloeistoffen/soepen. Het gieten van
een warme vloeistof in een gesloten
houder (zoals een blenderkan met
deksel) doet de druk automatisch
toenemen. Er is aldus risico dat het
deksel tijdens gebruik loskomt en de
warme vloeistof uit de houder wordt
gespoten. Om dit te vermijden, ga
als volgt te werk:
1. De temperatuur van de vloeistof
in de blender mag 80°C niet
overschrijden.
2. Vul de kan voor de helft met
de gewenste ingrediënten (bijv.
groente, wortels, etc.).
3. Schakel de blender in op de
stand MIN en giet de vloeistof
(warme soep, room, etc.)
langzaam door de opening in
het deksel. Schakel de blender
tijdens het gieten niet uit. Als de
blender wordt uitgeschakeld
terwijl de kan een warme
vloeistof bevat en vervolgens
opnieuw wordt ingeschakeld,
kan een druktoename vanaf de
onderkant en het hoge toerental
van de motor leiden tot het
loskomen van het deksel.
• Als de blender tijdens het
bovenstaande proces echter
werd uitgeschakeld en u wilt het
opnieuw inschakelen, oefen een
neerwaartse druk uit op het deksel
met uw hand - gebruik tevens een
theedoek of ovenwant. Opgelet,
er kan warme vloeistof uit het
apparaat spuiten.
• Giet nooit alleen een warme
vloeistof in de blender, de druk in
de kan kan te hoog worden.
Belangrijk! We bevelen aan om
niet alleen bevroren bessen/fruit
te mixen, deze kunnen een klont
vormen en de messen blokkeren.
73
NL
Page 13

• U kunt tijdens de werking
meer ingrediënten of vloeistof
toevoegen. Zorg er echter voor
dat het mengproces wordt
onderbroken voordat u de vulstop
of het volledig deksel afhaalt. Zorg
ervoor dat de ingrediënten die
u wilt toevoegen niet te kleverig,
droog of dik zijn om overbelasting
van de motor te vermijden. U kunt
extra vloeistof via de opening van
het deksel toevoegen wanneer
het mengsel te dik wordt of breng
het mengsel naar het mes toe met
behulp van een rubber spatel.
ZORG ERVOOR DAT HET DEKSEL
EN DE VULSTOP JUIST GEPLAATST
ZIJN VOORDAT U DE BLENDER
INSCHAKELT!
Belangrijk! Na het crushen van
ijsblokjes, was de glazen kan in
lauw water. De koude kan kan
onder een te grote spanning
komen te staan wanneer deze in
warm water wordt gewassen.
HET APPARAAT SCHOONMAKEN
• Haal de stekker uit het stopcontact
en verwijder de blenderkan (C).
• Wees voorzichtig: de messen in de
blenderkan zijn scherp.
• Haal de kan eraf en spoel deze en
het deksel onder stromend water.
• Maak de motoreenheid (A)
schoon met een vochtige doek.
Droog het vervolgens zorgvuldig af.
• Dompel de motoreenheid (A)
nooit in water.
• Voor een eenvoudige reiniging,
was de afneembare onderdelen
na gebruik onmiddellijk in water en
een beetje afwasmiddel.
• Recept
Wortelsoep met komijn:
Ingrediënten:
– 700 g wortelen, in blokjes van
15 mm x15 mm gesneden
– 1050 ml water
– 1 theelepel komijn
– zout en peper
Doe de stukjes wortel in de glazen
kan en voeg het water toe. Meng
gedurende maximum 3 minuten op
de maximum snelheid. Schakel het
apparaat uit. Giet het mengsel in
een sauspan, doe de komijn erbij
en laat circa 30 minuten koken.
Tijdens het koken kunt u water
toevoegen om een dunnere soep
te krijgen. Voeg zout en peper naar
believen toe.
• Om de blenderkan (C) eenvoudig
te reinigen, maak het mes (C1) los
door deze een kwartslag met de
klok mee te draaien. Verwijder de
pakking en reinig onder stromend
water of in de vaatwasser.
• De glazen kan (C4) kan worden
gereinigd in de bovenste mand
van de vaatwasser. Gebruik
het ‘ECO’ of ‘WEINIG ZOUT’
programma.
74
Page 14

WAT TE DOEN ALS UW APPARAAT NIET WERKT?
Problemen Oorzaken Oplossingen
De stekker zit niet goed in
het stopcontact.
Het apparaat werkt niet.
Overmatige trilling.
Het deksel lekt.
Lek aan de onderkant van
de blenderkan.
Het mes draait niet rond
zoals het hoort.
Het mes en de pakking
(C1-C2+C3) kunnen niet
op de kan (C4) worden
vastgemaakt.
De kan of het
accessoire is niet juist
op de motoreenheid
vastgemaakt.
Het apparaat is niet
op een vlak, stabiel
en warmtebestendig
oppervlak geplaatst.
Er bevinden zich te
veel ingrediënten in het
apparaat.
Er bevinden zich te
veel ingrediënten in het
apparaat.
Het deksel is niet juist
geplaatst.
De pakking (C3) is niet
juist op de blenderkan
vastgemaakt of ontbreekt.
De stukjes voedsel zijn te
groot of te hard.
De pakking (C3) bevindt
zich niet op de juiste plaats.
Steek de stekker in het
stopcontact en schakel
het apparaat in.
Controleer of de kan
of het accessoire juist
op de motoreenheid
is vastgemaakt, zoals
weergegeven in de
afbeelding.
Plaats het product op een
vlak oppervlak.
Verminder de hoeveelheid
te mengen ingrediënten.
Verminder de hoeveelheid
te mengen ingrediënten.
Maak het deksel juist op de
blenderkan vast.
Installeer de pakking
opnieuw en maak de
meshouder op een juiste
manier vast.
Verklein de stukjes of
verminder de hoeveelheid
te mengen ingrediënten.
Voeg vloeistof toe.
Installeer de pakking op de
juiste plaats.
Werkt uw blender nog steeds niet?
Neem contact op met een erkend
servicecentrum (raadpleeg de lijst in
het serviceboekje).
NL
75
Page 15

CİHAZIN TANIMI
A Motor bölümü
B Kontrol paneli
B1 Açma/kapama düğmesi
B2 İşlev düğmesi
B3 Otomatik Temizlik Düğmesi
C Blender sürahisi aksamı
C1 Kilitleme halkası
C2 Bıçak tutucu
C3 Conta
C4 Ölçekli cam sürahi
C5 Kapak
C6 Besleme kapağı
DİKKAT: güvenlik önlemleri cihazın bir parçasıdır. Cihazı ilk
defa kullanmadan önce talimatları dikkatle okuyun. Onları
bulabileceğiniz ve daha sonra başvurabileceğiniz bir yerde
saklayın.
GÜVENLİK KİLİDİ
Cihaz sadece blender sürahisi aksamı
(C) motor ünitesinin (A) üzerine doğru
konumlandırıldığı zaman çalışabilir.
İLK KULLANIM
• Cihazı ilk defa kullanmadan önce motor
ünitesi (A, B) hariç tüm aksesuarları (C)
ılık sabunlu su ile temizleyin.
DİKKAT: Bıçaklar çok keskindir, cihazı
kullanırken veya temizlerken onları
dikkatle kullanın.
• Tüm ambalajın cihazı çalıştırmadan önce
çıkarılmış olduğundan emin olun.
• Cihaz ancak sürahi veya aksesuarı doğru
şekilde konumlandırılmış ve gövdeye
kilitli olduğunda başlar.
• Kapak (C5+C6) yerinde değilse
blenderi çalıştırmayın.
76
Page 16

CİHAZI KULLANMA
• Contayı (C3) ıslatın ve bıçak ünitesinin
(C1) üzerine doğru şekilde yerleştirin.
• Aksamı (C1+C3) sürahinin (C4) tabanına
yerleştirin. Saat yönünün tersine çeyrek
tur çevirerek bıçak ünitesini kilitleyin.
(Şek. 2).
• Belirtilen maksimum seviyeyi aşmadan
malzemeleri birleştirilen sürahiye ekleyin:
* 1,75 litre
• Sürahideki kapağı (C5) kilitleyin. Kapağın
üzerindeki girintiye ölçüm kabını (C6)
yerleştirin.
• Motor ünitesinin (A) üzerine blender
sürahisi aksamını (C) yerleştirin.
• Cihazın kapalı ve sürahinin
konumunun sürahideki çentiklerin
motor bölümünün oluklarına geçecek
şekilde konumlandırıldığından
emin olun. Sürahinin yatay olarak
konumlandırıldığından ve sabit
olduğundan emin olun.
• Blenderin motoru bir karışım elde etmek
amacıyla, bıçakları yüksek hızda çalıştırır.
Dolayısıyla blenderin çalıştırılmadan
önce düz ve kuru bir yüzeye
alınması önemlidir. Sürahinin motor
bölümüne doğru şekilde yerleştirilip
yerleştirilmediğini kontrol edin. Değilse,
blender çalışmaz.
• Blenderi asla bir seferde en fazla 3
dakikadan fazla çalıştırmayın. Tekrar
çalıştırmadan önce (aşırı ısınmayı
önlemek için) blenderi 1 dakika
dinlendirin.
Dikkat: kase doğru şekilde
oturtulmazsa sızıntılar olabilir.
• Cihazın fişini prize takın ve işlev
seçme düğmesini "program" öğesine
getirin, açma/kapama düğmesinin
sinyal lambaları ve işlev düğmeleri
yanıp sönmeye başlar. "Ice crush "
(buz parçalama), "Smoothie" ya da
"Zaman Ayarı" düğmeleri ile isteğe
bağlı bir program işlevi seçin. Her
işlevin programlanmış bir işlem süresi
vardır (farklı işlevler bölümüne de
bakınız), ancak karıştırma işlev seçme
düğmesinin ortasındaki açma/kapama
düğmesine basarak bile manuel olarak
sonlandırılabilir. Blender ayrıca işlev
düğmesini isteğe bağlı min. maks. ayara
çevirerek etkinleştirilen bir kademesiz hız
seçme düğmesi içermektedir.
• Cihazınız bir termal akım kesici
ile donatılmıştır. Cihazınız, aşırı
ısınması durumunda otomatik olarak
kapanacaktır. Cihazınızın elektrik
bağlantısını kesin ve daha sonra
kullanmaya devam etmeden önce
yaklaşık 30 dakika soğumaya bırakın.
Blenderin işlevleri:
Buz kırma: Sürahiye maks. 200 gr buz
koyun. Blender açma/kapama düğmesi
ile veya Ice Crush (Buz Kırma) düğmesine
basarak manuel olarak kapatılmadığı
müddetçe yakl. 1 dakikalık aralıklarla
çalışacaktır.
Smoothie: Blender açma/kapama düğmesi
ile veya Smoothie düğmesine basarak
manuel olarak kapatılmadığı müddetçe
yakl. 1 dakika değişik hızlarda çalışacaktır.
Otomatik Temizleme: Bu işlev sürahiyi
temizlemenize imkan sağlar. Blender
sürahisinin içine 1250ml su ve bir damla
sıvı bulaşık deterjanı ekleyin. Auto Clean
(Otomatik Temizleme) düğmesine basın.
Blender açma/kapama düğmesi ile
veya Auto Clean (Otomatik Temizleme)
düğmesine basarak manuel olarak
kapatılmadığı müddetçe yakl. 45 saniye
değişik hızlarda çalışacaktır. Sonra iyice
durulayın.
TR
77
Page 17

Min.- maks. hız: Blenderde kademesiz
hız ayarı vardır. Düşük hızda başlayın ve
gerekirse arttırın. Kademesiz hız işlevini
kullandığınızda, buz kırma, smoothie ve
zaman ayarı işlevlerinin aktive edilemediğini
unutmayın. İşlev seçme düğmesini istenen
hıza çevirin ve açma/kapama düğmesi
vasıtasıyla karıştırmaya başlayın. İşlev
düğmesinin ortasındaki açma/kapama
düğmesine basarak blenderi kapatın ve işlev
düğmesini yeniden 0 konumuna çevirin.
• Malzemelerin karıştırılabilmesi için en
iyi hızı bulmak için kendi yönteminizi
denemenizi öneririz. Her zaman bir
gözünüz cihazda olsun ve istenen sonuç
elde edildiğinde cihazı kapatın. Her
kullanımdan sonra fişini prizden çekin.
• Motor açıkken cam sürahiyi çıkarmayın.
NOT! Bu blendere zarar
verebileceğinden, sürahi içinde
sadece kuru maddeler (ör. fındık)
varken blenderi çalıştırmayın. Cihazı
çalıştırmadan önce her zaman az bir
miktar sıvı ekleyin.
Sıcak sıvının karıştırılması
• Cam sürahi sıcak malzemeler ve sıcak
sıvılara/çorbalara dayanabilir. Kapalı bir
kabın (ör. kapaklı bir blender sürahisi gibi)
içine sıcak sıvı dökmek otomatik olarak
yüksek basınç yaratacaktır. Dolayısıyla
kullanım sırasında kapağın fırlaması
ve sıcak sıvı fışkırtma riski vardır. Bunu
önlemek için, aşağıdaki gibi ilerleyin:
1. Blenderdeki sıvının sıcaklığı 80°C'yi
aşmamalıdır.
2. Sürahiyi istenilen malzemelerle (ör.
sebze, kök bitkiler vs.) yarısına kadar
doldurun.
3. Blenderi MIN ayarında çalıştırın ve
sıvıyı (sıcak çorba, krema veya benzeri)
kapaktaki açıklıktan yavaşça dökün.
Bunu yaparken blenderi kapatmayın.
Blender sürahisi sıcak sıvı içerdiğinde
kapatılırsa ve yeniden çalıştırılırsa,
alttan gelen basınç motorun yüksek
devri sebebiyle kapağın çıkmasına
neden olabilir.
• Blender yukarıdaki işlem esnasında gene
de kapatılırsa ve yeniden başlatılırsa,
elinizle kapağın üzerine bastırın ve tutun
- bir havlu, fırın eldiveni veya benzeri
bir şey kullanın - ve fışkırabileceğini
unutmayın.
• Sürahideki basınç çok yüksek
olacağından, sıcak sıvılar karıştırıcıda tek
başına kullanılmamalıdır.
Önemli! Bir yumru şeklinde
donabilecekleri ve bıçakları
engelleyebilecekleri için sadece
dondurulmuş meyveleri karıştırmanızı
önermiyoruz.
• Kullanım sırasında daha fazla malzeme
veya sıvı eklemek istiyorsanız,
bunu yapabilirsiniz, ancak besleme
kapağını veya tüm kapağı çıkarmadan
önce karıştırma işleminin kesintiye
uğradığından emin olun. Eklenecek
malzemelerin motorun işlemesi için
çok yoğun veya çok kuru ya da ağır
olmadığından emin olun. Karışım yoğun
görünüyorsa kapaktaki delikten biraz
daha sıvı ekleyebilirsiniz veya karışımı bir
lastik spatula yardımıyla bıçaklara doğru
itebilirsiniz.
BLENDERİ TEKRAR ÇALIŞTIRMADAN
ÖNCE KAPAK VE DOLDURUCUNUN
MONTE EDİLDİĞİNDEN EMİN OLUN!
Önemli! Cam sürahide buz küplerini
karıştırdıktan sonra sürahi
soğutulmuş olduğundan ve sıcak
su camda gerilime ve patlamaya
sebep olabileceği için, ılık suda
temizlenmelidir.
• Yemek tarifi
Kimyonlu havuç çorbası:
Malzemeler:
– 700 gr havuç, 15 mm x 15 mm'lik küpler
halinde kesilmiş
– 1050 ml su
– 1 çay kaşığı kimyon
– tuz ve karabiber
78
Page 18

Cam sürahiye havuç parçalarını koyun ve
su ekleyin. En fazla 3 dakika maksimum
hızda karıştırın. Cihazı kapatın. Bir
tencereye dökün, kimyon ekleyin ve
yaklaşık 30 dakika boyunca pişirin.
Çorbayı inceltmek için pişirme sırasında
su ekleyebilirsiniz. Dilediğiniz gibi tuz ve
karabiber ekleyin.
CİHAZIN TEMİZLENMESİ
• Cihazın fişini çekin ve blender sürahisi
aksamını (C) çıkarın.
• Bunları dikkatle tutun: blender
sürahisinin üzerindeki bıçaklar keskindir.
• Sürahiyi çıkarın ve ve kapağı akan suyun
altında durulayın.
• Motor ünitesini (A) temizlemek için,
nemli bir bez kullanın. Dikkatle kurutun.
• Motor ünitesini (A) asla akan suya
sokmayın.
• Kolay temizlik için, kullanımdan hemen
sonra çıkarılabilir parçaları su ve biraz
bulaşık deterjanı ile yıkadığınızdan emin
olun.
• Blender sürahisini (C) kolayca temizlemek
için, bıçak ünitesini (C1) saat yönünde
çeyrek tur döndürerek serbest bırakın.
Contayı sökün ve akan suyun altında
veya bulaşık makinesinde yıkayın.
• Cam kase (C4) bulaşık makinesinde üst
rafta yıkanabilir - 'EKO' ya da 'DÜŞÜK TUZ'
programını kullanın.
79
TR
Page 19

CİHAZINIZ ÇALIŞMIYORSA NE YAPMALISINIZ?
Sorunlar Nedenler Çözümler
Fiş prize düzgün bir şekilde
takılmamış.
Ürün çalışmıyor.
Aşırı titreşimler.
Kapaktan sızıntı.
Blender sürahisinin altından
sızıntı.
Bıçak kolayca dönmüyor.
Bıçak ünitesini conta
(C1-C2+C3) ile sürahiye (C4)
oturtmak imkansız.
Blenderiniz halen çalışmıyor mu?
Yetkili bir servis merkezi ile irtibat kurun
(servis kitapçığındaki listeye bakın).
Sürahi veya aksesuarlar doğru
konumda değil ya da motor
ünitesine oturmamış.
Ürün düz, sağlam, ısıya
dayanıklı bir yüzeyde değil.
Malzemelerin hacmi çok fazla.
Malzemelerin hacmi çok fazla.
Kapak doğru takılmamış.
Blender sürahisinin contası
(C3) doğru yerleştirilmemiş
veya eksik.
Yiyecek parçaları çok büyük
veya çok sert.
Conta (C3) doğru
yerleştirilmemiş.
Bir prize takın ve çalıştırın.
Sürahi ve aksesuarların
kılavuzdaki şekilde gösterildiği
gibi doğru yerleştirilmiş ve
motor ünitesi üzerine oturmuş
olduğundan emin olun.
Cihazınızı düz bir yüzeye koyun.
İşlenmiş malzemelerin miktarını
azaltın.
İşlenmiş malzemelerin miktarını
azaltın.
Blender sürahisine kapağı
doğru şekilde oturtun.
Contayı yeniden yerleştirin ve
bıçak tutucuyu doğru şekilde
kilitleyin.
İşlenmiş malzemelerin miktarını
ve boyutunu azaltın. Sıvı
ekleyin.
Contayı yeniden yerleştirin.
80
Page 20

DESCRIPCIÓN DEL APARATO
A Parte del motor
B Panel de control
B1 Botón on/off
B2 Botón de función
B3 Botón de autolimpieza
C Ensamblaje del jarro de la
licuadora
C1 Anillo de sujeción
C2 Sostenedor de la cuchilla
C3 Junta
C4 Jarro de vidrio graduado
C5 Ta p a
C6 Tapa alimentadora
PRECAUCIÓN: las precauciones de seguridad son
parte del aparato. Léalas cuidadosamente antes de
usar su nuevo aparato por primera vez. Consérvelas
en un lugar donde pueda encontrarlas y consultarlas
posteriormente.
BLOQUEO DE SEGURIDAD
El aparato solo puede funcionar
cuando el ensamblaje del jarro de
la licuadora (C) está correctamente
ubicado en la unidad del motor (A).
USO POR PRIMERA VEZ
• Antes de usar su aparato por
primera vez, limpie todos los
accesorios (C) en agua jabonosa
tibia, excepto la unidad del
motor (A, B).
PRECAUCIÓN: Las cuchillas
estan extremadamente afiladas;
manipúlelas con precaución
cuando use o limpie el aparato.
• Asegúrese de que todo el
empaque haya sido retirado antes
de operar el aparato.
• El aparato solo se enciende
si el jarro o accesorio está
correctamente posicionado y
fijado en su cuerpo.
• No utilice la licuadora si la tapa
(C5+C6) no está en su lugar.
81
ES
Page 21

USO DE SU APARATO
• Humedezca la junta (C3) y
colóquela correctamente en la
unidad de la cuchilla (C1).
• Coloque el ensamblaje (C1+C3)
en la base del jarro (C4). Fíjela
girando la unidad de la cuchilla
un cuarto de giro en dirección a la
izquierda. (Fig. 2).
• Introduzca los ingredientes en el
jarro ensamblado sin exceder el
máximo nivel que indique el jarro:
* 1.75 litros
• Fije la tapa (C5) en el jarro.
Coloque la taza de medir (C6) in
su receso en la tapa.
• Coloque el ensamblaje del jarro de
la licuadora (C) en la unidad del
motor (A).
• Asegúrese de que el aparato esté
apagado y coloque el jarro en
la parte del motor de tal manera
que las muescas del jarro encajen
en las ranuras de la parte del
motor. Verifique que el jarro esté en
posición horizontal y estable.
• El motor de la licuadora hace girar
las cuchillas a gran velocidad para
garantizar un licuado exhaustivo.
En consecuencia, es importante
que la licuadora esté siempre
ubicada en una superficie estable
y seca antes de ser activada.
Verifique que el jarro esté ubicado
correctamente en la parte del
motor. Si no, no se puede activar la
licuadora.
• Nunca use la licuadora por
más de 3 minutos por vez. Deje
que la licuadora descanse por
1 minuto antes de activarla
nuevamente (para evitar el
sobrecalentamiento).
Precaución: puede haber
derrames si el tazón no se fija
correctamente.
• Enchufe el aparato y gire
el selector de funciones a
“programa”, y empezarán a
parpadear las luces de señal del
botón on/off y los botones de
función. Elija la función programa
mediante los botones “triturar
hielo”, “smoothie” o “intervalo”.
Cada función tiene un tiempo
de procesamiento programado
(ver más bajo las distintas
funciones), pero la mezcla puede
incluso terminarse manualmente
presionando el botón on/off en
la parte media del selector de
función. La licuadora además
incluye un selector de velocidad
sin pasos que se activa al girar
el botón de función a una
configuración opcional mín-máx.
• Su aparato viene equipado con
un corte térmico. En caso de
sobrecalentamiento, su aparato
se apagará automáticamente.
Desconecte el aparato y déjelo
enfriar por unos 30 minutos, luego
reanude el uso.
Funciones de la licuadora:
Tritura hielo: Coloque máx 200 g de
hielo en el jarro. La licuadora trabaja
en intervalos de pulsos por aprox.
1 minuto a menos que se apague
manualmente mediante el botón
on/off o presionando el botón de
triturar hielo.
Smoothie: La licuadora trabaja a
diversas velocidades, alternándose
por aprox. 1 minuto a menos que se
apague manualmente mediante el
botón on/off o presionando el botón
de smoothie.
Autolimpieza: Esta función le
permite limpiar el jarro. Añada
1250ml de agua y un gota de
82
Page 22

líquido lavaplatos dentro del jarro
de la licuadora. Presione el botón de
Autolimpieza.
La licuadora funciona a diferentes
velocidades alternándose por 45
segundos, a menos que se apague
manualmente mediante el botón
on/off o presionando el botón de
Autolimpieza. Luego enjuague bien.
Velocidad mín-máx: La licuadora
tiene una configuración de
velocidades sin pasos. Empiece a
una baja velocidad y auméntela
de ser necesario. Tome nota que las
funciones de triturar hielo, smoothie
e intervalo no pueden activarse
cuando use esta función de
velocidades sin pasos. Gire el selector
de función a la velocidad deseada
y comience a mezclar mediante el
botón on/off. Apague la licuadora
mediante el botón on/off en el medio
del botón de función y gire el botón
de función de regreso a 0.
• Recomendamos que intente
buscar la velocidad que sea mejor
para mezclar los ingredientes.
Siempre vigile la mezcla y apague
el aparato cuando se haya
obtenido el resultado deseado.
Siempre desenchufe después de
su uso.
• Nunca retire el jarro de vidrio
cuando el motor esté encendido.
¡NOTA! No active la licuadora
solamente con ingredientes
secos (p. ej. nueces) en el jarro,
ya que esto podría dañarla.
Siempre añada una pequeña
cantidad de líquido antes de
activar el aparato.
Mezcla de líquido caliente
• El jarro de vidrio puede tolerar
ingredientes calientes y líquidos/
sopas calientes. Si vierte líquidos
calientes en un contenedor
cerrado (como p. ej. el jarro de
una licuadora con tapa) se creará
alta presión. En consecuencia, hay
un riesgo de que la tapa se salga
durante el uso y que el líquido
pueda rociarse como chorro. Para
evitar esto, proceda como sigue:
1. La temperatura del líquido en la
licuadora no debe exceder los
80°C.
2. Llene el jarro con los ingredientes
deseados (p. ej. vegetales, raíces,
etc.).
3. Active la licuadora en la
configuración MIN y vierta
el líquido (sopa, crema, etc.
caliente) lentamente por la
abertura de la tapa. No apague
la licuadora mientras hace esto.
Si la licuadora se apaga mientras
el jarro contiene líquido caliente
y se reactiva, una presión desde
la parte inferior puede hacer
que la tapa se salga debido a la
alta rotación del motor.
• Si la licuadora se ha apagado de
todas formas durante el proceso
anterior y tiene que reiniciarse,
presione su mano y sostenga la
tapa - use una toalla, un guante de
horno, etc. - y tenga en cuenta que
el líquido caliente puede rociarse
como chorro.
• Los líquidos calientes solos no
deben usarse para rociar la
licuadora, ya que la presión en el
jarro podría ser demasiado alta.
¡Importante! No recomendamos
que mezcle solamente bayas/
frutas congeladas, ya que
pueden congelarse como un
bloque y bloquear las cuchillas.
• Si desea agregar más ingredientes
o líquido durante el uso, puede
hacerlo, pero asegúrese de que
la mezcla se interrumpa antes de
retirar la tapa de alimentación o
la tapa entera. Asegúrese de que
los ingredientes que se vayan a
83
ES
Page 23

añadir no sean demasiado viscosos
o demasiados secos o pesados
para que los procese el motor.
Puede añadir algo de líquido
adicional por el orificio de la tapa
si la mezcla parece estar pesada
o si usted pudiera raspar la mezcla
a través de la cuchilla con una
espátula de hule.
¡ASEGÚRESE DE QUE LA TAPA
Y el rellenador ESTÉN BIEN
ENSAMBLADOS ANTES DE
REACTIVAR LA LICUADORA!
¡Importante! Luego de mezclar
cubos de hielo, se debe limpiar
el jarro de vidrio con agua tibia,
ya que el jarro se ha enfriado y
el agua caliente podría causar
tensiones en el vidrio y hacerlo
estallar.
LIMPIEZA DE SU APARATO
• Desenchufe el aparato y retire la
licuadora y el ensamblaje del jarro
de la licuadora (C).
• Manipúlelos con precaución: las
cuchillas del jarro de la licuadora
están afiladas.
• Retire el jarro y enjuáguelo
junto con su tapa, bajo el agua
corriente.
• Para limpiar la unidad del motor
(A), use un paño húmedo. Séquelo
cuidadosamente.
• Nunca sumerja la unidad del motor
(A) en agua corriente.
• Receta
Sopa de zanahoria con comino:
Ingredientes:
– 700 g de zanahorias, cortadas en
cubos de 15 mm x 15 mm
– 1050 ml de agua
– 1 cucharadita de comino
– sal y pimienta
Coloque los trozos de zanahoria en
el jarro de vidrio y añada el agua.
Mezcle en velocidad máx por 3
minutos como máximo. Apague el
aparato. Vierta la mezcla en una
sartén, añada el comino y cocine
por unos 30 min. Puede añadir
agua durante la cocción para una
sopa menos espesa. Aderece con
sal y pimienta según su gusto.
• Para una fácil limpieza, asegúrese
de lavar las partes removibles
en agua y un poco de líquido
lavaplatos inmediatamente
después del uso.
• Para limpiar el jarro de la licuadora
(C) fácilmente, desbloquee
la unidad de la cuchilla (C1)
girándola un cuarto de giro hacia
la derecha. Retire la junta y lávelas
bajo agua corriente o en el
lavaplatos.
• El tazón de vidrio (C4) puede
limpiarse en el lavaplatos en la
rejilla superior - use el programa
‘ECO’ o ‘BAJA SAL’.
84
Page 24

¿QUÉ HACER SI SU APARATO NO FUNCIONA?
Problemas Causas Soluciones
El enchufe no cabe
correctamente en la
clavija.
El producto no funciona.
Demasiadas vibraciones.
Hay derrames desde la
tapa.
Hay derrames desde
la base del jarro de la
licuadora.
La cuchilla no gira
fácilmente.
Imposible de bloquear la
unidad de la cuchilla con
la junta (C1-C2+C3) en el
jarro (C4).
El jarro o accesorio no está
colocado correctamente
o bloqueado en la unidad
del motor.
El producto no está
colocado en una
superficie plana, estable y
resistente al calor.
El volumen de los
ingredientes es demasiado
alto.
El volumen de los
ingredientes es demasiado
alto.
La tapa no está
correctamente
posicionada.
La junta del jarro de
la licuadora (C3)
no está posicionada
correctamente o está
ausente.
Los trozos de comida son
demasiado grandes o
demasiado duros.
La junta (C3) no
está posicionada
correctamente.
Enchufe el aparato en una
clavija y enciéndalo.
Verifique que el jarro
o los accesorios estén
correctamente ubicados
y bloqueados en la
unidad del motor como
se muestra en la figura del
manual.
Coloque el producto en
una superficie plana.
Reduzca la cantidad de
ingredientes procesados.
Reduzca la cantidad de
ingredientes procesados.
Fije la tapa correctamente
en el jarro de la licuadora.
Vuelva a colocar la junta y
bloquee el sostenedor de
la cuchilla correctamente.
Reduzca el tamaño o la
cantidad de ingredientes
procesados. Añada líquido.
Vuelva a colocar la junta.
¿Su licuadora no funciona?
Contacte a un centro de servicio
aprobado (ver lista en cuadernillo
de servicio).
ES
85
Page 25

Page 26

Page 27

BG p. 1 – 5
BG
BS p. 6 – 10
BS
CS p. 11 – 15
CS
HU p. 16 – 20
HU
RO p. 21 – 25
RO
SK p. 26 – 30
SK
SL p. 31 – 35
SL
SR p. 36 – 40
SR
HR p. 41 – 45
HR
ET p. 46 – 50
ET
LV p. 51 – 55
LV
LT p. 56 – 60
LT
PL p. 61 – 65
PL
EN p. 66 – 70
EN
NL p. 71 – 75
NL
TR p. 76 – 80
TR
ES p. 81 – 85
ES
Ref. 8080015947-02
 Loading...