

Page 1
EN
ES
Page 2
1
2
1
2
1
2
1
2
1 2 3
4 5 6
7 8 9
K*
K1
K2
F6
F5
L1
L*
F4
L2
F
F3
M*
F1
F2
N*
A
D
B
I
C
G
H
E
J*
Page 3
1
2
1
2
1
2
1
2
1 2 3
4 5 6
7 8 9
Page 4

SAFETY INSTRUCTIONS
CAUTION: the safety precautions are part of the
appliance. Read them carefully before using your
new appliance for the first time. Keep them in a
place where you can find and refer to them later on.
Before using your appliance for the first time,
carefully read these instructions for use and retain
them for future reference: the manufacturer shall
not accept liability in the event of any use that
does not comply with the instructions.
• Make sure that the voltage that your appliance
uses matches that of your electrical supply
system.
Any error in connection will negate the guarantee.
• This product has been designed for indoor and
domestic use only, and at an altitude below
2000m. Any commercial use, inappropriate use
or failure to comply with the instructions, the
manufacturer accepts no responsibility and the
guarantee will not apply.
• Always disconnect the appliance from the mains
power supply when it is unattended and before
assembling, dismantling or cleaning it.
• Remember: you may injure yourself if you use the
appliance incorrectly.
4
Page 5

• Do not use the appliance if it is not working
properly or if it has been damaged. In this case,
contact an authorized service centre (see the list
in the service booklet).
• All maintenance other than cleaning and everyday
upkeep by the customer must be performed by
an authorized service centre.
• Do not use this appliance to blend or mix nonfood items.
• Never use the blender jug without ingredients or
with solid ingredients only.
• Always pour the liquid ingredients into the blender
jug first, before adding the solid ingredients.
• Do not use the mixing bowl or accessories
(according to model) as containers for preservation,
freezing, cooking or sterilisation.
• In order to prevent overflow, do not fill the bowl
or jug over the maximum level (if indicated).
• Do not touch any moving parts (blades, etc.).
• Blades are very sharp: to prevent injuries, handle
them with care when emptying the blender jug, the
bowls (according to model), cleaning, assembling
and dismantling the blender jug (according to
model) and the accessories (according to model).
• Never place your fingers or any other object not
intended for this function in the blender jug when
EN
5
Page 6

the appliance is running.
• Never remove the lid or the blender jug before
the appliance has come to a complete stop.
• Always use the blender jug with the lid.
• Place the appliance on a stable, heat-resistant,
clean and dry worktop.
• Do not immerse the appliance, power cord or
plug in any liquid.
• Do not leave the power cord hanging within reach
of children.
• Do not leave the power cord close to or in contact
with the hot parts of the appliance, near a source
of heat or a sharp angle or inside the blender jug
in contact with the blades.
• Keep moving parts (blades) away from the cord
during use.
• Never pull the power cord to disconnect the
appliance.
• Do not allow long hair, scarves, ties etc. to hang over
the appliance or attachment when either is in use.
• Do not use the appliance if the power cord or plug
have been damaged. To avoid all danger, have
them replaced by an authorized service centre
(see the list in the service booklet).
• For your safety, only use spare parts and
accessories that are approved for your appliance.
6
Page 7

• Be careful if hot liquid is poured into the blender
as it can be ejected out of the appliance as it
produces a lot steam.
• Do not pour boiling liquids (over 80°C/176°F) in
the bowl or jug (according to model).
• This appliance is not intended for use by persons
(including children) with reduced physical, sensory
or mental capabilities, or lack of experience
and knowledge, unless they have been given
supervision or instruction concerning use of the
appliance by a person responsible for their safety.
• Children should be supervised to ensure that they
do not play with the appliance.
• Do not allow children to use the appliance without
supervision.
• This appliance is designed for domestic use only.
It is not intended to be used in the following
environments, in which the guarantee shall not
apply:
– Kitchen work areas in shops, offices and other
working environments.
– In kitchen areas reserved for staff in shops,
offices and other professional environments.
– Farmhouses
– By clients in hotels, motels and other residential
environments.
EN
7
Page 8

– Bed and breakfast type environments.
• Switch off the appliance and unplug it from
the electrical power supply before changing
accessories or approaching parts that move in use.
• Refer to the instructions to obtain the appropriate
operating time and speed settings for each
accessory.
• Refer to the instructions for correct fitting and
assembly of your accessories.
• Refer to the instructions for initial and regular
cleaning of surfaces in contact with foodstuff, and
for cleaning and maintenance of your appliance.
EUROPEAN MARKETS ONLY
• This appliance shall not be used by children. Keep
the appliance and its cord out of reach of children.
• Children shall not play with the appliance.
• This appliance may be used by persons with
reduced physical, sensory or mental capabilities,
or whose experience or knowledge is not
sufficient, provided they are supervised or have
received instruction to use the appliance safely
and understand the dangers.
Environment protection first !
Your appliance contains valuable materials which can be
recovered or recycled.
8
Leave it at a local civic waste collection point.
Page 9

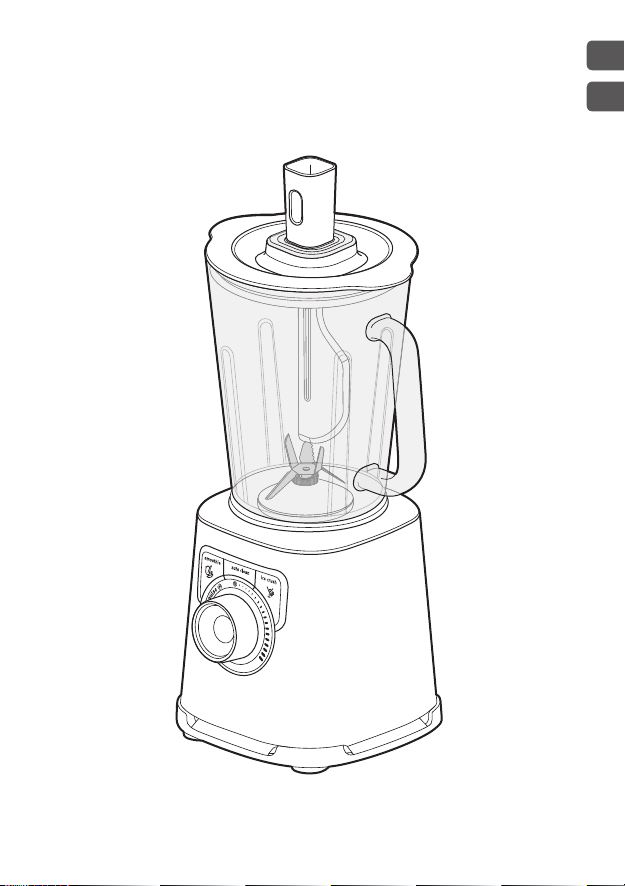
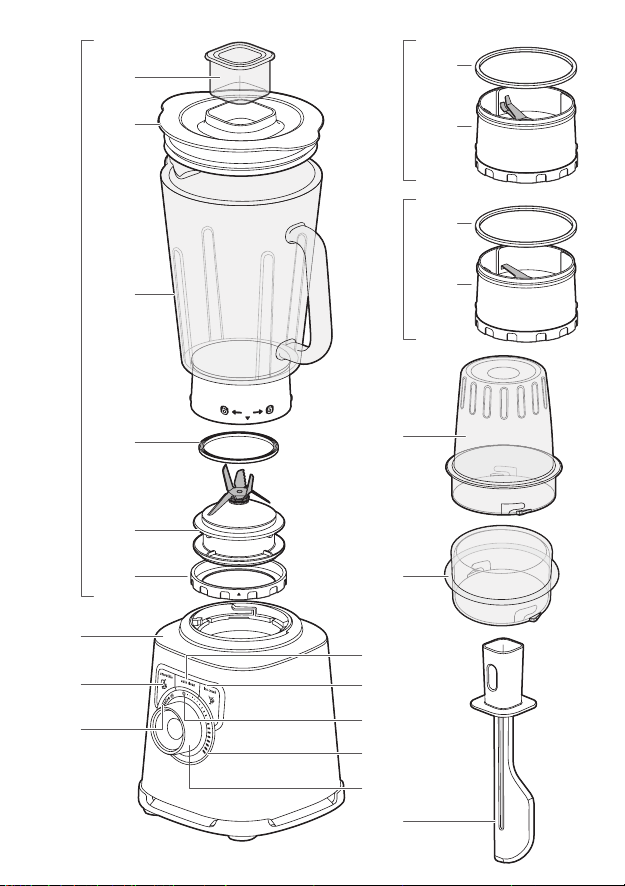
DESCRIPTION
A Motor unit
B “Smoothie” button
C “Ice crush” button
D “Auto clean” button
E Control knob
F Blender jug assembly
F1 Blade unit
F2 Locking ring
F3 Seal
F4 Graduated blender jug
F5 Lid
F6 Lid cap
G Min speed
H Max speed
I Pulse button
J Spatula* (accessory depending
on model)
K Herb chopper* (accessory
depending on model)
K1 Seal
K2 Herb chopper blade unit
L Spice grinder* (accessory
depending on model)
L1 Seal
L2 Spice grinder blade unit
M Herb chopper and Spice grinder
bowl* (accessory depending on
model)
N Mini chopper* (accessory
depending on model)
BEFORE THE FIRST USE
• Clean all the parts (F, J, K, L, M, N) with warm water and washing up
liquid except for the motor unit (A) which must never be immersed in
water or placed under running water (see section Cleaning).
CAUTION: The blades are extremely sharp; handle them with caution
when using or cleaning the appliance.
• Make sure all the packaging has been removed before operating the
appliance.
• Important note: Turn the control knob (E) to before placing the
blender jug (F) on the motor unit (A).
• The appliance will start only if the blender jug is locked correctly on the
motor unit.
• Do not operate the appliance if the lid is not in place.
EN
9
Page 10

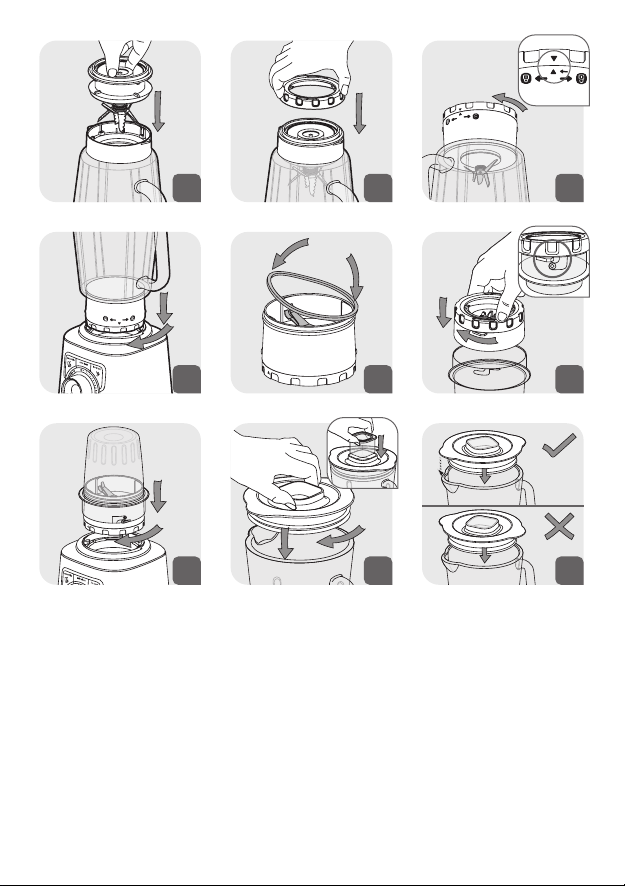
ASSEMBLING AND FITTING THE JUG
Moisten the seal (F3) (even if already fitted on the blade unit (F1)).
Becareful to correctly fit the seal (F3) back onto the blade unit (F1) the
correct way up (Fig 11).
• Check the seal is in place on the blade unit.
• Turn the jug upside down and place the blade unit on the base of the
jug (Fig 1).
• Fit the locking ring (Fig. 2) and lock it by rotating it through a quarter
turn in the clockwise direction.
• Make sure the locking ring is locked correctly : the two arrows must be
aligned (Fig 3).
• Add the ingredients to the assembled jug without exceeding the
maximum level indicated:
* 1.5 L for thick mixtures
* 1.25 L for liquid preparations
Warning : Do not pour boiling liquids (over 80°C/176°F) into the jug.
• Fit the lid (F5) on the jug (Fig. 8). To avoid any splashes during blending
make sure that the curved tabs on the lid are aligned with the spout and
handle (Fig. 9) . Fit the measuring cap (F6) in the hole on the lid (Fig. 8)
USING YOUR BLENDER
• Once the blender jug is locked correctly on the motor unit, plug in the
appliance. The lights on the appliance flash twice and you hear a beep.
Turn it on using the desired function.
• Speed selection: Turn the control knob (E) to choose the desired speed;
the speed increases gradually between min and max. The intensity of
the lights on the appliance increase gradually as the speed increases.
You can change the speed as required during preparation.
• “Pulse” function: Turn the control knob (E) to the “Pulse” position. Using
a succession of pulses gives finer control for precise preparations. In
this position, the appliance starts directly on maximum speed. It stops
as soon as you release the knob. The light remains on when the pulse
function is in use.
10
Page 11

• Function “ Smoothie”
This function is used to prepare smoothies, milkshakes and fruit
cocktails. The speed is pre-programmed for best results. To use this
function, press the “Smoothie” button (B). The light remains on during
this cycle and switches off when the cycle is finished. The program stops
automatically and beeps 4 times. You can stop it before the end by
pressing the “Smoothie” button (B) again.
• Function “ Ice crush”
You can use this function to crush ice finely with pre-programmed operating
cycles and speed. To use this function, press the “Ice crush” button (C).
The light remains on during this cycle and switches off when the cycle is
finished. You hear 4 beeps. The program stops automatically but you can
stop it before the end by pressing the “Ice crush” button (C) again.
• Function “Auto clean”:
This function is used to automatically clean your appliance. Pressthe
“Auto clean” button (D). Do not exceed 1 litre of hot water (maximum
temperature of 80°C / 176°F). At the end of the program, the appliance
stops automatically and you hear 4 beeps.
• WARNING : If the load becomes too high, your appliance will stop
automatically for safety reasons (if the motor runs for more than
3minutes or if you have used too much ingredients). To restart your
appliance, turn the control knob to . The overall cooling time may vary
and can be up to 30 minutes. Before restarting your appliance, adapt the
quantity of ingredients or blending time to avoid any overload. You can
then select the desired speed or function to complete your preparation.
• WARNING : Do not use the program functions smoothie, ice crush
and auto clean with the herb chopper (K) and spice grinder (L).
These programs can only be used with the blender jug (F). Do not
perform ice crush with the herb chopper (K) and spice grinder (L).
EN
11
Page 12

USING THE HERB CHOPPER (K) AND SPICE GRINDER (L)
(DEPENDING ON MODEL)
– With the herb chopper (K) you can chop ingredients like onions, garlic
or raw meat (pre-cut into small pieces) in a few seconds. Donot use
the herb chopper for liquid preparations (fruit juices, etc.).
– With the spice grinder (L) you can grind spices in a few seconds:
coriander seeds, peppercorns, etc.
– These accessories are equipped with a bowl (M) that prevents access
to the blades during use.
1. Turn the bowl (M) upside down and add the ingredients.
2. Position the seal (K1 or L1) in its recess on the blade unit (K2 or L2)
(Fig.5). Position the blade unit on the bowl. Lock the accessory by
rotating the blade unit until fully assembled (Fig.6). Caution: leaks
can occur if the accessory is not locked correctly.
3. Rotate the assembled accessory (K or L) and position it on the
motor unit (Fig.7).
4. Then turn the assembled accessory (K or L) through a quarter turn
clockwise (Fig.7).
5. Plug in the appliance and turn the Control knob (E) to the desired
position or apply a few pulses. To stop the appliance, turn the
control knob (E) to position zero.
6. Unlock the accessory by turning it through a quarter turn in the
anticlockwise direction. Remove the assembled accessory (K+M or
L+M) from the motor unit. Turn it over before opening to avoid any
spillage of your preparation. Then you can unlock the blade unit
(K1 or L1). The blades are very sharp: handle them with caution
to avoid injury. You can then remove the preparation in the bowl.
Warning : you can use the accessories with solid ingredients only. You
can pour liquid ingredients in the blender jug (F) only.
12
Page 13

ADVICE
• Depending on the nature of the ingredients, you can use the blender
jug to prepare up to
* 1.5 L for thick mixtures.
* 1.25 L for liquid preparations.
Warning : Do not pour boiling liquids (over 80°C/176°F) in the jug.
• You can prepare finely blended soups, cream soups, stewed fruit, light
batter (pancakes, fritters, Yorkshire pudding batter, etc.), milkshakes,
smoothies, cocktails, etc.
• If ingredients stick to the sides of the jug when blending, stop the
appliance. Remove the blender jug from the motor unit, and push the
food down onto the blades using a spatula and put your blender jug
back to continue your preparation.
• Always pour the liquid ingredients into the blender jug first, before
adding the solid ingredients, without exceeding the maximum level.
• To add ingredients while blending, remove the lid cap (F6) from the lid
(F5) and add the ingredients through the feeder hole.
• For finely crushed ice, use a maximum of 6 small ice cubes using “Ice
crush” function. There is no need to add water.
RECIPE
Cold carrot soup:
600g carrots + 900g water : Put the carrot pieces in the blender jug and
add the water. Mix on max speed for 3 minutes.
Mixed figs (with mini chopper accessory (N), depending on model)
70g figs: Cut the figs before placing them in mini chopper (N). Mix on
max speed for 3 seconds.
EN
CLEANING
Do not immerse the appliance in water. Never put the motor unit (A)
under running water.
• Clean the jug immediately after use.
• Fill up the jug with 1 litre of hot water along with 2 or 3 drops of washing
up liquid. Only use the recommended amount of water and washing
up liquid. An excess of washing up liquid creates more foam and
consequently can lead to overflowing.
13
Page 14

• Use the automatic auto clean program to carry out a prewash of the jug.
11
• Once the program has stopped, unplug the appliance.
• Remove the blender jug (F4)
• Place the jug on a flat surface.
• Unlock the lid and remove it with care. Pour out the water.
• Remove the blade unit (F1+F3) and clean them under running water.
The blades are very sharp, handle them with caution to avoid injury
(Fig.10).
10
• After cleaning, remember to correctly fit the seal (F3) back onto the
blade unit (F1) (Fig. 11). Please be careful to avoid any damage to the
seal by touching the blades.
Note: Incorrectly fitting the seal can result in ingredients leaking from
the base of the blender jug.
• Finish cleaning the jug with a damp cloth or sponge.
• Rinse the inside of the jug and the lid under running water.
• Take care when cleaning the blades in the blender jug and when you
empty the jug as they are sharp.
• Use a damp cloth to clean the motor unit (A). Dry it carefully.
• The detachable parts (lid, blade unit, locking ring,) can be cleaned with
a sponge and hot soapy water.
• The jug (F4), blade unit (F1) (but not the seal (F3)), locking ring (F2)
can be cleaned in the dishwasher on the upper rack - use the ‘ECO’ or
‘LOW SALT’ program.
• Caution: The jug (F4), blade unit (F1) and locking ring (F2) must be
disassembled and placed separately in the dishwasher. Please do not
put the seal (F3) in the dishwasher.
14
Page 15

WHAT TO DO IF YOUR APPLIANCE DOES NOT WORK
PROBLEMS CAUSES SOLUTIONS
Connect the appliance to a
socket with the same voltage
as that on the rating plate of
the appliance.
Check that the blender jug
is positioned properly on the
motor unit as explained in
the instructions.
Follow the instructions in section
USING YOUR BLENDER.
The cooling time is
variable and can last up to
30minutes
Place the appliance on
a flat surface.
Reduce the quantity of
ingredients processed.
Reduce the quantity of
ingredients processed.
Place the lid correctly on the
blender jug.
Reposition the seal with the
correct side uppermost (Fig.11)
and lock the assembled blade
unit (F1+F2+F3) onto the
blender jug correctly (Fig.1,
Fig.2 & Fig. 3)
Replace the seal with a
new one. Reduce the size
or quantity of ingredients
processed. Add liquid.
Appliance does not work
The appliance stopped
while in use
Excessive vibrations
Leak from the lid
Leak at the bottom of the
blender jug
The blade does not turn
easily
The plug is not connected
The blender jug is not
positioned correctly on the
motor unit
Overload
The product is not placed
ona flat, stable surface
Volume of ingredients is
too high
Volume of ingredients is
too high
The lid is not correctly
positioned
The blender seal (F3)
isnotpositioned correctly
orisabsent
Pieces of food are too large
or too hard. Liquid has been
blended that was too hot
and has distorted the seal
EN
YOUR APPLIANCE STILL DOES NOT WORK?
Contact an approved service centre (see list in service booklet).
15
Page 16

MEDIDAS DE SEGURIDAD
PRECAUCIÓN: Las medidas de seguridad forman
parte de este aparato. Lea detenidamente las
medidas de seguridad antes de utilizar por primera
vez su aparato. Manténgalas en un lugar donde
pueda encontrarlas y consultarlas en el futuro.
• Lea atentamente las instrucciones de uso antes
de utilizar el aparato por primera vez y guárdelas.
El uso no conforme con las instrucciones eximirá
al fabricante de cualquier responsabilidad.
• Compruebe que la tensión de alimentación de su
aparato corresponde a la de su instalación eléctrica.
Cualquier conexión incorrecta anulará la garantía.
• Este aparato está destinado únicamente a uso
doméstico, siempre en el interior del hogar y a
altitudes inferiores a 2000 m.
• La garantía no se aplicará en caso de uso
comercial, inapropiado o en caso de no respetar
el manual.
• Desconecte siempre el aparato de la corriente
eléctrica si se deja sin supervisión o antes de
montarlo/desmontarlo o limpiarlo.
• Riesgo de heridas en caso de mala utilización del
aparato.
• No utilice el aparato si no funciona correctamente
o si está dañado. En este caso, llévelo a un centro
16
Page 17

de servicio autorizado (consulte la lista en el
cuaderno de servicio).
• Cualquier tarea de mantenimiento, salvo las
tareas de limpieza y conservación de rutina
realizadas por el cliente, debe llevarse a cabo en
un centro de servicio oficial.
• Nunca utilice este aparato para batir o mezclar
elementos que no sean alimentos.
• Nunca utilice el vaso mezclador sin ingredientes
o con ingredientes sólidos únicamente.
• Vierta siempre los ingredientes líquidos en primer
lugar en el vaso mezclador antes de añadir los
ingredientes sólidos.
• No utilice el vaso mezclador o los accesorios (según
el modelo) como recipientes (para conservación,
congelación, cocción y esterilización).
• Para evitar desbordamientos, no supere el nivel
máximo del cuando, cuando se indica.
• No toque nunca las piezas en movimiento (cuchillas...).
• Las hojas de la cuchilla del vaso mezclador y de
los accesorios (según el modelo) cortan mucho.
Manipúlelas con cuidado para no hacerse daño
cuando se vierte el vaso, durante el montaje/
desmontaje de las hojas en el vaso (según el
modelo) o los accesorios (según el modelo) y
durante la limpieza.
ES
17
Page 18

• Nunca introduzca los dedos o cualquier otro
objeto no previsto para tal fin en el vaso mezclador
mientras el aparato esté en funcionamiento.
• Nunca retire la tapa y/o el vaso mezclador antes
de que el aparato se detenga completamente.
• Utilice siempre el vaso mezclador con la tapa.
• Utilice la batidora en una superficie plana, limpia
y seca.
• No sumerja el aparato, el cable de alimentación
ni el enchufe en agua ni en ningún tipo de líquido.
• Mantenga el cable de alimentación fuera del
alcance de los niños.
• El cable de alimentación nunca debe estar cerca
ni en contacto con piezas calientes del aparato,
fuentes de calor o ángulos pronunciados o
situados en el vaso en contacto con las hojas.
• No ponga el cable de alimentación en contacto con
las partes móviles (hojas) durante el funcionamiento.
• No desenchufe el aparato tirando del cable.
• Mantenga el pelo, bufandas, corbatas, etc. fuera
del alcance del aparato o de los accesorios en
funcionamiento.
• Si el cable de alimentación o el enchufe están
dañados, no utilice el aparato. Para que su
aparato sea seguro en todo momento, debe
sustituir estas piezas en un centro de servicio
18
Page 19

oficial (consulte la lista en el folleto de servicio).
• Por su seguridad, utilice únicamente accesorios y
piezas de recambio adaptados al aparato.
• Tenga cuidado si vierte un líquido caliente en el
preparador culinario o en el mezclador puesto que
al hervir repentinamente podría salir despedido.
• No vierta líquido hirviendo (superior a 80°C/176°F)
en el vaso ni en los accesorios (según el modelo).
• Este aparato no está diseñado para que lo utilicen
personas (niños incluidos) con alguna discapacidad
física, sensorial o mental, ni personas sin
conocimientos o experiencia, a no ser que alguien
responsable de su seguridad las supervise o las haya
instruido previamente sobre el uso del aparato.
• Se recomienda vigilar a los niños para asegurarse
de que no juegan con el aparato.
• No permita que los niños utilicen el aparato sin
vigilancia.
• Este aparato ha sido concebido únicamente para
uso doméstico.No ha sido concebido para su uso en
los siguientes casos, en que la garantía no cubre:
– Zona de trabajo de cocina en tiendas, oficinas y
otros entornos laborales.
– En el área de cocina reservada al personal en
tiendas, oficinas y otros entornos profesionales.
– Casas rurales.
ES
19
Page 20

– El uso por parte de los clientes de hoteles,
moteles y otros entornos de carácter residencial.
– Entornos tipo casas de huéspedes.
• Detenga el aparato y desconéctelo de la red
eléctrica cuando vaya a cambiar los accesorios
o a tocar alguna de las piezas que son móviles
durante su funcionamiento.
• Consulte el manual de instrucciones para ajustar
la velocidad y el tiempo de funcionamiento de
cada accesorio.
• Consulte el manual de instrucciones para saber cómo
montar y desmontar los accesorios en el aparato.
• Consulte el manual de instrucciones para saber
cómo efectuar la limpieza inicial y habitual de las
partes en contacto con los alimentos, además de
la limpieza y mantenimiento de su aparato.
MERCADOS EUROPEOS ÚNICAMENTE
• Los niños no deben utilizar este aparato.
Mantenga el aparato y el cable de alimentación
fuera del alcance de los niños.
• Los niños no deben jugar con el aparato.
• Este aparato puede ser utilizado por personas
con capacidades físicas, sensoriales o mentales
reducidas o falta de conocimientos y experiencia
suficientes, siempre que cuenten con supervisión
o hayan recibido instrucciones sobre el uso
20
Page 21

seguro del electrodoméstico y en la medida en
que entiendan los riesgos que implica.
¡Piense en el medio ambiente!
Su aparato contiene numerosos materiales recuperables o
reciclables.
Llévelo a un centro de recogida de residuos para su procesamiento.
DESCRIPCIÓN
A Conjunto del motor
B Botón de Licuado/Smoothie
C Botón de "Picado de hielo"
D Botón de "Limpieza
automática"
E Perilla de control
F Conjunto de la jarra de la
Licuadora
F1 Conjunto de las cuchillas
F2 Aro de bloqueo
F3 Junta
F4 Jarra graduada de la
Licuadora
F5 Tapa
F6 Tapón dosificador
G Velocidad mínima
H Velocidad máxima
I Selector de pulsación
J Espátula* (accesorio
dependiendo del modelo)
K Molinillo de hierbas* (accesorio
según el modelo)
K1 Junta
K2 Conjunto de la cuchilla del
molinillo de hierbas
L Molinillo de especias*
(accesorio según el modelo)
L1 Junta
L2 Conjunto de la cuchilla del
molinillo de especias
M Molinillo de especias y cuenco
del molinillo de especias*
(accesorio dependiendo del
modelo)
N Minipicadora* (accesorio
dependiendo del modelo)
ES
ANTES DE USAR POR PRIMERA VEZ
• Limpie todas las piezas (F, J, K, L, M) con agua tibia y un líquido
lavavajillas, a excepción del conjunto del motor (A) que no se debe
sumergir nunca en agua ni colocado debajo del grifo (Ver la sección de
limpieza).
PRECAUCIÓN: Las cuchillas están extremadamente afiladas;
manéjelas con cuidado durante el uso o la limpieza del aparato .
21
Page 22

• Antes de utilizar el aparato, asegúrese de haber retirado todo el
embalaje.
• Nota importante: Gire Perilla de control (E) a antes de colocar la jarra
de la licuadora (F) en el conjunto del motor (A).
• El aparato se pondrá en funcionamiento solo si la jarra está fijada en su
lugar correctamente sobre el conjunto del motor.
• No ponga en funcionamiento el aparato si la tapa no está colocada
en su lugar.
MONTAJE Y FIJACIÓN DE LA JARRA
Humedezca la junta (F3) (todavía insertada en el conjunto de la cuchilla
(F1)).
• Compruebe que la junta está ubicada en su lugar en el conjunto de la
cuchilla.
• Coloque el conjunto de la cuchilla en la base de la jarra (Fig. 1).
• Coloque el aro de fijación y bloquéelo girándolo un cuarto de vuelta en
sentido antihorario (Fig. 3).
• Compruebe que el aro de fijación está correctamente bloqueado, es
decir, que las dos flechas están alineadas (Fig. 3).
• Agregue los ingredientes a la jarra ya montada sin exceder el nivel
máximo indicado.
* 1,5L para mezclas densas
* 1,25L para mezclas líquidas
Advertencia: No vierta líquidos hirviendo (a temperaturas superiores a
80 °C / 176 °F) en la jarra.
• Coloque la tapa de inserción (F5) en la jarra. Para evitar salpicaduras
durante la preparación, verifique que las orejas de la tapa están
alineadas con la boquilla y el mango (Fig. 9). Coloque la taza medidora
(F6) en su ranura en la tapa (Fig. 8).
UTILIZACIÓN DEL APARATO APARATO POR PRIMERA VEZ
• Una vez que la jarra de la licuadora está fijada correctamente en el
conjunto del motor, enchufe el aparato. El aparato se ilumina 2 veces y
escuchará un tono de aviso. Actívelo con la función deseada.
• Selección de velocidad: Gire la perilla de control (E) para seleccionar
la velocidad deseada; la velocidad aumenta gradualmente entre min y
22
Page 23

max. La intensidad de la luz aumenta gradualmente con el aumento de
la velocidad. Puede cambiar esta velocidad según sea necesario durante
la preparación.
• Función de “pulsación ”: Gire la perilla de control (E) a la posición
de“Pulsación”. Una sucesión de pulsaciones le proporciona un control
más preciso en las preparaciones. En esta posición, el aparato comienza
directamente a una velocidad máxima. Se detiene tan pronto como
suelta el botón. Cuando se está utilizando la función de pulsación, un
indicador se ilumina.
• Función de “ Licuado/Smoothie”
Esta función se utiliza para preparar batidos y cócteles de fruta. La
velocidad ya está programada previamente para ofrecer un resultado
óptimo. Para usar esta función, presione el botón de “Licuado/
Smoothie” (B). La luz permanece iluminada durante este ciclo y se
apaga al finalizar el ciclo. El programa se detiene automáticamente y
emite 4 tonos de aviso. Puede detenerlo antes del final presionando el
botón de “Licuado/Smoothie” (B) de nuevo.
• Función de “ Picado de hielo”
Puede usar esta función para picar hielo finamente con ciclos y velocidad
de funcionamiento preprogramados. Para usar esta función, presione
el botón de "Picado de hielo" (C). La luz permanece iluminada durante
este ciclo y se apaga al finalizar el ciclo. Escuchará 4 tonos de aviso. El
programa termina automáticamente pero puede detenerlo antes del
final presionando el botón de “Picado de hielo” (C) de nuevo.
• Función de "Autolimpieza":
Esta función se usa para limpiar automáticamente su aparato. Presione
el botón de “Autolimpieza” (D). No exceda 1 litro de agua caliente a una
temperatura máxima de 80°C / 176°F. Al final del ciclo, el aparato se
detendrá automáticamente y emitirá 4 tonos de aviso.
• ATENCIÓN: Si la carga es excesiva, su aparato se detendrá
automáticamente por razones de seguridad (si el motor está en
funcionamiento más de 3 minutos o si ha introducido demasiados
ingredientes). Para volver a poner en marcha su aparato, gire el botón
de control a . El tiempo total de enfriado puede variar y ser de hasta un
máximo de 30 minutos. Antes de volver a poner en marcha su aparato,
adapte la cantidad de ingredientes o el tiempo de licuado para evitar
sobrecargas. Puede seleccionar la velocidad o función deseadas para
completar su preparación.
ES
23
Page 24

• ATENCIÓN: No use los programas de licuado/smoothie, picado de
hielo y autolimpieza con los accesorios.
• Estos programas solo se pueden utilizar con la jarra de vidrio. No pique
hielo con los accesorios.
• Uso del molinillo de hierbas (K) y del molinillo de especias (L)
(dependiendo del modelo)
– Con el molinillo de hierbas (K) puede picar ingredientes tales como:
cebollas, ajo o carne (previamente cortada en trozos pequeños) en
pocos segundos. No utilice el molinillo de hierbas para preparaciones
líquidas (zumos de frutas, etc.).
– Con el molinillo de especias (L) se pueden moler distintas especias en
pocos segundos hasta que estén en polvo: semillas de cilantro, granos
de pimienta, etc.
– Estos accesorios incluyen un cuenco(M) que evita el acceso a las
cuchillas durante el uso.
1. Gire el cuenco (M) boca abajo y agregue los ingredientes.
2. Coloque la junta (K1 o L1) en sus ranuras en el conjunto de la cuchilla
(K2 o L2) (Fig.5). Coloque el conjunto de la cuchilla en el cuenco.
Bloquee el accesorio girando el conjunto de la cuchilla hasta que
esté completamente montado (Fig. 6). Precaución: Pueden ocurrir
fugas si el accesorio no está correctamente bloqueado.
3. Coloque el accesorio montado (K o L) en el conjunto del motor y
gírelo.
4. Luego, gire el conjunto del accesorio (K o L) un cuarto de vuelta en
sentido horario (Fig.7).
5. Enchufe el aparato y gire el selector botón de control (E) a la
posición que desee, o haga varias pulsaciones. Para detener el
aparato, gire el botón de control (E) a la posición cero.
6. Desbloquee el accesorio girándolo un cuarto de vuelta en sentido
antihorario. Retire el accesorio montado (K+M o L+M) del
conjunto del motor. Gírelo antes de abrirlo para evitar derramar su
preparación. Luego, puede desbloquear el conjunto de la cuchilla
(K1 o L1). Las cuchillas están muy afiladas, manipúlelas con
cuidado para evitar lesiones personales. A continuación, puede
sacar la preparación del recipiente.
Advertencia: Puede usar los accesorios únicamente con ingredientes
sólidos. Puede echar ingredientes líquidos únicamente en la jarra de
vidrio.
24
Page 25

CONSEJO
• Dependiendo del tipo de ingredientes, puede usar la jarra de la licuadora
para preparar hasta
* 1,5 L para mezclas densas.
* 1,25 L para preparaciones líquidas.
Advertencia: No vierta líquidos hirviendo (a temperaturas superiores a
80 °C / 176 °F) en la jarra.
• Puede preparar sopas finamente licuadas, cremas, fruta cocida, masa
fina (hot cakes, buñuelos, masa para pastel de Yorkshire, etc.), licuados
de leche, batidos, cócteles, etc.
• Si los ingredientes se pegan a las paredes de la jarra al licuarlos, detenga
el aparato. Retire la jarra de licuadora del conjunto del motor y presione
los alimentos hacia la cuchilla usando una espátula. Luego, vuelva a
colocar la jarra en su lugar y continúe con su preparación.
• Vierta siempre los ingredientes líquidos en primer lugar dentro de la
jarra, antes de añadir los sólidos, y no sobrepase el nivel máximo.
• Para agregar ingredientes mientras está licuando, retire el tapón
dosificador (F6) de la tapa (F5) y agregue los ingredientes por el orificio
de alimentación.
• Para picar hielo finamente, use un máximo de 6 cubos de hielo pequeños
y la función de “Picado de hielo”. No es necesario agregar agua.
RECETA
Sopa fría de zanahoria:
600g de zanahorias + 900g de agua: Eche los trozos de zanahoria en la
jarra de vidrio y agregue el agua. Mezcle a velocidad máxima durante
unos 3 minutos.
ES
Higos picados (con el accesorio de la minipicadora, dependiendo del
modelo)
70g de higos: Corte los higos antes de introducirlos en la Minipicadora
(N). Mezcle a velocidad máxima durante 3 segundos.
LIMPIEZA
No sumerja el aparato en agua. No coloque nunca el conjunto del motor
(A) debajo del grifo.
25
Page 26

• Limpie la jarra inmediatamente después de usarla.
• Llene la jarra con 1 litro de agua caliente y 2 o 3 gotas de detergente
líquido. Use solo la cantidad recomendada de agua y detergente. Un
exceso de detergente creará demasiada espuma que se desparramará.
• Use el programa de autolimpieza para hacer un prelavado del cuenco.
• Una vez que el programa haya finalizado, desenchufe el aparato.
• Retire la jarra de la licuadora (F4)
• Coloque la jarra sobre una superficie plana.
• Desbloquee la tapa y retírela con cuidado.
• Retire el conjunto de la cuchilla (F1+F3) y límpielo bajo el grifo (Fig.10).
10
• Después de limpiarlo, recuerde que debe colocar la junta correctamente
(F3) de nuevo en el conjunto de la cuchilla (F1) (Fig. 11). Lleve cuidado
para no dañar la junta al tocar la cuchilla.
• La jarra (F4), conjunto de la cuchilla (F1) y aro de bloqueo (F2) se
pueden lavar en la rejilla superior del lavaplatos. Use un programa
‘ECO’ o ‘BAJO EN SAL’.
• Cuidado: Debe colocarse en el lavaplatos separado (no montado)
No lave la junta (F3) en el lavaplatos.
• Termine de lavar la jarra con la ayuda de una esponja.
• Enjuague el interior de la jarra y la tapa bajo el grifo.
• Lleve cuidado al lavar la cuchilla de la jarra batidora y al vaciar el cuenco
porque las cuchillas están afiladas.
• Use un paño húmedo para limpiar el conjunto del motor (A). Séquelo
bien.
• Las piezas separables (tapa, conjunto de la cuchilla, aro de bloqueo) se
pueden limpiar con una esponja y agua caliente jabonosa.
26
11
Page 27

¿QUÉ HACER SI EL APARATO NO FUNCIONA?
PROBLEMAS CAUSAS SOLUCIONES
Conecte el aparato a una
toma de corriente del mismo
voltaje que el indicado en la
placa de especificaciones del
Compruebe que la jarra
correctamente colocada en
el conjunto del motor tal y
como se indica en el folleto.
Siga las instrucciones de la
sección ANTES DE USAR
El tiempo total de enfriado
puede variar y puede ser de
Coloque el aparato sobre
Reduzca la cantidad de
ingredientes a procesar.
Reduzca la cantidad de
ingredientes a procesar.
correctamente sobre la jarra
Vuelva a colocar la junta de
la tapa y bloquee el soporte
de la cuchilla correctamente
Sustituya la junta de la tapa
la cantidad de ingredientes
El aparato no funciona
El producto se para durante
el uso.
Vibración excesiva
Fuga de la tapa.
Fuga en la parte inferior de
la jarra.
Las cuchillas no giran
fácilmente.
El enchufe no está
conectado
La jarra de la licuadora no
está colocada correctamente
en el conjunto del motor
Sobrecarga
El producto no está colocado
sobre una superficie plana.
El volumen de los
ingredientes es excesivo.
El volumen de los
ingredientes es excesivo.
La tapa no está colocada
correctamente.
La junta de la tapa (e2) no
está correctamente colocada
o no está presente
Los trozos de alimento
son demasiado grandes o
demasiado duros.
Se ha batido líquido
demasiado caliente y la
junta de la tapa se ha
deformado.
ES
aparato.
de la licuadora está
POR PRIMERA VEZ.
hasta 30 minutos.
una superficie plana.
Bloquee la tapa
de la licuadora.
(Fig. 5).
por una nueva.
Reduzca el tamaño o
a procesar.
Añada líquido.
SI EL APARATO SIGUE SIN FUNCIONAR, HAGA LO SIGUIENTE:
Póngase en contacto con un servicio técnico autorizado (consulte la
correspondiente lista que se incluye en el folleto de servicio).
27
Page 28

EN p. 4 – 10
EN
EN p. 11 – 17
ES
8020002981
 Loading...