

Page 1
FR
EN
KO
VI
MS
ZH
TH
Page 2
Page 3
Page 4

Page 5

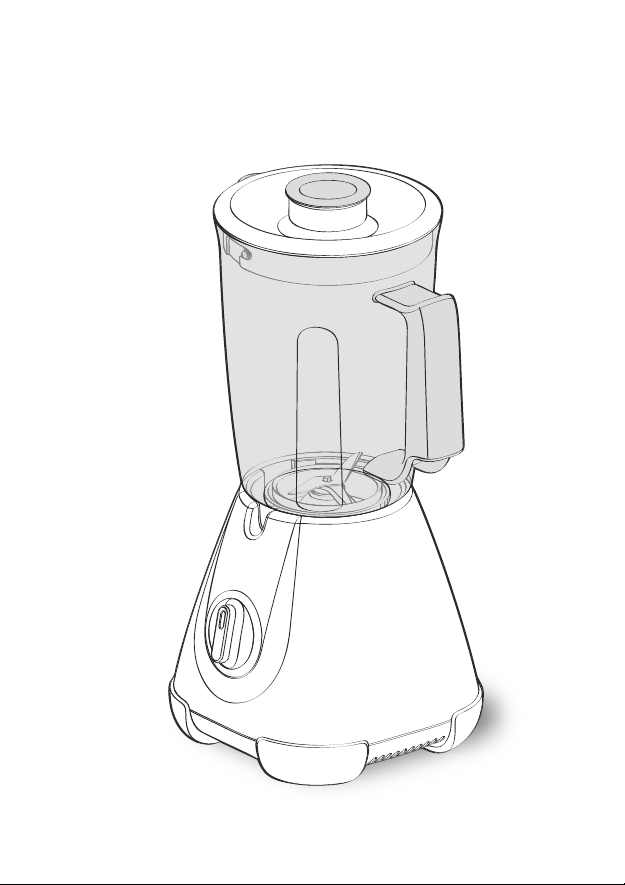
DESCRIPTION DE L’APPAREIL
A
Bloc moteur
B
Sélecteur de vitesse
C
Ensemble blender :
- c1 Bloc lames
- c2 Joint d’étanchéité
- c3 Bol blender gradué
- c4 Couvercle
- c5 Bouchon doseur
Moulin à fines herbes
D
(*accessoire selon modèle)
- d1 Joint d’étanchéité
- d2 Bloc lames fines herbes
Moulin à épices
E
(*accessoire selon modèle)
- e1 Joint d’étanchéité
- e2 Bloc lames épices
Bol moulin à fines herbes et moulin
F
à épices
Les accessoires contenus dans le modèle que vous venez d’acheter, sont représentés sur
l’étiquette sur le dessus de l’emballage.
CONSIGNES DE SÉCURITÉ
• Lisez attentivement le mode d’emploi avant la première utilisation de votre appareil : une
utilisation non conforme au mode d’emploi dégagerait le fabricant de toute responsabilité.
• Cet appareil n’est pas prévu pour être utilisé par des personnes (y compris les enfants) dont les
capacités physiques, sensorielles ou mentales sont réduites ou des personnes dénuées
d’expérience ou de connaissance, sauf si elles ont pu bénéficier, par l’intermédiaire d’une
personne responsable de leur sécurité, d’une surveillance ou d’instructions préalables
concernant l’utilisation de l’appareil. Il convient de surveiller les enfants pour s’assurer qu’ils ne
jouent pas avec l’appareil.
• L’appareil est conçu pour fonctionner uniquement en courant alternatif. Vérifiez que la tension
d’alimentation indiquée sur la plaque signalétique de l’appareil correspond bien à celle de votre
installation électrique.
• Ce produit est exclusivement destiné à un usage domestique. Le fabricant décline toute
responsabilité et se réserve le droit de résilier la garantie en cas d’utilisation commerciale ou
inadptée, ou de non-respect des consignes.
• Pensez à débrancher l’appareil de l’alimentation, si vous devez le laisser sans surveillance, avant
de placer ou d’enlever les accessoires ou avant de le nettoyer. Ne tirez jamais sur le cordon pour
débrancher l’appareil.
• N’utilisez pas votre appareil s’il ne fonctionne pas correctement, s’il a été endommagé ou si le
câble d’alimentation ou la fiche sont endommagés. Afin d’éviter tout danger, faites-les
obligatoirement remplacer par un centre service agréé (voir liste dans le livret service).
• Toute intervention autre que le nettoyage et l’entretien usuel par le client doit être effectuée par
un centre service agréé.
• Ne mettez pas l’appareil, le câble d’alimentation ou la fiche dans du liquide.
• Ne laissez pas le câble d’alimentation à portée de mains des enfants, être à proximité ou en
contact avec les parties chaudes de l’appareil, près d’une source de chaleur ou sur un angle vif.
• Pour votre sécurité, ne pas utiliser d’accessoires ou de pièces de rechange, autres que ceux
fournis par les centres de service après-vente agréés.
FR
1
Page 6

• Les lames sont très coupantes : manipulez-les avec précaution pour ne pas vous blesser.
• N’utilisez jamais le blender ou ses accessoires sans ingrédients et ne versez jamais de liquides
bouillants dans le bol.
• Utilisez toujours le bol blender avec son couvercle (c4).
• Versez toujours les ingrédients liquides en premier dans le bol avant d’ajouter des ingrédients
solides, sans dépasser le niveau maximal.
• Ne placez jamais vos doigts ou tout autre objet dans le blender pendant le fonctionnement de
l’appareil.
• Ne pas utiliser les bols comme récipients (congélation, cuisson, stérilisation).
• N’utilisez pas le blender plus de 3 minutes en marche continue.
• Placez le blender sur un plan de travail stable, résistant à la chaleur, propre et sec.
• Ne laissez pas pendre vos cheveux, un foulard, une cravate etc. au dessus du bol ou de ses
accessoires pendant le fonctionnement de l’appareil.
• N’utilisez pas le blender en plein air.
• N’enlevez pas le couvercle (c4) avant l’arrêt complet des lames.
• N’utilisez jamais cet appareil pour mélanger ou mixer d’autres éléments que des ingrédients
alimentaires.
VERROUILLAGE DE SECURITE
L’appareil ne peut fonctionner lorsque le bol (C) ou les accessoires (D ou E) n’ont pas été
correctement positionnés et verrouillés sur le bloc moteur (A).
AVANT LA PREMIERE UTILISATION
ATTENTION :
Les lames des couteaux
sont extrêmement
aiguisées, maniez-les avec
précaution lors de
l’utilisation ou du
nettoyage de l’appareil.
• Avant la première utilisation, nettoyer tous les
accessoires (C, D, E, F) à l’eau chaude savonneuse,
mais pas le bloc moteur (A).
• Assurez-vous que tout emballage soit retiré avant le
fonctionnement de l’appareil.
• Remarque importante : Mettre le sélecteur de vitesse
(B) sur «0» avant de placer le bol blender ou les
accessoires sur le bloc moteur.
• L’appareil démarre uniquement si le bol ou
l’accessoire est bien positionné et verrouillé sur son
corps.
• Ne faites pas fonctionner le blender si le couvercle
n’est pas en place.
UTILISATION DE L’APPAREIL
Humidifiez le joint (c2) et positionnez-le correctement
•
sur le bloc lames (c1)
visibles une fois le joint mis en place. S’il est
positionné dans l’autre sens vous ne pourrez pas
verrouiller le bloc lames sur le bol. (Fig. 1)
: les 3 plis du joint doivent être
2
Page 7

• Placez l’ensemble (c1+c2) sur le fond du bol (c3).
Verrouillez-le en tournant le bloc lames d’un quart de
tour dans le sens inverse des aiguilles d’une montre.
(Fig.2)
• Introduisez les ingrédients dans le bol assemblé sans
dépasser le niveau maximal indiqué :
* 1,25L pour les mélanges épais
* 1L pour les préparations liquides
• Verrouillez le couvercle (c4) sur le bol Placez le
bouchon doseur (c5) dans son logement situé sur le
couvercle.
• Placez l’ensemble bol blender (C) sur le bloc moteur
(A). Le cadenas rouge (ouvert) est aligné dans la
fente du bloc moteur. (Fig.3 position 1)
• Tournez ensuite le bol blender (C) d’un quart de tour
jusqu’à ce que le cadenas vert (fermé) apparaisse.
Fig.3
- position 2)
(
2 positions du bol sont possibles : poignée à droite ou à
gauche du bloc moteur.
• Le moulin à fines herbes (D) vous permet de hacher
en quelques secondes des ingrédients tels que des
oignons, de l’ail, de la viande (coupée en morceaux),
des fruits secs, de réaliser de la chapelure (biscotte) et
de préparer des préparations pour bébés.
N’utilisez pas le Moulin à fines herbes pour des
préparations liquides (jus de fruits …)
• Le moulin à épices (E) vous permet de moudre en
quelques secondes différentes épices : graines de
coriandre, poivre…
• Ces accessoires sont équipés d’un bol (F) qui interdit
l’accès aux lames pendant leur utilisation.
1- Retournez le bol (F) et versez les ingrédients
2- Positionnez le joint d’étanchéité (d1) ou (e1) dans
son logement sur le bloc lames (d2 ou e2).
Positionnez le bloc lames sur le bol en alignant les 2
repères présents sur le bol et le bloc
lames.Verrouillez l’accessoire en tournant le bloc
lames d’un quart de tour dans le sens inverse des
aiguilles d’une montre.
3- Retournez l’accessoire assemblé (D ou E) et
positionnez-le sur le bloc moteur. Le cadenas rouge
(ouvert) est aligné dans la fente du bloc moteur.
(Fig 6 - position 1)
4- Tournez ensuite l’accessoire assemblé (D ou E) d’un
quart de tour jusqu’à ce que le cadenas vert (fermé)
apparaisse.
Fig. 6
- position 2)
(
(Fig. 5)
.
(Fig.4)
.
3
Attention : si l'accessoire
est mal verrouillé des
fuites risquent de
se produire.
Page 8

5- Branchez l’appareil et tournez le sélecteur de vitesses
(B) sur la position désirée ou donnez quelques
impulsions vers «pulse».Tenir le bol (F) pendant le
fonctionnement. Pour arrêter l’appareil, ramenez le
sélecteur de vitesses (B) sur la position “0”.
6- Déverrouillez l’accessoire en le tournant d’un quart
de tour dans le sens inverse des aiguilles d’une
montre, jusqu’à ce que le cadenas rouge (ouvert)
apparaisse. Retirez l'accessoire assemblé (D, E) du
bloc moteur. Retournez-le sur le plan de travail avant
de déverrouiller le bloc lames (d2, e2) du bol (F) en
procédant à l'inverse de la mise en place.
Vous pouvez alors récupérer la préparation dans le
bol.
* La couleur du bol peut s'altérer suite au mixage
avec certains ingrédients très durs : (clous de girofle,
cannelle …)
Ingrédients
Abricots 40 g 3 s / vitesse 2 D
Chapelure 1 biscotte par impulsions D
Oignons 60 g 6 s / vitesse 1 D
Amandes / noisettes décortiquées 60 g par impulsions D
Persil / coriandre fraiche 10 g par impulsions D
Graines de coriandre 40 g 30 s / vitesse 2 E
Quantités
(max.)
Temps de
fonctionnement
Accessoire
NETTOYAGE DE L’APPAREIL
• Débranchez l’appareil et retirez les accessoires.
• Manipulez-les avec précaution, les lames du bol blender et des accessoires sont coupantes.
• Enlevez le bol et rincez-le sous l’eau courante ainsi que son couvercle.
• Pour nettoyer le bloc moteur (A), utilisez un chiffon humide. Séchez-le soigneusement.
4
Page 9

• Ne plongez jamais le bloc moteur (A) sous l’eau courante.
• Pour faciliter le nettoyage, pensez à laver les éléments amovibles à l’eau chaude
savonneuse immédiatement après l’utilisation.
• Le bol (C) et les accessoires (D, E) peuvent être nettoyés au lave-vaisselle dans le panier
supérieur avec le programme «ECO» ou «PEU SALE».
• Pour faciliter le nettoyage du bol blender (C), déverrouillez le bloc lames (c1) en le tournant
d’un quart de tour dans le sens inverse des aiguilles d’une montre. Retirez le joint
d’étanchéité (c2) et nettoyez-le à l’eau courante ou au lave-vaisselle.
SI VOTRE APPAREIL NE FONCTIONNE PAS, QUE FAIRE ?
Problèmes Causes Solutions
Branchez l'appareil sur une prise de
même voltage.
Vérifiez que le bol ou les accessoires
sont bien positionnés et verrouillés
sur le bloc moteur suivant fig.
notice.
Placez le produit sur une surface
plane.
Réduisez la quantité d'ingrédients
traités.
Réduisez la quantité d'ingrédients
traités.
Verrouillez correctement le couvercle
sur le bol blender.
Le produit ne fonctionne
pas.
Vibrations excessives.
Fuite par le couvercle.
La prise n'est pas branchée.
Le bol ou l'accessoire n'est pas
correctement positionné ou
verrouillé sur le bloc moteur.
Le produit n'est pas posé sur une
surface plane.
Volume d'ingrédients trop
important.
Volume d'ingrédients trop
important.
Le couvercle n'est pas bien
positionné.
Fuite par le bas du bol
blender.
Fuite par le bas des
accessoires.
Le couteau ne tourne pas
facilement.
Impossible de verrouiller le
bloc lames avec joint
(c1+c2) sur bol (c3).
Le joint (c2) du bol blender est mal
positionné ou absent.
Le joint sur le bloc lames (d2) ou
(e2) est mal verrouillé ou absent
Morceaux d'aliments trop gros ou
trop durs.
Le joint (c2) est mal positionné.
5
Repositionnez le joint et verrouillez
correctement le porte lame.
Repositionnez le joint sur le bloc
lames (d2) ou (e2) et verrouillez-le
correctement sur le couvercle (F).
Réduisez la taille ou la quantité
d'ingrédients traités.
Ajoutez du liquide.
Repositionnez le joint, les 3 plis sont
visibles suivant fig. 1
Page 10
Votre blender ne fonctionne toujours pas ?
Adressez-vous à un centre service agréé (voir liste dans livret service).
Vous pouvez personnaliser votre blender et vous procurer auprès de votre revendeur habituel
ou d’un centre agréé les accessoires suivants : Accessoire Moulin fines herbes (D),
l’accessoire Moulin à épices (E), ou un bol blender (C) supplémentaire.
RECYCLAGE
• Elimination des matériaux d’emballage et de l’appareil.
L'emballage comprend exclusivement des matériaux sans danger pour
l'environnement, pouvant être jetés conformément aux dispositions de
recyclage en vigueur.
Pour la mise au rebut de l'appareil, se renseigner auprès du service approprié
de votre commune.
• Produits électroniques ou produits électriques en fin de vie :
Votre appareil est prévu pour fonctionner durant de longues années. Toutefois, le jour où vous
envisagez de le remplacer, ne le jetez pas dans votre poubelle ou dans une décharge mais
apportez-leau point de collecte mis en place par votre commune (ou dans une déchetterie le cas
échéant).
Participons à la protection de l’environnement !
Votre appareil contient de nombreux matériaux valorisables ou recyclables.
Confiez celui-ci dans un point de collecte pour que son traitement soit
effectué.
6
Page 11

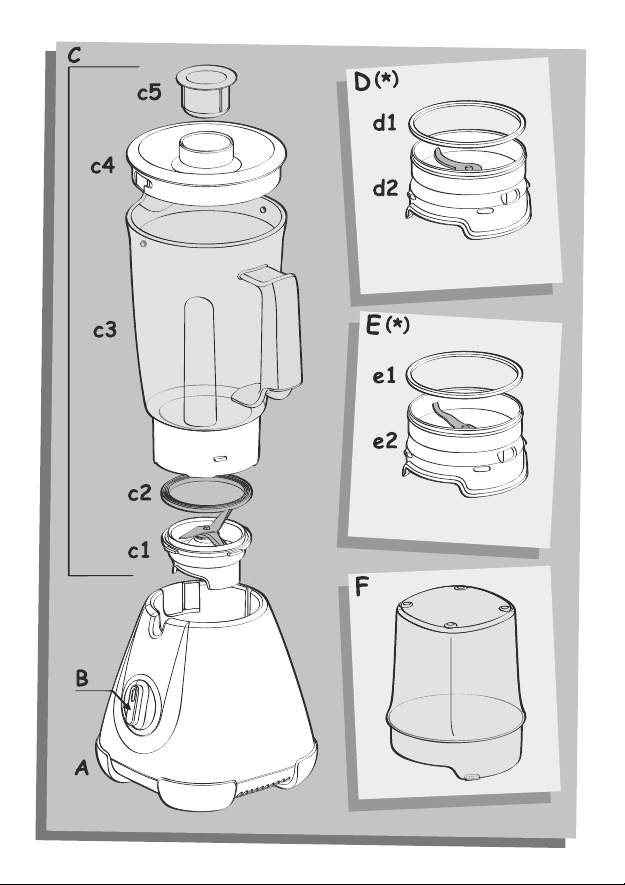
DESCRIPTION OF THE APPLIANCE
A
Motor unit
B
Speed selector
C
Blender unit:
- c1 Blade unit
- c2 Gasket
- c3 Graduated blender jug
- c4 Lid
- c5 Measuring cup
Herb chopper
D
(*accessory depending on model)
- d1 Gasket
- d2 Herb chopper blade unit
Spice grinder
E
(*accessory depending on model)
- e1 Gasket
- e2 Spice blade unit
Herb chopper and Spice grinder
F
bowl
The accessories contained in the model you have bought are represented on the label on the
top of the packaging.
SAFETY INSTRUCTIONS
•
Read the instructions for use carefully before using your appliance for the first time: the
manufacturer shall accept no liability in the event of any use that does not comply with the
instructions.
•
This appliance is not designed to be used by persons (including children) with reduced
physical, sensory or mental capacities, or lack of experience and knowledge, unless they have
been given supervision or instructions concerning use of the appliance by a person
responsible for their safety. Children should not be allowed to play with the appliance.
•
It is designed to work with alternating current only. Please check that the supply voltage
indicated on the name plate of the appliance corresponds to your electrical installation.
•
This product has been designed for domestic use only. Any commercial use, inappropriate
use or failure to comply with the instructions, the manufacturer accepts no responsibility and
the guarantee will not apply.
•
Be sure to unplug the appliance if you must leave it unattended, before inserting or
removing accessories or before cleaning it. Never pull on the power cord to unplug the
appliance.
•
Do not use your appliance if it does not operate correctly, if it has been damaged or if the
power cord or plug is damaged. To maintain safety, these parts must be replaced by an
approved service centre (see list in the service booklet).
•
Any maintenance other than routine cleaning and upkeep by customers must be carried out
by an approved service centre.
•
Do not immerse the appliance, cord or plug in liquid. The power cord must be kept out of the
reach of children and must not be placed near or come into contact with the hot parts of the
appliance, sources of heat or sharp corners.
•
For your safety, only use accessories and spare parts that correspond to your appliance, sold
by an approved service centre.
•
The blades are very sharp: handle them with caution to avoid injury.
•
Never use the blender or its accessories without ingredients and never pour boiling liquids
into the jug.
•
Always use the blender jug with its lid (c4).
EN
7
Page 12

•
Always pour the liquid ingredients into the jug first, before adding the solid ingredients,
without exceeding the maximum level.
•
Never place your fingers or any other object in the blender when the appliance is running.
•
Do not use the bowls as containers for freezing, cooking or sterilisation.
•
Do not use the blender for more than 3 minutes continuously.
•
Place the blender on a flat, stable, heat-resistant, clean and dry worktop.
•
Do not let long hair, scarves, ties, etc. hang over the blender jug or accessories when in
operation.
•
Do not use the blender outside in the open air.
•
Do not remove the lid (c4) before the blades have stopped completely.
•
Never use this appliance for blending or mixing items other than food ingredients.
SAFETY LOCKING
The appliance can run only when the jug (C) or accessories (D or E) are correctly positioned
and locked on the motor unit (A).
USING FOR THE FIRST TIME
CAUTION: The blades are
extremely sharp; handle
them with caution when
using or cleaning the
appliance.
• Before using your appliance for the first time, clean
all the accessories (C, D, E, F) in warm soapy water,
except for the motor unit (A).
• Make sure all the packaging has been removed before
operating the appliance.
• Important note: Turn the speed selector (B) to “0”
before placing the blender jug or accessories on the
motor unit.
• The appliance starts only if the jug or accessory is
correctly positioned and locked on its body.
• Do not operate the blender if the lid is not in place.
USING YOUR APPLIANCE
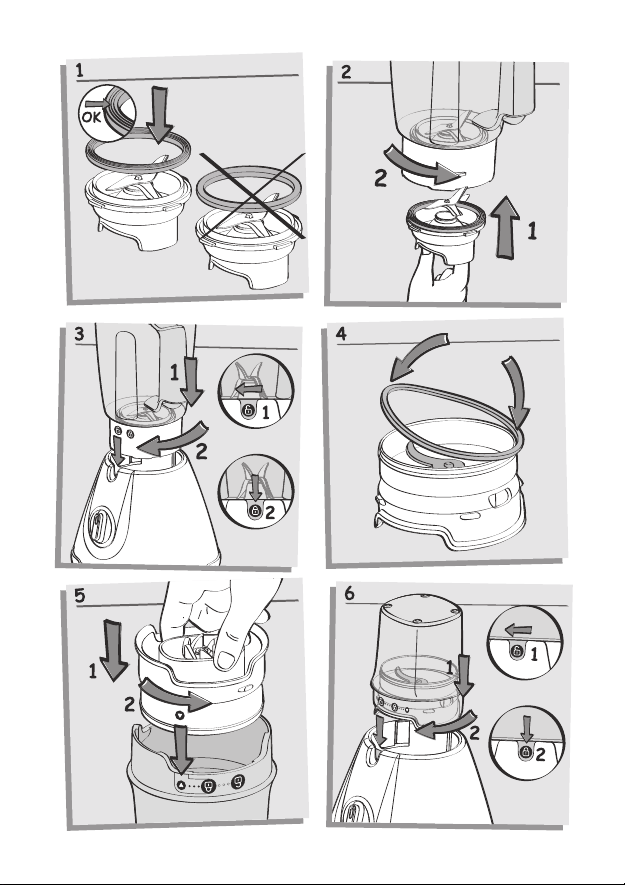
•
Moisten the gasket (c2) and position it correctly on the
blade unit (c1): the 3 folds of the gasket must be visible
once it is in place. If it is positioned in the other
direction, you will not be able to lock the blade unit on
the jug. (Fig. 1).
•
Place the assembly (c1+c2) on the base of the jug (c3).
Lock it by rotating the blade unit through a quarter
turn in the anticlockwise direction. (Fig. 2).
8
Page 13

•
Introduce the ingredients into the assembled jug
without exceeding the maximum level indicated:
* 1.25L for thick mixtures
* 1L for liquid preparations.
•
Lock the lid (c4) on the jug. Place the measuring cup
(c5) in its recess on the lid.
•
Place the blender jug assembly (C) on the motor unit
(A). The red lock (open is aligned in the slot on the
motor unit. (Fig. 3 - position 1)
•
Then rotate the blender jug (C) through a quarter turn
until the green lock (closed) appears. (Fig. 3 -
position 2).
2 jug positions are possible: handle on the right or left of
the motor unit.
•
With the herb chopper (D) you can chop ingredients
like onions, garlic, meat (cut into pieces) and dry fruits
in a few seconds, make crumbs (rusk) and prepare baby
food.
Do not use the herb chopper for liquid preparations (fruit
juices, etc.)
•
With the spice grinder (E) you can grind spices in a few
seconds: coriander seeds, pepper, etc.
•
These accessories are equipped with a bowl (F) that
prevents access to the blades during use.
1- Rotate the bowl (F) and pour the ingredients.
2- Position the gasket (d1) or (e1) in its recess on the
blade unit (d2 or e2). (Fig. 4). Position the blade unit
on the bowl aligning both the marks on the bowl
and the blade unit. Lock the accessory by rotating the
blade unit through a quarter turn in the anticlockwise
direction. (Fig. 5).
3- Rotate the assembled assembly (D or E) and position
it on the motor unit. The red lock (open) is aligned
in the slot on the motor unit. (Fig 6 - position 1)
4- Then rotate the assembled accessory (D or E) through
a quarter turn clockwise until the green lock (closed)
appears. (Fig. 6 - position 2).
5- Plug in the appliance and turn the speed selector (B)
to the desired position or apply a few pulses. Hold the
bowl (F) when the appliance is running. To stop the
appliance, turn the speed selector (B) back to position
“0”.
6- Unlock the accessory by rotating it through a quarter
turn in the anticlockwise direction, until the red lock
Caution: leaks can occur
if the accessory is not
locked correctly.
9
Page 14

(open) appears. Remove the assembled accessory
(D, E) from the motor unit.
Turn it over on the worktop before unlocking the blade
unit (d2, e2) from the bowl (F) in the reverse order of
the assembly. The blades are very sharp: handle them
with caution to avoid injury.
You can then collect the preparation in the bowl.
* The colour of the bowl may change after blending
certain very hard ingredients: (cloves, cinnamon, etc.).
Ingredients
Apricots / figs 40 g 3 s / speed 2 D
Crumbs 1 rusk In pulses D
Onions 60 g 6 sec / speed 1 D
Shelled almonds / hazelnuts 60 g In pulses D
Parsley / fresh coriander 10 g In pulses D
Coriander seeds 40 g 30 sec / speed 2 E
Quantities
(max.)
Operating time Accessory
CLEANING YOUR APPLIANCE
• Unplug the appliance and remove the accessories
• Handle them with caution: the blades on the blender jug and accessories are sharp.
• Remove the jug and rinse it and its lid under running water.
• To clean the motor unit (A), use a moist cloth. Dry it carefully.
• Never immerse the motor unit (A) in running water.
• For easy cleaning, be sure to wash the removable parts in water and a little washing-up
liquid immediately after use.
• The jug (C) and accessories (D, E) can be cleaned in the dishwasher in the top basket with the
“ECO” or “LIGHTLY SOILED” programme.
• To clean the blender jug (C) easily, unlock the blade unit (c1) by rotating it through a quarter
turn in the anticlockwise direction. Remove the gasket (c2) and clean them under running
water or in the dishwasher.
10
Page 15

WHAT TO DO IF YOUR APPLIANCE DOES NOT WORK ?
Problems Causes Solutions
The plug is not fitted correctly into
the socket .
Plug the appliance into a socket and
switch on.
Product does not work.
Excessive vibrations.
Leak from the lid.
Leak from the base of the
blender jug.
Leak from the base of the
accessories.
The blade does not turn
easily.
Impossible to lock the blade
unit with the gasket (c1+c2)
on the jug (c3).
The jug or accessory is not correctly
positioned or locked on the motor
unit.
The product is not placed on a flat,
stable, heat-resistant surface.
Volume of ingredients is too high.
Volume of ingredients is too high.
The lid is not correctly positioned.
The blender jug gasket (c2) is not
positioned correctly or is missing.
The gasket on the blade unit (d2) or
(e2) is not positioned correctly or is
missing.
Pieces of food too large or too hard.
The gasket (c2) is not positioned
correctly.
Check that the jug or accessories are
correctly positioned and locked onto
the motor unit as shown in the
figure in the manual.
Place the product on a flat surface.
Reduce the quantity of ingredients
processed.
Reduce the quantity of ingredients
processed.
Lock the lid correctly on the blender
jug.
Reposition the gasket and lock the
blade holder correctly.
Reposition the gasket on the blade
unit (d2) or (e2) and lock it correctly
onto the bowl (F).
Reduce the size or quantity of
ingredients processed.
Add liquid
Reposition the gasket, the
3 folds should be visible as shown in
Fig. 1.
Your blender still does not work?
Contact an approved service centre (see list in service booklet).
You can customise your blender and obtain the following accessories from your usual dealer
or from an approved service centre: Herb chopper accessory (D), Spice grinder accessory (E),
or an additional blender jug (C).
11
Page 16

RECYCLING
• Disposal of the appliance and its packaging materials.
The packaging is comprised exclusively of materials that present no danger
for the environment and which may therefore be disposed of in accordance
with the recycling measures in force in your area.
For disposing of the device itself, please contact the appropriate service of
your local authority.
• End of life electrical and electronic products:
Your appliance is expected to last for many years. However, when the time comes to replace it,
do not throw it into the bin, but take it to the recycling centre in your town (or to a waste
reception centre where applicable).
Think of the environment!
Your appliance contains valuable materials which can be recovered or
recycled.
Leave it at a local civic waste collection point.
HELPLINE:
If you have any product problems or queries, please contact our CustomerRelations Team first
for expert help and advice:
0845 602 1454 – UK
(01) 677 4003 – ROI
or consult our website – www.tefal.co.uk
12
Page 17

13141516171819
Page 18

Page 19

Page 20

Page 21

Page 22

Page 23

VI
Page 24

202122
Page 25

Page 26

Page 27

23
Page 28

24
Page 29

PENERANGAN
A
Unit motor
B
Pemilih kelajuan
C
Unit pengisar:
- c1 Unit bilah
- c2 Gasket
- c3 Jug pengisar bersenggat
- c4 Tudung
- c5 Cawan penyukat
Pencencang herba
D
(*aksesori bergantung pada model)
- d1 Gasket
- d2 Unit bilah pengisar
Pengisar rempah
E
(*aksesori bergantung pada model)
- e1 Gasket
- e2 Unit bilah rempah
Pencencang herba dan Mangkuk
F
pengisar rempah
Aksesori yang terdapat dalam model akan ditunjukkan pada bahagian atas bungkusan.
ARAHAN KESELAMATAN
• Baca arahan penggunaan dengan teliti sebelum menggunakan perkakas untuk kali pertama:
pengilang tidak bertanggungjawab sekiranya menggunakan alat dengan tidak mematuhi
arahan.
• Perkakas ini tidak direka bentuk untuk digunakan oleh orang (termasuk kanak-kanak) yang
mempunyai kekurangan fizikal, deria atau keupayaan mental, atau kurang pengalaman dan
pengetahuan, melainkan mereka telah diberikan penyeliaan atau arahan berkenaan
penggunaan alat oleh orang yang bertanggungjawab untuk keselamatan mereka. Kanak-kanak
tidak dibenarkan untuk bermain dengan perkakas.
• Ia direka bentuk untuk berfungsi dengan arus ulang-alik sahaja. Sila periksa bahawa voltan
bekalan yang ditunjukkan pada plat nama perkakas sepadan dengan pemasangan elektrik
anda.
• Produk ini telah direka bentuk untuk kegunaan domestik sahaja. Sebarang penggunaan
komersil, penggunaan tidak wajar atau gagal mematuhi arahan, pengilang tidak
bertanggungjawab dan jaminan tidak akan digunakan.
• Pastikan anda mencabut plug perkakas jika anda membiarkannya tanpa jagaan, sebelum
memasukkan atau mengeluarkan aksesori atau sebelum mencucinya. Jangan cabut kord kuasa
untuk mencabut plag perkakas.
• Jangan gunakan perkakas anda jika ia tidak beroperasi dengan betul, jika ia telah rosak atau
jika kord kuasa atau plug rosak. Untuk mengekalkan keselamatan, bahagian ini mesti
digantikan oleh pusat perkhidmatan yang diluluskan (lihat senarai dalam buku kecil
perkhidmatan).
• Sebarang penyelenggaraan selain daripada pencucian rutin dan senggaraan oleh pelanggan
mesti dilakukan oleh pusat perkhidmatan yang diluluskan.
• Jangan tenggelamkan perkakas, kord atau plug dalam cecair. Kord kuasa mesti dijauhi daripada
capaian kanak-kanak dan tidak boleh diletakkan berdekatan atau bersentuhan dengan
bahagian yang panas bagi perkakas, sumber haba atau penjuru yang tajam.
MS
25
Page 30

• Untuk keselamatan anda, gunakan hanya aksesori dan bahagian ganti yang sepadan dengan
perkakas anda, dijual oleh pusat perkhidmatan yang diluluskan.
• Bilah sangat tajam: gunakannya dengan berhati-hati untuk mengelakkan kecederaan.
• Jangan gunakan pengisar atau aksesorinya tanpa bahan dan jangan tuang cecair yang
mendidih ke dalam jug.
• Sentiasa gunakan jag pengisar dengan penutup (c4).
• Sentiasa tuang bahan cecair ke dalam jug dahulu sebelum menambah bahan pepejal, tanpa
melebihi paras maksimum.
• Jangan letakkan jari anda atau sebarang objek lain dalam pengisar semasa perkakas sedang
beroperasi.
• Jangan gunakan mangkuk sebagai bekas untuk penyejukan, memasak atau pensterilan.
• Jangan gunakan pengisar lebih daripada 3 minit secara berterusan.
• Letakkan pengisar pada tempat kerja yang rata, stabil, tahan haba, bersih dan kering.
• Jangan biarkan rambut yang panjang, ikatan, dll, tergantung pada jug pengisar atau aksesori
semasa ia beroperasi.
• Jangan gunakan pengisar di luar dalam udara terbuka.
• Jangan tanggalkan penutup (c4) sebelum bilah telah berhenti berputar sepenuhnya.
• Jangan gunakan perkakas ini untuk mengisar atau mencampurkan item selain daripada bahan
makanan.
SISTEM KESELAMATAN
Perkakas hanya boleh beroperasi semasa jug (C) atau aksesori (D atau E) diletakkan dalam
kedudukan yang betul dan dikunci pada unit motor (A).
MENGGUNAKAN UNTUK KALI PERTAMA
LANGKAH BERJAGA-JAGA:
Bilah sangat tajam;
gunakannya dengan
berhati-hati semasa
menggunakan atau
mencuci perkakas.
• Sebelum menggunakan perkakas anda untuk kali
pertama, cuci semua aksesori (C, D, E, F) dalam air
sabun suam, kecuali untuk unit motor (A).
• Pastikan semua bungkusan telah dikeluarkan
sebelum mengoperasikan perkakas.
• Nota penting: Putar pemilih kelajuan (B) kepada “0”
sebelum meletakkan jug pengisar atau aksesori pada
unit motor.
• Perkakas bermula hanya jika jug atau aksesori
diletakkan dengan betul dan dikunci pada badannya.
• Jangan mengoperasikan pengisar jika tudung tidak
berada pada tempatnya
MENGGUNAKAN PERKAKAS ANDA
Basahkan gasket (c2) dan letakkannya dengan betul
•
pada unit bilah (c1): 3 lipatan gasket mesti boleh
dilihat sebaik sahaja ia berada pada tempatnya. Jika ia
diletakkan dalam arah yang lain, anda tidak boleh
menguncinya pada unit bilah pada jag. (Rjh. 1).
26
Page 31

• Letakkan pemasangan
Kuncinya dengan memutar unit bilah melalui putaran
sukuan dalam arah melawan jam. (Rjh. 2).
• Masukkan bahan ke dalam jug yang dipasang tanpa
melebihi paras maksimum yang ditunjukkan:
* 1.25L untuk campuran tebal
* 1L untuk persediaan cecair.
• Letakkan i penutup
penyukat
• Letakkan pemasangan jug pengisar
motor
slot pada unit motor. (Rjh. 3 - kedudukan 1)
• Kemudian, putar jug pengisar
sukuan sehingga kunci hijau (ditutup) muncul.
(Rjh. 3 - kedudukan 2)
2 kemungkinan kedudukan jag: pemegang pada
sebelah kanan atau kiri
unit motor.
• Dengan pencencang herba
mencencang bahan seperti bawang merah, bawang
putih, daging (potong ke dalam kepingan) dan buah
kering dalam beberapa saat, membuat serbuk (rusk)
dan menyediakan makanan bayi.
Jangan gunakan pencencang herba untuk persediaan
cecair (jus buah-buahan. dll.)
• Dengan pengisar rempah
rempah dalam beberapa saat: biji ketumbar, lada
hitam, dll.
• Aksesori ini dilengkapi dengan mangkuk
mengelakkan capaian kepada bilah semasa
digunakan.
12-
3-
4-
5-
(c5)
(A)
. Kunci merah (buka diselarikan dalam
Putar mangkuk
Letakkan gasket
pada unit bilah
kedudukan unit bilah pada mangkuk selari dengan
tanda pada mangkuk dan unit bilah. Kunci aksesori
dengan memutar unit bilah melalui putaran sukuan
dalam arah melawan jam. (Rjh. 5).
Putar pemasangan yang pasang(DatauE)dan
kedudukannya pada unit motor. Kunci merah (buka)
diselarikan dalam slot pada unit motor. (Rjh. 6 -
kedudukan 1)
Kemudian, putar aksesori yang dipasang(Datau
melalui putaran sukuan sehingga kunci hijau
(ditutup) muncul. (Rjh. 6 - kedudukan 2)
Pasang plug perkakas dan putar pemilih kelajuan
ke kedudukan yang dikehendaki atau gunakan
beberapa denyutan. Pegang mangkuk
perkakas sedang digunakan. Untuk menghentikan
(c1+c2)
pada tapak jug
(c4)
dalam relungnya pada penutup.
pada jug . Letakkan cawan
(C)
(D)
anda boleh
(E)
anda boleh mengisar
(F)
dan tuangkan bahan.
(d1)
atau
(e1)
(d2
atau
dalam relungnya
e2)
. (Rjh. 4). Letakkan
(C)
pada unit
melalui putaran
(F)
(F)
semasa
(c3
yang
27
).
E)
(B)
Langkah berjaga-jaga:
kebocoran boleh berlaku
jika aksesori tidak dikunci
dengan betul.
Page 32

perkakas, putar pemilih kelajuan
(B)
kembali ke
kedudukan “0”.
6-
Buka kunci aksesori dengan memutarnya melalui
putaran sukuan dalam arah melawan jam, sehingga
kunci merah (buka) muncul. Tanggalkan aksesori
(D, E)
yang dipasang
dari unit motor.
Putar pada tempat kerja sebelum membuka kunci unit
(d2, e2)
bilah
dari mangkuk
(F)
dalam susunan terbalik
bagi pemasangan. Bilah sangat tajam: gunakannya
dengan berhati-hati untuk mengelakkan kecederaan.
Kemundian, anda boleh mengambil penyediaan dalam
mangkuk.
* Warna mangkuk mungkin berubah selepas mengisar
beberapa bahan yang sangat keras: (bunga cengkih,
kulit kayu manis, dll.).
Bahan
Aprikot / buah dalam tin 40 g 3 s / kelajuan 2 D
Serbuk 1 biskut rusk Dalam denyutan D
Bawang 60 g 6 saat / kelajuan 1 D
Buah badam berkulit / kacang hazel 60 g Dalam denyutan D
Pasli / ketumbar segar 10 g Dalam denyutan D
Biji ketumbar 40 g 30 saat / kelajuan 2 E
Kuantiti
(maks.)
Masa operasi Aksesori
MENCUCI PERKAKAS ANDA
• Cabut plug perkakas dan tanggalkan aksesori
• Gunakannya dengan berhati-hati: bilah pada jug pengisar dan aksesori adalah tajam.
• Tanggalkan jug dan bilaskannya bersama penutup di bawah air yang mengalir.
• Untuk mencuci unit motor
(A)
, gunakan kain yang lembap. Keringkannya dengan
berhati-hati.
• Jangan tenggelamkan unit motor
(A)
dalam air yang mengalir.
28
Page 33

• Untuk pencucian mudah, pastikan anda membasuh bahagian yang boleh ditanggalkan
dalam air dan sedikit cecair pencucian serta-merta selepas menggunakannya.
• Jug
(C)
dan aksesori
(D, E)
boleh dicuci dalam pencuci pinggan-mangkuk dalam bakul atas
dengan program "ECO" atau "LIGHTLY SOILED".
• Untuk mencuci jug pengisar
(C)
dengan mudah, buka kunci unit bilah
(c1)
dengan
memutarnya melalui putaran sukuan dalam arah melawan arah jam. Tanggalkan gasket
(c2)
dan cucikannya di bawah air yang mengalir atau dalam pencuci pinggan-mangkuk.
APA YANG PERLU DILAKUKAN JIKA PERKAKAS
ANDA TIDAK BERFUNGSI ?
Masalah Punca Penyelesaian
Produk tidak berfungsi.
Getaran berlebihan.
Kebocoran dari penutup.
La prise n'est pas branchée. Plug
tidak dimuatkan dengan betul ke
dalam soket.
Jug atau aksesori tidak diletakkan
dengan betul atau dikunci pada unit
motor.
Produk tidak diletakkan pada
permukaan yang rata, stabil, tahan
haba.
Isipadu bahan adalah terlalu tinggi.
Isipadu bahan adalah terlalu tinggi.
Penutup tidak diletakkan dengan
betul.
Branchez l'appareil sur une prise de
même voltage.Pasang plug perkakas
ke dalam soket dan hidupkannya.
Periksa bahawa jug atau aksesori
diletakkan dengan betul dan dikunci
pada unit motor seperti yang
ditunjukkan dalam rajah dalam
manual.
Letakkan produk pada permukaan
yang rata.
Kurangkan kuantiti bahan yang
diproses.
Kurangkan kuantiti bahan yang
diproses.
Kunci penutup dengan betul pada
jug pengisar.
Kebocoran dari tapak jug
pengisar
Kebocoran dari tapak
aksesori.
Bilah tidak berputar dengan
mudah.
Tidak dapat mengunci unit
bilah dengan gasket
(c1+c2) pada jag (c3).
Gasket jug pengisar (c2) tidak
diletakkan dengan betul atau tiada.
Gasket pada unit bilah (d2) atau
(e2) tidak diletakkan dengan betul
atau tiada.
Kepingan makanan terlalu besar
atau terlalu keras.
Gasket (c2) tidak diletakkan dengan
betul.
29
Letakkan semula gasket dan kunci
pemegang bilah dengan betul.
Letakkan semula gasket pada unit
bilah (d2) atau (e2) dan kuncinya
dengan betul ke atas mangkuk (F).
Kurangkan saiz atau kuantiti bahan
yang diproses. Tambah air
Letakkan semula gasket, 3 lipatan
boleh dilihat seperti yang
ditunjukkan dalam Rjh. 1.
Page 34

Pengisar anda masih tidak berfungsi?
Hubungi pusat perkhidmatan yang diluluskan (lihat senarai dalam buku kecil perkhidmatan).
Anda boleh menyesuaikan pengisar anda dan mendapatkan aksesori lain dari pengedar
biasa anda atau dari pusat perkhidmatan yang diluluskan. Aksesori pencencang herba
Aksesori pengisar rempah
(E)
, atau jag pengisar tambahan
(C)
.
(D)
,
MENGITAR SEMULA
• Pembuangan perkakas dan bahan pembungkusannya.
Secara eksklusif, pembungkusan terdiri daripada bahan yang tidak
memberikan bahaya kepada persekitarandan yang boleh dibuang mengikut
langkah mengitar semula yang dikuatkuasakan dalam kawasan anda.
Untuk pembuangan peranti itu sendiri, sila hubungi perkhidmatan yang
sesuai bagi pihak berkuasa tempatan anda.
• Penghujung hayat produk elektrik dan elektronik:
Perkakasdijangka untuk bertahan selama beberapa tahun. Walaubagaimanapun, apabila masa
tiba untuk menggantikannya, jangan buang ke dalam tong sampah, tetapi, bawakannya ke
pusat mengitar semula di bandar anda (atau ke pusat penerimaan bahan buangan di mana
berkenaan).
Fikir mengenai alam sekitar!
Perkakas anda mengandungi bahan bernilai yang boleh diperoleh semula
atau dikitar semula.
Berikannya pada pusat pengumpulan bahan buangan sivik tempatan.
30
Page 35

31ZH3233343536373839404142
Page 36

Page 37

Page 38

Page 39

Page 40

Page 41

Page 42

Page 43

Page 44

Page 45

Page 46

Page 47

Page 48

FR
p. 1 - 6
EN
KO
VI
MS
ZH
TH
p. 7 - 12
p. 13 - 18
p. 19 - 24
p. 25 - 30
p. 31 - 36
p. 37 - 42
Réf. 0828414
 Loading...