

Page 1
EN
KO
VI
MS
ZH
TH
ID
Page 2
D
D7
D6
E
D5
E4
E3
E1
D4
E2
F
D3
F4
D1
D2
F3
F1
F2
C
B
G
A
Page 3
OK
NO
"Click"
2
3
4
D3
2.b
1
3
1
2.a1
2.c
4
Page 4
E3
F3
11
5.a
"Click"
5.c
7
5.b
6
8.a
Page 5
8.c 8.b
Page 6

Page 7

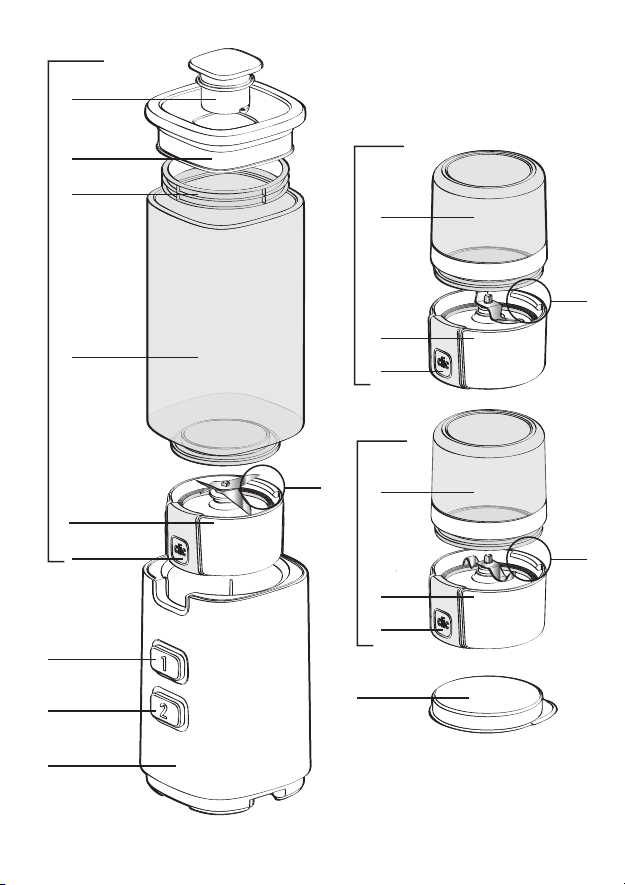
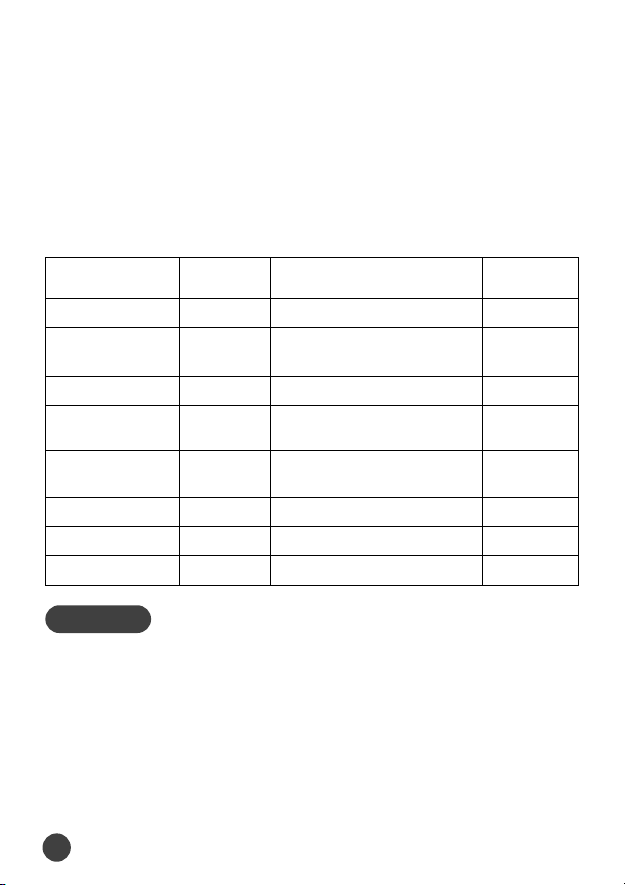
DESCRIPTION
A Motor unit
B Button 2: fast speed
C Button 1: slow speed
D Bowl blender assembly
D1 Blade unit with seal
D2 Blade unit unlocking button
D3 Positioning ridge
D4 Blender bowl
D5 Lid seal
D6 Lid
D7 Cap
The accessories contained in the model that you have just purchased are represented on the
packaging.
E Herb mill
E1 Blade unit with seal
E2 Blade unit unlocking button
E3 Positioning ridge
E4 Bowl
F Spice mill
F1 Blade unit with seal
F2 Blade unit unlocking button
F3 Positioning ridge
F4 Bowl
G Lid for accessory
(*accessory depending on model)
(*accessory depending on model)
SAFETY INSTRUCTIONS:
• Read these instructions for use carefully before using your appliance for the first time and
keep them to hand for future reference.
• This appliance is designed for indoor domestic household use only. In case of professional use,
inappropriate use or failure to comply with the instructions, the manufacturer accepts no
responsibility and the guarantee does not apply.
• It is not intended to be used in the following cases, which are not covered by the guarantee.
- In kitchens reserved for staff use in shops, offices and other professional environments;
- On farms;
- By hotel or motel clients, or on other residential premises;
- In bed and breakfast accommodation and other similar environments.
• This appliance is suitable for use by children of 8 years and above or by persons without the necessary
experience or knowledge or with impaired physical,sensory or mental capacities if they have been
trained and are supervised, to ensure that they use the appliance safely and understand the hazards
that exist. Children should not be left to play with the appliance. Children should not attempt to
clean or service the appliance unless they are aged at least 8 years or older and supervised.
• Please keep the appliance and its power cord out of the reach of children less than 8 years of age.
• Children should be supervised to ensure they do not play with the appliance.
• For your safety, this appliance meets applicable standards and regulations (Directives on Low Voltage,
Electromagnetic Compatibility, Materials in contact with food articles, Environment, etc.).
• This appliance is designed to function on AC current only. Before using it for the first time, check
that your mains supply voltage matches that indicated on the appliance data plate.
• Any connection error will invalidate your guarantee.
• Given the diverse standards in effect, if the appliance is used in a country other than that in which
it is purchased, have it checked by an Approved Service Centre.
• Do not use an extension lead. If you accept liability for doing so, only use an extension lead which
is in good condition, has a plug with an earth connection and is suited to the power rating of the
appliance.
• This appliance is not intended to function using an external time-switch or a separate remote control
system.
EN
5
Page 8

• To avoid the risk of electric shock, never use the appliance with wet hands or on a damp or wet
surface. Never immerse the motor unit, power cord or plug in water or any other liquid.
• Never leave the appliance unattended whilst connected to the power supply, even if for a few
moments, especially where children are present.
• Do not let the power cord hang where children may reach it.
• Always switch off and disconnect the appliance from the power supply before changing attachments,
cleaning & maintenance or when not in use.
• Never disconnect the plug by pulling on the power cord.
• Do not leave the power cord close to or in contact with sources of heat or sharp edges.
• Do not allow long hair, scarves, ties etc. to hang over the appliance or attachments when in use.
• Do not touch any moving parts (blades etc.).
• If your appliance “jams” during operation, switch off, disconnect from the power supply and check
that the attachment is not overloaded with ingredients. Carefully remove any obstructions before
reconnecting.
• Do not use your appliance if it does not operate correctly, if it has been damaged or if the power
cord or plug is damaged. To maintain safety, these parts must be replaced by an Approved Service
Centre.
• Any intervention other than normal cleaning and maintenance by the customer must be performed
by an Approved Service Centre.
• For you own safety, only use accessories and spare parts from the appliance manufacturer, which are
especially designed for your appliance.
• Do not put accessories containing metal in the microwave.
• Precautions should be taken when handling the sharp blades of the blender bowl blade
unit (D1), the herb mill blade assembly (E1) and the spice mill blade assembly (F1) on
emptying the bowls and cleaning them: they are extremely sharp.
• Never touch moving parts while the appliance is in operation, wait for the appliance and
accessories to come to a complete stop before touching parts or removing these accessories.
• Never introduce kitchen utensils (spoons, spatulas, etc.) into the bowl (D) while in operation.
• Do not operate the blender bowl without ingredients, with dry or hard products only (such as sugar
cubes) or if the lid (D6) with its seal (D5) is not fitted to the bowl (D).
• Warning: Never pour or mix liquids or ingredients with a temperature of more than 60° C
(140°F). If you have to mix hot ingredients, keep your hands at a distance from the lid (D6)
and the feeder (D7) to avoid any risk of burning.
• Always pour liquid ingredients into the blender bowl first before adding the solid ingredients, without
exceeding the maximum level indicated.
• Do not use the bowls as containers (for freezing, cooking or sterilising).
• Do not operate the appliance for more than 1 minute in continuous operation.
• Place the appliance on a stable, heatproof work surface.
• Never use this appliance to blend or mix non-food ingredients.
SAFETY LOCKING SYSTEM
The appliance will not operate if the blender bowl assembly (D) or the accessories (E) or (F)
are not correctly assembled and correctly positioned on the motor unit (A).
The bowls (E4) (F4) are marked with a coloured line on their base and should be assembled with
the blade units whose release buttons (E2)(F2) are the same colour.
The blender bowl (D4) is not marked with a colour, it should be assembled with the blade unit
that has a yellow release button (D2).
6
Page 9

BEFORE USING FOR THE FIRST TIME
Before using for the first time wash all accessories (D, E, F, G) in warm water and a little washing-
up liquid but not the motor unit (A).
WARNING: The cutter blades are extremely sharp, handle them with precaution during use,
cleaning or on emptying the bowls.
Make sure that all packaging has been removed before operating the appliance.
Important: Make sure that the motor unit has come to a complete stop, with buttons (B) and
(C) released before fitting the blender assembly or accessories to the motor unit.
Never operate the appliance if the lid fitted (D6) with the seal (D5) has not been placed on the
assembled bowl (D).
USING YOUR APPLIANCE
Using the Blender
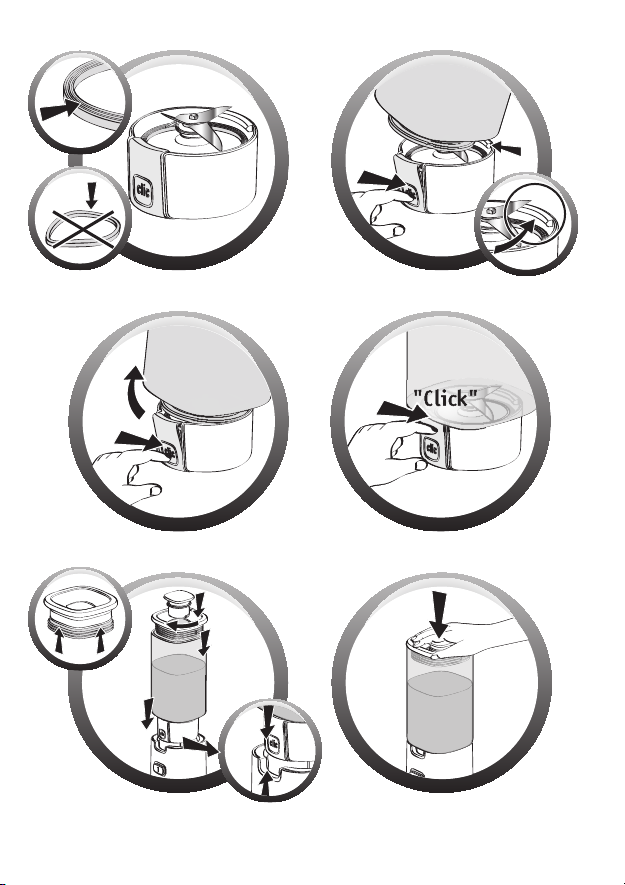
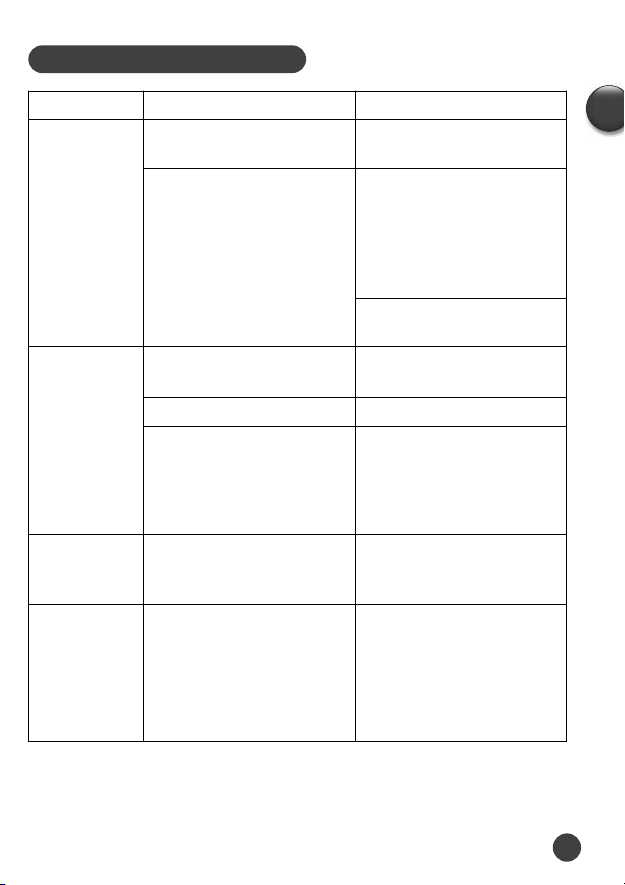
Make sure that the seal is fitted and correctly positioned on the blade unit (D1):
the folds of the seal should be visible when it is in place and the seal should be flat, it
should not be buckled (fig1).
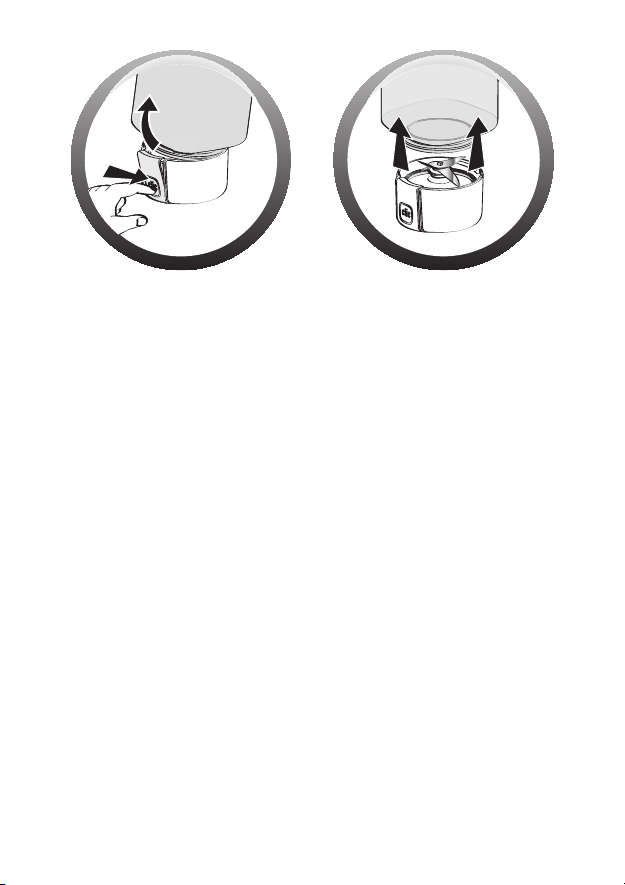
With the “click” button (D2) of the blade unit (D1) facing you, position the base of the bowl
(D4) under the ridge (D3) (fig 2a) then bring the blade unit back (D1) towards the bowl (fig
2b) until it locks, pressing on the top of the click button (D2) to ensure that the bowl (D4) and
the blade unit (D1) are fitted together correctly (fig 2c).
Add the ingredients into the bowl without exceeding the maximum level indicated:
of 0.6 L for thick preparations
and 0.5 L for liquid preparations
Do not put any liquid or ingredients whose temperature exceeds 60° C (140°F) in the mixer
bowl.
Fit the lid seal (D5) around the lid (D6) place the lid assembly on the bowl (D4), lock the cap
(D7) in its housing located on the lid.
Fit the assembled bowl (D) to the motor unit (A) with the click button (D2) of the blade unit
lined up with the notch located in front of the motor unit (A) (fig3). Note: If the bowl (D) is
not far enough down on the motor unit (A) the appliance will not work (fig4).
Plug in the appliance and press button 1 (C) or 2(B), depending on the required speed, pressing
several times or holding the button down for continuous operation. Do not use for more than 60
seconds in continuous operation.
To stop the appliance, release the pressure on button (B) or (C). Unplug the appliance.
Remove the bowl (D) from the motor unit (A).
Using the Herb Mill or Spice Mill
The herb mill (E) allows you, in a few seconds, to chop ingredients such as: parsley,
onions, garlic, dried apricots, meat (without sinews or gristle and cut into pieces), to
make breadcrumbs (rusk, etc.).
Do not use the herb mill for liquid preparations (fruit juice).
The spice mill (F) allows you, in a few seconds, to reduce different spices to a powder
(coriander seeds, peppercorns) and dried aromatic plant leaves (mint).
These accessories come with a bowl that does not allow access to the blades during use.
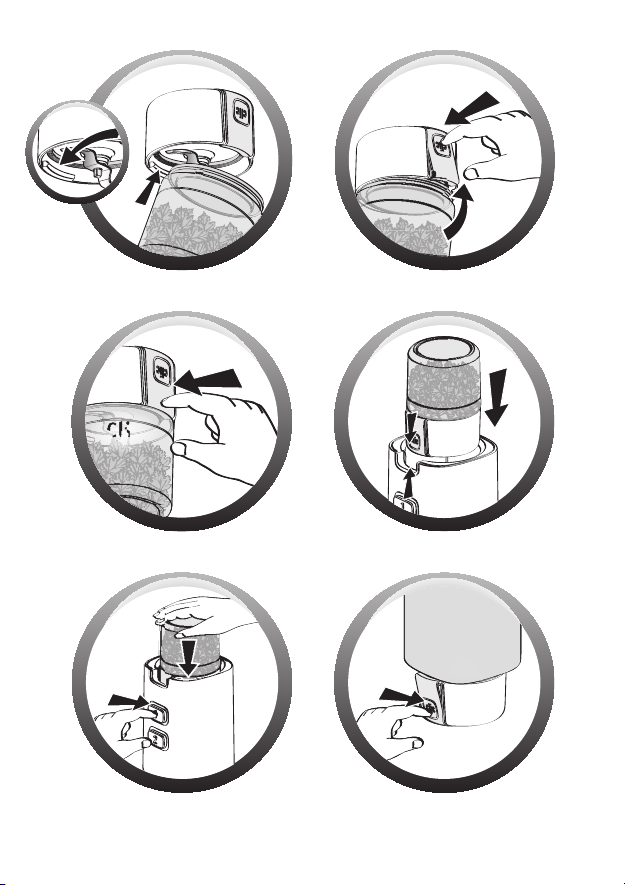
Make sure that the seal is fitted and correctly positioned on the blade unit (E1) or (F1) (fig1),
the folds of the seal should be visible when it is in place and the seal should be flat, it should
not be buckled (fig1).
EN
7
Page 10
Put the ingredients in the bowl (E4) or (F4).
Take the blade unit (E1) or (F1), with the blades facing downwards, with the “click” button (E2) or
(F2) facing you, position the ridge (E3)or (F3) in the neck of the bowl (E4) or (F4) (fig 5a).
Press the “click” button (E2) or (F2), bring the bowl (E4) or (F4) back to the blade unit (E1) or (F1)
(fig 5b) and clip it on the bowl by pressing down on the top of the click button (E2) or (F2). Make
sure that the bowl (E4) or (F4) and the blade unit (E1) or (F1) are fitted together (fig 5c).
Check that there are no errors in the assembly of the accessories (E) and (F):
the colour of the click button (E2 or F2) should correspond to the colour of the line at the base of
the bowl (E4 or F4)
Turn your accessory over, place the assembled accessory (E) or (F) on the motor unit (A), lining up
the click button (E2) or (F2) with the notch on the front of the motor unit (A), the accessories (E)
or (F) should be as far down as they can go on the motor unit (A) if not the appliance will not operate
(fig6).
Plug in the appliance. Keep your hand supporting the bowl (E4) or (F4) and during operation press
the button (B) or (C) several times or continuously (fig7).
To stop the appliance, release the button (B) or (C). Unplug the appliance.
Remove the accessory (E) or (F) from the motor unit (A), turn the accessory over on the work surface
and release the blade unit (E1) or (F1) by pressing on the “click” button (E2) or (F2).
You can then take out your preparation.
The mixing of certain very hard spices (cloves, cinnamon, etc.) is not recommended because they may
discolour the bowl.
The lid (G) to be fitted on the bowl (E4) or (F4) to avoid preparations drying out and allows them
to be kept in the refrigerator for later use.
Ingredients
Apricots 40g
Breadcrumbs
(made using rusks)
Onions/shallots 50g Press button 1 ten times Herb mill (E)
Almonds/
shelled hazelnuts
Pieces of meat with
sinews or gristle removed
Parsley 7-10g Press button 2 ten times Herb mill (E)
Coriander seeds 30 to 40g
Coffee beans 40 to 50g
Quantity
(max)
1 rusk
50-80g Press button 2 ten times Herb mill (E)
Press button 2 ten times and 15 secs with
70g
Operating time Accessory
4 secs with button 2 held down
continuously
button 2 held down continuously
10 secs with
button 2 held down
45 secs with button 2 held down
continuously
45 secs with button 2 held down
continuously
Herb mill (E)
Herb mill (E)
Spice mill (F)
Spice mill (F)
Spice mill (F)
8
Page 11
CLEANING YOUR APPLIANCE
Unplug the appliance and remove the bowl or accessories.
Handle them with care because the blade and accessory blades are sharp.
Rinse the bowls and lids immediately after use under running water and also the detachable elements in warm water and a little washing-up liquid.
To facilitate cleaning, the blade unit (D1) can be detached from the bowl (D4) by pressing on
the click button (D2) (fig 8a 8b 8c).
The bowl (D) the accessories (E) and (F) can be washed in the top basket of the dishwasher using
the "ECO" or "LIGHT WASH" programme.
To clean the motor unit (A), use a damp cloth and dry it carefully.
Never immerse the motor unit (A) in water or any other liquid.
WHAT TO DO IF YOUR APPLIANCE DOES NOT WORK
Problems Causes Solutions
The appliance
does not work.
Excessive
vibration.
It is not plugged in. Plug the appliance in using a plug with
The bowl (D) or the
accessories (E) and (F) are
not correctly assembled or
positioned on the motor unit
(A).
The appliance is not on a
flat, stable surface.
Volume of ingredients is too
high.
Error in assembling the
accessories.
the same voltage.
Check that the bowl or accessories are
correctly assembled; dismantle and start
to assemble again (Fig 2.a, 2.b and 2.c)
and check that they are far down enough
on the motor unit.
Maintain pressure on the accessory lid
(E) or (F) during operation.
Put the appliance on a flat surface.
Reduce the quantity of ingredients
processed.
Check that the bowls (E4) (F4) are
correctly assembled with the blade units
(E2) (F2) associated with them, the
coloured markers should be identical.
EN
Leak through lid. Volume of ingredients is too
high.
The lid is not fitted
correctly.
Reduce the quantity of ingredients
processed.
Check that the seal is in place (D5) on
the lid (D6). Correctly position the lid
(D6) on the bowl (D). Lock the button
(D7).
9
Page 12
Problems Causes Solutions
Leak from the
bowl or accessories
The blade does
not rotate easily.
Is your appliance still not working?
Contact customer service (see contact details in the booklet).
Incorrect positioning of the seal on
the blade unit (D1)(E1)(F1).
The blade unit (D1)(E1)(F1) is
insufficiently or incorrectly locked
on the bowl (D4)(E4)(F4).
Pieces of food that are too big or
too hard.
Make sure that the seal is correctly
positioned, the lips of the seal
should be visible and it should not
be buckled (fig1). Handle the
blade units (D1), (E1), (F1) with
care because the blades are
sharp.
Make sure that the blade unit and
the bowl are fitted together
correctly be pressing at the top of
the button (D2)(fig2c) or on the
buttons (E2)(F2) (fig5c)
Reduce the size or quantity of the
ingredients processed.
Add liquid to the bowl mix without
exceeding the maximum level.
RECYCLING
Elimination of packaging and appliance materials.
End-of-life electronic or electrical appliances:
Your appliance is designed to operate for many years. However, the day you plan to replace it, do
not throw it away with normal household rubbish or in a landfill but take it to a suitable collection
point.
The packaging exclusively contains materials that are not dangerous to the
environment, which can be disposed of in accordance with the recycling regulations
in force.
To dispose of your appliance, consult the appropriate department of your local
authority.
Environmental protection first!
Your appliance valuable materials that can be recovered or recycled.
Leave it at a local civic waste collection point.
10
Page 13

각부명칭
A 모터 본체
B 속도조절 버튼 2: 고속
C 속도조절 버튼 1: 저속
D 블렌더 용기
D1 칼날 몸체
D2 칼날 분리 버튼 (“클릭”버튼)
D3 용기 위치 받침 홀
D4 블렌더용기
D5 뚜껑 패킹
D6 블렌더 용기 뚜껑
D7 블렌더 뚜껑 마개
* 구입하신 모델에 따라 액세서리들은 다를 수 있습니다.
구매하신 제품의 모델에 포함되는 액세서리는 제품 패키지 겉면에서 확인하실 수 있습니다.
E 다지기 (*모델에 따라 다름)
E1 칼날 몸체
E2 칼날 분리 버튼
E3 용기 위치 받침 홀
E4 용기
F 분쇄기 (*모델에 따라 다름)
F1 칼날 몸체
F2 칼날 분리 버튼
F3 용기 위치 받침 홀
F4 용기
G 부속품용 뚜껑
안전상 주의사항
제품을 처음 사용하시기 전에, 사용설명서를 주의 깊게 읽어주시고 안전을 위하여 정확
•
하게 사용하여 주십시오. 사용설명서대로 사용하지 않아 발생한 문제는 당사의 품질보
증혜택을 받으실 수 없습니다.
어린이의 손에 닿지 않는 곳에 두십시오. 어린이나 몸이 불편하신 분이 제품을 사용할
•
때에는 곁에서 도와주시고 각별히 주의하여 주십시오. 어린이가 제품을 가지고 장난치
지 않도록 주의하십시오.
제품을 사용하시기 전에 제품의 전압이 가정의 전압과 맞는지 확인하여 주십시오. 전압
•
을 확인하지 않아 발생한 문제에 대해서는 품질보증 혜택을 받으실 수 없습니다.
• 본 제품은 가정용으로 제작되었으며, 가정용으로만 사용 가능합니다. 상업용으로 사용
되었거나 부적절하게 사용한 경우 당사의 품질보증 혜택을 받으실 수 없습니다.
• 제품을 사용하지 않거나, 조립 또는 분해할 때 또는 세척 시에는 반드시 제품의 전원코
드를 빼주십시오. 전선을 잡아당겨 전원코드를 뽑지 마십시오.
• 제품이 정상적으로 작동되지 않거나, 제품에 손상이 생긴 경우 사용하지 마시고 당사 서
비스센터에 의뢰해 주십시오. (전국 어디서나 1588-1588)
• 일반적인 세척 및 제품 관리를 위한 작업 외의 제품의 수리가 필요할 경우는 당사 서비
스센터에 의뢰해 주십시오.
• 제품 모터본체나 코드를 절대로 물에 담그지 마십시오. 제품 코드를 어린이의 손에 닿지
않는 곳에 두십시오. 전원코드 또는 전원전선을 테이블 등의 날카로운 모서리에 늘어뜨
려 놓지 마시고, 뜨거운 곳에 닿지 않도록 하십시오. 코드 손상으로 화재 및 감전의 원인
이 됩니다.
• 안전을 위하여 제품에 적합한 테팔 정품 부품 및 부속품을 사용하여 주시고 이에 따를지
않아 발생한 문제에 대해서는 품질보증 혜택을 받으실 수 없습니다.
• 경고: 사용설명서 또는 제품을 보여 주셔야만 액세사리를 구입하실 수 있습니다.
• 제품 모터본체나 코드를 절대로 물에 담그지 마십시오.
• 제품 코드를 어린이의 손에 닿지 않는 곳에 두십시오. 전원코드 또는 전원전선을 테이블
등의 날카로운 모서리에 늘어뜨려 놓지 마시고, 뜨거운 곳에 닿지 않도록 하십시오. 코
드 손상으로 화재 및 감전의 원인이 됩니다.
11
KO
Page 14

• 금속이 포함된 부속품은 전자렌지에 넣어서는 안 됩니다.
용기 내용물을 비우거나 씻을 때는 블렌더용기 칼날 몸체 (D1), 분쇄기 칼날 몸체(E1),
•
다지기 칼날 몸체 (F1)의 날카로운 칼날을 주의해서 취급하십시오. 칼날은 매우 날카롭
습니다.
제품 작동 중에는 절대 움직이는 부속품을 만지지 마십시오. ▪ 부속품을 만지거나 꺼내
•
야 할 때는 먼저 제품이 완전히 멈출 때까지 기다리십시오.
블렌더가 작동 중일 때는 절대 용기
•
• 블렌더가 작동 중일 때는 절대 블렌더 또는 부속품 위로 긴 머리카락, 스카프 등이 늘어
지지 않도록 하십시오.
• 용기가 빈 상태일 때, 마르거나 딱딱한 재료(각설탕 등)만 들어 있거나, 뚜껑(D6)의 뚜
껑 씰 (D5)이 용기(D)에 제대로 끼워지지 않은 상태에서는 작동시키지 마십시오.
경고: 60° C 이상 온도에서 액체나 재료를 붓거나 혼합하지 마십시오. 뜨거운 재료를
•
혼합하는 경우, 양손을 뚜껑
어야 화상 위험을 방지할 수 있습니다.
• 항상 블렌더 용기에는 고체 재료를 추가하기 전에 액체 재료를 먼저 부어 넣고, 표시되
어 있는 최대 높이를 초과하지 않도록 합니다.
• 용기를 보관 용기(냉동, 요리 또는 살균 용도)로 사용하지 마십시오.
• 블렌더는 1분 이상 계속해서 작동시키지 마십시오.
• 사용자의 안전을 위해 본 제품은 해당 표준 및 규정을 준수합니다:
• 절대 식품 이외의 물체를 넣고 갈거나 혼합하는 데 본 제품을 사용하지 마십시오.
(D6)
안에 주방 기구(스푼, 주걱 등)를 넣지 마십시오
(D)
과 블렌더 용기 컵
에서 어느 정도 떨어진 곳에 두
(D7)
안전 잠금 장치
블렌더 용기(D) 또는 악세사리 (E)또는 (F)가 제대로 조립되지 않거나 모터 본체(A)에 올
바로 끼워지지 않은 경우 작동하지 않습니다.
용기 (E4)(F4)에는 용기 외부에 (E4)빨간색선, (F4)황토색선으로 표시 되어 있으며 칼날
버튼(E2)(F2)이 같은 색으로 되어 있는 칼날몸체와 조립해야 합니다.
블렌더 용기(D4)에는 색이 표시되어 있지 않으며, 노란색 칼날 버튼(D2)이 있는 칼날몸체
와 함께 조립해야 합니다.
제품을 처음 사용하기 전
본 제품을 사용하기 전에 모터본체(A)를 제외한 모든 부속품(D, E, F, G)을 따뜻한 물로 세
척하여 주십시오.
주의: 칼날이 날카로우므로 사고의 방지를 위해 제품을 사용하거나 세척 시에 손으로 직
접 만지지 말고 주의를 기울이십시오.
제품을 작동시키기 전에 포장재를 빠짐없이 제거하십시오.
요:
블렌더 조립부나 부속 악세사리를 모터본체에 끼우기 전에 (B)와 (C) 버튼이 눌려지
지 않아 모터 본체가 완전히 멈춰 있는지 확인하십시오.
뚜껑 패킹(D5)가 뚜껑(D6)에 장착되어 있지 않은 상태에서는 절대 블렌더를 작동 시키지
마십시오.
.
제품 사용하기
칼날 패킹이 칼날본체(D1)에 잘 제대로 끼워져 올바르게 위치해 있는지 확인해 주십시:
끼워진 상태에서는 고무패킹의 주름 부분이 보이고, 휘지 않고 평평해야 합니다(그림 1).
12
Page 15

칼날 본체(D1)의 칼날 분리 버튼 (“클릭”버튼) (D2)이 사용자를 향한 상태에서, 용기(D4)
의 바닥 부분을 용기 위치 받침 홀 (D3) 아래에 위치시킨 다음, 칼날 분리 버튼(D2)의 아
랫 부분을 눌러 고정시켜 주십시오.
기(D4)와 칼날몸체(D1)가 제대로 조립되었는지 확인합니다
재료를 용기에 넣을 때는, 용기에 0.6L 표시가 되어 있지 않아 혼선 우려 있음 ,
액체 내용물의 경우 0.5L라고 표시된 높이를 초과하지 않도록 합니다.
온도가 60°C를 초과하는 액체나 재료는 블렌더 용기에 넣지 마십시오.
뚜껑 씰(D5)을 뚜껑(D6) 둘레에 끼운 다음, 뚜껑을 용기(D4) 위에 놓고, 블렌더 용기 컵
(D7)을 마름모 형태가 되도록 끼운 후 뚜껑 홈에 맞도록 시계방향으로 돌려 “딸칵” 하는 소
음이 들리도록 끼웁니다.
칼날본체의 분리 버튼(D2)이 용기 본체(D) 앞면에 위치한 눈금과
일직선이 되도록, 조립한 용기(D)를 모터본체(A) 위에 끼웁니다
지 않는 경우, 용기(D)가 모터본체(A)에 충분히 들어간 상태에서 끼워졌는지 확인합니다.
제품 코드를 꽂고 원하는 속도에 따라 속도조절버튼 1(C) 또는 2(B)를 여러 번 누르거나 계
속 작동시키려면 계속 누르고 있으면 됩니다.
작동을 멈추려면 누르고 있던 버튼 (B)나 (C)를 손에서 떼시거나 제품의 플러그를 뽑습니
다.
용기(D)를 모터본체(A)에서 분리시킵니다.
다지기(E)
을 제거하고 조각으로 자른 상태) 등과 같은 재료를 다지거나 빵부스러기(러스
크) 등을 만들 수 있습니다.
분쇄기는 액체를 섞는 데 사용하지 마십시오(과일 주스).
분쇄기(F)
린 향신료 식물 잎(민트)을 가루로 만들 수 있습니다.
이러한 부속품에는 사용 시 칼날에 주의할 수 있도록 부속품용 뚜껑이 들어 있습니다.
밀봉씰이 칼날몸체(E1) 또는 (F1)에 제대로 끼워져 올바르게 위치해 있는지 확인하십시오
(그림1). 끼워진 상태에서 씰의 주름 부분이 보이고 ▪ 씰이 휘지 않고 평평해야 합니다(그
림1).
재료를 용기 (E4) 또는 (F4)에 넣습니다.
칼날몸체 (E1) 또는 (F1)의 칼날을 아래로 향하게, 칼날 분리 버튼 (“클릭”버튼) (E2) 또는
(F2)가 사용자를 향하게 잡고, 용기 위치 받침 홀 (E3) 또는 (F3)이 용기 (E4) 또는 (F4)의
목 부분에 위치하도록 합니다
칼날 분리 버튼 (“클릭”버튼)(E2) 또는 (F2)누르고, 용기 (E4) 또는 (F4)를 다시 칼날몸체
(E1) 또는 (F1)에 위치시킨
단을 눌러 용기를 끼웁니다. 용기 (E4) 또는 (F4)와 칼날몸체 (E1) 또는 (F1)가 서로 잘 맞
게 끼워져 있는지 확인하십시오
부속 악세사리 (E)와 (F)가 오류 없이 제대로 조립되어 있는지 확인합니다:
칼날 분리 버튼 (“클릭”버튼) (E2 또는 F2)의 색은 용기(E4 또는F4) 아래 부분 색선의 색과
일치해야 합니다.
조립된 부속 악세사리 (E) 또는 (F)를 뒤집어 모터본체(A) 위에 조립합니다. 이 때 칼날 분
리 버튼 (“클릭”버튼) (E2) 또는 (F2)가 모터본체(A) 앞쪽의 눈금과 일직선이 되어야 합니
다. 블렌더가 작동하지 않는 경우, 부속품 (E) 또는 (F)가 모터본체(A) 안으로 충분히 들어
갔는지 확인하십시오
를 사용하면 단 몇 초 만에 파슬리, 양파, 마늘, 말린 살구, 고기(힘줄
를 사용하면 단 몇 초 만에 여러 가지 양념(고수 씨, 말린 후추)과 말
(그림 5b)
(그림6)
(그림 2b)
(그림 5a)
(그림 5c)
.
. 칼날분리버튼(D2)의 상단 부분을 눌러 용
60초 이상 계속 작동시키지 마십시오.
.
다음, 칼날 분리 버튼 (“클릭”버튼) (E2) 또는 (F2) 상
.
(그림 2c)
(그림 3)
.
. 블렌더가 작동하
13
KO
Page 16
플러그를 꽂습니다. 작동 중에는 손으로 용기 (E4) 또는 (F4)를 잡고 계십시오. 속도조절버
튼 (B) 또는 (C)를여러 번 누르거나 계속 누르고 계시면 됩니다
작동을 멈추려면 속도조절버튼 (B)나 (C)를 놓으면 됩니다. 제품의 플러그를 뽑습니다.
부속품 (E) 또는 (F)를 모터본체(A)에서 분리해, 부속품을 뒤집어 작업대 표면에 놓습니다.
칼날 분리 버튼 (“클릭”버튼) (E2) 또는 (F2)를 눌러 칼날 몸체(E1) 또는 (F1)을 분리 합니
다.
이제 내용물을 꺼내면됩니다.
매우 딱딱한 양념(정향, 계피 등)의 경우 용기를 변색시킬 수 있으므로 사용을 권장하지 않
습니다.
용기 (E4) 또는 (F4)위에 놓게 되어 있는 뚜껑(G)은 내용물이 건조 되는 것을 막아 주고, 냉
장고에 보관했다가 나중에 사용할 수 있게 해 줍니다.
재료 양(최대) 작동 시간 부속품
살구 40g 버튼 2를 4초 동안 누름 E
빵부스러기 러스크 1개
양파/샬롯 50g 버튼 1을 10회 누름 E
아몬드
껍질 벗긴 헤이즐넛
힘줄을 제거해 조각
낸 고기
파슬리 7-10g 버튼 2를 10회 누름 E
고수 씨 30 - 40g 버튼 2를 45초 동안 누름 F
커피 40 - 50g 버튼 2를 45초 동안 누름 F
70g 버튼 2를 10초 동안 누름 F
50-80g 버튼 2를 10회 누름 E
버튼 2를 10회 누른 다음, 버튼
2를 15초 동안 누름
(그림7)
.
E
세척하기
제품의 전원코드를 뽑고 모든 액세서리들을 분리해 주십시오.
주의: 칼날이 날카롭습니다. 칼날을 분리할 때나 세척할 때는 항상 주의하십시오.
용기를 모터본체에서 분리한 후, 용기를 흐르는 물에 헹궈주시고, 주변부속품도 같이 헹
궈주십시오.
칼날몸체(D1)는 칼날 분리 버튼 (“클릭”버튼) (D2)을 눌러
용기(D4)에서 분리할 수 있기 때문에 쉽게 세척이 가능합니다
용기(D)와 액세서리(E)및 (F)는 식기세척기의 상단 바구니에서 ‘간이세척’ 또는 ‘초간편세
척’으로 사용 가능합니다
모터본체(A)는 젖은 수건으로만 닦은 후, 물기가 내부로 스며들지 않도록 건조 시켜 주십
시오.
모터본체(A)를 흐르는 물에 절대 담그지 마십시오.
14
(그림 8a 8b 8c)
.
Page 17
제품이 작동하지 않을 때는?
문제 원인 해결방법
제품이 작동하지
않습니다.
제품 작동 시 심
한 진동이 있습
니다.
뚜껑을 통해 액
체가 새어 나옵
니다.
전원코드가 연결되어 있지 않습
니다.
용기 (D) 또는 부속악세사리 (E)
및 (F)가 모터본체 (A)와 제대로
조립되어 있지 않거나 잘못 끼워
져 있습니다.
제품이 평평한 표면에 놓여있지
않습니다.
재료를 너무 많이 넣었습니다. 재료의 양을 줄이십시오.
부속품 조립이 잘못되었습니다. 용기 (E4) (F4)의 해당 칼날 분리
재료를 너무 많이 넣었습니다. 재료의 양을 줄이십시오.
뚜껑에 새는 부분이 있습니다.. 뚜껑(D6)의 뚜껑 마개가 원위치
전원코드를 연결하여 주십시오.
용기나 부속 악세사리가 제대로
조립되어 있는지 확인합니다. 해
체한 다음 다시 조립해서
2.a, 2.b 및 2.c)
분히 깊이 들어가 있는지 확인합
니다.
작동 중에 부속품 뚜껑 (E) 또는
(F)를 눌러 줍니다.
제품을 평평한 표면에 놓아주십
시오.
버튼 (“클릭”버튼) (E2) (F2)와
맞게 조립되었는지 확인합니다.
용기의 선 색 표시가 일치해야
합니다.
에 있는지 확인 합니다. 뚜껑
(D6)을 용기(D)에 제대로 끼웁
니다. 뚜껑 마개가 뚜껑 홈에 맞
도록 제대로 조립 되어있는지 확
인 합니다.
KO
(그림
모터본체에 충
15
Page 18

문제 원인 해결방법
용기 밑부분을
통해 액체가 새
어 나옵니다.
칼날이 원활하게
작동하지 않습니
다.
제품이 여전히 작동하지 않습니까?
제품이 계속 작동하지 않을 경우 당사 서비스센터에 의뢰하십시오.
액세서리는 당사 서비스센터에서 구입할 수 있습니다.:
칼날몸체(D1)(E1)(F1)의
씰이 없거나 잘못 끼워져
있습니다.
칼날몸체(D1)(E1)(F1)가
용기(D4)(E4)(F4)에 충분
히 끼워지지 않았거나 잘못
끼워졌습니다.
재료가 너무 크거나 너무
단단합니다.
씰이 제자리에 제대로 끼워 있는지 확
인합니다. 씰의 주름 부분이 보이고
접히거나 휜 부분이 없어야 합니다
(그림1). 칼날이 날카롭기 때문에 칼
날몸체
(D1), (E1), (F1)
루어야 합니다
칼날분리버튼(“클릭”버튼)(D2)
2c)
을 눌러 칼날몸체와 용기가 서로 잘
끼워지도록 합니다.
재료의 크기나 양을 줄여 주십시오.
최대 양을 초과하지 않고
보울에 액체를 넣어 섞어 줍니다.
.
상단이나 버튼(E2)(F2)
재활용을 위한 분리수거
는 주의해서 다
(그림
(그림5c)
제품 및 제품 패키지는 재활용이 가능 합니다.
전자 제품의 수명
본 제품은 오랜 기간 사용이 가능 하지만 만약 제품을 폐기하실 경우에는 일반 쓰레기통
에 그냥 버리지 마시고 분리수거를 하십시오. 또는 폐기 관련 하여 궁금하신 사항이 있으
시면 당사 서비스센터에 문의하십시오.
제품은 환경에 전혀 무해한 성분으로 만들어 졌으며 모든 제품의 부품은 재
활용이 가능합니다.
이에 관련 상세한 사항은 당사 서비스센터에 문의 바랍니다.
환경을 생각합니다!
본 제품에는 재활용 할 수 있는 부품들이 있습니다.
수명이 끝난 제품을 폐기하실 때는 분리수거를 하십시오.
제품문의 080-733-7878
AS문의 1588-1588(전국 어디서나)
www.tefal.co.kr
16
Page 19

MIÊU TẢ
A Thân máy
B Nút bấm 2: tốc độ nhanh
C Nút bấm 1: tốc độ chậm
D Bình xay chính
D1 Khối chứa dao xay và gioăng cao su
D2 Nút mở khóa khối chứa dao xay
D3 Rãnh cố định bình xay
D4 Bình xay
D5 Gioăng làm kín nắp bình xay
D6 Nắp bình xay
D7 Mũ trên nắp bình xay để cho thêm hay
trộn thêm nguyên liệu
Phụ kiện đi kèm theo mẫu máy bạn mua được miêu tả trên bao bì đóng gói bên ngoài.
E Cối xay phụ dùng để xay rau gia vị
ày có kèm theo một sỗ mẫu máy)
n
E1 Khối chứa dao xay và gioăng cao su
E2 Nút mở khóa khối chứa dao xay
E3 Rãnh cố định chén xay
E4 Chén xay
F Cối xay phụ dùng để xay các loại gia vị khô
(*phụ kiện này có kèm theo một số mẫu máy)
F1 Khối chứa dao xay và gioăng cao su
F2 Nút mở khóa khối chứa dao xay
F3 Rãnh cố định chén xay
F4 Chén xay
G Nắp cho chén xay
(*phụ kiện
HƯỚNG DẪN AN TOÀN:
• Đọc kỹ hướng dẫn sử dụng trước khi dung máy lần đầu: Nhà sản xuất sẽ không chịu bất
cứ trách nhiệm nào trong trường hợp người dùng không tuân theo các hướng dẫn.
• Thiết bị gia dụng này không phù hợp với những người sử dụng (bao gồm cả trẻ em) bị
giảm khả năng về thể lực, giác quan hay trí tuệ, hoặc thiếu kinh nghiệm hay kiến thức,
trừ phi họ được hướng dẫn hay giám sát trong quá trình sử dụng bới một người khác chịu
trách nhiệm về sự an toàn của họ. Trẻ con phải được giám sát bởi người lớn để đảm bảo
chúng không dùng thiết bị này để chơi.
• Máy được thiết kế chỉ dùng với điện xoay chiều. Kiểm tra điện thế sử dụng hiển thị trên
nhãn ghi các thông số của máy để đảm bảo phù hợp với nguồn điện của bạn. Sử dụng
không đúng với thông số nguồn điện của máy sẽ làm mất hiệu lực bảo hành.
• Máy này nhằm cho mục đích sử dụng như một thiết bị gia dụng ở trong nhà. Không dùng thiết
bị này ngoài trời.
Nhà sản xuất sẽ không chấp nhận bất cứ trách nhiệm nào và bảo lưu quyền vô hiệu hóa bảo
hành nếu máy được sử dụng với mục đích thướng mại hay sử dụng không đúng cách và tuân
thủ theo các hướng dẫn.
• Luôn luôn rút phích cắm điện thiết bị ngay sau khi sử dụng, hay trong trường hợp bị mất điện
khi đang sử dụng hay mỗi khi bạn vệ sinh máy.
• Không nên sử dụng máy nếu bạn nhận thấy máy hoạt động bất thường, hoặc nếu dây điện
hay phích điện có dấu hiệu bị hư hại. Để tránh mọi nguy hiểm hãy đến các trung tâm dịch vụ
được ủy quyển để thay phụ tùng bị hỏng (xem danh sách trong cuốn sổ bảo hành).
• Mọi can thiệp vào máy ngoại trừ vệ sinh và và những bảo dưỡng thông thường bời người dùng
phải được thực hiện bởi trung tâm dịch vụ được ủy quyền.
• Vì sự an toàn của chính bạn, chỉ nên dùng phụ kiện vật tư thay thế cung cấp bởi những trung
tâm dịch vụ ủy quyền này.
Cảnh báo: Trung tâm sẽ không bán phụ tùng cho bạn nếu bạn không xuất trình được hướng
dẫn sử dụng của máy, hay máy bạn đã mua.
• Không được ngâm hoặc nhúng thiết bị, dây điện hay phích điện của máy vào bất cứ chất lỏng
nào.
17
VI
Page 20

• Dây điện phải để xa tầm với của trẻ em, không để gần hoặc chạm vào những chỗ nóng trên máy,
gần nguồn nhiệt hay đè lên các cạnh sắc nhọn.
• Không được cho các bộ phận của máy có thanh phần kim loại vào lò vi sóng.
• Phải cẩn trọng khi sử dụng các lưỡi dao sắc của cối xay bao gồm bộ phận dao xay của
bình xay chính (D1), của cối xay phụ dùng để xay rau gia vị (E1), cối xay phụ dùng để
xay gia vị khô (F1), hay khi vệ sinh bình xay: Những dao xay này rất sắc.
• Khi máy đang chạy không bao giờ được chạm vào các bộ phận chuyển động của máy, đợi
đến khi máy xay và các bộ phận hoàn toàn bất động trước khi chạm vào hay tháo rời các
bộ phận này ra.
• Không được cho các dụng cụ bếp như (thìa, cây trộn thức ăn v.v) vào trong bình xay (D)
khi máy đang hoạt động.
• Tránh để tóc dài, khăn choàng cổ, v.v… ở bên trên gần với máy khi máy xay đang chạy.
• Tránh chạy máy khi bình xay không có nguyên liệu gì bên trong, hay thứ cần xay chỉ là các sản
phẩm khô hay rắn không có nước (ví dụ như đường cục) hay khi nắp bình xay (D6) và gioăng
của nó (D5) không được lắp trên bình xay (D).
Cảnh báo: Không được đổ hay trộn chất lỏng và các nguyên liệu ở nhiệt độ lớn hơn
•
60° C (140°F). Nếu bạn phải trộn nguyên liệu nóng, đặt tay bạn xa khỏi nắp bình xay
(D6)
và mũ trên nắp bình xay
• Không dùng bình xay làm hộp chứa thực phẩm (với mục đích trữ đông, đun nấu hay tiệt trùng)
• Không bấm nút để chạy mô tơ liên tục quá 1 phút.
• Vì sự an toàn của bạn, thiết bị gia dụng này tuân thủ với các tiêu chuẩn và quy định sau:
- Chỉ thị về điện áp thấp
- Tương thích điện từ
- Môi trường
- Vật liệu tiếp xúc với thực phẩm
• Đặt máy trên mặt phẳng chắc chắn, cách nhiệt.
• Không được sử dụng máy để xay hay trộn nguyên liệu không phải là thực phẩm.
(D7)
để tránh bị phỏng.
HỆ THỐNG KHÓA AN TOÀN
Máy xay sẽ không hoạt động nếu bình xay (D) hay chén xay (E)hoặc (F) không được lắp vào và
khóa đúng vị trí trên thân máy (A).
Chén xay (E4) (F4) được đánh dấu bằng đường kẻ mầu ở phần đáy của chén xay và chúng phải
được lắp vào đúng khối chứa dao xay mà trên đó có nút mớ khóa (E2)(F2) cùng mầu.
Bình xay (D4) không được đánh dấu bằng đường kẻ mầu nào cả, nó cần được lắp với khối chứa
dao xay có nút mở khóa mầu vàng (D2).
LƯU Ý TRƯỚC KHI SỬ DỤNG LẦN ĐẦU
Trước khi sử dụng lần đầu, rửa tất cả các bộ phận của máy (D, E, F, G) bằng nước có pha xà
phòng trừ bộ phận thân máy (A).
CẢNH BÁO: Lưỡi dao xay rất sắc, hãy cẩn trọng khi chạm vào nó khi sử dụng, vệ sinh hay làm
sạch bình xay.
Gở bỏ tất cả vật liệu là phần bao bì dùng để đóng gói thiết bị trước khi sử dụng máy xay.
QUAN TRỌNG:
cách không bấm vào nút bấm (B)và (C) trên thân máy Không chạy máy nếu nắp bình xay (D6)
18
Đảm bảo rằng mô tô quay trong thân máy hoàn toàn không chuyển động bằng
Page 21

và gioăng của nó (D5) không được lắp trên bình xay (D).
SỬ DỤNG MÁY
Đảm bảo rằng gioăng cao su được lắp vào đúng vị trí trên bộ phận lưỡi dao xay (D1): Có
thể nhìn thấy được các đường gân trên gioăng và gioăng cao su phải nằm ngang phẳng
trên bề mặt, không bị cong vênh(hình 1).
Với nút mở khóa (D2) trên khối chứa dao xay (D1)quay về phía bạn, lắp bình xay (D4) vào rãnh
cố định (D3)
tới khi chúng khóa lại với nhau, Ấn vào mép phía trên của nút mở khóa (D2) để đóng bình xay
(D4) và khối chứa dao xay (D1) vào với nhau đúng cách
Cho nguyên liệu xay vào trong bình xay chú ý không để vượt quá mức tối
Không được đổ hay trộn dung dịch và các nguyên liệu ở nhiệt độ lớn hơn 60° C (140°F) vào
trong bình xay.
Lắp gioăng của nắp bình xay (D5) xung quanh nắp bình xay (D6) đặt cụm nắp đã lắp gioăng
này lên bình xay (D4), khóa mũ trên nắp của bình xay (D7).
Đặt khối bình xay đã lắp hoàn chỉnh (D) lên trên thân máy (A) với nút mở khóa (D2) thẳng
hàng với mấu lõm chữ U trên thân máy (A)
sâu trên thân máy (A) nếu không máy xay sẽ không hoạt động
Cắm điện máy xay và bấm vào nút 1(C) hoặc 2(B), tùy vào tốc độ mong muốn, bấm nút theo
kiểu từng lần ngăt quãng rồi thả ra hoặc giữ nguyên nút nếu muốn máy chạy liên tục.
nên giữ tay trên nút để mô tô quay liên tục quá 60 giây.
Để dừng máy, thả tay khỏi nút bấm (B) hoặc (C). Tháo phích cắm điện của máy.
Tháo bình xay (D) khỏi thân máy (A).
Những cối xay phụ này được thiết kế với chén xay kín không có nắp nên không có thể chạm vào
dao xay từ bên ngoài khi máy đang chạy.
Đảm bảo chắc chắn rằng gioăng cao su được lắp vào đúng vị trí trên khối chứa lưỡi dao xay
(E1) hoặc (F1), có thể nhìn thấy được các đường gân trên gioăng và gioăng cao su phải nằm
ngang, phẳng, không được cong vênh (hình1).
Cho nguyên liệu vào trong chén xay (E4) hoặc (F4).
Đặt khối chứa dao xay (E1) hoặc (F1), với dao xay hướng xuống dưới, và nút mở khóa (E2) hoặc
(F2) quay về phía bạn, khớp rãnh cố định (E3) hoặc (F3) vào trong cổ chén xay (E4) hoặc (F4)
(hình 5a)
Nhấn nút mở khóa (E2)hoặc (F2), đẩy chén xay (E4)hoặc (F4) vào trong khối chứa dao xay (E1)
hoặc (F1)
hoặc (F2).
(E1) hoặc
Kiểm tra lại chắc chắn việc lắp ráp cối xay phụ (E) và (F) không có sơ sót nào:
Mầu sắc của nút mở khóa (E2 hoặc F2) phải giống đường kẻ mầu hiển thị ở đáy của chén xay (E4
(hình 2a)
sau đó đẩy khối chứa dao xay (D1) về phía sau hướng vào bình xay cho
(hình 2c)
.
đa cho phép hiện thị trên bình là 0.6 L đối với dung dịch đặc
và 0.5 L đối với chất lỏng
(hình 3)
, bình xay (D) cần được ấn xuống vị trí đủ
(hình4)
.
Cối xay phụ dùng cho xay rau gia vị (E) giúp bạn, chỉ trong vài giây, xay nhuyễn
nguyên liệu như: ngò tây, hành tây, tỏi, mơ khô, thịt (không có gân và phải được cắt
thành miếng nhỏ), hay giúp bạn chế biến vụn bánh mỳ (từ lát bánh mỳ cứng, v.v).
Không được dùng cối xay phụ này để xay trộn dung dịch lỏng (nước hoa quả).
Cối xay phụ dùng cho gia vị khô (F) giúp bạn, chỉ trong vài giây, nghiền các gia vị
khô thành bột (hạt ngò, hạt tiêu) và các loại lá gia vị khô khác (bạc hà).
.
(hình 5b)
và khóa nó vào chén xay bằng cách ấn vào mép trên của nút mở khóa (E2)
Hãy đảm bảo chắc chắn rằng chén xay
(F1)
được lắp khít với nhau (hình 5c).
(E4)
hoặc
(F4)
cùng với khối chứa dao xay
Không
19
VI
Page 22

hoặc F4) Lật ngược lại, và đặt cối xay phụ đã lắp ráp hoàn chỉnh này (E) (F) lên trên thân máy
(A), chỉnh sao cho nút mở khóa (E)hoặc (F) thẳng hàng với mấu lõm chữ U trên thân máy (A),
cối xay phụ cần được lắp xuống đủ sâu trên thân máy (A) nếu không máy xay sẽ không hoạt
động
(hình6)
Cắm phích điện của máy. Dùng tay bạn giữ chặt chén xay (E4) hoặc (F4) xuống trong khi máy
chạy, ấn nút (B) hoặc (C) theo kiểu từng lần ngắt quãng rồi thả ra hay là giữ nút liên tục
Để dừng máy, thả tay khỏi nút bấm (B) hoặc (C). Tháo phích cắm điện của máy.
Tháo cối xay phụ (E) hoặc (F) khỏi thân máy (A), lật ngược cối xay phụ đặt lên mặt phẳng và
tháo khối chứa dao xay (E1) hoặc (F1) bằng cách bấm vào nút mở khóa (E2) hoặc (F2).
Sau đó bạn có thể lấy nguyên liệu vừa được xay ra.
Việc trộn xay một số gia vị khô cứng (hành khô, quế, v.v) không được khuyến khích vì chúng có
thể sẽ làm đổi mầu chén xay.
Nắp cho chén xay (G) dùng để đậy chén xay (E4) hoặc (F4) nhằm tránh cho nguyên liệu sau
khi xay bị khô và cho phép chúng có thể được trữ trong tủ mát để dùng cho lần sau.
Nguyên Liệu Số lượng (max) Thời gian xay Cối xay
Mơ 40g 4 giây nhấn liên tục nút 2 E
Vụn bánh mỳ
Hành tây/hành ta 50g Nhấn và thả nút 1 10 lần E
Hạnh nhân
Hạt phỉ có vỏ
Thịt được cắt thành
miếng nhỏ bỏ gân
Ngò tây 7-10g Nhấn và thả nút 2 10 lần E
Hạt rau ngò 30 to 40g
Cà phê hạt 40 to 50g
.
(hình7)
1 lát bánh mỳ
cứng
70g
50-80g
Nhấn và thả nút 2 10 lần
và 15 giây nhấn liên tục
nút 2
10 secs with
button 2 held down
10 giây nhấn liên tục nút
2
45 giây nhấn liên tục nút
2
45 giây nhấn liên tục nút
2
E
F
E
F
F
.
VỆ SINH MÁY
Rút phích cắm điện của máy và tháo bình xay hay chén xay ra.
Hãy thao tác cần thận với chúng vì dao xay rất sắc.
Rửa bình xay và nắp ngay sau khi sử dụng bằng nước vòi cùng với các bộ phận có thể tháo rời
khác với nước xà phòng ấm.
Việc vệ sinh máy trở nên dê dàng hơn, vì khối chứa dao xay (D1) có thể được tách ra khỏi bình
xay (D4) bằng cách bấm vào nút mở khóa (D2)
20
(hình 8a 8b 8c)
.
Page 23

Bình xay (D) cối xay phụ (E) và (F) có thể được đặt trong rổ cao nhất của máy rửa chén chạy
chương trình "ECO" hoặc "LIGHT WASH" của máy rửa chén để rửa
Để vệ sinh thân máy có chứa mô tơ (A), sử dụng khăn ẩm lau và sau đó phải làm khô nó một
cách cẩn thận.
Không bao giờ vệ sinh thân máy (A) trong nước.
LÀM GÌ NẾU MÁY XAY CỦA BẠN KHÔNG HOẠT ĐỘNG
Vấn đề Nguyên nhân Giải pháp
Máy xay không
hoạt động.
Rung bất thường. Máy xay không được đặt trên một
Rò rỉ qua nắp. Thể tích nguyên liệu xay quá
Không cắm phích điện. Cắm phích cắm điện của máy vào
Bình xay (D) hay cối xay phụ (E)
và (F) không được lắp đúng cách
hoặc đặt đúng vị trí trên thân máy
(A).
mặt phẳng.
Thể tích nguyên liệu xay quá
nhiều.
Lắp ráp cối xay phụ không chuẩn
xác.
nhiều.
Nắp bị hở. Kiểm tra gioăng của nắp bình xay
ổ có nguồn tương thích.
Kiểm tra bình xay và cối xay phụ
đã được lắp đúng cách chưa; tháo
chúng ra và lắp lại lần nữa
2.a, 2.b and 2.c)
được ấn vào đủ sâu trên thân máy.
Giữ chặt chén xay (E) hoặc (F)
xuống trong quá trình hoạt động.
Đặt máy xay trên mặt phẳng khi
hoạt động.
Giảm khối lượng nguyên liệu xay
xuống.
Kiểm tra nếu chén xay (E4) (F4)
được lắp ráp một cách chính xác
với khối chứa dao xay (E2) (F2)
tương ứng, mầu sắc đánh dấu
tương thích phải giống nhau.
Giảm khối lượng nguyên liệu xay
xuống.
(D5) có nằm đúng vị trí trên nắp
bình xay (D6). Đặt nắp bình xay
(D6) đúng vị trí trên bình xay (D).
Khóa mũ của nắp bình xay (D7).
và kiểm tra chúng
VI
(Hình
21
Page 24

Vấn đề Nguyên nhân Giải pháp
Rò rỉ từ bình xay
hay cối xay phụ
Dao xay quay khó
khăn
Máy của bạn vẫn không hoạt động?
Liên hệ trung tâm dịch vụ khách hàng (xem danh sách và thông tin để liên lạc với các trung tâm
này trong cuốn sổ bảo hành).
Không đặt hoặc đặt
không đúng gioăng cao
su vào trong khối chứa
dao xay (D1)(E1)(F1).
Khối chứa dao xay
(D1)(E1)(F1)
(D4)(E4)(F4).
Các miếng nguyên liệu
cần xay quá cứng hay
quá to
Đảm bảo chắc chắn rằng gioăng cao su
được đặt đúng vị trí, những nếp trên gioăng
phải quan sát được và gioăng không được
cong vênh
xay
dao xay rất sắc.
Đảm bảo chắc chắn rằng khối chứa dao xay
và bình xay được lắp với nhau đúng cách,
được đóng khóa với bình xay bằng việc
nhấn phần trên của nút mở khóa vào
(D2)
đối với (E2)(F2)
Giảm kích cỡ hay khối lượng của nguyên
liệu
Cho dung dịch vào bình xay trộn đảm bảo
tổng thể không vượt quá mức nước tối đa
(hình1). Sử dụng khối chứa dao
(D1), (E1), (F1)
(hình2c)
một cách cẩn thận vì
hoặc nhấn vào nút mở khóa
(hình5c)
THẢI BỎ & TÁI CHẾ
Thải bỏ các vật liệu đóng gói và bộ phận của máy
Các vật liệu đóng gói toàn bộ đều làm từ chất liệu không nguy hiểm đến môi
trường, chúng có thể được thải bỏ phù hợp với quy định rác thải hiện hành.
Đối với thải bỏ máy, hãy tham khảo với cơ quan chuyên trách địa phương.
Thiết bị gia dụng điện hết tuổi thọ:
Thiết bị này được thiết kế sử dụng lâu năm. Tuy nhiên, nếu ngày nào đó bạn có kế hoạch thay
thế nó, đừng vứt nó vào thùng giác dân sinh thông thường hay vứt vào bãi rác chôn chất thải
rắn hãy mang nó đến một điểm thu hồi sản phẩm thích hợp
Bảo vệ môi trường được đặt lên hàng đầu!
Thiết bị này có rất nhiều vật liệu có thể thu hồi và tái chế,
Mang nó đến một điểm thu hồi sản phẩm thích hợp hoặc một trung tâm dịch
vụ ủy quyển.
22
Page 25

KETERANGAN
A Unit motor
B Butang 2: kelajuan pantas
C Butang 1: kelajuan perlahan
D Pemasang mangkuk pengisar
D1 Unit mata pisau dengan pengedap
D2 Butang pembuka kunci unit mata pisau
D3 Ulir penempat
D4 Mangkuk pengisar
D5 Pengedap penutup
D6 Penutup
D7 Tutup
Aksesori yang terkandung dalam model yang baru sahaja anda beli ditunjukkan pada pembungkus.
E Pengisar herba
E1 Unit mata pisau dengan pengedap
E2 Butang pembuka kunci unit mata pisau
E3 Ulir penempat
E4 Mangkuk
F Pengisar rempah
F1 Unit mata pisau dengan pengedap
F2 Butang pembuka kunci unit mata pisau
F3 Ulir penempat
F4 Mangkuk
G Penutup untuk aksesori
*aksesori bergantung pada model)
(
(*aksesori bergantung pada model)
ARAHAN KESELAMATAN:
•
Baca arahan penggunaan dengan teliti sebelum menggunakan peralatan anda buat
pertama kali: pengilang tidak akan menanggung sebarang liabiliti sekiranya ia
digunakan secara tidak mematuhi arahan.
•
Peralatan ini bukan untuk digunakan oleh orang (termasuk kanak-kanak) yang
mempunyai kekurangan upaya fizikal, deria atau mental, atau yang tidak memiliki
pengetahuan atau pengalaman secukupnya, kecuali orang yang bertanggungjawab ke
atas keselamatan mereka boleh mengawasi dan memberikan arahan mengenai
penggunaan peralatan ini. Kanak-kanak patut diawasi bagi memastikan mereka tidak
bermain dengan peralatan.
•
Ia direka agar berfungsi dengan arus ulang-alik sahaja. Pastikan bahawa voltan bekalan
yang ditunjukkan di plat perkadaran pada peralatan sepadan dengan pemasangan
eletrik anda. Sebarang ralat penyambungan akan membatalkan jaminan.
• Peralatan ini dibuat khusus bagi penggunaan domestik di dalam rumah. Jangan menggunakan
peralatan anda di luar rumah.
• Pengilang tidak akan menanggung sebarang liabiliti dan berhak untuk membatalkan jaminan
sekiranya ia digunakan secara komersil atau secara tidak wajar atau gagal mematuhi arahan.
• Sentiasa cabut palam peralatan sebaik sahaja anda selesai menggunakannya, sekiranya bekalan
eletrik terpotong dan ketika anda mencucinya.
• Jangan menarik wayar untuk mencabut palam peralatan.
• Jangan menggunakan peralatan anda jika ia tidak berfungsi dengan betul, jika ia rosak atau jika
kabel kuasa atau palam rosak. Untuk mengelakkan sebarang bahaya, wayar patut ditukar oleh
pusat perkhidmatan yang diluluskan (lihat senarai dalam buku kecil jaminan).
• Sebarang campur tangan, selain daripada pencucian dan penyenggaraan biasa oleh pelanggan,
mestilah dikendalikan oleh pusat perkhidmatan yang diluluskan.
• Untuk keselamatan anda, gunakan hanya aksesori dan alat ganti yang dibekalkan oleh pusat
perkhidmatan kami yang diluluskan.
Amaran: aksesori tidak boleh dijual kepada anda tanpa menunjukkan manual arahan anda atau
peralatan anda.
• Jangan merendam peralatan, kabel kuasa atau palam dalam sebarang cecair.
MS
23
Page 26

• Jangan sesekali meletakkan kord kuasa di tempat yang boleh dicapai oleh kanak-kanak, berdekatan
atau bersentuhan dengan bahagian peralatan anda yang panas, berdekatan sumber haba atau pada
sisi yang tajam.
• Jangan meletakkan aksesori yang mengandungi logam ke dalam ketuhar gelombang mikro.
• Langkah berjaga-jaga patut diambil apabila mengendalikan mata pisau tajam pada unit
mata pisau mangkuk pengisar (D1), pemasang mata pisau pengisar herba (E1) dan
pemasang mata pisau pengisar rempah (F1) ketika mengosongkan mangkuk dan
mencucinya: ia amat tajam.
• Jangan sesekali menyentuh bahagian yang sedang bergerak sewaktu peralatan sedang
beroperasi, tunggu sehingga peralatan dan aksesori berhenti sepenuhnya sebelum
menyentuh bahagian atau menanggalkan aksesori-aksesori ini.
• Jangan memasukkan perkakas dapur (sudu, sudip, dsb.) ke dalam mangkuk (D) sewaktu ia
sedang beroperasi.
• Jangan membiarkan rambut yang panjang, skarf, dsb. terjuntai di atas peralatan atau aksesori
sewaktu ia sedang beroperasi.
• Jangan menggunakan mangkuk pengisar tanpa ramuan, hanya dengan produk kering atau keras
sahaja (seperti kiub gula) atau jika penutup (D6) dengan pengedapnya (D5) tidak dipasang
pada mangkuk.
Amaran: Jangan memasukkan atau mencampurkan cecair atau ramuan yang mempunyai
•
suhu melebihi daripada 60° C (140°F). Jika anda perlu mencampurkan ramuan yang
panas, jarakkan tangan anda daripada penutup (D6) dan penyuap (D7) untuk
mengelakkan sebarang risiko melecur.
• Sentiasa memasukkan ramuan cecair ke dalam mangkuk pengisar terlebih dahulu sebelum
menambahkan ramuan pepejal, tanpa melebihi paras yang ditunjukkan.
• Jangan menggunakan mangkuk sebagai bekas (untuk menyejuk beku, memasak atau mensteril).
• Jangan menggunakan peralatan anda melebihi 1 minit tanpa henti.
• Untuk keselamatan anda, peralatan ini mematuhi Standards dan Peraturan yang terpakai:
- Arahan Voltan Rendah
- Keserasian Elektromagnetik
- Alam sekitar
- Bahan yang bersentuh dengan barang makanan
• Letakkan peralatan di atas permukaan kerja yang stabil dan tahan haba.
• Jangan sesekali menggunakan peralatan untuk mengadun atau membancuh ramuan bukan
makanan.
SISTEM PENGUNCI KESELAMATAN
Peralatan tidak boleh digunakan jika pemasang mangkuk pengisar (D) atau aksesori (E) atau (F)
tidak dipasang dan diletakkan dengan betul pada unit motor (A).
Mangkuk (E4) (F4) ditandakan dengan garis berwarna pada tapaknya dan patut dipasang dengan
unit mata pisau yang butang pelepasnya (E2) (F2) daripada warna yang sama.
Mangkuk pengisar (D4) tidak ditandakan dengan warna, ia patut dipasang dengan unit mata pisau
yang mempunyai butang pelepas kuning (D2).
SEBELUM MENGGUNAKAN BUAT PERTAMA KALI
Sebelum menggunakan buat pertama kali, cuci semua aksesori (D,E,F,G) dengan air bersabun yang
suam tetapi jangan cuci unit motor (A).
24
Page 27

AMARAN: Mata pisau pemotong adalah amat tajam, kendalikannya secara berhati-hati semasa
mengguna, mencuci atau mengosongkan mangkuk.
Pastikan semua pembungkus telah dibuang sebelum menggunakan peralatan.
Penting: Pastikan unit motor telah berhenti sepenuhnya, dengan butang (B) dan (C)
dilepaskan sebelum memasang pemasang pengisar atau aksesori pada unit motor.
Jangan menggunakan peralatan jika penutup (D6) yang dilengkapi dengan pengedap (D5) tidak
diletakkan pada mangkuk yang dipasang.
MENGGUNAKAN PERALATAN ANDA
Pastikan pengedap dipasang dan diletakkan dengan betul pada unit mata pisau (D1):
lipatan pengedap patut boleh dilihat apabila ia dipasang dan pengedap sepatutnya rata, ia
tidak sepatutnya dikancingkan (gambarajah1).
Dengan butang “klik” (D2) unit mata pisau (D1) mengadap anda, letakkan dasar mangkuk (D4)
pada alur (D3) (gambarajah2) dan kemudian pusing unit mata pisau (D1) ke arah mangkuk
(gambarajah2b) sehingga ia terkunci, tekan bahagian atas butang klik (D2) bagi memastikan
mangkuk (D4) dan unit mata pisau (D1) telah dipasang dengan betul (gambarajah 2c).
Masukkan ramuan ke dalam mangkuk tanpa melebihi paras maksimum
yang 0.6L ditunjukkan untuk penyediaan pekat
dan 0.5L untuk penyediaan cecair
Jangan memasukkan cecair atau ramuan yang suhunya melebihi 60° C (140°F) ke dalam
mangkuk pengisar.
Pasangan pengedap penutup (D5) di sekeliling penutup (D6) dan letakkan pemasang pada
mangkuk (D4), kunci butang (D7) pada rerumah yang terletak di atas penutup.
Pasang mangkuk terpasang (D) kepada unit motor (A) dengan butang klik (D2) unit mata pisau
selari dengan takuk yang terletak di depan unit motor (A) (gambarajah3), mangkuk (D) patut
dimasukkan secukupnya ke dalam unit motor (A), jika tidak peralatan tidak akan berfungsi
(gambarajah4).
Pasangkan palam peralatan dan tekan butang 1 (C) atau 2 (B), bergantung kepada kelajuan yang
dikehendaki, tekan beberapa kali atau tekan butang dengan lama bagi penggunaan berterusan.
Jangan menggunakannya secara berterusan selama 60 saat.
Untuk memberhentikan peralatan, lepaskan butang (B) atau (C). Cabut palam peralatan.
Keluarkan mangkuk (D) daripada unit motor (A).
Pengisar herba (E) membolehkan anda, dalam hanya beberapa saat, untuk mencencang
ramuan seperti: parsli, bawang, bawang putih, aprikot kering, daging (tanpa urat dan
dipotong kecil), untuk membuat serbuk roti (roti rapuh, dsb.).
Jangan menggunakan pengisar herba untuk penyediaan cecair (jus buah).
Pengisar rempah (F) membolehkan anda, dalam hanya beberapa saat, untuk mengisar
rempah menjadi serbuk (biji ketumbar, lada biji) dan daun kering pokok beraroma
(pudina).
Aksesori-aksesori ini didatangkan bersama mangkuk yang menghalang capaian kepada mata pisau
semasa ia sedang digunakan.
Pastikan pengedap dipasang dan diletakkan dengan betul pada unit mata pisau (E1) atau (F1)
(gambarajah1), lipatan pengedap patut boleh dilihat apabila ia dipasang dan pengedap
sepatutnya rata, ia tidak sepatutnya dikancingkan (gambarajah1).
Masukkan ramuan ke dalam mangkuk (E4) atau (F4).
MS
25
Page 28

Ambil unit mata pisau (E1) atau (F1), dengan mata pisau dihadapkan ke bawah, dengan butang
“klik” (E2) atau (F2) mengadap anda, letakkan alur (E3) atau (F3) pada leher mangkuk (E4) atau
(F4) (gambarajah 5a).
Tekan butang “klik” (E2) atau (F2), pusing mangkuk (E4) atau (F4) ke arah unit mata pisau (E1)
atau (F1) (gambarajah 5b) dan klipkannya pada mangkuk dengan menekan pada atas butang klik
(E2) atau (F2). Pastikan mangkuk (E4) atau (F4) dan unit mata pisau (E1) atau (F1) dipasang
bersama (gambarajah 5c).
Pastikan tidak terdapat sebarang kesilapan dalam pemasangan aksesori (E) dan (F):
warna butang klik (E2 atau F2) patut sepadan dengan warna garis pada dasar mangkuk (E4 atau
F4)
Terbalikkan aksesori anda, letakkan aksesori terpasang (E) atau (F) pada unit motor (A),
menyelarikan butang klik (E2) atau (F2) dengan takuk di depan unit motor (A), aksesori (E) atau
(F) patut dimasukkan secukupnya ke dalam unit motor (A), jika tidak peralatan tidak akan
berfungsi (gambarajah6).
Pasangkan palam peralatan. Sokong mangkuk (E4) atau (F4) dengan tangan anda semasa operasi,
tekan butang (B) atau (C) beberapa kali atau secara berterusan (gambarajah7).
Untuk memberhentikan peralatan, lepaskan butang (B) atau (C). Cabut palam peralatan.
Keluarkan aksesori (E) atau (F) daripada unit motor (A), terbalikkan aksesori di atas permukaan
kerja dan lepaskan unit mata pisau (E1) atau (F1) dengan menekan butang “klik” (E2) atau (F2).
Selepas itu anda boleh mengeluarkan penyediaan anda.
Campuran beberapa rempah yang keras (bunga cengkih, kayu manis, dsb.) tidak digalakkan kerana
ia boleh menyebabkan warnanya melekat pada mangkuk
Penutup (G) yang patut diletakkan pada mangkuk (E4) atau (F4) mengelakkan penyediaan
daripada mengering dan membolehkannya disimpan di dalam peti sejuk untuk digunakan kemudian.
Ramuan
Aprikot 40g
Serbuk roti 1 roti rapuh
Bawang/bawang merah 50g Tekan butang 1 sepuluh kali E
Badam
Kacang hazel berkulit
Kepingan daging dengan
uratnya dibuang
Parsli 7-10g Tekan butang 2 sepuluh kali E
Biji ketumbar 30 ke 40g
kopi 40 ke 50g
Kuantiti
(maksimum)
70g
50-80g Tekan butang 2 sepuluh kali E
Masa pengendalian Aksesori
4 saat dengan menekan
butang 2 secara berterusan
Tekan butang 2 sepuluh kali
dan 15 saat dengan menekan
butang 2 secara berterusan
10 saat dengan menekan
butang 2 secara berterusan
45 saat dengan menekan
butang 2 secara berterusan
45 saat dengan menekan
butang 2 secara berterusan
E
E
F
F
F
26
Page 29

MENCUCI PERALATAN ANDA
Cabut palam peralatan dan keluarkan mangkuk atau aksesori.
Kendalikannya dengan berhati-hati kerana pisau dan mata pisau aksesori adalah tajam.
Bilas mangkuk dan penutup sebaik sahaja selesai menggunakan di bawah air yang mengalir dan
juga serta bahagian-bahagian yang boleh dibuka dengan air sabun suam.
Untuk memudahkan cucian, unit mata pisau (D1) boleh ditanggalkan daripada mangkuk (D4) den-
gan menekan butang klik (D2) (gambarajah 8a 8b 8c).
Mangkuk (D), aksesori (E) dan (F) boleh dibasuh dengan meletakkannya di bakul mesin pembasuh
pinggan mangkuk dengan menggunakan program "ECO" atau "LIGHT WASH".
Untuk membersihkan unit motor (A), gunakan kain lembab dan keringkannya dengan teliti.
Jangan sesekali meletakkan unit motor (A) di bawah air yang mengalir.
APA YANG PERLU DILAKUKAN JIKA PERALATAN ANDA
TIDAK BERFUNGSI
Masalah Penyebab Penyelesaian
Peralatan tidak
berfungsi.
Getaran
melampau.
Kebocoran melalui
penutup.
Palamnya tidak dipasang. Pasang palam peralatan menggunakan
Mangkuk (D) atau aksesori
(E) dan (F) tidak dipasang
dan diletakkan dengan betul
pada unit motor (A).
Peralatan tidak diletakkan di
atas permukaan yang rata.
Jumlah ramuan terlampau
banyak.
Kesilapan pemasangan
aksesori.
Jumlah ramuan terlampau
banyak.
Penutup tidak ditutup rapat. Pastikan bahawa pengedap diletakkan
palam dengan voltan yang sama.
Pastikan bahawa mangkuk atau aksesori
dipasang dengan betul; buka dan pasang
semula (Gambarajah 2.1,1.b dan 2.c)
dan pastikan ia dimasukkan sedalamnya
ke unit motor.
Kekalkan tekanan pada penutup aksesori
(E) atau (F) semasa penggunaan
Letakkan peralatan di atas permukaan
yang rata.
Kurangkan kuantiti ramuan yang diproses.
Pastikan bahawa mangkuk (E4) (F4)
dipasang dengan betul dengan unit mata
pisau (E2) (F2) yang dikaitkan dengannya,
penanda berwarna mestilah sama.
Kurangkan kuantiti ramuan yang diproses.
(D5) pada penutup (D6). Letakkan
penutup (D6) denagn betul pada mangkuk
(D). Kunci butang (D7).
MS
27
Page 30

Masalah Penyebab Penyelesaian
Kebocoran daripada mangkuk
atau aksesori
Pisau sukar berpusing
Adakah peralatan anda masih belum berfungsi?
Hubungi perkhidmatan pelanggan (lihat butiran untuk menghubungi pada buku kecil jaminan).
Pengedap tiada atau tidak
diletakkan dengan betul pada
unit mata pisau (D1)(E1)(F1).
unit mata pisau (D1)(E1)(F1)
tidak dikunci secukupnya atau
tidak dikunci dengan betul
pada mangkuk (D4)(E4)(F4).
Kepingan makanan terlampau
besar atau terlampau keras
Pastikan bahawa pengedap diletakkan
dengan betul, bibir pengedap boleh
dilihat dan tidak dikancing
(gambarajah1). Kendalikan unit mata
pisau (D1), (E1), (F1)
Pastikan unit mata pisau dan mangkuk
dipasang bersama dengan betul dengan
menekan bahagian atas butang
(D2)(gambarajah2c) atau pada
butang (E2)(F2)(gambarajah5c)
Kecilkan saiz atau kurangkan kuantiti
ramuan yang diproses.
Tambah cecair ke dalam mangkuk
bancuh tanpa melepasi paras
maksimum.
KITAR SEMULA
Menghapuskan bahan-bahan pembungkusan dan peralatan.
Peralatan elektronik atau elektrikal yang tamat tempoh:
Peralatan anda direka agar boleh digunakan untuk tempoh yang lama. Walau bagaimanapun, apabila
anda menggantikannya, jangan membuangnya bersama-sama dengan sampah sarap isi rumah yang
biasa atau di tempat pembuangan sampah tetapi bawanya ke pusat pengumpulan yang sesuai.
Pembungkusnya mengandungi bahan-bahan yang tidak berbahaya kepada
persekitaran sepenuhnya, yang boleh dilupuskan mengikut peraturan kitar semula
yang berkuat kuasa.
Untuk melupuskan peralatan anda, tanya jabatan pihak berkuasa tempatan anda
yang berkenaan.
Utamakan perlindungan alam sekitar!
Peralatan anda mengandungi pelbagai bahan yang boleh ditebus guna atau
dikitar semula.
Bawanya ke pusat pengumpulan atau pusat perkhidmatan pelanggan yang
diluluskan untuk diproses.
28
Page 31

說明
A馬達座
B 按鈕2:快速
C 按鈕1:慢速
D攪拌壼組合
D1攪拌刀裝置連蓋
D2 攪拌刀裝置解鎖鈕
D3 定位環
D4 攪拌壼
D5 蓋封
D6 蓋
D7 塞
您剛購買的型號之配件已顯示在包裝標籤上。
E 香草研磨器 (*配件視乎型號)
E1 攪拌刀裝置連蓋
E2 攪拌刀裝置解鎖鈕
E3 定位環
E4 攪拌壼
F 香料研磨器 (*配件視乎型號)
F1 攪拌刀裝置連蓋
F2 攪拌刀裝置解鎖鈕
F3 定位環
F4 攪拌壼
G 配件蓋
安全事項:
第一次使用本產品之前請先仔細閱讀使用說明書。若您不遵照說明書使
•
用本產品,製造商不會承擔任何責任。
•
本產品並非供身體、感官或智力弱能者或缺乏有關經驗和知識的人(包括
兒童)使用,除非他們是在負責其安全的人士監督下使用或上述人士已就
本產品的使用給予指示。請監督兒童,以免其將本產品用作戲耍。
•
本產品的設計只適用於交流電。核對本產品說明標籤所註明的電壓是否
跟您家的電路相符。若有任何電路連接失誤,保用將會撤銷。
• 本產品只擬作戶內的家居用途,切勿在戶外使用本產品。
若您將本產品用作商業或不適當的用途或不遵照說明書的指示,製造商可以免
除一切責任,並且保留撤銷保用的權利。
• 每次使用後必須盡快拔掉插頭。停電或清潔攪拌器時亦須拔掉插頭。
• 切勿拉扯電源線來拔掉插頭。
• 若攪拌器操作不正常、攪拌器、電源線或插頭損毀,切勿使用。為免發生危
險,必須由認可服務中心更換電源線(認可服務中心名單請參閱保用冊)。
• 除清潔和一般保養可以由用戶進行外,任何干擾機件的程序均須由認可服務
中心進行。
• 為確保安全,只能使用認可服務中心供應的配件和零件。
警告: 購買本產品的任何配件時必需出示產品隨附的說明書或本產品。
切勿將攪拌器、電源線或插頭浸入液體中。
•
•
切勿將電源線放在兒童觸及的地方,亦不得放近或接觸攪拌器的發熱部
分、其他發熱源或尖角。
•
切勿將有金屬的配件放入微波爐。
ZH
29
Page 32

•
清倒攪拌壼和清潔攪拌刀裝置
置
(F1)
的尖銳攪拌刀時必須小心:因為刀邊十分銳利。
•
攪拌器操作時切勿觸摸活動部分,必須等攪拌器和配件完全停頓才可以
觸摸活動部分或移除配件。
•
攪拌器操作時切勿將任何廚具(例如匙或抹刀等等)放入攪拌壼
•
攪拌器操作時切勿讓長髮或圍巾等等懸垂在攪拌器或任何配件之上。
•
沒有放入材料時切勿啟動攪拌器,亦不得用攪拌器攪拌乾質或硬質食物(
例如方糖);壼蓋
•
警告:切勿將攝氏60度(華氏140度) 以上的滾熱液體或材料倒入攪拌壼或
攪拌上述液體或材料。若您需要攪拌熱的材料,雙手必須跟蓋
器保持距離,以防灼傷。
•
必須先倒入液體材料才放入固體材料,放入的材料不得超過壼身顯示的
最高容量。
•
切勿將攪拌壼用作急凍、煮食或消毒容器。
•
切勿連續開動攪拌器超過1分鐘。
•
為確保安全,本產品已符合一切適用的規範和規例:
- 低電壓指引
- 電磁相容
- 環境
- 接觸食物的物料
•
將攪拌器放在防熱的穩固平面上。
•
切勿用攪拌器攪拌或混和食物以外的東西。
(D6)
連蓋封
(D1)
、香草研磨器裝置
(D5)
未安裝在攪拌壼
(E1)
和香料研磨器裝
(D)
亦不得啟動。
(D)
(D6)
內。
和進料
安全上鎖系統
若攪拌壼組合(D)、配件(E)或配件(F)未正確組合及正確安裝在馬達座(A),攪
拌器便不會操作。
攪拌壼(E4)和(F4)的底部均有一條顏色線,應該將之跟有相同顏色解鎖鈕的攪
拌刀裝置(E2) 或(F2) 組合起來。
攪拌壼(D4)沒有顏色線,應該將之跟有黃色解鎖鈕(D2)的攪拌刀裝置組合起來。
首次使用前
首次使用之前先以肥皂水清洗所有配件(D、E、F、G),但不要清洗馬達座(A)。
警告:攪拌刀非常銳利,使用和清潔攪拌刀或清倒攪拌壼時請小心。
使用攪拌器之前必須移除所有包裝。
30
Page 33

重要事項:將攪拌刀裝置或配件安裝在馬達座之前,必需確保馬達座已經完全
停頓,而且按下了的按鈕 (B)或(C)已經彈上。
如果壼蓋(D6)連蓋封(D5)沒有妥當安裝在已組裝旳攪拌壼(D)上,切勿開動攪
拌器。
使用攪拌器
確定蓋是否已經套好並且正確安裝在攪拌刀裝置(D1)上:
裝好後應該看得見蓋封的接位,而且蓋封應該是平順的,不應該起摺(圖1)。
讓攪拌刀裝置(D1)的鎖鈕(D2)面向自己,將壼(D4)底安裝在組裝槽之下(D3)(
圖2a),然後將攪拌刀裝置(D1)轉向壼(圖2b),直至聽見一聲啪響。按一按鎖
鈕(D2)的上部,以確定攪拌壼(D4)和攪拌刀裝置(D1)是否已經正確組合 (圖2c)。
將材料放入攪拌壼,但切勿超出壼身指示的最高水平:
稠濃材料不得超過0.6公升,
液體材料不得超過0.5公升
切勿將攝氏60度(華氏140度) 以上的液體或材料倒入攪拌壼。
將蓋封(D5)套在壼蓋(D6),然後將兩者安裝在攪拌壼 (D4),再將塞(D7)緊插在
蓋的特定位置。
將組裝好的攪拌壼(D)安裝在馬達座(A),攪拌刀裝置的鎖鈕(D2)必須跟馬達座
(A)前方的槽位配合(圖3)。攪拌壼(D)必須盡量推入馬達座(A),否則攪拌器不
能操作(圖4)。
接上插頭,然後視乎需要按動按鈕1(C)或2(B)以選擇速度。若要攪拌器持續操
作,可以多次按鈕或持續按鈕。切勿讓攪拌器持續操作60秒。
要停止操作,將按鈕 (B)或(C) 釋放回原位。拔掉插頭,將攪拌壼(D)從馬達座
(A)移除。
利用香草研磨器(E)刨碎材料只需數秒,適用於:歐芹、洋蔥、蒜、
杏乾和肉(去筋小肉粒),亦可將麵包刨成麵包碎(備製淡烤甜麵包
等等)。
切勿用研磨器攪拌液體食材(例如果汁)。
利用香料研磨器(F)將各種香料研磨成粉只需數秒(例如胡荽和乾胡
椒),也可以用來磨碎香葉乾(例如薄荷葉)。
這些配件均附有蓋,令使用者在使用時觸摸不到攪拌刀。
蓋封必須正確牢套在攪拌刀裝置(E1)或(F1)(圖1)。裝好後應該看得見蓋封的接
位,而且蓋封應該是平順的,不應該起摺(圖1)。
將材料倒入攪拌壼(E4)或(F4)。
取用攪拌刀裝置(E1)或(F1)、將攪拌刀向下並將鎖鈕(E2)或(F2)面向自己,將定
位環(E3)或(F3)套在攪拌壼(E4)或(F4)的頸(圖5a)。
ZH
31
Page 34

按動鎖鈕(E2)或(F2),將攪拌壼(E4)或(F4)轉回攪拌刀裝置(E1)或(F1)(圖5b),
然後按下鎖鈕(E2)或(F2)的上方將之鎖在攪拌壼上。必須確定攪拌壼(E4)或
(F4)跟攪拌刀裝置(E1)或(F1)已經妥為接合(圖5c)。
檢查一下以確定配件(E)或(F)是否正確組合:
鎖鈕(E2或F2)的顏色應該跟攪拌壼(E4或F4)底部的顏色線相符。
將配件倒轉,將已組裝的配件(E)或(F)安裝在馬達座(A)上,鎖鈕(E2)或(F2)必
須跟馬達座(A)前方的槽位配合。必須將配件(E)或(F)盡量推入馬達座(A),否
則攪拌器不能操作(圖6)。
接上插頭,攪拌器操作時用手扶穩攪拌壼(E4)或(F4),您可以按動按鈕(B)或
(C)多次或持續按著(圖7)。
要停止操作,請將按鈕 (B)或(C) 釋放回原位,拔掉插頭。
將配件(E)或(F)從馬達座(A)移除。在工作桌面上將配件倒轉,按動鎖鈕(E2)或
(F2)將攪拌刀裝置(E1)或(F1)解鎖。這時可以取出材料準備處理。
不建議攪拌某幾種極硬質的香料(例如丁香和肉桂),因為這些香料會令攪拌壼
變色。
在攪拌壼(E4)或(F4)套上蓋(G)可以防止材料乾水,方便處理後放入電冰箱冷藏
備用。
材料
份量 (最多)
使用時間 配件
杏 40克 持續按下按鈕2達4秒 E
麵包碎 1片淡烤甜麵包
將按鈕2按下10 次,並且持續
按下按鈕2達15秒
洋蔥/青蔥 50克 將按鈕1按下10 次 E
杏仁
有殼榛子
70克 按下按鈕2達10秒 F
去筋小肉粒 50-80克 將按鈕2按下10 次 E
歐芹 7-10克 將按鈕2按下10 次 E
胡荽籽 30-40克 按下按鈕2達45秒 F
咖啡豆 40-50克 按下按鈕2達45秒 F
32
E
Page 35

清潔攪拌器
拔掉插頭然後移除攪拌壼或配件。
小心處理,因為攪拌刀和配件的攪拌刀都非常銳利。
使用後立刻在水龍頭下沖洗攪拌壼和蓋,可移除的組件則以暖肥皂水清洗。
為方便清潔,請按鎖鈕(D2)將攪拌刀裝置(D1)從攪拌壼(D4)移除(圖8a、8b和8c)。
攪拌壼(D)和配件(E)或(F)可以放在自動洗碗機的第一層清洗,請使用"環保
"("ECO")或"輕洗"(“LIGHT WASH ")程式。
馬達座(A)可用濕布清潔,然後小心抹乾。
切勿將馬達座(A)放在水龍頭下沖洗。
攪拌器不操作怎麼辦﹖
問題 原因 解決方法
攪拌器不操作 沒有接上電源線。 將插頭插入相同電壓的牆上插座。
攪拌壼(D)或配件(E)或(F)未裝妥
或未鎖緊在馬達座(A)之上。
震動過猛 攪拌器放置之處不平坦。 將攪拌器放在平坦之處。
材料的份量過多。 減少處理的份量。
配件組裝不當。 檢查攪拌壼(E4) 或(F4) 是否正確
檢查攪拌壼或配件是否已經正確
組裝;拆除攪拌壼或配件再重新
組裝(圖2.a、2.b和2.c)。另外請
檢查是否已經盡量推入馬達座。
攪拌器操作時必須在配件(E)或
(F)的蓋上保持施壓。
跟相應的攪拌刀裝置(E2)或(F2)
組裝;顏色標記必須相符。
ZH
材料從攪拌壼蓋溢出材料的份量過多。 減少處理的份量。
壼蓋未蓋緊。 檢查蓋封是否套著蓋(D5), 將蓋
(D6)正確套在攪拌壼(D),然後
插牢蓋塞(D7)。
33
Page 36

問題 原因 解決方法
材料從攪拌壼或
配件溢出
攪拌刀裝置(D1)、(E1)或(F1)沒
有跟蓋封套接或蓋封安裝不正確。
蓋封必須正確安裝,裝好後應該
看得見蓋封的接位,而且蓋封應
該是平順的,不應該起摺(圖1)。
小心處理攪拌刀裝置(D1) 、E1)
或(F1),因為攪拌刀非常銳利。
攪拌刀裝置(D1)、(E1)或(F1)未
充分或不正確鎖在攪拌壼(D4)、
(E4)或(F4)。
攪拌刀攪動得不暢順放入的食材太大塊或太硬。 將食材切細或減少份量。
按一按按鈕(D2)的上方(圖2c)或
按動按鈕(E2)或(F2) (圖5c),以
確定攪拌刀裝置跟攪拌壼是否正
確接合。
添一點液體,但不要超過最高水
平。
若攪拌器仍然不操作,請跟客戶服務中心聯絡(聯絡資料請參閱保用冊)。
循環再造
棄置包裝物料和攪拌器部件。
包裝物料全部不會危害環境,可以按照有關循環再造的現行規例棄
置。
若要棄掉攪拌器,請向當地的有關當局查詢。
不能再用的電子產品或電器:
本產品可以用上多年,但如果您需要更換新的,切勿將本產品跟一般垃圾一起
棄置或將之棄置在堆填區,請將本產品送往適當的廢物收集站。
保護環境為上﹗
本產品有很多可以回收或循環再造的物料。
請將之送往廢物收集站或認可的服務中心供處理。
34
Page 37

คำอธิบาย
A ชุดมอเตอร์
B ปุ่ม 2: เร็ว
C ปุ่ม 1: ช้า
D ชิ้นส่วนโถเครื่องปั่น
D1 ชุดใบมีดพร้อมที่ล็อก
D2 ปุ่มปลดล็อกชุดใบมีด
D3 เขี้ยวล็อคตัวโถ
D4 โถปั่น
D5 ที่ล็อกฝา
D6 ฝา
D7 ที่ครอบ
อุปกรณ์เสริมสำหรับรุ่นที่ซื้ออยู่ในบรรจุภัณฑ์
E เครื่องบดสมุนไพร (*เฉพาะรุ่น)
E1 ชุดใบมีดพร้อมที่ล็อก
E2 ปุ่มปลดล็อกชุดใบมีด
E3 เขี้ยวล็อคตัวโถ
E4 โถ
F เครื่องบดเครื่องเทศ (*เฉพาะรุ่น)
F1 ชุดใบมีดพร้อมที่ล็อก
F2 ปุ่มปลดล็อกชุดใบมีด
F3 เขี้ยวล็อคตัวโถ
F4 โถ
G ฝาชิ้นส่วน
คำแนะนำเพื่อความปลอดภัย:
• ควรอ่านคู่มืออย่างละเอียดก่อนใช้งานครั้งแรก
บริษัทจะไม่รับผิดชอบต่อการใช้งานที่ไม่ปฏิบัติตามคำแนะนำ
• ไม่ควรให้บุคคล (รวมทั้งเด็กเล็ก) ที่มีสภาพร่างกายไม่แข็งแรงหรือสภาพจิตใจไม่ปกติ
หรือขาดประสบการณ์และความรู้ความเข้าใจ
นำอุปกรณ์นี้ไปใช้งานเว้นแต่จะอยู่ในการควบคุมดูแลหรือได้รับคำแนะนำในการใช้งานโดยผู้ที่รับผิดชอ
บในด้านความปลอดภัย เด็กเล็กควรได้รับการดูแลเพื่อป้องกันไม่ให้เด็กนำอุปกรณ์นี้ไปเล่น
• เครื่องนี้ออกแบบสำหรับใช้กับไฟฟ้ากระแสสลับเท่านั้น
ตรวจสอบแรงดันไฟฟ้าที่ระบุไว้ให้ตรงกับระบบไฟฟ้าของคุณ ความผิดพลาดในการเชื่อมต่อใดๆ
จะทำให้การรับประกันเป็นโมฆะ
• เครื่องนี้ออกแบบมาเพื่อใช้ในบ้านเท่านั้น อย่านำไปใช้นอกบ้าน
บริษัทผู้ผลิตจะไม่รับผิดชอบใดๆ และสงวนสิทธิ์ในการยกเลิกการรับประกันในกรณีที่มีการใช้เพื่อการค้า
การใช้ที่ไม่เหมาะสม หรือความผิดพลาดอันเนื่องมาจากการไม่ปฏิบัติตามคำแนะนำ
• ถอดปลั๊กเครื่องใช้ทันทีที่ใช้เสร็จ ไฟดับ และขณะทำความสะอาดเครื่อง
• อย่าถอดปลั๊กโดยการดึงที่สายไฟ
• อย่าใช้เครื่องหากทำงานผิดปกติ เสียหาย สายไฟหรือปลั๊กเสียหาย เพื่อป้องกันอันตรายที่อาจเกิดขึ้น
ให้นำไปให้ศูนย์บริการที่ได้รับการรับรอง (ดูรายชื่อในคู่มือรับประกัน)
• การดำเนินการนอกเหนือจากการทำความสะอาดและการบำรุงรักษาตามปกติ
ต้องปฏิบัติโดยศูนย์บริการที่ได้รับการรับรอง
• เพื่อความปลอดภัยของตัวท่านเอง ใช้เฉพาะชิ้นส่วนและอะไหล่ที่ได้รับจากศูนย์บริการที่ได้รับการรับรอง
คำเตือน: ไม่มีการขายชิ้นส่วนที่อยู่นอกเหนือจากคู่มือการใช้งานของเครื่อง
• อย่านำเครื่อง สายไฟ หรือปลั๊ก จุ่มลงในของเหลวใดๆ
• วางสายไฟให้ห่างจากมือเด็ก อย่าให้อยู่ใกล้หรือสัมผัสกับส่วนที่ร้อนของเครื่อง แหล่งความร้อน
หรือบนขอบที่มีความคม
35
TH
Page 38

• อย่าวางชิ้นส่วนที่ประกอบด้วยโลหะไว้ในไมโครเวฟ
• ควรระมัดระวังเมื่อใช้ใบมีดที่คมในชุดใบมีดของโถปั่น (D1) ใบมีดสำหรับเครื่องบดสมุนไพร (E1)
และใบมีดสำหรับเครื่องบดเครื่องเทศ (F1) เมื่อเอาออกจากโถและทำความสะอาด
เนื่องจากมีความคมมาก
• อย่าสัมผัสกับชิ้นส่วนที่เคลื่อนที่ได้ขณะที่เครื่องกำลังทำงาน
ให้รอจนเครื่องและชิ้นส่วนหยุดนิ่งก่อนสัมผัสกับชิ้นส่วนหรือเอาอุปกรณ์ออก
• อย่าใส่เครื่องครัว (ช้อน ไม้พาย ฯลฯ) ลงในโถ (D) ขณะที่เครื่องกำลังทำงาน
• อย่าปล่อยให้ผมยาว ผ้าพันคอ ฯลฯ อยู่เหนือเครื่องหรืออุปกรณ์ขณะที่เครื่องกำลังทำงาน
• อย่าใช้โถปั่นหากไม่มีส่วนผสม อย่าใช้กับของแห้งหรือแข็งเท่านั้น (เช่น น้ำตาลก้อน) หรือหากไม่มีฝา
(D6) พร้อมที่ล็อก (D5) บนโถ (D)
• คำเตือน: อย่าเทหรือผสมของเหลวหรือส่วนผสมที่มีอุณหภูมิสูงกว่า 60° ซ (140°ฟ)
หากต้องผสมส่วนผสมที่ร้อน อย่าให้มืออยู่ใกล้จากฝา (D6) และช่องใส่อาหาร (D7)
เพื่อหลีกเลี่ยงการไหม้
• เทส่วนผสมที่เป็นของเหลวลงในโถปั่นก่อนเติมส่วนผสมที่เป็นของแข็ง อย่าให้ถึงขีดสูงสุด
• อย่าใช้โถเป็นภาชนะ (สำหรับแช่แข็ง ประกอบอาหาร หรือต้ม)
• อย่าให้เครื่องทำงานนานกว่า 1 นาที สำหรับการใช้งานที่ต่อเนื่องกัน
• เพื่อความปลอดภัย เครื่องนี้เป็นไปตามมาตรฐานและข้อบังคับ:
- ระเบียบเกี่ยวกับเครื่องที่มีแรงดันไฟฟ้าต่ำ
- ความเข้ากันได้ทางแม่เหล็กไฟฟ้า
- สิ่งแวดล้อม
- วัสดุที่สัมผัสกับอาหาร
• วางเครื่องบนพื้นผิวที่มั่นคง ทนความร้อน
• อย่าใช้เครื่องสำหรับปั่นหรือผสมสิ่งที่ไม่ใช่อาหาร
ระบบล็อกเพื่อความปลอดภัย
เครื่องจะไม่ทำงานหากไม่ได้ประกอบโถเครื่องปั่น (D) หรืออุปกรณ์ (E) หรือ (F)
และวางบนชุดมอเตอร์อย่างถูกต้อง (A)
โถ (E4) (F4) มีเครื่องหมายเป็นเส้นมีสีที่ฐานและควรประกอบด้วยชุดใบมีดซึ่งมีปุ่มปลดล็อก (E2)(F2)
เป็นสีเดียวกัน
โถสำหรับเครื่องปั่น (D4) ไม่มีเครื่องหมายมีสี ควรประกอบเข้ากับชุดใบมีดซึ่งมีปุ่มปลดล็อกซึ่งมีสีเหลือง
(D2)
ก่อนการใช้งานครั้งแรก
ก่อนการใช้งานครั้งแรก ให้ล้างอุปกรณ์ทั้งหมด (D, E, F, G) ด้วยน้ำสบู่ แต่ไม่ต้องล้างชุดมอเตอร์ (A)
คำเตือน: ใบมีดตัดมีความคมมาก ควรจับด้วยความระมัดระวังระหว่างการใช้งาน ทำความสะอาด
หรือเอาของออกจากโถ
เอาสิ่งห่อหุ้มออกให้หมดก่อนใช้งาน
สิ่งสำคัญ: ตรวจสอบว่าชุดมอเตอร์หยุดนิ่งโดยกดปุ่ม (B) และ (C)
36
Page 39

เพื่อปลดล็อกก่อนประกอบชิ้นส่วนของเครื่องปั่นหรืออุปกรณ์สำหรับชุดมอเตอร์
อย่าเปิดเครื่องหากไม่ได้วางฝา (D6) กับที่ล็อก (D5) บนโถ (D)
การใช้เครื่อง
ตรวจสอบว่าประกอบที่ล็อกและอยูในตำแหน่งชุดใบมีด (D1):
ควรสามารถมองเห็นที่พับของที่ล็อกเมื่อวาง และควรให้ที่ล็อกเรียบสินท ไม่ควรรัดแน่นเกินไป (รูปที่
1)
หันปุ่ม “กด” (D2) ของชุดใบมีด (D1) เข้าหาตัว ให้ตำแหน่งฐานของโถ (D4) อยู่ใต้เขี้ยวล็อคตัวโถ
(D3) (รูปที่ 2a) จากนั้นหมุนชุดใบมีด (D1) กลับไปยังโถ (รูปที่ 2b) จนกว่าจะล็อก
กดด้านบนของปุ่มล็อก (D2) เพื่อให้มั่นใจว่าประกอบโถ (D4) และชุดใบมีด (D1)
เข้าด้วยกันอย่างถูกต้อง (รูปที่ 2c)
ใส่ส่วนผสมลงในโถ สำหรับสิ่งที่หนา อย่าให้ถึงขีดสูงสุดที่ 0.6 ลิตร
และอย่าให้ถึง 0.5 ลิตร สำหรับสิ่งที่เป็นของเหลว
อย่าใส่ของเหลวหรือส่วนผสมใดๆ ที่มีอุณหภูมิถึง 60° ซ (140°ฟ) ในโถผสม
ประกอบที่ล็อกฝา (D5) รอบฝา (D6) วางชิ้นส่วนบนโถ (D4) ล็อกปุ่ม (D7) ในตำแหน่งบนฝา
ติดตั้งโถ (D) ที่ชุดมอเตอร์ (A) โดยให้ปุ่มล็อก (D2)
ของชุดใบมีดตรงกับรอยบากด้านหน้าของชุดมอเตอร์ (A) (รูปที่ 3) ควรวางโถ (D)
ในตำแหน่งที่ถูกต้องบนชุดมอเตอร์ (A) มิฉะนั้น เครื่องจะไม่ทำงาน (รูปที่ 4)
เสียบปลั๊กเครื่องแล้วกดปุ่ม 1 (C) หรือ 2(B) ตามความเร็วที่ต้องการ
กดปุ่มหลายครั้งหรือกดค้างไว้เพื่อให้ทำงานอย่างต่อเนื่อง อย่าทำงานติดต่อกัน 60 วินาที
หยุดเครื่อง โดยกดปุ่ม (B) หรือ (C) ขึ้น แล้วถอดปลั๊กเครื่อง
เอาโถ (D) ออกจากชุดมอเตอร์ (A)
เครื่องบดสมุนไพร (E) ให้คุณสามารถสับส่วนผสม เช่น ผักชีฝรั่ง หัวหอม กระเทียม
แอพริคอทแห้ง เนื้อ (เอาเส้นเลือดออกและตัดเป็นชิ้น) ทำเป็นชิ้นขนมปังเล็กๆ
(ขนมปังชิ้นเล็กๆ ฯลฯ) ได้ภายในไม่กี่วินาที
อย่าใช้เครื่องบดสมุนไพรสำหรับของเหลว (น้ำผลไม้)
เครื่องบดเครื่องเทศ (F) ให้คุณสามารดบดเครื่องเทศ (เมล็ดผักชี เม็ดพริกไทย)
และใบพืชแห้งที่มีน้ำมันหอมระเหย (สะระแหน่) เป็นผงได้ภายในไม่กี่วินาที
อุปกรณ์ที่มาพร้อมกับโถป้องกันการเข้าถึงใบมีดขณะใช้งาน
ตรวจสอบว่าประกอบที่ล็อกและวางถูกตำแหน่งบนชุดใบมีด (E1) หรือ (F1) (รูปที่ 1)
ควรมองเห็นที่พับของที่ล็อกเมื่อวางและที่ล็อกควรเรียบ ไม่ควรแน่นเกินไป (รูปที่ 1)
Tใส่ส่วนผสมลงในโถ (E4) หรือ (F4)
วางชุดใบมีด (E1) หรือ (F1) โดยให้ใบมีดคว่ำลง ให้ปุ่มล็อก (E2) หรือ (F2) หันเข้าหาเขี้ยวล็อคตัวโถ
(E3) หรือ (F3) ที่คอโถ (E4) หรือ (F4) (รูปที่ 5a)
กดปุ่มล็อก (E2) หรือ (F2) วางโถ (E4) หรือ (F4) กลับคืนที่ชุดใบมีด (E1) หรือ (F1) (รูปที่ 5b)
และยึดบนโถโดยกดด้านบนของปุ่มล็อก (E2) หรือ (F2) ตรวจสอบว่าโถ (E4) หรือ (F4) และชุดใบมีด
(E1) หรือ (F1) ประกอบเข้าด้วยกัน (รูปที่ 5c)
TH
37
Page 40

ตรวจสอบว่าประกอบชิ้นส่วน (E) และ (F) ถูกต้อง:
สีของปุ่มล็อก (E2 หรือ F2) ควรสอดคล้องกับสีของเส้นที่ฐานของโถ (E4 หรือ F4)
งานชิ้นส่วนขึ้น วางชิ้นส่วน (E) หรือ (F) บนชุดมอเตอร์ (A) วางปุ่ม (E2) หรือ (F2)
ให้ตรงกับรอยบากด้านหน้าชุดมอเตอร์ (A), ควรวางอุปกรณ์ (E) หรือ (F)
ในตำแหน่งที่ถูกต้องเพื่อให้ชุดมอเตอร์ (A) สามารถทำงานได้ มิฉะนั้น เครื่องจะไม่ทำงาน (รูปที่ 6)
เสียบปลั๊กเครื่อง จับที่โถ (E4) หรือ (F4) ระหว่างเครื่องทำงานให้กดปุ่ม (B) หรือ (C)
หลายครั้งหรือติดต่อกัน (รูปที่ 7)
หยุดเครื่องโดยกดปุ่ม (B) หรือ (C) แล้วจึงถอดปลั๊กเครื่อง
เอาชิ้นส่วน(E) หรือ (F) ออกจากชุดมอเตอร์ (A)
แล้ววางโดยหงายไว้บนพื้นที่ทำงานและปลดล็อกชุดใบมีด (E1) หรือ (F1) กดปุ่ม “กด” (E2) หรือ (F2)
จากนั้นก็สามารถเอาส่วนผสมออกได้
ไม่ควรใส่เครื่องเทศที่แข็งมาก (กานพลู อบเชย ฯลฯ) เนื่องจากอาจทำให้โถเปลี่ยนสี
วางฝา (G) บนโถ (E4) หรือ (F4)
เพื่อมิให้ของที่เตรียมแห้งและสามารถเก็บไว้ในตู้เย็นสำหรับใช้ในภายหลังได้
ส่วนผสม ปริมาณ (สูงสุด) เวลาทำงาน อุปกรณ์
แอพริคอท 40 กรัม กดปุ่ม 2 ค้างไว้ 4 วินาที E
ขนมปังชิ้นเล็กๆ 1 ชิ้น
หัวหอม/หอมแดง 50 กรัม กดปุ่ม 1 สิบครั้ง E
อัลมอนด์
ฮาเซลนัททั้งเปลือก
ชิ้นเนื้อ 50-80 กรัม กดปุ่ม 2 สิบครั้ง E
ผักชีฝรั่ง 7-10 กรัม กดปุ่ม 2 สิบครั้ง E
เมล็ดผักชี 30 ถึง 40 กรัม กดปุ่ม 2 ค้างไว้ 45 วินาที F
กาแฟ 40 ถึง 50 กรัม กดปุ่ม 2 ค้างไว้ 45 วินาที F
70 กรัม กดปุ่ม 2 ค้างไว้ 10 วินาที F
กดปุ่ม 2 สิบครั้ง แล้วกดปุ่ม
2 ค้างไว้ 15 วินาที
การทำความสะอาดเครื่อง
ถอดปลั๊กเครื่องแล้วเอาโถหรืออุปกรณ์ออก
ใช้ด้วยความระมัดระวังเนื่องจากใบมีดและชุดใบมีดมีความคม
ล้างโถและฝาทันทีหลังใช้โดยเปิดน้ำก๊อกให้ไหลผ่าน
และล้างชิ้นส่วนที่ถอดได้ในน้ำสบู่อุ่นๆ
38
E
Page 41

เพื่อให้ง่ายต่อการทำความสะอาด สามารถถอดชุดใบมีด (D1) จากโถ (D4) ได้โดยกดปุ่ม (D2) (รูปที่
8a 8b 8c)
สามารถล้างโถ (D) อุปกรณ์ (E) และ (F)
โดยวางไว้ที่ตระกร้าด้านบนในเครื่องล้างจานโดยตั้งโปรแกรมการล้างที่ "ECO" หรือ "LIGHT WASH"
ล้างชุดมอเตอร์ (A) โดยใช้ผ้าชุบน้ำหมาดๆ แล้วค่อยๆ เช็ดให้แห้ง
อย่าล้างชุดมอเตอร์ (A) โดยเปิดให้น้ำก๊อกไหลผ่าน
สิ่งที่ควรกระทำหากเครื่องไม่ทำงาน
ปัญหา สาเหตุ การแก้ปัญหา
เครื่องไม่ทำงาน ไม่ได้เสียบปลั๊ก เสียบปลั๊กเครื่องโดยใช้ปลั๊กที่มีแรงดั
ไม่ได้ประกอบโถ (D) หรืออุปกรณ์
(E) และ (F)
เข้าด้วยกันหรือไม่ได้วางบนชุดมอเต
อร์ (A)
สั่นมากเกินไป วางเครื่องบนพื้นผิวที่ไม่เรียบ วางเครื่องบนพื้นผิวที่มั่นคง
ส่วนผสมมีปริมาณมากเกินไป ลดปริมาณของส่วนผสม
ประกอบอุปกรณ์ไม่ถูกต้อง ตรวจสอบว่าประกอบโถ (E4) (F4)
รั่วออกทางฝา ส่วนผสมมีปริมาณมากเกินไป ลดปริมาณของส่วนผสม
ปิดฝาไม่สนิท ตรวจสอบว่าได้ล็อก (D5)
นไฟฟ้าเดียวกัน
ตรวจสอบว่าประกอบโถหรืออุปกรณ์
ถูกต้อง
ถอดชิ้นส่วนและประกอบเข้าใหม่
(รูปที่ 2.a, 2.b และ 2.c)
แล้วตรวจสอบว่าอยู่ในตำแหน่งที่ถูก
ต้องบนชุดมอเตอร์
มีความดันที่ (E) หรือ (F)
ระหว่างการใช้งาน
เข้ากับชุดใบมีด (E2) (F2)
ควรมองเห็นเครื่องหมายที่มีสี
ฝา (D6) วางฝา (D6) บนโถ (D)
ถูกต้อง แล้วล็อกปุ่ม (D7)
TH
39
Page 42

ปัญหา สาเหตุ การแก้ปัญหา
รั่วออกจากโถหรือ
อุปกรณ์
มีดหมุนอย่างติดขัดอาหารมีชิ้นใหญ่หรือแข็งเกินไป ลดขนาดหรือปริมาณส่วนผสม
หากเครื่องยังคงไม่ทำงาน
ติดต่อศูนย์บริการลูกค้า (ดูรายละเอียดสำหรับการติดต่อในคู่มือการรับประกัน)
ที่ล็อกชุดใบมีดอยู่ในตำแหน่งที่ไม่ถูก
ต้อง (D1)(E1)(F1).
ล็อกชุดใบมีด (D1)(E1)(F1) ที่โถ
(D4)(E4)(F4)
ไม่ถูกต้องหรือไม่ดีพอ
ตรวจสอบว่าล็อกอยู่ในตำแหน่งที่ถูก
ต้อง
ควรมองเห็นขอบที่ล็อกและไม่ควรรัด
แน่นเกินไป (รูปที่ 1) ใช้ชุดใบมีด
(D1), (E1), (F1)
ด้วยความระมัดระวัง
เนื่องจากมีความคม
ตรวจสอบว่าประกอบชุดใบมีดและโถ
เข้าด้วยกันอย่างถูก้องโดยกดบนปุ่ม
(D2)(รูปที่ 2c) หรือที่ปุ่ม (E2)(F2)
(รูปที่ 5c)
เติมของเหลวลงในโถ
โดยอย่าให้เกินขีดสูงสุด
การรีไซเคิล
การกำจัดวัสดุห่อหุ้มและเครื่อง
วัสดุห่อหุ้มประกอบด้วยวัสดุที่ไม่เป็นอันตรายต่อสิ่งแวดล้อม
ซึ่งสามารถจำกัดได้ตามระเบียบการรีไซเคิลที่บังคับใช้
ในการกำจัดเครื่อง ให้ติดต่อฝ่ายที่เหมาะสมในหน่วยงานที่รับผิดชอบในพื้นที่
เมื่อเครื่องใช้ไฟฟ้าหรือเครื่องใช้อิเล็กทรอนิกส์หมดอายุการใช้งาน:
เครื่องออกแบบมาเพื่อให้สามารถใช้งานได้หลายปี หากต้อการเปลี่ยนเครื่อง
อย่าทิ้งในถังขยะตามบ้านหรือที่ทิ้งขยะตามปกติให้นำไปยังจุดทิ้งขยะที่เหมาะสม
รักษาสิ่งแวดล้อมเป็นอันดับแรก!
เครื่องประกอบด้วยวัสดุอันมีค่าซึ่งสามารถนำมาใช้ใหม่หรือรีไซเคิลได้
ทิ้งไว้ที่จุดพักขยะหรือศูนย์บริการที่ได้รับการรับรอง
40
Page 43

DESKRIPSI
A Unit motor
B Tombol 2: kecepatan kilat
C Tombol 1: kecepatan lamban
D Perakitan tabung blender
D1 Unit pisau dengan segel
D2 Tombol buka kunci unit pisau
D3 Pinggiran pemosisian
D4 Tabung blender
D5 Segel penutup
D6 Penutup
D7 Tutup
Aksesori ini terdapat dalam model yang baru saja Anda beli, dan ditunjukkan pada kemasannya.
E Gilingan rempah
E1 Unit pisau dengan segel
E2 Tombol pembuka kunci unit pisau
E3 Pinggiran pemosisian
E4 Tabung
F Gilingan bumbu
F1 Unit pisau dengan segel
F2 Tombol buka kunci unit pisau
F3 Pinggiran pemosisian
F4 Tabung
G Tutup aksesori
(*aksesori tergantung model)
(*aksesori tergantung model)
PETUNJUK KESELAMATAN:
• Baca petunjuk penggunaan secara saksama sebelum pertama kali menggunakan alat:
produsen tidak akan bertanggung jawab jika penggunaannya tidak mematuhi petunjuk.
• Alat ini tidak ditujukan untuk digunakan oleh orang (termasuk anak-anak) yang memiliki
keterbatasan fisik, kemampuan sensorik atau mental, atau tidak memiliki pengalaman dan
pengetahuan, kecuali mereka diawasi atau telah diberikan petunjuk mengenai cara
menggunakan alat oleh orang yang bertanggung jawab atas keselamatan mereka. Anakanak harus diawasi untuk memastikan mereka tidak bermain-main dengan alat.
• Alat ini didesain untuk berfungsi hanya dengan arus listrik bolak-balik. Periksa bahwa
voltase listrik yang tertera pada pelat rating alat sesuai dengan instalasi listrik Anda.
Kesalahan koneksi apa pun akan membatalkan jaminan.
• Alat ini secara eksklusif ditujukan untuk penggunaan rumah-tangga di dalam rumah. Jangan
gunakan alat di luar ruangan.
Produsen tidak akan bertanggung jawab dan berhak membatalkan jaminan jika dipergunakan untuk
tujuan komersial, tidak sesuai, atau tidak mematuhi petunjuk.
• Selalu mencabut alat, segera setelah Anda selesai menggunakannya, atau jika terjadi mati listrik
dan saat Anda membersihkannya.
• Jangan sekali-kali menarik steker untuk mencabut alat.
• Jangan gunakan alat jika tidak bekerja dengan benar, jika rusak atau kabel listrik atau stekernya
rusak. Untuk menghindari bahaya apa pun, ganti steker di pusat servis resmi (lihat daftar buklet
jaminan).
• Pengerjaan apa pun selain pembersihan dan perawatan yang biasa dilakukan oleh pelanggan
harus dilaksanakan di pusat servis resmi.
• Demi keselamatan Anda, hanya gunakan aksesori dan suku cadang yang disediakan oleh pusat
servis resmi.
Peringatan: tidak ada aksesori yang bisa dijual kepada Anda tanpa menunjukkan buku petunjuk
atau alat yang Anda miliki.
• Jangan merendam alat, kabel listrik atau steker di dalam cairan.
• Kabel listrik sama sekali tidak boleh ditinggalkan di tempat yang bisa diraih oleh anak-anak, di
dekat, atau terkena bagian panas alat Anda, dekat sumber panas atau pinggiran yang tajam.
• Jangan menaruh aksesori apa pun yang mengandung logam di dalam microwave.
41
ID
Page 44

• Harap waspada ketika menangani pisau tajam dalam unit pisau tabung blender (D1),
rangkaian gilingan bumbu (E1) dan rangkaian gilingan bumbu (F1) saat mengosongkan
tabung dan membersihkannya. Semua bilah pisau ini sangat tajam.
• Jangan sekali-kali menyentuh komponen yang bergerak sewaktu alat sedang digunakan,
tunggu sampai alat dan semua aksesorinya berhenti sepenuhnya sebelum Anda menyentuh
atau melepaskan komponen aksesori ini.
• Jangan sekali-kali memasukkan pecah-belah dapur (sendok, spatula, dll) ke dalam
tabung/mangkuk (D) sewaktu sedang digunakan.
• Jangan sekali-kali membiarkan rambut panjang, skarf, dll., menggantung pada alat atau
aksesorinya sewaktu alat/aksesori sedang digunakan.
• Jangan mengoperasikan tabung blender tanpa berisi bahan, hanya berisi produk kering atau
keras (seperti gula kubus), atau jika penutup (D6) dengan segelnya (D5) tidak terpasang dengan
benar pada tabung/mangkuk (D).
Peringatan: Jangan sekali-kali menuangkan atau mencampur cairan atau bahan dengan
•
suhu lebih dari 60° C (140°F). Jika harus mencampur bahan panas, jauhkan tangan
Anda pada jarak aman dari penutupnya (D6) dan lubang pengisian (D7) untuk
menghindari risiko luka bakar.
• Selalu menuangkan bahan cair terlebih dahulu ke dalam tabung blender sebelum menambahkan
bahan padat, dan jangan melampaui batas maksimum yang diindikasikan.
• Jangan gunakan tabung/mangkuk sebagai wadah (untuk membekukan, memasak atau sterilisasi).
• Jangan mengoperasikan alat lebih dari 1 menit secara terus-menerus.
• Demi keselamatan Anda, alat ini mematuhi Standar dan Peraturan yang berlaku:
- Petunjuk Voltase Rendah
- Kompatibilitas Elektromagnetik
- Lingkungan
- Bahan yang bersinggungan dengan bahan makanan
• Taruh alat pada permukaan bidang kerja yang stabil dan tahan panas.
• Jangan sekali-kali menggunakan alat ini untuk membaurkan atau mencampur bahan non-pangan.
SISTEM KUNCI PENGAMANAN
Alat tidak akan bekerja jika rangkaian tabung blender (D) atau aksesori (E) atau (F)
tidak dirakit dan diposisikan dengan benar pada unit motor (A).
Tabung/mangkuk (E4) (F4) diberi tanda garis berwarna pada alasnya, dan harus dirakit dengan
unit pisau yang memiliki tombol pelepas (E2)(F2) berwarna sama.
Tabung/mangkuk blender (D4) tidak ditandai dengan warna, dan harus dirangkaikan dengan unit
pisau yang memiliki tombol pelepas warna kuning (D2).
SEBELUM MENGGUNAKAN UNTUK PERTAMA KALI
Sebelum pertama kali menggunakan alat, cuci semua aksesori (D, E, F, G) dengan air sabun, tetapi
jangan membersihkan unit motornya (A).
PERINGATAN: Bilah pisau pemotong sangat tajam, tangani dengan hati-hati selama
menggunakan, membersihkan, atau mengosongkan tabung.
Pastikan bahwa semua kemasan sudah dikeluarkan sebelum mengoperasikan alat.
Penting: Pastikan bahwa unit motor sudah berhenti sepenuhnya, dengan tombol (B) dan
42
Page 45

(C)dilepaskan sebelum memasangkan rangkaian blender atau aksesori ke unit motor.
Jangan sekali-kali mengoperasikan alat jika penutup yang dilengkapi dengan (D6) segel (D5)
belum ditempatkan pada tabung yang sudah dirakit (D).
MENGGUNAKAN ALAT
Pastikan segel dipasang dan diposisikan dengan benar pada unit pisau (D1):
lipatan segel harus terlihat setelah alat terpasang di tempatnya, dan segel harus rata, tidak
boleh tertekuk (gbr 1).
Dengan tombol "klik" (D2) dari unit pisau (D1) yang menghadap Anda, posisikan alas tabung
(D4) di bawah pinggiran (D3) (gbr 2a) lalu sorong unit pisau ke belakang (D1) ke arah tabung
(gbr 2b) sampai mengunci, sambil menekan bagian atas tombol klik (D2) untuk memastikan
tabung (D4) dan unit pisau (D1) sudah terpasang dengan benar (gbr 2c).
Masukkan bahan ke dalam tabung dan jangan melampaui batas maksimum yang diindikasikan,
0.6 L untuk persiapan yang kental
dan 0.5 L untuk persiapan cair
Jangan menaruh cairan atau bahan apa pun yang suhunya melampaui 60° C (140°F) ke dalam
tabung penyampur.
FPasangkan segel penutup (D5) di sekeliling penutupnya (D6) tempatkan rakitan pada tabung
(D4), kunci tombol (D7) di dalam rumahnya yang terletak pada penutup.
Pasang rakitan tabung (D) pada unit motor (A) dengan tombol klik (D2) dari unit pisau yang
disejajarkan dengan takik yang terletak di depan unit motor (A) (gbr 3), tabung (D) harus
cukup jauh di bawah pada unit motor, (A) jika tidak, alat tidak akan bekerja (gbr 4).
Tancapkan steker alat dan tekan tombol 1 (C) atau 2(B), tergantung pada kecepatan yang
diperlukan, tekan beberapa kali atau tahan tombolnya untuk pengoperasian yang terus-menerus.
Jangan gunakan alat selama 60 detik dalam pengoperasian yang terus-menerus.
Untuk menghentikan alat, lepaskan tekanan pada tombol (B) atau (C). Mencabut alat.
Lepaskan tabung (D) dari unit motor (A).
Gilingan rempah (E) memungkinkan Anda dalam beberapa detik mencacah bahan
seperti: seledri, bawang merah, bawang putih, aprikot kering, daging (tanpa urat dan
sudah dipotong kecil-kecil), untuk membuat remah roti (roti panggang, dll.).
Jangan gunakan gilingan rempah untuk bahan cair (jus buah).
Gilingan bumbu (F) memungkinkan Anda, dalam beberapa detik menghaluskan berbagai
macam bumbu hingga menjadi tepung (biji ketumbar, merica) dan daun tumbuhan kering
(mint).
Semua aksesori ini disertakan bersama tabung yang tidak mengakses pisau selama digunakan.
Pastikan bahwa segel sudah terpasang dan diposisikan dengan benar pada unit pisau (E1) atau
(F1) (gbr 1), lipatan segel harus terlihat setelah segel ditempatkan dan segel harus rata, tidak
boleh tertekuk (gbr 1).
Taruh semua bahan di dalam tabung (E4) atau (F4). Ambil unit pisau (E1) atau (F1), dengan
pisau menghadap ke bawah, dengan tombol "klik" (E2) atau (F2) menghadap ke Anda, posisikan
bagian pinggiran (E3) atau (F3) di leher tabung (E4) atau (F4) (gbr 5a).
Tekan tombol "klik" (E2) atau (F2), lepaskan tabung/mangkuk (E4) atau (F4) kembalikan ke unit
pisau (E1) atau (F1) (gbr 5b) lalu pasang pada tabung dengan menekan bagian atas tombol klik
(E2) atau (F2). Pastikan bahwa tabung (E4) atau (F4) dan unit pisau (E1) atau (F1) dipasang
bersama-sama (gbr 5c).
Periksa, apakah ada kesalahan dalam rakitan/rangkaian aksesori (E) dan (F):
43
ID
Page 46

warna tombol klik (E2 atau F2) harus sama dengan warna garis alas tabung (E4 atau F4)
Putar aksesori, tempatkan rangkaian aksesori (E) atau (F) pada unit motor (A), sejajar dengan
tombol klik (E2) atau (F2) dengan takik pada bagian depan unit motor (A), aksesori (E) atau
(F) harus sejauh mungkin di bawah unit motor, (A) jika tidak, alat tidak akan bekerja (gbr 6).
Tancapkan steker alat. Tahan tabung dengan tangan Anda (E4) atau (F4) selama pengoperasian,
tekan tombol (B) atau (C) beberapa kali atau terus-menerus (gbr 7).
Untuk menghentikan alat, lepaskan tombol (B) atau (C). Mencabut alat.
Lepaskan aksesori (E) atau (F) dari unit motor (A), putar aksesori pada permukaan tempat kerja,
dan lepaskan unit pisau (E1) atau (F1) sambil menekan tombol "klik" (E2) atau (F2).
Selanjutnya, Anda dapat mengeluarkan bahan persiapan Anda.
Menyampurkan bahan tertentu yang sangat keras (cengkeh, kayu manis, dll) tidak dianjurkan,
karena dapat mengubah warna tabung.
Penutup (G) yang diposisikan pada tabung (E4) atau (F4) menjaga agar bahan persiapan tidak
mengering dan bahan tersebut dapat disimpan di lemari es untuk digunakan di lain waktu.
Bahan Jumlah (maks) Waktu operasi Aksesori
Aprikot 40g
Remah roti 1 roti panggang
Bawang merah 50g Tekan tombol 1 sepuluh kali E
Almond
kacang mede kupas
Potongan daging
tanpa urat
Seledri 7-10g Tekan tombol 2 sepuluh kali E
Biji ketumbar 30 hingga 40g
biji kopi 40 hingga 50g
70g
50-80g Tekan tombol 2 sepuluh kali E
4 detik dengan menekan
terus tombol 2
Tekan tombol 2 sepuluh kali
selama 15 detik dengan
menekan terus tombol 2
10 detik dengan menekan
terus tombol 2
45 detik dengan menekan
terus tombol 2
45 detik dengan menekan
terus tombol 2
E
E
F
F
F
MEMBERSIHKAN ALAT
Cabut alat dan keluarkan tabung atau aksesorinya.
Hati-hati ketika menanganinya, karena pisau dan bilah aksesori tajam.
Segera membilas tabung dan penutupnya setelah digunakan, di bawah keran air yang mengalir,
dan juga elemen yang bisa dilepas, dibersihkan dengan air sabun hangat.
44
Page 47

Agar lebih mudah membersihkannya, unit pisau (D1) bisa dilepaskan dari tabung (D4) dengan
menekan tombol "klik" (D2) (gbr 8a 8b 8c).
Tabung, (D) aksesori (E) dan (F) dapat dicuci pada rak teratas mesin cuci piring dengan program
"ECO" atau "LIGHT WASH".
Untuk membersihkan unit motor (A), gunakan kain lembap dan keringkan secara hati-hati.
Jangan sekali-kali menempatkan unit motor (A) di bawah keran air yang mengalir.
APA YANG DILAKUKAN JIKA ALAT TIDAK BEKERJA
Masalah Penyebab Solusi
Alat tidak bekerja. Steker alat belum
Getaran
berlebihan.
Penutup bocor. Bahan yang dimasukkan
ditancapkan.
Tabung (D) atau aksesori (E)
dan (F) tidak dirakit dan
diposisikan dengan benar
pada unit motor (A).
Alat tidak ditempatkan pada
permukaan yang rata.
Bahan yang dimasukkan
melampaui batas ketinggian.
Kesalahan dalam perakitan
aksesori.
melampaui batas ketinggian.
penutup tidak tertutup rapat
sehingga bocor.
Tancapkan steker alat ke stopkontak
dinding dengan voltase yang sama.
Periksa, apakan tabung atau aksesori
sudah dirakit dengan benar, kalau salah,
lepaskan lalu mulai merakitnya lagi (Gbr
2.a, 2.b dan 2.c) kemudian periksa
apakah alat sudah ditempatkan cukup
jauh ke bawah pada unit motor.
Tetap menekan penutup aksesori (E)
atau (F) selama pengoperasian
Taruh alat pada permukaan yang rata.
Kurangi jumlah bahan yang diolah.
Periksa apakah tabung (E4) (F4) sudah
dirakit dengan benar bersama unit pisau
(E2) (F2) yang bersangkutan, penanda
berwarna harus sama.
Kurangi jumlah bahan yang diolah.
Periksa, apakah segel sudah dipasang
(D5) pada penutup (D6). Posisikan
penutup dengan benar (D6) pada
tabung (D). Kunci tabungnya (D7).
ID
45
Page 48

Masalah Penyebab Solusi
Kebocoran dari tabung atau aksesori.
Pisau tidak berputar dengan lancar.
Apakah alat Anda masih tidak bekerja?
Hubungi layanan pelanggan (lihat keterangan rinci dalam buklet jaminan).
Segel tidak dipasang, atau
posisinya salah pada unit
pisau (D1)(E1)(F1).
unit pisau (D1)(E1)(F1) tidak
terkunci rapat atau salah,
pada tabung (D4)(E4)(F4).
Potongan makanan terlalu
besar atau terlalu keras.
Pastikan segel diposisikan dengan benar,
bibir segel harus terlihat dan tidak
boleh tertekuk (gbr 1). Menangani unit
pisau (D1), (E1), (F1) dengan hatihati, karena bilah pisau tajam.
Pastikan bahwa unit pisau dan tabung
dipasang bersama-sama dengan benar
sambil menekan bagian atas tombol
(D2)(gbr 2c) atau pada tombol
(E2)(F2) (gbr 5c)
Kurangi ukuran atau jumlah bahan yang
diolah.
Tambahkan cairan ke dalam tabung
campur, tetapi jangan sampai
melampaui batas maksimum.
DAUR-ULANG
Membuang bahan kemasan dan alat.
Akhir masa pakai alat elektronik atau listrik:
Alat Anda dirancang untuk bisa digunakan selama bertahun-tahun. Namun demikian, saat Anda
ingin mengganti alat tersebut, jangan membuangnya bersama sampah rumah tangga, atau dikubur
di dalam galian tanah, tetapi bawalah ke tempat pengumpulan barang bekas yang sesuai.
Secara eksklusif, kemasan alat mengandung bahan yang tidak membahayakan
lingkungan, yang dapat dibuang sesuai dengan peraturan daur-ulang yang berlaku.
Untuk membuang alat Anda, tanyakan kepada kantor dinas atau pihak berwenang
yang sesuai di tempat Anda.
Dahulukan perlindungan lingkungan!
Alat Anda mengandung banyak bahan yang dapat dipulihkan atau didaur ulang.
Bawalah ke tempat pengumpulan barang bekas atau ke pusat servis resmi
untuk diproses.
46
Page 49

Page 50

Page 51

Page 52

Page 53

Page 54

EN
K0
VI
MS
ZH
TH
ID
p. 5 - 10
p. 11 - 16
p. 17 - 22
p. 23 - 28
p. 29 - 34
p. 35 - 40
p. 41 - 46
10/2012 - Réf. 8080011969 - réalisation : Espace Graphique
 Loading...