

Page 1
A
F3
F
F2
B
C3
C
C2
C1
D
E
F1
EN
EN
TH
MS
VI
ZH
ID
KR
FR
EL
AR
FA
p. 7-12
p. 13 - 18
p. 19 - 24
p. 25 - 30
p. 31 - 36
p. 37 - 42
p. 43 - 48
p. 49 - 54
p. 55 - 60
p. 61 - 66
p. 67 - 72
TH
MS
VI
ZH
ID
KR
FR
AR
FA
Réf. NC00022877
Page 2
2
1
1
2
4
3
ok
fig.3 fig.4
fig.1 fig.2
fig.5 fig.6
1
2
1
2
2
1
2
1
Page 3

7
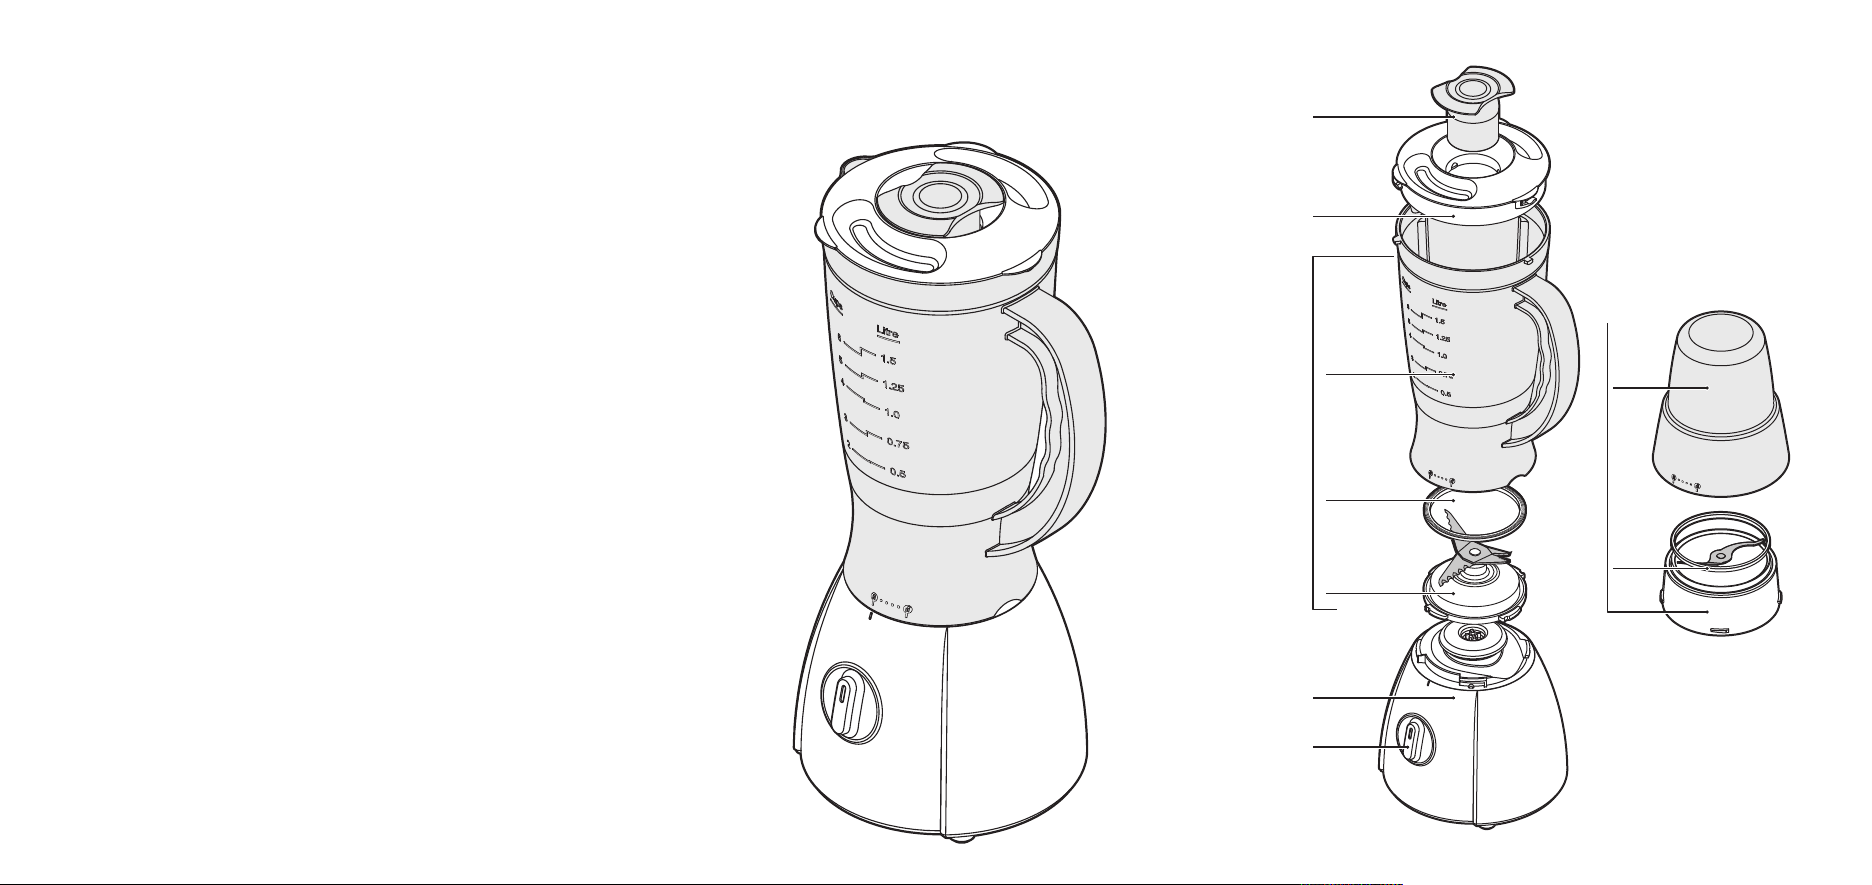
A
B
C
D
Measuring cup
Lid
Mixer jug unit
- c1 Blade unit
- c2 Gasket
- c3 Graduated mixer jug
Motor unit
E
F
Speed selector
Accessory (depending on model)
:
Universal mill
- f1 Sealing gasket
- f2 Mill blade unit
- f3 Universal mill bowl
DESCRIPTION OF THE APPLIANCE
The accessories contained in the model you have bought are represented on the label on the
top of the packaging.
SAFETY INSTRUCTIONS
•
Read the instructions for use carefully before using your appliance for the first time: the
manufacturer shall accept no liability in the event of any use that does not comply with the
instructions.
•
This appliance is not designed to be used by persons (including children) with reduced
physical, sensory or mental capacities, or lack of experience and knowledge, unless they have
been given supervision or instructions concerning use of the appliance by a person
responsible for their safety. Children should not be allowed to play with the appliance.
•
It is designed to work with alternating current only. Please check that the supply voltage
indicated on the name plate of the appliance corresponds to your electrical installation.
•
This product has been designed for domestic use only. Any commercial use, inappropriate
use or failure to comply with the instructions, the manufacturer accepts no responsibility and
the guarantee will not apply.
•
Be sure to unplug the appliance if you must leave it unattended, before inserting or
removing accessories or before cleaning it. Never pull on the power cord to unplug the
appliance.
•
Do not use your appliance if it does not operate correctly, if it has been damaged or if the
power cord or plug is damaged. To maintain safety, these parts must be replaced by an
approved service centre (see list in the service booklet).
•
Any maintenance other than routine cleaning and upkeep by customers must be carried out
by an approved service centre.
•
Do not immerse the appliance, cord or plug in liquid. The power cord must be kept out of the
reach of children and must not be placed near or come into contact with the hot parts of the
appliance, sources of heat or sharp corners.
•
For your safety, only use accessories and spare parts that correspond to your appliance, sold
by an approved service centre.
•
The blades are very sharp: handle them with caution to avoid injury.
•
Never use the blender or its accessories without ingredients and never pour boiling liquids
into the jug.
•
Always use the blender jug with its lid (B).
•
Always pour the liquid ingredients into the jug first, before adding the solid ingredients,
without exceeding the maximum level.
•
Never place your fingers or any other object in the blender when the appliance is running.
•
Do not use the bowls as containers for freezing, cooking or sterilisation.
EN
Page 4

8
•
Do not use the blender for more than 3 minutes continuously.
•
Place the blender on a flat, stable, heat-resistant, clean and dry worktop.
•
Do not let long hair, scarves, ties, etc. hang over the blender jug or accessories when in
operation.
•
Do not use the blender outside in the open air.
•
Do not remove the lid (B) before the blades have stopped completely.
•
Never use this appliance for blending or mixing items other than food ingredients.
•
Wait for the appliance to cool down to room temperature after each batch you process.
•
Never use the blender or its accessories without ingredients and never pour boiling liquids
(80C) into the jug.
•
If the supply cord is damaged, it must be replaced by an approved service centre.
SAFETY LOCKING
USING FOR THE FIRST TIME
USING YOUR APPLIANCE
The appliance can run only when the jug (C) or accessory (F) are correctly positioned and
locked on the motor unit (D).
• Before using your appliance for the first time, clean
all the accessories (A, B, C and F) in warm soapy
water, except for the motor unit (D).
• Make sure all the packaging has been removed before
operating the appliance.
• Important note: Turn the speed selector (E) to “0”
before placing the blender jug or accessories on the
motor unit.
• The appliance starts only if the jug or accessory is
correctly positioned and locked on its body.
• Do not operate the blender if the lid is not in place.
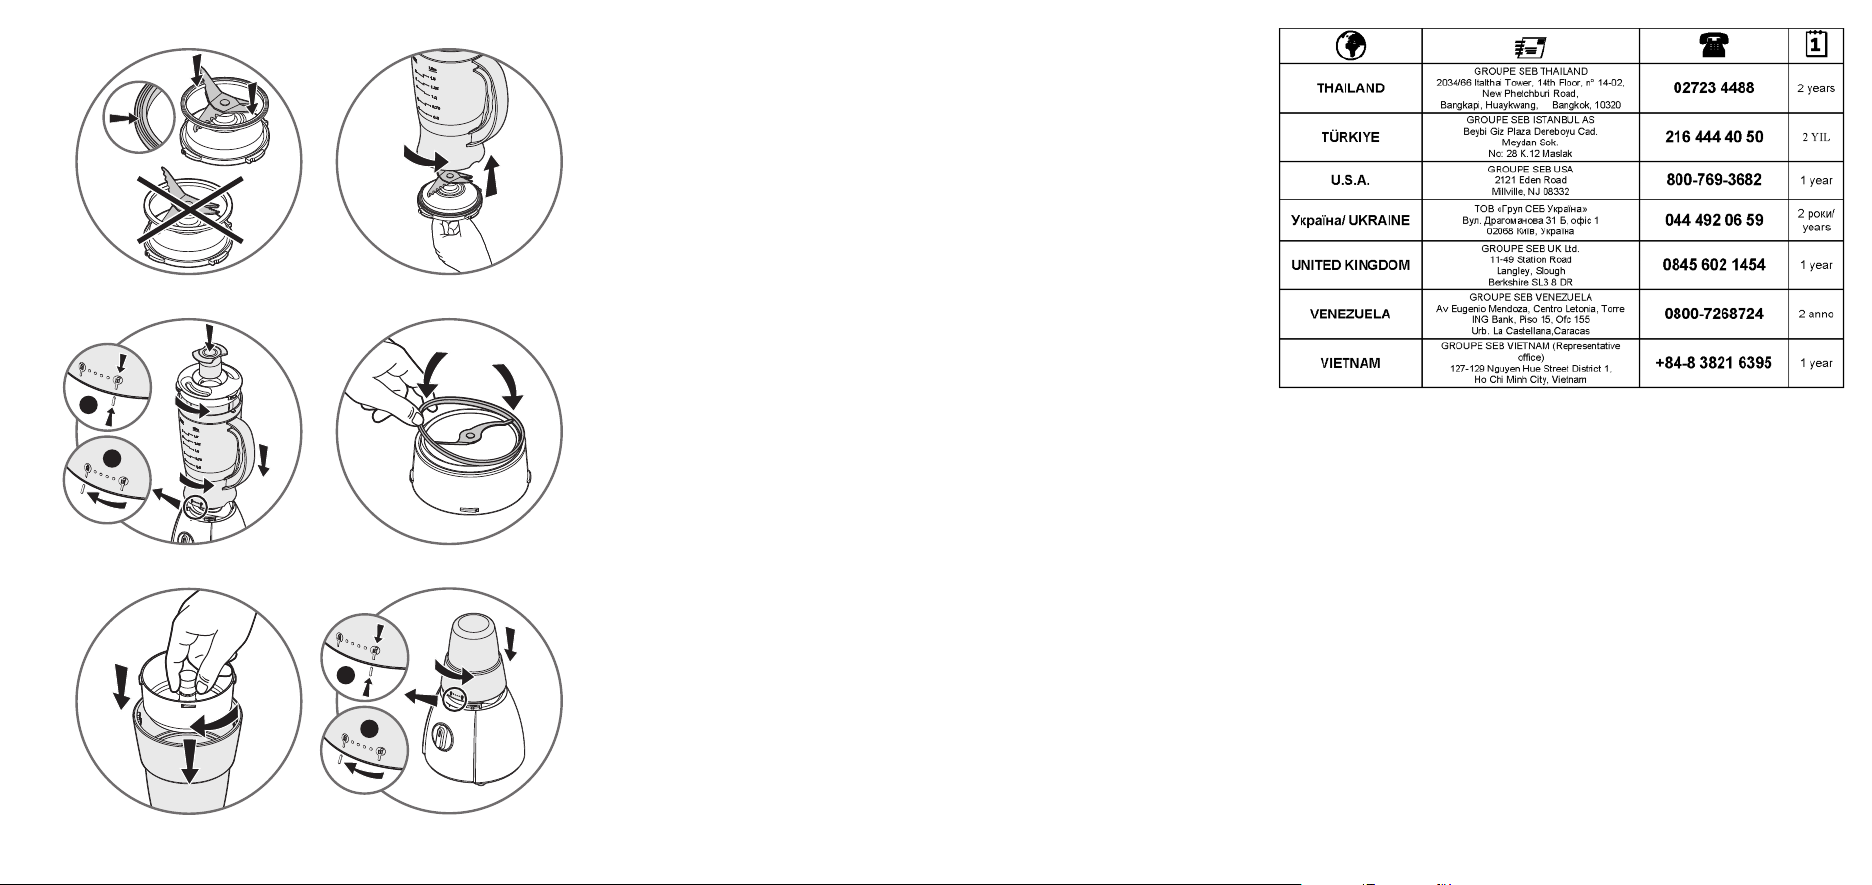
1. Mixer JUG:
• Moisten the gasket (c2) and position it correctly on the blade unit (c1): the 3 folds of the
gasket must be visible once it is in place. If it is positioned in the other direction, you will not
be able to lock the blade unit on the jug. (figure 1).
• Place the assembly (c1+c2) on the base of the jug (c3). Lock it by rotating the blade unit
through a quarter turn in the anticlockwise direction. (Figure 2).
• Introduce the ingredients into the assembled jug without exceeding the maximum level
indicated.
CAUTION: The blades are
extremely sharp; handle
them with caution when
using, emptying or
cleaning the appliance.
Page 5

9
• Fit the lid (B) to the mixer jug (C) and lock it by positioning it on the holes opposite the spout
(figure 3).
Introduce the measuring cup (A) into the lid and press into place (figure 3). You are advised to
hold the lid during operation.
• Place the mixer jug (C) on the body of the motor unit (D). The lock (open) is aligned in the
slot on the motor unit (figure 3).
• Then rotate the mixer jug (C) through a turn the lock (closed) appears (figure 3).
• Dice all the ingredients before putting them into the mixer jug (C). It is best to start with
liquids, without going over the maximum level shown on the jug (1.5L).
• Connect the appliance and start up by turning speed selector (E) to "Pulse," "1," or "2".
• To stop the appliance, bring the speed selector (E) to "0".
• Wait for the appliance back to a complete stop before removing the mixer jug (C).
• Remove the mixer jug (C) by unlocking it in opposite direction to installation.
2. Universal Mill:
• This universal mill (F) is equipped with a bowl (f3) that
prevents access to the blades during use.
• Rotate the bowl (F) and pour the ingredients.
• Position the sealing gasket (f1) in its recess on the mill
blade unit (f2) (figure 4). Position the mill blade unit
(f2) on the bowl (f3), and lock the universal mill by
rotating the blade unit (f2) through a turn in the
clockwise direction (figure 5).
• Rotate the assembled universal mill (F) and position it
on the motor unit (D). The lock (open) is aligned
in the slot on the motor unit (D) (figure 6).
• Rotate the assembled universal mill (F) though a turn
anticlockwise until the lock (closed) appears (figure 6).
• Connect the appliance and start up by turning speed
selector (E) to "Pulse," "1," or "2".
• To stop the appliance, bring the speed selector (E) to "0".
• Wait for the appliance back to a complete stop before
removing the universal mill (C).
• Remove the universal mill (F) by unlocking it in opposite
direction to installation.
• Turn it over on the worktop before unlocking the mill
blade unit (f2) from the bowl (f3) in the reverse order
of the assembly. The blades are very sharp: handle
them with caution to avoid injury. You can then collect
the preparation in the bowl.
Remark: The colour of the bowl may change after
blending certain very hard ingredients: cloves, cinnamon,
etc…
Caution: leaks can occur
if the accessory is not
locked correctly.
Page 6

10
Ingredients Quantities Operating time
Dried red chilli 30g 33s
Black pepper 30g 1min30s
Dried shrimp 25g 30s
Roasted rice 40g 16s
Black sesame 30g 21s
Peanuts 50g 4s
Onions 100g 13s
Pork (cut into a small pieces) 140g 20s
Pormesan (cheese cut into a small pieces) 100g 13s
CLEANING YOUR APPLIANCE
• Unplug the appliance and remove the accessories
• Remove the jug and rinse it and its lid under running
water.
• For easy cleaning, be sure to wash the removable parts
in water and a little washing-up liquid immediately
after use.
• The mixer jug
(A, B, C)
and universal mill
(F)
can be
cleaned in the dishwasher in the top basket with the
“ECO” or “LIGHTLY SOILED” programme.
• To clean the motor unit
(D)
, use a moist cloth. Dry it
carefully.
• Never put the motor unit
(D)
under water or under
running water.
• Empty the mixer jug
(C)
or universal mill bowl
(f3)
before clean.
CAUTION: Handle them
with caution: the blades
of the blender jug and
accessories are sharp.
Page 7

11
Problems Causes Solutions
Product does not work.
The plug is not fitted correctly into
the socket .
Plug the appliance into a socket and
switch on.
The jug or accessory is not correctly
positioned or locked on the motor
unit.
Check that the jug or accessories are
correctly positioned and locked onto
the motor unit as shown in the
figure in the manual.
Excessive vibrations.
The product is not placed on a flat,
stable, heat-resistant surface.
Place the product on a flat surface.
Volume of ingredients is too high.
Reduce the quantity of ingredients
processed.
Leak from the lid.
Volume of ingredients is too high.
Reduce the quantity of ingredients
processed.
The lid is not correctly positioned.
Lock the lid correctly on the blender
jug.
Leak from the base of the
blender unit
The gasket on the blade unit (f1) or
(f2) is not positioned correctly or is
missing.
Reposition the gasket on the blade
unit (f1) or (f2) and lock it correctly
onto the bowl (F3).
The blender jug gasket
(c2
) is not
positioned correctly or is missing.
Reposition the gasket and lock the
blade holder correctly.
Impossible to lock the blade
unit with the gasket
(c1+c2)
on the jug
(c3)
The gasket
(c2)
is not positioned
correctly.
Reposition the gasket, the 3 folds
should be visible as shown in the
Figure 1.
Leak from the base of the
universal mill.
The sealing gasket (f1) on the blade
unit
(f2)
is not positioned correctly
or is missing.
Reposition the sealing gasket (f1) on
the blade unit (f2) and lock it correctly
onto the universal mill bowl (f3).
The blade does not turn
easily.
Pieces of food too large or too hard.
Reduce the size or quantity of
ingredients processed.
Add liquid
WHAT TO DO IF YOUR APPLIANCE DOES NOT WORK ?
Contact an approved service centre (see list in service booklet).
You can customise your blender and obtain the following accessories from your usual dealer
or from an approved service centre: Universal mill (F), or an additional blender jug (C).
Your blender still does not work?
Page 8

12
RECYCLING
• Disposal of the appliance and its packaging materials.
The packaging is comprised exclusively of materials that present no danger
for the environment and which may therefore be disposed of in accordance
with the recycling measures in force in your area.
For disposing of the device itself, please contact the appropriate service of
your local authority.
• End of life electrical and electronic products:
Your appliance is expected to last for many years. However, when the time comes to replace it,
do not throw it into the bin, but take it to the recycling centre in your town (or to a waste
reception centre where applicable).
Think of the environment!
Your appliance contains valuable materials which can be recovered or
recycled.
Leave it at a local civic waste collection point.
HELPLINE:
If you have any product problems or queries, please contact our Customer Relations Team
first for expert help and advice:
0845 602 1454 – UK
(01) 677 4003 – ROI
or consult our website – www.tefal.co.uk
Page 9

13
A
B
C
D
E
ฝาตวงส่วนผสม
ฝาปิด
ชุดโถปั่น
-c1 ชุดใบมีด
-c2 ซีลยางกันรั่วซึม
-c3 โถปั่นแบบมีขีดบอกระดับ
ชุดมอเตอร์
ปุ่มปรับระดับความเร็ว
F
อุปกรณ์เสริม (จะแตกต่างกันไปในแต่ละรุ่น) :
เครื่องบดเอนกประสงค์
-f1 ซีลยางกันรั่วซึม
-f2 ชุดใบมีดบดสับ
-f3 โถบดเอนกประสงค์
รายละเอียดของเครื่องใช้ไฟฟ้า
รายการอุปกรณ์เสริมต่าง ๆ ที่มีอยู่ในแต่ละรุ่นที่คุณซื้อจะแสดงอยู่บนป้ายที่ติดอยู่ตรงด้านบนของบรรจุภัณฑ์
คู่มือการใช้งานเพื่อความปลอดภัย
• อ่านคู่มือการใช้งานอย่างละเอียดก่อนที่จะใช้งานเครื่องใช้ไฟฟ้าของคุณในครั้งแรก: ผู้ผลิตจะไม่ รับผิดชอบต่อเหตุการณ์ใด ๆ
ก็ตามที่เกิดจากการใช้งานที่ไม่ได้ปฏิบัติตามคู่มือการใช้งานฉบับนี้
• เครื่องใช้ไฟฟ้านี้ไม่ได้ออกแบบมาสำหรับการใช้งานโดยบุคคล (รวมถึงเด็ก) ที่มีความบกพร่อง ทางร่างกาย
ด้อยประสิทธิภาพด้านการรับรู้หรือด้านจิตใจ หรือโดยบุคคลที่ขาดประสบการณ์และความรู้เกี่ยวกับเครื่องใช้ไฟฟ้าดังกล่าว
เว้นแต่พวกเขาจะอยู่ใน การควบคุมดูแลหรือได้รับคำแนะนำในการใช้งานโดยผู้ใหญ่ที่รับผิดชอบในด้านความปลอดภัยของพวกเขา
ไม่ควรอนุญาตให้เด็กเล่นเครื่องใช้ไฟฟ้านี้
• เครื่องปั่นนี้ได้รับการออกแบบมาให้ทำงานด้วยไฟฟ้ากระแสสลับเท่านั้น โปรดตรวจสอบว่า
แรงดันไฟฟ้าขาเข้าที่ระบุอยู่บนแผ่นป้ายชื่อของเครื่องใช้ไฟฟ้าตรงกับแรงดันไฟฟ้าที่คุณติดตั้งใช้งาน
• ผลิตภัณฑ์นี้ได้รับการออกแบบมาสำหรับการใช้งานภายในครัวเรือนเท่านั้น ผู้ผลิตไม่รับผิดชอบใด ๆ ทั้งสิ้น และการรับประกันจะเป็นโมฆะ
หากมีการใช้งานเพื่อการค้า การใช้งานที่ไม่เหมาะสม หรือไม่ปฏิบัติตาม คู่มือการใช้งาน
• ตรวจสอบให้แน่ใจว่าคุณได้ถอดปลั๊กเครื่องใช้ไฟฟ้าแล้ว เมื่อไม่ได้ใช้งาน และก่อนที่จะใส่หรือถอด อุปกรณ์เสริมออก
หรือก่อนที่จะทำความสะอาด ห้ามดึงบริเวณสายไฟเพื่อถอดปลั๊กเครื่องใช้ไฟฟ้านี้
• ห้ามใช้เครื่องใช้ไฟฟ้าของคุณ หากเครื่องทำงานผิดปรกติ หรือหากตัวเครื่อง ปลั๊กไฟ หรือสายไฟ ชำรุดเสียหาย
เพื่อความปลอดภัยของผู้ใช้งาน การเปลี่ยนแทนชิ้นส่วนดังกล่าวนี้ต้องดำเนินการโดยศูนย์บริการที่ได้รับอนุญาตเท่านั้น
(โปรดดูรายชื่อศูนย์บริการได้จากคู่มือการบริการ)
• การบำรุงรักษาอื่นใดนอกเหนือจากการทำความสะอาดและการดูแลรักษาตามปกติ ต้องดำเนินการโดย ศูนย์บริการที่ได้รับอนุญาตเท่านั้น
• ห้ามจุ่มเครื่องใช้ไฟฟ้า สายไฟ หรือปลั๊กลงในของเหลว เก็บสายไฟให้พ้นมือเด็ก และต้องไม่วางสายไฟ
ไว้ใกล้หรือสัมผัสโดนชิ้นส่วนที่ร้อนของเครื่องใช้ไฟฟ้า แหล่งความร้อน หรือมุมที่แหลมคม
• เพื่อความปลอดภัยของตัวคุณเอง ให้ใช้อุปกรณ์เสริมและอะไหล่ที่ตรงกับเครื่องใช้ไฟฟ้าของคุณ
ซึ่งจัดจำหน่ายโดยศูนย์บริการที่ได้รับอนุญาตเท่านั้น
• ใบมีดของเครื่องปั่นมีความคมมาก:ให้ใช้งานด้วยความระมัดระวังเพื่อหลีกเลี่ยงการบาดเจ็บ
• ห้ามใช้งานเครื่องปั่นหรืออุปกรณ์เสริมของเครื่องปั่นโดยไม่ได้ใส่ส่วนผสม และไม่เทน้ำที่กำลังเดือด ลงในโถปั่นเด็ดขาด
• ใช้โถปั่นพร้อมฝาปิด (B) ทุกครั้ง
• เทส่วนผสมชนิดน้ำลงในโถปั่นก่อนที่จะเติมส่วนผสมแบบแข็งอื่น ๆ ทุกครั้ง และต้องไม่ใส่ในปริมาณเกินระดับสูงสุดที่กำหนด
• ห้ามยื่นนิ้วของคุณหรือวัตถุใด ๆ เข้าไปในเครื่องปั่นขณะที่เครื่องกำลังทำงานอยู่
• ห้ามใช้โถเป็นภาชนะสำหรับการแช่แข็ง การทำอาหาร หรือการฆ่าเชื้อโรค
TH
Page 10

14
• ห้ามใช้เครื่องปั่นต่อเนื่องกันนานเกิน 3 นาที
• วางเครื่องปั่นไว้บนพื้นผิวเรียบที่มั่นคง ทนความร้อนสะอาด และแห้งสะอาด
• ห้ามปล่อยให้ผมยาว ผ้าพันคอ เน็คไท ฯลฯ ห้อยอยู่เหนือโถปั่นหรืออุปกรณ์เสริม ขณะที่เครื่อง กำลังทำงานอยู่
• ห้ามใช้งานเครื่องปั่นนอกบ้านในที่เปิดโล่ง
• ห้ามถอดฝาปิด (B) ออกจนกว่าใบมีดหยุดหมุนจนนิ่งสนิทแล้ว
• ห้ามใช้เครื่องใช้ไฟฟ้านี้สำหรับการปั่นหรือผสมสิ่งอื่น ๆ นอกเหนือจากส่วนผสมจำพวกอาหาร
• รอให้เครื่องใช้ไฟฟ้าเย็นลงเท่ากับอุณหภูมิห้อง หลังจากที่ปั่นหรือบดสับส่วนผสมแต่ละชุดแล้ว
• ห้ามใช้งานเครื่องปั่นหรืออุปกรณ์เสริมของเครื่องปั่นโดยไม่ได้ใส่ส่วนผสม และห้ามเทน้ำที่กำลังเดือด (80C) ลงในโถปั่นอย่างเด็ดขาด
• หากสายไฟชำรุด โปรดติดต่อให้ศูนย์บริการที่ได้รับอนุญาตเปลี่ยนแทนสายไฟให้
ระบบล็อคนิรภัย
ก่อนการใช้งานครั้งแรก
การใช้งานเครื่องปั่น
เครื่องปั่นจะสามารถทำงานได้เมื่อประกอบและล็อคโถปั่น (C) หรืออุปกรณ์เสริม (F) เข้าที่อย่างถูกต้องและล็อคบนชุดมอเตอร์ (D) แล้วเท่านั้น
• ก่อนที่จะใช้งานเครื่องใช้ไฟฟ้าเป็นครั้งแรก
คุณควรทำความสะอาดอุปกรณ์เสริมทุกชิ้น (A,B,CและF)
ด้วยน้ำยาล้างจานในน้ำอุ่น ยกเว้นสำหรับชุดมอเตอร์ (D)
• ตรวจดูให้แน่ใจว่าได้แกะบรรจุภัณฑ์ทุกชิ้นออกแล้ว
ก่อนที่จะเปิดทำงานเครื่องใช้ไฟฟ้า
• สิ่งสำคัญที่ต้องจำ: หมุนปุ่มปรับระดับความเร็ว (E) ไปที่ “0”
ก่อนที่จะประกอบโถปั่นหรืออุปกรณ์เสริมบนชุดมอเตอร์
• เครื่องใช้ไฟฟ้าจะเริ่มทำงานก็ต่อเมื่อคุณ
ประกอบและล็อคโถปั่นหรืออุปกรณ์เสริมเข้าที่
อย่างถูกต้องแล้วเท่านั้น
• ห้ามเปิดทำงานเครื่องปั่นหากยังปิดฝาไม่เข้าที่
1.โถปั่น:
• เช็ดซีลยางกันรั่วซึม (c2) ให้เปียกน้ำพอหมาด ๆ แล้วใส่ให้เข้าที่บนชุดใบมีด (c1): คุณจะต้อง
มองเห็นรอยพับ 3 ร่องของซีลยางกันรั่วซึมได้อย่างชัดเจนเมื่อใส่ซีลยางเข้าที่ดีแล้ว ถ้าคุณใส่ซีลยางกันรั่วซึมกลับด้าน
คุณจะไม่สามารถล็อคชุดใบมีดบนโถปั่นได้ (รูปที่ 1)
• ใส่ชุดใบมีดที่ประกอบแล้ว (c1+c2) เข้ากับฐานด้านล่างของโถปั่น (c3)
ล็อคชุดใบมีดที่ประกอบแล้วให้เข้าที่กับโถปั่นโดยหมุนชุดใบมีดทวนเข็มนาฬิกา 90 องศา (รูปที่ 2)
• เทส่วนผสมลงในโถที่ประกอบแล้วโดยไม่ให้เกินระดับสูงสุดที่กำหนด
•
ปิดฝาปิด (B) บนโถปั่น (C) แล้วล็อคให้เข้าที่โดยหมุนให้ช่องอยู่ในทิศตรงข้ามกับพวยสําหรับริน (รูปที่3)
ใส่จุกปิด (A) ลงบนฝาปิดแล้วกดให้เข้าที่ (รูปที่3) คุณควรเอามือกดฝาปิดไว้ขณะที่เครื่องทำงาน
•
วางชุดประกอบโถปั่น (C) บนฐานชุดมอเตอร์ (D) ตัวล็อค (รูปกุญแจเปิด) จะอยู่ตรงกันกับขีดที่อยู่บนชุดมอเตอร์ (รูปที่ 3)
•
จากนั้น ให้หมุนโถปั่น (C) จนกระทั่งตัวล็อค (รูปกุญแจปิด) อยู่ตรงกันกับขีดที่อยู่บน ชุดมอเตอร์ (รูปที่3)
คำเตือน:ใบมีดมีความคมมาก
ให้ใช้งานด้วยความระมัดระวัง
เมื่อใช้งานเทส่วนผสมออกหรือ
ทำความสะอาดเเครื่องใช้ไฟฟ้า
Page 11

15
•
หั่นส่วนผสมทั้งหมดเป็นชิ้นเล็ก ๆ ก่อนที่จะใส่ในโถปั่น (C) วิธีที่ดีที่สุดคือให้เทส่วนผสมชนิดน้ำ ลงในโถปั่นก่อน
และต้องไม่ใส่ในปริมาณเกินขีดระดับสูงสุดที่แสดงอยู่บนโถปั่น (1.5 ล.)
•
เสียบปลั๊กไฟของเครื่องใช้ไฟฟ้าแล้วเปิดเครื่องโดยหมุนปุ่มปรับระดับความเร็ว (E) ไปที่ "Pulse" หรือ "1" หรือ "2"
•
หากต้องการหยุดเครื่องใช้ไฟฟ้า ให้หมุนปุ่มปรับระดับความเร็ว (E) กลับมาที่ "0"
•
รอจนกระทั่งเครื่องหยุดหมุนจนนิ่งสนิทดีแล้ว ก่อนที่จะถอดโถปั่น (C) ออก
•
ถอดโถปั่น (C) โดยหมุนเพื่อปลดล็อคในทิศทางตรงกันข้ามกับตอนประกอบ
2.เครื่องบดเอนกประสงค์:
• ชุดเครื่องบดเอนกประสงค์ (F) นี้ประกอบด้วยโถบด (f3)
ซึ่งทำหน้าที่เป็นฝาครอบที่ช่วยป้องกันไม่ให้ใบมีดบาดผู้ใช้ในระหว่างการใช้งาน
• หมุนโถบด (F) ออกแล้วเทส่วนผสมลงไป
• ใส่ซีลยางกันรั่วซึม (f1) ให้เข้าที่กับขอบของชุดใบมีดบดสับ (f2)(รูปที่4)
ประกอบชุดใบมีดบดสับ (f2) เข้ากับโถบด (f3) แล้วล็อคเครื่องบดเอนกประสงค์
โดยหมุนชุดใบมีดบดสับ (f2) ไปในทิศทางตามเข็มนาฬิกา (รูปที่5)
• หมุนเครื่องบดเอนกประสงค์ (F) ที่ประกอบแล้วให้เข้าที่บนชุดมอเตอร์ (D) ตัวล็อค
(รูปกุญแจเปิด) จะอยู่ตรงกันกับขีดที่อยู่บนชุดมอเตอร์ (D)(รูปที่6)
• หมุนเครื่องบดเอนกประสงค์ (F) ที่ประกอบแล้วไปในทิศทางทวนเข็มนาฬิกา
จนกระทั่งตัวล็อค (รูปกุญแจปิด) อยู่ตรงกันกับขีดที่อยู่บนชุดมอเตอร์ (รูปที่6)
• เสียบปลั๊กไฟของเครื่องใช้ไฟฟ้าแล้วเปิดเครื่องโดยหมุนปุ่มปรับระดับความเร็ว (E)
ไปที่ "Pulse" หรือ "1" หรือ "2"
• หากต้องการหยุดเครื่องใช้ไฟฟ้า ให้หมุนปุ่มปรับระดับความเร็ว (E) กลับมาที่ "0"
• รอจนกระทั่งเครื่องหยุดหมุนจนนิ่งสนิทดีแล้ว ก่อนที่จะถอดเครื่องบดเอนกประสงค์ (F)
ออก
• ถอดเครื่องบดเอนกประสงค์ (F) ออก
โดยหมุนในทิศทางตรงกันข้ามกับตอนประกอบเพื่อปลดล็อค
• วางชุดเครื่องบดเอนกประสงค์หงายขึ้นบนพื้นเรียบก่อนที่จะปลดล็อคชุดใบมีดบดสับ
(f2) ออกจากโถบด (f3) โดยหมุนไปในทิศทางตรงกันข้ามกับตอนประกอบ
ใบมีดของเครื่องมีความคมมาก:
ให้ใช้งานด้วยความระมัดระวังเพื่อหลีกเลี่ยงการบาดเจ็บ
คุณสามารถเก็บส่วนผสมที่เตรียมไว้ในโถบดนั้นได้
หมายเหตุ: โถบดอาจเปลี่ยนสีได้หากใช้บดส่วนผสมที่เป็นเนื้อแข็งบางอย่าง เช่น
กานพลูหรืออบเชย เป็นต้น
คำเตือน:ส่วนผสมอาจรั่วซึม
ได้หากคุณไม่ได้ล็อคอุปกรณ์
เสริมให้เข้าที่อย่างถูกต้อง
Page 12

16
ส่วนผสม ปริมาณ ระยะเวลาทำงาน
พริกแห้ง 30 กรัม 33 วินาที
พริกไทดำ 30 กรัม 1 นาที 30 วินาที
กุ้งแห้ง 25 กรัม 30 วินาที
ข้าวคั่ว 40 กรัม 16 วินาที
งาดำ 30 กรัม 21 วินาที
ถั่วลิสง 50 กรัม 4 วินาที
หอมหัวใหญ่ 100 กรัม 13 วินาที
เนื้อหมู (ปรับลดลงมาเป็นชิ้นเล็กชิ้นน้อยขนาดเล็ก) 140 กรัม 20 วินาที
พาเมซานชีส (ปรับลดลงมาเป็นชิ้นเล็กชิ้นน้อยขนาดเล็ก) 100 กรัม 13 วินาที
การทำความสะอาดเครื่องใช้ไฟฟ้า
• ถอดปลั๊กเครื่องใช้ไฟฟ้าและถอดอุปกรณ์เสริมออก
• ถอดโถปั่นออก แล้วล้างโถปั่นและฝาปิดใต้ก๊อกน้ำที่กำลังไหล
• เพื่อให้สามารถทำความสะอาดได้ง่าย ให้ทำความสะอาดชิ้นส่วนที่ถอดออก
ด้วยน้ำและน้ำยาล้างจานทันทีหลังการใช้งาน
• คุณสามารถทำความสะอาดชุดโถปั่น (A,B,C) และเครื่องบดเอนกประสงค์ (F)
ด้วยเครื่องล้างจานได้ โดยวางไว้ที่ตระกร้าบนสุด และใช้โปรแกรม “ECO” หรือ
“LIGHTLY SOILED”
• วิธีการทำความสะอาดชุดมอเตอร์ (D) คือให้ใช้ผ้าชุดน้ำบิดพอหมาดเช็ด
แล้วเช็ดให้แห้ง ด้วยความระมัดระวัง
• ห้ามจุ่มชุดมอเตอร์ (D) ในน้ำ หรือรองใต้น้ำก๊อกที่กำลังไหลโดยเด็ดขาด
• ถอดโถปั่น (C) หรือโถบดเอนกประสงค์ (f3) ออกก่อนที่จะทำความสะอาด
คำเตือน: หยิบจับด้วยความ
ระมัดระวัง: ใบมีดของโถปั่นและ
อุปกรณ์เสริมมีความคมมาก
Page 13

17
ปัญหา สาเหตุ วิธีแก้ไข
เครื่องใช้ไฟฟ้าไม่ทำงาน
ไม่ได้เสียบปลั๊กเข้ากับ
เต้ารับอย่างถูกต้อง
เสียบปลั๊กเครื่องใช้ไฟฟ้าเข้ากับเต้ารับ
แล้วเปิดสวิตช์
ประกอบหรือล็อคโถปั่น
หรืออุปกรณ์เสริมไม่เข้าที่
บนชุดมอเตอร์
ตรวจสอบว่าได้ประกอบหรือล็อคโถปั่นหรือ
อุปกรณ์เสริมให้เข้าที่อย่างถูกต้องบนชุด
มอเตอร์ ตามรูปประกอบที่แสดงอยู่ในคู่มือ
เครื่องสั่นสะเทือน
มากเกินไป
ไม่ได้วางเครื่องใช้ไฟฟ้าบนพื้นผิวเรียบที่มั่นคง
และทนความร้อน
ให้วางเครื่องใช้ไฟฟ้าบนพื้นผิวที่เรียบ
ใส่ส่วนผสมในปริมาณมากเกินไป ลดปริมาณส่วนผสมที่จะปั่นหรือบดให้น้อยลง
มีส่วนผสมรั่วซึม
ออกมาจากฝาปิด
.
ใส่ส่วนผสมในปริมาณมากเกินไป ลดปริมาณส่วนผสมที่จะปั่นหรือบดให้น้อยลง
ปิดฝาปิดไม่เข้าที่ ล็อคฝาปิดให้ถูกต้องบนโถปั่น
มีส่วนผสมรั่วซึมออกมา
จากฐานของโถปั่น
ใส่ซีลยางกันรั่วซึม (c2) ของโถปั่นไม่ถูกต้อง
หรือไม่ได้ใส่ซีลยางกันรั่วซึม
ใส่ซีลยางกันรั่วซึมใหม่ให้เข้าที่
แล้วล็อคต้วยึดใบมีดให้ถูกต้อง
ไม่สามารถล็อคชุดใบมีด
เข้ากับซีลยางกันรั่วซึม
(c1+c2) บนโถปั่น (c3)
ใส่ซีลยางกันรั่วซึม (c2)
ไม่เข้าที่
ใส่ซีลยางกันรั่วซึมใหม่ให้เข้าที่
คุณควรจะมองเห็นรอยพับ 3 ร่อง
ได้อย่างชัดเจน ดังที่แสดงในรูปที่ 1
มีส่วนผสมรั่วซึมออกมาจาก
ฐานของเครื่องบดเอนกประสงค์
ใส่ซีลยางกันรั่วซึม (f1)
บนชุดใบมีด (f2) ไม่ถูกต้อง หรือไม่ได้ใส่ซีลยางกันรั่วซึม
(f1) บน
ชุดใบมีด (f2) อีกครั้งให้เข้าที่
และล็อคบนโถบดเอนกประสงค์ (f3)
ใบมีดติดขัด
ใส่อาหารชิ้นใหญ่เกินไป
หรือแข็งเกินไป
ลดปริมาณหรือขนาดของส่วนผสมที่จะปั่น
หรือบดให้น้อยลง เติมของเหลวให้มากขึ้น
วิธีการแก้ปัญหาเมื่อเครื่องใช้ไฟฟ้าไม่ทำงาน
โปรดติดต่อศูนย์บริการที่ได้รับอนุญาต (ดูรายชื่อศูนย์บริการได้จากคู่มือการบริการ)
คุณสามารถปรับเปลี่ยนเครื่องปั่นของคุณ และซื้ออุปกรณ์เสริมต่อไปนี้ได้จากดีลเลอร์เจ้าประจำของคุณ หรือจากศูนย์บริการที่ได้รับอนุญาต:
เครื่องบดเอนกประสงค์ (F) หรือโถปั่น (C) เพิ่มอีกหนึ่งอัน
เครื่องปั่นของคุณยังคงไม่ทำงานหรือทำงานผิดปกติอยู่หรือ?
Page 14

18
การรีไซเคิล
• การกำจัดเครื่องใช้ไฟฟ้าและวัสดุที่ใช้ทำบรรจุภัณฑ์
วัสดุที่ใช้ทำบรรจุภัณฑ์ของเราผลิตจากวัสดุเฉพาะที่ไม่เป็นอันตรายต่อสิ่งแวดล้อม ดังนั้น
คุณอาจกำจัดวัสดุที่ใช้ทำบรรจุภัณฑ์ตามมาตรการรีไซเคิลที่มีผลบังคับใช้ในภูมิภาคของคุณก็ได้
สำหรับวิธีการกำจัดตัวเครื่อง โปรดติดต่อสอบถามจากเจ้าหน้าที่ของหน่วยงานที่กำกับดูแล ในประเทศของคุณ
• ระยะเวลาการใช้งานของเครื่องใช้ไฟฟ้าหรือสินค้าอิเล็กทรอนิก:
เครื่องใช้ไฟฟ้าของคุณน่าจะมีอายุการใช้งานได้นานหลายปี อย่างไรก็ตาม เมื่อถึงเวลา
ที่ต้องทำการเปลี่ยนเครื่องใหม่ ห้ามโยนทิ้งลงในถังขยะหรือในที่ทิ้งขยะ แต่ให้นำไปยัง
ศูนย์รีไซเคิลในเมืองของคุณ (หรือศูนย์รับขยะ ถ้ามี)
คำนึงถึงสภาพแวดล้อม!
เครื่องใช้ไฟฟ้าของคุณประกอบด้วยวัสดุที่สามารถแปรสภาพหรือนำกลับมาใช้ใหม่ได้
ให้นำส่งที่ศูนย์จัดเก็บขยะเทศบาลในท้องถิ่นของคุณ
สายด่วนเพื่อขอความช่วยเหลือ:
หากคุณพบปัญหาหรือมีคำถามเกี่ยวกับผลิตภัณฑ์ โปรดติดต่อทีมลูกค้าสัมพันธ์ของเราก่อน
เพื่อขอความช่วยเหลือและคำแนะนำจากผู้เชี่ยวชาญ ได้ที่
08456021454–สหราชอาณาจักร
(01)6774003–ROI
หรือศึกษาข้อมูลจากเว็บไซต์ของเรา ที่ www.tefal.co.uk
Page 15

19
A
B
C
D
E
Cawan penyukat
Penudung
Unit jag pengadun
- c1 Unit mata pisau
- c2 Gasket
- c3 Jag pengadun berperingkat
Unit motor
Pemilih kelajuan
F
Aksesori (bergantung pada model) :
Giling universal
- f1 Gasket pengedap
- f2 Unit mata pisau giling
- f3 Mangkuk giling universal
PENERANGAN PERALATAN
Aksesori yang terkandung dalam model yang anda telah beli ditunjukkan pada label di atas
pembungkusan.
ARAHAN KESELAMATAN
• Baca arahan untuk digunakan dengan berhati-hati sebelum menggunakan peralatan
bagi kali pertama: pengilang tidak akan menerima liabiliti sekiranya berlaku apa-apa
penggunaan yang tidak mematuhi arahan.
• Peralatan ini bukan untuk digunakan oleh orang (termasuk kanak-kanak) yang
kurang keupayaan fizikal, deria atau mental, atau kurang pengalaman dan
pengetahuan, kecuali mereka telah diberikan pengawasan atau arahan mengenai
penggunaan peralatan oleh orang yang bertanggungjawab ke atas keselamatan
mereka. Kanak-kanak hendaklah tidak dibenarkan bermain dengan peralatan.
• Ia direka untuk berfungsi dengan arus ulang alik sahaja. Sila periksa sama ada
voltan bekalan kuasa yang ditunjukkan pada plat nama peralatan sepadan dengan
pemasangan elektrik anda.
• Produk ini telah direka untuk kegunaan domestik saja. Apa-apa penggunaan
komersil, secara tidak sesuai atau gagal mematuhi arahan, pengilang tidak akan
bertanggungjawab dan jaminan tidak akan terpakai.
• Pastikan untuk tanggalkan plag peralatan jika anda mesti tinggalkan tanpa
pengawasan, sebelum memasukkan atau mengeluarkan aksesori atau sebelum
membersihkannya. Jangan tarik kord bekalan kuasa untuk menanggalkan peralatan.
• Jangan gunakan alat anda jika ia tidak beroperasi dengan betul, jika ia telah rosak
atau jika kord bekalan kuasa atau plag rosak. Untuk mengekalkan keselamatan,
bahagian ini mesti digantikan oleh pusat perkhidmatan yang diluluskan (lihat senarai
dalam buku panduan perkhidmatan).
• Apa-apa penyelenggaraan selain daripada pembersihan rutin dan senggaraan oleh
pelanggan mesti dijalankan oleh pusat perkhidmatan yang diluluskan.
• Jangan rendam peralatan, kord atau plag di dalam cecair. Kord bekalan kuasa mesti
dijauhkan daripada kanak-kanak dan mesti tidak diletakkan berdekatan atau
bersentuhan dengan bahagian panas peralatan, sumber haba atau bucu tajam.
• Untuk keselamatan anda, hanya gunakan dan alat ganti yang sepadan dengan
peralatan anda, dijual oleh pusat perkhidmatan yang diluluskan.
• Mata pisau adalah sangat tajam: kendalikannya dengan berhati-hati untuk
mengelakkan kecederaan.
• Jangan gunakan pengadun atau aksesorinya tanpa bahan dan jangan tuang cecair
mendidih ke dalam jag.
• Selalu gunakan jag pengadun dengan penutupnya (B).
• Sentiasa tuang bahan cecair ke dalam jag dahulu, sebelum menambah bahan
pepejal, tanpa melebihi aras maksimum.
MS
Page 16

20
• Jangan masukkan jari anda atau apa-apa objek lain ke dalam pengadun apabila
peralatan berjalan.
• Jangan gunakan mangkuk sebagai bekas untuk penyejukbekuan, pemasakan atau
pensterilan.
• Jangan gunakan pengadun untuk lebih daripada 3 minit secara berterusan.
• Letakkan pengadun di atas permukaan kerja rata, stabil dan kalis haba, bersih dan kering.
• Jangan biarkan rambut panjang, skarf, tali leher, dll tergantung atas jag pengadun
aksesori semasa operasi.
• Jangan gunakan pengadun di luar kawasan terbuka.
• Jangan tanggalkan penutup (B) sebelum mata pisau telah berhenti sepenuhnya.
• Jangan sekali-kali gunakan peralatan ini untuk mengadunkan atau mencampurkan
barangan selain daripada bahan makanan.
• Tunggu sehingga peralatan sejuk ke suhu bilik selepas setiap kelompok anda proseskan.
• Jangan gunakan pengadun atau aksesorinya tanpa bahan dan jangan tuang cecair
mendidih (80C) ke dalam jag.
• Jika kord bekalan kuasa rosak, ia mesti digantikan oleh pusat perkhidmatan yang diluluskan.
PENGUNCIAN KESELAMATAN
MENGGUNAKAN BAGI KALI PERTAMA
MENGGUNAKAN PERALATAN ANDA
Peralatan hanya boleh dijalankan apabila jag (C) atau aksesori (F) diletakkan dengan
betul dan dikuncikan pada unit motor (D).
• Sebelum menggunakan peralatan anda bagi kali
pertama, bersihkan semua aksesori (A, B, C dan F)
dalam air suam bersabun, kecuali unit motor (D).
• Pastikan semua pembungkusan telah
ditanggalkan sebelum mengendalikan peralatan.
• Pemberitahuan penting: Putar pemilih kelajuan (E)
ke “0” sebelum meletakkan jag pengadun atau
aksesori pada unit motor.
• Peralatan hanya bermula jika jag atau aksesori
diletakkan dengan betul dan dikunci pada badannya.
• Jangan memakai pengadun jika penutup tidak
ditutup.
1. JAG Pengadun:
• Lembapkan
(c2) dan tempatkannya dengan betul pada unit mata pisau (c1): 3 lipatan
gasket mesti boleh dilihat sebaik sahaja ia di tempatnya. Jika ia diletakkan dalam
arahan lain, anda tidak boleh mengunci unit mata pisau pada jag.
(rajah 1).
• Letakkan pemasangan
(c1+c2) pada tapak jag (c3). Kuncinya dengan memutar unit
mata pisau melalui pusingan suku dalam lawan arah jam.
(rajah 2).
• Masukkan bahan ke dalam jag yang dipasang tanpa melebihi paras maksimum
ditandakan.
•
Pasang penutup (B) ke jag pengadun (C) dan kuncinya dengan menempatnya ke dalam
lubang bertentangan muncung (rajah 3).
AWAS: Mata pisau
adalah sangat tajam,
kendalikan dengan
berhati-hati apabila
menggunakan,
mengosongkan atau
membersihkan
peralatan.
Page 17

21
Masukkan cawan penyukat (A) ke dalam penudung dan tekan ke dalam tempatnya
(rajah 1). Anda dinasihatkan untuk memegang penudung semasa operasi.
•
Letakkan jag pencampur (C) atas badan unit motor (D). Kunci (buka) dijajarkan
dalam slot pada unit motor (rajah 3).
•
Kemudian putarkan jag pengadun (C) melalui putaran kunci (tertutup)
dipaparkan
(rajah 3).
•
Potong semua bahan sebelum meletakkannya ke dalam jag pengadun (C). Memulakan
dengan cecair, tanpa sampai tahap maksimum yang ditunjukkan pada jag (1.5L).
•
Sambungkan peralatan dan bermula dengan memutar pemilih kelajuan (E) ke "Pulse,"
"1," atau "2".
•
Untuk menghentikan alat, bawa pemilih kelajuan (E) ke "0".
•
Tunggu peralatan berhenti sepenuhnya sebelum mengeluarkan jag pengadun (C).
•
Keluarkan jag (C) dengan membuka kunci dalam arahan bertentangan dengan pemasangan.
2. Giling universal:
• Giling universal ini (F) dilengkapkan dengan
mangkuk (f3) yang menghalang akses kepada mata
pisau semasa penggunaan.
• Putar mangkuk (F) dan tuangkan bahan.
• Letakkan gasket pengedap (f1) pada rehatnya pada
unit mata pisau giling (f2) (rajah 2). Letakkan unit
mata pisau giling (f2) atas mangkuk (f3), dan
kuncikan giling universal dengan memutar unit mata
pisau (f2) melalui putaran dalam arahan ikut jam
(rajah 5).
• Putar giling universal yang dipasang (F) dan
letaknya pada unit motor (D). Kunci (buka)
dijajarkan dalam slot pada unit motor (D) (rajah 6).
• Putar giling universal yang dipasang (F) melalui
putaran lawan arah jam sehingga jam mengunci
(ditutup)
dipaparkan (rajah 6).
• Sambungkan peralatan dan bermula dengan
memutar pemilih kelajuan (E) ke "Pulse," "1,"
atau "2".
• Untuk menghentikan alat, pusing pemilih kelajuan
(E) ke "0".
• Tunggu peralatan berhenti sepenuhnya sebelum
mengeluarkan giling universal (F).
• Keluarkan giling universal (F) dengan membuka
kunci dalam arahan bertentangan dengan
pemasangan.
• Terbalikkan di atas permukaan atas sebelum
membuka kunci unit mata pisau giling (f2) dari
mangkuk (f3) dalam urutan songsang pemasangan.
Mata pisau adalah sangat tajam: kendalikannya
dengan berhati-hati untuk mengelakkan
kecederaan.
Awas: kebocoran boleh
berlaku jika aksesori
tidak dikunci dengan
betul.
Page 18

22
Bahan Kuantiti Masa pengendalian
Cili merah kering 30g 33s
Lada hitam 30g 1min30s
Udang kering 25g 30s
Nasi panggang 40g 16s
Bijian hitam 30g 21s
Kacang 50g 4s
Bawang 100g 13s
Daging (potong sehingga ketulan kecil) 140g 20s
Keju Parmesan (potong sehingga ketulan
kecil)
100g 13s
MEMBERSIHKAN PERALATAN ANDA
• Tanggalkan plag peralatan dan keluarkan
aksesori.
• Keluarkan jag dan penudungnya dan bilas di
bawah air.
• Untuk pembersihan mudah, pastikan bahagian
yang boleh ditanggalkan dicuci dengan sabun
pencuci mangkuk dalam air dan sedikit cecair
mencuci.
• Jag pengadun (A, B, C) dan giling universal (F)
boleh dibersihkan dalam mesin basuh pinggan
mangkuk atas program “ECO” atau “LIGHTLY
SOILED”.
• Untuk bersihkan unit motor (D) dengan gunakan
kain lembap. Keringkan dengan berhati-hati.
• Jangan letakkan unit motor (D) di dalam air.
• Kosongkan jag pengadun (C) atau mangkuk giling
universal (f3) sebelum membersih.
AWAS: Kendalikannya
dengan berhati-hati.
Mata pisau jag
pengadun dan aksesori
adalah tajam.
Kemudian anda boleh mengambil penyediaan dalam
mangkuk.
Catatan: Warna mangkuk boleh berubah selepas
mengadun bahan tertentu: cengkih, kayu manis, dll...
Page 19

23
Masalah Penyebab Penyelesaian
Produk tidak berfungsi
Plag tidak dipasang dengan betul
ke dalam soket.
Plag peralatan ke dalam soket
dan hidupkan.
Jag atau aksesori tidak
ditempatkan dengan betul atau
dikunci pada unit motor.
Periksa sama ada jag atau
aksesori diletakkan dengan betul
dan dikunci atas unit motor
seperti ditunjukkan dalam rajah
dalam buku panduan.
Getaran berlebihan.
Produk tidak diletakkan di atas
permukaan rata, stabil dan kalis
haba.
Letakkan produk di atas
permukaan rata.
Isipadu bahan terlalu tinggi.
Kurangkan kuantiti bahan
diproses
Kebocoran dari penudung.
Isipadu bahan terlalu tinggi.
Kurangkan kuantiti bahan
diproses
Penudung tidak ditempatkan
dengan betul.
Kuncikan penudung dengan betul
atas jag pengadun.
Kebocoran dari tapak unit
pengadun
Gasket jag pengadun (c2) tidak
diletakkan dengan betul atau
hilang.
Reposisi gasket dan kunci
pemegang mata pisau dengan
betul
Mustahil untuk mengunci
unit mata pisau dengan
gasket (c1+c2) atas jag
(c3)
Gasket (c2) tidak diletakkan
dengan betul.
Reposisi gasket, 3 lipatan
hendaklah boleh dilihat seperti
ditunjukkan dalam Rajah 1.
Kebocoran dari tapak
giling universal.
Gasket kedap (f1) pada unit mata
pisau (f2) tidak diletakkan dengan
betul atau hilang.
Reposisi gasket kedap (f1) pada
unit mata pisau (f2) dan kuncinya
dengan betul ke atas mangkuk
giling universal.(f3).
Pisau tidak diputar dengan
senang.
Potongan makanan terlalu besar
atau terlalu keras.
Kurangkan saiz atau kuantiti
bahan yang diproses.
Tambah cecair.
APA HENDAK DILAKUKAN JIKA PERALATAN TIDAK BERFUNGSI?
Hubungi pusat perkhidmatan yang diluluskan (lihat senarai dalam buku panduan
perkhidmatan).
Anda boleh sesuaikan pengadun anda dan mendapatkan aksesori yang berikut daripada
peniaga biasa anda atau daripada pusat perkhidmatan yang diluluskan: Giling universal
(F), atau jag pengadun tambahan (C).
Pengadun anda masih tidak berfungsi?
Page 20

24
PENGITARAN SEMULA
• Pelupusan peralatan dan bahan pembungkusannya.
Pembungkusan terdiri daripada bahan yang tidak menyebabkan
bahaya untuk alam sekitar dan boleh dilupuskan mengikut langkahlangkah pengitaran semula berkuat kuasa di tempat anda.
Untuk pelupusan peralatan itu sendiri, sila hubungi perkhidmatan pihak
berkuasa tempatan anda yang sesuai.
• Akhir hayat produk elektrik dan elektronik:
Peralatan anda dijangka boleh tahan untuk beberapa tahun. Walau bagaimanapun,
apabila tiba masanya untuk menggantikannya, jangan buang ke dalam tong sampah tetapi
bawanya ke pusat pengitaran semula di bandar anda (atau ke pusat penerimaan buangan
di mana berkenaan).
Fikirkan alam sekitar!
Peralatan anda mengandungi bahan berharga yang boleh didapati
semula atau dikitarkan semula.
Tinggalkannya di tempat pengumpulan sampah sivik tempatan.
TALIAN BANTUAN:
Jika anda mempunyai apa-apa masalah atau pertanyaan produk, sila hubungi Pasukan
Perhubungan Pelanggan kami dahulu untuk bantuan dan nasihat pakar:
603-7957 6020 – TMT Service Center Malaysia
Atau rujuk tapak web kami – www.tefal.com
Page 21

25
A
B
C
D
E
Chén đo lường
Nắp
Bộ phận cối trộn
- c1 Bộ phận dao
- c2 Miếng đệm
- c3 Cối trộn có chia độ
Bộ phận động cơ
Núm chọn tốc độ
F
Linh kiện (tùy theo mẫu máy) :
Cối xay chung
- f1 Miếng đệm làm kín
- f2 Lưỡi xay
- f3 Chén xay chung
MÔ TẢ THIẾT BỊ
Các linh kiện có trong mẫu máy bạn đã mua được ghi trên nhãn phía trên bao bì.
HƯỚNG DẪN SỬ DỤNG AN TOÀN
• Đọc kỹ bảng hướng dẫn sử dụng trước khi sử dụng thiết bị lần đầu tiên: nhà sản
xuất sẽ không chịu trách nhiệm khi sử dụng không đúng theo hướng dẫn.
• Thiết bị này không được thiết kế cho những người (kể cả trẻ em) thiểu năng, tàn tật
hoặc tâm thần, hoặc thiếu kinh nghiệm và kiến thức, nếu không có sự giám sát chặt
chẽ hoặc hướng dẫn sử dụng của một người lớn có trách nhiệm về sự an toàn của
họ. Trẻ em không được đùa giỡn vớI thiết bị.
• Máy chỉ được thiết kế để sử dụng điện xoay chiều. Vui lòng kiểm tra điện thế nguồn
ghi trên đĩa tên xem có tương ứng với dòng điện trong nhà bạn không.
• Sản phẩm này chỉ được thiết kế để sử dụng trong gia đình. Nếu sử dụng để kinh
doanh, sử dụng sai hoặc không đúng theo hướng dẫn, nhà sản xuất sẽ không chịu
trách nhiệm và việc bảo hành sẽ không được áp dụng.
• Luôn rút dây điện khỏI ổ cắm nếu bạn phải rời khỏi thiết bị, trước khi tháo hoặc lắp
các linh kiện hoặc trước khi lau chùi thiết bị. Không bao giờ nắm kéo dây điện để rút
dây điện khỏi ổ cắm.
• Đừng sử dụng khi thấy thiết bị hoạt động không bình thường hoặc bị hư hỏng, dây
điện hoặc phích cắm bị hư hỏng. Để giữ an toàn, những bộ phận đó phải được thay
thế bởi một trung tâm dịch vụ được ủy quyền (xem danh sách trong cẩm nang
hướng dẫn dịch vụ).
• Mọi sự sửa chữa khác với lau chùi và bảo trì bình thường của khách hàng đều phải
được thực hiện bởi một trung tâm dịch vụ được ủy quyền.
• Đừng nhúng thiết bị, dây điện hoặc phích cắm vào bất kỳ chất lỏng nào. Đừng để
dây điện trong tầm tay trẻ em và không được để gần hoặc tiếp xúc với các bộ phận
nóng của thiết bị hoặc gần nguồn nhiệt hoặc cạnh sắc.
• Vì sự an toàn của bạn, chỉ sử dụng các linh kiện và phụ tùng thích hợp vớI thiết bị,
có bán ở một trung tâm dịch vụ được ủy quyền.
• Các lưỡi dao cực kỳ sắc bén: hãy xử lý chúng thật cẩn thận để tránh bị thương.
• Đừng bao giờ sử dụng cối trộn hoặc các linh kiện khi nó đang trống và không bao
giờ đổ chất lỏng đang sôi vào cối.
• Luôn sử dụng cối trộn khi đã đậy nắp (B).
• Luôn đổ các thành phần lỏng vào cối trước, sau đó mới cho các thành phần cứng
vào, và không được vượt mức tối đa.
• Không bao giờ đưa ngón tay hoặc bất kỳ vật nào vào cối trộn khi thiết bị đang chạy.
• Đừng sử dụng các chén làm vật chứa để đông lạnh, nấu ăn hoặc khử trùng.
VI
Page 22

26
• Đừng sử dụng cối trộn liên tục hơn 3 phút.
• Đặt cối trộn trên bề mặt phẳng, vững chắc, không dẫn nhiệt, sạch và khô.
• Đừng để tóc dài, khăn quàng, cà vạt, v.v…. lơ lửng trên cốI trộn hoặc linh kiện đang
hoạt động.
• Đừng sử dụng cối trộn ngoài trời.
• Đừng mở nắp (B) khi các lưỡi dao chưa ngừng hẳn.
• Đừng bao giờ sử dụng thiết bị để xay hoặc trộn những thứ không phải là thực phẩm.
• Chờ cho thiết bị nguội xuống bằng nhiệt độ trong phòng sau mỗi khi xử lý một mẻ.
• Đừng bao giờ sử dụng cối trộn hoặc các linh kiện khi nó đang trống và không bao
giờ đổ chất lỏng đang sôi (80C) vào cối.
• Nếu dây điện bị hư hỏng, thì dây phải được thay bởi một trung tâm dịch vụ được ủy
quyền.
KHÓA AN TOÀN
SỬ DỤNG LẦN ĐẦU TIÊN
SỬ DỤNG THIẾT BỊ CỦA BẠN
Thiết bị chỉ có thể chạy khi cối (C) hoặc linh kiện (F) được lắp đúng và khóa lại trên bộ
phận động cơ (D).
• Trước khi sử dụng thiết bị lần đầu tiên, rửa tất cả
linh kiện (A, B, C và F) trong nước xà phòng ấm,
ngoại trừ bộ phận động cơ (D).
• Bảo đảm tháo tất cả bao bì trước khi vận hành
thiết bị.
• Ghi chú quan trọng: Xoay núm chọn tốc độ (E) về
“0” trước khi đặt cối trộn hoặc linh kiện lên bộ
phận động cơ.
• Thiết bị chỉ khởi động khi cối hoặc linh kiện được
gắn đúng và khóa vào thân máy.
• Đừng vận hành cối trộn khi chưa đậy nắp.
1. CỐI trộn:
• Làm ẩm miếng đệm (c2) và đặt nó một cách chính xác trên bộ phận dao (c1): bạn phải
nhìn thấy 3 nếp gấp trên miếng đệm sau khi miếng đệm đã vào đúng vị trí.
Nếu miếng đệm được đặt theo một hướng khác, bạn sẽ không thể khóa bộ phận dao
vào cối (hình 1).
• Đặt lắp ráp (c1 + c2) lên bệ cối (c3). Khóa lại bằng cách quay bộ phận dao một phần tư
vòng ngược chiều kim đồng hồ (hình 2).
• Đổ các thành phần vào cối đã lắp ráp không vượt quá mức tối đa đã chỉ định
CHÚ Ý: Các lưỡi dao
cực kỳ sắc bén; hãy xử
lý chúng thật cẩn thận
trong khi sử dụng, làm
trống hoặc lau chùi
thiết bị.
Page 23

27
•
Đậy năp (B) vào cối trộn (C) và khóa lại bằng cách định vị với các lỗ đối diện miệng vòi
(hình 3).
Đưa chén đo lường (A) vào trong nắp và nhấn vào vị trí (hình 1). Bạn nên đặt tay lên giữ
nắp khi vận hành máy.
•
Đặt cối trộn (C) lên thân bộ phận động cơ (D). Khóa (mở) thẳng hàng với rãnh trên
bộ phận động cơ (hình 3).
•
Sau đó xoay cối trộn (C) cho đến khi khóa (đóng)
xuất hiện (hình 3).
•
Cắt nhỏ các thành phần trước khi bỏ chúng vào cối trộn (C). Tốt nhất là bắt đầu với các
chất lỏng, và không vượt quá mức tối đa ghi trên cối (1.5L).
•
Cắm dây điện thiết bị và khởi động bằng cách vặn núm chọn tốc độ (E) sang "Pulse,"
"1," hoặc "2".
•
Để ngừng máy, chuyển núm chọn tốc độ (E) về "0".
•
Chờ cho thiết bị ngừng hẳn trước khi tháo cối trộn (C).
•
Tháo cối trộn (C) bằng cách xoay cối ngược với chiều gắn vào.
2. Cối xay Chung:
• Cối xay chung (F) được trang bị một chén (f3) để
phòng ngừa chạm vào các lưỡi dao khi đang sử
dụng.
• Xoay chén (F) và đổ các thành phần vào.
• Gắn miếng đệm làm kín (f1) vào rãnh trên lưỡi dao
xay (f2) (hình 2). Gắn lưỡi dao xay (f2) vào chén
(f3), và khóa cối xay chung bằng cách xoay bộ phận
lưỡi dao (f2) theo chiều kim đồng hồ (hình 5).
• Xoay bộ phận cối xay chung đã ráp (F) và gắn vào
bộ phận động cơ (D). Khóa (mở) thẳng hàng với
rãnh trên bộ phận động cơ (D) (hình 6).
• Xoay bộ phận cối xay chung đã ráp (F) ngược chiều
kim đồng hồ cho đến khi khóa (đóng)
xuất hiện
(hình 6).
• Cắm dây điện thiết bị và khởi động bằng cách vặn
núm chọn tốc độ (E) sang "Pulse," "1," hoặc "2".
• Để ngừng thiết bị, chuyển núm chọn tốc độ (E) về
"0".
• Chờ cho thiết bị ngừng hẳn trước khi tháo cối xay
chung (F).
• Tháo cối xay chung (F) bằng cách xoay ngược với
chiều lắp vào.
• Đặt cối lên bề mặt làm việc trước khi tháo lưỡi dao
xay (f2) khỏi chén (f3) theo trình tự ngược lại với
khi lắp vào. Các lưỡi dao rất sắc bén: xử lý chúng
thật cẩn thận để tránh bị thương. Sau đó bạn có thể
lấy những thứ hiện có trong chén.
Chú ý: Màu của chén có thể thay đổi sau khi xay
những thành phần quá cứng như: đinh hương, quế,
v.v…
Chú ý: có thể xảy ra rò
rỉ nếu linh kiện không
được khóa đúng cách.
Page 24

28
Thành phần Số lượng Thời gian vận hành
Ớt khô 30g 33 giây
Tiêu đen 30g 1 phút 30 giây
Tôm khô 25g 30 giây
Gạo rang 40g 16 giây
Mè đen 30g 21 giây
Đậu phọng 50g 4 giây
Hành 100g 13 giây
Thịt heo (cắt thành miếng nhỏ) 140g 20 giây
Phó mát Ý (cắt thành miếng nhỏ) 100g 13 giây
LAU CHÙI MÁY
• Rút dây điện vào máy và tháo linh kiện.
• Tháo cối, rửa cối và nắp dưới vòi nước máy.
• Để dễ làm vệ sinh, nhớ rửa những bộ phận có thể
tháo rời bằng nước và một ít dung dịch rửa ngay
sau khi sử dụng.
• Cối trộn (A, B, C) và cối xay chung (F) có thể
được làm vệ sinh bằng máy rửa chén trong tầng
rổ trên cùng theo chương trình “ECO” hoặc
“LIGHTLY SOILED”.
• Để lau chùi bộ phận động cơ (D), sử dụng vải
thấm nước. Lau thật cẩn thận.
• Đừng bao giờ đưa bộ phận động cơ (D) vào nước
hoặc dưới vòi nước máy.
• Làm trống cối trộn (C) hoặc chén cối xay chung
(f3) trước khi lau chùi.
CHÚ Ý: Xử lý chúng
thật cẩn thận: các lưỡi
dao của cối trộn và linh
kiện rất sắc bén.
Page 25

29
Vấn đề Nguyên nhân Giải pháp
Sản phẩm không hoạt
động.
Phích cắm chưa được cắm đúng
vào ổ cắm.
Cắm dây điện vào ổ cắm và bật
công tắc.
Cối hoặc linh kiện chưa được gắn
đúng hoặc khóa vào bộ phận
động cơ.
Kiểm tra xem cối hoặc linh kiện có
được gắn đúng và khóa vào bộ
phận động cơ như trong hình của
cẩm nang hướng dẫn không.
Rung quá mức.
Sản phẩm không được đặt trên
bề mặt phẳng, vững chắc, không
dẫn nhiệt.
Đặt sản phẩm lên bề mặt phẳng.
Khối lượng các thành phần quá
nhiều.
Giảm số lượng các thành phần
cần xử lý.
Rò rỉ ở nắp.
Khối lượng các thành phần quá
nhiều.
Giảm số lượng các thành phần
cần xử lý.
Nắp không được gắn đúng. Khóa nắp đúng cách vào cối trộn.
Rò rỉ từ bệ bộ phận xay
Miếng đệm cối trộn (c2) không
được định vị chính xác hoặc chưa
được lắp.
Định vị lại miếng đệm và khóa bộ
phận giữ dao một cách chính xác.
Không thể khóa bộ phận
dao với miếng đệm
(c1+c2) trên cối (c3)
Miếng đệm (c2) không được định
vị chính xác.
Định vị lại miếng đệm, bạn phải
nhìn thấy 3 nếp gấp như trong
Hình 1.
Rò rỉ từ bệ cối xay tổng
hợp.
Miếng đệm làm kín (f1) trên bộ
phận dao (f2) không được định vị
chính xác hoặc chưa được lắp.
Định vị lại miếng đệm làm kín (f1)
trên bộ phận dao (f2) và khóa một
cách chính xác vào cối xay tổng
hợp (f3).
Lưỡi dao khó quay.
Các miếng thực phẩm quá lớn
hoặc quá cứng.
Giảm kích thước hoặc số lượng
các thành phần cần xử lý. Thêm
chất lỏng.
PHẢI LÀM GÌ NẾU THIẾT BỊ KHÔNG HOẠT ĐỘNG?
Liên hệ trung tâm dịch vụ được ủy quyền (xem danh sách trong cẩm nang dịch vụ).
Bạn có thể tùy chỉnh cối trộn và có được các linh kiện sau từ đại lý quen thuộc hoặc
trung tâm dịch vụ được ủy quyền: Cối xay chung (F), hoặc một cối trộn phụ (C).
Cối trộn vẫn không hoạt động?
Page 26

30
TÁI SINH
• Thải bỏ thiết bị và vật liệu đóng gói.
Các bao bì được chế tạo chủ yếu từ vật liệu không gây nguy hiểm cho
môi trường và có thể được thải bỏ theo các phương pháp tái sinh hiện
hành trong khu vực của bạn.
Để thải bỏ bản thân thiết bị, vui lòng liên hệ dịch vụ thích hợp ở địa
phương của bạn.
• Thời hạn sử dụng các sản phẩm điện và điện tử:
Thiết bị của bạn được sản xuất để sử dụng trong nhiều năm. Tuy nhiên, khi đến lúc phải
thay thế, đừng ném thiết bị vào thùng rác, mà hãy mang đến trung tâm tái sinh trong thành
phố của bạn (hoặc trung tâm thu nhận vật dụng phế thải nếu có).
Nghĩ đến môi trường!
Thiết bị của bạn có các vật liệu giá trị có thể phục hồi hoặc tái sinh.
Hãy đem thiết bị đến điểm thu gom vật liệu phế thải đô thị ở địa phương
của bạn.
ĐƯỜNG DÂY TRỢ GIÚP:
Nếu bạn có thắc mắc hoặc vấn đề về sản phẩm, vui lòng liên hệ Nhóm Quan hệ Khách
hàng trước để được trợ giúp và tư vấn:
0845 602 1454 – Anh quốc
(01) 677 4003 – ROI
Hoặc tham khảo trang web của chúng tôi – www.tefal.co.uk
Page 27

313233
Page 28

Page 29

4
5
6
6
Page 30

343536
Page 31

Page 32

Page 33

37
A
B
C
D
E
Cangkir pengukur
Tutup
Gelas mikser bertingkat
- c1
Unit pisau
- c2
Gasket
- c3
Gelas mikser bertingkat
Unit motor
Pengatur kecepatan
F
Aksesori tergantung model) :
Penggiling universal
- f1 Gasket seal
- f2 Unit pisau penggiling
- f3 Mangkuk penggiling universal
KETERANGAN PERLENGKAPAN ALAT
Daftar aksesori dalam model yang Anda beli ada pada label di bagian atas kemasan.
PETUNJUK KESELAMATAN
• Baca petunjuk penggunaan dengan seksama sebelum menggunakan alat ini yang pertama kali:
produsen tidak akan bertanggung jawab jika penggunaan alat tidak sesuai petunjuk.
• Alat ini tidak dirancang untuk digunakan oleh orang yang (termasuk anak-anak) memiliki
kelainan fisik atau mental, atau kurang pengalaman maupun pemahaman, kecuali mereka
di bawah pengawaan orang yang bertanggung jawab dalam memberi petunjuk tentang
cara menggunakan alat ini demi keselamatan mereka. Jangan biarkan anak-anak
bermain-main dengan alat ini.
• Alat ini dirancang untuk hanya menggunakan arus listrik AC. Pastikan tegangan yang
tertera pada pelat nama alat sesuai dengan tegangan listrik di rumah Anda.
• Produk ini dirancang untuk penggunaan dalam rumah tangga. Setiap penggunaan untuk
usaha atau yang tidak sesuai dengan peruntukannya atau tidak mengikuti petunjuk,
produsen tidak akan bertanggung jawab dan garansi tidak berlaku lagi.
• Cabut steker alat jika setiap kali akan Anda pergi, sebelum memasang atau melepas
aksesori atau sebelum membersihkannya. Jangan cabut steker dengan menarik kabelnya.
• Jangan gunakan alat ini jika tidak bekerja dengan baik, jika sudah rusak atau jika kabel
daya atau stekernya rusak. Demi keselamatan, pastikan komponen diganti oleh pusat
servis resmi (lihat daftar dalam buku pegangan servis).
• Perawatan alat, selain membersihkannya yang dapat dilakukan oleh pelanggan, hanya
boleh dilakukan oleh pusat servis resmi.
• Jangan masukkan alat, kabel catu daya atau stekernya ke dalam cairan. Jauhkan kabel
daya dari jangkauan anak-anak dan simpan, dan jauhkan dari bagian yang panas pada
alat, sumber panas ataupun benda tajam.
• Demi keamanan, gunakan hanya aksesori dan komponen yang dirancang untuk alat Anda,
yang dapat dibeli di pusat servis resmi.
• Pisau pada alat ini sangat tajam: Hati-hati saat membersihkannya agar Anda tidak
terluka.
• Jangan operasikan blender atau aksesorinya tanpa isi dan jangan tuangkan air mendidih
ke dalam gelas blender.
• Operasikan blender selalu dengan tutupnya terpasang (B).
• Tuangkan cairan ke dalam gelas terlebih dahulu, sebelum menambahkan bahan padat,
serta tanpa melebihi batas maksimum.
• Jangan masukkan jari atau benda lain ke dalam gelas, ketika blender sedang bekerja.
• Jangan gunakan mangkuk sebagai wadah untuk membekukan, memasak atau mensterilkan.
ID
Page 34

38
• Jangan gunakan blender tanpa henti lebih dari 3 menit.
• Letakkan blender pada permukaan yang datar, kokoh, tahan panas, bersih dan kering.
• Jangan biarkan rambut, syal, dasi, dsb menjuntai di atas blender atau aksesorinya saat
dioperasikan.
• Jangan gunakan blender di luar rumah.
• Jangan lepas tutup blender (B) sebelum putaran pisau benar-benar berhenti.
• Jangan gunakan alat ini untuk menggiling atau mencampurkan bahan lain selain bahan
makanan.
• Tunggu sampai suhu alat sama dengan suhu ruangan setelah satu proses penggilingan.
• Jangan operasikan blender atau aksesorinya tanpa isi dan jangan tuangkan air mendidih
(80C) ke dalam gelas blender.
• Jika rusak, kabel daya harus diganti oleh pusat servis resmi.
PENGUNCI PENGAMAN
PENGGUNAAN PERTAMA
MEMNGGUNAKAN ALAT
Alat ini tidak dapat dijalankan sebelum gelas (C) atau aksesori (F) dipasang dengan benar
dan terkunci di atas unit motor (D).
• Sebelum menggunakan alat untuk yang pertama kali,
bersihkan semua aksesori (A, B, C dan F) dalam air
hangat yang diberi sabun, kecuali unit motor (D).
• Pastikan semua kemasan sudah dibuka sebelum alat
dioperasikan untuk yang pertama kali
• Catatan penting: Putar pengatur kecepatan (E) ke “0”
sebelum meletakkan gelas blender atau aksesori di
atas unit motor.
• Alat hanya dapat dioperasikan bila posisi gelas atau
aksesori sudah benar dan terkunci kuat ke bodi.
• Jangan operasikan blender jika tutupnya belum
terpasang.
1. GELAS Mikser:
• Lembabkan gasket (c2) dan tempatkan gasket dengan benar pada unit pisau (c1): dengan 3
lipatan gasket harus terlihat setelah berada di tempatnya. Jika ditempatkan pada arah yang
berlawanan, Anda tidak dapat mengunci unit pisau pada gelas. (gambar 1).
• Tempatkan perakit (c1+c2) pada dudukan gelas tersebut (c3). Kunci dengan memutar unit
pisau melalui seperempat putaran dengan arah berlawanan jarum jam. (Gambar 2).
• Masukkan bahan ke dalam gelas yang terpasang tanpa melebihi batas maksimum yang
ditunjukkan.
HATI-HATI: Pisau pada
alat ini sangat tajam;
karena itu berhati-hatilan
ketika menggunakan,
mengosongkan atau
membersihkan alat.
Page 35

39
•
Pasang tutup (B) dengan gelas mikser (C) lalu kunci dengan menempatkannya di atas lubang
yang berhadapan dengan cerat (gambar 3).
Pasang cangkir pengukur (A) ke dalam tutup (gambar 3). Anda disarankan untuk memegang
tutup selama operasi berlangsung.
•
Letakkan gelas mikser (C) di atas unit motor (D). Kunci (terbuka) sejajar dalam slot pada
unit motor (gambar 3).
•
Lalu putar gelas mikser (C) sampai gambar kunci (ditutup) terlihat (gambar 3).
•
Iris semua bahan sebelum memasukkannya ke dalam gelas mikser (C). Sebaiknya dimulai
dengan bahan yang cair, tanpa melebihi batas maksimum yang tertera pada gelas (1,5L).
•
Sambungkan alat dan hidupkan dengan memutar pengatur kecepatan (E) ke "Pulse (Getar),"
"1," atau "2".
•
Untuk menghentikan alat ini, putar kembali pengatur kecepatan (E) ke "0".
•
Tunggu sampai alat benar-benar berhenti sebelum melepas gelas mikser (C).
•
Lepas gelas mikser (C) dengan memutarnya ke kiri.
2. Penggiling Universal:
• Penggiling universal ini (F) dilengkapi mangkuk (f3)
yang menghalangi akses ke unit pisau saat sedang
digunakan.
• Putar mangkuk (F) lalu tuangkan bahan-bahan.
• Letakkan gasket (f1) di tempatnya pada unit pisau (f2)
(gambar 4). Letakkan unit pisau (f2) di atas mangkuk
(f3), lalu kencangkan penggiling universal dengan
memutar unit pisau (f2) ke kanan (gambar 5).
• Putar penggiling universal (F) lalu pasang di atas unit
motor (D). Kunci (terbuka) sejajar dalam slot pada
unit motor (D) (gambar 6).
• Lalu putar penggiling universal (F) ke kiri sampai
gambar kunci (ditutup) terlihat (gambar 6).
• Sambungkan alat dan hidupkan dengan memutar
pengatur kecepatan (E) ke "Pulse (Getar)," "1," atau "2".
• Untuk menghentikan alat ini, putar kembali pengatur
kecepatan (E) ke "0".
• Tunggu sampai alat benar-benar berhenti sebelum
melepas penggiling universal (F).
• Lepas penggiling universal (F) dengan urutan terbalik
dari petunjuk pemasangannya.
• Balikkan di atas meja sebelum melepas unit pisau
penggiling (f2) dari mangkuknya (f3) dengan urutan
terbalik dari petunjuk pemasangannya. Pisau pada alat
ini sangat tajam: Hati-hati saat membersihkannya
agar Anda tidak terluka. Anda selanjutnya dapat
memasukkan bahan ke dalam mangkuk.
Catatan: Warna mangkuk dapat berubah setelah
menggiling bahan tertentu yang sangat keras: cengkeh,
kayu manis, dsb…
Hati-hati: kebocoran
dapat terjadi jika aksesori
tidak terkunci dengan
benar.
Page 36

40
Bahan-bahan Takaran Waktu pengoperasian
Cabai merah kering 30 gram 33 detik
Merica 30 gram 1,5 menit
Ebi 25 gram 30 detik
Nasi panggang 40 gram 16 detik
Wijen hitam 30 gram 21 detik
Kacang tanah 50 gram 4 detik
Bawang merah 100 gram 13 detik
Daging (dipotong-potong kecil) 140 gram 20 detik
Keju parmesan (dipotong-potong kecil) 100 gram 13 detik
MEMBERSIHKAN ALAT
• Cabut steker alat lalu lepas aksesorinya.
• Lepaskan gelas lalu bilas dengan air keran.
• Agar mudah membersihkan bagian yang dapat
dilepas, setelah digunakan segera cuci di dalam air
dengan diberi sedikit sabun cair.
• Gelas mikser (A, B, C) dan penggiling universal (F)
dapat dibersihkan dalam mesin pencuci piring di
keranjang atas dengan menggunakan program “ECO”
atau “LIGHTLY SOILED”.
• Untuk membersihkan unit motor (D), gunakan kain
lembab. Keringkan dengan seksama.
• Jangan letakkan unit motor (D) di bawah air atau di
bawah kucuran air.
• Kosongkan gelas mikser (C) atau mangkuk penggiling
universal (f3) sebelum dibersihkan.
HATI-HATI: Hati-hati saat
membersihkannya: pisau
pada gelas blender dan
aksesori sangat tajam.
Page 37

41
Masalah Sebab Solusi
Produk tidak berfungsi.
Steker belum dipasang dengan
benar ke soket.
Pasang steker alat ke soket lalu
nyalakan.
Gelas atau aksesori tidak diletakkan
atau dikunci dengan benar pada
unit motor.
Pastikan gelas atau aksesori sudah
dipasang dan dikunci di atas unit
motor seperti terlihat pada gambar
dalam manual ini.
Getaran terlalu besar.
Alat tidak diletakkan pada
permukaan yang datar, kokoh,
tahan panas.
Letakkan alat ini pada permukaan
yang datar.
Volume bahan terlalu banyak. Kurangi jumlah bahan makanan.
Tumpahan dari tutup
Volume bahan terlalu banyak. Kurangi jumlah bahan makanan.
Tutup tidak dipasang dengan benar
Kencangkan tutup (c4) di atas gelas
blender.
Kebocoran pada dudukan
unit blender
Gasket gelas blender
(c2
)
tidak dipasang dengan benar atau
hilang.
Pasangkan kembali gasket dan
kunci pemegang pisau dengan
benar.
Tidak mungkin mengunci
unit pisau dengan gasket
(c1+c2)
pada gelas
(c3)
Gasket
(c2)
tidak dipasang dengan
benar.
Pasangkan kembali gasket, 3 lipatan
harus tampak seperti yang
ditunjukkan pada Gambar 1.
Kebocoran pada dudukan
penggiling universal
Gasket seal
(f1)
pada unit pisau
(f2)
tidak dipasang dengan benar atau
hilang.
Pasangkan kembali gasket seal
(f1)
pada unit pisau
(f2)
dan kunci
dengan penggiling benar pada
mangkuk penggiling universal
(f3)
.
Pisau tidak berputar dengan
lancar.
Irisan bahan makanan terlalu besar
atau terlalu keras.
Kurangi ukuran atau jumlah bahan
makanan.
Tambahkan air.
APA YANG HARUS DILAKUKAN JIKA ALAT ANDA TIDAK BERFUNGSI?
Hubungi pusat servis resmi (lihat daftar dalam buku servis).
Anda bisa menyesuaikan blender ini dan mendapatkan aksesori berikut dari dealer atau pusat
servis resmi. Penggiling universal (F), atau gelas blender tambahan (C).
Blender Anda masih tidak berfungsi?
Page 38

42
DAUR ULANG
• Pembuangan alat dan kemasannya.
Kemasan ini khusus dibuat dari material yang tidak membahayakan
lingkungan sehingga dapat dibuang sesuai dengan kebijakan daur ulang
yang berlaku di daerah Anda.
Untuk membuang alat saja, hubungi layanan yang disediakan oleh
pemerintah setempat.
• Masa pakai produk-produk listrik dan elektronik:
Alat ini diharapkan dapat berfungsi selama beberapa tahun. Akan tetapi, ketika tiba saat untuk
menggantinya, jangan buang alat ke kotak sampah, tetapi bawalah ke pusat daur ulang di kota
Anda (atau pusat penampung sampah bila memungkinkan).
Ingat Kelestarian Lingkungan!
Alat ini mengandung berbagai material berharga yang dapat diperbaiki
atau didaur ulang.
Bawalah ke pusat penampungan sampah setempat.
Page 39

43
A
B
C
D
E
계량컵
믹서용기 뚜껑
믹서 용기 유닛
- c1
칼날 유닛
- c2
밀봉 부품
- c3
눈금 믹서 용기
모터본체
속도조절 다이얼
F
악세서리 (모델에 따라 다름)
복합 분쇄 다지기
- f1
누수방지 실리콘링
- f2
복합 분쇄 다지기용 칼날 몸체
- f3
용기
각부명칭
구매하신 제품의 모델에 포함되는 악세서리는 제품 패키지 겉면에서 확인하실 수
있습니다.
안전상 주의사항
• 제품을 처음 사용하시기 전에, 사용설명서를 주의 깊게 읽어주시고 안전을 위하여
정확하게 사용하여 주십시오. 사용설명서대로 사용하지 않아 발생한 문제는 당사의
품질보증혜택을 받으실 수 없습니다.
• 어린이의 손에 닿지 않는 곳에 두십시오. 어린이나 몸이 불편하신 분이 제품을 사용
할 때에는 곁에서 도와주시고 각별히 주의하여 주십시오. 어린이가 제품을 가지고
장난치지 않도록 주의하십시오.
• 제품을 사용하시기 전에 제품의 전압이 가정의 전압과 맞는지 확인하여 주십시오.
전압을 확인하지 않아 발생한 문제에 대해서는 품질보증 혜택을 받으실 수 없습니다
.
• 본 제품은 가정용으로 제작되었으며, 가정용으로만 사용 가능합니다. 상업용으로 사
용되었거나 부적절하게 사용한 경우 당사의 품질보증 혜택을 받으실 수 없습니다.
• 제품을 사용하지 않거나, 조립 또는 분해할 때 또는 세척 시에는 반드시 제품의 전원
코드를 빼주십시오. 전선을 잡아당겨 전원코드를 뽑지 마십시오.
• 제품이 정상적으로 작동되지 않거나, 제품에 손상이 생긴 경우 사용하지 마시고 당
사 서비스센터에 의뢰해 주십시오. (전국 어디서나 1588-1588)
• 일반적인 세척 및 제품 관리를 위한 작업 외의 제품의 수리가 필요할 경우는 당사 서
비스센터에 의뢰해 주십시오.
• 제품 모터본체나 코드를 절대로 물에 담그지 마십시오. 제품 코드를 어린이의 손에
닿지 않는 곳에 두십시오. 전원코드 또는 전원전선을 테이블 등의 날카로운 모서리
에 늘어뜨려 놓지 마시고, 뜨거운 곳에 닿지 않도록 하십시오. 코드 손상으로 화재
및 감전의 원인이 됩니다.
• 안전을 위하여 제품에 적합한 테팔 정품 부품 및 부속품을 사용하여 주시고 이에 따
를지 않아 발생한 문제에 대해서는 품질보증 혜택을 받으실 수 없습니다.
•
칼날은 매우 날카롭습니다: 사용시 주의를 기울이십시오.
• 용기가 비어있는 상태나 마른 재료만 넣고 작동하지 마십시오. 절대 뜨거운 액체 재
료를 넣고 사용하지 마십시오.
• 항상 용기는 용기 뚜껑
(B)
을 닫은 상태에서 사용하십시오.
• 항상 용기 안에 내용물을 먼저 넣고, 물이나 액체를 다음에 넣으십시오. 절대 용기에
표시된 최대 수위를 넘치지 않도록 주의하십시오.
• 사용 중에는 절대로 손가락이나 이물질을 용기 안에 넣지 마십시오.
• 제품의 용기를 음식을 냉동하거나, 요리할 때, 소독용을 위한 용기로 사용하지 마십
시오.
KR
Page 40

44
• 제품을 한번에 3분 이상 사용하지 마십시오.
• 제품은 평평하고 깨끗하고 건조한 바닥에 두고 사용하십시오.
• 작동 시 긴 머리카락이나 스카프, 넥타이 등이 용기 근처에 늘어지지 않도록
하십시오.
• 제품의 뚜껑을 열어둔 채 작동 시키지 마십시오.
• 작동 후 칼날이 완전히 멈추기 전에 뚜껑
(B)
을 열지 마십시오.
• 음식 재료 이외의 다른 재료의 혼합이나 믹싱 용도로 이 제품을 사용하지 마십시오.
• 제품 사용 후 제품의 열이 식을 수 있도록 기다려 주십시오.
• 제품과 악세사리를 음식물을 넣지 않은채로 절대 사용하지 마시고, 뜨거운 액체
(80°C이상)를 용기에 담고 사용하지 마십시오.
• 전원코드가 손상된 경우에는, 반드시 공인된 서비스 센터에서 교체하여 주십시오.
안전 잠금 장치
제품을 처음 사용하기 전
제품 사용하기
믹서 용기
(C)
또는 악세서리
(F)
에 모터 본체
(D)
를 정확하게 장착 되어야만 제품이 작
동됩니다. 만일 용기가 모터본체에 정확하게 장착되지 않으면 안전잠금장치에 의해 제
품은 작동되지 않습니다.
주의: 칼날이 날카로우므로 사고의 방지를 위해 제품을 사용하거나 세척 시에 손으로
직접 만지지 말고 주의를 기울이십시오.
• 본 제품을 사용하기 전에 모터본체
(D)
를 제외한 모든 부속품
(A, B, C, F)
을 따뜻한
물로 세척하여 주십시오.
• 모든 포장물은 제품을 사용하기 전에 제거
하십시오.
• 주의: 용기를 모터본체에 끼우시기 전에 속도조절 다이얼
(E)
을 0 에 맞추십시오.
• 용기를 모터 본체에 정확히 끼우신 후 오른쪽으로 돌려 잠그신 다음 제품을 작동하
십시오.
•
만약 용기의 뚜껑이 제대로 닫혀져 있지 않으면 제품을 작동하지 마십시오.
1. 믹서기:
• 밀봉 부품(c2)에 약간 물을 적시고 칼날 유닛(c1)에 올바로 장착합니다. 밀봉 부품
은 올바른 위치에 장착되면 세 겹으로 구성된 쪽이 보여야 합니다. 만일 방향이 잘못
되었다면 용기 위에 칼날 유닛을 올바로 고정시킬 수 없습니다. (그림 1).
• 조립된 부분(c1+c2)을 용기 베이스 부분(c3)에 위치시킵니다. 칼날 유닛을 반시계
방향으로 1/4 정도 회전시켜서 고정시킵니다. (그림 2).
• 표시된 최대 수위를 초과하지 않도록 조립된 용기에 내용물을 넣어 주십시오
Page 41

45
•
믹서용기
(C)
에 뚜껑
(B)
을 닫고 내용물 출구 반대쪽위 구멍에 맞춰 잠궈 주십시오
.
(fig.3)
계량컵
(A)
을 뚜껑에 닫아 주십시오.
(fig.3)
작동중에는 뚜껑을 누르는 것이 좋
습니다.
•
모터본체
(A)
에 조립된 용기
(C)
를 장착하십시오. 모터본체의 홈에 믹서용기의 빨간색
의 잠김해제 표시된 부분과 맞춰 끼우십시오.
(fig.3)
•
모터본체에 용기를 잠그기 위해서 용기를 돌려 초록색의 잠김 표시된 부분이 나타
나도록 하십시오.
(fig.3)
•
믹서용기
(C)
에 내용물을 넣기전에 적당한 크기로 모두 잘라 주십시오. 최대용량
(1.5L)을 넘지 않도록 주의하며, 액체의 내용물 먼저 작동하여 주십시오.
•
제품을 연결하고 속도조절 다이얼을 ‘펄스(Pulse)’, ’1’, ’2’ 중에 하나로 선택하여 작동
하여 주십시오.
•
제품 작동을 중단하려면 속도조절 다이얼
(E)
을 ‘0’으로 돌려 주십시오.
•
믹서용기
(C)
를 꺼내기 전에 제품이 완전히 정지할 때까지 기다려 주십시오.
•
믹서용기
(C)
를 설치 때의 반대 방향으로 돌려서 잠금 해제하십시오.
2. 복합 분쇄 다지기:
• 분쇄기
(F)
를 사용 할 경우, 칼날을 보호하기 위해 반드시 분쇄기 용기
(f.3)
과 함께 장
착하십시오.
• 주의: 액세서리를 올바로 잠그지 않으면 내용물이 새어 나올 수 있습니다.
• 분쇄 용기
(F)
를 모터본체에 돌려 끼우고 음식 재료를 용기에 넣으십시오.
• 누수방지 실리콘링
(f1)
을 분쇄기 칼날본체
(f2)
에 끼우십시오.
(fig.4)
. 분쇄기 용기
(f.5)
에 분쇄용 칼날 본체
(f.2)
를 끼워 칼날을 시계 방향으로 돌려 잠궈주십시오.
(fig.
3)
.
• 조립된 분쇄 용기
(F)
를 모터 본체 위에 끼우십시오. 모터본체의 홈에 믹서용기의 빨
간색의 잠김해제 표시된 부분과 맞춰 끼우십시오.
(Fig.6)
.
• 조립된 분쇄 용기를 반시계 방향으로 돌려 초록색의 잠김 표시된 부분이 나타나도
록 하십시오.
(Fig.6)
• 전원을 연결한 후, 속도조절 다이얼
(E)
을 원하는 위치에 돌려 놓거나 재료가 잘 혼합
되도록 펄스 기능을 작동하십시오. 제품이 작동 중일 때는 용기를 움직이지 마십시오.
• 제품의 작동을 멈추시려면 속도조절 다이얼
(E)
을 “0” 위치로 되돌리십시오.
• 분쇄기
(F)
를 분리하기 전에 제품이 완전히 정지할 때까지 기다려 주십시오.
• 분쇄기
(F)
를 설치 때의 반대방향으로 돌려서 잠금해제를 하여 주십시오.
• 분쇄기용 칼날
(F2)
을 분쇄용기
(F3)
에서 잠금해제하기 전에 제품을 평평한 바닥 위에
뒤집어 올려 놓고 조립 순서의 반대 방향으로 분해하십시오. 칼날이 날카로우므로 사고
의 방지를 위해 손으로 직접 만지지 말고 주의를 기울이십시오.
참고:
강한 색을 가진 음식 재료를 넣어 작동 하였을 경우 용기의 색이 변색될
수 있습니다.
Page 42

46
재료 수량 (최대) 작동 시간
마른 고추 30g 33초
후추 30g 1분 30초
마른 새우 25g 30초
구운 쌀 40g 16초
검은 깨 30g 21초
땅콩 50g 4초
양파 100g 13초
돼지고기 (작은 조각에 커트) 140g 20초
파마산 치즈 (작은 조각에 커트) 100g 13초
세척하기
• 제품의 전원코드를 뽑고 모든 악세서리들을 분리해 주십시오.
• 주의: 칼날이 날카롭습니다. 칼날을 분리할 때나 세척할 때는 항상 주의하십시오.
• 용기를 모터본체에서 분리한 후, 용기를 흐르는 물에 헹궈주시고, 주변부속품도
같이 헹궈주십시오.
• 제품을 쉽게 세척하려면, 세척 전 칼날을 분리하고 소량의 주방용 세제로
세척하십시오.
• 믹서 용기
(C)
와 모든 주변 부속품
(A,B,F)
은 식기세척기의 상단 바구니에서 ‘간이세척’
또는 ‘초간편세척’으로 사용 가능합니다.
• 모터본체(D)는 젖은 수건으로만 닦은 후, 조심스럽게 말려 주십시오.
• 모터본체(D)는 흐르는 물에 절대 담그지 마십시오.
• 세척 전에 믹서용기(C)와 분쇄용기(f.3)을 비워 주십시오.
Page 43

47
문제 원인 해결방법
제품이 작동하지 않습니다.
전원코드가 연결되어 있지
않습니다.
전원코드를 연결하여 주십시오.
믹서용기 또는 악세서리가 정확하
게 모터본체에 정확하게 장착되어
있지 않거나 모터 본체가 제대로
잠겨 있지 않습니다.
믹스용기 또는 악세서리가 정확하
게 장착되었는지를 확인하거나 모
터본체에 용기를 정확하게 안전
잠금장치를 이용하여 잠궈주십
시오.
제품 작동 시 심한 진동이
있습니다.
제품이 평평한 표면에 놓여있지
않습니다.
제품을 평평한 표면에 놓아주십
시오.
재료를 너무 많이 넣었습니다. 재료의 양을 줄이십시오.
뚜껑을 통해 액체가 새어
나옵니다.
재료를 너무 많이 넣었습니다. 재료의 양을 줄이십시오.
믹서용기의 뚜껑이 제대로 닫혀
있지 않았습니다.
믹서용기의 뚜껑을 제대로 닫아
주십시오.
다지기나 분쇄기 밑부분을
통해 내용물이 새어 나옵
니다.
누수방지 실리콘링
(C2)
이 다지
기 및 분쇄기 칼날 본체(d2또는
e2
)에 제대로 장착되어 있지 않
거나 누수방지 실리콘링
(C2)
없
이 장착되어 있습니다.
누수방지 실리콘링
(C2)
을 다시
칼날(d2또는 e2)에 장착시키고
칼날을 꽉 잠그시고 용기
(F)
에 정
확하게 끼워 잠그십시오.
블렌더 유닛의 베이스 부분
에서 내용물 새어 나옴
블렌더 용기 밀봉 부품
(c2)
이 올
바로 위치되지 않았거나 장착되지
않았습니다.
밀봉 부품을 올바로 위치시키고 칼
날 홀더를 올바로 고정시킵니다.
용기
(c3)
의 밀봉 부품
(c1+c2)
을 칼날 유닛에 고
정할 수 없음
밀봉 부품
(c2)
의 위치가 올바르지
않습니다.
올바른 밀봉 부품 위치는 그림 1
에서처럼 세 겹으로 구성된 부분
이 보이는 방향이어야 합니다.
범용 분쇄기의 베이스 부분
에서 내용물 새어 나옴
블레이드 유닛
(f2)
의 밀봉 개스킷
(f1)
이 올바로 위치하지 않았거나
장착되지 않았습니다.
블레이드 유닛
(f2)
에 밀봉 개스킷
(f1) 부품 위치를 다시 조정하고
올바로 범용 분쇄 보울
(f3)
에 고
정시킵니다.
칼날이 원활하게 작동하지
않습니다.
재료가 너무 크거나 너무 단단합
니다.
재료의 크기 또는 양을 줄이십시
오. 액체를 첨가하십시오.
제품이 작동하지 않을 때는?
제품이 계속 작동하지 않을 경우 당사 서비스센터에 의뢰하십시오.
다음의 악세서리는 당사 서비스센터에서 구입할 수 있습니다: 분쇄기 악세서리
(F)
,
추가 믹서 용기
(C)
.
제품이 여전히 작동하지 않습니까?
Page 44

48
재활용을 위한 분리수거
•
제품 및 제품 패키지는 재활용이 가능 합니다.
제품은 환경에 전혀 무해한 성분으로 만들어 졌으며 모든 제품의 부품은
재활용이 가능합니다.
이에 관련 상세한 사항은 당사 서비스센터에 문의 바랍니다.
•
전자 제품의 수명
본 제품은 오랜 기간 사용이 가능 하지만 만약 제품을 폐기하실 경우에는 일반 쓰레기통
에 그냥 버리지 마시고 분리수거를 하십시오. 또는 폐기 관련 하여 궁금하신 사항이 있으
시면 당사 서비스센터에 문의하십시오.
환경을 생각합니다!
본 제품에는 재활용 할 수 있는 부품들이 있습니다.
수명이 끝난 제품을 폐기하실 때는 분리수거를 하십시오.
제품문의 080-733-7878
AS문의 1588-1588(전국 어디서나)
www.tefal.co.kr
Page 45

A
B
C
D
E
Bouchon doseur
Couvercle
Bol mixeur gradué
- c1 Bloc lames
- c2 Joint
- c3 Bol gradué
Bloc moteur
Sélecteur de vitesse
F
Accessoire (selon modèle) :
moulin à fines herbes
- f1 Joint d’étanchéité
- f2 Bloc lames
- f3 Bol du moulin à fines herbes
DESCRIPTION DE L'APPAREIL
Les accessoires contenus dans le modèle que vous avez acheté sont représentés sur
l’étiquette située en haut de l’emballage.
CONSIGNES DE SÉCURITÉ
• Lisez attentivement le mode d’emploi avant la première utilisation de votre appareil. Une
utilisation non conforme au mode d’emploi dégagerait le fabricant de toute responsabilité.
• Cet appareil n’est pas prévu pour être utilisé par des personnes (y compris les
enfants) dont les capacités physiques, sensorielles ou mentales sont réduites, ou des
personnes manquant d’expérience ou de connaissances, sauf si elles ont pu
bénéficier, par l’intermédiaire d’une personne responsable de leur sécurité, d’une
surveillance ou d’instructions préalables concernant l’utilisation de l’appareil.
Il convient de ne pas laisser les enfants jouer avec l’appareil.
• Celui-ci est conçu pour fonctionner uniquement avec du courant alternatif. Vérifiez
que la tension d’alimentation indiquée sur la plaque signalétique de l’appareil
correspond bien à celle de votre installation électrique.
• Ce produit est destiné à un usage domestique uniquement. En cas d’utilisation
commerciale, inappropriée ou non conforme au mode d’emploi, le fabricant décline
toute responsabilité et la garantie ne s’applique pas.
• Veillez à débrancher l’appareil si vous devez le laisser sans surveillance, avant
d’ajouter ou de retirer des accessoires, et avant de le nettoyer. Ne tirez jamais sur le
cordon d’alimentation pour débrancher l’appareil.
• N’utilisez pas votre appareil s’il ne fonctionne pas correctement, s’il a été abîmé ou si
le cordon d’alimentation ou la fiche sont endommagés. Afin d’éviter tout danger, ces
parties doivent être remplacées par un centre SAV agréé (voir la liste dans le livret
d’entretien).
• Toute intervention autre que le nettoyage et l’entretien usuels par le client doit être
effectuée par un centre SAV agréé.
• Ne plongez pas l’appareil, le cordon ou la fiche dans un liquide. Ne laissez pas le
cordon d’alimentation à portée de mains des enfants, à proximité ou en contact avec
les parties chaudes de l’appareil, près d’une source de chaleur ou sur un angle vif.
• Pour votre sécurité, n’utilisez que des accessoires et des pièces détachées adaptés
à votre appareil et vendus par un centre SAV agréé.
• Manipulez les lames avec précaution car elles sont très aiguisées et peuvent
vous blesser.
• N’utilisez jamais le blender ou ses accessoires sans ingrédients et ne versez jamais
de liquides bouillants dans le bol.
• Utilisez toujours le bol mixeur avec son couvercle (B).
• Versez toujours les ingrédients liquides en premier dans le bol avant d’ajouter les
ingrédients solides, sans dépasser la limite maximale.
• Ne mettez jamais les doigts ou tout autre objet dans le blender pendant le
fonctionnement de l’appareil.
• N’utilisez pas les bols comme récipients pour la congélation, la cuisson ou la stérilisation.
FR
49
Page 46

• N’utilisez pas le blender pendant plus de 3 minutes en marche continue.
• Posez le blender sur une surface de travail plane, stable, résistante à la chaleur,
propre et sèche.
• Ne laissez pas pendre les cheveux longs, les écharpes, les cravates, etc. au dessus
du bol mixeur ou des accessoires en fonctionnement.
• N’utilisez pas le blender en plein air.
• N’enlevez pas le couvercle (B) avant l’arrêt complet des lames.
• N’utilisez jamais cet appareil pour mixer ou mélanger des éléments autres que des
ingrédients alimentaires.
• Attendez que l’appareil refroidisse à température ambiante après chaque utilisation.
• N’utilisez jamais le blender ou ses accessoires sans ingrédients et ne versez jamais
de liquides bouillants (80 °C) dans le bol.
• Si le cordon d’alimentation est endommagé, il doit être remplacé par un centre SAV
agréé.
VERROUILLAGE DE SÉCURITÉ
PREMIÈRE UTILISATION
UTILISATION DE VOTRE APPAREIL
L’appareil ne pourra fonctionner que si le bol (C) ou l’accessoire (F) sont correctement
installés et verrouillés sur le bloc moteur (D).
• Avant la première utilisation, nettoyez tous les
accessoires (A, B, C et F) à l’eau chaude
savonneuse, sauf le bloc moteur (D).
• Assurez-vous que tout emballage soit retiré avant
le fonctionnement de l’appareil.
• Important : Tournez le sélecteur de vitesse (E) sur
« 0 » avant de placer le bol mixeur ou les
accessoires sur le bloc moteur.
• L’appareil ne démarrera que si le bol ou
l’accessoire sont correctement installés et
verrouillés sur le corps de l’appareil.
• Ne faites pas fonctionner le blender si le
couvercle n’est pas en place.
1. Bol mixeur :
•
Humectez le joint (c2) et positionnez-le correctement sur le bloc lames (c1) : les 3 plis du joint
doivent être visibles une fois en place. S’il est placé à dans l’autre sens, vous ne pourrez pas
verrouiller le bloc lames sur le bol. (Figure 1)
• Placez l’ensemble (c1+c2) à la base du bol (c3). Verrouillez le tout en faisant pivoter le bloc
lames d’un quart de tour dans le sens inverse des aiguilles d’une montre. (Figure 2)
• Versez les ingrédients dans le bol mixeur assemblé sans dépasser la limite maximale indiquée.
•
Mettez le couvercle (B) sur le bol mixeur (C) et verrouillez-le en le positionnant sur les
orifices situés à l’opposé du bec verseur (figure 3).
ATTENTION : Les
lames sont extrêmement coupantes ;
manipulez-les avec
précaution lorsque
vous utilisez l’appareil,
vider ou nettoyer le bol.
50
Page 47

Insérez le bouchon doseur (A) dans le couvercle et appuyez dessus jusqu’à ce qu’il soit
bien en place (figure 3). Il est conseillé de tenir le couvercle pendant le fonctionnement.
•
Posez le bol mixeur (C) sur le corps du bloc moteur (D). Le verrou (ouvert) est
aligné sur la marque présente sur le bloc moteur (figure 3).
•
Faites tourner le bol mixeur (C) jusqu’à ce que le verrou (fermé)
apparaisse (figure 3).
•
Coupez tous les ingrédients en dés avant de les mettre dans le bol mixeur (C). Il est
préférable de commencer par les liquides, sans dépasser la limite maximale indiquée
sur le bol (1,5 l).
•
Branchez l’appareil et mettez-le en marche en tournant le sélecteur de vitesse (E)
sur « Pulse » « 1 » ou « 2 ».
•
Pour arrêter l’appareil, mettez le sélecteur de vitesse (E) sur la position « 0 ».
•
Attendez l’arrêt complet de l’appareil avant de retirer le bol mixeur (C).
•
Retirez le bol mixeur (C) en le déverrouillant dans le sens inverse de l’installation.
2. Moulin à fines herbes :
• Ce moulin à fines herbes (F) comprend un bol (f3)
empêchant l’accès aux lames pendant l’utilisation.
• Retournez le bol (F) et versez les ingrédients.
• Placez le joint d’étanchéité (f1) dans le
renfoncement sur le bloc lames (f2) (figure 4).
Positionnez le bloc lames (f2) sur le bol (f3) et
verrouillez le moulin à fines herbes en faisant
tourner le bloc lames (f2) dans le sens des aiguilles
d’une montre (figure 5).
• Retournez le moulin à fines herbes monté (F) et
placez-le sur le bloc moteur (D). Le verrou (ouvert)
est aligné sur la marque présente sur le bloc moteur
(D) (figure 6).
• Faites tourner le moulin à fines herbes monté (F)
dans le sens inverse des aiguilles d’une montre
jusqu’à ce que le verrou (fermé) apparaisse
(figure 6).
• Branchez l’appareil et mettez-le en marche en
tournant le sélecteur de vitesse (E) sur « Pulse »
« 1 » ou « 2 ».
• Pour arrêter l’appareil, mettez le sélecteur de
vitesse (E) sur la position « 0 ».
• Attendez l’arrêt complet de l’appareil avant de
retirer le moulin à fines herbes (F).
• Retirez le moulin à fines herbes (F) en le
déverrouillant dans le sens inverse de l’installation.
• Retournez-le sur le plan de travail avant de
désolidariser le bloc lames (f2) du bol (f3) dans
l’ordre inverse du montage. Manipulez les lames
avec précaution car elles sont très aiguisées et
peuvent vous blesser. Vous pouvez recueillir la
préparation dans le bol.
Attention : des fuites
peuvent se produire si
l’accessoire n’est pas
correctement verrouillé.
51
Page 48

Ingrédients Quantités Temps de fonctionnement
Piments rouges secs 30 g 33 s
Poivre noir 30 g 1 min 30 s
Crevettes séchées 25 g 30 s
Riz grillé 40 g 16 s
Sésame noir 30 g 21 s
Cacahuètes 50 g 4 s
Oignons 100 g 13 s
Porc (coupé en petits morceaux) 140 g 20 s
Parmesan (coupé en petits morceaux) 100 g 13 s
NETTOYAGE DE VOTRE APPAREIL
• Débranchez l’appareil et enlevez les accessoires.
• Retirez le bol et rincez-le sous l’eau courante ainsi
que son couvercle.
• Pour un nettoyage facile, lavez les parties
amovibles dans l’eau et un peu de liquide
vaisselle immédiatement après utilisation.
• Le bol mixeur (A, B, C) et le moulin à fines herbes
(F) peuvent être lavés au lave-vaisselle dans le
bac supérieur en utilisant le programme « ÉCO »
ou « PEU SALE ».
• Pour nettoyer le bloc moteur (D), utilisez un
chiffon humide. Séchez-le soigneusement.
• Ne mettez jamais le bloc moteur (D) dans l’eau ou
ne le passer pas sous l’eau courante.
• Videz le bol mixeur (C) ou le bol du moulin à fines
herbes (f3) avant nettoyage.
ATTENTION :
Manipulez les lames du
bol mixeur et des
accessoires avec
précaution car elles
sont coupantes.
Remarque : La couleur du bol peut changer après
avoir mixé certains ingrédients très durs : clous de
girofle, cannelle, etc.
52
Page 49

Problèmes Causes Solutions
Le produit ne fonctionne
pas.
La fiche n’est pas correctement
enfoncée dans la prise.
Branchez l’appareil sur une prise
puis mettez-le en marche.
Le bol ou l’accessoire n’est pas
correctement installé ou verrouillé
sur le bloc moteur.
Vérifiez que le bol ou les
accessoires sont correctement
installés et verrouillés sur le bloc
moteur comme indiqué sur le
dessin dans le mode d’emploi.
Vibrations excessives
L’appareil n’est pas posé sur une
surface plane, stable et résistante
à la chaleur.
Posez le produit sur une surface
plane.
Le volume d’ingrédients est trop
important.
Diminuez la quantité d’ingrédients
dans le bol.
Fuite au niveau du
couvercle
Le volume d’ingrédients est trop
important.
Diminuez la quantité d’ingrédients
dans le bol.
Le couvercle est mal positionné.
Verrouillez correctement le
couvercle sur le bol mixeur.
Fuite à la base du blender
Le joint (f1) sur le bloc lames (f2)
est mal positionné ou manquant.
Repositionnez le joint (f1) sur le
bloc lames (f2) et vérouillez-le
correctement sur le bol (F3).
Le joint du bol mixeur (c2) est mal
positionné ou manquant.
Repositionnez le joint et
verrouillez correctement le
porte-lames.
Impossible de verrouiller le
bloc lames avec le joint
(c1+c2) sur le bol (c3)
Le joint (c2) est mal positionné.
Repositionnez le joint, les 3 plis
doivent être visibles comme sur la
Figure 1.
Fuite à la base du moulin
à fines herbes
Le joint d’étanchéité (f1) sur le
bloc lames (f2) est mal positionné
ou manquant.
Repositionnez le joint d’étanchéité
(f1) sur le bloc lames (f2) et
verrouillez-le correctement sur le
bol du moulin à fines herbes (f3).
La lame a du mal à
tourner.
Les morceaux d’aliments sont
trop gros ou trop durs.
Réduisez la taille ou la quantité
des ingrédients dans le bol.
Ajoutez du liquide.
QUE FAIRE SI VOTRE APPAREIL NE FONCTIONNE PAS ?
Contactez un centre SAV agréé (voir la liste dans le livret d’entretien).
Vous pouvez personnaliser votre blender et vous procurer auprès de votre revendeur
habituel ou d’un centre SAV agréé les accessoires suivants : moulin à fines herbes (F)
ou un autre bol mixeur (C).
Votre blender ne fonctionne toujours pas ?
53
Page 50

RECYCLAGE
• Mise au rebut de l’appareil et de ses matériaux d’emballage.
L’emballage comprend exclusivement des matériaux sans danger pour
l’environnement, pouvant être jetés conformément aux dispositions de
recyclage en vigueur.
Pour la mise au rebut de l’appareil lui-même, renseignez-vous auprès du
service approprié de votre commune.
• Produits électriques et électroniques en fin de vie :
Votre appareil est conçu pour durer de nombreuses années. Toutefois, quand viendra le
moment de le remplacer, ne le jetez pas à la poubelle mais apportez-le au centre de
recyclage de votre commune (ou à un point de collecte des déchets suivant le cas).
Participons à la protection de l’environnement !
Votre appareil contient de nombreux matériaux valorisables ou
recyclables.
Déposez celui-ci dans un point municipal de collecte des déchets.
54
Page 51

A
B
C
D
Πώμα δοσομέτρησης
Καπάκι
Διαβαθμισμένο μπολ ανάμειξης
- c1
Σύστημα λεπίδων
- c2
Λάστιχο στεγανοποίησης
- c3
Διαβαθμισμένο μπολ
Κεντρική μονάδα
E
F
Διακόπτης ταχύτητας
Εξάρτημα (ανάλογα με το μοντέλο):
μύλος μυρωδικών
- f1
Λάστιχο στεγανοποίησηςt
- f2
Σύστημα λεπίδων
- f3
Μπολ του μύλου μυρωδικών
ΠΕΡΙΓΡΑΦΗ ΤΗΣ ΣΥΣΚΕΥΗΣ
Τα εξαρτήματα που συνοδεύουν το παρόν μοντέλο που αγοράσατε απεικονίζονται στην
ετικέτα που βρίσκεται στο επάνω μέρος της συσκευασίας.
ΟΔΗΓ
Ι
ΕΣ ΑΣΦΑΛΕΙ
ΑΣ
• Διαβάστε προσεκτικά τις οδηγίες χρήσης πριν χρησιμοποιήσετε για πρώτη φορά τη
συσκευή: Η κατασκευάστρια εταιρεία δεν φέρει καμία ευθύνη σε περίπτωση μη τήρησης
των οδηγιών αυτών.
• Η παρούσα συσκευή δεν προορίζεται για χρήση από άτομα (συμπεριλαμβανομένων των
παιδιών) με μειωμένες σωματικές, αισθητήριες ή διανοητικές ικανότητες, ή άτομα με
ελλιπή εμπειρία ή γνώση ως προς τη χρήση, εκτός εάν τη χρησιμοποιούν υπό επιτήρηση ή
έχουν λάβει οδηγίες σχετικά με τη χρήση της συσκευής από κάποιο άτομο που είναι
υπεύθυνο για την ασφάλειά τους.
Τα παιδιά δεν πρέπει να χρησιμοποιούν τη συσκευή ως παιχνίδι.
• Η συσκευή έχει σχεδιαστεί αποκλειστικά για λειτουργία με εναλλασσόμενο ρεύμα.
Βεβαιωθείτε ότι η ηλεκτρική τάση που αναγράφεται πάνω στην ετικέτα χαρακτηριστικών
της συσκευής είναι ίδια με αυτήν του ηλεκτρικού σας δικτύου.
• Η παρούσα συσκευή προορίζεται αποκλειστικά για οικιακή χρήση. Σε περίπτωση
εμπορικής, μη εγκεκριμένης χρήσης ή μη συμβατής με τις οδηγίες χρήσης, η εταιρεία δεν
φέρει καμία ευθύνη και η εγγύηση δεν ισχύει.
• Να αποσυνδέετε τη συσκευή εάν πρόκειται να μείνει δίχως επίβλεψη, πριν από την
προσθήκη ή την αφαίρεση εξαρτημάτων, και πριν από τον καθαρισμό της συσκευής. Ποτέ
μην τραβάτε το καλώδιο ρεύματος για να αποσυνδέσετε τη συσκευή από την πρίζα.
• Μη χρησιμοποιείτε τη συσκευή εάν δεν λειτουργεί σωστά ή έχει υποστεί ζημιά, ή εάν το
καλώδιο ρεύματος ή το βύσμα έχουν φθαρεί. Προκειμένου να αποφευχθεί κάθε κίνδυνος,
προσκομίστε τη συσκευή ή το ελαττωματικό εξάρτημα προς αντικατάσταση σε ένα
εξουσιοδοτημένο κέντρο εξυπηρέτησης μετά την πώληση (δείτε τη λίστα στο φυλλάδιο
συντήρησης).
• Εκτός από τις τακτικές εργασίες καθαρισμού και συντήρησης που εκτελούνται από τον
χρήστη, οποιαδήποτε άλλη επέμβαση πρέπει να ανατίθεται σε ένα εξουσιοδοτημένο κέντρο
εξυπηρέτησης μετά την πώληση.
• Μη βυθίζετε τη συσκευή, το καλώδιο ρεύματος ή το βύσμα σε οποιοδήποτε υγρό. Μην
αφήνετε το καλώδιο ρεύματος εκτεθειμένο σε σημείο που είναι προσβάσιμο σε παιδιά,
κοντά ή σε επαφή με τα ζεστά μέρη της συσκευής, κοντά σε πηγή θερμότητας ή επάνω σε
αιχμηρή γωνία.
• Για την ασφάλειά σας, να χρησιμοποιείτε αποκλειστικά και μόνο γνήσια εξαρτήματα και
ανταλλακτικά που είναι κατάλληλα για τη συσκευή σας, τα οποία μπορείτε να
προμηθευτείτε από ένα εξουσιοδοτημένο κέντρο εξυπηρέτησης μετά την πώληση.
EL
55
Page 52

56
• Να χειρίζεστε τις λεπίδες με προσοχή, διότι είναι εξαιρετικά αιχμηρές και μπορούν να
σας τραυματίσουν.
• Μη χρησιμοποιείτε ποτέ το μπλέντερ ή τα εξαρτήματά του ενώ είναι άδειο και μη χύνετε
ποτέ καυτά υγρά μέσα στο μπολ.
• Να χρησιμοποιείτε πάντα το μπολ ανάμειξης μαζί με το καπάκι του (B).
• Να προσθέτετε πάντα τα υγρά συστατικά πρώτα μέσα στο μπολ ανάμειξης προτού
προσθέσετε τα στερεά συστατικά, χωρίς να υπερβαίνετε τη μέγιστη στάθμη.
• Ποτέ μην τοποθετείτε τα δάχτυλά σας ή οποιοδήποτε άλλο αντικείμενο μέσα στο μπλέντερ
κατά τη λειτουργία της συσκευής.
• Μη χρησιμοποιείτε τα μπολ ως δοχεία κατάψυξης, μαγειρέματος ή αποστείρωσης.
• Μη χρησιμοποιείτε το μπλέντερ για περισσότερο από 3 λεπτά σε συνεχή λειτουργία.
• Τοποθετήστε το μπλέντερ πάνω σε μια επίπεδη, σταθερή, θερμοανθεκτική, καθαρή και
στεγνή επιφάνεια.
• Μην αφήνετε να κρέμονται μακριά μαλλιά, φουλάρια, γραβάτες, κ.λπ. πάνω από το μπολ
ανάμειξης ή τα εξαρτήματα ενώ η συσκευή λειτουργεί.
• Μη χρησιμοποιείτε το μπλέντερ σε εξωτερικούς χώρους.
• Μην αφαιρείτε το καπάκι (B) προτού σταματήσουν εντελώς οι λεπίδες.
• Ποτέ μη χρησιμοποιείτε την παρούσα συσκευή για ανάμειξη ή πολτοποίηση άλλων
συστατικών πέρα από τροφές.
• Περιμένετε να κρυώσει η συσκευή σε θερμοκρασία περιβάλλοντος μετά από κάθε χρήση.
• Μη χρησιμοποιείτε ποτέ το μπλέντερ ή τα εξαρτήματά του ενώ είναι άδειο και μη χύνετε
ποτέ καυτά υγρά (80°C) μέσα στο μπολ.
• Εάν το καλώδιο ρεύματος φθαρεί, πρέπει να το προσκομίσετε προς αντικατάσταση σε ένα
εξουσιοδοτημένο κέντρο εξυπηρέτησης μετά την πώληση.
ΑΣΦΑΛΕΙΑ
ΠΡΩΤΗ ΧΡΗΣΗ
Η συσκευή λειτουργεί μόνο όταν το μπολ (C) ή το εξάρτημα (F) είναι σωστά εγκατεστημένο
και ασφαλισμένο πάνω στην κεντρική μονάδα (D)
• Πριν από την πρώτη χρήση, πλύνετε όλα τα
εξαρτήματα (A, B, C και F), εκτός από την κεντρική
μονάδα (D), με ζεστό νερό και σαπουνάδα.
• Βεβαιωθείτε ότι έχετε αφαιρέσει όλα τα υλικά
συσκευασίας πριν από τη λειτουργία της συσκευής.
• Σημαντικό: Γυρίστε τον διακόπτη ταχύτητας (E) στο
"0" προτού τοποθετήσετε το μπολ ανάμειξης ή τα
εξαρτήματα πάνω στην κεντρική μονάδα.
• Η συσκευή λειτουργεί μόνο όταν το μπολ ή το
εξάρτημα είναι σωστά εγκατεστημένο και
ασφαλισμένο πάνω στο κυρίως σώμα της συσκευής.
• Μη θέτετε σε λειτουργία το μπλέντερ εάν το καπάκι
δεν είναι τοποθετημένο στη θέση του.
1. Μπολ ανάμειξης:
• Βρέξτε το λάστιχο (c2) και τοποθετήστε το σωστά πάνω στο σύστημα λεπίδων (c1): οι 3
πτυχές του λάστιχου πρέπει να είναι ορατές μετά από την τοποθέτηση στη θέση του. Εάν
ΠΡΟΣΟΧΗ: Οι λεπίδες
είναι εξαιρετικά
αιχμηρές. Να τις
χειρίζεστε με προσοχή
κατά τη λειτουργία της
συσκευής, το άδειασμα
ή τον καθαρισμό του
μπολ.
ΧΡΗΣΗ ΤΗΣ ΣΥΣΚΕΥΗΣ
Page 53

57
τοποθετηθεί με διαφορετική κατεύθυνση, δεν θα μπορείτε να ασφαλίσετε το σύστημα
λεπίδων πάνω στο μπολ. (Εικόνα 1)
• Τοποθετήστε το όλο μαζί (c1+c2) στον πυθμένα του μπολ (c3). Ασφαλίστε το
περιστρέφοντας το σύστημα λεπίδων κατά ?της στροφής αριστερόστροφα. (Εικόνα 2)
• Προσθέστε τα συστατικά μέσα στο συναρμολογημένο μπολ ανάμειξης χωρίς να υπερβείτε
την υποδεικνυόμενη μέγιστη στάθμη.
• Τοποθετήστε το καπάκι (B) πάνω στο μπολ ανάμειξης (C) και ασφαλίστε το τοποθετώντας
το πάνω στις οπές που βρίσκονται απέναντι από το στόμιο σερβιρίσματος (εικόνα 3).
Εισαγάγετε το πώμα δοσομέτρησης (A) μέσα στο καπάκι και πιέστε το από πάνω έως ότου
να ασφαλίσει στη θέση του (εικόνα 3). Σας συνιστούμε να κρατάτε το καπάκι κατά τη
λειτουργία.
• Τοποθετήστε το μπολ ανάμειξης (C) πάνω στο κυρίως σώμα της κεντρικής μονάδας (D). Η
κλειδαριά (ανοικτή) πρέπει να είναι ευθυγραμμισμένη με τη σήμανση που φέρει η
κεντρική μονάδα (εικόνα 3).
• Περιστρέψτε το μπολ ανάμειξης (C) έως ότου να εμφανιστεί η κλειδαριά (κλειστή)
(εικόνα 3).
• Κόψτε όλα τα συστατικά σε κομμάτια προτού τα τοποθετήσετε μέσα στο μπολ ανάμειξης
(C). Είναι προτιμότερο να προσθέσετε πρώρα τα υγρά συστατικά, χωρίς να υπερβείτε τη
μέγιστη στάθμη που υποδεικνύεται στο μπολ (1,5 λ.).
• Συνδέστε τη συσκευή στο ρεύμα και θέστε τη σε λειτουργία γυρίζοντας τον διακόπτη
ταχύτητας (E) στο "Pulse", "1" ή "2".
• Για διακοπή λειτουργίας της συσκευής, γυρίστε τον διακόπτη ταχύτητας (E) στη θέση "0".
• Περιμένετε έως ότου να σταματήσει πλήρως η συσκευή προτού αφαιρέσετε το μπολ
ανάμειξης (C).
• Αφαιρέστε το μπολ ανάμειξης (C) απασφαλίζοντας το με την αντίθετη κατεύθυνση από
αυτήν που το τοποθετήσατε.
2. Μύλος μυρωδικών:
• Αυτός ο μύλος μυρωδικών (F) διαθέτει ένα μπολ (f3)
το οποίο αποτρέπει την πρόσβαση στις λεπίδες κατά
τη λειτουργία.
• Αναποδογυρίστε το μπολ (F) και προσθέστε τα
συστατικά.
• Τοποθετήστε το λάστιχο στεγανοποίησης (f1) στην
προβλεπόμενη κοιλότητα πάνω στο σύστημα λεπίδων
(f2) (εικόνα 4). Τοποθετήστε το σύστημα λεπίδων (f2)
πάνω στην κεντρική μονάδα (f3) και ασφαλίστε τον
μύλο μυρωδικών περιστρέφοντας το σύστημα
λεπίδων (f2) δεξιόστροφα (εικόνα 5).
• Αναποδογυρίστε πάλι τον συναρμολογημένο μύλο
μυρωδικών (F) και τοποθετήστε τον πάνω στην
κεντρική μονάδα (D). Η κλειδαριά (ανοικτή) is
πρέπει να είναι ευθυγραμμισμένη με τη σήμανση που
φέρει η κεντρική μονάδα (D) (εικόνα 6).
• Περιστρέψτε τον συναρμολογημένο μύλο μυρωδικών
(F) αριστερόστροφα έως ότου να εμφανιστεί η
κλειδαριά (κλειστή) (εικόνα 6).
• Συνδέστε τη συσκευή στο ρεύμα και θέστε τη σε λειτουργία γυρίζοντας τον διακόπτη
ταχύτητας (E) στο "Pulse", "1" ή "2".
Προσοχή: μπορεί να
προκληθεί διαρροή άν
τα εξαρτήματα δεν έχουν
εφαρμόσει σωστά.
Page 54

58
Συστατικά Ποσότητα Χρόνος λειτουργίας
Αποξηραμένες κόκκινες πιπεριές 30 γρ. 33 δευτ.
Μαύρο πιπέρι 30 γρ. 1 λεπτό 30 δευτ.
Αποξηραμένες γαρίδες 25 γρ. 30δευτ.
Βρασμένο ρύζι 40 γρ. 16 δευτ.
Μαύρο σησάμι 30 γρ. 21 δευτ.
Φιστίκια 50 γρ. 4 δευτ.
Κρεμμύδια 100 γρ. 13 δευτ.
Χοιρινό (κομμένο σε μικρά κομμάτια) 140 γρ. 20 δευτ.
Παρμεζάνα (κομμένη σε μικρά
κομμάτια)
100 γρ. 13 δευτ.
ΚΑΘΑΡΙΣΜΟΣ ΤΗΣ ΣΥΣΚΕΥΗΣ
• Αποσυνδέστε τη συσκευή από το ρεύμα και αφαιρέστε
τα εξαρτήματα.
• Αφαιρέστε το μπολ και ξεπλύνετέ το με νερό βρύσης,
το ίδιο και το καπάκι του.
• Για εύκολο καθαρισμό, πλύνετε τα αφαιρούμενα
εξαρτήματα με νερό και λίγο υγρό πιάτων αμέσως
μετά από τη χρήση.
• Το μπολ ανάμειξης (A, B, C) και ο μύλος μυρωδικών
(F) μπορούν να πλυθούν στο πλυντήριο πιάτων στο
επάνω καλάθι στο πρόγραμμα "ECO" ή "ΛΙΓΟ
ΛΕΡΩΜΕΝΑ".
• Για τον καθαρισμό της κεντρικής μονάδας (D),
χρησιμοποιήστε ένα βρεγμένο πανί. Στεγνώστε την
καλά.
• Μη βυθίζετε ποτέ την κεντρική μονάδα (D) σε νερό και
μην τη βρέχετε στον νεροχύτη.
• Αδειάστε το μπολ ανάμειξης (C) ή το μπολ του μύλου
μυρωδικών (f3) πριν από τον καθαρισμό.
ΠΡΟΣΟΧΗ: Να χειρίζεστε
τις λεπίδες του μπολ
ανάμειξης και των
εξαρτημάτων με
προσοχή, διότι είναι
αιχμηρές.
• Για διακοπή λειτουργίας της συσκευής, γυρίστε τον διακόπτη ταχύτητας (E) στη θέση "0".
• Περιμένετε έως ότου να σταματήσει πλήρως η συσκευή προτού αφαιρέσετε τον μύλο
μυρωδικών (F).
• Αφαιρέστε τον μύλο μυρωδικών (F) απασφαλίζοντας τον με την αντίθετη κατεύθυνση από
αυτήν που τον τοποθετήσατε.
• Αναποδογυρίστε τον πάνω στην επιφάνεια εργασίας προτού αφαιρέσετε το σύστημα
λεπίδων (f2) από το μπολ (f3) με την αντίθετη φορά από αυτήν που τον τοποθετήσατε.
Να χειρίζεστε τις λεπίδες με προσοχή, διότι είναι εξαιρετικά αιχμηρές και μπορούν να σας
τραυματίσουν. Μπορείτε τώρα να αφαιρέσετε το μείγμα από το μπολ.
Προσοχή: ενδέχεται να παρουσιαστεί διαρροή εάν δεν ασφαλίσει σωστά το εξάρτημα.
Παρατήρηση: Το χρώμα του μπολ μπορεί να αλλάξει μετά από την ανάμειξη ορισμένων
πολύ σκληρών συστατικών: μοσχοκάρφια, κανέλα κ.λπ.
Page 55

59
ΤΙ ΝΑ ΚΑΝΕΤΕ ΕΑΝ Η ΣΥΣΚΕΥΗ ΔΕΝ ΛΕΙΤΟΥΡΓΕΙ
Το μπλέντερ εξακολουθεί να μη λειτουργεί;
Προβλήματα Αιτίες Λύσεις
Η συσκευή δεν λειτουργεί.
Το βύσμα δεν έχει εισαχθεί
σωστά στην πρίζα.
Συνδέστε τη συσκευή σε μια
πρίζα και κατόπιν
ενεργοποιήστε την.
Το μπολ ή το εξάρτημα δεν έχει
τοποθετηθεί ή ασφαλίσει
σωστά στην κεντρική μονάδα.
Βεβαιωθείτε ότι το μπολ ή τα
εξαρτήματα έχουν τοποθετηθεί
και ασφαλίσει σωστά στην
κεντρική μονάδα όπως φαίνεται
στην εικόνα στις οδηγίες
χρήσης.
Υπερβολικοί κραδασμοί
Η συσκευή πρέπει να είναι
τοποθετημένη πάνω σε μια
επίπεδη, σταθερή και
θερμοανθεκτική επιφάνεια.
Τοποθετήστε τη συσκευή πάνω
σε μια επίπεδη επιφάνεια.
Η ποσότητα των συστατικών
είναι υπερβολικά μεγάλη.
Μειώστε την ποσότητα
συστατικών στο μπολ.
Διαρροή από το καπάκι
Η ποσότητα των συστατικών
είναι υπερβολικά μεγάλη.
Μειώστε την ποσότητα
συστατικών στο μπολ.
Το καπάκι δεν έχει τοποθετηθεί
σωστά.
Ασφαλίστε σωστά το καπάκι
πάνω στο μπολ ανάμειξης.
Διαρροή στη βάση του
μπλέντερ
Το λάστιχο (c2) του μπολ
ανάμειξης δεν έχει τοποθετηθεί
σωστά ή λείπει.
Τοποθετήστε εκ νέου το λάστιχο
(f1) πάνω στο σύστημα λεπίδων
(f2) και ασφαλίστε το σωστά
πάνω στο μπολ (F3).
Το λάστιχο (c2) δεν έχει
τοποθετηθεί σωστά.
Τοποθετήστε εκ νέου το λάστιχο
και ασφαλίστε σωστά τη βάση
λεπίδων.
Δεν είναι δυνατή η
ασφάλιση του
συστήματος λεπίδων με
το λάστιχο (c1+c2) πάνω
στο μπολ (c3)
The gasket (c2) is not positioned
correctly.
Τοποθετήστε εκ νέου το λάστιχο,
οι 3 πτυχές του πρέπει να είναι
ορατές σύμφωνα με την
Εικόνα 1.
Διαρροή στη βάση του
μύλου μυρωδικών
Το λάστιχο στεγανοποίησης (f1)
πάνω στο σύστημα λεπίδων (f2)
δεν έχει τοποθετηθεί σωστά ή
λείπει.
Τοποθετήστε εκ νέου το λάστιχο
στεγανοποίησης (f1) πάνω στο
σύστημα λεπίδων (f2) και
ασφαλίστε το σωστά πάνω στο
μπολ του μύλου μυρωδικών (f3).
Οι λεπίδες γυρνούν με
δυσκολία.
Τα κομμάτια τροφών είναι
υπερβολικά μεγάλα ή σκληρά.
Μειώστε το μέγεθος ή την
ποσότητα συστατικών μέσα στο
μπολ.
Προσθέστε ρευστή ουσία.
Επικοινωνήστε με ένα εξουσιοδοτημένο κέντρο εξυπηρέτησης μετά την πώληση (δείτε τη
λίστα στο φυλλάδιο συντήρησης). Μπορείτε να εξατομικεύσετε το μπλέντερ σας
Page 56

60
ΑΝΑΚΥΚΛΩΣΗ
• Απόρριψη της συσκευής και των υλικών συσκευασίας της
Η συσκευασία αποτελείται αποκλειστικά από υλικά που είναι ακίνδυνα
προς το περιβάλλον και μπορούν να απορριφθούν σύμφωνα με τις
ισχύουσες διατάξεις ανακύκλωσης.
Για την απόρριψη της συσκευής, ζητήστε πληροφορίες από την αρμόδια
υπηρεσία του δήμου σας.
• Ηλεκτρικά και ηλεκτρονικά προϊόντα στο τέλος της ζωής τους:
Η συσκευή προορίζεται για πολύχρονη λειτουργία. Εντούτοις, όταν έρθει η ώρα να την
αντικαταστήσετε, μην απορρίψετε την παλιά συσκευή στον κάδο οικιακών απορριμμάτων,
αλλά προσκομίστε τη στο κέντρο ανακύκλωσης του δήμου σας (ή σε ένα κέντρο διαλογής
απορριμμάτων ανάλογα με την περίπτωση).
Συμβάλλουμε στην προστασία του περιβάλλοντος!
Η συσκευή σας περιέχει πολλά αξιοποιήσιμα ή
ανακυκλώσιμα υλικά.
Προσκομίστε τη στο κέντρο διαλογής απορριμμάτων του
δήμου σας.
προμηθευόμενοι τα παρακάτω εξαρτήματα από το κατάστημα όπου αγοράσατε τη συσκευή
ή από ένα εξουσιοδοτημένο κέντρο εξυπηρέτησης μετά την πώληση: μύλος μυρωδικών (F) ή
ανταλλακτικό μπολ ανάμειξης (C).
Page 57

>
«∞∑ªKh ±s «∞LM∑Z Ë ±u«œ «∞∑GKOn «∞∑U°FW ∞t
«∞∑GKOn ±R∞n ±s ±u«œ îUÅW ô ¢ÔAJq îDd«Î ´Kv «∞∂OµW, Ë«∞∑w ¥LJs «∞∑ªKh
±MNU °Lu§V ≈§d«¡«‹ «∞∑bË¥d Ë≈´Uœ… «∞∑BMOl ≠w ±MDI∑p .
∞K∑ªKh ±s «∞πNU“ °∫b –«¢t. ¥Ôd§v «ù¢BU‰ °LdØe îb±W ±ÔF∑Lb √Ë ¢ºKOLt
∞KIºr «∞Lª∑h ≠w «∞∂Kb¥W «∞L∫KOW ≠w °Kb„.
≈´‡‡‡Uœ… «∞∑‡B‡M‡O‡‡‡‡l
>
±ÔM∑Z «∞J∑dË≤w √Ë ØNd°Uzw ±ÔM∑Nw «∞Bö•Ot
±s «∞LH∑d÷ √Ê ¥bË «∞LM∑Z ∞b¥p ßMOs ´b¥b…. Ë∞Js ≠w «∞Ou «∞cÍ ¢Id¸ ≠Ot «ùß∑GMU¡ ´Mt Ë«ß∑∂b«∞t,
≠ö ¢d±Ot ≠w ßKW «∞LNLö, Ë∞Js «Ëœ´t ≠w «∞LdØe «∞Lª∑h °S´Uœ… «∞∑BMOl ≠w ±b¥M∑p (√Ë ßKÒLt ∞LdØe
¢πLOl «∞LNLö‹ •OY ¥LJMp –∞p).
•LU¥W «∞∂OµW √Ëô Î !
¥∫∑uÍ ≥c« «∞LÔM∑Z ´Kv ±u«œ ÆOÒLW ÅMU´OUΠ˥LJs ≈´Uœ… ¢BMOFNU.
√Ëœ´NU ≠w ±d«Øe ¢πLOl «∞LNLö‹ «∞LÔª∑BW.
∞DKV «∞LºU´b… :
≈–« ØU≤X ∞b¥p √Í ±AJKW √Ë «ß∑HºU¸ ´s «∞LM∑Z , ¥Ôd§v «ù¢BU‰ °Hd¥o «∞FöÆU‹ «∞FU±W ∞K∫Bu‰ ´Kv
«∞LºU´b… Ë«∞MBO∫W.
KU - 4541 206 5480
IOR - 3004 776 )10(
√Ë ¢HCq °e¥U¸… ±uÆFMU ´Kv «ù≤∑d≤X - ku.oc.lafet.www
61
Page 58

«∞LÔM∑Z ô ¥FLq
«∞LÔAJö‹ «_ß∂U» «∞∫Ku‰
∞r ¥Ô∏∂ÒX «∞IU°f «∞JNd°Uzw §Ob«Î
°U∞LI∂f
«ËÅq «∞LM∑Z °U∞∑OU¸ °AJq §Ob £r
Ær °∑AGOKt
±U–« ¢HFq ≈–« ∞r ¢∑LJs ±s ¢AGOq «∞LM∑Z
∞r ¥u{l «ù°d¥o √Ë «∞LK∫o ≠w
«∞LJUÊ «∞B∫O` √Ë √≤t ±ÔIHq ´Kv
œË•b… «∞L∫d„
¥Ôd§v «∞∫d’ ´Kv Ë{l «ù°d¥o √Ë
«∞LK∫o ≠w «∞LJUÊ «∞B∫O` Ë√Ê ¥ÔIHq
´Kv Ë•b… «∞L∫d„ ØLU ¥ÔENd «∞AJq
≠w œ∞Oq «∞Lº∑ªbÂ
«≥∑e«“«‹ ¨Od ´Uœ¥W
∞r ¥u{l «∞LM∑Z ≠u‚ ßD` ±º∑uÌ,
£U°X ˱IUË ∞K∫d«¸….
{l «∞LM∑Z ≠u‚ ßD` ±º∑uÌ, Ë £U°X
•πr «∞LJu≤U‹ ±d¢Hl §b«Î îHn ØLOW «∞LJu≤U‹
•πr «∞LJu≤U‹ ±d¢Hl §b«Î
îHn ØLOW «∞LJu≤U‹
∞r ¥u{l «∞GDU¡ °AJq Å∫O`
{l «∞GDU¡ Ë«ÆHKt °AJq Å∫O`
´Kv ≈°d¥o «∞ªö◊
¢ºdÒ» ±s «∞GDU¡
¢ºdÒ» ±s ÆU´b… «∞LK∫IU‹
«∞∫KIW «∞LDU©OW «∞LU≤FW ∞K∑ºd» ´Kv
Ë•b… «∞AHd«‹ (1f) √Ë (2f) ≠w ¨Od
±u{FNU «∞B∫O`, √Ë «≤NU ±HIuœ…
«´b ¢dØOV «∞∫KIW «∞LDU©OW «∞LU≤FW
∞K∑ºd» ´Kv Ë•b… «∞AHd«‹ (1f) √Ë
(2f) Ë«ÆHq §Ob«Î ´Kv «∞u´U¡ (3f)
«∞AHd«‹ ô ¢b˸ °ºNu∞W
ÆDl «∞DFU Ø∂Od… √Ë «≤NU ÆUßOW
îHn •πr ËØLOW «∞LJu≤U‹,
Ë√{n «∞ºu«zq
≥q ±U “«‰ «∞ªö◊ ô ¥FLq ?
¥Ôd§v ±d«§FW ±dØe «∞ªb±W «∞LÔF∑Lb
(«≤Ed «∞IUzLW ≠w Ø∑OV «∞ªb±U‹).
¥ÔLJMp ¢Fb¥q «∞ªö◊ Ë«∞∫Bu‰ ´Kv «∞L∂∫IU‹ «∞∑U∞OW ±s °Uzl «∞∑πezW, √Ë ±s ±dØe «∞ªb±W
«∞LF∑Lb : «∞LD∫MW «∞AU±KW (F), √Ë ≈°d¥o ≈{U≠w ∞Kªö◊ (C).
¢ºdÒ» ±s ÆU´b… Ë•b…
«∞ªö◊
«∞∫KIW «∞LDU©OW «∞LU≤FW ∞K∑ºd»
(2c) ∞OºX ≠w
±u{FNU «∞B∫O`,
√Ë «≤NU ±HIuœ…
«´b ¢dØOV «∞∫KIW «∞LDU©OW, ¥πV √Ê
¢JuÊ «∞DOU‹ «∞∏öÀ ±dzOW ØLU ≥u ±u{l
≠w «∞AJq 1
¢ºdÒ» ±s ÆU´b… «∞LD∫MW
«∞AU±KW
«∞∫KIW «∞LDU©OW «∞LU≤FW ∞K∑ºd» (1f)
´Kv Ë•b… «∞AHd«‹ (2f) ≠w ¨Od
±u{FNU «∞B∫O`, √Ë «≤NU ±HIuœ…
«´b ¢dØOV «∞∫KIW «∞LDU©OW (1f), ´Kv
Ë•b… «∞AHd«‹ (2f), Ë«ÆHKNU §Ob«Î ´Kv
Ë´U¡ «∞LD∫MW «∞AU±KW (3f)
«´b ¢dØOV «∞∫KIW «∞LDU©OW «∞LU≤FW
∞K∑ºd» Ë«ÆHq •U±KW «∞AHd«‹ §Ob«Î
«∞∫KIW «∞LDU©OW «∞LU≤FW ∞K∑ºd» (2c)
∞OºX ≠w ±u{FNU «∞B∫O`
ô ¥LJs ≈ÆHU‰ Ë•b… «∞AHd«‹ ±l
«∞∫KIW «∞LU≤FW ∞K∑ºd» 2c +1c
´Kv «ù°d¥o
62
Page 59

> «≠Bq «∞LM∑Z ´s «∞∑OU¸ «∞JNd°Uzw £r «≠Bq «∞LK∫IU‹ ´Mt.
> «≠Bq «ù°d¥o Ë«¨ºKt ±l ¨DUzt ¢∫X «∞LU¡ «∞πU¸Í.
> ∞K∑MEOn «∞ºNq, ¥Ôd§v «∞∫d’ ´Kv ¨ºq «_§e«¡ «∞IU°KW
∞KHBq °U∞LU¡ Ë«∞IKOq ±s ßUzq ¢MEOn «_©∂U‚ ±Ô∂U®d… °Fb
«ùß∑FLU‰.
> ≈°d¥o «∞ªö◊ (A, B, C), Ë«∞LD∫MW «∞AU±KW (F), ¥LJs
¢MEOHNr §LOFUÎ ≠w §ö¥W «∞B∫uÊ, ≠w «∞ºKW «∞FKu¥W °∂d≤U±Z
"OCE" √Ë «∞∂d≤U±Z "DELIOS YLTHGIL".
> ∞∑MEOn Ë•b… «∞L∫d„ (D), «ß∑FLq ÆDFW ÆLU‘ ¸©∂W, £r
§Hn °FMU¥W.
> ô ¢GLd Ë•b… «∞L∫d„ (D) °U∞LU¡, Ëô ¢CFNU ¢∫X «∞LU¡
«∞πU¸Í.
¥πV ¢Hd¥m ≈°d¥o «∞ªö◊ (C) √Ë «∞LD∫MW «∞AU±KW (3f) Æ∂q
≈§d«¡ ´LKOW «∞∑MEOn.
¢∫c¥d : ¥Ôd§v «∞∑FU±q °Jq
•d’ Ë•c¸ ±l ®Hd«‹
≈°d¥o «∞ªö◊ Ë«∞LK∫IU‹
«_îdÈ _≤NU •Uœ… §b«Î
≠KHq √•Ld ±ÔπHn
≠KHq «ßuœ
¸Ë°OUÊ ±πHn
√¸“ ±∫Lh
ßLºr √ßuœ
≠u‰ ßuœ«≤w
°Bq
§∂MW °U¸±Oe«Ê (¢ÔIDÒl «∞v ÆDl ÅGOd…)
«∞LJu≤U‹ «∞JLOU‹ ËÆX «∞∑AGOq
03 §d«Â
03 §d«Â
52 §d«Â
04 §d«Â
03 §d«Â
05 §d«Â
001 §d«Â
001 §d«Â
33 £U≤OW
1 œÆOIW/03 £U≤OW
03 £U≤OW
61 £U≤OW
12 £U≤OW
4 £u«Ê
31 £U≤OW
31 £U≤OW
¢‡M‡E‡‡O‡‡‡n «∞L‡M‡∑‡‡‡Z
63
Page 60

> ¢ÔIDÒl «∞LJu≤U‹ «∞v ±JF∂U‹ Æ∂q Ë{FNU ≠w ≈°d¥o «∞ªö◊ (C). ±s «_≠Cq «∞∂b¡ °U∞ºu«zq, œËÊ
√Ê ¢∑FbÈ ±º∑uÈ «∞∫b «_ÆBv «∞LÔ∂OÒs ´Kv «ù°d¥o (5,1 ∞∑d).
> √ËÅq «∞LM∑Z °U∞∑OU¸ «∞JNd°Uzw Ë«°b√ °∑∫u¥q ±M∑Iw «∞ºd´W (E) «∞v "eslup", "1", √Ë "2".
> ∞Jw ¢uÆn ¢AGOq «∞LM∑Z, {l ±ÔM∑Iw «∞ºd´W ´Kv «∞LuÆl "0".
> «≤∑Ed «∞v √Ê ¥Fuœ «∞LM∑Z «∞v «∞∑uÆn «∞∑U Æ∂q ¸≠l ≈°d¥o «∞LM∑Z (C).
> «≠Bq ≈°d¥o «∞ªö◊ (C) °∑∫d¥dÁ ±s «∞IHq °Sœ«¸¢t «∞v «ù¢πUÁ «∞LÔFUØf ∞K∑dØOV.
2- «∞LD∫MW «∞AU±KW :
> “ÔËÒœ‹ ≥cÁ «∞LD∫MW «∞AU±KW (F) °u´U¡ (3f) «∞cÍ ¥LMl
«∞uÅu‰ «∞v «∞AHd«‹ √£MU¡ «ùß∑FLU‰.
> √œ¸ «∞u´U¡ (F) Ë«ßJV «∞LJu≤U‹.
> {l «∞∫KIW «∞LU≤FW ∞K∑ºd» (1f) ≠w «∞∑πu¥n «∞LªBh
∞NU ≠w Ë•b… ®Hd«‹ «∞LD∫MW (2f) (®Jq 4), {l Ë•b…
®Hd«‹ «∞LD∫MW (2f) ´Kv «∞u´U¡ (3f), Ë«ÆHq «∞LD∫MW
°Sœ«¸… Ë•b… «∞AHd«‹ (2f) œË¸… Ë«•b… °FJf «¢πUÁ ´IU¸»
«∞ºU´W (®Jq 5)..
> √œ¸ ¢dØO∂W «∞LD∫MW «∞AU±KW (F) Ë{FNU ´Kv Ë•b… «∞L∫d„
(D). «∞IHq (±H∑uÕ) ´Kv ≤Hf «∞ªj ±l «∞H∑∫W «∞Lu§uœ…
´Kv Ë•b… «∞L∫d„ (D) (®Jq 6).
> √œ¸ ¢dØO∂W «∞LD∫MW «∞AU±KW (F) œË¸… Ë«•b… °U¢πUÁ ´IU¸»
«∞ºU´W «∞v √Ê ¥ENd «∞IHq (±IHöÎ) (®Jq 6).
> √ËÅq «∞LM∑Z °U∞∑OU¸ «∞JNd°Uzw Ë«°b√ °∑∫u¥q ±M∑Iw «∞ºd´W
(E) «∞v "eslup", "1", √Ë "2".
>
∞Jw ¢uÆn ¢AGOq «∞LM∑Z, {l ±ÔM∑Iw «∞ºd´W ´Kv «∞LuÆl "0".
> «≤∑Ed «∞v √Ê ¥Fuœ «∞LM∑Z «∞v «∞∑uÆn «∞∑U Æ∂q ¸≠l «∞LD∫MW
«∞AU±KW (F).
> «≠Bq «∞LD∫MW «∞AU±KW (F) °∑∫d¥d≥U ±s «∞IHq °Sœ«¸¢NU
«∞v «ù¢πUÁ «∞LÔFUØf ∞K∑dØOV.
>
«ÆKV «∞LD∫MW «∞AU±KW ¸√ßUÎ ´Kv ´IV Æ∂q ¢∫d¥d Ë•b… «∞AHd«‹
(2f) ±s «∞u´U¡ (3f) °FJf ´LKOW «∞∑dØOV. «∞AHd«‹ •Uœ… §b«Î
: ¥Ôd§v «∞∑FU±q ±FNU °Jq •c¸ Ë´MU¥W ¢πM∂UÎ ∞ûÅU°W °U∞πdËÕ.
¥LJMp «üÊ ¢πLOl «∞LJu≤U‹ ±s «∞u´U¡.
±ö•EW : Æb ¥∑GOd ∞uÊ «∞u´U¡ °Fb ©∫s ±Ju≤U‹ §U±b… : «∞∏uÂ,
«∞Id≠W, ˨Od≥U..
¢∫c¥d : Æb ¥∫bÀ «∞∑ºd» ≈–«
∞r ¢Js «∞LK∫IU‹ ±ÔIHKW °AJq
Å∫O`.
>
¸ØÒV «∞GDU¡ (B) ´Kv ≈°d¥o «∞ªö◊ (C) Ë«ÆHKt °Lu{Ft ´Kv «∞H∑∫U‹ «∞LIU°KW ∞HuÒ≥W «∞ºJV (®Jq 3).
{l ≠MπUÊ «∞IOU” (A) ´Kv «∞GDU¡ Ë«{Gj ∞Jw ¥Qîc ±JU≤t (
®Jq
3). ≤MB` √Ê ¢ÔLºp °U∞GDU¡
√£MU¡ «∞∑AGOq.
> {l ≈°d¥o «∞ªö◊ (C) ´Kv Ë•b… «∞LÔ∫d„ (D). «∞IHq (±H∑uÕ) ´Kv ≤Hf «∞ªj ±l ≠∑∫W Ë•b…
«∞LÔ∫d„ (
®Jq
3).
> £r √œ¸ ≈°d¥o «∞ªö◊ (C) îö‰ œË¸… Ë«•b… ¥ENd «∞IHq (±IHq) (
®Jq
3)
64
Page 61

> ô ¢º∑FLq «∞ªö◊ _Ø∏d ±s 3 œÆUzo °AJq ±∑u«Åq.
> {l «∞ªö◊ ≠u‚ ßD` ±º∑uÌ, £U°X, ±IUË ∞K∫d«¸…, ≤EOn ˧U·.
> ô ¢bŸ «∞AFd «∞Du¥q, «_Ë®∫W «∞ILU®OW, ¸°DU‹ «∞FMo, ¢∑b∞v ≠u‚ ≈°d¥o «∞ªö◊, √Ë «∞LK∫IU‹
´Mb±U ¥JuÊ «∞LM∑Z ÆOb «∞∑AGOq.
> ô ¢º∑FLq «∞ªö◊ ≠w «∞ªU¸Ã ≠w «∞Nu«¡ «∞DKo.
> ô ¢d≠l «∞FDU¡ (B) Æ∂q √Ê ¢∑uÆn «∞AHd«‹ ´s «∞b˸«Ê ¢LU±UÎ.
> ô ¢º∑FLq «∞ªö◊ ∞Leà √Ë îKj ±u«œ √îdÈ ¨Od ±JuÒ≤U‹ «∞DFUÂ.
> «≤∑Ed «∞v √Ê ¥∂dœ «∞LM∑Z Ë¥ÔB∂` °∫d«¸… «∞Gd≠W, Æ∂q √Ê ¢∂b√ °∑AGOKt ±d… £U≤OW ∞ªKj œ≠FW §b¥b…
±s «∞LJu≤U‹.
> ô ¢º∑FLq «∞ªö◊ √Ë «∞LK∫IU‹ «∞∑U°FW ∞t œËÊ Ë§uœ ±Ju≤U‹ «∞DFU ≠Ot, Ëô ¢ºJV ≠w ≈°d¥o
«∞ªö◊ ßu«zq ßUîMW (08 œ¸§W ±µu¥W).
> ≈–« ØUÊ «∞ºKp «∞JNd°Uzw «∞∑U°l ∞t ¢U∞HUÎ, ¥Ôd§v «ß∑∂b«∞t °u«ßDW ±dØe îb±W ±ÔF∑Lb.
ÆHq «∞ºö±W
∞s ¥LJs ¢AGOq «∞LM∑Z ±U∞r ¥Js «ù°d¥o (C) √Ë «∞LK∫o (F) ≠w ±uÆFNLU «∞B∫O` ˱IHöÊ ´Kv
Ë•b… «∞L∫d„ (D).
«ùß∑FLU‰ ∞KLd… «_Ë∞v
>
Æ∂q «ß∑FLU‰ ≥c« «∞LM∑Z ∞KLd… «_Ë∞v, ¥Ôd§v ¨ºq «∞LK∫IU‹
§LOFNU (A, B, C, Ë
F) °U∞LU¡ Ë«∞BU°uÊ. ±U ´b« Ë•b… «∞LÔ∫d„
(D).
>
¥Ôd§v «∞∑QØb °QÊ §LOl °IU¥U «∞∑GKOn Æb √Ô“¥KX Æ∂q ¢AGOq
«∞LM∑Z.
> ±ö•EW ≥U±W : {l ±ÔM∑Iw «∞ºd´W (E) ´Kv «∞LuÆl "0" Æ∂q
Ë{l ≈°d¥o «∞ªö◊ √Ë «∞LK∫IU‹ ´Kv Ë•b… «∞LÔ∫d„.
> ßu· ¥LJs ¢AGOq «∞LM∑Z ≈–« ØUÊ «ù°d¥o √Ë «∞LK∫o ≠w
«∞LJUÊ «∞B∫O` ˱IHöÊ ´Kv §ºr «∞LM∑Z.
> ô ¢ÔAGÒq «∞ªö◊ ≈–« ∞r ¥Js «∞GDU¡ ≠w ±JU≤t.
¢∫c¥d : «∞AHd«‹ •Uœ… §b«Î ;
¥Ôd§v «∞∑FU±q ±FNU °Jq •c¸
Ë´MU¥W √£MU¡ «ùß∑FLU‰,
Ë√£MU¡ «∞∑MEOn √Ë ≈≠d«⁄
«∞LM∑Z.
≈ß∑FLU‰ «∞LM∑Z
1- ≈°d¥o «∞ªö◊ :
> ¢Ôd©ÒV •KIW ±Ml «∞∑ºd» (2c) Ë¢u{l ≠w ±uÆFNU «∞B∫O` ´Kv Ë•b… «∞AHd«‹ ( 1c): «∞Du¥U‹
«∞∏öÀ ∞K∫KIW ¥πV √Ê ¢JuÊ ±dzOW §LOFNU ´Mb±U ¢JuÊ ≠w ±uÆFNU. ≠S–« Ë{FX ≠w «ù¢πUÁ «∞LÔFUØf, ≠Ks ¥LJs ≈ÆHU‰ Ë•b… «∞AHd«‹ ´Kv «ù°d¥o («∞AJq 1)
> ¢u{l «∞∑dØO∂W (2c +1c) ´Kv ÆU´b… «ù°d¥o (3c). ¢ÔIHq °u«ßDW ≈œ«¸… Ë•b… «∞AHd«‹ ¸°l
œË¸… °FJf «¢πUÁ ´IU¸» «∞ºU´W. «∞AJq 2).
> ¢u{l «∞LJu≤U‹ ≠w ¢dØO∂W «ù°d¥o, œËÊ √Ê ¥∑FbÈ •πLNU ±º∑uÈ ´ö±W «∞∫b «_ÆBv.
65
Page 62

A Øu» ∞KIOU”
B ¨DU¡
C Ë•b… ≈°d¥o «∞ªö◊
- 1c Ë•b… «∞AHd«‹
- 2c ßbÒ«œ… ±U≤FW ∞K∑ºd»
- 3c ≈°d¥o «∞ªö◊ °IOUßU‹ ±Ô∑b¸§W
D Ë•b… «∞LÔ∫d„
E ±ÔM∑Iw «∞ºd´W
F ±ÔK∫IU‹ (•ºV «∞Luœ¥q) :
±D∫MW ®U±KW
- 1f ßbÒ«œ… ±U≤FW ∞K∑ºd»
- 2f Ë•b… ®Hd«‹ «∞LD∫MW
- 3f Ë´U¡ «∞LD∫MW «∞AU±KW
>
¥Ôd§v Æd«¡… ≈¸®Uœ«‹ «ùß∑FLU‰ °FMU¥W Æ∂q «ß∑FLU‰ «∞LM∑Z ∞KLd… «_Ë∞v: ≈Ê √Í «ß∑FLU‰ ô ¥∑IOÒb
°Uù¸®Uœ«‹ «∞Ld≠IW, ∞s ¢JuÊ «∞AdØW «∞LBMÒFW ±ºRË∞W ´Mt. Ë°U∞∑U∞w ¢ºIj «∞CLU≤W ´s «∞LM∑Z.
>
∞r ¥ÔFbÒ ≥c« «∞LM∑Z ∞ûß∑FLU‰ °u«ßDW √®ªU’ (°Ls ≠ONr «_©HU‰) ±Ls ô ¥∑L∑FuÊ °U∞Ib¸…«∞πºb¥W,
√Ë °Uù±JU≤U‹ «∞FIKOW, √Ë ≈–« ØU≤u« ¥FU≤uÊ ±s «∞IBu¸ √Ë «∞MIh ≠w «∞ª∂d… √Ë «∞LFd≠W, ±U ∞r ¥Ju≤u«
¢∫X ¸´U¥W ®ªh ∞b¥t «∞LFd≠W «∞∑ÒU±W Ë«∞b¸«¥W ≠w «ß∑FLU‰ ≥c« «∞LM∑Z ±s √§q ßö±∑Nr.
¥πV
±d«Æ∂W «_©HU‰ Ë«∞∑QØb °Q≤Nr ô ¥KF∂uÊ °U∞LM∑Z.
> ÅÔLr ≥c« «∞LM∑Z ∞OFLq °U∞∑OU¸ «∞JNd°Uzw «∞LÔ∑MUË» ≠Ij. ¥Ôd§v «∞∑QØb √Ê ¢u¢d ®∂JW «∞JNd°U¡ ´Mb„
¥∑MUßV ±l ±U ≥u ±∂Os ≠w ∞u•W ¢Fd¥n «∞LM∑Z.
> ÅÔLr ≥c« «∞LM∑Z ∞ûß∑FLU‰ «∞LMe∞w ≠Ij, ≈Ê √Í «ß∑FLU‰ ¢πU¸Í, √Ë √Í «ß∑FLU‰ ô ¥∑IOÒb
°Uù¸®Uœ«‹ «∞Ld≠IW, ∞s ¢JuÊ «∞AdØW «∞LBMÒFW ±ºRË∞W ´Mt. Ë°U∞∑U∞w ¢ºIj «∞CLU≤W ´s «∞LM∑Z.
> ¥πV ≠Bq «∞LM∑Z ´s «∞∑OU¸ «∞JNd°Uzw ≈Ê ∞r ¥Js ÆOb «ùß∑FLU‰, √Ë ´Mb ¢dØOV «∞LK∫IU‹ √Ë ´Mb
≠BKNU ´Mt √Ë ´Mb ¢MEOHt. ô ¢HBq «∞LM∑Z ´s «∞∑OU¸ °u«ßDW ®bÒ «∞ºKp «∞JNd°Uzw.
> ô ¢º∑FLq «∞LM∑Z ≈Ê ∞r ¥Fb ¥RœÍ ´LKW °AJq Å∫O`, √Ë ≈–« √Ô´DV, √Ë ≈–« ØUÊ «∞ºKp «∞JNd°Uzw
«∞∑U°l ∞t ¢U∞HUÎ. ∞∑uîw «∞ºö±W, ¥Ôd§v «ß∑∂b«‰ «∞IDl «∞∑U∞HW °u«ßDW ±dØe îb±W ±ÔF∑Lb («≤Ed
«∞IUzLW ≠w Ø∑OV «∞ªb±U‹).
> ¥I∑Bd ¢bîKp °U∞LM∑Z ´Kv «∞∑MEOn Ë«∞BOU≤W «ù´∑OUœ¥W, √±U «∞ªb±U‹ «_îdÈ ≠ö ¥Iu °NU «ô
±dØe îb±W ±ÔF∑Lb.
> ô ¢GLd «∞LM∑Z √Ë «∞ºKp «∞JNd°Uzw √Ë «∞IU°f «∞∑U°l ∞t °U∞LU¡ Ëô °QÍ ßUzq ¬îd. ¥πV ≈°IU¡ «∞ºKp
«∞JNd°Uzw °FOb«Î ´s ±Ô∑MUˉ «_©HU‰, Ë√Ê ô ¥I∑d» ±s «_§e«¡ «∞ºUîMW ±s «∞LM∑Z √Ë ¥ö±ºNU,
Ë√Ê ô ¥Ld °U∞Id» ±s √Í ±BUœ¸ •d«¸¥W √Ë ≠u‚ “Ë«¥U •Uœ….
> ±s √§q ßö±∑p, ô ¢º∑FLq √Í ±ÔK∫IU‹ √îdÈ ¨Od «∞LK∫IU‹ ËÆDl «∞GOU¸ «∞∑U°FW ∞KLM∑Z , Ë«∞∑w
¢Ô∂UŸ ≠w ±d«Øe «∞ªb±W «∞LÔF∑Lb….
> «∞AHd«‹ •Uœ… §b«Î : ¥Ôd§v «∞∑FU±q ±FNU °Jq •c¸ Ë´MU¥W ¢πM∂UÎ ∞ûÅU°W °U∞πdËÕ.
> ô ¢º∑FLq «∞ªö◊ √Ë «∞LK∫IU‹ «∞∑U°FW ∞t œËÊ Ë§uœ ±Ju≤U‹ «∞DFU ≠Ot , Ëô ¢ºJV ≠w «∞ªö◊
ßu«zq ßUîMW °b¸§W «∞GKOUÊ.
> «ß∑FLq ≈°d¥o «∞ªöÒ◊ œ«zLUÎ °U∞GDU¡ «∞∑U°l ∞t (B).
> «ßJV √ËôÎ «∞LJu≤U‹ «∞ºUzKW ≠w «ù°d¥o œ«zLUÎ, Æ∂q ≈{U≠W «∞LJu≤U‹ «∞πU±b…, œËÊ √Ê ¢∑FbÈ
±º∑uÈ «∞∫b «_ÆBv.
> ô ¢Cl «ÅU°Fp, √Ë «¥W √®OU¡ √îdÈ ≠w «∞ªö◊ ´Mb±U ¥JuÊ ÆOb «∞∑AGOq.
> ô ¢º∑FLq ≈°d¥o «∞ªö◊ Ø∫UË¥W ∞KDFU ±s √§q «∞∑∏KOZ, «∞DNw , √Ë «∞∑FIOr.
ËÅn √§e«¡ «∞LM∑Z
≈¸®Uœ«‹ ±s √§q «∞ºö±W
«∞LÔK∫IU‹ «∞LÔd≠IW ±l ≥c« «∞Luœ¥q, ±cØu¸… ´Kv «∞LÔKBo ≠w √´Kv «∞∑GKOn ´Kv ´K∂W «∞LM∑Z.
66
AR
Page 63

>
«“ ¸œÁ îU¸Ã ØdœÊ °º∑t °MbÍ Ë œß∑~UÁ
°º∑t °MbÈ «≤∫BU¸«Î ®U±q ±u«œÈ ±}∂U®Mb Øt ≥}â~u≤t îDdÈ °d«È ±∫}j
“|ºX ≤b«¸≤b Ë °U «|s ˧uœ ±}∑u«≤Mb ©∂o Æu«≤}s °U“|U≠X œ¸ ±MDIt ®LU
°U“|U≠X ®u≤b.
°d«È «“ ¸œÁ îU¸Ã ØdœÊ îuœ œß∑~UÁ, îu«≥ALMb «ßX °U ±d«Øe ±πU“
îb±U¢v ±MDIt îuœ ¢LU” °~}d|b.
°U“¥U≠X
>
ÄU|UÊ ´Ld ±∫Buô‹ «∞J∑d¥Jv |U «∞J∑dË≤}Jv :
«≤∑EU¸ ±}dËœ œß∑~UÁ ®LU ßU∞NU ´Ld ±H}b œ«®∑t °U®b. œ¸ ≥d Åu¸‹, ≥M~U±v Øt “±UÊ §U|~e|Mv
¬Ê ≠d« ¸ß}b, ¬≤d« œ¸ ßDq “°U∞t ≤}Mb«“|b Ë °t |Jv «“ ±d«Øe °U“|U≠X ®Nd îuœ (|U °t ±∫q ±ªBu’
§Ll ¬Ë¸È “°U∞t) ¢∫u|q œ≥}b.
°t ±∫}j “|ºX ≠Jd ØMOr!
œß∑~UÁ ®LU •UËÈ ±u«œ °U «¸“®v «ßX Øt ÆU°q ¢d±}r |U °U“|U≠X ±}∂U®Mb.
¬≤d« œ¸ ±∫q ±ªBu’ §Ll ¬Ë¸È “°U∞t œ¸ ®Nd Æd«¸ œ≥}b.
îj ØLJ‡ ¸ßU≤v:
ÇMU≤ât °U ≥dÖu≤t «®JU‰ Ë ßu«‰ œ¸ ¸«°Dt °U ±∫Bu‰ ±u«§t ®b|b, îu«≥ALMb «ßX §NX ØLJ‡
¢ªBBv «°∑b« °U ¢}r ¸Ë«°j ´Lu±v îb±U‹ ±Bd· ØMMbÁ ¢LU” •UÅq ≤LUz}b:
KU - 4541 206 5480
IOR - 3004 776 )10(
Ë ¥U °U Ë» ßU|X ±U ±JU¢∂t ≤LUz}b:
ku.oc.lafet.www
67
Page 64

œß∑~UÁ ØU¸ ≤LOJMb
±AJö‹ œô¥q ¸«Á •KNU
œË®Uît œ¸ßX œ«îq Äd¥e Æd«¸
≤~d≠∑t
œË®Uît ¸« œ¸ßX °t Äd|e ËÅq
≤LUz}b Ë œß∑~UÁ ¸« ¸Ë®s ≤LUz}b
ÇMU≤ât œß∑~U≥∑UÊ ØU¸ ≤Jdœ Çt °U¥b ØdœÈ
ÄU¸ı ¥U ∞u«“ ¬Ê œ¸ßX °d ¸ËÈ
ƺLX ±u¢u¸ Æd«¸ ≤~d≠∑t Ë ÆHq
≤AbÁ «≤b
ØM∑d‰ ≤LUz}b ±DU°o °U ®Jq ¸«≥MLU, ÄU¸ı
|U ∞u«“ œ|~d œ¸ßX °d ¸ËÈ ÆºLX ±u¢u¸
Æd«¸ °~}d≤b Ë œ¸ §UÈ îuœ ÆHq ®u≤b
∞d“‘ °Og «“ «≤b«“Á
œß∑~UÁ °d ¸ËÈ ±∫Kv ÅU·, £U°X,
±IUË œ¸ °d«°d Öd±U Æd«¸ ≤b«¸œ
œß∑~UÁ ¸« °d ¸ËÈ ßD∫v ÅU·
Æd«¸ œ≥}b
±Ib«¸ ±u«œ °}g «“ «≤b«“Á ±}∂U®b
±Ib«¸ ±u«œ ±u¸œ «ß∑HUœÁ ¸« ØU≥g œ≥}b
±Ib«¸ ±u«œ °}g «“ «≤b«“Á ±}∂U®b
±Ib«¸ ±u«œ ±u¸œ «ß∑HUœÁ ¸« ØU≥g œ≥}b
œ¸» œ¸ßX œ¸ §UÈ îuœ Æd«¸
≤~d≠∑t
œ¸Äu‘ ¸« œ¸ßX °d ¸ËÈ ÄU¸ı
±ªKu◊ Øs ÆHq ≤LUz}b
≤A∑v «“ œ¸Äu‘
≤A∑v «“ ƺLX “|d ∞u«“Â
Ë«®d œ¸“Ö}d œ¸ßX °d ¸ËÈ ÆºLX
¢}Gt (1f) |U (2f) Æd«¸ ≤~d≠∑t Ë |U
«Åö ˧uœ ≤b«¸œ
Ë«®d œ¸“Ö}d ¸« |J∂U¸ œ¥~d °d ¸ËÈ
¢}Gt (1f) |U (2f) Æd«¸ œ≥}b Ë ¬≤d«
œ¸ßX °d ¸ËÈ ØUßt (3f) ÆHq ≤LUz}b
¢}Gt ≥U °t ¸«•∑v ≤Lv
ÇdîMb
¢Jt ≥UÈ ±u«œ °º}U¸ °e¸¯ |U
ߪX ±}∂U®Mb
±Ib«¸ Ë |U «≤b«“Á ±u«œ ¸« Ør
≤LU≤Ob. ±U¥FU‹ «{U≠t ØMOb
±ªKu◊ Øs ®LU ≥LâMUÊ ØU¸ ≤L}JMb?
°U ¥Jv «“ ±d«Øe îb±U‹ ±πU“ ¢LU” •UÅq ≤LUzOb (∞OºX ±d«Øe œ¸ œ≠∑dÇt îb±U‹). ®LU
±O∑u«≤Ob œß∑~UÁ îuœ ¸« «¸¢IU¡ œ≥Ob Ë «¥s ∞u«“ §U≤∂v ¸« «“ ±dØe Īg ¬Ê Ë ¥U |Jv «“ ±d«Øe
îb±U‹ ±πU“ ¢N}t ≤LUz}b: ¬ß}U» ≥Lt ØU¸Á (
F), ¥U ¥J‡ ÄU¸ı ±ªKu◊ Øs (C) «{U≠v.
¢d«Ë‘ «“ ÄU¥t ±ªKu◊ Øs
Ë«®d ¢M@ ±ªKu◊ Øs (2c) °Du¸
Å∫O` Æd«¸ ≤~d≠∑t ¥U ±HIuœ ®bÁ
«ßX
Ë{FOX Ë«®d ¸« ¢GOOd œ«œÁ Ë
≤~Nb«¸≤bÁ ¢OGt ¸« °Du¸ Å∫O` ÆHq
ØMOb
Ë«®d (2c) °Du¸ Å∫O` Æd«¸
≤~d≠∑t «ßX
Ë{FOX Ë«®d ¸« ¢GOOd œ≥Ob, 3 ¢U
°U¥b ©∂o ¢Bu¥d 1 ÆU°q ¸Ë¥X °U®b
ÆHq ¢OGt °U Ë«®d(2c+1c) ¸ËÈ
¢M@ (3c) ¨Od ±LJs ±v °U®b
Ë{FOX Ë«®d œ¸“ÖOdÈ (1f) ¸ËÍ ¢OGt
(2f) ¸« ¢GOOd œ«œÁ Ë °Du¸ Å∫O` ¸ËÈ
ØUßt ¬ßOU» (3f) ÆHq ØMOb
Ë«®d œ¸“ÖOdÈ (1f) ¸ËÈ ¢OGt
(2f) °Du¸ Å∫O` Æd«¸ ≤~d≠∑t ¥U
±HIuœ ®bÁ «ßX
¢d«Ë‘ «“ ÄU¥t ¬ßOU»
68
Page 65

> œß∑~UÁ ¸« «“ °d‚ °JA}b Ë ∞u«“ ¬≤d« îU¸Ã ≤LUz}b.
> ÄU¸ı ¸« îU¸Ã ≤LuœÁ ¬≤d« °t ≥Ld«Á œ¸Äu‘ ¬Ê “|d §d|UÊ ¬»
¬°JAv ≤LUz}b.
> §NX ¢L}eÈ ¸«•∑∑d, ßd|FUÎ Äf «“ «ß∑HUœÁ, ƺL∑NUÈ
±∑∫d؇ ¸« “|d §d|UÊ ¬» Ë ±Ib«¸ ØLv ±U|l ™d≠Auzv
°Auz}b.
> ÄU¸ı ±ªKu◊ Øs (A, B, C) Ë ¬ß}U» ≥Lt ØU¸Á (F) ÆU°q
®º∑Au œ¸ ±U®}s ™d≠Auzv °d ¸ËÈ ß∂b °Uôzv °U °d≤U±t
"OCE" ¥U "DELIOS YLTHGIL" ±O∂U®Mb.
> §NX ¢LOe ≤LuœÊ ƺLX ±u¢u¸ (D), «“ ¥J‡ œß∑LU‰ ≤Lb«¸
«ß∑HUœÁ ≤LUzOb. °U œÆX ¬≤d« îAJ‡ ØMOb.
> ≥Oâ~UÁ ƺLX ±u¢u¸ (D) ¸« œ¸ ¬» ¥U “¥d §d¥UÊ ¬» Æd«¸
≤b≥Ob.
> ÄU¸ı ±ªKu◊ Øs (C) ¥U ØUßt ¬ßOU» ≥Lt ØU¸Á (3f) ¸« ÄOg
«“ ¢LOe ≤LuœÊ îU∞v ØMOb.
≥Ab«¸: ¬≤NU ¸« °U œÆX
§U°πU ≤LUz}b: ¢}Gt ≥UÈ
ÄU¸ı ±ªKu◊ Øs Ë ∞u«“ ¬Ê
¢}e ±}∂U®Mb.
≠KHq Æd±e îAJ‡
≠KHq ßOUÁ
±O~u îAJ‡
°d≤Z °uœ«œÁ ®bÁ
ØMπb ßOUÁ
°Uœ«Â “±OMv
Ä}U“
ÄM}d ÄU¸±e«Ê (°t ÆDFU‹ ØuÇJ‡ °d¥bÁ ®bÁ)
±u«œ ±Ib«¸ ±b‹ ØU¸Ødœ
03 ÖdÂ
03 ÖdÂ
52 ÖdÂ
04 ÖdÂ
03 ÖdÂ
05 ÖdÂ
001 ÖdÂ
001 ÖdÂ
33 £U≤Ot
1 œÆOIt Ë 03 £U≤Ot
03 £U≤Ot
61 £U≤Ot
12 £U≤Ot
4 £U≤Ot
31 £U≤Ot
31 £U≤Ot
¢LOe ≤LuœÊ œß∑~UÁ
69
Page 66

œ¸Äu‘ «≤b«“Á ÖOdÈ (A) ¸« °d ¸ËÈ œ¸» Æd«¸ œ≥}b Ë ¬≤d« œ¸ §UÈ îuœ ±∫Jr ≤LUz}b (®Jq 3).
¢uÅOt ±}~dœœ œ¸ ©u‰ ØU¸Ødœ œß∑~UÁ œ¸» ¸« ≤~Nb«¸|b.
> ÄU¸ı ±ªKu◊ Øs (C) ¸« °d ¸ËÈ °b≤t ƺLX ±u¢u¸ (D) Æd«¸ œ≥}b. ÆHq (°U“) °U ®OU¸ ±u§uœ
°d ¸ËÈ ÆºLX ±u¢u¸ œ¸ |J‡ ¸œ|n Æd«¸ Ö}dœ (®Jq 3).
> ßáf ÄU¸ı ±ªKu◊ Øs (C) ¸« °âdîU≤}b ¢U ÆHq (°º∑t) ≤LU|UÊ Ödœœ (®Jq 3).
> ±u«œ ¸« ÄOg «“ «{U≠t ≤LuœÊ °t œ«îq ÄU¸ı ±ªKu◊ Øs (C) îdœ ≤LUz}b. °N∑d|s •U∞X «{U≠t
≤LuœÊ ±U|FU‹, Ä}g «“ ±u«œ œ|~d ±}∂U®b, °t ßD` •b«Ø∏d ≤LU|g œ«œÁ ®bÁ °d ¸ËÈ ÄU¸ı ¢u§t
≤LUz}b (5,1 ∞}∑d).
> œß∑~UÁ ¸« °t °d‚ ËÅq ≤LUz}b Ë °U ÇdîU≤bÊ «≤∑ªU°~d ßd´X (E) °d ¸ËÈ Ë{F}X "eslup",
"1", ¥U "2" ¬≤d« °JU¸ «≤b«“|b.
> §NX ±∑uÆn ≤LuœÊ œß∑~UÁ, «≤∑ªU°~d ßd´X (E) ¸« °d ¸ËÈ "0" Æd«¸ œ≥}b.
> Ä}g «“ îU¸Ã ≤LuœÊ ÄU¸ı ±ªKu◊ Øs (C) ±M∑Ed °LU≤}b ¢U œß∑~UÁ ØU±öÎ ±∑uÆn Ödœœ.
> °U ÇdîU≤bÊ ÄU¸ı ±ªKu◊ Øs (C) °d îö· §N∑v Øt ¬≤d« ≤BV ≤LuœÁ «|b, ±}∑u«≤}b ÆHq ¬≤d« °U“
≤LuœÁ Ë ¬≤d« °KMb ≤LUz}b.
2- ¬ßOU» ≥Lt ØU¸Á
>
¬ßJU» ≥Lt ØU¸Á (F) ±πNe °t ¥J‡ ØUßt (3f) ±O∂U®b Øt «“ œß∑dßv
°t ¢}Gt ≥U œ¸ ©u‰ ´LKJdœ œß∑~UÁ §KuÖOdÈ îu«≥b Ødœ.
> ØUßt (F) ¸« °âdîU≤Ob Ë ±u«œ ¸« °d¥e¥b.
> Ë«®d œ¸“ÖOd (1f) ¸« œ¸ ±∫q ≠d˸≠∑~v °d ¸ËÈ ¢}Gt ƺLX
¬ß}U» (2f) Æd«¸ œ≥}b (®Jq 4). ƺLX ¢OGt ¬ßOU» (2f) ¸«
°d ¸ËÈ ØUßt (3f) Æd«¸ œ≥Ob, Ë °U ÇdîU≤bÊ ÆºLX ¢OGt (2f)
°d îö· §NX •dØX ´Id°t ≥UÈ ßU´X, ¬ß}U» ≥Lt ØU¸Á
(F) ¸« ÆHq ≤LUzOb (®Jq 5).
> ¬ß}U» ≥Lt ØU¸Á (F) ±u≤∑U˛ ®bÁ ¸« °âdîU≤Ob Ë ¬≤d« °d ¸ËÈ
ƺLX ±u¢u¸ (D) Æd«¸ œ≥}b. ÆHq (°U“) °U ®}U¸ ±u§uœ °d
¸ËÈ ÆºLX ±u¢u¸ (D) œ¸ |J‡ ¸œ¥n Æd«¸ ÖOdœ (®Jq 6).
> ¬ßOU» ≥Lt ØU¸Á (F) ±u≤∑U˛ ®bÁ ¸« œ¸ §NX •dØX ´Id°t ≥UÈ
ßU´X °âdîU≤}b ¢U ÆHq (°º∑t) ≤LU|UÊ Ödœœ (®Jq 6).
> œß∑~UÁ ¸« °t °d‚ ËÅq ≤LUzOb Ë °U ÇdîU≤bÊ «≤∑ªU°~d ßd´X
(E) °d ¸ËÈ Ë{F}X "eslup", "1", ¥U "2" ¬≤d« °JU¸ «≤b«“¥b.
> §NX ±∑uÆn ≤LuœÊ œß∑~UÁ, «≤∑ªU°~d ßd´X (E ) ¸« °d ¸ËÈ
Ë{F}X "0" Æd«¸ œ≥}b.
> Ä}g «“ îU¸Ã ≤LuœÊ ¬ß}U» ≥Lt ØU¸Á (F) ±M∑Ed °LU≤Ob ¢U œß∑~UÁ
ØU±ö ±∑uÆn Ödœœ.
>
°U ÇdîU≤bÊ ¬ß}U» ≥Lt ØU¸Á (F) °d îö· §N∑v Øt ¬≤d« ≤BV
≤LuœÁ «¥b, ±O∑u«≤Ob ÆHq ¬≤d« °U“ ≤LuœÁ Ë ¬≤d« îU¸Ã ≤LUzOb.
>
ÄOg «“ °U“ ≤LuœÊ ƺLX ¢OGt ¬ßOU» (2f) «“ ¸ËÈ ØUßt (3f)
œ¸ §NX ´Jf ±d«•q ≤BV, ¬≤d« °dÖdœ«≤Ob. ¢OGt ≥U °ºOU¸
¢Oe ±O∂U®Mb: §NX §KuÖOdÈ «“ ≥dÖu≤t §d«•X ¬≤NU ¸« °U œÆX
Ë|óÁ §U°πU ≤LUz}b. •U‰ ±}∑u«≤}b ±u«œ ¸« «“ œ«îq ØUßt îU¸Ã
≤LUz}b.
≤J∑t : ¸≤@ ØUßt ±LJs «ßX Äf «“ ¬ßOU» ≤LuœÊ °dîv ±u«œ
îU’ °ºOU¸ ߪX ≤EOd ±OªJ‡, œ«¸ÇOs Ë ¨OdÁ ¢GOOd ¥U°b.
≥Ab«¸: ÇMU≤ât ∞u«“Â
§U≤∂v ØU±öÎ ÆHq ≤~dœ≤b
«±JUÊ ≤A∑v ˧uœ îu«≥b
œ«®X.
70
Page 67

> «“ ±ªKu◊ Øs °}g «“ 3 œÆ}It °Du¸ ±b«Ë «ß∑HUœÁ ≤MLUz}b.
> ±ªKu◊ Øs ¸« °d ¸ËÈ |J‡ ßD` ÅU·, £U°X, ±IUË œ¸ °d«°d •d«¸‹, ¢L}e Ë îAJ‡ Æd«¸ œ≥}b.
> ≥M~U ´LKJdœ ÄU¸ı ±ªKu◊ Øs Ë ¥U ∞u«“ œ¥~d ¬Ê ±d«ÆV °U®Ob Øt ±u≥UÈ °KMb, ¸ËßdÈ, Ød«Ë«‹
Ë «±∏U‰ ¬≤NU °U ƺL∑NUÈ ±∑∫d؇ œß∑~UÁ ¢LU” ≤b«®∑t °U®b.
> «“ ±ªKu◊ Øs œ¸ ≠CUÈ °U“ îU¸Ã «“ ±Me‰ «ß∑HUœÁ ≤MLUz}b.
> Æ∂q «“ ¢uÆn ØU±q ¢}Gt ≥U œ¸Äu‘ (B) ¸« îU¸Ã ≤MLUz}b.
> ≥}â~UÁ «“ œß∑~UÁ §NX ±ªKu◊ ≤LuœÊ ±u«œ ¨}d îu¸«Øv «ß∑HUœÁ ≤MLUz}b.
> Äf «“ ≥d °U¸ ØU¸ °U ËßOKt «§U“Á œ≥}b œß∑~UÁ œ¸ œ±UÈ «¢U‚ îMJ‡ Ödœœ.
> ≥}â~UÁ «“ ±ªKu◊ Øs Ë |U ∞u«“ §U≤∂v ¬Ê °bËÊ ±u«œ «ß∑HUœÁ ≤MLUz}b Ë ≥}â~UÁ ±U|FU‹ œ¸ •U‰
§u‘ (C08) ¸« œ¸ËÊ ÄU¸ı ¬Ê ≤d|e|b.
> œ¸ Åu¸‹ ±AU≥bÁ ≥d Öu≤t «®JU‰ œ¸ ß}r °d‚ œß∑~UÁ, ß}r °U|b ¢ußj |Jv «“ ±d«Øe îb±U‹
±πU“ ¢Fu|i Ödœœ.
ÆHq «¥LMv
œß∑~UÁ ¢MNU œ¸ Åu¸¢v ÆU°q «ß∑HUœÁ ±}∂U®b Øt ÄU¸ı (C) ¥U ∞u«“ (F) ØU±öÎ œ¸ §UÈ îuœ Æd«¸
Öd≠∑t °U®Mb Ë °d ¸ËÈ ÆºLX ±u¢u¸ (D) ÆHq ®bÁ °U®Mb.
«ß∑HUœÁ °d«È °U¸ ≤ªºX
>
Æ∂q «“ «Ë∞}s «ß∑HUœÁ «“ œß∑~UÁ, ¢LU±v ÆDFU‹ (A, B, C, Ë
F) ¸« °t ¨}d «“ ƺLX ±u¢u¸ (D) °U ¬» ÖdÂ Ë ÅU°uÊ °Auz}b.
> Æ∂q «“ °U“ ØdœÊ œß∑~UÁ «©L}MUÊ •UÅq ≤LUz}b ¢LU±v
ËßU|q ±d°u◊ °t °º∑t °MbÈ ¸« §b« ≤LuœÁ «|b.
> ≤J∑t ±Nr: Ä}g «“ Æd«¸ œ«œÊ ÄU¸ı ±ªKu◊ Øs |U ∞u«“ œ|~d
°d ¸ËÈ ÆºLX ±u¢u¸, «≤∑ªU°~d ßd´X (E) ¸« °d ¸ËÈ
Ë{F}X "0" °âdîU≤}b.
> œß∑~UÁ ¢MNU œ¸ Åu¸¢v ®dËŸ °t ØU¸ îu«≥b Ødœ Øt ÄU¸ı
|U ∞u«“ œ|~d œ¸ßX °d ¸ËÈ ÆºLX ±u¢u¸ ÆHq ®bÁ °U®Mb.
> ÇMU≤ât œ¸Äu‘ œ¸ §UÈ îuœ ≤L}∂U®b ÄU¸ı ±ªKu◊ Øs ¸«
°JU¸ ≤}Mb«“|b.
¢u§t : ¢}Gt ≥U °º}U¸ ¢}e
±}∂U®Mb: ≥M~U «ß∑HUœÁ,
îU∞v ≤LuœÊ |U ¢L}e ØdœÊ
œß∑~UÁ, ¬≤NU ¸« °U œÆX
§U°πU ≤LUz}b.
«ß∑HUœÁ «“ œß∑~UÁ
1- ÄU¸ı ±ªKu◊ Øs
> Ë«®d (2c) ¸« ±d©u» ≤LuœÁ Ë °Du¸ Å∫O` °d ¸ËÈ ¢OGt (1c) Æd«¸ œ≥Ob: 3 ¢UÈ Ë«®d °U¥b °U Æd«¸
Öd≠∑s œ¸ §UÈ îuœ ÆU°q ¸Ë¥X °U®b. œ¸ Åu¸‹ Æd«¸ Öd≠∑s œ¸ §NX œ¥~d, ≤Lv ¢u«≤Ob ¢OGt ¸« ¸ËÈ ¢M@
ÆHq ØMOb. (¢Bu¥d1).
> ±πLu´t (2c + 1c) ¸« ¸ËÈ ÄU¥t ¢M@ (3c) Æd«¸ œ≥Ob. ¬≤d« °U Çdîg ¥J‡ ¸°l œ¸ îö· §NX ´Id°t ≥UÈ
ßU´X ÆHq ØMOb. (¢Bu¥d2).
> ±u«œ ¸« °bËÊ ≠d«¢d ¸≠∑s «“ •b ±UØe¥Lr œ¸ ¢M@ Æd«¸ œ≥Ob.
> œ¸Äu‘ (B) ¸« °d ¸ËÈ ÄU¸ı ±ªKu◊ Øs (C) Æd«¸ œ≥Ob Ë °U Æd«¸ œ«œÊ ¬Ê œ¸ •HdÁ ≥U ±IU°q œ≥U≤t
¸¥e‘, ¬≤d« ÆHq ≤LUzOb (®Jq 3).
71
Page 68

A ÄOLU≤t «≤b«“Á ÖOdÈ
B œ¸Äu‘
C ¢M@ ±ªKu◊ Øs
- 1c ¢OGt
- 2c Ë«®d
- 3c ¢M@ ±ªKu◊ Øs ≥Lt ØU¸Á
D ƺLX ±u¢u¸
E «≤∑ªU°~d ßd´X
F ∞u«“Â §U≤∂v (°d ©∂o ±b‰) :
¬ßOU» ≥Lt ØU¸Á
- 1f Ë«®d œ¸“ÖOd
- 2f ƺLX ¢OGt ¬ßOU»
- 3f ØUßt ¬ßOU» ≥Lt ØU¸Á
> Æ∂q «“ ØU¸°dœ œß∑~UÁ °d«È ≤ªº∑}s °U¸, œß∑u¸«∞FLKNU ¸« °t œÆX ±DU∞Ft ≤LUz}b: ≥d Öu≤t «ß∑HUœÁ
≤Uœ¸ßX Ë °d îö· ≤JU‹ «¥LMv –Ød ®bÁ œß∑~UÁ ¸« «“ ÖU¸«≤∑v îU¸Ã îu«≥b Ødœ, Ë ßU“≤bÁ
±ºµu∞}∑v œ¸ Æ∂U‰ ¬Ê ≤L}ác|dœ.
> «|s œß∑~UÁ °d«È «ß∑HUœÁ «≠d«œÈ (®U±q ØuœØUÊ) Øt œ«¸«È ≤U¸ßUzv ≥UÈ §ºLv, ≠JdÈ Ë
¸Ë«≤v ±}∂U®Mb Ë≤}e «®ªU’ °bËÊ ¢πd°t Ë ¬ÖU≥v ßUî∑t ≤AbÁ «ßX, ±~d ¢∫X ≤EU¸‹ ≠dœÈ
Øt ±ºµu‰ ±d«Æ∂X Ë «|LMv ¬≤NU °uœÁ Ë œß∑u¸«‹ ô“ §NX «ß∑HUœÁ «“ œß∑~UÁ ¸« °t ¬≤NU œ«œÁ
°U®b. ±d«ÆV ØuœØUÊ °U®}b ¢U «“ œß∑~UÁ °t ´Mu«Ê Ëß}Kt °U“È «ß∑HUœÁ ≤JMMb.
> «|s œß∑~UÁ ¢MNU §NX ØU¸ °U §d|UÊ ±∑MUË» °d‚ ©d«•v Ödœ|bÁ «ßX. «©L}MUÊ •UÅq ≠d±U|}b
°d‚ ±Me∞∑UÊ, ±DU°o °U Ë∞∑U˛ œ¸Ã ®bÁ °d ¸ËÈ Äö؇ ±AªBU‹ œß∑~U≥∑UÊ °U®b.
> «|s ±∫Bu‰ Åd≠UÎ §NX ±BU¸· îU≤~v ©d«•v Ödœ|bÁ «ßX. ≥d Öu≤t «ß∑HUœÁ ÅMF∑v,
≤Uœ¸ßX Ë °d îö· ≤JU‹ «|LMv –Ød ®bÁ œß∑~UÁ ¸« «“ ÖU¸«≤∑v îU¸Ã îu«≥b Ødœ, Ë ßU“≤bÁ
±ºµu∞}∑v œ¸ Æ∂U‰ ¬Ê ≤L}ác|dœ.
> ≥M~U±v Øt œß∑~UÁ ¸« °bËÊ ±d«ÆV ¸≥U ±}MLUz}b, Ä}g «“ §U “œÊ Ë îU¸Ã ≤LuœÊ ∞u«“ §U≤∂v |U
Ä}g «“ ¢L}e ØdœÊ œß∑~UÁ, «©L}MUÊ •UÅq ≤LUz}b œË®Uît ¬≤d« «“ Äd|e §b« ≤LuœÁ «|b.
> ÇMU≤ât œß∑~UÁ œ¸ßX ØU¸ ≤L}JMb, ¬ß}∂v °t ¬Ê Ë«¸œ ®bÁ |U °t œË®Uît |U ß}r °d‚ ¬Ê Åb±t
«È Ë«¸œ ®bÁ, «“ ¬Ê «ß∑HUœÁ ≤MLUz}b. §NX •Hk «|LMv, «|s ƺL∑NU °U|b ¢ußj ±d«Øe îb±U‹
±πU“ ¢Fu|i Ödœ≤b («ßU±v ≤LU|MbÖv ≥U œ¸ œ≠∑dÇt îb±U‹).
> ≥d Öu≤t «Æb«±v °t ¨}d «“ ¢L}e ØdœÊ Ë ≤~Nb«¸È ¸Ë“«≤t ¢ußj ±Bd· ØMMbÁ, °U|b ¢ußj
±d«Øeîb±U‹ ±πU“ «≤πU Äc|dœ.
> «“ ¢LU” œß∑~UÁ, ß}r °d‚ Ë |U œË®Uît ¬Ê °U ¬» Ë ±U|FU‹ œ|~d§b«Î §KuÖ}dÈ ≤LUz}b. ß}r °d‚
¸« œ¸ œß∑d” ØuœØUÊ Æd«¸ ≤b≥}b. ß}r œß∑~UÁ ≤∂U|b ≥}â~UÁ œ¸≤eœ|Jv Ë |U ¢LU” °U ßDuÕ
œ«⁄ œß∑~UÁ, œ¸ ±πU˸‹ ±MU°l •d«¸¢v |U °d ¸ËÈ ∞∂t ≥UÈ ¢}e Æd«¸ Ö}dœ.
> °d«È «|LMv îuœ, ¢MNU «“ ∞u«“ ¥bØv Ë ÆDFU‹ ±MUßV °U ±b‰ œß∑~UÁ îuœ Øt ¢ußj ±d«Øe îb±U‹
±πU“ ´d{t ±}~dœœ, «ß∑HUœÁ ≤LUz}b.
> ¢}Gt ≥U °º}U¸ ¢}e ±}∂U®Mb: §NX §KuÖ}dÈ «“ §d«•X ¬≤NU ¸« °U œÆX Ë|óÁ §U°πU ≤LUz}b.
> ≥}â~UÁ «“ ±ªKu◊ Øs Ë |U ∞u«“ §U≤∂v ±d°u◊ °t ¬Ê °bËÊ ±u«œ «ß∑HUœÁ ≤MLUz}b Ë ≥}â~UÁ ±U|FU‹
œ¸ •U‰ §u‘ ¸« œ«îq ÄU¸ı ¬Ê ≤d|e|b.
> ≥L}At «“ ÄU¸ı ±ªKu◊ Øs ≥Ld«Á °U œ¸Äu‘ (B) ¬Ê «ß∑HUœÁ ≤LUz}b.
> ≥L}At Ä}g «“ «{U≠t ≤LuœÊ ±u«œ §U±b, ≤ªºX ±U|FU‹ ¸« œ¸ËÊ ÄU¸ı °d|e|b, °}g «“ îj
≤AU≤~d •b«Ø∏d, ±u«œ ≤d|e|b.
> ≥M~U ØU¸Ødœ œß∑~UÁ, ≥}â~UÁ «≤~A∑UÊ îuœ Ë |U ≥d Öu≤t Ëß}Kt œ|~dÈ ¸« œ«îq ÄU¸ı ≤JM}b.
> «“ ØUßt ≥UÈ œß∑~UÁ °FMu«Ê ±∫HEt «È §NX œ«îq ≠d|e Öc«®∑s ±u«œ, ĪX Ë Äe Ë «ß∑d|q
ØdœÊ «ß∑HUœÁ ≤MLUz}b.
±AªBU‹ œß∑~UÁ
¢uÅOt ≥UÈ «|LMv
∞u«“ §U≤∂v ±u§uœ œ¸ ±b‰ œß∑~U≥v Øt ®LU îd|b«¸È ØdœÁ «|b °d ¸ËÈ °dǺ∂v Øt °UôÈ °º∑t
°MbÈ ±u§uœ ±}∂U®b –Ød ®bÁ «ßX.
FA
72
Page 69

Page 70

Page 71

Page 72

 Loading...