

Page 1

EN
DE
ES
PT
ActiFry Genius XL 2in1
www.tefal.com
Page 2

7
2
1
8
3
9
10
11
12
14
6
7
5
4
13
15
7
16
19
20
5
7
17
18
21
22
23
Page 3

7
1
7
1
2
7
7
7
1
2
7
7
7
7
7
7
7
1
4 5
7
10 11 12
2
3
6
8
9
Page 4
7
7
7
7
7
7
7
7
7
7
7
13 14 15
5
1816 17
2119 20
25 26 27
2422 23
Page 5
7
7
7
7
7
7
7
7
7
7
25 26 27
28 29 30
31 32 33
34
Page 6

Welcome to the world of ActiFry Genius XL
2in1!
Here’s how you can make your very own delicious
meal.
It’s our patented technology which makes the chips crisp and fluffy. You
choose the ingredients, the oil, spices, herbs and seasoning… ActiFry
Genius XL 2in1 will take care of the rest.
Only 3 %* fat: 1 spoonful of oil is all you need!
One spoonful of oil of your choice is all you need to make 1.5 kg of real
chips. The ActiFry Genius XL 2in1 spoon has a salt measure on the
underside which helps you to reduce the amount of salt you use without
compromising on taste.
* 1.5 kg of fresh potatoes, cut into chips with a cross section 13 mm x 13
mm, cooked until weight loss of -55% with 20 ml of oil.
So much more than just ordinary steak and chips!
With ActiFry Genius XL 2in1 you can cook a lot of different recipes. Put a
bit of variety into your daily diet with some steak and chips, some tender
stir-fry vegetables, delicious tasty meatballs, flavoursome prawns, fruits
and more…
: the ActiFry Genius XL 2in1
Also included is a book of recipes prepared
by our top chef.
It’s full of original ideas on how to make delicious and
nutritional main meals, along with side dishes to accompany
them, as well as desserts you can create for the whole of the
family.
6
Page 7

So that you can get the best results from
your cooking, offers you special
advice on potatoes and oils.
The potato: for an enjoyable and balanced diet every day!
Potatoes are a great food for everybody at every age. They are an excellent source of energy
and are rich in vitamins. Depending on the varieties, the climatic conditions and cultivation,
the potato can vary greatly in terms of: shape, size, quality of taste. Each one has its own
characteristics in respect of earliness, yield, size, colour, storage quality and directions for
cooking. The cooking results may vary depending on the origin and seasonality.
What variety should be used for ActiFry Genius XL 2in1?
In general, we advise that you use potato varieties that are recommended for making chips
such as Maris Piper and King Edward. For newly harvested potatoes which have a high moisture
content, we advise that you cook your chips for an extra few minutes.
With ActiFry Genius XL 2in1 it’s also possible to cook frozen chips. Because they are already
pre-cooked, there is no need to add any oil.
Where should you store potatoes?
The best places to store potatoes are in a dark cellar, or a cool cupboard (between 6 and 8°C),
away from any light.
How should potatoes be prepared for ActiFry Genius XL 2in1?
For best results, you must make sure that the chips do not stick together. For this we recommend
you wash the peeled potatoes thoroughly before cutting them and then once again when they
have been cut up, until the water has turned clear.
This will allow you to remove the maximum amount of starch. Carefully dry the chips using a
dry and highly absorbent clean tea towel. The chips must be perfectly dry before they are put
in the ActiFry Genius XL 2in1.
How should the potatoes be cut?
The chip’s crispiness and fluffiness depends on its size. The more thinly cut your chips are, the
crispier they will be and vice-versa, the thicker they are the fluffier they will be on the inside.
Depending on your preference, you can vary the size of your chips and change the cooking
time accordingly:
Thickness: Thin American style: 8 x 8 mm / Standard: 10 x 10 mm / Thick: 13 x 13 mm Length
up to 9 cm.
The maximum recommended chip thickness is 13 x 13 mm and a length of up to 9 cm.
Try using different oils which are good for you
If you fancy treating yourself to a different taste, then choosing one spoonful of a different
oil is all you need. All the fatty acids which are essential for life can be found in vegetable oils.
They all contain in different proportions, the nutrients which are essential for a balanced diet.
It’s important to vary the oils you use in order to provide your body with everything it needs!
With ActiFry Genius XL 2in1, you can use a very large variety of oils:
EN
7
Page 8

• Standard oils: sunflower, olive, corn, rapeseed, grapeseed, groundnut (peanut), soya.
• Flavoured oils: oils infused with herbs, garlic, peppers, lemon…
• Speciality oils: hazelnut*, sesame*, safflower*, almond*, avocado*, argan* (cooking time
varies according to the manufacturer).
*Note: Some of these oils are not available in the UK.
The ActiFry Genius XL 2in1 technology with its low quantity of fats, allows you to retain the
good fatty acids which are essential for providing you with the energy you need.
With ActiFry Genius XL 2in1, you can treat yourself and your friends too!
To find out more or if you’ve any questions, please visit www.actifry.co.uk
DESCRIPTION
1 Lid
2 Lid opening button
3 Lid latch
4 Base
5 Removable filter
6 Viewing window
7 Cooking tray handle (removable)
8 Measuring spoon (20 ml)
9 2in1 cooking tray with “MAX level”
10 Removable mixing paddle
11 Paddle release button
12 Removable cooking pan
13 Removable turn-over ring
14 Cooking pan handle
15 Cooking time
16 Cooking pan or tray in use indicator
17 Delayed start display
18 Keep warm display
19 Button for activating the 2in1 function
20 + and – button for adjusting cooking
time
21 Start/Stop cooking
22 Manual mode
23 Cooking modes
INSTRUCTIONS FOR USE
Before using for the first time
• Remove all the stickers and any packaging.
• Open the lid by pressing on the lid opening button - fig.1.
• Remove the measuring spoon.
• Remove all polystyrene packing which you can then throw away - fig. 2.
• To remove the turn-over ring, pull the clips outwards, then lift it off - fig 3.
• Remove the tray using the cooking tray handle - fig. 4.
• Lift the pan handle to a horizontal position until you hear a “CLICK” as it locks - fig.5.
• Remove the paddle by pushing the release button - fig.6.
• Take out the cooking pan - fig.7.
• Push up the latch to remove the lid - fig. 8
• Remove the detachable filter - fig.9.
• All the removable parts are dishwasher safe, except the tray handle (7) - fig.10 or can be
cleaned using a non abrasive sponge and some washing up liquid.
• Clean the body of the appliance and the handle with a damp sponge and washing up liquid
- fig.11.
8
Page 9

• Dry carefully before putting everything back in place.
• Reposition the paddle until you hear the «CLICK» - fig.12.
• To replace the turn-over ring, place it at the edge of the pan, centre it on the pan and press
down until you hear a “CLICK”.
NOTE:
• Never immerse the base unit in water or any other liquid.
• On first use, to obtain the best results from your new product, we advise you to prepare
a recipe that cooks for 30 minutes or more.
COOKING
When you are not using it, the appliance will automatically switch itself off after
10minutes.
Some helpful advice
• When using the appliance for the first time you may notice a harmless smell. This smell,
which will not affect the appliance in any way, will quickly disappear.
• So as not to damage your appliance make sure you stick to the quantities of ingredients and
liquid given in the instruction booklet and recipe book.
• Never overload the cooking pan or the tray and do not exceed the recommended quantities.
• Never exceed the height indicated by the maximum level marker on the tray.
• This appliance is not suitable for recipes with a high-liquid content (eg. soups, cook-in
sauces...).
• Never leave your ActiFry spoon or the tray handle in the appliance whilst it is on.
• Never place the tray in the appliance without the pan.
• Never put the paddle in without the pan.
• Place the tray in the appliance when the reminder beep sounds and not at the the beginning
of cooking (except if the cooking time in the pan and the tray are the same).
• Never leave the appliance unattended whilst in operation.
• Never operate your appliance when empty.
• When using the cooking pan on its own, never place the tray in the appliance.
• Never use the removable turn-over ring on the tray, either when using it alone or in 2in1
mode. Only use the removable turn-over ring on the cooking pan - fig. 33-35.
• Place the removable turn-over ring on the cooking pan to cook large quantities.
USING THE PAN ON ITS OWN
EN
Preparing the food
Do not leave the measuring spoon inside the pan while cooking food.
• Open the lid - fig.1.
• Remove the spoon inside the pan.
• Prepare your ingredients as indicated in the recipe book or these instructions.
• Place the food in the cooking pan, distributing it evenly, making sure that you respect the
maximum quantity (see cooking tables p. 12 to p. 14)
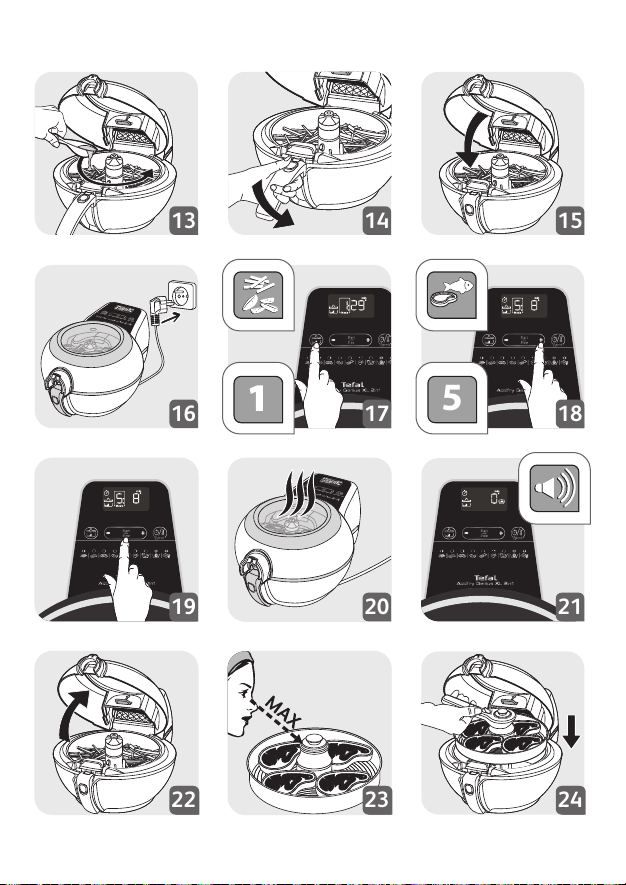
• Add the oil to the food with the spoon (1 Actifry Genius spoonful = 14 ml) - fig.13 distributing
it evenly.
• Unlock the handle and push it right back into its housing - fig.14.
• Close the lid - fig.15.
9
Page 10
Start cooking
7
• Plug the appliance into an electrical socket outlet - fig. 16. The appliance will emit 2 beeps
and the screen will flashing.
2 ways of setting the cooking time:
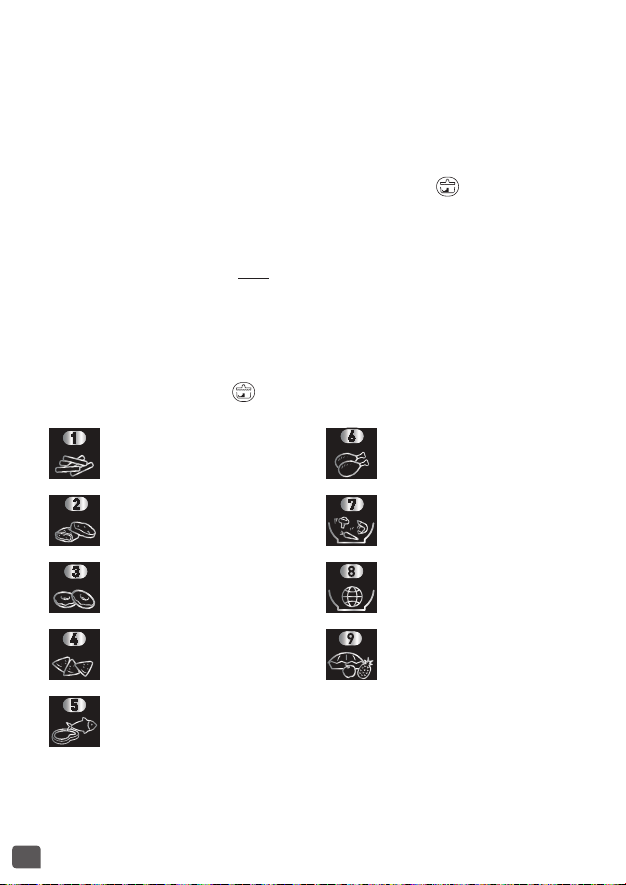
Automatic cooking mode:
The 9 cooking modes automatically adjust the cooking temperature and whether the paddle
rotates according to the type of food selected.
• Once you have closed the lid and plugged in the appliance the icon flashes on the screen.
• To select the cooking mode press the + button until the required mode 1 to 9 is displayed
- fig.18.
• Press start key - fig.19.
• Adjust cooking time by pressing +/- button.
Note: Adjust the cooking time after starting the appliance.
• When using the automatic cooking mode follow the instructions in the recipe book on where
to position food in the pan.
Note: The paddle does not turn at the beginning of cooking for programs 2, 3, 4, 5, 7,
8 and 9.
• To stop the cooking mode, press the START/STOP key.
• To cancel the cooking mode, continually hold down the START/STOP key for 2 seconds and
the screen will display the icon , ‘1’ for mode and 29 min.
1. Chips and fries e.g potato
chips, vegetable chips, potato
wedges, ...
2. Breaded recipes e.g chicken
nuggets, breaded king prawns,
...
3. Battered recipes e.g. battered
onion rings, battered calamari
rings, ...
6 Chicken e.g drumsticks and
wings, ...
7. Wok* e.g. fried rice with
prawns, sautéed beef, stir fry
vegetables, ...
8. World food* e.g lamb
tajine, fried noodles with
vegetables, ...
* ‘1 meal in 1 go’ programs
10
4. Spring rolls, samosas and filo
pastry snacks
5. Meat and Fish
9. Desserts e.g apples and pear
compote, coconut clusters, ...
Page 11

Manual mode:
• Set to manual mode by pressing the +/- button until ‘M’ is displayed.
• Set the cooking time by press the temperature/timer button and set the cooking time in
minutes by using the +/- button (see cooking table p. 12 to p. 14)
• Set the cooking in minutes by using the +/- button (see cooking table p. 12 to p. 14).
• Then set the cooking temperature by pressing the temperature/timer button , and set
the temperature required using the +/- button (see cooking table p. 12 to p. 14).
• Press start.
NOTE:
• The selected time will be displayed and a minute by minute countdown will begin. Time is
selected and displayed in minutes. Only time remaining under 1 minute will be displayed in
seconds.
• The appliance can be paused. Simply press START/STOP key. Pressing the START/STOP key
will restart cooking.
• The time can be changed at any time during cooking by using the +/- buttons - fig.18.
• In the event of an error or to delete the selected time, hold down the START/STOP key for 2
seconds and re-select the time.
Remove the food
When you open the lid, the appliance stops working. To restart cooking, close the lid and
press the START button.
When the lid is left open for over 2 minutes, the appliance will reset.
• Once cooking is completed, the timer beeps.
• Open the lid - fig.22.
• Lift the handle until you hear a “click” that it locks and take out the cooking pan - fig.31&32.
• Serve at once.
• To avoid any risk of burns, do not touch the lid or any part other than the cool touch areas:
pan handle and lid opening button.
Cooking times FOR PAN ONLY
The cooking times are given as an approximate guide and may vary depending on the
seasonality of the food, its size, the quantities used and individual tastes, as well as the voltage.
The amount of oil indicated may be increased depending on your taste and needs. If you want
crisper chips, you can add a few extra minutes to the cooking time.
EN
11
Page 12

Potatoes
Actifry spoons
of oil
Fresh chips
10 mm x
10mm
Frozen chips
13 mm x 13
mm
Type Quantity
Fresh (chips)*
Frozen
(chips)**
750 g 1/2 1 25-27
1000 g 3/4 1 28-30
1500 g 1 1 36-38
1700 g 1 1 42-44
750 g None 1 23-25
1200 g None 1 36-38
* Freshly harvested potatoes may require a longer cooking time to obtain a crisper more golden
brown result.
** For best results we recommend using frozen chips without any wheat flour batter coating
as they tend to give less crisp results and the batter may fall off during cooking (check the
ingredient list on the packet for details).
Cooking
mode
Cooking time for
the pan (mins)
Meat- poultry
To add a little flavour to your meat, don’t hesitate to mix spices in with the oil (paprika, curry,
mixed herbs, thyme, bay leaf, etc).
12
Chicken nuggets
Chicken
drumsticks
Chicken breast
(boneless)
Meatballs
Type Quantity
Fresh or Frozen 750 g None 2 10 - 12
Fresh 1200 g None 2 13 - 15
Frozen 1200 g None 2 15 - 17
Fresh 4 to 6 None 6 20- 22
Fresh 6 None 6 18 - 20
Fresh 9 None 6 22 - 24
Frozen 750 g 1 5 14 - 15
Frozen 1200 g 1 1/2 5 18 - 20
Actifry
spoons of oil
Cooking
mode
Cooking time
for the pan
(mins)
Page 13

Rice and Vegetable Dishes
Type Quantity
Ratatouille*
Farmer’s stir fry* Frozen 1000 g None 6 22-24
Paëlla*
Frozen 750 g None 7 14 - 16
Frozen 1000 g None 7 23-25
Frozen 650 g None Manual: 220°C 12 - 14
Frozen 1000 g None Manual: 220°C 15-17
Actifry
spoons of oil
* Frozen preparations not available in all countries.
Cooking
mode
Cooking time for the
pan (mins)
Fish – shellfish
Battered
calamari
King prawns
(raw)
Type Quantity
Frozen
Fresh
300 g
500 g 3 11-13
300 g
450 g 3 8-10
Actifry
spoons of oil
None
None
Cooking
mode
Cooking time for the
3 10-12
3 8-10
pan (mins)
Vegetables
Type Quantity Actifry spoons of oil Cooking mode
Courgettes Strips
Peppers Strips
Mushrooms Quarters
Tomatoes Quarters
Onions Slices
750 g 1 + 150 ml. water 7 20 - 25
1200 g 1 + 150 ml. water 7 25-30
650 g 1 + 150 ml. water 7 15 - 18
1200 g 1 + 150 ml. water 7 20-25
650 g 1 7 10 - 15
1000 g 1 7 16-18
650 g 1 + 150 ml. water 7 12 - 14
1000 g 1 + 150 ml. water 7 15-17
500 g 1 Manual: 220°C 12 - 14
750 g 1 Manual: 220°C 18-20
Cooking time for the
pan (mins)
EN
13
Page 14

Fruit
Type Quantity
Bananas Slices
Strawberries Quarters
Apples Halves
Fresh
Pineapples
(peeled &
cut into
pieces)
1000 g 2 of sugar 9 8-10
1500 g 2 of sugar 9 10-12
Actifry spoons of
oil and sugar
5 1 + 1 of sugar 9 5-6
7 1 + 1 of sugar 9 5-6
3 1 + 1 of sugar 9 8-10
5 1 + 2 of sugar 9 10-12
1 2 of sugar 9 10-12
2 2 of sugar 9 15-17
USING THE TRAY ON ITS OWN
Cooking
mode
Cooking time for the
pan (mins)
Get your food ready
• Open the lid – fig.1.
• Remove the measuring spoon and removable turn-over ring from the cooking pan.
• Remove the tray – fig.4.
• Place your food on the tray making sure you always keep to the quantities recommended in
the cooking tables and/or the recipe book (please see “Cooking table for tray quantities page
17). Never exceed the “MAX” level marker shown on the centre of the tray – fig.23.
• Put the tray back in the appliance using the tray handle - fig. 24.
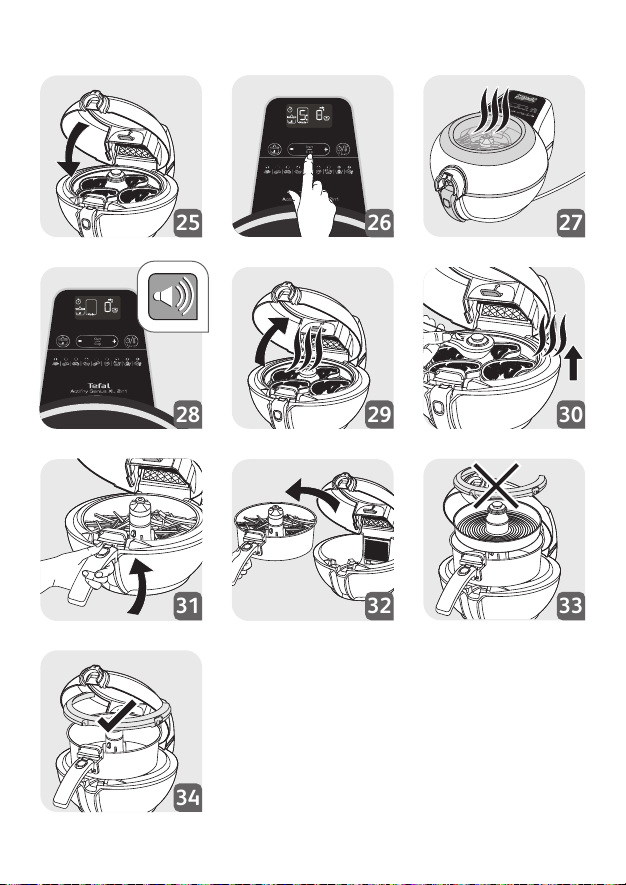
• Close the lid - fig. 25.
When using the tray on its own, do not put food into the cooking pan.
Start the cooking
• Plug the appliance into an electrical socket outlet.
• The appliance will make a beep sound.
• Press the - button and the flashes and the mode flashes ‘-’. Press the key and the
icon appears on the screen.
• To select the cooking mode, press the + button until the required mode 2, 3, 4, 5, 6, 9, or M
for manual mode is displayed.
• Press Start/Stop key.
• You can adjust the cooking time at any time by pressing +/- button
• The minute countdown starts. The countdown will only be displayed in seconds where there
is less than a minute left.
Opening the lid stops the cooking. You can resume cooking by closing the lid and pressing
on the start button.
Once the lid has been open for 3 minutes the appliance will go into stand-by mode.
14
Page 15

Remove your food
• When the cooking is finished, the timer will sound and the screen will start flashing and
displaying 0 min. The appliance automatically stops cooking your food.
• Open the lid - fig.29.
• Remove the tray using the tray handle and take your food out - fig 30. Be careful, the tray is
very hot after cooking. Always use the tray handle supplied with your appliance to remove it.
• Serve your food.
Cooking table for the tray ONLY
Type
Chicken
nuggets
Chicken
drumsticks
Chicken Wings Frozen 10 pieces None 6 22
Chicken breast
(boneless)
Meatballs
Steak
Fresh or Frozen 500 g None 2 13 - 15
Fresh or Frozen 750 g None 2 15 - 17
Fresh 4 to 6 pieces None 6 20 - 22
Fresh 6 pieces None 6 18 - 20
Fresh 9 pieces None 6 22 - 24
Frozen 500 g 1 5 12 - 15
Frozen 750 g 1 5 15 - 17
Fresh 4 pieces 1* 5 8**
Frozen 4 - 6 pieces 1 1/2* 5 8 - 10**
Quantity for
tray
* Brush steaks on both sides with oil.
** Cooking time for rare steak. Add additional cooking time for medium and well done steaks.
USING THE 2IN1 PAN + TRAY
Actifry
spoons of oil
Cooking
mode
Cooking time for
tray (mins)
Get your food ready
• Open the lid – fig.1.
• Remove the tray and the removable turn-over ring from the cooking pan – fig.4.
• Lift the handle up and remove the pan from the appliance.
• Place your food in the pan making sure you always keep to the quantities recommended
in the cooking tables and/or the recipe book. Never exceed the MAX level indicated in the
paddle.
• Depending on the food, add the recommended amount of oil in the ActiFry spoon and pour
the contents evenly in to the pan – fig.13.
• Put the pan back in the appliance and close the lid - fig. 15.
EN
15
Page 16

Start the 2in1 cooking
• Plug the appliance, it will make a beep sound and the screen displays the flashing icons
and ‘1’ for mode, and 29 min.
• Choose the cooking program desired for the pan. To select the cooking mode, press the +
button until the required mode 1 to 9 is displayed
• The icon appears on the screen - fig.17.
• Press the key to select the tray mode. The corresponding icon appears on the screen.
• Choose the cooking program desired for the tray using the + button until the required mode
2, 3, 4, 5, 6, or M for manual mode is displayed - fig.18.
• Press START/STOP key - fig.19.
• You can adjust the cooking time at any time by pressing +/- button.
• The cooking of the food in the pan starts.
• The minute by minute countdown starts
• While the food is cooking in the pan, get the food ready for cooking on the tray. Make sure
you do not exceed the maximum level mark on the tray - fig.23.
• When the appliance beeps and stops automatically, open the lid and put the tray in
- fig.22 & 24.
• Close the lid again - fig.25 and press the START button - fig.26.
• The minute countdown resumes. The countdown will only be displayed in seconds where
there is less than a minute left.
• Adjust the cooking time at any time by pressing +/- buttons.
• There is a pre-set time for each cooking mode which you can adjust.
– Adjust the cooking time in minutes using the + and - keys.
– Adjust the cooking temperature by pressing the key and the + and - buttons to set the
temperature desired.
Remove your food
• When the cooking is finished, the timer will sound and the screen will start flashing and
displaying ‘0’ min: the appliance automatically stops cooking your food.
• Open the lid - fig.29.
• Remove the tray with the tray handle and take your food out - fig.30. Be careful, the tray is
very hot after cooking. Always use the tray handle supplied with your appliance to remove it.
• Lift up the pan handle until you hear the “CLICK” - fig. 31.
• Remove the pan and take your food out - fig. 32.
Cooking table for 2in1
The cooking times given are a guide only, they may vary depending on the size of the food
items and on how well done you like your food cooked. At the end of the 2in1 cooking time,
if you like your chips or potatoes even more crispy cook them for an few extra minutes after
you’ve removed the tray.
16
Page 17

Food in pan
Fresh potato
chips*
10 mm x
10mm
Fresh* or
frozen chips
Fresh* or
frozen chips
Fresh* or
frozen chips
Courgettes, in
slices
Figs cut in
pieces
Quantity in
1500 g 1 35 min
1200 g 1 32 min 4 5 7 min**
1200 g 1 32 min
1000 g 1 30 min 4 6 15 min
1200 g 1 29 min
1200 g 1 32 min
1200 g 7 25 min
Mode Time for Pan Food in tray
pan
750 g 1 27 min 3 5 6 min**
250 g 1 15 min 1 5 5 min**
750 g 1 27 min 3 6 15 min
250 g 1 20 min 1 6 10 min
750 g 7 20 min 3 5 10 min
500 g 7 15 min 2 5 8 min
250 g 7 12 min 1 5 7 min
10 9 15 min
Steaks
Chicken
drumsticks
Home-made
chicken
nuggets
Chicken
wings
Salmon
fillet
Filo
chocolate
parcels
Tray
quantity
Mode
4 5 8 min**
8 6 15 min
14 2 8 min
10 6 22 min
4 5 10 min
4 9 4 min
Tray
time
* For fresh chips add oil. For 1200 g add 1 ActiFry spoon, 1000 g add 3/4 spoon, 750 g add 1/2
spoon and 250 g add 1/4 spoon.
** Cooking time for rare steak. Add additional cooking time for medium and well done steaks.
DELAYED START
Delayed start can be set for pan on its own, tray on its own or 2in1 program with one of the 9
automatic cooking modes or manual mode.
– Plug in the appliance.
– First set the cooking mode and cooking time required.
– Then press the Temperature/Timer key for 3 seconds. The pictogram with appear,
and the timer will flash ‘0’ min.
– Set the delayed start time using the +/- buttons (Intervals: 10 minutes) (up to a maximum
of 9 hours).
– Press START, and the delayed start timer will begin to count down. Cooking will begins once
the delayed start timer reaches 0:00.
EN
17
Page 18

KEEP WARM FUNCTION
• When cooking is finished, if no action is done after 3 minutes, the keep warm mode
automatically starts (except for mode 1 – Chips).
• After 30 minutes keeping warm, the appliance stops.
• To desactivate «Keep warm» function, press simultaneously + and – buttons for a long time
(3 seconds).
• To re-activate «Keep warm» function, press simultaneously + and – buttons for a long time
(3 seconds).
ACTIFRY GENIUS COOKING TIPS
• Do not add salt to chips while the chips are in the cooking pan. Only add salt once the chips
are removed from the cooking pan.
• When adding dried herbs and spices to ActiFry, mix them with some oil or liquid. If you try
sprinkling them directly into the pan they will just get blown around by the hot air system.
• Strong coloured spices may slightly stain the paddle and parts of the appliance. This is
normal.
• Prepare all food in evenly sized pieces to ensure that they all cook at the same time.
• Prepare vegetables, especially root vegetables, in small pieces or cut to stir fry size to ensure
they cook through.
• If using onions in ActiFry recipes they are best thinly sliced rather than chopped as they cook
better. Separate the onion rings before adding them to the cooking pan and give them a
quick stir so that they are evenly distributed.
For the automatic cooking mode only:
• For selected cooking modes, ingredients should be placed in the cooking pan as stated in the
ActiFry Genius recipe book. This ensures the right level of cooking for each ingredient. Those
which require a longer cooking time are put in the top half of the pan. Those requiring a
shorter cooking time are put next to the handle.
EASY TO CLEAN
Cleaning the appliance
Never immerse the appliance in water or any other liquid. Do not use any corrosive or
abrasive cleaning products. The removable filter must be cleaned regularly. To ensure your
removable cooking pan and tray last longer, never use any metal ustensils.
We do not recommend the use of any detergent other than washing up liquid to clean any
part of the appliance.
• Leave the appliance to cool completely before cleaning.
• Open the lid by pressing the button - fig.1 and push up the latch to remove the lid - fig.8.
• Remove the tray.
• Lift the pan handle until you hear a «CLICK».
• Remove the paddle by pushing the release button - fig.6.
• Take out the cooking pan - fig.7.
• Remove the detachable filter - fig.9.
• To remove the turn-over ring, pull the clips outwards, then lift it off.
18
Page 19

• All the removable parts, except the tray handle (7), are dishwasher safe - fig.10 or can be
cleaned using a non abrasive sponge and some washing up liquid.
• Clean the inside and outside of the appliance and the handle with a damp sponge and a
little washing up liquid - fig.11. Dry carefully before putting everything back in place.
• If food gets stuck or burnt onto the pan or paddle, leave them to soak in warm water before
cleaning.
A FEW TIPS IN CASE OF PROBLEMS…
Problems Causes Solutions
The appliance is not plugged in
properly.
You have not yet pressed START/
STOP button .
You have pressed START/STOP
button but the appliance does not
The appliance does
not work.
The paddle does
not stay in place
The tray does not turn. The tray is not locked.
The food has not been
cooked uniformly.
The chips are not
crispy enough.
operate.
The appliance is not heating. Call the customer Helpline (seebelow)
The paddle does not turn.
The paddle is not locked.
You have not used the paddle. Put it in position.
The food / chips have not been cut
uniformly.
You are using a variety of potatoes
unsuitable for chips.
The potatoes haven’t been
sufficiently washed and dried.
The chips are too thick. Cut them more thinly.
There’s not enough oil.
The filter (5) is blocked.
Make sure the appliance is properly
plugged in to a mains power socket.
Press START/STOP button .
Close the lid.
The paddle does not turn at the beginning
of cooking in cooking modes 2, 3, 4, 5, 7,
8 and 9. Restart using the manual mode
to check the paddle turns. If it does not
turn, check that it is correctly in place and
adjust until you hear a “CLICK” sound. If
it still does not operate contact our the
customer Helpline.
Reposition the paddle until you hear it
«CLICK» - fig.12.
Adjust the position until you hear the
“CLICK” sound.
Cut the food / chips all to the same size.
Choose a variety of potato suitable for
chips such as Maris Piper or King Edward
for best results. Freshly harvested potatoes
may have a high moisture content, either
cook for a few minutes more or try using a
different batch and/or variety of potatoes.
Wash, drain and dry the potatoes
thoroughly before cooking.
Increase the quantity of oil (see “Cooking
table”).
Clean the filter.
EN
19
Page 20

Problems Causes Solutions
The food won’t turn
with the tray.
The food in the pan
isn’t cooked when
using for 2in1 cooking.
The chips become
broken whilst they are
being cooked.
The food remains on
the edge of the pan.
The LCD screen does
not work.
The appliance is
abnormally noisy.
The food is too thick. Reduce the thickness of your food.
The tray was put on the pan when
the cooking started.
You are using too large a quantity
or the chips are too long.
The pan has too much food.
Maximum level recommended
exceeded.
The appliance is not plugged in. Plug the appliance in.
The lid is open. Close the lid.
You suspect there is a problem in
the way the appliance motor is
working.
Only put the tray in during the second half
of the cooking phase.
Reduce the quantity of potatoes and
adjust cooking time. Or do not cut chips
longer than 9 cm in length.
Comply with the maximum quantities
shown on the cooking table.
Put the turn-over ring in place when
cooking chips.
Reduce the amount of food.
Reduce the quantities.
Call the customer Helpline below.
20
Page 21

TEFAL/T-FAL* INTERNATIONAL LIMITED GUARANTEE
This product is repairable by TEFAL/T-FAL*, during and after the guarantee period.
Accessories, consumables and end-user replaceable parts can be purchased, if locally available, as described on the
The Guarantee**:
TEFAL/T-FAL guarantees this product against any manufacturing defect in materials or workmanship during the guarantee period
within those countries*** as stated in the attached country list, starting from the initial date of purchase or delivery date. The
international manufacturer’s guarantee covers all costs related to restoring the proven defective product so that it conforms to its
original specifications, through the repair or replacement of any defective part and the necessary labour. At TEFAL/T-FAL’s choice, an
equivalent or superior replacement product may be provided instead of repairing a defective product. TEFAL/T-FAL’s sole obligation
and your exclusive resolution under this guarantee are limited to such repair or replacement.
Conditions & Exclusions:
TEFAL/T-FAL shall not be obliged to repair or replace any product which is not accompanied by a valid proof of purchase. The
product can be taken directly in person or must be adequately packaged and returned, by recorded delivery (or equivalent method
of postage), to a TEFAL/T-FAL authorised service centre. Full address details for each country’s authorised service centres are listed
on TEFAL/T-FAL website (www.tefal.com) or by calling the appropriate consumer service centre set out in the attached country
list. In order to offer the best possible after-sales service and constantly improve customer satisfaction, TEFAL/T-FAL may send a
satisfaction survey to all customers who have had their product repaired or exchanged in a TEFAL/T-FAL authorised service centre.
This guarantee applies only for products purchased and used for domestic purposes and will not cover any damage which occurs as a
result of misuse, negligence, failure to follow TEFAL/T-FAL instructions, or a modification or unauthorised repair of the product, faulty
packaging by the owner or mishandling by any carrier. It also does not cover normal wear and tear, maintenance or replacement of
consumable parts, or the following:
–damages or poor results specifically due to wrong voltage or frequency as stamped on the product ID or specification
–using the wrong type of water or consumable
–mechanical damages, overloading
–ingress of water, dust or insects into the product (excluding appliances with features specifically designed for insects)
–scaling (any de-scaling must be carried out according to the instructions for use)
–damage as a result of lightning or power surges
–damage to any glass or porcelain ware in the product
–accidents including fire, flood, etc
–professional or commercial use
Consumer Statutory Rights:
This international TEFAL/T-FAL guarantee does not affect the Statutory Rights a consumer may have or those rights that cannot be
excluded or limited, nor rights against the retailer from which the consumer purchased the product. This guarantee gives a consumer
specific legal rights, and the consumer may also have other legal rights which vary from State to State or Country to Country. The
consumer may assert any such rights at his sole discretion.
***Where a product purchased in a listed country and then used in another listed country, the international TEFAL/TFAL guarantee duration is the period for the country of usage, even if the product was purchased in a listed country
with a lon ger guarantee duration. The repair process may require a longer time if the product is not locally sold by
TEFAL/T-FAL in th e country of usage. If the product is not repairable in the new country of usage, the international
TEFAL/T-FAL guarantee i s limited to a replacement by a similar or alternative product at similar cost, where possible.
*TEFAL household appliances appear under the T-FAL brand in some territories like America and Japan. TEFAL/T-FAL are registered
trademarks of Groupe SEB.
Please keep this document for your reference should you wish to make a claim under the guarantee.
**For Australia only:
Our goods come with guarantees that cannot be excluded under the Australian Consumer Law. You are entitled to a replacement
or refund for a major failure and compensation for any other reasonably foreseeable loss or damage. You are also entitled to have
the goods repaired or replaced if the goods fail to be of acceptable quality and the failure does not amount to a major failure.
**For India Only:
Your Tefal product is guaranteed for 2 years. The guarantee covers exclusively the repair of a defective product, but at TEFAL’s
choice, a replacement product may be provided instead of repairing a defective product. It is mandatory that the consumer, to
have his product repaired, has to log a service request on the dedicated Smartphone application TEFAL SERVICE APP or by calling
TEFAL Consumer Care Center at 1860-200-1232, Opening hours Mon-Sat 09 AM to 06 PM. Products returned by Post will not be
covered by the guarantee. As a proof of purchase consumer needs to provide both this stamped guarantee card and cash memo.
: www.tefal.com
TEFAL/T-FAL internet site www.tefal.com
EN
21
Page 22
Willkommen in der Welt von ActiFry Genius XL 2in1!
Bereiten Sie ein komplettes, leckeres Gericht in einem
Gerät zu.
Dank der patentierten Technologien wie etwa dem rotierenden Rührarm, der das Öl
gleichmäßig verteilt und der schnell zirkulierenden Heißluft, gelingen Pommes Frites
besonders lecker und knusprig ohne Austrocknen. Sie wählen die Zutaten, das Öl, die
Gewürze, die Kräuter aus ActiFry Genius XL 2in1 kümmert sich um den Rest!
Nur 3%* Fett und die richtige Menge Salz: Nur mit einem
Löffel Öl!
Mit einem Löffel Öl Ihrer Wahl können Sie Pommes frites aus 1,5 kg frischen Kartoffeln
zubereiten. Der Dosierlöffel des ActiFry Genius XL 2in1 ermöglicht es Ihnen, das Salz zu
dosieren und so die Verwendung auf ein Optimum zu verringern, ohne Abstriche beim
Geschmack zu machen.
* Pommes frites aus 1,5 kg frischen Kartoffeln, Durchmesser 10 x 10 mm, beim Garen -55%
Gewichtsverlust mit 20 ml Öl.
Steaks mit Pommes und noch viel mehr!
Neben Steak mit Pommes frites und vielen anderen Kartoffelspezialitäten wie Bratkartoffeln,
können Sie Ihren täglichen Speiseplan mit knackigen Gemüsepfannen, zarten und leckeren
Fleischgerichten, knusprigen Meeresfrüchten, cremigen Rissottos, Früchten uvm. bereichern.
Weil es so einfach geht, können Sie mit ActiFry Genius XL 2in1 ganz nebenbei kochen täglich aus frischen Zutaten!
: the ActiFry Genius XL 2in1
Ein in Zusammenarbeit mit einem Koch zusammengestelltes
Rezeptheft bietet Ihnen bekannte Rezepte. originelle Ideen
für Fleisch, Fisch, Gemüse sowie Pommes frites für die ganze
Famile.
Tipps zu Kartoffeln und Ölen, damit Ihre
Zubereitungen stets gelingen.
Die Kartoffel: Ausgewogene und leckere
Ernährung für jeden Tag
Kartoffeln sind eine ausgezeichnete Energiequelle und enthalten viele Vitamine. Form, Größe
und Geschmack der Kartoffeln hängen von der Sorte, den klimatischen Bedingungen und der
Anbauweise ab. Jede Kartoffelsorte besitzt ihre eigenen, charakteristischen Eigenschaften in
Bezug auf Reifezeit, Größe, Farbe, Haltbarkeit und Eignung zu verschiedenen Zubereitungen.
Die Garergebnisse können je nach Ursprung, Jahreszeit und Lagerung variieren.
22
Page 23

Für ActiFry Genius XL 2in1 geeignet keine Lücke:
Wir raten zur Verwendung von festkochenden Kartoffelsorten. Neue Kartoffeln enthalten viel
Wasser und sollten einige Minuten länger gegart werden.
Mit ActiFry Genius XL 2in1 können ebenfalls tiefgefrorene Pommes frites zubereitet werden.
Da diese bereits vorfrittiert sind, braucht man kein weiteres Öl hinzuzugeben.
Wo sollten Kartoffeln gelagert werden?
Kartoffeln lagert man am besten im Keller oder in einem kühlen (6 bis 8°C) und vor Licht
geschütztem Lebensmittelschrank.
Wie werden die Kartoffeln für ActiFry Genius XL 2in1 vorbereitet?
Um optimale Ergebnisse zu erzielen, müssen Sie dafür sorgen, dass die Pommes frites nicht
aneinander kleben. Aus diesem Grund sollten die Kartoffeln im Vorfeld ausgiebig gewaschen
und die geschnittenen Kartoffeln abgespült werden (2-3-mal), bis das ablaufende Wasser
klar bleibt. Auf diese Weise entfernen Sie einen Großteil der Stärke. Die Pommes frites sollten
anschließend sorgfältig mit einem saugfähigen Tuch (z.B. Geschirrtuch) getrocknet werden.
Die Pommes frites sollten trocken sein, bevor man sie in die ActiFry Genius XL 2in1 gibt.
Wie werden die Kartoffeln geschnitten?
Die Größe der Pommes frites hat Einfluss darauf, wie knusprig bzw. weich sie werden. Je
dünner sie sind, desto knuspriger werden sie, je dicker sie sind, desto weicher werden sie
innen. Wählen Sie Größe und Garzeit ganz nach Ihrem persönlichen Geschmack:
Dünn: 8 x 8 mm / Standard: 10 x 10 mm / Dick: 13 x 13 mm
Benutzen Sie verschiedene hochwertige Öle:
Seien Sie abwechslungsreich und experimentierfreudig bei der Auswahl der Ölsorten.
Pflanzenöle enthalten essentielle Fettsäuren in unterschiedlicher Zusammensetzung,
welche für eine gesunde Ernährung, insbesondere für den Zellaufbau, besonders wichtig
sind. Verwenden Sie verschiedene Öle, um Ihrem Körper alles zu geben, was er braucht! Mit
ActiFry Genius XL 2in1, können Sie zwischen einer Vielzahl von Ölen wählen:
• Standardöle: Olivenöl, Rapskernöl*, Traubenkernöl, Maisöl, Erdnussöl, Sonnenblumenöl,
Sojaöl*.
• Aromatisierte Öle: Kräuteröl, Knoblauchöl, Chiliöl, Zitronenöl…
• Spezialöle: Sesamöl*, Mandelöl*, Avocadoöl*… (*beim Garen die Hinweise des Herstellers
beachten).
Dank der ActiFry Genius XL 2in1 Technologie, d.h. dank schonender Gartemperatur und
der geringen Ölmenge Öl, welche immer wieder frisch verwendet wird, werden die für Ihre
Vitalität wichtigen essentiellen Fettsäuren geschont.
DE
23
Page 24

BESCHREIBUNG
1 Deckel
2 Deckelentriegelungstaste
3 Hebel zur Ver- und Entriegelung des
Deckels
4 Basis
5 Abnehmbarer Filter
6 Sichtfenster
7 Handgriff
8 Messlöffel
9 2in1-Grillplatte mit MAX-Markierung
10 Abnehmbarer Rührarm
11 Entriegelungstaste des Rührarms
12 Entnehmbarer Gargutbehälter
13 Abnehmbarer Wendering
14 Gargutbehältergriff
15 Garzeit
16 2in1 Funktionsanzeige
17 Verzögerter Start
18 Warmhalten
19 Funktionstaste für die 2in1-Funktion
20 Tasten + und - zum Einstellen der
Garzeit
21 Starten/Unterbrechen des Garvorgangs
22 Manueller Modus
23 Garprogramm
GEBRAUCHSANWEISUNGEN
Vor dem ersten Gebrauch
• Entfernen Sie alle Aufkleber und sämtliches Verpackungsmaterial.
• Öffnen Sie durch Drücken der Deckelentriegelungstaste den Deckel - Abb.1.
• Entfernen Sie dessen Verpackung, die Sie entsorgen können - Abb.2
• Nehmen Sie den Messlöffel heraus.
• Ziehen Sie zum Entfernen des Wenderings die Klemmen nach außen und nehmen Sie diesen
dann ab - Abb. 3.
• Entfernen Sie die Grillplatte - Abb.4.
• Ziehen Sie den Behältergriff nach oben in eine waagrechte Position, bis er mit einem
hörbaren „KLICKEN“ einrastet - Abb. 5.
• Entfernen Sie den Rührarm, indem Sie die Entriegelungstaste drücken – Abb.6.
• Entnehmen Sie den Gargutbehälter - Abb.7.
• Und pressen Sie die Arretierungen zusammen, um den Deckel abzunehmen - Abb.8.
• Entfernen Sie den abnehmbaren Filter – Abb.9.
• Alle abnehmbaren Teile außer dem Griff sind spülmaschinenfest – Abb.10 oder können mit
einem weichen Schwamm und etwas Geschirrspülmittel abgewaschen werden.
• Reinigen Sie die Haupteinheit des Gerätes und den Griff mit einem feuchten Schwamm und
Geschirrspülmittel – Abb.11.
• Trocknen Sie alle Teile gründlich ab, bevor Sie sie wieder anbringen.
• Setzen Sie den Rührarm wieder ein, bis Sie ein „KLICKEN“ hören – Abb.12.
• Um den Wendering wieder anzubringen, setzen Sie ihn auf den Rand des Behälters, zentrieren
Sie ihn auf dem Behälter und drücken Sie ihn nach unten, bis Sie ein „KLICKEN“ hören.
ANMERKUNG:
• Tauchen Sie die Basis niemals ins Wasser oder andere Flüssigkeiten.
• Um bei der ersten Benutzung das beste Ergebnis mit Ihrem neuen Produkt zu erzielen,
raten wir Ihnen, ein Rezept mit einer Garzeit von mindestens 30 Minuten zuzubereiten.
24
Page 25

KOCHEN
Wenn Sie es nicht verwenden, schaltet sich das Gerät nach 10 Minuten automatisch aus.
Empfehlungen
• Während der ersten Anwendung ein unschädlicher Geruch entstehen. Dieser hat keine
Folgen auf die Verwendung des Gerätfunktion und verschwindet schnell. Öffnen Sie in
diesem Fall das Fenster und warten Sie bis Sie keine Geruchs- oder Rauchentwicklung mehr
feststellen können.
• Achten Sie darauf, die in der Gebrauchsanweisung und im Rezeptbuch angegebenen
Zutaten- und Flüssigkeitsmengen einzuhalten, um Ihr Gerät nicht zu beschädigen.
• Überladen Sie die Grillplatte nicht, halten Sie die empfohlenen Mengen ein.
• Überschreiten Sie niemals den auf dem Rührarm angegebenen, maximalen Füllstand des
Garbehälters und der Grillplatte. Halten Sie sich an die empfohlenen Mengen.
• Dieses Gerät ist nicht für Rezepte mit einem hohen Flüssigkeitsgehalt geeignet (z. B. Suppen,
in Soßen gekochte Gerichte ...).
• Lassen Sie den 2in1-Löffel niemals während des Betriebs im Gerät.
• Legen Sie die Grillplatte niemals ohne Garbehälter in das Gerät.
• Setzen Sie den Rührarm niemals ohne den Garbehälter ein.
• Im 2in1-Betrieb muss die Grillplatte erst nach dem Signalton eingesetzt werden und darf
nicht von Beginn an platziert werden.
• Nehmen Sie das Gerät nicht in Betrieb, wenn es leer ist.
• Schalten Sie das Gerät niemals ein, wenn der Gargutbehälter leer ist.
• Wenn Sie die Pfanne alleine verwenden, legen Sie das Tablett niemals in das Gerät.
• Verwenden Sie niemals den herausnehmbaren Wendering auf dem Tablett, entweder
alleine oder im 2-in-1-Modus. Verwenden Sie nur den abnehmbaren Drehring auf der
Pfanne – fig. 33-35.
• Legen Sie den abnehmbaren Drehring auf die Pfanne, um große Mengen zu garen.
VERWENDUNG DES GARBEHÄLTERS OHNE GRILLPLATTE
Zubereitung von Speisen
Lassen Sie während der Zubereitung der Speisen den Messlöffel nicht im Behälter.
• Öffnen Sie den Deckel – Abb. 1.
• Nehmen Sie den Löffel aus dem Behälter.
• Geben Sie die Lebensmittel in den Gargutbehälter, verteilen Sie sie gleichmäßig.
Überschreiten Sie dabei nicht die Höchstmenge (siehe Gartabellen p. 28 bis p. 30).
• Geben Sie das Öl mit dem Löffel dazu (1 voller Actifry Genius Löffel = 14 ml) – Abb. 13,
verteilen Sie das Öl gleichmäßig (siehe Gartabellen p. 28 bis p. 30).
• Entriegeln Sie den Griff und schieben Sie ihn zurück in sein Gehäuse – Abb. 14.
• Schließen Sie den Deckel – Abb. 15.
DE
25
Page 26

So fangen Sie an
7
• Verbinden Sie das Gerät mit einer Steckdose. Das Gerät erzeugt zwei Pieptöne und das
Display zeigt 00 an.
Zwei Methoden zum Einstellen der Garzeit:
Automatische Garprogramme:
Die neun Garprogramme passen automatisch die Gartemperatur und die Rotation des
Rührarmes gemäß der Art der ausgewählten Lebensmittel an.
• Drücken Sie die Taste , um den Schwenkmodus auszuwählen. Das entsprechende Symbol
erscheint auf dem Bildschirm.
• Um ein Garprogramm auszuwählen, drücken Sie die + Taste, bis das gewünschte
Garprogramm (1 bis 9) angezeigt wird.
• Taste START drücken - fig.19.
• Stellen Sie die Garzeit mithilfe der +/- Tasten an.
Anmerkung: Stellen Sie die Garzeit nach dem Starten des Gerätes ein.
• Wenn Sie ein automatisches Garprogramm nutzen, folgen Sie den Anleitungen im
Rezeptbuch, die Ihnen beschreiben, wie Sie die Lebensmittel im Behälter positionieren
sollten.
Entfernen Sie den Rührarm nicht aus dem Behälter, sofern dies nicht eindeutig in dem
ActiFry Rezept von der mobilen App oder der offiziellen Website der Marke angegeben wird.
Anmerkung: Die Rührarm dreht sich nicht zu Beginn der Garprogramme 2, 3, 4, 5, 7, 8
und 9.
• Um das Garprogramm anzuhalten oder abzubrechen, halten Sie die Taste START/STOP 2
Sekunden lang gedrückt. Auf dem Display wird nun 00 angezeigt.
1. Frittiertes Gemüse und
Kartoffeln z. B. Pommes frites,
Gemüsefritten, Kartoffelecken
...
2. Panierte Snacks z. B: Chicken
Nuggets, panierte Garnelen
...
3. Snacks im Backteig z. B.
gebackene Zwiebelringe,
gebackene Calamari-Ringe,
Apfel-Donuts ...
4. Teigrollen z. B. Teigsnacks wie
Samosa, Frühlingsrollen ...
6. Hähnchen z. B. Schenkel
und Flügel ...
7. Wok* z. B. Bratreis
mit Garnelen, kurz
angebratenes Rindfleisch,
gebratenes Gemüse ...
8. Internationale Gerichte*
z. B. Schweinefleisch
süßsauer, Thailändisches
Hühnercurry ...
9. Desserts z. B. Apfelund Birnenkompott,
karamellisierte Nüsse,
Schokoladenkuchen,
hausgemachtes Müsli ...
26
5. Fleisch und Fisch
Page 27

*One-Pot-Programme (eine Mahlzeit in einem Schritt)
Zwei innovative Garprogramme – Wok und Küche der Welt – sind so konfiguriert, dass eine komplette
Mahlzeit in nur einem Schritt zubereitet werden kann.
Füllen Sie lediglich Ihre Zutaten nach den Angaben des Smart Displays ein, drücken Sie auf Start und
lassen Sie ActiFry die Arbeit für Sie erledigen. Die exklusive 2-in-1-Technologie von ActiFry gewährleistet,
dass alle Zutaten zur richtigen Zeit mit der richtigen Temperatur gegart werden. Es ist so einfach, gesunde
und leckere Hauptgerichte zu genießen.
Manueller Modus:
• Stellen Sie die Garzeit in Minuten mithilfe der +/- Tasten ein (siehe Gartabelle p. 28 bis
p. 30).
• Stellen Sie dann die Gartemperatur durch Drücken der Temperatur/Timer-Taste ein .
Wählen Sie dann mithilfe der +/- Tasten die gewünschte Temperatur aus (siehe Gartabelle
p. 28 bis p. 30).
• Drücken Sie Start.
ANMERKUNG:
• Die ausgewählte Zeit wird angezeigt und ein minutenweiser Countdown beginnt. Die Zeit
wird in Minuten ausgewählt und angezeigt. Nur die restliche Zeit unter 1 Minute wird in
Sekunden angezeigt.
• Das Gerät kann pausiert werden. Drücken Sie einfach die Taste START/STOP. Durch Drücken
der Taste START/STOP wird der Garvorgang fortgesetzt.
• Die Garzeit kann jederzeit während des Garvorgangs mithilfe der +/- Tasten geändert werden.
• Halten Sie im Falle eines Fehlers oder zum Löschen der eingestellten Garzeit die Taste START/
STOP 2 Sekunden lang gedrückt und stellen Sie die Garzeit erneut ein.
Herausnehmen der Speisen
Wenn Sie den Deckel öffnen, unterbricht das Gerät den Garvorgang. Um den Garvogang
fortzusetzen, schließen Sie den Deckel und drücken Sie die Taste START/STOP.
Wenn der Deckel länger als 2 Minuten geöffnet bleibt, setzt sich das Gerät zurück.
• Sobald der Garvorgang abgeschlossen ist, erzeugt der Timer ein akustisches Signal
(Pieptöne).
• Öffnen Sie den Deckel – Abb. 22.
• Heben Sie den Griff an, bis er hörbar einrastet, und nehmen Sie den Gargutbehälter heraus
– Abb. 31 & 32.
• Servieren Sie die Speisen sofort.
• Um Verbrennungen zu vermeiden, berühren Sie weder den Deckel noch einen anderen Teil,
sondern nur die Cool-Touch-Bereiche: Behältergriff und Deckelentriegelungstaste.
DE
27
Page 28

GARZEITEN
Die Garzeiten dienen nur als Orientierungshilfe und können je nach Saisonabhängigkeit der
Lebensmittel, ihrer Größe, der verwendeten Menge und persönlichem Geschmack sowie der
Spannung variieren. Die angegebene Ölmenge Öl können Sie nach Geschmack und Bedarf erhöhen.
Wenn Sie krossere Pommes frites wünschen, können Sie die Garzeit um einige Minuten verlängern.
Kartoffeln
Actifry
Löffel Öl
Garprogramm
Frische Pommes
frites
10 mm x 10 mm
Tiefgekühlte
Pommes frites
13 mm x 13 mm
Art Menge
Frisch (Pommes
frites)
Tiefgekühlt
(Pommes frites)**
750 g 1/2 1 25-27
1.000 g 3/4 1 28-30
1.500 g 1 1 36-38
1700 g 1 1 42-44
750 g Kein 1 23-25
1200 g Kein 1 36-38
* Frisch geerntete Kartoffeln benötigen unter Umständen eine längere Garzeit, um ein
knusprigeres, goldbraunes Ergebnis zu erzielen.
** Für die besten Ergebnisse empfehlen wir die Verwendung tiefgekühlter Pommes frites für
klassische Fritteusen ohne Weizenmehlbackteig, da diese weniger kross werden und der Teig
während des Garens abfallen kann (lesen Sie sich die Zutatenliste auf der Verpackung durch).
Garbehälter
Garzeit* (min)
Fleisch und Geflügel
Um dem Fleisch mehr Geschmack zu verleihen, können Sie Gewürze (Paprika, Curry, Kräuter
aus der Provence, Thymian, Lorbeer…) in das Öl geben.
Art Menge
Frisch oder
Frittierte
Hähnchenstücke
Hähnchenschenkel Frisch 4-6 Kein 6 20-22
Hühnerbrust (ohne
Knochen)
Fleischbällchen
tiefgekühlt
Frisch 1.200 g Kein 2 13-15
Tiefgekühlt 1.200 g Kein 2 15-17
Frisch 6 Kein 6 18-20
Frisch 9 Kein 6 22-24
Tiefgekühlt 750 g 1 5 14-15
Tiefgekühlt 1.200 g 1 1/2 5 18-20
Actifry
Garprogramm Garbehälter Garzeit (min)
Löffel Öl
750 g Kein 2 10-12
28
Page 29

Reis- und Gemüsegerichte
Art Menge Actifry Löffel Öl Garprogramm Garbehälter Garzeit (min)
Ratatouille*
Wok-Gemüse* Tiefgekühlt 1.000 g Kein 6 22-24
Paëlla*
Tiefgekühlt 750 g Kein 7 14-16
Tiefgekühlt 1.000 g Kein 7 23-25
Tiefgekühlt 650 g Kein manuell - 220 12-14
Tiefgekühlt 1.000 g Kein manuell - 220 15-17
* Tiefgekühlte Mischungen sind nicht in allen Ländern erhältlich.
Fisch – Meeresfrüchte
Art Menge Actifry Löffel Öl Garprogramm Garbehälter Garzeit (min)
Calamari im
Backteig
Riesengarnelen
(roh)
Tiefgekühlt
Frisch
300 g
500 g 3 11-13
300 g
450 g 3 8-10
Kein
Kein
3 10-12
3 8-10
Gemüse
Art Menge Actifry Löffel Öl Garprogramm Garbehälter Garzeit (min)
Zucchinis Streifen
Paprika Streifen
Pilze Viertel
Tomaten Viertel
Zwiebeln Scheiben
750 g 1 + 150 ml Wasser 7 20-25
1.200 g 1 + 150 ml Wasser 7 25-30
650 g 1 + 150 ml Wasser 7 15-18
1.200 g 1 + 150 ml Wasser 7 20-25
650 g 1 7 10-15
1.000 g 1 7 16-18
650 g 1 + 150 ml Wasser 7 12-14
1.000 g 1 + 150 ml Wasser 7 15-17
500 g 1 manuell - 220 12 - 14
750 g 1 manuell - 220 18-20
DE
29
Page 30

Obst
Art Menge
Bananen Scheiben
Erdbeeren Viertel
Äpfel Hälften
Frisch
Ananas
(geschält
und in Stücke
geschnitten)
VERWENDUNG DER GRILLPLATTE ALLEINE
Actifry Löffel Öl
und Zucker
5 1 + 1 Zucker 9 5-6
7 1 + 1 Zucker 9 5-6
1.000 g 2 Zucker 9 8-10
1.500 g 2 Zucker 9 10-12
3 1 + 1 Zucker 9 8-10
5 1 + 2 Zucker 9 10-12
1 2 Zucker 9 10-12
2 2 Zucker 9 15-17
Garprogramm Garbehälter Garzeit (min)
Vorbereitung der Lebensmittel
• Wenn Sie die Grillplatte alleine verwenden, geben Sie niemals Lebensmittel in die den
Garbehälter.
• Öffnen Sie den Deckel - Abb.1.
• Entfernen Sie den Actifry-Löffel.
• Nehmen Sie die Grillplatte ab - Abb.4.
• Geben Sie die Lebensmittel auf die Grillplatte und achten Sie dabei immer auf die in der
Gartabelle und/oder im Rezeptbuch empfohlenen Mengen. Überschreiten Sie niemals die
MAX-Markierung in der Grillplattenmitte - Abb.23.
• Setzen Sie die Grillplatte wieder ins Gerät - Abb. 24.
• Schließen Sie den Deckel - Abb. 25.
Wenn Sie die Grillplatte alleine verwenden, geben Sie niemals Lebensmittel in die den
Garbehälter.
30
Page 31

Das Garen beginnen
• Verbinden Sie das Gerät mit einer Steckdose.
• Das Gerät erzeugt zwei Pieptöne und das Display zeigt 00 an.
• Um ein Garprogramm auszuwälhen, drücken Sie die + Taste, bis das gewünschte
Garprogramm (1 bis 9) angezeigt wird.
• Drücken Sie Die Taste und Drücken Sie die - Taste, um den Fachmodus auszuwählen. Das
entsprechende Symbol erscheint auf dem Bildschirm.
• Drücken Sie die Starttaste . Der Minutenzähler beginnt zu laufen.
• Unter einer Minute wird in Sekunden gezählt.
• Die Garzeit kann jederzeit über die Tasten + und - eingestellt werden.
• Beim Öffnen des Deckels wird der Garvorgang gestoppt.
• Starten Sie ihn neu, indem Sie nach Schließen des Deckels auf die Starttaste drücken.
• Wenn der Deckel länger als 2 Minuten offen ist, schaltet das Gerät in den Standby-
Modus.
Entnahme der Lebensmittel
• Sobald das Garen beendet ist, ertönt ein Signalton und das Display blinkt und zeigt 00 an:
Das Gerät beendet das Garen automatisch.
• Schalten Sie den Timer mit der Start-/Stopptaste aus.
• Öffnen Sie den Deckel - Abb.29.
• Platzieren Sie den Grillplatten-Handgriff auf der Grillplatte und lassen Sie ihn einrasten -
Abb.30. Achtung: Die Grillplatte ist nach dem Garen sehr heiß. Verwenden Sie immer den
Grillplatten-Handgriff, um sie herauszunehmen.
• Servieren Sie Ihre Speisen.
GARTABELLE
DE
Art Gesamzteit
Frisch oder
Frittierte
Hähnchenstücke
Hähnchenschenkel Frisch
Hühnerflügel Tiefgekühlt 10 Stücke Kein 6 22
Hühnerbrust (ohne
Knochen)
Fleischbällchen
Fleisch Steak
tiefgekühlt
Frisch oder
tiefgekühlt
Frisch 6 Stücke Kein 6 18 - 20
Frisch 9 Stücke Kein 6 22 - 24
Tiefgekühlt 500 g 1 5 12 - 15
Tiefgekühlt 750 g 1 5 15 - 17
Frisch 4 Stücke 1 5 8
Tiefgekühlt 4 - 6 Stücke 1 1/2 5 8 - 10
500 g Kein 2 13 - 15
750 g Kein 2 15 - 17
4 to 6
Stücke
Actifry
Löffel Öl
Garprogramm
Kein 6 20 - 22
Grillplatte Garzeit
(mins)
31
Page 32

2IN1-VERWENDUNG: GARBEHÄLTER + GRILLPLATTE
Vorbereitung der Lebensmittel
• Öffnen Sie den Deckel - Abb.1.
• Entfernen Sie den Actifry-Löffel und die Grillplatte - Abb.4.
• Ziehen Sie den Griff nach oben und entfernen Sie den Garbehälter.
• Geben Sie die Lebensmittel in den Garbehälter und achten Sie dabei immer auf die in
der Gartabelle und/oder dem Rezeptbuch empfohlenen Mengen (siehe “Gartabelle”).
Überschreiten Sie dabei niemals die MAX-Markierung auf dem Rührarm.
• Dosieren Sie das für die jeweiligen Lebensmittel empfohlene Öl mit dem Löffel und verteilen
Sie es gleichmäßig im Garbehälter - Abb. 13.
• Setzen Sie den Garbehälter wieder ins Gerät und schließen Sie den Deckel.
Das 2in1-Garen beginnen
• Verbinden Sie das Gerät mit einer Steckdose.
• Es ertönt ein Signalton und das Display zeigt 00 an - fig.14.
• Um ein Garprogramm auszuwählen, drücken Sie die + Taste, bis das gewünschteGarprogramm
(1 bis 9) angezeigt wird - Abb.17.
• Das entsprechende Symbol erscheint auf dem Bildschirm.
• Drücken Sie die Taste , um den Schwenkmodus auszuwählen. Das entsprechende Symbol
erscheint auf dem Bildschirm.
• Um ein Garprogramm auszuwählen, drücken Sie die + Taste, bis das gewünschte
Garprogramm (1 bis 9) angezeigt wird.
• Drücken Sie die Start-/Stopptaste . Das Garen beginnt.
• Der Minutenzähler beginnt zu laufen.
• Legen Sie zwischenzeitlich die Lebensmittel auf die Grillplatte und achten Sie darauf, den
max. Füllstand einzuhalten - Abb.23.
• Wenn der Signalton ertönt und sich das Gerät automatisch ausschaltet, öffnen Sie den
Deckel und setzen Sie die Grillplatte ein - Abb.22&24.
• Schließen Sie den Deckel wieder und drücken Sie die Start-/Stopptaste .
• Der Zähler beginnt wieder zu laufen.
• Falls Sie nichts weiter tun, schaltet sich das Gerät nach 10 Minuten automatisch ab.
Entnahme der Lebensmittel
Für noch knusprigere Pommes können Sie diese nach Herausnahme der Grillplatte noch 2
Min. weitergaren.
• Sobald das Garen beendet ist, ertönt ein Signalton und das Display blinkt und zeigt 00 an:
Das Gerät beendet das Garen automatisch.
• Schalten Sie den Timer mit der Start-/Stopptaste aus.
• Öffnen Sie den Deckel - Abb. 29.
• Entfernen Sie die Grillplatte mit dem Griff und nehmen Sie die Lebensmittel heraus - fig.30.
Achtung: Die Grillplatte ist nach dem Garen sehr heiß. Verwenden Sie immer den GrillplattenHeber, um sie herauszunehmen.
• Handgriff Sie den Griff nach oben, bis er einrastet - fig.31.
• Entfernen Sie den Garbehälter und nehmen Sie die Lebensmittel heraus - fig. 32.
32
Page 33

GARTABELLE
Die Garzeiten dienen nur als Anhaltspunkt und können je nach Saisonalität, Größe, Menge und
persönlichem Geschmack und Spannung variieren. Wenn Sie am Ende der 2-in-1-Zubereitung
knusprigere Pommes frites wünschen, können Sie die Garzeit um einige Minuten verlängern.
Speise im
garbehälter
Frische Pommes
frites
10mm x 10mm
Frische oder
Tiefgekühlte
Pommes
Frische oder
Tiefgekühlte
Pommes
Frische oder
Tiefgekühlte
Pommes
Zucchini
Früchtekompott 10 9 15 min
Menge
garbehälter
1500 g 1 35 min
1200 g 1 32 min 4 5 7 min
1200 g 1 32 min
1000 g 1 30 min 4 6 15 min
1200 g 1 29 min
1200 g 1 32 min Hühnerflügel 10 6 22 min
1200 g 7 25 min
1000 g 7 20 min 3 5 10 min
Garprogramm
Garbehälter
garzeit
im
750 g 1 27 min 3 5 6 min
250 g 1 15 min 1 5 5 min
750 g 1 27 min 3 6 15 min
250 g 1 20 min 1 6 10 min
750 g 7 15 min 2 5 8 min
250 g 7 12 min 1 5 7 min
Speise auf
der
grillplatte
Fleisch Steak
Hähnchen-
schenkel
Frittierte
Hähnchen-
stücke
Lachsfillets
Teigtaschen
(z.B. aus
Brickteigoder Yuk-
fateigblätter)
mit Schoko-
Füllung
Menge
auf
Garpro-
der
grillplatte
gramm
4 5 8 min
8 6 15 min
14 2 8 min
4 5 10 min
4 9 4 min
Zeit auf
der
grillplatte
DE
VERZÖGERTER START
Der verzögerte Start kann für eines der neun automatischen Garprogramme oder für den
manuellen Modus eingestellt werden:
– Stecken Sie den Netzstecker in eine Steckdose.
– Halten Sie die Temperatur/Timer-Taste 3 Sekunden lang gedrückt. Das Symbol erscheint
auf dem Display und der Timer blinkt 0:00.
– Stellen Sie die verzögerte Startzeit mithilfe der +/- Tasten ein (Intervalle: 10 Minuten) (bis
maximal 9 Stunden).
– Drücken Sie Start. Der Timer für den verzögerten Start beginnt den Countdown. Der
Garvorgang startet, sobald der Timer für den verzögerten Start 0:00 erreicht.
33
Page 34

WARMHALTEFUNKTION
• Wenn der Garvorgang beendet ist und innerhalb von 3 Minuten keine Bedienung erfolgt,
wird der Warmhaltemodus automatisch aktiviert (außer für das Garprogramm 1 –
frittiertes Gemüse).
• Nach einer Warmhaltedauer von 30 Minuten schaltet sich das Gerät aus.
• Halten Sie zum Deaktivieren der „Warmhaltefunktion“ die + und - Taste gleichzeitig längere
Zeit gedrückt (3 Sekunden).
• Halten Sie die + und - Taste gleichzeitig längere Zeit gedrückt (3 Sekunden), um die
„Warmhaltefunktion“ erneut zu aktivieren.
TIPPS ZUM GAREN MIT DER ACTIFRY GENIUS
• Geben Sie kein Salz zu den Pommes frites, so lange die Pommes frites im Gargutbehälter
sind. Salzen Sie erst, nachdem Sie die Pommes frites aus dem Gargutbehälter genommen
haben.
• Wenn Sie getrocknete Kräuter und Gewürze in die ActiFry geben, mischen Sie diese mit
etwas Öl oder Flüssigkeit. Wenn Sie die Kräuter und Gewürze trocken in den Behälter streuen,
werden sie nur durch das Heißluftsystem herumgewirbelt.
• Stark gefärbte Gewürze können die Rührvorrichtung und andere Teile des Gerätes leicht
verfärben. Das ist normal.
• Bereiten Sie alle Zutaten in gleich großen Stücken zu, um sicherzustellen, dass alle gleichzeitig
gar sind.
• Bereiten Sie Gemüse, insbesondere Wurzelgemüse, in kleinen Stücken oder Wok-Größe vor,
um sicherzustellen, dass diese durchgaren.
• Wenn Sie Zwiebeln in ActFry-Rezepten verwenden, ist es besser, die Zwiebeln in dünne
Scheiben zu schneiden, als sie kleinzuhacken, da sie so besser garen. Trennen Sie die
Zwiebelringe, bevor Sie diese in den Gargutbehälter geben, und rühren Sie einmal kurz um,
damit die Zwiebeln gleichmäßig verteilt sind.
Nur für automatische Garprogramme:
• Für ausgewählte Garprogramme sollten Zutaten wie im ActiFry Genius Rezeptbuch
angegeben in den Gargutbehälter gelegt werden. Auf diese Weise wird das richtige
Garergebnis für jede Zutat sichergestellt. Zutaten, die eine längere Garzeit erfordern, werden
in die obere Hälfte des Behälters gegeben. Zutaten, die eine kürzere Garzeit erfordern,
werden neben den Griff gelegt.
• Backfunktion: Backen Sie mit dem Produkt Brötchen, Muffins oder kleine Pizzen auf. Folgen
Sie hierzu diesen Schritten:
– Entfernen Sie die Rührarm
– Legen Sie die Lebensmittel in das Gerät (maximal 4)
– Starten Sie den manuellen Modus mit maximaler Temperatur (220°C) für 10 bis 15
Minuten (sollte je nach Art der Zutaten angepasst werden).
– Drehen Sie die Lebensmittel nach der Hälfte der Garzeit um, um zu verhindern, dass sie
übergart werden. Wechseln Sie insbesondere ihre Position. Die während der ersten Hälfte
im oberen Teil des Gargutbehälters gegarten Lebensmittel werden nun für die zweite
Hälfte in den unteren Teil gelegt.
34
Page 35

EINFACH ZU REINIGEN
Reinigen des Gerätes
Tauchen Sie das Gerät niemals in Wasser oder eine andere Flüssigkeit. Benutzen Sie keine
aggressiven oder scheuernden Reinigungsmittel. Der abnehmbare Filter muss regelmäßig
gereinigt werden. Um sicherzustellen, dass Ihr entnehmbarer Gargutbehälter länger hält,
benutzen Sie niemals Metallutensilien.
Wir empfehlen, keine anderen Reinigungsmittel als Geschirrspülmittel zum Reinigen eines
Teils des Gerätes zu verwenden.
• Lassen Sie das Gerät komplett abkühlen, bevor Sie es reinigen.
• Öffnen Sie durch Drücken der Taste den Deckel – Abb.1 und pressen Sie die Arretierungen
zusammen, um den Deckel abzunehmen - Abb.2.
• Heben Sie den abnehmbaren Behältergriff an, bis Sie ein „KLICKEN“ hören, um den Behälter
zu entnehmen – Abb.3.
• Entnehmen Sie den Gargutbehälter.
• Entfernen Sie den Rührarm, indem Sie die Entriegelungstaste drücken – Abb.4.
• Entfernen Sie den abnehmbaren Filter – Abb.9.
• Ziehen Sie zum Entfernen des Wenderings die Klemmen nach außen und nehmen Sie ihn
dann ab.
• Alle abnehmbaren Teile außer dem Griff sind spülmaschinenfest – Abb.10 oder können mit
einem weichen Schwamm und etwas Geschirrspülmittel abgewaschen werden.
• Reinigen Sie die Haupteinheit des Gerätes und den Griff mit einem feuchten Schwamm und
etwas Geschirrspülmittel – Abb.11. Trocknen Sie alle Teile gründlich ab, bevor Sie sie wieder
anbringen.
• Falls Lebensmittel am Behälter oder, an der am Rührarm kleben oder angebrannt sind,
weichen Sie die Teile vor dem Reinigen in warmem Wasser ein.
DE
35
Page 36

EINIGE TIPPS, FALLS PROBLEME AUFTRETEN ...
Problem Ursachen Lösungen
Das Gerät funktioniert
nicht.
Der Rührarm sitzt nicht fest
Die Lebensmittel sind nicht
einheitlich gegart.
Die Pommes frites sind
nicht kross genug.
Die Pommes frites brechen
während des Frittierens.
Die Zutaten bleiben am
Rand des Behälters.
Das Gerät ist nicht korrekt mit einer
Steckdose verbunden.
Sie haben nicht die Taste START/
STOP gedrückt.
Sie haben die Taste START/STOP
gedrückt, aber das Gerät funktioniert
trotzdem nicht.
Das Gerät heizt nicht auf.
Der Rührarm dreht sich nicht.
Der Rührarm ist nicht verriegelt/
eingerastet.
Sie haben der Rührarm nicht benutzt.
Die Zutaten/Pommes frites wurden
nicht in gleich große Stücke
geschnitten.
Sie benutzen keine Kartoffelsorte, die
für Pommes frites empfohlen wird.
Die Kartoffeln wurden nicht
ausreichend gewaschen und/oder
nicht gründlich abgetrocknet.
Die Pommes frites sind zu dick.
Sie verwenden nicht genug Öl.
Der Filter ist verstopft. Reinigen Sie den Filter.
Die Menge ist zu groß.
Der Behälter ist zu voll.
Höchstmarkierung ist überschritten. Verringern Sie die Menge.
Stellen Sie sicher, dass das Gerät korrekt
mit einer Netzsteckdose verbunden ist.
Drücken Sie die Taste START/STOP.
Schließen Sie den Deckel.
Rufen Sie die Kundendienst-Rufnummer
an
Der Rührarm dreht sich nicht zu Beginn
des Garvorgangs in den Garprogrammen
2, 3, 4, 5, 7, 8 und 9. Starten Sie den
Garvorgang erneut im manuellen
Modus, um zu prüfen, ob sich der
Rührarm dreht. Falls sie sich nicht
dreht, prüfen Sie, ob sie in der korrekten
Position eingesteckt ist. Rufen Sie
andernfalls die folgende KundendienstRufnummer an
Befestigen Sie der Rührarm erneut, bis
sie hörbar einrastet.
Setzen Sie die Garschale erneut ein, bis
sie hörbar mit eineim „KLICK“ einrastet.
Schneiden Sie die Zutaten/Pommes
frites in gleich große Stücke.
Wählen Sie eine Kartoffelsorte, die für
Pommes frites empfohlen wird, wie z. B.
Maris Piper oder King Edward.
Waschen Sie die Kartoffeln längere
Zeit, um die Stärke zu entfernen, und
trocknen Sie sie vor dem Garen gründlich
ab. Sie müssen komplett trocken sein.
Schneiden Sie die Kartoffeln in dünnere
Stäbchen. Die maximale Größe der
Pommes frites ist 13 mm x 13 mm.
Verwenden Sie mehr Öl (siehe
Gartabelle).
Verringern Sie die Kartoffelmenge und
passen Sie die Garzeit an.
Halten Sie sich an die maximalen
Mengen, die in der Gartabelle
angegeben werden.
Setzen Sie den Wendering ein.
Verringern Sie die Menge der Zutaten.
36
Page 37

Problem Ursachen Lösungen
Es sind Kochflüssigkeiten
in die Basis des Geräts
gelaufen.
Die LCD-Anzeige
funktioniert nicht.
Das Gerät ist
ungewöhnlich laut.
Schadhafter Behälter oder Rührarm
Die maximale Menge wurde
überschritten.
Das Gerät ist nicht mit einer
Steckdose verbunden.
Der Deckel ist geöffnet. Schließen Sie den Deckel.
Sie haben den Verdacht, dass es
ein Problem mit dem Motor des
Gerätes gibt.
Prüfen Sie, ob der Rührarm korrekt
eingesetzt ist, rufen Sie ansonsten die
nachfolgende Kundendienst-Rufnummer
an.
Beachten Sie den Höchstfüllstand.
Bereiten Sie mit der ActiFry
keine Rezepte mit einem hohen
Flüssigkeitsgehalt zu.
Verbinden Sie das Gerät mit einer
Steckdose.
Rufen Sie die nachfolgende
Kundendienst-Rufnummer an.
DE
37
Page 38

TEFAL/T-FAL* INTERNATIONALE GARANTIE
Zubehör, Verbrauchsmaterialien und durch den Endverbraucher austauschbare Ersatzteile können, mit Ausnahme der Schweiz, auf
Garantie
TEFAL/T-FAL gewährt für dieses Produkt eine Garantie auf Material- oder Herstellungsfehler innerhalb der Garantiezeit, beginnend
mit dem Datum des Kaufes, in den Ländern, die in der beigefügten Länderliste aufgeführt sind.
Die internationale Herstellergarantie deckt alle Kosten ab, die zur Wiederherstellung der ursprünglichen Eigenschaften eines
defekten Produktes dienen, durch Reparatur oder Austausch eines defekten Teiles und der dazu erforderlichen Arbeit. TEFAL/T-FAL
behält sich vor, ein gleich- oder höherwertiges Ersatzgerät anstelle einer Reparatur des defekten Gerätes zu liefern. TEFAL/T-FAL’S
einzige und ausschließliche Verpflichtung im Rahmen dieser Garantie beschränkt sich auf die Reparatur oder den Ersatz.
Bedingungen & Ausschluss
Die internationale TEFAL/T-FAL Garantie findet nur Anwendung innerhalb der Garantiezeit in den Ländern, die in der beigefügten
Länderliste aufgeführt sind und gilt nur bei Vorlage eines gültigen Kaufbeleges. Das defekte Gerät kann persönlich bei einer
autorisierten TEFAL/T-FAL Servicestelle abgegeben oder gut verpackt an eine autorisierte Servicestelle eingesandt werden.
Die Anschriften der autorisierten Servicestellen eines Landes finden Sie auf den TEFAL/T-FAL Websiten oder rufen Sie unter
der entsprechenden Telefonnummer in der Länderliste an, um die Postanschrift zu erfragen. Um Ihnen einen bestmöglichen
Kundendienst zu bieten und eine kontinuierliche Verbesserung der Kundenzufriedenheit zu gewährleisten, behält sich TEFAL/T-FAL*
das Recht vor, Ihnen nach einer bei einem autorisierten Servicepartner durchgeführten Reparatur einen Fragebogen zuzusenden.
TEFAL/T-FAL ist nicht verpflichtet, ein Produkt zu reparieren oder zu ersetzen, wenn diesem kein gültiger Kaufbeleg beiliegt oder
das Produkt gewerblich genutzt wurde. Diese Garantie deckt keine Schäden ab, die auftreten können in Folge von Missbrauch,
Fahrlässigkeit, Nichtbeachtung der TEFAL/T-FAL Bedienungsanleitungen, anderer Spannungen oder Frequenzen als auf dem
Typenschild des Produktes angegeben, sowie einer Veränderung oder nicht autorisierten Reparatur des Produktes. Darüber hinaus
erstreckt sie sich nicht auf normalen Verschleiß, fehlende Wartung oder ausgetauschte Ersatzteile und die folgenden Fälle:
–Verwendung von ungeeigneten Flüssigkeiten oder Zubehörteilen
–Verkalkung (jede Entkalkung muss gemäß der Bedienungsanleitung durchgeführt werden)
–Mechanische Schäden, Überbeanspruchung
–Bruch von Glas – oder Porzellanbestandteilen des Produktes
–Schäden durch Bltzschlag oder Überspannung
–Schäden oder ungenügende Ergebnisse wegen falscher Spannung oder Frequenz
–Unglücksfälle wie Feuer, Wasser, etc.
–Eindringen von Wasser, Staub oder Insekten in das Produkt (ausgenommen Insektenfallen)
–Professionelle oder gewerbliche Nutzung
Gesetzliche Rechte des Verbrauchers
Diese internationale TEFAL/T-FAL Garantie beeinträchtigt weder die gesetzlichen Rechte des Verbrauchers, noch können diese
ausgeschlossen werden. Dies gilt auch für Rechte gegen den Händler, bei dem der Verbraucher das Produkt erworben hat. Diese
Garantie gibt dem Verbraucher besondere Rechte. Zusätzlich hat der Verbraucher andere gesetzliche Rechte, die von Staat zu Staat
oder von Land zu Land variieren. Der Verbraucher kann diese Rechte nach eigenem Ermessen geltend machen.
*** Wurde ein Produkt in einem der aufgeführten Länder gekauft und in einem anderen der aufgeführten Lände genutzt, gilt die
internationale TEFAL/T-FAL Garantie des Landes, in dem das Produkt genutzt wird. Dies gilt selbst dann wenn in dem Land in dem
das Produkt gekauft wurde andere Garantiebedingungen gelten. Die Reparatur kann längere Zeit in Anspruch nehmen, falls das
Produkt von TEFAL/T-FAL nicht vor Ort verkauft wird. Sollte das Produkt in dem Land der Nutzung nicht zu reparieren sein, so ist die
internationale TEFAL/T-FAL Garantie darauf beschränkt das Produkt durch ein gleiches oder, wenn möglich, ähnliches Produkt im
gleichen Kostenrahmen zu ersetzen.
Bitte bewahren Sie dieses Dokument zusammen mit den Unterlagen dieses Gerätes auf.
* TEFAL Hausgeräte werden in einigen Regionen wie Amerika und Japan unter der Marke T-FAL vertrieben. TEFAL/ T-FAL sind
eingetragene Handelsmarken der Groupe SEB.
GROUPE SEB DEUTSCHLAND GmbH
Theodor-Stern-Kai 1
60596 Frankfurt am Main
Dieses Produkt wird von TEFAL/T-FAL* innerhalb und nach der Garantiezeit repariert.
der TEFAL Internetseite www.tefal.com erworben werden.
: www.tefal.com
38
Page 39

PRECAUCIONES IMPORTANTES
1. Le invitamos a leer cuidadosamente este manual antes de usar el
aparato, en él encontrará instrucciones y características.
2. No toque las superficies calientes. Utilice las agarraderas o los
botones.
3. Para protegerse contra una posible descarga eléctrica, no sumerja el
cable de alimentación, la toma de corriente o el aparato, en el agua
ni en ningún otro líquido.
4. Se necesita una vigilancia atenta cuando cualquier aparato eléctrico
es utilizado por los niños o está a su alcance.
5. Desconecte el aparato después de usarlo y antes de limpiarlo. Déjelo
enfriar antes de instalar, de retirar los accesorios o de limpiarlo.
6. No utilice ningún aparato eléctrico con un cable de alimentación o
una toma dañados, cuando el aparato funciona mal o después de que
haya sido dañado de cualquier forma. Lleve los aparatos defectuosos
a un centro de servicio.
7. El uso de determinados accesorios no recomendados por el fabricante,
puede ocasionar daños y heridas.
8. No utilice el aparato en el exterior.
9. No deje el cable de alimentación colgar de una mesa. Esto podría
ocasionar accidentes graves. No lo deje en contacto con superficies
calientes.
10. No coloque nunca el aparato sobre/cerca de un quemador de gas, de
un hornillo eléctrico o dentro de un horno caliente.
11. Sea muy prudente cuando desplace un aparato que contenga aceite
u otros líquidos calientes.
12. Siempre fije la toma al aparato en primer (según el modelo) lugar y
luego conecte. Para apagar, coloque el termostato en la posición O/I,
después desconecte.
13. Este aparato es para uso exclusivamente doméstico.
ES
14. CONSERVE CUIDADOSAMENTE
ESTAS INTRUCCIONES ÚNICAMENTE
PARA USO DOMÉSTICO.
15. Antes de utilizar su electrodoméstico, asegúrese que el voltaje
corresponda con el que viene marcado en la placa metálica que se
encuentra debajo del aparato.
16. Únicamente conecte su aparato electrodoméstico en una conexión
de mínimo 15A. Si la entrada y la clavija del electrodoméstico no son
compatibles, llame a un técnico especializado para reemplazar la
39
Page 40

clavija por una adecuada.
17. Este equipo eléctrico funciona a altas temperaturas por lo que puede
provocar quemaduras. No toque el fitro, ventana, paredes metálicas
(dependiendo del modelo), ni otros metales aparentes.
18. Para garantizar una operación segura, no coloque alimentos muy grandes.
19. No sature nunca la canastilla, ni exceda la capacidad máxima de aceite.
20. Los tiempos de cocción son indicativos.
21. No deje el cable colgando.
22. No desconecte el aparato tirando del cable.
23. Desconecte siempre el aparato: después de su utilización, o para
desplazarlo o limpiarlo.
24. En caso de incendio, nunca intente apagar las llamas con agua.
Sofoque las llamas con un paño húmedo.
25. No desplace el aparato cuando contenga alimentos calientes.
26. Nunca sumerja el aparato en el agua.
27. Este electrodoméstico no es apto para recetas con base líquida (por
ejemplo sopas).
28. Nunca ponga a funcionar el aparato en vacío.
29. No sobrecargue la fuente, respete las cantidades recomendadas.
30. Este aparato no está diseñado para freír como si fuera una freidora
tradicional en el que se sumergen los ingredientes en aceite ya que se
trata de una tecnología de aire caliente pulsado.
31. Este aparato no está previsto para que lo utilicen personas (incluso
niños) cuya capacidad física, sensorial o mental esté disminuida, o
personas sin experiencia o conocimientos, excepto si pueden recibir
a través de otra persona responsable de su seguridad, una vigilancia
adecuada o instrucciones previas relativas a la utilización del aparato.
Conviene vigilar a los niños para asegurarse de que no juegan con el
aparato.
32. En caso de problemas contacte nuestros centros servicios autorizados
Tefal.
33. No utilizar para freír (sumergido en aceite).
34. PRECAUCIÓN : No utilizar para freír (aceite profundo).
INSTRUCCIONES PARA LA POLARIZACIÓN:
ESPECIALPARA USA
Si su aparato está equipado con una toma polarizada (una espiga es más
ancha que la otra), esto tiene por objetivo reducir los riesgos de choques
eléctricos y, esta toma sólo puede conectarse en un sentido. Si la toma no
entra correctamente en el enchufe, voltéela. Si aún no entra, contacte con
un electricista. No trate de modificar la toma de ninguna forma.
40
Page 41

MODO DE EMPLEO PARA LOS CABLES DE
ALIMENTACIÓN CORTOS
No utilice un cable de alimentación largo, se le suministrará un cable de
alimentación corto para evitar que éste se enrede o que se pueda enredar
los pies con él.
¡Bienvenido al universo ActiFry Genius XL 2in1 !
Elabore un delicioso plato completo a su manera
Gracias a sus tecnologías patentadas, las patatas fritas quedan crujientes y tiernas. Escoja sus
ingredientes, el aceite, las especias, las finas hierbas, las hierbas aromáticas... ActiFry Genius
XL 2en1 se ocupará del resto.
Con solo el 3%* de materia grasa y una justa cantidad de
sal: ¡basta con 1 cuchara!
Con tan solo una cuchara del aceite que usted elija podrá cocinar 1,5 kg de auténticas patatas
fritas. Con la cuchara dosificadora de ActiFry Genius XL 2en1 podrá dosificar la sal y reducir
su consumo sin tener que renunciar al sabor.
* 1,5 kg de patatas fritas frescas, con una sección de 10 x 10 mm, una cocción con un -55% de
pérdida de peso con 2 cl de aceite.
¡Bistecs con patatas fritas y mucho más!
Con ActiFry Genius XL 2en1 podrá preparar una gran variedad de recetas. Aporte variedad a
su cocina diaria preparando bistecs con patatas fritas, salteados de verduras crocantes, filetes
de carne tiernos y sabrosos, camarones crujientes, frutas…
: ActiFry Genius XL 2in1
Le ofrecemos un libro de recetas familiares elaborado por un
cocinero. Allí encontrará recetas originales de deliciosos platos
nutritivos y de sus acompañamientos, además de postres que
podrá elaborar en familia.
ES
Para sacar el máximo partido a sus recetas, le
ofrece consejos específicos sobre patatas y aceites.
La patata: ¡equilibrio y placer cotidiano!
Todo tipo de personas, de todas las edades, pueden consumir patatas, pues constituyen una
excelente fuente de energía y contienen vitaminas. En función de las distintas variedades,
además de las condiciones meteorológicas y de cultivo, la patata varía de manera significativa:
forma, tamaño y calidad gustativa.
41
Page 42

Cada una tiene sus características propias en términos de precocidad, rendimiento, tamaño,
color, calidad de conservación e indicaciones culinarias.
Los resultados de cocción pueden variar en función del origen y la estacionalidad.
¿Qué variedad hay que utilizar para ActiFry Genius XL 2in1?
En general, le aconsejamos que utilice patatas especiales para freír. Con patatas nuevas ricas
en humedad, le aconsejamos que mantenga las patatas fritas cocinándose durante unos
minutos más de lo habitual.
Con ActiFry Genius XL 2en1 también puede cocinar patatas fritas congeladas. Como estas ya
están precocinadas, no es necesario añadirles aceite.
¿Dónde es mejor conservar las patatas?
Los mejores sitios para conservar patatas son un sótano o un armario fresco (entre 6 y 8°C),
protegido de la luz.
¿Cómo hay que preparar la patata para ActiFry Genius XL 2in1?
Para obtener mejores resultados, hay que asegurarse de que las patatas fritas no se queden
pegadas.
Para conseguirlo, se recomienda lavar abundantemente las patatas enteras y luego las patatas
cortadas, hasta que el agua salga clara. Así, se retira el máximo de almidón posible. Seque
cuidadosamente las patatas con un paño seco muy absorbente. Las patatas han de estar
completamente secas antes de colocarlas en ActiFry Genius XL 2in1.
¿Cómo hay que cortar las patatas?
El tamaño de la patata influye en lo crujiente y tierna que quede luego. Cuanto más finas las
corte, más crujientes quedarán, y a la inversa: cuanto más gruesas sean, más tiernas estarán
por dentro. En función de sus gustos, puede variar los cortes de las patatas y adaptar el tiempo
de cocción en consecuencia:
Finas: 8 x 8 mm / Estándar: 10 x 10 mm / Gruesas: 13 x 13 mm
Utilice distintos aceites de calidad y su salud saldrá
beneficiada
Puede variar los sabores en función de sus necesidades, con 1 cucharada de aceite de uso
único. Todos los ácidos grasos esenciales en la vida se encuentran en los aceites vegetales.
Todos los aceites contienen, en proporciones diferentes, los nutrientes indispensables para su
equilibrio. Para aportarle a su cuerpo todo lo que necesita, ¡utilice distintos tipos de aceites!
Con ActiFry Genius XL 2in1, puede utilizar una amplia variedad de aceites:
• Aceites estándar: oliva, colza*, semillas de uva, maíz, cacahuete, girasol, soja*.
• Aceites aromatizados: hierbas aromáticas, ajo, pimiento, limón,…
• Aceites especiales: nuez*, sésamo*, cártamo*, almendra*, aguacate*, argán*... (*cocción
según fabricante).
La tecnología ActiFry Genius XL 2in1, con su baja cantidad de materia grasa y sal, le permite
conservar los ácidos grasos esenciales buenos para su vitalidad.
Con ActiFry Genius XL 2in1, ¡disfrute de la comida y haga disfrutar a quienes le rodean!
Si desea más información o tiene alguna pregunta, visite www.tefal.com
42
Page 43

DESCRIPCIÓN
1 Tapa
2 Botón de apertura de la tapa
3 Botón de desbloqueo de la tapa
4 Filtro extraíble
5 Base
6 Ventana
7 Cuchara de medición
8 Bandeja de cocción 2en1 con indicador
de nivel “MAX “
9 Aspa mezcladora extraíble
10 Botón de desbloqueo del aspa
11 Recipiente extraíble
12 Asa del recipiente
13 Aro de giro extraíble
14 Tiempo de cocción
15 Indicador de la función 2en1
16 Inicio demorado
17 Conservación del calor
18 Botón de activación de la función 2en1
19 Botones + y – para ajustar el tiempo
de cocción
20 Botón de encendido y apagado de la
cocción
21 Modo manual
22 Modos de cocción
INSTRUCCIONES DE USO
Antes de utilizar el aparato por primera vez
• Retire todas los adhesivos y material de empaque.
• Para retirar la tapa - presione el botón para abrirla - fig.1.
• Retire la cuchara medidora.
• Retire el contenedor de poliestireno, que puede tirar - fig. 2.
• Para retirar el aro de giro, tire hacia afuera de los clips y levántelo - fig. 3.
• Retire la bandeja - fig. 4.
• Levante el asa del recipiente en posición horizontal hasta que oiga un CLIC al cerrarse. - fig.5.
• Retire el aspa pulsando el botón de desbloqueo - fig.4.
• Extraiga el recipiente - fig. 7.
• Presione el botón de bloqueo para quitar la tapa - fig. 8.
• Retire el filtro extraíble - fig.9.
• Todas las piezas extraíbles se pueden lavar en lavavajillas - fig.10 o se pueden lavar con una
esponja no abrasiva y detergente líquido lavaplatos.
• Limpie el interior y la superficie exterior del aparato con una esponja húmeda y un poco de
detergente líquido lavaplatos - fig.11.
• Séquelo todo cuidadosamente antes de volver a colocarlo en su lugar.
• Vuelva a colocar el aspa hasta oír un “CLIC”.
• Para volver a colocar el anillo en su lugar, colóquelo en el borde de la olla, céntrelo en el
recipiente y presione hasta oír un “CLIC”.
NOTA:
• Nunca sumerja la base en agua.
• Al utilizarlo por primera vez, y para obtener óptimos resultados, le aconsejamos que
prepare una receta cuya cocción sea de 30 minutos o más.
ES
43
Page 44

COCINAR
Recomendaciones
• Durante el primer uso, el aparato puede desprender un olor que no resulta nocivo. Este
fenómeno no tiene consecuencias sobre la utilización del electrodoméstico y desaparecerá
rápidamente.
• Para no dañar el aparato, asegúrese de que respeta las cantidades de ingredientes y de
líquido que figuran en el manual de uso y el libro de recetas.
• No cargue en exceso la bandeja, respete las cantidades recomendadas.
• No exceda nunca la altura indicada por el nivel máximo del aspa y el máximo de la bandeja.
• Este artefacto no es adecuado para recetas con un alto contenido de líquido (como sopas,
salsas de cocina, etc.).
• No deje nunca la cuchara 2en1 en el aparato mientras este esté en funcionamiento.
• No coloque nunca la bandeja en el aparato sin el recipiente.
• No coloque el aspa mezcladora sin el recipiente.
• No coloque nunca la bandeja en el aparato al empezar la cocción al utilizarlo en modo 2en1,
espere a la señal sonora que le indica en qué momento la tiene que colocar.
• Nunca ponga en funcionamiento un aparato en vacío.
• Nunca sobrecargue la olla de cocción. Siga las cantidades recomendadas.
• Nunca encienda el aparato si la cesta de cocción está vacía.
• Nunca utilice el anillo antidesbordamiento en la bandeja, ya sea cuando lo use solo o en
modo 2en1. El anillo se usa solo en el recipiente - fig. 33, 34 y 35.
• Coloque el anillo antidesbordamiento en la bandeja para cocinar grandes cantidades.
UTILIZACIÓN DEL RECIPIENTE SOLO
Preparación de los alimentos
No deje la cuchara medidora dentro de la olla mientra cocina alimentos.
• Abra la tapa - fig.1.
• Retire la cuchara y la bandeja.
• Prepare los ingredientes como indica la receta. Coloque los ingredientes en el recipiente de
cocción como indican las instrucciones de su receta.
• Coloque los alimentos dentro del recipiente distribuyéndolos uniformemente y respetando la
cantidad máxima (ver tabla de cocción p. 46 a p. 48).
• Agregue aceite a los alimentos con la cuchara - fig.13, extendiéndolo de modo uniforme (ver
tablas de cocción p. 46 a p. 48).
• Desbloquee el mango y presiónelo hacia atrás en su carcasa - fig.14.
• Cierre la tapa - fig.15.
Comience a cocinar
• Enchufe el artefacto en un tomacorrientes eléctrico - fig. 16. El aparato emitirá 2 pitidos y la
pantalla mostrará 00.
44
Page 45

2 modos de programar el tiempo de cocción:
7
Modo de función con menús automáticos:
Los 9 modos de cocción ajustan automáticamente la temperatura de cocción y si la paleta
debe girar según el tipo de alimento seleccionado.
• Pulse la tecla para seleccionar el recipiente. El icono correspondiente aparece en
la pantalla.
• Para seleccionar el modo de cocción, presione el botón + hasta que el modo elegido del 1 al
9 aparezca en pantalla - Fig. 19.
• Presione el botón de inicio.
• Ajuste el tiempo de cocción presionando el botón +/-.
Nota: Ajuste el tiempo de cocción después de encender el aparato.
• Cuando usa el modo de cocción automático, siga las instrucciones del libro de recetas para
saber dónde colocar los alimentos en la olla.
Nota: El aspa no gira al principio de la cocción en los modos 2, 3, 4, 5, 7, 8 y 9.
• Para detener o cancelar los modos de cocción, mantenga presionado el botón de inicio
durante 2 segundos y en la pantalla aparecerá 00.
ES
1. Papitas y chips: papas fritas,
verduras fritas, papas en cuña...
2. Aperitivos empanados:
nuggets de pollo, camarones
empanados...
3. Aperitivos rebozados: aros
de cebolla y aros de calamar
rebozados...
4. Enrollados: aperitivos de tipo
samosas, rollitos de primavera...
5. Carne y pescado
*Programas de ‘1 comida en 1 vez’
Modo manual:
• Programe los tiempos de cocción mediante los botones +/- (ver tabla de cocción p. 46 a p.
48).
• Después, seleccione la temperatura de cocción presionando el botón de temperatura/
temporizador , y programe la temperatura usando el botón +/- (ver tabla de cocción
p. 46 a p. 48).
• Presione inicio.
6. Pollo: muslos y alas...
7. Wok*: arroz frito con
camarones, vaca salteada,
verduras salteadas...
8. Comida internacional*:
tajine de cordero, kebab, ...
9. Postres: compota de
manzanas y peras, frutos
secos caramelizados...
45
Page 46

NOTA:
• El tiempo seleccionado aparecerá en pantalla y la cuenta atrás comenzará minuto a minuto.
El tiempo es seleccionado y aparece en pantalla en forma de minutos. Solo el tiempo que
reste por debajo de 1 minuto aparecerá en segundos.
• El electrodoméstico se puede pausar. Solo tiene que presionar el botón START/STOP. Presione
el botón START/STOP para reanudar la cocción.
• El tiempo se puede cambiar en cualquier momento durante la cocción usando los botones
+/-.
• En caso de error o de borrarse el tiempo seleccionado, mantenga presionado el botón
START/STOP por 2 segundos y vuelva a seleccionar el tiempo.
Retire los alimentos
Al abrir la tapa, el aparato se apaga. Para reanudar la cocción, cierre la tapa y presione el
botón START/STOP.
Después de estar abierto 2 minutos, el aparato se reinicia.
• Cuando haya finalizado la cocción, el temporizador emite pitidos.
• Abra la tapa - fig.22.
• Levante el mango hasta escuchar un clic que lo bloquea y retire la olla de cocción - fig.31
y 32.
• Servir inmediatamente.
• Para evitar riesgos de sufrir quemaduras, no toque la tapa ni ninguna otra parte, a excepción
de las zonas frías: mango de la olla y botón de abertura de la olla.
TIEMPOS DE COCCIÓN
Los tiempos de cocción se proporcionan como guía aproximada y pueden variar dependiendo del
tipo de alimentos, su tamaño, cantidades y gustos personales, así como también dependiendo
del voltaje. La cantidad de aceite indicada puede aumentarse dependiendo de sus gustos y
necesidades. Si desea papas fritas más crujientes, puede agregar unos minutos más de cocción.
Papas
Papas de
tamaño
estándar
10 mm x 10 mm
Papas
tradicionales
Tipo Cantidad
Frescas
Congeladas
Agregar
(cucharadas de
aceite)
750 g 1/2 1 25 - 27
1000 g 3/4 1 28 - 30
1500 g 1 1 36 - 38
1700 g 1 1 42 - 44
750 g Ninguno 1 23 - 25
1200 g Ninguno 1 36 - 38
Modo de
cocción
Tiempo de cocción
recipiente (min)
46
Page 47

Carne - Pollo
Para agregar un cierto sabor a su carne, mezcle especias con el aceite (ají molido, curry, mezcla
de hierbas, tomillo, hojas de laurel, etc.).
Tipo Cantidad
Frescos o
Nuggets de
pollo
Muslos de pollo Frescos de 4 a 6 Ninguno 6 20 - 22
Filete de
pechuga de
pollo
Albóndigas
congelados
Frescos 1200 g Ninguno 2 13 - 15
Congelados 1200 g Ninguno 2 15 - 17
Frescos 6 Ninguno 6 18 - 20
Frescos 9 Ninguno 6 22 - 24
Congeladas 750 g 1 5 14 - 15
Congeladas 1200 g 1 1/2 5 18 - 20
750 g Ninguno 2 10 - 12
Agregar
(cucharadas de
aceite)
Modo de
cocción
Tiempo de cocción
recipiente (min)
Arroz y verduras
ES
Agregar
(cucharadas de
aceite)
Ratatouille*
Revuelto campero*
Paella*
Tipo Cantidad
Congelada 750 g Ninguno 7 14 - 16
Congelada 1000 g Ninguno 7 23 - 25
Congelada 750 g Ninguno 6 16 - 18
Congelada 1000 g Ninguno 6 22 - 24
Congelada 650 g Ninguno – 12 - 14
Congelada 1000 g Ninguno – 15 - 17
* Preparaciones congeladas no disponibles en todos los países.
Pescado - Marisco
Tipo Cantidad
Calamares
(rebozados)
Camarones Frescos
Congelados
300 g
500 g 3 11 - 13
300 g
450 g 3 8 - 10
Agregar
(cucharadas de
aceite)
Ninguno
Ninguno
Modo de
cocción
Modo de
cocción
Tiempo de cocción
Tiempo de cocción
3 10 - 12
3 8 - 10
recipiente (min)
recipiente (min)
47
Page 48

Verduras
Calabacines
Pimientos
Setas
Tomates
Cebollas
Postres
Bananas Trozos
Fresas Cuartos
Manzanas Mitades
Piña Trozos
48
Tipo Cantidad
Fresco en
rodajas
Fresco en
rodajas
Fresco en
rodajas
Fresco en
rodajas
Frescas en
cuartos
Frescas en
cuartos
Frescos en
cuartos
Frescos en
cuartos
Frescas en
rodajas
Frescas en
rodajas
Tipo Cantidad
Agregar
(cucharadas de aceite)
750 g 1 c. + 150 ml de agua 7 20 - 25
1200 g 1 c. + 150 ml de agua 7 25 - 30
650 g 1 c. + 150 ml de agua 7 15 - 18
1200 g 1 c. + 150 ml de agua 7 20 - 25
650 g 1 7 10 - 15
1000 g 1 7 16 - 18
650 g 1 c. + 150 ml de agua 7 12 - 14
1000 g 1 c. + 150 ml de agua 7 15 - 17
500 g 1
750 g 1
Agregar
(cucharadas de
aceite)
5 1 c. + 1 c. de azúcar 9 5 - 6
7 1 c. + 1 c. de azúcar 9 5 - 6
1000 g 2 c. de azúcar 9 8 - 10
1500 g 2 c. de azúcar 9 10 - 12
3 1 c. + 1 c. de azúcar 9 8 - 10
5 1 c. + 2 c. de azúcar 9 10 - 12
1 2 c. de azúcar 9 10 - 12
2 2 c. de azúcar 9 15 - 17
Modo de
cocción
Manual :
220°C
Manual :
220°C
Modos de
cocción
Tiempo de
cocción recipiente
(min)
12 - 14
18 - 20
Tiempo de
cocción recipiente
(min)
Page 49

USO DE LA BANDEJA SOLA
Prepare los alimentos
• Abra la tapa - fig.1.
• Retire la cuchara de medicion.
• Retire la bandeja - fig.4.
• Coloque los alimentos en la bandeja respetando siempre las cantidades recomendadas en
las tablas de cocción y/o en el libro de recetas (consulte “Tabla de cocción”). No exceda
nunca la marca de nivel “MAX” indicada en el centro de la bandeja - fig.23.
• Coloque la bandeja en el aparato - fig.24.
• Cierre la tapa - fig.25.
Inicie la cocción
• Enchufe el artefacto en un tomacorrientes eléctrico.
• El aparato emitirá un bip sonoro y en la pantalla aparecerá 00.
• Pulse la tecla y pulse la Tecla « - »
• Pulse de nuevo la tecla para seleccionar la bandeja. El icono correspondiante
aparece en la pantalla.
• Para seleccionar el modo de cocción, presionel el botón + hasta que el modo elegido del 1 al
9 aparezca en pantalla.
• Ajuste el tiempo de cocción con los botones (véase la “Tabla de cocción”).
• Apriete el botón START. Se inicia la cuenta atrás por minutos. Solo se visualizarán los
segundos cuando la cuenta atrás sea inferior a 1 minuto.
• En todo momento se puede ajustar el tiempo de cocción presionando los botones +/-.
Al abrir la tapa se detiene la cocción. Vuelva a iniciarla presionando el botón start después
de cerrar la tapa. Transcurridos 2 minutos de la apertura de la tapa, el aparato se pone en
modo de espera.
Retire los alimentos
• Cuando se termina la cocción, el temporizador suena y en la pantalla aparece 00
parpadeando: el aparato detendrá automáticamente la cocción de los alimentos. Detenga
el timbre apretando el botón start.
• Abra la tapa - fig 29.
• Retire la bandeja con una agarradera - fig. 30. Tenga cuidado, la bandeja está muy caliente
al final de la cocción. Para evitar cualquier riesgo de quemaduras, utilice siempre una
agarradera o protección para manipular la bandeja después de la cocción.
• Sirva los alimentos.
ES
49
Page 50

Tiempos de cocción bandeja
Agregar
(cuchara de
aceite)
Nuggets de
pollo
Muslos de
pollo
Alas de
pollo
Filetes de
pechuga de
pollo
Albóndigas
Bistec
Tipo Cantidad
Frescos o
congelados
Frescos o
congelados
Frescos 4 a 6 piezas Ninguno 6 20 - 22
Congeladas 10 piezas Ninguno 6 22
Frescos 6 piezas Ninguno 6 18 - 20
Frescos 9 piezas Ninguno 6 22 - 24
Congeladas 500 g 1 5 12 - 15
Congeladas 750 g 1 5 15 - 17
Frescos 4 piezas 1 5 8
Congelados 4-6 piezas 1 1/2 5 8 - 10
500 g Ninguno 2 13 - 15
750 g Ninguno 2 15 - 17
UTILIZACIÓN 2EN1: RECIPIENTE + BANDEJA
Modo de
cocción
Tiempo de cocción
bandeja (min)
Prepare los alimentos
• Abra la tapa - fig.1.
• Retire la cuchara 2en1 y la bandeja - fig.4.
• Levante el asa y saque el recipiente del aparato.
• Coloque los alimentos en el recipiente respetando siempre las cantidades recomendadas en
las tablas de cocción y/o en el libro de recetas (consulte la “Tabla de cocción”). No exceda
nunca la marca de nivel “MAX” del aspa - fig.13.
• Según los alimentos, dosifique la materia grasa recomendada con la cuchara y vierta el
contenido de forma homogénea en el interior del recipiente - fig.13.
• Vuelva a colocar el recipiente en el aparato y cierre la tapa.
• Abata el asa - fig.15.
Inicie la cocción 2en1
• Enchufe el artefacto en un tomacorrientes eléctrico.
• El aparato emitirá un bip sonoro y en la pantalla aparecerá 00.
• Para seleccionar el modo de cocción, presione el botón + hasta que el modo elegido del 1 al
9 aparezca en pantalla - fig.17.
• El simbolo aparece en la pantalla.
50
Page 51

• Pulse la tecla para seleccionar la bandeja. El icono correspondiante aparece en la
pantalla.
• Apriete el botón start . Se iniciará la cocción.
• Se inicia la cuenta atrás por minutos.
• Durante este tiempo, coloque los alimentos en la bandeja respetando el nivel máximo -
fig.23.
• Cuando el aparato emita un bip sonoro y se detenga automáticamente, abra la tapa y
coloque la bandeja - fig.22&24.
• Vuelva a cerrar la tapa y apriete el botón start .
• Se reiniciará la cuenta atrás.
Para cada tipo de alimentos se propone un tiempo predefinido que usted podrá ajustar.
Si no efectúa ninguna acción, el aparato se detendrá automáticamente al cabo de 10
minutos.
Retire los alimentos
• Cuando se termina la cocción, el temporizador suena y en la pantalla aparece 00
parpadeando: el aparato detendrá automáticamente la cocción de los alimentos. Detenga
el timbre apretando el botón start.
• Abra la tapa - fig.29.
• Levante el asa hasta oír un “CLIC” - fig. 31.
• Gire el asa de la bandeja para colocarla sobre esta última - fig.26.
• Retire el recipiente y saque los alimentos - fig.32.
Atención: la bandeja estará muy caliente al acabar la cocción.
Utilice siempre el asa de la bandeja para retirarla.
Para conseguir unas patatas aún más crujientes, puede alargar su cocción 2 min. tras
haber retirado la bandeja.
Alimentos
recipiente
Patatas
Papas fritas
frescas o
congeladas
Calabacines
Higos 10 9 15 min
Cantidad
recipiente
1500 g 1 35 min
1200 g 1 32 min 4 5 7 min
750 g 1 27 min 3 5 6 min
250 g 1 15 min 1 5 5 min
1200 g 1 32 min
1000 g 1 30 min 4 6 16 min
750 g 1 27 min 3 6 16 min
250 g 1 20 min 1 6 15 min
1200 g 7 25 min
750 g 7 20 min 3 3 10 min
500 g 7 15 min 2 3 8 min
250 g 7 12 min 1 3 7 min
Modo
Tiempo
recipiente
Alimentos
bandeja
Hamburguesa
Patas de pollo
Salmón
Crujientes de
chocolate
Cantidad
Modo
bandeja
4 5 7 min
5 6 18 min
4 3 10 min
4 9 5 min
Tiempo
Bandeja
ES
51
Page 52

INICIO DEMORADO
• Programe el tiempo de cocción con la función de inicio demorado o el modo de selección
automático.
Después de programar el modo predeterminado o el manual:
• Enchufe el electrodoméstico. La pantalla se ilumina y el tiempo aparece 0:00.
• Programe la cocción con el modo predeterminado o el manual.
• Presione el botón de temperatura/tiempo durante un tiempo (3 segundos). La imagen
aparecerá y parpadeará.
• Programe el tiempo de demora con los botones +/- (intervalo: 10 minutos).
• Presione inicio.
FUNCIÓN DE CONSERVACIÓN DE CALOR
• Cuando finalice la cocción, si no se activa ninguna función al cabo de 3 minutos, el modo
se inicia automáticamente (excepto el modo 1 – Papas fritas).
• Al cabo de 30 minutos de conservación de calor, el electrodoméstico se apaga.
• Para desactivar la función de conservación de calor, presione a la vez los botones + y –
durante un cierto tiempo (3 segundos).
• Para reactivar la función de conservación de calor, presione a la vez los botones + y – durante
un cierto tiempo (3 segundos).
CONSEJOS DE COCCIÓN ACTIFRY GENIUS
• No agregue sal a las papas fritas mientras se están cocinando. Solo agregue sal una vez que
haya retirado las papas fritas de la olla.
• Si agrega hierbas aromáticas y especias a ActiFry, mézclelas con algo de aceite o líquido. Si
las echa directamente el sistema de aire caliente las dispersará.
• Las especias de colores fuertes pueden manchar ligeramente la paleta y las piezas del
artefacto. Esto es normal.
• Prepare todos los alimentos en pedazos de tamaño uniforme para que se cocinen todos al
mismo tiempo.
• Prepare las verduras, en especial los tubérculos, en pedazos pequeños o trozos para sofreír
para que se cocinen bien por dentro.
• Si utiliza cebollas en las recetas ActFry, se cocinan mejor cortadas en rebanadas finas que
picadas. Separe los aros de cebolla antes de echarlos a la olla y remuévalos un poco para
distribuirlos de modo uniforme.
Solo para el modo de cocción automática:
• Para ciertos modos de cocción, los ingredientes deben colocarse en la olla siguiendo las
indicaciones del libro de recetas ActiFry Genius. Esto asegura el nivel de cocinado correcto
para cada uno de los ingredientes. Aquellos que necesitan un mayor tiempo de cocción, se
ubican en la mitad superior de la olla. Aquellos que requieren un menor tiempo de cocción,
se colocan al lado del mango.
52
Page 53

FÁCIL DE LIMPIAR
Limpie el artefacto
Nunca sumerja el artefacto en agua. No use productos de limpieza agresivos o abrasivos.
El filtro extraíble debe limpiarse con regularidad. Para que la calidad de la olla extraíble no
se deteriore, nunca use utensilios metálicos.
No recomendamos el uso de detergentes, solo líquidos lavaplatos.
• Deje que el electrodoméstico se enfríe completamente antes de limpiarlo.
• Abra la tapa - fig.1.
• Para retirar el aro de giro, tire hacia afuera de los clips y levántelo.-
• Levante el mango de la olla y colóquelo en posición horizontal hasta escuchar un CLIC al
cerrarse. - fig.3.
• Extraiga la olla de cocción - fig.7.
• Presione el botón de liberación para retirar la paleta - fig.4.
• Retire el filtro extraíble - fig.6.
• Para retirar el aro de giro, tire hacia afuera de los clips y levántelo.
• Todas las piezas extraíbles se pueden lavar en lavavajillas - fig.7 o se pueden lavar con una
esponja no abrasiva y detergente líquido lavaplatos.
• Limpie la carcasa del electrodoméstico con una esponja húmeda y un poco de detergente
líquido lavaplatos - fig.8. Séquela bien antes de volver a colocar todo en su lugar.
ES
53
Page 54

ALGUNOS CONSEJOS EN CASO DE DIFICULTAD...
PROBLEMAS CAUSAS SOLUCIONES
El aparato no está bien conectado.
Todavía no ha apretado el botón
ON / OFF.
El aparato no funciona.
El aspa no gira
correctamente.
La bandeja no gira. La bandeja no está bloqueada.
La cocción de los
alimentos
no es homogénea.
Las patatas fritas no
están lo bastante
crujientes.
Los alimentos no giran
con la bandeja.
Los alimentos del
recipiente no están
cocinados.
Ha apretado el botón ON / OFF
pero el aparato no funciona.
El aparato no calienta.
El aspa no gira.
El aspa no está bloqueada.
No ha utilizado el aspa. Colóquela en su lugar.
Los alimentos no están cortados de
forma regular.
Las patatas fritas no están cortadas
de manera regular.
El aspa está en su lugar pero no gira.
No ha utilizado patatas especiales
para freír.
Las patatas no se han lavado y
secado lo suficiente.
Las patatas fritas son demasiado
gruesas.
No hay bastante aceite.
El filtro (5) está obstruido. Limpie el filtro.
Los alimentos son demasiado
gruesos.
Se ha puesto la bandeja sobre el
recipiente al inicio de la cocción.
Asegúrese de que el aparato se
encuentra bien conectado.
Apriete el botón ON / OFF.
Cierre la tapa.
Llévelo a un Centro de Servicio
Autorizado.
Compruebe que esté bien colocada
o si no, lleve el aparato a un Centro
de Servicio Autorizado.
Vuelva a colocar el aspa hasta oír un
“CLIC” - fig.8b.
Vuelva a colocar la bandeja hasta
oír un “CLIC”
Corte todos los alimentos del mismo
tamaño.
Corte todos los alimentos del mismo
tamaño.
Lleve el aparato a un Centro de
Servicio Autorizado.
Escoja patatas especiales para freír.
Lave, escurra y seque bien las
patatas antes de cocinarlas.
Córtelas más finas.
Incremente la cantidad de aceite
(consulte la “Tabla de cocción”).
Reduzca el grosor de sus alimentos.
Coloque la bandeja solamente en la
segunda parte de la cocción.
54
Page 55

PROBLEMAS CAUSAS SOLUCIONES
Las patatas fritas se han
roto durante la cocción.
Los alimentos se quedan
en el borde del plato.
Se han vertido líquidos
de cocción en el interior
del cuerpo del aparato.
La pantalla LCD no
funciona.
En la pantalla LCD
aparece Err.
El aparato hace
demasiado ruido.
Durante una cocción
combinada, la máquina
no se ha detenido para
colocar la bandeja.
La cantidad no es la correcta.
El recipiente está demasiado
cargado.
Se ha excedido el nivel máximo. Reduzca las cantidades.
Recipiente defectuoso.
Se ha excedido el nivel máximo. Respete el nivel máximo.
El aparato no está conectado. Enchufe el aparato.
El aparato no se ha puesto en
funcionamiento.
Tras un problema de funcionamiento
del producto, el mecanismo de
seguridad ha detenido el aparato.
Es una anomalía en el
funcionamiento del aparato.
Sospecha que hay alguna anomalía
en el funcionamiento de los motores
del aparato.
No se ha programado la cocción en
bandeja.
Reduzca la cantidad de patatas y
adapte el tiempo de cocción.
Respete las cantidades que se
indican en la tabla de cocción.
Reduzca la cantidad de alimentos.
Compruebe que no hay fugas
llenando el recipiente hasta el nivel
MAX del aspa. En caso de fuga, lleve
su recipiente a un Centro de Servicio
Autorizado.
Apriete el botón ON / OFF.
Lleve el aparato a un Centro de
Servicio Autorizado.
Desenchúfelo, espere 10 segundos,
enchúfelo de nuevo, apriete el botón
ON/OFF. Si en la pantalla LCD sigue
apareciendo la palabra Err., lleve
el aparato a un Centro de Servicio
Autorizado.
Lleve el aparato a un Centro de
Servicio Autorizado.
Utilice la función 2en1 para realizar
cocciones combinadas.
ES
55
Page 56

TEFAL/T-FAL* GARANTÍA LIMITADA INTERNACIONAL
Los accesorios, consumibles y componentes reemplazables por el usuario final, en caso de estar disponibles localmente, pueden ser
Garantía:
Este es un producto garantizado por TEFAL/T-FAL contra defectos de fabricación o en los materiales durante el periodo de garantía
aplicable en aquellos países ** que figuran en la lista de países incluida en la última página del manual de usuario, a partir de la
fecha de compra.
La garantía internacional que TEFAL/T-FAL emite como fabricante es una ventaja adicional que no transgrede los derechos del
consumidor
La garantía internacional del fabricante cubre todos los costes de reparación del producto defectuoso, de forma que se ajuste a
sus especificaciones originales, ya sea mediante su reparación o la sustitución de los componentes defectuosos y la mano de obra
necesaria. A criterio de TEFAL/T-FAL, se podrá sustituir el producto defectuoso por un equivalente o superior en lugar de repararlo.
La reparación o sustitución del producto es la única obligación de TEFAL/T-FAL y la única y exclusiva solución ofrecida al cliente en
virtud de la presente garantía.
Condiciones y exclusiones:
TEFAL/T-FAL no estará obligada a reparar o sustituir productos que no vayan acompañados de una prueba de compra válida. Se
puede llevar el producto en persona directamente a un centro de servicios autorizado, o embalarlo adecuadamente y enviarlo, por
correo certificado (o envío postal equivalente), a un centro de servicios autorizado de TEFAL/T-FAL. La dirección completa de los
centros de servicio autorizados en cada país puede obtenerse en el sitio web de TEFAL/T-FAL (www.tefal.com) o llamando al número
de teléfono de Atención al Consumidor del país en cuestión indicado en la Lista de Países. Para ofrecer el mejor servicio post-venta
posible y mejorar constantemente el grado de satisfacción del cliente, TEFAL/T-FAL puede enviar una encuesta de satisfacción a
todos los clientes que hayan reparado o canjeado sus productos en un centro de servicio autorizado TEFAL/T-FAL.
La garantía internacional TEFAL/T-FAL se aplica únicamente a productos adquiridos en alguno de los países relacionados, y
destinados exclusivamente a uso doméstico en uno de los países indicados en la Lista de Países. Esta garantía no cubrirá los daños
que puedan producirse como resultado de usos incorrectos, negligencia, inobservancia de las instrucciones de TEFAL/T-FAL, o una
modificación o reparación no autorizada del producto, un embalaje inadecuado por parte del consumidor o por una manipulación
incorrecta del transportista. Tampoco cubre el uso y desgaste habitual, el mantenimiento o sustitución de consumibles, ni lo
siguiente:
Derechos de los consumidores:
La garantía internacional TEFAL/T-FAL no afecta a los derechos de los consumidores ni derechos que no puedan ser excluidos o
restringidos, ni a los derechos que el consumidor tenga frente al comerciante minorista que le vendió el producto. Esta garantía
proporciona al consumidor derechos específicos, y el consumidor también podrá ejercer otros derechos que variarán de una región
a otra o de un país a otro.
* Los electrodomésticos de TEFAL se comercializan bajo la marca T-FAL en algunos territorios, como América y Japón. TEFAL/T-FAL son
marcas registradas del Groupe SEB.
**Cuando un producto sea adquirido en un país incluido en la Lista de Países y posteriormente se utilice en otro país incluido en la Lista, la
duración de la garantía internacional TEFAL/T-FAL será la vigente en el país de uso del producto, aunque el producto haya sido adquirido
en otro país incluido en la Lista con una duración distinta de garantía. El proceso de reparación para productos adquiridos fuera del país
de uso puede requerir un plazo mayor si TEFAL/T-FAL no comercializa localmente el producto. En los casos en los que el producto no sea
susceptible de reparación en el país de uso, la garantía internacional TEFAL/T-FAL se limitará a la sustitución por un producto similar o
un producto alternativo de precio similar, siempre que sea posible.
Por favor conserve este documento para consulta en caso de que deseara hacer una reclamación bajo garantía.
Específicamente para México:
El sitio para comprar accesorios, refacciones, así como para realizar las reparaciones de los productos TEFAL/T-FAL se localiza en
Home & Cook and Service, Av. San Fernando 649, local 27 A, Col. Peña Pobre, C.P. 14060, Alcaldía. Tlalpan, Ciudad de México. México
TEFAL/T-FAL cubrirá los gastos razonablemente erogados para el cumplimiento de esta garantía, exclusivamente para aquellos sitios
donde no se cuente con un centro de servicio autorizado. El periodo de garantía es el indicado en la lista de países, a menos que se
especifique algo diferente sobre la información del producto.
Este producto puede ser reparado por TEFAL/T-FAL* durante y después del periodo de garantía.
adquiridos tal y como se describe en el sitio web www.tefal.com
–la utilización de un tipo de agua o consumible incorrecto
–la calcificación (las descalcificaciones deberán realizarse de acuerdo a las instrucciones de uso)
–accidentes, incluidos incendios, inundaciones, rayos, etc.
–la entrada de agua, polvo o insectos dentro del producto (excluyendo los aparatos con características específicamente diseñadas
para insectos)
–daños o mal funcionamiento debidos específicamente a un voltaje o frecuencia distintos de los que aparecen impresos en la
etiqueta del producto u otras especificaciones locales.
–daños mecánicos, sobrecarga
–ruptura en los materiales de vidrio o porcelana del producto
–uso profesional o comercial
: www.tefal.com
56
Page 57

Bem-vindo ao mundo da ActiFry Genius XL
2em 1!
Eis como pode preparar as suas próprias refeições
deliciosas.
É a nossa tecnologia patenteada que torna as batatas fritas crocantes e
macias. Escolha os ingredientes, o óleo, as especiarias, as ervas aromáticas
e os temperos… A ActiFry Genius XL 2 em 1 trata do resto.
Apenas 3%* de gordura: Só precisa de 1 colher
de óleo!
Uma colher de óleo à sua escolha é tudo o que precisa para preparar
1,5 kg de batatas fritas. A colher da ActiFry Genius XL 2 em 1 tem um
medidor de sal na parte inferior que ajuda a reduzir a quantidade de sal
usada sem comprometer o sabor.
* 1,5 kg de batatas frescas cortadas às rodelas com um corte de 13 mm x
13 mm, cozedura com -55% de perda de peso com 20 ml de óleo.
Muito mais do que apenas bife com batatas
fritas!
Com a ActiFry Genius XL 2 em 1, pode cozinhar uma grande variedade
de receitas diferentes. Dê alguma variedade à sua dieta diária com alguns
bifes e batatas fritas, com alguns vegetais salteados, com carne picada
deliciosa, com camarões saborosos, com fruta e mais...
PT
: A ActiFry Genius XL 2 em 1
Também está incluído um livro de receitas preparado por
alguns dos melhores chefs de cozinha do mundo.
Encontrará ideias originais sobre como preparar refeições
deliciosas e nutritivas, pratos de acompanhamento, bem como
sobremesas que pode criar para toda a família.
57
Page 58

De modo a obter os melhores resultados
a cozinhar, oferece conselhos especiais
sobre as batatas e o óleo.
A batata: Para uma dieta agradável e equilibrada todos
os dias!
As batatas são um alimento excelente para todos, em qualquer faixa etária. São uma excelente
fonte de energia e são ricas em vitaminas. Dependendo das variedades, das condições
climáticas e do cultivo, a batata pode variar imenso em termos de forma, tamanho, qualidade
e gosto. Cada uma tem as suas próprias características. Depende de quando são colhidas, do
teor, do tamanho, da cor, da qualidade do armazenamento e dos conselhos de cozedura. Os
resultados da cozedura podem variar, dependendo da origem e sazonalidade.
Que variedade deverá ser usada com a ActiFry Genius XL 2 em 1?
De um modo geral, aconselhamos a usar variedades de batatas que sejam recomendadas
para preparar batatas fritas, como Maris Piper e King Edward. Para batatas novas com muita
humidade, aconselhamos a fritá-las durante mais alguns minutos.
Com a ActiFry Genius XL 2 em 1, também pode cozinhar batatas fritas congeladas. Como
estas já estão pré-fritas, não precisa de adicionar óleo.
Onde deve guardar as batatas?
O melhor lugar para guardar batatas é numa dispensa escura ou num armário fresco (entre os
6 ºC e os 8 ºC), ao abrigo de qualquer luz.
Como é que as batatas devem ser preparadas para a ActiFry Genius XL 2 em 1?
Para obter os melhores resultados, tem de se certificar de que as batatas fritas não se colam
umas às outras. Para isso, recomendamos que lave bem as batatas descascadas antes de as
cortar e depois do corte, até que a água se apresente limpa no final.
Isto permite-lhe retirar a máxima quantidade de amido. Seque cuidadosamente as batatas
usando papel de cozinha limpo, seco e bastante absorvente. As batatas têm de estar
completamente secas antes de serem colocadas na ActiFry Genius XL 2 em 1.
Como é que as batatas devem ser cortadas?
O modo como ficam suaves e estaladiças depende do tamanho. Quanto mais finas estiverem
as batatas, mais estaladiças ficam, e vice-versa. Quanto mais grossas, mais suaves ficam no
interior. Dependendo das suas preferências, pode variar o tamanho das suas batatas e alterar
o tempo de confeção respetivamente.
Espessura: Finas: 8 x 8 mm / Normais: 10 x 10 mm / Espessas: 13 x 13 mm Comprimento até
9 cm.
A espessura máxima recomendada para as batatas fritas é de 13 x 13 mm com um
comprimento de até 9 cm.
Tente usar diferentes tipos de óleo que considere bons
para si.
Se gosta de diferentes sabores, só precisa de escolher uma colher de óleo diferente. Todos os
ácidos gordos essenciais para a vida podem ser encontrados em óleos vegetais. Eles contêm,
em diferentes proporções, os nutrientes essenciais para uma dieta equilibrada. É importante
58
Page 59

variar nos óleos utilizados, de modo a fornecer ao seu corpo tudo o que ele necessita! Com a
ActiFry Genius XL 2 em 1, pode usar uma grande variedade de óleos:
• Óleos tradicionais: girassol, azeite, milho, colza*, extrato de grainhas de uva, amendoim,
soja*.
• Óleos aromatizados: Óleos com infusão de ervas, alho, pimento, limão...
• Óleos especiais: Avelã*, sésamo*, cártamo*, amêndoa*, abacate*, argão* (o tempo de
cozedura varia de acordo com o fabricante).
*Nota: Alguns destes óleos podem não estar presentes no seu país.
A tecnologia da ActiFry Genius XL 2 em 1 com a sua baixa quantidade de gordura, permitelhe reter os ácidos gordos saudáveis essenciais para lhe fornecer a energia de que necessita.
Com a ActiFry Genius XL 2 em 1, pode deliciar-se na companhia dos seus amigos!
Para saber mais ou caso tenha alguma dúvida, visite www.actifry.pt
DESCRIÇÃO
PT
1 Tampa
2 Botão de abertura da tampa
3 Fecho da tampa
4 Corpo
5 Filtro amovível
6 Janela de visualização
7 Pega
8 Colher doseadora
9 Tabuleiro de cozedura 2 em 1 com
“Nível MAX”
10 Pá misturadora amovível
11 Botão de desbloqueio da pá
12 Cuba amovível
13 Anel giratório amovível
14 Pegada cuba de cozedura
15 Tempo de cozedura
16 Indicador de utilização da cuba de
cozedura ou do tabuleiro
17 Visualização do início diferido
18 Visualização de manter quente
19 Botão para ativar a função 2 em 1
20 Botão + e - para ajustar o tempo de
cozedura
21 Iniciar/parar a confeção
22 Modo manual
23 Programas de cozedura
INSTRUÇÕES DE UTILIZAÇÃO
Antes da primeira utilização
• Retire todos os autocolantes e todo o material da embalagem.
• Abra a tampa, premindo o botão de abertura da tampa - Imagem 1.
• Retire a colher doseadora.
• Retire a embalagem de polistireno, e deite fora - Imagem 2.
• Para retirar o anel giratório, puxe as molas para fora e depois levante - Imagem 3.
• Retire o tabuleiro - Imagem 4.
• Levante a pega da cuba na horizontal até ouvir um “CLIQUE” do bloqueio - Imagem 5.
• Retire a pá pressionando o botão de desbloqueio - Imagem 6.
• Retire a cuba - Imagem 7.
• Puxe o fecho para cima para retirar a tampa - Imagem 8.
• Retire o filtro amovível - Imagem 9.
• Todas as peças amovíveis podem ser lavadas na máquina de lavar loiça, exceto a pega -
Imagem 10, ou podem ser lavadas com uma esponja que não seja abrasiva e detergente
para a loiça.
59
Page 60

• Limpe o corpo do aparelho e a pega com uma esponja ligeiramente embebida em água e
detergente para a loiça - Imagem 11.
• Seque cuidadosamente antes de voltar a colocar todas as peças no respetivo lugar.
• Volte a colocar a pá até ouvir o “CLIQUE” - Imagem 12.
• Para voltar a colocar o anel giratório, coloque-o na extremidade da cuba, centre na cuba e
pressione para baixo até ouvir um “CLIQUE”.
NOTA:
• Nunca coloque o corpo dentro de água ou qualquer outro líquido.
• Aquando da primeira utilização, para obter os melhores resultados com o seu novo produto,
aconselhamo-lo a preparar uma receita que demore mais de 30 minutos a ser preparada.
COZINHAR
Quando não usar o aparelho, este desliga-se automaticamente passados 10 minutos.
Alguns conselhos úteis
• Quando usar o aparelho pela primeira vez, poderá reparar nalgum odor que não é nocivo.
Este odor, que não afeta o aparelho de modo algum, desaparece rapidamente.
• Para não danificar o seu aparelho, certifique-se de que segue as quantidades de ingredientes
e líquidos apresentadas no manual de instruções e livro de receitas.
• Nunca sobrecarregue a cuba nem o tabuleiro, e não exceda as quantidades recomendadas.
• Nunca exceda a altura indicada pela marca de nível máximo no tabuleiro.
• Este aparelho não é adequado para receitas com muitos líquidos (sopas, molhos...).
• Nunca deixe a colher da sua ActiFry nem a pega do tabuleiro no aparelho enquanto este
estiver ligado.
• Nunca coloque o tabuleiri no aparelho sem a cuba.
• Nunca coloque a pá sem a cuba.
• Coloque o tabuleiro no aparelho quando ouvir o aviso sonoro e não no início da cozedura
(exceto se o tempo de cozedura na cuba e no tabuleiro forem iguais).
• Nunca deixe o aparelho sem supervisão enquanto estiver em funcionamento.
• Nunca utilize o aparelho vazio.
• Quando usar apenas a cuba, nunca coloque o tabuleiro no aparelho.
• Nunca use o anel giratório amovível no tabuleiro, quer sozinho, quer quando usar o
modo 2 em 1. Use o anel giratório amovível apenas na cuba - Imagem 33-35.
• Coloque o anel giratório amovível na cuba para cozinhar grandes quantidades.
USAR APENAS A CUBA
Preparar os alimentos
Não deixe a colher doseadora dentro da cuba enquanto cozinha os alimentos.
• Abra a tampa – Imagem 1.
• Retire a colher do interior da cuba.
• Prepare os seus ingredientes conforme indicado no livro de receitas ou manual de utilização.
• Coloque os alimentos na cuba, distribuindo-os uniformemente e certificando-se de que
respeita as quantidades máximas (consulte as tabelas de cozedura nas páginas 63 a 65).
• Adicione óleo nos alimentos com a colher (1 colher Actifry Genius cheia = 14 ml) - Imagem
13, regando uniformemente.
60
Page 61

• Desbloqueie a pega e pressione-a para baixo para o respectivo compartimento - Imagem 14.
7
• Feche a tampa - Imagem 15.
Iniciar a cozedura
• Ligue o aparelho a uma tomada elétrica - Imagem 16. O aparelho emite 2 sons e o visor
apresenta 00.
2 modos para definir o tempo de cozedura:
Modo de cozedura automática:
Os 9 modos de cozedura ajustam automaticamente a temperatura de cozedura e se a pá roda
de acordo com o tipo de alimento selecionado.
• Prima o botão para selecionar o modo da cuba. O ícone correspondente aparece
no visor.
• Para selecionar o modo de cozedura, prima o botão + até que o modo desejado 1 a 9 seja
apresentado - Imagem 18.
• Prima o botão de iniciar - Imagem 19.
• Ajuste o tempo de cozedura premindo o botão +/-.
Nota: Ajuste o tempo de cozedura após iniciar o aparelho.
• Quando usar o modo de cozedura automática, siga as instruções no livro de receitas sobre
como posicionar os alimentos cozedura
Nota: A pá não gira no início da cozedura nos modos 2, 3, 4, 5, 7, 8 e 9.
• Para cancelar o modo de cozedura, mantenha premido o botão de INICIAR/PARAR durante
2 segundos, e o ecrã apresenta 00.
PT
*1 refeição num programa
1. Batatas fritas, aperitivos
vegetais, casca de batata
frita...
2. Panados, como nuggets,
camarões panados...
3. Salgados como aros de
cebola panados, calamares...
4. Rolos, como chamuças,
rolinhos primavera...
5. Carne e peixe
6. Frango, como coxas e
asas...
7. Wok*, como arroz frito com
camarões, carne salteada,
vegetais salteados...
8. Alimentos étnicos*, como
tajine de borrego, kebab...
9. Sobremesas, como
compota de maçã e pera,
nozes caramelizadas...
61
Page 62

Modo manual:
• Defina a cozedura em minutos usando o botão +/- (consulte a tabela de confeção p. 63 a
p. 65).
• A seguir, defina a temperatura da cozedura premindo o botão da temperatura/temporizador
, e defina a temperatura necessária usando o botão +/- (consulte a tabela de cozedura
p. 63 a p. 65).
• Prima o botão de iniciar.
NOTA:
• O tempo selecionado é apresentado e começa uma contagem decrescente minuto a minuto.
O tempo é selecionado e apresentado em minutos. Apenas o tempo restante abaixo de 1
minuto é apresentado em segundos.
• O aparelho pode ser colocado em pausa. Basta premir o botão de INICIAR/PARAR. Premir o
botão de INICIAR/PARAR reinicia a cozedura.
• O tempo pode ser alterado a qualquer altura durante a cozedura usando os botões +/- -
Imagem 18.
• No caso de erro ou para alterar o tempo selecionado, mantenha premido o botão de
INICIAR/PARAR durante 2 segundos e volte a selecionar o tempo.
Retirar os alimentos
Quando abrir a tampa, o aparelho pára de funcionar. Para reiniciar a cozedura, feche a
tampa e prima o botão de INICIAR.
Se a tampa estiver aberta mais de 2 minutos, o aparelho é reiniciado.
• Quando a cozedura terminar, o temporizador emite um aviso sonoro.
• Abra a tampa - Imagem 22.
• Levante a pega até ouvir um “clique” a indicar o bloqueio, e retire a cuba - Imagem 31 e 32.
• Sirva imediatamente.
• Para evitar riscos de queimaduras, não toque na tampa nem em qualquer parte para além
da pega da cuba e botão de abertura da tampa.
Tempos de cozedura APENAS PARA A CUBA
Os tempos de cozedura são meramente indicativos e podem variar, dependendo da
sazonalidade dos alimentos, do tamanho, das quantidades usadas e das preferências, bem
como a voltagem. A quantidade de óleo indicada pode ser aumentada, dependendo do seu
gosto e das suas necessidades necessidades. Se desejar batatas fritas mais crocantes, pode
adicionar mais alguns minutos ao tempo de cozedura.
62
Page 63

Batatas
Batatas fritas
frescas
10 mm x 10
mm
Batatas fritas
congeladas
13 mm x 13
mm
Tipo Quantidade
Frescas
(batatas
fritas)
Congeladas
(batatas
fritas)**
Colheres
ActiFry de
óleo
750 g 2 1 25 - 27
1000 g 3/4 1 28 - 30
1500 g 1 1 36 - 38
1700 g 1 1 42 - 44
750 g Nenhum 1 23 - 25
1200 g Nenhum 1 36 - 38
Modo de
cozedura
* Batatas colhidas recentemente podem necessitar de um tempo de cozedura mais prolongado
para obter um resultado mais crocante e dourado.
** Para melhores resultados, recomendamos a utilização de batatas fritas congeladas sem
qualquer cobertura de farinha, pois estas tendem a oferecer resultados menos crocantes e a
cobertura pode cair durante a cozedura (para mais detalhes, verifique a lista de ingredientes
na embalagem).
Tempo de
cozedura para a
cuba (minutos)
Carne e Aves
Para tornar os seus pratos de carne mais saborosos, não hesite em misturar especiarias com o
óleo (paprika, caril, mistura de ervas, tomilho, folha de louro, etc.).
PT
Tipo Quantidade
Frescos ou
Nuggets de
frango
Coxas de frango Frescas 4 a 6 Nenhum 6 20 - 22
Peitos de frango
(sem osso)
Almôndegas
congelados
Frescos 1200 g Nenhum 2 13 - 15
Congelado 1200 g Nenhum 2 15 - 17
Frescos 6 Nenhum 6 18 - 20
Frescos 9 Nenhum 6 22 - 24
Congeladas 750 g 1 5 14 - 15
Congeladas 1200 g 1 1/2 5 18 - 20
750 g Nenhum 2 10 - 12
Colheres
ActiFry de
óleo
Modo de
cozedura
Tempo de
cozedura
para a cuba
(minutos)
63
Page 64

Pratos com arroz e vegetais
Tipo Quantidade
Ratatouille*
Legumes
salteados
Paelha*
Congelado 750 g Nenhum 7 14 - 16
Congelado 1000 g Nenhum 7 23-25
Congelado 1000 g Nenhum 6 22-24
Congelado 650 g Nenhum Manual: 220 °C 12 - 14
Congelado 1000 g Nenhum Manual: 220 °C 15 - 17
* As preparações congeladas não estão disponíveis em todos os países.
Colheres
ActiFry de
óleo
Peixe - Marisco
Tipo Quantidade
Calamares Congelado
Lagostins Frescos
300 g
500 g 3 11 - 13
300 g
450 g 3 8 - 10
Colheres
ActiFry de
óleo
Nenhum
Nenhum
Vegetais
Colheres ActiFry
de óleo
Curgetes Rodelas
Pimentos Rodelas
Cogumelos
Tomates
Cebolas Rodelas
64
Tipo Quantidade
750 g 1 + 150 ml de água 7 20 - 25
1200 g 1 + 150 ml de água 7 25 - 30
650 g 1 + 150 ml de água 7 15 - 18
1200 g 1 + 150 ml de água 7 20 - 25
Aos
quartos
Aos
quartos
650 g 1 7 10 - 15
1000 g 1 7 16 - 18
650 g 1 + 150 ml de água 7 12 - 14
1000 g 1 + 150 ml de água 7 15 - 17
500 g 1
750 g 1
Modo de
cozedura
Modo de
cozedura
3 10 - 12
3 8 - 10
Modo de
cozedura
Manual:
220 °C
Manual:
220 °C
Tempo de
cozedura para a
cuba(minutos)
Tempo de
cozedura para a
cuba (minutos)
Tempo de
cozedura para a
cuba (minutos)
12 - 14
18 - 20
Page 65

Frutas
Tipo Quantidade
Bananas Rodelas
Morangos Aos quartos
Maçãs Metades
Frescos
Ananás
(descascados
e cortados
em pedaços)
5 1 + 1 de açúcar 9 5 - 6
7 1 + 1 de açúcar 9 5 - 6
1000 g 2 de açúcar 9 8 - 10
1500 g 2 de açúcar 9 10 - 12
3 1 + 1 de açúcar 9 8 - 10
5 1 + 2 de açúcar 9 10 - 12
1 2 de açúcar 9 10 - 12
2 2 de açúcar 9 15 - 17
USAR APENAS O TABULEIRO
Colheres ActiFry
de óleo e açúcar
Modo de
cozedura
Tempo de cozedura
para a cuba
(minutos)
Preparar os seus alimentos
• Abra a tampa – Imagem 1.
• Retire a colher doseadora.
• Retire o tabuleiro – Imagem 4.
• Coloque os alimentos no tabuleiro, certificando-se de que segue sempre as quantidades
recomendadas nas tabelas de cozedura e/ou livro de receitas (por favor, consulte a tabela
de cozedura quanto às quantidades do tabuleiro, na página 68). Nunca exceda a marca do
nível “MAX” apresentada no centro do tabuleiro - Imagem 23.
• Volte a colocar o tabuleiro no aparelho - Imagem 24.
• Feche a tampa - Imagem 25.
Quando usar apenas o tabuleiro, não coloque alimentos na cuba.
Iniciar a cozedura
• Ligue o aparelho a uma tomada.
• O aparelho emite um aviso sonoro e o visor apresenta “00”.
• Prima o botão e prima o botão - para selecionar o modo do tabuleiro. O ícone
correspondente aparece no visor.
• Para selecionar o modo de cozedura, prima o botão + até que o modo desejado 1 a 9 seja
apresentado.
• Prima o botão de INICIAR/PARAR.
• Pode ajustar o tempo de cozedura premindo o botão +/-.
• A contagem decrescente por minutos começa. A contagem decrescente só é apresentada
em segundos quando restar menos de um minuto.
Abrir a tampa pára a cozedura. Pode continuar a cozedura premindo o botão de iniciar
após o ter desligado.
PT
65
Page 66

Quando a tampa for aberta durante 3 minutos, o aparelho entra no modo de poupança
de energia.
Retirar os seus alimentos
• Quando a cozedura terminar, o temporizador emite um som sonoro e o ecrã começa a piscar
e a apresentar “00 -”: O aparelho pára automaticamente de cozinhar os seus alimentos. Pode
parar o som de aviso premindo o botão de iniciar.
• Abra a tampa – Imagem 29.
• Retire o tabuleiro com a pega e retire os seus alimentos - Imagem 30. Tenha cuidado. O
tabuleiro está muito quente após a cozedura. Use sempre a pega do tabuleiro incluída para
a retirar.
• Sirva os seus alimentos.
Tabela de cozedura APENAS para o tabuleiro
Tipo
Frescos ou
Nuggets de
frango
Coxas de
frango
Asas de frango Congeladas 10 pedaços Nenhum 6 22
Peitos de
frango (sem
osso)
Almôndegas
Bife
congelados
Frescos ou
congelados
Frescos 4 a 6 pedaços Nenhum 6 20 - 22
Frescos 6 pedaços Nenhum 6 18 - 20
Frescos 9 pedaços Nenhum 6 22 - 24
Congeladas 500 g 1 5 12 - 15
Congeladas 750 g 1 5 15 - 17
Frescos 4 pedaços 1 5 8
Congelados 4 a 6 pedaços 1 1/2 5 8 - 10
Quantidade
para o
tabuleiro
500 g Nenhum 2 13 - 15
750 g Nenhum 2 15 - 17
USAR O MODO 2 EM 1 CUBA + TABULEIRO
Colheres
ActiFry de
óleo
Modo de
cozedura
Tempo de cozedura
para o tabuleiro
(minutos)
Preparar os seus alimentos
• Abra a tampa – Imagem 1.
• Retire o tabuleiro – Imagem 4.
• Levante a pega e retire a cuba do aparelho.
• Coloque os alimentos na cuba, certificando-se de que segue sempre as quantidades
recomendadas nas tabelas de cozedura e/ou livro de receitas. Nunca exceda o nível MAX
indicado na pá.
• Dependendo dos alimentos, adicione a quantidade recomendada de óleo na colher ActiFry
e verta o conteúdo uniformemente na cuba - Imagem 13.
• Volte a colocar a cuba no aparelho e feche a tampa - Imagem 15.
66
Page 67

Iniciar a cozedura 2 em 1
• Ligue o aparelho. Este emite um aviso sonoro e o ecrã apresenta “00”.
• Escolha o programa de cozedura desejado para a cuba. Para selecionar o modo de cozedura,
prima o botão + até que o modo desejado 1 a 9 seja apresentado - Imagem 17.
• O ícone aparece no visor.
• Prima o botão para selecionar o modo do tabuleiro. O ícone correspondente
aparece no ecrã.
• Escolha o programa de cozedura desejado para o tabuleiro usando o botão +, até que o
modo desejado 1 a 9 seja apresentado - Imagem 18.
• Prima o botão de INICIAR/PARAR - Imagem 19.
• Pode ajustar o tempo de cozedura a qualquer altura premindo o botão +/-.
• A cozedura dos alimentos na cuba é iniciada.
• A contagem decrescente por minutos começa.
• Enquanto os alimentos estiverem a ser cozinhados na cuba, prepare os alimentos para os
cozinhar no tabuleiro. Certifique-se de que não excede a marca do nível máximo do tabuleiro
- Imagem 23.
• Quando o aparelho emitir um aviso sonoro e parar automaticamente, abra a tampa e insira
o tabuleiro - Imagem 22 e 24.
• Volte a fechar a tampa - Imagem 25 e prima o botão de INICIAR - Imagem 26.
• A contagem decrescente por minutos continua. A contagem decrescente só é apresentada
em segundos quando restar menos de um minuto.
• Há um tempo predefinido para cada tipo de alimento que pode ajustar.
– Ajuste o tempo de cozedura em minutos usando os botões + e -.
– Ajuste a temperatura de cozedura premindo o botão [add here the icon temp/time in
email] e os botões + e - para definir a temperatura desejada.
Retirar os seus alimentos
• Quando a cozedura terminar, o temporizador emite um aviso sonoro e o ecrã começa a
piscar e a apresentar “00”: O aparelho pára automaticamente de cozinhar os seus alimentos.
Pode parar o som de aviso premindo o botão de iniciar.
• Abra a tampa - Imagem 29.
• Retire o tabuleiro com a pega e retire os seus alimentos - Imagem 30. Tenha cuidado. O
tabuleiro está muito quente após a cozedura. Use sempre a pega do tabuleiro incluída para
a retirar.
• Levante a pega até ouvir o “CLIQUE” - Imagem 31.
• Retire a cuba e retire os alimentos - Imagem 32.
Tabela de cozedura para 2 em 1
Os tempos de cozedura apresentados servem apenas de orientação. Eles podem variar,
dependendo do tamanho dos alimentos e do modo como gosta de os cozinhar. No final do
tempo de cozedura 2 em 1, e se gostar das suas batatas fritas ainda mais crocantes, cozinhe-as
durante mais uns minutos após retirar o tabuleiro.
PT
67
Page 68

Alimentos na
cuba
Batatas fritas
frescas
10 mm x 10
mm
Batatas fritas
frescas ou
congeladas
Batatas fritas
frescas ou
congeladas
Batatas fritas
frescas ou
congeladas
Curgete às
rodelas
Figos cortados
aos pedaços
Quantidade
na cuba
1500 g 1 35 min
1200 g 1 32 min 4 5 7 min
750 g 1 27 min 3 5 6 min
250 g 1 15 min 1 5 5 min
1200 g 1 32 min
1000 g 1 30 min 4 6 15 min
750 g 1 27 min 3 6 15 min
250 g 1 20 min 1 6 10 min
1200 g 1 29 min
1200 g 1 32 min
1200 g 7 25 min
750 g 7 20 min 3 5 10 min
500 g 7 15 min 2 5 8 min
250 g 7 12 min 1 5 7 min
10 9 15 min
Modo
Tempo para
a cuba
Alimentos
no
tabuleiro
Bifes
Coxas de
frango
Nuggets de
frango
Asas de
frango
Filete de
salmão
Massa
filo de
chocolate
Quantidade
no tabuleiro
4 5 8 min
8 6 15 min
14 2 8 min
10 6 22 min
4 5 10 min
4 9 4 min
Modo
Tempo
no
tabuleiro
INÍCIO DIFERIDO
O início diferido pode ser definido usando um dos 9 modos automáticos de cozedura ou o
modo manual:
– Ligue o aparelho.
– Mantenha o botão da Temperatura/Temporizador premido durante 3 segundos. A imagem
aparece e o temporizador pisca 0:00.
– Defina o tempo de início diferido usando os botões +/- (intervalos: 10 minutos) (até um
máximo de 9 horas).
– Prima o botão de INICIAR e o temporizador de início diferido começa a contagem
decrescente. A cozedura começa quando o temporizador de início diferido chegar a 0:00.
68
Page 69

FUNÇÃO DE MANTER QUENTE
• Quando terminar de cozinhar, se não efetuar qualquer ação no espaço de 3 minutos, o
modo de manter quente é iniciado automaticamente (exceto para o modo 1 - Batatas fritas).
• Passados 30 minutos a manter quente, o aparelho desliga-se.
• Para desativar a função de “Manter quente”, prima em simultâneo os botões + e - e
mantenha-os premidos (3 segundos).
• Para voltar a ativar a função de “Manter quente”, prima em simultâneo os botões + e - e
mantenha-os premidos (3 segundos).
CONSELHOS PARA COZINHAR COM A ACTIFRY GENIUS
• Não adicione sal nas batatas enquanto estas estiverem na cuba. Adicione sal apenas
quando as batatas fritas forem retiradas da cuba.
• Quando adicionar ervas secas e especiarias na ActiFry, misture-as com algum óleo ou líquido.
Se tentar polvilhá-las diretamente na cuba, serão sopradas pelo sistema de ar quente.
• Especiarias fortes coloridas podem manchar ligeiramente a pá e as peças do aparelho. Isto
é normal.
• Prepare todos os alimentos em pedaços com um tamanho uniforme para se certificar de que
todos ficam cozinhados em simultâneo.
• Prepare os vegetais, especialmente os de raiz, em pequenos pedaços, ou tamanho para
saltear, para se certificar de que ficam bem cozinhados.
• Se usar cebolas nas receitas da ActiFry, elas ficam melhor se forem cortadas finas do que
picadas, pois cozinham melhor. Separe os aros de cebola antes de os colocar na cuba e
mexa-os, de modo a ficarem uniformemente distribuídos.
Apenas para o modo de cozedura automática:
• Para os modos de cozedura selecionados, os ingredientes deverão ser colocados na cuba
conforme indicado no livro de receitas da ActiFry Genius. Isto garante o nível correto de
cozedura de cada ingrediente. Os que necessitam de um tempo de cozedura superior são
colocados no topo da cuba. Os que necessitam de um tempo de cozedura inferior são
colocados ao lado da pega.
FÁCIL DE LIMPAR
Limpeza do aparelho
Nunca coloque o aparelho dentro de água ou de qualquer outro líquido. Não use produtos
de limpeza corrosivos ou abrasivos. O filtro amovível tem de ser lavado regularmente. Para
garantir que a cuba amovível e o tabuleiro durem mais tempo, nunca use utensílios de
metal.
Não recomendamos a utilização de qualquer outro detergente para além de detergente
líquido para a loiça para lavar qualquer parte do aparelho.
• Deixe o aparelho arrefecer por completo antes de proceder à limpeza.
• Abra a tampa premindo o botão - Imagem 1, e pressione o fecho para cima para retirar a
tampa - Imagem 8.
• Retire o tabuleiro.
• Levante a pega da cuba amovível até ouvir um “CLIQUE”.
PT
69
Page 70

• Retire a pá pressionando o botão de desbloqueio - Imagem 6.
• Retire a cuba - Imagem 7.
• Retire o filtro amovível - Imagem 9.
• Para retirar o anel giratório, puxe as molas para fora e depois levante.
• Todas as peças amovíveis, exceto a pega, podem ser lavadas na máquina de lavar loiça, -
Imagem 10, ou podem ser lavadas com uma esponja que não seja abrasiva e com algum
detergente líquido.
• Limpe o interior e exterior do aparelho e a pega com uma esponja ligeiramente embebida
em água e um pouco de detergente líquido - Imagem 11. Seque cuidadosamente antes de
voltar a colocar todas as peças no respetivo lugar.
• Se os alimentos ficarem presos ou queimados na cuba ou na pá, deixe-os a embeber em
água quente antes de proceder à limpeza.
ALGUMAS CONSELHOS EM CASO DE PROBLEMAS...
Problemas Causas Soluções
O aparelho não
funciona.
A pá não
permanece no lugar.
O tabuleiro não gira.
Os alimentos não
ficam cozinhados
uniformemente.
O aparelho não está ligado
corretamente.
Não premiu ainda o botão de
INICIAR/PARAR.
Premiu o botão de INICIAR/PARAR,
mas o aparelho não funciona.
O aparelho não aquece.
A pá não roda.
A pá não está corretamente
encaixada.
O tabuleiro não está corretamente
colocado.
Não usou a pá. Coloque a pá na respetiva posição.
Os alimentos/batatas fritas não
foram cortados uniformemente.
Certifique-se de que o aparelho está
devidamente ligado a uma tomada.
Prima o botão de INICIAR/PARAR.
Feche a tampa.
Contacte o Centro de Contato do
Consumidor (consulte em baixo).
A pá não roda no início da cozedura nos
modos 2, 3, 4, 5, 7, 8 e 9. Reinicie usando
o modo manual para verificar se a pá
roda. Se não rodar, certifique-se de que foi
colocada corretamente e ajuste até ouvir
um “CLIQUE”. Se não funcionar, contacte
o Centro de Contato do Consumidor.
Volte a colocar a pá até ouvir o “CLIQUE”
- Imagem 12.
Ajuste a posição até ouvir o “CLIQUE”.
Corte os alimentos/batatas fritas todos
com o mesmo tamanho.
70
Page 71

Problemas Causas Soluções
Escolha uma variedade de batatas
adequada para fritar. Batatas apanhadas
recentemente podem ter muita humidade.
Cozinhe-as durante mais alguns minutos
ou tente usar uma variedade de batatas
diferente.
Lave, e seque bem as batatas antes de
as cozinhar.
Corte-as mais finas.
Aumente a quantidade de óleo (consulte a
“Tabela de cozedura”).
Limpe o filtro.
Coloque o tabuleiro apenas durante a
segunda metade da fase de cozedura.
Reduza a quantidade de batatas e
ajuste o tempo de cozedura. Ou não
corte as batatas com mais de 9 cm de
comprimento.
Siga as quantidades máximas
apresentadas na tabela de cozedura.
Coloque o anel giratório no respetivo
lugar.
Reduza a quantidade de alimentos.
Reduza as quantidades.
Ligue o aparelho à corrente.
Contacte o Centro de Contato do
Consumidor.
As batatas fritas não
estão suficientemente
estaladiças.
Os alimentos não
viram com o tabuleiro.
Os alimentos na cuba
não estão cozinhados.
As batatas fritas
partem-se enquanto
estão a ser cozinhadas.
Os alimentos
permanecem na
extremidade da cuba.
O visor LCD não
funciona.
O aparelho faz um
ruído anormal.
Está a usar uma variedade de
batatas que não é adequada para
fritar.
As batatas não foram lavadas nem
secadas o suficiente.
As batatas fritas estão muito
espessas.
Não há óleo suficiente.
O filtro (5) está obstruído.
Os alimentos são muito espessos. Reduza a espessura dos seus alimentos.
O tabuleiro foi colocado na cuba
quando a cozedura foi iniciada.
Está a usar uma grande
quantidade, ou as batatas estão
muito compridas.
A cuba tem muitos alimentos.
O nível máximo recomendado foi
excedido.
O aparelho não está ligado à
corrente.
A tampa está aberta. Feche a tampa.
Suspeita que há um problema no
modo como o motor do aparelho
está a funcionar.
PT
71
Page 72

TEFAL/T-FAL* GARANTIA INTERNACIONAL LIMITADA
Acessórios, consumíveis e peças de substituição poderão ser adquiridos, caso estejam localmente disponíveis, tal como indicado no
Garantia :
Este aparelho é garantido pela TEFAL/T-FAL contra qualquer defeito de fabrico nos materiais ou mão-de-obra, durante o período de
garantia, nos países *** como mencionado na lista de países anexa, a partir da data da compra ou da data da entrega.
A garantia internacional do fabricante cobre todos os custos inerentes à restituição do artigo defeituoso de forma a ficar em
conformidade com as suas especificações de origem, mediante reparação ou substituição de qualquer peça defeituosa, e à mão-deobra necessária. Sendo opção da TEFAL/T-FAL proceder à troca dum aparelho defeituoso por um equivalente ou superior em vez da
sua reparação. A única obrigação da TEFAL/T-FAL limita-se à substituição ou reparação do aparelho.
Condições e exclusões :
A TEFAL/T-FAL não tem obrigação de proceder à reparação ou substituição dum aparelho caso não seja acompanhado por
uma prova de compra válida. O aparelho pode ser entregue directamente num Serviço de Assistência Técnica autorizado ou ser
devidamente embalado e enviado por correio registado (ou por outras forma de envio semelhante) para um Serviço de Assistência
Técnica autorizado TEFAL/T-FAL. A lista completa dos Serviços de Assistência Técnica autorizados em cada país, encontra-se
disponível no site da TEFAL/T-FAL (www.tefal.com) ou pode também ser obtida ligando para o número do Centro de Contacto do
Consumidor indicado na Lista de Países. Para poder oferecer um serviço após venda de alta qualidade e melhorar constantemente
a satisfação do consumidor, a TEFAL/T-FAL poderá enviar um inquérito de satisfação a todos os consumidores que tiveram os seus
produtos a reparar ou que foram trocados num dos serviços autorizados de assistência técnica TEFAL/T-FAL.
A garantia internacional TEFAL/T-FAL apenas se aplica a aparelhos adquiridos num dos países constantes da Lista de Países, e
utilizados apenas para uso doméstico. Esta garantia não abrange danos que sejam resultantes de má utilização, negligência, não
cumprimento das instruções TEFAL/T-FAL, modificação ou reparação não autorizada do aparelho, embalagem defeituosa ou danos
durante o transporte. Também não cobre o desgaste natural do aparelho, nem manutenção ou substituição de consumíveis, nem:
–utilização de certos tipos de água ou produtos não adequados
–danos ou avarias devido à utilização duma voltagem não adequada
–acidentes incluindo fogo, inundação
–danos provocador por raios ou picos de corrente
–utilização profissional ou comercial
–danos mecânicos, sobrecarga
–danos das partes de vidro ou porcelana do aparelho
–utilização com corrente ou voltagem diferente da indicada na placa sinalética do aparelho, ou outras especificações técnicas
–calcário (a descalcificação do aparelho deve ser feita de acordo com as instruções mencionadas no manual)
–entrada de água, pó ou insectos no interior do aparelho (exceto nos aparelhos concebidos com características especificamente
concebidas para os insetos)
Direitos dos Consumidores :
A garantia internacional TEFAL/T-FAL não afecta os direitos legais dos consumidores, e os seus direitos não podem ser excluídos nem
limitados, nem o direito de reclamar junto da loja onde adquiriu o aparelho. Esta garantia confere aos consumidores direitos legais
específicos, e o consumidor pode também ter outros direitos legais que podem variar consoante a região ou país. Fica ao critério do
consumidor poder reivindicar estes direitos.
***Em caso de utilização do aparelho num país diferente daquele em que foi comprado, a duração da garantia internacional TEFAL/
T-FAL é igual à do país no qual o aparelho é utilizado, mesmo que o aparelho tenha sido adquirido num país onde o período de
garantia seja diferente. O processo de reparação dos produtos adquiridos fora do país de utilização pode ser mais demorado caso o
artigo em questão não seja comercializado pela TEFAL/T-FAL localmente. No caso de o aparelho não ter reparação no país em que
está a ser utilizado, a garantia internacional TEFAL/T-FAL limita-se à substituição por um aparelho equivalente ou por um aparelho
com valor semelhante, sempre que possível.
* A marca TEFAL aparece sob a designação T-FAL em alguns países tais como América e Japão. TEFAL / T-FAL são marcas registadas
do Groupe SEB
Por favor conserve este documento caso deseje apresentar alguma reclamação ao abrigo da garantia
Este aparelho é reparável pela TEFAL/T-FAL*, durante e após o período de garantia.
: www.tefal.com
site da TEFAL/T-FAL* www.tefal.com
72
Page 73

EN
EN p. 6 – 21
EN p. 22 – 39
DE
EN p. 40 – 56
ES
EN p. 57 – 72
PT
1520008912
 Loading...