

Page 1
EN
ActiFry express
www.tefal.com
Page 2
D
E
F
A
D
I
U
Q
I
L
I
X
A
M
G
C
H
I
J
M
N
O
K
L
B
P
Q
Page 3
2 2
1
2
1
2
1
1
M
A
X
I
L
I
Q
U
I
D
2
3
4
7
56
8
9
10
13
11
14
12
15
Page 4
COOKING
• Never operate your appliance when empty.
• Never overload the cooking pan comply with the recommended quantities.
• This product should not be used for traditional deep frying (do not fi ll the pan with oil).
DESCRIPTION
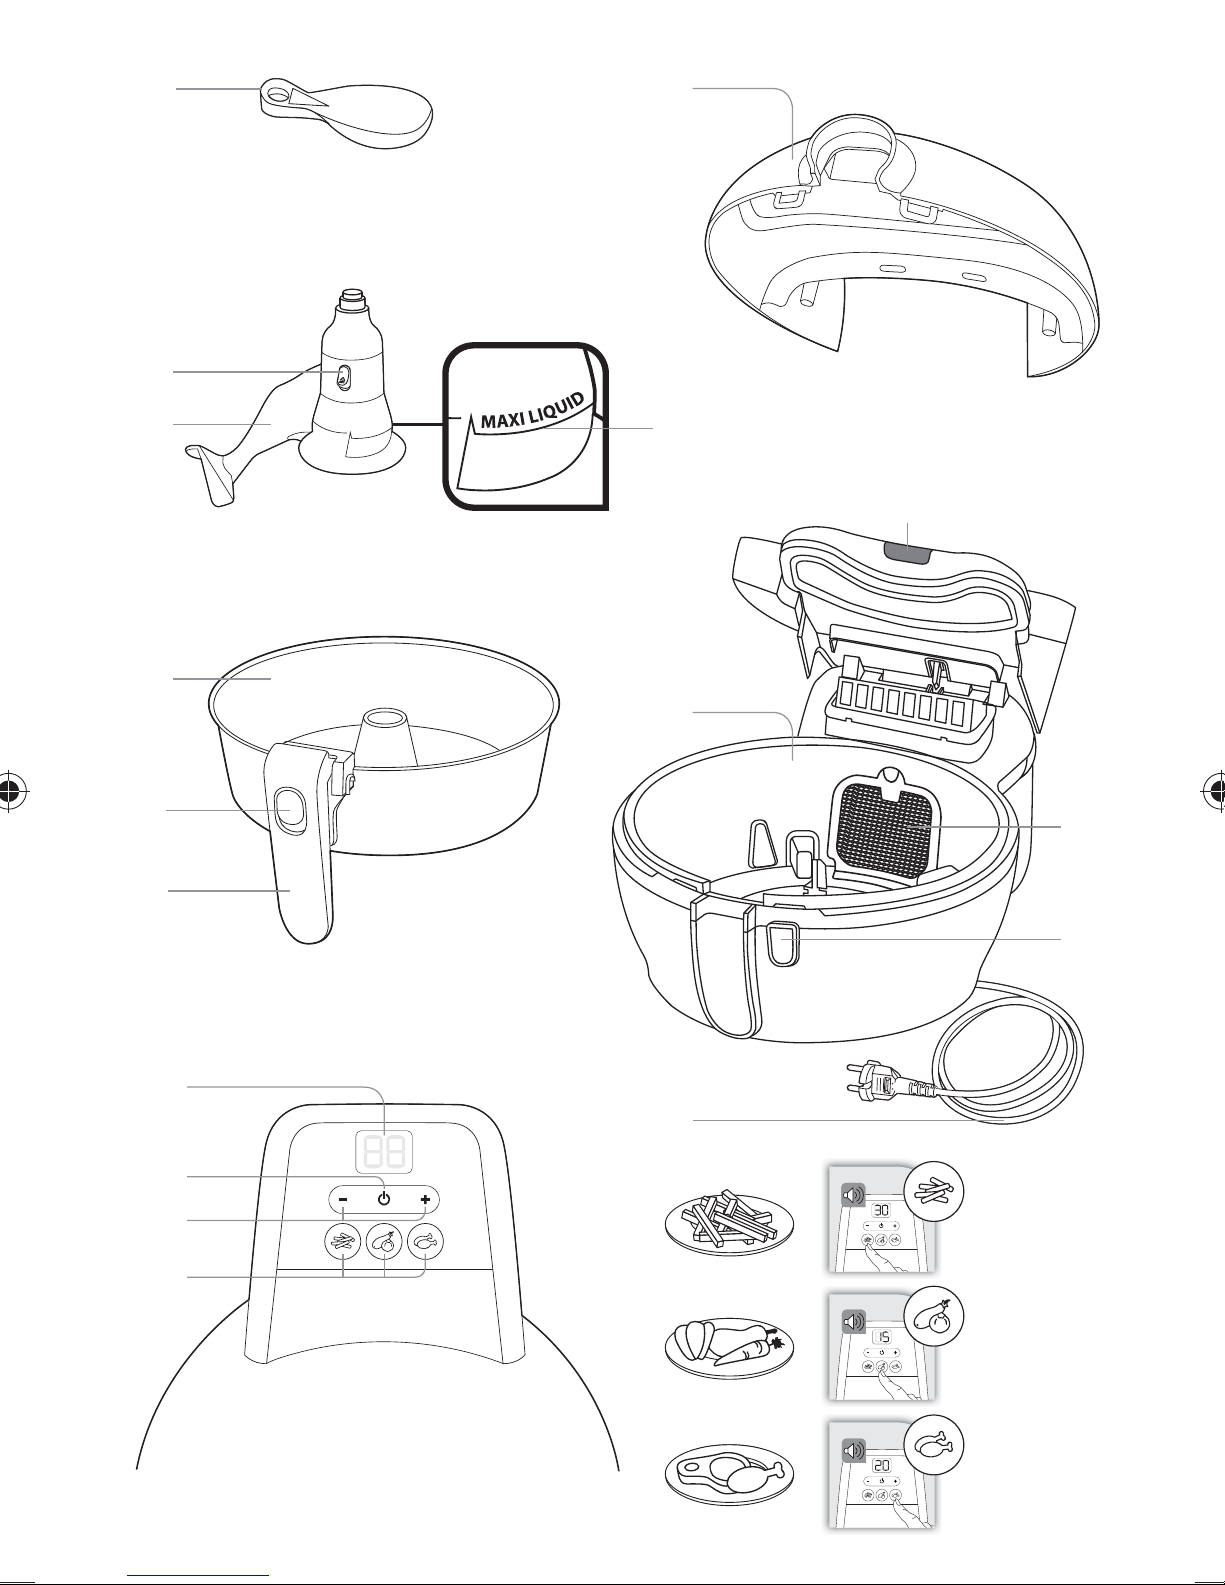
A Lid
B Lid opening button
C Lid unlocking button
D Measuring spoon
E Paddle release button
F Removable mixing paddle
G
Maximum capacity for liquids only
H Removable cooking pan
I Handle release
J Pan handle
K Body
L Removable fi lter
M LCD screen
N On/off button
O Timer adjustment button +/- (in minutes)
P Fixed power cord
Q Pre-programming buttons to set time
INSTRUCTIONS FOR USE
Before using for the fi rst time
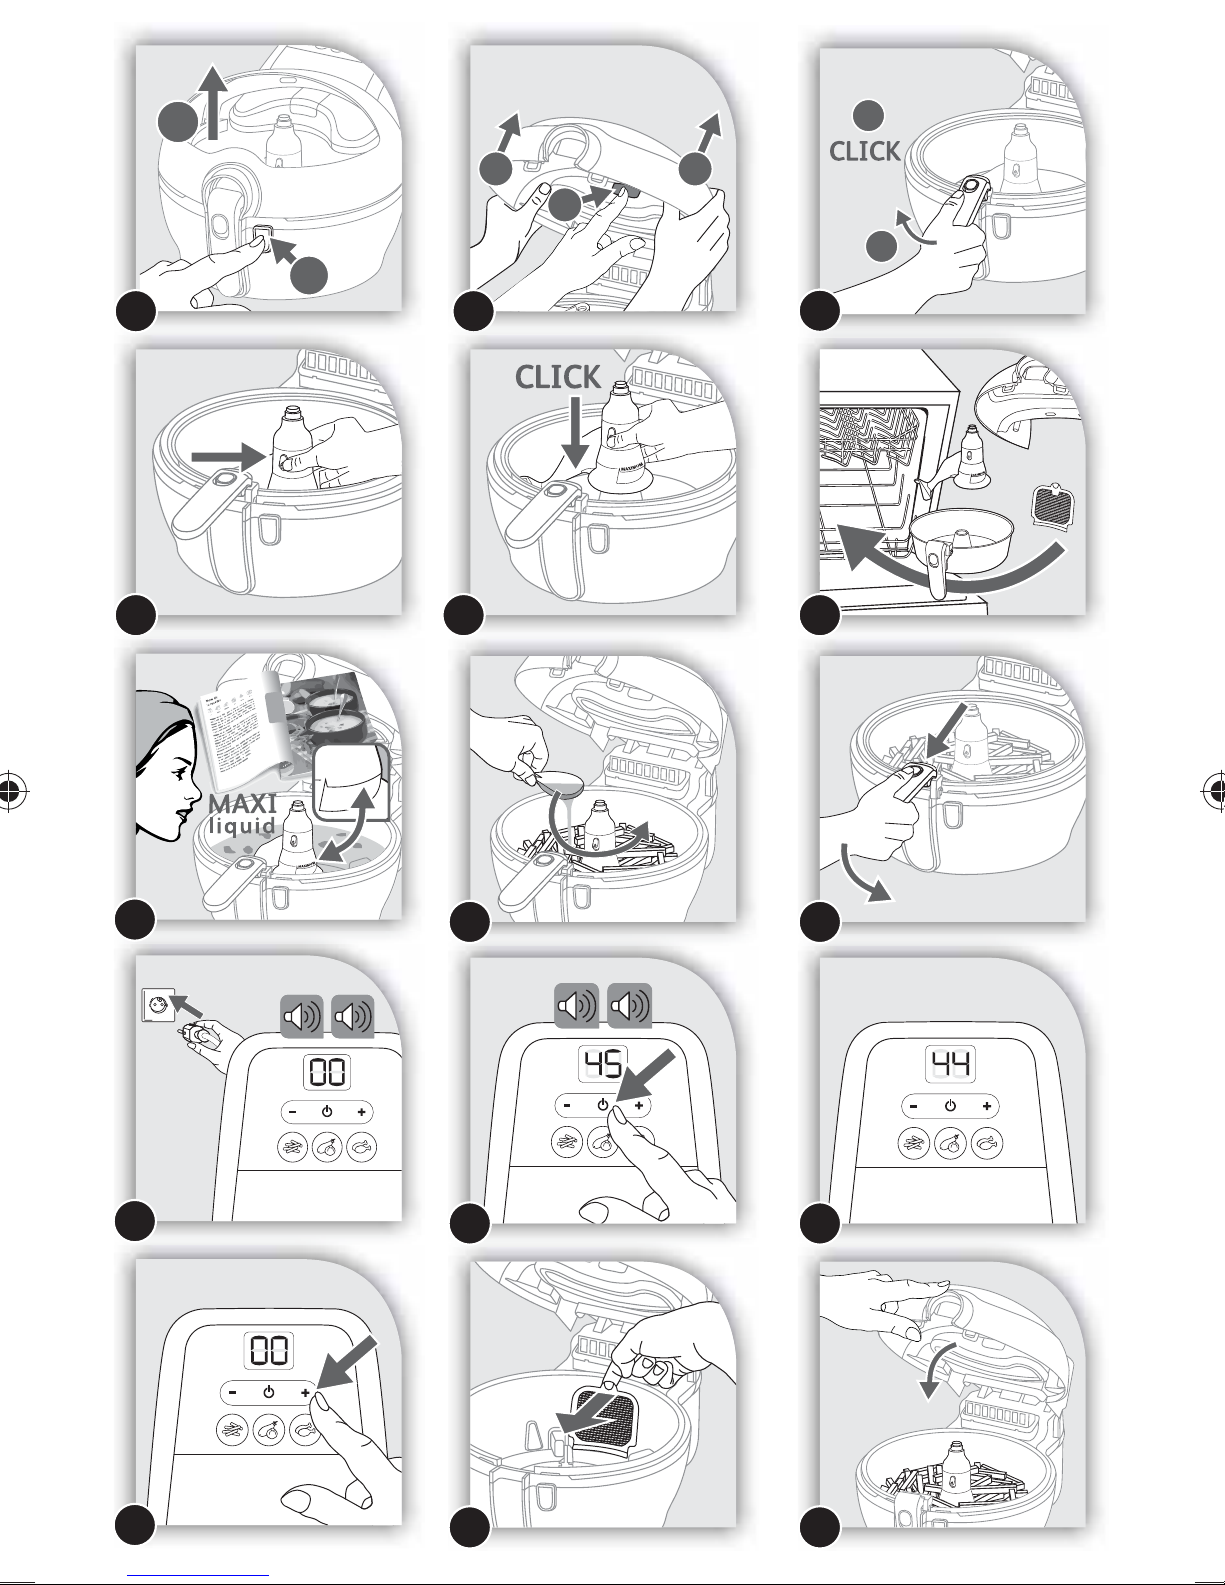
• To remove the lid - open the lid by pressing the lid opening button - fi g.1. and press the
button -
• Lift the detachable pan handle until you hear a «CLICK» as it locks, in order to remove the pan - fi g.3.
• Remove the paddle by pushing the release button - fi g.4.
• Remove the detachable fi lter - fi g.14.
• All the removable parts are dishwasher safe - fi g.6 or can be cleaned using a non abrasive sponge
and some washing up liquid.
• Clean the body of the appliance with a damp sponge and a little washing-up liquid.
• Dry carefully before putting everything back in place.
• Reposition the paddle until you hear the «CLICK» -
• When using for the fi rst time, the appliance may give off a harmless odour. This has no impact on
the use of the appliance and will soon disappear.
fi g.2.
fi g.5.
Preparing the food
To avoid damaging your appliance, please follow the quantities of ingredients and liquids
given in the manual and the recipe book.
For all recipes, containing liquids, never exceed the maximum level indicated on the
removable paddle - fi g.7.
Do not leave the measuring spoon inside the pan while cooking food.
4
Page 5
• Open the lid - fi g.1.
• Place the foodstuffs in the cooking pan and always observe the maximum amounts (see cooking
table p. 6 to 7) and the level for liquid recipes -
• Fill the spoon with the recommended amount of oil (see cooking table p. 6 to 7) and pour the
contents evenly onto the food -
• Unlock the handle and push it right back into its housing - fi g.9.
• Close the lid and ensure it is properly locked - fi g.15.
fi g.8.
fi g.7.
LIGHT COOKING
Start cooking
• Plug the appliance into an electrical socket outlet with an earth connection. the appliance emits
2 beeps and the screen displays 00 -
• Set the cooking time using the +/- button (see cooking table p. 6 to 7), or press on the preprogramming button (adjust the time, if necessary). Then, press the button
again emits 2 beeps cooking chamber.
fi g.11 and the cooking starts thanks to the movement of hot air into the
fi g.10.
, the appliance
• The selected time is displayed and the second-by-second countdown starts and time displayed is in minutes and only the time displayed below one minute is in seconds.
• The appliance can be paused. Simply press the button
more to start cooking again.
• Ilhe time can be changed at any time during cooking by using the + and - buttons -
• In the event of an error or to delete the selected time, hold the button down for 2 seconds and
re-select the time.
- fi g.11, then press this button once
fi g.12. The selection
fi g.13.
Remove the food
When you open the lid, the appliance switches itself off. To restart cooking, close the lid
and press the
After being open 2 minutes, the appliance is reset.
• When the cooking is complete, the timer beeps and the display shows 00: the appliance automatically
stops cooking what you have prepared. Stop the beeps by pressing one of the +/- buttons -
button.
fi g.13.
• Open the lid - fi g.1.
• Lift the handle until it «CLICK» to remove the pan and the food.
5
Page 6
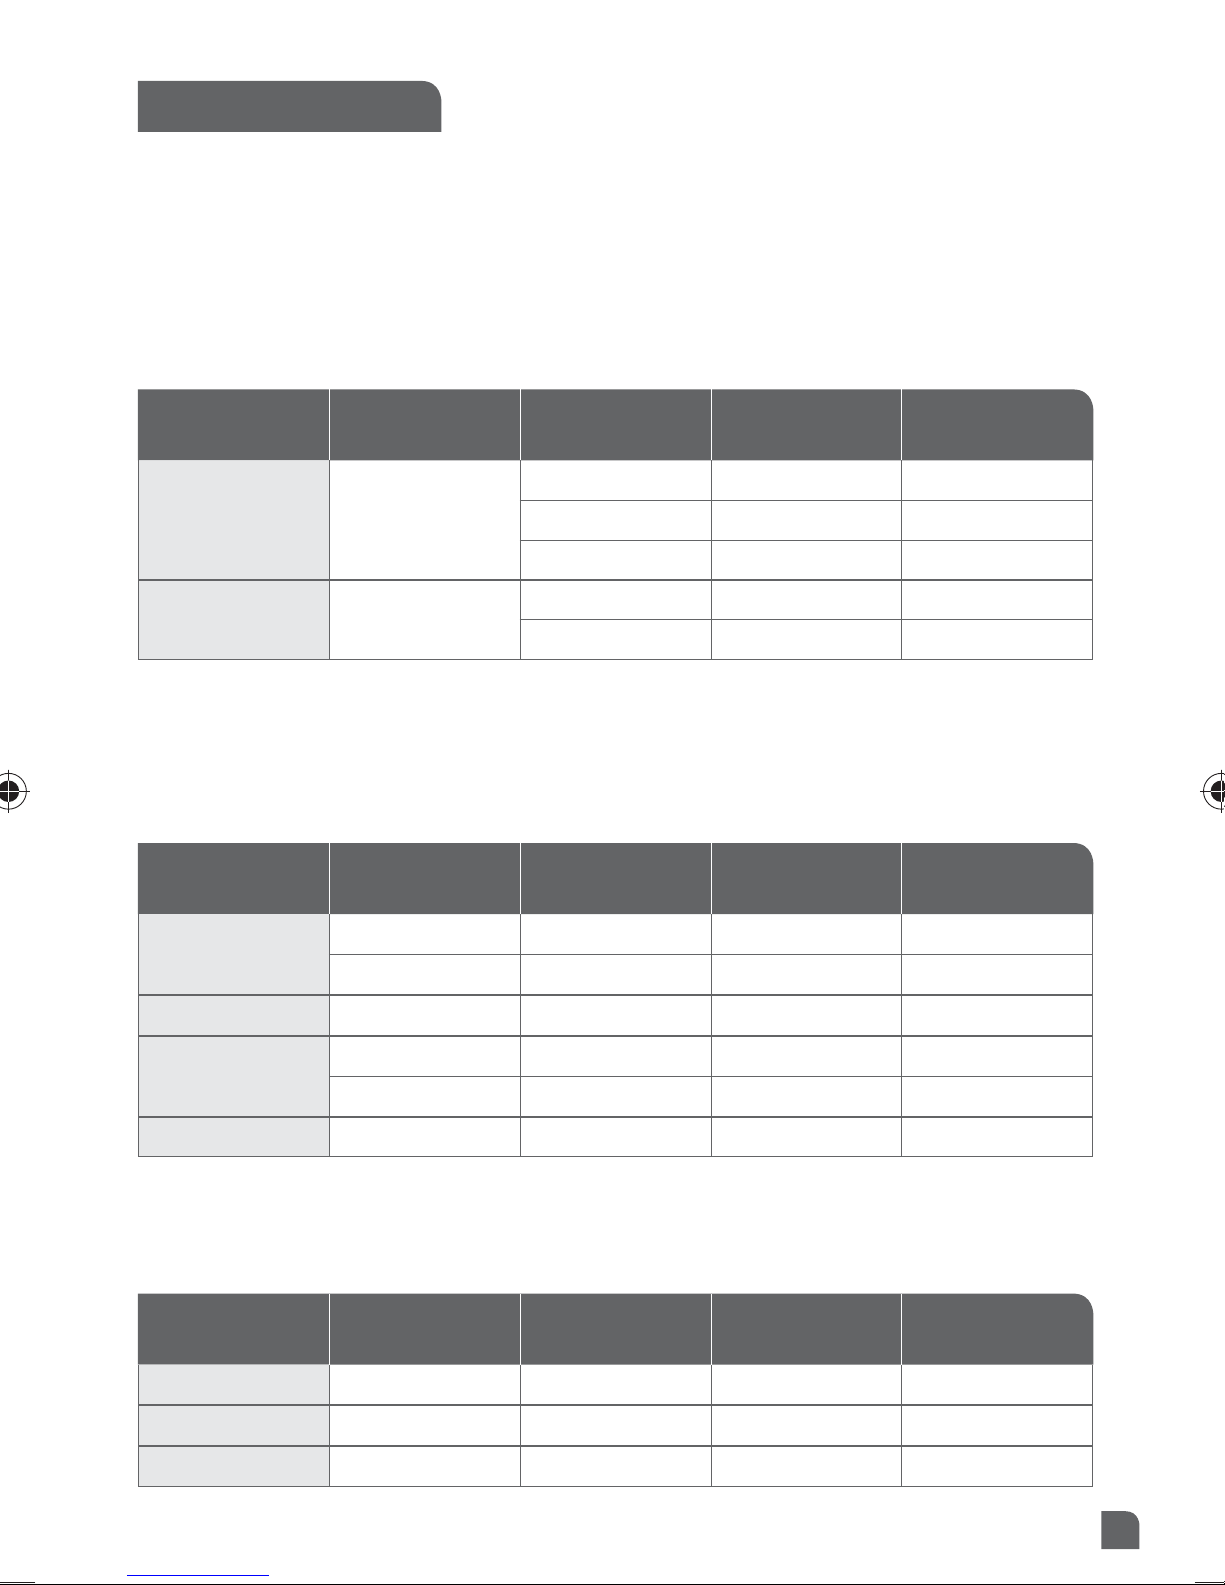
COOKING TIMES
The cooking times are given as a rough guide and may vary depending on the seasonality of the
food, its size, the quantities used and individual tastes, as well as the voltage of the mains system.
The amount of oil indicated may be increased depending on your taste and needs. If you want
crisper chips, you can add a few extra minutes to the cooking.
Potatoes
Type Quantity
Standard
sized chips
10 mm x 10 mm
Traditional chips Frozen (chips)
Fresh (chips)
Addition
(s. of oil)
750 g 1/2 -
1000 g 3/4 30 - 34
1500 g 1 -
750 g none 26 - 28
1200 g none -
Cooking time
(mins)
Meat- poultry
To add a little fl avour to your meat, don’t hesitate to mix spices in with the oil (paprika, curry, mixed
herbs, thyme, bay leaf, etc).
Chicken Nuggets
Type Quantity
Fresh 1200 g none -
Frozen 1200 g none -
Addition
(s. of oil)
Cooking time
(mins)
Chicken drumsticks
Chicken breast
Meatballs Frozen 1200 g 1 -
Frais 4 à 6 none 20 - 25
Frais 6 none 20 - 25
Frais 9 none -
Frozen preparations
Type Quantity
Ratatouille Frozen 1000 g none -
Farmer’s stir fry Frozen 1000 g none -
Paëlla Frozen 1000 g none -
Addition
(s. of oil)
Cooking time
(mins)
6
Page 7
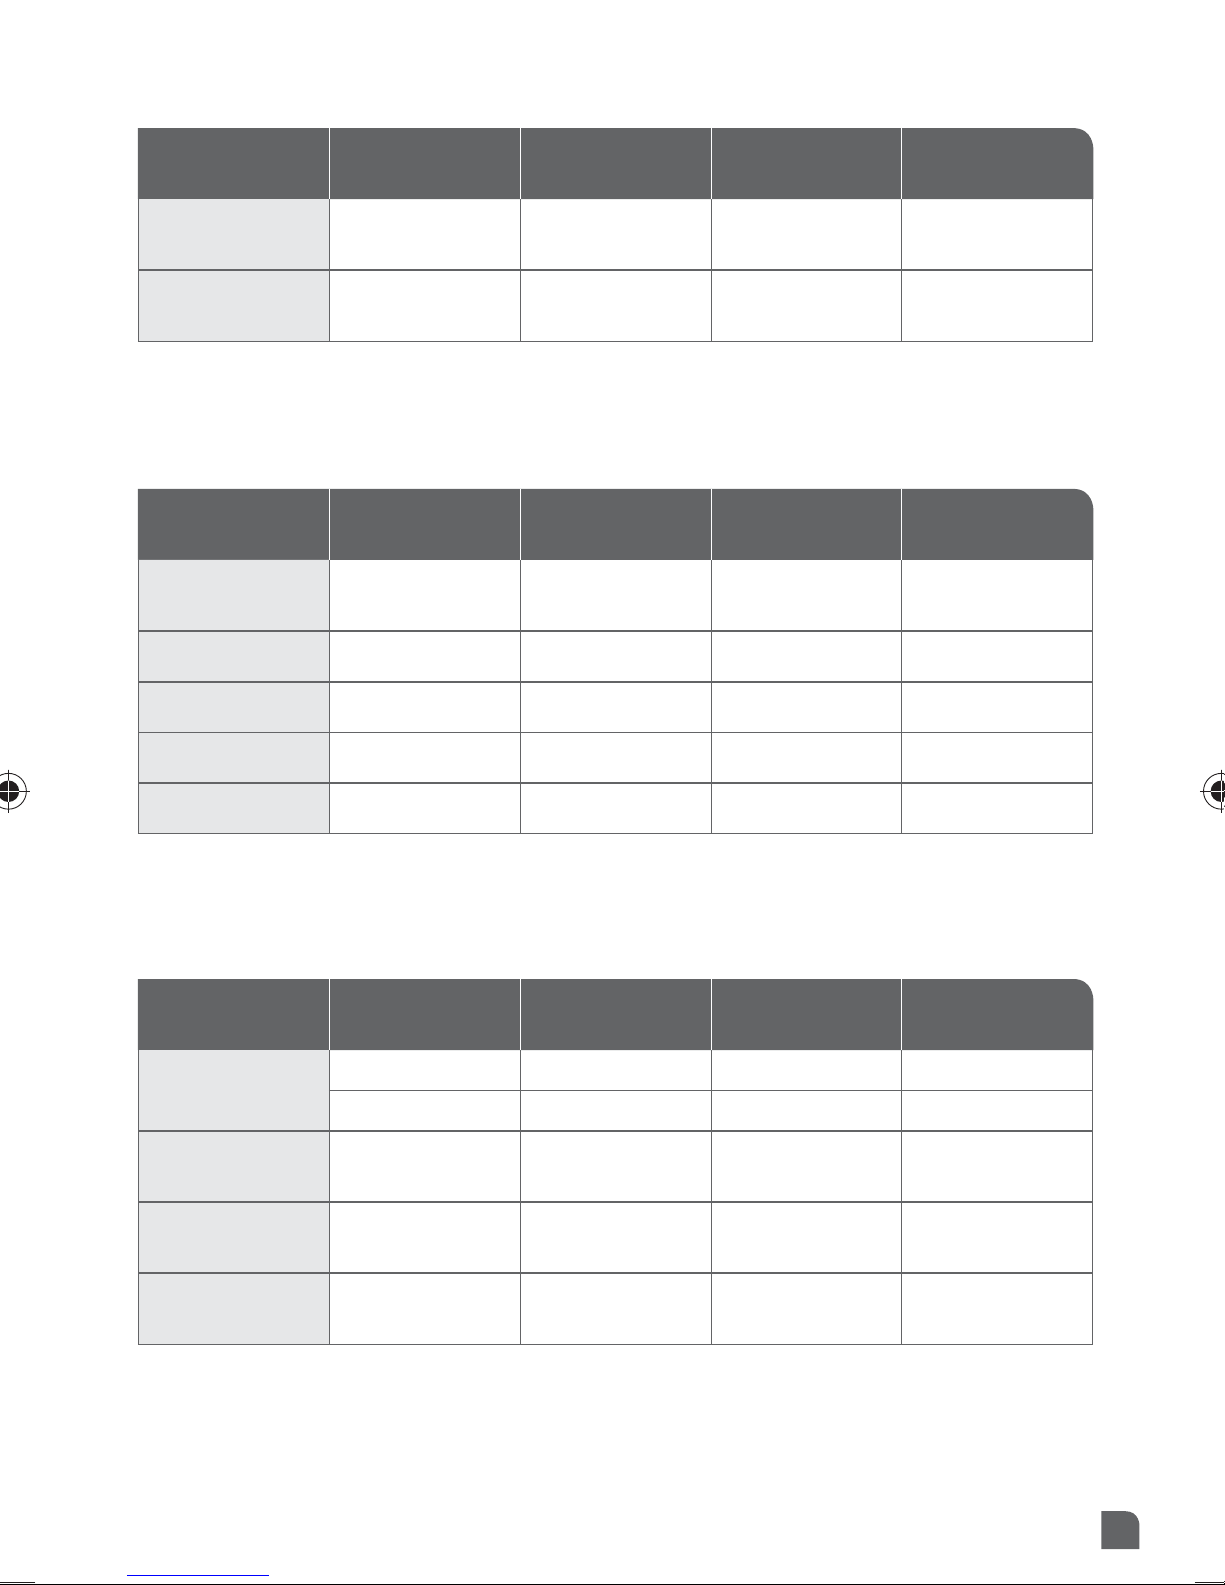
Fish - shellfi sh
Calmari
(battered)
Raw prawns
(thawed completely)
Type Quantity
Frozen 500 g none 11 - 13
Frozen 450 g none 8 - 10
Addition
(s. of oil)
Cooking time
Vegetables
Type Quantity
Courgettes
Zucchinis
Peppers Strips 1000 g 1 s. + 15 cl water 20 - 25
Mushrooms Quarters 1000 g 1 16 - 18
Strips 1200 g 1 s. + 15 cl water 25 - 30
Addition
(s. of oil)
Cooking time
(mins)
(mins)
Tomatoes Quarters 1000 g 1 s. + 15 cl water 15 - 17
Onions Slices 750 g 1 18 - 20
Desserts
Type Quantity
Slices 7 1 s. + 1 s. of sugar 5 - 6
Bananas
Foil wrapped 3 none 15 - 17
Strawberries Quarters 1500 g 2 s. of sugar 10 - 12
Apples Halves 5
Pineapples Pieces 2 2 s. of sugar 15 - 17
Addition
(s. of oil)
1 s. + 2 s.
of sugar
Cooking time
(mins)
10 - 12
7
Page 8

EASY TO CLEAN
Clean the appliance
• Leave it to cool completely before cleaning.
• Open the lid by pressing the button -
• Lift the detachable pan handle until you hear a «CLICK», in order to remove the pan - fi g.3.
• Remove the paddle by pushing the release button - fi g.4.
Never immerse the appliance in water. Do not use any corrosive or abrasive cleaning products.
The removable fi lter must be cleaned regularly. To ensure the qualities of your removable
pan last longer, never use any metal utensils.
We do not recommend the use of any detergent other than washing-up liquid.
• Remove the detachable fi lter - fi g.14.
• All the removable parts are dishwasher safe - fi g.6 or can be cleaned using a non abrasive sponge
and some washing up liquid.
• Clean the body of the appliance with a damp sponge and a little washing-up liquid. Dry carefully
before putting everything back in place.
fi g.1 and press the button to remove the lid - fi g.2.
• We guarantee that the detachable pan COMPLIES WITH REGULATIONS with regards to materials
in contact with food.
IN CASE OF PROBLEMS, CHECK THE ‘SECURITY GUIDELINES’ BOOKLET PROVIDED
WITH YOUR APPLIANCE.
8
Page 9

S.A.S. SEB SELONGEY CEDEX • RC. DIJON B 302 412 226
03/2015
Félix création • felix-creation.fr
 Loading...