

Page 1
Instructions for use
REF 5062264
ADHOC STUDIO
Page 2

Please follow the instructions for use and carefully follow the directions
for use.
This appliance produces boiling hot steam.
Safety instructions
This appliance complies with the safety
regulations and conditions in effect, and
with the following:
- Household appliance directive
89/336/CEE modified by directive
93/68/CEE
- Low Voltage Directive 72/23/CEE
modified by directive 93/68/CEE.
• Check that the power supply voltage
corresponds to that shown on the
appliance (alternating current).
• Given the diverse standards in effect, if
the appliance is used in a country other
than that in which it is purchased, have
it checked by an approved service
centre.
• Do not place the appliance near a heat
source or in a hot oven, as serious
damage could result.
• Use a flat and stable work surface, away
from any water splashes.
• Never leave the appliance in operation
unattended. Keep away from children.
• Do not leave the cord hanging.
• Always plug the appliance into an earthed socket.
• Do not unplug the appliance by pulling
on the cord.
• Do not use the appliance if:
- the appliance or the cord is damaged.
- the appliance has fallen or shows
visible damage or does not work properly.
In the event of the above, the appliance
must be sent to the closest approved
Service Centre.
• If the power supply cable is damaged, it
must be replaced by the manufacturer,
the after-sales service or a similarly qualified person in order to avoid any risk.
• Burns can occur by touching the hot
surface of the appliance, the hot water,
the steam or the food.
• Always unplug the appliance:
- immediately after use,
- when moving it,
- prior to any cleaning or maintenance.
• Never immerse the appliance in water !
• Do not place the appliance near a wall
or a closet - the steam produced by the
appliance can cause damage.
• Do not move the appliance when it is
full of liquids or hot foods.
• This appliance is designed for domestic
use only. In case of professional use,
inappropriate use or failure to comply
loith the instructions, the manufacturer
accepts no responsibility and the guarantee does not apply.
Page 3
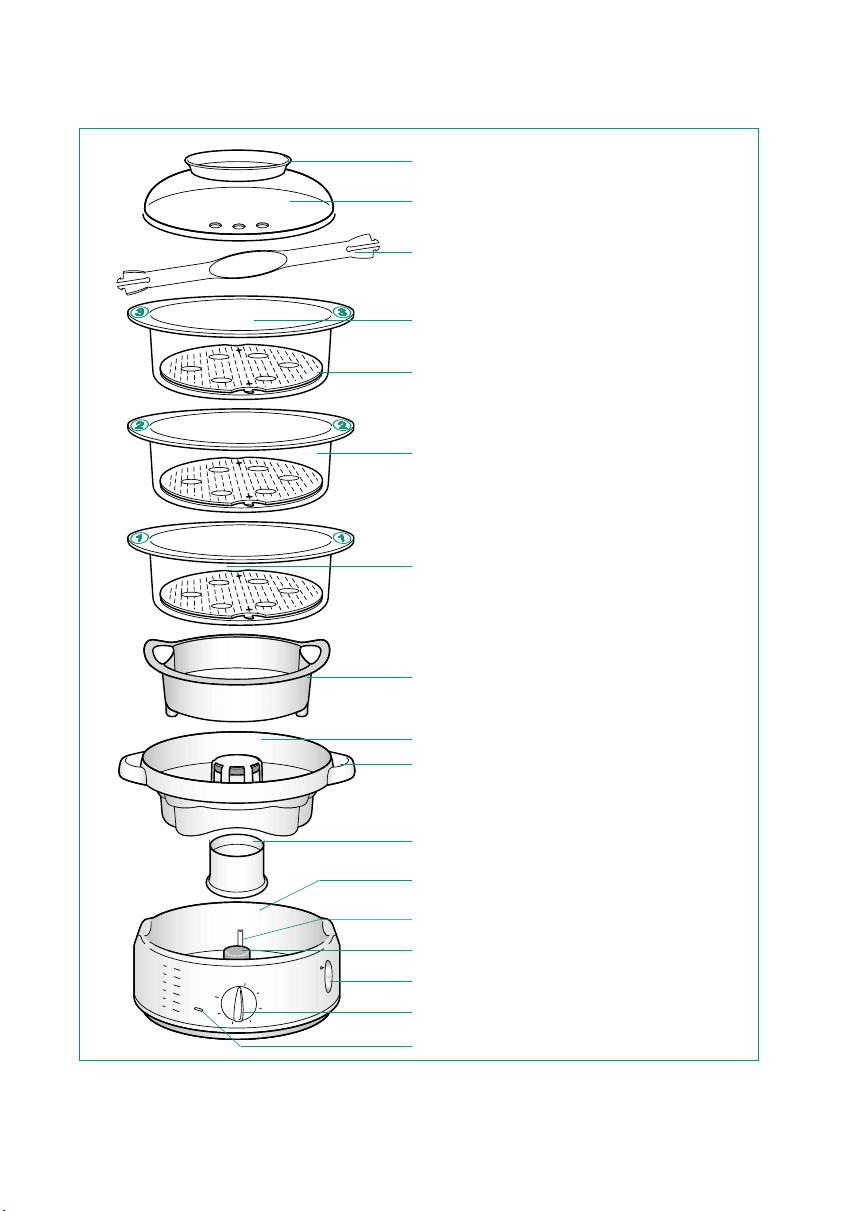
1. Lid handle
2. Lid (can be used upturned as
a table mat)
3. Clip-it handle
4. Steam basket n°3
(depending on the model)
5. Removable grid with hooks and
built-in egg holder
6. Steam basket n°2
7. Steam basket n°1
8. Rice basket
9. Juice collector with built-in egg holder
10. Water inlet
11. Removable turbo ring
12. Water tank (1L capacity and 1-hour
autonomy)
13. Inside maximum water level
14. Heating element
15. Exterior water level indicator
16. 60-minute timer
17. On/off light
Page 4

Preparation
10
Prior to use
• Using warm soapy water, wash all the
removable parts and the inside of the
water tank.
• Rinse and dry.
Preparing the steam
cooker
• Place the cooker on a stable surface.
• Place the turbo ring around the heating
element.
Filling the water tank
• There are two ways to fill the water tank:
1. Pour the water directly into the water
tank, up to the maximum level, and pour
the water into the turbo ring (fig. A).
2. Pour the water into the water tank
A
through the water inlets, up to the maximum level (fig B).
• Place the juice collector in the tank and
adjust it properly.
• Use fresh water with each use.
B
Do not
immerse the water
tank in water when
cleaning.
Keep away
from any objects
which could be
damaged by the
steam.
Do not use
seasoning or any
other liquid other than
water in the water
tank.
Make sure
there is water in the
tank prior to use.
Positioning the removable
grids
• The baskets have grids which can be
removed to obtain a larger cooking
Check that the
grid is always in
basket n°1, placed on
the juice collector.
space or to cook larger foods.
• To position the grids:
- Place the basket on the table.
- Hold the grid right side up (hooks
toward the bottom).
- Centre the grid inside the basket.
- Press on the hooks until the grid is locked into place.
• For baskets n°2 and n°3 (depending on
the model), make sure that the grid
hooks are properly inserted.
• To remove the grids, push up from
underneath.
Page 5

Wiring instructions UK only
Brown
or red
Fit 13 amp
fuse
Green
and
yellow
or green
Blue or
black
Use cable
gripper
E
N
L
WARNING:
This appliance must be earthed.
Important: the wires in this lead are coloured in accordance with
the following codes:
Green and Yellow: Earth
Blue: Neutral
Brown: Live
Connect the Green/Yellow wire to the terminal in the plug marked
“ E ” (or by the earth symbol) or coloured Green or coloured
Green and Yellow. Connect the Brown wire to the terminal in the
plug marked “ L ” or coloured Red. Connect the Blue wire to the
terminal in the plug marked “ N ” or coloured Black. A 13 amp
fuse should be fitted when the appliance is connected to a BS
1363 plug. Seek professional advice if you are unsure of the correct procedure for the above.
Voltage
This appliance is designed to run on 230 - 240 volts AC only.
Check that the mains supply corresponds to that shown on the
rating plate of the appliance. If the appliance is to be used in any
country other than that of purchase, it should be checked by an
approved Service Dealer. Standards can vary from country to
country.
About your factory fitted plug
(supplied with certain models only)
The lead is already fitted with a plug incorporating a 13 amp fuse.
If the plug does not fit your socket outlet, see next paragraph.
Should you need to replace the fuse in the plug supplied, a 13
amp approved BS 1362 fuse must be used.
The fuse cover is an important part of the plug. Please ensure that
it is always refitted. If you lose this cover please do not use the
plug. You may contact TEFAL for a replacement.
If the plug supplied does not fit your socket outlet, it should be
removed from the mains lead and disposed of safely. The flexible
cord insulation should be stripped back as appropriate and a suitable alternative plug fitted. The replacement plug must be equipped with a 13 amp fuse.
Important: If the electrical cord of this appliance is damaged, it
must only be replaced by an authorised Service Dealer. The safety of this appliance complies with the technical regulations and
standards in force.
Helpline:
For any problems or queries please telephone:
0845 602 1454 (UK - CALLS CHARGED AT LOCAL RATE)
(01) 47 51947 (IRELAND)
Page 6

Preparation
Your steam cooker comes with a clip-it
handle which makes it easy to remove the
cooked food from the basket without harming it (fish, asparagus tips, etc ...)
• Clip the tip of the clip-it handle on the
grid.
• Squeeze the tip of the handle to unclip it.
the “clip-it” handle with
a basket, do not clip the
grid into that basket,
simply lay the grid, in
order to remove it more
easily.
When you use
Positioning the baskets
• Place the food in the basket.
• Place the baskets on top of the juice col-
Only use the
“clip-it” handle on the
top basket.
lector.
• The baskets are numbered: 1, 2 and 3
(depending on the model).
- Always put basket n°1 on the juice collector.
Always place
the baskets in the
right order.
- Then place basket n°2.
- Then basket n°3 (depending on the
model).
• Put the lid on. (The lid fits on all the baskets).
For best
results, do not put too
much food in the bas-
To cook rice
60
50
40
30
20
10
• Place the rice basket in the steam basket.
• Put the rice and the water in the rice bas-
kets.
ket (see the table of cooking times).
60
50
40
30
20
10
To cook eggs
• Place the eggs in the built-in egg holders.
Page 7

!
!
!
Steam cooking
Choose the cooking time
• Plug the appliance in.
• Set the timer for the recommended
cooking times.
• When the red light is on, the steam
cooking has begun.
the timer, the
appliance must be
plugged in.
During cooking
• Check the water level during cooking by
looking at the exterior water level indicator.
• If necessary, add water through the
water inlets.
At the end of cooking
• The appliance switches off automatically.
• The timer rings.
• The on light goes off.
• To stop the appliance ahead of time, turn
the timer to the 0 position.
more water, the appliance switches off automatically.
Re-heating
• You can reheat food (see the table of
cooking times).
In order to set
If there is no
Removing the food from
the steam baskets
• Lift the lid by the handle.
• Remove the steam basket.
• Place the steam basket on a plate or on
the upturned lid.
Afterwards
• Unplug the appliance.
• Let it cool completely before putting it
away.
Use oven
gloves to handle the
baskets and the lid.
Check that the
juice collector has
cooled sufficiently
before removing it.
Page 8

Table of cooking times
Fish - Shellfish
Food Type Amount Cooking Time
Fillet of fish Frozen 250 g 10 -12 min.
Fresh 250 g 6-8 min.
Steak Tuna 250/400 g 10-12 min.
Salmon 250/400 g 12-14 min.
Meat - Poultry
Food Type Amount Cooking Time
Chicken Fillets 250 g 12-15 min.
450 g 30-35 min.
Sausages Knackwurst 400 g 10 min.
(Prick them prior to cooking) sausage
Frankfort 400 g 15 min.
sausage
Vegetables
Food Type Amount Cooking Time
Artichokes Fresh 3 average 45-50 min.
(cut the stem off) sized artichokes
Asparagus (leave space between Fresh 400 g 13-15 min.
the asparagus so the steam Frozen 400 g 16-18 min.
can circulate)
Broccoli Fresh 400 g 16-18 min.
Frozen 400 g 15-18 min.
Cabbage (in quarters) Fresh 400 g 40-45 min.
Carrots (sliced thin) Fresh 400 g 20-22 min.
Mushrooms Fresh 200 g 12-15 min.
Courgettes (Zucchini) Fresh 400 g 16-18 min.
Spinach Fresh 250 g 8-10 min.
Frozen 400 g 18-20 min.
Green beans (thin) Fresh 400 g 35-40 min.
(leave space between the green Frozen 400 g 25-28 min.
beans so the steam circulates)
Peas Fresh 400 g 10-12 min.
Frozen 400 g 15-18 min.
Potatoes Fresh 10-12 small 20-22 min.
(for shorter cooking time,
slice the potatoes)
Rice - Grains - Pasta
Food Rice Amount Water Amount Cooking Time
White rice 200 g/2 pers. 300 ml 25 min.
300 g/2 pers. 450 ml 35 min.
Brown rice 200 g/2 pers. 300 ml 35 min.
Couscous grain 150 g/2 pers. 300 ml 5-10 min.
(medium grain)
Pasta (spaghetti) 120 g/2 pers. 500 ml 18-20 min.
Other Foods
Food Type Amount Cooking Time
Eggs Hard-boiled 6 18 min.
Soft-boiled 6 10 min.
Apples/Pears Fresh 4 average 15-18 min.
Re-heating
Food Type Amount Cooking Time
Meat Pieces 10-20 min.
Pasta 10-20 min.
Vegetables 5-15 min.
Cooking times
are indicative and may
vary depending on the
size of the food, the
space between the
food, the amount of
food, and individual preferences.
For foods with
different cooking times:
place the larger items or
the items which require
longer cooking times in
basket n°1. As these
cook, add basket n°2
filled with the more
rapidly cooked items.
Use oven
gloves when handling
the baskets during the
cooking time.
The longest
cooking time (indicated
in the recipe tables) corresponds to food
cooked in basket n°3.
Page 9

Cleaning and maintenance
Cleaning the appliance
• Empty the water tank and clean it with a
dampcloth.
• All the other removable parts can be put
in the dishwasher.
• Clean the turbo ring regularly.
abrasive cleaning
products.
immerse the water
tank in water.
Removing scale build-up
from the appliance
• Fill the tank with 1/3 white vinegar and
2/3 water to the maximum filling level.
• Operate the appliance for 30 minutes
without the baskets and lid.
• Rinse out the inside of the water tank
with warm water several times.
the appliance every
8 uses.
other scale-removing
products.
Storing the baskets
• The baskets can be stacked.
• Place basket n°3 (depending on the
model) on the juice collector, then stack
basket n°2, then basket n°1, then the lid.
Do not use
Do not
Descale from
Do not use
 Loading...