

Page 1
max
2/3
1/2
1/3
FR p. 1
EN p. 12
FR
NL p. 26
DE p. 38
IT p. 50
SV p. 62
FI p. 74
DA p. 86
NO p. 98
ES p. 110
PT p. 122
EL p. 134
SECURE 5 NEO
EN
NL
DE
IT
SV
FI
DA
NO
ES
PT
EL
Guide de l'utilisateur - User's Guide
Handleiding - Bedienungsanleitung
Manuale d’uso - Bruksanvisning - Käyttöohje
Brugsanvisning - Brukerveiledning
Guía del usuario - Guia do Usuário
www.tefal.com
TEFAL S.A.S. - 21260 Selongey
FRANCE
November 2015 - Ref. : NE2INSA4 - Realization : Espace Graphique
Οδηγίες χρήσης.
www.tefal.com
*Panier non inclus dans certains modèles - *Basket not included with certain models - *Mandje en drievoet niet inbegrepen bij bepaalde modellen
*Bei einigen Modellen ist der Einsatz nicht enthalten - *Cestello non incluso in certi modelli - *Korgen ingår inte i vissa modeller - *Höyrytyskori
ei kuulu kaikkiin malleihin - *Dampindsatsen medfølger ikke til visse modeller - *Visse modeller har ikke dampkurv - *Cestillo no incluido en algunos modelos - *Cesto não incluído em alguns modelos - *Σε ορισμένα μοντέλα δεν περιλαμβάνεται το καλάθι.
Page 2
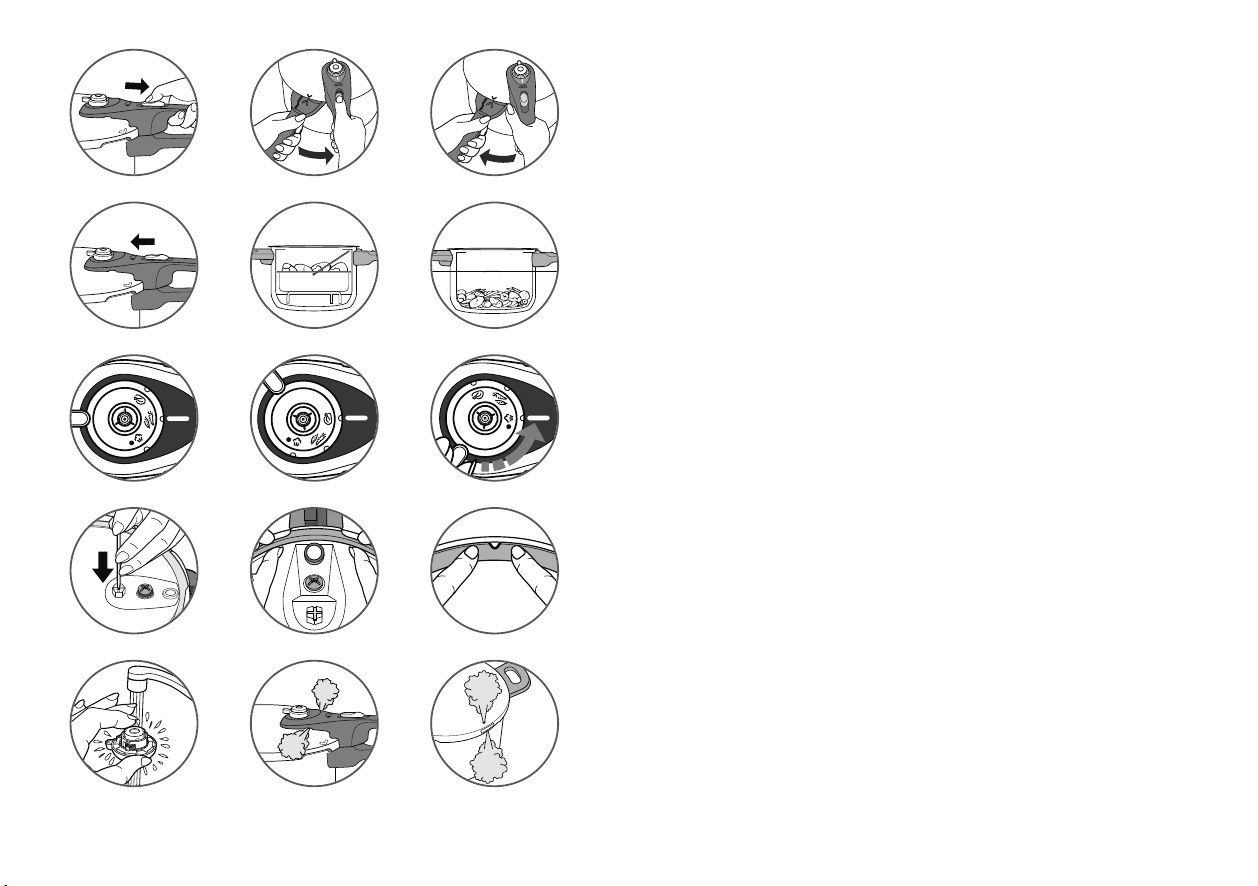
fig. 1 fig. 2 fig. 3
CLICK
max
2/3
fig. 4 fig. 5*
fig. 7 fig. 8 fig. 9
fig. 10
fig. 13
*Panier non inclus dans certains modèles - *Basket not included with certain models - *Mandje en drievoet niet inbegrepen bij bepaalde modellen
*Bei einigen Modellen ist der Einsatz nicht enthalten - *Cestello non incluso in certi modelli - *Korgen ingår inte i vissa modeller - *Höyrytyskori
ei kuulu kaikkiin malleihin - *Dampindsatsen medfølger ikke til visse modeller - *Visse modeller har ikke dampkurv - *Cestillo no incluido en algunos modelos - *Cesto não incluído em alguns modelos - *Σε ορισμένα μοντέλα δεν περιλαμβάνεται το καλάθι.
fig. 11 fig. 12
fig. 14 fig. 15
fig. 6
PRÉCAUTIONS IMPORTANTES
Pour votre sécurité, cet appareil est conforme aux normes et réglementations applicables :
- Directive des Équipements sous Pression
- Matériaux en contact avec les aliments
- Environnement
• Cet appareil a été conçu pour un usage domestique.
• Prenez le temps de lire toutes les instructions et reportez-vous toujours au “Guide de l’utilisateur”.
• Comme pour tout appareil de cuisson, assurez une étroite surveillance surtout si vous utilisez
l’autocuiseur à proximité d’enfants.
• Ne mettez pas votre autocuiseur dans un four chaud.
• Déplacez votre autocuiseur sous pression avec un maximum de précautions. Ne touchez pas les
surfaces chaudes. Utilisez les poignées et boutons. Utilisez des gants, si nécessaire.
• Vérifiez régulièrement que les poignées de la cuve sont correctement fixées. Revissez-les si besoin.
• N’utilisez pas votre autocuiseur dans un autre but que celui auquel il est destiné.
• Votre autocuiseur cuit sous pression. Des blessures par ébouillantage peuvent résulter d’une utilisation
inadéquate. Assurez-vous que l’autocuiseur est convenablement fermé avant de le mettre en service.
Voir paragraphe “Fermeture”.
• N’ouvrez jamais l’autocuiseur en force. Assurez-vous que la pression intérieure est retombée. Voir
paragraphe “Sécurité”.
• N’utilisez jamais votre autocuiseur sans liquide, cela le détériorerait gravement. Assurez-vous qu’il y
a toujours suffisamment de liquide pendant la cuisson.
• Utilisez la(les) source(s) de chaleur compatible(s), conformément aux instructions d’utilisation.
• Ne réalisez jamais de recette à base de lait dans votre autocuiseur.
• N’utilisez pas de gros sel dans votre autocuiseur, ajoutez du sel fin en fin de cuisson.
• Ne remplissez pas votre autocuiseur au-delà des 2/3 (repère maximum de remplissage).
• Pour les aliments qui se dilatent pendant la cuisson, comme le riz, les légumes déshydratés, ou les
compotes, ... ne remplissez pas votre autocuiseur au-delà de la moitié de sa capacité. Pour certaines
soupes à base de potirons, courgettes…, laissez refroidir votre autocuiseur quelques minutes, puis
effectuez un refroidissement sous eau froide. Dans le cas des modèles 3 et 4L, pour les aliments
pâteux ou qui se dilatent pendant la cuisson, ne remplissez pas votre produit au-delà de 1/3. En fin
de cuisson, attendez 5 minutes avant de décompresser sous l'eau.
• Après cuisson de viandes qui comportent une peau superficielle (ex. langue de bœuf…), qui risque
de gonfler sous l’effet de la pression, ne piquez pas la viande tant que la peau présente un aspect
gonflé ; vous risqueriez d’être ébouillanté. Veillez à piquer la viande avant cuisson.
• Dans le cas d’aliments pâteux (pois cassés, rhubarbe…), l’autocuiseur doit être légèrement secoué
avant ouverture pour que ces aliments ne giclent pas à l’extérieur.
• Vérifiez que les soupapes ne sont pas obstruées avant chaque utilisation. Voir paragraphe “Avant la
cuisson”.
• N’utilisez pas votre autocuiseur pour frire sous pression avec de l’huile.
• N’intervenez pas sur les systèmes de sécurité au-delà des consignes de nettoyage et d’entretien.
• N’utilisez que des pièces d’origine TEFAL correspondant à votre modèle. En particulier, utilisez une
cuve et un couvercle TEFAL.
• Les vapeurs d’alcool sont inflammables. Portez à ébullition environ 2 minutes avant de mettre le
couvercle. Surveillez votre appareil dans le cadre des recettes à base d’alcool.
• N’utilisez pas votre autocuiseur pour stocker des aliments acides ou salés avant et après cuisson au
risque de dégrader votre cuve.
• Si vous constatez qu'une partie de votre cocotte est cassée ou fissurée, n'essayez en aucun cas de
l'ouvrir si elle est fermée, attendez qu'elle refroidisse complètement avant de la déplacer, ne l'utilisez
plus et rapportez la à un Centre de Service Agréé TEFAL pour réparation.
CONSERVEZ CES INSTRUCTIONS
Page 3
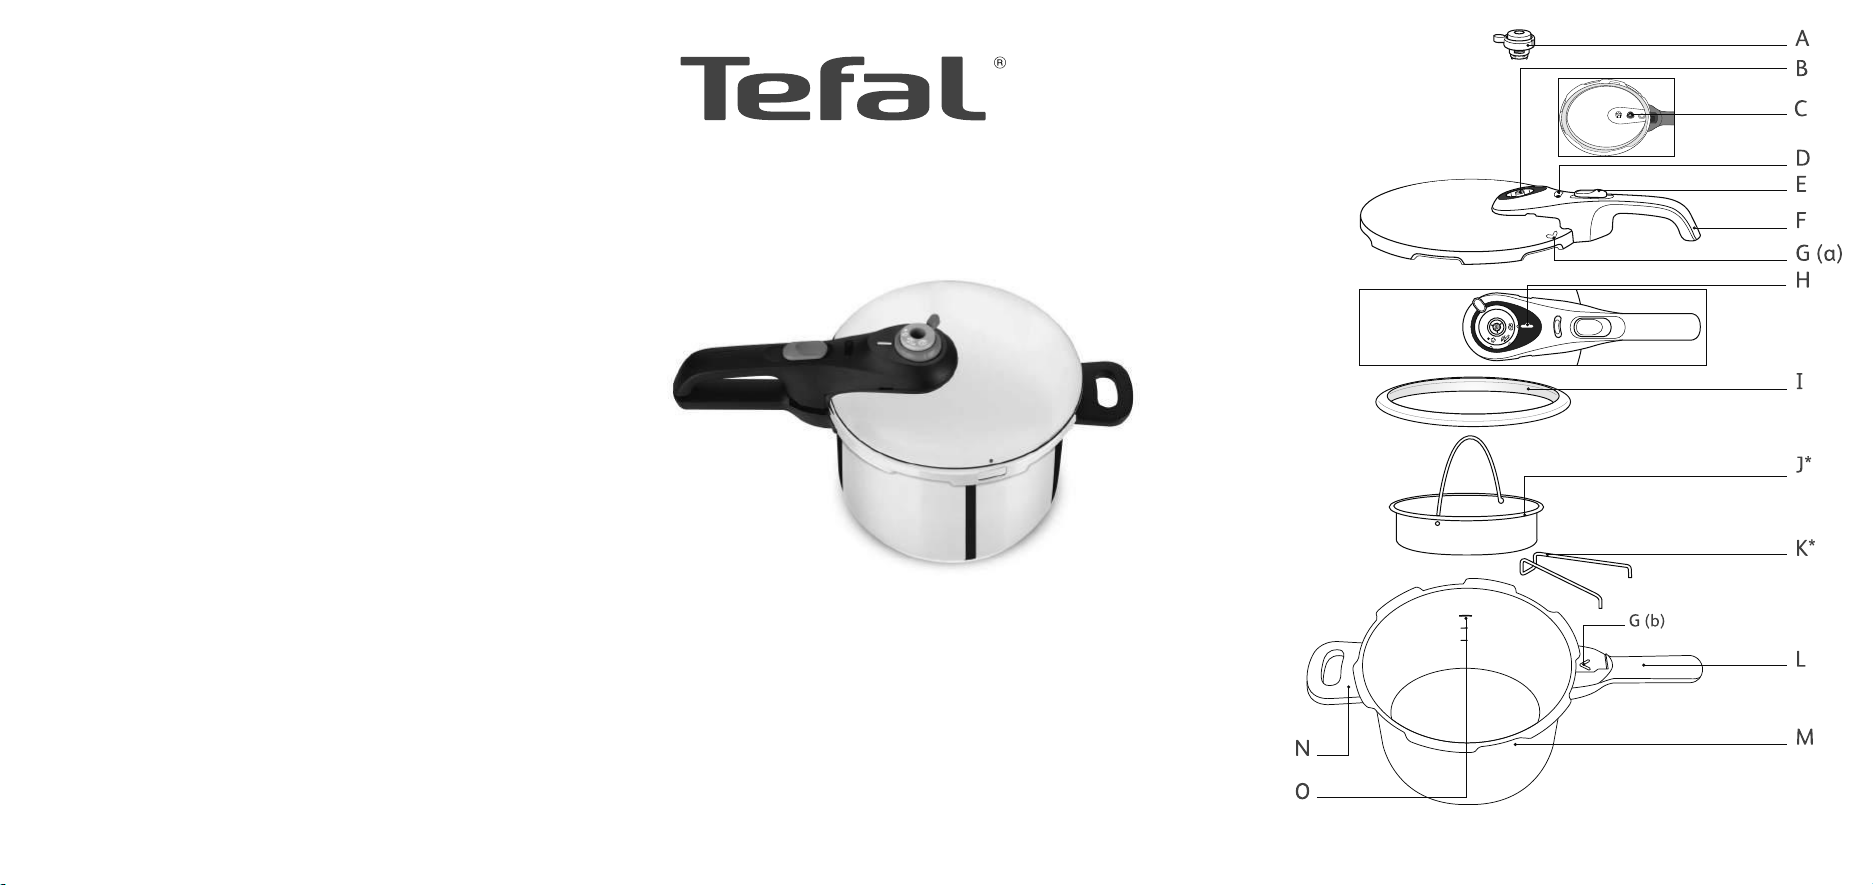
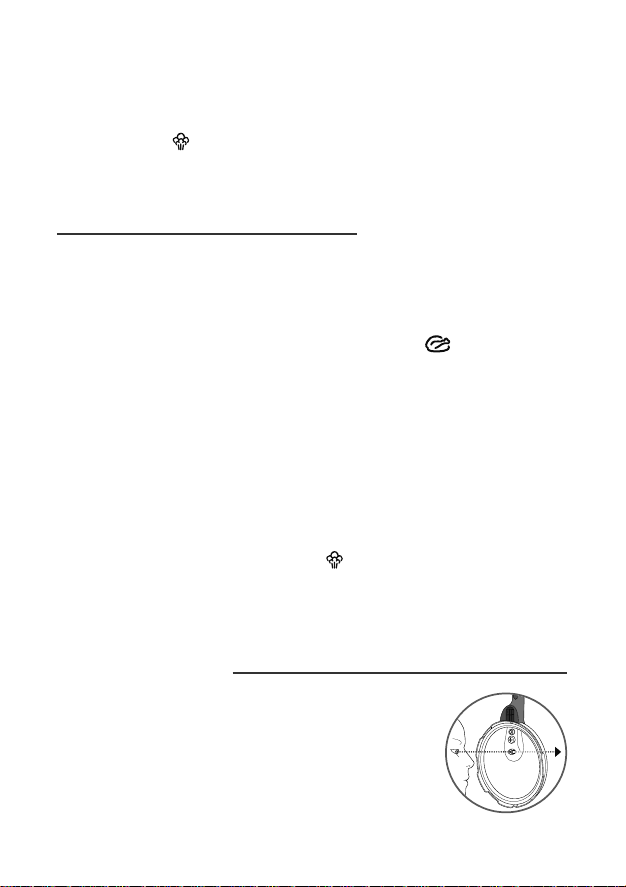
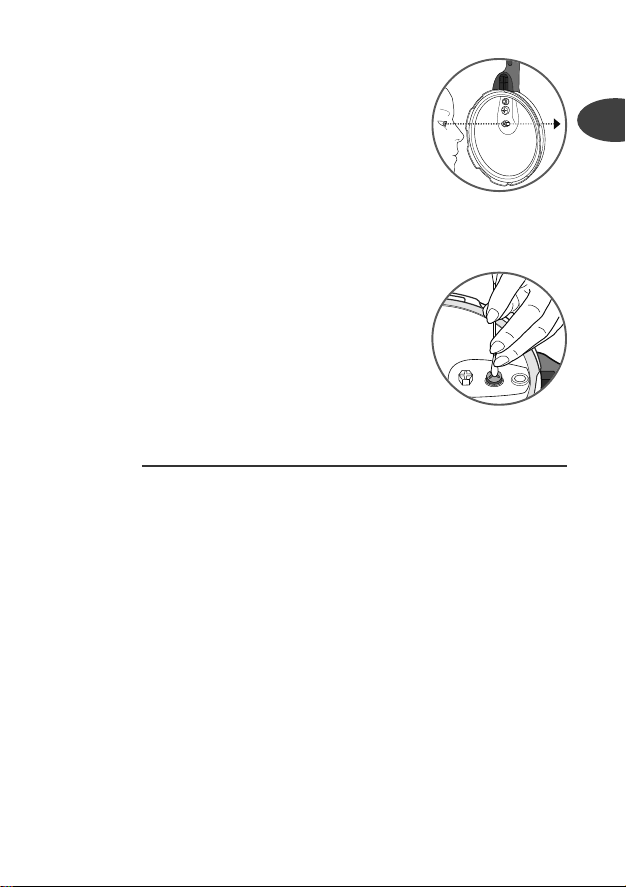
Schéma descriptif
A. Soupape de fonctionnement
B. Conduit d'évacuation de vapeur
C. Soupape de sécurité
D. Indicateur de présence de pression
E. Bouton d’ouverture
F. Poignée longue de couvercle
G(a). Repère de positionnement
du couvercle
G(b). Repère de positionnement du
couvercle par rapport à la cuve
H. Repère de positionnement de la
soupape de fonctionnement
I. Joint de couvercle
J. Panier vapeur*
K. Trépied*
L. Poignée longue de cuve
M. Cuve
N.Poignée courte de cuve
O. Repère maximum de remplissage
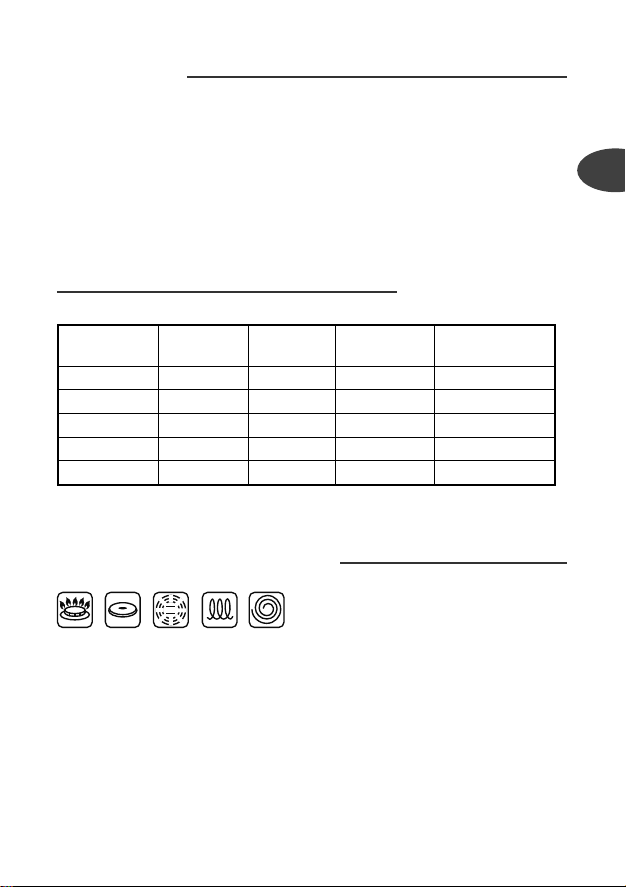
Caractéristiques
Diamètre du fond de l’autocuiseur - références
Capacité Ø Cuve Ø Fond
Modèle
INOX
Pression maximum
4 L 22 cm 15 cm P25342 170 kPa
6 L 22 cm 15 cm P25307 170 kPa
Set 4L + 6L 22 cm 15 cm P25443 170 kPa
7 L 22 cm 15 cm P25308 170 kPa
8 L 22 cm 15 cm P25344 170 kPa
Informations normatives :
Pression supérieure de fonctionnement : 80 kPa
Sources de chaleur compatibles
GAZ ELECTRIQUE HALOGÈNE INDUCTION RADIANT
FR
de sécurité
• Cet autocuiseur convient à toutes les sources de chaleur.
• Sur une cuisinière électrique ou à induction, assurez-vous que la taille
de la plaque chauffante ne dépasse pas celle de la base de
l’autocuiseur.
• Sur une cuisinière céramique ou halogène, assurez-vous que la base de
l’autocuiseur est toujours propre et sèche.
• Sur une cuisinière au gaz, la flamme ne doit pas dépasser le diamètre
de la base de l’autocuiseur.
• Sur tous les foyers, veillez à ce que votre autocuiseur soit bien centré.
*Panier non inclus dans certains modèles
1
Page 4

Accessoires TEFAL
• Les accessoires suivants sont disponibles pour l'autocuiseur :
Accessoire Numéro de référence
Joint de couvercle X9010101
Panier vapeur* 792185
Trépied* 792691
• Pour le changement d’autres pièces ou pour les réparations, faites appel
aux Centres de Service Agréés TEFAL (merci de vous référer à : www.tefal.com).
• N’utilisez que des pièces d’origine TEFAL correspondant à votre modèle.
Utilisation
Ouverture
• À l’aide du pouce tirez sur le bouton d’ouverture (E) et maintenez-le reculé
- fig. 1.
• Une main tenant la poignée longue de cuve (L), tournez avec l’autre main
la poignée longue de couvercle (F) dans le sens inverse des aiguilles d’une
montre, jusqu’à ouverture - fig. 2 .
• Puis soulevez le couvercle.
Fermeture
Hors fonctionnement,
produit fermé, le fait
que le couvercle
bouge par rapport à la
cuve est normal. Cet
effet disparaît dès que
le produit est en pression.
Remplissage minimum
• Mettez toujours une quantité minimale de liquide
égale à 25 cl/ 250 ml (2 verres).
Pour une cuisson vapeur* :
• Le remplissage doit être au moins égal à 75 cl/ 750 ml
(6 verres).
• Posez votre panier* (J) sur le support* (K) prévu à
cet effet - fig. 5.
• Posez le couvercle bien à plat sur la cuve en
alignant les repères de positionnement du
couvercle G(a) et G(b).
• Tournez le couvercle dans le sens des aiguilles
d'une montre jusqu’à la butée - fig. 3 jusqu’à
entendre le bruit d’enclenchement du bouton
fig. 4.
Si vous ne réussissez pas à tourner le couvercle,
vérifiez que le bouton d'ouverture (E) est bien reculé.
Les aliments placés
dans le panier
vapeur* ne doivent
pas toucher le
couvercle de
l’autocuiseur.
2
*Panier non inclus dans certains modèles
Page 5
Remplissage maximum
• Ne remplissez jamais votre autocuiseur au-delà des 2/3 de la hauteur de la
cuve (repère maximum de remplissage) (O) - fig. 6.
Pour certains aliments :
• Pour les aliments qui se dilatent pendant la cuisson, comme le riz, les légumes
déshydratés ou les compotes,... ne remplissez pas votre autocuiseur au-delà
de la moitié de sa capacité.
• Dans le cadre des soupes, nous vous conseillons d'effectuer une
décompression rapide (voir paragraphe "Décompression rapide").
Utilisation de la soupape de
fonctionnement (A)
Pour mettre en place la soupape de fonctionnement
(A) :
Attention, ces opérations ne doivent s'effectuer que
lorsque le produit est froid et n'est pas en
fonctionnement.
• Posez la soupape de fonctionnement (A) en
alignant le pictogramme •de la soupape avec le
repère de positionnement (H).
• Appuyez sur la soupape puis tournez-la jusqu’au
pictogramme ou .
Pour enlever la soupape de fonctionnement :
Attention, ces opérations ne doivent s'effectuer que
lorsque le produit est froid et n'est pas en
fonctionnement.
• Appuyer sur la soupape et tournez-la pour aligner
le pictogramme
positionnement (H) comme sur le dessin ci-contre.
• Retirez la soupape comme sur le dessin ci-contre.
Pour faire cuire des légumes ou des aliments fragiles :
• Positionnez le pictogramme de la soupape face
au repère de positionnement (H) - fig. 7.
Pour faire cuire de la viande ou des aliments surgelés :
• Positionnez le pictogramme de la soupape face
au repère de positionnement (H) - fig. 8.
avec le repère de
•
FR
H
*Panier non inclus dans certains modèles
3
Page 6
Pour laisser s’échapper la vapeur :
• Tournez progressivement la soupape (A) en
choisissant à votre convenance la vitesse de
décompression pour terminer face au repère du
pictogramme - fig. 9, ou placez votre autocuiseur
sous un robinet d’eau froide (paragraphe
«Décompression rapide»).
Première utilisation
La présence de
vapeur au niveau de
l'indicateur de
présence de
pression (D) est
normale au début
du fonctionnement
du produit.
• Posez le support du panier (K) au fond de la cuve
et déposez le panier (J) dessus*.
• Remplissez d’eau jusqu’aux 2/3 de la cuve (repère
maximum de remplissage (O)).
• Fermez l’autocuiseur.
• Positionnez le pictogramme face au repère de
positionnement (H)- fig. 8.
• Posez l’autocuiseur sur une source de chaleur, puis
réglez-la à sa puissance maximum.
• Lorsque la vapeur commence à s’échapper par la
soupape, réduisez la source de chaleur et
décomptez 20 min.
• Lorsque les 20 min. sont écoulées, éteignez votre
source de chaleur.
• Tournez progressivement la soupape (A) en
choisissant à votre convenance la vitesse de
décompression pour terminer en butée face au
pictogramme - fig. 9.
• Lorsque l’indicateur de présence de pression (D)
redescend, votre autocuiseur n’est plus sous pression.
• Ouvrez l’autocuiseur - fig. 1 - 2.
• Rincez l’autocuiseur à l’eau et séchez-le.
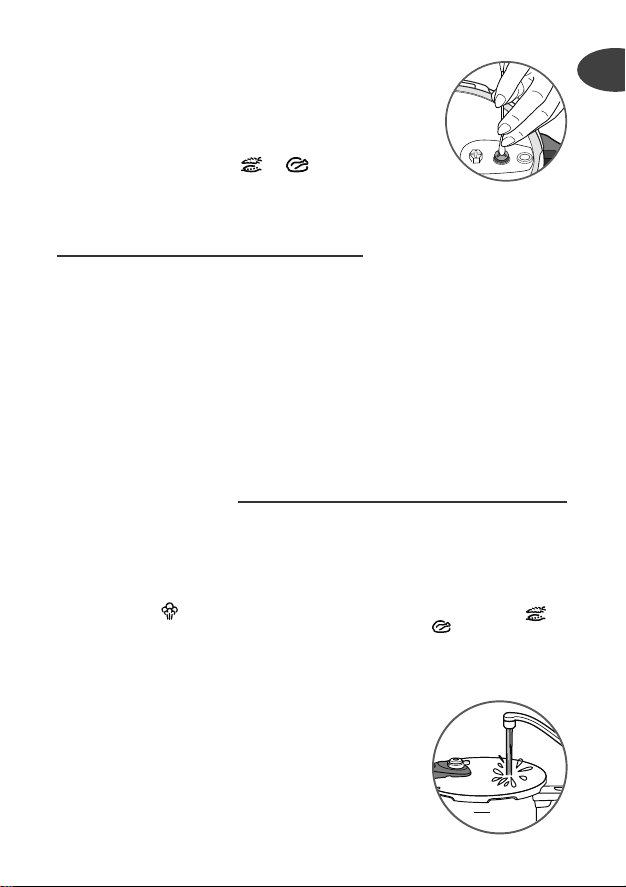
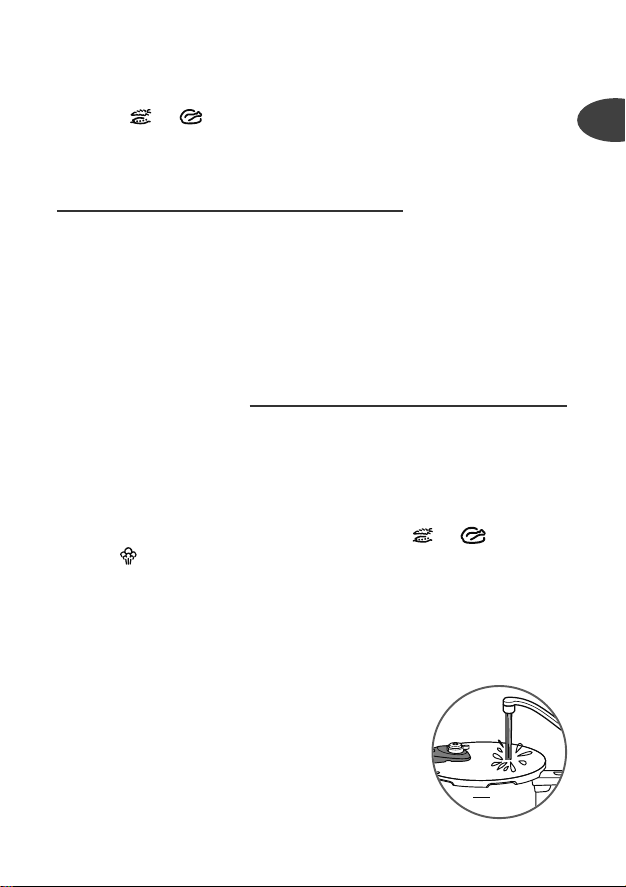
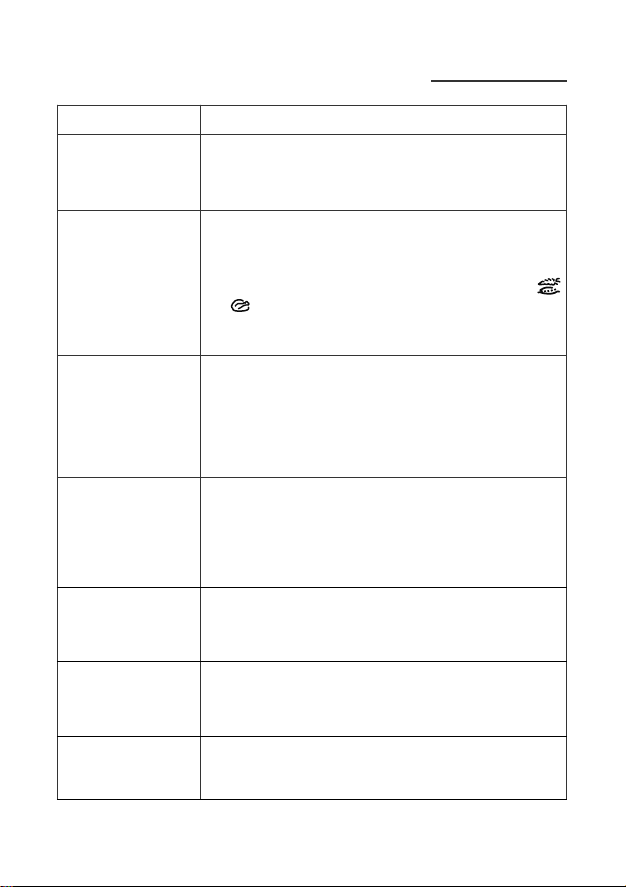
Avant la cuisson
•
Avant chaque utilisation retirez la soupape (A) (voir
paragraphe “Utilisation de la soupape de fonctionnement”)
et vérifiez à l’œil et au jour que le conduit d'évacuation de
vapeur (B) n’est pas obstrué (voir dessin ci contre). Si besoin,
nettoyez-le avec un cure-dent - fig. 10.
4
*Panier non inclus dans certains modèles
Page 7
• Vérifiez que la bille de la soupape de sécurité (C) est
mobile, dessin ci-contre et voir paragraphe “Nettoyage
et entretien”.
• Ajoutez vos ingrédients et le liquide.
• Fermez l’autocuiseur - fig. 3 et assurez-vous qu'il est
correctement fermé - fig. 4.
• Positionnez le pictogramme ou de la soupape face
au repère de positionnement H
• Posez l'autocuiseur sur une source de chaleur, puis
réglez-la à sa puissance maximum.
-
fig. 7 ou 8.
Pendant la cuisson
L'indicateur de
présence de
pression (D)
empêche
l'autocuiseur de
monter en pression
si ce dernier n'est
pas correctement
fermé.
• La présence de vapeur au niveau de l'indicateur de
présence de pression (D) est normale au début du
fonctionnement du produit.
• Lorsque la soupape de fonctionnement (A) laisse
échapper de la vapeur de façon continue, en
émettant un son régulier (PSCHHHT), réduisez la
source de chaleur de manière à ce que la soupape
(A) continue à chuchoter régulièrement.
• Décomptez le temps de cuisson indiqué dans la
recette.
• Dès que le temps de cuisson est écoulé, éteignez la
source de chaleur.
Fin de cuisson
Pour libérer la vapeur :
- Décompression lente :
• Tournez progressivement la soupape (A) en
choisissant à votre convenance la vitesse de
décompression pour terminer face au repère du
pictogramme - fig. 9. Lorsque l’indicateur de
présence de pression (D) redescend, votre
autocuiseur n’est plus sous pression.
L'indicateur de présence de pression (D) empêche
l'ouverture de l'autocuiseur s'il est encore sous
pression.
- Décompression rapide :
• Vous pouvez placer votre autocuiseur sous un
robinet d'eau froide pour accélérer la
décompression, voir schéma ci-contre. Lorsque
l'indicateur de présence de pression (D) redescend,
votre autocuiseur n'est plus sous pression.
• Vous pouvez ouvrir votre autocuiseur - fig. 1 et 2.
Si lors de la libération
de la vapeur vous
observez des projections anormales,
remettez la soupape
de fonctionnement
(A) sur le repère
ou
- fig. 7 ou
8 -
puis redécompressez
lentement en vous assurant qu’il n’y a plus
de projections.
FR
5
Page 8

- Cas particulier :
• Dans les cas de cuisson d'aliments émulsifs (cf.
tableau de cuisson) ou de légumes secs, ne
décompressez pas et attendez la descente de
l'indicateur de présence de pression (D) pour
ouvrir. Prévoyez de réduire un peu les temps de
cuisson préconisés.
Nettoyage et entretien
Nettoyage de l’autocuiseur
Pour le bon fonctionnement de votre appareil,
veillez à respecter ces recommandations de
nettoyage et d’entretien après chaque utilisation.
• Lavez l’autocuiseur (cuve et couvercle) après
chaque utilisation avec de l’eau tiède additionnée
de produit vaisselle. Procédez de même pour le
panier*.
• N’utilisez pas d’eau de javel ou de produits chlorés.
• Ne surchauffez pas votre cuve lorsqu’elle est vide.
Pour nettoyer l’intérieur de la cuve :
• Lavez avec une éponge et du produit vaisselle.
• L’apparition de taches sur le fond intérieur de la cuve
n’altère en rien la qualité du métal. Il s’agit de dépôt
calcaire. Pour les faire disparaître, vous pouvez
utiliser une éponge avec un peu de vinaigre blanc.
Pour nettoyer l’extérieur de la cuve :
• Lavez avec une éponge et du produit vaisselle.
Pour nettoyer le couvercle :
• Lavez le couvercle sous un filet d’eau tiède avec
une éponge et du produit vaisselle et rincez-le
bien.
Pour nettoyer le joint du couvercle :
• Après chaque cuisson, nettoyez le joint (I) et son
logement.
• Pour la remise en place du joint, reportez-vous
- fig. 11 - 12.
Déplacez votre autocuiseur sous pression
avec un maximum de
précautions sans le
secouer.
Lavez votre
autocuiseur après
chaque utilisation.
Le brunissement et
les rayures qui
peuvent apparaître
à la suite d’une
longue utilisation
ne présentent pas
d’inconvénients.
Seuls la cuve et le
panier passent au
lave-vaisselle.
Pour conserver plus
longtemps les
qualités de votre
autocuiseur, ne
surchauffez pas
votre cuve
lorsqu’elle est vide.
Il est impératif de
faire vérifier votre
autocuiseur dans
un Centre de
Service Agréé
TEFAL après 10 ans
d’utilisation.
6
*Panier non inclus dans certains modèles
Page 9
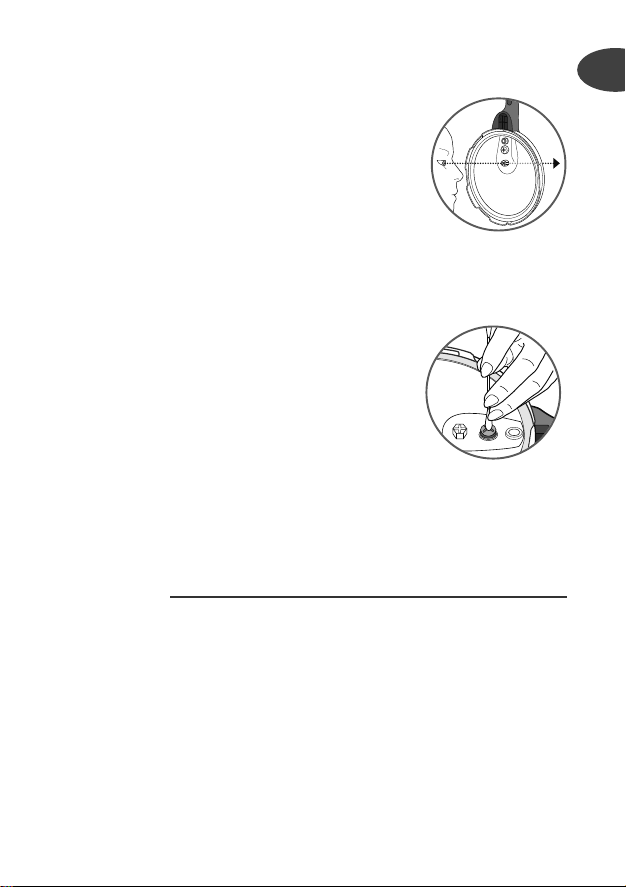
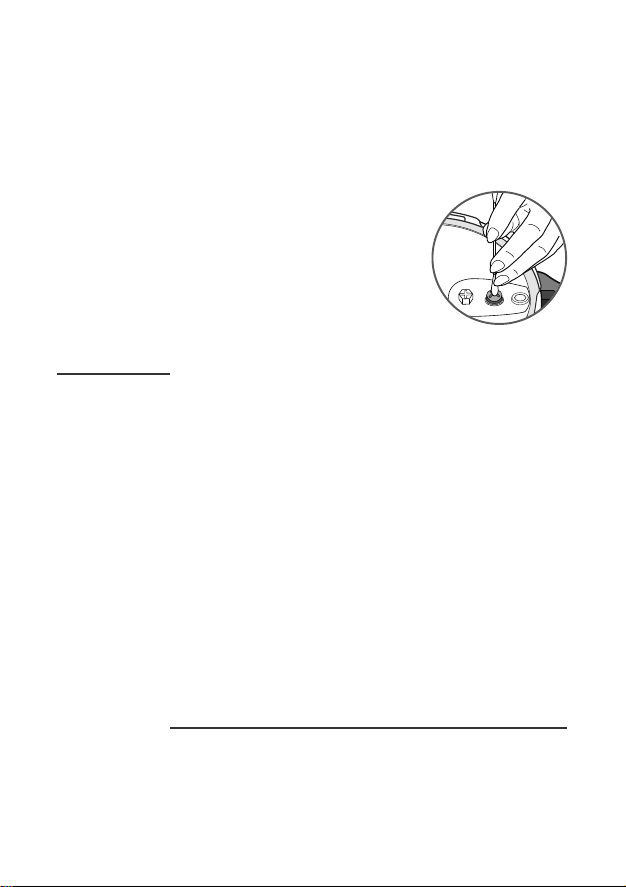
Pour nettoyer la soupape de fonctionnement (A) :
• Retirez la soupape de fonctionnement (A), voir
paragraphe “Utilisation de la soupape de
fonctionnement”.
• Nettoyez la soupape de fonctionnement (A) sous
le jet d’eau du robinet - fig. 13.
Pour nettoyer le conduit d'évacuation de vapeur (B) :
• Enlevez la soupape (A).
• Contrôlez à l’œil et au jour que le conduit
d’évacuation de vapeur est débouché et rond. Voir
dessin ci-contre. Si besoin, nettoyez-le avec un
cure-dent - fig. 10.
Pour nettoyer la soupape de sécurité (C) :
• Nettoyez la partie de la soupape de sécurité située
à l’intérieur du couvercle en passant celui-ci sous
l’eau.
• Vérifiez son bon fonctionnement en appuyant
légèrement sur la bille qui doit s’enfoncer sans
difficulté. Voir dessin ci-contre.
Pour changer le joint de votre autocuiseur :
• Changez le joint de votre autocuiseur tous les ans
ou si celui-ci présente une coupure.
• Prenez toujours un joint d’origine TEFAL
correspondant à votre modèle.
Pour ranger votre autocuiseur :
• Retournez le couvercle sur la cuve.
N’utilisez jamais
d’objet tranchant
ou pointu pour effectuer cette opération.
Sécurité
Votre autocuiseur est équipé de plusieurs dispositifs de sécurité :
• Sécurité à la fermeture :
- Si le produit n’est pas correctement fermé l’indicateur de présence de
pression (D) ne peut pas monter et de ce fait l’autocuiseur ne peut pas
monter en pression.
• Sécurité à l’ouverture :
- Si l’autocuiseur est sous pression, le bouton d’ouverture (E) ne peut être
actionné. N’ouvrez jamais l’autocuiseur en force. N’agissez surtout pas sur
l’indicateur de présence de pression (D).
FR
7
Page 10
• Deux sécurités à la surpression :
- Premier dispositif : la soupape de sécurité (C) libère la pression et de la
vapeur s’échappe horizontalement sur le dessus du couvercle - fig.14
- Second dispositif : le joint (I) laisse échapper de la vapeur verticalement
par le petit trou situé sur le bord du couvercle ou le long de la cuve - fig.15.
Attention, cela peut entraîner l'extinction de la flamme sur un foyer à gaz.
Si l’un des systèmes de sécurité à la surpression
se déclenche :
• Arrêtez la source de chaleur.
• Laissez refroidir complètement l’autocuiseur.
• Ouvrez.
• Vérifiez et nettoyez la soupape de fonctionnement
(A) - fig.13, le conduit d’évacuation de vapeur (B)
- fig.10, la soupape de sécurité (C) et le joint (I). Voir
dessin ci-contre.
Recommandations d’utilisation
1 - La vapeur est très chaude lorsqu'elle sort de l'autocuiseur, veillez à ne
pas vous brûler. Utilisez des gants si nécessaire.
2 - Dès que l’indicateur de présence de pression s’élève, vous ne pouvez plus
ouvrir votre autocuiseur.
3 - Comme pour tout appareil de cuisson, assurez une étroite surveillance
si vous utilisez l’autocuiseur à proximité d’enfants.
4 - Pour déplacer l’autocuiseur, servez-vous des deux poignées de cuve.
5 - Ne laissez pas séjourner d’aliments dans votre autocuiseur.
6 - N’utilisez jamais d’eau de javel ou de produits chlorés, qui pourraient
altérer la qualité du matériau.
7 - Ne passez pas au lave-vaisselle et ne laissez pas tremper dans l'eau : le
joint, le couvercle et la soupape de fonctionnement.
8 - Changez le joint tous les ans ou s'il présente une coupure.
9 - Le nettoyage de votre autocuiseur s’effectue impérativement à froid,
l’appareil vide.
10 - Il est impératif de faire vérifier votre autocuiseur dans un Centre de
Service Agréé TEFAL après 10 ans d’utilisation.
Garantie
• Dans le cadre de l’utilisation préconisée par le mode d’emploi, la cuve de
votre nouvel autocuiseur TEFAL est garantie 10 ans contre :
- Tout défaut lié à la structure métallique de votre cuve,
- Toute dégradation prématurée du métal de base.
8
Page 11
• Toutes les autres pièces de votre cocotte sont garanties contre tout
défaut de fabrication ou de matière, pour la période de garantie définie
par la loi en vigueur dans le pays d'achat et à partir de la date d'achat.
• Cette garantie contractuelle sera acquise sur présentation du ticket de
caisse ou facture de cette date d’achat.
Ces garanties excluent :
• Les dégradations consécutives au non respect des précautions importantes ou
à des utilisations négligentes, notamment :
- Chocs, chutes, passage au four,
- Passage du couvercle et de la soupape de fonctionnement au lave-vaisselle.
• Seuls les Centres de Services Agréés TEFAL sont habilités à vous faire bénéficier
de cette garantie (merci de vous référer à : www.tefal.com).
Marquage réglementaire
Marquage Localisation
Identification du fabricant et marque
commerciale
Année et lot de fabrication Sur la cuve
Référence modèle
Pression maximum de sécurité (PS)
Pression supérieure de fonctionnement
(PF)
Capacité Fond de cuve
• Participons à la protection de l’environnement !
i Votre appareil contient de nombreux matériaux valorisables
ou recyclables.
‹ Confiez celui-ci dans un point de collecte pour que son
traitement soit effectué.
Poignée de cuve et poignée
de couvercle
Sur le couvercle
FR
*Panier non inclus dans certains modèles
9
Page 12
TEFAL répond à vos questions
Problèmes Recommandations
Si l’autocuiseur a
chauffé sous pression sans liquide à
l’intérieur :
Si l’indicateur de
présence de pression
n’est pas monté et
que rien ne
s’échappe par la soupape pendant la
cuisson :
Si l’indicateur de
présence de pression
est monté et que
rien ne s’échappe
par la soupape pendant la cuisson :
Si la vapeur fuit
autour du couvercle,
vérifiez :
Si vous ne pouvez
pas ouvrir le
couvercle :
Si les aliments ne
sont pas cuits ou s’ils
sont brûlés, vérifiez :
Si des aliments ont
brûlé dans
l’autocuiseur :
Faites vérifier votre autocuiseur par un Centre de Service
Agréé TEFAL.
Ceci est normal pendant les premières minutes.
Si le phénomène persiste, vérifiez que :
- La source de chaleur est assez forte, sinon augmentez-la.
- La quantité de liquide dans la cuve est suffisante.
- La soupape de fonctionnement est positionnée sur l’un
des pictogrammes ou - fig. 7 ou 8.
- L’autocuiseur est bien fermé.
- Le joint ou le bord de la cuve ne sont pas détériorés.
Ceci est normal pendant les premières minutes.
Si le phénomène persiste, passez votre appareil sous l’eau
froide, voir paragraphe “Décompression rapide et Cas particulier” puis ouvrez-le.
Nettoyez la soupape de fonctionnement et le conduit d'évacuation de vapeur et vérifiez que la bille de la soupape de sécurité s’enfonce sans difficulté.
La bonne fermeture du couvercle.
Le positionnement du joint dans le couvercle.
Le bon état du joint, au besoin changez-le.
La propreté du couvercle, du joint et de son logement dans
le couvercle, de la soupape de sécurité et de la soupape de
fonctionnement.
Le bon état du bord de la cuve.
Vérifiez que l’indicateur de présence de pression est en position basse.
Sinon, décompressez, au besoin, refroidissez l’autocuiseur
sous un jet d’eau froide, voir paragraphe “Décompression rapide et Cas particulier”.
Le temps de cuisson.
La puissance de la source de chaleur.
Le bon positionnement de la soupape de fonctionnement.
La quantité de liquide.
Laissez tremper votre cuve quelque temps avant de la laver.
N’utilisez jamais d’eau de javel ou de produits chlorés.
10
Page 13

Légumes
FRAIS
Artichauts
Asperges - immersion 5 min. -
Betterave rouge - vapeur 20 - 30 min. Blé (lég. secs) - immersion 15 min. Brocolis - vapeur 3 min. 3 min.
Carottes
(aliments émulsifs)
Céleri
Champignons
Chou vert
Chou Bruxelles - vapeur 7 min. 5 min. - immersion
Chou-fleur - immersion 3 min. 4 min.
Courgettes
Endives - vapeur 12 min. Epinards
Haricots verts - vapeur 8 min. 9 min.
Haricots mi-secs - immersion 20 min. Lentilles vertes (lég. secs) - immersion 10 min. -
Navets
Petits pois - vapeur 1 min. 30 4 min
Poireaux rondelles - vapeur 2 min. 30 Potiron (purée)(aliments émulsifs)
Pommes de terre en
quartiers
Pois cassés (lég. secs) - immersion 14 min. Riz (lég. secs) - immersion 7 min. -
rondelles - vapeur 7 min. 5 min.
émincés - vapeur 1 min. 5 min.
entiers - immersion 1 min. 30 émincé - vapeur 6 min. effeuillé - vapeur 7 min. -
Cuisson
- vapeur** 18 min. -
- immersion*** 15 min. -
- vapeur 6 min. -
- immersion 10 min. -
- vapeur 6 min. 30 9 min
- immersion 2 min. -
- vapeur 5 min. 8 min.
- immersion 3 min. -
- vapeur 7 min. -
- immersion 6 min. -
- immersion 8 min. -
- vapeur 12 min. -
- immersion 6 min. -
** Aliment dans le panier vapeur*
*** Aliment dans l’eau
Position de la
soupape
SURGELÉS
Position de la
soupape
FR
Viandes et Poissons
FRAIS
Agneau (gigot 1,3 Kg) 25 min.
Bœuf (rôti 1 Kg) 10 min.
Lotte (filets 0,6 Kg) (aliments émulsifs) 4 min.
Porc (rôti 1 Kg) 25 min.
Poulet (entier 1,2 Kg) 20 min.
Saumon (4 darnes 0,6 Kg) (aliments émulsifs) 6 min.
Thon (4 steaks 0,6 Kg) (aliments émulsifs) 7 min.
*Panier non inclus dans certains modèles
Position de la soupape
SURGELÉ
Position de la soupape
35 min.
28 min.
6 min.
45 min.
45 min.
8 min..
9 min.
11
Page 14

IMPORTANT PRECAUTIONS
For your safety, this appliance complies with the applicable standards and regulations:
- Pressure Equipment Directive
- Materials in contact with food
- Environment
• This appliance is designed for domestic use. Any commercial use, inappropriate use or failure to
comply with the instructions, the manufacturer accepts no responsibility and the guarantee will not
apply.
• Take the time to read all the instructions and always refer to the 'User Guide'.
• As with any cooking appliance, be vigilant, especially if you use your pressure cooker in proximity to
children.
• Do not place your pressure cooker in a hot oven.
• Always be very careful when moving your pressure cooker under pressure. Do not touch the hot
surfaces. Use the handles and knobs. Use oven gloves when necessary.
• Check regularly that the pot handles are properly attached. Re-tighten them if necessary.
• Do not use your pressure cooker for any use other than that for which it was intended.
• Your pressure cooker cooks under pressure. Scalding injuries may result if it is used incorrectly. Ensure
that the pressure cooker is properly closed before use. See section 'Closing'.
• Never open the pressure cooker by force. Make sure the internal pressure has been released. See
section 'Safety'.
• Never use your pressure cooker without liquid as this will seriously damage it. Ensure that there is
always enough liquid during cooking.
• Use a compatible heat source, in accordance with the instructions for use.
• Never use your pressure cooker for milk-based pudding recipes (such as rice pudding, semolina
pudding, ...).
• Do not use coarse salt in your pressure cooker; add fine salt at the end of the cooking time.
• Do not fill your pressure cooker more than 2/3 full (maximum fill level).
• For foods that swell during cooking, such as rice, dried vegetables, stewed fruit, etc., do not fill your
pressure cooker to more than half full. For certain soups made with pumpkins, courgettes, etc., leave
your pressure cooker to cool for a few minutes, and then cool it under cold water. In the case of the
3L and 4L models, for soft or thick texture foods or those which expand during cooking, do not fill
your product more than 1/3 full. At the end of the cooking time, wait 5 minutes before decompressing
under running water.
• After cooking meats with a superficial skin (eg. beef tongue, etc.), which may swell under the effect
of the pressure, do not pierce the meat while the skin has a swollen appearance; there is a risk that
you may be scalded. Be sure to pierce the skin prior to cooking.
• In the case of soft or thick texture foods (split peas, rhubarb, etc.), the pressure cooker should be
gently shaken before opening so that these foods do not spurt out.
• Check that the valves are not obstructed prior to each use. See section 'Before cooking'.
• Do not use your pressure cooker to fry with oil under pressure.
• Do not undertake any operation on the safety systems other than those featuring in the instructions
for cleaning and maintenance.
• Only use original TEFAL parts corresponding to your model. In particular, use a TEFAL pot and lid.
• Alcohol vapours are inflammable. Bring to the boil for around 2 minutes before fitting the lid. Watch
your device closely when cooking alcohol-based recipes.
• Do not use your pressure cooker for storing acid or salty foods before and after cooking as there is a
risk that this may damage your pot.
•
If during use you notice that any part of your pressure cooker is broken or cracked, do not
attempt to open it under any circumstances; turn off the heat and leave on the hob to cool
down completely before moving it or opening the lid. Do not use it again and take it to a TEFAL
Approved Service Centre for repair.
RETAIN THESE INSTRUCTIONS
12
Page 15
Descriptive diagram
A. Operating valve
B. Steam release outlet
C. Safety valve
D. Pressure indicator
E. Lid release button
F. Lid handle
G(a). Lid positioning mark
G(b). Lid-pot positioning mark
H. Operating valve positioning
mark
I. Lid gasket
J. Steam basket*
K. Trivet*
L. Long pot handle
M. Pot
N. Short pot handle
O. Maximum fill level mark
Characteristics
Pressure cooker bottom diameter – model references
Capacity
To ta l
Capacity**
4 L 4.7 L 22 cm 15 cm P25342 170 kPa (25 psi)
6 L 6.7 L 22 cm 15 cm P25307 170 kPa (25 psi)
Set 4L + 6L 4.7 L / 6.7 L 22 cm 15 cm P25443 170 kPa(25 psi)
7 L 7.7 L 22 cm 15 cm P25308 170 kPa(25 psi)
8 L 8.7 L 22 cm 15 cm P25344 170 kPa(25 psi)
** : Product capacity with the lid in position.
Cooker
diameter
Base
diameter
STAINLESS
STEEL model
safe pressure:
Technical information:
Maximum operating pressure: 80 kPa (12 psi)
Maximum
EN
Compatible heat sources
GAS SEALED
PLATE
ELECTRIC
CERAMIC
HALOGEN
• This pressure cooker is suitable for all heat sources, except Aga hobs
but including induction.
• On an electric or induction hob, ensure that the diameter of the hot
plate does not exceed that of the pressure cooker base.
• On a ceramic or halogen hob, ensure that the pressure cooker base is
always clean and dry.
• On a gas hob, the flame must never exceed the diameter of the pressure
cooker base.
• On all hobs, check that your pressure cooker is well centred.
*Basket not included with certain models
INDUCTION
ELECTRIC
COIL
13
Page 16

TEFAL Accessories
• The following accessories are available for the pressure cooker:
Accessory Reference number
Lid gasket X9010101
Steam basket* 792185
Trivet* 792691
•
To change other parts, or for repairs, contact an Approved TEFAL Service Centre
(please go to: www.tefal.com)
• Only use original TEFAL parts corresponding to your model.
.
Use
Opening
• Using your thumb, pull back on the lid release button (E) and hold it in the
retracted position -
• Holding the long handle of the pot (L) with one hand, turn the long handle
of the lid (F) with the other hand in an anti-clockwise direction until open
Fig. 2
.
• Then lift the lid.
• Do not open the pressure cooker until the unit has cooled and all internal
pressure has been released. If the handles are difficult to push apart, this
indicates that the cooker is still pressurised – do not force it open. Any
pressure in the cooker can be hazardous.
When the appliance is
closed but not in operation, it is normal for
the lid to move
slightly relative to the
pot. This effect disappears when the product is pressurised.
Minimum fill level
• Always put at least 25 cl/ 250 ml (2 cups) of liquid in
the pressure cooker when in use
For steam cooking*:
• The pot must contain at least 75 cl/ 750 ml (6 cups) of
water.
• Place the basket* (J) on the trivet* (K) provided for this
purpose - Fig. 5.
Fig. 1.
Closing
• Place the lid horizontally onto the pot, aligning
the lid positioning marks G(a) and G(b).
• Turn the lid in a clockwise direction until it stops
- Fig. 3 until you hear the button click as it
engages
If you are unable to turn the lid, ensure that the
opening button (E) is properly retracted.
- Fig. 4.
The food in the
steam basket*
must not touch
the lid of the
pressure cooker.
-
14
*Basket not included with certain models
Page 17

Maximum fill level
• Never fill your pressure cooker to more than two-thirds full (maximum fill
mark) (O) - Fig. 6.
For certain foods:
• For foods that swell during cooking, such as rice, dried vegetables, stewed
fruit, etc., do not fill your pressure cooker to more than half full.
• When cooking soups, we would advise you to carry out a rapid pressure
release (see section 'Rapid pressure release').
Using the operating valve (A)
To fit the operating valve (A):
Caution, these operations must only be carried out when
the product is cold and not in use.
• Place the operating valve (A) in position, aligning the
symbol •on the valve with the positioning mark (H)
as shown in the diagram opposite.
• Press down on the valve then turn it to the symbol
or as shown in the diagram opposite.
To remove the operating valve:
Caution, these operations must only be carried out when
the product is cold and not in use.
• Press down on the valve then turn it to align the
symbol •with the positioning mark (H) as shown in
the drawing opposite.
• Remove the valve as shown in the drawing opposite.
To cook vegetables or delicate foods:
• Position the pictogram on the valve opposite the
positioning mark (H)
• Pressure operates at 50kPa (7 psi / 7lbs pressure).
To cook meat or frozen foods:
• Position the pictogram on the valve opposite the
positioning mark (H)
• Pressure operates at 80kPa (12 psi / 12lbs pressure).
To release the steam:
• Gradually turn the valve (A), adjusting the speed that
the pressure is released by how far you open the valve,
- Fig. 7.
- Fig. 8.
EN
H
*Basket not included with certain models
15
Page 18

until it aligns opposite the mark with the symbol -
fig. 9, or place your pressure cooker under running water
from the cold tap (section 'Rapid pressure release').
It is normal for
steam to be present
near the pressure
indicator (D) when
the product begins
operating.
• Place the basket trivet (K) in the bottom of the pot
and place the basket (J) on top of it*.
• Fill the pot to two-thirds full with water (maximum
fill mark (O)).
• Close the pressure cooker.
• Position the symbol opposite the positioning
mark (H)
• Place the pressure cooker on a heat source, then
set to maximum power.
• When steam begins to escape from the valve, turn
down the heat source and leave for 20 min.
• After the 20 min is up, turn off your heat source.
• Gradually turn the valve (A), adjusting the speed
that the pressure is released by how far you open
the valve, until it aligns opposite the symbol -
fig. 9.
• When the pressure indicator (D) drops down, your
pressure cooker is no longer under pressure.
• Open the pressure cooker
• Rinse the pressure cooker with water and dry it.
- Fig. 8.
Before cooking
• Before each use, remove the valve (A) (see section
'Using the operating valve') and check visually and
against the light that the steam release outlet (B) is
not obstructed (See diagram opposite). If necessary,
clean it with a toothpick - Fig. 10.
• Check that the safety valve ball (C) is mobile (see
drawing opposite) and see section 'Cleaning and
maintenance'.
First use
- Fig. 1 - 2.
16
*Basket not included with certain models
Page 19
• Add your ingredients and the liquid.
• Close the pressure cooker - Fig. 3 and ensure that it is
properly closed - Fig. 4.
• Position or on the valve to the positioning
mark H - Fig. 7 or 8.
• Place the pressure cooker on a heat source, then set it
to maximum power.
During cooking
The pressure
indicator (D)
prevents the
pressure from rising
in the pressure
cooker if it is not
properly closed.
• It is normal for steam to be present at the pressure
indicator (D) when the product begins operating.
• When steam escapes continuously from the
operating valve (A), with a steady "pschhht" sound,
reduce the heat source until the valve (A) continues
to whisper steadily.
• Leave for the cooking time indicated in the recipe.
• As soon as the cooking time is over, turn off the heat
source.
End of cooking
To release the steam:
- Slow pressure release:
• This is used for stews, vegetables, meat joints and
fish dishes.
• Gradually turn the valve (A), adjusting the speed
that the pressure is released by how far you open
the valve, until it aligns opposite the mark with the
symbol
drops down again, your pressure cooker is no
longer under pressure.
The pressure indicator (D) prevents the pressure
cooker from being opened if it is still under pressure.
- Rapid pressure release:
• This is used for soups, rice, pasta, egg custards, cake
and pudding mixes, recipes containing rice or pasta
and recipe with a high liquid content.
• You may place your pressure cooker under a cold
running tap to speed up decompression, see
diagram opposite. When the pressure indicator (D)
drops down, your pressure cooker is no longer under
pressure.
• You may open your pressure cooker
- fig. 9. When the pressure indicator (D)
- Fig. 1 and 2.
If while releasing the
steam, you notice any
food or liquid start to
spray out from the
valve, return the operating valve (A) to
ou
or 8 - , wait a minute
and then slowly turn
the operating valve
again to the steam
release position,
ensuring nothing
else spurts out.
mark- Fig. 7
EN
17
Page 20

- Special case foods:
• When cooking special case foods (see cooking table)
or dried vegetables, do not release the pressure;
instead leave the cooker to stand at room
temperature and wait for the pressure indicator (D)
to drop before opening. Reduce the recommended
cooking time slightly.
Cleaning and maintenance
Cleaning the pressure cooker
To ensure the correct operation of your pressure
cooker, follow these cleaning and maintenance
recommendations after each use:
• Wash the pressure cooker (pot and lid) after each
use with warm water and washing-up liquid.
Follow the same procedure for the basket*.
• Do not use bleach or chlorinated products.
• Do not overheat your pan when it is empty.
To clean the inside of the pot:
• Wash using a sponge and washing-up liquid.
• The appearance of stains in the bottom of the
pot does not affect the quality of the metal at
all. These are limescale deposits. To remove
them, use a sponge with a little white vinegar.
To clean the outside of the pot:
• Wash using a sponge and washing-up liquid.
To clean the lid:
• Wash the lid under a stream of warm water with
a sponge and washing-up liquid and rinse well.
To clean the lid gasket:
• After each use, clean the gasket (I) and its
groove.
• To replace the gasket, please refer to
- 12.
To clean the operating valve (A):
• Remove the operating valve (A), see section
'Using the operating valve'.
• Clean the operating valve (A) under the tap
Fig. 13.
- Fig. 11
-
When moving your
pressure cooker under
pressure always take
great care to move it
without shaking it.
Wash your pressure
cooker after each
use.
The browning and
marks which may
appear following
extended use do
not affect the
operation of the
pressure cooker.
Only the pot is
dishwasher-safe.
To extend the
lifespan of your
pressure cooker, do
not overheat the
pot when it is
empty.
It is essential to
have your pressure
cooker checked at
a TEFAL Approved
Service Centre
after 10 years of
use.
18
*Basket not included with certain models
Page 21
To clean the steam release outlet (B):
• Remove the valve (A).
• Visually inspect against the light that the steam
release outlet is round and clear of debris. See
drawing opposite. If necessary, clean it with a
toothpick - Fig. 10.
To clean the safety valve (C):
• Clean the part of the safety valve on the inside
of the lid by placing it under running water.
• Check its correct operation by lightly pressing
down on the ball using a cotton bud, which
must move freely. See drawing opposite.
To change the gasket of your pressure cooker:
• Change the gasket of your pressure cooker
every year or if split or damaged.
• Always use an original TEFAL gasket
corresponding to your model.
To store your pressure cooker:
• Place the lid upside-down on the pot.
Never use a sharp
or pointed object
to carry out this
operation.
Safety
Your pressure cooker is fitted with several safety devices:
• Closing safety:
- If the appliance is not properly closed, the pressure indicator (D) cannot
rise and the pressure cooker cannot build pressure.
• Opening safety:
- If the pressure cooker is under pressure, the release button (E) cannot be
operated. Never open the pressure cooker by force. Above all, do not
interfere with the pressure indicator (D).
• Two safety devices against overpressure:
- First device: the safety valve (C) releases the pressure and steam escapes
horizontally from the top of the lid
- Second device: the gasket (I) permits steam to escape vertically from the
small hole located on the edge of the lid or along the side of the pot - Fig.15.
Caution, this may extinguish the flame on a gas hob.
- Fig.14
EN
19
Page 22

If one of the overpressure safety systems is
triggered:
• Turn off the heat source.
• Leave the pressure cooker to cool completely.
• Open the pressure cooker.
• Check and clean the operating valve (A) - Fig.13,
the steam release outlet (B) - Fig.10, the safety
valve (C)and the gasket (I). See drawing opposite.
Recommendations for use
1 - The steam is very hot when it leaves the pressure cooker, take care not
to scald yourself. Use oven gloves if necessary.
2 - Once the pressure indicator has risen, you can no longer open your
pressure cooker.
3 - As with any cooking appliance, ensure close supervision when using the
pressure cooker near children.
4 - To move the pressure cooker, use the two pot handles.
5 - Never leave food standing in your pressure cooker.
6 - Never use bleach or products containing chlorine, as these may alter the
quality of the material.
7 - Do not put the following in a dishwasher or leave them to soak in water:
the gasket, lid, and operating valve.
8 - Change the gasket every year or if it is split or damaged.
9 - Only clean your pressure cooker when it is cold and empty.
10 - It is essential to have your pressure cooker checked in a TEFAL Approved
Service Centre after 10 years of use.
Guarantee
• When used as recommended in these instructions, the pot of your new
TEFAL pressure cooker is guaranteed for 10 years against:
- Any defect associated with the metal structure of your pot,
- Any premature deterioration of the base metal.
• All other parts of your pressure cooker are guaranteed against defects in
workmanship or materials, for the period of guarantee defined in valid
legislation in force in the country where the product was purchased from
the date of purchase. For full details of the guarantee terms and
conditions please refer to www.tefal.com
• This contractual guarantee shall be honoured upon presentation of the
receipt or invoice showing the date of purchase.
20
Page 23

These guarantees exclude:
• Damage resulting from failure to comply with important precautions, or
negligent use, particularly:
- Knocks, dropping, use in the oven, etc.
- Putting the lid and the operating valve through a dishwasher.
• Only TEFAL Approved Service Centres are authorised to provide this guarantee
service (please go to: www.tefal.com).
Australian – NZ warranty
COOKWARE, BAKEWARE AND PRESSURE COOKERS
Limited Replacement Guarantee
Our goods come with guarantees that cannot be excluded under the Australian Consumer
Law. You are entitled to a replacement or refund for a major failure and compensation for
any other reasonably foreseeable loss or damage. You are also entitled to have the goods
repaired or replaced if the goods fail to be of acceptable quality and the failure does not
amount to a major failure. In addition to these statutory rights and any other rights and
remedies you may have under the law, Groupe SEB Australia Pty Ltd (we or us) guarantees
this Jamie Oliver by Tefal/Tefal/All-Clad/Moulinex product will be free of defects in material
and craftsmanship including handles, body, knobs, lids and fixings for 12 months from the
date of purchase.We also guarantee the non-stick coating of this Jamie Oliver by
Tefal/Tefal/All-Clad/Moulinex product will be free of blistering or peeling for the life of the
Jamie Oliver by Tefal/Tefal/All-Clad/Moulinex product. Should your Jamie Oliver by
Tefal/Tefal/All-Clad/Moulinex product develop a defect during the guarantee period or the
non-stick coating peel during the life of your Jamie Oliver by Tefal/Tefal/All-Clad/Moulinex
product, you should return it, at your cost, to the retailer from which you purchased it from,
together with your receipt as proof of purchase. The retailer will then forward your claim
directly to us for processing. Alternatively, if the retailer is unable to help you, you may
contact us directly at:
Groupe SEB Australia Pty Ltd,Customer Service Department,Unit 1, No 10 Hill Rd,
Homebush NSW 2127 T: +61 2 9748 7944
If on receipt your Jamie Oliver by Tefal/Tefal/All-Clad/Moulinex product is found to be
defective or the non-stick coating has peeled, we will, at our cost, replace or repair the
product in our discretion. Only the defective part or accessory will be repaired or replaced.
Packaging, instructions etc. will not be replaced unless faulty.This guarantee excludes
defects caused by the Jamie Oliver by Tefal/Tefal/All-Clad/Moulinex product not being used
in accordance with instructions , accidental damage (including overheating), misuse or
being tampered with by unauthorised persons. It also does not apply if the Jamie Oliver
by Tefal/Tefal/All-Clad/Moulinex product is used commercially and excludes consumable
items (including accessories such as pressure regulators and safety devices), dishwasher
effects and damages, stains, dents, discolouration, scratches or scuffs due to normal wear
and tear, and your costs of claiming under the warranty.
EN
*Basket not included with certain models
21
Page 24
TEFAL answers your questions
Problems
If the pressure cooker has been heated
under pressure without liquid inside:
If the pressure indicator has not risen
and nothing escapes
through the valve
during cooking:
If the pressure indicator has risen and
nothing is escaping
through the valve
during cooking:
If steam leaks from
around the lid,
check:
If you are unable to
open the lid:
If the food is not
cooked or is burned,
check:
If food is burned
onto the pressure
cooker:
Recommendations
Have your pressure cooker checked by a TEFAL Approved Service Centre.
This is normal during the first few minutes.
If the problem persists, check that:
- The heat source is sufficiently high; if not, increase it.
- The quantity of liquid in the pot is sufficient.
- The operating valve is positioned to one of the symbols
or - fig. 7 or 8.
- The lid is properly closed.
- The gasket or the rim of the pot is not damaged.
This is normal during the first few minutes.
If the problem persists, put the pressure cooker under cold
running water until the pressure indicator drops down, see
sections 'Rapid pressure release' and 'Special case', then
open it.
Clean the operating valve and the steam release outlet and
check that the safety valve ball moves freely.
That the lid is properly closed.
The position of the gasket in the lid.
The condition of the gasket; replace it if necessary.
The cleanliness of the lid, the gasket and its groove in the lid,
the safety valve and the operating valve.
The condition of the rim of the pot.
Check that the pressure indicator is in the down position.
If not, depressurise; if necessary, cool the pressure cooker
under running water, see sections 'Rapid pressure release'
and 'Special case'.
The cooking time.
The power of the heat source.
The correct position of the operating valve.
The quantity of liquid.
Leave the interior of the pot to soak for some time before
washing it.
Never use bleach or products containing chlorine.
22
Page 25
Vegetables
FRESH
Artichokes whole
Asparagus whole - immersion 5 min Beetroot
Broccoli florets - steam 3 min 3 min
Brussels sprouts whole - steam 7 min 5 min - immersion
Carrots (special case food) round slices - steam 7 min 5 min
Cauliflower florets - immersion 3 min 4 min
Celery 5-cm pieces
Courgettes
Endives 2.5 cm slices - steam 12 min Green beans
Green cabbage
Green lentils (dried vegetables) - immersion 10 min -
Leeks 5.cm slices - steam 2 min 30 -
Mushrooms
Peas - steam 1 min 30 4 min
Potatoes (such as King
Edward)
Pumpkin (mashed)
(special case food)
Rice (long grain white) see note below - immersion 7 min Semi-dried beans **** - immersion 20 min -
Spinach
Split peas (dried vegetables) - immersion 14 min -
Turnips 2.5 cm cubes
Wheat (dried vegetables)**** - immersion 15 min -
** Food in the steam basket*
*** Food in the water
**** Not available in some countries
RICE: never fill pan more than half full including liquid as rice froths and boils up during cooking. Use 225 g rice and
1.75 litre water from a boiling kettle.
peel after
cooking
2.5 cm slices - steam 6 min 30 9 min
whole or
sliced
thinly sliced - steam 6 min -
leaves
thinly sliced - steam 1 min 5 min
whole - immersion 1 min 30 -
quartered - steam 12 min quartered - immersion 6 min -
pieces - immersion 8 min -
Cooking
- steam** 18 min -
- immersion*** 15 min -
- steam 20 - 30 min -
- steam 6 min -
- immersion 10 min -
- immersion 2 min -
- steam 8 min 9 min
- steam 7 min -
- steam 5 min 8 min
- immersion 3 min -
- steam 7 min -
- immersion 6 min -
Valve position
FROZEN
Valve position
EN
*Basket not included with certain models
23
Page 26

Meat and Fish
FRESH Valve position
Beef (1 kg topside) 32 min (medium)**
Chicken (1.2 kg whole) 22 min
Lamb (1.3 kg leg) 40 min (medium)**
Monkfish (0.6 kg fillets) (special case food) 4 min
Pork (1 kg roast) 28 min
Salmon (4 steaks 0.6 kg) (special case food) 6 min
Tuna (4 x 0.6 kg steaks) (special case food) 7 min
**Cook for an additional 5 minutes for well done meat.
Golden rules when pressure cooking (for UK Consumers)
For 6 Litre models only.
• The minimum quantity of liquid required for normal cooking is 250 ml (½ pint) for the first
¼ hour cooking. For each additional ¼ hour, or part of ¼ hour, add a further 150 ml (¼
pint) of liquid. For example, 45 minutes cooking requires 600 ml (1 pint) of liquid. Note:
This is only a general guide. Certain foods, such as rice, pulses, steamed puddings and
Christmas puddings may require extra water (see text below).
• When steaming foods in the basket use a minimum of 750 ml (1¼ pint) water in the cooker.
• Always use a liquid that gives off steam when boiled e.g. water stock, wine, beer, cider.
Never use oil or fat. All pressure cooking requires some liquid.
• Whatever the size of pressure cooker, the maximum filling level when all the ingredients
and liquid have been added are:
Solid foods e.g. vegetables, meat joints: no more than two-thirds full
Liquids and cereals e.g. soups, stews, rice, cereal and pasta: no more than half full
Pulses e.g. dried beans and dried peas: no more than one-third full
• When cooking pulses they swell up and tend to froth up. Use 1.2 litres (2 pints) water for
every 450 g (1 lb) pre-soaked weight of pulses. Remember all dried peas and dried beans,
must be soaked in boiling water for 1 hour before cooking. Drain, rinse thoroughly and cook
in fresh water. Never eat uncooked beans or peas. Soaking is not necessary for red lentils.
The high temperatures achieved in the pressure cooker ensure that any natural toxins in
the pulses are destroyed. Canned beans and pulses can simply be drained and rinsed before
adding to the pressure cooker.
• For steamed suet puddings, sponge puddings or Christmas puddings, a short pre-steaming
time is best to enable the raising agent to activate and prevent a heavy, close texture. Extra
liquid is required so use a minimum of 1½ pint/900 ml of boiling water for a combined
steaming and cooking time of up to 1 hour. For each additional ¼ hour of cooking, or part
of ¼ hour, add a further ¼ pint/150 ml of boiling water. Pre-steaming is done with the
operating valve in the steam release position on a low heat for the required time. Then turn
24
Page 27
the operating valve to either or , and increase the heat to bring to full pressure.
Lower the heat and pressure cook for the required time.
• Pressure operates at 50kPa (7 psi / 7lbs pressure) and pressure at 80kPa (12
psi / 12lbs pressure).
• Never cook dumplings with the lid tightly closed, as they could rise up and block the safety
devices. Cook the stew and at the end of cooking, release the steam and cook gently for
about 10 - 15 minutes without the lid on.
• Pressure cooking times vary according to the size of individual pieces or thickness of the
food, not the weight.
• To prevent discolouration of the interior, caused by mineral deposits in hard water areas,
add a tablespoon of lemon juice or vinegar.
• Cooking containers must withstand temperatures of 130°C (250°F). Any covering on
containers, e.g. foil, greaseproof paper or cling film, must be securely tied otherwise they
could block the safety devices. Do not use plastic lids as they prevent steam from being in
contact with the food. Also, they could distort and come off during cooking which could
block the safety outlets.
• Accurate timing is essential when pressure cooking to prevent overcooking, especially with
vegetables, fruit and fish.
Regulatory markings
Marking Location
Identification of manufacturer and
commercial brand
Year and batch of manufacture On the pot
Model reference
Maximum safe pressure (PS)
Maximum operating pressure (PF)
Pot handle and lid handle
On the lid
EN
Capacity Bottom of pot
• Let's protect the environment!
i Your appliance contains many materials which can be
recovered or recycled.
‹ Leave it at a local civic waste collection point for processing.
*Basket not included with certain models
25
Page 28

BELANGRIJKE
VOORZORGSMAATREGELEN
Voor uw veiligheid beantwoordt dit apparaat aan de toepasselijke normen en regelgevingen:
- Leidraad uitrustingen onder druk
- Materialen in contact met voedingsmiddelen
- Milieu
• Dit apparaat is bestemd voor huishoudelijk gebruik.
• Neem de tijd om alle instructies te lezen en sla er tijdens het gebruik altijd de "Handleiding" op na.
• Net als voor elk ander kookapparaat, dient u de snelkookpan onder toezicht te houden, vooral
indien u de snelkookpan in de nabijheid van kinderen gebruikt.
• Zet uw snelkookpan niet in een hete oven.
• Verplaats de snelkookpan voorzichtig als deze onder druk staat. Raak de hete oppervlakken niet
aan. Gebruik de handgrepen en de knoppen. Gebruik ovenwanten indien nodig.
• Controleer regelmatig of de handgrepen van de pan correct vastzitten. Schroef ze indien nodig
opnieuw vast.
• Gebruik uw snelkookpan niet voor andere doeleinden dan die waarvoor deze werd gemaakt.
• Uw snelkookpan staat tijdens het gebruik onder druk. Oneigenlijk gebruik kan leiden tot
verwondingen door contact met kokende vloeistoffen. Zorg ervoor dat de snelkookpan goed
gesloten is voordat u deze gaat gebruiken. Zie paragraaf "Sluiten".
• Gebruik nooit kracht om de snelkookpan te openen. Zorg ervoor dat het drukniveau in de pan
verminderd is. Zie paragraaf "Veiligheid".
• Gebruik uw snelkookpan nooit zonder vloeistof, dit kan uw pan aanzienlijk beschadigen. Zorg
ervoor dat er tijdens het koken altijd voldoende vocht aanwezig is.
• Maak gebruik van geschikte warmtebronnen, conform de gebruiksinstructies.
• Gebruik geen snelkookpan voor recepten op basis van melk.
• Gebruik geen grof zout in uw snelkookpan, maar voeg liever tafelzout toe wanneer het gerecht
bijna klaar is.
• Vul uw snelkookpan niet hoger dan 2/3 (maximale vulstreep).
• Voor voedingsmiddelen die tijdens het koken opzwellen, zoals rijst, gedroogde peulvruchten,
vruchtencompotes, ... dient u uw snelkookpan niet meer dan halfvol te gebruiken. Geef voor
bepaalde soepen (zoals pompoen- of courgettesoep) de snelkookpan een paar minuten de tijd
om af te koelen. Laat de snelkookpan vervolgens helemaal afkoelen door deze onder koud
stromend water te houden. Voor de modellen van 3 en 4 liter dient u bij de bereiding van
brijachtige voedingsmiddelen (zoals spliterwten, rabarber etc) of voedingsmiddelen die tijdens
het koken opzwellen, uw snelkookpan niet meer dan 1/3 gevuld te gebruiken. Wacht 5 minuten
na het einde van de bereiding voor u de druk van de snelkookpan onder water vermindert.
• Na het koken van vleesgerechten met huid (zoals ossentong…), die onder druk kunnen opzwellen,
dient u het vlees niet in te prikken zolang de huid er opgezwollen uitziet; u loopt dan het risico
door kokend vocht gewond te raken. Wij raden u aan het vlees voor het koken in te prikken.
• In geval van brijachtige voedingsmiddelen (spliterwten, rabarber…) dient u de snelkookpan voor
het openen licht te schudden zodat de voedingsmiddelen niet uit de pan spatten.
• Controleer voor elk gebruik dat de drukventielen niet verstopt zijn. Zie paragraaf "Voor het koken".
• Gebruik uw snelkookpan niet om onder druk met olie te frituren.
• U dient de beveiligingssystemen alleen volgens de instructies te reinigen en te onderhouden.
• Gebruik alleen originele TEFAL-onderdelen die met uw model snelkookpan overeenkomen. Gebruik
zeker een TEFAL-pan en -deksel.
• Alcoholdampen zijn brandbaar. Breng ongeveer 2 minuten voordat u het deksel sluit de vloeistof
aan de kook. Houd uw pan onder toezicht wanneer u recepten met alcohol bereidt.
• Gebruik uw snelkookpan niet om zure of zoute voedingsmiddelen voor of na het koken in op te
slaan omdat deze de pan kunnen aantasten.
• Indien u constateert dat een onderdeel van uw snelkookpan is afgebroken of scheurtjes vertoont,
probeer de snelkookpan dan niet te openen als hij gesloten is. Wacht tot de pan volledig is
afgekoeld voordat u hem verplaatst. Gebruik de snelkookpan niet meer en breng hem naar een
erkend servicecentrum van TEFAL voor reparatie.
BEWAAR DEZE INSTRUCTIES
26
Page 29
Beschrijving
A. Bedrijfsventiel
B. Stoomopening
C. Veiligheidsventiel
D. Drukindicator
E. Openingsknop
F. Lange handgreep van het deksel
G(a). Positieteken van het deksel
G(b). Positieteken van het deksel ten
opzichte van de pan
H. Positieteken van het bedrijfsven-
tiel
I. Afdichtingsring van het deksel
J. Stoommandje*
K. Drievoet*
L. Lange handgreep van de pan
M. Pan
N. Korte handgreep van de pan
O. Teken max. vulniveau
Eigenschappen
Diameter van de bodem van de snelkookpan - referenties
Inhoud Ø pan Ø bodem
Model
RVS
4 L 22 cm 15 cm P25342 170 kPa
6 L 22 cm 15 cm P25307 170 kPa
Set 4 L + 6 L 22 cm 15 cm P25443 170 kPa
7 L 22 cm 15 cm P25308 170 kPa
8 L 22 cm 15 cm P25344 170 kPa
Technische informatie:
Maximale bedrijfsdruk: 80 kPa
Maximale
veiligheidsdruk:
NL
Geschikte warmtebronnen
GAS ELEKTRISCHE
KOOKPLAAT
KERAMISCH/
HALOGEEN
INDUCTIE
ELEKTRISCHE
SPIRAAL
• Uw snelkookpan is geschikt voor gebruik op alle warmtebronnen, ook op
inductiekookplaten.
• Zorg ervoor dat bij gebruik op een elektrische, keramische of
inductiekookplaat de afmetingen van de kookplaat niet groter zijn dan
de bodem van de snelkookpan.
• Zorg ervoor dat bij gebruik van een keramische kookplaat of
inductiekookplaat de onderkant van de snelkookpan droog en schoon
is.
• Op gas mag de vlam niet groter zijn dan de diameter van de bodem van
de pan.
• Plaats uw snelkookpan op alle warmtebronnen goed in het midden.
*Mandje en drievoet niet inbegrepen bij bepaalde modellen
27
Page 30

TEFAL-accessoires
•De volgende accessoires zijn verkrijgbaar voor uw snelkookpan:
Accessoire Referentienummer
Afdichtingsring X9010101
Stoommandje* 792185
Drievoet* 792691
• Neem voor de vervanging van andere onderdelen of reparaties contact op met
een Erkend Servicecentrum van TEFAL (raadpleeg de website: www.tefal.com).
• Gebruik alleen originele TEFAL-onderdelen die met uw model snelkookpan
overeenkomen.
Gebruik
Openen
• Druk met uw duim op de openingsknop (E) op het deksel en houd het op
veilige afstand - fig. 1.
• Terwijl u met één hand de lange handgreep van de pan vasthoudt (L), draait
u met uw andere hand de lange handgreep van het deksel (F) tegen de
wijzers van de klok in, tot het deksel opengaat - fig. 2 .
• Til het deksel op.
Sluiten
Wanneer de snelkookpan gesloten is
maar niet in werking, is het normaal
dat het deksel op de
pan beweegt. Dit
effect verdwijnt
wanneer de snelkookpan onder druk
staat.
Minimaal vulniveau
• Voeg altijd een minimale hoeveelheid vloeistof toe
van 25 cl/250 ml (2 glazen).
Voor koken met stoom*:
• Giet ten minste 75 cl/ 750 ml water op de bodem
van de pan (6 glazen).
• Plaats het mandje* (J) op de drievoet (K) - fig. 5.
28
• Plaats het deksel goed plat op de pan, op de
positietekens voor het deksel G(a) en G(b).
• Draai het deksel met de wijzers van de klok mee
tot het vastzit - fig. 3 en u het sluitmechanisme
hoort van de knop - fig. 4.
Als u het deksel niet kunt vastdraaien, controleer
dan of de openingsknop (E) goed ingedrukt is.
Het voedsel in het
stoommandje* mag
het deksel van de
snelkookpan niet
raken.
*Mandje en drievoet niet inbegrepen bij bepaalde modellen
Page 31

Maximaal vulniveau
• Vul uw snelkookpan nooit meer dan 2/3 van de diepte van de pan (max.
vulniveau) (O) - fig. 6.
Voor bepaalde voedingsmiddelen:
• Voor voedingsmiddelen die tijdens het koken opzwellen, zoals rijst,
gedroogde peulvruchten, fruitcompotes, ... dient u uw snelkookpan niet meer
dan halfvol te gebruiken.
• Voor soep raden we aan de druk snel te verlagen (zie paragraaf "Druk snel
verlagen").
Het bedrijfsventiel (A) gebruiken
Om het bedrijfsventiel (A) te installeren:
Opgelet! Deze handeling alleen uitvoeren wanneer de
snelkookpan koud en niet in werking is.
• Plaats het bedrijfsventiel (A) door het sysmbool
tegenover het positieteken te plaatsen (H).
• Druk op het ventiel en draai het tot bij het symbool
of .
Het bedrijfsventiel verwijderen:
Opgelet! Deze handeling alleen uitvoeren wanneer de
snelkookpan koud en niet in werking is.
• Druk op het ventiel en draai het symbool•tegenover
het positieteken zoals op de figuur hiernaast (H).
• Verwijder het ventiel zoals op de figuur hiernaast.
Om groenten en tere voedingsmiddelen te bereiden:
• Draai het symbool van het ventiel op het
positieteken (H) - fig. 7.
Om vlees en diepvriesvoedsel te bereiden:
• Draai het symbool van het ventiel op het
positieteken (H) - fig. 8.
Om de stoom te verminderen:
• Draai het ventiel (A) geleidelijk op de druk-
verlagingsstand van uw keuze tot het symbool - fig.
9, of plaats uw snelkookpan onder een koude
waterstraal (zie paragraaf "Druk snel verlagen").
•
NL
H
*Mandje en drievoet niet inbegrepen bij bepaalde modellen
29
Page 32

De aanwezigheid
van stoom bij de
drukindicator (D) is
normaal wanneer
de snelkookpan in
werking treedt.
• Plaats de drievoet (K) op de bodem van de pan en
plaats het stoommandje (J) op de drievoet*.
• Vul de pan tot 2/3 met water (max. vulniveau (O)).
• Sluit de snelkookpan.
• Draai het symbool op het positieteken (H) -
fig. 8.
• Plaats de snelkookpan op een warmtebron op de
hoogste stand.
• Wanneer er stoom uit het ventiel komt, zet u de
warmtebron lager en stelt u een timer in op 20
minuten.
• Zet de warmtebron na 20 minuten uit.
• Draai het ventiel (A) geleidelijk op de druk-
verlagingsstand van uw keuze tot het symbool
- fig. 9.
• Wanneer de drukindicator (D) weer zakt, staat uw
snelkookpan niet meer onder druk.
• Open de snelkookpan - fig. 1 - 2.
• Spoel de snelkookpan af en droog deze af.
Vóór het koken
• Verwijder voor elk gebruik het ventiel (A) (zie paragraaf
"Gebruik van het bedrijfsventiel") en controleer met het
blote oog en in daglicht of de stoomopening (B) niet
geblokkeerd is (Zie de figuur hiernaast.). Reinig de
stoomopening indien nodig met een tandenstoker - fig. 10.
• Controleer of de pin van het veiligheidsventiel (C) vrij
beweegt - zie de figuur hiernaast (zie paragraaf
"Reiniging en onderhoud").
• Voeg de ingrediënten en de vloeistof toe.
• Sluit de snelkookpan - fig. 3 en controleer of het deksel
correct is gesloten - fig. 4.
• Draai het symbool of van het ventiel op het
positieteken H - fig. 7 of 8.
• Plaats de snelkookpan op een warmtebron op de
hoogste stand.
Eerste gebruik
30
*Mandje en drievoet niet inbegrepen bij bepaalde modellen
Page 33

De drukindicator
(D) zorgt ervoor dat
de druk in de
snelkookpan niet
kan oplopen als
deze niet correct
gesloten is.
• De aanwezigheid van stoom bij de drukindicator (D)
is normaal wanneer de snelkookpan in werking
treedt.
• Wanneer het bedrijfsventiel (A) permanent stoom
laat ontsnappen en regelmatig een PSHHHT-geluid
maakt, zet de warmtebron dan lager tot het ventiel
(A) een regelmatig fluistergeluid maakt.
• Stel een timer voor de bereidingstijd van het recept
in.
• Zodra de bereidingstijd erop zit, de warmtebron
uitzetten.
Na het koken
Om stoom vrij te laten:
- De druk langzaam verlagen:
• Draai het ventiel (A) geleidelijk op de druk-
verlagingsstand van uw keuze tot het symbool
- fig. 9. Wanneer de drukindicator (D) weer zakt,
staat uw snelkookpan niet meer onder druk.
De drukindicator (D) zorgt ervoor dat de
snelkookpan niet kan worden geopend wanneer
deze nog onder druk staat.
- De druk snel verlagen:
• Zet uw snelkookpan onder een koude waterstraal
voor een snellere drukverlaging, zie figuur. Wanneer
de drukindicator (D) weer zakt, staat uw
snelkookpan niet meer onder druk.
• U kunt de snelkookpan nu openen - fig. 1 en 2.
Tijdens het koken
NL
Als er voedsel of
vloeistof uit de pan
begint te spuiten terwijl u de stoom laat
ontsnappen, draait u
het bedrijfsventiel (A)
weer naar de kookpositie of - fig. 7
of 8 - om vervolgens
een langzame drukverlaging uit te voeren zodat er geen
opspattingen meer
zijn.
- Let op!
• Bij het koken van schuimig voedsel (zie
bereidingstabel) of peulvruchten, laat u de stoom
niet vrij en wacht u tot de drukindicator (D) zakt
voor u de pan opent. Verminder de aanbevolen
kooktijd een beetje.
Verplaats de snelkookpan voorzichtig
als deze onder druk
staat, zonder te
schudden.
31
Page 34

Reiniging en onderhoud
De snelkookpan reinigen
Volg deze afwas- en onderhoudstips na elk
gebruik om een correcte werking van uw
snelkookpan te verzekeren.
• Was de snelkookpan (pan en deksel) na elk
gebruik af met lauw water en afwasmiddel. Doe
hetzelfde voor het mandje*.
• Gebruik geen bleekwater of chloorhoudende
producten.
• Oververhit uw snelkookpan niet wanneer hij
leeg is.
De binnenkant van de pan schoonmaken:
• Was deze af met een sponsje en afwasmiddel.
• Het verschijnen van vlekken op de bodem van de
pan heeft geen invloed op de kwaliteit van het
metaal. Het betreft namelijk kalkaanslag. Gebruik
een spons met wat azijn om deze te verwijderen.
De buitenkant van de pan schoonmaken:
• Was deze af met een sponsje en afwasmiddel.
Het deksel schoonmaken:
• Was het deksel af onder een lauwe waterstraal
met een spons en afwasmiddel. Goed
afspoelen.
De afdichtingsring schoonmaken:
• Maak de ring (I) en haar groef na elk gebruik
schoon.
• Raadpleeg fig. 11-12 om de ring weer correct
te plaatsen.
Het bedrijfsventiel (A) schoonmaken:
• Verwijder het bedrijfsventiel (A), zie paragraaf
"Gebruik van het bedrijfsventiel".
• Was het bedrijfsventiel (A)af onder de kraan - fig.
13.
Was de
snelkookpan na elk
gebruik.
De bruine kleur en
sporen die na
langdurig gebruik
kunnen verschijnen,
hebben geen
invloed op de
werking van de
snelkookpan.
Alleen de pan
(zonder deksel) en
het mandje zijn
geschikt voor
gebruik in de
vaatwasmachine.
Oververhit uw
snelkookpan niet
wanneer hij leeg is
om de levensduur
van de pan te
verlengen.
U dient uw
snelkookpan
verplicht na tien
jaar gebruik te
laten nakijken in
een Erkend
Servicecentrum van
TEFAL.
32
*Mandje en drievoet niet inbegrepen bij bepaalde modellen
Page 35

De stoomopening (B) schoonmaken:
• Verwijder het drukventiel (A).
• Kijk in voldoende daglicht en met het blote oog of
de stoomopening schoon en rond is. Zie de figuur
hiernaast. Reinig de stoomopening indien nodig
met een tandenstoker - fig. 10.
Het veiligheidsventiel (C) schoonmaken:
• Maak het deel van het veiligheidsventiel binnen in
het deksel schoon door het onder de kraan te
houden.
• Controleer de juiste werking door met een
wattenstaafje hard te drukken op de pin, die
moeiteloos zou moeten zakken. Zie de figuur
hiernaast.
De ring van uw snelkookpan vervangen:
• Vervang de ring van uw snelkookpan elk jaar of
wanneer deze beschadigd is.
• Gebruik alleen een originele TEFAL-ring die met uw
model snelkookpan overeenkomt.
Uw snelkookpan opbergen:
• Draai het deksel om op de pan.
Gebruik nooit een
scherp of snijdend
voorwerp om deze
handeling uit te
voeren.
Veiligheid
Uw snelkookpan is uitgerust met verschillende veiligheidsvoorzieningen:
• Sluitveiligheid:
- De drukindicator (D) verhindert de snelkookpan om de druk te verhogen
als deze niet correct werd gesloten.
• Openingsveiligheid:
- Als de snelkookpan onder druk staat, kan de openingsknop (E) niet worden
ingedrukt. Gebruik nooit kracht om de snelkookpan te openen. Kom vooral
niet aan de drukindicator (D).
• Twee veiligheidsvoorzieningen tegen overdruk:
- Eerste voorziening: het veiligheidsventiel (C) laat de druk vrij en de stoom
ontsnapt horizontaal aan de bovenkant van het deksel - fig. 14.
- Tweede voorziening: dankzij de ring (I) kan er verticaal stoom ontsnappen
door het gaatje op de dekselrand of langs de pan - fig. 15. Opgelet,
hierdoor kan de vlam van het vuur uitgaan.
NL
33
Page 36

Als een van de veiligheidssystemen tegen
overdruk in werking treedt :
• Zet de warmtebron uit.
• Laat de snelkookpan volledig afkoelen.
• Open de pan.
• Controleer en reinig het bedrijfsventiel (A) - fig.13,
de stoomopening (B) - fig.10, het veiligheidsventiel
(C) en de ring (I). Zie de figuur hiernaast.
Gebruiksadvies
1 - De stoom die uit het bedrijfsventiel komt is heel heet. Zorg ervoor dat u
zich niet verbrandt. Gebruik ovenwanten indien nodig.
2 - Zodra de drukindicator stijgt, kunt u uw snelkookpan niet meer openen.
3 - Net als voor elk ander keukenapparaat dient u de snelkookpan onder
toezicht te houden indien u de snelkookpan in de nabijheid van kinderen
gebruikt.
4 - Gebruik de twee handgrepen om de snelkookpan te verplaatsen.
5 - Laat nooit voedsel in uw snelkookpan zitten.
6 - Gebruik nooit bleekmiddel of chloorhoudende producten, want die zullen
de kwaliteit van het materiaal aantasten.
7 - Reinig de ring, het deksel en het bedrijfsventiel niet in de
vaatwasmachine en laat deze niet weken in water.
8 - Vervang de ring elk jaar of wanneer deze beschadigd is.
9 - Maak uw snelkookpan alleen schoon als deze koud en leeg is.
10 - U dient uw snelkookpan verplicht na tien jaar gebruik te laten nakijken
door een Erkend Servicecentrum van TEFAL.
Garantie
• Wanneer gebruikt volgens de voorwaarden uit deze handleiding geldt er op
de pan van uw nieuwe TEFAL-snelkookpan een garantie van 10 jaar tegen:
- defecten aan de metalen structuur van uw pan,
- voortijdige slijtage van de metalen bodem.
• Alle overige onderdelen van uw snelkookpan hebben vanaf de
aankoopdatum garantie op fabricage- en materiaalfouten, gedurende de
garantieperiode die de wetgeving in het land van aankoop voorschrijft.
• De garantie geldt alleen op vertoon van een geldig aankoopbewijs met
de aankoopdatum erop vermeld.
34
Page 37

De garantie geldt niet voor:
• Schade doordat belangrijke instructies niet werden nageleefd of door nalatig
gebruik, zoals:
- schokken, vallen, gebruik in een oven,
- reiniging van het deksel en het bedrijfsventiel in de vaatwasmachine.
• Alleen Erkende Servicecentra van TEFAL zijn bevoegd u deze garantie te
verlenen (raadpleeg de website: www.tefal.com).
Regelgevende markeringen
Markering Plaats
Identificatie van fabrikant of handelsmerk
Productiejaar en productiepartij Op de pan
Modelreferentie
Maximale veiligheidsdruk (MVD)
Maximale bedrijfsdruk (MWD)
Inhoud Op de onderkant van de pan
• Wees vriendelijk voor het milieu!
i Uw apparaat bevat veel materialen die geschikt zijn voor
hergebruik of recycling.
‹ Breng het naar een daarvoor geschikt verzamelpunt voor de
verwerking ervan.
Handgreep van de pan en
het deksel
Op het deksel
NL
*Mandje en drievoet niet inbegrepen bij bepaalde modellen
35
Page 38

TEFAL beantwoordt uw vragen
Problemen Aanbevelingen
Als uw snelkookpan
zonder vloeistof
onder druk werd
verhit:
Als de drukindicator
niet is gestegen en
er tijdens het koken
niets door het ventiel ontsnapt:
Als de drukindicator
is gestegen en er tijdens het koken
niets door het ventiel ontsnapt:
Als er stoom van
onder het deksel
komt, controleert u:
Als u het deksel niet
kunt openen:
Als het voedsel niet
gaar of verbrand is,
controleert u:
Als voedsel is
aangebrand in de
snelkookpan:
Laat uw snelkookpan nakijken door een Erkend
Servicecentrum van TEFAL.
Dit is normaal gedurende de eerste minuten.
Blijft het probleem zich voordoen? Controleer dan of:
- De warmtebron hoog genoeg staat. Zet deze anders
hoger.
- Er genoeg vloeistof in de pan zit.
- Het bedrijfsventiel op of staat - fig. 7 of 8.
- De snelkookpan correct is gesloten.
- De ring of rand van de pan niet is beschadigd.
Dit is normaal gedurende de eerste minuten.
Als het probleem zich blijft voordoen, houd uw snelkookpan dan onder koud water, zie paragraaf "Druk snel verlagen en bijzondere gevallen". Open de snelkookpan.
Maak het bedrijfsventiel en de stoomopening schoon en
controleer of de pin van het veiligheidsventiel moeiteloos
zakt.
Of het deksel correct is gesloten.
De positie van de ring van het deksel.
De staat van de ring. Vervang deze indien nodig.
Of het deksel, de ring, de groef in het deksel, het
veiligheidsventiel en het bedrijfsventiel schoon zijn.
De staat van de rand van de pan.
Controleer of de drukindicator in de benedenpositie staat.
Zo niet, geeft u de druk vrij en houdt u uw snelkookpan
onder koud water, zie paragraaf "Druk snel verlagen en
bijzondere gevallen".
De kooktijd.
De kracht van de warmtebron.
De correcte positie van het bedrijfsventiel.
De hoeveelheid vloeistof.
Laat de pan weken voordat u deze afwast.
Gebruik nooit bleekwater of chloorhoudende producten.
36
Page 39

Groenten
Andijvie
Artisjokken
Asperges
Bloemkool
Bonen, halfgedroogd
Champignons
Courgettes
Erwten
Granen (peulvruchten)
Groene linzen (peulvruchten)
Kwartjes aardappel
Pompoen (puree) (schuimig
voedsel)
Prei in ringen
Prinsessenbonen
Rapen
Rijst (peulvruchten)
Rode bieten
Selderij
Savooiekool
Spinazie
Spliterwten (peulvruchten)
Spruiten
Wortel (schuimig voedsel) in schijfjes
in plakjes
in hun
geheel
in reepjes
bladeren
Vlees en vis
Kip (hele kip, 1,2 kg) 20 min.
Lam (bout van 1,3 kg) 25 min.
Lotte (filets van 0,6 kg) (schuimig voedsel) 4 min.
Rund (gebraad van 1 kg) 10 min.
Tonijn (4 steaks van 0,6 kg) (schuimig voedsel) 7 min.
Varken (gebraad van 1 kg) 25 min.
Zalm (4 moten van 0,6 kg) (schuimig voedsel) 6 min.
*Mandje en drievoet niet inbegrepen bij bepaalde modellen
Bereiding
- stoom
- stoom**
- ondergedompeld***
- ondergedompeld
- ondergedompeld
- ondergedompeld
- stoom
- ondergedompeld
- stoom
- ondergedompeld
- stoom
- ondergedompeld
- ondergedompeld
- stoom
- ondergedompeld
- ondergedompeld
- stoom
- stoom
- stoom
- ondergedompeld
- ondergedompeld
- stoom
- stoom
- ondergedompeld
- stoom
- stoom
- stoom
- ondergedompeld
- ondergedompeld
- stoom
- stoom
** Voedingsmiddel in het stoommandje*
*** Voedingsmiddel in het water
Positie van het
VERS
Positie van het
ventiel
VERS
ventiel
12 min. 18 min. 15 min. -
20 min. -
1 min. 30 6 min. 30 9 min.
1 min. 30 4 min.
15 min. 10 min. -
2 min. 30 -
20-30 min.
10 min. -
14 min. -
DIEPGEVROREN
Positie van het
ventiel
5 min. 3 min. 4 min.
1 min. 5 min.
2 min. -
2 min. 6 min.
8 min. -
8 min. 9 min.
7 min. 6 min. 7 min. -
6 min. -
6 min. 7 min. 5 min. 8 min.
3 min. -
7 min.
7 min. 7 min.
5 min. - ondergedompeld
DIEPGEVROREN
Positie van het
ventiel
45 min.
35 min.
6 min.
28 min.
9 min.
45 min.
8 min.
NL
37
Page 40

WICHTIGE SICHERHEITSHINWEISE
Um Ihre Sicherheit zu gewährleisten, entspricht dieses Gerät den gültigen Normen und Vorschriften hinsichtlich:
- Richtlinien für Geräte, die unter Druck stehen
- Materialien, die mit Lebensmitteln in Berührung kommen
- Umweltschutz
• Dieses Gerät wurde für den haushaltsüblichen Gebrauch entwickelt.
• Lesen Sie bitte die nachstehenden Hinweise sorgfältig durch und sehen Sie im Zweifelsfall in der
„Bedienungsanleitung“ nach.
• Überwachen Sie den Schnellkochtopf, wie alle Kochgeräte, aufmerksam, insbesondere wenn Sie ihn in der Nähe
von Kindern benutzen.
• Stellen Sie Ihren Schnellkochtopf nie in einen heißen Ofen.
• Bewegen Sie den unter Druck stehenden Schnellkochtopf mit höchster Vorsicht. Berühren Sie die heißen Flächen
nicht. Nutzen Sie die vorgesehenen Griffe und Knöpfe. Verwenden Sie gegebenenfalls Topfhandschuhe.
• Überprüfen Sie regelmäßig, ob die Handgriffe des Behälters richtig befestigt sind. Ziehen Sie sie bei Bedarf erneut
fest.
• Verwenden Sie Ihren Schnellkochtopf nur für den vorgesehenen Verwendungszweck.
• Ihr Schnellkochtopf gart unter Druck. Bei unsachgemäßer Verwendung kann es zu Verbrühungen kommen.
Vergewissern Sie sich, dass der Schnellkochtopf richtig verschlossen ist, bevor Sie ihn in Betrieb nehmen. Siehe
Kapitel „Schließen“.
• Öffnen Sie den Schnellkochtopf nie mit Gewalt. Vergewissern Sie sich, dass er nicht mehr unter Druck steht. Siehe
Kapitel „Sicherheit“.
• Verwenden Sie Ihren Schnellkochtopf niemals ohne Flüssigkeit. Bei Nichtbeachtung kann es zu schweren
Beschädigungen kommen. Stellen Sie sicher, dass während des Kochvorgangs jederzeit ausreichend Flüssigkeit
in dem Schnellkochtopf vorhanden ist.
• Verwenden Sie ausschließlich die geeignete(-n) Herdplatte(-n) und Kochfeld(-er), gemäß den Benutzerhinweisen.
• Bereiten Sie niemals Rezepte auf Milchbasis in Ihrem Schnellkochtopf zu.
• Verwenden Sie kein grobes Salz in Ihrem Schnellkochtopf. Fügen Sie stattdessen nach dem Garen feines Salz
hinzu.
• Füllen Sie Ihren Schnellkochtopf niemals zu mehr als 2/3 (Markierung des maximalen Füllstands).
• Bei der Zubereitung von Lebensmitteln, die sich während des Garens ausdehnen, wie zum Beispiel Reis,
Hülsenfrüchte oder Kompott usw. darf der Schnellkochtopf nur bis zur Hälfte seines Fassungsvermögens gefüllt
werden. Lassen Sie Ihren Schnellkochtopf bei Suppen aus Kürbis, Zucchini usw. einige Minuten abkühlen, und
kühlen Sie ihn dann unter kaltem Wasser herunter. Bei den Modellen 3 und 4 Liter, bei dickflüssigen
Nahrungsmitteln oder Nahrungsmitteln, die sich während des Kochvorgangs ausdehnen, befüllen Sie Ihr Produkt
nur bis max. 1/3 der Füllmenge. Warten Sie am Ende des Kochvorgangs 5 Minuten, bevor Sie unter fließendem
Wasser den Dampf ablassen.
• Nach der Zubereitung von Fleisch, das mit einer Haut überzogen ist (z. B. Rinderzunge,…), die sich unter Druck
aufblähen kann, darf das Fleisch nicht angestochen werden, solange die Haut aufgebläht ist. Sie könnten sich
verbrühen. Stechen Sie das Fleisch daher vor dem Kochen ein.
• Bei der Zubereitung von mehligen Lebensmitteln (Trockenerbsen, Rhabarber, …) muss Ihr Schnellkochtopf vor
dem Öffnen leicht geschüttelt werden, damit die Lebensmittel beim Öffnen des Deckels nicht herausspritzen.
• Vergewissern Sie sich vor jeder Verwendung, dass die Ventile nicht verstopft sind. Siehe Kapitel „Vor dem Garen“.
• Verwenden Sie Ihren Schnellkochtopf nicht zum Frittieren von Lebensmitteln in Öl unter Druck.
• Beschränken Sie sich bei der Handhabung der Sicherheitssysteme auf Maßnahmen zur Reinigung und
Instandhaltung.
• Verwenden Sie nur Original-Zubehörteile von TEFAL, die für Ihr Modell geeignet sind. Verwenden Sie ausschließlich
Töpfe und Deckel von TEFAL.
• Alkoholdämpfe sind entflammbar. Bringen Sie die Speisen etwa 2 Minuten vor dem Aufsetzen des Deckels zum
Kochen. Bei der Zubereitung von Rezepten mit Alkohol muss der Schnellkochtopf überwacht werden.
• Verwenden Sie Ihren Schnellkochtopf nicht dazu, vor oder nach dem Kochvorgang säurehaltige oder salzhaltige
Nahrungsmittel aufzubewahren, da die Gefahr besteht, dass das Gerät beschädigt wird.
• Sollten Sie feststellen, dass Ihr Schnellkochtopf Brüche oder Risse aufweist, versuchen Sie keinesfalls ihn zu öffnen,
wenn er verschlossen ist. Warten Sie ab, bis er vollständig abgekühlt ist, bevor Sie ihn bewegen. Verwenden Sie
ihn nicht mehr und bringen Sie ihn zur Reparatur in eine autorisierte TEFAL-Kundendienstwerkstatt.
BEWAHREN SIE DIESE BEDIENUNGSANLEITUNG AUF!
38
Page 41

Schemazeichnung
Gas Elektro Glaskeramik-Kochfeld
Halogen-Kochfeld
Induktion
Elektrische
Heizspirale
A. Garregler
B. Dampfaustritt
C. Sicherheitsventil
D. Druckanzeige
E. Taste zum Öffnen des Topfes
F. Deckelgriff
G(a). Positionsanzeige des Deckels
G(b). Positionsanzeige Deckel - Griff
H. Positionsanzeige des Garreglers
I. Dichtungsring des Deckels
J. Dampfkorb*
K. Dreifuß *
L. Langer Topfgriff
M. To p f
N. Kurzer Topfgriff
O. Markierung der maximalen
Füllhöhe
Eigenschaften
Bodendurchmesser des Schnellkochtopfs - Artikelnummern
Fassungsvermögen Ø Topf Ø Boden
Modell
EDELSTAHL
Maximaler
Sicherheitsdruck:
4 L 22 cm 15 cm P25342 170 kPa
6 L 22 cm 15 cm P25307 170 kPa
Set 4L + 6L 22 cm 15 cm P25443 170 kPa
7 L 22 cm 15 cm P25308 170 kPa
8 L 22 cm 15 cm P25344 170 kPa
Informationen bzgl. der Normen:
Maximaler Betriebsdruck: 80 kPa
Geeignete Herdarten
• Dieser Schnellkochtopf ist für alle Herdarten, einschließlich Induktion, geeignet.
• Überprüfen Sie bei Verwendung einer elektrischen Kochplatte oder
Induktionskochplatte, dass die Größe der Heizplatte den Durchmesser des
Schnellkochtopfsbodens nicht übersteigt.
• Bei Benutzung von Glaskeramik-Kochfeldern muss darauf geachtet werden, dass
der Topfboden sauber und rückstandsfrei ist.
• Bei der Benutzung auf Gasherden darf die Flamme nicht über den Rand des
Schnellkochtopfs hinausschlagen.
• Bitte stellen Sie bei allen Herdarten sicher, dass Ihr Schnellkochtopf in der Mitte
der Heizplatte steht.
*Bei einigen Modellen ist der Einsatz nicht enthalten
DE
39
Page 42

Zubehör von TEFAL
• Für den Schnellkochtopf sind folgende Zubehörteile verfügbar:
Zubehör Artikelnummer
Dichtungsring X9010101
Dampfkorb* 792185
Dreifuß * 792691
•
Für den Austausch anderer Teile oder für Reparaturen wenden Sie sich an ein
autorisiertes TEFAL-Servicecenter (Nähere Informationen finden Sie auf www.tefal.com).
• Verwenden Sie ausschließlich Original-Zubehör von TEFAL, das für Ihr Modell
geeignet ist.
Gebrauch
Öffnen
• Ziehen Sie mit dem Daumen die Taste zum Öffnen des Topfes (E) nach hinten und
halten Sie sie auf dieser Position - Abb. 1.
• Halten Sie mit einer Hand den langen Topfgriff (L) fest und drehen Sie mit der anderen
Hand den langen Deckelgriff (F) gegen den Uhrzeigersinn, bis der Deckel sich öffnen
lässt. Abb. 2
• Nehmen Sie anschließend den Deckel ab.
Schließen
•
Wenn das Produkt außerhalb des Betriebs
geschlossen ist, ist es
normal, dass der
Deckel sich leicht bewegen lässt. Dieser
Effekt tritt nicht mehr
auf, wenn das Produkt
unter Druck steht.
Legen Sie den Deckel flach auf den Topf auf und
schieben Sie die Positionsanzeigen des Deckels und
Griffs übereinander
•
Drehen Sie den Deckel im Uhrzeigersinn bis zum
Anschlag -
Abb. 4
Falls sich der Deckel nicht drehen lässt, vergewissern Sie
sich, dass die Taste zum Öffnen
zurückgeschoben ist.
.
G(a)
und
G(b)
Abb. 3
- bis der Deckel hörbar einrastet.
.
(E)
weit genug
-
Mindestfüllmenge
• Füllen Sie immer eine Mindestmenge Flüssigkeit in den
Topf. Diese liegt bei 25 cl/250 ml (2 Gläser).
Zum Dampfgaren*:
•
Die Mindestfüllmenge beträgt 75 cl/750 ml (6 Gläser).
•
Setzen Sie den Dampfkorb
vorgesehenen Dreifuß
(K) - Abb. 5
40
(J)
auf den dafür
*Bei einigen Modellen ist der Einsatz nicht enthalten
Die in den
Dampfkorb* gefüllten
Nahrungsmittel
dürfen den Deckel
des Schnellkochtopfs
nicht berühren.
Page 43

Höchstfüllmenge
•
Befüllen Sie Ihren Schnellkochtopf nie über 2/3 der Topfhöhe (Markierung maximaler
Füllstand)
Für einige Lebensmittel:
•
Bei der Zubereitung von Lebensmitteln, die sich während des Garens ausdehnen, wie
zum Beispiel Reis, Hülsenfrüchte oder Kompott usw. darf der Schnellkochtopf nur bis
zur Hälfte seines Fassungsvermögens gefüllt werden.
•
Für Suppen empfehlen wir Ihnen eine schnelle Druckminderung (siehe Abschnitt „Schnelle
Druckminderung“).
(O) - Abb. 6
.
Verwendung des Garreglers (A)
Zum Anbringen des Garreglers (A):
Vorsicht: Dieser Vorgang darf nur durchgeführt werden, wenn
das Produkt kalt und außer Betrieb ist.
• Setzen Sie den Garregler
Symbol •des Garreglers an der Positionsanzeige
• Drücken Sie auf den Garregler herunter, dann drehen Sie ihn
bis zum Symbol oder .
Zum Entfernen des Garreglers:
Vorsicht: Dieser Vorgang darf nur durchgeführt werden, wenn
das Produkt kalt und außer Betrieb ist.
• Drücken Sie auf den Garregler und drehen Sie ihn, um das
Symbol •an der Positionsanzeige
nebenstehender Zeichnung dargestellt.
• Entnehmen Sie den Garregler wie auf der nebenstehenden
Zeichnung dargestellt.
Zum Kochen von Gemüse oder empfindlichen Nahrungsmitteln:
• Positionieren Sie das Piktogramm des Garreglers bei der
Positionsanzeige
Zum Garen von Fleisch oder tiefgefrorenen Nahrungsmitteln:
•
Positionieren Sie das Piktogramm des Garreglers bei der
Positionsanzeige
Zum Abdampfen:
• Drehen Sie stufenweise den Regler
von Ihnen gewünschte Druckablassgeschwindigkeit, um an
der Piktogrammanzeige abzuschließen
stellen Sie Ihren Schnellkochtopf unter fließendes kaltes
Wasser (Abschnitt „SchnelleDruckminderung“).
*Bei einigen Modellen ist der Einsatz nicht enthalten
(A)
(H) - Abb. 7
(H) - Abb. 8
ein und richten Sie dabei das
(H)
.
.
(A)
(H)
aus.
auszurichten, wie in
und wählen Sie die
- Abb. 9
oder
DE
H
41
Page 44

Es ist normal, wenn zu
Betriebsbeginn des
Geräts Dampf im
Bereich der
Druckanzeige (D)
austritt.
• Stellen Sie den Dreifuß
und stellen Sie den Dampfkorb
• Füllen Sie den Topf zu 2/3 mit Wasser (maximale
Füllanzeige
• Schließen Sie den Schnellkochtopf.
• Positionieren Sie das Piktogramm gegenüber der
Positionsanzeige des Garreglers
• Stellen Sie den Schnellkochtopf auf eine Heizquelle und
stellen Sie dann die Maximalleistung ein.
• Wenn der Dampf durch den Regler entweicht, reduzieren
Sie die Heizleistung und warten Sie 20 Minuten.
• Wenn die 20 Minuten vorbei sind, schalten Sie die
Heizquelle aus.
• Drehen Sie den Garregler
gewünschten Geschwindigkeit des Druckablasses auf die
Position
• Wenn die Druckanzeige
Schnellkochtopf nicht mehr unter Druck.
• Öffnen Sie den Schnellkochtopf
• Spülen Sie den Schnellkochtopf mit Wasser aus und
trocknen Sie ihn ab.
(O)
- Abb. 9
(K)
auf den Boden des Topfes
).
.
(D)
abgesunken ist, steht der
Vor dem Garen
• Entnehmen Sie vor jedem Gebrauch den Garregler
Abschnitt „Verwendung des Garreglers“) und vergewissern Sie
sich, dass der Dampfaustritt
nebenstehende Zeichnung). Falls erforderlich, reinigen Sie ihn
mit einem Zahnstocher
• Überprüfen Sie außerdem, ob sich der Stift des
Sicherheitsventils
Zeichnung und im Abschnitt „Reinigung und Pflege"
dargestellt.
• Geben Sie die Zutaten und die Flüssigkeit hinzu.
• Schließen Sie den Schnellkochtopf
Sie sich, dass er richtig geschlossen ist
• Positionieren Sie das Piktogramm oder des Reglers
bei der Positionsanzeige
• Stellen Sie den Schnellkochtopf auf eine Heizquelle und
stellen Sie dann die Maximalleistung ein.
(C)
(B)
nicht blockiert ist (Siehe
- Abb. 10
bewegen lässt, wie in nebenstehender
.
- Abb. 3
- Abb. 4.
(H) - Abb. 7 oder 8
(A)
(siehe
und vergewissern
.
Erstbenutzung
(J)
darauf*.
(H) - Abb. 8
(A)
- Abb. 1 - 2
.
langsam, in der
.
42
*Bei einigen Modellen ist der Einsatz nicht enthalten
Page 45
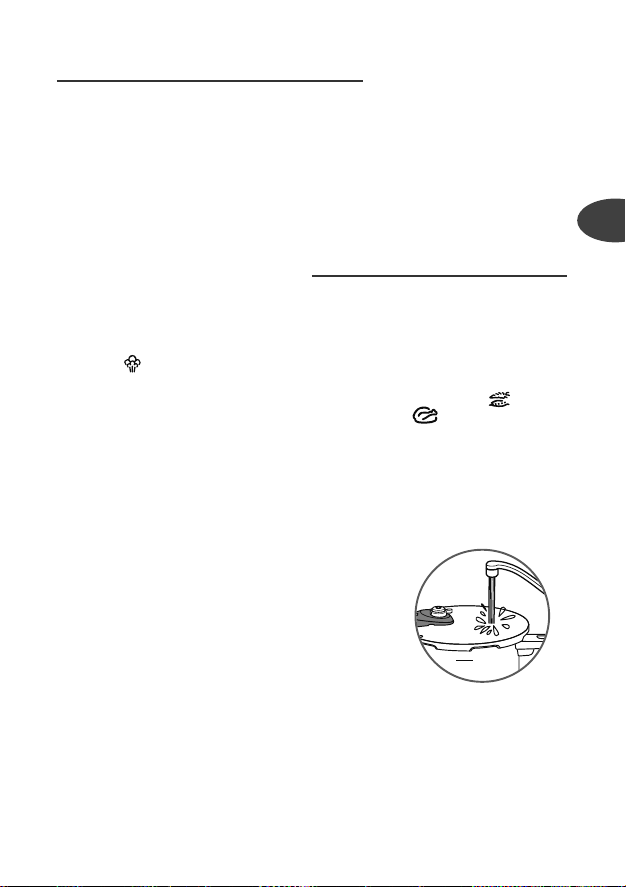
Während des Garens
•
Die Druckanzeige (D)
verhindert, dass der
Druck im
Schnellkochtopf
ansteigt, falls dieser
nicht richtig
geschlossen ist.
Es ist normal, wenn zu Betriebsbeginn des Geräts Dampf
im Bereich der Druckanzeige
•
Sobald ständig Dampf aus dem Garregler
und ein gleichmäßiges Geräusch (PSCHHHT) zu hören ist,
verringern Sie die Leistung der Heizquelle soweit, dass der
Garegler (A) weiterhin gleichmäßig zischt.
•
Warten Sie die im Rezept angegebene Garzeit ab.
•
Wenn die Garzeit verstrichen ist, schalten Sie die Heizquelle
aus.
Ende des Garvorgangs
Ablassen des Dampfs:
- Langsames Abdampfen:
•
Drehen Sie den Garregler
gewünschte Druckablassgeschwindigkeit, auf die
Position
abgesunken ist, steht der Schnellkochtopf nicht mehr
unter Druck.
Die Druckanzeige (D) verhindert das Öffnen des
Schnellkochtopfs, wenn dieser noch unter Druck steht.
- Schnelle Druckminderung:
•
Sie können Ihren Schnellkochtopf unter fließendes kaltes
Wasser stellen, um das Druckablassen zu beschleunigen.
Siehe nebenstehende Darstellung. Wenn die
Druckanzeige
Schnellkochtopf nicht mehr unter Druck.
•
Sie können Ihren Schnellkochtopf nun öffnen
und 2
- Ausnahme:
• Bei emulsiven Lebensmitteln (siehe Gartabelle) oder bei
trockenem Gemüse lassen Sie den Druck nicht ab und
warten Sie ab, bis die Druckanzeige
bevor Sie den Schnellkochtopf öffnen. Reduzieren Sie
gegebenenfalls die empfohlene Garzeit.
- Abb. 9
(D)
.
(A)
langsam, in der
. Wenn die Druckanzeige
abgesunken ist, steht der
(D)
- Abb. 1
(D)
abgefallen ist,
(D)
austritt.
Falls Sie während des
Abdampfens ungewöhnlich viele Spritzer beobachten, stellen Sie den
Garregler (A) auf die
Markierung oder
oder 8 - und lassen Sie
anschließend erneut
langsam den Dampf ab.
Achten Sie dabei darauf,
dass keine weiteren
Spritzer mehr austreten.
Bewegen Sie den unter
Druck stehenden
Schnellkochtopf mit
höchster Vorsicht und
schütteln Sie ihn dabei
nicht.
- Abb. 7
(A)
entweicht
DE
43
Page 46

Reinigung und Pflege
Reinigung des Schnellkochtopfs
Bitte beachten Sie diese Hinweise zur Reinigung und
Pflege Ihres Topfs nach jedem Gebrauch, um seine
Funktionsfähigkeit zu erhalten.
•
Reinigen Sie den Schnellkochtopf (Topf und Deckel)
nach jedem Gebrauch mit lauwarmem Wasser und
etwas Spülmittel. Gehen Sie beim Dampfkorb*
gleichermaßen vor.
•
Verwenden Sie kein Bleichmittel und keine
chlorhaltigen Reinigungsmittel.
•
Erhitzen Sie den Topf nicht im leeren Zustand.
Reinigung des Topfinneren:
•
Reinigen Sie ihn mit einem Schwamm und Spülmittel.
•
Das Auftreten von Flecken auf der inneren Bodenseite
des Behälters beeinflusst in keiner Weise die Qualität
des Metalls. Es handelt sich um Kalkablagerungen.
Um diese zu beseitigen, können Sie einen Schwamm
mit ein wenig Essig einsetzen.
Reinigung der Topfaußenseite:
•
Reinigen Sie ihn mit einem Schwamm und Spülmittel.
Reinigung des Deckels:
•
Reinigen Sie den Deckel unter einem lauwarmem
Wasserstrahl mit einem Schwamm und Spülmittel
und spülen Sie ihn gut ab.
Reinigung des Dichtungsrings:
•
Reinigen Sie nach jedem Garvorgang den
Dichtungsring
•
Wenn Sie den Dichtungsring ersetzen müssen, halten
Sie sich an
Reinigung des Garreglers (A):
•
Entnehmen Sie den Garregler
Abschnitt „Verwendung des Garreglers“.
•
Reinigen Sie den Garregler
Wasser
(l)
Abb. 11 - 12
- Abb. 13
und die Einlegrille.
.
(A)
(A)
.
. Siehe dazu den
unter fließendem
Reinigen Sie Ihren
Schnellkochtopf nach
jedem Gebrauch.
Nach längerem
Gebrauch
auftretende
bräunliche
Verfärbungen und
Streifen stellen keine
Beeinträchtigung der
Funktionstüchtigkeit
dar.
Nur der Topf und der
Korb sind
spülmaschinenfest.
Damit die guten
Eigenschaften Ihres
Schnellkochtopfs
lange erhalten
bleiben, erhitzen Sie
den Topf nicht, wenn
er leer ist.
Nach 10 Jahren
Gebrauch muss der
Schnellkochtopf von
einer autorisierten
TEFAL-Servicestelle
überprüft werden.
44
*Bei einigen Modellen ist der Einsatz nicht enthalten
Page 47

Reinigung des Dampfaustritts (B):
•
Nehmen Sie den Garregler
•
Vergewissern Sie sich bei Tageslicht, dass der
Dampfaustritt nicht verstopft und rund ist. Siehe
nebenstehende Zeichnung. Falls erforderlich, reinigen Sie
ihn mit einem Zahnstocher
Reinigung des Sicherheitsventils (C):
•
Reinigen Sie den Teil des Sicherheitsventils, der sich im
Inneren des Deckels befindet, indem Sie ihn unter
fließendes Wasser halten.
•
Überprüfen Sie die korrekte Funktionsweise, indem Sie
leicht auf den Schwimmer drücken, der ohne Schwierigkeit
einrasten muss. Siehe nebenstehende Zeichnung.
Auswechseln des Dichtungsrings Ihres Schnellkochtopfs:
•
Wechseln Sie den Dichtungsring Ihres Schnellkochtopfs
jedes Jahr aus oder dann, wenn er einen Riss aufweist.
•
Verwenden Sie ausschließlich einen OriginalDichtungsring von TEFAL, der für Ihr Modell geeignet ist.
Zur Aufbewahrung Ihres Schnellkochtopfs:
•
Setzen Sie den Deckel auf den Topf.
(A)
ab.
- Abb. 10
.
Verwenden Sie dazu
niemals scharfe oder
spitze Gegenstände.
Sicherheit
Ihr Schnellkochtopf verfügt über mehrere Sicherheitsvorrichtungen:
• Sicherheit beim Schließen:
- Wenn das Produkt nicht richtig geschlossen ist, kann die Druckanzeige
steigen und somit kann der Schnellkochtopf keinen Druck aufbauen.
• Sicherheit beim Öffnen:
- Wenn der Schnellkochtopf unter Druck steht, kann die Taste zum Öffnen
betätigt werden. Öffnen Sie den Schnellkochtopf niemals mit Gewalt. Wirken Sie
unter keinen Umständen auf die Druckanzeige
• Doppelte Sicherheit gegen Überdruck:
- Erste Sicherung: Das Sicherheitsventil
tritt horizontal über dem Deckel aus
- Zweite Sicherung: Der Dichtungsring
das kleine Loch, das sich am Rand des Deckels oder auf der Längsseite des Topfes
befindet
- Abb.15
Gasherd erlischt.
Vorsicht: Dies kann dazu führen, dass die Flamme auf dem
- Abb.14
(l)
(D)
ein.
(C)
lässt Druck entweichen und der Dampf
lässt den Dampf vertikal entweichen durch
(D)
(E)
DE
nicht
nicht
45
Page 48

Falls eine der Sicherungen gegen Überdruck ausgelöst
wird:
•
Schalten Sie die Heizquelle aus.
•
Lassen Sie den Schnellkochtopf vollständig abkühlen.
•
Öffnen Sie ihn.
•
Überprüfen und reinigen Sie den Garregler
Abb.13
, den Dampfaustritt
Sicherheitsventil
nebenstehende Zeichnung.
(C)
und den Dichtungsring
(B) - Abb.10
(I)
(A) -
, das
. Siehe
Tipps zum Gebrauch
1 - Der Dampf ist sehr heiß, wenn er aus dem Schnellkochtopf austritt. Seien Sie
vorsichtig, damit Sie sich nicht verbrennen. Falls notwendig, verwenden Sie
Topfhandschuhe.
2 - Wenn die Druckanzeige ansteigt, können Sie den Schnellkochtopf nicht mehr
öffnen.
3 - Überwachen Sie den Schnellkochtopf wie alle Kochgeräte aufmerksam, wenn
Sie ihn in der Nähe von Kindern verwenden.
4 - Benutzen Sie zum Tragen des Schnellkochtopfes immer die beiden Topfgriffe.
5 - Bewahren Sie keine Lebensmittel im Schnellkochtopf auf.
6 - Verwenden Sie niemals Bleichmittel oder chlorhaltige Produkte, da diese die
Qualität des Materials beeinträchtigen können.
7 - Den Dichtungsring, den Deckel und den Garregler nicht in der Spülmaschine
reinigen und nicht im Wasser stehen lassen.
8 - Der Dichtungsring Ihres Schnellkochtopfs muss jedes Jahr bzw. wenn er Risse
aufweist ausgetauscht werden.
9 - Der Schnellkochtopf darf erst gereinigt werden, nachdem er vollständig
ausgekühlt ist und geleert wurde.
10 - Nach 10 Jahren Gebrauch muss der Schnellkochtopf bei einer autorisierten
TEFAL Servicestelle überprüft werden.
Garantie
• Für den Topf Ihres neuen TEFAL Schnellkochtopfs gilt eine 10-Jahres-Garantie, sofern
der Schnellkochtopf gemäß der Bedienungsanleitung genutzt wurde, bei:
- allen Mängeln an der Metallstruktur des Topfes,
- vorzeitiger Abnutzung des Grundmetalls.
• Für die übrigen Teile Ihres Schnellkochtopfes besteht für den im Land des Erwerbs
gültigen gesetzlichen Garantiezeitraum und ab dem Kaufdatum eine Garantie
hinsichtlich sämtlicher Herstellungs- oder Materialfehler.
• Die vertragliche Garantie gilt nur bei Vorlage eines gültigen Kaufnachweises, auf
dem das Kaufdatum angegeben ist.
46
Page 49

Die Garantie gilt nicht für:
• Schäden, die auf die Nichteinhaltung von wichtigen Hinweisen oder auf
unsachgemäßen Gebrauch zurückzuführen sind, insbesondere:
- Stöße, Herunterfallen, in einen heißen Ofen stellen,
- Reinigung des Deckels und des Garreglers in der Geschirrspülmaschine.
• Die Garantie kann nur in autorisierten TEFAL Servicestellen geltend gemacht werden
(Nähere Informationen finden Sie auf www.tefal.com).
Gesetzlich vorgeschriebene
Kennzeichnungen
Kennzeichnung Stelle
Angabe des Herstellers oder der Handelsmarke
Herstellungsjahr und -los Am Topf
Artikelnummer des Modells
Maximaler Sicherheitsdruck (SD)
Maximaler Betriebsdruck (BD)
Kapazität Topfboden
• Leisten Sie einen Beitrag zum Umweltschutz!
i Ihr Gerät enthält viele wiederverwertbare oder recycelbare
Materialien.
‹ Geben Sie Ihr Gerät deshalb bitte bei einer Sammelstelle
Ihrer Stadt oder Gemeinde ab.
Topfgriff und Deckelgriff
Am Deckel
TEFAL beantwortet Ihre Fragen
Probleme
Wenn der Schnellkochtopf unter Druck
erhitzt wurde, ohne
dass sich Flüssigkeit
darin befindet:
Lassen Sie Ihren Schnellkochtopf durch eine autorisierte Servicestelle von TEFAL überprüfen.
Empfehlungen
DE
*Bei einigen Modellen ist der Einsatz nicht enthalten
47
Page 50

Probleme
Wenn die Druckanzeige nicht gestiegen
ist und während des
Kochens kein Dampf
aus dem Ventil entweicht:
Wenn die Druckanzeige gestiegen ist
und während des Garvorgangs kein Dampf
aus dem Ventil entweicht:
Wenn Dampf rund
um den Deckel
entweicht, prüfen Sie
Folgendes:
Wenn Sie den Deckel
nicht öffnen können:
Wenn Lebensmittel
im Schnellkochtopf
nicht gar oder
angebrannt sind,
überprüfen Sie
Folgendes:
Wenn Lebensmittel
im Schnellkochtopf
angebrannt sind:
Empfehlungen
Dies ist während der ersten Minuten normal.
Wenn dieses Phänomen anhält, prüfen Sie Folgendes:
- Die Leistung der Heizquelle ist ausreichend hoch; falls nicht,
erhöhen Sie sie.
- Es befindet sich ausreichend Flüssigkeit im Topf.
- Der Garregler ist auf oder eingestellt - Abb. 7 oder 8.
- Der Schnellkochtopf ist richtig geschlossen.
- Der Dichtungsring und der Rand des Topfes sind nicht beschädigt.
Dies ist während der ersten Minuten normal.
Falls dieses Phänomen anhält, stellen Sie Ihr Gerät unter
kaltes Wasser. Siehe hierzu den Abschnitt „Schnelles Druckablassen und Ausnahmen“. Anschließend öffnen Sie das Gerät.
Reinigen Sie den Garregler und und den Dampfaustritt und
überprüfen Sie, Stift des Sicherheitsventils problemlos sinkt.
Der Deckel ist richtig geschlossen.
Der Dichtungsring sitzt richtig im Deckel.
Der Dichtungsring ist in einwandfreiem Zustand. Falls nötig,
tauschen Sie ihn aus.
Der Deckel, der Dichtungsring und die Einlegerille im Deckel,
das Sicherheitsventil und der Garregler sind sauber.
Der Rand des Topfes befindet sich in einwandfreiem Zustand.
Vergewissern Sie sich, dass die Druckanzeige nach unten gesunken ist.
Falls dies nicht so ist, lassen Sie Druck ab. Gegebenenfalls kühlen Sie den Schnellkochtopf unter fließendem kaltem Wasser
ab. Siehe hierzu den Abschnitt „Schnelles Druckablassen und
Ausnahmen“.
die Garzeit
die Leistung der Heizquelle
die korrekte Positionierung des Dampfventils
die Flüssigkeitsmenge
Lassen Sie den Topf vor dem Reinigen einweichen.
Verwenden Sie nie Bleichmittel oder chlorhaltige Reinigungsmittel.
48
Page 51

Gemüse
FRISCH
Artischocken
Blumenkohl - kochen 3 Min. 4 Min.
Brokkoli - dämpfen 3 Min. 3 Min.
Chicorée - dämpfen 12 Min.
Erbsen - dämpfen 1 Min. 30 4 Min.
Erbsenmus (Gemüse, trocken) - kochen 14 Min.
Grüne Bohnen - dämpfen 8 Min. 9 Min.
Grüne Linsen (Gemüse, trocken) - kochen 10 Min.
Grünkohl
Karotten Scheiben - dämpfen 7 Min. 5 Min.
Kartoffeln
Kürbis (püriert) - kochen 8 Min.
Lauchscheiben - Dampf 2 Min. 30
Pilze
Reis - kochen 7 Min.
Rosenkohl - dämpfen 7 Min. 5 Min. - kochen
Rote Beete - dämpfen 20 - 30 Min.
Sellerie
Spargel - kochen 5 Min.
Spinat
Steckrüben
Trockenerbsen - kochen 20 Min.
Weizen (Gemüse, trocken) - kochen 15 Min.
Zucchini
zerkleinert - dämpfen 6 Min.
ohne Blätter - dämpfen 7 Min.
geviertelt - dämpfen 12 Min.
zerkleinert - dämpfen 1 Min. 5 Min.
ganz - kochen 1 Min. 30
** Nahrungsmittel im Dampfkorb*
*** Nahrungsmittel im Wasser
Garmethode
- dämpfen** 18 Min.
- kochen*** 15 Min.
- kochen 6 Min.
- dämpfen 6 Min.
- kochen 10 Min.
- dämpfen 5 Min. 8 Min.
- kochen 3 Min.
- dämpfen 7 Min.
- kochen 6 Min.
- dämpfen 6 Min. 30 9 Min.
- kochen 2 Min.
Einstellung des
Garregler
TIEFGEFROREN
Einstellung des
Garreglers
DE
Fleisch und Fisch
FRISCH
Hähnchen (ganz, 1,2 kg) 20 Min.
Lachs (4 Scheiben, 0,6 kg) 6 Min.
Lamm (Keule, 1,3 kg) 25 Min.
Rind (Braten, 1 kg) 10 Min.
Seeteufel (Filet, 0,6 kg) 4 Min.
Schwein (Braten, 1 kg) 25 Min.
Thunfisch (4 Steaks, 0,6 kg) 7 Min.
*Bei einigen Modellen ist der Einsatz nicht enthalten
Einstellung des Garregler
TIEFGEKÜHLT
Einstellung des Garreglers
45
Min.
8
Min.
35
Min.
28
Min.
6
Min.
45
Min.
9
Min.
49
Page 52

PRECAUZIONI IMPORTANTI
Per garantire la sicurezza, l'apparecchio è conforme alle norme e ai regolamenti vigenti:
- Direttiva apparecchi a pressione
- Materiali a contatto con gli alimenti
- Ambiente
• Questo apparecchio è stato progettato per il solo uso domestico.
• Leggere attentamente tutte le istruzioni e fare sempre riferimento al "Manuale d'uso".
• Come per qualsiasi apparecchio di cottura, prestare particolare attenzione soprattutto durante l’uso
della pentola a pressione nelle vicinanze dei bambini.
• Non collocare la pentola a pressione in un forno caldo.
• Adoperare la massima cautela durante lo spostamento della pentola quando è in pressione. Non
toccare le superfici calde. Utilizzare i manici e le manopole. Indossare i guanti se necessario.
• Verificare regolarmente che i manici della pentola siano ben fissati. Riavvitarli, se necessario.
• Utilizzare la pentola a pressione unicamente allo scopo per cui è destinata.
• La pentola cuoce a pressione. Un utilizzo inadeguato può causare ustioni da acqua bollente. Prima
di ogni utilizzo della pentola a pressione, assicurarsi che sia adeguatamente chiusa. Consultare il
paragrafo "Chiusura".
• Non forzare mai l’apertura della pentola a pressione. Assicurarsi che la pressione interna si sia ridotta.
Consultare il paragrafo “Sicurezza”.
• Non utilizzare mai la pentola a pressione senza liquido, poiché potrebbe subire gravi danni. Assicurarsi
che, durante la cottura, vi sia sempre una quantità di liquido sufficiente.
• Utilizzare fonti di calore compatibili, conformemente alle istruzioni per l'uso.
• Non utilizzare mai la pentola a pressione per preparare ricette a base di latte.
• Non utilizzare sale grosso nella pentola a pressione, ma aggiungere sale fino a fine cottura.
• Non riempire la pentola a pressione per più di 2/3 (livello di riempimento massimo).
• Per gli alimenti che si dilatano durante la cottura, come il riso, i legumi secchi o le composte, ... riempire
la pentola a pressione non oltre la metà della sua capacità. Per alcune zuppe a base di zucca, zucchine,
... far raffreddare la pentola a pressione per qualche minuto, quindi raffreddarla sotto l'acqua fredda.
Nei modelli da 3 e 4L, per gli alimenti pastosi o che si dilatano durante la cottura, non riempire la
pentola oltre 1/3. A fine cottura, aspettare 5 minuti prima di lasciare la pressione sotto l'acqua.
• Dopo aver cotto carni con pelle superficiale (ad es. lingua di bue ...) che rischia di gonfiarsi per effetto
della pressione, per non scottarsi evitare di pungere la carne quando la pelle è gonfia. Pungere la
carne prima della cottura.
• Per gli alimenti pastosi (piselli spezzati, rabarbaro ...), scuotere leggermente la pentola a pressione
prima di aprirla per evitare che il contenuto schizzi all'esterno.
• Prima di ogni utilizzo, assicurarsi che le valvole non siano ostruite. Consultare il paragrafo "Prima della
cottura".
• Non utilizzare la pentola a pressione per friggere a pressione con l’olio.
• Limitare gli interventi sui sistemi di sicurezza con le azioni di pulizia e manutenzione.
• Utilizzare unicamente ricambi originali TEFAL corrispondenti al modello. Specificamente, utilizzare
una pentola e un coperchio TEFAL.
• I vapori d'alcol sono infiammabili. Portare a ebollizione per 2 minuti circa prima di mettere il
coperchio. Tenere sotto controllo l'apparecchio quando si fanno ricette a base di alcol.
• Non utilizzare la pentola a pressione per conservare alimenti acidi o salati prima o dopo la cottura,
altrimenti si rischia di degradare la pentola.
• Se si riscontra che una parte della pentola a pressione è rotta o crepata, non cercare in alcun
modo di aprire la pentola se è chiusa; aspettare che si raffreddi completamente prima di
spostarla, non utilizzarla più e portarla a riparare presso un Centro assistenza autorizzato TEFAL.
CONSERVARE QUESTE ISTRUZIONI
50
Page 53

Schema descrittivo
A. Valvola di funzionamento
B. Sfiato del vapore
C. Valvola di sicurezza
D. Indicatore di presenza di pressione
E. Pulsante di apertura
F. Manico del coperchio
G(a). Riferimento di posiziona-
mento del coperchio
G(b). Riferimento di posizionamento
del coperchio rispetto alla pentola
H. Riferimento di posizionamento
della valvola di funzionamento
I. Guarnizione del coperchio
J. Cestello vapore*
K. Treppiedi*
L. Manico lungo della pentola
M. Pentola
N.Manico corto della pentola
O. Riferimento massimo di riempi-
mento
Caratteristiche
Diametro del fondo della pentola a pressione - modelli
Capacità Ø Pentola Ø Fondo
Modello
INOX
Pressione massima
di sicurezza:
4 L 22 cm 15 cm P25342 170 kPa
6 L 22 cm 15 cm P25307 170 kPa
Set 4L + 6L 22 cm 15 cm P25443 170 kPa
7 L 22 cm 15 cm P25308 170 kPa
8 L 22 cm 15 cm P25344 170 kPa
Informazioni normative:
Pressione superiore di funzionamento: 80 kPa
Fonti di calore compatibili
GAS PIASTRA
ELETTRICA
VETROCERAMICA
ALOGENA
RADIANTE
INDUZIONE
ELETTRICITÀ
A SPIRALE
IT
• Questa pentola a pressione è adatta a tutte le fonti di calore.
• Su una cucina elettrica o a induzione, assicurarsi che le dimensioni della
piastra non superino quelle della base della pentola a pressione.
• Su una cucina in ceramica o alogena, assicurarsi che la base della pentola
a pressione sia sempre pulita ed asciutta.
• Su una cucina a gas, la fiamma non deve oltrepassare il diametro della
base della pentola a pressione.
• Su tutti i tipi di fonti di calore, assicurarsi che la pentola a pressione sia ben
centrata.
*Cestello non incluso in certi modelli
51
Page 54

Accessori TEFAL
• Gli accessori per la pentola a pressione sono disponibili:
Accessorio Numero di riferimento
guarnizione X9010101
Cestello vapore* 792185
Treppiedi* 792691
• Per la sostituzione di altri componenti o per le riparazioni, rivolgersi ad un
centro assistenza autorizzato TEFAL (fare riferimento a: www.tefal.com).
• Utilizzare unicamente ricambi originali TEFAL corrispondenti al modello.
Utilizzo
Apertura
• Con il pollice, tirare il pulsante di apertura (E) verso l'esterno e mantenerlo in
questa posizione - fig. 1.
• Mantenendo con una mano il manico lungo della pentola a pressione (L),
ruotare con l'altra mano il manico lungo del coperchio (F) in senso antiorario,
fino all'apertura - fig. 2.
• Sollevare quindi il coperchio.
Chiusura
Quando la pentola
non è sul fuoco ed è
installato il coperchio, è normale che
il coperchio si
muova. L'effetto
scompare quando il
prodotto è in pressione.
• Poggiare bene il coperchio sulla pentola a
pressione allineando i riferimenti di
posizionamento del coperchio G(a) e G(b).
• Ruotare il coperchio in senso orario fino all'arresto
- fig. 3 finché non si sente il rumore di
azionamento del pulsante - fig. 4.
Se non si riesce a ruotare il coperchio, assicurarsi che
il pulsante di apertura (E) sia ben tirato verso
l'esterno.
Riempimento minimo
• Versare sempre una quantità minima di liquido pari
a 25 cl/ 250 ml (2 bicchieri).
Per la cottura a vapore*:
• La quantità di liquido deve essere pari ad almeno
75 cl/ 750 ml (6 bicchieri).
• Poggiare il cestello* (J) sull'apposito supporto* (K)
- fig. 5.
52
Gli alimenti
contenuti nel
cestello vapore* non
devono toccare il
coperchio della
pentola a pressione.
*Cestello non incluso in certi modelli
Page 55

Riempimento Massimo
• Non riempire mai la pentola a pressione oltre i 2/3 dell'altezza della pentola
stessa (livello di riempimento massimo) (O) - fig. 6.
Per alcuni alimenti:
• Per gli alimenti che si dilatano durante la cottura, come il riso, gli ortaggi
essiccati o le composte, ... riempire la pentola a pressione non oltre la metà
della sua capacità.
• Per le zuppe, si consiglia di effettuare una decompressione rapida (consultare
il paragrafo "Decompressione rapida").
Utilizzo della valvola
di funzionamento (A)
Per installare la valvola di funzionamento (A):
Attenzione, queste operazioni vanno eseguite
esclusivamente quando il prodotto è freddo e non è in
funzione.
• Posizionare la valvola di funzionamento (A)allineando
il pittogramma •della valvola con il riferimento di
posizionamento (H).
• Premere la valvola, quindi ruotarla fino al pittogramma
o .
Per rimuovere la valvola di funzionamento:
Attenzione, queste operazioni vanno eseguite
esclusivamente quando il prodotto è freddo e non è in
funzione.
• Premere la valvola e ruotarla in modo da allineare il
pittogramma •con il riferimento di posizionamento
(H), come nel disegno accanto.
• Rimuovere la valvola come nel disegno accanto.
Per cuocere verdure o alimenti delicati:
• Posizionare il pittogramma della valvola in
corrispondenza del riferimento di posizionamento (H) -
fig. 7.
Per cuocere carne o alimenti surgelati:
• Posizionare il pittogramma della valvola in
corrispondenza del riferimento di posizionamento (H) -
fig. 8.
IT
H
53
Page 56

Per lasciar fuoriuscire il vapore:
• Ruotare gradualmente la valvola (A) scegliendo la velocità di
decompressione desiderata, arrestandosi in corrispondenza del
riferimento del pittogramma - fig. 9, oppure collocare la
pentola a pressione sotto il getto di acqua fredda del rubinetto
(paragrafo "Decompressione rapida").
Primo utilizzo
• Porre il supporto del cestello (K) sul fondo della pentola a
pressione e collocarvi sopra il cestello (J)*.
All'inizio del
funzionamento
del prodotto, è
normale che al
livello
dell'indicatore
di presenza di
pressione (D) vi
sia del vapore.
• Riempire la pentola d'acqua fino ai 2/3 (livello di
riempimento massimo (O)).
• Chiudere la pentola a pressione.
• Posizionare il pittogramma in corrispondenza del
riferimento di posizionamento (H) - fig. 8.
• Porre la pentola a pressione su una fonte di calore, quindi
regolarla alla massima potenza.
• Quando il vapore inizia a fuoriuscire dalla valvola, ridurre la
fonte di calore e lasciar trascorrere 20 minuti.
• Trascorsi i 20 minuti, spegnere la fonte di calore.
• Ruotare progressivamente la valvola (A) scegliendo in base
alle proprie esigenze la velocità di decompressione,
arrestandosi in corrispondenza del pittogramma - fig. 9.
• Quando l'indicatore di presenza di pressione (D) si abbassa,
la pentola a pressione non si trova più in pressione.
• Aprire la pentola a pressione - fig. 1 - 2.
• Sciacquare la pentola a pressione con acqua ed asciugarla.
Prima della cottura
• Prima di ogni utilizzo, togliere la valvola (A) (vedere il
paragrafo "Utilizzo della valvola di funzionamento") e
controllare visivamente, alla luce del giorno, che lo
sfiato del vapore (B) non sia ostruito (Vedere disegno
a fianco). Se necessario, liberarlo con uno stecchino -
fig. 10.
• Assicurarsi che la sfera della valvola di sicurezza (C)sia
mobile; vedere il disegno accanto ed il paragrafo
"Pulizia e manutenzione".
• Aggiungere gli ingredienti ed il liquido.
54
*Cestello non incluso in certi modelli
Page 57

• Chiudere la pentola a pressione - fig. 3 e controllare
che sia ben chiusa - fig. 4.
• Posizionare il pittogramma o della valvola in
corrispondenza del riferimento di posizionamento H -
fig. 7 o 8.
• Porre la pentola a pressione su una fonte di calore,
quindi regolarla alla massima potenza.
Durante la cottura
• All'inizio del funzionamento del prodotto, è normale
L'indicatore di
presenza di
pressione (D)
impedisce che la
pentola a pressione
aumenti di
pressione se non è
ben chiusa.
che al livello dell'indicatore di presenza di pressione
(D) vi sia del vapore.
• Quando dalla valvola di funzionamento (A) esce
vapore in maniera continua, con emissione di un
rumore costante (PSCCCT), ridurre la fonte di calore
in modo che la valvola (A) continui ad emettere un
mormorio regolare.
• Far passare il tempo di cottura indicato nella ricetta.
• Trascorso il tempo di cottura, spegnere la fonte di
calore.
Fine cottura
Per liberare il vapore:
- Decompressione lenta:
• Ruotare progressivamente la valvola (A)scegliendo
la velocità di decompressione desiderata e
arrestarla in corrispondenza del riferimento del
pittogramma - fig. 9. Quando l'indicatore di
presenza di pressione (D) si abbassa, la pentola a
pressione non si trova più in pressione.
L'indicatore di presenza di pressione (D)
impedisce l'apertura della pentola a pressione se
questa si trova ancora in pressione.
- Decompressione rapida:
• Per accelerare la decompressione, porre la pentola
a pressione sotto l'acqua fredda; vedere lo schema
accanto. Il riabbassamento dell'indicatore di
presenza di pressione (D) indica che la pentola non
è più in pressione.
• Ora è possibile aprire la pentola a pressione - fig.
1 e 2.
- Caso particolare:
IT
Se durante la liberazione del vapore si osservano schizzi
anomali, riposizionare
la valvola di funzionamento (A) sul riferimento o - fig.
7 o 8 - quindi effettuare lentamente una
nuova decompressione, assicurandosi
che non si producano
più schizzi.
55
Page 58

• Quando si cuociono alimenti emulsivi (vedere la
tabella di cottura) o legumi secchi, non effettuare
la decompressione e, prima di procedere
all'apertura, attendere la discesa dell'indicatore di
presenza di pressione (D). Prevedere di ridurre
leggermente i tempi di cottura indicati.
Pulizia e manutenzione
Pulizia della pentola a pressione
Per il corretto funzionamento dell'apparecchio,
rispettare le seguenti operazioni di pulizia e
manutenzione dopo ogni utilizzo.
• Dopo ogni utilizzo, lavare la pentola a pressione
(pentola e coperchio) con acqua tiepida e
detergente per i piatti. Procedere allo stesso
modo per il cestello*.
• Non utilizzare candeggina o prodotti contenenti
cloro.
• Non surriscaldare la pentola quando è vuota.
Per pulire l'interno della pentola:
• Lavare con una spugna e detersivo per piatti.
• La comparsa di macchie sul fondo interno della
pentola non altera in alcun modo la qualità del
metallo. Si tratta di depositi calcarei. Per farle
scomparire, utilizzare una spugnetta con un po' di
aceto bianco.
Per pulire l'esterno della pentola:
• Lavare con una spugna e detersivo per piatti.
Per pulire il coperchio:
• Lavare il coperchio sotto un getto leggero
d'acqua tiepida, con una spugna e detergente
per i piatti, quindi sciacquare bene.
Per pulire la guarnizione del coperchio:
• Dopo ogni cottura, pulire la guarnizione (I) ed il
relativo alloggiamento.
• Per rimettere in sede la guarnizione, fare
riferimento alle - fig. 11 - 12.
Per pulire la valvola di funzionamento (A):
Quando la pentola è
in pressione, procedere con la massima
cautela quando la si
sposta, evitando di
agitarla.
Lavare la pentola a
pressione dopo ogni
utilizzo.
In seguito a un
utilizzo prolungato,
sulla superficie della
pentola possono
comparire righe o
zone scure, ciò non
provoca
inconvenienti.
È possibile lavare in
lavastoviglie solo la
pentola ed il
cestello.
Per conservare più a
lungo le qualità
della pentola a
pressione, non
surriscaldarla
quando è vuota.
Far verificare la
pentola a pressione
presso un centro
assistenza
autorizzato TEFAL
ogni 10 anni di
utilizzo.
56
*Cestello non incluso in certi modelli
Page 59

• Rimuovere la valvola di funzionamento (A); vedere
il paragrafo "Utilizzo della valvola di
funzionamento".
• Pulire la valvola di funzionamento (A)sotto il getto
d'acqua del rubinetto - fig. 13.
Per pulire lo sfiato del vapore (B):
• Rimuovere la valvola (A).
• Controllare visivamente sotto la luce che lo sfiato
del vapore sia libero e tondo. Vedere il disegno
accanto. Se necessario, liberarlo con uno stecchino
- fig. 10.
Per la pulizia della valvola di sicurezza (C):
• Pulire la parte della valvola di sicurezza situata
all'interno del coperchio mettendo quest'ultimo
sotto l'acqua.
• Verificarne il buon funzionamento premendo
leggermente la sfera, che deve abbassarsi senza
difficoltà. Vedere il disegno accanto.
Per sostituire la guarnizione della pentola a
pressione:
• Sostituire la guarnizione della pentola a pressione
ogni anno, o qualora presenti un taglio.
• Utilizzare sempre guarnizioni originali TEFAL
corrispondenti al modello.
Per riporre la pentola a pressione:
• Capovolgere il coperchio e posizionarlo sulla
pentola.
Non utilizzare mai
oggetti taglienti o
appuntiti per effettuare questa operazione.
Sicurezza
La pentola a pressione è dotata di diversi dispositivi di sicurezza:
• Sicurezza per la chiusura:
- Se la pentola non è stata chiusa correttamente, l'indicatore di presenza di
pressione (D) non può salire, e la pentola a pressione non può, di
conseguenza, salire in pressione.
• Sicurezza per l'apertura:
- Se la pentola a pressione si trova sotto pressione, non è possibile azionare
il pulsante di apertura (E). Non forzare mai l’apertura della pentola a
pressione. In ogni caso, non agire assolutamente sull'indicatore di
presenza di pressione (D).
• Due dispositivi di sicurezza per la sovrapressione:
IT
57
Page 60

- Primo dispositivo: la valvola di sicurezza (C) libera la pressione e fuoriesce
del vapore orizzontalmente sulla superficie esterna del coperchio - fig.14
- Secondo dispositivo: la guarnizione (I) lascia fuoriuscire del vapore
verticalmente attraverso il piccolo foro situato sul bordo del coperchio o
lungo la pentola - fig.15. Attenzione, su un fornello a gas, vi è il rischio che
la fiamma si spenga.
Se uno dei due sistemi di sicurezza per la
sovrapressione si attiva:
• Spegnere il fornello.
• Far raffreddare completamente la pentola a
pressione.
• Aprire.
• Verificare e pulire la valvola di funzionamento (A) -
fig.13, lo sfiato del vapore (B) - fig.10, la valvola di
sicurezza (C) e la guarnizione (I). Vedere il disegno
accanto.
Consigli d'uso
1 - Il vapore che fuoriesce dalla pentola a pressione è molto caldo; fare
pertanto attenzione a non bruciarsi. Indossare i guanti se necessario.
2 - Non appena l'indicatore di presenza di pressione si alza, non è più possibile
aprire la pentola a pressione.
3 - Come per qualsiasi apparecchio di cottura, prestare particolare attenzione
durante l’uso della pentola a pressione in vicinanza di bambini.
4 - Per spostare la pentola a pressione, servirsi degli appositi manici.
5 - Non lasciare a lungo gli alimenti all'interno della pentola.
6 - Per non alterare la qualità dell'acciaio inossidabile, non utilizzare mai
candeggina né prodotti clorati.
7 - Non lavare mai in lavastoviglie né lasciare in ammollo le seguenti parti: la
guarnizione, il coperchio e la valvola di funzionamento.
8 - Sostituire la guarnizione ogni anno o in caso di taglio.
9 - La pulizia della pentola a pressione deve essere eseguita a freddo e ad
apparecchio vuoto.
10 - Ogni 10 anni di utilizzo, è assolutamente necessario far verificare la
pentola presso un centro assistenza autorizzato TEFAL.
Garanzia
• Nel rispetto dell'utilizzo indicato nelle istruzioni d'uso, la pentola a pressione
TEFAL è garantita 10 anni per:
- ogni difetto legato alla struttura metallica della pentola stessa,
- ogni deterioramento prematuro del metallo di base.
• Tutti gli altri pezzi della pentola a pressione sono garantiti contro
58
Page 61

qualsiasi difetto di fabbricazione o di materiale, per il periodo di garanzia
stabilito dalla legge in vigore nel paese di acquisto e a partire dalla data
di acquisto.
• Tale garanzia contrattuale si applica dietro presentazione dello scontrino
o della ricevuta fiscale recanti la data di acquisto.
Queste garanzie escludono:
• I deterioramenti dovuti al mancato rispetto delle precauzioni d'uso o a
utilizzi impropri, quali:
- urti, cadute, cottura in forno, ecc.
- lavaggio in lavastoviglie del coperchio e della valvola di funzionamento.
• I centri assistenza autorizzati TEFAL sono gli unici abilitati ad applicare la
garanzia (fare riferimento a: www.tefal.com).
Marcatura regolamentare
Marcatura Posizione
Contrassegno identificativo del fabbricante
e marchio commerciale
Anno e lotto di fabbricazione Sulla pentola
N. modello
Pressione massima di sicurezza (PS)
Pressione superiore di funzionamento (PF)
Capacità ondo della pentola
• Partecipiamo alla tutela dell'ambiente!
i Questo apparecchio è composto da diversi materiali che
possono essere smaltiti o riciclati.
‹ Per il suo smaltimento, depositarlo presso un centro per la
raccolta differenziata.
Manico della pentola e manico del coperchio
Sul coperchio
IT
59
Page 62
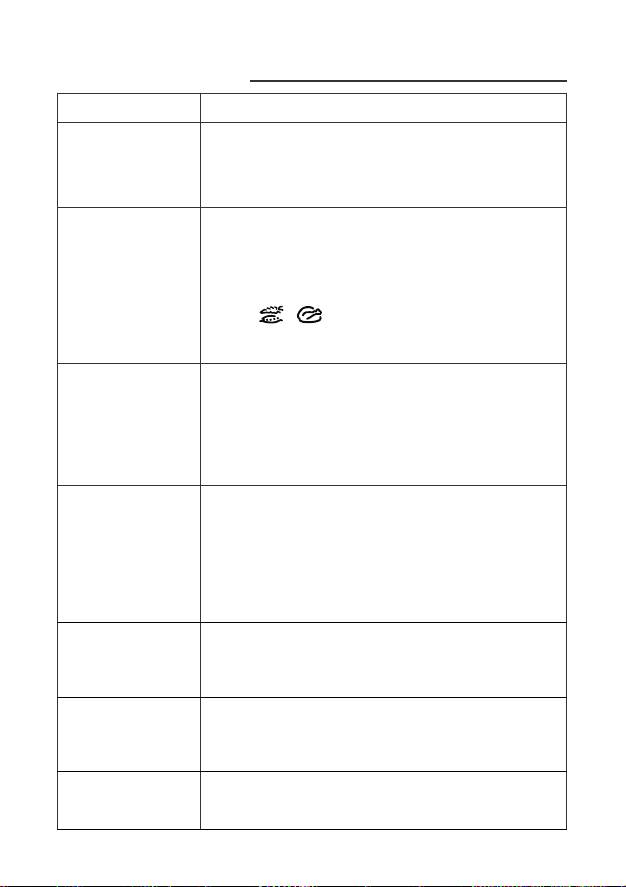
TEFAL risponde
Problemi Soluzioni
La pentola a pressione è stata riscaldata in pressione in
assenza di liquido al
suo interno:
L'indicatore di presenza di pressione
non è salito e durante la cottura non
vi è fuoriuscita di vapore dalla valvola:
L'indicatore di presenza di pressione è
salito e durante la
cottura non si verificano fuoriuscite
dalla valvola:
Fuoriesce vapore dal
coperchio:
Non si riesce ad
aprire il coperchio:
Alimenti non cotti o
bruciati. Controllare:
Se nella pentola a
pressione si sono
bruciati degli alimenti:
Far controllare la pentola a pressione da un centro di assistenza autorizzato TEFAL.
Nei primi minuti si tratta di un fenomeno normale.
Se il fenomeno persiste, verificare che:
- la fonte di calore sia sufficientemente potente e, se necessario,
aumentarla,
- la quantità di liquido presente nella pentola sia sufficiente,
- la valvola di funzionamento sia posizionata su uno dei pittogrammi o - fig. 7 o 8,
- la pentola a pressione sia chiusa bene,
- la guarnizione o il bordo della pentola non siano rovinati.
Nei primi minuti si tratta di un fenomeno normale.
Se il fenomeno persiste, passare la pentola a pressione sotto un
getto d'acqua fredda; vedere i paragrafi "Decompressione rapida
e Caso particolare”; quindi aprire la pentola.
Pulire la valvola di funzionamento e lo sfiato del vapore e verificare che la sfera della valvola di sicurezza possa essere abbassata
senza difficoltà.
verificare la corretta chiusura del coperchio,
verificare il posizionamento della guarnizione nel coperchio,
verificare le condizioni della guarnizione e, se necessario, sostituirla,
verificare la pulizia del coperchio, della guarnizione e del relativo
alloggiamento nel coperchio, della valvola di sicurezza e della valvola di funzionamento,
verificare il bordo della pentola (che sia in buono stato).
verificare che l'indicatore di presenza di pressione sia abbassato.
In caso contrario, procedere alla decompressione, se necessario,
raffreddare la pentola a pressione sotto un getto d'acqua fredda;
vedere i paragrafi "Decompressione rapida e Caso particolare".
i tempi di cottura,
la potenza della fonte di calore,
il corretto posizionamento della valvola di funzionamento,
la quantità di liquido.
Lasciare la pentola a mollo per un po' di tempo prima di lavarla.
Non utilizzare mai candeggina o prodotti contenenti cloro.
60
Page 63

Verdure
FRESCHI
Asparagi - immersione 5 min. Barbabietole rosse - vapore 20 - 30 min. Broccoli - vapore 3 min. 3 min.
Carciofi
Carote
(alimenti emulsivi)
Cavoletti di Bruxelles - vapore 7 min. 5 min. - immersione
Cavolfiore - immersione 3 min. 4 min.
Cavolo cappuccio
Fagiolini - vapore 8 min. 9 min.
Fagioli semi-secchi - immersione 20 min. -
Funghi
Grano (legumi secchi) - immersione 15 min. Insalata belga - vapore 12 min. Lenticchie verdi (legumi secchi) - immersione 10 min. -
Patate a pezzi
Piselli - vapore 1 min. 30 4 min.
Piselli spezzati (legumi secchi) - immersione 14 min. -
Porri affettati - vapore 2 min. 30 -
Rape
Riso (legumi secchi) - immersione 7 min. Sedano
Spinaci
Zucca (purè)
Zucchine
(alimenti emulsivi)
affettate - vapore 7 min. 5 min.
a fettine
sottili
a foglie - vapore 7 min. -
a fettine
sottili
interi - immersione 1 min. 30 -
Cottura
- vapore** 18 min. -
- immersione***
- vapore 6 min. -
- vapore 1 min. 5 min.
- vapore 12 min. -
- immersione 6 min. -
- vapore 7 min. -
- immersione 6 min. -
- vapore 6 min. -
- immersione 10 min. -
- vapore 5 min. 8 min.
- immersione 3 min. -
- immersione 8 min. -
- vapore 6 min. 30 9 min.
- immersione 2 min.
** Alimento nel cestello vapore*
*** Alimento in acqua
Posizione della
valvola
15 min. -
SURGELATI
Posizione della
valvola
-
Carne e pesce
FRESCHI
Posizione della
Agnello (cosciotto 1,3 Kg) 25 min.
Maiale (arrosto 1 Kg) 25 min.
Manzo (arrosto 1 Kg) 10 min.
Pollo (intero 1,2 Kg) 20 min.
Rana pescatrice (filetti 0,6 Kg) (alimenti emulsivi) 4 min.
Salmone (4 tranci 0,6 Kg)(alimenti emulsivi) 6 min.
Tonno (4 tranci 0,6 Kg) (alimenti emulsivi) 7 min.
*Cestello non incluso in certi modelli
valvola
SURGELATI
Posizione della
valvola
35 min.
45 min.
28 min.
45 min.
6 min.
8 min.
9 min.
IT
61
Page 64

VIKTIGA FÖRSIKTIGHETSÅTGÄRDER
För din säkerhets skull uppfyller denna apparat kraven enligt gällande standarder och föreskrifter:
– Direktivet om tryckbärande anordningar
– Material i kontakt med livsmedel
– Miljö
• Denna apparat är avsedd för hushållsbruk.
• Ta dig tid att läsa igenom alla anvisningar och använd alltid användarhandboken som referens.
• Precis som för alla matlagningsapparater är det viktigt att noga övervaka tryckkokaren, särskilt
om den används i närheten av barn.
• Placera inte tryckkokaren i en varm ugn.
• Var ytterst försiktig om du flyttar tryckkokaren medan den är trycksatt. Vidrör inte de heta ytorna.
Använd handtagen och knapparna. Använd grytlappar vid behov.
• Kontrollera regelbundet att handtagen på kärlet sitter ordentligt fast. Skruva åt dem vid behov.
• Använd inte tryckkokaren för något annat ändamål än den avsedda användningen.
• I tryckkokaren sker tillagningen under tryck. Felaktig användning kan orsaka personskador genom
skållning. Säkerställ att tryckkokaren är ordentligt stängd innan den tas i drift. Se avsnittet
”Stängning”.
• Öppna aldrig tryckkokaren genom att tvinga upp den. Säkerställ att det invändiga trycket har
sjunkit. Se avsnittet ”Säkerhet”.
• Använd aldrig tryckkokaren utan vätska eftersom det skulle orsaka allvarliga produktskador.
Säkerställ att det alltid finns tillräckligt mycket vätska under tillagningen.
• Använd den/de kompatibla värmekällan/-källorna enligt bruksanvisningen.
• Laga aldrig mat efter recept med mjölk som bas i tryckkokaren.
• Använd aldrig grovt salt i tryckkokaren. Tillsätt salt vid slutet av tillagningstiden.
• Fyll aldrig tryckkokaren över 2/3 (markeringen för högsta fyllningsnivå).
• För livsmedel som sväller under tillagningen, som ris, torkade baljväxter eller kompotter osv., får
tryckkokaren inte fyllas till över halva sin volym. För vissa soppor baserade på pumpa, squash osv.,
låt tryckkokaren svalna under några minuter, kyl därefter ned den i kallvatten. Vad gäller
modellerna på 3 l och 4 l ska apparaten inte fyllas till mer än 1/3 vid tillagning av livsmedel som
är tjocka eller sväller. Efter tillagning, vänta 5 minuter och sänk sedan trycket under vatten.
• Efter tillagning av kött med en ytlig hinna (t.ex. oxtunga osv.), som kan svälla upp till följd av
trycket, ska du inte sticka i köttet så länge hinnan ser uppblåst ut eftersom det finns en risk för
skållning. Stick hål i köttet innan tillagningen.
• Vid tillagning av livsmedel som bildar en massa (ärtpuré, rabarber osv.) ska du skaka tryckkokaren
något innan du öppnar den, så att dessa livsmedel inte stänker ut.
• Kontrollera ventilerna före varje användning, för att säkerställa att de inte är igensatta. Se avsnittet
”Före tillagningen”.
• Använd inte tryckkokaren för att fritera under tryck med olja.
• Gör inga ingrepp på säkerhetssystemen, utöver enligt rengörings- och underhållsanvisningarna.
• Använd endast originaldelar från TEFAL som motsvarar din modell. Var särskilt noga med att
använda ett kärl och ett lock från TEFAL.
• Alkoholångor är antändliga. Koka upp och låt koka i ca 2 minuter innan du sätter på locket.
Övervaka apparaten när du lagar mat efter recept baserade på alkohol.
• Använd inte tryckkokaren för att förvara syrliga eller salta livsmedel före och efter tillagningen
eftersom det kan leda till att kärlet skadas.
Om du under användning av din tryckkokare skulle upptäcka att någon del av den är trasig
•
eller spräckt, skall du under inga omständigheter försöka öppna den; stäng av värmen och låt
den stå kvar på spisen och kallna helt och hållet innan den flyttas eller locket öppnas. Använd
den inte igen utan ta den till ett av TEFALs godkända servicecenter för reparation.
SPARA DE HÄR ANVISNINGARNA
62
Page 65

Beskrivande schema
A. Funktionsventil
B. Rör för bortledning av ånga
C. Säkerhetsventil
D. Tryckindikator
E. Knapp för öppning
F. Lockhandtag
G(a). Lägesmarkering till locket
G(b). Lägesmarkering för locket i
förhållande till kärlet
H. Lägesmarkering för funktionsven-
tilen
I. Packning
J. Ångkorg*
K. Stativ*
L. Långt handtag till kärlet
M. Kärl
N.Kort handtag till kärlet
O. Markering för högsta fyllningsnivå
Kännetecken
Diameter på tryckkokarens botten – referenser
Kapacitet Ø Kärl Ø Botten
Modell
Rostfritt stål
Maximalt
säkerhetstryck:
4 L 22 cm 15 cm P25342 170 kPa
6 L 22 cm 15 cm P25307 170 kPa
Set 4L + 6L 22 cm 15 cm P25443 170 kPa
7 L 22 cm 15 cm P25308 170 kPa
8 L 22 cm 15 cm P25344 170 kPa
Normativ information:
Övre driftstryck: 80 kPa
Kompatibla värmekällor
GAS LEKTRISK
PLATTA
KERAMISK
HALOGEN
STRÅLNINGSVÄRME
• Tryckkokaren kan användas med alla typer av värmekällor.
• Om du använder en elektrisk värmeplatta ska plattans diameter vara
lika stor som eller mindre än tryckkokarens botten.
• Om du använder glaskeramikhäll ska du se till att kärlets botten alltid
är ren och torr.
• På gasspis är det viktigt att lågan inte sträcker sig utanför kärlets
bottendiameter.
• Se till att tryckkokaren placeras exakt mitt på värmekällan, oavsett typ.
INDUKTION
ELEKTRISK
SPIRAL
SV
*Korgen ingår inte i vissa modeller
63
Page 66

Tillbehör från TEFAL
• Följande tillbehör till tryckkokaren finns tillgängliga:
Tillbehör Referensnummer
Packning X9010101
Ångkorg* 792185
Stativ* 792691
• Kontakta ett servicecenter som godkänts av TEFAL vid behov av byte av
andra komponenter eller reparationer (vänd dig till: www.tefal.com).
• Använd endast originaldelar från TEFAL som motsvarar din modell.
Användning
Öppning
• Tryck in öppningsknappen med tummen (E) och håll kvar den i intryckt läge –
fig. 1.
• Håll i kärlets långa handtag (L) med ena handen, vrid med den andra handen
lockets långa handtag (F) i motsatt riktning till klockans visare ända till dess
att det öppnas – fig. 2.
• Lyft sedan av locket.
Stängning
När produkten är
stängd och inte är i
drift är det normalt
att locket är rörligt i
förhållande till kärlet.
Denna effekt upphör
så fort produkten blir
trycksatt.
• Placera locket vågrätt på kärlet utifrån lockets
lägesmarkeringar G(a) och G(b).
• Vrid locket i klockans riktning ända till
stoppklotsen – fig. 3 till dess att du kan höra ljudet
av att knappen låser sig – fig. 4.
Om du inte lyckas vrida om locket, kontrollera att
öppningsknappen (E) är ordentligt intryckt.
Lägsta fyllningsnivå
• Fyll alltid kärlet med minst 25 cl/250 ml (2 glas)
vätska.
För ångkokning*:
• Fyllningsnivån ska uppgå till minst 75 cl/750 ml (6
glas).
• Placera korgen* (J)på det stativ* (K) som är avsett
för detta ändamål – fig. 5.
64
De livsmedel som
läggs i ångkorgen*
får inte vidröra
tryckkokarens lock.
*Korgen ingår inte i vissa modeller
Page 67

Högsta fyllningsnivå
• Fyll aldrig tryckkokaren till högre än 2/3 av kärlets höjd (märket för högsta
fyllningsnivå) (O) – fig. 6.
För vissa livsmedel:
• För livsmedel som sväller under tillagningen, såsom ris, torkade baljväxter eller
kompotter osv., får tryckkokaren inte fyllas till över halva kärlets höjd.
• Vid tillagning av soppor rekommenderar vi att du utför en snabb
trycksänkning (se avsnittet ”Snabb trycksänkning”).
Användning av
funktionsventilen (A)
För att sätta funktionsventilen (A) på plats:
Obs, dessa moment bör utföras endast när produkten är
sval och och inte är i drift.
• Placera funktionsventilen (A) genom att rikta in
symbolen •på ventilen efter lägesmarkeringen (H).
• Tryck in ventilen och vrid tills det tar stopp mot
symbolen eller .
Avlägsna funktionsventilen:
Obs, dessa moment bör utföras endast när produkten är
sval och och inte är i drift.
• Tryck in ventilen och vrid på den för att rikta in symbolen
efter lägesmarkeringen (H) som på motstående
•
teckning.
• Ta loss ventilen som på motstående teckning.
För att tillaga grönsaker eller ömtåliga livsmedel:
• Rikta in symbolen på ventilen mittemot
lägesmarkeringen (H) - fig. 7.
För att tillaga kött eller djupfrysta livsmedel:
• Rikta in symbolen på ventilen mittemot
lägesmarkeringen (H) - fig. 8.
För att släppa ut ånga:
• Vrid ventilen (A) gradvis och välj önskad hastighet för
trycksänkningen fram till lägesmarkeringen mittemot
symbolen – fig. 9 eller ställ tryckkokaren i vasken
under en kall vattenstråle (avsnittet ”Snabb
trycksänkning”).
H
SV
*Korgen ingår inte i vissa modeller
65
Page 68

Första användningen
När produkten tas i
drift är det normalt
att det förekommer
ånga i höjd med
tryckindikatorn (D).
• Placera stativet (K) på kärlets botten och ställ
korgen (J) ovanpå*.
• Fyll kärlet med vatten till 2/3 (lägesmarkering för
högsta fyllningsnivå (O)).
• Stäng tryckkokaren.
• Rikta in symbolen mittemot lägesmarkeringen
(H) – fig. 8.
• Ställ tryckkokaren på en värmekälla, ställ sedan in
den på högsta effekt.
• När det börjar komma ut ånga genom ventilen
sänker du värmen från värmekällan och startar
tidtagning på 20 minuter.
• När de 20 minuterna har förflutit stänger du av
värmekällan.
• Vrid ventilen (A) gradvis och välj önskad hastighet
för trycksänkningen fram till stoppklotsen
mittemot symbolen – fig. 9.
• När tryckindikatorn (D) har sjunkit ned igen är
tryckkokaren inte längre trycksatt.
• Öppna tryckkokaren – fig. 1 – 2.
• Skölj ur tryckkokaren och torka den.
Före tillagningen
• Före varje användning ska du ta av ventilen (A) (se
avsnittet ”Användning av funktionsventilen”) och
utföra en visuell kontroll i dagsljus av att röret för
bortledning av ånga (B) inte är igensatt (se ritningen
här intill). Rengör det med en tandpetare vid behov –
fig. 10.
• Kontrollera att säkerhetsventilens kula (C) är rörlig, se
motstående teckning och avsnittet ”Rengöring och
underhåll”.
• Tillsätt dina ingredienser och vätskan.
• Stäng tryckkokaren – fig. 3 och se till att den är
ordentligt stängd – fig. 4.
• Rikta in symbolen eller på ventilen mittemot
lägesmarkeringen H – fig. 7 eller 8.
• Ställ tryckkokaren på en värmekälla, ställ sedan in den
på högsta effekt.
66
Page 69

Tryckindikatorn (D)
förhindrar att
trycket i
tryckkokaren ökar
om tryckkokaren
inte är ordentligt
stängd.
• När produkten tas i drift är det normalt att det
förekommer ånga i höjd med tryckindikatorn (D).
• Om funktionsventilen (A) släpper ut ånga
kontinuerligt, med ett regelbundet ljud (PSCHHHT),
ska du sänka värmen så att ventilen (A) fortsätter
att susa regelbundet.
• Starta tidtagning enligt den tillagningstid som
anges i receptet.
• Stäng av värmen när tillagningstiden är över.
Slutet av tillagningen
Släppa ut ångan:
– Långsam trycksänkning:
• Vrid ventilen (A) gradvis och välj önskad
hastighet för trycksänkningen fram till
lägesmarkeringen mittemot symbolen – fig.
9. När tryckindikatorn (D) har sjunkit ned igen är
tryckkokaren inte längre trycksatt.
Tryckindikatorn (D) förhindrar öppning av
tryckkokaren om den fortfarande är trycksatt.
- Snabb trycksänkning:
• Du kan ställa tryckkokaren under en kran med
rinnande kallvatten för att skynda på
trycksänkningen, se motstående bild. När
tryckindikatorn (D) har sjunkit ned igen är
tryckkokaren inte längre trycksatt.
• Du kan öppna tryckkokaren - fig. 1 - 2.
- Specialfall:
• Vid tillagning av emulgerande livsmedel (se
tillagningstabellen) eller torkade baljväxter ska
du inte sänka trycket utan vänta tills
tryckindikatorn (D) har sjunkit ned innan du
öppnar tryckkokaren. Räkna med att förkorta de
rekommenderade tillagningstiderna något.
Under tillagningen
SV
Om innehåll slungas
ut på ett onormalt
sätt i samband med
utsläpp av ånga ska
du vrida tillbaka funktionsventilen (A) till
lägesmarkeringen
eller – fig. 7 eller
8 – och sedan sänka
trycket långsamt för
att undvika ytterligare utslungning.
Var ytterst försiktig
om du flyttar på
tryckkokaren när den
är trycksatt och se till
att inte skaka den.
67
Page 70

Rengöring och underhåll
Rengöring av tryckkokaren
För att apparaten ska fungera korrekt är det
viktigt att följa dessa rekommendationer
angående rengöring och underhåll efter varje
användningstillfälle.
• Diska tryckkokaren (kärlet och locket) med
ljummet vatten och diskmedel efter varje
användning. Gör samma sak med korgen*.
• Använd inte klorblekmedel eller andra
klorhaltiga produkter.
• Överhetta inte kärlet när det är tomt.
Rengöra insidan av kärlet:
• Rengör med en svamp och diskmedel.
• Förekomsten av bruna fläckar på insidan av kärlets
botten påverkar inte metallens kvalitet. Det är
fråga om kalkavlagringar. För att avlägsna dem kan
du använda en svamp indränkt i lite vitvinsvinäger.
Rengöra utsidan av kärlet:
• Rengör med en svamp och diskmedel.
Rengöra locket:
• Diska locket under rinnande ljummet vatten
med en svamp och diskmedel och skölj av det
ordentligt.
Rengöra lockets packning:
• Rengör packningen (I) och packningsspåret
efter varje tillagning.
• Montera tillbaka packningen enligt - fig. 11 - 12.
Rengöra funktionsventilen (A):
• Avlägsna funktionsventilen (A), se avsnittet
”Användning av funktionsventilen”.
• Rengör funktionsventilen (A) under rinnande
vatten vid vattenkranen - fig. 13.
Diska tryckkokaren
efter varje
användning.
Den brunfärgning
och de repor som
kan uppträda efter
långvarig
användning innebär
inga problem.
Det är bara kärlet
och korgen som får
diskas i diskmaskin.
Tryckkokarens goda
egenskaper bevaras
längre om du
undviker att
överhetta kärlet när
det är tomt.
Det är mycket
viktigt att låta ett
servicecenter som
godkänts av TEFAL
kontrollera
tryckkokaren efter
10 års användning.
68
*Korgen ingår inte i vissa modeller
Page 71

Rengöra röret för bortledning av ånga (B):
• Avlägsna ventilen (A).
• Utför en visuell kontroll i dagsljus av att röret för
bortledning av ånga har en rund form och inte är
igensatt. Se motstående teckning. Rengör det med
en tandpetare vid behov - fig. 10.
Rengöra säkerhetsventilen (C):
• Rengör den del av säkerhetsventilen som är
placerad på insidan av locket genom att skölja den
under vatten.
• Kontrollera att den fungerar korrekt genom att
trycka lätt på kulan, som ska sjunka ned utan
motstånd. Se motstående teckning.
Byta packning i tryckkokaren:
• Byt packningen i tryckkokaren en gång per år eller
om den uppvisar hack.
• Använd alltid en originalpackning från TEFAL,
motsvarande den aktuella modellen.
Ställa undan tryckkokaren för förvaring:
• Vänd på locket på kärlet.
Använd aldrig ett
vasst eller spetsigt
föremål för att
utföra denna
åtgärd.
Säkerhet
Tryckkokaren är utrustad med flera säkerhetsanordningar:
• Säkerhet vid stängning:
- Om produkten inte är ordentligt stängd kan tryckindikatorn (D) inte stiga
och trycket kan inte öka i tryckkokaren.
• Säkerhet vid öppning:
– Om tryckkokaren (E) är trycksatt går det inte att manövrera
öppningsknappen. Öppna aldrig tryckkokaren genom att tvinga upp den.
Utför inga som helst ingrepp på tryckindikatorn (D).
• Två säkerhetsanordningar mot övertryck:
– En första anordning: Säkerhetsventilen (C) frigör trycket och ångan släpps
ut horisontellt över lockets ovansida – fig.14.
– En andra anordning: Packningen (I) släpper igenom ånga vertikalt genom
det lilla hålet vid lockets kant eller längs kärlet – fig.15. Obs!, detta kan leda
till att lågan släcks på en gasspis.
SV
69
Page 72

Om något av säkerhetssystemen mot övertryck
utlöses:
• Stäng av värmekällan.
• Låt tryckkokaren svalna helt.
• Öppna den.
• Kontrollera och rengör funktionsventilen (A) –
fig.13, röret för bortledning av ånga (B) – fig.10,
säkerhetsventilen (C) och packningen (I). Se
motstående teckning.
Rekommendationer för användningen
1 – Ångan är mycket het när den kommer ut ur tryckkokaren, akta dig för
brännskador. Använd handskar vid behov.
2 – Så snart tryckindikatorn höjs går det inte längre att öppna tryckkokaren.
3 – Precis som för alla matlagningsapparater är det viktigt att noga övervaka
tryckkokaren om den används i närheten av barn.
4 – Använd kärlets båda handtag för att flytta tryckkokaren.
5 – Låt inga livsmedel ligga kvar under längre tid i tryckkokaren.
6 – Använd aldrig klorblekmedel eller andra klorhaltiga produkter, som skulle
kunna försämra det rostfria stålets kvalitet.
7 – Diska inte packningen, locket eller funktionsventilen i diskmaskin och låt
inte dessa delar ligga i blöt i vatten.
8 – Byt packningen en gång per år eller om den uppvisar hack.
9 – Rengöringen av tryckkokaren får utföras endast när den är sval och tom.
10 – Det är mycket viktigt att låta ett servicecenter som godkänts av TEFAL
kontrollera tryckkokaren efter 10 års användning.
Garanti
• Förutsatt att tryckkokaren används enligt rekommendationerna i
bruksanvisningen, åtföljs kärlet i din nya tryckkokare från TEFAL av 10 års
garanti mot:
– varje fel som rör kärlets metallkonstruktion,
– all förtida förslitning av grundmetallen.
• Alla övriga delar av din tryckkokare omfattas av garanti mot
tillverkningsfel eller materialfel under den lagstadgade tidsperiod som
gäller i det land där produkten är inköpt och från och med inköpsdatum.
• Denna avtalsenliga garanti gäller vid uppvisande av kassakvitto eller
faktura som bekräftar inköpsdatumet.
70
Page 73

Följande undantas från dessa garantier:
• Skador som uppstår till följd av underlåtelse att följa de viktiga
försiktighetsåtgärderna eller försumlig användning, i synnerhet:
– mekanisk stöt, fall, placering i ugn,
– diskning i diskmaskin av locket och funktionsventilen.
• Endast servicecenter som godkänts av TEFAL är behöriga att låta dig utnyttja
denna garanti (vänd dig till: www.tefal.com).
Föreskriven märkning
Märkning Placering
Uppgift om tillverkaren och varumärket
Tillverkningsår och tillverkningsparti På kärlet
Modellnummer
Maximalt säkerhetstryck (PS)
Övre driftstryck (PF)
Kapacitet På kärlets botten
• Var rädd om miljön!
i Apparaten innehåller mycket material som kan tas tillvara
och återvinnas.
‹ Lämna in den till ett insamlingsställe för återvinning.
På kärlets handtag och
lockets handtag
På locket
SV
*Korgen ingår inte i vissa modeller
71
Page 74

TEFAL svarar på dina frågor
Problem Rekommendationer
Om tryckkokaren
har värmts upp
under tryck utan
vätska inuti:
Om tryckindikatorn
inte har höjts och
inget släpps ut
genom ventilen
under tillagningen:
Om tryckindikatorn
har höjts och inget
släpps ut genom
ventilen under tillagningen:
Om ångan läcker ut
runt locket ska du
kontrollera följande:
Om det inte går att
öppna locket:
Om livsmedlen inte
är kokta eller om de
är vidbrända ska du
kontrollera följande:
Låt ett servicecenter som godkänts av TEFAL kontrollera
tryckkokaren.
Det här är normalt under de första minuterna.
Kontrollera följande om fenomenet kvarstår:
– Att värmekällan är tillräckligt varm. Öka värmen om så
inte är fallet.
– Att mängden vätska i kärlet är tillräcklig.
– tt funktionsventilen har riktats mot en av symbolerna
eller – fig. 7 eller 8.
– Att tryckkokaren är ordentligt stängd.
– Att packningen eller kärlets kant inte är skadade.
Det här är normalt under de första minuterna.
Om fenomenet kvarstår ska du hålla tryckkokaren under
rinnande kallvatten, se avsnitten ”Snabb trycksänkning”
och ”Specialfall”, öppna den därefter.
Rengör funktionsventilen och röret för bortledning av
ånga och kontrollera att det går att trycka in kulan i säkerhetsventilen utan svårigheter.
Att locket är ordentligt stängt.
Att packningen är korrekt placerad i locket.
Att packningen är i gott skick. Byt ut den vid behov.
Att locket, packningen och packningens spår i locket är
rena, liksom säkerhetsventilen och funktionsventilen.
Att kärlets kant är i gott skick.
Kontrollera att tryckindikatorn är i det låga läget.
Om så inte är fallet ska du hålla tryckkokaren under rinnande kallvatten vid kranen tills tryckindikatorn sjunker
ned igen, se avsnitten ”Snabb trycksänkning” och ”Specialfall”.
Tillagningstiden.
Värmekällans effekt.
Att funktionsventilen är korrekt placerad.
Mängden vätska.
Om livsmedel har
bränts vid i
tryckkokaren:
72
Lägg kärlet i blöt en stund innan du diskar det.
Använd aldrig klorblekmedel eller andra klorhaltiga produkter.
Page 75

Grönsaker
FÄRSKA
Ärtpuré (baljväxter) – nedsänkning 14 min Blomkål – nedsänkning 3 min 4 min
Broccoli – ånga 3 min 3 min
Brysselkål – ånga 7 min 5 min – nedsänkning
Champinjoner
Endiver – ånga 12 min -
Gröna ärter – ånga 1 min 30 s 4 min
Gröna bönor – ånga 8 min 9 min
Gröna linser (baljväxter) – nedsänkning 10 min Halvtorkade bönor – nedsänkning 20 min -
Kronärtskocka
Morötter
(emulgerande
livsmedel)
Potatisklyftor
Pumpa (puré)
rande livsmedel)
Ris (baljväxter) – nedsänkning 7 min Rödbeta – ånga 20 – 30 min -
Rova
Savoykål
Selleri
Skivad purjolök – ånga 2 min. 30 Spenat
Sparris – nedsänkning 5 min Squash
Vete (baljväxter) – nedsänkning 15 min -
(emulge-
unnskivade – ånga 7 min 5 min
hela – nedsänkning 1 min 30 s -
skivor – ånga 7 min 5 min
skiva – ånga 6 min avbladad – ånga 7 min -
** Livsmedel i ångkorgen* - *** Livsmedel i vatten
Tillagning
– ånga 18 min – nedsänkning 15 min -
– ånga 12 min – nedsänkning 6 min -
– nedsänkning 8 min -
– ånga 7 min – nedsänkning 6 min -
– ånga 6 min – nedsänkning 10 min -
– ånga 5 min 8 min
– nedsänkning 3 min -
– ånga 6 min 30 s 9 min
– nedsänkning 2 min
Ventilläge
DJUPFRYSTA
Ventilläge
Kött och fisk
FÄRSKA
Fläskkött (stek 1 kg) 25 min
Kyckling (hel 1,2 kg) 20 min
Lake (filéer 0,6 kg) (emulgerande livsmedel) 4 min
Lamm (stek 1,3 kg) 25 min
Lax (4 kotletter på 0,6 kg) (emulgerande livsmedel) 6 min
Nötkött (stek 1 kg) 10 min
Tonfisk (4 biffar på 0,6 kg) (emulgerande livsmedel) 7 min
*Korgen ingår inte i vissa modeller
Ventilläge
DJUPFRYSTA
Ventilläge
45 min
45 min
6 min
35 min
8 min
28 min
9 min
SV
73
Page 76

TÄRKEÄT HUOMAUTUKSET
Laite on seuraavien voimassa olevien käyttöturvallisuutta koskevien standardien ja
säännösten mukainen:
– painelaitedirektiivi
– elintarvikkeiden kanssa kosketuksiin joutuvia materiaaleja koskevat säädökset
– ympäristöä koskevat säädökset.
• Laite on tarkoitettu vain kotikäyttöön.
• Lue kaikki ohjeet huolella ja noudata aina käyttöohjetta.
• Ole erityisen huolellinen, kun käytät painekattilaa tai muita keittimiä lasten läheisyydessä.
• Älä laita painekattilaa kuumaan uuniin.
• Ole erittäin varovainen, kun siirrät paineistettua painekattilaa. Varo kuumia pintoja. Kosketa
vain kahvoja ja painikkeita. Käytä tarvittaessa uunikintaita.
• Tarkasta säännöllisesti kahvojen kiinnitys kattilaan. Kiristä ruuvit tarvittaessa.
• Älä käytä painekattilaa mihinkään muuhun kuin sen alkuperäiseen käyttötarkoitukseen.
• Painekattilassa on kypsennyksen aikana korkea paine. Virheellisestä käytöstä voi seurata
palovammoja. Varmista ennen käyttöä, että painekattilan kansi on hyvin suljettu. Katso
kappale ”Sulkeminen”.
• Älä koskaan avaa painekattilaa väkisin. Varmista, että paine kattilan sisällä on laskenut.
Katso kappale ”Turvallisuus”.
• Älä koskaan käytä painekattilaa ilman nestettä, sillä se voi aiheuttaa vakavia vaurioita.
Varmista, että nestettä on kypsennyksen aikana riittävästi.
• Käytä käyttöohjeiden mukaisia yhteensopivia lämmönlähteitä.
• Älä valmista painekattilassa maitopohjaisia ruokia.
• Älä laita painekattilaan karkeaa suolaa. Lisää hieno suola kypsennyksen lopuksi.
• Täytä enintään 2/3 painekattilan tilavuudesta (merkitty enimmäistaso).
• Kun valmistat ruoka-aineita, jotka laajenevat kypsennettäessä, kuten riisiä, kuivattuja
kasviksia tai hillokkeita, täytä painekattila enintään puolilleen. Jos teet keittoa esim.
kurpitsoista tai kesäkurpitsoista, anna painekattilan ensin jäähtyä muutaman minuutin
ajan ja valuta sitten sen päälle kylmää vettä. Täytä 3 ja 4 litran mallien laitteesta enintään
1/3, jos valmistat puuroutuvaa ruokaa tai ruoka-aineita, jotka laajenevat kypsennettäessä.
Odota kypsentämisen loputtua 5 minuuttia ennen kuin päästät paineen pois veden alla.
• Liha, jossa on pintakalvo (esim. naudan kieli), saattaa turvota, kun sitä kypsennetään
painekattilassa. Älä pistele lihaa, joka näyttää turvonneelta, sillä siitä voi roiskua polttavan
kuumaa nestettä. Pistele lihaa ennen kypsentämistä.
• Kun kypsennät puuroutuvaa ruokaa (esim. hernerouhe tai raparperi), ravistele painekattilaa
kevyesti ennen avaamista, jotta ruoka-aineet eivät roisku ulos kattilasta.
• Varmista aina ennen käyttöä, että venttiilit eivät ole tukossa. Katso kappale ”Ennen
käyttöä”.
• Älä käytä painekattilaa paineistettuun öljyssä paistamiseen.
• Noudata aina puhdistus- ja kunnossapito-ohjeita, jos käsittelet turvaominaisuuksia.
• Käytä vain malliin sopivia alkuperäisiä TEFAL-osia. Tämä koskee erityisesti kattilaa ja kantta.
• Alkoholihöyry on helposti syttyvää. Kiehauta alkoholia noin 2 minuuttia ennen kannen
sulkemista. Valvo painekattilaa, jos valmistettava ruoka sisältää alkoholia.
• Älä säilytä painekattilassa happamia tai suolaisia ruokia ennen kypsennystä tai sen jälkeen,
sillä ne voivat vaurioittaa kattilaa.
• Mikäli huomaat käytön aika että joku osa painekeittimestä on rikkoutunut tai murtunut
älä missään tapauksessa yritä avata kantta; sen sijaan sammuta levy ja anna kattila
jäähtyä liedellä kokonaan ennenkuin avaat kannen. Älä enää käytä painekeitintä ja vie se
valtuutettuun TEFAL huoltoon korjattavaksi.
SÄILYTÄ NÄMÄ OHJEET
74
Page 77

Laitteen osat
A. Käyttöventtiili
B. Höyrynpoistoaukko
C. Varoventtiili
D. Paineenilmaisin
E. Avauspainike
F. Kahva
G(a). Kannen asentomerkki
G(b). Kannen asentomerkki suh-
H. Käyttöventtiilin asentomerkki
I. Kannen tiiviste
J. Höyrytyskori*
K. Kolmijalka*
L. Kattilan pitkä kahva
M. Kattila
N.Kattilan lyhyt kahva
O. Enimmäistason merkki
teessa kattilaan
Ominaisuudet
Painekattilan pohjan halkaisija - viitearvot
Tilavuus
KattilanØPohjanØMalli Ruostumaton
eräs
4 L 22 cm 15 cm P25342 170 kPa
6 L 22 cm 15 cm P25307 170 kPa
Sarja 4L + 6L 22 cm 15 cm P25443 170 kPa
7 L 22 cm 15 cm P25308 170 kPa
8 L 22 cm 15 cm P25344 170 kPa
Suurin toimintapaine: 80 kPa
Yhteensopivat lämmönlähteet
KAASULIESI SÄHKÖLEVY LASIKERAAMINEN LEVY
HALOGEENILEVY
SÄHKÖLIESI
INDUKTIOLEVY
SPIRAALI
SÄHKÖ LEVY
• Tämä painekattila sopii käytettäväksi kaikilla lämmönlähteillä.
• Jos käytät sähkö- tai induktiolevyä, varmista, että levy ei ole kooltaan
painekattilan pohjaa suurempi.
• Jos käytät keraamista levyä tai halogeenilevyä, varmista, että
painekattilan pohja on aina puhdas ja kuiva.
• Kaasulieden liekki ei saa olla suurempi kuin kattilan halkaisija.
• Liesityypistä riippumatta pyri sijoittamaan painekattila levyn keskelle.
Suurin turvalli-
nen paine:
FI
*Höyrytyskori ei kuulu kaikkiin malleihin
75
Page 78

TEFAL-lisätarvikkeet
• Painekattilaan on saatavissa seuraavat lisätarvikkeet:
Lisätarvike Viitenumero
Kannen tiiviste X9010101
Höyrytyskori* 792185
Kolmijalka* 792691
• Jos muita osia täytyy vaihtaa tai korjata, ota yhteys TEFALin valtuuttamaan
huoltopalveluun (löydät lisätietoa osoitteesta www.tefal.com).
• Käytä vain malliin sopivia alkuperäisiä TEFAL-osia.
Käyttö
Avaaminen
• Vedä avauspainetta (E) peukalolla ja pidä painike vedettynä – kuva 1.
• Pidä toisella kädellä kiinni kattilan pitkästä kahvasta (L) ja käännä toisella
kannen pitkää kahvaa (F) vastapäivään, kunnes kansi aukeaa – kuva 2.
• Nosta kansi pois.
Sulkeminen
Kun kattilaa ei käytetä ja se on kiinni,
on normaalia, että
kansi liikkuu kattilan päällä. Näin ei
tapahdu, kun kattilassa on painetta.
Vähimmäistaso
• Lisää nestettä aina vähintään 2,5 dl (2 lasillista).
Höyrykypsentämistä* varten:
• Täyttöasteen on oltava vähintään 7,5 dl (6
lasillista).
• Aseta höyrytyskori* (J) sille tarkoitetun tuen* (K)
päälle – kuva 5.
• Aseta kansi suorassa kattilan päälle ja varmista,
että kannen asentomerkit G(a) ja G(b) ovat
vastakkain.
• Käännä kantta myötäpäivään rajoittimeen asti –
kuva 3, kunnes kuulet painikkeen lukittumisäänen
– kuva 4.
Jos kannen kääntäminen ei onnistu, tarkasta, että
avauspainike (E) on vedettynä oikein.
Höyrytyskorissa*
olevat ruoka-aineet
eivät saa koskettaa
painekattilan
kantta.
76
*Höyrytyskori ei kuulu kaikkiin malleihin
Page 79
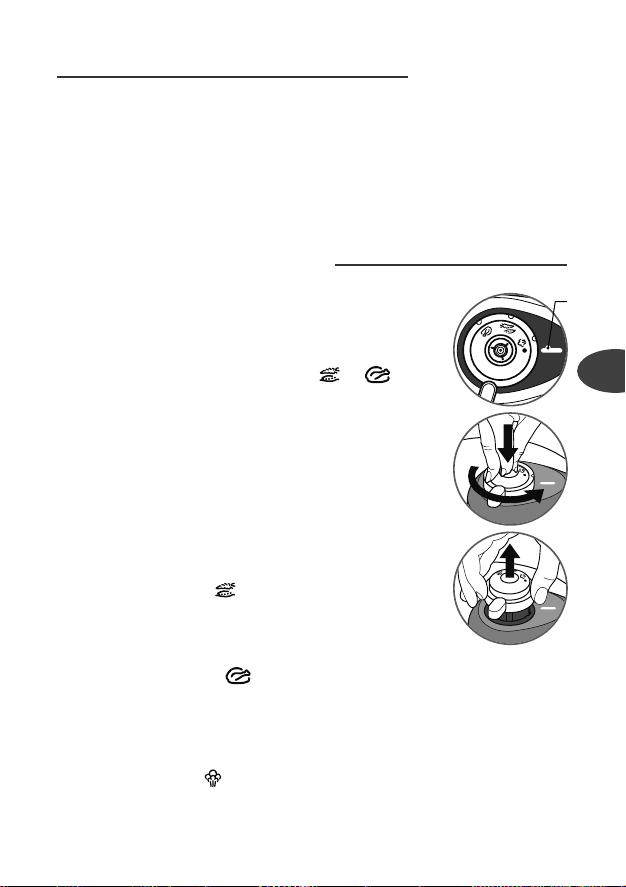
Enimmäistaso
• Älä täytä painekattilaa koskaan yli 2/3 kattilan korkeudesta (enimmäistason
merkki) (O) – kuva 6.
Tietyt ruoka-aineet:
• Kun valmistat ruoka-aineita, jotka laajenevat kypsennettäessä, kuten riisiä,
kuivattuja kasviksia tai hillokkeita, täytä painekattila enintään puolilleen.
• Kun valmistat keittoa, suosittelemme nopeaa paineenvapautusta (katso
kappale ”Nopea paineenvapautus”).
Käyttöventtiilin (A) käyttö
Käyttöventtiilin (A) paikalleen sijoittaminen:
Huomioi, että nämä toimenpiteet saa tehdä vain, jos
laite on kylmä eikä se ole toiminnassa.
• Aseta käyttöventtiili (A) niin, että venttiilin merkki
on vastakkain asentomerkin (H) kanssa.
• Paina venttiiliä ja käännä se merkkiin tai asti.
Käyttöventtiilin poistaminen:
Huomioi, että nämä toimenpiteet saa tehdä vain, jos
laite on kylmä eikä se ole toiminnassa.
• Paina venttiiliä ja käännä sitä niin, että merkki•on
vastakkain asentomerkin (H) kanssa oheisen kuvan
mukaisesti.
• Poista venttiili oheisen kuvan mukaisesti.
Vihannesten tai herkkien elintarvikkeiden kypsentäminen:
• Aseta venttiilin merkki vastakkain asentomerkin (H)
kanssa – kuva 7.
Lihan tai pakastettujen elintarvikkeiden kypsentäminen:
• Aseta venttiilin merkki vastakkain asentomerkin
(H) kanssa – kuva 8.
Höyryn vapauttaminen:
• Vapauta paine haluamallasi nopeudella kääntämällä
venttiiliä (A) vähitellen niin, että se on lopuksi
vastakkain merkin kanssa – kuva 9, tai pane
painekattila kylmään virtaavaan veteen (kappale
”Nopea paineenvapautus”).
•
H
FI
*Höyrytyskori ei kuulu kaikkiin malleihin
77
Page 80

Ensimmäinen käyttökerta
Kun laitetta
ryhdytään
käyttämään, on
tavallista, että
paineenilmaisimen
(D) tasolla on
höyryä.
• Aseta korin tuki (K) kattilan pohjalle ja pane kori
(J) sen päälle*.
• Lisää kattilaan vettä 2/3 tilavuudesta
(enimmäistason merkki (O)).
• Sulje painekattila.
• Aseta merkki vastakkain asentomerkin (H)
kanssa – kuva 8.
• Laita painekattila liedelle ja säädä liesi täydelle
teholle.
• Kun venttiilistä alkaa tulla ulos höyryä, pienennä
lieden lämpöä ja keitä 20 min.
• Sammuta liesi 20 min kuluttua.
• Vapauta paine haluamallasi nopeudella
kääntämällä venttiiliä (A) vähitellen vastakkain
merkin kanssa – kuva 9.
• Kun paineenilmaisin (D) laskeutuu, painekattilassa
ei ole enää painetta.
• Avaa painekattila – kuvat 1–2.
• Huuhtele painekattila vedellä ja kuivaa.
Ennen käyttöä
• Poista venttiili (A) aina ennen käyttöä (katso kappale
”Käyttöventtiilin käyttö”) ja tarkasta valoa vasten
katsomalla, että höyrynpoistoaukko (B) ei ole tukossa
(Katso oheinen kuva). Puhdista tarvittaessa
hammastikulla – kuva 10.
• Tarkasta, että varoventtiilin (C) kuula liikkuu esteettä,
katso oheinen kuva ja kappale ”Puhdistus ja
kunnossapito”.
• Lisää elintarvikkeet ja neste.
• Sulje painekattila – kuva 3 ja varmista, että se on
kunnolla kiinni – kuva 4.
• Aseta venttiilin merkki tai vastakkain
asentomerkin H kanssa – kuva 7 tai 8.
• Laita painekattila liedelle ja säädä liesi täydelle teholle.
78
*Höyrytyskori ei kuulu kaikkiin malleihin
Page 81

Paineenilmaisin (D)
estää paineen
nousun
painekattilassa, jos
kantta ei ole
suljettu kunnolla.
• Kun laitetta ryhdytään käyttämään, on tavallista,
• Kun käyttöventtiilistä (A) alkaa tulla höyryä
• Aloita reseptissä mainitun kypsennysajan
• Kun kypsennysaika on päättynyt, sammuta
Käytön lopuksi
Käytön aikana
että paineenilmaisimen (D) tasolla on höyryä.
jatkuvasti ja kuuluu tasaista suhisevaa ääntä,
pienennä lieden lämpöä niin, että venttiilistä (A)
kuuluu edelleen tasaista suhinaa.
mittaaminen.
lämmönlähde.
Paineen vapauttaminen:
- Hidas paineenvapautus:
• Vapauta paine haluamallasi nopeudella
kääntämällä venttiiliä (A) vähitellen kohti
merkkiä – kuva 9. Kun paineenilmaisin (D)
laskeutuu, painekattilassa ei ole enää
painetta.
Paineenilmaisin (D) estää painekattilan
avaamisen, jos kattilassa on vielä painetta.
- Nopea paineenvapautus:
• Voit laskea painekattilan päälle kylmää
juoksevaa vettä, jotta paine vapautuu
nopeammin, katso oheinen kuva. Kun
paineenilmaisin (D) laskeutuu, painekattilassa
ei ole enää painetta.
• Voit nyt avata painekattilan – kuvat 1 ja 2.
- Erityistapaus:
• Jos valmistat puuroutuvaa ruokaa (ks.
kypsennystaulukko) tai kuivattuja
vihanneksia, älä vapauta painetta, vaan
odota ennen avaamista, että paineenilmaisin
(D) laskeutuu. Lyhennä kypsennysaikaa
hieman tarvittaessa.
Jos höyryn vapautumisen aikana esiintyy
epänormaaleja roiskeita, aseta käyttöventtiili (A) takaisin
merkkiin tai
– kuva 7 tai 8 – ja
vapauta paine sen
jälkeen hitaasti ja
tarkasta, että roiskeita ei enää tule.
Ole erittäin varovainen, kun siirrät paineistettua
painekattilaa, äläkä
heiluta sitä.
FI
79
Page 82

Puhdistus ja kunnossapito
Painekattilan puhdistus
Varmista laitteen moitteeton toiminta
noudattamalla puhdistusta ja kunnossapitoa
koskevia suosituksia jokaisen käyttökerran
jälkeen.
• Pese painekattila (kattila ja kansi) aina käytön
jälkeen lämpimällä vedellä ja astianpesuaineella.
Pese näin myös höyrytyskori*.
• Älä käytä puhdistukseen valkaisuaineita tai
klooria sisältäviä tuotteita.
• Älä anna kattilan ylikuumeta tyhjänä.
Kattilan sisäpuolen puhdistus:
• Pese pesusienellä ja astianpesuaineella.
• Kattilan sisäpinnalle ilmestyvät tahrat eivät vaikuta
metallin laatuun. Kyse on kalkkikertymistä. Voit
poistaa ne sienellä, jossa on hiukan
valkoviinietikkaa.
Kattilan ulkopuolen puhdistus:
• Pese pesusienellä ja astianpesuaineella.
Kannen puhdistus:
• Pese kansi lämpimässä, juoksevassa vedessä
sienellä ja astianpesuaineella ja huuhtele
huolellisesti.
Kannen tiivisteen puhdistus:
• Puhdista tiiviste (I) ja sen paikka kannessa aina
käytön jälkeen.
• Katso ohjeet tiivisteen paikoilleen asettamiseen
– kuvat 11–12.
Käyttöventtiilin (A) puhdistus:
• Irrota käyttöventtiili (A), katso kappale
”Käyttöventtiilin käyttö”.
• Puhdista käyttöventtiili (A) juoksevalla vedellä –
kuva 13.
Pese painekattila
jokaisen
käyttökerran
jälkeen.
Pitkän käytön
seurauksena
syntyneet naarmut
ja pinnan
tummuminen eivät
estä kattilan
käyttöä.
Vain kattilan ja
korin saa pestä
astianpesukoneessa
.
Älä anna kattilan
ylikuumeta tyhjänä.
Näin painekattila
säilyy pidempään
hyvässä
käyttökunnossa.
Painekattila täytyy
tarkastuttaa
TEFALin
valtuuttamassa
huoltopalvelussa
10 vuoden käytön
jälkeen.
80
*Höyrytyskori ei kuulu kaikkiin malleihin
Page 83

Höyrynpoistoaukon (B) puhdistus:
• Poista venttiili (A).
• Tarkasta valoa vasten katsomalla, että
höyrynpoistoaukko on pyöreä eikä se ole
tukkeutunut. Katso oheinen kuva. Puhdista
tarvittaessa hammastikulla – kuva 10.
Varoventtiilin (C) puhdistus:
• Puhdista kannen sisäpuolella oleva varoventtiilin
osa juoksevalla vedellä.
• Tarkasta sen toiminta painamalla kevyesti kuulaa,
jonka pitää painua alaspäin esteettä. Katso
oheinen kuva.
Painekattilan tiivisteen vaihtaminen:
• Vaihda painekattilan tiiviste kerran vuodessa tai jos
siinä on halkeama.
• Käytä vain malliin sopivia alkuperäisiä TEFALtiivisteitä.
Painekattilan säilytys:
• Aseta kansi ylösalaisin kattilan päälle.
Älä yritä korjata
sitä terävällä esineellä.
Turvallisuus
Painekattilassa on useita turvaominaisuuksia:
• Lukituksen varmistus:
- Jos laitetta ei ole suljettu oikein, paineenilmaisin (D) ei pääse nousemaan,
eikä painekattila voi muodostaa painetta.
• Avaamisen turvallisuus:
- Kun painekattilassa on painetta, avauspainiketta (E) ei voi käyttää. Älä
koskaan avaa painekattilaa väkisin. Älä missään nimessä koske
paineenilmaisimeen (D).
• Kaksi ylipainetta valvovaa ominaisuutta:
- Ensimmäinen ominaisuus: varoventtiili (C) vapauttaa paineen, ja höyryä
vapautuu vaakatasossa kannen alta – kuva 14.
- Toinen ominaisuus: tiiviste (I) päästää höyryä pystytasossa pienestä
aukosta, joka on kannen reunassa tai kattilassa – kuva 15. Huomioi, että
tämä voi sammuttaa kaasulieden liekin.
FI
81
Page 84

Jos jokin ylipainetta valvova turvaominaisuus
käynnistyy:
• Sammuta lämmönlähde.
• Anna painekattilan jäähtyä täysin.
• Avaa.
• Tarkasta ja puhdista käyttöventtiili (A) – kuva 13,
höyrynpoistoaukko (B) – kuva 10, varoventtiili (C)
ja tiiviste (I). Katso oheinen kuva.
Käyttöä koskevia suosituksia
1 – Painekattilasta tuleva höyry on erittäin kuumaa: ole varovainen, ettet
polta itseäsi. Käytä tarvittaessa uunikintaita.
2 – Kun paineenilmaisin on noussut esiin, painekattilaa ei voi enää avata.
3 – Ole erityisen huolellinen, kun käytät painekattilaa tai muita keittimiä
lasten läheisyydessä.
4 – Kun siirrät painekattilaa, käytä molempia kahvoja.
5 – Älä jätä ruokaa pitkäksi aikaa painekattilaan.
6 – Älä käytä valkaisuaineita tai klooria sisältäviä tuotteita. Ne voivat
muuttaa materiaalin ominaisuuksia.
7 – Älä pese astianpesukoneessa tiivistettä, kantta ja käyttöventtiiliä äläkä
liota niitä.
8 – Vaihda tiiviste kerran vuodessa tai jos siinä on halkeama.
9 – Painekattilan saa puhdistaa vain kylmänä ja tyhjänä.
10 – Painekattila täytyy tarkastuttaa TEFALin valtuuttamassa
huoltopalvelussa 10 vuoden käytön jälkeen.
Takuu
• Kun tätä TEFAL-painekattilaa käytetään käyttöohjeen mukaisesti,
kattilaosalle annetaan 10 vuoden takuu, joka kattaa:
- kattilan metallirakenteeseen liittyvät viat,
- valmistukseen käytetyn metallin ennenaikaisen vanhenemisen.
• Kaikki muut painekeittimen osat ovat takuun alaisia, takuuaika on
voimassa kuitin ostopäivästä alkaen, takuuaika on sen maan laissa
määrätyn takuuajan mukainen josta tuote on ostettu . Suomessa takuu
on kaksi vuotta.
• Takuukorjausta varten täytyy esittää ostokuitti tai lasku, josta ilmenee
kyseisen hankinnan ostopäivämäärä.
82
Page 85

Näihin takuisiin eivät sisälly:
• Vauriot, jotka johtuvat tärkeiden varotoimien noudattamatta jättämisestä
tai huolimattomasta käytöstä, muun muassa:
- iskut, putoaminen, käyttö uunissa,
- kannen ja käyttöventtiilin pesu astianpesukoneessa.
• Takuukorjauksia tekevät vain TEFALin valtuuttamat huoltopalvelut (löydät
lisätietoa osoitteesta www.tefal.com).
Sääntömääräiset merkinnät
Merkintä Sijainti
Valmistajan tunnistetiedot ja tavaramerkki
Valmistusvuosi ja -erä Kattilassa
Mallin numero
Suurin turvallinen paine (PS)
Suurin toimintapaine (PF)
Tilavuus Kattilan pohjassa
• Suojele ympäristöäsi!
i Laitteessasi on monia hyödynnettäviä ja kierrätettäviä
materiaaleja.
‹ Toimita se kierrätyspisteeseen, jotta se käsitellään
asianmukaisesti.
Kattilan kahvassa ja kannen
kahvassa
Kannessa
FI
*Höyrytyskori ei kuulu kaikkiin malleihin
83
Page 86

TEFAL vastaa kysymyksiin
Ongelma Suositus
Painekattilaa on
kuumennettu paineistettuna ilman
nestettä:
Paineenilmaisin ei
nouse eikä venttiilistä tule ulos mitään
kypsennyksen aikana:
Paineenilmaisin nousee mutta venttiilistä ei tule ulos
mitään kypsennyksen aikana:
Höyryä vuotaa
kannen reunoilta.
Tarkasta seuraavat
asiat:
Kannen avaaminen
ei onnistu:
Ruoka ei ole kypsää
tai se on palanut
pohjaan. Tarkasta
seuraavat asiat:
Ruoka on palanut
pohjaan
painekattilassa:
Vie painekattila tarkastettavaksi TEFALin valtuuttamaan
huoltopalveluun.
Ensimmäisten minuuttien aikana se on normaalia.
Jos tilanne jatkuu pidempään, tarkasta, että seuraavat asiat
ovat kunnossa:
- Lämmönlähde on tarpeeksi suurella teholla. Säädä tarvittaessa tehoa suuremmaksi.
- Kattilassa on riittävästi nestettä.
- Käyttöventtiili on asetettu johonkin seuraavista merkeistä:
tai – kuva 7 tai 8.
- Painekattila on suljettu huolellisesti.
- Tiiviste ja kattilan reuna ovat hyväkuntoisia.
Ensimmäisten minuuttien aikana se on normaalia.
Jos ilmiö toistuu, siirrä laite kylmään veteen, katso kappale
”Nopea paineenvapautus” ja ”Erityistapaus”, ja avaa laite
sen jälkeen.
Puhdista käyttöventtiili ja höyrynpoistoaukko ja tarkasta,
että varoventtiilin kuula painuu alaspäin esteettä.
Kansi on suljettu huolellisesti.
Tiiviste on asetettu paikalleen kanteen.
Tiiviste on hyvässä kunnossa. Vaihda se tarvittaessa.
Kansi, tiiviste, tiivisteen paikka kannessa, varoventtiili ja käyttöventtiili ovat puhtaita.
Kattilan reuna on hyvässä kunnossa.
Varmista, että paineenilmaisin on ala-asennossa.
Jos näin ei ole, vapauta paine ja tarvittaessa jäähdytä painekattila juoksevan veden alla, katso kappale ”Nopea paineenvapautus” ja ”Erityistapaus”.
Kypsennysaika.
Lämmönlähteen teho.
Käyttöventtiilin oikea asento.
Nesteen määrä.
Liota kattilaa ennen pesua.
Älä käytä valkaisuaineita tai klooria sisältäviä tuotteita.
84
Page 87

Vihannekset
TUORE
Artisokka
Endiivi - höyry 12 min -
Herneet - höyry 1 min 30 s 4 min
Hernerouhe (kuivat vihannekset)
Kesäkurpitsa
Kukkakaali - upottaminen 3 min 4 min
Kurpitsa (sose) (puuroutuva
elintarvike)
Nauris
Parsa - upottaminen 5 min -
Parsakaali - höyry 3 min 3 min
Peruna kuutioituna
Pinaatti
Porkkana (puuroutuvat elintar-
vikkeet)
Punajuuri - höyry 20–30 min Puolikuivat pavut - upottaminen 20 min Purjo siivuina - höyry 2 min 30 s Riisi (kuivat vihannekset) - upottaminen 7 min Ruusukaali - höyry 7 min
Selleri
Sienet
Vehnä (kuivat vihannekset) - upottaminen 15 min Viherkaali
Vihreät linssit (kuivatut vi-
hannekset)
Vihreät pavut - höyry 8 min 8 min
siivuina - höyry 7 min 5 min
pilkottuna - höyry 1 min kokonaisina - upottaminen 1 min. 30 -
pilkottuna - höyry 6 min lehtinä - höyry 7 min -
** Elintarvike höyrytyskorissa* - *** Elintarvike vedessä
Kypsennys
- höyry** 18 min -
- upottaminen*** 15 min -
- upottaminen 14 min -
- höyry 6 min 30 s 9 min
- upottaminen 2 min -
- upottaminen 8 min -
- höyry 7 min -
- upottaminen 6 min -
- höyry 12 min -
- upottaminen 6 min -
- höyry 5 min 8 min
- upottaminen 3 min -
- höyry 6 min -
- upottaminen 10 min -
- upottaminen 10 min -
Venttiilin
asento
PAKASTETTU
Venttiilin
asento
5 min - upottaminen
Liha ja kala
TUORE
Kana (kokonainen 1,2 kg) 20 min
Karitsanliha (viulu 1,3 kg) 25 min
Lohi (4 medaljonkia 0,6 kg) (puuroutuvat elintarvikkeet)
Made (filee 0,6 kg) (puuroutuvat elintarvikkeet)
Naudanliha (paahtopaisti 1 kg) 10 min
Sianliha (paahtopaisti 1 kg) 25 min
Tonnikala (4 pihviä 0,6 kg) (puuroutuvat elintarvikkeet)
*Höyrytyskori ei kuulu kaikkiin malleihin
Venttiilin asento
6 min
4 min
7 min
PAKASTETTU
Venttiilin asento
45 min
35 min
8 min
6 min
28 min
45 min
9 min
FI
85
Page 88

VIGTIGE SIKKERHEDSANVISNINGER
Af hensyn til din egen sikkerhed opfylder dette apparat relevante standarder og bestemmelser:
- direktiv om trykbærende udstyr
- materialer i kontakt med næringsmidler
- miljø
• Dette apparat er beregnet til husholdningsbrug.
• Giv dig tid til at læse instruktionerne, og læs altid "Brugsanvisningen".
• Som alle andre apparater til madlavning skal trykkogeren holdes under opsyn, især hvis den
bruges, når der er børn i nærheden.
• Trykkogeren må ikke sættes i en varm ovn.
• Vær meget forsigtig, når du flytter trykkogeren under tryk. Rør aldrig de varme flader, kun
håndtag og knapper. Brug eventuelt grydelapper/handsker.
• Kontrollér jævnligt, at grydens håndtag er fastgjort ordentligt. Skru dem til om nødvendigt.
• Brug ikke trykkogeren til andre formål end det, den er beregnet til.
• Trykkogeren koger under tryk. Forkert brug kan medføre skoldning. Kontrollér, at trykkogeren
er korrekt lukket, før den sættes over varmen. Se afsnittet "Lukning".
• Forsøg aldrig at åbne trykkogeren med tvang. Kontrollér, at det indre tryk er faldet igen. Se
afsnittet "Sikkerhed".
• Brug aldrig trykkogeren uden væske, ellers kan den tage alvorligt skade. Sørg for, at der altid
er tilstrækkeligt med væske under tilberedningen.
• Brug kompatible varmekilder i overensstemmelse med brugsvejledningen.
• Lav aldrig retter, der indeholder mælk, i trykkogeren.
• Brug ikke groft salt i trykkogeren, men kun fint salt, som tilsættes til sidst.
• Fyld ikke trykkogeren mere end 2/3 (mærke for maks. fyldning).
• Trykkogeren må kun fyldes halvt op i forhold til kapaciteten med madvarer, som svulmer op
under tilberedningen, såsom ris, tørrede grøntsager eller kogt frugt. Ved visse typer supper, der
indeholder græskar, squash o.l., skal trykkogeren køle af i et par minutter og derefter afkøles
under koldt vand. Når 3 og 4 liters modellerne anvendes til klæbrige madvarer eller madvarer,
som svulmer op under tilberedningen, må trykkogeren kun fyldes 1/3. Vent 5 minutter, efter
madvarerne er kogt færdig, før trykket bringes ned under koldt vand.
• Efter tilberedning af kød med skind på overfladen (f.eks. oksetunge), som risikerer at svulme
op på grund af trykket, må der ikke prikkes hul, så længe skindet er svulmet op, da der er risiko
for at blive skoldet. Det anbefales at prikke kødet inden tilberedning.
• Ved tilberedning af klæbrige madvarer (gule ærter, rabarber...) skal trykkogeren rystes lidt, før
den åbnes, for at udgå sprøjt.
• Kontrollér altid inden brug, at ventilerne ikke er tilstoppet. Se afsnittet "Inden tilberedning".
• Brug ikke trykkogeren til friturestegning under tryk med olie.
• Rør ikke ved sikkerhedsanordningerne ud over almindelig rengøring og vedligeholdelse.
• Anvend udelukkende originale TEFAL dele, som passer til din model. I særdeleshed må der kun
anvendes en gryde og et låg fra TEFAL.
• Alkoholdampe er brandfarlige. Lad retten koge i 2 minutter, inden låget sættes på. Hold
trykkogeren under opsyn, når du tilbereder retter, der indeholder alkohol.
• Brug ikke trykkogeren til at opbevare sure eller salte madvarer før eller efter tilberedning, da
der er risiko for at ødelægge gryden.
• Hvis du under anvendelse af produktet opdager ødelagte eller beskadigede dele må du under
ingen omstændigheder forsøge at åbne trykkogeren; sluk for varmen, og lad den stå på
kogepladen, til den er helt afkølet, før den flyttes eller åbnes. Brug ikke trykkogeren igen, og kontakt
et autoriseret TEFAL-serviceværksted for reparation.
GEM DISSE INSTRUKTIONER
86
Page 89

Oversigtstegning
GAS EL-PLADE GLASKERAMISK
HALOGEN
INDUKTION
SPIRAL-KOGEPLADE
A. Driftsventil
B. Dampudgang
C. Sikkerhedsventil
D. Trykindikator
E. Knap til åbning
F. Håndtag på låg
G(a).Mærke for lågets position
G(b).Mærke for lågets position i fo-
rhold til gryden
H. Mærke for driftsventilens position
I. Lågpakning
J. Dampindsats*
K. Stativ til dampindsats*
L. Langt håndtag på gryde
M. Gryde
N. Lille håndtag på gryde
O. Mærke for maks. fyldning
Egenskaber
Trykkogerens diameter - varenumre
Kapacitet Ø Gryde Ø Bund
Model
Rustfrit stål
Maksimalt
sikkerhedstryk:
4 liter 22 cm 15 cm P25342 170 kPa
6 liter 22 cm 15 cm P25307 170 kPa
Sæt 4 + 6 liter 22 cm 15 cm P25443 170 kPa
7 liter 22 cm 15 cm P25308 170 kPa
8 liter 22 cm 15 cm P25344 170 kPa
Informationer i henhold til standarder:
Højeste driftstryk: 80 kPa
Kompatible varmekilder
• Denne trykkoger kan anvendes til alle varmekilder.
• På el- og induktionskomfurer må den anvendte plade ikke være større
end trykkogerens bund.
• På glaskeramiske komfurer og halogenplader sikres, at grydens bund
altid er helt ren og tør.
• På gasblus må flammen ikke være bredere end trykkogerens bund.
• Sørg altid for, at trykkogeren står midt på varmekilden.
DA
*Dampindsatsen medfølger ikke til visse modeller
87
Page 90

TEFAL tilbehør
• Der findes følgende tilbehør til trykkogeren:
Tilbehør Varenummer
Lågpakning X9010101
Dampindsats* 792185
Stativ til dampindsats* 792691
• Henvend dig til et autoriseret TEFAL serviceværksted for udskiftning af andre
dele eller reparationer Se venligst: www.tefal.com.
• Anvend udelukkende originale TEFAL dele, som passer til din model.
Brug
Åbning
• Træk knappen til åbning (E) bagud med tommelfingeren, og hold den i
stillingen - fig. 1.
• Hold fast om det lange håndtag på gryden (L) med den ene hånd, og drej
med den anden det lange håndtag på låget (F) mod uret, til trykkogeren er
åben - fig. 2.
• Tag derefter låget af.
Lukning
Når trykkogeren er
lukket, men endnu
ikke stillet over varmen, er det normalt,
at låget kan forskydes
i forhold til gryden.
Det kan det ikke mere,
når trykket er oparbejdet.
Minimum fyldning
• Hæld altid mindst 25 cl/250 ml (2 glas) væske i
trykkogeren.
Dampning*:
• Til dampning skal trykkogen fyldes med mindst 75
cl/750 ml (6 glas).
• Sæt dampindsatsen* (J)på det dertil indrettede stativ*
(K) - fig. 5.
88
• Sæt låget lige ned på gryden, så lågets
positionsmærker G(a) og G(b) flugter.
• Drej låget med uret, til det ikke kan drejes
længere
låser
Hvis du ikke kan dreje låget, kontrolleres, at
knappen (E) nu også er trukket bagud.
- fig. 3, og det kan høres, at knappen
- fig. 4.
Madvarer, som
lægges i
dampindsatsen*,
må ikke røre
trykkogerens låg.
*Dampindsatsen medfølger ikke til visse modeller
Page 91

Maksimum fyldning
• Fyld aldrig trykkogeren mere end 2/3 af grydens højde (mærke for maks.
fyldning) (O) - fig. 6.
Visse madvarer:
• Trykkogeren må kun fyldes halvt op med madvarer, som svulmer op under
tilberedningen, såsom ris, tørrede grøntsager eller kogt frugt.
• I forbindelse med supper anbefaler vi hurtig dekompression (se afsnittet
"Hurtig dekompression").
Anvendelse af driftsventil (A)
Påsætning af driftsventil (A):
OBS. Ventilen må kun håndteres, når trykkogeren er
kold og ikke under tilberedning.
• Sæt ventilen (A) på med ventilens piktogram
ud for positionsmærket (H).
• Tryk ventilen ned, og drej den hen til
piktogrammet eller .
Aftagning af driftsventil:
OBS. Ventilen må kun håndteres, når trykkogeren er
kold og ikke under tilberedning.
• Tryk ventilen ned, og drej den, til piktogrammet
flugter med positionsmærket (H) som vist på
tegningen.
• Tag ventilen af som vist.
Tilberedning af sarte grøntsager eller madvarer:
• Sæt ventilens piktogram ud for
positionsmærket (H)
Tilberedning af kød eller frosne varer:
• Sæt ventilens piktogram ud for
positionsmærket (H)
Udledning af damp:
• Drej ventilen (A) gradvis, og lad dampen og trykket
slippe ud lidt efter lidt, og slut med piktogrammet
ud for mærket
under den kolde vandhane (afsnit "Hurtig
dekompression").
- fig. 7.
- fig. 8.
- fig. 9. Trykkogeren kan i stedet stilles
•
•
H
DA
*Dampindsatsen medfølger ikke til visse modeller
89
Page 92

Første ibrugtagning
Til at begynde med
er det normalt, at
trykindikatoren (D)
viser damp.
• Sæt stativet til dampindsatsen (K) i bunden af
gryden, og stil dampindsatsen (J) ovenpå*.
• Fyld gryden 2/3 med vand (mærke for maks.
fyldning (O)).
• Luk trykkogeren.
• Sæt piktogrammet ud for positionsmærket (H)
- fig. 8.
• Sæt trykkogeren over varmen, og indstil
varmekilden til maksimal effekt.
• Skru ned for varmen, så snart dampen begynder
at slippe ud af ventilen, og sæt et stopur til 20 min.
• Sluk for varmekilden, når de 20 minutter er gået.
• Drej ventilen (A) gradvis, og lad dampen og trykket
slippe ud lidt efter lidt, og slut med piktogrammet
ud for mærket
• Når trykindikatoren (D) falder igen, er trykkogeren
ikke længere under tryk.
• Åbn trykkogeren
• Skyl trykkogeren under vand, og tør den af.
- fig. 9.
- fig. 1 - 2.
Inden tilberedning
• Hver gang dampkogeren skal bruges, tages ventilen (A)
af (se afsnittet "Anvendelse af driftsventil"), og
dampudgangen (B) ses efter for tilstopning ved at
holde låget op mod lyset og kigge gennem hullet (se
omstående tegning). Rens eventuelt med en
tandstikker
• Kontrollér, at kuglen i sikkerhedsventilen (C) kan
bevæge sig, se omstående tegning og afsnittet
"Rengøring og vedligeholdelse".
• Hæld ingredienser og væske i.
• Luk trykkogeren
rigtigt
• Sæt ventilens piktogram eller ud for
positionsmærket (H) -
• Sæt trykkogeren over varmen, og indstil varmekilden
til maksimal effekt.
- fig. 10.
- fig. 3. Kontrollér, at den er lukket
- fig. 4.
fig. 7 eller 8.
90
*Dampindsatsen medfølger ikke til visse modeller
Page 93

Under tilberedning
Trykindikatoren (D)
forhindrer, at
trykket i
trykkogeren stiger,
hvis den ikke er
ordentlig lukket.
• Til at begynde med er det normalt, at
trykindikatoren (D) viser damp.
• Så snart driftsventilen (A) slipper damp ud konstant
og afgiver en uafbrudt fløjtelyd, skrues ned for
varmekilden, men ventilen (A) skal stadig hvisle.
• Sæt et stopur til den tid, som angives i opskriften.
• Når kogetiden er afsluttet, slukkes for varmekilden.
Efter afsluttet tilberedningstid
Trykaflastning af damp:
- Langsom dekompression:
• Drej ventilen (A) gradvis, og lad dampen og trykket
slippe ud lidt efter lidt, og slut med piktogrammet
ud for mærket - fig. 9. Når trykindikatoren (D)
falder igen, er trykkogeren ikke længere under tryk.
Trykindikatoren (D) forhindrer åbning af
trykkogeren, hvis den stadig er under tryk.
- Hurtig dekompression:
• Trykkogeren kan stilles under den kolde vandhane
for at bringe trykket ned hurtigere, se omstående
tegning. Når trykindikatoren (D) falder igen, er
trykkogeren ikke længere under tryk.
• Du kan nu åbne trykkogeren
- Særlige tilfælde:
• Ved tilberedning af madvarer, som skummer (se
tilberedningstabellen), eller tørrede grøntsager
såsom bælgfrugter må fremgangsmåden for
dekompression ikke anvendes. Vent med at åbne
trykkogeren, til trykindikatoren (D) er faldet. Den
anbefalede kogetid skal måske sættes en smule
ned.
- fig. 1 og 2.
Hvis det sprøjter voldsomt, når dampen og
trykket lukkes ud,
sættes driftsventilen
(A) tilbage på mærket
eller 8. Derefter
lukkes dampen og
trykket langsomt ud,
så udsprøjtning undgås.
Vær meget forsigtig,
og undgå at ryste
trykkogeren, når du
flytter den, mens den
er under tryk.
eller
- fig. 7
DA
91
Page 94

Rengøring og vedligeholdelse
Rengøring af trykkoger
Følg anbefalingerne for rengøring og
vedligeholdelse hver gang, apparatet har været
brugt, for at sikre, at det fortsat kan fungere korrekt.
• Vask trykkogeren (gryde og låg) hver gang, den
har været brugt, med lunkent vand og
opvaskemiddel. Følg samme fremgangsmåde for
dampindsatsen*.
• Der må ikke anvendes klorvand eller klorholdige
rengøringsmidler.
• Gryden må ikke opvarmes, når den er tom.
Indvendig rengøring af gryden:
• Vask den med en svamp og opvaskemiddel.
• Pletter indvendig i bunden af gryden har ingen
betydning for metallets kvalitet. Det er bare
kalkafsætninger. De kan fjernes med en svamp
og lidt eddike.
Udvendig rengøring af gryden:
• Vask den med en svamp og opvaskemiddel.
Rengøring af låget:
• Vask låget under lidt lunkent vand med en
svamp og opvaskemiddel, og skyl det grundigt.
Rengøring af lågpakning:
• Efter hver brug skal pakningen (I) og dens leje
rengøres.
• Pakningen påsættes igen som vist
12.
Rengøring af driftsventil (A):
• Tag driftsventilen af (A), se afsnittet
"Anvendelse af driftsventil".
• Vask driftsventilen (A) under vandhanen
13.
- fig. 11 -
- fig.
Vask altid
trykkogeren efter
brug.
Det brune skær og
ridserne, som kan
fremkomme efter
længere tids brug,
har ingen
betydning.
Kun selve
grydeunderdelen og
dampindsatsen må
vaskes i
opvaskemaskine.
For at forlænge din
trykkogers levetid
mest muligt må
gryden ikke
opvarmes, når den
er tom.
Det er meget
vigtigt at få
trykkogeren
efterset af et
autoriseret TEFAL
serviceværksted
efter 10 års brug.
92
*Dampindsatsen medfølger ikke til visse modeller
Page 95

Rengøring af dampudgang (B):
• Tag ventilen af (A).
• Se efter, at dampudgangen er rund, og at den
ikke er tilstoppet, ved at holde låget op mod lyset
og kigge gennem hullet. Se omstående tegning.
Rens eventuelt med en tandstikker - fig. 10.
Rengøring af sikkerhedsventil (C):
• Rengør den del af sikkerhedsventilen, som
sidder på lågets inderside, ved at holde låget
under rindende vand.
• Kontrollér, at den fungerer korrekt, ved at trykke
forsigtigt på kuglen. Den skal let kunne trykkes
ind. Se omstående tegning.
Udskiftning af trykkogerens pakning:
• Skift trykkogerens pakning hvert år, eller hvis
den er beskadiget.
• Anvend altid en original TEFAL pakning, som
Opbevaring af trykkogeren:
• Vend låget om, og læg det på gryden.
Brug aldrig skarpe
eller spidse genstande til at rense
med.
Sikkerhed
Trykkogeren er udstyret med flere sikkerhedsanordninger:
• Sikkerhed ved lukning:
- Hvis trykkogeren ikke er lukket ordentligt, kan trykindikatoren (D) ikke stige,
og derfor kan der ikke oparbejdes tryk.
• Sikkerhed ved åbning:
- Hvis trykkogeren er under tryk, kan knappen til åbning (E) ikke betjenes.
Forsøg aldrig at åbne trykkogeren med tvang. Forsøg især aldrig at ændre
noget ved trykindikatoren (D).
• To sikkerhedsanordninger mod overtryk:
- Første sikkerhedsanordning: Sikkerhedsventilen (C) lukker trykket ud, og
dampen slipper ud vandret på lågets overside
- Anden sikkerhedsanordning: Pakningen (I) lader dampen slippe ud lodret
gennem et lille hul på lågets kant eller langs grydekanten - fig. 15. OBS.
Det kan få et gasblus til at slukke.
- fig.14.
DA
93
Page 96

Hvis en af sikkerhedsanordningerne mod overtryk
udløses:
• Sluk for varmekilden.
• Lad trykkogeren køle helt af.
• Tag låget af.
• Kontrollér og rens driftsventilen (A) - fig.13,
dampudgangen (B) - fig.10, sikkerhedsventilen
(C) og pakningen (I). Se omstående tegning.
Anbefalinger for brug
1 - Dampen er meget varm, når den slipper ud af trykkogeren, pas på ikke
at blive skoldet. Brug eventuelt grydelapper/handsker.
2 - Så snart trykindikatoren stiger, kan trykkogeren ikke længere åbnes.
3 - Som alle andre apparater til madlavning skal trykkogeren holdes under
opsyn, hvis den bruges, når der er børn i nærheden.
4 - Brug begge grydehåndtag til at flytte trykkogeren.
5 - Lad ikke madvarer blive liggende i trykkogeren.
6 - Brug aldrig klorvand eller klorholdige rengøringsmidler, som kan forringe
grundmaterialets kvalitet
7 - Pakningen, låget og driftsventilen må ikke vaskes i opvaskemaskine eller
lægges i blød.
8 - Skift pakningen hvert år, eller hvis den er beskadiget.
9 - Trykkogeren må kun rengøres, når den er afkølet og tom.
10 - Det er meget vigtigt at få trykkogeren efterset af et autoriseret TEFAL
serviceværksted efter 10 års brug.
Garanti
• Ved brug i overensstemmelse med anbefalingerne i brugsanvisningen er
gryden til din nye TEFAL trykkoger dækket af 10 års garanti mod:
- Fejl i forbindelse med grydens metalstruktur.
- Tidlig forringelse af grundmaterialet.
• Garantien dækker fabrikations- og materialefejl i alle andre dele af din
trykkoger i den garantiperiode, som lovgivningen i købslandet foreskriver
som gældende fra købsdatoen.
• For at gøre denne garanti gældende skal der fremvises kassebon eller
købsfaktura med købsdatoen.
Garantien dækker ikke:
• Ødelæggelser som følge af manglende overholdelse af vigtige
sikkerhedsanvisninger eller skødesløs brug, herunder:
- Slag, fald, anvendelse i ovn, o.l.
94
Page 97

- Vask af låget i opvaskemaskine.
• Det er kun autoriserede TEFAL serviceværksteder, som er bemyndiget til at yde
service i forbindelse med denne garanti Se venligst: www.tefal.com.
Lovbestemt mærkning
Mærkning Placering
Producentens identifikation samt handelsmærke
Produktionsår og serienummer På gryden
Modelnummer
Maksimalt sikkerhedstryk (PS)
Højeste driftstryk (PF)
Kapacitet Grydens bund
• Tænk på miljøet!
i Apparatet indeholder mange materialer, der kan genvindes
eller genbruges.
‹ Aflevér det på et indsamlingssted, som sikrer den videre
behandling.
Grydens håndtag og lågets
håndtag
På låget
DA
*Dampindsatsen medfølger ikke til visse modeller
95
Page 98

TEFAL svarer på dine spørgsmål
Problemer Anbefalinger
Hvis trykkogeren er
opvarmet under tryk
uden væske i:
Hvis trykindikatoren
ikke er steget og der
ikke slipper damp ud
af ventilen under tilberedningen:
Hvis trykindikatoren
er steget og der ikke
slipper damp ud af
ventilen under tilberedningen:
Hvis der siver damp
ud rundt langs låget,
kontrolleres:
Hvis du ikke kan
åbne låget:
Hvis madvarerne
ikke er kogt. eller
hvis de er brændt på,
kontrolleres:
Hvis madvarerne er
brændt på i gryden:
Få trykkogeren efterset af et autoriseret TEFAL serviceværksted.
Det er normalt i de første minutter.
Hvis det forsætter, kontrolleres:
- at varmekilden er stærk nok, ellers skal den sættes op
- at der er tilstrækkelig med væske i gryden
- at driftsventilen står på et af piktogrammerne eller
- fig. 7 eller 8.
- at trykkogeren er korrekt lukket
- at pakningens eller grydens kant ikke er beskadiget.
Det er normalt i de første minutter.
Hvis det forsætter, stilles trykkogeren under den kolde vandhane, se afsnittet "Hurtig dekompression og Særlige tilfælde", og åbnes så.
Rens driftsventilen og dampudgangen, og kontrollér, at kuglen i sikkerhedsventilen let kan trykkes ind.
- at låget er korrekt lukket
- at pakningen sidder rigtigt i låget
- at pakningen er i god stand, ellers skal den skiftes
- at låget, pakningen og dens leje i låget, sikkerhedsventilen
og driftsventilen er rene
- at grydens kant er i god stand.
Kontrollér, at trykindikatoren er i laveste position.
Ellers bringes trykket ned, eventuelt afkøles trykkogeren
under den kolde vandhane, se afsnittet "Hurtig dekompression og Særlige tilfælde".
- tilberedningstiden
- varmekildens effekt
- at driftsventilen står i den rigtige position
- vandmængden.
Sæt gryden i blød et stykke tid, inden den vaskes.
Brug aldrig klorvand eller klorholdige rengøringsmidler.
96
Page 99
Grøntsager
FRISK
Tilberedning
Ærter, gule (tørrede grøntsager) - neddyppet 14 min
Artiskokker
Asparges - neddyppet 5 min
Blomkål - neddyppet 3 min 4 min
Bønner, halvtørrede - neddyppet 20 min
Broccoli - damp 3 min 3 min
Champignon
Græskar (mos) (skummer) - neddyppet 8 min
Grønærter - damp 1 1/2 min 4 min
Grønkål
Grønne bønner - damp 8 min 9 min
Gulerødder (skummer) i skiver - damp 7 min 5 min
Hvedekorn (tørrede grøntsager) - neddyppet 15 min
Julesalat - damp 12 min
Kartofler i kvarte
Linser, grønne (tørrede grøntsager)
Majroer
Porrer i skiver - damp 2 1/2 min
Ris (tørrede grøntsager) - neddyppet 7 min
Rødbeder - damp 20 - 30 min
Rosenkål - damp 7 min 5 min neddyppet
Selleri
Spinat
Squash
- damp** 18 min
- neddyppet*** 15 min
snittet - damp 1 min 5 min
hele - neddyppet 1 1/2 min
snittet - damp 6 min
blade - damp 7 min
- damp 12 min
- neddyppet 6 min
- neddyppet 10 min
- damp 7 min
- neddyppet 6 min
- damp 6 min
- neddyppet 10 min
- damp 5 min 8 min
- neddyppet 3 min
- damp 6 1/2 min 9 min
- neddyppet 2 min
** I dampindsatsen
*** I vand
Ventilens
position
DYBFROST
Ventilens
position
Kød og fisk
FRISK
Havtaske (fileter 0,6 kg) (skummer) 4 min
Kylling (hel 1,2 kg) 20 min
Laks (4 bøffer 0,6 kg) (skummer) 6 min
Lam (lammekølle 1,3 kg) 25 min
Oksekød (steg 1 kg) 10 min
Svinekød (steg 1 kg) 25 min
Tunfisk (4 bøffer 0,6 kg) (skummer) 7 min
*Dampindsatsen medfølger ikke til visse modeller
Ventilens position
DYBFROST
Ventilens position
6 min
45 min
8 min
35 min
28 min
45 min
9 min
DA
97
Page 100

VIKTIGE FORHOLDSREGLER
Av sikkerhetsgrunner er dette apparatet i samsvar med gjeldende standarder og forskrifter:
- Direktiv om trykkpåkjent utstyr
- Materialer i kontakt med næringsmidler
- Miljø
• Dette produktet er beregnet på bruk i hjemmet.
• Ta deg tid til å lese alle instruksjonene, og benytt deg av Brukerveiledningen.
• Som med alle andre kokeapparater, skal dette apparatet brukes under nøye overvåking, spesielt
dersom du bruker trykkokeren i nærheten av barn.
• Trykkokeren må aldri settes inn i en varm ovn.
• Vær ytterst forsiktig når du flytter rundt på trykkokeren dersom denne er under trykk. Rør ikke
varme deler av apparatet. Bruk håndtakene og knappene. Om nødvendig, bruk grytelapper.
• Kontroller regelmessig at håndtakene til trykkokeren er korrekt festet. Skru dem fast om
nødvendig.
• Trykkokeren skal ikke brukes til andre formål enn det den er beregnet på.
• Trykkokeren fungerer under trykk. Ved uriktig bruk kan man risikere skader som skyldes at man
blir skåldet. Påse at trykkokeren er forsvarlig lukket før du tar den i bruk. Se avsnittet "Lukke".
• Man må aldri bruke kraft til å åpne trykkokeren. Påse at trykket inne i trykkokeren har falt. Se
avsnittet "Sikkerhet".
• Trykkokeren må aldri brukes uten væske da det kan føre til alvorlige skader. Påse at det alltid
er tilstrekkelig med væske under tilberedningen.
• Bruk kompatible varmekilder, i overensstemmelse med bruksinstruksjonene.
• Man må aldri tilberede retter basert på melk i trykkokeren.
• Ha ikke grovt salt i trykkokeren. Tilsett salt helt på slutten.
• Trykkokeren må aldri fylles opp over 2/3 (maks merke for fylling).
• For matvarer som utvider seg under koking, som ris, tørkede grønnsaker eller kompott, skal ikke
trykkokeren fylles mer enn halvt. For visse typer supper som inneholder gresskar, squash, la
trykkokeren kjøle seg ned noen minutter før du skyller den under kaldt vann. Dersom 3- og 4
liters-modellene brukes med tykke ingredienser eller ingredienser som utvider seg under koking,
må ikke trykkokeren fylles over 1/3. Når kokingen er slutt, vent i 5 minutter, og skyll deretter
med kaldt vann.
• Etter å ha tilberedt kjøtt med et ytre hudlag (som for eksempel oksetunge), som risikerer å
svelle på grunn av trykket, må man ikke stikke gaffel i kjøttet så lenge yttersiden ser oppblåst
ut. Du risikerer å bli skåldet. Stikk kjøttet med en gaffel før tilberedelse.
• Ved tilberedning av matvarer som avgir skum (som splitterter, rabarbra), skal man riste lett på
trykkokeren før åpning for å unngå at matvarene spruter ut.
• Hver gang før du bruker trykkokeren, kontroller at ikke ventilene er tette. Se avsnittet "Før
koking."
• Man må aldri bruke trykkokeren til å steke med olje under trykk.
• Foreta ingen inngrep på sikkerhetssystemene ut over det som anbefales for rengjøring og
vedlikehold.
• Bruk kun TEFAL-originaldeler som svarer til din modell. Det er spesielt viktig at kjelen og lokket
er av merket TEFAL.
• Husk at alkoholdamp kan ta fyr. Kok opp i ca. 2 minutter før du setter på lokket. Følg ekstra
godt med på apparatet dersom du tilbereder oppskrifter med alkohol.
• Bruk ikke trykkokeren til å lagre syrlige eller salte ingredienser, hverken før eller etter koking.
Det kan skade kjelen.
Hvis du under bruk bemerker at en hvilken som helst del av trykkokeren er ødelagt eller sprukket,
•
så forsøk ikke under noen omstendigheter å åpne den; skru av varmen og la den stå på
koketoppen og avkjøles helt før du flytter den eller åpner lokket. Ikke bruk den igjen, og ta den
med til et TEFAL-godkjent servicesenter for reparasjon.
OPPBEVAR DISSE INSTRUKSJONENE
98
 Loading...