

Page 1
S.A. SEB 21260 SELONGEY CEDEX, R.C. DIJON B 302 412 226
RÉF. 3303252, 1
ère
ÉDITION, NOVEMBRE 2001, IMPRIMÉ EN FRANCE
TOUS DROITS RÉSERVÉS
Notice 12L Inox.qxd 14/11/2001 09:36 Page 1
Page 2
u Guide
utilisateur
u User’s
Manual
u Benutzer-
handbuch
u Guida per
l’utilizzatore
u Gebruiks-
aanwijzing
u Instrucciones
de uso
u Guia do
utilizador
u Brugsanvisning
Mini Four
12 L
Notice 12L Inox.qxd 12/11/2001 14:46 Page 2
Page 3

280
0
120
150
175
200
220
240
260
Mini Four
12 L
2
4
0
C
1
6
m
i
n
.
2
6
0
C
1
5
m
i
n
.
1
7
5
C
5
5
m
i
n
.
2
6
0
C
2
5
m
i
n
.
2
6
0
C
2
0
m
i
n
.
2
4
0
C
4
0
m
i
n
.
2
6
0
C
7
0
m
i
n
.
2
6
0
C
4
0
m
i
n
.
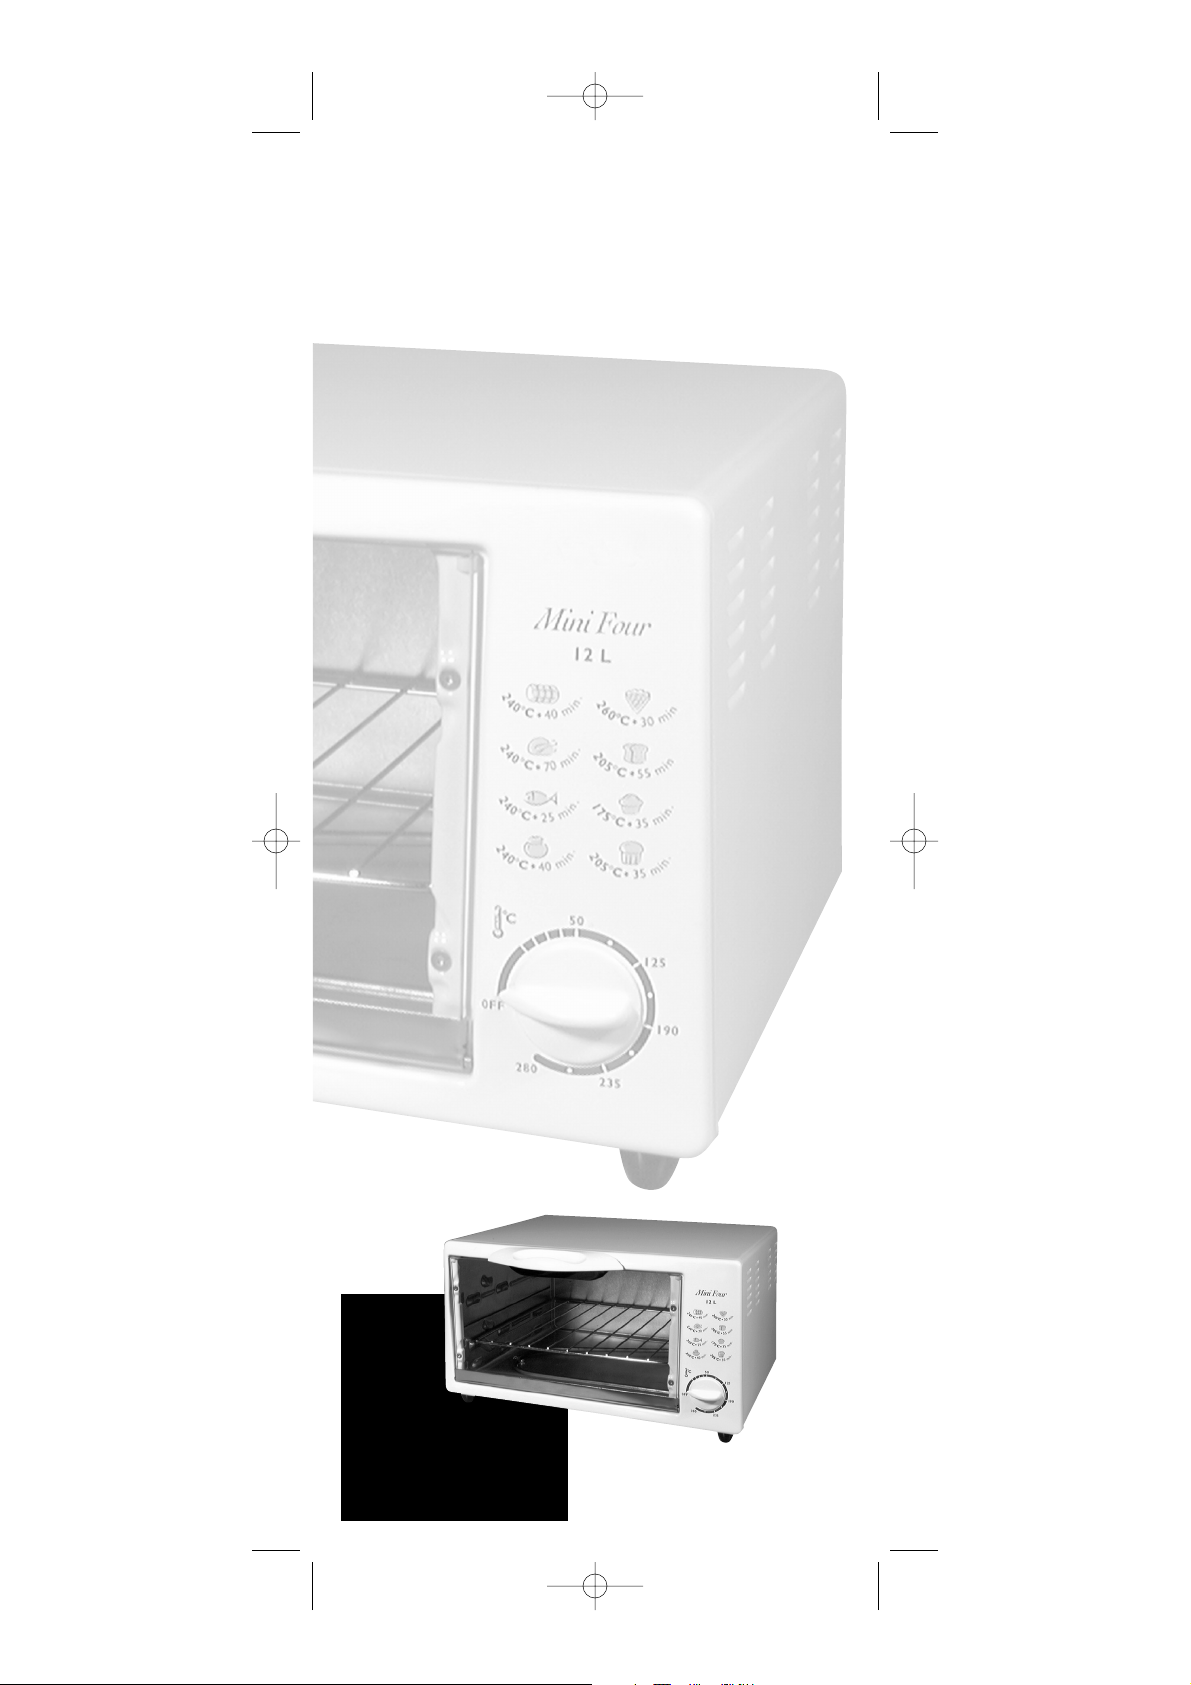
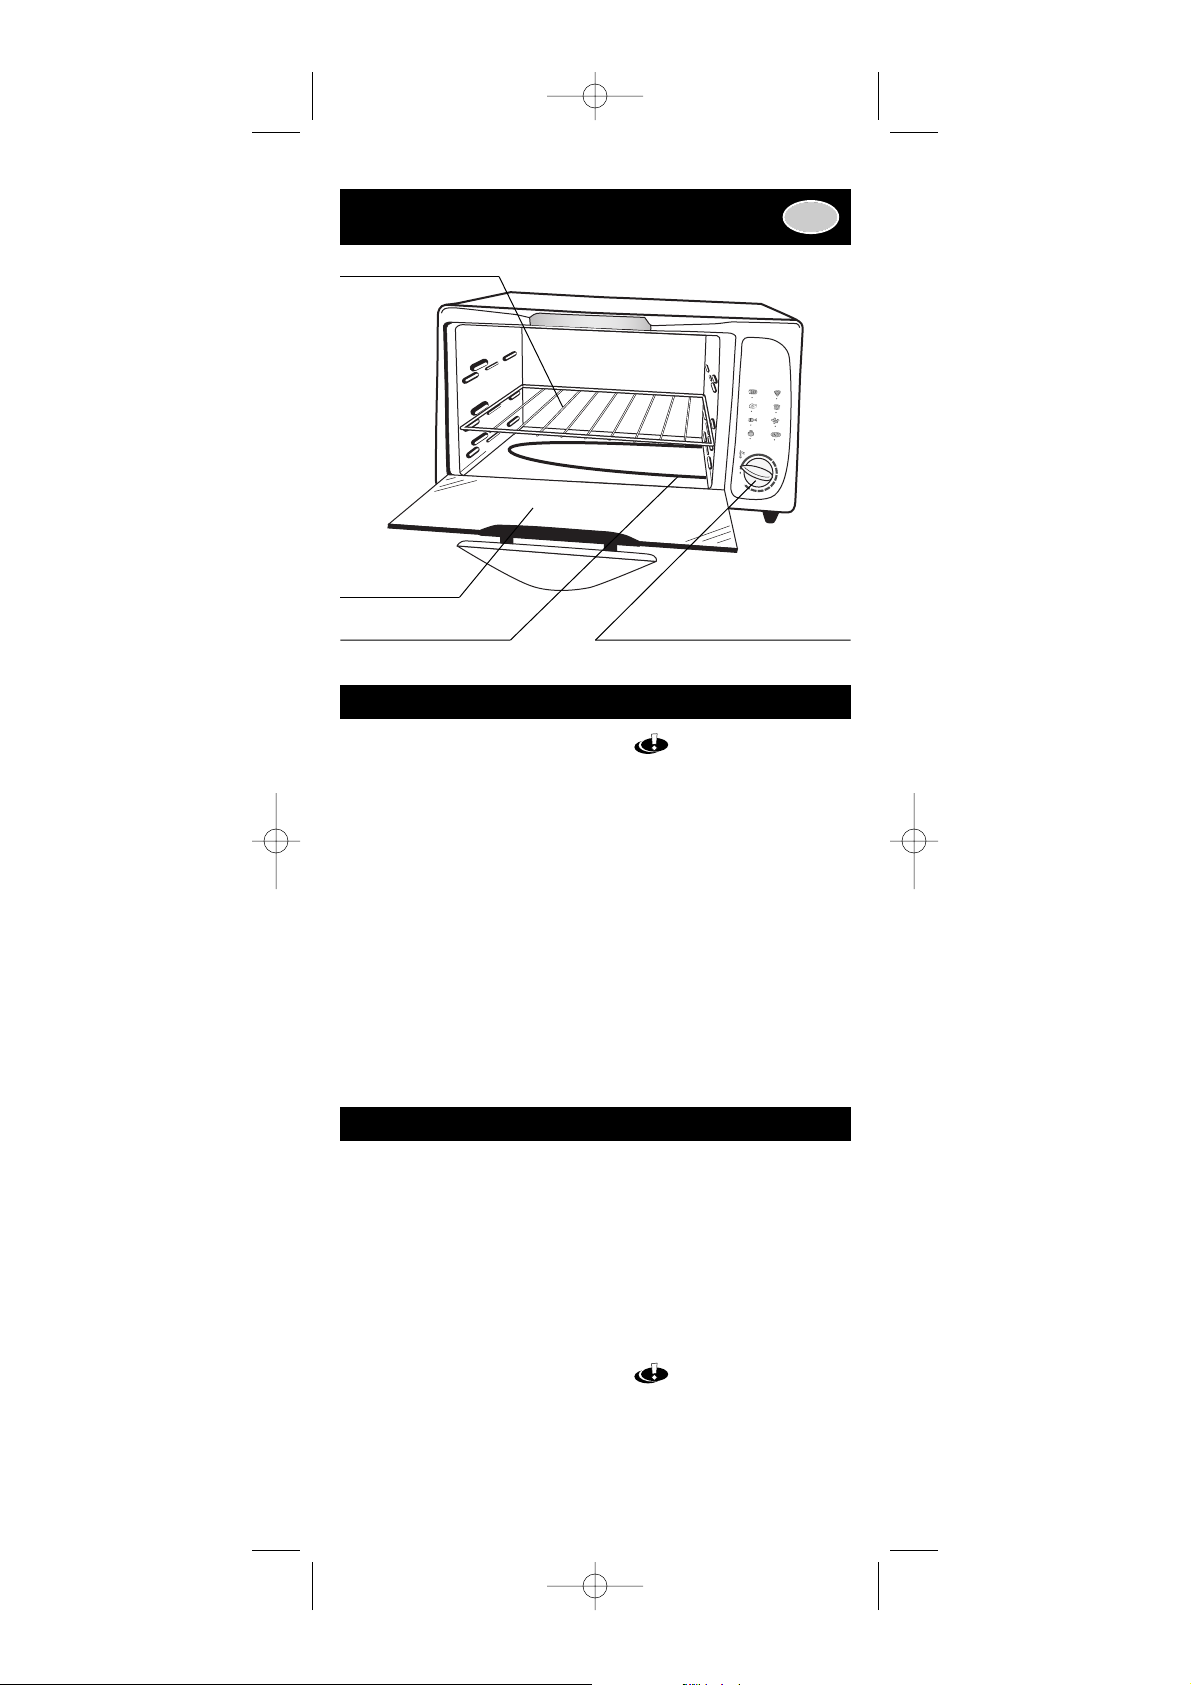
Connaître votre four
Schéma descriptif
n
Grille trois positions
Votre four est équipé d’une grille
plate pouvant se placer à trois
niveaux différents afin d’optimiser
la cuisson de votre préparation.
n
Bouton de fonction : Arrêt et
thermostat de réglage
Un seul bouton de réglage pour
régler la température et mettre en
marche le four.
F Il suffit d’actionner le bouton
arrêt/thermostat pour mettre en
marche et régler la température,
et de positionner sur 0 pour
arrêter le fonctionnement du
four.
Veillez à bien remettre le
bouton sur la position 0 à la fin de
la cuisson sinon le four risque de
continuer à fonctionner.
Débrancher systématiquement
le four à la fin de la cuisson.
F Pour obtenir une bonne tempé-
rature de cuisson, le thermostat
offre une large gamme de
réglage (de 120°C à 280°C).
Placer le thermostat sur la
position souhaitée. La température peut être modifiée en
cours de cuisson, en déplaçant
simplement le bouton.
Installer votre four
n
Avant la première utilisation
Déballer l’appareil et enlever
éventuellement les autocollants et
tous les papiers se trouvant à
l’intérieur du four. L’emballage est
recyclable, mais il peut être utile
pour transporter ou retourner votre
four à une station service agréée.
Lire attentivement le mode
d’emploi ainsi que les consignes de
sécurité. Nettoyer l’appareil et les
accessoires avec un linge humide.
Sécher.
n
Installation de votre appareil
Placer votre four sur un plan de
travail stable. Laisser une libre
circulation de l’air tout autour de
votre appareil. Dérouler complètement le cordon d’alimentation.
Brancher.
Nous vous conseillons de faire
fonctionner la première fois votre
four à vide (sans grille), porte
fermée, pendant 15 minutes environ pour éliminer «l’odeur de
neuf». Mettre en marche en réglant
le thermostat sur la position 280°C.
Un léger dégagement de
fumée peut se produire. Ce
phénomène, tout à fait normal,
disparaîtra rapidement.
Résistance inférieure
Bouton Arrêt et Thermostat
Porte en verre
Grille à 3 positions
F
Notice 12L Inox.qxd 12/11/2001 14:46 Page 3
Page 4
Nettoyer votre four
n
Avant tout entretien ou nettoyage,
débrancher et laisser refroidir
l’appareil.
n
Ne jamais projeter d’eau sur la
porte en verre trempé lorsqu’elle
est encore chaude.
n
Nettoyer la porte et les parois
intérieures métalliques avec de
l’eau additionnée de détergent.
Sécher.
n
N’utiliser ni produit d’entretien
agressif (notamment les décapants
à base de soude), ni éponge
grattoir, ni tampon abrasif.
n
Pour les modèles avec capot inox :
utilisez en complément un chiffon
doux avec un produit nettoyant les
vitres.
Ne pas utiliser de produit
d’entretien spécifique pour métaux.
n
La grille se nettoie à l’eau
additionnée de détergent ou au
lave-vaisselle.
n
Un simple coup d’éponge suffit
pour nettoyer l’extérieur du four.
n
Il est recommandé de nettoyer le
four après chaque cuisson pour
éviter les odeurs et les goûts
persistants.
Utiliser votre four
n
Mise en route et cuisson
Choisir le plat qui convient pour
votre préparation. Placer la grille à
la hauteur souhaitée.
Disposer le plat avec les aliments
dans le four et fermer la porte.
Régler le thermostat à la température désirée en tournant le
bouton. Le four chauffe.
Surveiller de temps en temps votre
cuisson.
n
Fin de cuisson
A la fin de la cuisson, arrêter
votre four en ramenant le
bouton thermostat sur la position
arrêt (0). Débrancher.
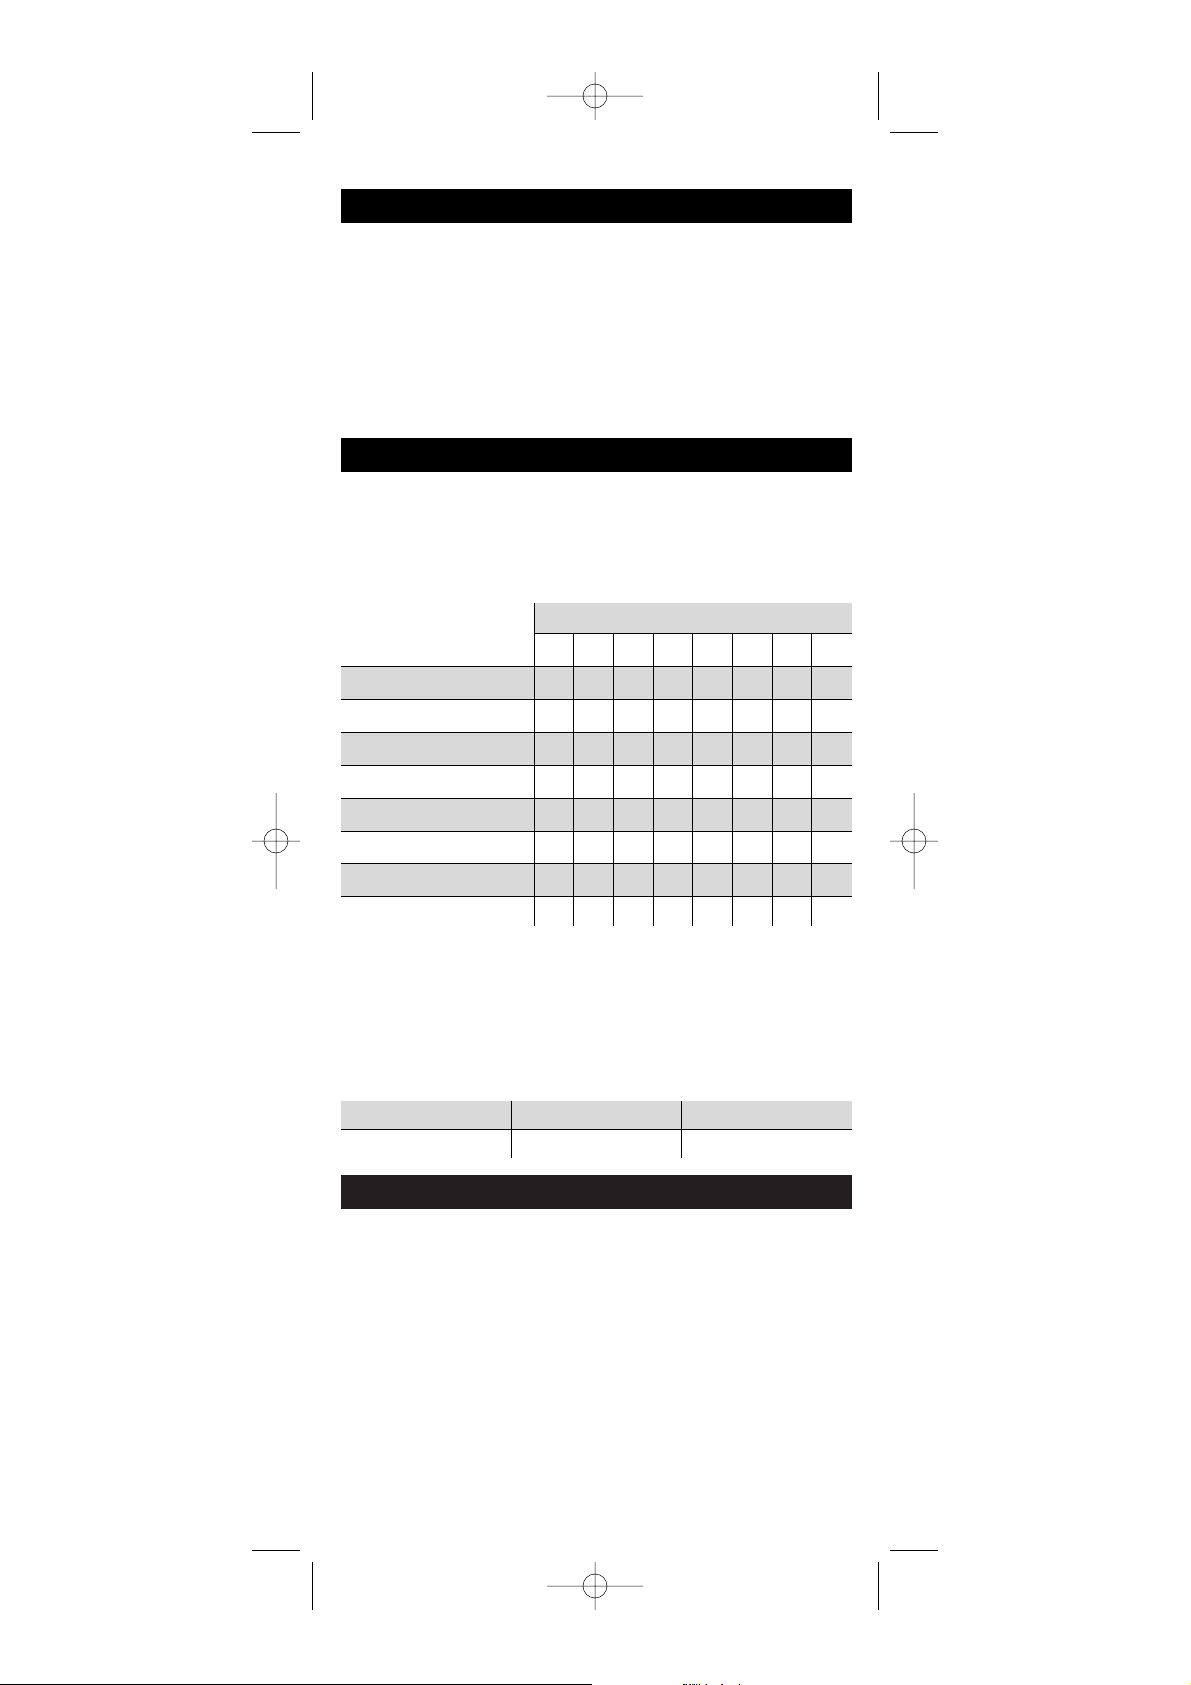
Gérer la cuisson
n
Tableau des positions de
réglage du thermostat
Utiliser ce tableau si votre recette
ne précise pas la température de
cuisson. Les températures du
thermostat sont données à titre
indicatif et elles varient en fonction
du poids, de la taille, de l’épaisseur
ou de la température des aliments
(surgelés).
n
Conseils et précautions
Pour les rôtis de viande et de
volaille, utiliser des plats à bords
hauts (5 cm minimum) afin de
réduire les projections grasses sur
les parois du four.
Pour les pâtisseries, utiliser de
préférence des plats avec revêtement anti-adhésif qui facilite le
démoulage.
Pour choisir plats et moules, tenir
compte des dimensions maximum
suivantes :
Hauteur Largeur Profondeur
155 mm 275 mm 290 mm
Position du thermostat
120° 150° 175° 205° 225° 240° 260° 280°
Chauffe-plat
u
Chauffages
uuuuuu
Surgelés
uuuuuuu
Poissons
uuu
Gratins
uuu
Volailles
uuu
Viandes
uuuu
Pâtisserie
uuuuuu
Notice 12L Inox.qxd 12/11/2001 14:46 Page 4
Page 5
Consignes de sécurité
Consommation d’énergie (kWh) :
Montée à 200° C : 0.07
Maintien à 200° C pendant 1 heure : 0.37
TTOOTTAALL :: 00..4444
Prenez le temps de lire
toutes les instructions et
reportez-vous au «guide de
l’utilisateur».
•
Cet appareil est conforme aux règles et
conditions de sécurité en vigueur ainsi
qu’aux directives :
- Directive Compatibilité Électromagnétique 89/336/CEE modifiée par
les Directives 92/31/CEE et 93/68/CEE,
- Directive Basse Tension 73/23/CEE
modifiée par la Directive 93/68/CEE.
•
Comme pour tout appareil de cuisson,
assurez une étroite surveillance si
vous utilisez votre four à proximité
d’enfants. Ne le laissez pas à leur
portée.
•
Compte-tenu de la diversité des
normes en vigueur, si cet appareil est
utilisé dans un pays différent de celui
où il a été acheté, faites-le vérifier par
une station service agréée.
•
Ne placez pas l’appareil à proximité
d’une source de chaleur.
•
Vérifiez que la tension du réseau
correspond bien à celle indiquée
sur l’appareil (courant alternatif
seulement).
•
Ne laissez pas le cordon pendre ou
toucher les parties chaudes du four. Ne
débranchez pas l’appareil en tirant sur
le cordon.
•
Branchez toujours l’appareil sur une
prise reliée à la terre.
•
N’utilisez qu’une rallonge en bon état,
avec une prise reliée à la terre, et avec
un fil conducteur de section au moins
égale au fil fourni avec le produit.
•
Assurez-vous que l’installation électrique est suffisante pour alimenter un
appareil de cette puissance.
•
La température de la porte et de la
surface extérieure peut être élevée
lorsque l’appareil fonctionne. Utilisez
les poignées et boutons. Utilisez des
gants, si nécessaire.
•
Afin d’éviter les chocs électriques, ne
plongez pas le fil électrique, la prise de
courant ou l’appareil dans l’eau ou un
autre liquide.
•
S’il arrivait que certaines parties du
produit s’enflamment, ne tentez
jamais de les éteindre avec de l’eau.
Étouffez les flammes avec un linge
humide.
•
Ne rangez pas de produits inflammables à proximité ou sous le meuble
où est placé l’appareil.
•
N’utilisez pas l’appareil si :
- celui-ci a un cordon défectueux,
- l’appareil est tombé et présente des
détériorations visibles ou des
anomalies de fonctionnement.
Dans ce cas, l’appareil doit être envoyé
au centre de service après-vente agréé
le plus proche afin d’éviter tout danger.
•
Ne faites pas fonctionner l’appareil
sous un meuble mural, une étagère, ou
à proximité de matériaux inflammables
tels que stores, rideaux, tentures ...
•
Cet appareil n’est pas prévu pour être
encastré.
•
N’utilisez pas l’appareil comme source
de chaleur.
•
Ne placez jamais de papier, carton ou
plastique dans l’appareil et ne posez
rien dessus (ustensiles, objets ...).
•
N’introduisez rien dans les ouïes de
ventilation, ne les obstruez pas.
•
Pour votre sécurité, ne démontez
jamais l’appareil par vous-même ;
faites appel à un centre de service
agréé.
•
Cet appareil a été conçu pour un usage
domestique uniquement, toute utilisation professionnelle, non appropriée
ou non conforme au mode d’emploi
n’engage ni la responsabilité, ni la
garantie du fabricant.
Conservez ces instructions
Notice 12L Inox.qxd 12/11/2001 14:46 Page 5
Page 6
280
0
120
150
175
200
220
240
260
Mini Four
12 L
2
4
0
C
1
6
m
i
n
.
2
6
0
C
1
5
m
i
n
.
1
7
5
C
5
5
m
i
n
.
2
6
0
C
2
5
m
i
n
.
2
6
0
C
2
0
m
i
n
.
2
4
0
C
4
0
m
i
n
.
2
6
0
C
7
0
m
i
n
.
2
6
0
C
4
0
m
i
n
.
Understanding your oven
Descriptive diagram
n
3-position grill
Your oven is fitted with a flat grill
which can be placed at three
different levels, so as to maximize
the cooking of your food.
n
Function button: Stop and
adjustment thermostat
There is one button to adjust the
temperature and turn on the oven.
F You only need to turn the
Stop/thermostat button to turn
ON the oven and adjust the
temperature. Turn the button to
O to turn the oven OFF.
Make sure the button is
on 0 when cooking is finished,
otherwise the oven will continue
to function.
Disconnect the oven after
cooking.
F To obtain correct cooking tem-
peratures, the thermostat gives a
wide range of adjustments (from
120° to 280°C). Place the
thermostat on the required
position. The temperature can be
modified during cooking, simply
by moving the dial.
Installing your oven
n
Before using
for the first time
Unpack the appliance and if
necessary take off all the stickers
and papers inside and on the oven.
The packaging can be recycled, but
it may be useful to transport or
return the oven to an approved
service dealer. Please read the
operating instructions carefully, as
well as the safety instructions.
Clean the appliance and accessories
with a damp cloth, and then dry.
n
Installation of your appliance
Place your oven on a stable counter
top. Allow air to circulate freely
around the appliance. Completely
unwind the supply lead. Connect.
We would advise that you turn on
the oven while empty for the first
time (without grill) with the door
closed for about 15 minutes so as
to eliminate «the new smell». Turn
on and adjust the thermostat to
280°C.
A slight burning smell may
occur, this is perfectly normal and
will disappear completely after
the first use.
Lower resistance
Stop and thermostat button
Glass door
3-position grill
UK
Notice 12L Inox.qxd 12/11/2001 14:46 Page 6
Page 7

Cleaning your oven
n
Before any upkeep or cleaning,
disconnect and leave the appliance
to cool down.
n
Never throw water on the
toughened glass door while it is still
hot.
n
Clean the door and the inside metal
sides with water and detergent.
Then dry.
n
Do not use scouring products
(notably soda-based removers),
scouring pads or Scotchbrite.
n
For models with stainless steel
hoods, use a soft cloth with a
cleaning product suitable for
cleaning windows. Do not use
special metal cleaning products
(stainless steel, copper, etc...).
n
Clean the grill tray with water and
detergent or in the dishwasher.
n
Just wipe the outside of the oven
with a damp sponge.
n
It is advisable to clean the oven
each time it is used to avoid
persistent odours and tastes.
Using your oven
n
Starting-up and cooking
Choose the dish appropriate for
your preparation.
Place the grill at the required
height.
Put the dish of food to cook in the
oven and close the door.
Adjust the thermostat to the right
temperature by turning the button.
The oven heats up. Watch the
cooking from time to time.
n
End of cooking
At the end of cooking time, turn off
the oven by turning the thermostat
button to 0, and disconnect.
Control the cooking
n
Table of thermostat
adjustment positions
Use this table if your recipe does
not give cooking temperatures. The
thermostat temperatures are given
as an indication, and vary depending on weight, size, thickness or
temperature of the food (deepfrozen) :
n
Advice and precautions
For roast meats and fowl, use highsided dishes (minimum 5 cm) in
order to reduce splashes of fat on
the sides of the oven.
For pastries, preferably use non-
stick dishes which make turning out
easier.
When choosing dishes and moulds,
consider the following maximum
sizes :
Height Width Depth
155 mm 275 mm 290 mm
Thermostat position
120° 150° 175° 205° 225° 240° 260° 280°
Hot plate
u
Heating
uuuuuu
Frozen foods
uuuuuuu
Fish
uuu
Quiche
uuu
Poultry
uuu
Meats
uuuu
Pastries
uuuuuu
Notice 12L Inox.qxd 12/11/2001 14:46 Page 7
Page 8
Safety instructions
Power consumption (kWh) :
Build-up to 200° C : 0.07
Keep at 200°C for 1 hour : 0.37
TTOOTTAALL :: 00..4444
Please take the time to read
the instructions thoroughly
and refer to the «User’s
Guide».
•
This appliance is in compliance with
the safety rules and conditions in force,
as well as with the following directives:
- Electromagnetic Compatibility Directive 89/336/ EEC, modified by Directives 92/31/EEC and 93/68/EEC,
- Low Voltage Directive 73/23/EEC,
modified by Directive 93/68/EEC.
•
Like any cooking appliance, take great
care which using your oven near
children. Never leave it within reach of
children.
•
Considering the diversity of standards
in force, if this appliance is used in a
different country from where it was
purchased, have it checked by an
approved service.
•
Do not place the appliance near a
source of heat.
•
Check that the mains' voltage
corresponds to the figure indicated on
the appliance (AC only).
•
Do not leave the lead trailing or
touching the hot parts of the oven. Do
not disconnect the appliance by
pulling out the lead.
•
Always connect the appliance on an
earthed socket.
•
Only use a connection in good
condition, with an earthed socket, and
with a wire at least equal in diameter
to the wire supplied with the product.
•
Make sure that the electricity installation is sufficient to supply an
appliance of this capacity.
•
The temperature of the door and
outside surface may be hot when the
appliance is working. Use the handles
and buttons. If necessary, use gloves.
•
In order to avoid electric shocks, keep
the electric wire, plug or appliance
away from water or any other liquid.
•
If certain parts of the product happen
to ignite, never try to extinguish using
water. Smother the flames with a
damp cloth.
•
Do not store inflammable products
near to or under the surface where the
oven is placed.
•
Do not use the appliance if :
- the latter has a faulty lead, or,
- has fallen and shows visible damage
or operation anomalies.
In this case, the appliance must be
returned to the nearest approved aftersales centre so as to avoid all danger.
•
Do not use the appliance under a wall
cupboard, shelf or near inflammable
materials such as blinds, curtains or
hangings, etc ...
•
This appliance is not designed to be
built-in.
•
Do not use the appliance as a source of
heat.
•
Never put paper, cardboard or plastic
in the oven, and never put anything on
top (utensils, objects, etc.).
•
Never put anything in the air vents or
block them up.
•
For your own safety, never dismantle
the appliance yourself - call up an
approved service centre.
•
This appliance has been designed for
domestic use only - any professional
use, not appropriate or not in
compliance with the operating
instructions does not bind the liability
or the guarantee of the maker.
Please keep these instructions
Notice 12L Inox.qxd 12/11/2001 14:46 Page 8
Page 9

Wiring Instructions
(for U.K. only)
Customer relations helpline
About your factory fitted plug
(for U.K. only - supplied with selected models)
n
Connect the Green/Yellow wire to
the terminal in the plug marked «E»
or by the earth symbol or
coloured Green or coloured Green
and Yellow.
n
Connect the Brown wire to the
terminal in the plug marked «L» or
coloured Red.
n
Connect the Blue wire to the
terminal in the plug marked «N» or
coloured Black.
n
A 13 amp fuse should be fitted
when the appliance is connected to
a BS 1363A plug.
n
Seek professional advice if you are
unsure of the correct procedure for
the above.
n
The cord is already fitted with a
plug incorporating an appropriate
fuse. If the plug does not fit your
socket outlet, see paragraph below.
Should you need to replace the fuse
in the plug supplied an appropriately rated approved BS 1362
fuse must be used (refer to wiring
instructions for fuse rating).
n
If the plug supplied does not fit
your socket outlet, it should be
removed from the mains lead and
disposed of safely. The flexible cord
insulation should be stripped back
as appropriate and a suitable
alternative plug fitted. The
replacement plug must be
equipped with an appropriate fuse.
n
If the plug has external access to
the fuse (non-rewirable type plug)
please note that the fuse cover is an
important part of the plug. Please
ensure that it is always refitted
correctly. If you lose this cover
please do not use the plug. You
may contact Tefal UK Limited for a
replacement.
n
If you need any help or advice,
please call our customer relation’s
team on :
- 0845 60214 54 (for UK)
- (1) 677 41 76 (for Ireland)
n
WARNING : All appliances must be earthed
Important : The wires in this lead are coloured in accordance with the
following codes :
Green and Yellow : Earth
Brown : Live
Blue : Neutral
E
Green and
yellow or
green
L
Brown
or
Red
Fit correct fuse
Use cable gripper
N
Blue or
black
Notice 12L Inox.qxd 12/11/2001 14:46 Page 9
Page 10

280
0
120
150
175
200
220
240
260
Mini Four
12 L
2
4
0
C
1
6
m
i
n
.
2
6
0
C
1
5
m
i
n
.
1
7
5
C
5
5
m
i
n
.
2
6
0
C
2
5
m
i
n
.
2
6
0
C
2
0
m
i
n
.
2
4
0
C
4
0
m
i
n
.
2
6
0
C
7
0
m
i
n
.
2
6
0
C
4
0
m
i
n
.
Funktionen
Schematische Darstellung
n
Dreifach verstellbarer Rost
Ihr Ofen verfügt über einen flachen
Rost, der sich dreifach verstellen
lässt (3 Stufen) und so den
Backvorgang optimiert.
n
Funktionsknopf: Ein-/ Ausschalter
und Regelthermostat
Ein einziger Einstellknopf, um die
Temperatur zu regeln und den
Backofen in Betrieb zu setzen.
F Man braucht nur den Knopf Ein-
/Ausschalter/Thermostat zu
betätigen, um die Inbetriebsetzung vorzunehmen und die
Temperatur zu regeln. Um den
Backofen auszuschalten, positioniert man diesen Knopf auf 0.
Darauf achten, dass der
Knopf nach Backvorgang wieder
in Position 0 gebracht wird,
andernfalls läuft man Gefahr, dass
der Backofen weiterhin in Betrieb
bleibt.
Backofen nach Backvorgang systematisch vom
Stromnetz trennen.
F Um eine gute Kochtemperatur
zu erhalten, bietet der Thermostat einen weiten Einstellbereich (von 120 °C bis 280 °C).
Thermostat auf die gewünschte
Position stellen. Die Temperatur
kann während des Kochvorgangs
durch einfaches Drehen des
Knopfes geändert werden.
Einbau
n
Vor dem erstmaligen Gebrauch
ist folgendes zu beachten
Gerät auspacken und eventuell
Aufkleber und Papier, das sich im
Innern des Backofens befindet,
entfernen. Die Verpackung ist zwar
wiederverwertbar, kann sich aber bei
einem erneuten Transport oder dem
Zurückschicken Ihres Ofens an eine
zugelassene Kundendienstwerkstatt
als nützlich erweisen. Gebrauchsanweisung und Sicherheitshinweise
aufmerksam durchlesen und
Einbauanweisungen beachten.
Betrieb des Gerätes prüfen. Gerät
und Zubehör mit einem feuchten
Tuch reinigen und abtrocknen.
n
Einbau Ihres Gerätes
Ofen auf eine feste Arbeitsfläche
stellen. Für freien Luftumlauf um das
Gerät sorgen. Anschlussschnur ganz
ausrollen. Anschließen. Wir empfehlen Ihnen, Ihren Ofen das erste
Mal 15 Minuten lang bei geschlossener Tür, leer (ohne Rost), laufen zu
lassen, damit sich der «Geruch
des Neuen» verflüchtigt. Gerät
anschalten und den Thermostat auf
280°C einstellen.
Es kann zu einer leichten
Rauchentwicklung kommen. Dies
ist völlig normal und legt sich
bald.
Untere Heizschlange
Ein-/Ausschalter
und Thermostat
Glastür
Rost, 3-fach verstellbar
D
Notice 12L Inox.qxd 12/11/2001 14:46 Page 10
Page 11

Reinigung
n Vor Wartung oder Reinigung stets
Stecker ziehen und das Gerät abkühlen
lassen.
n Niemals Wasser auf die gehärtete Glas-
tür spritzen, wenn diese noch heiß ist.
n Tür und Innenwände aus Metall mit
einer Mischung aus Wasser und
Reinigungsmittel reinigen. Abtrocknen.
n Weder scharfe Reinigungsmittel (vor
allem Natriumkarbonat enthaltende
Beizmittel), noch Scheuerschwamm
oder Scheuerbällchen verwenden.
n Für Modelle mit Edelstahlverkleidung:
Um eine optimale Reinigung zu
erreichen, verwenden Sie bitte ein
weiches Tuch und einen handelsüblichen Fensterreiniger. Verwenden
Sie bitte keine speziellen Metalleiniger
(z.B. für Edelstahl, Kupfer, etc.) .
n Der Rost wird mit einer Mischung aus
Wasser und Reinigungsmittel oder mit
Spülmittel gereinigt.
n
Ofen außen leicht mit einem Schwamm
säubern.
n Es ist empfehlenswert, den Ofen nach
jedem Gebrauch zu reinigen, um
Geruchsbildung oder unangenehmen
Nachgeschmack der Speisen zu
verhindern.
Gebrauch
n
Einschalten und Backvorgang
Wählen Sie die Schüssel, die sich
für Ihre Zubereitung am besten
eignet. Rost auf die gewünschte
Stufe stellen. Schüssel mit den
Nahrungsmitteln in den Ofen
schieben und Tür schließen
Thermostat durch Drehen des
Knopfes auf die gewünschte
Temperatur stellen.
Der Ofen heizt sich auf. Von Zeit zu
Zeit Backvorgang prüfen.
n
Ende des Backvorgangs
Nach Ende des Kochvorgangs
Backofen ausschalten, indem
Sie den Thermostatknopf auf
Position AUS (0) stellen. Stecker
herausziehen.
Backhinweise
n
Tabelle mit den
Thermostateinstellungen
Richten Sie sich nach dieser Tabelle,
falls in Ihrem Rezept keine Backtemperatur angegeben ist.
Die Thermostat-Temperaturen
dienen der Orientierung und
schwanken je nach Gewicht,
Größe, Dicke oder Temperatur der
Nahrungsmittel (Tiefkühlkost).
n
Hinweise und
Vorsichtsmaßnahmen
Für Braten und Geflügel, Schüsseln
mit hohem Rand (mindestens 5 cm)
verwenden, um Fettspritzer an den
Innenwänden des Ofens zu
vermeiden. Für Kuchen und Gebäck
besser haftbeschichtete Schüsseln
verwenden: so lassen sich die
Backwaren leichter aus der Form
nehmen.
Bei der Wahl von Schüsseln und
Backformen folgende Höchstmaße
beachten :
Höhe Breite Tiefe
155 mm 275 mm 290 mm
Stellung des Thermostats
120° 150° 175° 205° 225° 240° 260° 280°
Wärmen
u
Erhitzen
uuuuuu
Tiefkühlkost
uuuuuuu
Fisch
uuu
Überbacken
uuu
Geflügel
uuu
Fleisch
uuuu
Gebäck
uuuuuu
Notice 12L Inox.qxd 12/11/2001 14:46 Page 11
Page 12

Wichtige Vorsichtsmaßnahmen
Energiebedarf (kW/Std.) :
Anstieg auf 200°C : 0.07
Halten der Temperatur auf 200°C während einer Stunde : 0.37
GGEESSAAMMTT :: 00..4444
Nehmen Sie sich die Zeit
alle Anweisungen zu lesen
und schlagen Sie in Ihrem
«Benutzerhandbuch» nach.
•
Dieses Gerät ist mit den geltenden
Sicherheitsvorschriften und -bedingungen sowie mit den folgenden
Richtlinien konform :
-E
WG-Richtlinie 89/336 (elektromagnetische Verträglichkeit) abgeändert
durch die EWG-Richtlinien 92/31 und
93/68,
- EWG-Richtlinie 73/23 (Niederspannung) abgeändert durch die EWGRichtlinie 93/68.
•
Dieses Gerät, wie alle Kochgeräte,
niemals unbeaufsichtigt lassen, wenn
Sie Ihren Backofen in der Nähe von
Kindern verwenden.
•
Aufgrund der Vielfalt der gültigen
Normen sollte das Gerät von einem
Vertrags-Service-Center überprüft
werden, wenn es außerhalb des
Verkaufslandes benutzt wird.
•
Das Gerät nicht in der Nähe einer
Hitzequelle aufstellen.
•
Überprüfen Sie, ob die vorhandene
Netzspannung mit der auf dem Gerät
angegebenen Spannung übereinstimmt (nur Wechselstrom).
•
Das Anschlusskabel nicht herunterhängen oder mit den heißen Teilen des
Ofens in Berührung kommen lassen.
Zum Ausschalten des Gerätes nicht am
Anschlusskabel ziehen.
•
Das Gerät immer an eine geerdete
Steckdose anschließen.
•
Nur ein Verlängerungskabel in einwandfreiem Zustand an einer geerdeten
Steckdose verwenden. Das Verlängerungskabel muss mindestens einen
gleich großen Querschnitt wie das mit
dem Produkt gelieferte Kabel haben.
•
Überprüfen Sie, ob die Strominstallation ausreicht, um ein Gerät
dieser Leistung zu speisen.
•
Die Temperatur der Tür, des Kabel und
der Außenteile kann bei Betrieb des
Gerätes sehr hoch sein. Möglichst nur
Griffe und Knöpfe berühren, ansonsten
Küchenhandschuhe verwenden.
•
Um elektrische Schläge zu vermeiden,
das Stromkabel, den Stecker oder das
Gerät niemals in Wasser oder eine
andere Flüssigkeit tauchen.
•
Sollte es vorkommen, dass gewisse
Teile des Produktes Feuer fangen,
versuchen Sie niemals dieses mit
Wasser zu löschen. Ersticken Sie die
Flammen mit einem feuchten Tuch.
•
Bewahren Sie in der Nähe des Geräts
oder unter der Arbeitsfläche, auf
welchem das Gerät steht, niemals
entflammbare Produkte auf.
•
Das Gerät nicht verwenden wenn :
- dieses ein beschädigtes
Anschlusskabel hat,
- das Gerät heruntergefallen ist und
sichtbare Schäden oder
Funktionsstörungen aufweist.
In diesem Fall muss das Gerät in
das nächstgelegene Vertrags-ServiceCenter geschickt werden, um jegliches
Risiko zu vermeiden.
•
Das Gerät niemals unter einem
Wandmöbel, einem Regal oder in der
Nähe von entflammbaren Materialien
wie Vorhängen, Markisen, Tapeten etc.
in Betrieb nehmen.
•
Das Gerät nicht als Hitzequelle
verwenden.
•
Niemals Papier, Karton oder Plastik in
das Gerät legen und nichts darauf
stellen.
•
Nichts in die Lüftungsöffnungen
einschieben und diese nicht behindern.
•
Zerlegen Sie aus Sicherheitsgründen
das Gerät niemals selbst : Wenden Sie
sich an ein Vertrags-Service-Center.
•
Dieses Gerät ist ausschließlich für den
privaten Gebrauch im Haushalt
bestimmt. Bei gewerblicher, zweckentfremdeter oder der Gebrauchsanweisung zuwiderlaufender Benutzung übernimmt der Hersteller keine
Haftung und die Garantieansprüche
erlöschen.
Bewahren Sie diese Anweisungen auf
Notice 12L Inox.qxd 12/11/2001 14:46 Page 12
Page 13

Consumo di energia (kW/h) :
Salita a 200° C : 0.07
Mantenimento a 200° C per 1 ora : 0.37
TTOOTTAALLEE :: 00..4444
280
0
120
150
175
200
220
240
260
Mini Four
12 L
2
4
0
C
1
6
m
i
n
.
2
6
0
C
1
5
m
i
n
.
1
7
5
C
5
5
m
i
n
.
2
6
0
C
2
5
m
i
n
.
2
6
0
C
2
0
m
i
n
.
2
4
0
C
4
0
m
i
n
.
2
6
0
C
7
0
m
i
n
.
2
6
0
C
4
0
m
i
n
.
Conoscere il vostro forno
Schema descrittivo
n
Griglia a 3 posizioni
Il vostro forno è munito di una
griglia piatta che può essere
posizionata su tre livelli diversi al
fine di ottimizzare la cottura delle
vostre preparazioni.
n
Manopola a doppia
funzione : Marcia-Arresto e
Termostato di regolazione
Manopola unica per accendere e
spegnere il forno e per regolarne la
temperatura.
F
Per accendere il forno e regolarne
la temperatura, è sufficiente agire
sulla manopola Marcia-Arresto /
Termostato. Per spegnere il forno,
basta posizionare questa manopola sullo 0.
Alla fine della cottura, non
dimenticare di rimettere la
manopola sullo 0, in quanto in
caso contrario il forno rischia di
continuare a funzionare.
Alla fine
della cottura, scollegare in
modo sistematico la spina del
forno dalla presa di corrente.
F Per regolare in modo ottimale la
temperatura di cottura, il
termostato offre une larga
gamma di possibilità (da 120 a
280° C). A tal fine, regolare il
termostato sulla temperatura
voluta. La temperatura può
anche essere modificata durante
la cottura, regolando semplicemente la manopola.
Installare il vostro forno
n
Al primo utilizzo
Estrarre l'apparecchio dall'imballo e
togliere eventualmente gli autoadesivi
e tutti gli elementi cartacei che si
trovano all'interno del forno. L'imballaggio può essere riciclato, ma può
servire per trasportare o riportare il
vostro forno presso un punto di
assistenza tecnica autorizzato.
Leggete attentamente ed attenetevi
alle istruzioni per l'uso, ed alle norme
di sicurezza. Verificate che l'apparecchio funzioni. Pulite l'apparecchio
e gli accessori con un panno umido.
Asciugate.
Resistenza inferiore
Manopola Marcia-Arresto
e Termostato
Sportello in vetro
Griglia a 3 posizioni
I
Notice 12L Inox.qxd 12/11/2001 14:46 Page 13
Page 14

Utilizzare il vostro forno
n
Funzionamento
Scegliete la teglia che si adatta
meglio alla vostra ricetta.
Disponete la griglia all'altezza
richiesta.
Introducete nel forno la teglia con
gli alimenti e chiudete lo sportello.
Accendere il forno regolando il
termostato sulla temperatura
voluta. Il forno comincia allora a
riscaldarsi.
Sorvegliate la cottura di tanto in
tanto.
n
Fine della cottura
Alla fine della cottura, spegnere il
forno riportando la manopola del
termostato sulla posizione di
arresto (0). Togliere la spina.
Gestire la cottura
n
Tabella delle posizioni
del termostato
Utilizzate la presente tabella nel
caso in cui la vostra ricetta non
fornisca delle indicazioni sulla
temperatura di cottura. Le tempe-
rature sono fornite a titolo
indicativo in quanto esse variano in
funzione del peso, delle dimensioni, dello spessore e della temperatura (surgelati) degli alimenti da
cucinare.
n
Consigli e precauzioni
Per gli arrosti di carne o di pollame,
utilizzate delle teglie a bordi alti
(minimo 5 cm) al fine di ridurre gli
schizzi di grasso sulle pareti del
forno. Per la pasticceria, utilizzate
di preferenza delle teglie con
rivestimento antiaderente al fine di
facilitare la sformatura.
Per scegliere le teglie e gli stampi,
tenete conto delle dimensioni
massime :
Altezza Larghezza Profondità
155 mm 275 mm 290 mm
Posizione del termostato
120° 150° 175° 205° 225° 240° 260° 280°
Scalda piatti
u
Scalda alimenti
uuuuuu
Surgelati
uuuuuuu
Pesci
uuu
Gratinati
uuu
Pollame
uuu
Carni
uuuu
Pasticceria
uuuuuu
n
Installare il vostro apparecchio
Poggiate il vostro forno su un piano di
lavoro stabile. Fate in modo che l'aria
possa circolare liberamente intorno
all'apparecchio. Srotolate completamente il cordone di alimentazione.
Collegatelo ad una presa di corrente.
La prima volta, vi consigliamo di far
funzionare il vostro forno a vuoto
(senza griglia), con lo sportello
chiuso, per 15 minuti circa, al fine di
eliminare l'odore di «nuovo».
Mettere in funzione regolando il
termostato sulla posizione 280°C.
Si può produrre una
leggera esalazione di fumo.
Questo fenomeno, del tutto
normale, sparisce rapidamente.
Notice 12L Inox.qxd 12/11/2001 14:46 Page 14
Page 15

Precauzioni importanti
Leggete e seguite attentamente la «Guida per l'uso».
•
Questo apparecchio è conforme alle
regole ed alle condizioni di sicurezza in
vigore nonché alle direttive :
- Compatibilità elettromagnetica
89/336/CEE modificata dalle Direttive
92/31/CEE e 93/68/CEE,
- Bassa Tensione 72/23/CEE modificata
dalla Direttiva 93/68/CEE.
•
Come per qualsiasi apparecchio di
cottura, sorvegliate il vostro forno
soprattutto in presenza di bambini.
•
Tenuto conto della differenza delle
norme in vigore, se questo apparecchio viene utilizzato in un paese
diverso da quello nel quale è stato
comprato, fatelo verificare da un
centro di assistenza autorizzato.
•
Non ponete l'apparecchio nelle vicinanze di una sorgente di calore.
•
Verificate che la tensione della rete
corrisponda a quella indicata sull'apparecchio (solo corrente alternata).
•
Non lasciate pendere il cordone e non
toccate le parti calde del forno. Non
scollegate l'apparecchio tirando il cavo,
agite sulla spina.
•
Collegate sempre l'apparecchio ad una
presa di corrente con messa a terra.
•
Utilizzate solo prolunghe in buono
stato, con una presa collegata alla
terra, con un filo di sezione almeno
uguale a quello del prodotto.
•
Assicuratevi che l'impianto elettrico sia
sufficiente per alimentare un apparecchio di questa potenza.
•
La temperatura dello sportello e della
superficie esterna può essere elevata
mentre l'apparecchio è in funzione. Utilizzate le impugnature ed i pulsanti e se
necessario utilizzate il guanto da cucina.
•
Allo scopo di evitare scosse elettriche,
non immergete il filo elettrico, la presa
di corrente o l'apparecchio nell'acqua o
in altro liquido.
•
Se certe parti del prodotto si infiammano, non tentate in nessun caso di
spegnerle con dell'acqua. Soffocate le
fiamme con un panno umido.
•
Non conservate dei prodotti
infiammabili in prossimità o sotto il
mobile dove è riposto l'apparecchio.
•
Non utilizzate l'apparecchio :
- se ha il cavo di alimentazione
difettoso,
- se è caduto e presenta dei
danni visibili o delle anomalie di
funzionamento.
In questo caso, l'apparecchio deve
essere inviato al centro di assistenza
autorizzato più vicino al fine di evitare
qualsiasi pericolo.
•
Non fate funzionare l'apparecchio
sotto un mobile fissato al muro, uno
scaffale o in prossimità di materiali
infiammabili come tende, stuoie,
tappezzeria ...
•
Non utilizzate mai l'apparecchio come
fonte di calore.
•
Non mettete mai della carta, cartone o
plastica nell'apparecchio e non posate
niente al di sopra (utensili, oggetti ...).
•
Non introducete niente nelle feritoie di
ventilazione, non ostruitele.
•
Per la vostra sicurezza, non smontate
mai l'apparecchio : rivolgetevi ad un
centro autorizzato.
•
Questo apparecchio è stato progettato
esclusivamente per un uso domestico,
qualsiasi utilizzazione professionale,
non appropriata o non conforme alle
istruzioni per l'uso, non impegna né la
responsabilità, né la garanzia del
produttore.
Conservate queste istruzioni
Pulire il vostro forno
n
Prima di procedere ad una operazione di manutenzione o alla
pulizia, togliete la spina e lasciate
raffreddare l’apparecchio.
n
Non utilizzate mai acqua sullo sportello fin tanto che è ancora caldo.
n
Pulite lo sportello e le pareti
metalliche interne con dell'acqua e
detersivo. Asciugate.
n
Per la pulizia, non utilizzate prodotti aggressivi (in particolare a
base di soda), né le spugne che
graffiano.
n
Per i modelli con la capote inox:
utilizzare insieme uno straccio
morbido con un prodotto per pulire
le finestre. Non utilizzare prodotti
specifici per il metallo.
n
La griglia si pulisce con dell'acqua e
detersivo ed è anche lavabile in
lavastoviglie.
n
Per pulire l'esterno del forno, è sufficiente un semplice colpo di spugna.
n
Vi raccomandiano di pulire il forno
dopo ogni utilizzazione al fine di
evitare odori e sapori persistenti.
Notice 12L Inox.qxd 12/11/2001 14:46 Page 15
Page 16

Energieverbruik (kW/u) :
Verwarmen tot 200°C : 0.07
Constant op 200°C gedurende 1 uur : 0.37
TToottaaaall :: 00..4444
280
0
120
150
175
200
220
240
260
Mini Four
12 L
2
4
0
C
1
6
m
i
n
.
2
6
0
C
1
5
m
i
n
.
1
7
5
C
5
5
m
i
n
.
2
6
0
C
2
5
m
i
n
.
2
6
0
C
2
0
m
i
n
.
2
4
0
C
4
0
m
i
n
.
2
6
0
C
7
0
m
i
n
.
2
6
0
C
4
0
m
i
n
.
Leer uw oven kennen
Belangrijkste onderdelen
n
Grillrooster met
3 hoogtestanden
Dit rooster kan op 3 verschillende
hoogtes in de oven geplaatst
worden voor een optimaal gebruik
van de oven.
n
Functieknop : aan/uit-zetten en
regelen van de thermostaat
Eén enkele regelknop om de
temperatuur te regelen en het
apparaat aan te zetten.
F U hoeft alleen de aan/uit/
thermostaatknop maar te
gebruiken om de temperatuur in
te stellen en het apparaat aan te
zetten. Door de knop op 0 in te
stellen zet u de oven uit.
Let er altijd goed op de
knop aan het einde van de baktijd
terug op 0 te zetten, anders blijft
de oven aan staan.
Haal na elk gebruik altijd de
stekker uit het stopcontact.
F Om altijd het juiste bereidings-
resultaat te krijgen, biedt de
thermostaat u een ruime instelkeuze (van 120°C tot 280°C).
Zet de thermostaatknop op de
gewenste temperatuur. De
temperatuur kan tijdens het
bakken hoger of lager ingesteld
worden, door eenvoudigweg te
knop te draaien.
Het installeren van de oven
n
Vóór het eerste gebruik
Verwijder na het uitpakken
eventuele stickers op het apparaat
en alle papieren die zich in de
ovenruimte kunnen bevinden. De
verpakking is recyclebaar, maar hij
zou u in geval van reparatie voor
transport of verzending van pas
kunnen komen. Lees de gebruiksaanwijzing aandachtig door, volg
de gegeven instructies nauwkeurig
op en neem de veiligheidsvoorschriften in acht. Controleer
vóór gebruik of de oven het
Onderelement
Aan/Uit-knop
en thermostaat
Glazen ovendeur
Grillrooster met 3
hoogtestanden
NL
Notice 12L Inox.qxd 12/11/2001 14:46 Page 16
Page 17

Het gebruik van de oven
n
Aanzetten en bakken
Kies een ovenschotel die geschikt is
voor het gerecht en die in de oven
past. Plaats het grillrooster op de
gewenste stand. Plaats de schotel
of vorm in de oven en sluit het
deurtje. Draai de thermostaatknop
op de gewenste temperatuur. De
oven begint te verwarmen.
Controleer van tijd tot tijd de
bereiding.
n
Einde van de baktijd
Aan het einde van de bereidingstijd
zet u de oven uit door de
thermostaatknop op de stand uit
(0) te zetten. Haal de stekker uit het
stopcontact.
Het bakken
n
Bereidingstabel
Gebruik deze tabel als richtlijn
indien de bereidingstemperatuur
niet in uw recept vermeld staat.
Uiteraard vormen deze tijden
slechts een indicatie, zij kunnen
variëren al naar gelang het
gewicht, de afmeting/dikte en de
begintemperatuur van het
(diepvries)product.
n
Aanbevelingen
Voor het braden van vlees en
gevogelte dient gebruik te worden
gemaakt van een ovenschotel met
een rand van tenminste 5 cm. Dit
om overmatig spatten van vet
tegen de ovenwanden te voorkomen. Gebruik voor gebak bij
voorkeur bakvormen met een antiaanbaklaag, zodat het gebak extra
gemakkelijk en mooi uit de vorm
komt. Voor de juiste keuze van
ovenschotels en bakvormen dient
u rekening te houden met de
volgende maximale afmetingen :
Hoogte Breedte Diepte
155 mm 275 mm 290 mm
Stand van de thermostaat
120° 150° 175° 205° 225° 240° 260° 280°
Borden verwarmen
u
Opwarmen
uuuuuu
Diepvriesproducten
uuuuuuu
Vis
uuu
Gratineren
uuu
Gevogelte/kip
uuu
Vlees
uuuu
Gebak
uuuuuu
daadwerkelijk doet. Neem de oven
en de accessoires met een vochtig
doekje af en droog ze na.
n
Het allereerste gebruik
Plaats de oven op een stabiel
werkvlak waar u hem niet meer
hoeft te verplaatsen tijdens het
gebruik. Zorg ervoor dat er
voldoende lucht kan circuleren
rondom de oven. Rol het snoer
helemaal uit. Steek de stekker in het
stopcontact. Wij raden u aan de
oven de allereerste keer leeg
(zonder rooster) en met gesloten
ovendeur gedurende ca. 15 min.
aan te laten staan om de «nieuwe»
geur te doen verdwijnen. Zet de
oven aan door de thermostaatknop
op 280°C in te stellen.
Een lichte geur- en
rookontwikkeling is normaal. Dit
verschijnsel zal tijdens het gebruik
snel verdwijnen.
Notice 12L Inox.qxd 12/11/2001 14:46 Page 17
Page 18

Schoonmaken
n
Haal vóór elke schoonmaak- en
onderhoudsbeurt de stekker uit het
stopcontact en laat het apparaat
voldoende afkoelen.
n
Geen (koud) water tegen de glazen
ovendeur aan laten komen als deze
nog heet is.
n
Maak de ovendeur en de metalen
binnenwanden schoon met warm
water en een vloeibaar schoonmaakmiddel. Wrijf alles daarna
droog. Gebruik geen agressieve
schoonmaakmiddelen (met name
bijtende producten op basis van
soda), schuursponsjes en metalen
sponsjes
n
Voor modellen met roestvrijstalen
behuizing : gebruik uitsluitend
een zachte doek met een beetje
schoonmaakmiddel dat speciaal
geschikt is voor ramen (glassex...)
Reinig de deur, de geëmailleerde
of gelakte oppervlakken en de
doorzichtige onderdelen met een
vochtige spons en een zacht
schoomaakmiddel.
n
Het grillrooster kan op gebruikelijke
wijze met de hand of in de
vaatwasmachine afgewassen
worden. Neem de buitenkant met
een vochtig doekje en wat
afwasmiddel af.
n
Het is aan te raden de oven na elk
gebruik schoon te maken om nare
luchtjes te voorkomen en om het
schoonmaken te vergemakkelijken.
Notice 12L Inox.qxd 12/11/2001 14:46 Page 18
Page 19

Veiligheidsvoorschriften
Lees aandachtig alle voorschriften en raadpleeg de
«gebruiksaanwijzing».
•
Dit apparaat voldoet aan de geldende
veiligheidsnormen en aan de volgende
Europese richtlijnen :
- EMC-richtlijn (Elektromagnetische
Compatibiliteit) 89/336, gewijzigd
door de richtlijnen 92/31 en 93/68,
- Laagspanningsrichtlijn 73/23,
gewijzigd door richtlijn 93/68.
•
Zoals voor elk kookapparaat geldt,
dient u goed op te letten als u de oven
in de nabijheid van kinderen gebruikt.
Houd de oven buiten hun bereik.
•
Houd rekening met de diversiteit van
de geldende normen bij gebruik van
het apparaat in een ander land dan
daar waar het aangekocht werd. Laat
het controleren door een officieel
erkende servicedienst.
•
Het apparaat niet vlakbij een
warmtebron plaatsen.
•
Controleer of de netspanning
overeenkomt met de aangegeven
spanning op het apparaat (uitsluitend
wisselstroom).
•
Laat het snoer niet hangen of tegen de
warme delen van de oven aankomen.
Niet aan het snoer trekken om de
stekker uit het stopcontact te halen.
•
Het apparaat aansluiten op een geaard
stopcontact.
•
Gebruik alleen goedgekeurde en in
uitstekende staat verkerende verlengsnoeren met een geaarde stekker. Het
snoer moet minstens dezelfde draaddoorsnede (mm
2
) hebben als die van
het meegeleverde snoer van het
product.
•
Controleer of het vermogen van de
elektrische installatie voldoet voor het
apparaat.
•
De ovendeur en het bovenoppervlak
kunnen zeer warm worden. Raak alleen
de handgrepen en knoppen aan en
gebruik indien nodig ovenhandschoenen.
•
Om elektrische schokken te vermijden,
het snoer, het stopcontact of het
apparaat buiten contact van water of
een andere vloeistof houden.
•
Indien onderdelen van het product
vlam vatten, probeer dan niet te
blussen met water maar doof de
vlammen met een vochtige doek.
•
Bewaar geen ontvlambare producten
vlakbij of onder het meubel waarop de
oven geplaatst wordt.
•
Het apparaat niet meer gebruiken als :
- het snoer beschadigd is,
- het apparaat gevallen is en zichtbare
schade of werkingsstoornissen
vertoont.
In dit geval dient het apparaat naar de
dichtstbijzijnde erkende servicedienst
gebracht te worden om ieder gevaar te
voorkomen.
•
Het apparaat niet in werking stellen
onder een muurkast of wandrek, of
vlakbij brandbare materialen zoals
gordijnen, wandbekleding, e.d.
•
Gebruik het apparaat niet als
warmtebron.
•
Plaats nooit papier, karton of plastic in
het apparaat. Leg er geen voorwerpen
bovenop.
•
De ventilatieopeningen mogen niet
belemmerd worden.
•
Voor uw veiligheid het apparaat nooit
zelf uit elkaar nemen : doe beroep op
een erkende servicedienst.
•
Dit apparaat is uitsluitend bestemd
voor gewoon huishoudelijk gebruik.
Verkeerd gebruik of niet-naleven van
de gebruiksaanwijzing valt niet onder
de verantwoordelijkheid noch de
garantie van de fabrikant.
Bewaar deze voorschriften
Notice 12L Inox.qxd 12/11/2001 14:46 Page 19
Page 20

280
0
120
150
175
200
220
240
260
Mini Four
12 L
2
4
0
C
1
6
m
i
n
.
2
6
0
C
1
5
m
i
n
.
1
7
5
C
5
5
m
i
n
.
2
6
0
C
2
5
m
i
n
.
2
6
0
C
2
0
m
i
n
.
2
4
0
C
4
0
m
i
n
.
2
6
0
C
7
0
m
i
n
.
2
6
0
C
4
0
m
i
n
.
Conozca su horno
Descripción del aparato
n
Rejilla con 3 posiciones
Este horno está equipado con una
rejilla que podrá colocar en 3
niveles diferentes, optimizando así
los resultados de cocción.
n
Botón de funciones : Paro y
termostato de regulación
Un solo botón de ajuste para
regular la temperatura y poner en
marcha el horno.
F Basta con accionar el botón
paro/termostato para poner en
marcha el horno y regular su
temperatura, y situarlo en
posición 0 para detener su
funcionamiento.
Al finalizar la cocción,
asegúrese de que haya vuelto
a situar el botón en posición 0
para evitar que el horno siga
funcionando.
Al finalizar la cocción, desconecte
sistemáticamente el horno.
F El termostato ofrece una amplia
gama de ajustes (de 120°C a
280°C), permitiendo obtener la
temperatura más adecuada para
la cocción. Sitúe el termostato en
la posición deseada. La temperatura puede modificarse durante
la cocción sólo con desplazar el
botón de ajuste.
Instalación
n
Antes de la primera utilización
Desembale el aparato y retire en su
caso todos los autoadhesivos y
papeles que se encuentren dentro
del horno. El embalaje es reciclable,
pero puede serle útil para su
transporte o si necesita enviar el
aparato a un Servicio Técnico. Lea
atentamente el modo de empleo y
los consejos de seguridad y siga
atentamente las instrucciones de
uso. Verifique que el aparato
funciona. Limpie el aparato y los
accesorios con un paño húmedo.
Séquelos.
n
Instalación
Coloque el horno sobre una superficie de trabajo estable. Deje un
espacio alrededor del aparato para
que el aire circule libremente. Desenrolle completamente el cable de
alimentación. Enchufe el aparato.
Le recomendamos que la primera
vez haga funcionar el horno en
vacío (sin la rejilla) y con la puerta
cerrada durante 15 minutos
aproximadamente para eliminar «el
olor a nuevo».
Ponga en marcha colocando el
termostato sobre la posición 280°C.
Puede producirse un ligero
desprendimiento de humo. Este
fenómeno es totalmente normal y
desaparecerá rápidamente.
Resistencia inferior
Botón Paro y Termostato
Puerta de vidrio
Rejilla con 3 posiciones
E
Notice 12L Inox.qxd 12/11/2001 14:46 Page 20
Page 21

Limpieza
n
Antes de cualquier operación de
mantenimiento o limpieza,
desenchufe y deje enfriar el
aparato.
n
No moje la puerta de vidrio
templado mientras esté caliente.
n
Limpie la puerta y las paredes
interiores metálicas con agua
jabonosa. Séquelas.
n
No utilice productos de limpieza
agresivos (particularmente aquellos
que contienen sodio), ni estropajos
metálicos.
n
Para los modelos con paredes exteriores de acero inoxidable: utilice
además un paño suave con un producto de limpieza específico para
cristales. No utilice productos de
limpieza específicos para metales.
n
La rejilla se limpia con agua
jabonosa o en el lavavajillas.
n
Es suficiente con pasar una esponja
para limpiar el exterior del aparato.
n
Se recomienda limpiar el horno
después de cada utilización para
evitar olores y gustos persistentes.
Utilización
n
Puesta en marcha y cocción
Escoja la fuente o plato adecuada a
su preparación. Coloque la rejilla a
la altura deseada.
Coloque la fuente con los alimentos
dentro del horno y cierre la puerta.
Ajuste el termostato a la
temperatura deseada girando el
botón. El horno empieza a calentar.
Vigile de vez en cuando la cocción.
n
Fin de la cocción
Al finalizar la cocción, vuelva a
situar el botón del termostato en
posición paro (0). Desconecte el
horno.
Manejo
n
Tabla de posiciones del
termostato
Utilice esta tabla si su receta no
especifica la temperatura de
cocción. Las temperaturas del
termostato se dan a título indicativo y pueden variar en función
del peso, el tamaño y grosor, así
como de la temperatura inicial de
los alimentos (congelados).
n
Consejos y precauciones
Para los rustidos de carnes y de
aves, utilice fuentes con bordes
altos (5 cm. Mínimo), para reducir
las salpicaduras de grasa sobre las
paredes del horno.
Para la preparación de pasteles,
utilice preferentemente fuentes con
revestimiento antiadherente que
facilita su desmolde.
Al elegir fuentes y moldes, tenga en
cuenta las dimensiones máximas
siguientes :
Altura Longitud Profundidad
155 mm 275 mm 290 mm
Posición del termostato
120° 150° 175° 205° 225° 240° 260° 280°
Recalentar un plato
u
Calentamiento
uuuuuu
Congelados
uuuuuuu
Pescados
uuu
Gratinados
uuu
Aves
uuu
Carnes
uuuu
Pastelería
uuuuuu
Notice 12L Inox.qxd 12/11/2001 14:46 Page 21
Page 22

Normas de seguridad
Consumo de energía (kW/h) :
Hasta alcanzar los 200ºC : 0.07
Mantenimiento a 200ºC durante 1 hora : 0.37
TTOOTTAALL :: 00..4444
Lea atentamente
las instrucciones.
•
Este aparato cumple con la normativa
en vigor y condiciones de seguridad,
así como las siguientes Directivas :
- Compatibilidad electromagnética
según la directiva CEE 89/336 modificada por las directivas CEE/92/31 y
CEE/93/68,
- Baja Tensión según la directiva
CEE 73/23 modificada por la directiva
CEE/93/68.
•
Como para cualquier aparato de
cocción, deberá mantener una
estrecha vigilancia en caso de utilizar el
horno en presencia de niños.
Mantenga el horno fuera del alcance
de los niños.
•
Teniendo en cuenta la diversidad de
normas en vigor, si el aparato va a
utilizarse en un país diferente al de su
compra, verifíquelo en un Servicio
Técnico Homologado.
•
No coloque el aparato cerca de una
fuente de calor.
•
Compruebe que la tensión de su
instalación coincide con la indicada en
la placa del aparato (sólo corriente
alterna).
•
No deje que el cable toque las partes
calientes del aparato. No desconecte el
aparato tirando del cable.
•
Siempre conecte el aparato a un
enchufe con toma de tierra.
•
Si necesita un alargo, utilice uno en
perfecto estado, con toma de tierra y
de sección como mínimo igual a la del
aparato.
•
Asegúrese que su instalación eléctrica
es suficiente para alimentar un aparato
de esta potencia.
•
La temperatura de la puerta y de la
superficie exterior puede ser muy
elevada cuando el aparato está en
funcionamiento. Utilice las asas y
tiradores. Utilice guantes si es
necesario.
•
Para evitar choques eléctricos, no
sumerja el cable eléctrico, la toma de
corriente o el aparato en agua u otro
líquido.
•
En caso de que algunas partes llegasen
a arder, nunca apague las llamas con
agua. Apáguelas con un paño
húmedo.
•
No guarde productos inflamables cerca
del lugar donde está colocado el
aparato.
•
No utilice el aparato si :
- el cable está dañado,
- el aparato se ha caído y presenta
daños visibles o no funciona
correctamente.
En este caso, lleve el aparato al Servicio
Técnico Tefal más cercano a su
domicilio para evitar cualquier peligro.
•
No haga funcionar el aparato sobre un
mueble mural, una estantería, o en
proximidad de materiales inflamables,
tales como estores, cortinas, ...
•
Este aparato no ha sido concebido
para ser empotrado.
•
No utilice el aparato como fuente de
calor.
•
Nunca coloque papel, cartón o plástico
en el aparato, ni nada encima
(utensilios, objetos ...).
•
No introduzca nada en las rejillas de
ventilación, no las obstruya.
•
Para su seguridad, no desmonte el
aparato : llévelo a un Servicio Técnico
Homologado.
•
Este aparato ha sido diseñado
exclusivamente para uso doméstico.
Toda utilización de tipo profesional o
comercial, inadecuada o en desacuerdo con las instrucciones de uso,
anula la responsabilidad y la garantía
del fabricante.
Conserve estas instrucciones
Notice 12L Inox.qxd 12/11/2001 14:46 Page 22
Page 23

280
0
120
150
175
200
220
240
260
Mini Four
12 L
2
4
0
C
1
6
m
i
n
.
2
6
0
C
1
5
m
i
n
.
1
7
5
C
5
5
m
i
n
.
2
6
0
C
2
5
m
i
n
.
2
6
0
C
2
0
m
i
n
.
2
4
0
C
4
0
m
i
n
.
2
6
0
C
7
0
m
i
n
.
2
6
0
C
4
0
m
i
n
.
Conhecer o seu forno
Esquema descritivo
n
Grelha de três posições
O seu forno está equipado com
uma grelha que pode colocar-se a
três níveis diferentes de forma a
optimizar a cozedura dos alimento.
n
Botão com função: Parar +
termostato
Um único botão para regular a
temperatura e colocar em
funcionamento o forno.
F Basta accionar o botão parar/
termostato para colocar em
funcionamento e regular a
temperatura posicionar no 0
para parar o funcionamento do
forno.
Tenha o devido cuidado de
colocar novamente o botão na
posição 0 no fim da cozedura
senão o forno pode continuar a
funcionar.
Desligar sistematicamente o
forno no fim da cozedura.
F Para obter uma boa temperatura
de cozedura, o termostato oferece uma gama larga de regulação (de 120°C a 280°C).
Colocar o termostato na posição
desejada. A temperatura pode
ser modificada durante a
cozedura, deslocando simplesmente o botão.
Instalar o seu forno
n
Antes da primeira utilização
Tire o aparelho da embalagem e
retire todos os autocolantes e
papéis que se encontram no
interior do forno. A embalagem é
reciclável, mas pode ser utilizada
para transportar ou devolver o seu
forno a um posto de assistência
técnica autorizado. Leia atentamente as instruções de utilização
assim como as de segurança. Limpe
o aparelho e os acessórios com um
pano húmido. Seque.
n
Instalação do seu aparelho
Coloque o seu forno numa área de
trabalho estável. Deixe livre
circulação de ar à volta do seu
aparelho. Estique completamente a
ficha de alimentação. Ligue.
Aconselhamos que ponha a
funcionar a primeira vez o seu
forno vazio (sem grelha), porta
fechada, durante cerca de 15 min.
para eliminar «o cheiro a novo».
Coloque em funcionamento regulando o termostato para a posição
280°C.
Pode produzir-se uma
ligeira dispersão de fumo. Este
fenómeno, totalmente normal,
desaparecerá rapidamente.
Resistência inferior
Botão parar
+ Termostato
Porta de vidro
Grelha com 3 posições
P
Notice 12L Inox.qxd 12/11/2001 14:46 Page 23
Page 24

Limpar o forno
n
Antes de qualquer manutenção ou
limpeza, desligue e deixe arrefecer
o aparelho.
n
Nunca deite água na porta de vidro
quando a mesma ainda está
quente.
n
Limpe a porta e as partes laterais
internas metálicas com a água e
detergente. Seque.
n
Não utilize nem produto de
manutenção agressivo (nomeadamente os decapantes à base de
soda), nem esponja para esfregar,
nem esfregão abrasivo.
n
Para os modelos com cobertura
em aço inoxidável: utilizar como
complemento um pano suave com
um produto para limpeza de vidros.
Não utilizar produtos de limpeza
especiais para metais.
n
A grelha limpa-se com água e
detergente ou na máquina de lavar
a loiça.
n
Basta passar a esponja no interior
do forno.
n
É recomendado limpar o forno
após cada cozedura para evitar os
odores e os paladares persistentes.
Utilize o seu forno
n
Colocação em
funcionamento/cozedura
Escolher o recipiente que convém
para o seu cozinhado.
Coloque a grelha à altura desejada.
Coloque o recipiente com os
alimentos no forno e feche a porta.
Regule o termostato à temperatura
desejada girando o botão. O forno
começa a aquecer.
Verifique de vez em quando a sua
cozedura.
n
Fim de cozedura
No fim da cozedura, desligue o
forno pondo o botão termostato
na posição parar (0). Desligue.
Gerir a cozedura
n
Tabela das posições de
regulação do termostato
Utilize esta tabela se a sua receita
não especifica a temperatura de
cozedura. As temperaturas do
termostato são dadas a título
indicativo e variam em função do
peso, tamanho, espessura ou
temperatura dos alimentos
(congelados).
n
Conselhos e precauções
Para os assados de carne e ave,
utilize recipientes com os lados
allos (no mínimo 5 cm) de forma a
reduzir as projecções de gordura
nas partes laterais internas do
forno.
Para as pastelarias, utilize de
preferência recipientes com revestimento anti-aderente para ser mais
fácil de tirar da forma.
Para escolher recipientes e formas,
tenha em conta as seguintes
dimensões máximas :
Altura Largura Profundidade
155 mm 275 mm 290 mm
Posição do termostato
120° 150° 175° 205° 225° 240° 260° 280°
Aquece-prato
u
Aquecimentos
uuuuuu
Congelados
uuuuuuu
Peixes
uuu
Gratinar
uuu
Aves
uuu
Carnes
uuuu
Pastelaria
uuuuuu
Notice 12L Inox.qxd 12/11/2001 14:46 Page 24
Page 25

Instruções de segurança
Consumo de energia (kWh) :
Subida a 200° C : 0.07
Mantém a 200° C durante 1 hora : 0.37
TTOOTTAALL :: 00..4444
É melhor ler todas as instruções e consultar o seu «guia
do utilizador».
•
Este aparelho está em conformidade
com as regras e condições de
segurança em vigor assim como com
as seguintes directivas :
- Directiva Contabilidade Electromagnética 89/336/CEE modificada pelas
Directivas 92/31/CEE e 93/68/CEE,
- Directiva Baixa Tensão 73/23/CEE
modificada pela Directiva 93/68/CEE.
•
Como para qualquer aparelho, tenha o
devido cuidado de vigiar o forno
quando utilizar próximo de crianças.
Não o deixe ao seu alcance.
•
Devido à diversidade das normas em
vigor, se este aparelho é utilizado num
país diferente de onde foi comprado,
faça-o verificar por um posto de
assistência técnica autorizado.
•
Não coloque o aparelho próximo de
uma fonte de calor.
•
Verifique que a voltagem da rede
corresponde à indicada no aparelho
(apenas corrente alternativa).
•
Não deixe a ficha cair ou tocar as
partes quentes do forno. Não desligue
o seu aparelho puxando na ficha.
•
Ligue sempre o aparelho numa
tomada com ligação terra.
•
Apenas utilize uma extensão em bom
estado, com uma tomada com ligação
terra, e com um fio condutor de secção
igual ao fio fornecido com o produto.
•
Assegure-se de que a instalação eléctrica é suficiente para alimentar um
aparelho desta potência.
•
A temperatura da porta e da superfície
externa pode ser elevada quando o
aparelho está em funcionamento.
Utilize os punhos e os botões. Utilize
pegas, se for necessário.
•
De forma a evitar choques eléctricos,
não mergulhe o fio eléctrico, a ficha ou
o aparelho em água ou outro líquido.
•
Se algumas partes do aparelho se
inflamarem, nunca tente apagar com
àgua abafar as chama com um pano
húmido.
•
Não arrume produtos inflamáveis
próximo ou debaixo do móvel em que
colocou o aparelho.
•
Não utilize o aparelho se :
- o mesmo tem a ficha defeituosa,
- o aparelho caiu e apresenta
deteriorações visíveis ou anomalias de
funcionamento.
Neste caso, o aparelho deve ser
enviado para um posto de assistência
técnica autorizado mais próximo de
forma a evitar qualquer perigo.
•
Não ponha a funcionar o aparelho sob
um móvel, uma estante, ou próximo
de materiais inflamáveis tais como os
estores, cortinas, jogos de tapeçarias...
•
Este aparelho não foi previsto para ser
encastrado.
•
Não utilize o aparelho como fonte de
calor.
•
Nunca coloque papel, cartão ou
plástico no aparelho e não coloque
nada em cima (utensílios, objectos ...).
•
Não introduza nada nas ventilações,
não as obstrua.
•
Para a sua segurança, nunca desmonte
o aparelho; recorra a um posto de
assistência técnica autorizado.
•
Este aparelho foi concebido apenas
para um uso doméstico, qualquer
utilização profissional, não apropriada
ou não conforme as instruções de
utilização não compromete nem a
responsabilidade, nem a garantia do
fabricante.
Conserve estas instruções
Notice 12L Inox.qxd 12/11/2001 14:46 Page 25
Page 26

280
0
120
150
175
200
220
240
260
Mini Four
12 L
2
4
0
C
1
6
m
i
n
.
2
6
0
C
1
5
m
i
n
.
1
7
5
C
5
5
m
i
n
.
2
6
0
C
2
5
m
i
n
.
2
6
0
C
2
0
m
i
n
.
2
4
0
C
4
0
m
i
n
.
2
6
0
C
7
0
m
i
n
.
2
6
0
C
4
0
m
i
n
.
Præsentation af ovnen
Beskrivelse
n
Ovnrist med 3 positioner
Ovnen er udstyret med en flad rist,
der kan placeres i tre forskellige
højder, så tilberedningen bliver
optimal.
n
Funktionsknap : Stop og
termostatindstilling
Ovnen tændes og temperaturen
indstilles med samme knap.
F Aktiver Stop/Termostat-knappen
for at tænde ovnen og indstille
temperaturen, og indstil den på
0 for at slukke ovnen.
Sluk ovnen ved at indstille
knappen på position 0 efter
tilberedningen.
Tag altid ovnledningen ud af stikkontakten, når
ovnen ikke er i brug.
F Termostaten kan indstilles fra
120°C til 280°C, så tilberedningen altid sker ved den rette
temperatur. Indstil termostaten
på den ønskede temperatur.
Temperaturen kan ændres under
tilberedningen ved at ændre
termostatens indstilling.
Installation af ovnen
n
Før brug første gang
Pak ovnen ud, og fjern eventuelle
klistermærker samt alt papir inde i
ovnen. Emballagen er fremstillet af
genbrugsmaterialer. Det kan være
nyttigt at gemme den, hvis ovnen
skal transporteres eller returneres til
et autoriseret servicested. Læs
brugsanvisningen og alle sikkerhedsforskrifter nøje. Rengør ovnen
og tilbehøret med en fugtig klud.
Tør efter.
n
Installation af ovnen
Stil ovnen på et solidt køkkenbord.
Sørg for, at der er fri luftcirkulation
hele vejen rundt om ovnen. Rul
elledningen helt ud. Tilslut
elledningen til en stikkontakt.
Det anbefales at tænde ovnen
første gang, mens den er tom
(uden ovnristen) med lukket dør i
ca. 15 minutter for at fjerne lugten
af «ny ovn». Tænd ovnen ved at
indstille termostaten på 280°C.
Der kan muligvis
forekomme lidt røg. Dette er helt
normalt og forsvinder hurtigt
igen.
Varmelegeme i
ovnbunden
Stopknap og termostat
Ovndør i glas
Ovnrist med 3 positioner
Dan
Notice 12L Inox.qxd 12/11/2001 14:46 Page 26
Page 27

Rengøring af ovnen
n
Før vedligeholdelse og rengøring af
ovnen skal elledningen tages ud af
stikkontakten, og ovnen skal være
helt afkølet.
n
Sprøjt aldrig vand på ovndøren,
som er i hærdet glas, mens den
endnu er varm.
n
Rengør ovndøren og de indvendige
metalsider med vand og et
rengøringsmiddel. Tør efter.
n
Brug aldrig aggressive rengøringsmidler, f.eks. rengøringsmidler
med kaustisk soda, eller skure- og
grydesvampe.
n
For modeller af rustfri stål: Brug en
blød klud med rengøringsmiddel
ved rengøring. Brug ikke rengøringsmidler specielt beregnet til metal
(rustfrit stål, kobber etc.).
n
Ovnristen vaskes i vand og
opvaskemiddel eller i opvaskemaskinen.
n
Tør ovnen af udvendigt med en
fugtig klud.
n
Det anbefales at rengøre ovnen
efter hver brug for at undgå
vedhængende lugte og smag.
Brug af ovnen
n
Tænde og bruge ovnen
Vælg altid fade og bageforme, der
passer til den pågældende
tilberedning. Sæt ovnristen ind i
den ønskede højde i ovnen. Stil
fadet med madretten ind i ovnen,
og luk ovndøren.
Indstil termostaten på den ønskede
temperatur ved at dreje på
knappen. Ovnen begynder at
varme. Overvåg tilberedningen fra
tid til anden.
n
Når tilberedningstiden er slut
Sluk ovnen ved at dreje termostatknappen hen på Stop (0), når
tilberedningstiden er slut. Tag
elledningen ud af stikkontakten.
Tilberedning
n
Skema over
termostatindstillinger
Brug dette skema, hvis tilberedningstemperaturen ikke er angivet i
opskriften. Termostatens tempera-
turindstillinger er vejledende og
varierer afhængigt af madvarernes
vægt, størrelse, tykkelse og
temperatur, f.eks. dybfrosne
madvarer.
n
Gode råd og forholdsregler
Brug fade med høj kant (minimum
5 cm) til at stege kød og fjerkræ, så
det sprøjter mindst muligt op på
ovnens sider.
Til bagværk er det bedst at bruge
forme med slip let-belægning, så
bagværket ikke hænger fast.
Når du skal vælge fade og
bageforme, må de ikke være større
end følgende maksimummål :
Højde Bredde Dybde
155 mm 275 mm 290 mm
Termostatens position
120° 150° 175° 205° 225° 240° 260° 280°
Tallerkenvarmer
u
Opvarmning
uuuuuu
Dybfrost
uuuuuuu
Fisk
uuu
Gratin
uuu
Fjerkræ
uuu
Kød
uuuu
Bagværk
uuuuuu
Notice 12L Inox.qxd 12/11/2001 14:46 Page 27
Page 28

Sikkerhedsregler
Strømforbrug (kWh) :
Opvarmning til 200° C : 0.07
Vedligeholdelse på 200° C i 1 time : 0.37
II AALLTT :: 00..4444
Brug den nødvendige tid til
at læse brugsanvisningen,
og følg dens instruktioner.
•
Dette apparat er fremstillet i overensstemmelse med gældende sikkerhedsregler og -forhold samt følgende
direktiver :
- Direktivet om Elektromagnetisk
kompatibilitet 89/336/EØF med
ændringer i direktiverne 92/31/EØF og
93/68/EØF,
- Lavspændingsdirektivet 73/23/EØF
med ændringer i direktivet 93/68/EØF.
•
Ovnen skal, ligesom alle andre bageog stegeapparater, nøje overvåges, hvis
den anvendes i nærheden af børn.
Ovnen skal opstilles på et sted, der er
utilgængeligt for børn.
•
Hvis apparatet skal anvendes i et andet
land end det land, hvor det er købt,
bør det efterses på et autoriseret
servicested, før det tages i brug, da de
gældende normer ikke er ens i alle
lande.
•
Opstil aldrig apparatet i nærheden af
en varmekilde.
•
Kontroller, at netspændingen svarer til
den spænding, der er angivet på
apparatet (kun vekselstrøm).
•
Lad aldrig den elektriske ledning
hænge ned eller komme i berøring
med ovnens varme dele. Træk aldrig i
den elektriske ledning for at tage den
ud af stikkontakten.
•
Tilslut kun apparatet til en stikkontakt
med jordforbindelse.
•
Brug kun forlængerledninger i korrekt
stand med jordstik og et tværsnit, der
mindst svarer til den ledning, der følger
med apparatet.
•
Kontroller, at den elektriske installation
er tilstrækkelig til at strømforsyne et
apparat med denne effekt.
•
Ovndøren og ovnens udvendige sider
kan blive meget varme, når ovnen er i
brug. Brug ovnens håndtag og knapper.
Brug handsker, hvis det er nødvendigt.
•
Ovnens ledning, stik eller selve
apparatet må aldrig neddyppes i vand
eller i en anden væske, da det kan
medføre elektrisk stød.
•
Hvis det skulle ske, at ovnen begynder
at brænde, må ilden aldrig slukkes ved
hjælp af vand. Bekæmp åben ild med
en fugtig klud.
•
Opbevar ikke letantændelige varer i
nærheden af eller under det køkkenelement, hvor apparatet er opstillet.
•
Brug ikke apparatet, hvis :
- ledningen er defekt,
- apparatet er faldet på gulvet og viser
tydelige tegn på beskadigelse eller
driftsforstyrrelser.
Apparatet skal i givet fald sendes til det
nærmeste autoriserede servicested for
at blive undersøgt.
•
Tænd ikke apparatet, hvis det står
under et overskab, en hylde eller i
nærheden af letantændelige materialer, f.eks. rullegardiner, gardiner eller
tapeter.
•
Dette apparat er ikke beregnet til at
blive indbygget i et køkkenelement.
•
Brug ikke apparatet som varmekilde.
•
Læg aldrig papir, karton eller plastik
ind i apparatet, og læg intet oven på
apparatet, f.eks. køkkenredskaber,
diverse genstande mv.
•
Stik aldrig noget ind i ventilationsåbningerne, og tildæk dem ikke.
•
For din egen sikkerheds skyld må du
aldrig selv forsøge at skille apparatet
ad. Kontakt et autoriseret servicested.
•
Dette apparat er udelukkende
fremstillet til brug i private hjem.
Fabrikanten fralægger sig ethvert
ansvar i tilfælde af professionel brug
eller anvendelser, som apparatet ikke er
beregnet til, eller som ikke sker i
overensstemmelse med brugsanvisningen, og fabrikantens garanti bortfalder i givet fald også.
Opbevar denne brugsanvisning
Notice 12L Inox.qxd 12/11/2001 14:46 Page 28
 Loading...