

Page 1
MINUTE GRIL 1700 •
M
INUTEGRILDELUXE
1700
GRILL MINUTE 1700 •
G
RILLMINUTEDELUXE
1700
MINUTE GRILL 1700 •
M
INUTEGRILLDELUXE
1700
MINUTEN GRILL 1700 •
M
INUTENGRILLDELUXE
1700
BISTECCHIERA ELETTRICA 1700 •
B
ISTECCHIERA ELETTRICA MODELLO"DELUXE
"
MODE D’EMPLOI • GEBRUIKSAANWIJZING • INSTRUCTIONS FOR USE
GEBRAUCHSANWEISUNG • ISTRUZIONI D’USO
Page 2

1
2
3
6
7
8
9
4
5
Page 3

For UK users only
Wiring instructions
Warning:
All appliances must be earthed.
Important:
the wire in this lead are coloured in
accordance with the following
codes :
Green and Yellow . . . . . . . . Earth
Blue . . . . . . . . . . . . . . . . Neutral
Brown . . . . . . . . . . . . . . . . . Live
• Connect the Green/Yellow wire to
the terminal in the plug marked “E”
(or by the earth symbol ) or
coloured Green or coloured Green
and Yellow. Connect the Brown wire
to the terminal in the plug marked
“L” or coloured Red. Connect the
Blue wire to the terminal in the plug
marked “N” or coloured Black. A 13
amp fuse should be fitted when the
appliance is connected to a BS
1363A plug. Seek professional advice if you are unsure of the correct
procedure of the above.
About
your factory fitted plug.
FOR UK ONLY
(supplied with selected models)
• The cord is already fitted with a
plug incorporating an appropriate
fuse. If the plug does not fit your
socket outlet, see paragraph below.
• Should you need to replace the fuse
in the plug supplied, an appropriatly rated approved BS 1362 fuse
must be used (refer to wiring instructions for fuse rating).
• If the plug supplied does not fit
your socket outlet, it should be
removed from the mains lead and
disposed of safety. The flexible cord
insulation should be stripped back
as appropiate and a suitable alternative plug fitted. The replacement
plug must be equipped with an
appropriate fuse.
• If the plug has external access to
the fuse (non-rewirable type plug)
please note that the fuse cover is an
important part of the plug. Please
ensure that it is always refitted correctly. If you lose this cover please
do not use the plug. You may
contact TEFAL UK Limited for a
replacement.
HELPLINE :
For any problems or queries, please telephone :
0845 602 1454 - UK (calls charged at local rate)
or
(01) 47 51947 (Ireland)
GB
N
E
Blue or
black
Green and
yellow
or green
Brown
or red
Fit correct
fuse
Use cable
gripper
L
Page 4

GB
Figure 1
Figure 2
Figure 3
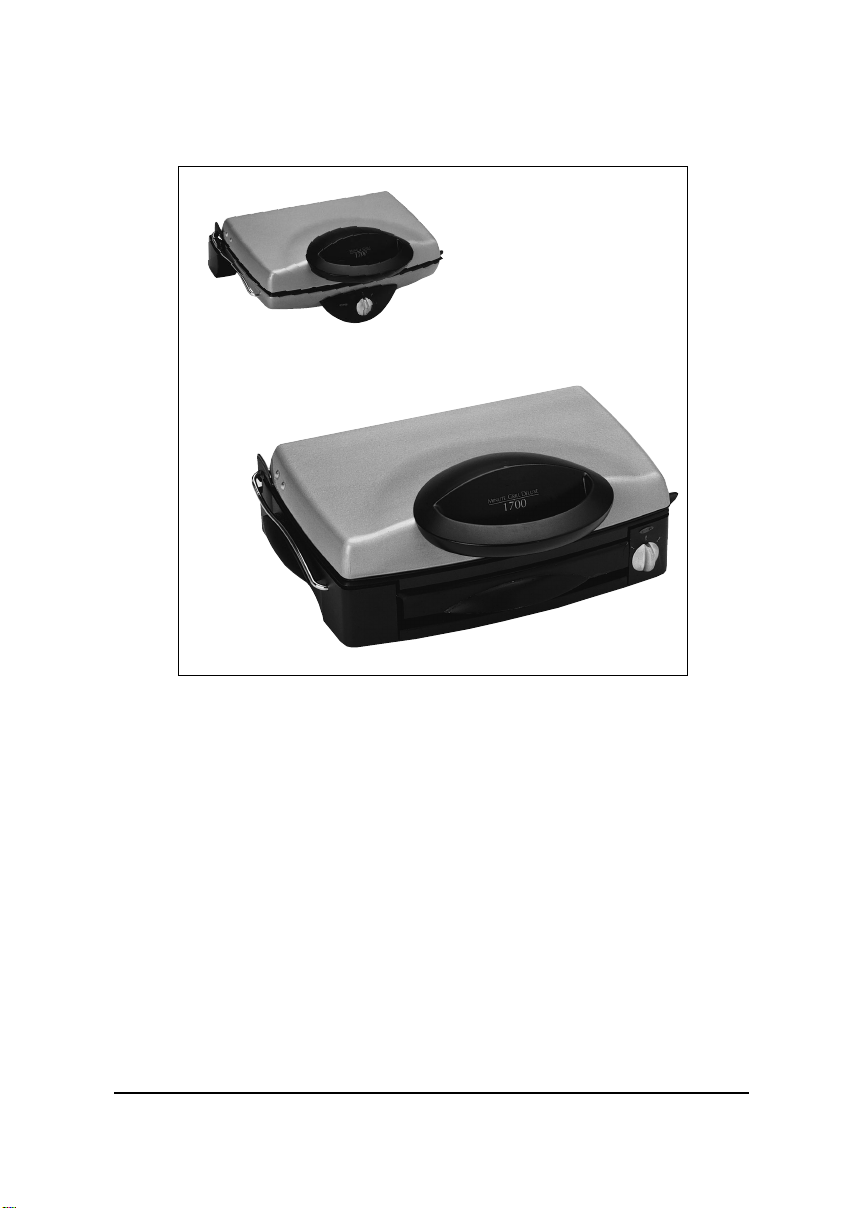
Description of your Minute Grill 1700:
1. Handle (for full safety in operating your grill)
2. Upper cooking plate
3. Lower cooking plate
4. Plate connection hinge
5. Latch to lock the plates in place
6. Indicator light
(light on when the grill
is heating up)
7. Thermostat
M
INUTEGRILL
1700 DEL
UXE
:
8. Removable drip tray
9. Lower perforated plate
(so that grease can drain into the
drip tray)
Warning!
Unpack the grill and remove any
stickers.
Read the User Manual and closely
follow the instructions given in
the "Safety Instructions" section,
page 15. Keep this User Manual in
a handy place.
To grill:
Warning : please note, it is normal for your grill to emit some slight smoke on first use.
Your Minute Grill 1700
The drip tray collects fat and juices
during the cooking process. This
reduces the amount of smoke and
also facilitates the cleaning of the
Grill. Your grilled food is healthier.
This tray should always be filled with
water.
1. Before plugging in your M
INUTEGRILL
1700 DEL
UXE
, gently pull out the
drip tray without completely removing it. See Fig. 1.
2. With a measuring jug, fill the drip
tray 2/3 full with water (i.e. 500 ml).
Then push the drip tray back into
place.
Warning!
Never operate your M
INUTEGRILL
1700
D
ELUXE
without filling the drip tray 2/3
full with water (i.e. 500 ml). Never use
the drip tray as a cooking pan.
Do not move the appliance when it
still contains hot water.
Wait until the appliance has cooled
down completely before emptying
the water from the drip tray.
With M
INUTEGRILL
1700 DEL
UXE
:
1
For any model, select the appropriate cooking
mode: Contact or Barbecue
2
Contact Cooking:
Your food is simultaneously grilled on
the top and on the bottom. They cook
twice as fast by keeping their juices.
First, pre-heat your Minute Grill
in the closed position:
1. Pull the power cord out and plug it
in.
The indicator light is on. Your
Minute Grill starts heating up.
2. Refer to the tables on the following
page. Select the cooking time according to the food to be grilled.
3. Adjust the thermostat. See Fig. 2.
4. Let your Minute Grill heat up for a
little while until the indicator light
goes off.
Warning!
Never touch the metallic parts of your
Minute Grill during pre-heating or
cooking operations: you may burn
yourself. Never use tin foil or anything
else between the cooking plates and
the food during cooking on any model.
Warning: when opening the grill, be
careful not to touch the cooking plates
which are always very hot.
5. When the indicator light goes off,
open the Minute Grill and place the
meat on the lower plate.
6. Close the upper plate. See Fig. 3.
The spacing between both plates
is automatically adjusted. You
can cook pieces up to 4 cm in
thickness.
For the Contact cooking mode:
Page 5

Figure 4
Cooking mode
Contact
Contact
Contact
Barbecue
Barbecue
Contact
Contact
Contact
Barbecue
Barbecue
Barbecue
Barbecue
Meat & Skewered Food
Time
8-10 mn
2-3 mn
3-4 mn
6-8 mn per side
6-7 mn per side
6-8 mn
2-3 mn
5-7 mn
8-10 mn
2-3 mn
3-4 mn
6-8 mn
Thermostat 3
Beef ribs
Fillet of beef
Fillet steak
Veal cutlet
Lamb chops
Pork chop
Rump steak
Sausages
Skewered lamb
Skewered liver kidney
Skewered chicken
Cocktail sausages
Cooking mode
Barbecue
Barbecue
Barbecue
Barbecue
Poissons
Time
2-3 mn per side
3-4 mn per side
3-4 mn per side
3-4 mn per side
Thermostat 2
Plain sole
Grilled turbot
Fillets of sardines
Salmon slices
Cooking mode
Barbecue
Barbecue
Barbecue
Barbecue
Vegetables Turn the vegetables while cooking
Time
9-10 mn
5-7 mn
12-15 mn
8-10 mn
Thermostat 3
Mushroom
Tomatoes
Courgette
Aubergine
Cooking mode
Contact
Contact
Contact
Sandwiches and waffles
Time
7-9 mn
4-5 mn
4-6 mn
Thermostat 2 & 3
Panini (th 2)
1
Toasted cheese
& ham sandwich (th 3)
1
Waffles(th 3)
2
1. Open the Minute Grill:
Hold the insulated handle, and pull
the upper plate upwards to open it.
See Fig.4.
In a flat position, the Minute Grill
should be opened at a 180°
angle.
Once the Minute Grill is opened,
pre-heat it:
2. Pull the power cord out and plug it
in.
The indicator light is on. Your
Minute Grill starts heating up.
3. Refer to the tables below and select
a cooking time according to the food
to be cooked.
4. Adjust the thermostat. See Fig. 2,
page 12.
5. When the indicator light goes off,
place the food evenly on both plates.
M
INUTEGRILL
1700 DEL
UXE
:
It is better to always position meat
on the perforated plate (especially
for fatty food such as sausage).
When the meat is cooking, the drip
tray collects the juices and fat.
Warning!
Never touch the metallic parts of
your Minute Grill during pre-heating
or cooking operations: you may burn
yourself.
Never use tin foil nor anything else
between the cooking plates and the
food during cooking on any model.
Warning: when opening the grill, be
careful not to touch the cooking
plates which are always very hot.
For the Barbecue cooking mode:
Warning!
Cooking times are provided
for estimating purposes only.
They may vary according to
the quantity of food, each
person's taste, and the type
and thickness of the food.
1
For cooking paninis or toasted ham and cheese sandwiches,
it is recommended to not fill the drip tray of the M
INUTEGRILL
DEL
UXE
with water.
2
Waffles can only be made with the optional plates for the
Minute Grill 1700.
GB
Page 6

GB
1. Unplug the Minute Grill and let it
cool down before touching it
(approximately 1 hour if it is closed,
or 15 minutes if it is opened).
2. Completely open your Minute Grill,
as if you were performing a double
side cooking operation.
3. Open the securing latches and
remove the plates. See Fig. 5.
4. Clean the plates with washing-up
liquid or place them in a dishwasher.
Warning!
Never use scouring cream or any
abrasive pad. Never put the Minute
Grill in water.
Once you are finished with your Minute Grill,
Remove and clean the cooking plates:
1
Figure 5
Figure 6
To Clean Your Minute Grill:
1. Place the rear edge of the plates
against its stops. See Fig. 6.
2. Position the plate and push on it to
lock it into place.
3. Check that the plates are properly
assembled.
M
INUTEGRILL
1700 DEL
UXE
:
The perforated cooking plate is
pushed into place without locking it.
Re-assemble the cooking plates:
2
1. Clean it with a sponge, using
washing-up liquid.
Warning!
Never use scouring cream or any
abrasive pad. Never put the Minute
Grill in water.
Clean the body of the Minute Grill:
4
1. Once you have finished operating
the Grill, remove the drip tray and
clean it the same way as for the plates.
2. Place the drip tray under the perforated plate.
With the M
INUTEGRILL
1700 DEL
UXE
:
To clean the drip tray
3
The Minute Grill
does not get hot enough:
• The thermostat is not adjusted
properly.
• The thermostat is not working.
The indicator light
does not come on:
• Not connected to power supply.
Too much smoke comes from
the Minute Grill:
• Cooking plates are not clean
enough.
• There is not enough water in the
drip tray.
• Thermostat too high.
Troubleshooting
Solutions:
• Make adjustments according to
the tables on page 13.
• Take the Minute Grill to an
approved service centre.
• Take the Minute Grill to an
approved service centre.
• Plug in and switch on.
• Remove and clean the plates, as
indicated above.
• Fill the drip tray 2/3 full with water
(500 ml).
• Turn down.
Page 7

Safety Instructions
• Check that your power supply
meets the requirements specified
on the Grill.
• Before plugging the Grill in, pull
the entire power cord out.
• Flex positionning : Please ensure
that it is firmly connected to the
grill when using.
• If you need to use an extension
cord, check that it is in proper
condition, earthed, and that it has
a 10 amp rating minimum.
• Always plug your Minute Grill into
an earthed socket.
• Never operate your M
INUTEGRILL
1700 DEL
UXE
without filling the drip
tray with water.
• If you ever use your Minute Grill in
a foreign country, have it checked
by an approved service centre first.
• Always place your Minute Grill on a
flat, stable surface, away from any
water.
• Never operate your Minute Grill
directly beneath a wall mounted
cupboard, or under a shelf or near
flammable materials such as
Venetian blinds, curtains or any
hangings fabrics.
• Your Minute Grill should not be
built into kitchen units.
• Never move the Minute Grill while
it is in use.
• Never touch the metallic parts of
the Minute Grill when cooking. You
may burn yourself.
• Once you are finished using your
Minute Grill, always unplug it.
• Keep the Minute Grill out of the
reach of children.
• Never allow the power cord to
hang, and make sure that it does
not touch the cooking plates.
• Never lay any object on the Minute
Grill.
• Before cleaning, storing or moving
the Minute Grill, always unplug it
and let it cool down.
• Never pull on the power cord to
unplug your Minute Grill.
• Never put the Minute Grill in water.
• Never use the Minute Grill:
- if the power cord is damaged, or
- if the Minute Grill does not
operate properly, or
- if the Minute Grill is dropped
and damaged,
• Take the Minute Grill to an approved service centre (Refer to the
attached list) for repair with the
proper tools.
• Never use the Minute Grill as a heater.
• This appliance is designed for
domestic use only. In the case of
professional use, inappropriate
use, or failure to comply with the
instructions, the manufacturer
accepts no responsability and the
guarantee does not apply.
Your Minute Grill complies with European
Directives EC 73/23,
EC 89/336 and EC
93/68.
Warranty:
• One-year warranty. Refer to the warranty card or warranty certificate
printed on the package.
Subject to change without notice
GB
Page 8

Conception & réalisation International
SA SEB SELONGEY CEDEX • RC. DIJON B 302 412 226 • REF 3056906-C • 3ème édition Janvier 2001
 Loading...