

Page 1
MOD. 1690
INSTRUCTIONS FOR USE
089242 - 06-99
Page 2
16
15
14
13
12
10
8
7
5
4
3
6
11
17
18
19
20
21
22
23
3
4
5
10
6
7
9
8
2
1
11
9
Page 3
25
26
24
27 a
27 b
27 c
Page 4

English
2
C
G
F
A
B
D
E
I
O
J
L
K
H
N
M
Please read carefully and keep in a safe place.
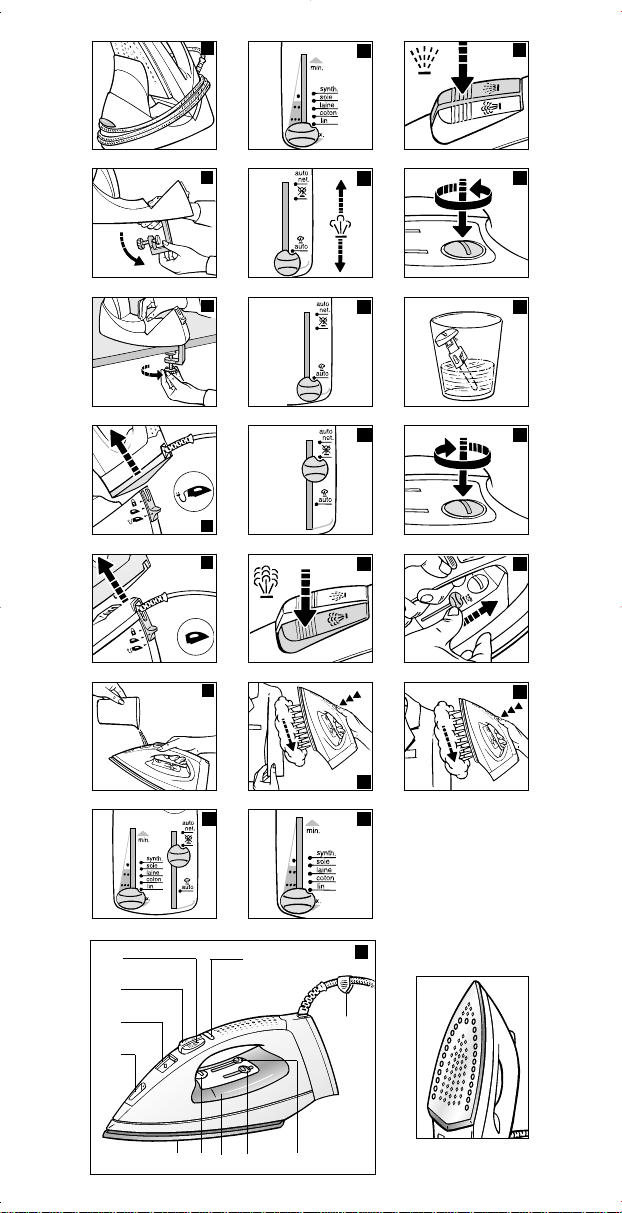
YOUR CORDLESS IRON
A. Spray
B. Tank opening flap
Use tap water.
C. SuperPress button
To obtain more steam and smooth vertically.
D. Spray button
To dampen your ironing.
E. Indicator lights - Thermostat
Goes out when the required temperature is reached.
F. Anti-scale rod
Clean once per month.
G. Tank max. level mark
Do not exceed this limit.
H. Thermostat control:
To choose the temperature.
I. Steam and Auto-cleaning Control
To adjust the steam output and clean your iron automatically.
J. Connection Block
K. Base
L. 3-position selector
• Cordless Position : To iron without a cord.
• Cord Position : To iron with a cord.
• Lock Position : To transport and store your iron.
M. Table grip
To fix the base of your iron to your table.
N. Cord winder
To avoid contact between the cord and the soleplate of the iron.
O. Clip
To attach the cord.
Page 5

1 - PREPARATION
1. Set up your iron on the table.
• Unwind the cord completely.
• Set the selector to Cordless and remove the iron from its base.
• Turn the base over, pull out the table grip and fix it to the table at the
rear.
2. Fill the tank.
WHAT WATER SHOULD BE USED?
Your iron is designed to function with tap water. However, you should
regularly carry out auto-cleaning of the steam chamber to remove
any scale deposits.
If you have very calcareous (hard) water (you can check this with
your water supplier), you can mix tap water with commercially-available demineralized water in the proportions:
- 50% tap water
- 50% demineralized water
WHY NOT USE OTHER TYPES OF WATER?
Do not use the following types of water, which may cause spitting,
brown streaks or premature ageing of your iron:
- commercially-available demineralized water on its own
- water from spin-dryers
- scented water
- softened water
- water from refrigerators
- water for batteries
- rainwater
- water from air
- conditioning units
- distilled water air
Caution
• Always remove your iron from the base (cordless) before filling it.
• Set the Steam control to DRY.
• Open the flap of the tank, tilt the iron and fill it.
Caution
Do not fill above the Max indicator (with the iron on its heel).
• Put it back on its base.
2 - STEAM IRONING
1. Adjust the temperature and the steam.
• Position the thermostat control on the name of the fabric that you want
to iron (see diagram below).
T o start ironing, allow the indicator to come on twice before commencing.
Tip
• Start by ironing fabrics which require a low temperature (•) and finish with
those which require a higher temperature (••• or MAX).
• If you reduce the thermostat, wait for the lamp to come on again before
continuing with your ironing.
• If you are ironing a mixed-fibre fabric: set the ironing temperature according to the most fragile of the fibres.
• Set the Steam control to AUTO. Steam production is automatically adapted
to the temperature selected.
Caution
• Your iron only produces steam when the thermostat control is in the
coloured zone.
Page 6

3 - ANTI-DRIP FUNCTION
• When the iron's temperature is no longer sufficient to produce steam, the
water supply is automatically cut off so that the soleplate does not "drip".
• When you first use it, you must wait for 2 minutes before steam becomes
available.
2. Choose your ironing mode.
• Cordless: Set the cursor to CORDLESS. You can start ironing when the
thermostat indicator goes out.
Caution
• Always put the iron back on its base for maximum ironing efficiency.
Tip
• Use this ironing mode for small items and fabrics that are easy to iron.
• Cord: Set the cursor to CORD. You can start ironing when the thermostat
indicator goes out.
Tip
• Use this ironing mode for large items and fabrics that are difficult to iron
or when you use the SuperPress button frequently.
3. To smooth vertically
• Hang up the garment and stretch the fabric.
Set the thermostat control to MAX, press the SuperPress button (x)
repeatedly and move the iron from the top downwards.
Tip:
• If you have to use the SuperPress button very frequently, use the iron
with the Cord setting.
• Hold the iron a few centimetres from the fabric to avoid burning delicate
fabrics.
4. To remove resistant creases
• Press the Spray button repeatedly to wet the linen or use the
SuperPress button.
4 - DRY IRONING:
• Set the Steam control to DRY.
• You can iron once the indicator goes out.
5 - MAINTAINING YOUR IRON
Caution
Always unplug and leave your iron to cool before cleaning it.
1. Clean the soleplate
• When the soleplate is warm, clean it with a damp, non-metal pad.
Caution
• Do not use any cleaning products.
• Never hold the iron or its base under the tap.
Tip
• When you use starch, spray it on the underside of the fabric and clean
the soleplate more frequently.
2. Clean the anti-scale rod (once a month)
• Drain the iron and set the ironing control button to DRY.
• Press the anti-scale rod. Turn it anticlockwise while keeping it pushed
down.
• Release and remove the rod from its housing WITHOUT TOUCHING
THE END.
• Soak the rod for 4 hours in spirit vinegar or pure lemon juice.
• Rinse the rod with tap water. Re-insert it.
Page 7

Caution
The iron can only operate with the anti-scale rod in place.
3. Use the auto-cleaning function (twice a month).
Information:
• The auto-cleaning function reduces the amount of scale in the iron.
• Set your iron to "Cordless" and fill the tank up to the MAX indicator with tap
water.
• Set the thermostat control to MAX and the steam control to DRY.
• Place your iron on its base and wait for the indicator to go out.
• Hold it above the kitchen sink.
• Set the control to AUTOCLEAN and hold it there.
• When the soleplate is warm, wipe the iron with a soft cloth.
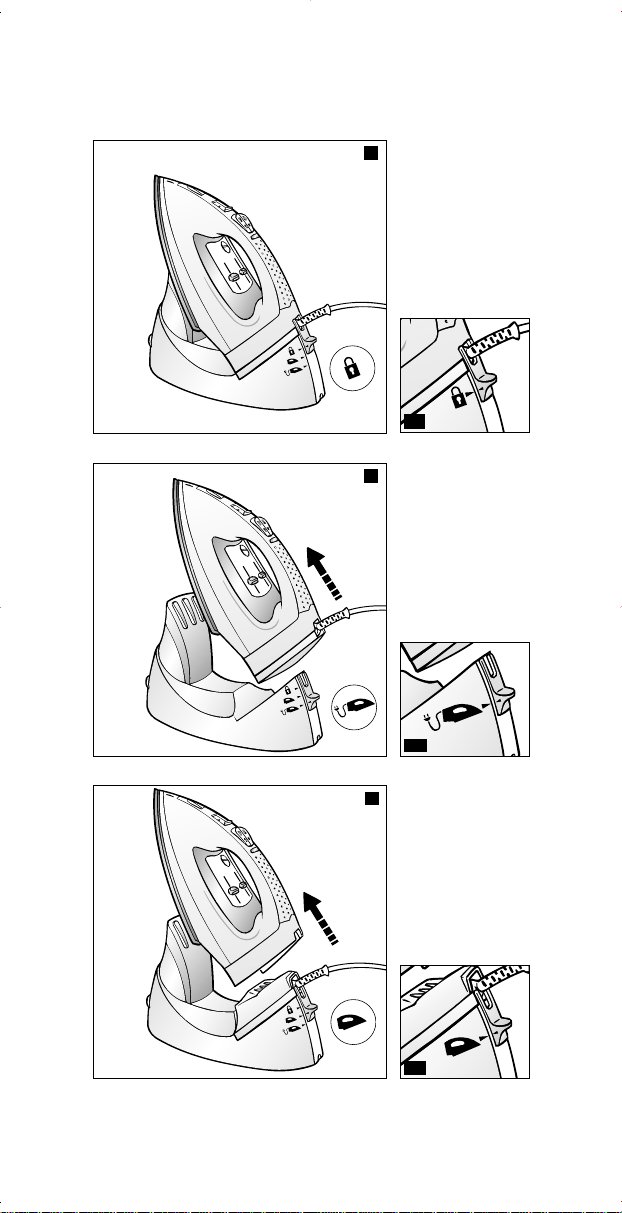
6 - STORING YOUR IRON
INFORMATION:
• You do not have to empty the tank.
• Unplug it and wait for the soleplate to cool down.
• Place the iron on its base and set the cursor to the lock position.
Your iron is now fixed to its base. You can transport and store them easily.
• Unfasten the base from the table.
• Wind the cord around the base and fasten the clip on the cord.
Caution:
• The cord winder avoids contact between the cord and the soleplate
which may still be hot.
• Tighten the table grip again so that you can fold it back into the base.
7 - IF YOU HAVE A PROBLEM WITH YOUR IRON
PROBLEMS
AND POSSIBLE CAUSES
Your iron is producing little or no
steam.
• Your iron is new.
• In the Cordless position, your iron
needs recharging.
• The steam control is set to DRY.
• Your iron is covered with scale or
has been used dry for too long.
Water runs through the holes
in the soleplate.
• Steam cannot be produced
at the temperature you have selected.
• The iron is not hot enough.
• You are using the SuperPress control
too often.
• Your thermostat is possibly faulty.
Brown streaks come through
the soleplate and stain the linen.
• You use chemical scale removers or
demineralized water.
SOLUTIONS
When you first use it, you must wait for 2
minutes before steam becomes available.
Systematically put your iron back on its
base during ironing.
Set the Steam control to AUTO.
Clean the anti-scale rod and use the
auto-cleaning function.
Set the thermostat control
in the coloured zone (••, ••• or MAX).
Wait for the thermostat indicator
to go out.
Wait for a few seconds in between each
use of the SuperPress control.
Take your iron to an approved service
centre.
Use the auto-cleaning function
and use tap water only.
(see chapter on
"what water should be used")
Page 8

PROBLEMS
AND POSSIBLE CAUSES
• Fabric fibres have built up
and become charred in the soleplate
holes or between the iron's casing
and the soleplate.
The soleplate is dirty or brown and
may stain your ironing.
• The temperature setting is too high.
• Your ironing is not rinsed sufficiently or
you are using starch.
The soleplate is scratched
or damaged.
• You have placed your iron face down
on a metal iron rest.
SOLUTIONS
Clean the soleplate with a damp
non-metal pad. Vacuum the soleplate
holes from time to time.
Use the auto-cleaning function.
Clean the soleplate. See the section on
adjusting the temperature.
Clean the soleplate. Spray the starch on
the underside of the surface to be ironed.
Always place your iron on its base.
8 - FOR YOUR SAFETY
•
Caution! the voltage of your electrical installation must match that of your
iron (220-240V). Incorrect connection may cause irreparable damage to
the iron and render the guarantee null and void.
•
This iron must be plugged into an earth socket. If your are using an
extension lead, ensure that it is the bipolar type (13 A) with an earth
conductor.
•
If the power cord is damaged, it must be replaced immediately by an
Approved Service Centre to avoid danger.
•
The base and the connection block must only be used with the iron that
accompanies them. Never use them with other equipment or for a different purpose.
•
Do not immerse the iron or its base in water !
•
Set the iron to Cordless and always remove it from its base before filling
or emptying the tank.
•
If the iron is dropped, have it examined by a professional before turning
it back on: invisible damage may cause a safety hazard.
•
The iron's soleplate may be very hot:
-
never touch it.
-
always leave your iron to cool down before storing it.
-
never leave your iron unattended when it is connected to the mains or
while the soleplate is still hot.
-
never leave the iron within the reach of children.
Never dismantle your iron: always take it to an Approved Service
Centre.
Wiring instructions (for U.K. only).
Warning : this appliance must be earthed.
Important : the wires in this lead are coloured in
accordance with the following code :
- Green and yellow : earth
- Brown : live
- Blue : neutral.
• Connect the green and yellow wire to the terminal in the
plug marked ”E” or by the earth symbol or coloured
green or green and yellow.
• Connect the brown wire to the terminal in the plug marked ”L” or coloured red or brown.
• Connect the blue wire to the terminal in the plug marked ”N” or coloured black or blue.
• A13 amp fuse should be fitted when the appliance is connected to a BS 1363A plug.
• Seek professional advice if unsure of the correct procedure for the above.
Important : If the electrical cord of this appliance is damaged or shows signs of wear, it
must only be replaced by an authorised Tefal Service Centre (see section After Sales
Service).
Green and
yellow
or green
E
Blue or
black
Brown
or red
Fit
correct
fuse
N
L
Use
cable
gripper
 Loading...