

Page 1
STEAM CUISINE 700 TURBO DIFFUSION
STEAM CUISINE 1000 TURBO DIFFUSION
GEBRUIKSAANWIJZING • INSTRUCTIONS FOR USE • BRUGSANVISNING
ANVÄNDNING • BRUKSANVISNING
Page 2

INHOUDSOPGAVE
Beschrijving van het apparaat blz. 4
Vóór het eerste gebruik blz. 4
Gebruiksaanwijzing blz. 4
Description of the appliance P. 12
Before use P. 12
Instructions for use P. 12
Dampkogerens opbygning s. 20
Inden du tager dampkogeren
i brug første gang s. 20
Brugsanvisning s. 20
Onderhoud en schoonmaken blz. 7
Stoomtijdentabellen blz. 8
Veiligheidsvoorschriften blz. 11
CONTENTS
Cleaning and maintenance P. 1 5
Table of cooking times P. 1 6
Safety instructions P. 19
INDHOLDSFORTEGNELSE
Rengøring og vedligeholdelse s. 23
Oversigt over kogetider
Sikkerhedsadvarsler s. 27
s. 24
Ångkokarens olika delar s. 28
Innan användning s. 28
Användning s. 28
Beskrivelse av apparatet s. 36
Før første gangs bruk s. 36
Brukerveiledning s. 36
INNEHÅLL
Rengöring och underhåll s. 31
Tillagningstider s. 32
Säkerhetsföreskrifter s. 35
INDHOLDSFORTEGNELSE
Rengjøring og vedlikehold s. 39
Tebell med koketider s. 41
Sikkerhetsinstruksjoner s. 44
Page 3
STEAM CUSINE 700 TURBO DIFFUSION
STEAM CUSINE 1000 TURBO DIFFUSION
1
2
4
12
13
3
6
5
7
8
9
10
11
14
15
16
Page 4
Your steam cooker
can be used to prepare excellent food,
with ease. It is ideal
for families who wish
to eat a healthy diet,
and can be used to
cook nutritious dishes
without any added
fats. This reduces the
calories and preserves
the vitamins. It may
be used to cook all
types of food : vegetables, fruit, fish,
meat, rice, etc.
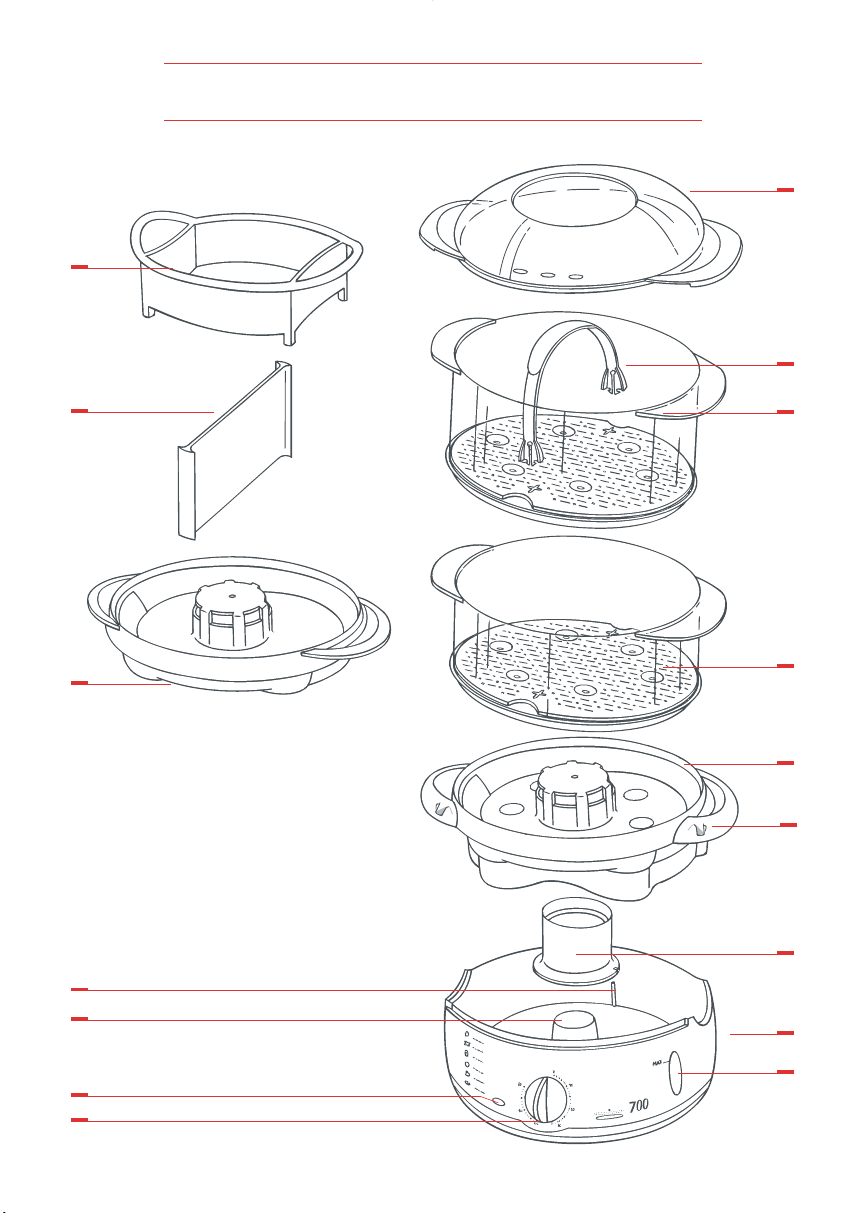
Description of the appliance
1 Lid
2 Rice bowl
3 Separator (depending on model)
4 Clip-on handle
5 Large steam bowl (4 L) and remo-
vable grids with integral egg holder
(models 6162 and 6163)
6 Separator / juice tray
(depending on model)
7 Small steam bowl (3 L) and remo-
vable grids with integral egg holder
(1 with model 6162 and 2 with model
6163)
Before use
8 Juice collector with integral egg
holder
9 Openings for filling with water
10 Removable turbo ring
11 Base / water reservoir (capacity
1 litre, lasts 1 hour)
12 Maximum level for filling
13 Heating element
14 On indicator
15 Timer
16 Water level indicator
Read the instructions for use and follow
them carefully.
Unpacking the appliance.
• Remove the appliance from its packaging and unpack all the accessories.
Wash the lid, rice bowl, steam cooking
bowls, removable grids, Clip-on
handle, juice collector and separator /
juice tray (depending on the model)
with warm soapy water.
• Rinse and dry. Wash the water reservoir in the same way.
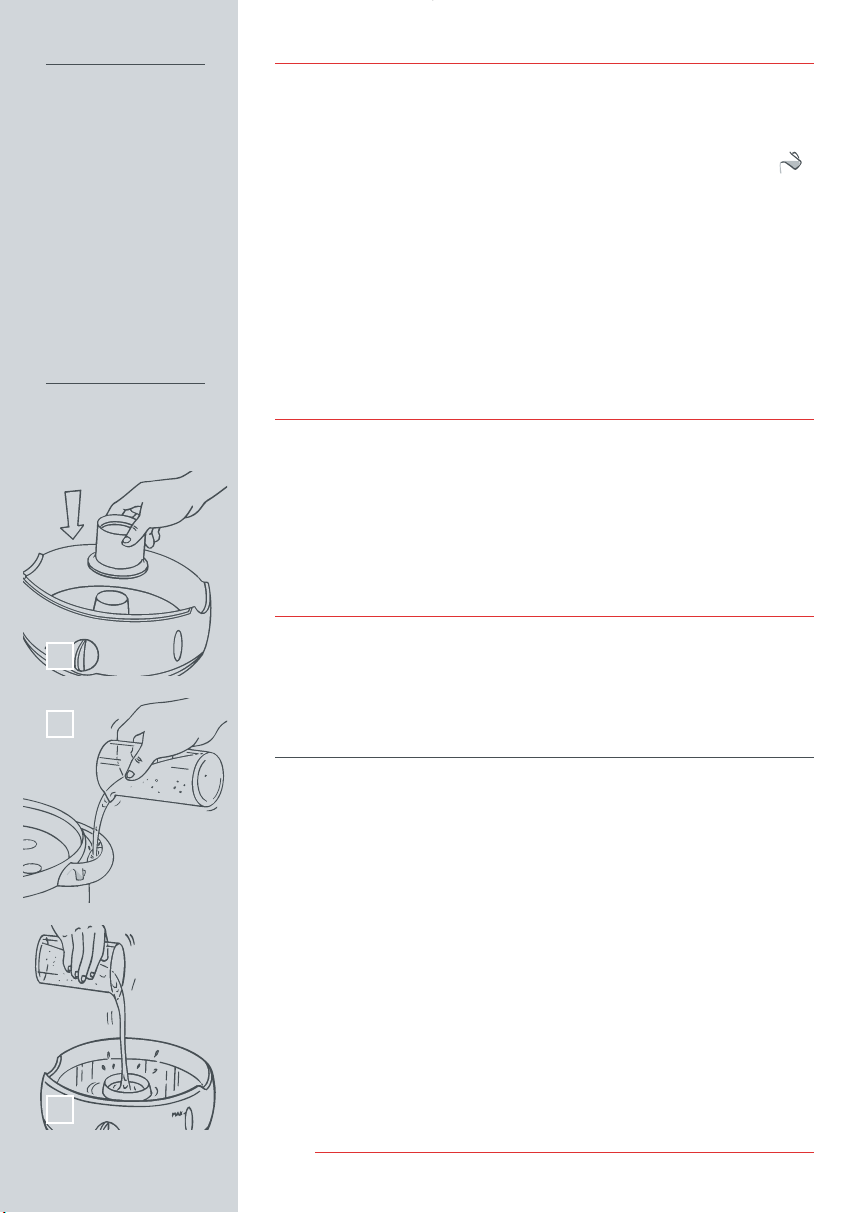
Instructions for use
1
Operation
▲
• Place the base of the appliance on a
2
stable surface, away from any objects
which could be damaged by steam.
Filling the water reservoir
To fill the water reservoir, there are two
possible methods:
• Method 1: pour cold water into the
water reservoir through the filling ope-
▲
nings until the maximum level is reached - Fig. 2
• Method 2: pour cold water directly into
the water reservoir and heating element
housing until the maximum level is rea-
▲
ched - Fig. 3
• Put the turbo ring in position around the
heating element - Fig. 1
Caution: never put any seasoning or liquid other than water into the water reservoir.
• Place the juice collector on the base
and check that it is level.
Caution: make sure you check that there
is water in the reservoir before switching on.
3
Page 5

ENGLISH
Use of the various elements
Single bowl model
• Place the food in the bowl.
• If you wish to cook different types of
food at the same time, you can use the
food separator (depending on model).
▲
Place it in the centre of the bowl - Fig. 4
Put the food into each compartment.
• Place the bowl onto the juice collector.
4
5
Use of several steam bowls at the same
time
• It is possible to put different food items
in each bowl, but make sure that their
flavours complement each other.
• It is also possible (depending on
model) to put the juice tray / separator
between the bowls. This avoids mixing
the cooking juices from each bowl. In
this way you can cook different items
of food whilst conserving their flavour.
▲
Use of removable grids - Fig. 5
• The bowls are fitted with removable
grids which increase the volume of the
▲
cooking area and can be used to cook
large items of food (whole chickens,
▲
kebabs, artichokes, lobsters, etc.
To put the grids in position - Fig. 6
• Take the grid the right way up (clip facing downwards).
Model with more than one bowl.
The bowls and grids can be assembled in
any order.
• Place the food in the bowls. We recommend that you put the largest pieces of
food, requiring the longest cooking
time, in the lowest bowl.
• Place the bowls onto the juice collector.
• If you are cooking food with different
cooking times, start cooking in the
lower bowl with the food requiring a
longer cooking time. When the timer
reaches the setting for cooking the food
which requires a shorter cooking time,
remove the lid using a cloth, and put
the higher bowl in position. Close and
continue cooking.
• Place the grid in the bowl.
• Press in the clip area to clip-on onto the
bowl.
To remove the grids - Fig. 7
• To unclip the grid, press on the top from
the outside.
Caution: the bowl placed on the juice
collector must always have its grid fitted.
6
7
Page 6

▲
Use of the Clip-on handle.
The Clip-on handle has been specially designed so that food can easily be removed
from the bowl without damaging it. This
preserves the appearance of the food, for
better presentation (fish, asparagus, etc.).
• Place the grid right side up (with the
hooks underneath).
• Pick up the handle with the rounded
8
9
side uppermost.
▲
Use of the rice bowl
• Place a bowl on the juice collector.
• Put one volume of rice and one and a
half volumes of water into the rice bowl
(maximum 300 grams of rice).
Instructions for using your steamer
Thanks to its removable grid, your steamer adapts to every recipe. A pictogram
will help you assemble the different bowls
in the best way.
1 steaming bowl with grid
• Grip the end of the handle - Fig. 8
• Insert the end into the cross on the grid
and release
• Repeat the operation on the other side.
Caution: The Clip-on handle can be
equally used in the bowls. However, the
bowl using a clip-on handle must necessarily be equipped with a lid.
• Put the rice bowl into the steam bowl
- Fig. 9
• Place the lid on top.
2 steaming bowls with grid
+ rice bowl
1 steaming bowl without grid
+ 1 steaming bowl with grid
10
11
1 steaming bowl with grid
+ rice bowl
2 steaming bowls with grid
Cooking eggs
▲
To cook up to 6 eggs - Fig. 10
• Place the eggs directly into the juice
collector using the specially shaped
holders provided for this purpose.
• Place the lid on top.
Switching on
▲
Caution: make sure that the appliance is
correctly assembled before use. Use
only the special containers designed for
the appliance.
• Plug in.
• Set the timer to the recommended cooking time.
Clip-it handle
Remember, however, that for all recipes
you will need:
the base with the juice collector
and the lid
To cook more than 6 eggs
• Use the steam bowls as well as the
juice collector.
• Put the eggs on the grids using the specially shaped holders provided for this
purpose.
• Place the lid on top.
• The on indicator lights up, and steam
cooking begins - Fig. 11
Caution: the appliance must be plugged
in before setting the timer, since the
timer operates even when the appliance
is not plugged in.
• When the cooking time is up, the timer
rings and the light goes out.
Page 7

During cooking
• The water level indicator is used to
check on the level of water during co-
▲
oking - Fig. 12
• The openings for filling have been designed so that the water can be topped
up at any time during cooking without
having to move the bowls.
ENGLISH
Caution: for food which releases a lot of
water during cooking (e.g. frozen vegetables, asparagus, etc.) it may be necessary to empty the juice collector(s) during the cooking time.
12
When cooking is finished
• Remove the lid carefully. Avoid placing
face in direct contact with escaping
steam.
• To avoid food becoming overcooked,
remove the steam bowl using a cloth
and place it on a plate.
• If you used the rice bowl, remove it carefully by the handles.
Cleaning and maintenance
• Do not use abrasive cleaning products
or solvents.
Cleaning the base / water reservoir
• Do not immerse the base of the product
in water.
• Use a damp cloth.
• Wash the water reservoir with soapy
water.
Cleaning the plastic accessories
• The steam bowls are easily cleaned,
thanks to their removable base.
• Do not clean the plastic bowls with the
scourer side of a sponge.
• If you used the Clip-on handle, remove
the Clip-on handle and removable grid
carefully, using an oven glove.
Caution: before removing the juice collector, check that the whole appliance
has cooled down sufficiently.
• After use, unplug the appliance and
leave it to cool down completely before
putting it away.
• Clean the turbo ring, and the notch
which lets the water through, regularly.
• Empty the reservoir and refill the appliance with fresh water before each
use.
• Plastic accessories can be washed in
the dishwasher.
Page 8

Descaling
After using the appliance 7 to 10 times,
scale may form on the heating element, depending on the hardness of the water used.
It is recommended to descale the appliance regularly, so that steam formation is not impeded, and also to prolong
the life of your appliance.
• Fill the water reservoir and the heating
element housing with a solution of half
water and half white vinegar to the
maximum level mark. Do not use other
descaling products.
• Plug in. The juice collector, juice tray /
separator (depending on model), turbo
ring, steam bowls, lid and rice bowl are
not used during this operation.
• Set the timer to 20-25 minutes. If the
vinegar solution boils over, stop the
timer and unplug the appliance.
• When the timer rings, unplug the appliance and wait for it to cool down before emptying out the vinegar solution.
• Rinse the reservoir with clear water several times.
• Check that water flows correctly between the reservoir and the heating element housing.
CAUTION
When using the juice
tray separator, it is recommended to add
1 to 3 minutes to the
times shown.
Some recommendations
• If you so wish you can reduce cooking
times significantly by filling the reservoir with warm water, but note that cooking times given in the recipes are for
use with cold water.
• Do not pack food too tightly in the
steam bowls or rice bowl. Leave some
space for steam to circulate as much
as possible.
• The times indicated may vary depending on the size of pieces of food, the
space left between items, the quality of
food used and individual taste. Once
you are familiar with the appliance, you
will be able to adjust these times. For
best results, use pieces of food of approximately the same size. If the pieces
are of different sizes, and need to be
put in layers, put the smallest pieces on
top.
• If you are steaming large quantities of
food, remove the lid halfway through
the cooking time, stir the food and put
the lid back on. Avoid placing face in direct contact with the steam.
• Use the juice collected in the juice accessory to make soups, sauces, etc.
Table of cooking times
Fish • Seafood
Food Type Quantity
Shellfish Fresh 250/400 g 8-10 min. when the shells are
Prawns Fresh 400 g 6 min.
Mussels Fresh 400 g 8-10 min.
Saint-Jacques
Lobster (tail) Frozen
Fish fillets
Fish steak Tuna 250/400 g 10-12 min.
Fresh
Flesh cooking
Frozen 250 g 10-12 min.
Fresh 250 g 6-8 min.
Salmon 250/400 g 12-14 min.
400 g 10 min.
2 pieces,
400 g each
Cooking
time
20-22 min.
Recommendations
Cooking is finished
open
Stir halfway through
cooking
Stir halfway through
cooking
Stir halfway through
Page 9

Times are given as an
indication only. They
can be varied to suit
quantities used and
individual tastes.
ENGLISH
Meat • Poultry
Food Type Quantity
Chicken fillets
Sausages
Boneless 250 g 12 - 15 min.
Joints 450 g 30 - 35 min.
Knackwurst 400 g 10 min.
Frankfurters 400 g 15 min.
Vegetables
Food Type Quantity
Artichokes Fresh 3 medium 45-50 min. Cut off the base
Asparagus Frozen 400 g 16-18 min.
Broccoli
Cabbage (quarters) Fresh 400 g 40-45 min.
Carrots (sliced) Fresh 400 g 20-22 min.
Cauliflower
Brussels Sprouts Frozen 400 g 20-22 min.
Mushrooms Fresh 200 g 12-15 min.
Courgettes
(sliced) cooking time
Spinach
French beans
Haricot beans Partly dried 400 g 45-50 min.
Peas (podded)
Potatoes Fresh 10-12 small 20-22 min.
Fresh 400 g 13-15 min.
(green)
Fresh 400 g 16-18 min.
Frozen 400 g 15-18 min.
Fresh 400 g 16-18 min. Stir half-way through
Frozen 400 g 18-20 min. cooking time
Fresh 400 g 16-18 min.
Fresh 250 g 8-10 min. Stir half-way through
Frozen 400 g 18-20 min. cooking time
Fresh 400 g 35-40 min. Cross beans over to let
Frozen 400 g 25-28 min. steam through
Fresh;
Frozen 400 g 15-18 min.
400 g 10-12 min. Stir half-way through
Cooking
time
Cooking
time
Recommendations
Prick before cooking
Recommendations
Cross over the asparagus
stalks to let the steam through
Stir half-way through
cooking time
Stir half-way through
cooking time
Stir half-way through
Stir half-way through
cooking time
cooking time
Page 10

Rice • Cereals • Pasta
Food Type Quantity Quantity Cooking
Rice 300 g/3 pers. 450 ml 35 min.
Couscous Medium
grains grains
Pasta Spaghetti 120 g/ 2 pers. 500 ml 18-20 min.
White
Brown 200 g/2 pers. 300 ml 35 min.
(glass) of water time
200 g/2 pers. 300 ml 25 min.
150 g/2 pers. 300 ml 5-6 min.
Others foods
Food Type Quantity
Eggs
Apples / Pears Fresh 4 medium 15-18 min.
Hard-boiled 6 18 min.
Soft-boiled 10 min.
Cooking
time
Recommendations
NOTE
Place the food in the
rice bowl. To avoid
the food getting too
moist, cover the top
of the rice bowl with
a sheet of aluminium
foil, so that moisture
from the lid goes into
the steam bowl and
not into the rice bowl.
Reheating
Food Type Quantity
Meat Pieces 10-20 min.
Pasta 10-20 min.
Vegetables 5-15 min.
Reheating
time
Recommendations
Page 11

Protect the environment
ENGLISH
This appliance complies with current safety regulations and
conditions, and with
directives:
Electro-magnetic directive 89/336/EC
modified by Directive
93/68/EC
- Low Voltage
Directive 72/23/EC
modified by Directive
93/68/EC
Your appliance is designed for many years
use. However, when you decide to replace
your appliance, do not forget that you can
contribute towards protecting the environ-
Safety Instructions
• The safety of this appliance complies
with technical regulations and standards in force.
• Check that the voltage of the power
supply corresponds to that shown on
the appliance (alternating current only).
• Taking into account the diversity of
standards in force, if the appliance is
used in a country other than that in
which it is purchased, get it checked by
an approved service agent.
• Do not place the appliance near a
source of heat: it could be badly damaged. Do not put it into a hot oven.
• Use a stable work surface, away from
water splashes.
• Never leave the appliance in use wi-
thout supervision. Keep the appliance
out of the reach of children.
• Do not leave the cord hanging down.
• Always plug the appliance into an ear-
thed socket.
• Do not unplug the appliance by pulling
on the cord.
• Always unplug the appliance:
- immediately after use
- to move it
- before cleaning or maintenance.
• Never immerse the appliance in water !
• Do not use the appliance if:
- the appliance or the cord is damaged
- the appliance has been dropped or
fallen and appears damaged or does
not work properly.
ment. The approved service centres will
take your worn appliances so as to destroy them in accordance with the environmental rules.
In these cases, the appliance must be
sent to the nearest approved after-sales
Service Centre, since special tools are
needed to carry out all repairs.
• If the power supply cable is damaged,
it must be replaced by the manufacturer, approved service centre or a similarly qualified person to avoid any danger.
• Burns may be caused by touching the
hot surface of the appliance, the hot
water, steam or food.
• Do not place the appliance near a wall
or cupboard. The steam produced may
cause damage.
• To avoid burns, remove the lid gently,
keeping away from the inside of the lid
and letting the steam escape gradually.
• Do not touch the appliance when it is
producing steam. Use a cloth to remove the lid, rice bowl and steam bowl.
• Do not touch food inside the steam co-
oker directly.
• Do not move the appliance with hot li-
quid or food inside.
• This appliance is designed for domes-
tic use only. In the case of professional
use, inappropriate use or failure to
comply with the instructions, the manufacturer takes no responsibility and
the guarantee does not apply.
Page 12

S.A. SEB SELONGEY CEDEX • RC. DIJON B 302 412 226 • REF. 5060382
CONCEPTION GRAPHIQUE : AVANT PREMIÈRE / RÉALISATION : adhoc.studio@wanadoo.fr
 Loading...