

POWER II
TM
OWNER'S MANUAL
Patent applies.
Height / Weight Capacity:
Max 6'6" / 300 lbs. (198 cm, 136 kg)
!
T o reduce the risk of burns, fire, electric shock, or injury to persons:
DANGER - Electrical Hazards
• ONLY connect this appliance to a properly grounded outlet. See "REQUIRED GROUNDING PROCEDURES" below.
• ALWAYS unplug before cleaning, putting on or taking off parts.
• NEVER operate this appliance if it has been dropped or damaged, or it has a damaged cord or plug.
• DO NOT attempt to fix this appliance if damaged or malfunctioning. Contact the manufacturer for troubleshooting and
evaluation. USA & Canada: (800) 847-0143, (253) 840-5252, International +1 (242) 362-1001.
• NEVER operate the appliance with the air opening blocked.
• DO NOT operate where aerosol (spray) products are being used or where oxygen is administered. Normal internal
motor sparking could ignite these gases.
• DO NOT use outdoors.
• DO NOT leave unattended when plugged in.
REQUIRED GROUNDING PROCEDURES:
Connect this product to a properly grounded outlet only. Grounding protects you if certain components fail.
• The 3-prong grounding plug provided with this product must be plugged into an outlet that is properly grounded in
accordance with all local codes and ordinances. A qualified electrician can verify the outlet is properly grounded.
• If the 3-prong plug will not fit in the outlet, DO NOT modify the plug or use an adapter. Have a proper outlet installed by a
qualified electrician.
• This product is for use on a nominal 220-volt circuit. (Unless otherwise specified due to special order)
WARNING
!
It is your responsibility to familiarize yourself with the proper use of the equipment and the inherent risks of inversion, such as
falling on your head or neck, pinching, entrapment or equipment failure
WARNINGS COULD RESULT IN SERIOUS INJURY OR DEATH.
Restrictions on Use
DO NOT use the equipment without a licensed physician's approval. Carefully review the following list of medical
•
contraindications for inversion with your licensed physician:
· Middle ear infection · Conjunctivitis · Recent stroke or transient ischemic attack
· Extreme obesity · High blood pressure · Bone weakness (osteoporosis)
· Pregnancy · Hypertension · Recent or unhealed fractures
· Hiatal hernia · Heart or circulatory disorders · Medullary pins
· Ventral hernia · Spinal injury · Surgically implanted orthopedic supports
· Glaucoma · Cerebral sclerosis · Use of anticoagulants (includes high aspirin use)
· Retinal detachment · Acutely swollen joints
• DO NOT use if you are over 6'6" (198 cm ) or 300 lbs (136 kg). Structural failure could occur or head/neck may impact the
floor during inversion.
DO NOT modify the equipment or use accessory attachments that are not recommended by the manufacturer. Utilize the
•
equipment for its intended purpose only.
• This product is not intended for use in public facilities.
Precautions Before Using
DO NOT use the inversion table until you have thoroughly and carefully read the Owner's Manual, reviewed all other
•
accompanying documents, and inspected the equipment.
NEVER allow children to use the equipment unsupervised.
•
• DO NOT operate equipment while under the influence of drugs, alcohol, or medication that may cause drowsiness or
disorientation.
ALWAYS inspect the equipment prior to use. Make sure that all fasteners are secure and that the equipment is located
•
on a level surface.
ALWAYS replace defective components immediately and/or keep the equipment out of use until repair.
•
ALWAYS wear securely tied lace-up shoes with a flat sole, such as a normal tennis style shoe. DO NOT wear shoes
•
with thick soles, boots, high-tops or any shoe that extends above the anklebone.
• In the event of a power outage during use, this table requires the use of a hand crank to return to an upright position. All
first time users should practice manual cranking to an upright position with a spotter until comfortable with the
procedure. Users who are not able to successfully utilize the hand crank should
• Refer to additional warning notices posted on the equipment.
Precautions During Use
DO NOT use aggressive movements, or use weights, elastic bands or any other exercise or stretching device while on
•
the inversion table.
ALWAYS keep hands and fingers away from moving parts to avoid injury. DO NOT drop or insert objects into any opening.
•
IMPORTANT SAFETY INFORMATION
• First time users should use a spotter to ensure they are comfortable with the operation of the table.
. FAILURE TO FOLLOW INSTRUCTIONS OR HEED
(This is not an exhaustive list, it is intended only for reference)
NEVER use the unit without a spotter.
DO NOT REMOVE FROM TABLE
INTRODUCTION TO INVERSION
Inversion reverses the natural pull of gravity on the body, using your own body weight to apply
a decompressive stretch for your joints and muscles. Inversion is a passive activity that you
can do easily at any time of the day to give you the benefits of decompression, stretching,
relaxation and improved flexibility and posture.
For a more active workout, the Power II will rotate to full inversion*. Controlled stretching and
exercise in full inversion can help build muscle strength and flexibility.
* Definition of full inversion: Hanging completely by your ankles with your back free from the
table. DO NOT attempt full inversion until you are comfortable with partial inversion.
!
W ARNING - Tip-Over Hazard
The equipment is structurally rated at a capacity of 6'6" (198 cm) or 300 lbs (136 kg). However,
please confine all inverted activities to smooth movements. Aggressive exercises, which involve
a lot of body movement, can cause the table to tip-over resulting in serious injury or death!
PRIOR TO USE
Press the rotation control button to make sure that the table rotates smoothly to the fully inverted position and back.
USING THE GRAVITY LOCK SYSTEM
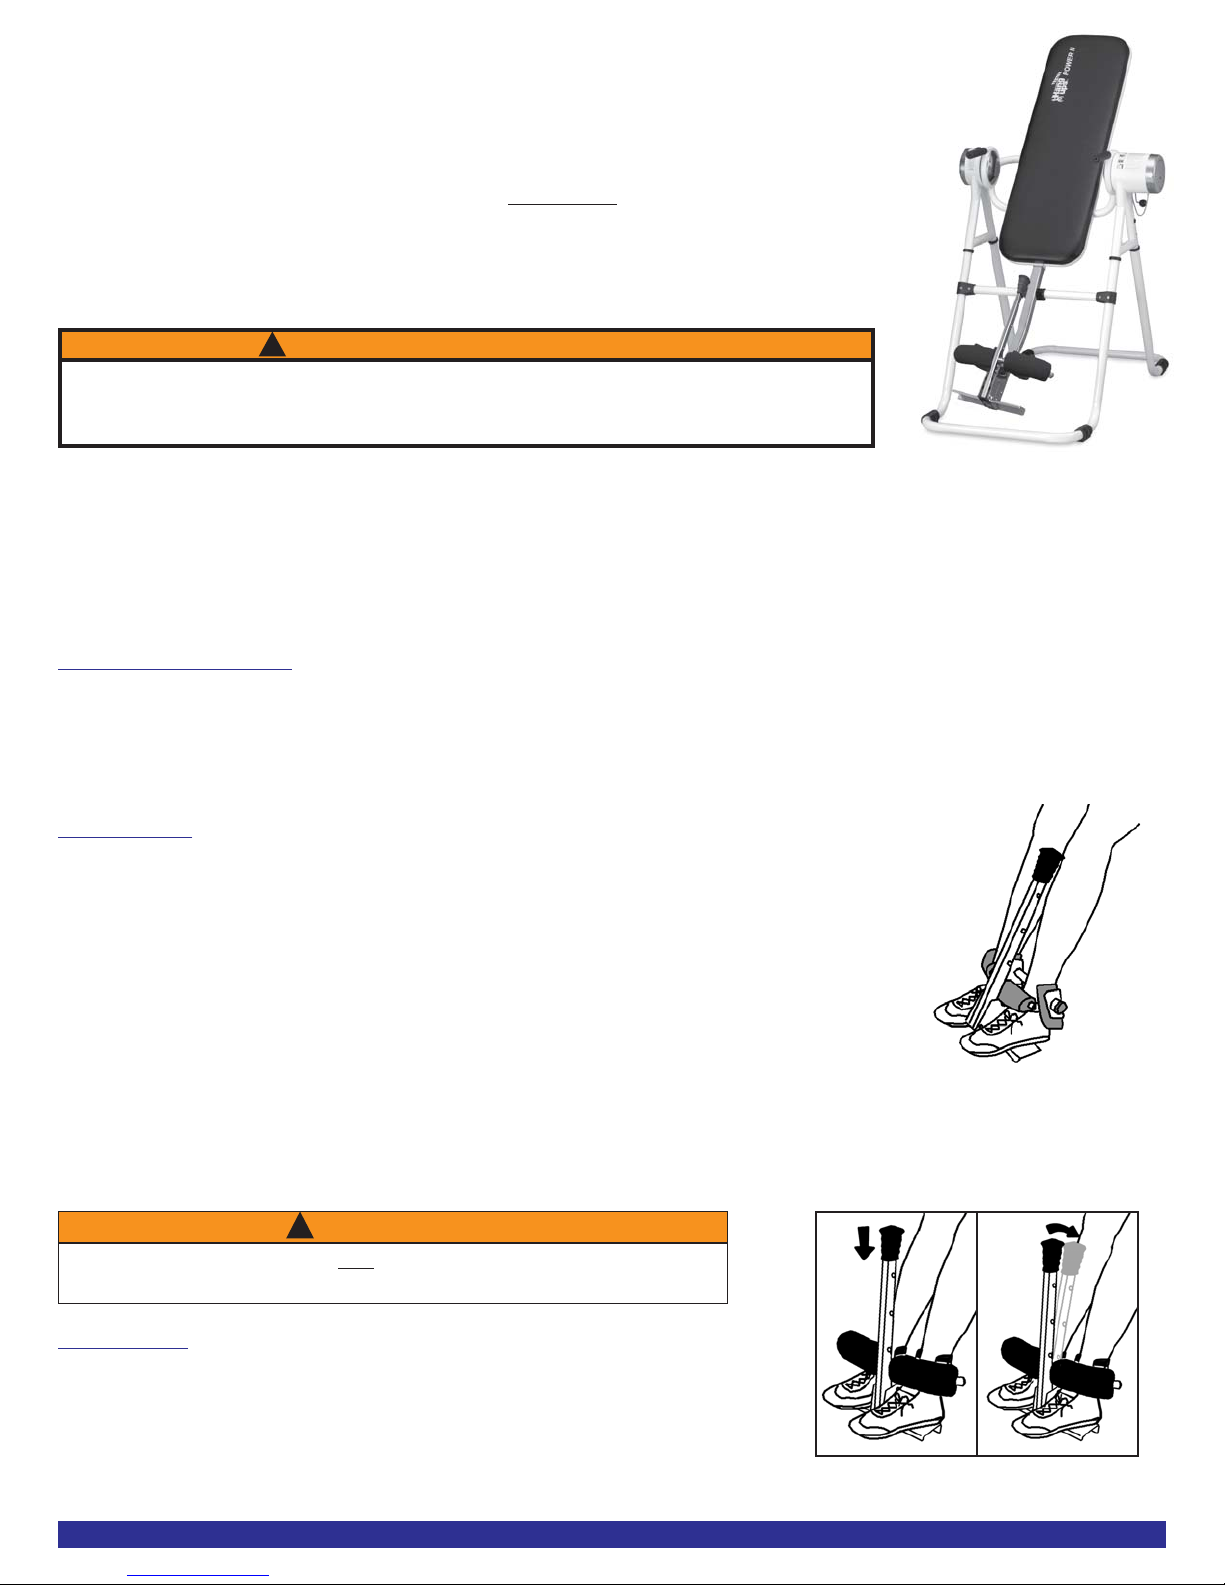
1. Preparing to Mount:
• ALWAYS wear securely tied lace-up shoes with a flat sole, such as a normal tennis style shoe. DO NOT wear shoes
with thick soles, boots, high-tops or any shoe that extends above the anklebone, as this type of footwear could interfere
with properly securing your ankles.
• Push down on the knob of Gravity Lock Handle, close slightly, then push open-this allows the locking
system inside the Gravity Lock Housing to disengage.
2. Mounting:
• Slide your ankles between the foam ankle clamps, resting your feet on the Foot Platform.
• Press your ankles back firmly against the rear ankle clamps.
• Rotate the top of the rear clamps slightly inward toward your ankles - this will increase your
comfort while inverting.
• Pull the Gravity Lock Handle toward you. Make sure your pant legs do not interfere with
obtaining a secure closure.
• Adjust the ratchet handle to make sure both the front and rear ankle clamps are snug against
your ankles. (See Figure 2)
IMPORTANT!
Jiggle the Gravity Lock Handle from front to back to make sure the foot clamps are locked securely. ALWAYS carefully
check to be certain the Gravity Lock Handle is locked securely each time you use your inversion table and make sure
that both the front and rear ankle clamps are snug against your ankles or you could fall when the table inverts.
!
W ARNING
Failure to lock the foot clamps fully could result in serious injury or death!
DO NOT deviate from these instructions.
Figure 2
3. Unlocking
• Push down the knob of the Gravity Lock Handle. (See Figure 3)
• Pull the Handle toward you slightly, allowing the spring locking system inside
the Gravity Lock Housing to disengage. (See Figure 3A)
• Push out so that you have enough room to slide your feet out from between
the Ankle Clamps .
Owner's Manual II-L256 Pg. 2
Figure 3
Figure 3A

INVERTING
Precautions:
• When first using the inversion table, do not go to full inversion. To start, invert to only 15-
20 degrees
angle. Refer to "Important Details Regarding Inverting" on the next page.
• Use a spotter for your first few inversion sessions until you are comfortable with the
operations of the table.
• This table requires hand cranking to an upright position in the event of a power outage
during use. (See "Emergency Power Outage Directions" below). PRACTICE manual
cranking to an upright position with a spotter until you are comfortable with the
procedure. Users who are not able to successfully hand crank to an upright position
should
How to Use:
• ENSURE there is clearance for the table to rotate without contacting other objects or
people.
• TO INVERT, push rotation control button in direction of your head.
• TO RETURN UPRIGHT, press rotation control button in direction of your feet.
Keep elbows clear of the Rear Frame when returning from the fully-inverted position in
order to avoid catching your arm between the Rear Frame and the table while the table
rotates. (See Figure 6) Rest at the horizontal position for a moment prior to returning to
upright position.
(see Figure 4) until you feel comfortable enough to progress to a greater
NEVER use the unit without a spotter.
(See Figure 5)
Figure 4
Figure 5
Emergency Power Outage Directions:
• If a power failure occurs, please remain calm.
• Reach for the emergency crank attached to the motor housing. (See Figure 7)
• Insert the emergency crank into the hole on the motor housing and turn the crank
clockwise to rotate the table upright.
For information about the Teeter Hang Ups® 2-year warranty, to order replacement labels or manuals,
or if you have any problems assembling the equipment or questions about its use, please contact
Customer Service at the appropriate location below:
International:
Inversion International, Ltd.
PO Box: AP 59245
New Providence Island, Bahamas
(Phone) +1-242-362-1001
(Fax) +1-242-362-1002
(email) Info@InversionInternational.com
(web) www.InversionInternational.com
Patent applies.
Teeter Hang Ups® is a registered trademark of STL
International, Inc. and Inversion International, Ltd.
Specifications subject to change without notice.
© COPYRIGHT 2006, STL International, Inc. and
Inversion International, Ltd.
International Law Prohibits Any Copying, 01/06-3
USA & Canada:
STL International, Inc.
9902 162nd St. Ct. E.
Puyallup, WA 98375
(Phone) 800-847-0143
(Fax) 800-847-0188
(email) Sales@STLIntl.com
(web) www.STLIntl.com
Figure 6
Figure 7
Europe:
Teeter Ltd.
Cygnet House, Sydenham Road
Croydon, Surrey CR0 2EE
United Kingdom
(Phone) +44-20-8667-0060
(Fax) +44-20-8680-3999
(email) mail@T eeterLt d.com
(web) www.TeeterLtd.com
Owner's Manual II-L256 Pg. 3

OWNER'S MANUAL
IMPORTANT DETAILS REGARDING INVERTING
Begin Slowly:
• To start, invert only 15 - 20 degrees for a week or more until you get used to it.
• Stay down as long as you are comfortable, even if only a few seconds at first.
Make Changes Gradually:
• Increase the angle in small increments only if it is comfortable to you. You
can gain all the benefits of inversion without ever inverting beyond 60 degrees.
Muscle stretching and relaxation can be realized at as little as 20 degrees.
• You may want to increase your routine from 1-2 minutes to 5 or more over time
- just listen to your body. Remember, this is not a no pain, no gain situation!
Pay Attention to What Your Body Tells You:
• Remind yourself that your body is unique and it will tell you what is good for it.
• Pause at horizontal when returning upright - dizziness after a session is a sign
that you should take more time to let your body readjust.
• Wait for a while after you've eaten before you invert.
• If inversion makes you nauseous, don't fight it. Come up as soon as you feel queasy, even if after only a few seconds.
Give it time--it may take weeks or months before your inner ear gets used to inverting.
Moving While Inverted is Helpful:
• Add gentle stretching and light exercises only after you are comfortable with inversion. Movement while inverted may
help make inversion a more comfortable experience and may help joints to realign and muscles to stretch and relax.
• Movement may be accomplished either by intermittent or rhythmic traction or by stretching and exercise:
Intermittent traction consists of 1-2 minutes inverted and a half minute up, to
be repeated as long as is comfortable at angles that are comfortable for you.
Rhythmic traction is a more evenly spaced moving down and up.
Stretching can be done at partial inversion (torso rotation) or at full inversion
(torso rotation, back extension and flexion).
Exercise should only be performed from the fully inverted position. Crunches,
full-range sit-ups and squats provide a great way to strengthen muscles with
virtually no loads to your joints.
Keep elbows close to the body while exercising to avoid impact with the
Rear Frame. DO NOT use weights, elastic bands or any other exercise or
stretching device while on the inversion table. Confine all inverted
activities to smooth movements. Aggressive exercises, which involve a lot
of body movement, can cause equipment to tip over resulting in serious
injury or death.
Do It Regularly:
• Make inversion a regular routine and integral part of your life...that is how
you will experience the most benefits!
© COPYRIGHT 2006, STL International, Inc.
International Law Prohibits Any Copying, 01/06-3
Owner's Manual II-L256 Pg. 4
 Loading...