

Teeter Hang Ups Over EZ Assembly Instructions Manual
Over EZ
Over EZ
Notice de montage
pour les tables pour inversion vertébrale T eeter Hang Ups
Trainingshandgrif fe für T eeter Hang Ups Inversionsbänke
Trainingshandgrepen voor Teeter Hang Ups Inversietafels
Instrucciones de montaje Manillas de entrenamiento
TM
Handles for T eeter Hang Ups Inversion Tables
Montageanweisungen Over EZ
Instructies voor de Montage
Over EZ
TM
T raining Handles
English
Assembly Instructions
Francois
Poignées d’entraînement Over EZ
Deutsch
TM
Nederlands
Over EZ
Espanol
TM
di Inversione T eeter Hang Ups
TM
TM
Maniglie di addestramento di Inversione T eeter Hang Ups
Instucoes de Montagem Manipulos de Treinamento Over EZTM parra pranchas
Italiano
Instruzioni di montaggio Over EZ
Portuguese
de Inversao T eeter Hang Ups
TM
II-L577
ASSEMBLY INSTRUCTIONS
TM
Over EZ
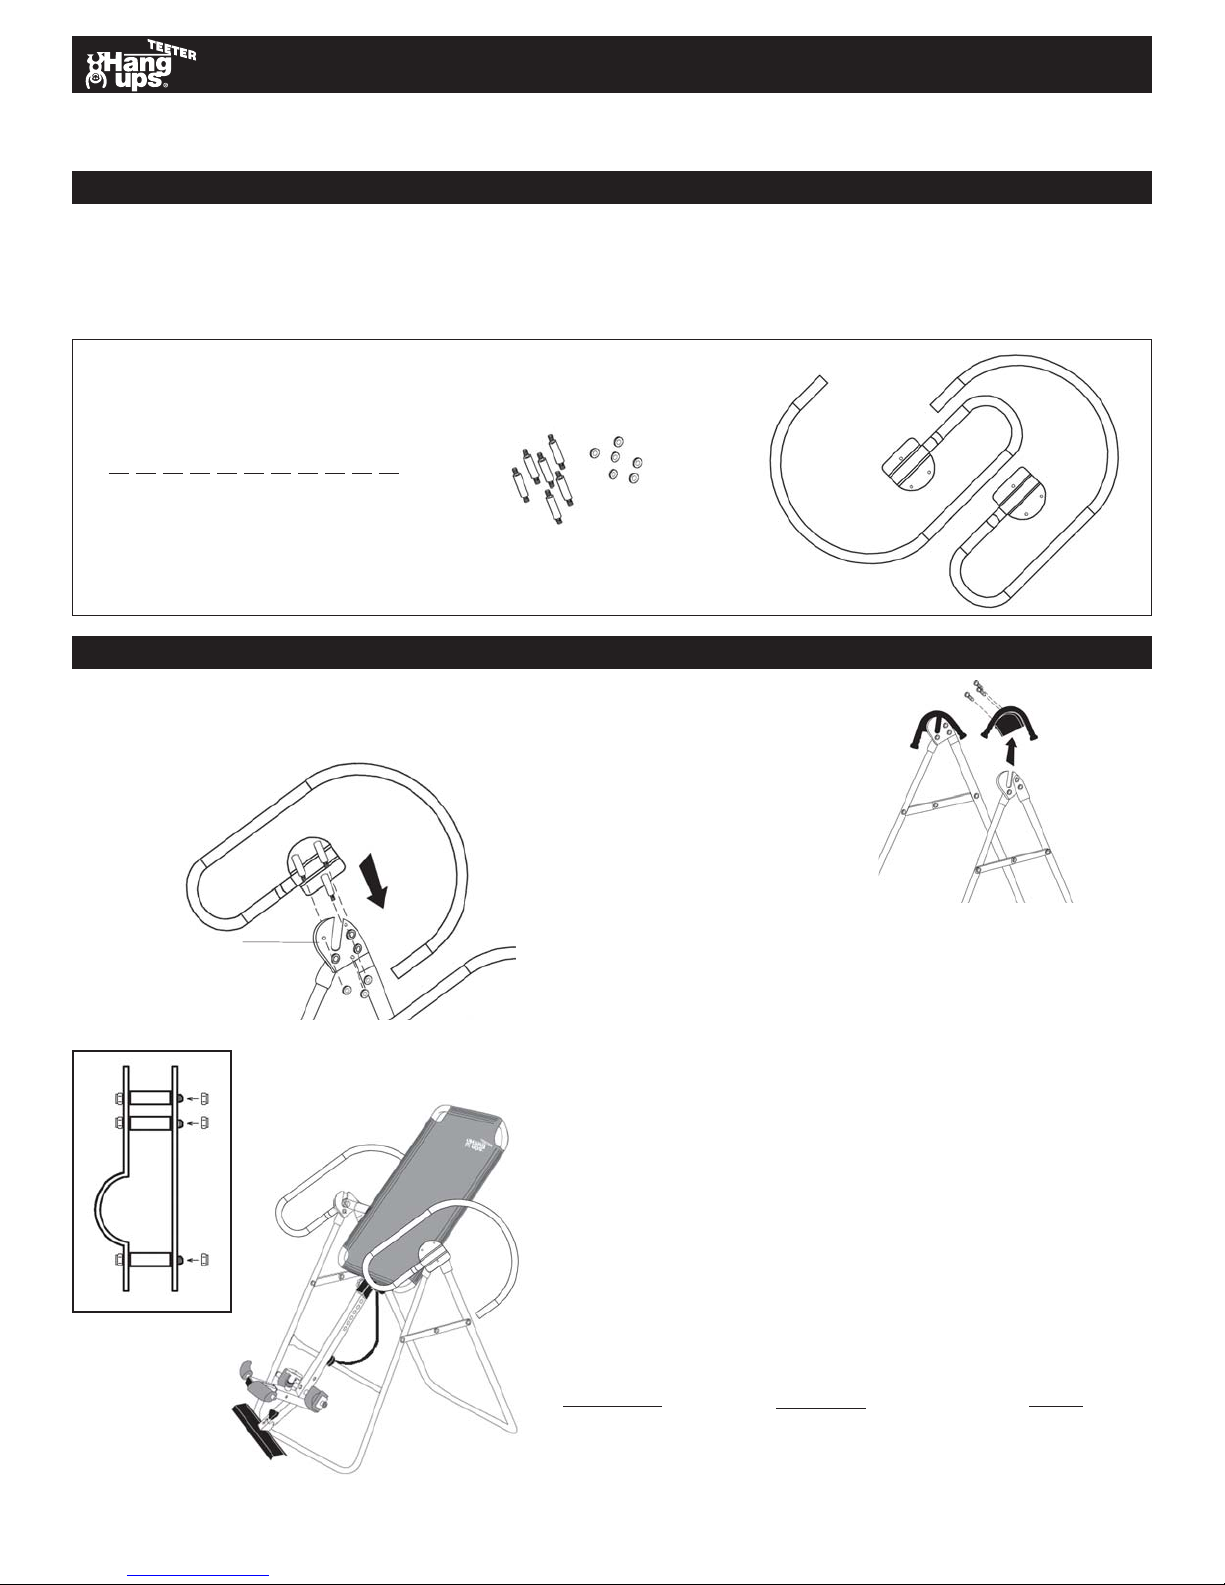
PRE-ASSEMBLY
The Over EZTM Training Handles are an optional accessory to be used with T eeter Hang Ups® F-series Inversion T ables and are
designed to assist novice inverters much like training wheels for a bicycle! Once you are comfortable using the inversion table
(for proper balancing instructions, please refer to the Owner’s Manual attached to your inversion table), you can choose to use
either the Over EZ
BEFORE ST ARTING to assemble your Over EZTM Training Handles,
remove all of the individual parts from the carton. You should
have the following items:
ITEMS FOR ASSEMBL Y ITEM #’ s
Double-ended
Threaded Bolts (6) F5-1128
Locking Nuts (6) H1-3013
Left Handle F5-1 117
Right Handle F5-1 116
ASSEMBLY
TM
Training Handles or convert back to the standard handles that come with the F-series Inversion T ables.
Training Handles
H1-3013
F5-1128
Note: The Double-ended Threaded Bolts
and Locking Nuts arrive pre-assembled on
the handles.
F5-1117
(Left)
F5-1116
(Right)
T o assemble the Over EZTM Training Handles:
1) First remove the standard hand grips from the A-frame (if they are already assembled).
See Figure 1.
Right
Figure 2
Rear of
A-frame
Hinge plate
2) Remove the three inside Locking Nuts (H1-3013) from the
Figure 2A
Front of
A-frame
Left
Double-ended Threaded Bolts (F5-1 128) on the Right
Handle (F5-1 116).
3 ) Line up the Right Handle with the hinge plate on the
right side of the A-frame, inserting the Double-ended
Figure 3
Threaded Bolts into the corresponding holes in the hinge
plate. See Figure 2.
4) Secure the handle with the three Locking Nuts, tightening
the Locking Nuts with a 10 mm wrench or pliers. See
Figure 2A for proper assembly .
5) Repeat S teps 2-4 with the Left Handle.
Figure 1
Teeter Hang Ups® is a registered trademark of STL International, Inc., Inversion
International, Ltd. and Teeter Ltd.
© COPYRIGHT 2006, Inversion International, Ltd. and Teeter Ltd.
International Law Prohibits Any Copying II-L578 11/06-3
6) Figure 3 shows the finished assembly .
For information about the Teeter Hang Ups® 5-year warranty, or if you have any
problems assembling the equipment or questions about its use, please contact
Customer Service at the appropriate location below:
USA & Canada:
STL International, Inc.
(Phone) 800-847-0143
nd
9902 162
Puyallup, WA 98375
(Fax) 800-847-0188
Info@STLIntl.com
St. Ct. E.
www.STLIntl.com
International:
Inversion International, Ltd.
PO Box: AP 59245
New Providence Island, Bahamas
(Phone) +1-242-362-1001
(Fax) +1-242-362-1002
Info@InversionInternational.com
www.InversionInternational.com
Cygnet House, Sydenham Road
(Phone) +44-(0)20-8667-0060
Europe:
T eeter Ltd.
Croydon, Surrey CR0 2EE
United Kingdom
(Fax) +44-(0)20-8680-3999
mail@TeeterLtd.com
www .TeeterLtd.com
NOTICE DE MONT AGE
TM
Over EZ
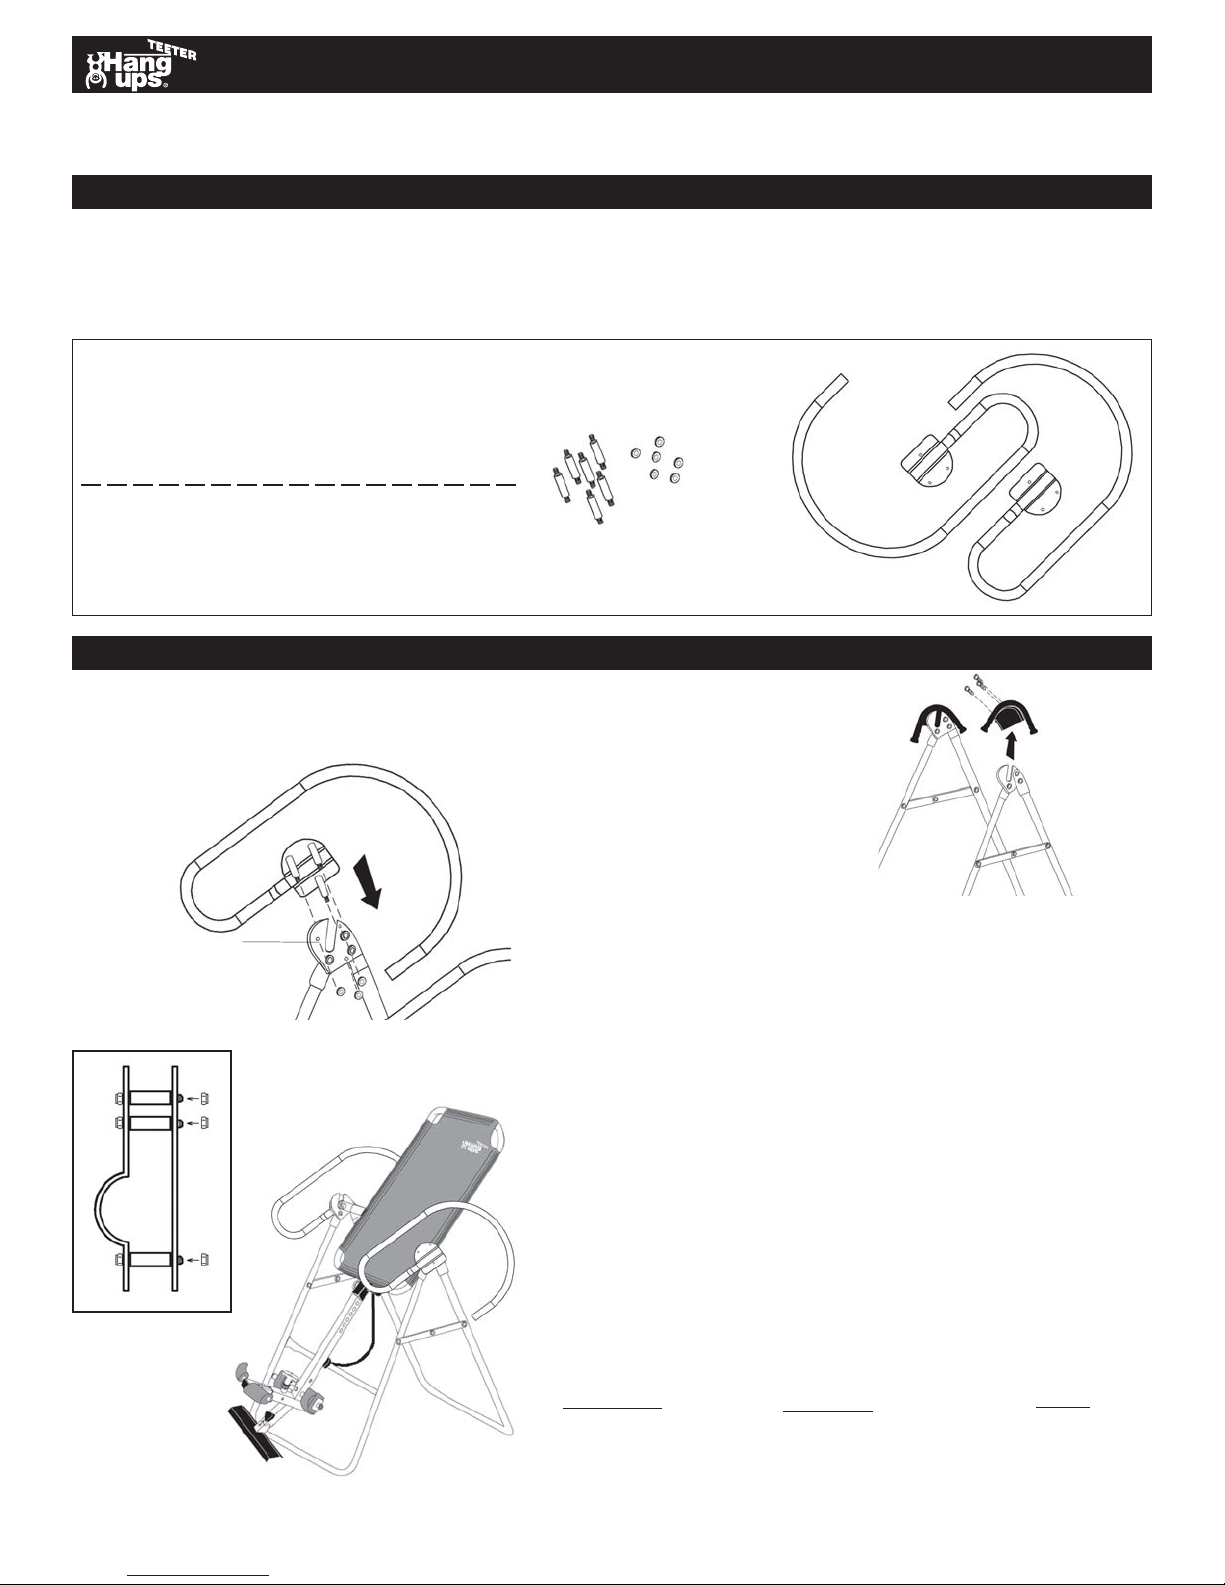
PRE-MONTAGE
Les poignées d’entraînement Over EZTM sont un accessoire optionnel utilisable avec les T ables d’Inversion de la Série F de
T eeter Hang Ups
pour enfant! Une fois à l’aise avec la table d’inversion (pour de plus amples informations sur les instructions pour rester en
équilibre, veuillez consulter le Manuel fourni avec la table), vous pouvez choisir d’utiliser les Poignées d’entraînement Over
EZTM ou bien de passer aux poignées standard fournies avec les Tables d’Inversion de la série F .
A V ANT DE COMMENCER le montage de vos Poignées d’entraînement Over
EZTM, sortez les différentes parties de leur emballage. A l’intérieur , vous
devez trouver les parties suivantes:
PIECES A MONTER # ARTICLE
Boulons filetés bidirectionnels (6) F5-1 128
Ecrou de blocage (6) H1-3013
Poignée gauche F5-1 117
Poignée droite F5-1 116
. Leur fonction est d’assister ceux qui découvrent l’inversion, l’équivalent de petites roues dans un vélo
®
Training Handles
Poignées d’entraînement Over EZ
H1-3013
F5-1128
Note: Les boulons filetés bidirectionnels et
les écrous de blocage sont fournis déjà
montés sur les poignées.
F5-1117
(gauche)
TM
F5-1116
(droite)
MONTAGE
Pour monter les Poignées d’entraînement Over EZTM:
1) S’ils sont déjà montés, enlever tout d’abord les poignées standard de la structure en
A. Voir schéma 1.
Droite
Schéma
Schéma 2A
2
Plaque de
charnière
structure en A
Avant de la
Schéma 3
Arrière de la
structure en A
Gauche
2) Enlever les 3 écrous de blocage intérieurs (H1-3013) des
boulons filetés bidirectionnels (F5-1 128) sur la poignée
droite (F5-1 1 16).
3) Aligner la poignée droite avec la plaque de charnière sur
le côté droit de la structure en A en insérant les boulons
filetés bidirectionnels dans les trous correspondants.
Voir schéma 2.
4) Fixer la poignée avec trois écrous de blocage en les
serrant avec une clé ou une pince de 10 mm. Voir
schéma 2A pour un montage correct.
Schéma 1
Teeter Hang Up s® est une marque déposée de
STL International, Inc., ’Inversion International, Ltd. et d T eeter Ltd.
© COPYRIGHT 2006, Inversion International, Ltd. etd. T eeter Lt d.
Conformément aux lois internationales, toute reproduction est interdite II-L579 11/06-3
5) Refaire les passages 2 à 4 pou la poignée gauche.
6) Le Schéma 3 présente le montage fini.
Pour de plus amples informations concernant la garantie de 5 ans Teeter Hang
Ups® ou si vous aviez des difficultés quant au montage de l’équipement ou à son
utilisation, veuillez contacter le Service Clients aux sièges suivants:
USA & Canada:
STL International, Inc.
(Phone) 800-847-0143
nd
9902 162
Puyallup, WA 98375
(Fax) 800-847-0188
Info@STLIntl.com
St. Ct. E.
www.STLIntl.com
International:
Inversion International, Ltd.
PO Box: AP 59245
New Providence Island, Bahamas
(Phone) +1-242-362-1001
(Fax) +1-242-362-1002
Info@InversionInternational.com
www.InversionInternational.com
Cygnet House, Sydenham Road
(Phone) +44-(0)20-8667-0060
Europe:
T eeter Ltd.
Croydon, Surrey CR0 2EE
United Kingdom
(Fax) +44-(0)20-8680-3999
mail@TeeterLtd.com
www .TeeterLtd.com
 Loading...