

Page 1
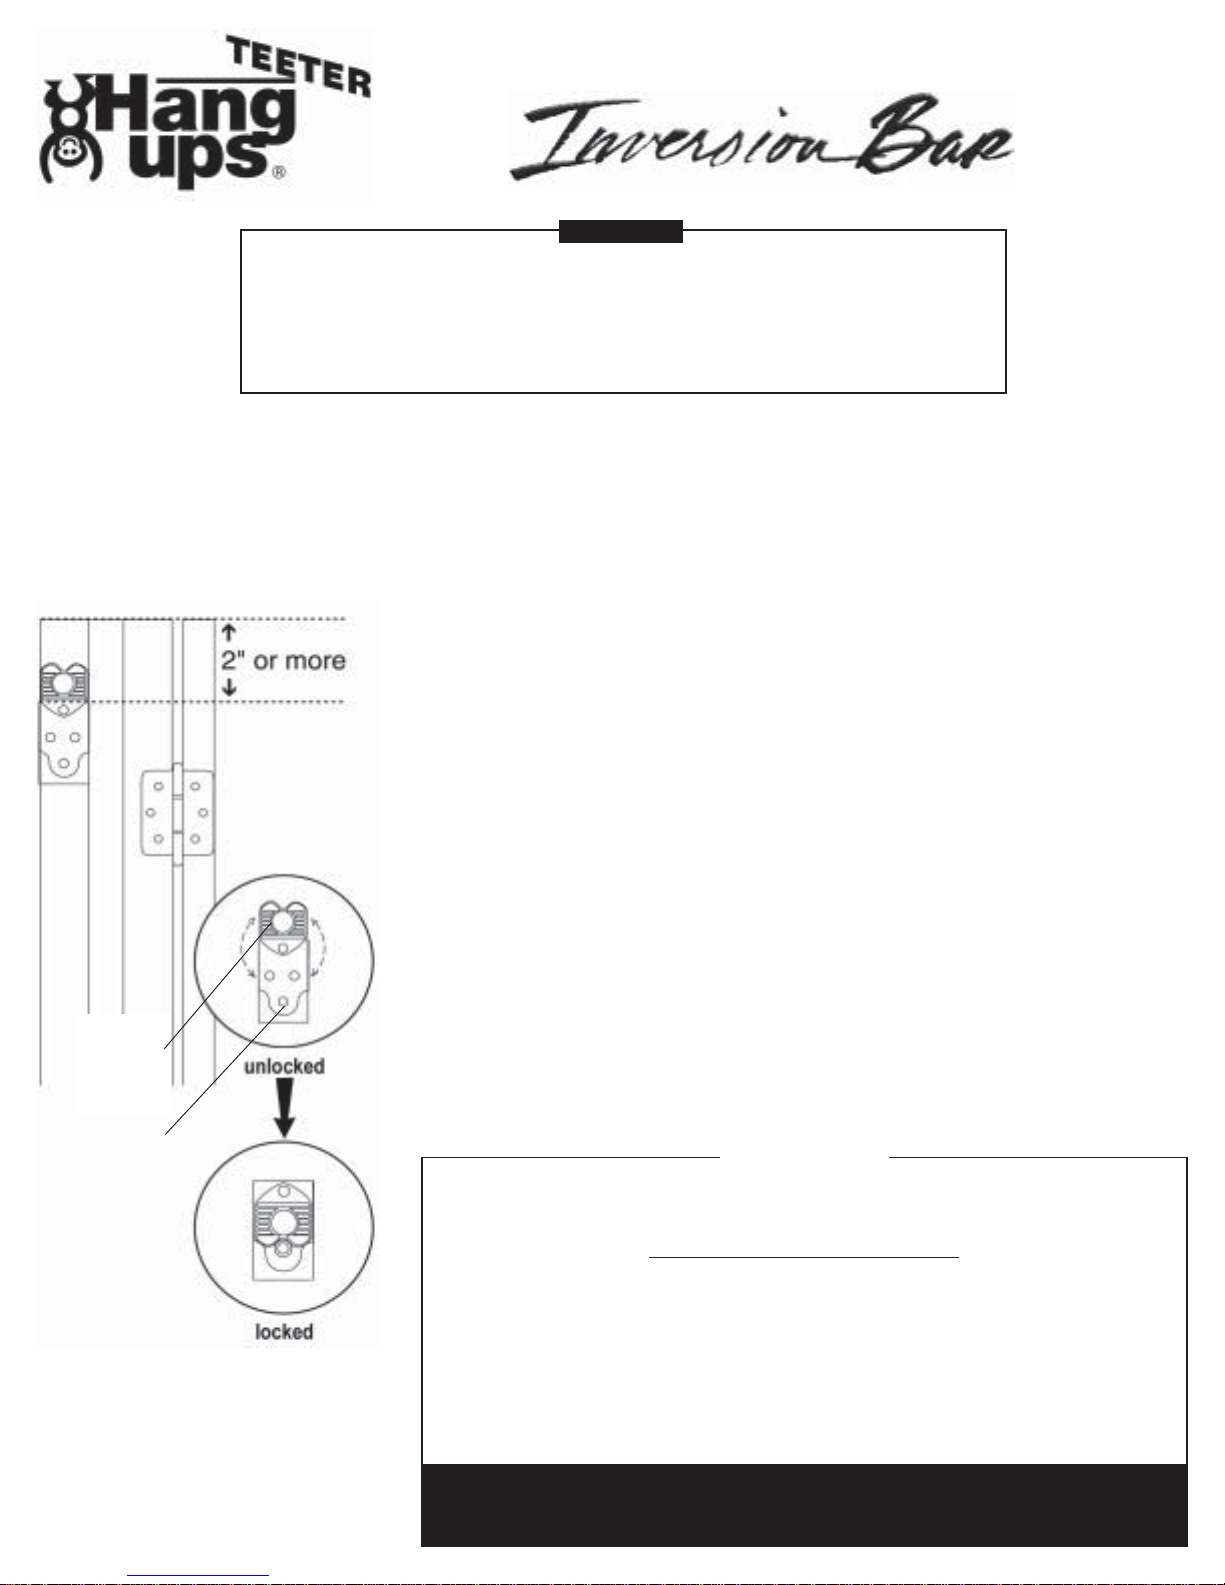
Figure 1
Assembly Instructions
CAUTION!
DO NOT USE THE Inversion Bar IN DOORW A YS WIDER THAN 36” (91 cm).
• Your Inversion Bar is pre-assembled in two halves which slide together to fit in doorways
from 28 to 36 inches (71 cm to 91 cm) wide.
• USE ONL Y in solid wood doorways built according to national building codes. Do not use
in faux or metal doorways.
Installation of Brackets:
• Important: There are two sizes of Locking Brackets, one to fit the large
diameter tube (with blue hand grips) and one to fit the small diameter tube (with
red warning label). The Locking Brackets should mount on the door frame
opposite from the hinged door, to allow use of the equipment without interfer ing with operation of the door.
• Install the first bracket as shown in Figure 1. Place the Locking Bracket
against the doorstop edge, and 2” (5 cm) or more down from the top of the
door frame. CAUTION: Make sure the plastic rotating lock is on top.
plastic
rotating
lock
u-shaped
receiver
Figure 2
• Mark and then drill three 5/32” (3.9 mm) diameter holes and drill at least 2”
(5cm) deep into the door frame.
• Mount the Locking Bracket using the three wood screws provided. YOU
MUST USE THE SCREWS PROVIDED—DO NOT SUBSTITUTE WITH
OTHER LENGTH SCREWS. Screws must fully engage the door frame. (T o
make the installation easier, rub bar soap on the screw threads.)
• Install the second Locking Bracket on the opposite side of the door frame at
the same height as the first Locking Bracket. After both Locking Brackets are
installed, extend your Inversion Bar out to the width of the door frame and
hook the flared tube ends into the u-shaped receiver in each Locking Bracket.
• Lock the Inversion Bar into the Locking Brackets by snapping the plastic
rotating lock over the top of the bar. See Figur e 2. IMPORTANT: Always
check to make sure the tubes are securely locked in place before hanging on
the bar. Failur e to do so could cause serious injur y or death!
WARNING!
FAILURE TO PROPERLY INSTALL THE INVERSION BAR
COULD RESULT IN SERIOUS INJURY OR DEATH.
TO TEST BAR INSTALLATION:
After installing the Locking Brackets and securing the Inversion Bar in place,
two people should hang by their hands from one end of the bar.
While hanging, bounce up and down several times. Next, both people should hang
from the other end of the bar and repeat the test.
IF THE DOOR FRAME IS UNSTABLE OR WEAK, DO NOT CONTINUE
USE OF THE BAR IN THAT DOOR FRAME.
CAUTION: ONL Y ONE PERSON A T A TIME SHOULD USE THE INVERSION BAR FOR
INVERSION. DO NOT ALLOW CHILDREN TO USE UNSUPERVISED.
ATTENTION!
Teeter Hang Ups
Boots, which have been designed specifically for use with the Inversion Bar.
Inversion Bar to be used only with SL SpyderTM Gravity
®
Page 2
Weight Capacity:
User Instructions
Max 250 lbs. /
You have most likely purchased your Inversion Bar in the hope that it will increase your intervertebral dimensions,
decrease pressure on intervertebral discs, stretch and relax your muscles, and temporarily relieve back pain associated
with the listed conditions. You will probably experience all of these benefits and much more. However, Inversion is not
for everyone. Please review the list of contraindications:
CAUTION!
Figure 3
If you have one or more of the above contraindications, you may still be able to invert.
Do n ot us e y ou r Inversion Bar without a licensed physician's approval.
A list of contraindications for Inversion is as follows:
(This is not an exhaustive list, it is intended only for reference).
• Pregnancy
• Hiatal Hernia, Ventral Hernia
• Glaucoma, retinal detachment or conjunctivitis
• High blood pressure, hypertension, recent stroke or transient ischemic attack
• Heart or circulatory disorders for which you're being treated
• Spinal injury, Cerebral Sclerosis, and acutely swollen joints
• Bone weakness (osteoporosis), recent unhealed fractures, medullary pins,
and surgically implanted orthopedic supports.
• The use of anticoagulants, including high doses of Aspirin
• Middle ear infection, and extreme obesity
However, you must first obtain approval from your licensed physician.
113.6 kg
Figure 4
TRY THE ULTIMATE
ABDOMINAL EXERCISE–
THE INVERTED SIT–UP!
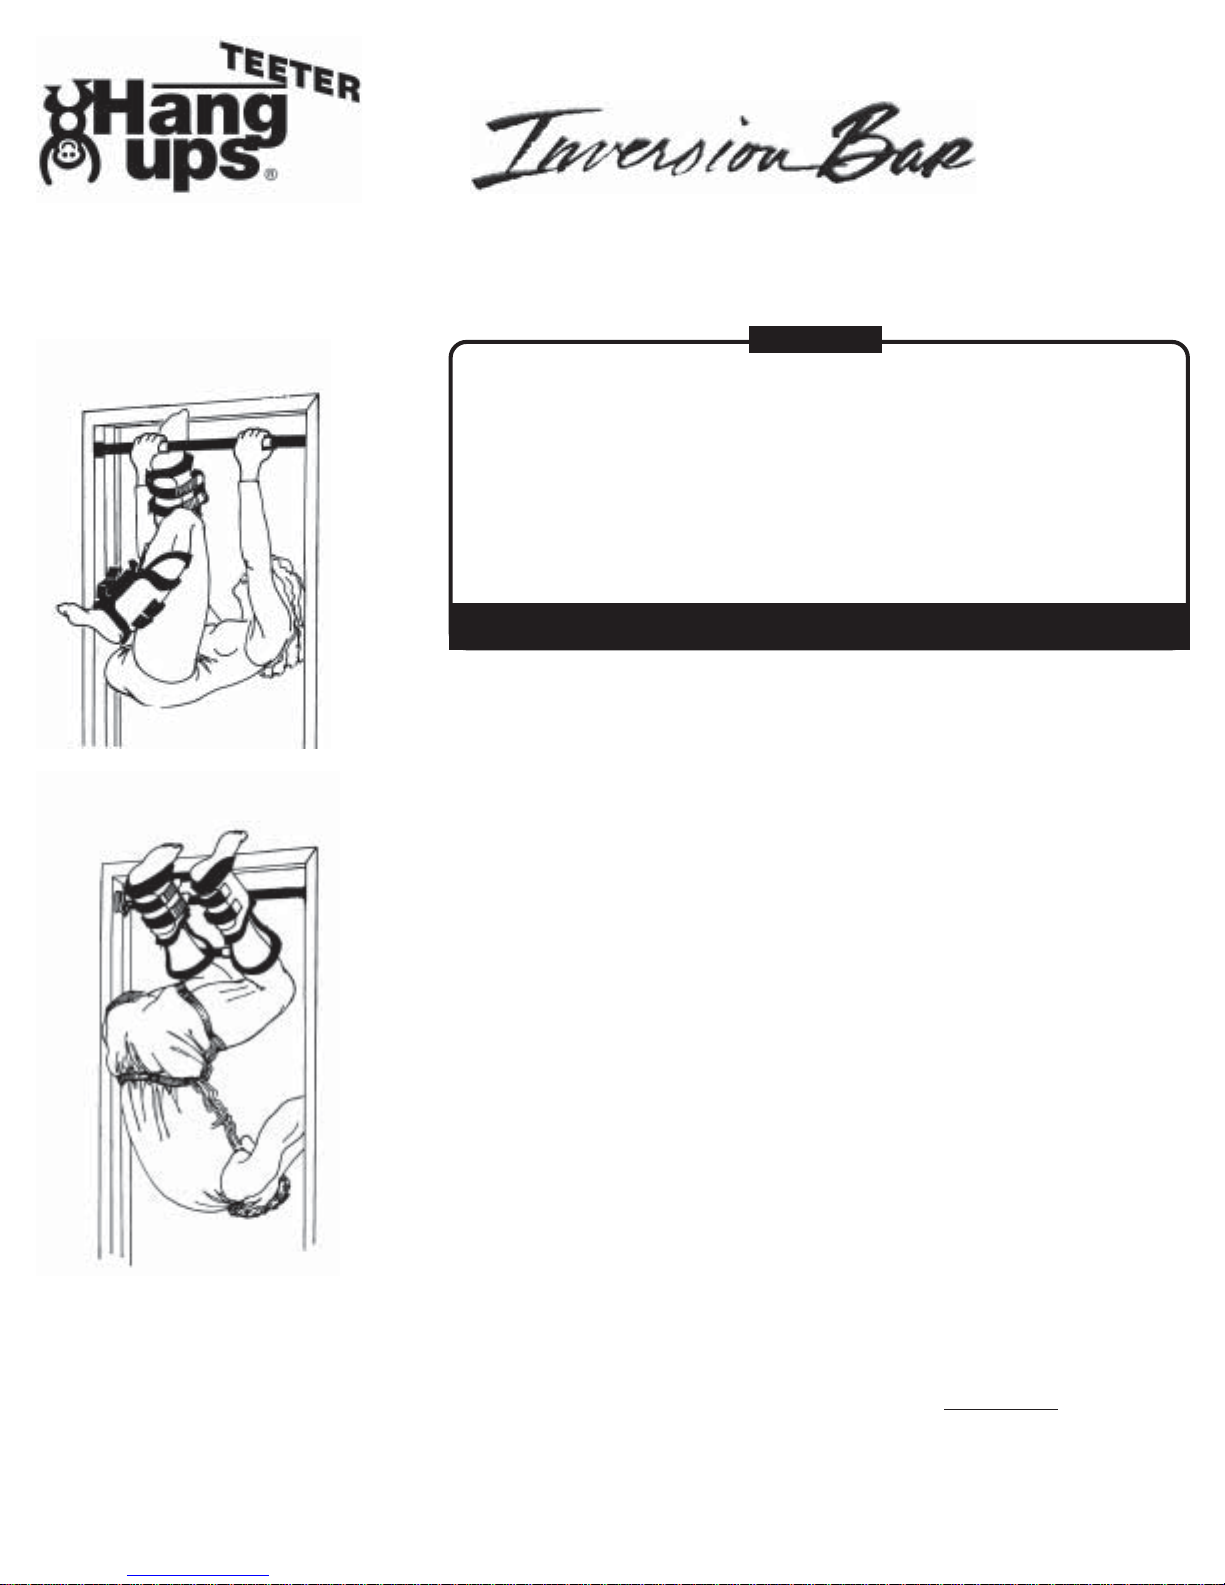
(See Figure 4)
Other Inversion Bar exercises
include: crunches, reverse squats,
twisting and stretching, relaxation
breathing, and chin-ups.
WARNING:
Do not use if you are over 250 lbs. / 113.6 kg.
Never let children use the Inversion Bar unsupervised.
USING THE INVERSION BAR
Make sure to test the bar installation. Failure to test installation could
result in serious injury or death. See Assembly Instructions.
Mounting (See Figur e 3):
• Grasp the bar with both hands. Swing one leg up and place your foot against
the bottom of the bar .
• Raise your other foot up and hook the boot onto the bar.
• Shift your weight to the hooked boot and hook the second boot.
• Slowly lower yourself, using the door jam for support, until you are inverted.
Dismounting:
• Reach your arms up toward the bar. Y ou may need to use the door jam or a
rope tied to the bar to help yourself up.
• Grasp the blue foam grips on the bar. To reduce the chance of dizziness while
getting down, pause for 30 seconds with both hands on the bar while the boots
are still hooked. Relax in this position to stretch the upper back.
• Unhook one boot and place that foot against the bottom of the bar. Shift your
weight to the unhooked foot and unhook the second boot.
CAUTION! Until you are fully confident in your ability to get down from
an inverted position always work with a spotting partner .
This document is intended for use in
the U.S. and Canada only.
For additional languages in Spanish,
French, Dutch, German, or Italian,
please contact Teeter Hang Ups
customer service.
®
Toll Free: (Ph) 800-847-0143 (Fax) 800-847-0188
(Ph) 253-840-5252 (Fax) 253-840-5757
9902 162nd St. Ct. E., Puyallup, WA 98375
©Copyright 2003, STL International, Inc. 03/03-1 #LB1004
USA & Canada
Local / International:
www.teeterhangups.com
 Loading...