

Page 1
R
www.ActiveForever.com
EP-550™/EP-650
Inversion Table Assembly Instructions
A
H
N
G
R
E
T
E
E
T
U
P
S
5
W
A
YEAR
R
Y
T
N
R
A
™
Page 2

BEFORE YOU BEGIN: Review all steps before beginning assembly and read all precautions before using the inversion table. Carefully adhere to the Assembly
Instructions and Owner ’s Manual to help ensure safety and product integrity.
IMPORTANT SAFETY INSTRUCTIONS
READ ALL INSTRUCTIONS BEFORE USING THE INVERSION TABLE.
WARNING
!
WARNING - To reduce the risk of injury to persons:
• Read and understand all the instructions, view the instructional DVD, review all other accompanying documents, and inspect the equipment before using the inversion
table. It is your responsibilit y to familiarize yourself with the proper use of this equipment and the inherent risks of inversion, such as falling on your head or neck,
pinching, entrapment, or equipment failure. It is the responsibility of the owner to ensure that all users of the product are fully informed about the proper use of the
equipment and all safet y precautions.
Close supervision is necessar y when the inversion table is used near children, or by or near invalids or disabled persons.
•
• Use the inversion table only for its intended use as described in this manual. DO NOT use attachments not recommended by the manufacturer.
• NEVER drop or insert any object into any opening.
• DO NOT use or store product outdoors.
• DO NOT use if you are over 6 ft 6 in (198 cm) or over 300 lbs. (136 kg). Structural failure could occur or head/neck may impact the oor during inversion.
• DO NOT allow children to use this machine.
• Keep children, bystanders, and pets away from machine while in use.
• Keep body parts, hair, loose clothing and jewelry clear of all moving parts.
• The inversion table has no user serviceable parts.
• This product is intended for indoor home use only. DO NOT use in any commercial, rental or institutional setting.
• DO NOT use the equipment without a licensed physician’s approval and a review of the medical contraindications, as noted in the Owner’s Manual.
• Failure to assemble and/or use the equipment as directed may void the manufacturer’s warranty on this product and could result in injury or death.
• Choose a level surface for assembling and operating the table.
• Follow each step in sequence. DO NOT skip ahead.
• Make sure that all fasteners are secure.
• ALWAYS test and inspect the table. Make sure the table rotates smoothly to inverted position and back.
• ALWAYS replace defective components immediately and/or keep the equipment out of use until repair.
FAILURE TO FOLLOW INSTRUCTIONS AND WARNINGS COULD RESULT IN SERIOUS INJURY OR DEATH.
SAVE THESE INSTRUCTIONS
Page 3
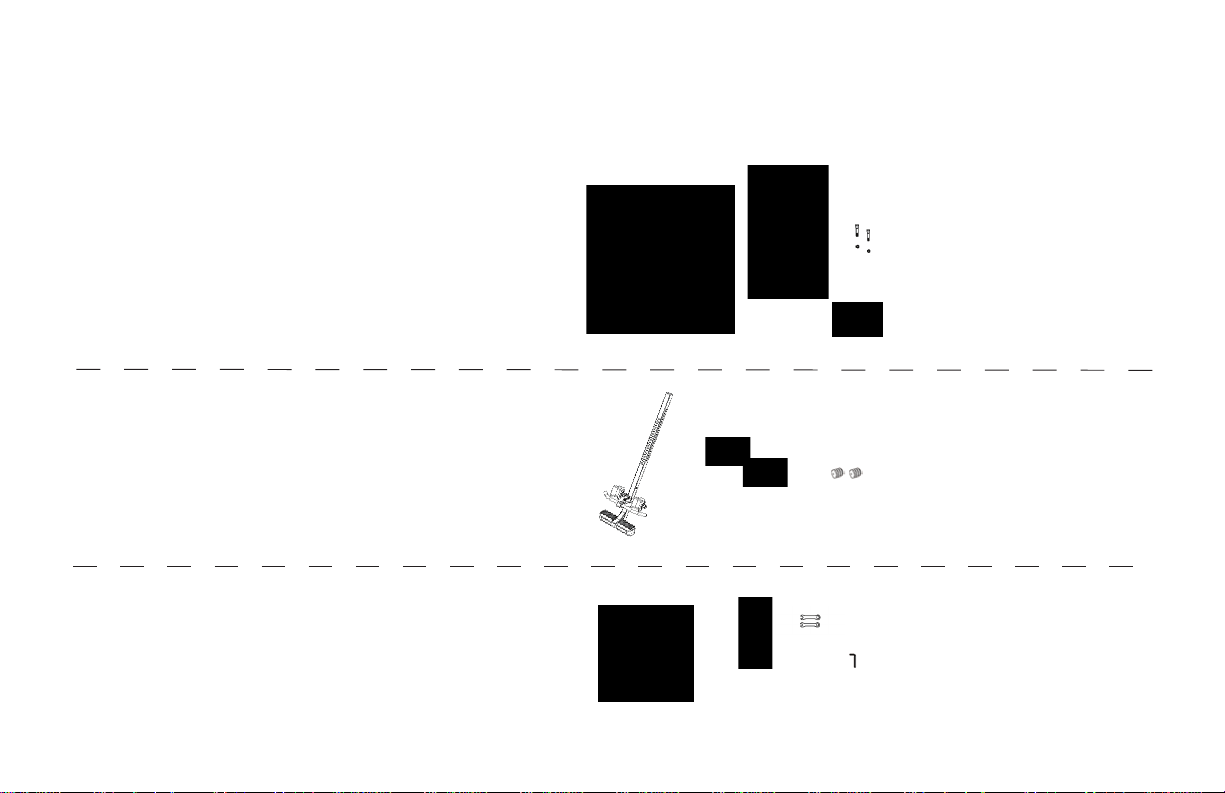
ItemsforAssembly
Carefullyremovetheindividualpartsfromthecarton.Youshouldhavealloftheitemslistedbelow.Ifanyitemsaremissingordamaged,
contact Customer Service at 1-800-847-0143.
ItemsforAssembly ItemNumbers
A-frame Base (F7-1002)
Tether
Table Bed
Assembly
Bolts and Nuts
Head Pillow (EP-1105)
(F5-1007)
(EP-1140)
(EP-1149)
(F5-1007)
(F7-1002)
(EP-1149)
(EP-1140)
(EP-1105)
Main Shaft with
Ankle Lock System
Foam Rollers (2)
Rubber Plugs (2)
Hand Grips
1/2” (13mm)
hex bolts (6)
Roller Hinges (2)
Wrenches (2)
Allen Wrench
(F5-1088)
(IA-1149)
(EP-1120)
(F5-1051)
(F5-1056)
(EP-1120)
(F5-1051)
(F5-1056)
(F5-1069)
(H1-1202)
(F5-1064)
(F5-1069)
(H1-1202)
Bolts may
be packaged
separately or
assembled in
hand grips
(F5-1064)
(F5-1088)
(IA-1149)
Page 4

BeforeBeginning
Before reading further, study the drawing below to familiarize
yourself with the important components of your new Teeter Hang
®
inversion table.
Ups
Table Bed
A-frame
Crossbar
Hand Grip
Main Shaft
Rear and
Front Ankle
Clamps
Adjustable
Foot Platform
Tether Strap
Ankle Locking
Pin
Stability Feet
Page 5

Figure 1
Right
Crossbar
spreader arms
front
Left
back
Step 1
AssembletheA-frameBase(F7-1002)andInstalltheHandles(F5-1069)
• Open the A-frame and make sure the spreader arms are locked, rest the A-frame on the oor (Figure 1). The
Crossbar is at the front.
Place each Hand Grip (left/right) over the outside edge of the corresponding Hinge Plate (Figure 2).
•
•
Insert three 1/2” (13mm) hex bolts (H1-1202) through the hinge plate into each Hand Grip. Use the wrenches
provided to tighten the bolts, being careful not to over-tighten.
Figure 2
Page 6
Step2
Support Beam
Figure 3
Upper Support Arms
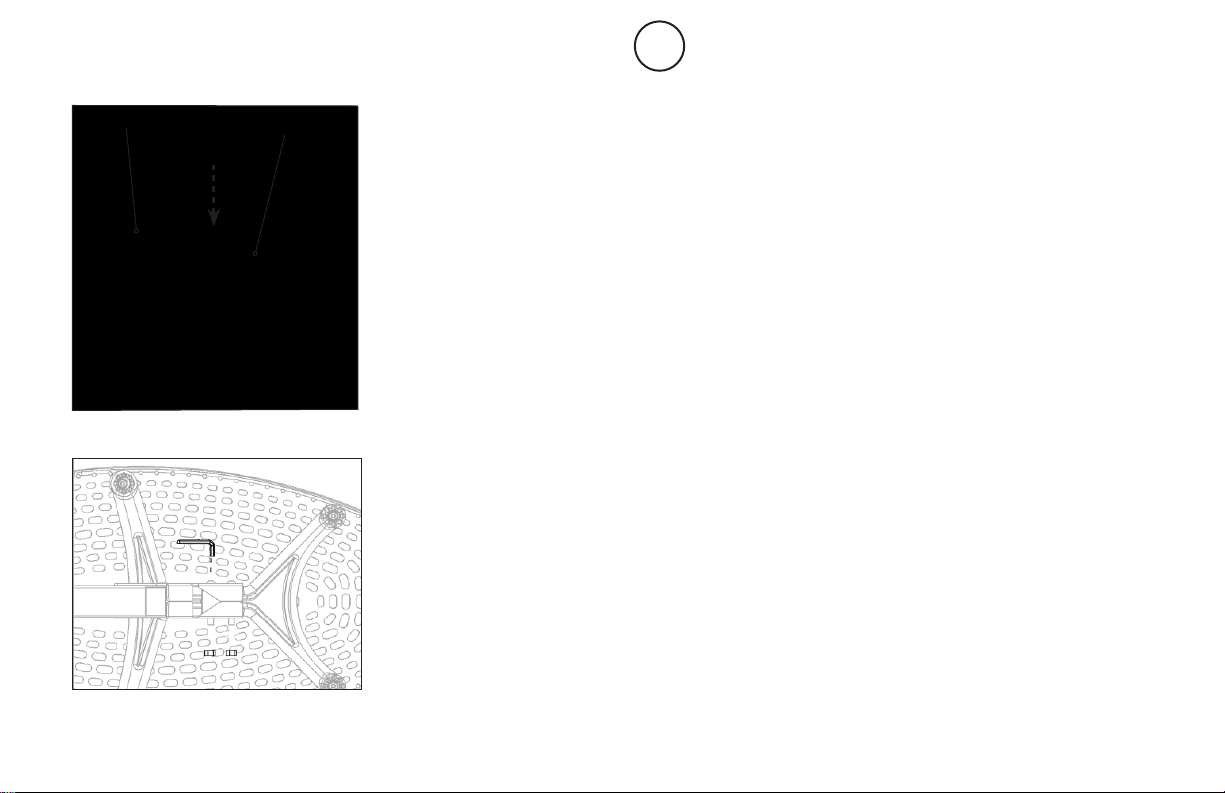
Attach the Upper Support Arms to the Table Bed (EP-1140)
• Before following this step, make sure you have read the orange insert that came attached to the Table Bed.
•
Place the T
evenly with holes at the base of Upper Support Arms (Figure 3). You may have to exert extra pressure to
ensure the Support Beam slides over the rubber spacers.
Insert the two bolts (EP-1149) into the open holes.
•
•
Fasten each bolt with a nut.
•
Use the Allen Wrench (IA-1149) to steady the bolts, tighten the nut onto the bolt with the larger wrench
(F5-1088) (Figure 4). Repeat with the second bolt.
able Bed face down on the oor and push down on the Support Beam, so the two holes align
Figure 4
Page 7
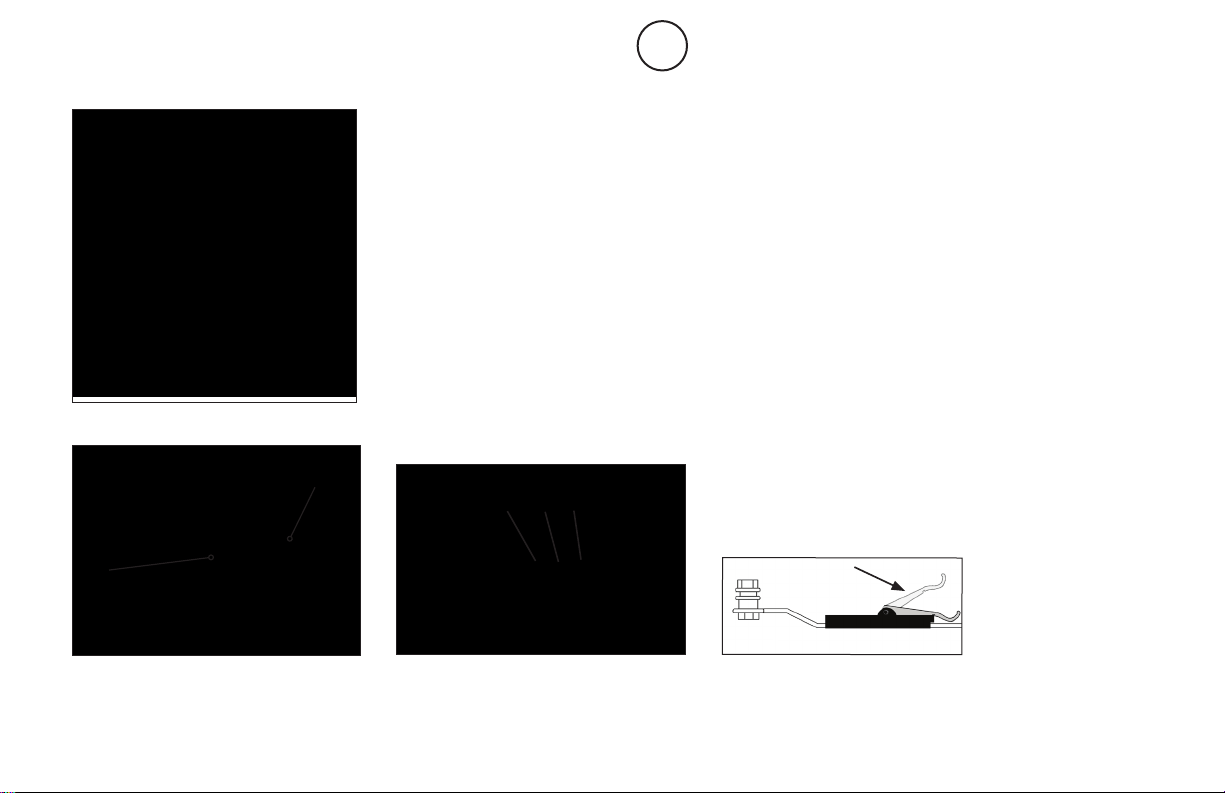
Figure 5
Pivot Pin
Step 3
Install the Roller Hinges (F5-1064) onto the Table Bed (EP-1140)
• For ease-of-assembly, rest the Table Bed against the side of the A-frame (Figure 5).
• Open the Cam Locks on each side of the Table Bed (Figure 5A).
• With the Pivot Pins facing outward, insert the Roller Hinges into the brackets on each side of the
Table Bed. The Roller Hinges must slide between the Cam Locks and the brackets.
• Make sure the Roller Hinges are in the same hole setting on both sides. Figure 6 shows the Roller
Hinges engaged correctly in setting C.
• Push down on the Cam Locks (Figure 6A) to secure the hinges.
NOTE: Refer to the Owner ’s Manual for an explanation of the hole settings. If you are unsure, use
setting C to start.
Cam Lock
A B C
Figure 5A
Figure 6
Figure 6A
Page 8

Figure 7
Step 4
AttachtheTableBed(EP-1140)totheA-frame(F7-1002)
• Holding each side near the Roller Hinges, pick up the Table Bed and stand at the front of the A-frame where the
Crossbar is located. Lower each Pivot Pin into the A-frame hinge plates one at a time (Figure 7). You may need
to push outward on the A-frame in order to slide the second Pivot Pin into the hinge. Figure 8 shows the correct
placement of the Pivot Pin into the hinge plate.
• Make sure that both Pivot Pins are seated at the base of the slot in the hinge plate. Check to make sure that the
self-locking hooks have closed over both Pivot Pins, and the table rotates smoothly (Figure 9).
Figure 8
Figure 9
Page 9

Figure 10
De-rattler Knob
Main Shaft
Housing
Height-Selector
Locking Pin
Crossbar
Step 5
InserttheMainShaft(EP-1120)intotheTableBed(EP-1140)
• Loosen the De-rattler knob on the Main Shaft Housing.
• With the height adjustment settings on the Main Shaft facing up, slide the end of the Main Shaft into the Main Shaft
Housing on the Table Bed.
• Pull out the height-selector locking pin to allow the Main Shaft to slide in farther (Figure 10). For the purpose of
easy assembly, slide in the Main Shaft and release the pin in the last height setting (Refer to the Owner’s Manual
for proper height adjustment before use).
NOTE: The De-rattler knob is an optional accessory that helps prevent a slight shift in the table when you invert.
The security of the product is not compromised if you choose not to tighten the knob.
• The Main Shaft must rest against the Crossbar of the A-frame (Figure 11). The Crossbar prevents the table
from rotating forward when the user steps on the Foot Platform. If the Main Shaft does not rest on the Crossbar
as shown in Figure 11 then the Table Bed has been assembled backwards onto the A-frame and this must be
corrected before use.
Figure 11
Page 10

Figure 12
Figure 12A
Step 6
Install the Front Foam Rollers (F5-1051)
• Slide the Foam rollers over each side of the Front Ankle Bar (Figures 12 and 12A).
• Insert the black plugs (F5-1056) into each open end of the Front Ankle Bar if they are not already assembled.
Page 11
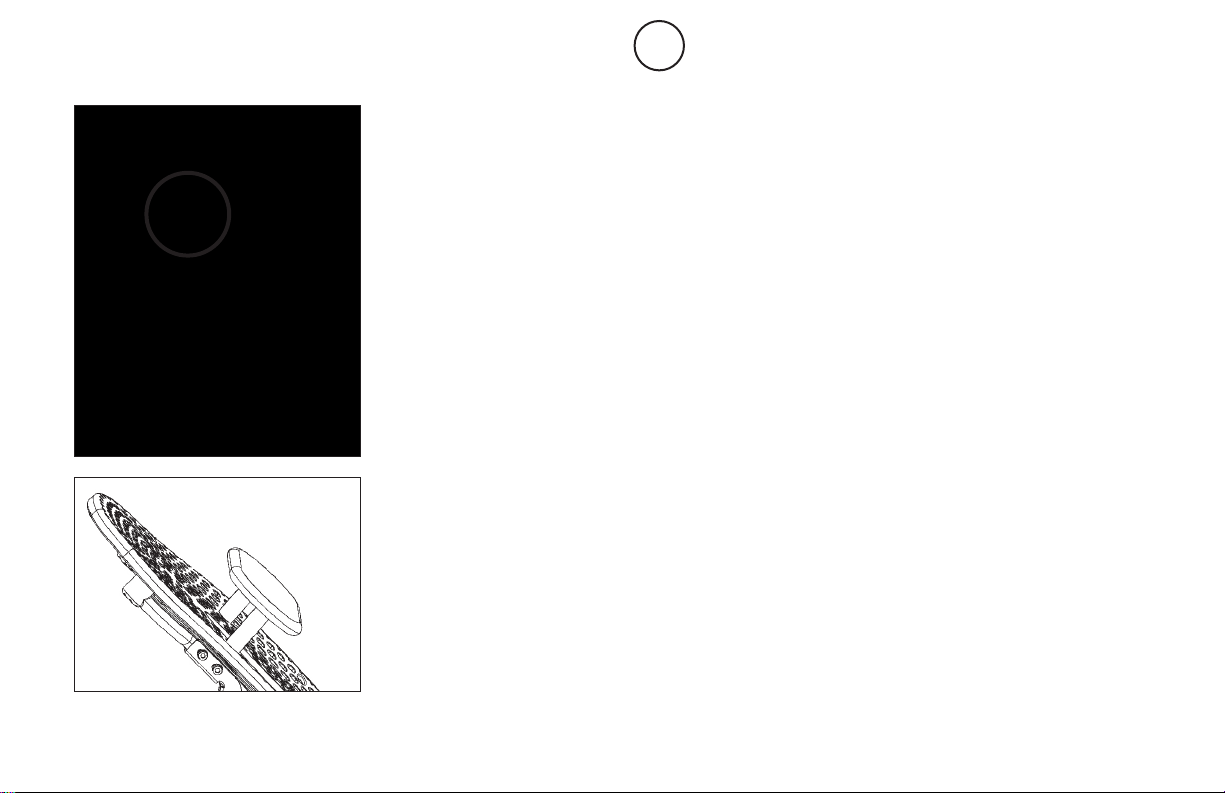
Figure 13
Step 7
AttachtheTetherStrap(F5-1007)toLimittheDegreeofRotation
• Hook the clip at the end of the tether strap to the loop at the base of the table bed (Figure 13) to limit your
degree of rotation.
• Tighten or loosen the strap to restrict or extend your angle of rotation.
AttachtheHeadPillow
• Attach the Head Pillow by securing the Velcro straps through the holes in the Table Bed – the position of the
pillow can be adjusted depending on the user (Figure 14).
Figure 14
Page 12
Figure 15
Step 8
BeforeUse
• Test the table by hand for smooth and steady rotation (Figure 15).
• Ensure that all fasteners are secure.
• Please complete the warranty registration online
• For your reference, the serial number can be found on the back of the Table Bed.
!
WARNING
Read the Owner’s Manual thoroughly before using your Teeter Hang Ups Inversion Table.
Improper settings could result in serious injury or death!
Page 13
Figure 16
Figure 17
A B C
Adjustments / Maintenance / Storage
CHANGING THE ROLLER HINGE SETTING
• Stand with your legs on either side of the Main Shaft.
• Reach under each Roller Hinge with your index ngers. Use your thumbs to release the locks over
the Roller Hinges (See Figure 16).
• Lift both sides of the table out of the A-frame at the same time. You may rest the table on the
Crossbar of the A-frame.
• Unlock the Cam Locks for each Roller Hinge. Change the Roller Hinges to the desired setting
(A, B or C) (Figure 17).
• Re-lock the Cam Locks. Replace the Roller Hinges into the hinge plates of the A-frame.
MAINTENANCE
• To clean the Table Bed, wipe down with a damp cloth. Do not use abrasive cleaners.
STORING THE INVERSION TABLE
• Loosen the De-rattler knob.
• Pull the height-selector locking pin and slide the Main Shaft in all the way to the nal hole setting.
Engage the pin in the storage setting.
• Rotate the table opposite from use until the table has turned 180 degrees and rests against the
Crossbar on the A-frame.
• Pull up on the spreader arms to fold the A-frame (Figure 18). WARNING: This operation may
pinchngersifnotdoneslowlyandcarefully.
Figure 18
!
WARNING
Tipping Hazard: For upright storage, leave A-frame open wide enough to remain stable, or secure to the wall
to prevent tipping. In households with small children, the table should be stored at on the oor, not upright
.
Page 14
Assembly & User Instructions
Conversion Bar
for Teeter Hang Ups® Inversion Tables
PURPOSE: Some users prefer to use the standard ankle clamps provided with the Teeter Hang Ups Inversion Table.
Others prefer to use the Teeter Hang Ups Gravity Boots while inverting. To convert your inversion table for use with
Gravity Boots, you must install the Conversion Bar - failure to do so could result in serious injury or death.
Please carefully comply with the following instructions:
WARNING
!
It is your responsibility to familiarize yourself with the proper use of the equipment and the inherent risks of inversion, such as falling on your
head or neck, pinching, entrapment or equipment failure. FAILURE TO FOLLOW INSTRUCTIONS OR HEED WARNINGS COULD RESULT
IN SERIOUS INJURY OR DEATH.
Restrictions on Use
• DO NOT attempt to use the Conversion Bar with any other inversion table that is not designed specically to be adapted with the
Conversion Bar. The Conversion Bar is to be used only with certain Teeter Hang Ups model inversion tables. Check with the manufacturer
if you are unsure whether or not your inversion table can be modied with the Conversion Bar.
Precautions During Assembly and Before Use
• ALWAYS choose a level surface for assembling the Conversion Bar and operating the inversion table.
• Follow each step in sequence. DO NOT skip ahead.
• DO NOT use until you have thoroughly and carefully read all accompanying documents for the inversion table and Gravity Boots, reviewed
product labeling, and inspected the equipment.
• ALWAYS test and inspect the Teeter Hang Ups Conversion Bar, Gravity Boots and Inversion Table prior to use. Make sure the table
rotates smoothly to inverted position and back. Make sure that all fasteners are secure.
• ALWAYS replace defective components immediately and/or keep the equipment out of use until repair.
Precautions During Use
• ALWAYS wear the Gravity Boots when using the Conversion Bar, making sure the Gravity Boots are fastened securely around the ankles
and checking that the Gravity Boot Hooks are tted properly around the Conversion Bar.
PRE-ASSEMBLY
BEFORE YOU BEGIN: These instructions will guide you in properly assembling and using the unit. Please review all the
steps before beginning assembly. Carefully adhere to these instructions to help ensure user safety and product integrity.
ASSEMBLY
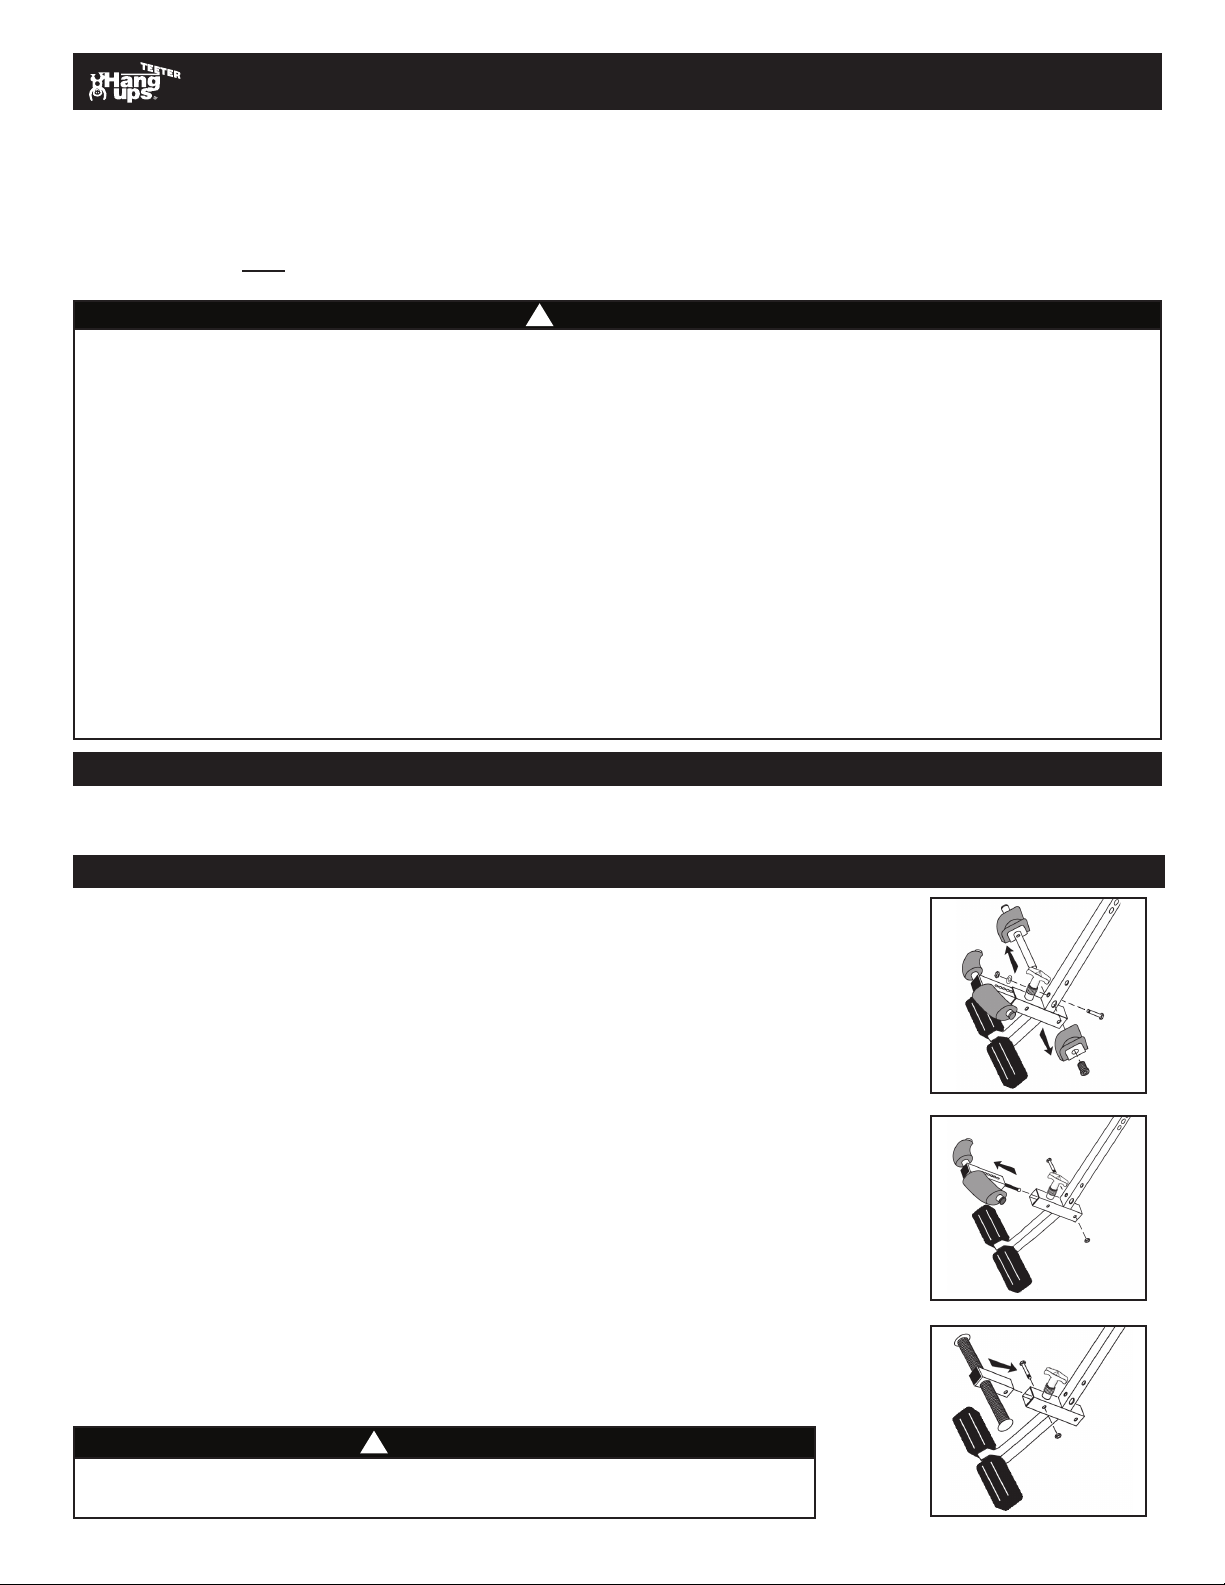
Step One: Remove the Rear Bar
• Remove a black plug and one rear foam ankle clamp with backing from the same side
of the rear bar (Figure 1).
• Remove the nut and bolt; slide the rear bar out from the main shaft. Keep the nut and bolt
in case you want to re-attach the ankle clamps in the future.
Step Two: Remove the Front Ankle Clamps
• Remove the bolt that holds the retainer spring attached to the front ankle clamp (Figure 2).
*Keep the bolt and nut for use in Step Three.
• Pull up on the locking pin and remove the front ankle clamp assembly and spring.
Step Three: Install the Conversion Bar
• Insert the Conversion Bar into the ankle clamp housing.
• Attach the Conversion Bar by inserting the bolt removed in Step Two through the holes
located at the front of the ankle clamp housing underneath the T-Pin (Figure 3).
• Tighten the nut and bolt with the wrenches provided with your inversion table.
• With the Conversion Bar in place, you may choose to remove the locking pin by unscrewing
its base. Be sure to keep it in case you want to re-attach the ankle clamps in the future.
Figure 1
Figure 2
WARNING
!
Failure to assemble the Conversion Bar properly could result
in serious injury or death!
Figure 3
Page 15
PRIOR TO USE
Review all product support materials with the Teeter Hang Ups Gravity Boots
and Inversion Table before inverting with the Teeter Hang Ups Conversion Bar.
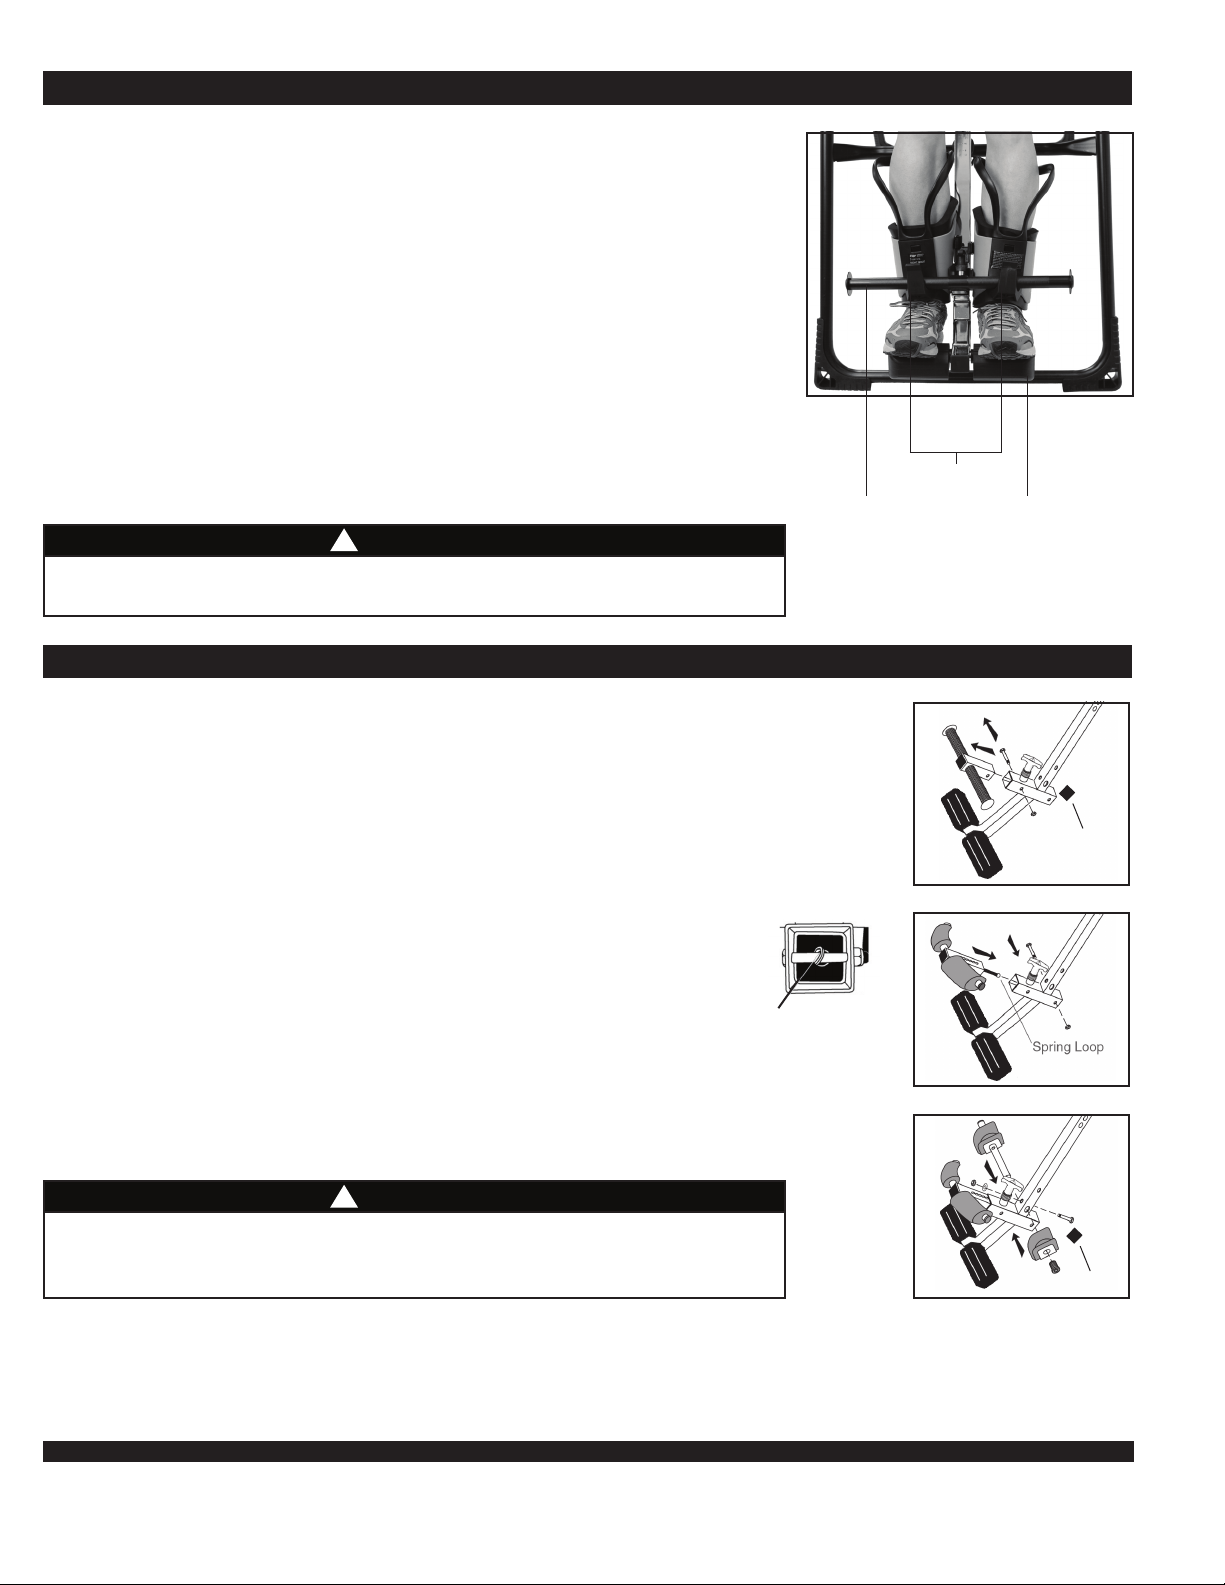
1. Preparing the Inversion Table
• Conrm that the Main Shaft is adjusted to your proper height setting.
• Adjust the Ankle Comfort Dial (up or down) to ensure the hooks are securly
hooked to the Conversion Bar with the bar touching or nearly touching the base
of the hook while the feet rest at on the Ankle Comfort Dial.
2. Mounting
• While facing away from the table with your legs positioned on either side of the
Main Shaft, lift one foot so that Gravity Boot Hook on the boot wraps around
the Conversion Bar.
• Slide the hook along the Conversion Bar until the foot is able to rest at on
the Ankle Comfort Dial (Figure 4).
WARNING
!
Setting the Ankle Comfort Dial so that the hooks are not securely around the bar
could cause you to fall during inversion, resulting in serious injury or death!
RE-ASSEMBLING THE ANKLE CLAMPS
Conversion Bar
Gravity Boot
Hooks
Ankle Comfort Dial
Figure 4
To re-assemble the Ankle Clamps - reverse the process
• Remove the black end cap from the back of the ankle clamp housing (Figure 5).
• Follow Step Three through Step One, reversing the installation process to remove the
Conversion Bar and re-assemble the rear and front ankle clamp assemblies (Figures 6 & 7).
• IMPORTANT FOR FRONT ANKLE CLAMP ASSEMBLY:
- Make sure that the holes in the front ankle clamp assembly
are on top (facing the same side as the locking pin).
- When inserting the bolt into the holes in the housing, be sure to slide
the bolt through the loops at the end of the spring and security cable.
You may need to use needle nose pliers to pull and align the spring
loop and cable with the bolt.
- Fasten securely with the nut. Test the installation of the front ankle
clamps to ensure there is spring-loaded tension.
- Replace the black end cap on the back of the ankle clamp housing.
• If you removed the locking pin when you installed the Conversion Bar, you MUST replace
it securely before using the ankle clamp assembly. Use channel locks or vise grips to ensure
that the locking pin is fully tightened. You may want to wrap the base of the locking pin
with a cloth to prevent cosmetic scarring when tightening.
WARNING
!
Failure to properly re-assemble the ankle clamps, including the T-Pin,
could cause serious injury or death! Test the locking function of the
ankle clamp assembly prior to use.
Bottom of Ankle Housing
Spring and Cables
Black End Cap
Figure 5
Figure 6
Black End Cap
Figure 7
DO NOT DISCARD - KEEP FOR FUTURE REFERENCE
Teeter Hang Ups® is a registered trademark of Teeter © COPYRIGHT 2011, Teeter.. LB-1003 0511-4
Page 16

R
E
This product is Listed by
Underwriters Laboratories Inc.
Representative samples of this
product have been evaluated
by UL and meet applicable
safety standards.
D
T
A
R
1
OWNER’S MANUAL
EP-550™/EP-650™ Inversion Table
IMPORTANT SAFETY INSTRUCTIONS
READ ALL INSTRUCTIONS BEFORE USING THE INVERSION TABLE.
WARNING
!
FAILURE TO FOLLOW INSTRUCTIONS AND WARNINGS COULD RESULT IN SERIOUS INJURY OR DEATH.
WARNING - To reduce the risk of injury to persons:
• Read and understand all the instructions, view the instructional video, review all other accompanying documents, and inspect the
equipment before using the inversion table. It is your responsibility to familiarize yourself with the proper use of this equipment and the
inherent risks of inversion, such as falling on your head or neck, pinching, entrapment, or equipment failure. It is the responsibility of
the owner to ensure that all users of the product are fully informed about the proper use of the equipment and all safety precautions.
• Close supervision is necessary when the inversion table is used near children, or by or near invalids or disabled persons.
• Use the inversion table only for its intended use as described in this manual. DO NOT use attachments not recommended by the
manufacturer.
• NEVER drop or insert any object into any opening.
• DO NOT use or store product outdoors.
• DO NOT use if you are over 6 ft 6 in (198 cm) or over 300 lbs. (136 kg). Structural failure could occur or head/neck may impact the
oor during inversion.
• DO NOT allow children to use this machine.
• Keep children, bystanders, and pets away from machine while in use.
• Keep body parts, hair, loose clothing and jewelry clear of all moving parts.
• The inversion table has no user serviceable parts.
• This product is intended for home use only. DO NOT use in any commercial, rental or institutional setting.
• DO NOT operate equipment while under the inuence of drugs, alcohol, or medication that may cause drowsiness or disorientation.
• ALWAYS inspect the equipment prior to use. Make sure all fasteners are secure.
• ALWAYS replace defective components immediately and/or keep the equipment out of use until repair.
• ALWAYS position equipment on a level surface and away from water or ledges that could lead to accidental immersion or falls.
• ALWAYS wear securely tied lace-up shoes with a at sole, such as a normal tennis style shoe. DO NOT wear any footwear that could interfere
with securing the Ankle Lock System, such as shoes with thick soles, boots, high-tops or any shoe that extends above the anklebone.
• ALWAYS make sure the equipment is properly adjusted to the correct user settings prior to each use.
• DO NOT use aggressive movements, or use weights, elastic bands or any other exercise or stretching device while on the inversion table.
• New users, and users who are physically or mentally compromised, will require the assistance of a partner to ensure they are able to
nd the correct balance setting and can return to an upright position unassisted.
• If you feel pain or become light-headed or dizzy while inverting, immediately return to the upright position for recovery and eventual
dismount.
• DO NOT use the equipment without a licensed physician’s approval. Carefully review the following list of medical contraindications for
inversion with your licensed physician: (This is not an exhaustive list, it is intended only for reference)
· Middle ear infection · Glaucoma · Heart or circulatory disorders · Bone weakness (osteoporosis)
· Extreme obesity · Retinal detachment · Spinal injury · Recent or unhealed fractures
· Pregnancy · Conjunctivitis · Cerebral sclerosis · Medullary pins
· Hiatal hernia · High blood pressure · Acutely swollen joints · Surgically implanted orthopedic supports
· Ventral hernia · Hypertension · Recent stroke or transient · Use of anticoagulants
ischemic attack (including high doses of aspirin)
• Refer to additional warning notices posted on the equipment. If a product label or Owner’s Manual should become lost, damaged or
illegible, contact Customer Service for replacement.
SAVE THESE INSTRUCTIONS
EP-2010 0611-3
Page 17
BEFORE YOU INVERT make sure that the
inversion table rotates smoothly to the fully inverted position
and back, and that all fasteners are secure. Make sure the
user settings described below are properly adjusted for your
unique needs and body type. Take your time nding your
proper settings and remember them. Check these settings
every time prior to using the equipment.
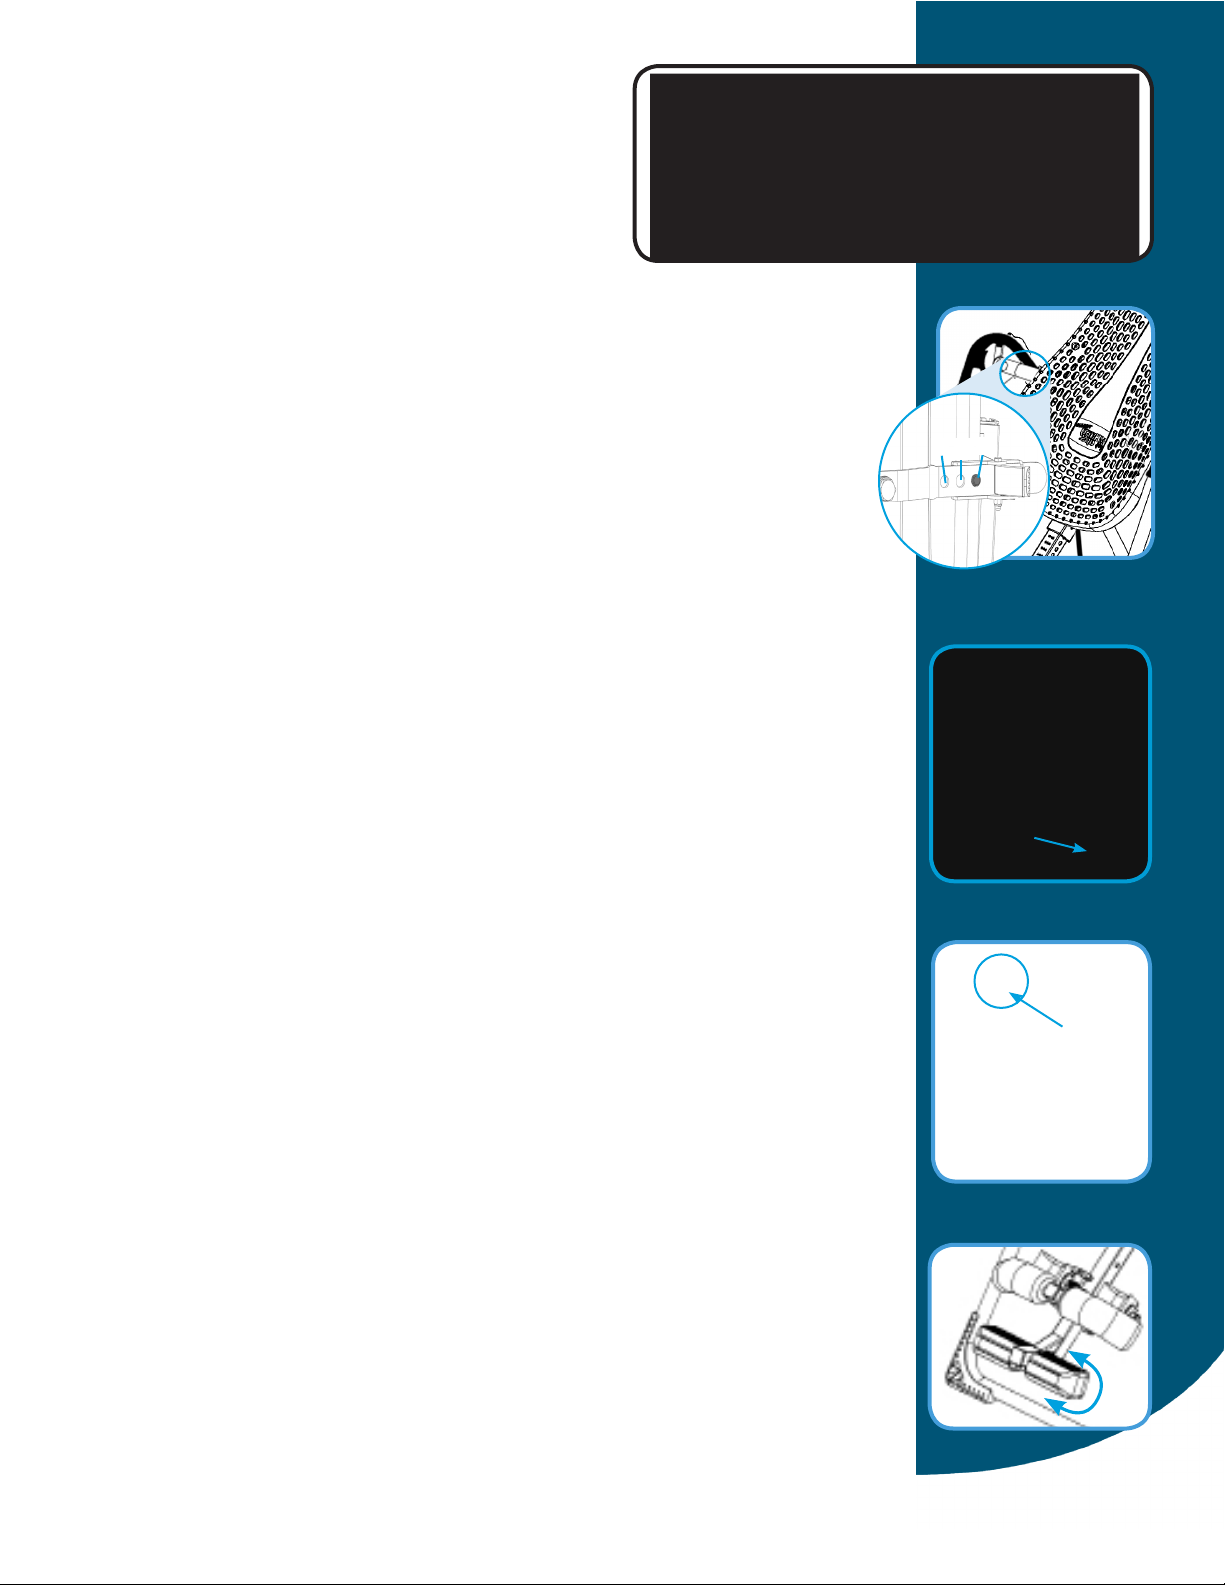
Roller Hinge Selection Per User Weight
Roller Hinge: Find Your Setting
The Roller Hinge controls the responsiveness or rate of rotation. There are three holes;
the hole selection depends both on your body weight and the rotational responsiveness
you desire (diagram above right). For users just learning to use the inversion table, we
recommend starting with Setting C (Figure 1).
IMPORTANT: Set the Roller Hinges in the same hole setting on each side.
Height Setting: Adjust the Main Shaft
The height settings are labeled on the Main Shaft in both inches and centimeters.
• Loosen the De-Rattler Knob.
• Pull out the Height-Selector Locking Pin with your right hand while sliding the
Main Shaft with your left (Figure 2).
• Slide the Main Shaft until the last setting you can read is one inch greater than
your height. e.g. If you’re 5’10” (178 cm) the last numbers you’ll be able to read
will be 5’11” (180 cm).
NOTE: The best height setting for you will depend on your weight distribution and
could vary one or two inches on either side of your actual height. Starting at one or two
inches more than your height will help to ensure that the rotation of the table is not too fast.
• Release the Height-Selector Locking Pin so that it fully engages in a hole. Re-tighten
the De-Rattler Knob (optional).
Angle Tether: Adjust to Desired Angle
For rst time users, attach the Angle Tether to help control your angle of rotation (Figure 3).
You can increase the angle of rotation allowed by the Angle Tether as you become more
comfortable using the table, or remove it all together for full inversion.
Ankle Comfort Dial: Find Your Setting
The Ankle Comfort Dial can rotate into a High or Low setting (Figure 4). There is a one inch
height difference between the settings. The setting you select will vary by the type of shoes
you wear and your ankle type. Try inverting in both settings to determine which one is most
comfortable for you.
The Ankle Comfort Dial should be set so the ankle clamps are secure around the smallest
part of the ankles (with minimal distance between the ankle clamp and the top of your foot);
this will reduce sliding on the Table Bed while inverted.
C
A
B
Figure 1
Figure 2
Prepare to Mount
•
ALWAYS
• DO NOT wear shoes with thick soles, boots, high-tops or any shoe that extends above
the ankle bone, as this type of footwear could interfere with properly securing your ankles.
wear securely tied, lace up shoes with a at sole, such as a tennis shoe.
R
1.2
Figure 3
Figure 4
Page 18
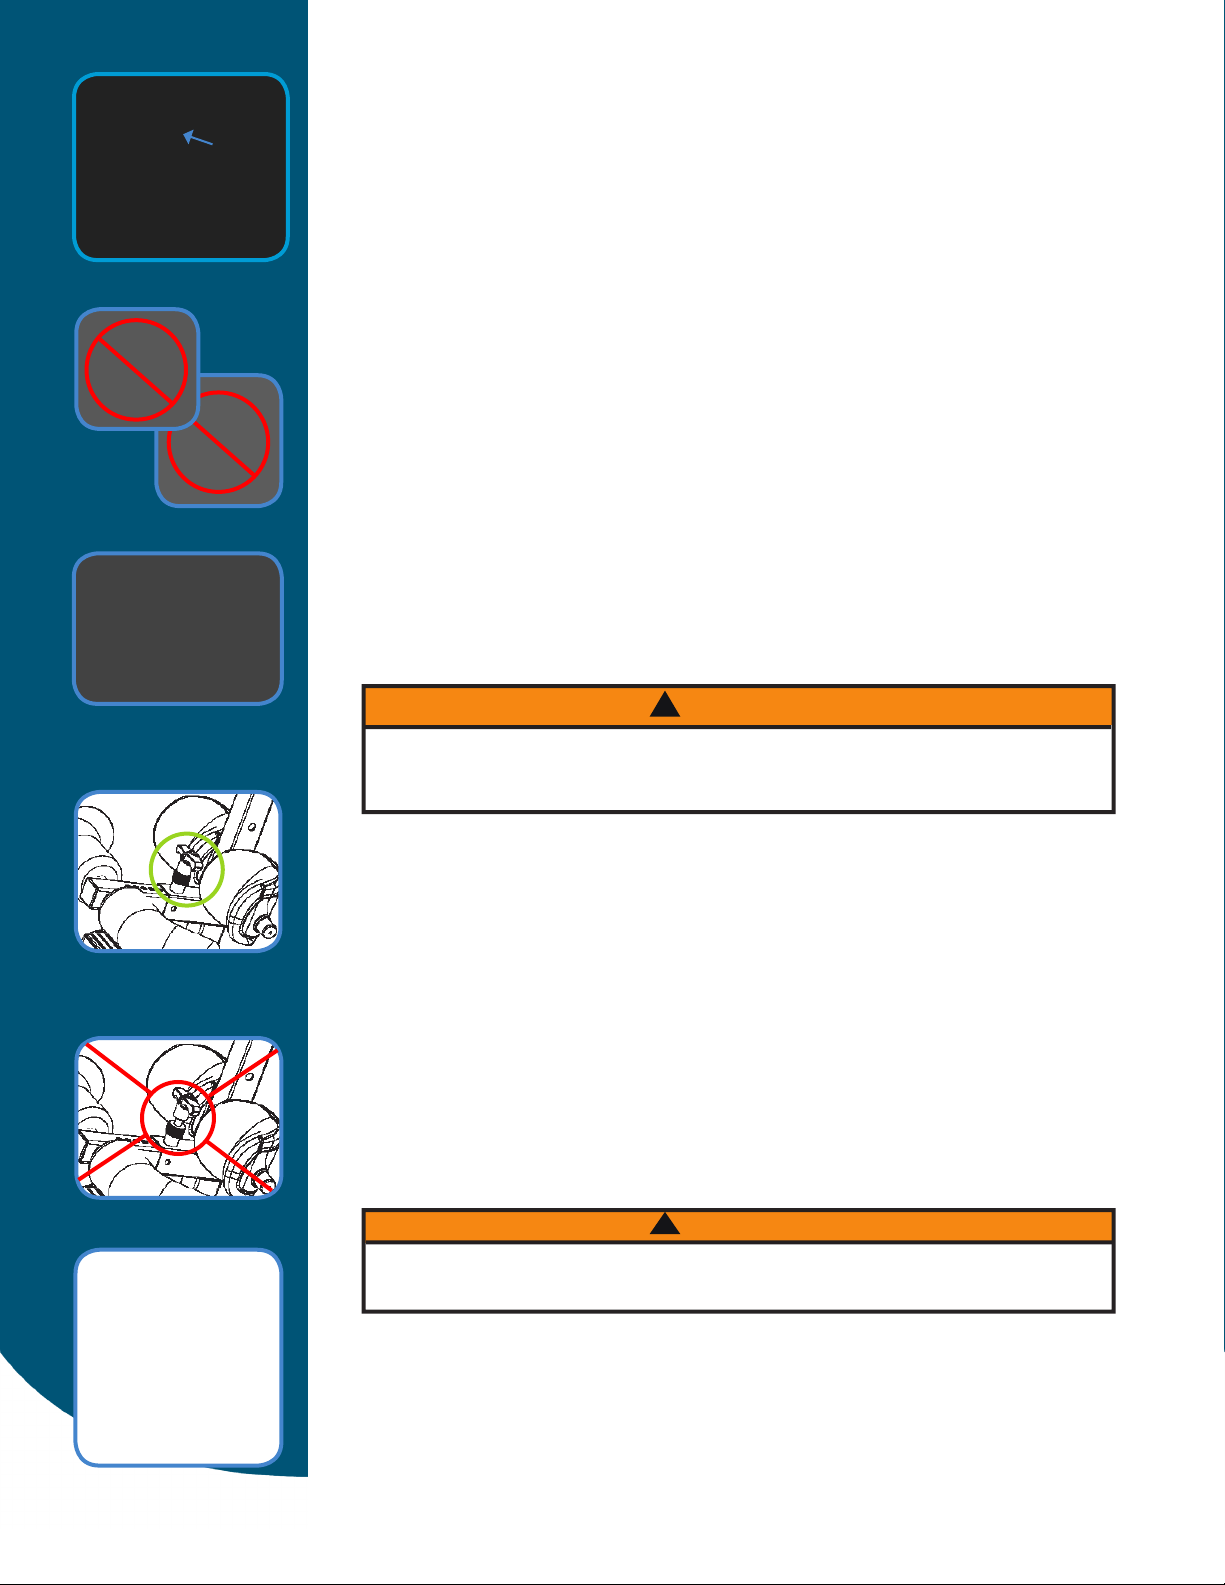
Figure 5
Figure 6
Figure 7
Securing Y our Ankles
• Stand with your back to the Table Bed - do not use the inversion table face-down.
• Step over the Main Shaft, placing your feet on the oor on either side. To balance
yourself, rest only your lower body against the Table Bed as you slide one ankle at a
time between the ankle clamps onto the Ankle Comfort Dial. Be sure to slide your ankle
in from the side (Figure 5); DO NOT insert your foot through the ankle clamps as you
would slide your foot into a shoe. Your feet should always be either on the oor or
on the Ankle Comfort Dial; never use any other part of the inversion table as a step
(Figure 6 and 7).
• Press your ankles back rmly against the rear ankle clamps.
• Rotate the top of the rear clamps slightly inward toward your ankles, this will increase
your comfort while inverting.
• Pull the T-Pin Lock out to allow the front ankle clamps to snap closed against your
ankles (Figure 8). Make sure your pant legs do not interfere with obtaining a secure
closure.
• Adjust the front ankle clamps to make sure both the front and rear ankle clamps are
snug against your ankles. Release the T-Pin Lock so that it fully engages a hole setting
(Figure 9).
• If the T-Pin Lock does not automatically engage in a hole (Figure 10), push the front
ankle clamps inward until the pin engages fully in the next tightest hole setting. Verify
that no part of your footwear or garments touch or interfere with the T-Pin Lock in any
way during inversion.
• Use the concept of HEAR, FEEL, SEE every time you secure your ankles: HEAR the
Locking Pin click into place; FEEL the Locking Pin to make sure it is fully engaged in a
hole setting; SEE that there is NO space between the Locking Pin and its base.
Figure 8
Figure 9
Figure 10
!
WARNING
DO NOT lean your upper body against the Table Bed before securing your ankles—
FAILURE to engage the Ankle Lock System fully could result in serious injury
or death! DO NOT deviate from these instructions.
Test Your Balance Setting
The inversion table is sensitively balanced, and it responds to very small changes in weight
distribution. As a result, you must always test to make sure you have the correct height
setting. Ensure that there is clearance to rotate in front, above and behind you. To begin,
rest your head on the bed and slowly place your arms on your chest.
• If your head is lower than your feet, lengthen the height setting by one hole and
test again.
• If your feet do not move at all, shorten the height setting by one hole and test again.
• If the table comes to rest with your feet lifted a few inches off the A-frame, then you
have found the correct balance setting (Figure 11).
This is an important step - spend the time needed to nd your correct balance setting.
Your setting should remain the same as long as your weight does not uctuate substantially.
!
WARNING
For your rst few inversion sessions, ask a spotter to assist you until
you are comfortable with the operation of the inversion table.
Figure 11
R
1.3
Page 19
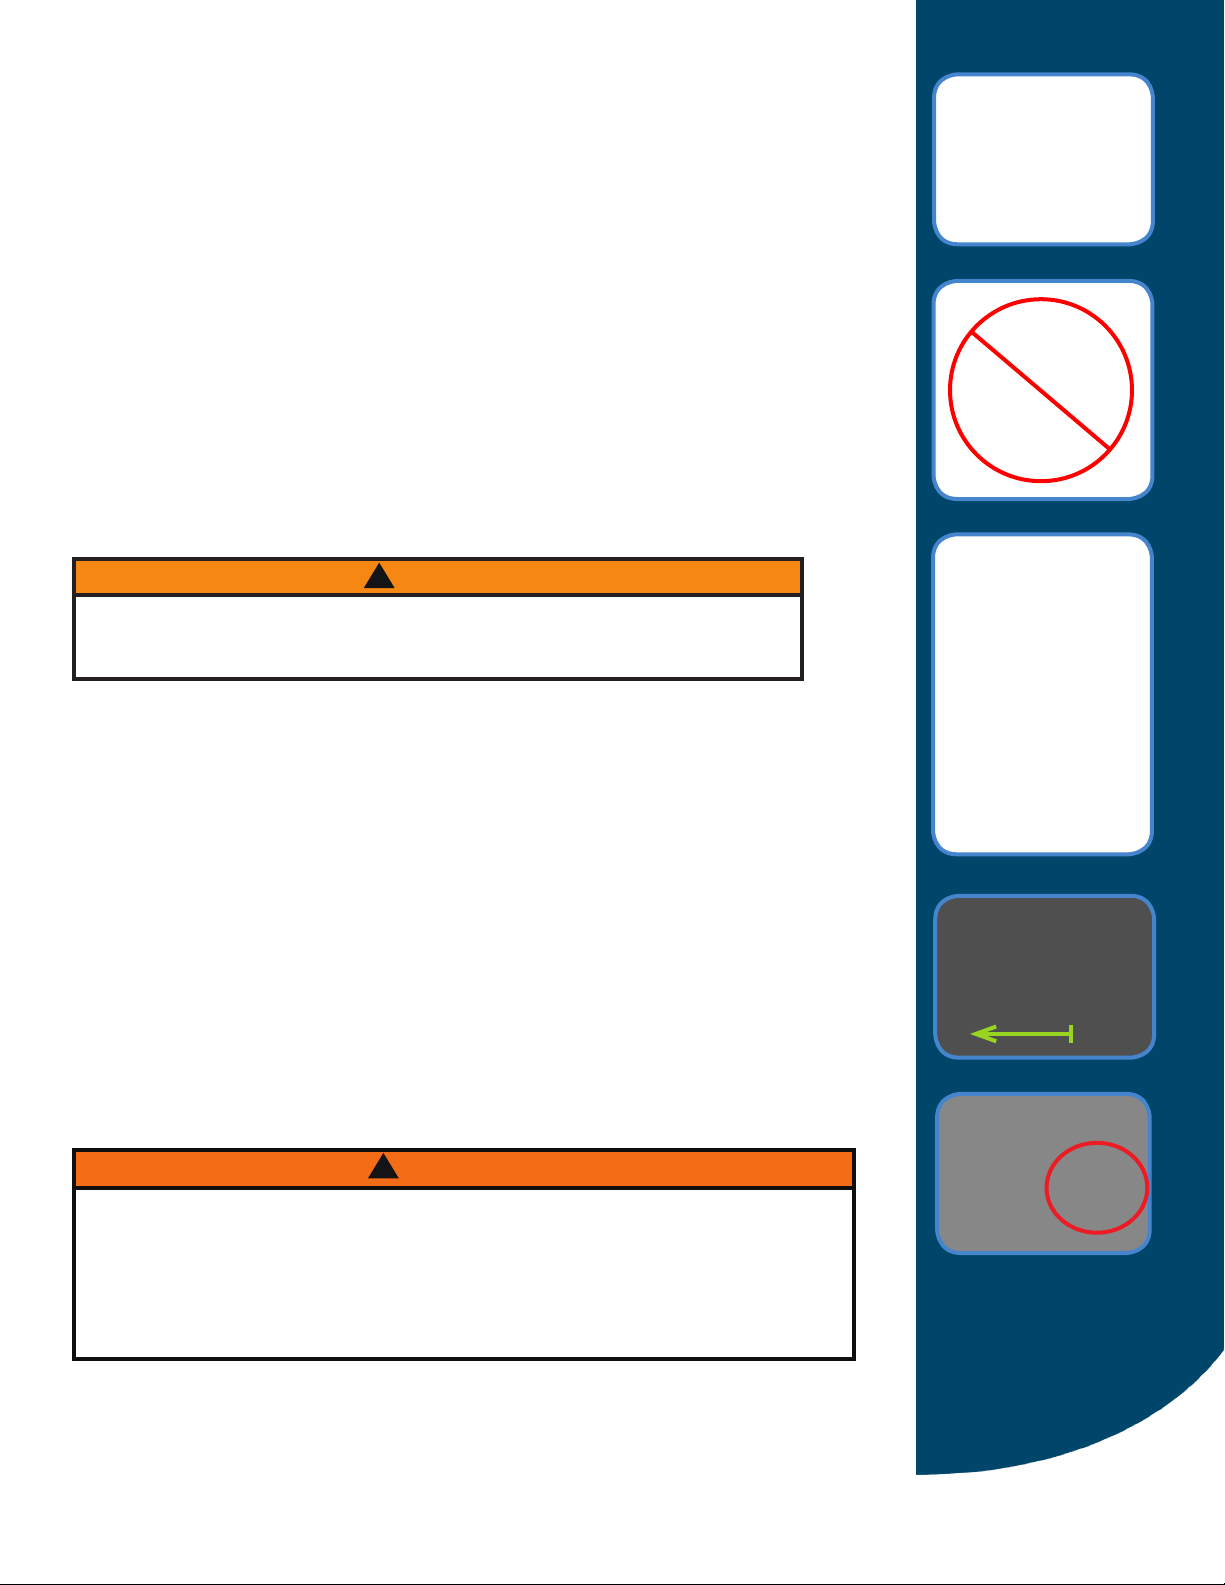
Inverting
When correctly balanced, the table will rotate in response to simple arm movements. To
invert, lift your arms overhead slowly and to return upright, bring your arms back to your
sides. Your arms provide the weight needed to rotate the table. (Figure 12).
To ensure the inversion table does not rotate too far, too quickly:
• Set the Roller Hinges to Setting “C” (as explained on pg.2);
• Attach the Angle Tether to the underside of the table and test to maximum rotation;
• Raise one arm at a time, and do so very slowly (the faster you move, the faster the
inversion table will rotate).
Returning Upright
To return to the upright position, put your arms at your sides. Since your body may have
lengthened or shifted on the Table Bed during inversion, you may need to bend your knees to
shift your body weight to the foot side of the pivot point. DO NOT lift your head or try to sit up
(Figure 13).
Full Inversion
Denition: Hanging completely upside down by your ankles with your back free from the
table. DO NOT attempt this step until you are comfortable with partial inversion.
!
WARNING
To reduce tipping hazard, conne all inverted activities to smooth movements.
Aggressive exercises that involve vigorous body movement can cause the table
to tip over, resulting in serious injury or death!
Figure 12
Figure 13
• Disconnect the AngleTether.
• Set the Roller Hinges in the top hole setting “A” if you want the table to “lock” rmly
while inverted. If you are 220 lbs (100 kg) or more, set the Roller Hinges in the
“B” hole setting.
• From a balanced position on the table, slowly raise both hands over your head to begin
rotation. You may need to assist the last few degrees of rotation by pushing on the oor
or A-frame until the table pulls away from your back (Figure 14). In your correct balance
setting, your weight will keep the table “locked” in this position until you are ready to
return upright.
To Release from the Inverted “Locked” Position:
• Place one hand on the top of the Table Bed behind your head and place the other hand
on the base of the A-frame in front of you.
• Pull both hands together (Figure 15). This will rotate the table out of the “locked”
position. Slowly move your arms and elbows to your sides to complete the rotation.
USE CAUTION: Elbows protruding over the sides of the Table Bed could get pinched
between the A-frame and the Table Bed as you return upright (Figure 16).
!
WARNING
It is your responsibility to familiarize yourself with the proper use of the equipment
and the inherent risks of inversion, such as falling on your head or neck,
pinching, entrapment or equipment failure.
DO NOT use the inversion table until you have thoroughly and carefully read the
Owner’s Manual, reviewed all accompanying documents and inspected the equipment.
ALWAYS test and inspect the equipment for smooth operation prior to each use.
Figure 14
Figure 15
Figure 16
R
1.4
QUESTIONS? USA: 1-800-847-0143
International: +1-242-362-1001
4
Page 20
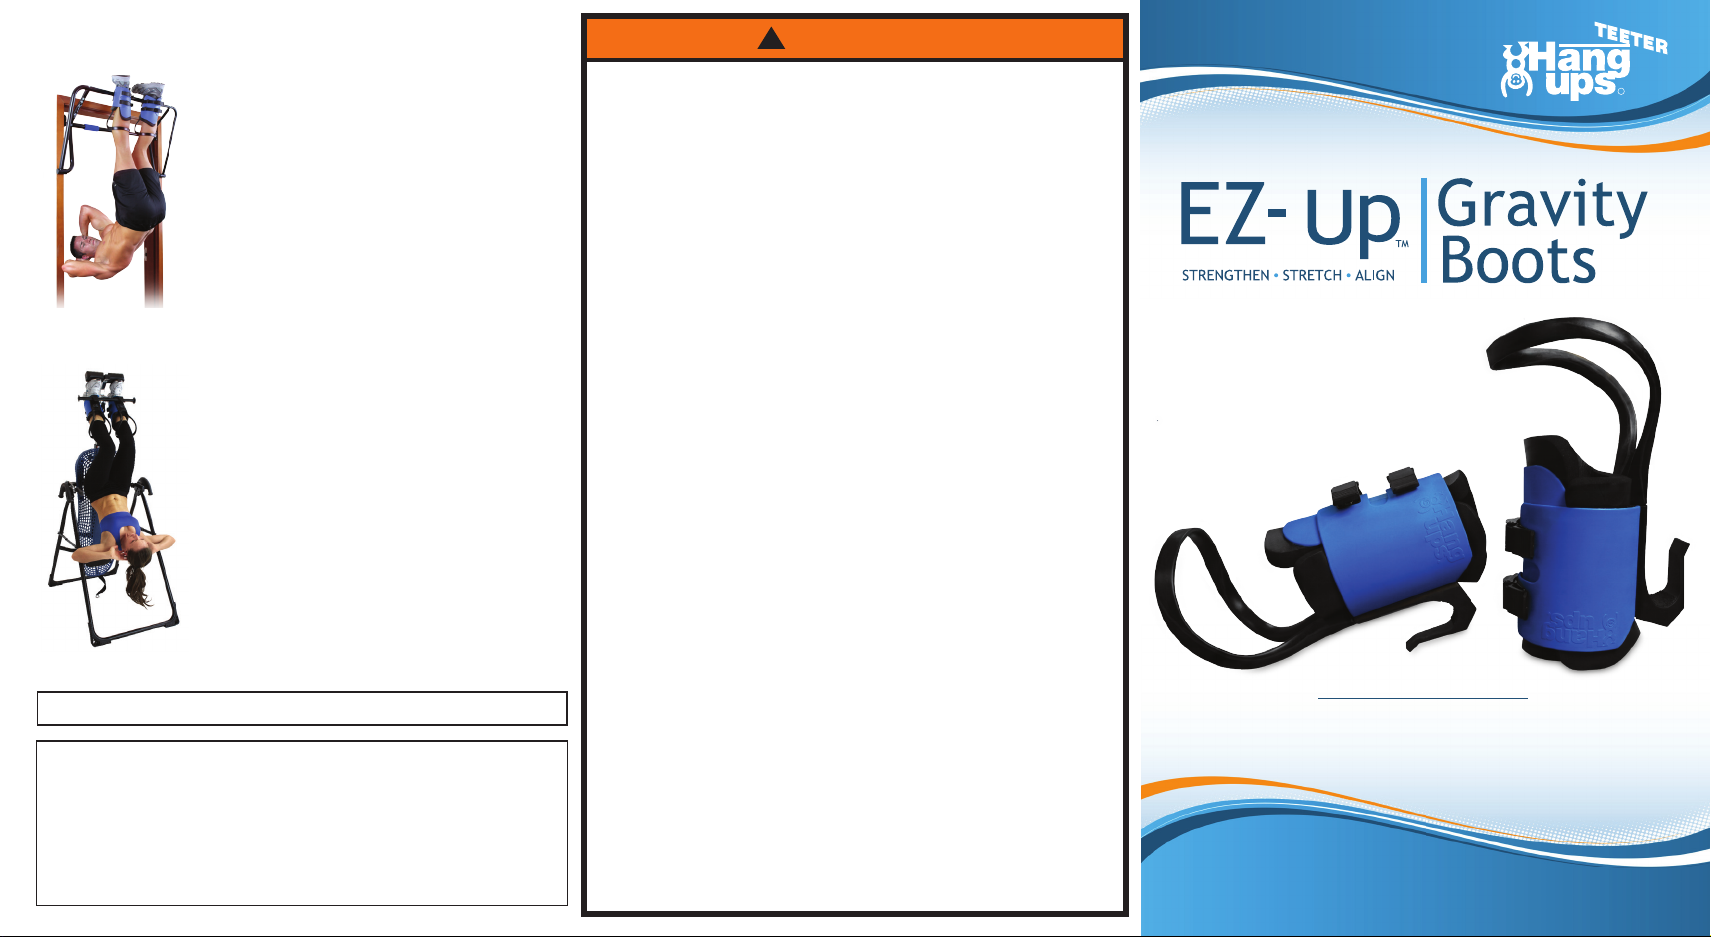
Teeter Hang Ups® Gravity Boots are designed to be used with
R
the following Teeter Hang Ups products:
Teeter Hang Ups EZ-Up
™
Inversion & Chin-Up Rack:
Gravity Boots can be used with the EZ-Up™
Inversion & Chin-Up Rack, a double-bar system
that secures to a standard wood door frame.
Quick-disconnect locking brackets allow the rack
to be installed or removed in less than 5-seconds
and do not interfere with normal use of the door.
EZ-Up Inversion &
Chin-Up Rack
Teeter Hang Ups Inversion Table:
Gravity Boots are an optional upgrade for
use with Teeter Inversion Tables equipped
with the T-Pin Ankle Lock System. These
tables can be converted with a Conversion Bar*
for use with Gravity Boots, providing
maximum comfort and support for the ankle.
Inversion Table
Larger style Gravity Boots XL are also available from Teeter Hang Ups.
For information about the Teeter Hang Ups® 5-year warranty, or if you have any
problems assembling the equipment or questions about its use, please contact
USA & Canada: Teeter
Toll Free (Phone) 800-847-0143
(Fax) 800-847-0188
Customer Service at the appropriate location below:
International: Inversion International, Ltd.
(Phone) +1-242-362-1001
(Fax) +1-242-362-1002
!
WARNING
It is your responsibility to familiarize yourself with the proper use of the equipment
and the inherent risks of inversion, such as falling on your head or neck, pinching,
entrapment or equipment failure. FAILURE TO FOLLOW INSTRUCTIONS OR
HEED WARNINGS COULD RESULT IN SERIOUS INJURY OR DEATH.
Restrictions on Use
• DO NOT use the equipment without a licensed physician’s approval.
Carefully review the following list of medical contraindications for inversion
with your licensed physician: (This is not an exhaustive list, it is intended only
for reference) Pregnancy; Hiatal Hernia, Ventral Hernia; Glaucoma, retinal
detachment or conjunctivitis; High blood pressure, hypertension, recent stroke
or transient ischemic attack; Heart or circulatory disorders; Spinal injury,
Cerebral Sclerosis, and acutely swollen joints; Bone weakness (osteoporosis),
recent and/or unhealed fractures, medullary pins, and surgically implanted
orthopedic supports; The use of anticoagulants, including high doses of Aspirin;
Middle ear infection; Extreme obesity.
• DO NOT use with the EZ-Up Inversion & Chin-Up Rack if you are over 250 lbs
(113.6 kg). DO NOT use with converted Teeter Hang Ups Inversion Tables if you
are over 300 lbs. (136 kg) or 6ft 6in (198 cm). Structural failure could occur or
head/neck may impact the oor during inversion.
• DO NOT modify the equipment or use accessory attachments that are not
recommended by the manufacturer. Utilize the equipment for its intended
purpose only.
• We recommend only using the Gravity Boots with properly installed and tested
Teeter Hang Ups products, which are designed specically for inversion and for
use with Gravity Boots.
DO NOT use Gravity Boots with the specic models of Teeter Hang Ups Inversion
•
Tables until you have replaced the ankle clamps with the Conversion Bar.
• DO NOT use Gravity Boots with a bar that is not secure to at least four times your
body weight. Test this by having two persons hang from the bar by the hands at
the same time then pull down vigorously.
• DO NOT use Gravity Boots with a bar that exceeds 1.25” (3.2 cm) in diameter.
The bar must sit loosely at the base of the hook. Bars that are too large will stress
the hook and could result in equipment failure.
• Not for unsupervised commercial use.
Precautions Before Using
• DO NOT use until you have thoroughly and carefully read this booklet, reviewed
product labeling, and inspected the equipment.
• NEVER allow children to use the equipment unsupervised.
• DO NOT operate equipment while under the inuence of drugs, alcohol, or
medication that may cause drowsiness or disorientation.
• ALWAYS inspect the equipment prior to use. Make sure that all fasteners
are secure.
• ALWAYS replace defective components immediately and/or keep the equipment
out of use until repair.
Precautions During Use
• ALWAYS use a spotter.
• DO NOT use aggressive
cause the hook to disengage from the bar.
• DO NOT use weights, elastic bands or any other stretching device.
• DO NOT over-exert your muscl
movements, bounce or swing excessively, which may
es while inverted so you have strength to dismount.
The most comfortable
boots on the market!
Inversion may help you to:
• Relieve back pain • Reduce stress • Decompress spine and joints
• Improve circulation • Increase exibility • Improve posture
• Stretch and relax muscles • Recover from high-impact workouts
SAVE THESE INSTRUCTIONS
Teeter Hang Ups is a registered trademark of Teeter and Inversion International, Ltd.
Page 21
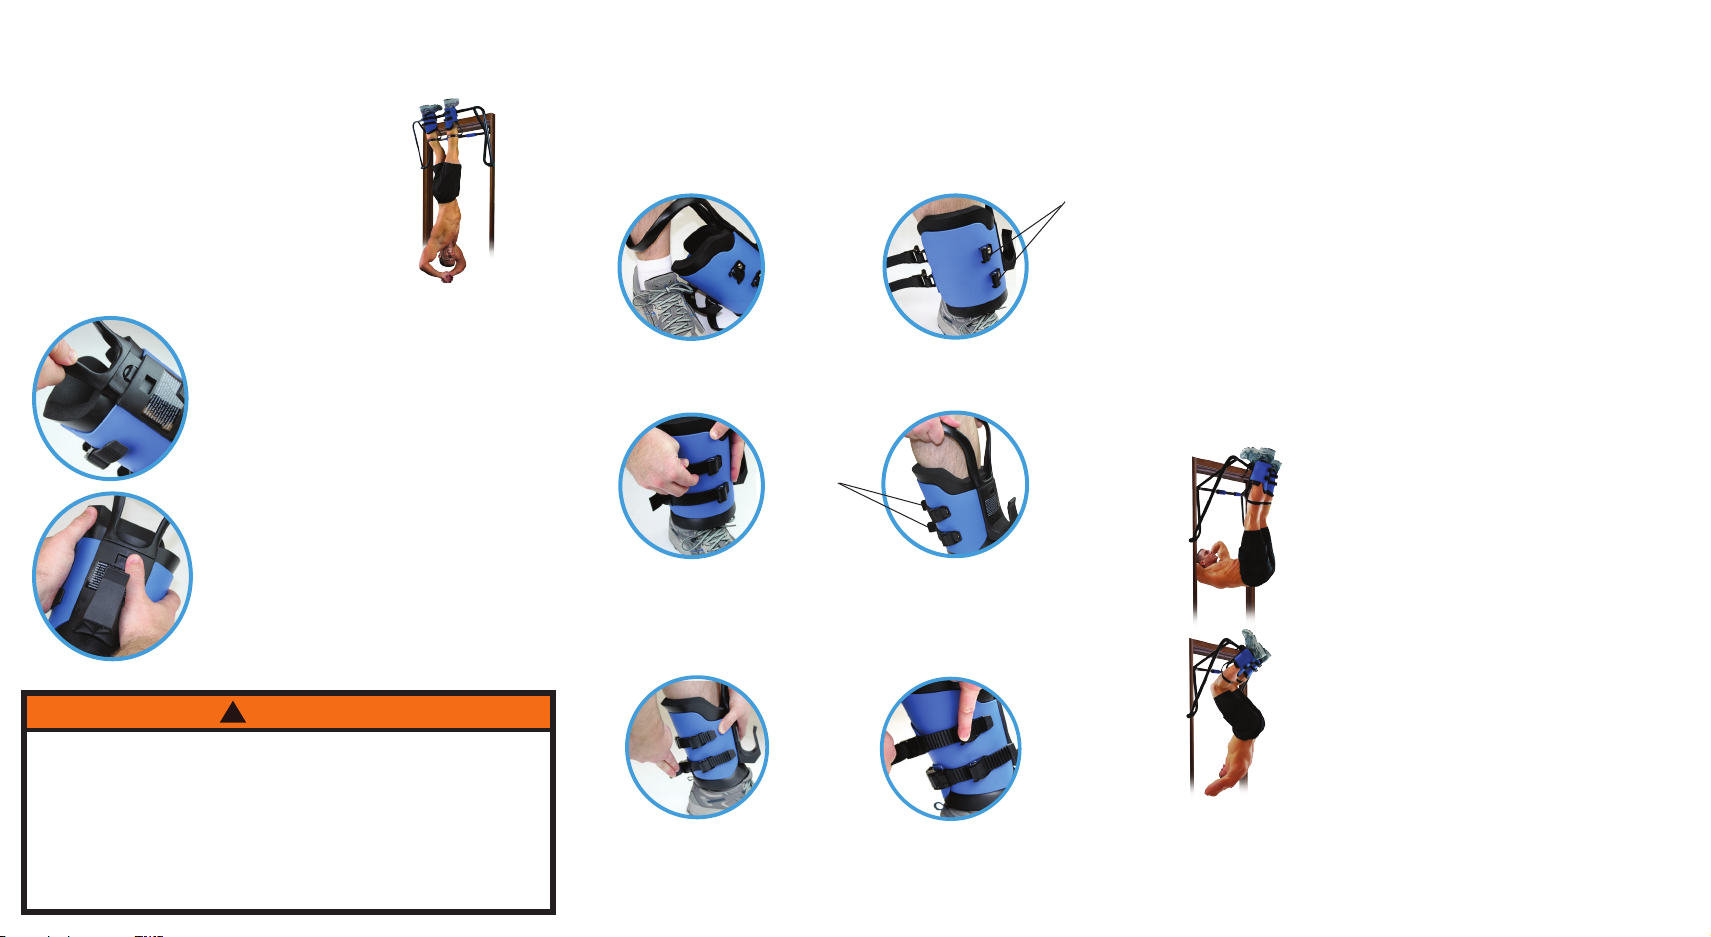
Calf Loops: Why use them?
Calf loops are an optional feature that easily detach, so shorter
adults can easily invert. Calf loops provide the following benets:
1. Reduce loads on the ankles and prevent
the front edge of the boot from placing
uncomfortable pressure on the top of
your feet.
2. Offer a hand hold to help you get back
up to the bar.
3. Place a 2° bend in the knees, which for
most people is more comfortable than
inverting with straight legs.
User Instructions:
Before putting on the boots, rst time users should practice and fully
understand how to insert the straps and how to snap-lock the buckles.
When you are ready to use the boots, determine the correct boot for each
leg. The hook of the Right Boot will be marked “Right Boot.” Always put
Boots on the correct ankles. Failure to do so may cause discomfort or
equipment failure.
1. 2.
strap locks
For proper mounting, inverting, and dismounting, ALWAYS follow the listed
WARNINGS & SAFETY INSTRUCTIONS included in this booklet, as well as
the instructions for the Rack or Inversion Table with Conversion Bar.
Inverting
You will use the hooks on the front of the Gravity Boots to suspend yourself
with both legs in an inverted position from a securely supported bar.
We recommend these Gravity Boots be used only with properly installed
and tested Teeter Hang Ups products, which are designed specically for
inversion with Gravity Boots. Follow the specic directions for mounting,
inverting, and dismounting that are included with your Teeter Hang Ups
EZ-Up™ Inversion & Chin-Up Rack or Inversion Table with Conversion Bar.
A.
To Attach Calf Loops:
Insert the base of the Calf Loop into the open
end of the Boot Hook (Figure A). Make sure
you hear the Calf Loop snap into place for
secure attachment. Repeat on other boot.
To Detach Calf Loops:
Press your nger onto the Calf Loop Release
Tab (Figure B) and pull loop out of the
B.
Boot Hook slot.
*Calf Loops must be attached/detached while
boots are NOT secured around ankles.
Boot Care:
No regular maintenance is required,
however, for continued smooth use, we
recommend keeping buckles latched when
not in use.
!
WARNING
• DO NOT use Gravity Boots with a Bar that is not secure to at least four times your
body weight. Test this by having two people hang from the bar at the same time by
the hands then pull down vigorously. Repeat this test on the other end of the Bar.
• DO NOT use Gravity Boots with a Bar that exceeds 1.25” (3.2 cm) in diameter.
The Bar must sit loosely at the base of the hook. Bars that are too large will stress
the hook and could result in equipment failure.
• A LWAYS use a spotter.
• DO NOT engage in excessive bouncing or swinging which could disengage the
Boot hooks from the bar.
• A LWAYS use slow, controlled movements while inverting.
• DO NOT over-exert your muscles while inverted so you have strength to dismount.
Insert the foot through the
calf loop.
3.
buckle levers
Insert the strap ends into the
strap locks for two clicks.
At least one full “v-notch” must
be visible; DO NOT tighten yet.
5.
Adjust the straps to t the ankle.
A snug but not tight t will be
most comfortable. Close the
buckle levers, making sure they
snap shut completely.
Wrap the Boots around the ankle
with the strap locks toward the
front inside of the foot.
4.
Rotate the Boot so the hook is
positioned at the front of the leg,
with the buckle levers on the backside
of the leg. Push down on the Boot so
it sits on the top of the foot.
6.
TO RELEASE: Lift up on the
buckle lever and push down
on the strap lock tab to release
the strap.
Note: If you are not using a Teeter Hang Ups product in conjunction
with the Teeter Hang Ups Gravity Boots, you will need to determine
the proper procedures specic to that particular bar/apparatus for safe
mounting, inverting, and dismounting.
Having a spotter to assist you for the rst few uses of the Gravity Boots is
mandatory, and recommended for each time you use the equipment.
Stretching
Gravity Boots provide a comfortable way to invert and
decompress your spine and weight bearing joints.
Moving your joints through their range of motion while
your muscles are relaxed helps to improve exibility
and promote healthy joints.
Crunches & Sit-Ups
Inversion offers a method of strengthening
abdominal muscles without the addition of
compressive loads to your back.
Squats
Reverse squats utilize your own body weight to
resist gravity and are an amazing workout for glutes,
hamstrings, and calves.
Note: Invert only as long as you are comfortable. First time users should
be careful not to overdo it–this is NOT a no pain, no gain situation!
Made in Thailand.
©COPYRIGHT 2011 Teeter and
International Law Prohibits Any Copying. LB-1002 0911-11
Inversion International, Ltd.
 Loading...