

Page 1
ASSEMBLY INSTRUCTIONS
INSTRUCTIONAL TRAINING MANUAL
DO NOT DISCARD - KEEP FOR FUTURE REFERENCE
LD-1001 10/06-1
Page 2
ASSEMBLY INSTRUCTIONS
PRE-ASSEMBLY
Before you begin: These instructions will guide you in properly assembling the unit. Please review all the steps before
beginning assembly . Carefully adhere to the Assembly Instructions and Instructional Training Manual to help ensure user
safety and product integrity .
!
W ARNING
1. Failure to assemble and/or use the equipment as directed may void the manufacturer’s warranty on this product and could
result in injury or death.
2. It is your responsibility to familiarize yourself with the proper use of the equipment and the inherent risks of inversion, such
as falling on your head or neck, pinching, entrapment or equipment failure.
3. Do not use the DEX
accompanying documents, and inspected the equipment.
4. Choose a level surface for assembling and operating the DEX
5. Follow each step in sequence. Do not skip ahead.
6. Make sure that all fasteners are secure.
7. Replace defective components immediately and/or keep the equipment out of use until repair.
8. Schedule daily, weekly and monthly equipment inspections. Make sure that the parts rotate smoothly and that all fasteners
are secure.
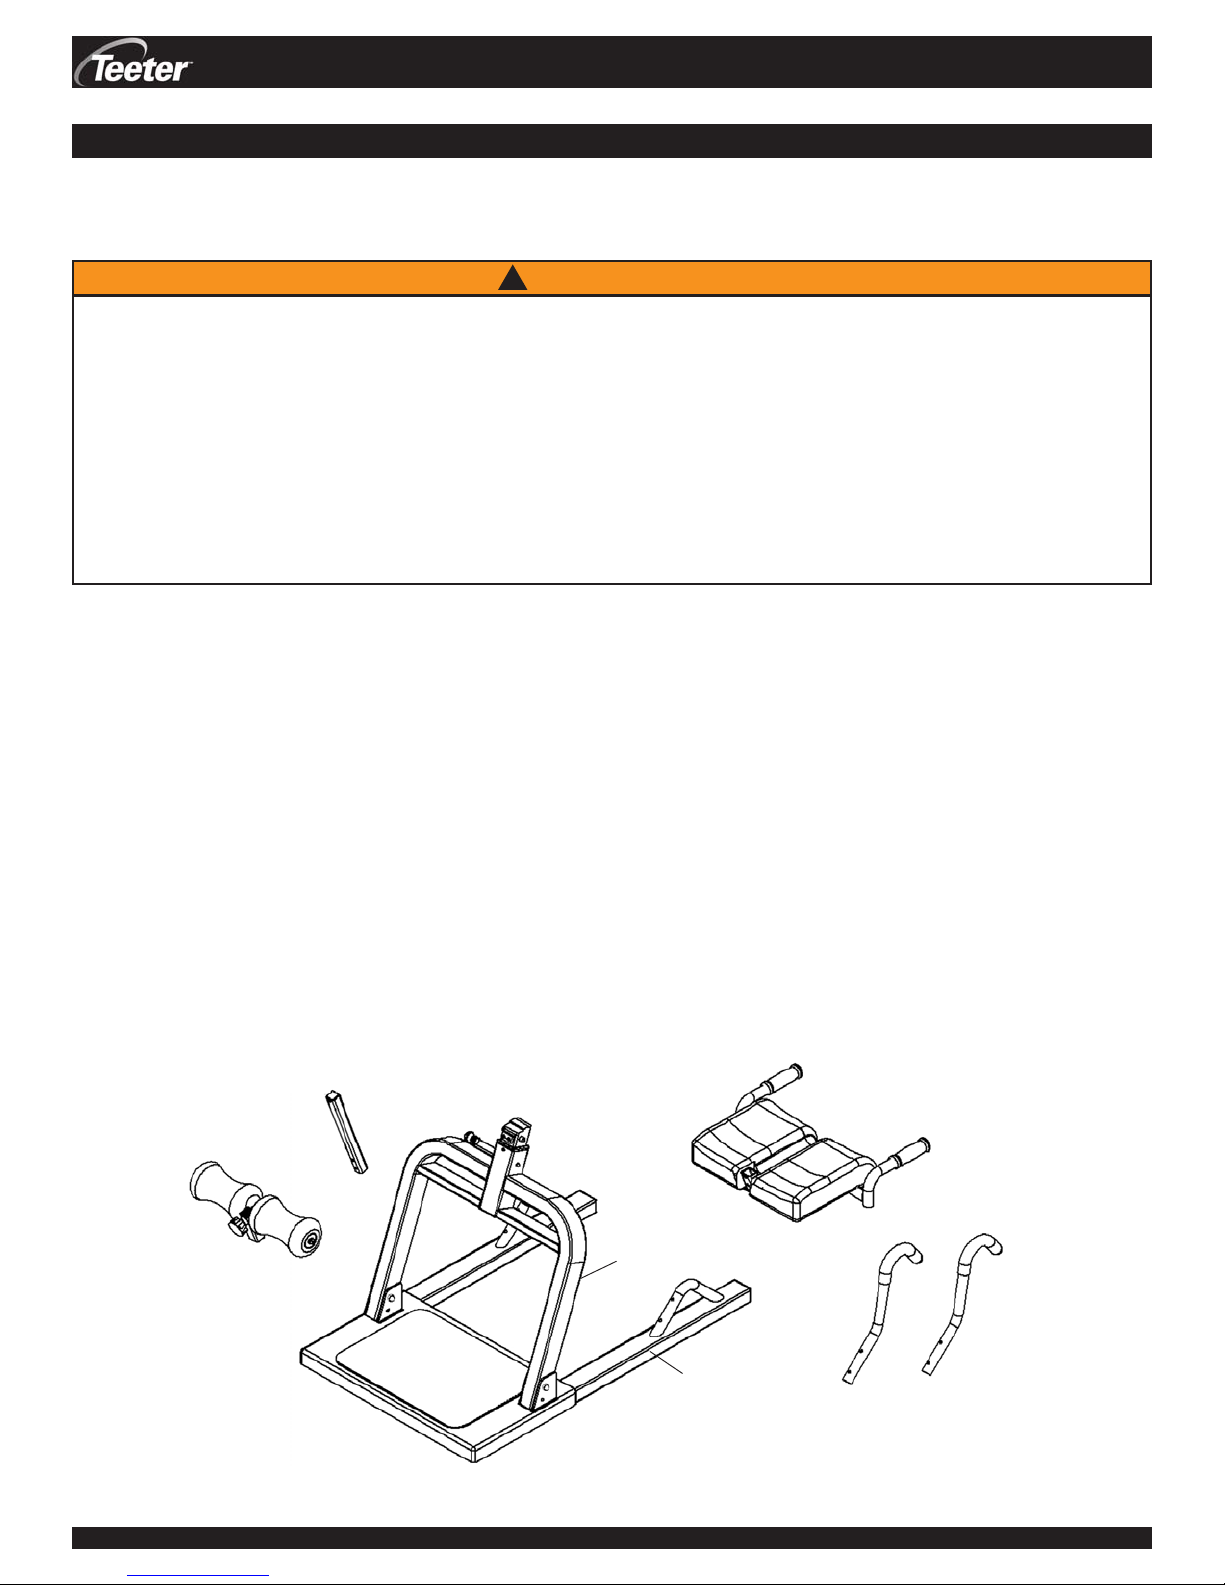
Carefully remove the individual parts from the carton. Y ou should have all of the items listed below . If any items are
missing or damaged, contact your retailer or the manufacturer directly (See Pg. 4 of the Instructional Training Manual).
TM
until you have thoroughly and carefully read the Instructional Training Manual, reviewed all other
TM
.
ITEMS FOR ASSEMBL Y ITEM #’s
Leg Roller Assembly D1-1007
Leg Roller Adjustment Frame D1-1011
Leg Roller Shaft D1-1010
Two (2) Flat Washers (M8) H1-4108
Two (2) Hex Bolts
Frame Assembly
Support Post D1-1003
Base Frame D1-1002
Four (4) Hex Bolts
Eight (8) Flat Washers (3/8) H1-1302
Four (4) Lock Washers
Four (4) Capped Nuts
Leg Roller Adjustment Frame
D1-1011
Lap Pad Assembly D1-1004
Two (2) Flat Washers
One (1) Hex Bolt (3/8-16) H1-1303
One (1) Hex Nut
(M8 x 25mm) H1-1412
Cane Shaped Handle Assembly R1-2038
Eight (8) Curved Washers
Four (4) Hex Bolts
(3/8-16) H1-1502
(3/8) H1-1301
(3/8-16) H1-3504
Required tools: 13 mm Box Wrench, 9/16” Box Wrench and/or adjustable wrenches
* all hardware arrives pre-assembled to the corresponding parts
Leg Roller Shaft
D1-1010
Four (4) Capped Nuts (M8 nylon) H1-3009
Support Post
D1-1003
(3/8) H1-1302
(3/8-16) H1-1304
(M8) H1-4108
(M8 50mm) H1-1410
Lap Pad Assembly
D1-1004
DEXTM Assembly Instructions #LD-1001 Pg. 1
Base Frame
D1-1002
Cane Shaped Handles
R1-2038
Page 3
ASSEMBLY
STEP ONE
ASSEMBLY INSTRUCTIONS
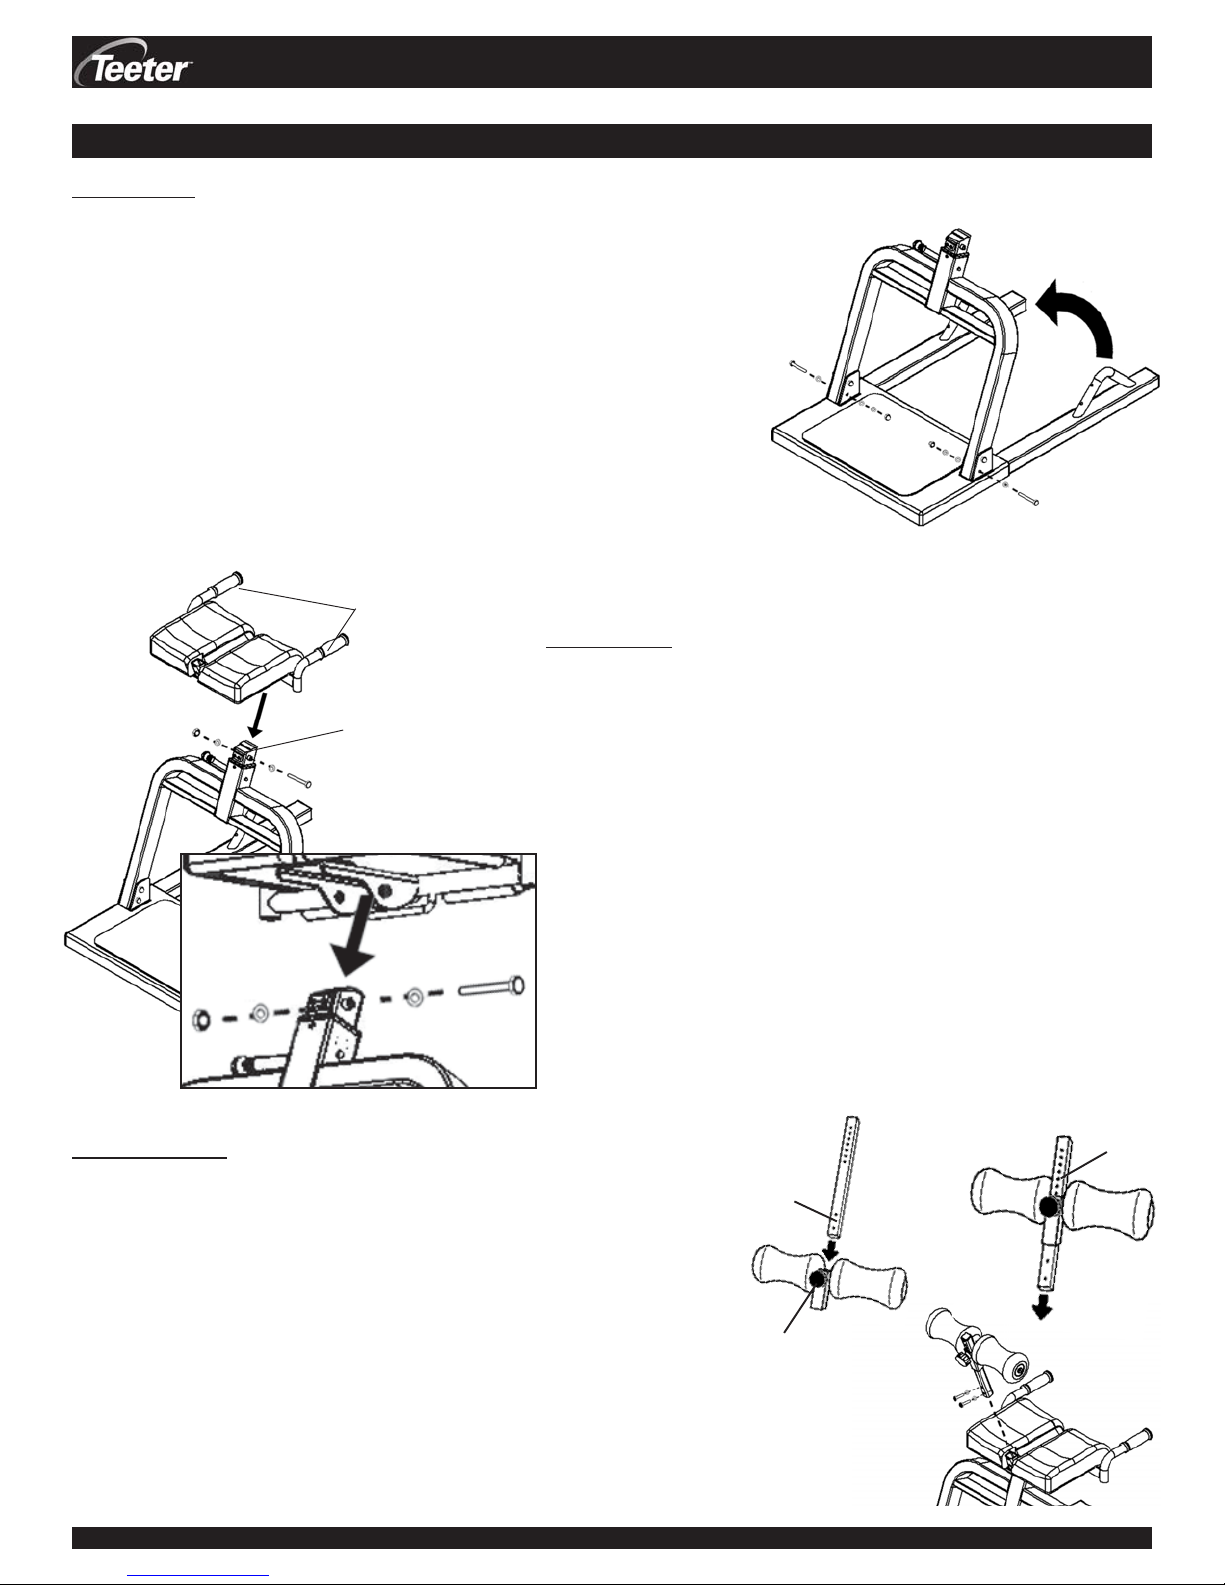
Position the Support Post (D1-1003) on the Base Frame (D1-1002)
• The Base Frame and Support Post arrive pre-assembled in the storage
position. Remove only the LOWER Hex Bolt from each column of the
Support Post. Keep this hardware nearby .
• Rotate the Support Post up approximately 80 degrees until the two
lower holes in the Support Post align with the lower holes in the Base
Frame (See Figure 1).
• Insert the Hex Bolt with Flat Washer from the outside through the
lower holes in each column. Finish with another Flat Washer and a
Lock Washer and fasten with the Capped Nut using a 9/16” Wrench.
Figure 2
Traction
Handles
STEP TWO
Secure the Lap Pad Assembly (D1-1004) to the Chrome Shaft in
Chrome
Shaft
(Rear)
(Front)
the Support Post (D1-1003)
• Remove the Hex Nut, Flat Washers and Hex Bolt from the
Lap Pad Assembly (leave the bushings in place). Keep this
hardware nearby .
• With the Traction Handles facing the rear of the Support Post,
place the Lap Pad Assembly over the Chrome Shaft and align
the holes (See Figure 2).
• Thread the Hex Bolt through a Flat Washer . Insert through the
holes, securing the Lap Pad Assembly to the Chrome Shaf t.
Finish with the remaining Flat Washer and Hex Nut. Secure
using a 9/16” Wrench. (See Figure 2A for close-up view)
• Make sure the fasteners are securely tightened and the Lap
Pad rotates smoothly .
Figure 1
STEP THREE
Attach the Leg Roller Assembly (D1-1007) to the Lap Pad
Assembly (D1-1004)
• Y ou must remove the Hex Bolt s and Flat Washers from the Leg
Roller Assembly before proceeding. Keep this hardware nearby!
• Loosen the Adjustment Knob and slide the bottom of the Leg
Roller Shaft into the Leg Roller Adjustment Frame (See Figure
3A). Align to any one of the adjustment settings and secure by
hand-tightening the Adjustment Knob (See Figure 3B). Do not
overtighten.
• Slide the Leg Support Shaft into the receiving end of the Lap Pad
Assembly (See Figure 3C). Lining up the two holes, re-insert the
Flat Washers and Hex Bolts. Secure using a 13 mm Wrench.
DEXTM Assembly Instructions #LD-1001 Pg. 2
Figure 2A
Figure 3A
bottom
of shaft
Adjustment
Knob
Figure 3C
Figure 3B
Adjustment
Settings
Page 4
ASSEMBLY INSTRUCTIONS
STEP FOUR
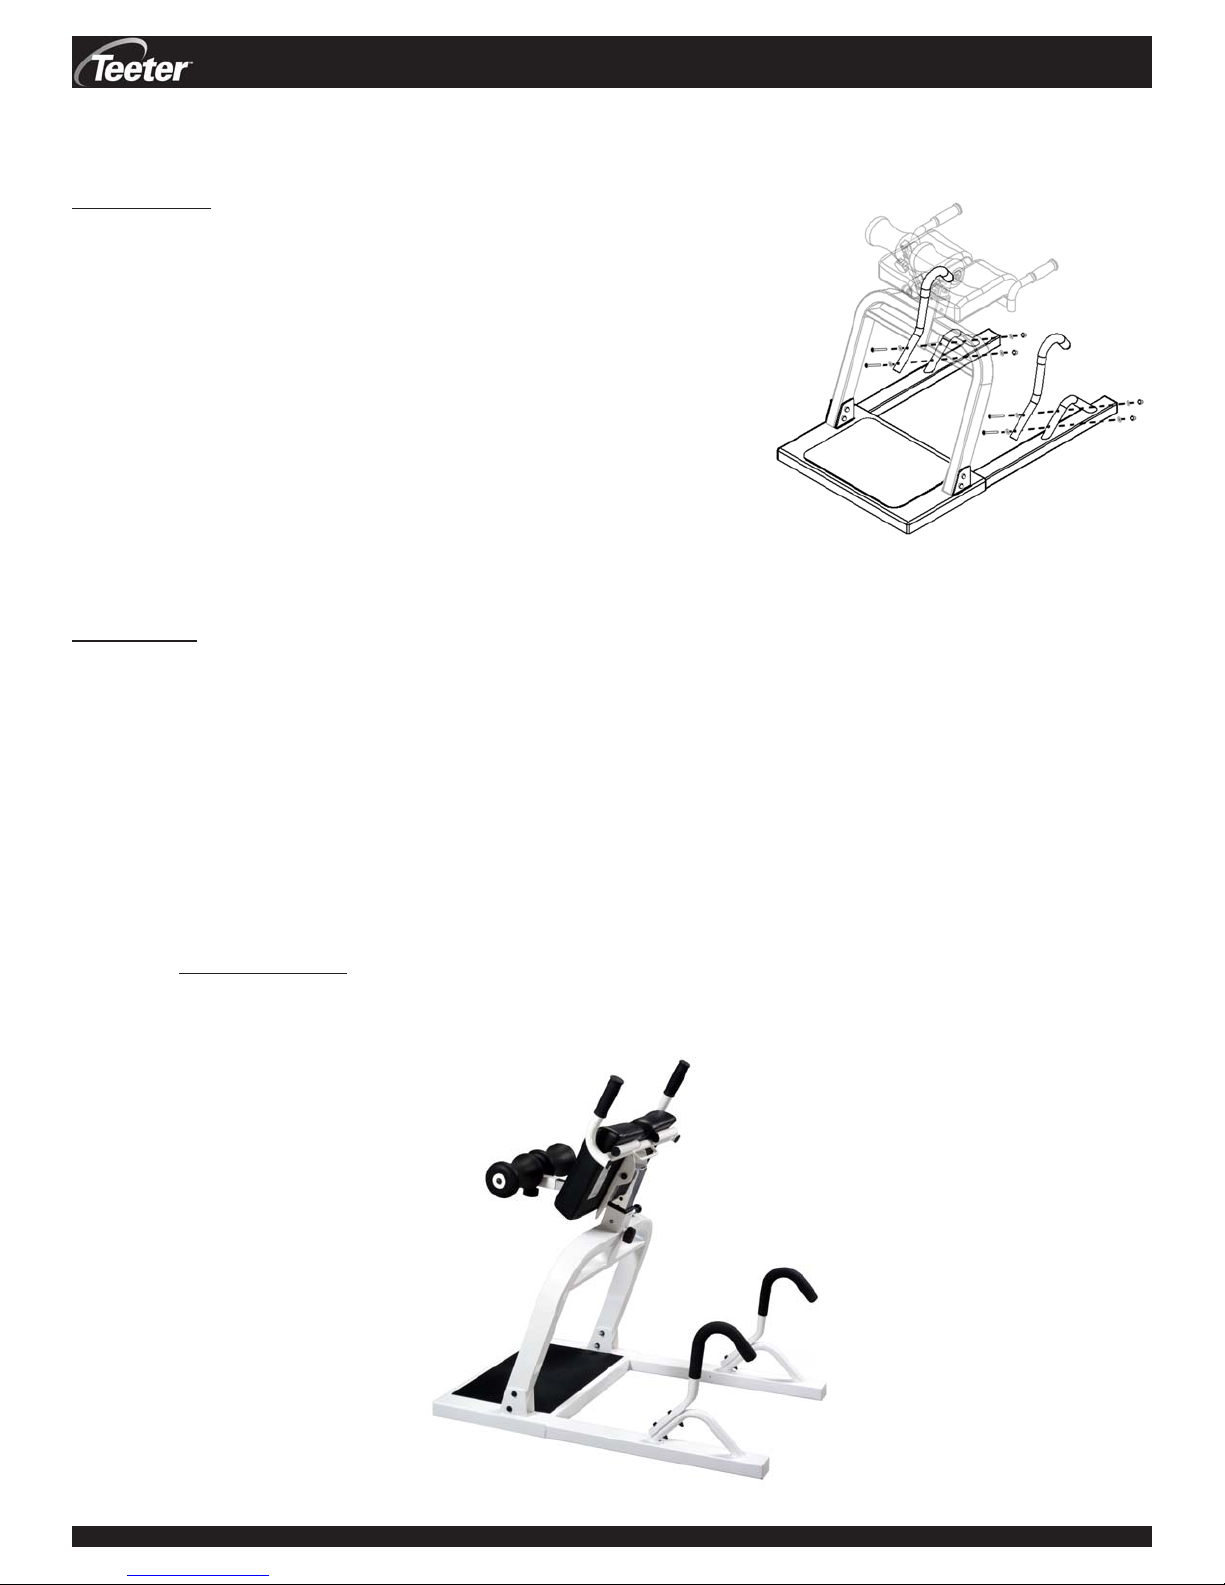
Attach the Cane Shaped Handles (R1-2038) to the Base Frame
(D1-1002)
• Y ou must remove the Hex Bolts, Curved W ashers and Capped
Nuts from the handle supports on the Base Frame before
proceeding. Keep this hardware nearby.
• Align the two holes in the Cane Shaped Handles to the holes in
the handle supports on the Base Frame (See Figure 4).
• Insert a Hex Bolt with Curved Washer through both holes on
each Cane Shaped Handle. Finish with another Curved Washer
and secure with a Capped Nut using a 13 mm Wrench.
STEP FIVE
Figure 4
T esting the Assembly
PRIOR TO USE:
• T est the Lap Pad for smooth and steady rot ation.
• Ensure that all fasteners are secure.
The assembly of the DEX • decompression & extensionTM is now complete! Please remember:
• Read the Instructional Training Manual and accompanying materials thoroughly before using the DEXTM. Improper
use could result in serious injury or death.
• Please complete and mail the warranty card.
• Visit www.STLIntl.com for information on the Power VITM Inversion Table, another valuable tool for core training
offering unique and complimentary benefits.
DEXTM Assembly Instructions #LD-1001 Pg. 3
Page 5
INSTRUCTIONAL TRAINING MANUAL
!
WARNING
Users must familiarize themselves with the proper use of the equipment and the inherent risks of inversion, such as
falling on one’s head or neck, pinching, entrapment or equipment failure. FAILURE TO FOLLOW INSTRUCTIONS OR
HEED WARNINGS COULD RESULT IN SERIOUS INJURY OR DEATH.
Restrictions on Use
• DO NOT allow use of the equipment without a licensed physician's approval. Carefully review the following list of
medical contraindications for inversion with every user:
· Middle ear infection · Conjunctivitis · Recent stroke or transient ischemic attack
· Extreme obesity · High blood pressure · Bone weakness (osteoporosis)
· Pregnancy · Hypertension · Recent or unhealed fractures
· Hiatal hernia · Heart or circulatory disorders · Medullary pins
· Ventral hernia · Spinal injury · Surgically implanted orthopedic supports
· Glaucoma · Cerebral sclerosis · Use of anticoagulants (including high doses
· Retinal detachment · Acutely swollen joints of aspirin)
• DO NOT allow use of the equipment by anyone over 6'6" (198 cm) or 300 lbs. (136 kg). Structural failure could occur
or head/neck may impact the floor during inversion.
• DO NOT allow modifications to the equipment or the use of accessory attachments that are not recommended by
the manufacturer, as this may result in serious injury or death. Utilize the equipment for its intended purpose only.
Precautions Before Use
DO NOT allow anyone to use the DEX until they have been instructed on the proper and safe use of the equipment
•
by someone who has thoroughly and carefully read the Instructional Training Manual, reviewed all other
accompanying documents, and inspected the equipment.
NEVER allow children to use the equipment unsupervised.
•
DO NOT allow anyone to operate equipment while under the influence of drugs, alcohol, or medication that may cause
•
drowsiness or disorientation.
• Users must ALWAYS inspect the equipment prior to use. Make sure that the Lap Pad rotates smoothly to the fully
inverted position and back, and that all fasteners are secure.
ALWAYS replace defective components immediately and/or keep the equipment out of use until repair.
•
• Users must
adjusted prior to each use.
• The user should refer to warning notices posted on the equipment.
Precautions During Use
• DO NOT allow the use of aggressive movements while on the DEX.
• Users must
or insert objects into any opening.
• A trained instructor should closely supervise new users until they are sure the user is able to safely and correctly
use the equipment.
ALWAYS make sure that the height of the chrome shaft and the width of the leg rollers are correctly
ALWAYS keep hands and fingers away from moving parts to avoid injury. DO NOT allow anyone to drop
(This is not an exhaustive list, it is intended only for reference)
The DEXTM is a high quality inversion machine intended for use in commercial facilities. It is important that all
users receive training on how to adjust and utilize the equipment.
Placement within the facility:
• Ensure the unit is on a level surface.
• Assemble the equipment in an area with sufficient clearance on all sides of the unit. Users will require adequate
space to rotate their bodies.
• Be aware that passersby may be bumped or kicked if they stand too near to the unit while in use.
• Make sure that the instructions and poster are nearby and accessible to the users.
Maintenance of the equipment:
• Facilities are responsible for the cleaning and maintenance of the equipment.
• Regularly wipe down the unit with mild soap and water.
• Schedule daily, weekly and monthly equipment inspections to verify that the unit is clean and in good shape, the
unit functions properly, all parts rotate smoothly, and all fasteners are secure.
• For warranty service, refer to the contact information listed on pg. 4 of this manual.
Training for staff and users:
• Familiarize all staff members with this Instructional Training Manual so that they will be prepared to provide
adequate training for the users of the equipment.
• Provide users with adequate training on proper equipment function, adjustments, precautions, risks from
IMPORTANT SAFETY INSTRUCTIONS
overexertion or improper use, and health contraindications (see above).
DEXTM Instructional Training Manual #LD-1001 Pg. 1
ATTENTION OWNERS, MANAGERS AND STAFF:
Page 6
INSTRUCTIONAL TRAINING MANUAL
WHO SHOULD USE / NOT USE THE DEXTM?
The DEXTM is ideal for most reasonably fit people who want to achieve functional fitness, decompress the back and weight
bearing joints, effectively train core muscle groups, exercise without loading the spine, and recover from high impact
workouts. Facilities are responsible for evaluating their own clientele to determine who should and should not use
the equipment. It is also the facilities’ responsibility to review the health contraindications and safety instructions
with all users prior to allowing them access to the equipment (see Important Safety Instructions on pg. 1).
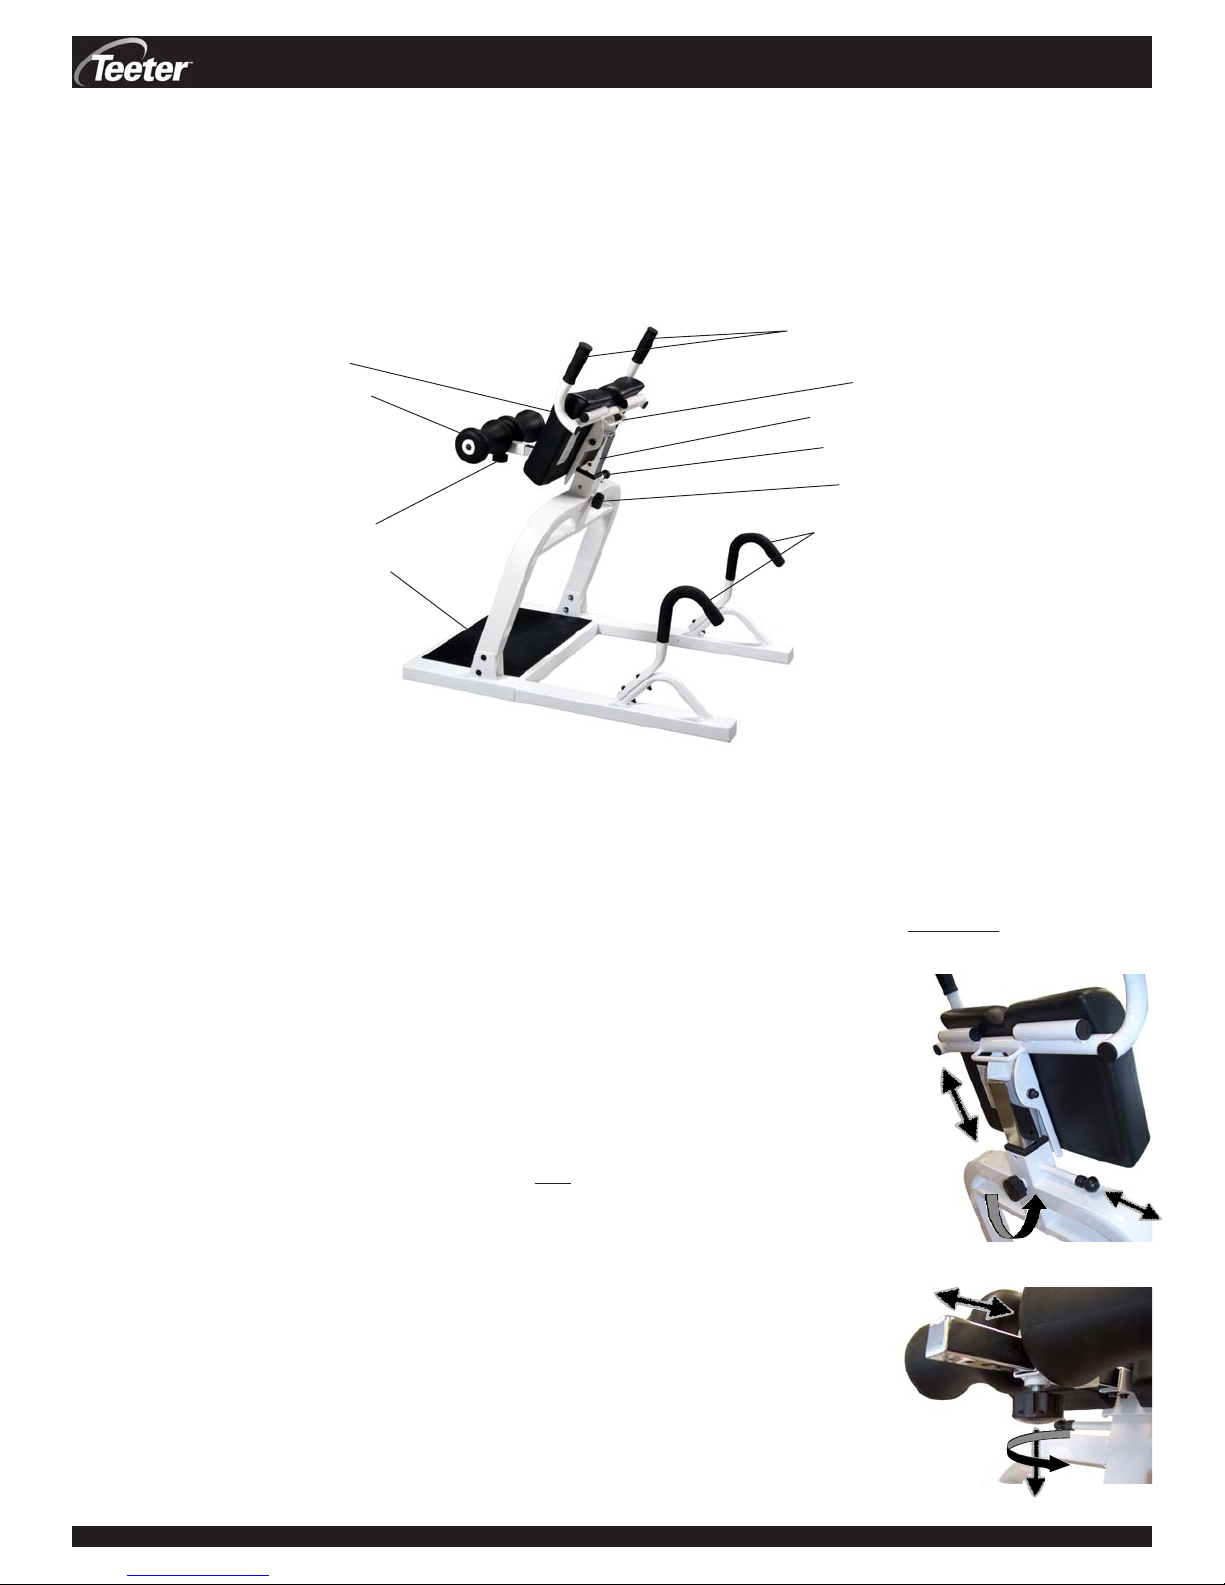
Traction Handles
Lap Pad
Leg Rollers
Adjustment
Knob
Foot Platform
Height Adjustment
Handle
Chrome Shaft
Locking Pin
De-rattler
Knob
Cane Shaped
Handles
PRIOR TO USE
Step One
• Instruct the users to test and inspect the equipment before each use. They should make sure that the Lap Pad rotates
smoothly to the fully inverted position and back and that all fasteners are secure.
Step Two
• Explain to the users that the DEXTM features two adjustment settings that allow each user to properly adjust the
equipment for their own body type. They must make sure the equipment is properly adjusted every time they use the
equipment by A) adjusting the height of the Chrome Shaft, and B) adjusting the width of
the Leg Rollers:
A. Instruct the users to adjust the height of the Chrome Shaft:
i. Loosen the De-rattler Knob by rotating it several turns counterclockwise.
ii. Pull the locking pin for the Chrome Shaft while lifting or lowering the Lap Pad by the
Height Adjustment Handle on the back.
iii. Select a height setting so that while standing on the Platform, the user’s hips are
at the same height as the top edge of the Lap Pad.
iv . Release the Locking Pin so that it engages fully into one of the height settings.
Tighten the De-rattler Knob by rotating clockwise.
v . Instruct the users to make sure the Locking Pin is fully engaged and the De-rattler
Knob is tightened prior to use. Failure to do so could result in serious injury!
B. Instruct the users to adjust the width of the Leg Rollers:
i. Loosen the Adjustment Knob by rotating it several turns counterclockwise.
ii. Pull out on the Adjustment Knob and slide the Leg Rollers in or out depending on
the leg width and comfort of the user.
iii. Release the Adjustment Knob so that it engages fully into one of the hole settings.
Tighten the Adjustment Knob by rotating clockwise.
iv . Instruct the users to make sure the Adjustment Knob is fully engaged and tightened
prior to use. Failure to do so could result in serious injury!
DEXTM Instructional Training Manual #LD-1001 Pg. 2
Page 7
INSTRUCTIONAL TRAINING MANUAL
HOW TO INVERT
Before users attempt to operate the equipment, they must be briefed on how the equipment works. Explain that the DEX
operates strictly under user control - that is, the users are able to rotate the unit as slow or as fast as they desire. They will
need to use the strength of their arms to lower their body down and to return upright. If you or the user is are unsure about
their ability to operate the equipment properly , advise them to always have a spotter nearby or else to discontinue the use of
the equipment.
TM
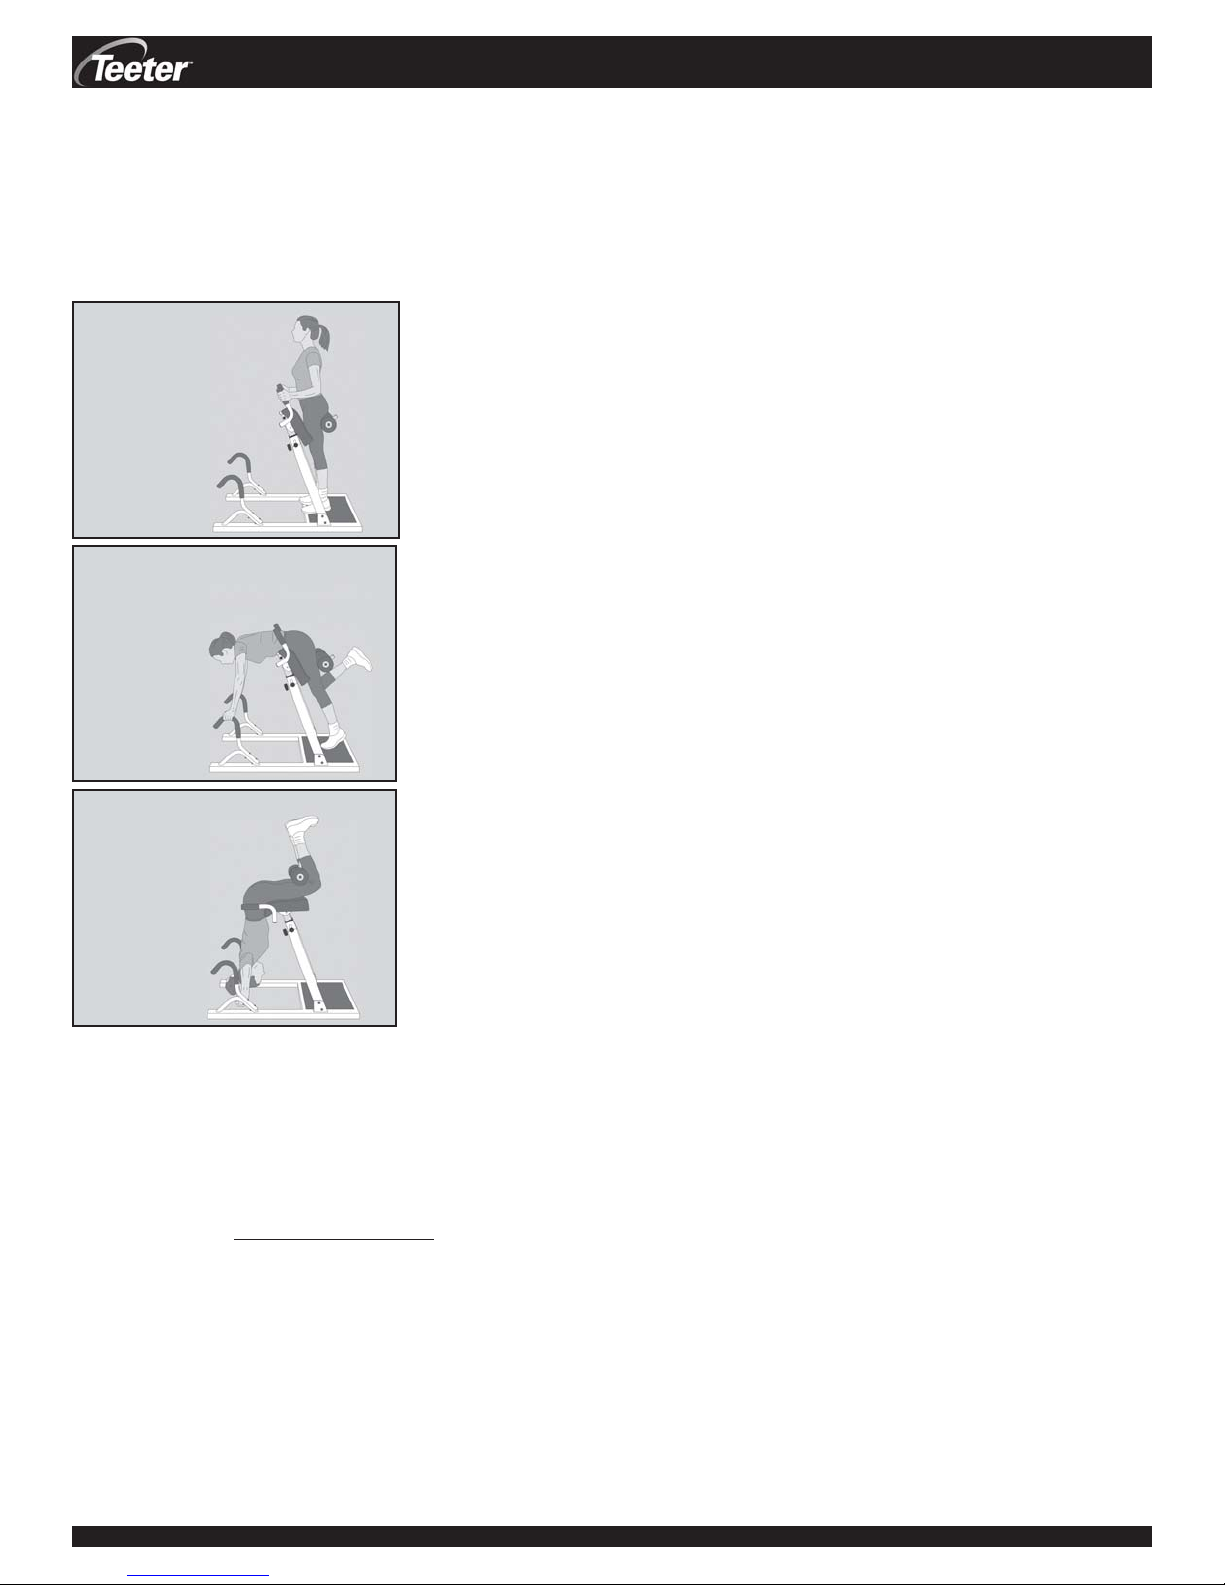
Step One
User stands inside
the Leg Rollers hips should align
with the top edge
of the Lap Pad
Step Two
User leans
forward, bends
one knee and
reaches for
the Cane
Shaped
Handles
Step Three
User rotates the
Lap Pad, inverting
in the 90/90
position
Instruct the users in the following steps to invert:
Step One
• Stand with your feet on the Foot Platform, positioning your thighs between the
Leg Rollers and Lap Pad.
• Determine whether the width of the Leg Rollers is comfortable. Adjust if
necessary .
• Determine whether the Lap Pad is at the correct height. Your hip s should be
the same height as the top edge of the Lap Pad. Adjust if necessary.
Step Tw o
• T o begin inversion, move from the waist and slowly lean forward.
• Bend one knee and reach for the Cane Shaped Handles with both hands.
• While holding the Cane Shaped Handles, continue to slowly lean forward and
rotate the Lap Pad while lifting and bending the other leg.
Step Three
• Continue rotation until the Lap Pad reaches the stop position. Y our body
weight will be supported by your thighs.
• Keep both knees bent around the Leg Rollers. Allow your hands to dangle on
the floor or place them folded behind your head.
It is important to maintain bent knees to help support your body while inverted.
Failure to do so could result in serious injury or death!
WHILE INVERTED
ENCOURAGE USERS TO... RELAX. BREA THE. STRETCH. DECOMPRESS. MOVE. EXERCISE. Explain how to
achieve maximum benefits when using the DEXTM:
• For maximum decompression, breathe deeply and relax the muscles in the lower back and shoulders.
• Movement is also helpful to encourage relaxation, stimulation of circulation and lymph flow.
• It is important to listen to your own body . Everyone is unique and your own body will tell you when you’ve had enough.
• Y ou may want to increase the duration of use over a period of time. However , inversion is NOT a no p ain, no gain
activity. Always listen to your body’s response to inversion and ascend if you feel anxiety, discomfort, dizziness or pain.
• Some people may prefer to use the equipment for decompression and relaxation. Others may prefer a more active workout
consisting of stretching and exercise (see pg. 4). Spend time with each individual user to develop his or her own unique routine.
RETURNING TO THE UPRIGHT POSITION
T o return to an upright position, instruct the user to reverse the procedure explained above:
• Use the Cane Shaped Handles to gradually walk yourself upright, rotating the Lap Pad and straightening your legs until
standing at the start position.
DEXTM Instructional Training Manual #LD-1001 Pg. 3
Page 8
INSTRUCTIONAL TRAINING MANUAL
EXERCISING ON THE DEX
TM
Depending upon the users’ current fitness level and goals, you may want to introduce them to advanced inversion exercises on
the DEXTM. Proper form is key for effective stretching and strengthening, and that is why it is essential that users receive
adequate training from staff members before attempting the following exercises.
Instruct users to confine all activities to smooth movements. Aggressive exercises that involve a lot of body movement
could cause the DEX to tip over resulting in serious injury or death.
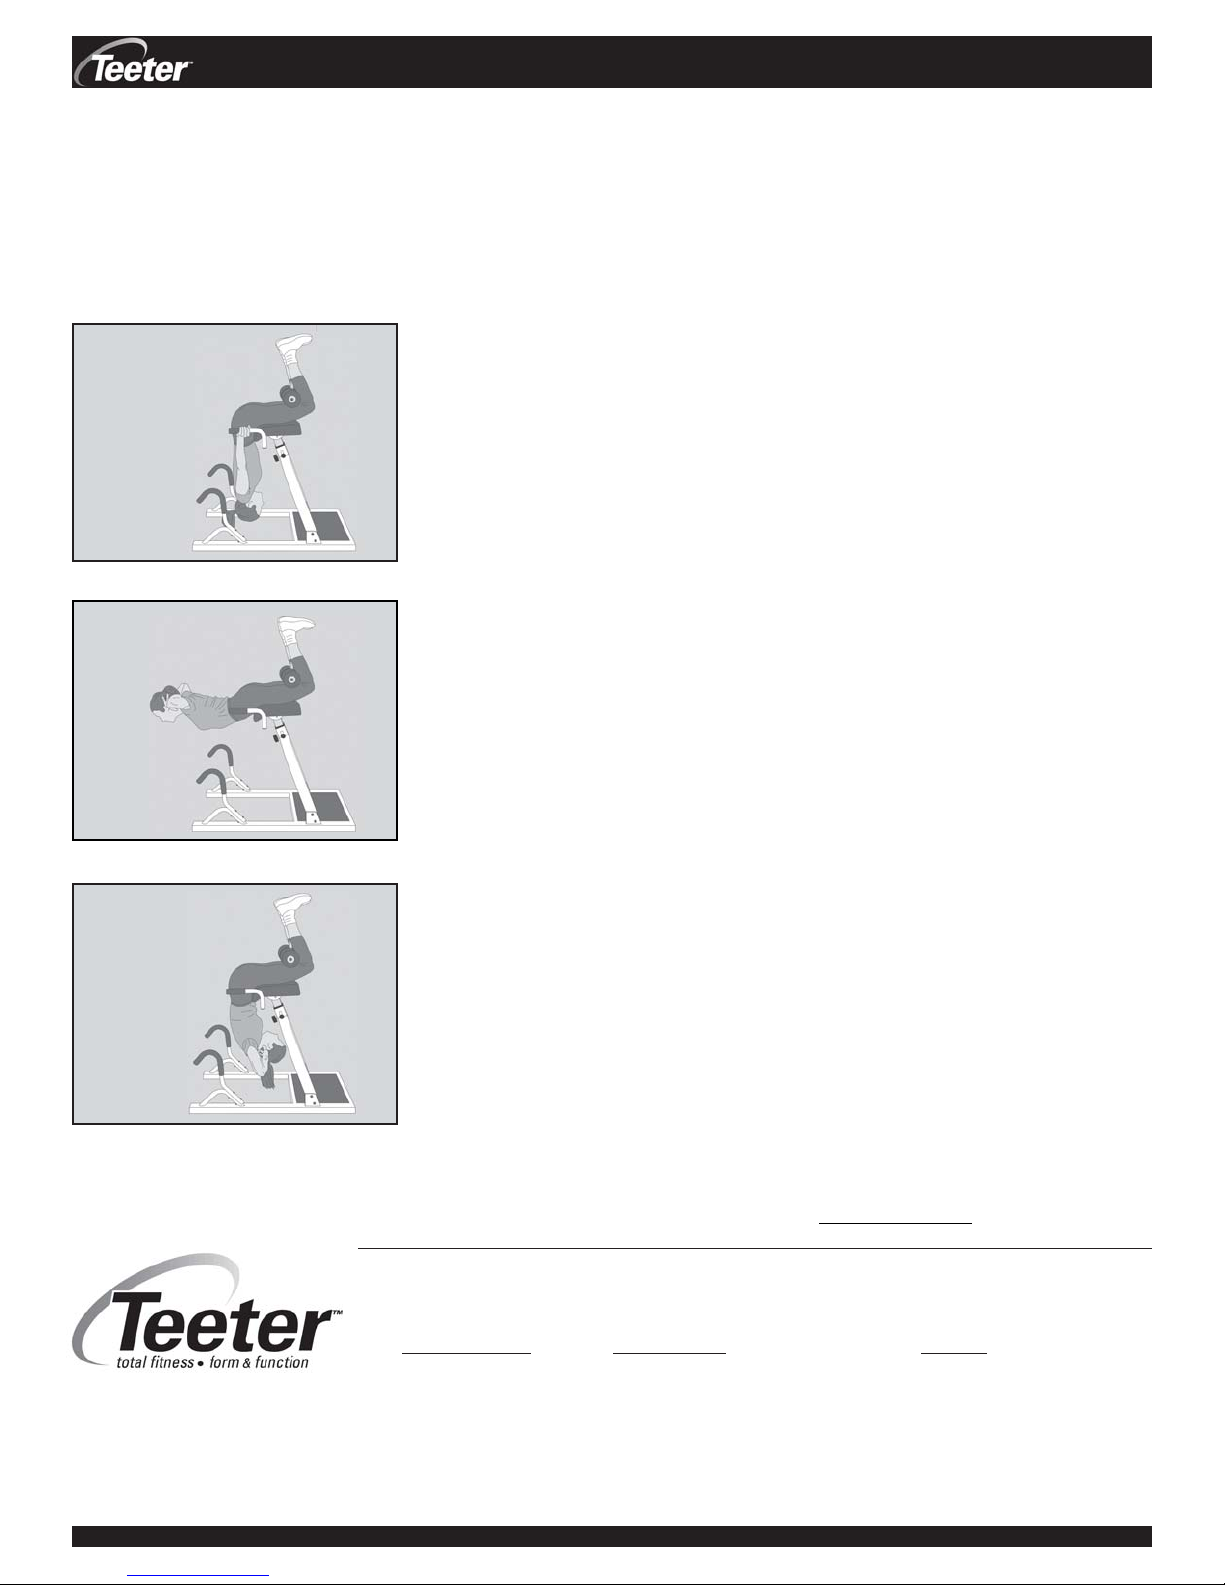
Traction Stretch - Push
Users can obtain a
more aggressive
stretch and greater
joint decompression
Traction S tretch - Push
• Hang fully inverted and relax.
• Firmly push against the Traction Handles located at the side of the Lap Pad.
Alternative: Traction Stretch - Pull
• Hang fully inverted and relax.
• Place your elbows under the Cane Shaped Handles and gently push against the
Handles.
Helpful Hints: Stretch, hold 10 seconds and release, repeating several times to
achieve the desired stretch. Relax and breathe deeply .
Back Extensions
Back Extensions
Users can strengthen their
lower back, glutes and
hamstrings
• Hang fully inverted with hands crossed on your chest or folded behind your head.
• Tighten glutes and back and lift torso up slowly into extension. Make sure to keep
abdominal muscles engaged to support spine while extended.
• While the DEX is designed to reduce the chance of hyperextension, it is important
that you perform this exercise in a slow and controlled manner. DO NOT use body
momentum for the extension or extend past parallel with the floor.
Alternative: Back Extensions - Rotation
• Slightly rotate your torso when extending to work the back extensors and external
oblique abdominal muscles.
Crunches
Users can achieve a
great workout for their
abs and obliques
Helpful Hints: Extend, hold and release, repeating as desired to meet your
workout goals.
Abdominal Crunches
• Hang fully inverted with hands crossed on your chest or folded behind your head.
• Contract your abdominal muscles, crunching inward toward the support posts.
Alternative: Abdominal Crunch - Rotation
• Slightly rotate your torso when crunching to work the rectus abdominus and
external oblique muscles.
Helpful Hints: Contract, hold and release, repeating as desired to meet your workout goals.
More Information: For additional exercises and supplementary benefits and
training information, please visit www.STLIntl.com.
For information about the 2-year warranty, to order replacement labels or manuals, or if you have any
problems assembling the DEX™ or questions about its use, please contact Customer Service at the
appropriate location below:
USA & Canada:
STL International, Inc.
9902 162nd St. Ct. E.
TeeterTM is a trademark of Inversion International, Ltd.
and licensed to STL International, Inc.
Specifications subject to change without notice.
© COPYRIGHT 2006, Inversion International, Ltd.
International Law Prohibits Any Copying, 10/06-1
DEXTM Instructional Training Manual #LD-1001 Pg. 4
Puyallup, WA 98375
(Phone) 800-847-0143
(Fax) 800-847-0188
(email) [email protected]
(web) www.STLIntl.com
International:
Inversion International, Ltd.
PO Box: AP 59245
New Providence Island, Bahamas
(Phone) +1-242-362-1001
(Fax) +1-242-362-1002
(email) [email protected]
(web) www.InversionInternational.com
Europe:
Teeter Ltd.
Cygnet House, Sydenham Road
Croydon, Surrey CR0 2EE, UK
(Phone) +44-20-8667-0060
(Fax) +44-20-8680-3999
(email) mail@T eeterLtd.com
(web) www.TeeterLtd.com
 Loading...