

Page 1
Table fan
TSA8023
Bedienungsanleitung
Owner’s manual
Instrukcja obsługi
Manual de utilizare
Návod na použitie
DE
EN
PL
RO
SK
Page 2

Page 3

Bedienungsanleitung 3
Danke für den Kauf des TEESA Gerätes. Bitte lesen Sie diese
Bedienungsanleitung sorgfältig und bewahren diese auf für späteres
Nachschlagen.
Der Händler übernimmt keine Verantwortung für Schäden, die durch
unsachgemäße Handhabung und Verwendung des Produktes verursacht
wurden.
SICHERHEITSANLEITUNGEN
Um die Gefahr von Feuer, Stromschlag oder anderen Verletzungen zu
vermeiden, befolgen Sie die grundlegenden Sicherheitsvorkehrungen bei
der Verwendung elektrischer Geräte, einschließlich der folgenden:
1. Bitte lesen Sie sorgfältig diese Bedienungsanleitung vor der ersten
Benutzung und heben sie auf für späteres Nachschlagen.
2. Vor dem Anschluss des Gerätes an Netzsteckdose, stellen Sie sicher,
dass die auf dem Gerät angegebene Spannung mit der Spannung der
Steckdose übereinstimmt.
3. Stellen Sie das Gerät auf eine trockene, ebene und stabile Fläche.
4. Schützen Sie das Gerät vor Stößen und Herunterfallen.
5. Reinigen Sie das Gerät gemäß den Angaben im Abschnitt „Reinigung
und Wartung“.
6. Schalten Sie das Gerät IMMER aus und trennen es vom Stromnetz:
• Wenn es nicht richtig funktioniert,
• Wenn ein seltenes Geräusch bei der Verwendung gibt,
• Vor dem Zerlegen des Gerätes,
• Vor der Reinigung,
• Bei Nichtgebrauch.
7. Ziehen Sie beim Trennen des Netzkabels am Stecker und nicht am
Kabel.
8. Das Gerät kann von Kindern benutzt werden, die älter als 8 Jahre alt
sind und von Personen mit eingeschränkten physischen, sensorischen
oder geistigen Fähigkeiten oder Mangel an Erfahrung und Wissen,
wenn sie von einer Person beaufsichtigt und geleitet werden, die für
ihre Sicherheit zuständig ist, in einer vorsichtigen Art und Weise und
die alle Sicherheitsvorkehrungen verstanden hat und befolgen wird.
Kinder sollten nicht mit diesem Gerät spielen. Kinder sollten nicht die
Reinigung und Wartung des Gerätes ohne Aufsicht durchführen.
9. Das Netzkabel darf nur von einem autorisierten Kundendienst ersetzt
werden.
10. Halten Sie das Gerät und sein Kabel fern von Hitze, Wasser, Feuchtigkeit,
scharfen Kanten und andere Faktoren, die das Gerät oder das Netzkabel
beschädigen könnten.
DE
Page 4
Bedienungsanleitung4
11. Stellen Sie das Gerät nicht ins Wasser oder andere Flüssigkeiten;
verwenden Sie es nicht mit nassen oder feuchten Händen.
12. Das Produkt nicht für andere Zwecke verwenden, als in dieser
Bedienungsanleitung angegeben.
13. Verwenden Sie kein nicht autorisiertes Zubehör.
14. Das Gerät ist für den Heimgebrauch bestimmt; verwenden Sie es nicht
für gewerbliche oder industrielle Zwecke. Gerät nur im Innenbereich
benutzen.
15. VERWENDEN SIE NICHT das Gerät wenn das Kabel oder der Netzstecker
beschädigt ist, oder das Gerät defekt ist.
16. Versuchen Sie nicht, dieses Gerät selbst zu reparieren, nur autorisiertes
und qualiziertes Personal darf dieses Produkt reparieren. Das Gerät
nie zerlegen.
17. Stellen Sie den Lüfter nie in der Nähe von Gasgeräten, Feuer oder
brennbaren Flüssigkeiten.
18. Schalten Sie das Gerät nicht ein, wenn die Schutzgitter nicht richtig
montiert sind.
19. Netzstecker nicht mit der Stromversorgung verbinden vor Abschluss
der Installation.
20. Stecken Sie niemals Finger, Bleistifte oder andere Gegenstände durch
die Schutzgitter wenn der Ventilator läuft.
21. Bedecken Sie niemals oder behindern den Lufteinlass oder Auslass, um
eine Überhitzung zu verhindern.
22. Eine unsachgemäße Installation kann Gefahr von Feuer, Stromschlag
oder Personenschäden zur Folge haben.
DE
Page 5
Bedienungsanleitung 5
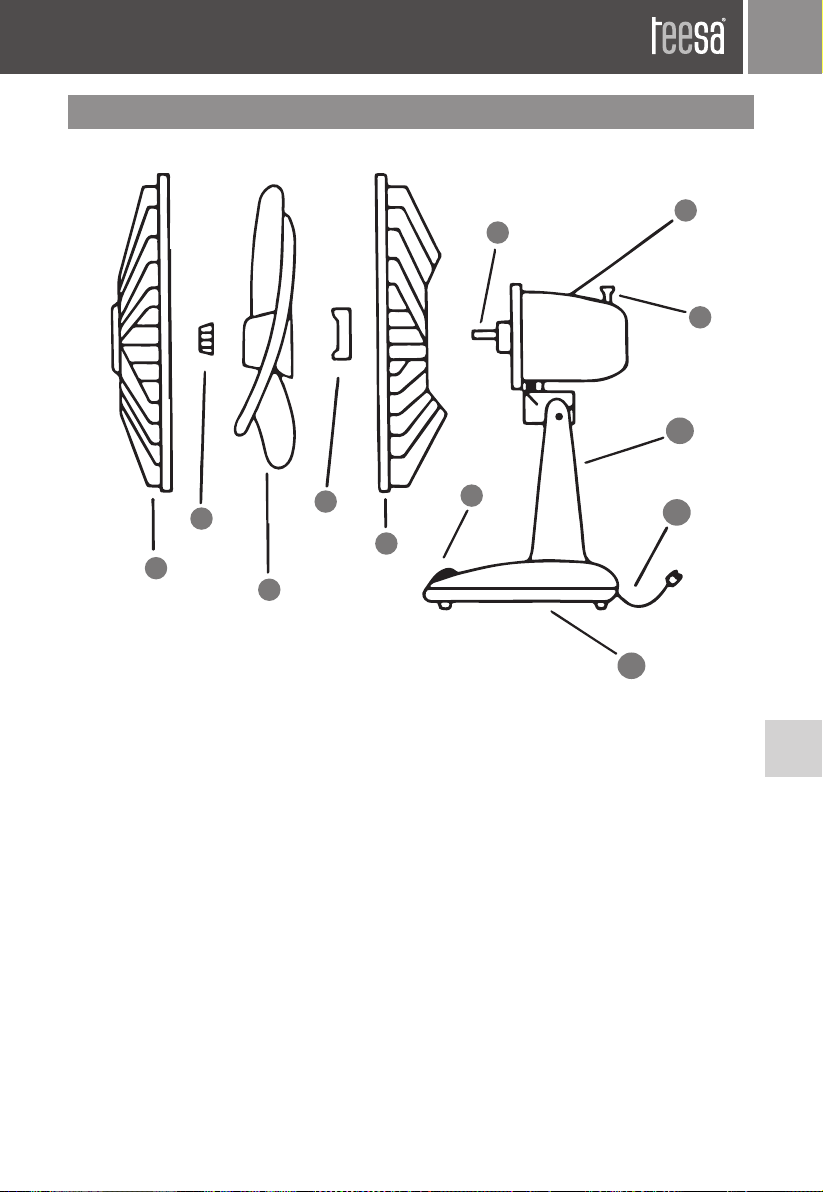
PRODUKTBESCHREIBUNG
8
7
9
10
2
4
5
1
3
1. Vorderes Schutzgitter
2. Spinner (Linksdrehung)
3. Rotorblatt
4. Mutter für hinteres Schutzgitter
5. Hinteres Schutzgitter
6. Geschwindigkeitstasten
6
12
7. Ventilatorachse
8. Motorgehäuse
9. Oszillationsschalter
10. Stand
11. Netzkabel
12. Basis
11
DE
Page 6
Bedienungsanleitung6
MONTAGE
1. Den Ständer in die Basis einfügen und dann mit den mitgelieferten
Schrauben befestigen.
2. Das hintere Schutzgitter auf die Stützen am Motorgehäuse einfügen
und mit der Schutzgitter-Mutter befestigen. Stellen Sie sicher, das
hintere Schutzgitter ist eng am Motorgehäuse befestigt.
3. Legen Sie das Rotorblatt auf die Ventilatorachse und den Spinner
festdrehen um das Rotorblatt zu befestigen.
4. Setzen Sie die Haken am Ring des vorderen Schutzgitters auf die
Oberseite des hinteren Schutzgitters. Setzen Sie das hintere Schutzgitter
in den Frontschutzring, um vollständig zusammenzupassen. Ziehen Sie
die Befestigungsschraube am unteren Ende des vorderen Schutzgitters
an.
BEDIENUNG
1. Stellen Sie den Ventilator auf eine ache stabile Oberäche.
2. Stellen Sie sicher dass keiner der Geschwindigkeitstasten gedrückt ist.
3. Ventilator an die Steckdose anschließen.
4. Drücken Sie eine der Geschwindigkeitstasten um den Luftstrom zu regeln:
1 - niedrig, 2 - mittel, 3 – hoch. Drücken Sie die Taste 0 um den Ventilator
auszuschalten.
5. Um die Oszillation zu kontrollieren, den Oszillationsschalter drücken/
DE
herausziehen.
6. Kopf nach oben oder unten in die gewünschte Position bringen.
REINIGUNG UND WARTUNG
• Vor dem Reinigen, Gerät vom Netz trennen.
• Reinigen Sie das Gerät mit einem weichen, leicht feuchten Tuch. Benutzen
Sie keine Chemikalien um das Gerät zu reinigen.
• Ventilator mit einem trockenen Tuch nach der Reinigung abwischen.
Page 7
Bedienungsanleitung 7
TECHNISCHE DATEN
FUNKTIONEN
3 Geschwindigkeiten
Automatische Oszillation: 90°
Einstellbare Neigung
Metallisches Schutzgitter
TECHNISCHE DATEN
Leistung: 35 W
Gitterdurchmesser: 34 cm
Rotordurchmesser: 30 cm
Kabellänge: 1,8 m
Stromversorgung: 220 ~240 V; 50/60 Hz
Deutsch
Korrekte Entsorgung dieses Produkts
(Elektromüll)
(Anzuwenden in den Ländern der Europäischen Union und anderen
europäischen Ländern mit einem separaten Sammelsystem)
Die Kennzeichnung auf dem Produkt bzw. auf der dazugehörigen
Literatur gibt an, dass es nach seiner Lebensdauer nicht zusammen mit
dam normalen Haushaltsmüll entsorgt werden darf. Entsorgen Sie dieses
Gerät bitte getrennt von anderen Abfällen, um der Umwelt bzw. der
menschilchen Gesundheit nicht durch unkontrollierte Müllbeseitigung zu
schaden. Recyceln Sie das Gerät, um die nachhaltige Wiederverwertung von
stoichen Ressourcen zu fördern. Private Nutzer sollten den Händler, bei dem
das Produkt gekauft wurde, oder die zuständigen Behörden kontaktieren,
um in Erfahrung zu bringen, wie sie das Gerät auf umweltfreundliche Weise
recyceln können. Gewerbliche Nutzer sollten sich an Ihren Lieferanten
wenden und die Bedingungen des Verkaufsvertrags konsultieren. Dieses
Produkt darf nicht zusammen mit anderem Gewerbemüll entsorgt werden.
Hergestellt in China für LECHPOL ELECTRONICS Sp. z o.o. Sp.k.,
ul. Garwolińska 1, 08-400 Miętne.
DE
Page 8
Owner’s manual8
Thank you for purchasing TEESA appliance. Please read this operation
instruction carefully before use, and keep it for future use.
Distributor does not take responsibility for damages caused by inappropriate
handling anduse of the product.
SAFETY INSTRUCTIONS
In order to reduce the injuries or damages, follow basic safety precautions
applied when using any electrical device, including the following:
1. Read this instruction manual carefully, even if you are familiar with the
appliance. Keep the manual for future reference.
2. Before connecting the device to power supply socket, make sure the
voltage indicated on the appliance corresponds to the voltage in the
power supply socket.
3. Place the device on at, stable surface.
4. Protect this device from shock and being dropped.
5. Clean this device in accordance to instructions listed in “Cleaning and
Maintenance” section.
6. ALWAYS turn o the device and disconnect it from the mains supply:
• if it’s not operating correctly,
• if there’s an uncommon voice when using,
• before disassembling the device,
• before cleaning,
• when not in use.
7. When you disconnect the power cord of the device, grasp and pull the
plug, not the cord/cable.
8. This appliance may be used by children who are above 8 years old and
by persons with reduced physical, sensory or mental capabilities, or
EN
lack of experience and knowledge, if they are supervised and guided
by a person who is responsible for their safety in a cautious manner,
and all the safety precautions are understood and followed. Children
should not play with this device. Children should not perform cleaning
and servicing of the device unsupervised.
9. Fixed power cable may only be replaced in an authorized service point.
10. Keep the device and its cord/cable away from heat, water, moisture, sharp
edges and any other factor which may damage the appliance or its cord.
11. Do not place the appliance in water or any liquid; nor handle/use it
with wet or moist hands.
12. Do not use the product for purposes dierent from displayed in this
operating manual.
13. Do not use unauthorized accessories.
Page 9

Owner’s manual 9
14. Appliance for home use; do not use it for commercial or industrial
purposes. Device for indoor use only.
15. DO NOT use this device if the cord or the plug is damaged, or the
appliance is broken.
16. Do not attempt to repair this appliance yourself. Only authorized and
qualied personnel may repair this device. Never disassemble this
device.
17. Never place the fan near any gas appliances, re or ammable liquids.
18. Do not turn on the device if the guard is not mounted properly.
19. Do not plug the device to power mains before completing the
installation.
20. Never insert ngers, pencils, or any other object through the guard
when the fan is running.
21. Never cover or obstruct the air inlet or outlet to prevent overheating.
22. Improper installation may result in the risk of re, electric shock, or
injury to persons.
EN
Page 10
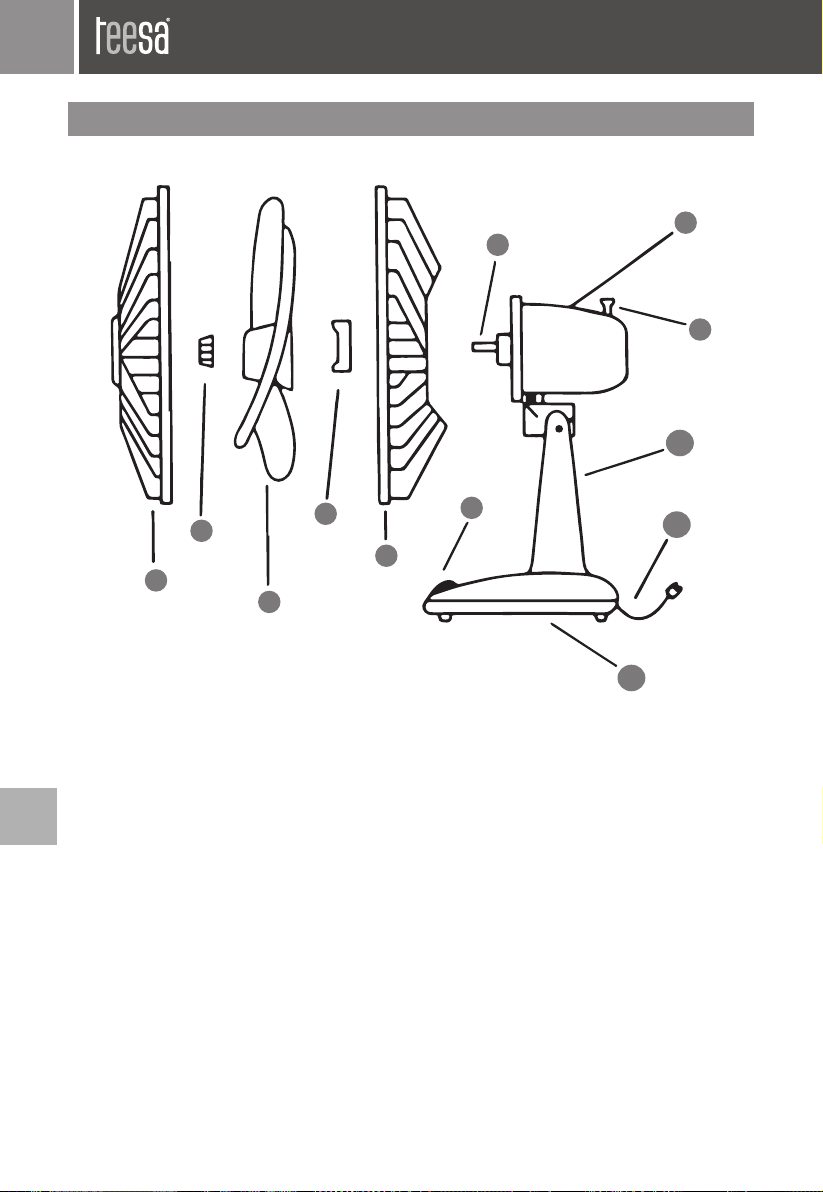
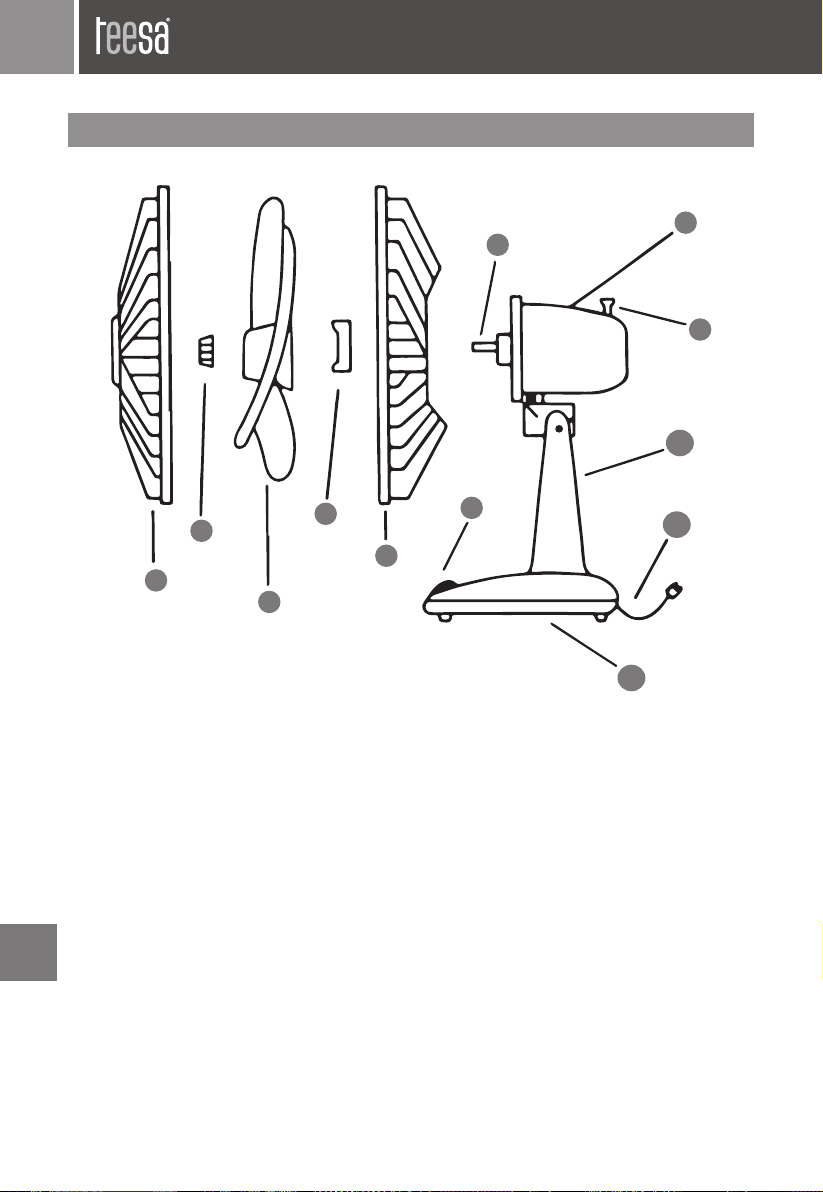
PRODUCT DESCRIPTION
7
Owner’s manual10
8
9
10
EN
2
4
1
3
1. Front guard
2. Blade screw (left spin)
3. Blade
4. Rear guard screw
5. Rear guard
6. Speed buttons
6
11
5
12
7. Fan axle
8. Motor housing
9. Oscillating button
10. Stand
11. Power supply cable
12. Base
Page 11

Owner’s manual 11
MOUNTING
1. Fit the stand into the base, then use the supplied screws to x them.
2. Place the rear guard on pillars on the motor housing and fasten it with guard
mounting nut. Make sure the rear guard is closely mounted to the motor
housing.
3. Place the blade on the fan axle and fasten the spinner to ax the blade.
4. Put the hook of the front guard ring on the top of the rear net. Put the
rear net into the front guard ring to make them tally completely. Tighten
the fastening screw at the lower end of front guard.
OPERATION
1. Place the fan on a at stable surface.
2. Make sure none of the speed button is pressed.
3. Plug the fan into power mains.
4. Press one of the speed buttons to control air outlet: 1 - low, 2 - medium,
3 – high. Press 0 button to turn the fan o.
5. To control oscillation press/pull the oscillation button.
6. Tilt the head up or down to the required position.
CLEANING AND MAINTENANCE
• Prior to cleaning, disconnect the device from power mains.
• Clean this device with soft, slightly damp cloth. Do not use any chemical
agents to clean the fan.
• Dry the fan with a dry cloth after cleaning.
SPECIFICATION
FUNCTIONS
3 speed modes
Automatic oscillation: 90°
Adjustable tilt angle
Metal blade guard
EN
Page 12
TECHNICAL DATA
Power: 35 W
Grill diameter: 34 cm
Blade diameter: 30 cm
Power cable length: 1,8 m
Power supply: 220 ~ 240 V, 50/60 Hz
Owner’s manual12
English
Correct Disposal of This Product
(Waste Electrical & Electronic Equipment)
(Applicable in the European Union and other European countries with
separate collection systems) This marking shown on the product or Its
literature, indicates that It should not be disposed with other household
EN
wastes at the end of its working life. To prevent possible harm lo the
environment or human health from uncontrolled waste disposal, please
separate this from other types of wastes and recycle it responsibly to
promote the sustainable reuse of material resources. Household users
should contact either the retailer where they purchased this product, or
their local government oce, for details of where and how they can take this
item for environmentally safe recycling. Business users should contact their
supplier and check the terms and conditions of the purchase contract This
product should not be mixed with other commercial wastes for disposal.
Made in China for LECHPOL ELECTRONICS Sp. z o.o. Sp.k., ul. Garwolińska 1,
08-400 Miętne.
Page 13
Instrukcja obsługi 13
Dziękujemy za zakup urządzenia TEESA. Przed użyciem należy dokładnie
zapoznać się z treścią instrukcji obsługi oraz zachować ją w celu późniejszego
wykorzystania.
Producent nie ponosi odpowiedzialności za nieprawidłowe użycie produktu.
KWESTIE BEZPIECZEŃSTWA
Aby uniknąć uszkodzeń lub obrażeń, należy przestrzegać podstawowych
środków bezpieczeństwa stosowanych przy obsłudze urządzeń elektrycznych,
włączając te wyszczególnione poniżej:
1. Przed użyciem należy dokładnie zapoznać się z treścią instrukcji obsługi,
nawet w przypadku wcześniejszego używania podobnego sprzętu.
Instrukcję należy zachować w celu późniejszego wykorzystania.
2. Przed podłączeniem urządzenia, należy sprawdzić zgodność napięcia
prądu gniazda sieciowego i urządzenia.
3. Urządzenie należy umieścić na płaskiej, stabilnej powierzchni.
4. Urządzenie należy chronić przed upadkiem i wstrząsami.
5. Urządzenie należy czyścić zgodnie z wytycznymi wskazanymi w dziale
„Czyszczenie i przechowywanie”.
6. Należy zawsze wyłączać urządzenie i odłączyć je od źródła zasilania:
• gdy urządzenie nie działa poprawnie,
• jeśli odgłosy pracy urządzenia nie są standardowe lub świadczą o anomalii,
• przed demontażem,
• przed czyszczeniem,
• jeśli nie jest używane.
7. Odłączając urządzenie od źródła zasilania, należy chwycić i pociągnąć za
wtyczkę, nigdy za kabel/sznur.
8. Niniejszy sprzęt może być użytkowany przez dzieci w wieku co najmniej
8 lat i przez osoby o obniżonych możliwościach zycznych, czuciowych
lub umysłowych, a także te, które nie posiadają doświadczenia i nie
są zaznajomione ze sprzętem, jeżeli zapewniony zostanie nadzór lub
instruktaż odnośnie użytkowania sprzętu w bezpieczny sposób, tak
aby związane z tym zagrożenia były zrozumiałe. Należy poinstruować
dzieci, aby nie traktowały urządzenia jako zabawki. Dzieci nie powinny
wykonywać czyszczenia i konserwacji sprzętu bez nadzoru.
9. Przewód zasilający nieodłączalny może być wymieniany wyłącznie w
autoryzowanym punkcie serwisowym.
10. Urządzenie i kabel zasilający należy przechowywać z dala od źródeł ciepła,
wody, wilgoci, ostrych krawędzi oraz innych czynników, które mogłyby
spowodować uszkodzenie tego urządzenia.
11. Nie należy zanurzać urządzenia w wodzie ani obsługiwać go mokrymi
dłońmi.
PL
Page 14

Instrukcja obsługi14
12. Nie należy używać urządzenia w innym celu niż opisanym w poniższej
instrukcji.
13. Nie należy używać nieoryginalnych akcesoriów ani części.
14. Urządzenie przeznaczone jest do użytku domowego. Nie należy używać
go w obiektach komercyjnych ani przemysłowych. Urządzenie wyłącznie
do użytku wewnątrz pomieszczeń.
15. Zabrania się używać urządzenia, jeśli kabel zasilający został uszkodzony
lub sprzęt nie działa prawidłowo.
16. Zabrania się własnoręcznej naprawy sprzętu. Jedynie osoby do tego
upoważnione i wykwalikowane mogą naprawiać urządzenie. Urządzenie
nie posiada części, które mogłyby być naprawione własnoręcznie przez
użytkownika.
17. Nie wolno umieszczać wentylatora w pobliżu urządzeń gazowych, ognia
lub cieczy łatwopalnych.
18. Nie należy włączać urządzenia, jeśli osłona wentylatora nie została
prawidłowo zamocowana.
19. Nie należy podłączać urządzenia do gniazdka sieciowego przed
zakończeniem montażu.
20. W czasie pracy wentylatora zabrania się wkładać palców, ołówków lub
innych przedmiotów w osłonę wentylatora.
21. Aby zapobiec przegrzaniu wentylatora, nie należy zakrywać ani blokować
wlotów / wylotów powietrza.
22. Niewłaściwy montaż urządzenia może grozić pożarem, porażeniem
prądem lub obrażeniami.
PL
Page 15
Instrukcja obsługi 15
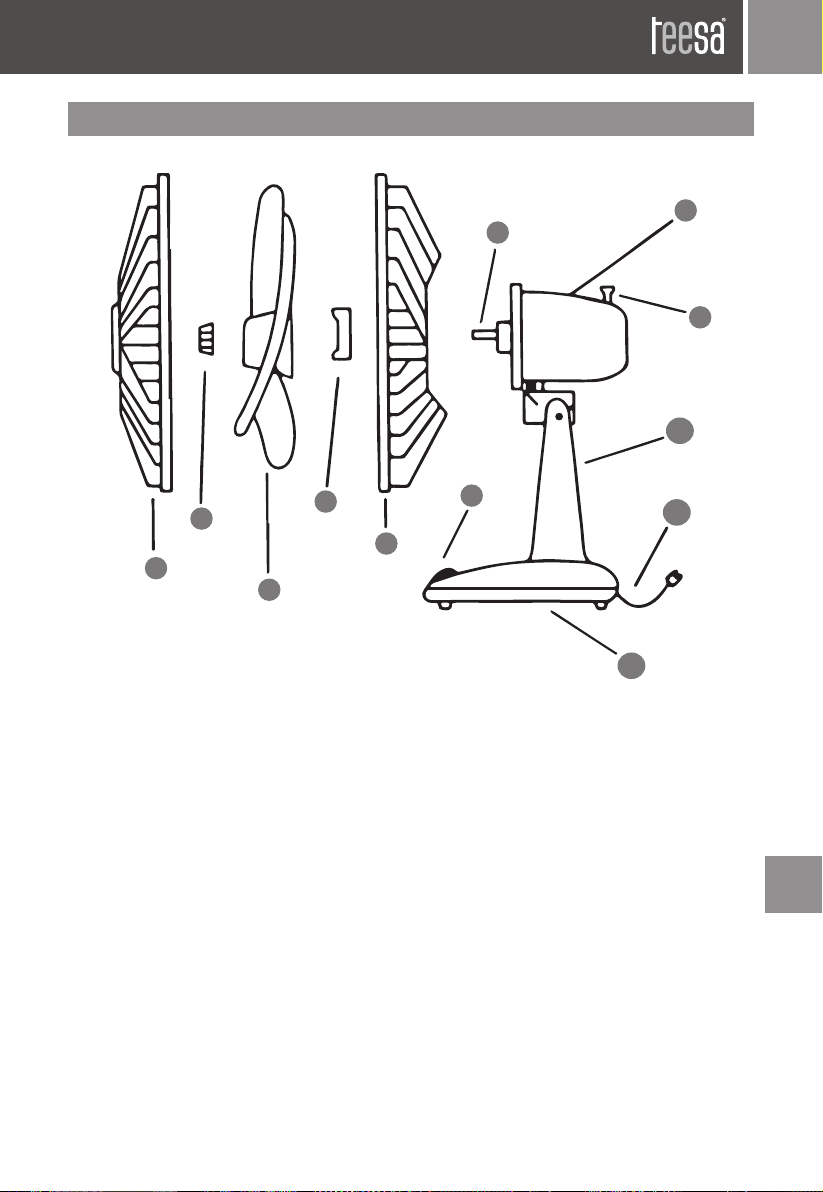
OPIS PRODUKTU
8
7
9
10
2
4
5
1
3
1. Przednia osłona
2. Nakrętka mocująca śmigło (lewoskrętna)
3. Śmigło
4. Nakrętka mocująca tylną osłonę
5. Tylna osłona
6. Przyciski prędkości
6
11
12
7. Wałek napędowy
8. Głowica
9. Przełącznik oscylacji
10. Kolumna
11. Przewód zasilający
12. Podstawa
PL
Page 16
Instrukcja obsługi16
MONTAŻ
1. Dopasować kolumnę wentylatora (10) do jego podstawy (12), a
następnie skręcić obydwa elementy za pomocą dołączonych śrub.
2. Następnie umieścić tylną osłonę (5) na bolcach pozycjonujących na
głowicy (8) i zamocować ją za pomocą nakrętki (4). Tylna osłona powinna
dobrze przylegać do głowicy.
3. Umieścić śmigło (3) na wałku napędowym (7), i przykręcić nakrętkę
mocującą śmigło (2).
4. Połączyć przednią osłonę (1) z osłoną tylną (5), unieruchomić je zamykając
dwie blokady znajdujące się po bokach, a następnie przykręcić śrubę
znajdującą się na dolnym łączeniu osłon.
OBSŁUGA
1. Należy ustawić wentylator na równej i suchej powierzchni.
2. Sprawdzić czy żaden z przycisków prędkości nie jest wciśnięty.
3. Podłączyć wtyczkę wentylatora do gniazda zasilania sieciowego.
4. W celu ustawienia prędkości nawiewu należy nacisnąć jeden z
przycisków prędkości: 1 — niska prędkość, 2—średnia prędkość, 3
— wysoka prędkość. W celu wyłączenia wentylatora należy nacisnąć
przycisk oznaczony cyfrą 0.
5. Aby włączyć funkcję oscylacji, należy wcisnąć przełącznik oscylacji; aby
ją wyłączyć, należy wyciągnąć przełącznik.
6. Wentylator posiada możliwość regulacji kąta nachylenia głowicy. W tym
celu należy przechylić głowicę do przodu lub do tyłu.
CZYSZCZENIE I PRZECHOWYWANIE
PL
• Przed przystąpieniem do czyszczenia należy odłączyć urządzenie od
zasilania sieciowego.
• Urządzenie należy czyścić jedynie za pomocą miękkiej, lekko wilgotnej
ściereczki. Nie należy używać środków chemicznych do czyszczenia.
• Po zakończeniu czyszczenia wszystkie elementy wentylatora należy
dokładnie osuszyć za pomocą suchej ściereczki.
Page 17
Instrukcja obsługi 17
SPECYFIKACJA
FUNKCJE
3 tryby prędkości
Automatyczna oscylacja: 90°
Regulacja kąta nachylenia
Metalowa osłona śmigła
DANE TECHNICZNE
Moc: 35 W
Średnica grilla: 34 cm
Średnica śmiga: 30 cm
Długość kabla zasilającego: 1,8 m
Zasilanie: 220 ~ 240 V, 50/60 Hz
Poland
Prawidłowe usuwanie produktu
(zużyty sprzęt elektryczny i elektroniczny)
Oznaczenie umieszczone na produkcie lub w odnoszących się do niego
tekstach wskazuje, że po upływie okresu użytkowania nie należy usuwać z
innymi odpadami pochodzącymi z gospodarstw domowych. Aby uniknąć
szkodliwego wpływu na środowisko naturalne i zdrowie ludzi wskutek
niekontrolowanego usuwania odpadów, prosimy o oddzielenie produktu od
innego typu odpadów oraz odpowiedzialny recykling w celu promowania
ponownego użycia zasobów materialnych jako stałej praktyki. W celu
uzyskania informacji na temat miejsca i sposobu bezpiecznego dla środowiska
recyklingu tego produktu użytkownicy w gospodarstwach domowych
powinni skontaktować się z punktem sprzedaży detalicznej, w którym dokonali
zakupu produktu, lub z organem władz lokalnych. Użytkownicy w rmach
powinni skontaktować się ze swoim dostawcą i sprawdzić warunki umowy
zakupu. Produktu nie należy usuwać razem z innymi odpadami komercyjnymi.
Wyprodukowano w CHRL dla LECHPOL ELECTRONICS Sp. z o.o. Sp.k.,
ul. Garwolińska 1, 08-400 Miętne.
PL
Page 18
Manual de utilizare18
Va multumim pentru achizitionarea acestui produs TEESA. Va rugam sa cititi
cu atentie instructiunile de utilizare inainte de utilizarea produsului sis a le
pastrati pentru consultari ulterioare.
DIstribuitorul nu isi asuma nici o responsabilitate pentru posibilele daune
cauzate de utilizarea necorespunzatoare a produsului.
INSTRUCTIUNI PRIVIND SIGURANTA
Pentru a reduce riscul aparitiei accidentelor, va rugam sa respectati
urmatoarele indicatii privind siguranta in utilizarea produsului:
1. Cititi cu atentie instructiunile de utilizare chiar daca sunteti familiarizat
cu produsul. Pastrati manualul pentru consultari ulterioare.
2. Inainte de conectarea produsului la retea, vericati ca valoarea
tensiunii retelei sa e corespunzatoare cu cea necesara produsului.
3. Asezati dispozitivul pe o suprafață uscată, plata și stabilă.
4. Nu loviti sau scuturati niciodata ventilatorul pentru a preveni
deteriorarea acestuia.
5. Curatati dispozitivul respectand instructiunile din sectiunea “ Curatare
si intretinere”.
6. INTOTDEAUNA deconectati dispozitivul de la reteaua de alimentare:
• daca nu functioneaza corespunzator,
• daca se aud zgomote suspecte pe durata utilizarii,
• inainte de dezasamblare,
• inainte de curatare,
• cand nu este utilizat.
7. Cand deconectati cablul de alimentare de la retea, trageti de stecher,
nu de cablu.
8. Acest aparat nu poate folosit de copii cu vârsta de peste 8 ani sau
de către persoane cu capacități zice și mentale reduse sau cu lipsă
de experiență sau cunoștințe, dacă nu sunt supravegheați sau nu li se
acordă instruire cu privire la folosirea aparatului în siguranță și dacă
nu înțeleg pericolele pe care le implică utilizarea aparatului. Copiii
nu trebuie să se joace cu aparatul. Mentenanța uzuală și curățarea
aparatului nu se va face de către copii fără supraveghere.
RO
9. Cablu de alimentare defect sau deteriorat poate înlocuit numai de
un centru de service autorizat.deteriorarea acestora.
10. Păstraţi-l aparatul, cablul de alimentare departe de surse de caldura,
lumina directă a soarelui, umiditate şi margini ascuţite.
11. Nu puneti cablul de alimentare sau aparatul in apa sau alt lichid. Nu
utilizati aparatul cu mainile ude.
12. Nu folosiți aparatul în alte scopuri decât cele pentru care a fost
proiectat.
Page 19

Manual de utilizare 19
13. Utilizati doar componente originale.
14. Aparatul este proiectat doar pentru uz casnic; nu-l utilizati în scopuri
comerciale sau industriale. Dispozitiv destinat exclusiv utilizării în
interior.
15. Nu utilizati aparatul daca cablul de alimentare este deteriorat, dacă
ștecherul prezinta defecțiuni sau în cazul în care aparatul a fost
deteriorat.
16. În cazul în care aparatul indică o funcționare defectuoasă sau anomalii
la prima pornire, contactati imediat un centru de service autorizat. Nu
dezasamblați aparatul.
17. Nu amplasati niciodata ventilatorul langa surse de gaz, foc sau lichide
inamabile.
18. Nu porniți aparatul dacă apărătoarea nu este montată corect.
19. Nu introduceti stecherul de alimentare la priza de la retea decat dupa
instalarea completa a ventilatorului.
20. Nu introduceti degetele sau alte obiecte in interiorul grilajului de
protectie pentru a evita ranirea utilizatorului.
21. Pentru a preveni incalzirea ventilatorului, nu obturati circulatia aerului
dinspre ventilator.
22. Instalarea necorespunzătoare poate duce la riscul de incendiu, șoc
electric, sau rănire a persoanelor.
RO
Page 20
DESCRIEREA PRODUSULUI
7
Manual de utilizare20
8
9
10
RO
2
4
1
3
1. Grilaj de protectie fata
2. Piulita paleta
3. Paleta
4. Piulita de xare pentru
partea din spate a paletei
5. Grilaj de protectie spate
6. Comutator viteza
6
11
5
12
7. Axul de la motor
8. Motor
9. Buton pentru miscarea de oscilatie
10. Stand
11. Cablul de alimentare
12. Picior
Page 21

Manual de utilizare 21
MONTARE
1. Montați suportul în bază, apoi utilizați șuruburile furnizate pentru a-l
xa.
2. Montati partea din spate a grilajului de protectie pe carcasa motorului si
xati-o cu piulita de xare.
3. Asigurați-vă că grilajul de protectie din spate este strâns si montat bine
pe carcasa motorului.
4. Place the blade on the fan axle and fasten the spinner to ax the blade.
5. Așezați elicea pe axul ventilatorului și xați-o cu piulita pentru elice.
6. Montati partea din fata a grilajului impreuna cu partea din spate si xatile impreuna cu clemele de xare de pe grilaj.
FUNCTIONARE
1. Așezați ventilatorul pe o suprafață plată și stabilă.
2. Asigurați-vă că nici unul dintre butoanele de viteză nu sunt apasate.
3. Conectați ventilatorul la retea.
4. Apasati butoanele de comanda pentru setarea vitezei de ventilatie
astfel:
0 = OPRIT,
1 = viteza redusa,
2 = viteza medie,
3 = viteza mare
5. Pentru a activa/opri miscarea de oscilație apăsați / trageți butonul de
oscilație.
6. Înclinați ventilatorul în poziția dorită.
CURATARE SI MENTENANTA
• Înainte de curățare, deconectați aparatul de la rețeaua de alimentar.
• Curatati acest aparat cu o carpa moale, usor umezita. Nu folositi agenti
chimici pentru a curata ventilatorul.
• Ştergeţi suprafaţa ventilatorului cu o cârpă curată şi uscată.
RO
Page 22
SPECIFICATII
FUNCTII
3 viteze ventilator
Miscare oscilanta automată: 90°
Reglarea unghiului de inclinare
Grilaj metalic pentru protectie elice
DATE TEHNICE
Putere nominala: 35 W
Diametrul gratarului: 34 cm
Diametrul elicei: 30 cm
Lungime cablu: 1,8 m
Alimentare: 220 ~ 240 V, 50/60 Hz
Romania
Reciclarea corecta a acestui produs
(reziduuri provenind din aparatura electrica si
electronica)
Manual de utilizare22
Marcajale de pe acest produs sau mentionate in instructiunile sale de
folosire indica faptul ca produsul nu trebuie aruncat impreuna cu alte
reziduuri din gospod arie atunci cand nu mai este in stare de functionare.
Pentru a preveni posibile efecte daunatoare asupra mediului inconjurator
sau a san ata tii oamenilor datorate evacuarii necontrolate a reziduurilor,
vă rugăm să separați acest produs de alte tipuri de reziduuri si să-l reciclati
in mod responsabil pentru a promova refolosirea resurselor materiale.
Utilizatorii casnici sunt rugati să ia legatura e cu distribuitorul de la care au
RO
achizitionat acest produs, e cu autoritatile locale, pentru a primi informatii
cu privire la locul si modul in care pot depozita acest produs in vederea
reciclarii sale ecologice. Utilizatorii institutionali sunt rugati să ia legatura
cu furnizorul și să verice condițiile stipulate in contractul de vanzare.
Acest produs nu trebuie amestecat cu alte reziduuri de natura comerciala.
Distribuit de Lechpol Electronic SRL, Republicii nr. 5, Resita, CS, ROMANIA.
Page 23

Návod na použitie 23
Ďakujeme Vám za nákup zariadenia značky TEESA. Pred použitím si pozorne
prečítajte návod na použitie a uschovajte ho pre neskoršie použitie.
Výrobca nezodpovedá za škody spôsobené nesprávnym používaním
výrobku.
BEZPEČNOSTNÉ POKYNY
Aby nedošlo k poškodeniu alebo zraneniu, dodržujte pri manipulácii s
elektrickými spotrebičmi základné bezpečnostné opatrenia, vrátane tých,
ktoré sú uvedené nižšie:
1. Pred použitím si pozorne prečítajte návod na použitie a to aj v prípade
predchádzajúceho použitia podobných zariadení. Uschovajte si
tento návod pre neskoršie použitie.
2. Pred pripojením zariadenia skontrolujte, či sa napätie uvedené na
štítku spotrebiča zhoduje s napätím vašej elektrickej siete.
3. Umiestnite zariadenie na suchú, rovnú a stabilnú plochu.
4. Zariadenie je potrebné čistiť v súlade s pokynmi uvedenými v
kapitole „ Čistenie”.
5. Vždy vypnite zariadenie a odpojte ho od napájania:
• ak prístroj nepracuje správne,
• v prípade, že zariadenie vydáva neprirodzený zvuk,
• pred demontážou,
• pred čistením,
• ak sa nepoužíva.
7. Pri odpájaní zariadenia od napájania uchopte a potiahnite za
konektor, nikdy nie za kábel.
8. Spotrebič nesmú obsluhovať deti vo veku do 8 rokov a osoby so
zníženými fyzickými, zmyslovými alebo duševnými schopnosťami,
rovnako ako osoby, ktoré nemajú vedomosti a skúsenosti potrebné
na prevádzku zariadenia; s výnimkou ak bude zabezpečený dohľad a
poučenie týkajúce sa používania spotrebiča bezpečným spôsobom
a oboznámenie sa s možnými rizikami. Je potrebné poučiť deti, že
spotrebič nie je hračka. Deti by nemali vykonávať čistenie a údržbu
bez dozoru.
9. Neodpája teľný prívodný kábel môže byť vymenený výrobcom,
servisným pracovníkom, alebo kvalikovanou osobou.
10. Udržujte zariadenie a jeho kábel čo najďalej od horúcich predmetov,
vody, vlhkosti,ostrých hrán a ďalších faktorov, ktoré by mohli poškodiť
zariadenie alebo kábel.
11. Neponárajte zariadenie do žiadnych tekutín a nemanipulujte s ním ak
máte mokré ruky.
SK
Page 24

Návod na použitie24
12. Nepoužívajte výrobok na iné účely ako sú uvedené v tomto návode na
použitie.
13. Nepoužívajte neoriginálne príslušenstvo.
14. Spotrebič je určený na domáce použitie. Nepoužívajte ho na komerčné
a priemyselné účely. Tento spotrebič je určený len na použitie v interiéri.
15. Nepoužívajte toto zariadenie ak je kábel alebo zástrčka poškodená
prípadne ak je rozbité.
16. Nikdy nerozoberajte a neopravujte zariadenie. Všetky servisné úkony
môže vykonávať len odborný servis.
17. Neumiestňujte ventilátor v blízkosti plynových spotrebičov, ohňa a
horľavých kvapalín.
18. Nezapínajte spotrebič, ak nie je ochranný kryt vrtule správne nasadený.
19. Nezapájajte spotrebič do elektrickej zásuvky ešte pred skončením
montáže.
20. Počas prevádzky ventilátora je zakázané vkladať prsty, ceruzky a iné
predmety do otvorov krytu ventilátora.
21. Aby ste predišli prehriatiu ventilátora, nezakrývajte ani neblokujte
vstupné a výstupné otvory prúdenia vzduchu.
22. Nesprávna inštalácia môže spôsobiť požiar, úraz elektrickým prúdom,
alebo zranenie.
SK
Page 25
Návod na použitie 25
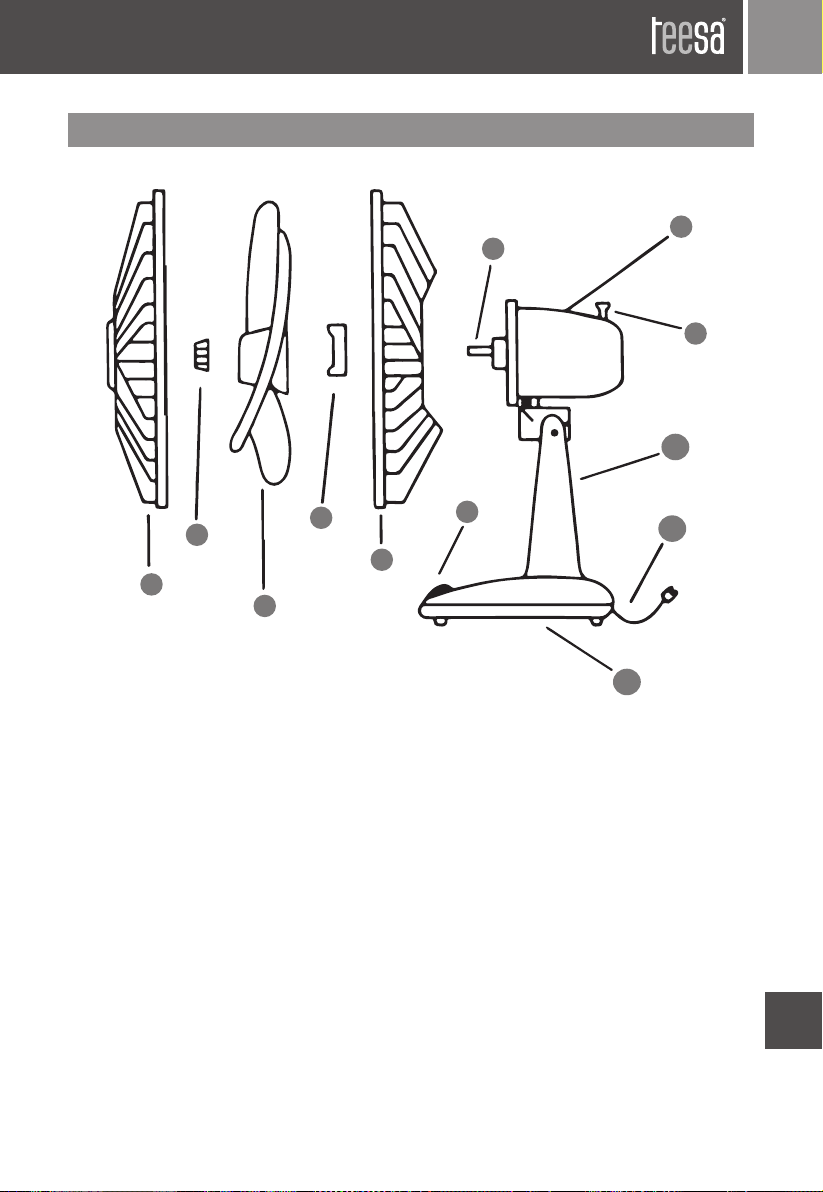
POPIS PRODUKTU
8
7
9
10
2
4
5
1
3
1. Predný kryt
2. Zaisťovacia matica vrtule (ľavotočivá)
3. Vrtuľa
4. Upevňovacia matica zadného krytu
5. Zadný kryt
6. Tlačidlá rýchlosti
6
11
12
7. Hriadeľ pohonu
8. Pohonná jednotka
9. Prepínač oscilácie
10. Držiak pohonnej jednotky
11. Napájací kábel
12. Podstavec
SK
Page 26

Návod na použitie26
MONTÁŽ
1. Dopasujte a vložte držiak pohonnej jednotky (10) do podstavca (12), a
následne tieto komponenty zoskrutkujte pomocou priložených skrutiek.
2. Umiestnite zadný kryt (5) na polohovacie kolíky pohonnej jednotky (8) a
pripevnite ho maticou (4). Zadný kryt by mal pekne priliehať k pohonnej
jednotke.
3. Nasaďte vrtuľu (3) na hriadeľ pohonu (7), a utiahnite zaisťovacou maticou
(2).
4. Spojte predný kryt (1) so zadným krytom (5) pomocou spojovacej
západky a následne ich zoskrutkujte skrutkou v spodnej časti krytov.
POUŽITIE
1. Umiestnite ventilátor na rovný a stabilný povrch.
2. Skontrolujte, či nie je stlačené žiadne tlačidlo rýchlosti.
3. Pripojte zástrčku ventilátora k elektrickej zásuvke.
4. Stlačením jedného z tlačidiel rýchlosti nastavte požadovanú rýchlosť
prúdenia vzduchu: 1 — nízka rýchlosť, 2—stredná rýchlosť, 3 — vysoká
rýchlosť. Ventilátor vypnete stlačením tlačidla s označením 0.
5. Ak chcete aktivovať funkciu oscilácie, stlačte tlačidlo otáčania ventilátora;
naopak ak chcete túto funkciu deaktivovať, tlačidlo povytiahnite.
6. Ventilátor umožňuje nastaviť uhol sklonu hlavy. Ak chcete nastaviť sklon,
uchopte pohonnú jednotku a sklopte ju nahor alebo nadol.
ČISTENIE A ÚDRŽBA
• Pred čistením odpojte spotrebič od elektrickej siete.
• Spotrebič čistite iba pomocou mäkkej, jemne navlhčenej handričky. Na
čistenie nepoužívajte chemické čistiace prostriedky.
• Po čistení vysušte všetky komponenty ventilátora suchou handričkou.
SK
Page 27
Návod na použitie 27
ŠPECIFIKÁCIA
VLASTNOSTI A FUNKCIE
3 režimy rýchlostí
Automatická oscilácia: 90°
Nastavenie sklonu hlavy
Kovový kryt vrtule
TECHNICKÉ PARAMETRE
Príkon: 35 W
Priemer krytu vrtule: 34 cm
Priemer vrtule: 30 cm
Dĺžka prívodného kábla: 1,8 m
Napájanie: 220 - 240 V; 50 / 60 Hz
Slovensko
Správna likvidácia tohto produktu
(O odpade z elektronických zariadení a ich
príslušenstva)
(Platí v Európskej únii a v ostatných európskych krajinách so systémom
triedeného odpadu) Toto označenie na výrobku alebo v dokumentácii
znamená, že by nemal byť likvidovaný s inými domácimi zariadeniami
po skončení svojho funkčného obdobia. Aby sa zabránilo možnému
znečisteniu životného prostredia alebo poškodeniu ľudského zdravia
nekontrolovanou likvidáciou odpadu, oddeľte ich prosíme od ďalších
typov odpadov a recyklujte ich zodpovedne a podporte opätovné využitie
materiálnych zdrojov. Domáci spotrebitelia by sa mali informovať u predajcu
kde tento výrobok zakúpili ako ho správne recyklovať alebo kde by ho
mohli odovzdať k recyklácii. Priemyselní používatelia by mali kontaktovať
svojho dodávateľa a preveriť podmienky kúpnej zmluvy. Tento výrobok by
sa nemal miešať s inými komerčnými produktmi, určenými na likvidáciu.
Vyrobené v Číne pre LECHPOL ELECTRONICS Sp. z o.o. Sp.k., ul. Garwolińska 1,
08-400 Miętne.
SK
Page 28

www.teesa.pl
 Loading...