

Page 1
Bagged vacuum cleaner
TSA5020
Bedienungsanleitung
Owner’s manual
Instrukcja obsługi
Manual de utilizare
Návod na použitie
DE
EN
PL
RO
SK
Page 2

Page 3
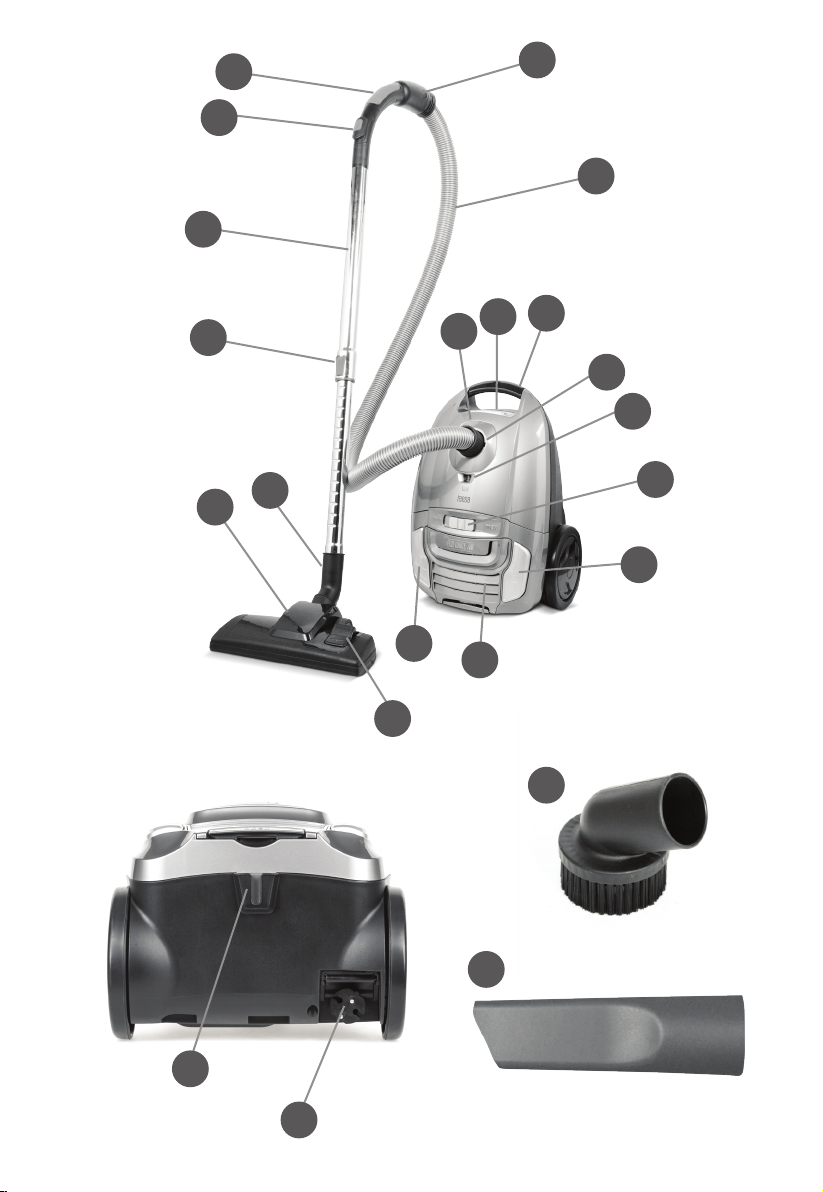
14
15
13
12
11
10
3
2
1
4
5
17
16
6
7
9
8
18
19
20
21
22
Page 4
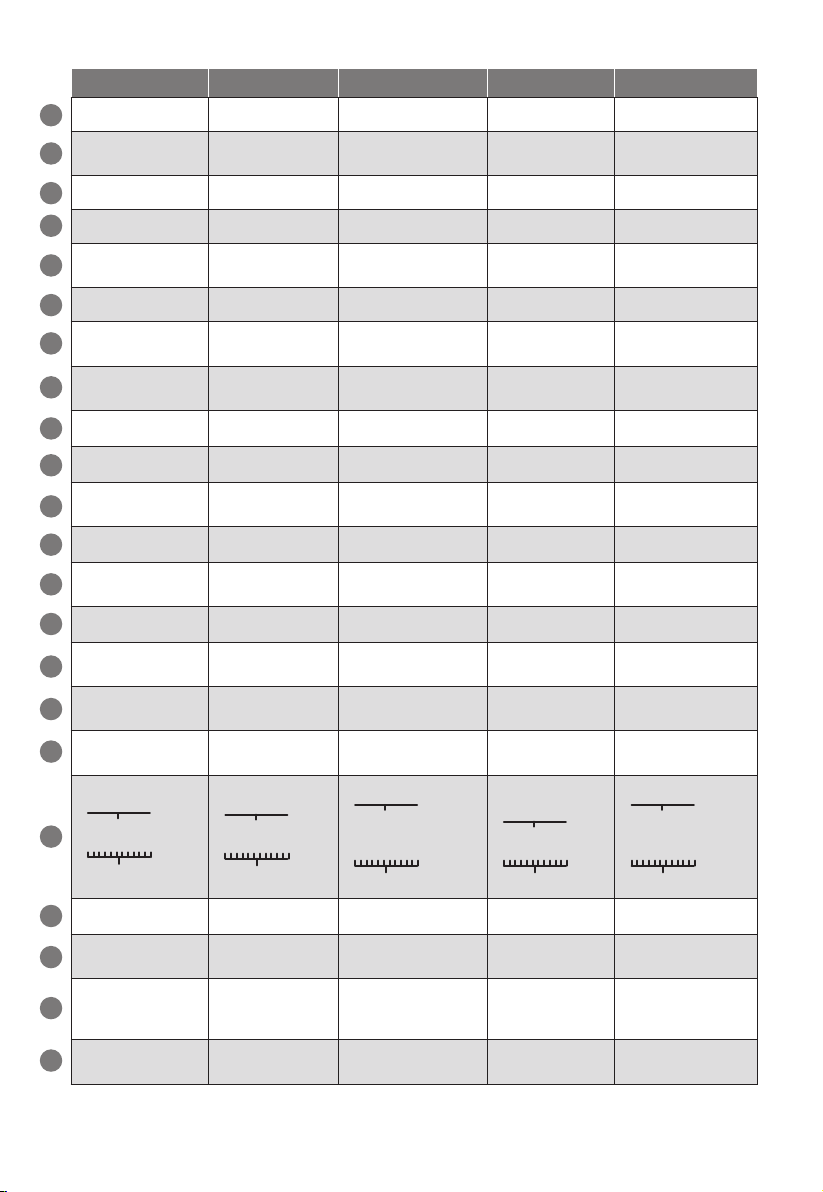
DE EN PL RO SK
Vordere Abdeckung Front cover Pokrywa przednia Capac frontal Predný kryt
1
Verrieglung der vorderen
2
Abdeckung
Gri Handle Uchwyt Maner Rukoväť
3
4
Schlauchtülle Hose socket Otwór wlotowy węża Priza pentru furtun Otvor pre hadicu
Staubbeutel-Vollanzeige Dust bag full indicator Wskaźnik zapełnienia worka
5
Leistungs-Schieberegler Power control slider Suwak regulacji mocy Comutator pornire Posuvný regulátor výkonu
6
7
Taste Kabel zurückspulen Cord rewind button Przycisk zwijania przewodu
8
Austrittslter-Abdeckung Outlet lter cover Pokrywa ltra wylotowego
Netzschalter Power button Przycisk zasilania Buton pornire Hlavný vypínač
9
Schlauch Hose Wąż Furtun Hadica
10
Schlauch-
11
Verriegelungsknöpfe
Gri Grip Uchwyt Sistem de prindere Rukoväť
12
Saugleistungsschieber Suction power slider Suwak regulacji mocy ssania
13
Teleskoprohr Telescopic tube Rura teleskopowa Tub telescopic Teleskopická rúrka
14
Längenverriegelung Length lock
15
2-Stufen-Bodendüsehaken 2-step oor nozzle hook
16
17
2-Stufen-Bodendüse 2-step oor nozzle
Bodenoberäche Schalter:
•
Bodenreinigungsmodus
18
•
Teppichreinigungsmodus
Runde Düse Round nozzle Ssawka okrągła Duza rotunda Okrúhla hubic a
19
Fugendüse Crevice nozzle Ssawka szczelinowa
20
2-Stufen-Bodendüsebefest
21
igungsschlitzBodendüsebe
festigungsschlitz
22
Stecker und Kabel Plug and cord Wtyczka i przewód
Front cover release
button
Hose release buttons
Floor surface switch:
•
oor cleaning mode
•
carpets cleaning mode
2 -step oor nozzle
fastener
Przycisk pokrywy przedniej
Przyciski zwalniające blokadę
węża
Blokada (długości rury
teleskopowej)
Zaczep dwustopniowej
ssawki podłogowej
Dwustopniowa
ssawka podłogowa
Przełącznik powierzchni:
•
tryb czyszczenia podłóg
twardych
•
tryb czyszczenia dywanów
Uchwyt postojowy
Buton de eliberare a
capacului frontal
Indicator grad umplere
sac pentru praf
Buton de înfăşurare
cordon alimentare
Capacul ltrului
de evacuare
Buton de infasurare a
cablului
Glisiera pentru
reglarea puterii
Dispozitiv blocare teava
Carlig cu 2 trepte
pentru peria de podea
Perie cu 2 trepte
pentru aspirare podea
Comutator pentru
aspirare suprafete:
•
Mod aspirare podea
•
Mod aspirare carpete
Dispozitiv pentru
aspirare spatii inguste
Sistem xare perie
podea cu 2 trepte
Stecher si cordon
alimentare
Aretačné tlačidlo predného
krytu
Indikátor naplnenia vrecka
Tlačidlo navíjania šnúry
Kryt výstupného ltra
Aretačné tlačidlá pre
uvoľnenie hadice
Posuvná regulácia sily sania
Poistka (regulácie dĺžky
teleskopickej rúrky)
Západka podlahovej hubice
Podlahová hubica
dvojstupňová
Prepínač podľa povrchu:
•
režim čistenia tvrdých
podláh
•
režim čistenia kobercov
Štrbinová hubica
Držiak parkovacej polohy
Zástrčka s káblom
Page 5

Bedienungsanleitung 5
Danke für den Kauf des TEESA Gerätes. Bitte lesen Sie diese
Bedienungsanleitung sorgfältig und bewahren diese auf für späteres
Nachschlagen.
Der Händler übernimmt keine Verantwortung für Schäden, die durch
unsachgemäße Handhabung und Verwendung des Produktes verursacht
wurden.
SICHERHEITSANLEITUNGEN
Um die Gefahr von Feuer, Stromschlag oder anderen Verletzungen zu
vermeiden, befolgen Sie die grundlegenden Sicherheitsvorkehrungen bei
der Verwendung elektrischer Geräte, einschließlich der folgenden:
1. Bitte lesen Sie sorgfältig diese Bedienungsanleitung vor der ersten
Benutzung und heben sie auf für späteres Nachschlagen.
2. Vor dem Anschluss des Gerätes an Netzsteckdose, stellen Sie sicher,
dass die auf dem Gerät angegebene Spannung mit der Spannung der
Steckdose übereinstimmt.
3. Nicht den Saugprozess starten, wenn der Staubbehälter, oder Filter
nicht montiert ist, da sonst das Gerät beschädigt werden kann.
4. Das Gerät ist nur für den Hausgebrauch.
5. Benutzen Sie das Gerät nur auf trockene Oberächen.
6. Keine Gegenstände in die Lüftungsönungen stecken.
7. Den Luftstrom nicht behindern.
8. Überprüfen Sie immer vor jedem Gebrauch, ob Schlauch, Düsen,
Rohre oder Lüftungsschlitze nicht blockiert sind. Wenn ja, entfernen
Sie zuerst das blockierte Objekt und beginnen dann mit dem Saugen.
9. Wenn der Schlauch, die Düsen oder das Rohr während des Betriebs
blockiert werden, schalten Sie das Gerät aus und entfernen das
gestaute Objekt, bevor Sie den Staubsauger wieder einschalten.
10. Reinigen Sie das Gerät gemäß den Angaben im Abschnitt „Reinigung
und Wartung“.
11. Schalten Sie das Gerät IMMER aus und trennen es vom Stromnetz:
• Wenn es nicht richtig funktioniert;
• Wenn ein seltenes Geräusch bei der Verwendung gibt;
• Vor dem Zerlegen des Gerätes;
• Vor der Reinigung;
• Bei Nichtgebrauch.
12. Ziehen Sie beim Trennen des Netzkabels am Stecker und nicht am
Kabel.
13. Bevor Sie das Gerät vom Netz trennen, den Staubsauger ausschalten
durch drücken der zugehörigen Taste am Gerät.
DE
Page 6

DE
Bedienungsanleitung6
14. Halten Sie das Gerät außerhalb der Reichweite von Kindern. Lassen Sie
Kinder nicht unbeaufsichtigt mit dem Produkt. Kinder sollten nicht mit
dem Gerät spielen.
15. Dieses Gerät sollte nicht von Personen (einschließlich Kinder) mit
eingeschränkten physischen, sensorischen oder geistigen Fähigkeiten
oder mangelnder Erfahrung und Wissen benutzt werden, sofern
sie nicht von der Person überwacht werden, die für ihre Sicherheit
verantwortlich ist.
16. Ein beschädigtes Netzkabel kann nur in einem autorisierten
Kundendienst ersetzt werden.
17. Halten Sie das Gerät und sein Kabel fern von Hitze, Wasser, Feuchtigkeit,
scharfen Kanten und andere Faktoren, die das Gerät oder das Netzkabel
beschädigen könnten.
18. Verwenden Sie den Staubsauger nicht zu nahe an Öfen oder
Heizungen.
19. Den Staubsauger nicht mit am Netzkabel oder Schlauch transportieren.
20. Ziehen Sie das Netzkabel nicht über scharfe Kanten oder treten lassen.
21. Lassen Sie den Stecker beim Zurückspulen nicht peitschen.
22. Stehen Sie nicht auf oder legen kein Gewicht auf den Schlauch.
23. Stellen Sie das Gerät nicht ins Wasser oder andere Flüssigkeiten;
verwenden Sie es nicht mit nassen oder feuchten Händen.
24. Beim Staubsaugen von Treppen unbedingt Vorsicht walten lassen und
darauf achten, dass das Gerät unter Ihnen steht.
25. Im betrieb, halten Sie den Staubsauger immer weg von Ihrem Kopf
und anderen Körperteilen sowie Haar und Kleidung.
26. Den Staubsauger nicht auf Personen oder Tiere richten während das
Gerät in betrieb ist.
27. Verwenden Sie das Gerät nicht um Personen oder Tiere zu reinigen.
28. Das Gerät nicht verwenden zum saugen von:
• große, scharfkantige Gegenstände, die das Gerät blockieren und
beschädigen könnten;
• schädigende oder erodierende Flüssigkeiten oder brennbare und
explosive Stoe, da dies zu einem Brand führen kann;
• heiße oder brennende Stoe;
• nasse Oberächen oder Gegenstände;
• Wasser oder andere Flüssigkeiten.
29. Das Produkt nicht für andere Zwecke verwenden, als in dieser
Bedienungsanleitung angegeben.
30. Lassen Sie das Gerät nicht unbeaufsichtigt, wenn es funktioniert.
31. Der Hersteller dieses Produkts ist nicht verantwortlich für Schäden,
die durch unsachgemäße Handhabung und Verwendung des Geräts
verursacht werden.
32. Schalten Sie das Gerät IMMER aus und trennen es von der
Stromversorgung, wenn es für längere Zeit nicht benutzt wird.
Page 7

Bedienungsanleitung 7
33. Das Gerät NICHT benutzen wenn das Netzkabel beschädigt ist, oder
das Gerät defekt ist.
34. Versuchen Sie nicht, dieses Gerät selbst zu reparieren, nur autorisiertes
und qualiziertes Personal darf dieses Produkt reparieren.
35. Benutzen Sie kein unautorisiertes Zubehör.
36. Stellen Sie sicher dass das Netzkabel keine scharfen Kanten oder heiße
Flächen berührt.
MONTAGE UND BEDIENUNG
Hinweis: Bevor Sie Zubehör anbringen oder entfernen, immer den Stecker
von Netz trennen.
1. Schlauch in die Schlauchtülle einfügen und zum befestigen, in
Uhrzeigersinn drehen.
2. Schlauch mit dem Teleskoprohr verbinden. Korrekte Montage wird
durch einen hörbaren Klick angezeigt.
3. Das Teleskoprohr in die ausgewählte Düse stecken.
4. Verwenden Sie die Längenverriegelung, um das Teleskoprohr auf die
gewünschte Länge einzustellen.
5. Fassen Sie den Stecker an und ziehen daran, um das Kabel auszuziehen
und schließen es an die Steckdose an.
Hinweise:
• Immer am Stecker ziehen und nicht am Kabel!
• Eine gelbe Markierung zeigt die optimale Länge an. Kabel nicht über
die rote Markierung ausziehen.
6. Drücken Sie den Netzschalter um den Staubsauger einzuschalten.
7. Benutzen Sie den Leistungs-Schieberegler um die Leistung zu regeln.
8. Verwenden Sie den Saugleistungsschieber, um die Saugleistung
einzustellen. Bewegen Sie diesen nach vorne / hinten, um die
Saugleistung zu verringern / erhöhen.
9. Beginnen Sie mit dem Staubsaugen.
Hinweise:
• Nie mit dem Saugen beginnen wenn der Staubbeutel nicht eingelegt
ist.
• Während des Staubsaugens, das Kabel nicht über scharfe Kanten
ziehen.
• Nicht auf dem Schlauch stehen.
10. Wenn Sie mit dem Staubsaugen fertig sind, drücken Sie den
Netzschalter am Gerät.
11. Trennen Sie den Stecker vom Stromnetz und drücken die Taste Kabel
zurückspulen um das Kabel aufzuspulen.
DE
Page 8

Bedienungsanleitung8
Hinweise:
• Immer am Stecker ziehen und nicht am Kabel!
• Beim zurückspulen des Kabels, führen Sie dieses mit der Hand, um
sicherzustellen dass es nicht peitscht und Beschädigungen oder
Verletzungen verursacht.
Wichtig
Wenn eine Verstopfung im Schlauch, Rohr oder in den Düsen vorhanden ist,
kann das Gerät erst nach dem Entfernen der Verstopfung weiter betrieben
werden. Tun Sie dies nur, wenn das Gerät ausgeschaltet und vom Netz
getrennt ist.
Wechseln des Staubbeutels
Hinweise:
• Wenn die Staubbeutel-Vollanzeige rot leuchtet, bedeutet dies, dass
der Staubbeutel ausgetauscht werden muss.
• Die Staubbeutel-Vollanzeige leuchtet auch rot, wenn die Düse, das
Rohr oder der Filter durch Schmutz blockiert ist. Befreien Sie diese von
Schmutz oder einem blockierten Objekt und schalten das Gerät wieder
ein.
• Vor dem Auswechseln des Staubbeutels sicherstellen, dass das Gerät
von der Steckdose getrennt ist.
1. Zuerst den Schlauch aus der Schlauchtülle nehmen. Greifen Sie das
Schlauchende, drehen es gegen den Uhrzeigersinn um es von der
Schlauchtülle zu trennen und ziehen es hinaus.
DE
2. Lösen Sie die Verrieglung der vorderen Abdeckung und önen die
vordere Abdeckung.
3. Schieben Sie den Staubbeutel aus dem Halter:
• Papierstaubbeutel - sie sollten jedes Mal durch neue ersetzt werden.
4. Legen Sie einen neuen Papierstaubbeutel in den Halter.
5. Schließen Sie die vordere Abdeckung.
Entfernen und Reinigen der Filter
Hinweis: Bevor Sie die Filter entfernen oder austauschen, immer den Stecker
von Netz trennen.
Motorlter
1. Drücken Sie die Verrieglungs-Taste der vorderen Abdeckung und
önen die Abdeckung.
2. Staubbeutel entfernen.
3. Filter herausziehen.
4. Filter reinigen, indem Sie den Schmutz ausklopfen.
Page 9

Bedienungsanleitung 9
5. Es empehlt sich, den Filter unter ießendem Wasser einmal jede
sechs Monate zu spülen oder wenn der Filter so stark verschmutzt ist,
dass er die Absaugung behindert. Waschen Sie den Motorlter nicht
in einer Waschmaschine!
Hinweis: Lassen Sie den Filter komplett trockenen, bevor Sie diesen
wieder einlegen! In einem oenen Bereich trocknen lassen.
6. Wenn der Filter rein und trocken ist, diesen wieder an seinen Platz
einlegen, Staubbeutel einfügen und vordere Abdeckung schließen.
Austrittslter
1. Austrittslter-Abdeckung entfernen.
2. Filter herausziehen.
3. Filter reinigen, indem Sie den Schmutz ausklopfen, oder wenn der
Filter stark Verschmutzt ist, unter ießendem Wasser ausspülen.
Waschen Sie den Filter nicht in einer Waschmaschine!
Hinweis: Lassen Sie den Filter komplett trockenen, bevor Sie diesen
wieder einlegen! In einem oenen Bereich trocknen lassen.
4. Wenn der Filter rein und trocken ist, diesen wieder an seinen Platz
einlegen und Austrittslter-Abdeckung schließen, bis Sie ein Klick
hören.
REINIGUNG
• Borsten der 2-Stufen-Bodendüse oder kleine Düse kann durch klopfen
von Schmutz gereinigt werden.
• Reinigen Sie den Staubsauger mit einem weichen, leicht
angefeuchteten Tuch.
• Verwenden Sie zum Reinigen dieses Produkts keine Scheuermittel
oder Chemikalien.
• Keines der Teile oder Zubehör eignet sich zu waschen in einer
Waschmaschine oder einem Geschirrspüler.
Wichtig! Alle Filter sollten regelmäßig auf eventuelle Beschädigungen
überprüft werden, vorzugsweise nach jeder Reinigung. Die Filter müssen
sofort ersetzt werden, wenn sie beschädigt sind. Bevor Sie die Filter
überprüfen, trennen Sie den Staubsauger immer von Netz.
DE
Page 10
Bedienungsanleitung10
AUFBEWAHRUNG
• Vor der Lagerung sicherstellen, dass das Gerät sauber und trocken ist.
• Das Gerät in einem kühlen und trockenen Bereich aufbewahren.
• Das Gerät kann in zwei Positionen gelagert werden:
• Vertikal: Die 2-stuge Bodendüse im Befestigungsschlitz am Boden
des Staubsaugers einstecken;
• Waagerecht: Die 2-stuge Bodendüse im Befestigungsmittel an der
Rückseite des Staubsaugers einstecken.
• Vor der Lagerung kann das Gerät auch zerlegt werden.
• Trennen Sie das Teleskoprohr von der Düse.
• Trennen Sie das Teleskoprohr vom Schlauch. Drücken und halten
der Verriegelungsknöpfe an der Seite des Schlauches und ziehen
ihn heraus.
• Trennen des Schlauchs vom Staubsauger. Greifen Sie das
Schlauchende, drehen es gegen den Uhrzeigersinn um es von der
Schlauchtülle zu trennen und ziehen es hinaus.
• Achten Sie darauf, dass der Schlauch nicht verheddert oder gedrückt
wird.
Papier Staubbeutel sowie Austrittslter HEPA H12 können vom Online-Shop
Teesa.pl oder lpelektronik.com gekauft werden.
DE
TECHNISCHE DATEN
Leistung Energieezienzklasse A
Jährlicher
Energieverbrauch
Teppichreinigungsklasse D
Hartbodenreinigungsklasse A
Staub-Re-Emissionsklasse A
Schallleistungspegel 69 dB
Luftstrom 25 l/s
Vakuum (maxi) 16 kPa
Nennleistung 700 W
Saugkraft
Stromversorgung 230 V; 50 Hz
23,8 kWh
160 W
Page 11
Bedienungsanleitung 11
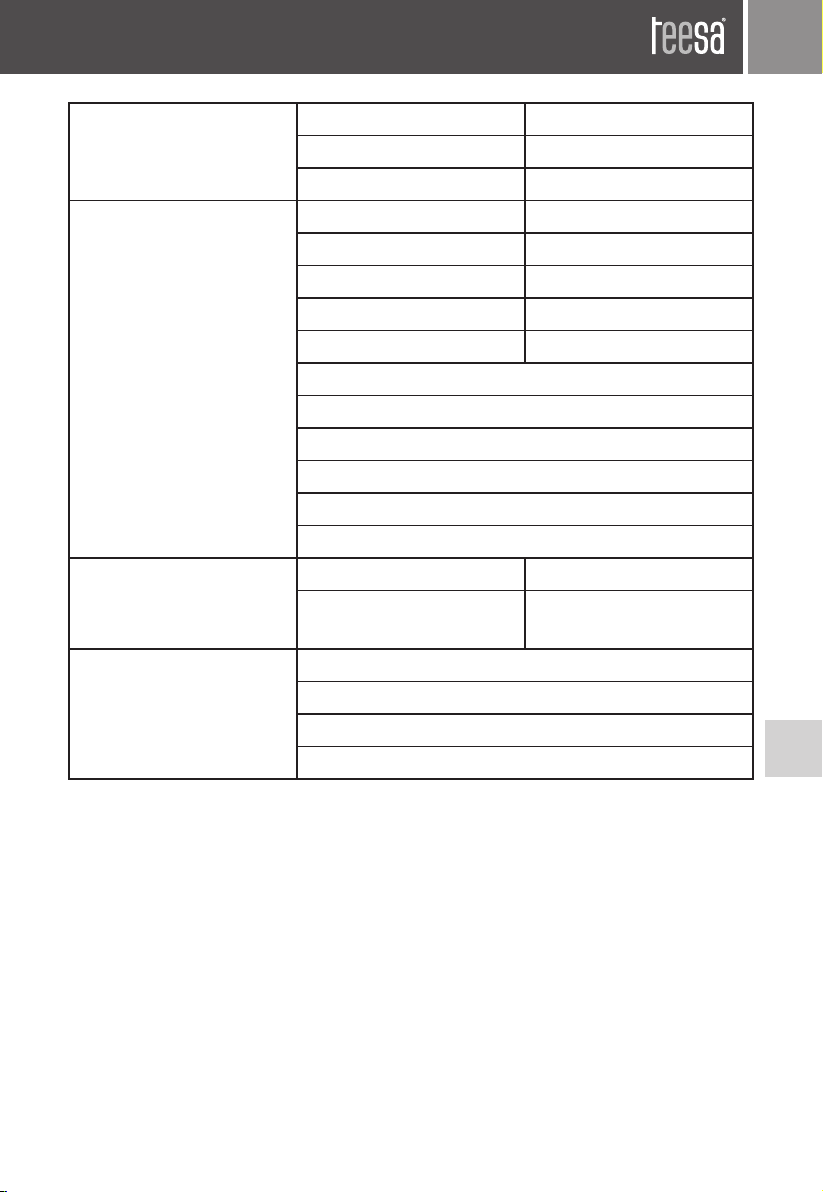
Filtration Staubbeutelkapazität 3 l
Staubbeutel Papier
Abluftlter HEPA H12
Verwendbarkeit Betriebsradius 10 m
Kabellänge 7 m
Leistungsregelung Schieber
Schlauchart Teleskopisch mit Schloss
Rohrdurchmesser 35 mm
360° schwenkbarer Schlauch
2 Gummiräder und 1 Drehrad
Vorderer Tragegri
Anzeige Staubbeutel voll
Automatische Kabelaufwicklung
Vertikale und horizontale Abstellung
Physikalische Parameter Gewicht (Staubsauger) 5,1 kg
Abmessungen
(Staubsauger)
Im Set Fugendüse
Runde Düse
Zweifach-Bodendüse
Bedienungsanleitung
30 x 24 x 43 cm
DE
Page 12
Deutsch
Korrekte Entsorgung dieses Produkts
(Elektromüll)
Bedienungsanleitung12
(Anzuwenden in den Ländern der Europäischen Union und anderen
europäischen Ländern mit einem separaten Sammelsystem)
Die Kennzeichnung auf dem Produkt bzw. auf der dazugehörigen
DE
Literatur gibt an, dass es nach seiner Lebensdauer nicht zusammen mit
dam normalen Haushaltsmüll entsorgt werden darf. Entsorgen Sie dieses
Gerät bitte getrennt von anderen Abfällen, um der Umwelt bzw. der
menschilchen Gesundheit nicht durch unkontrollierte Müllbeseitigung zu
schaden. Recyceln Sie das Gerät, um die nachhaltige Wiederverwertung von
stoichen Ressourcen zu fördern. Private Nutzer sollten den Händler, bei dem
das Produkt gekauft wurde, oder die zuständigen Behörden kontaktieren,
um in Erfahrung zu bringen, wie sie das Gerät auf umweltfreundliche Weise
recyceln können. Gewerbliche Nutzer sollten sich an Ihren Lieferanten
wenden und die Bedingungen des Verkaufsvertrags konsultieren. Dieses
Produkt darf nicht zusammen mit anderem Gewerbemüll entsorgt werden.
Hergestellt in China für LECHPOL ELECTRONICS Sp. z o.o. Sp.k.,
ul. Garwolińska 1, 08-400 Miętne.
Page 13

Owner’s manual 13
Thank you for purchasing TEESA appliance. Please read this operation
instruction carefully before use, and keep it for future use.
Distributor does not take responsibility for damages caused by inappropriate
handling and use of the product.
SAFETY INSTRUCTIONS
In order to reduce the injuries or damages, follow basic safety precautions
applied when using any electrical device, including the following:
1. Read this instruction manual carefully, even if you are familiar with the
appliance. Keep the manual for future reference.
2. Before connecting the appliance to power supply socket, make sure
the voltage indicated on the appliance corresponds to the voltage in
the power supply socket.
3. Never start vacuuming if the lters or dust bag are not mounted as this
may damage the device.
4. Product intended for household use only.
5. Use the device only on dry surfaces.
6. Do not insert any objects into the ventilation slots.
7. Do not obstruct the airow.
8. Prior to each use, always check if the hose, nozzles, tube or ventilation
slots are blocked. If so, rst remove the blocked object and then start
vacuuming.
9. If the hose, nozzle or tube gets blocked during operation, turn o the
appliance and remove jammed object before you turn on the vacuum
cleaner again.
10. Clean this appliance in accordance to instructions listed in “Cleaning
and Maintenance” section.
11. ALWAYS turn o the appliance and disconnect it from the mains
supply:
• if it’s not operating correctly,
• if there’s an uncommon voice when using,
• before disassembling the device,
• before cleaning,
• when not in use.
12. When you disconnect the power cord of the appliance, grasp and pull
the plug, not the cord/cable.
13. Before unplugging from the power supply socket, turn o the vacuum
cleaner by pressing the appropriate button on the body of the
appliance.
EN
Page 14

EN
Owner’s manual14
14. Keep the appliance out of the reach of children. Do not leave children
unsupervised with the product. Children should not play with the
device.
15. This appliance must not be used by persons (including children) with
reduced physical, sensory or mental capabilities, or lack of experience
and knowledge, unless they are supervised by the person who is
responsible for their safety.
16. Fixed power cable may only be replaced in an authorized service point.
17. Keep the appliance and its cord/cable away from heat, water, moisture,
sharp edges and any other factor which may damage the appliance or
its cord.
18. Do not use the vacuum cleaner too close to heaters or radiators.
19. Do not transport the vacuum cleaner by the power cord or the hose.
20. Do not pull the power cord over sharp edges or allow it to become
trapped.
21. Do not allow the plug to whip when rewinding.
22. Do not stand or put weight on the hose.
23. Do not place the appliance in water or any liquid; nor handle/use it
with wet or moist hands.
24. When vacuuming stairs, use extra caution and make sure that the
appliance is positioned below you.
25. When in use, always keep the vacuum cleaner away from your head
and other body parts as well as hair and clothes.
26. Do not point the vacuum cleaner at persons or animals when it is
working.
27. Do not use this device to clean animals or people.
28. Do not use the appliance to vacuum up:
• large, sharp-edged objects which could block and damage the
appliance;
• harming or erodent liquids or inammable and explosive substances,
as this could cause a re;
• hot or burning substances;
• wet surfaces or wet objects;
• water or any other liquid.
29. Do not use the product for purposes dierent from displayed in this
operating manual.
30. Do not leave the appliance unattended when it’s working.
31. Producer of this product is not responsible for damages caused by
inappropriate handling and using of the appliance.
32. ALWAYS disconnect the product from the mains supply when it is not
in use.
Page 15

Owner’s manual 15
33. DO NOT use this appliance if the cord or the plug is damaged, or the
appliance is broken.
34. Do not attempt to repair this appliance yourself. Only authorized and
qualied personnel may repair this appliance. Never disassemble this
appliance.
35. Do not use unauthorized accessories.
36. Make sure the power cord does not touch any hot or sharp elements.
ASSEMBLY AND OPERATION
Note: Before assembling or disassembling accessories, always remove the
plug from the power supply socket.
1. Insert the hose in the hose socket and turn it clockwise to lock it in
place.
2. Connect the hose to the telescopic tube. Proper installation is indicated
by an audible click.
3. Insert the telescopic tube into the selected nozzle.
4. Use the length lock to adjust the telescopic tube to the desired length.
5. Grasp the plug and pull it to remove the cord and connect it to the
power supply socket.
Note:
• Always pull the plug, not the cord!
• A yellow mark on the cord indicates optimal length. Do not pull the
cord beyond the red mark.
6. Press the Power button to turn on the vacuum cleaner.
7. Use the Power control slider to adjust the power.
8. Use the suction power slider to adjust the suction power. Move it
forwards/backwards to reduce/increase suction power.
9. Start vacuuming.
Note:
• Never start vacuuming if the dust bag is not installed.
• While vacuuming make sure that you don’t pull the power cord over
sharp edges.
• Do not stand on the hose.
10. When you have nished vacuuming, press Power button to turn o
the appliance.
11. Disconnect the plug from power mains supply and press Cord rewind
button to rewind the cord.
Note:
• Always pull the plug, not the cord!
• While rewinding the power cord, guide it with a hand to ensure that
it does not whip causing damage or injury.
EN
Page 16

Owner’s manual16
Important
If any blockage is found in the hose, tube or the nozzles, the device can
continue to operate only after the blockage is removed. Do this only when
the device is turned o and disconnected from power supply.
Changing the dust bag
Note:
• When the Dust bag full indicator lights red, it indicates that the dust
bag needs to be replaced.
• The Dust bag full indicator also lights red when the nozzle, tube or
lter is blocked by dirt. Get rid of dirt or a blocked object and turn on
the appliance again.
• Before changing the dust bag make sure the appliance is disconnected
from the power supply socket.
1. First, remove the hose from the hose socket. Grasp the end of the hose,
turn it counterclockwise to release it from the hose socket and pull it
out.
2. Release the front cover fastening and open the front cover.
3. Slide the dust bag out of the holder:
• paper dust bag- it should be replaced with a new one each time.
4. Insert a new paper dust bag in the holder.
5. Close the front cover.
Removing and cleaning lters
Note: Before removing or changing the lters make sure the appliance is
disconnected from the power supply socket.
Motor lter
EN
1. Press the front cover release button and open the front cover.
2. Remove the dust bag.
3. Grasp the lter and pull it out.
4. Clean the lter by tapping out the dirt.
5. It is recommended to rinse the lter under running water once a six
months or when the lter is so heavily soiled that it obstructs the
suction. Do not wash the motor lter in a washing machine!
Note: Let the lter dry completely before reassembly! Let it dry in an
open area.
6. When the lter is clean and dry, put it back into place, install the dust
bag and close the front cover.
Page 17

Owner’s manual 17
Outlet lter
1. Remove the outlet lter cover.
2. Grasp the lter and remove it.
3. Clean it by tapping out dirt or if heavily soiled, rinse it under running
water. Do not wash the outlet lter in a washing machine!
Note: Let the lter dry completely before reassembly! Let it dry in an
open area.
4. When the lter is clean and dry, put it back into place and close the
outlet lter cover until you hear a click.
CLEANING
• Bristle of the 2-step oor nozzle or small nozzle can be cleaned by
tapping out dirt.
• Clean the body of the vacuum cleaner with a soft, slightly damp cloth.
• Do not use any abrasives or chemical agents to clean this product.
• Non of the parts or accessories is suitable to be washed in a washing
machine or a dishwasher.
Important! All lters should be regularly checked for any signs of damage,
preferably after each cleaning. The lters must be replaced immediately if
they become damaged. Before checking the lters, always disconnect the
vacuum cleaner from the power supply socket.
STORAGE
• Before storing make sure the appliance is clean and dry.
• Store the appliance in a cool and dry area.
• The appliance can be stored in two positions:
• vertical: park the 2-step oor nozzle in the fastener at the bottom of
the vacuum cleaner;
• horizontal: park the 2-step oor nozzle in the fastener at the back of
the vacuum cleaner.
• Before storing, the appliance can also be disassembled.
• Disconnect the telescopic tube from the nozzle.
• Disconnect the telescopic tube from the hose. Press and hold hose
release buttons and pull out the hose.
• Disconnect the hose from the vacuum cleaner. Grasp the end of the
hose, turn it counterclockwise to release it from the hose socket and
pull it out.
• Make sure that while storing the hose is not tangled or pressed.
EN
Page 18
Owner’s manual18
Paper dust bag as well as exhaust lter HEPA H12 are available to be bought
from the online store Teesa.pl or lpelektronik.com
SPECIFICATION
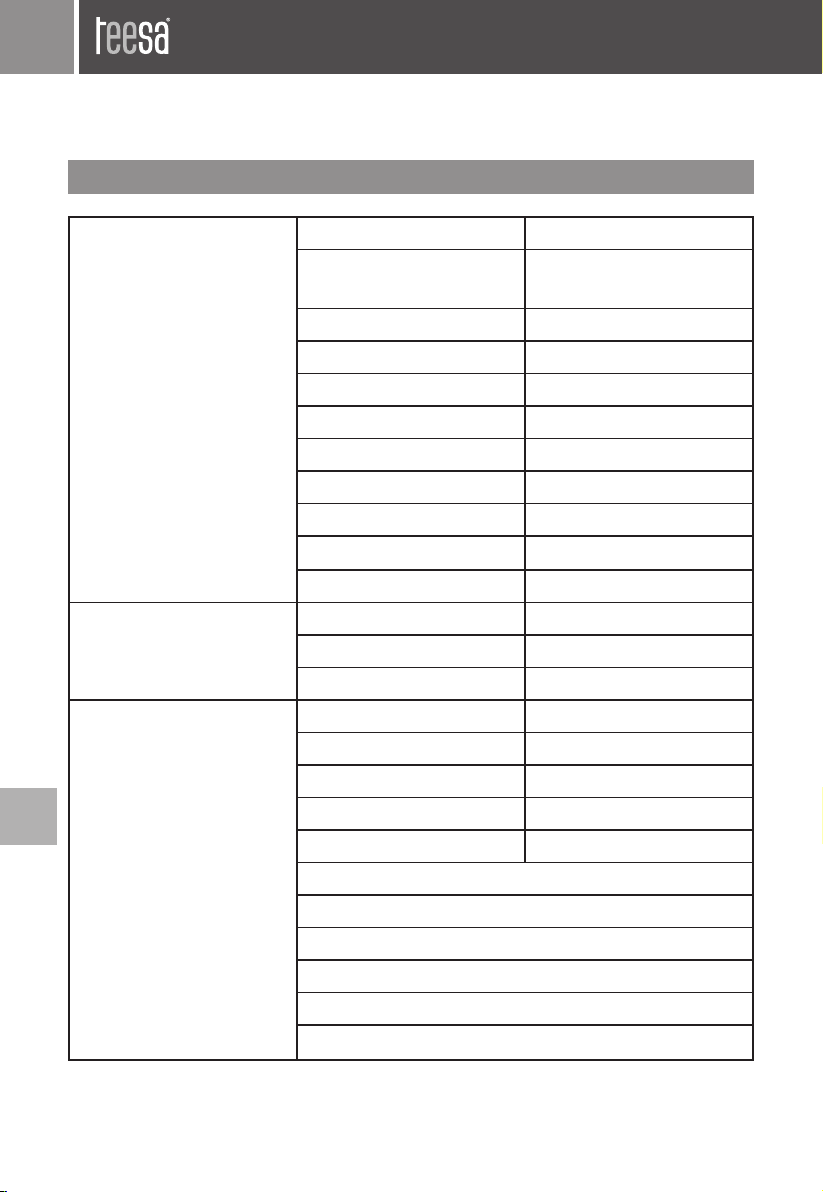
Performance Energy eciency rating A
EN
Annual energy
consumption
Carpet cleaning class D
Hard oor cleaning class A
Dust re-emission class A
Sound power level 69 dB
Airow 25 l/s
Vacuum (max) 16 kPa
Nominal power 700 W
Suction power
Power supply 230 V; 50 Hz
Filtration Dust bag capacity 3 l
Dust bag type Paper
Exhaust lter HEPA H12
Usability Operating radius 10 m
Cord length 7 m
Power control Slider
Tube type Telescopic with lock
Tube diameter 35 mm
360° swivel hose
2 rubber and 1 rotary wheel
Front carrying handle
Dust bag full indicator
Automatic cable rewind
Vertical and horizontal parking
23,8 kWh
160 W
Page 19
Owner’s manual 19
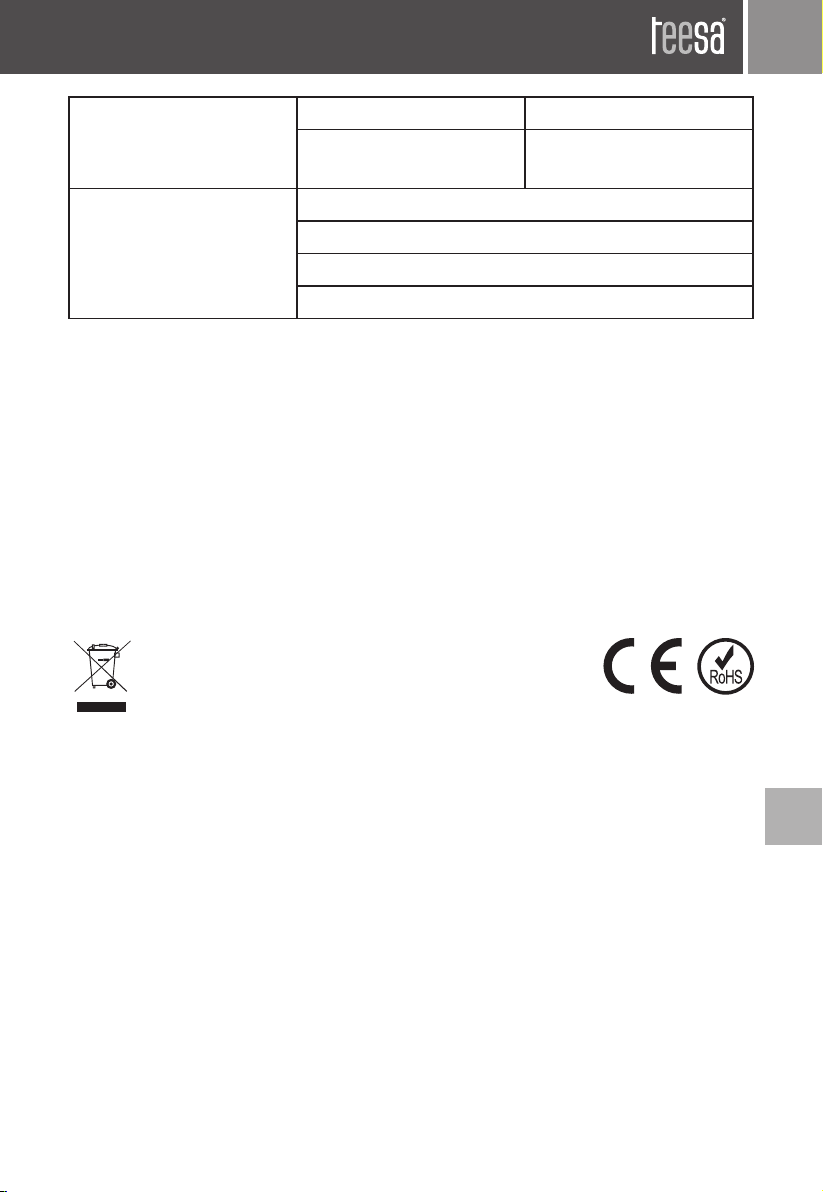
Physical parameters Weight (vacuum cleaner) 5,1 kg
Dimensions
(vacuum cleaner)
In set Crevice nozzle
Round nozzle
2-step oor nozzle
User’s manual
30 x 24 x 43 cm
English
Correct Disposal of This Product
(Waste Electrical & Electronic Equipment)
(Applicable in the European Union and other European countries with
separate collection systems) This marking shown on the product or Its
literature, indicates that It should not be disposed with other household
wastes at the end of its working life. To prevent possible harm lo the
environment or human health from uncontrolled waste disposal, please
separate this from other types of wastes and recycle it responsibly to
promote the sustainable reuse of material resources. Household users
should contact either the retailer where they purchased this product, or
their local government oce, for details of where and how they can take this
item for environmentally safe recycling. Business users should contact their
supplier and check the terms and conditions of the purchase contract This
product should not be mixed with other commercial wastes for disposal.
Made in China for LECHPOL ELECTRONICS Sp. z o.o. Sp.k., ul. Garwolińska 1,
08-400 Miętne.
EN
Page 20

Instrukcja obsługi20
Dziękujemy za zakup urządzenia TEESA. Przed użyciem należy dokładnie
zapoznać się z treścią instrukcji obsługi oraz zachować ją w celu późniejszego
wykorzystania. Producent nie ponosi odpowiedzialności za nieprawidłowe
użycie produktu.
KWESTIE BEZPIECZEŃSTWA
Aby uniknąć uszkodzeń lub obrażeń, należy przestrzegać podstawowych
środków bezpieczeństwa stosowanych przy obsłudze urządzeń elektrycznych,
włączając te wyszczególnione poniżej:
1. Przed użyciem należy dokładnie zapoznać się z treścią instrukcji obsługi,
nawet w przypadku wcześniejszego używania podobnego sprzętu.
Instrukcję należy zachować w celu późniejszego wykorzystania.
2. Przed podłączeniem urządzenia, należy sprawdzić zgodność napięcia
prądu gniazda sieciowego i urządzenia.
3. Zabronione jest rozpoczynanie odkurzania, jeśli worek na kurz lub ltry
nie są zamontowane w odkurzaczu, ponieważ może to doprowadzić do
uszkodzenia urządzenia.
4. Urządzenie wyłącznie do użytku domowego.
5. Urządzenia należy używać wyłącznie na suchych powierzchniach.
6. Nie należy umieszczać żadnych przedmiotów w otworach
wentylacyjnych urządzenia.
7. Nie należy blokować przepływu powietrza, na przykład poprzez
zakrywanie otworów wentylacyjnych.
8. Przed każdym użyciem, należy sprawdzić czy wąż, ssawki, rura lub otwor y
wentylacyjne nie są zablokowane. Jeśli tak, należy przed rozpoczęciem
odkurzania usunąć zablokowany przedmiot lub zanieczyszczenia.
9. Jeśli podczas odkurzania, wąż, ssawka lub rura zatka się, należy
niezwłocznie wyłączyć urządzenie i usunąć zablokowany przedmiot, po
czym ponownie włączyć urządzenie.
10. Urządzenie należy czyścić zgodnie ze wskazówkami zawartymi w sekcji
“Czyszczenie”.
11. Należy zawsze wyłączać urządzenie i odłączyć je od źródła zasilania:
PL
• gdy urządzenie nie działa poprawnie,
• jeśli odgłosy pracy urządzenia nie są standardowe lub świadczą o
anomalii,
• przed demontażem,
• przed czyszczeniem,
• jeśli nie jest używane.
12. Odłączając urządzenie od źródła zasilania, należy chwycić i pociągnąć za
wtyczkę, nigdy za kabel/sznur.
13. Przed odłączeniem odkurzacza od gniazda zasilania sieciowego,
należy najpierw je wyłączyć poprzez naciśnięcie Przycisku zasilania
znajdującego się na urządzeniu.
Page 21

Instrukcja obsługi 21
14. Urządzenie należy przechowywać w miejscu niedostępnym dla dzieci.
Zabrania się używania urządzenia przez dzieci bez nadzoru osób
dorosłych. Należy poinstruować dzieci, aby nie traktowały urządzenia
jako zabawki.
15. Urządzenie nie może być obsługiwane przez osoby (w tym dzieci) o
ograniczonych zdolnościach zycznych, sensorycznych lub umysłowych,
oraz przez osoby, które nie posiadają wiedzy i doświadczenia
niezbędnego do obsługi tego urządzenia; z wyłączeniem sytuacji
użytkowania urządzenia w obecności osoby odpowiedzialnej za ich
bezpieczeństwo.
16. Przewód zasilający nieodłączalny może być wymieniany u wytwórcy,
przez pracownika zakładu serwisowego lub przez wykwalikowaną
osobę.
17. Urządzenie i kabel zasilający należy przechowywać z dala od źródeł
ciepła, wody, wilgoci, ostrych krawędzi oraz innych czynników, które
mogłyby spowodować uszkodzenie tego urządzenia lub kabla.
18. Nie należy używać odkurzacza zbyt blisko grzejników lub kaloryferów.
19. Nie należy przenosić odkurzacza trzymając go za przewód lub wąż.
20. Nie należy przeciągać przewodu nad ostrymi krawędziami i
przytrzaskiwać go drzwiami.
21. Należy uważać, aby podczas zwijania przewodu wtyczka nie obijała się
o ludzi, zwierzęta lub przedmioty.
22. Nie należy stawać na wężu ani go przygniatać.
23. Nie należy zanurzać urządzenia w wodzie ani obsługiwać go mokrymi
dłońmi.
24. Podczas odkurzania schodów zachowaj szczególną ostrożność i upewnij
się, że urządzenie znajduje się poniżej użytkownika.
25. Podczas używania, zawsze trzymaj głowę, inne części ciała, włosy i
ubrania z dala od urządzenia.
26. Kiedy urządzenie jest włączone, nie należy kierować go w stronę ludzi
lub zwierząt.
27. Nie należy używać urządzenia do czyszczenia zwierząt lub ludzi.
28. Nie należy używać urządzenia do odkurzania:
• dużych przedmiotów o ostrych krawędziach, gdyż mogłyby one
zablokować i w konsekwencji doprowadzić do uszkodzenia urządzenia;
• szkodliwych i żrących płynów lub łatwopalnych i wybuchowych
substancji, gdyż grozi to pożarem;
• gorących lub żarzących się substancji;
• wilgotnych lub mokrych powierzchni i przedmiotów;
• wody lub innych płynów.
29. Nie należy używać urządzenia w innym celu niż opisanym w poniższej
instrukcji.
PL
Page 22

Instrukcja obsługi22
30. Nie należy pozostawiać urządzenia w czasie pracy bez nadzoru.
31. Producent nie ponosi odpowiedzialności za uszkodzenia powstałe
wskutek nieprawidłowego użycia produktu.
urządzenie od źródła zasilania, jeśli nie jest używane.
32. Zabrania się używać urządzenia, jeśli kabel zasilając y został uszkodzony
lub sprzęt nie działa prawidłowo.
33. Zabrania się własnoręcznej naprawy sprzętu. Jedynie osoby do
tego upoważnione i wykwalikowane mogą naprawiać urządzenie.
Zabrania się demontażu urządzenia.
34. Nie należy używać nieoryginalnych akcesoriów.
35. Należy zwrócić szczególną uwagę, aby kabel zasilający nie dotykał
gorących / ostrych krawędzi.
MONTAŻ I OBSŁUGA URZĄDZENIA
Uwaga: Przed montażem lub demontażem akcesoriów upewnij się, że wtyczka
odłączona jest od gniazda zasilania sieciowego.
1. Należy umieścić końcówkę węża w otworze wlotowym I przekręcić
zgodnie z ruchem wskazówek zegara, aby zablokować.
2. Należy połączyć drugi koniec węża z rurą teleskopową.
3. Na drugim końcu rury teleskopowej należy zamontować wybraną ssawkę.
4. Za pomocą blokady, należy ustawić odpowiednią długość rury
teleskopowej.
5. Należy chwycić za wtyczkę i pociągnąć ją, tak aby wysunąć przewód, a
następnie połączyć ją do gniazda zasilania sieciowego.
Uwagi:
• Należy zawsze ciągnąć za wtyczkę, nigdy za przewód!
• Żółte oznaczenie na przewodzie wskazuje na optymalną długość
wysunięcia przewodu. Nie należy wysuwać przewodu poza czerwone
oznaczenie.
6. Należy nacisnąć Przycisk zasilania, aby włączyć odkurzacz.
PL
7. Następnie dostosować moc za pomocą Suwaka regulacji mocy.
8. Za pomocą suwaka znajdującego się na uchwycie węża, należy ustawić
żądaną moc ssania. Należy przesunąć suwak do przodu/do tyłu, aby
zmniejszyć/zwiększyć moc ssania.
9. Należy rozpocząć odkurzanie.
Uwagi:
• Zabronione jest rozpoczynanie odkurzania, jeśli worek na kurz nie jest
zamontowany w urządzeniu.
• Podczas odkurzania należy uważać, aby nie przeciągać przewodu nad
ostrymi krawędziami.
• Nie należy stawać na wężu.
Należy zawsze odłączyć
Page 23

Instrukcja obsługi 23
10. Po zakończeniu odkurzania, należy nacisnąć Przycisk zasilania, aby
wyłączyć urządzenie.
11. Należy odłączyć wtyczkę od gniazda zasilania sieciowego i nacisnąć
Przycisk zwijania przewodu, aby go zwinąć.
Uwagi:
• Należy zawsze ciągnąć za wtyczkę, nigdy za przewód!
• Podczas zwijania przewodu, należy trzymać za wtyczkę, tak aby nie
obijała się o ludzi lub przedmioty powodując szkody czy urazy.
Ważne!
Jeśli jakakolwiek część odkurzacza (wąż, rura, ssawka) zostanie zablokowana,
należy natychmiast wyłączyć urządzenie i usunąć źródło zapchania. Dopiero
po wykonaniu tej czynności można powrócić do odkurzania.
Wymiana worka na kurz
Uwagi:
• Kiedy Wskaźnik zapełnienia worka zapali się na czerwono, należy
wymienić worek na kurz.
• Wskaźnik zapełnienia worka może również aktywować się w przypadk u
zatkania ssawki, rury lub ltra przez zanieczyszczenia. Należy pozbyć
się zanieczyszczeń lub zablokowanego przedmiotu i ponownie
włączyć urządzenie.
• Przed wymianą worka na kurz należy upewnić się, że urządzenie jest
odłączone od gniazda zasilania sieciowego.
1. Najpierw należy wyjąć końcówkę węża z otworu, w którym się znajduje.
Aby to zrobić należy nacisnąć przyciski znajdujące się po obu stronach
węża i wyciągnąć go.
2. Należy chwycić za koniec węża, przekręcić przeciwnie do ruchu
wskazówek zegara i wyciągnąć.
3. Wysunąć worek na kurz z uchwytu:
• papierowy worek na kurz - należy każdorazowo wymieniać go na
nowy.
4. Należy umieścić nowy papierowy worek w uchwycie.
5. Zamknąć przednią pokrywę.
Wyjmowanie i czyszczenie ltrów
Uwaga: Przed wymianą ltrów należy upewnić się, że urządzenie jest
odłączone od gniazda zasilania sieciowego.
PL
Page 24

Instrukcja obsługi24
Filtr silnika
1. Należy nacisnąć Przycisk pokrywy przedniej i otworzyć pokrywę.
2. Wyjąć worek na kurz.
3. Chwycić za ltr, pociągnąć do siebie i zdjąć.
4. Należy wyczyścić ltr poprzez wytrzepanie zanieczyszczeń.
5. Zalecane jest czyszczenie ltra pod bieżącą wodą raz na pół roku
lub w przypadku tak dużego zanieczyszczenia ltra, że blokuje on
swobodny przepływ powietrza. Nie należy prać tekstylnego worka na
kurz w pralce!
Uwaga: Przed ponownym montażem należy upewnić się, że ltr jest
całkowicie suchy. Należy pozostawić ltr do całkowitego wyschnięcia
w otwartej przestrzeni.
6. Kiedy ltr jest już czysty i suchy, należy umieścić go w uprzednio
zajmowanym miejscu, zamontować worek na kurz i zamknąć przednią
pokrywę.
Filtr wylotowy
1. Należy zdjąć pokrywę ltra wylotowego.
2. Chwycić za ltr i wyjąć go.
3. Wyczyścić ltr poprzez wytrzepanie zanieczyszczeń lub wypłukanie
pod bieżącą wodą, jeśli jest mocno zabrudzony. Nie należy prać ltra
wylotowego w pralce!
Uwaga: Przed ponownym montażem należy upewnić się, że ltr jest
całkowicie suchy. Należy pozostawić ltr do całkowitego wyschnięcia
w otwartej przestrzeni.
4. Kiedy ltr jest już czysty i suchy, należy umieścić go w uprzednio
zajmowanym miejscu i zamknąć przednią pokrywę, tak aby słyszalne
było kliknięcie.
CZYSZCZENIE
• Włosie dwustopniowej ssawki podłogowej lub ssawki okrągłej może
PL
być wyczyszczone poprzez wytrzepanie zanieczyszczeń.
• Korpus odkurzacza należy czyścić za pomocą miękkiej, lekko wilgotnej
ściereczki.
• Nie należy używać środków chemicznych lub detergentów do
czyszczenia tego urządzenia.
• Żadna z części nie jest odpowiednia do mycia w pralce lub zmywarce.
Ważne! Wszystkie ltry powinny być regularnie sprawdzane pod kątem
uszkodzeń, najlepiej po każdym czyszczeniu. Jeśli ltry ulegną uszkodzeniu,
należy je natychmiast wymienić. Przed sprawdzeniem ltrów, należy zawsze
odłączyć odkurzacz od gniazda zasilania sieciowego.
Page 25
Instrukcja obsługi 25
PRZECHOWYWANIE
• Przed przechowywaniem urządzenia, należy upewnić się, że jest ono
czyste i suche.
• Urządzenie należy przechowywać w suchym i chłodnym miejscu.
• Urządzenie można przechowywać w dwóch pozycjach:
• pionowej: należy umieścić zaczep dwustopniowej ssawki
podłogowej w uchwycie znajdującym się pod spodem odkurzacza;
• poziomej: należy umieścić zaczep dwustopniowej ssawki
podłogowej w uchwycie znajdującym się z tyłu odkurzacza.
• Przed przechowywaniem urządzenia, można je również rozmontować:
• Należy odłączyć rurę teleskopową od ssawki.
• Trzymając przyciski zwalniające blokadę węża należy jednocześnie
go wyciągnąć.
• Należy odłączyć węża od odkurzacza. Chwycić za koniec węża,
przekręcić przeciwnie do ruchu wskazówek zegara i wyciągnąć.
• Należy upewnić się, że podczas przechowywania rura nie jest splątana
ani przygnieciona.
Papierowy worek na kurz jak również ltr wylotowy HEPA H12 są dostępne
do kupienia w sklepie internetowym Teesa.pl lub lpelektronik.com
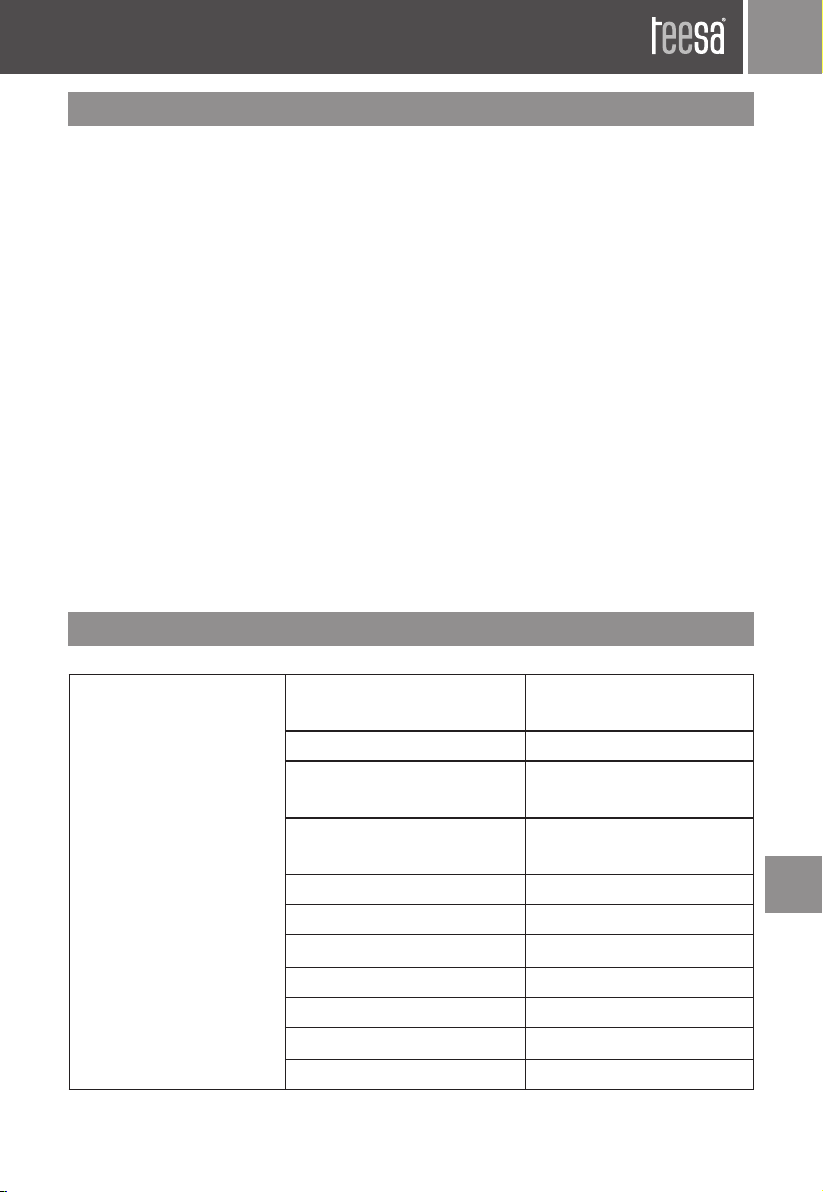
SPECYFIKACJA
Wydajność Klasa efektywności
energetycznej
Roczne zużycie energii 23,8 kWh
Klasa skuteczności
odkurzania dywanów
Klasa skuteczności
odkurzania podłóg twardych
Klasa reemisji kurzu A
Poziom głośności 69 dB
Nadmuch 25 l/s
Podciśnienie (max) 16 kPa
Moc nominalna 700 W
Moc ssania
Zasilanie 230V; 50 Hz
A
D
A
PL
160 W
Page 26
Instrukcja obsługi26
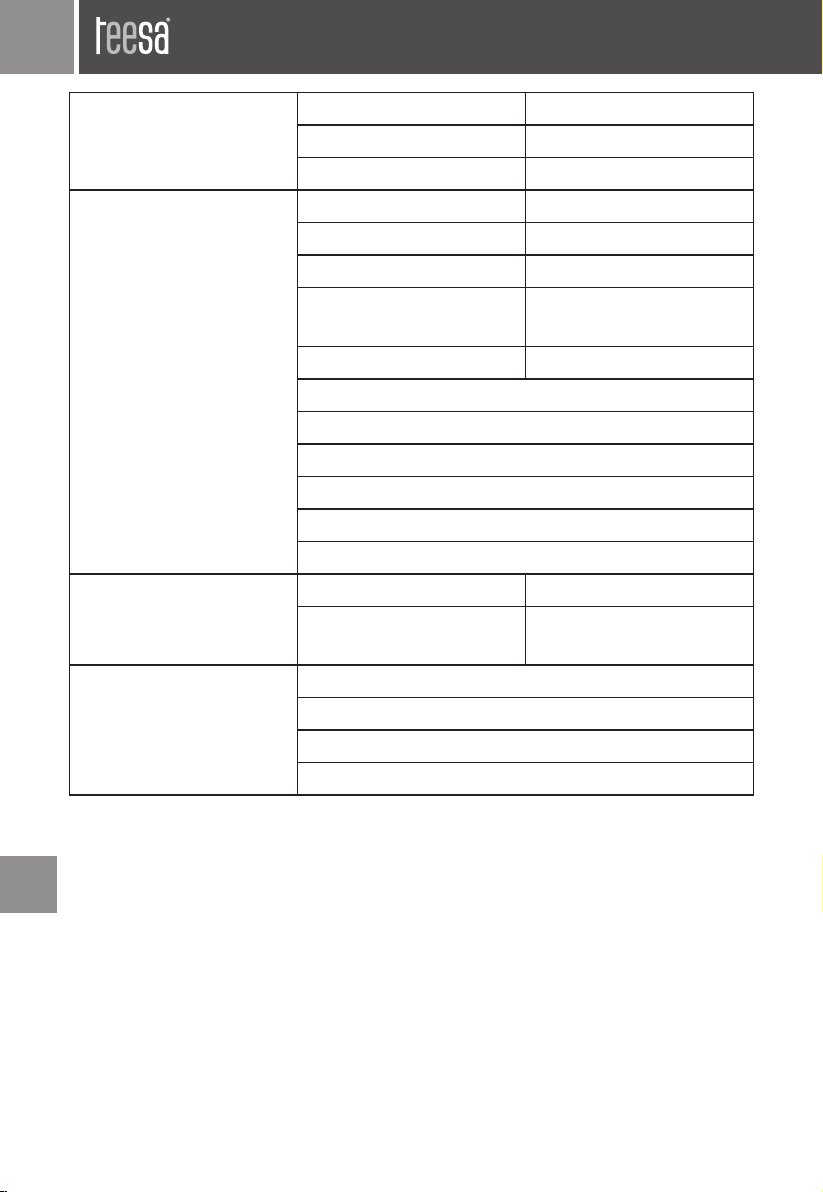
Filtracja Pojemność worka na kurz 3 l
Typ worka na kurz Papierowy
Filtr wylotowy HEPA H12
Parametry użytkowe Zasięg działania 10 m
Długość przewodu 7 m
Regulacja mocy Suwak
Typ rury
Średnica rury 35 mm
Obrotowy wąż 360°
2 koła gumowe i 1 obrotowe
Uchwyt do przenoszenia z przodu
Wskaźnik zapełnienia worka na kurz
Automatyczne zwijanie kabla
Parkowanie pionowe i poziome
Parametry zyczne Waga odkurzacza 5,1 kg
Wymiary odkurzacza
(SxWxG)
W zestawie Ssawka szczelinowa
Ssawka okrągła
Dwustopniowa ssawka podłogowa
Instrukcja obsługi
Teleskopowa z blokadą
wysuwania
30 x 24 x 43 cm
PL
Page 27
Instrukcja obsługi 27
Poland
Prawidłowe usuwanie produktu
(zużyty sprzęt elektryczny i elektroniczny)
Oznaczenie umieszczone na produkcie lub w odnoszących się do niego
tekstach wskazuje, że po upływie okresu użytkowania nie należy usuwać z
innymi odpadami pochodzącymi z gospodarstw domowych. Aby uniknąć
szkodliwego wpływu na środowisko naturalne i zdrowie ludzi wskutek
niekontrolowanego usuwania odpadów, prosimy o oddzielenie produktu od
innego typu odpadów oraz odpowiedzialny recykling w celu promowania
ponownego użycia zasobów materialnych jako stałej praktyki. W celu
uzyskania informacji na temat miejsca i sposobu bezpiecznego dla środowiska
recyklingu tego produktu użytkownicy w gospodarstwach domowych
powinni skontaktować się z punktem sprzedaży detalicznej, w którym dokonali
zakupu produktu, lub z organem władz lokalnych. Użytkownicy w rmach
powinni skontaktować się ze swoim dostawcą i sprawdzić warunki umowy
zakupu. Produktu nie należy usuwać razem z innymi odpadami komercyjnymi.
Wyprodukowano w CHRL dla LECHPOL ELECTRONICS Sp. z o.o. Sp.k.,
ul. Garwolińska 1, 08-400 Miętne.
PL
Page 28

Manual de utilizare28
Va multumim pentru achizitionarea aparatului TEESA. Va rugam sa cititi cu
atentie manualul inainte de a utiliza aparatul si pastrati manualul pentru
consultari ulterioare. Distribuitorul nu isi asuma nici o responsabilitate
pentru posibilele daune cauzate de o utilizare necorespunzatoare a
aparatului.
INSTRUCTIUNI PRIVIND SIGURANTA
Va rugam sa cititi cu atentie manualul de instructiuni inainte de utilizarea
produsului! Urmati toate instructiunile de siguranta pentru a evita eventuale
pericole ce pot aparea din cauza unei utilizari necorespunzatoare!
1. Va rugam sa cititi cu atentie manualul de instructiuni inainte de a
utiliza aparatul si pastrati manualul pentru consultari ulterioare.
2. Inainte de a conecta dispozitivul la priza, asigurati-va ca tensiunea de
alimentare de la retea corespunde cu tensiunea necesara aparatului,
inscrisa pe eticheta produsului.
3. Nu folosiţi aspiratorul fără să îi montaţi sacul de praf si ltrul. În caz
contrar, aparatul poate deteriorat.
4. Acest dispozitiv este destinat exclusiv uzului casnic.
5. Utilizaţi aspiratorul exclusiv pentru aspirarea substanţelor uscate.
6. Nu introduceti obiecte in fanta de aerisire.
7. Asigurati-va ca nu blocati circulatia aerului.
8. Inainte de ecare utilizare asigurati-va ca tuburile si locurile de
ventilatie nu sunt blocate. Daca sunt blocate, indepartati obiectele
si incepeti sa aspirati.
9. In cazul in care teava sau tubul se blocheaza in timpul utilizarii, opriti
aspiratorul si indepartati obiectele care sunt blocate inauntru.
10. Curatati acest dispozitiv, conform instructiunilor mentionate in
sectiunea “Curatare si intretinere”.
11. Opriti intotdeauna aparatul și deconectati-l de la reteaua de
alimentare:
• in cazul in care nu functioneaza corect,
• in cazul in care scoate un zgomot neobisnuit pe durata utilizarii,
RO
• inainte de curatare,
• atunci cand nu este utilizat.
12. Cand doriti sa scoateti aparatul din priza, trageti de stecher, nu de
cablu.
13. Opriţi aspiratorul de la butonul aat pe carcasă, înainte de a-l scoate
din priză.
Page 29

Manual de utilizare 29
14. Nu pastrati aparatul la indemana copiilor. Copiii trebuie supravegheati,
pentru a va asigura ca nu se joaca cu produsul.
15. Aparatul nu trebuie folosit de persoane (inclusiv copii) cu abilitati
psihice, senzoriale sau mentale reduse, lipsite de experienta sau
cunostinte, decat daca acestea sunt supravegheate sau primesc
instructiuni cu privire la folosirea aparatului de la o persoana
responsabila de siguranta acestora.
16. Cablul de alimentare poate inlocuit numai intr-un service autorizat.
17. Pastrati aparatul si cablul de alimentare departe de surse de caldura,
de lumina directa a soarelui, umiditate si feriti-le de margini ascutite.
18. Nu utilizaţi aspiratorul prea aproape de încălzitoare sau radiatoare.
19. Nu transportaţi aspiratorul tinandu-l de furtun sau cablu de
alimentare.
20. Nu trageti de cablul de alimentare pe marginile de ascutite sau
lasati-o sa devina blocat.
21. Nu lasati stecherul sa se loveasca de aparat cand se aduna rul de
alimentare.
22. Nu staţi cu picioarele pe furtun. Nu puneţi greutăţi pe furtun.
23. Nu introduceti cablul, ştecherul sau orice alt element în apă sau alte
lichide. Nu atingeţi cablul electric cu mâinile ude.
24. Daca aspiraţi pe scări, asiguraţi-vă că staţi pe o treaptă superioară
comparativ cu aparatul.
25. Întotdeauna mentineţi, părul, îmbrăcămintea şi alte ustensile
departe de produs în timpul funcţionării acestuia, pentru prevenirea
accidentelor şi defecţiunilor.
26. Nu îndreptaţi apiratorul spre persoane sau animale cand este in
functiune.
27. Nu îl folosiţi asupra oamenilor sau animalelor.
28. Nu aspirati:
• obiecte de dimensiune mare, cu varfuri ascuțite, care ar putea
bloca si deteriora aspiratorul;
• substante inamabile;
• materiale incandescente sau cenusa;
• suprafete umede sau obiecte umede;
• apa sau alte lichide
29. Utilizaţi aspiratorul doar pentru scopul în care a fost conceput,
conform descrierii din acest manual de utilizare.
30. Nu lăsaţi niciodată aspiratorul să funcţioneze nesupravegheat.
31. Producătorul nu este responsabil pentru daunele cauzate de
utilizarea incorectă a acestui aparat sau a accesoriilor sale.
32. Deconectaţi-l de la priza electrica atunci când nu îl utilizaţi şi înainte
de a scoate ltrele.
RO
Page 30

Manual de utilizare30
33. Nu utilizaţi aparatul în cazul în care cablul de alimentare sau ştecherul
prezintă deteriorări.
34. În scopul evitării pericolelor, în cazul în care cablul de alimentare este
deteriorat, acesta trebuie înlocuit de către producător sau de către un
service autorizat. Nu demontati niciodata produsul.
35. Nu utilizati accesorii neautorizate.
36. Nu atingeţi cordonul de alimentare de suprafeţe erbinţi sau orice alte
elemente ascutite.
ASAMBLARE ȘI UTILIZARE
Notă: Înainte de a monta sau demonta accesoriile, scoateți întotdeauna
ștecherul din priza de alimentare.
1. Introduceti furtunul in oriciul de aspirare şi rotiţi in sens orar pentru
a-l xa.
2. Conectati furtunul de aspirare la tubul telescopic. Instalarea corecta
este indicata printr-un clic sonor.
3. Conectati la tubul telscopic peria adecvata pentru aspirare.
4. Reglati tubul telescopic la lungimea dorita.
5. Prindeti de stecherul rului de alimentare si trageti usor afara cablul de
alimentare si conectati stecherul la o priza de perete.
Nota:
• Totdeauna trageti de stecher, nu de cablul de alimentare!
• Un semn galben pe cablul de alimentare marcheaza lungimea
optima. Nu trageti de cablu dincolo de marcajul rosu!
6. Apasati butonul de pornire pentru a porni aspiratorul.
7. Utilizati butonul de control al puterii pentru a regla puterea.
8. Utilizati glisiera de control de pe tub pentru a regla puterea de aspirare
prin furtun. Mutati glisiera in fata/spate pentru a reduce/creste puterea
de aspirare.
9. Incepeti aspirarea.
Nota:
• Nu incepeti aspirarea daca sacul de colectare a prafului nu este
montat.
RO
• Pe durata aspirarii, vericati ca rul de alimentare sa nu treaca peste
margini ascutite.
• Nu va asezati pe furtunul de aspirare.
10. Cand ati terminat aspirarea, apasati butonul de oprire pentru a opri
aspiratorul.
11. Deconectati cablul de alimentare de la priza de perete si apasati
butonul de infasurare a cablului pentru a infasura cablul de alimentare
inapoi.
Page 31

Manual de utilizare 31
Nota:
• Intotdeauna trageti de stecher, nu de cablu!
• Pe durata infasurarii cablului de alimentare, ghidati-l usor cu mana
pentru a va asigura ca nu se incurca.
Important
In cazul in care oriciile de aspiratie ale unitatii, furtunul sau tubul sunt
blocate, opriti aparatul și inlaturati cauza blocajului inainte de a reporni
aparatul. Asigurati-va de a face acest lucru numai atunci cand dispozitivul
este oprit si deconectat de la sursa de alimentare.
Schimbarea sacului de colectare a prafului
Note:
• Cand indicatorul pentru sacul de colectare a prafului arata culoarea
rosie, sacul trebuie inlocuit.
• Indicatorul arat culoarea rosie si atunci cand este infundat tubul de
aspirare sau peria. In acest caz curatati tubul sau peria si indepartati
obiectele care obtureaza caile de aspiratie si porniti din nou
aspiratorul.
• Inainte de schimbarea sacului de colectare a prafului, vericati ca
aspiratorul sa e oprit si deconectati-l de la reteaua de alimentare.
1. Intai, scoateti tubul aspiratorului din locasul lui prin apasarea pe
butoanele de deblocare aate pe partea laterala si trageti-l in afara.
2. Prindeti capatul furtunului, rotiti-l in sens invers acelor de ceasornic
pentru a-l elibera din oriciul de aspiratie si trageti-l afara.
3. Scoateti sacul din suport:
• sacul de hartie trebuie inlocuit cu unul nou de ecare data.
4. Introduceti sacul de hartie.
5. Inchideti capacul frontal.
Inlocuire si curatare ltre
Nota: Inainte de inlocuirea ltrelor, vericati ca aspiratorul sa e oprit si
deconectat de la reteaua de alimentare.
Filtrul motorului
1. Apasati butonul de eliberare a capacului frontal si deschideti capacul
frontal.
2. Scoateti sacul de colectare a prafului.
3. Scoateti ltrul motorului.
4. Curatati ltrul prin scuturare pentru a elimina praful adunat.
RO
Page 32

Manual de utilizare32
5. Se recomandă să clătiți ltrul sub jet de apă o dată la șase luni sau
în cazul în care ltrul este foarte murdar încât acesta nu mai permite
aspirarea. Nu spălați ltrul motorului la mașina de spălat!
Nota: Lasati ltrul sa se usuce complet intr-o zona deschisa inainte
de reasamblare!
6. Cand ltrul este curat si uscat, puneti-l la loc , puneti sacul de praf la
locul lui si inchideti capacul frontal.
Filtrul de evacuare
1. Indepartati capacul ltrului de evacuare.
2. Scoateti ltrul.
3. Curatati ltrul prin scuturare sau clatiti-l cu jet apa în cazul în care
ltrul este foarte murdar încât acesta nu mai permite aspirarea. Nu
spălați ltrul la mașina de spălat!
Nota: Lasati ltrul sa se usuce complet intr-o zona deschisa inainte
de reasamblare!
4. Cand ltrul este curat si uscat, puneti-l la loc si inchideti capacul
ltrului de evacuare.
CURATARE
• Peria de aspirare poate curatata prin scuturare.
• Curatati corpul aspiratorului cu un material textil moale, usor umezit.
• Nu utilizati substante abrazive sau agenti chimici pentru curatarea
aspiratorului.
• Nici o parte componenta a aspiratorului nu va spalata la masina de
spalat sau la masina de spalat vase!
Important! Toate ltrele trebuiesc vericate periodic. Daca prezinta semne
de uzura sau sunt deteriorate, acestea trebuie inlocuite imediat. Inainte de
vericarea ltrelor sau de curatarea aspiratorului, acesta trebuie sa e oprit
si deconectat de la reteaua de alimentare.
DEPOZITARE
RO
• Înainte de a depozita aspiratorul asigurați-vă că acesta este curat și
uscat.
• Depozitați aparatul într-un spațiu răcoros și uscat.
• Aparatul poate depozitat în două poziții:
• vertical,
• orizontal.
Page 33
Manual de utilizare 33
• Deconectați tubul telescopic de la peria de aspirare.
• Apasati si tineti apasat butoanele de eliberare furtun si scoateti
furtunul.
• Asigurați-vă că în timpul depozitarii, furtunul nu este încurcat sau
presat.
Sacul de praf din hartie precum și ltrul de evacuare HEPA H12 sunt
disponibile pentru a cumparate din magazinul online Teesa.pl sau
lpelektronik.com
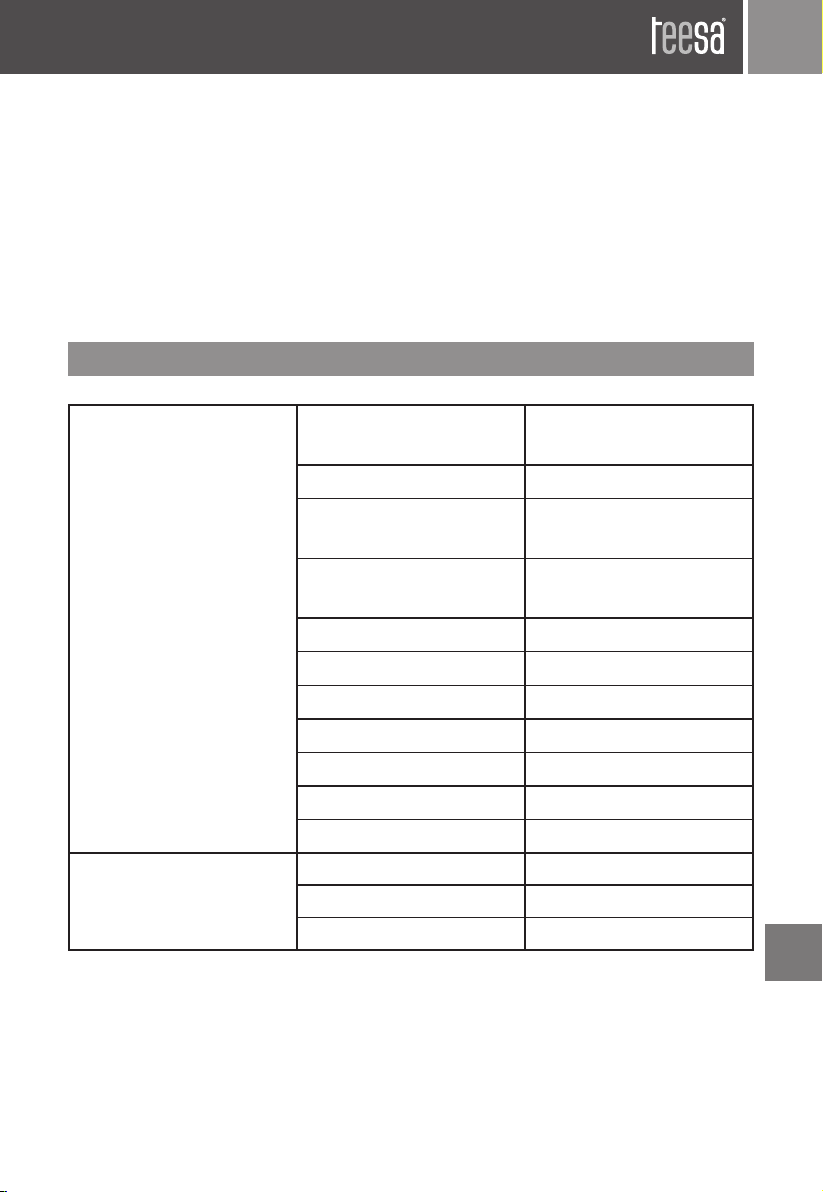
SPECIFICATII
Caracteristici principale Clasa de ecienta
energetica
Consumul anual de energie 23,8 kWh
Clasa de performanta de
curatare a covoarelor
Clasa de performanta
de curatare a suprafetelor dure
Clasa emisiilor de praf A
Nivelul de zgomot 69 dB
Debit de aer 25 l/s
Putere vacuum (max) 16 kPa
Putere nominala 700 W
Puterea de aspiratie 160 W
Tensiune de alimentare 230 V; 50 Hz
Filtru Capacitate rezervor praf 3 l
Sac pentru praf Din material textil
Filtru evacuare HEPA H12
A
D
A
RO
Page 34
Manual de utilizare34
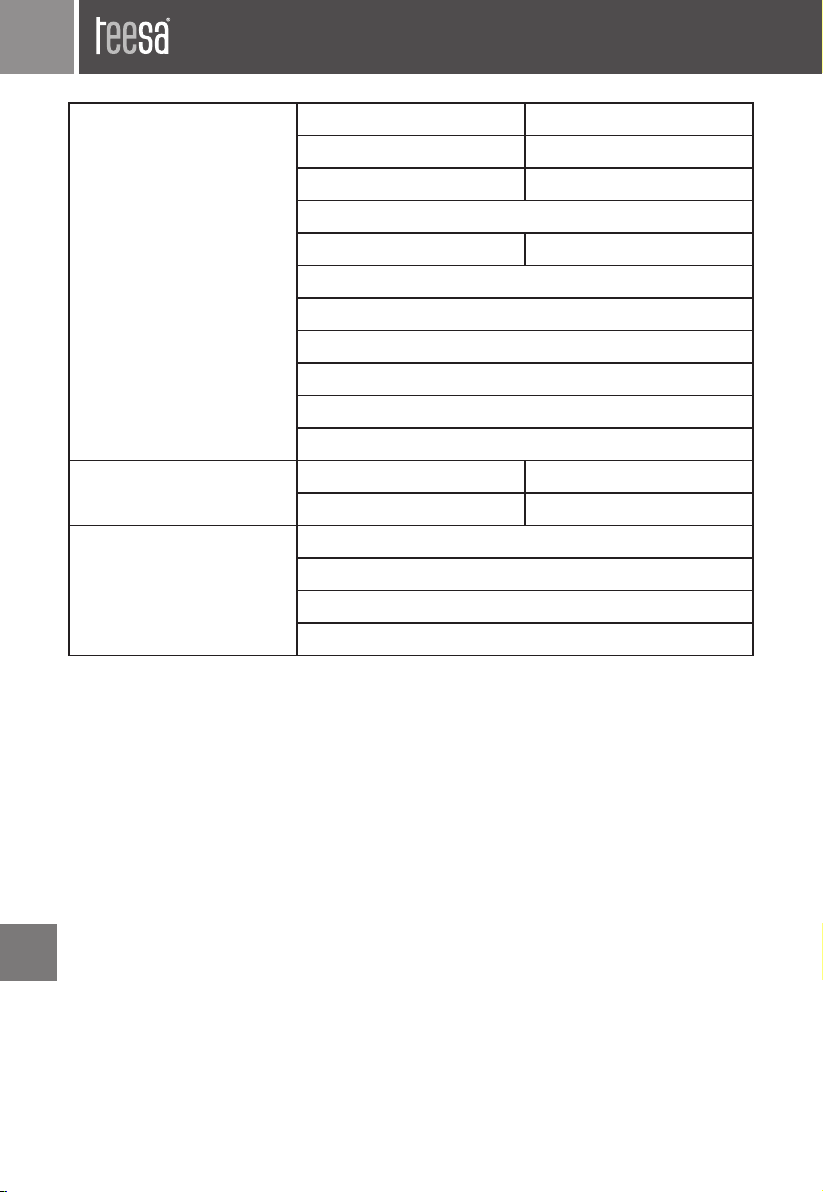
Utilizare Raza de actiune 10 m
Lungime cablu 7 m
Control putere aspirare Cursor
Tub telescopic cu sistem de inchidere
Diametru tub 35 mm
Mobilitate furtun: 360°
2 cauciucuri si 1 rotita
Maner confortabil
Indicator de umplere sac pentru praf
Cordon retractabil
2 pozitii de stocare vertical si orizontal
Caracteristici zice Greutate (aspirator) 5,1 kg
Dimensiuni (aspirator) 30 x 24 x 43 cm
Continut colet Accesoriu pentru spaţii înguste
Duza rotunda
Perie cu 2 trepte pentru aspirare podea
Manual de utilizare
RO
Page 35
Manual de utilizare 35
Romania
Reciclarea corecta a acestui produs
(reziduuri provenind din aparatura electrica si
electronica)
Marcajale de pe acest produs sau mentionate in instructiunile sale de
folosire indica faptul ca produsul nu trebuie aruncat impreuna cu alte
reziduuri din gospod arie atunci cand nu mai este in stare de functionare.
Pentru a preveni posibile efecte daunatoare asupra mediului inconjurator
sau a san ata tii oamenilor datorate evacuarii necontrolate a reziduurilor,
vă rugăm să separați acest produs de alte tipuri de reziduuri si să-l reciclati
in mod responsabil pentru a promova refolosirea resurselor materiale.
Utilizatorii casnici sunt rugati să ia legatura e cu distribuitorul de la care au
achizitionat acest produs, e cu autoritatile locale, pentru a primi informatii
cu privire la locul si modul in care pot depozita acest produs in vederea
reciclarii sale ecologice. Utilizatorii institutionali sunt rugati să ia legatura
cu furnizorul și să verice condițiile stipulate in contractul de vanzare.
Acest produs nu trebuie amestecat cu alte reziduuri de natura comerciala.
Distribuit de Lechpol Electronic SRL, Republicii nr. 5, Resita, CS, ROMANIA.
RO
Page 36

Návod na použitie36
Ďakujeme Vám za zakúpenie výrobku značky TEESA. Pred použitím si
pozorne prečítajte tento návod na použitie a uschovajte ho pre prípadné
neskoršie použitie.
Výrobca nezodpovedá za škody spôsobené nesprávnym používaním.
BEZPEČNOSTNÉ PREDPISY
Aby nedošlo k poškodeniu alebo zraneniu, dodržujte pri manipulácii s
elektrickými spotrebičmi základné bezpečnostné opatrenia, vrátane tých,
ktoré sú uvedené nižšie:
1. Pred použitím si pozorne prečítajte návod na použitie a to aj v prípade
predchádzajúceho použitia podobných zariadení. Uschovajte si tento
návod pre neskoršie použitie.
2. Pred pripojením zariadenia skontrolujte, či sa napätie uvedené na
štítku spotrebiča zhoduje s napätím vašej elektrickej siete.
3. Je zakázané začať s vysávaním, ak vrecko na prach alebo ltre nie sú
vložené vo vysávači, pretože by mohlo dôjsť k poškodeniu spotrebiča.
4. Spotrebič je určený len na domáce použitie.
5. Používajte spotrebič iba na suchom povrchu.
6. Nevkladajte do ventilačných otvorov žiadne predmety.
7. Neblokujte prúdenie vzduchu, napríklad zakrytím vetracích otvorov.
8. Pred každým použitím skontrolujte, či hadica, hubice, rúrky alebo
ventilačné otvory nie sú upchaté. Ak áno, skôr než začnete vysávať,
odstráňte zaseknutý predmet alebo nečistoty.
9. Ak sa počas vysávania upchá hadica, hubica alebo rúrka, okamžite
vysávač vypnite a zablokovaný predmet uvoľnite. Následne opäť
vysávač zapnite.
10. Zariadenie je potrebné čistiť v súlade s pokynmi uvedenými v kapitole
„ Čistenie”.
11. Vždy vypnite zariadenie a odpojte ho od napájania:
• ak zariadenie nepracuje správne,
• v prípade, že zariadenie vydáva neprirodzený zvuk,
• pred demontážou,
• pred čistením,
• ak sa nepoužíva.
12. Pri odpájaní zariadenia od napájania uchopte a potiahnite za zástrčku,
nikdy nie za kábel.
SK
13. Pred odpojením vysávača z elektrickej zásuvky ho najskôr vypnite
stlačením hlavného vypínača, nachádzajúceho sa na vysávači.
Page 37

Návod na použitie 37
14. Zariadenie by malo byť umiestnené mimo dosahu detí. Je zakázané
používať prístroj deťom bez dozoru dospelej osoby. Je potrebné
poučiť deti, že výrobok nie je hračka.
15. Zariadenie nesmú obsluhovať osoby (vrátane detí) so zníženými
fyzickými, zmyslovými alebo duševnými schopnosťami, rovnako ako
osoby, ktoré nemajú vedomosti a skúsenosti potrebné na prevádzku
zariadenia; s výnimkou situácie použitia prístroja za prítomnosti
osoby zodpovednej za ich bezpečnosť.
16. Neodpájateľný prívodný kábel môže byť vymenený výrobcom,
servisným pracovníkom, alebo kvalikovanou osobou.
17. Zariadenie a napájací kábel udržujte ďaleko od zdrojov tepla, vody,
vlhkosti, ostrých hrán a ďalších faktorov, ktoré by mohli spôsobiť
poškodenie výrobku, alebo kábla.
18. Nepoužívajte vysávač v blízkosti ohrievačov a radiátorov.
19. Neprenášajte vysávač uchopením za kábel, alebo hadicu.
20. Neťahajte kábel cez ostré hrany a vyhýbajte sa privretiu kábla do
dverí.
21. Dávajte pozor, aby pri navíjaní kábla zástrčka nenarážala do ľudí,
zvierat a predmetov.
22. Nestúpajte na hadicu, ani ju neprehýbajte.
23. Neponárajte spotrebič do vody, ani ho neobsluhujte mokrými
rukami.
24. Pri vysávaní schodov buďte zvlášť opatrní a pamätajte, že sa vysávač
nachádza pod vami.
25. Počas vysávania držte hlavu, iné časti tela, vlasy a oblečenie vzdialené
od nasávania.
26. Ak je zariadenie zapnuté, nesmerujte ním na ľudí a zvieratá.
27. Nepoužívajte vysávač na čistenie zvierat, alebo ľudí.
28. Nepoužívajte vysávač na vysávanie:
• veľkých predmetov s ostrými hranami, ktoré by sa mohli vo vysávači
zablokovať a následne spôsobiť poškodenie,
• škodlivých a agresívnych kvapalín, alebo horľavých a výbušných
látok, ktoré môžu spôsobiť požiar,
• horúcich a rozžeravených predmetov,
• vlhkých, alebo mokrých povrchov a predmetov,
• vody a iných kvapalín.
29. Nepoužívajte spotrebič na iný účel než je uvedené v tomto návode.
30. Nenechávajte spotrebič počas prevádzky bez dozoru.
31. Výrobca nezodpovedá za škody spôsobené nesprávnym používaním
výrobku.
32. Je potrebné vždy odpojiť spotrebič zo siete, ak sa nepoužíva.
SK
Page 38

Návod na použitie38
33. Je zakázané používať zariadenie, ak je napájací kábel poškodený,
alebo zariadenie nepracuje správne.Je zakázané vlastnoručne
prevádzať opravy zariadenia a demontovať ho. Iba oprávnené osoby
a kvalikovaný personál môže zariadenie opraviť.
34. Nepoužívajte neoriginálne príslušenstvo.
35. Napájací kábel udržujte ďaleko od zdrojov tepla a ostrých hrán.
MONTÁŽ A OBSLUHA
Poznámka: Pred nasadením alebo demontážou príslušenstva sa uistite, že
je zástrčka odpojená od elektrickej zásuvky.
1. Umistnite koncovku hadice do nasávacieho otvoru a pootočením v
smere hodinových ručičiek ju zaistite.
2. Na druhý koniec hadice nasaďte teleskopickú rúru. Správne nasadenie
je signalizované zacvaknutím.
3. Na druhý koniec teleskopickej rúry namontujte príslušnú hubicu.
4. Pomocou poistky nastavte vhodnú dĺžku teleskopickej rúry.
5. Uchopte zástrčku a kábel vytiahnite. Následne ju pripojte do zásuvky.
Poznámky:
• Vždy ťahajte za zástrčku, nikdy nie za kábel!
• Žltá značka na kábli signalizuje optimálnu dĺžku vysunutia kábla.
Nevysúvajte kábel za červenú značku.
6. Pre zapnutie vysávača stlačte hlavný vypínač.
7. Následne nastavte výkon pomocou posuvného regulátora výkonu.
8. Pomocou posuvného regulátora sania na rukoväti hadice nastavte
požadovaný sací výkon. Posúvajte regulátorom dopredu / dozadu
pre zníženie / zvýšenie sacieho výkonu.
9. Začnite s vysávaním.
Poznámky:
• Je zakázané začať s vysávaním, ak vrecko na prach nie je vložené
vo vysávači.
• Pri vysávaní dajte pozor, aby ste neťahali kábel cez ostré hrany.
• Nestúpajte na hadicu.
10. Po skončení vysávania spotrebič vypnite stlačením hlavného
vypínača.
11. Odpojte zástrčku zo zásuvky a navite kábel stlačením tlačidla
navíjania šnúry.
SK
Poznámky:
• Vždy ťahajte za zástrčku, nikdy nie za kábel!
• Počas navíjania kábla držte za zástrčku, tak aby nenarážala do ľudí a
predmetov. V opačnom prípade môže spôsobiť úraz, alebo škodu.
Page 39

Návod na použitie 39
Dôležité!
Ak dôjde k upchatiu akejkoľvek časti vysávača (hadica, rúra, hubica),
okamžite spotrebič vypnite a odstráňte zdroj upchatia. Až po odstránení
pokračujte vo vysávaní.
Výmena vrecka na prach
Poznámky:
• Ak indikátor naplnenia vrecka na prach zmení farbu na červeno, je
potrebné vrecko vymeniť.
• Indikátor plného vrecka môže byť tiež aktivovaný v prípade upchatia
hubice, rúry, alebo znečistením ltra. Odstráňte nečistoty, alebo
zaseknutý predmet a vysávač znovu zapnite.
• Pred výmenou vrecka na prach sa uistite, že je vysávač odpojený od
elektrickej zásuvky.
1. Najprv odpojte koncovku hadice od otvoru v ktorom sa nachádza.
Uchopte za koniec hadice, otočte proti smeru hodinových ručičiek a
vytiahnite ju.
2. Následne povytiahnite držiak, v ktorom sa nachádza vrecko na prach.
3. Vyberte vrecko na prach z držiaka:
• Papierové vrecko na prach – zakaždým ho vymeňte za nové.
4. Nasaďte nové papierové vrecko na prach do držiaku.
5. Zatvorte predný kryt.
Vybratie a čistenie ltrov
Poznámka: Pred výmenou ltrov sa uistite, že je spotrebič odpojený od
elektrickej siete.
Motorový lter
1. Stlačte aretačné tlačidlo predného krytu a kryt otvorte.
2. Vyberte prachové vrecko.
3. Uchopte lter, potiahnite ho smerom k sebe a vyberte ho.
4. Vyprášením vyčistite lter od nečistôt.
5. Odporúča sa vyčistiť lter pod tečúcou vodou raz za šesť mesiacov,
alebo v prípade silného znečistenia ltra, ktoré by blokovalo voľné
prúdenie vzduchu. Neperte motorový lter v práčke!
Poznámka: Pred opätovným nasadením ltra sa uistite, že je úplne
suchý. Ponechajte lter vyschnúť na otvorenom priestore.
6. Ak je lter čistý a suchý, umiestnite ho na správne miesto, vložte vrecko
na prach a uzatvorte predný kryt.
SK
Page 40

Návod na použitie40
Výstupný lter
1. Vyberte kryt výstupného ltra.
2. Uchopte lter a vyberte ho.
3. Vyprášením vyčistite lter od nečistôt, alebo v prípade silného
znečistenia ho opláchnite pod tečúcou vodou. Neperte výstupný lter
v práčke!
Poznámka: Pred opätovným nasadením ltra sa uistite, že je úplne
suchý. Ponechajte lter vyschnúť na otvorenom priestore.
4. Ak je lter čistý a suchý, umiestnite ho na správne miesto, uzatvorte
kryt tak aby bolo počuť zacvaknutie.
ČISTENIE
• Štetiny podlahovej a okrúhlej hubice môžte vyčistiť od nečistôt
poklepaním.
• Povrch vysávača čistite pomocou mäkkej navlhčenej handričky.
• Na čistenie nepoužívajte chemikálie ani rozpúšťadlá.
• Žiadny komponent vysávača nie je vhodný na pranie v práčke alebo
na umývanie v umývačke.
Dôležité! Všetky ltre pravidelne kontrolujte či nie sú poškodené, najlepšie
po každom čistení. Ak sú poškodené, ihneď ich vymeňte. Pred kontrolou
ltrov vždy odpojte vysávač zo zásuvky.
SK
SKLADOVANIE
• Pred uskladnením spotrebiča sa uistite, že je vyčistený a suchý.
• Spotrebič skladujte na suchom a chladnom mieste.
• Vysávač môže byť uložený v dvoch polohách:
• Zvislej: zasuňte záves na podlahovej hubici do drážky nachádzajúcej
sa na spodnej časti vysávača;
• Vodorovnej: zasuňte záves na podlahovej hubici do drážky
nachádzajúcej sa na zadnej časti vysávača.
• Pred uskladnením vysávača môžete tiež jednotlivé komponenty
rozobrať:
• Odpojte teleskopickú rúru od hubice.
• Držiac aretačné tlačidlá na uvoľnenie hadice ju súčasne vytiahnite.
• Odpojte hadicu od vysávača. Uchopte za koniec hadice, otočte proti
smeru hodinových ručičiek a vytiahnite ju.
• Uistite sa, že počas uskladnenia nie je hadica zamotaná, alebo
zalomená.
Page 41
Návod na použitie 41
Papierové vrecko na prach a výstupný lter HEPA H12 si môžete zakúpiť v
internetovom obchode velko.sk alebo lpelektronik.sk
ŠPECIFIKÁCIA
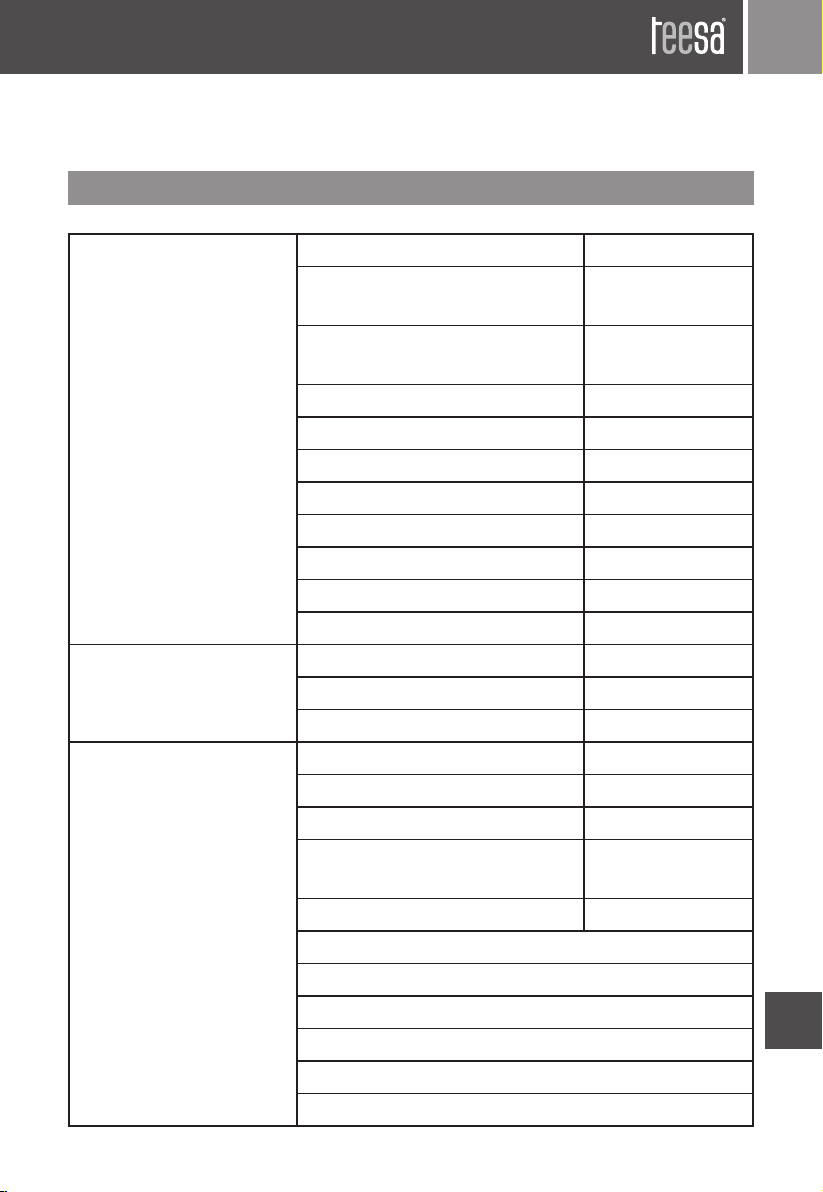
Výkon Energetická trieda A
Priemerná ročná
spotreba energie
Trieda účinnosti
čistenia kobercov
Trieda účinnosti čistenia tvrdých podláh A
Trieda reemisie prachu A
Hladina akustického výkonu 69 dB
Prietok vzduchu 25 l/s
Podtlak (max) 16 kPa
Príkon 700 W
Sací výkon 160 W
Napájanie 230 V; 50 Hz
Filtrácia Objem vrecka na prach 3 l
Typ vrecka na prach Papierový
Výstupný lter HEPA H12
Vlastnosti Akčný rádius 10 m
Dĺžka prívodnej šnúry 7 m
Regulácia výkonu Posuvná
Typ rúrky
Priemer rúrky 35 mm
Otočná sacia hadica 360°
2 pogumované kolieska a 1 otočné
Predné držadlo na prenášanie
Indikátor plného vrecka na prach
Automatické navíjanie kábla
Odkladacia a parkovacia poloha
23,8 kWh
D
Teleskopická so
zámkom vysúvania
SK
Page 42
Návod na použitie42
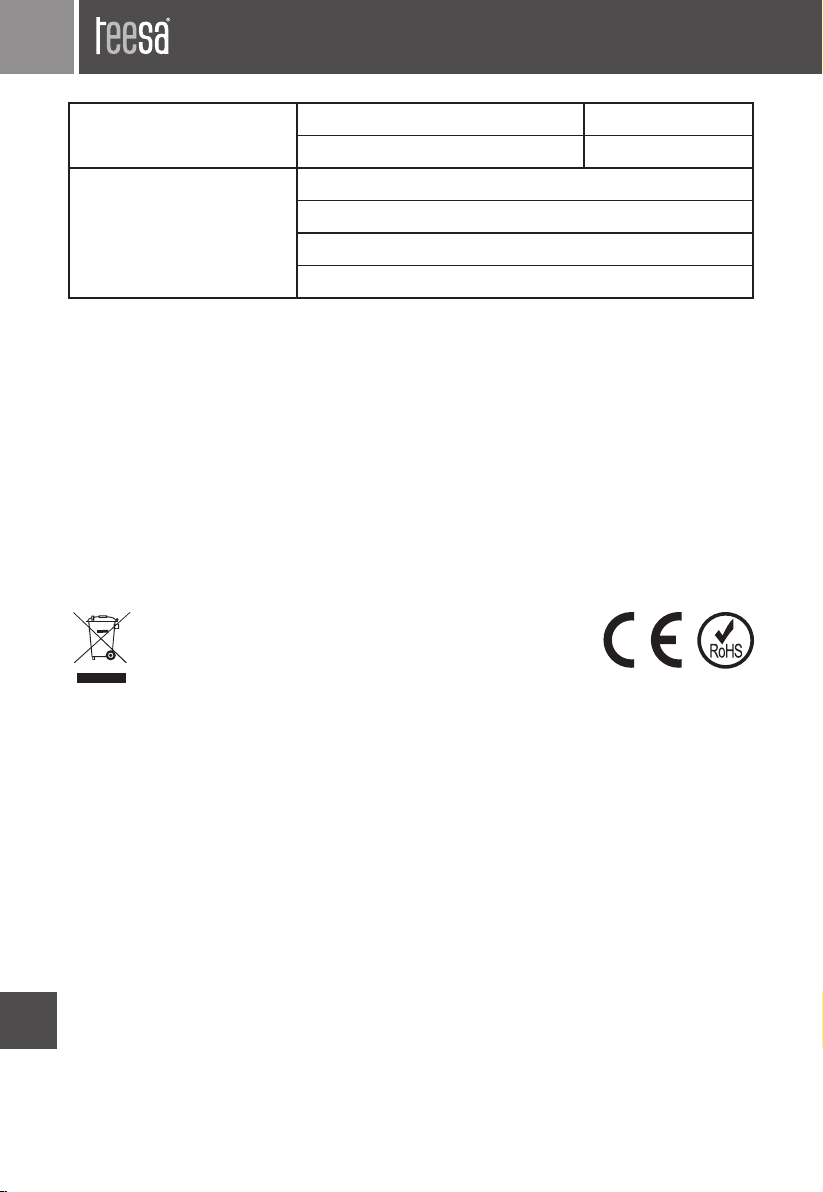
Fyzické parametre Hmotnosť vysávača 5,1 kg
Rozmery vysávača (ŠxVxH) 30 x 24 x 43 cm
Obsah balenia Štrbinová hubica
Okrúhla hubica
Podlahová hubica dvojstupňová
Návod na použitie
Slovensko
Správna likvidácia tohto produktu
(O odpade z elektronických zariadení a ich
príslušenstva)
(Platí v Európskej únii a v ostatných európskych krajinách so systémom
triedeného odpadu) Toto označenie na výrobku alebo v dokumentácii
znamená, že by nemal byť likvidovaný s inými domácimi zariadeniami
po skončení svojho funkčného obdobia. Aby sa zabránilo možnému
znečisteniu životného prostredia alebo poškodeniu ľudského zdravia
nekontrolovanou likvidáciou odpadu, oddeľte ich prosíme od ďalších
typov odpadov a recyklujte ich zodpovedne a podporte opätovné využitie
materiálnych zdrojov. Domáci spotrebitelia by sa mali informovať u predajcu
kde tento výrobok zakúpili ako ho správne recyklovať alebo kde by ho
mohli odovzdať k recyklácii. Priemyselní používatelia by mali kontaktovať
svojho dodávateľa a preveriť podmienky kúpnej zmluvy. Tento výrobok by
SK
sa nemal miešať s inými komerčnými produktmi, určenými na likvidáciu.
Vyrobené v Číne pre LECHPOL ELECTRONICS Sp. z o.o. Sp.k., ul. Garwolińska 1,
08-400 Miętne.
Page 43

Page 44
www.teesa.pl
 Loading...