

Page 1
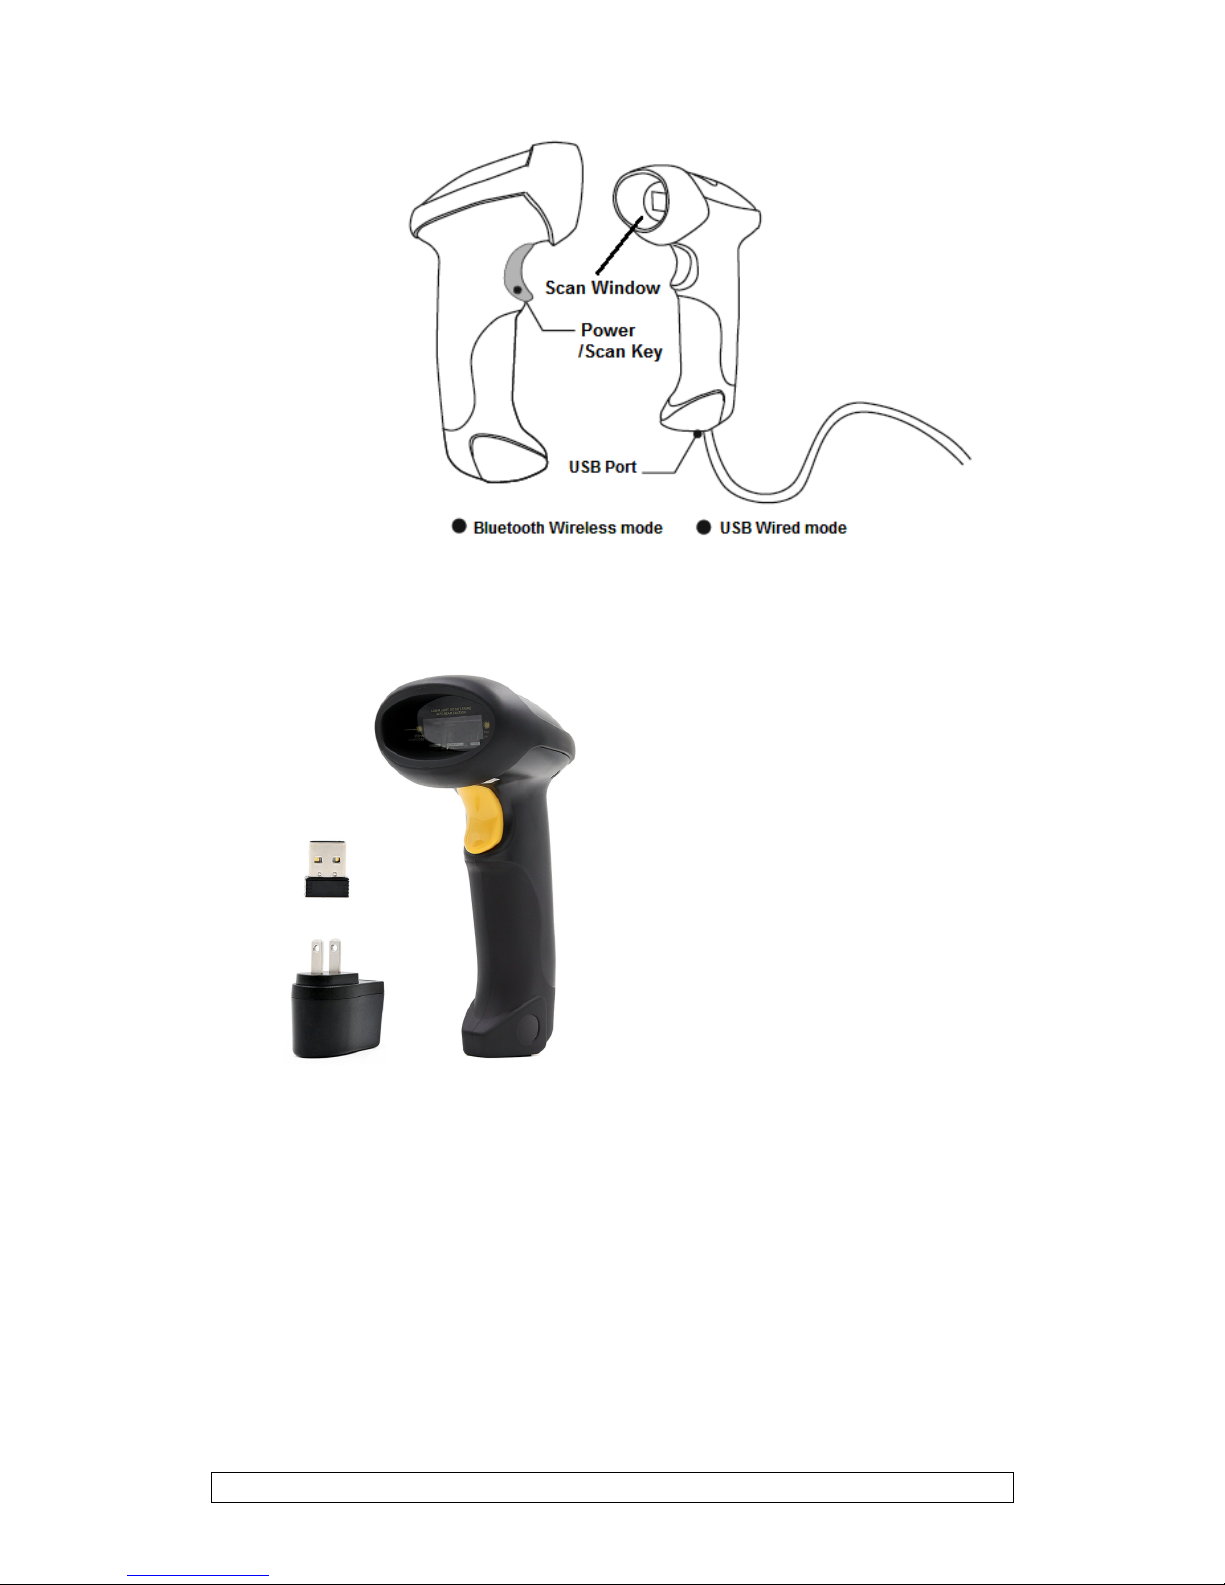
Appearance
Introduction of Key Function
Note: Long press Scan button 3 seconds will turn on the TMCT-07 scanner.
Long press Scan button 3 seconds will turn off the TMCT-07 scanner.
Flip the Scan button can read the barcodes.
Specifications
PHYSICAL CHARACTERISTICS
Page 2

Material
ABS+TPU
Size
Length 167mm*Width 70mm* Height 85.5mm
Color
Black
Power supply
Built-in rechargeable lithium battery
Weight
150g(With battery)
PERFORMANCE CHARACTRISTICS
Bluetooth
Bluetooth class 2.0, Version +EDR
Interfaces Supported
Multiple Interface with: USB, RS232, PS2 Keyboard
Light Source (Laser)
Laser LED 650+/-20nm
Sensor
2500 pixels
Decode Capability
Codabar, Code 11, Code 93, MSI, Code 128, UCC/EAN-128,
Code 39, EAN-8, EAN-13, UPC-A, ISBN, Industrial 25,
Interleaved 25, Standard 25, 2/5 Matrix
Resolution
3mil
Nominal Working Distance
6~30cm
Decode Rate
200 decodes per second
Scan width
30mm=Scanner Window
Decode mode
Single-Line Aiming
Scan mode
Auto off mode / Manual mode
Print Contrast Minimum
30%
Scan angles
Roll 30° Pitch 75° Yaw65°
Cylinder Horizontal Scan
Diameter 35mm
Indication
Beeper, LED
Radio Range
10m Visual range
POWER
Voltage
DC 5V
Laser Safety
Accord with national level two laser safety standards
EMC
CE & FCC DOC Compliance
standby Current
35mA
Operating current
60mA
USER ENVIRONMENT
Operating Temp.
0 to 50. °C / 32 to 122°F
Storage Temp.
0 to 50. °C / 32 to 122°F
Operating Humidity
20-85% ( non-condensing )
Storage Humidity
20-85% ( non-condensing )
Drop Specifications
Free fall of 1.5m air drop
Accessories
Scanner, Charger., Data lines
Correct Aiming
Page 3
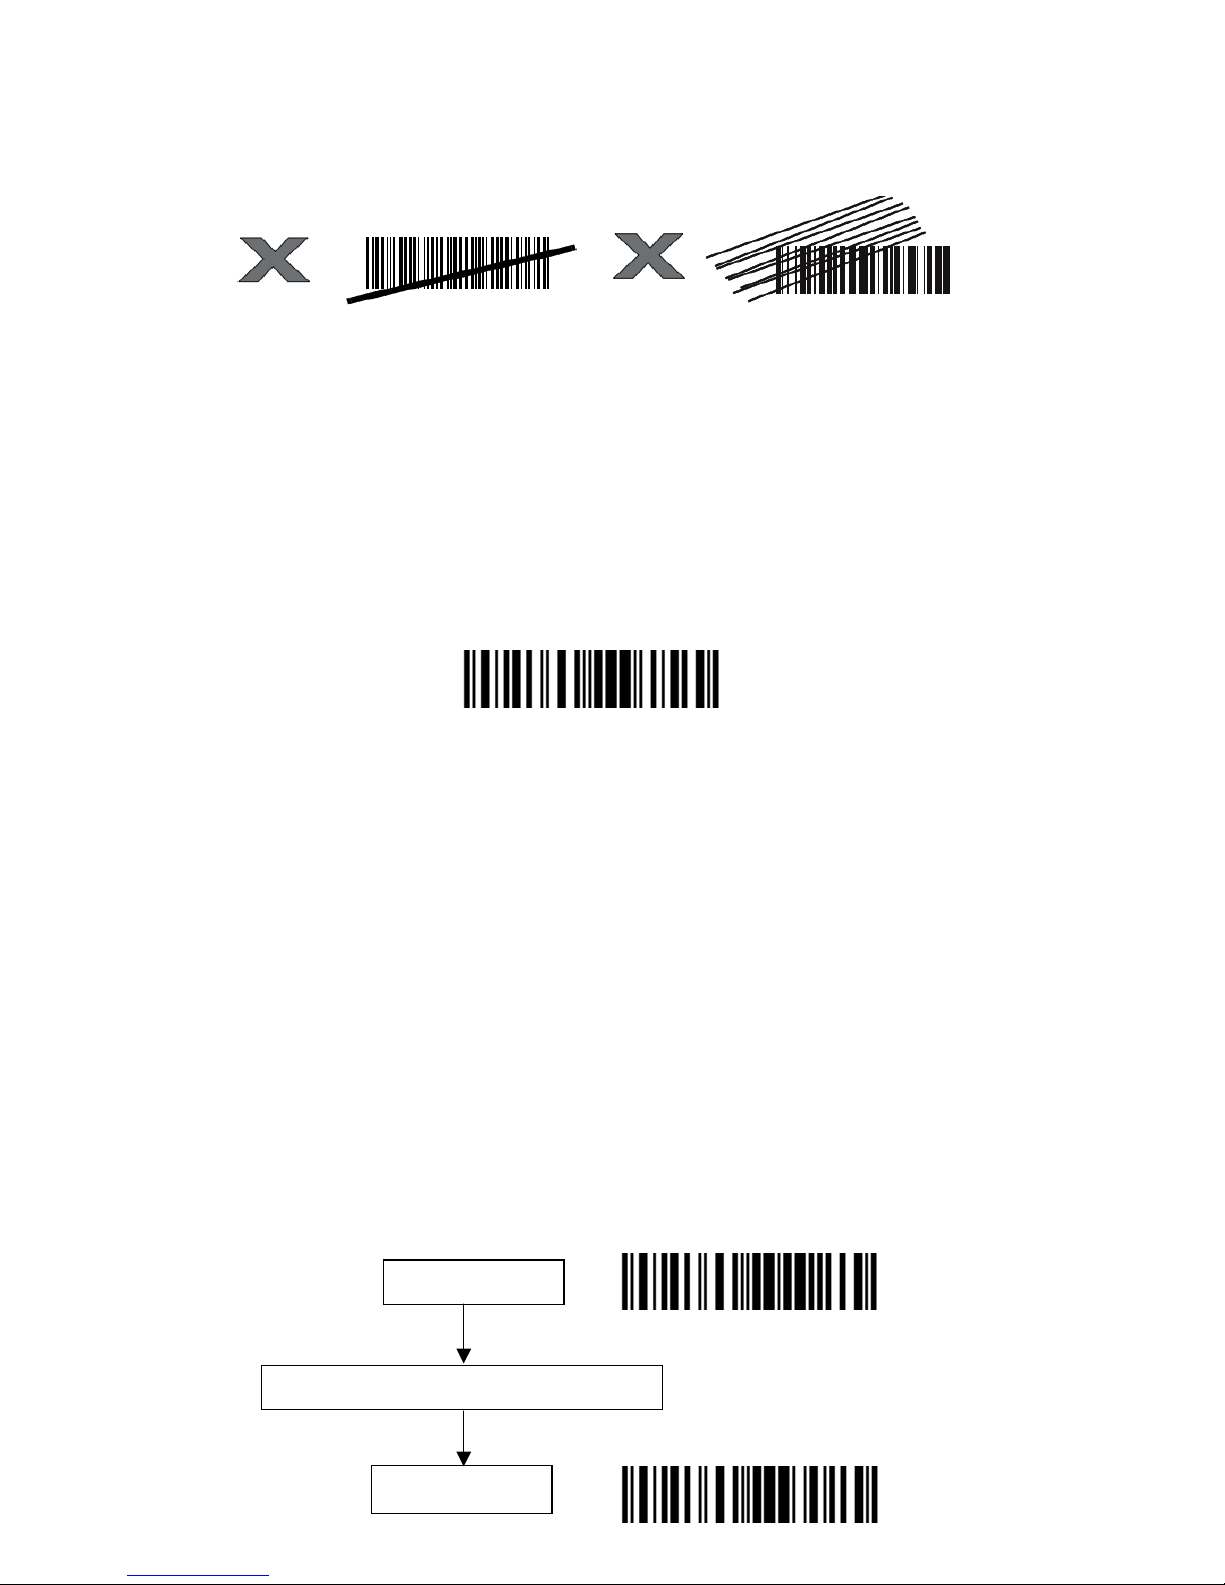
Incorrect Aiming
1. Restore Factory Defaults
"Restore Factory Defaults" is a special barcode. The TMCT-10 Barcode Scanner will
respond with a short beep (high tone) after reading this barcode. At this time, the scanner
system could restore factory defaults, and no need to read "Exit with Save" barcode again.
The Scanner defaults enable HID, PIN defaults 10010.
Note: Most of setting mode have restore factory defaults selection. The factory default
value for each setting is indicated by an asterisk "*".
You could use this barcode at the following status:
1、The scanner cannot work. For example, it cannot read barcodes.
2、You forget the settings you did to the scanner before, and you don't want to be affected
by the settings when you use the scanner.
3、After using a function which is not be used usually in the scanner.
2. Steps of Programming the scanner:
If you like to configure and modify one or a couple of the TMCT-10 or TMCT-07 scanner’s
properties, you may do so by following the scanning steps shown below:
“Enter setup mode” -> [configuration barcode(s)] -> “Exit with save”.
Enter Setup
Details (eg: Enable/Disable a Barcode)
Exit Setup
Enter Setup
Exit with Save
Restore Factory
Page 4
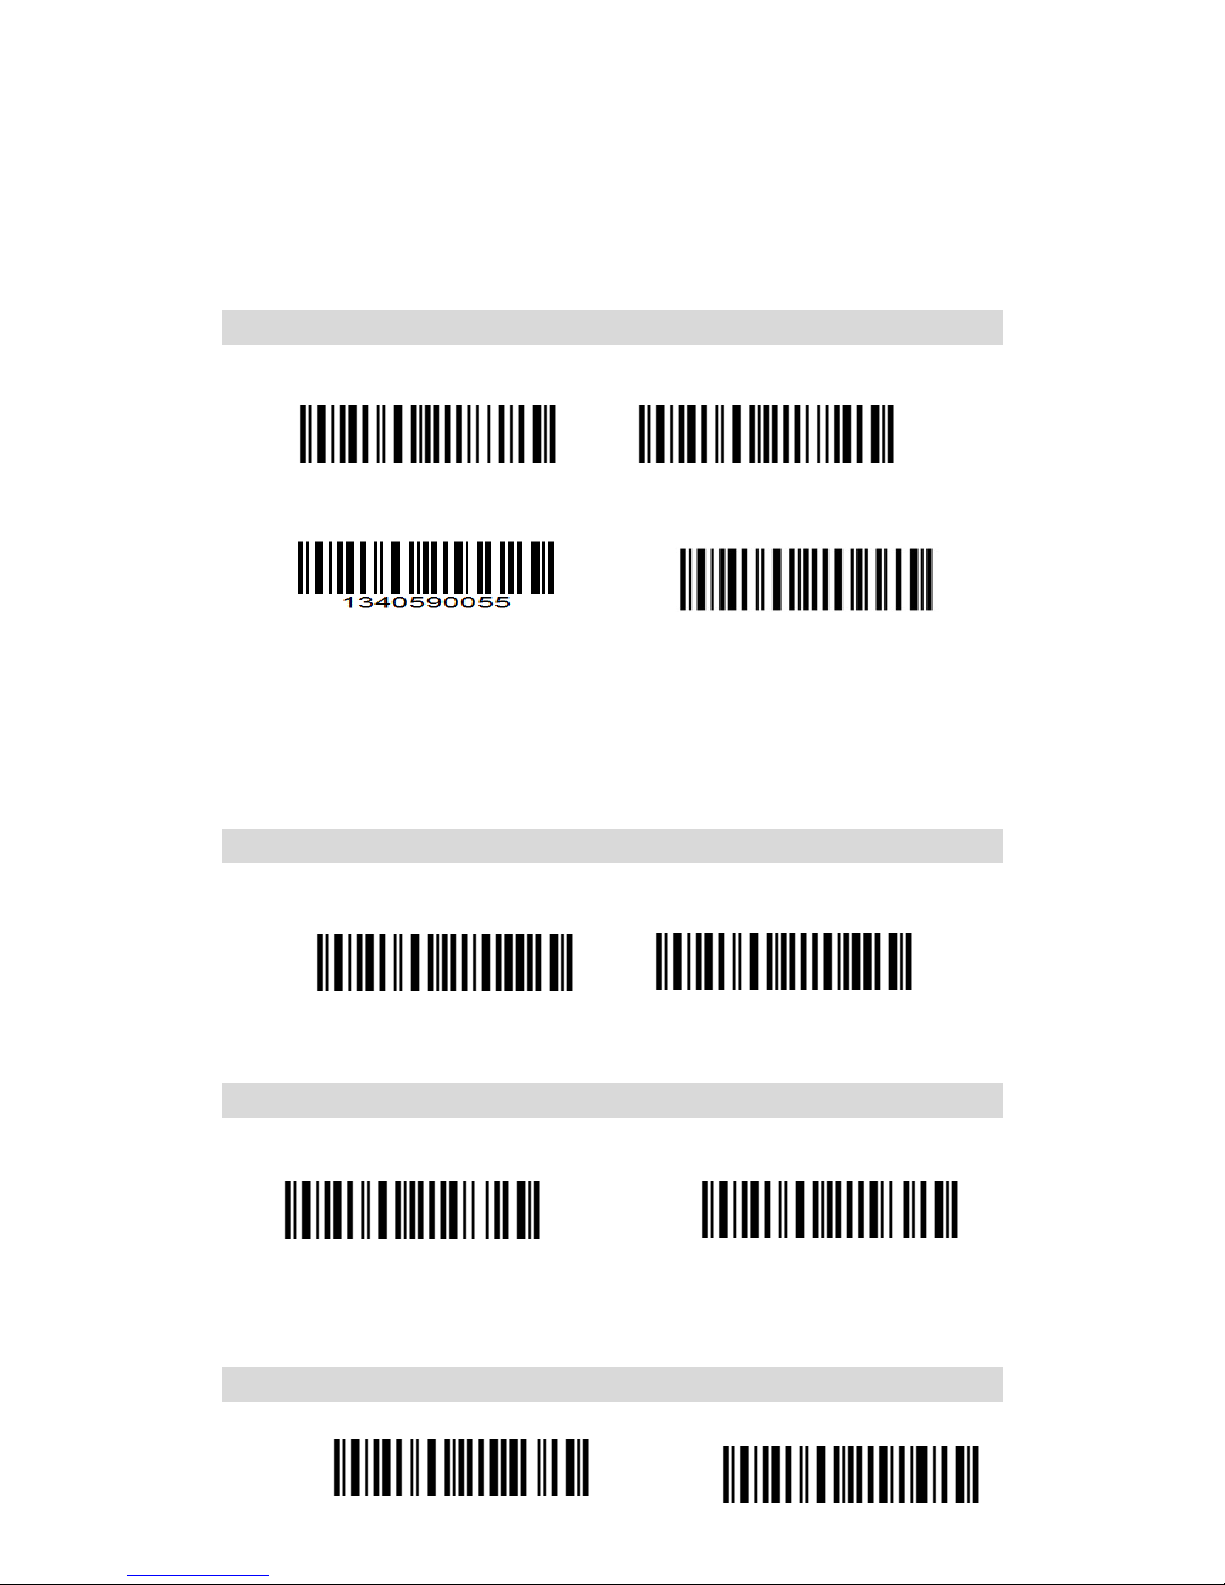
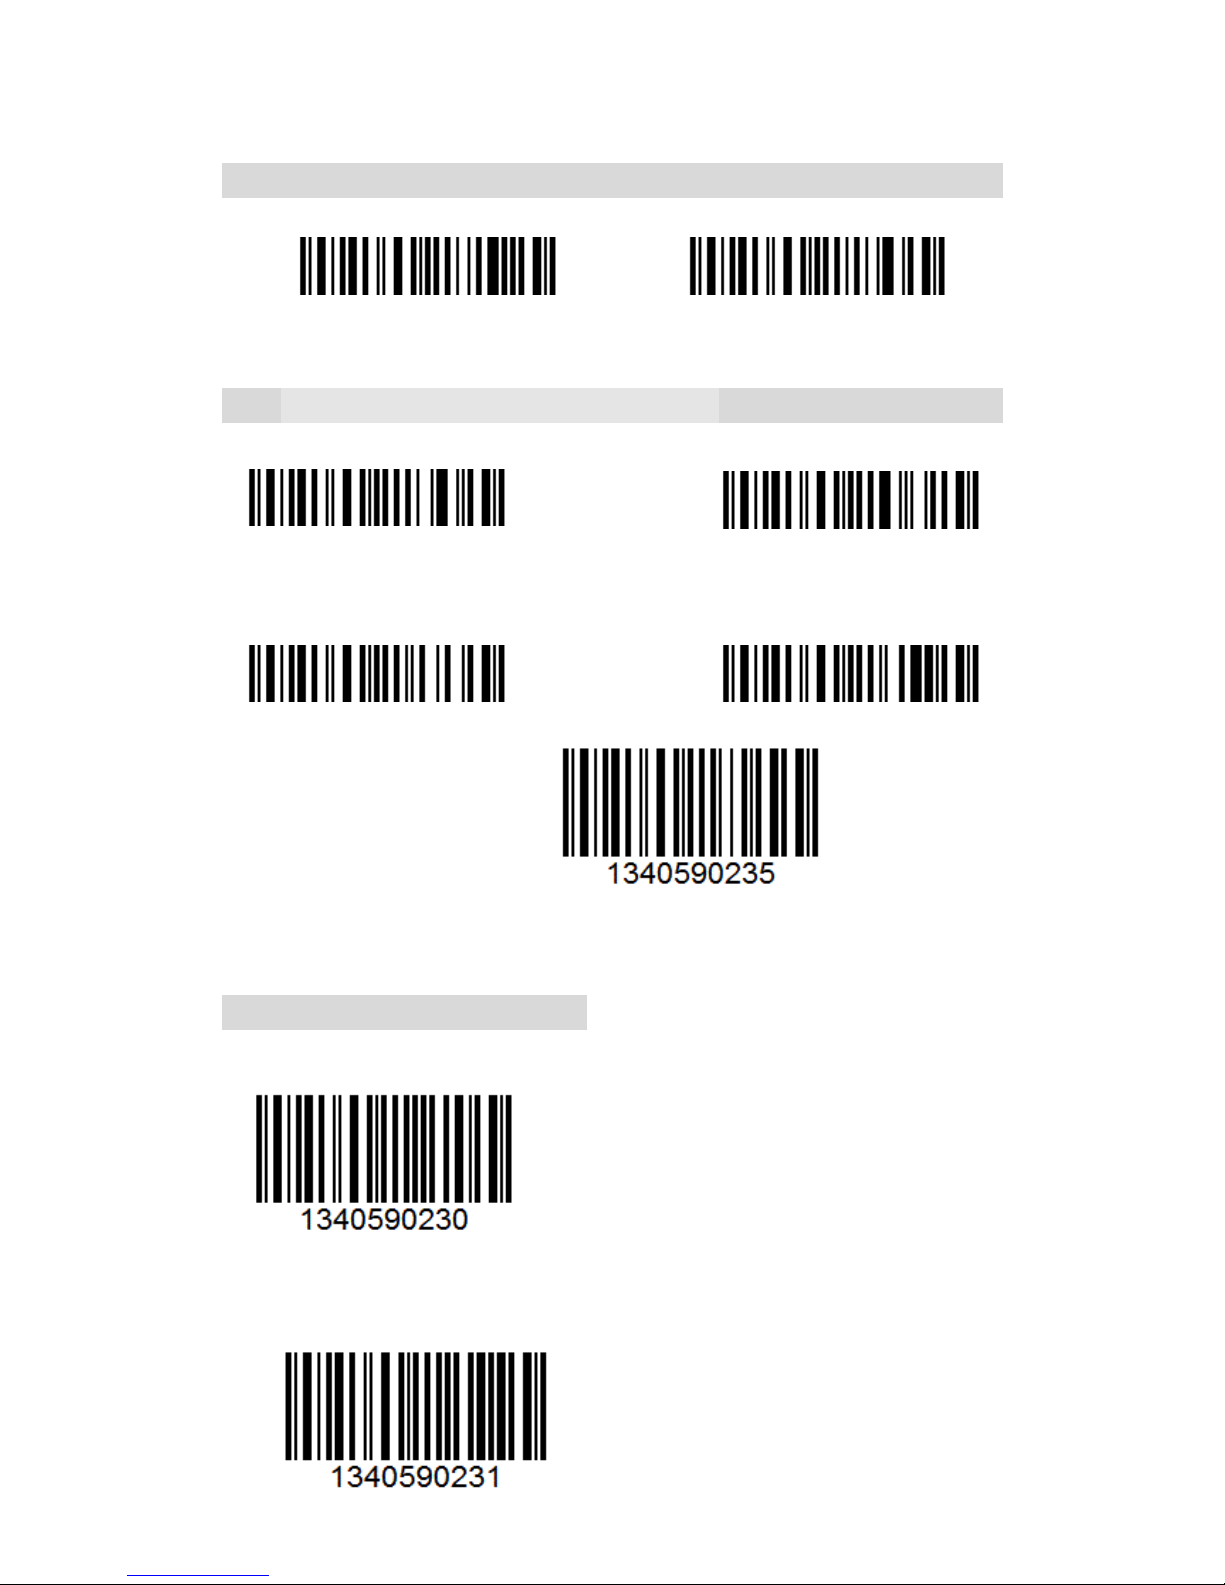
For example: Enable Codabar.
1. Read the "Enter Setup" barcode;
2. Read the "Enable Codabar" barcode;
3. Read the "Exit with Save" barcode.
3.1 CODABAR
Without output start and stop symbols of Output start and stop symbols of
Codebar Codebar
start and stop symbols: The alphabet characters A, B, C, D (in some specifications, E, N,
asterisk, and T) are used to mark the beginning and end of the barcode. They do not
appear in the body of a Codabar string.
3.2 CODE 25 –INDUSTRIAL25
3.3 CODE 25 –INTERLEAVED 25
3.4 CODE 25 –MATRIX 25
Enable Codabar
(*)Disable Codabar
Enable Industrial25
(*)Disable Industrial25
Enable Interleaved 25
(*)Disable Interleaved 25
Enable Matrix 25
(*)Disable Matrix 25
Page 5
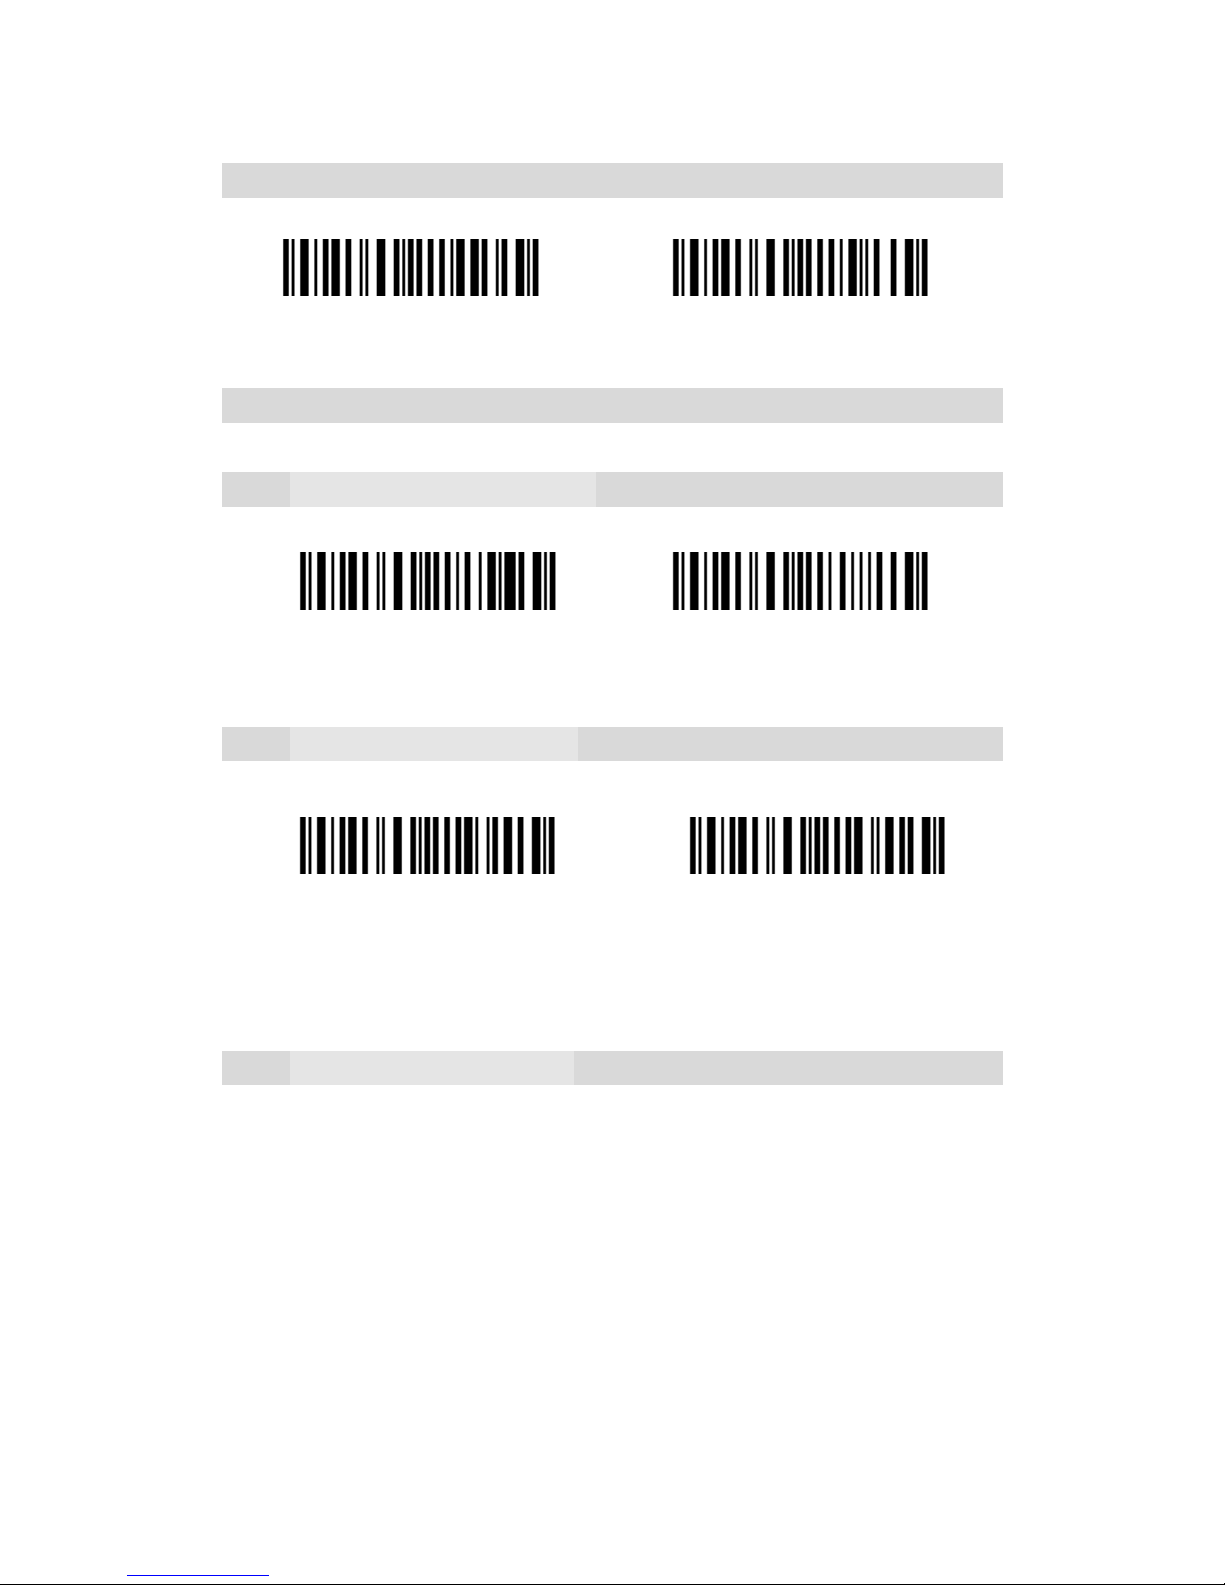
3.5 CODE 25-STANDARD 25
3.6 CODE 39
3.6.1 Enable/Disable Code 39
3.6.2 START/STOP Output
3.6.3 Checksum Verification
It is not enforced to include the checksum character in the Code 39 data. If checksum
character is included, it should be the last character of the barcode data. Checksum
character is a calculate value bases on all of the data, and is used to check the data is
correct or not.
Thus, if the scanner is set to "Do Not Verify", the scanner will output all the barcode data.
If the scanner is set to "Verify without Output Checksum Character", the scanner will
check the data bases on the last character of the barcode data. If the check passes, the
scanner will output the data without the checksum character; if the check does not passes,
the scanner will display read failure.
If the scanner is set to "Verify with Output Checksum Character", the scanner will check
the data bases on the last character of the barcode data. If the check passes, the scanner
will output the data with the checksum character; if the check does not pass, the scanner
will display read failure.
Enable Standard 25
(*)Disable Standard 25
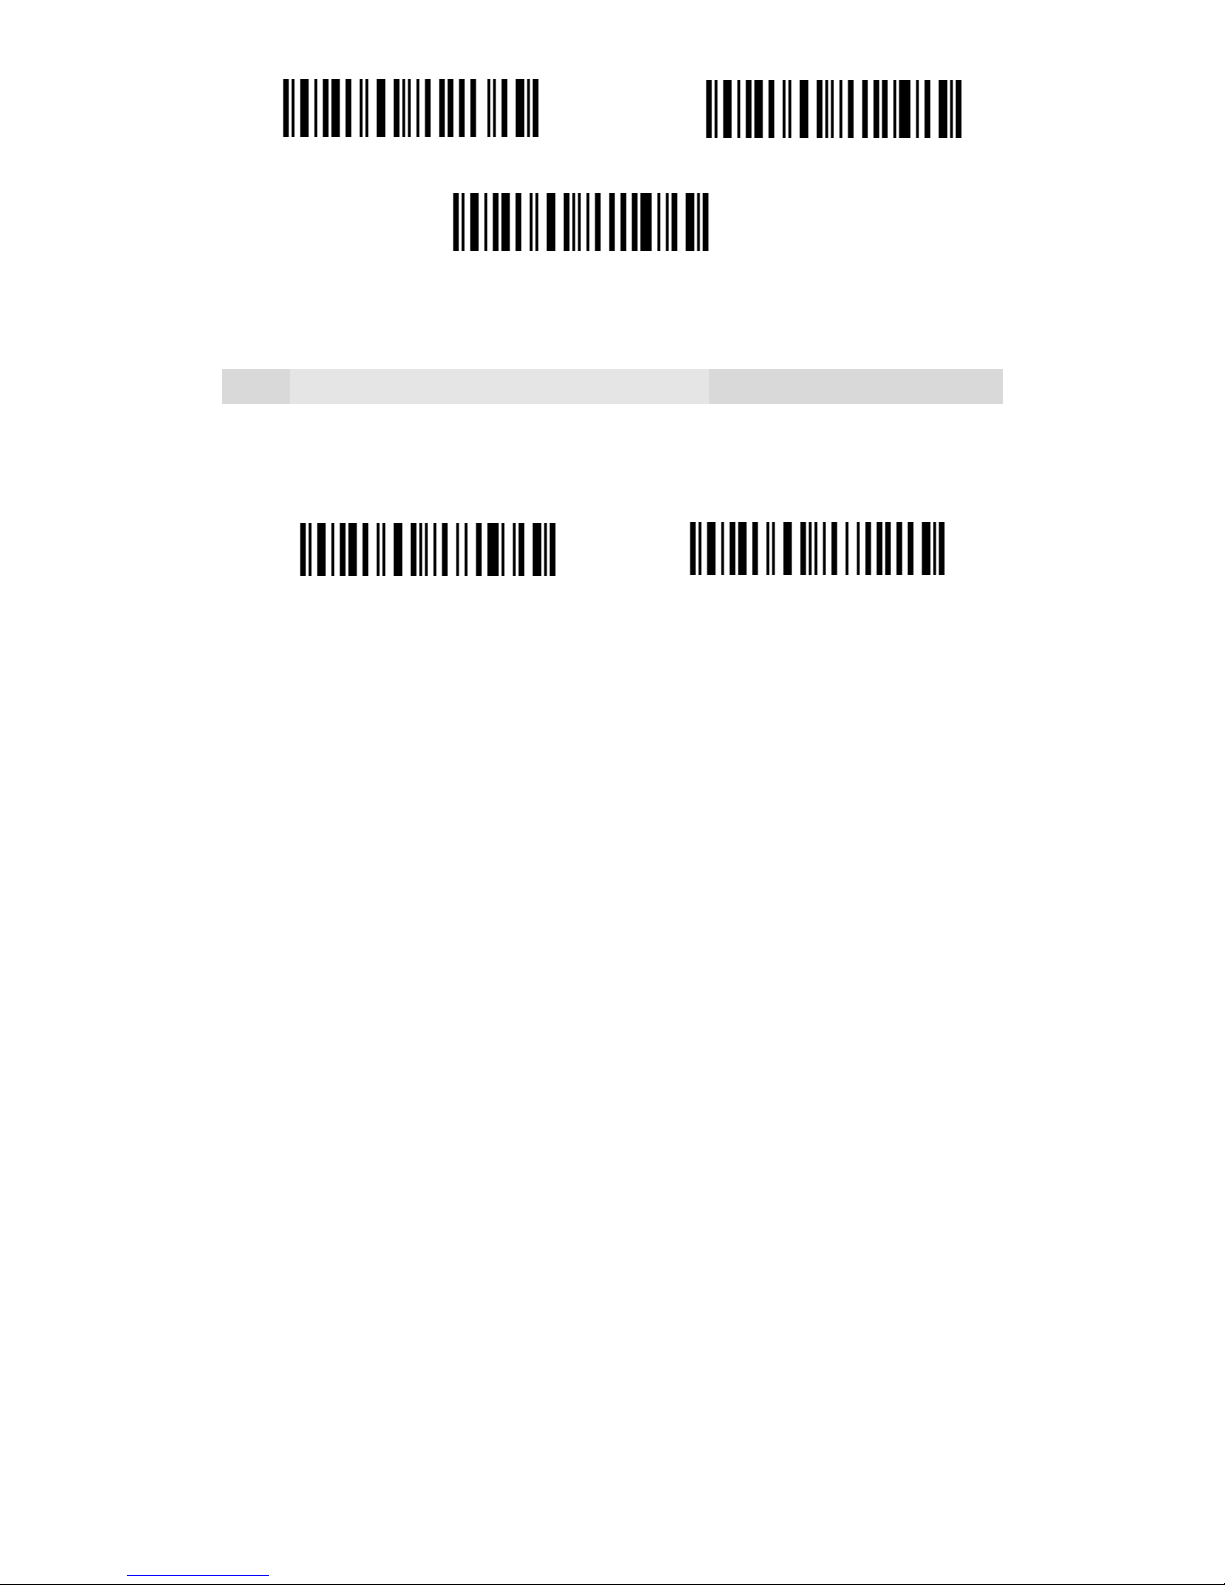
(*)Enable Code 39
Disable Code 39
(*)Output Code 39 Start/Stop
Characters
Without output Code 39
Start/Stop Characters
Page 6
3.6.4 STANDARD/FULL ASCII CODE 39
Decide whether to support Code 39 Full ASCII or not that includes all the alphanumeric
and special character. The default setting is to support Code 39 full ASCII.
Verify with Output
Verify without Output
Checksum Character
(*)Do Not Verify
Disable Code39 Full ASCII
(*)Enable Code39 Full ASCII
Page 7
3.7CODE 93
3.8 Code 128
3.9 EAN-8
3.9.1 Enable/Disable EAN-8
3.9.2 Convert to EAN-13
There are two ways for EAN-8 changing, one is converting to EAN-13, another is adding
"0" ahead of EAN-8, and the EAN-8 ID is not change.
If EAN-8 converts to EAN-13, it will be read as same as EAN-13. If add a "0" ahead of
EAN-8, and the EAN-8 ID is not change, the output ID is still EAN-8 ID.
3.9.3 Checksum Output
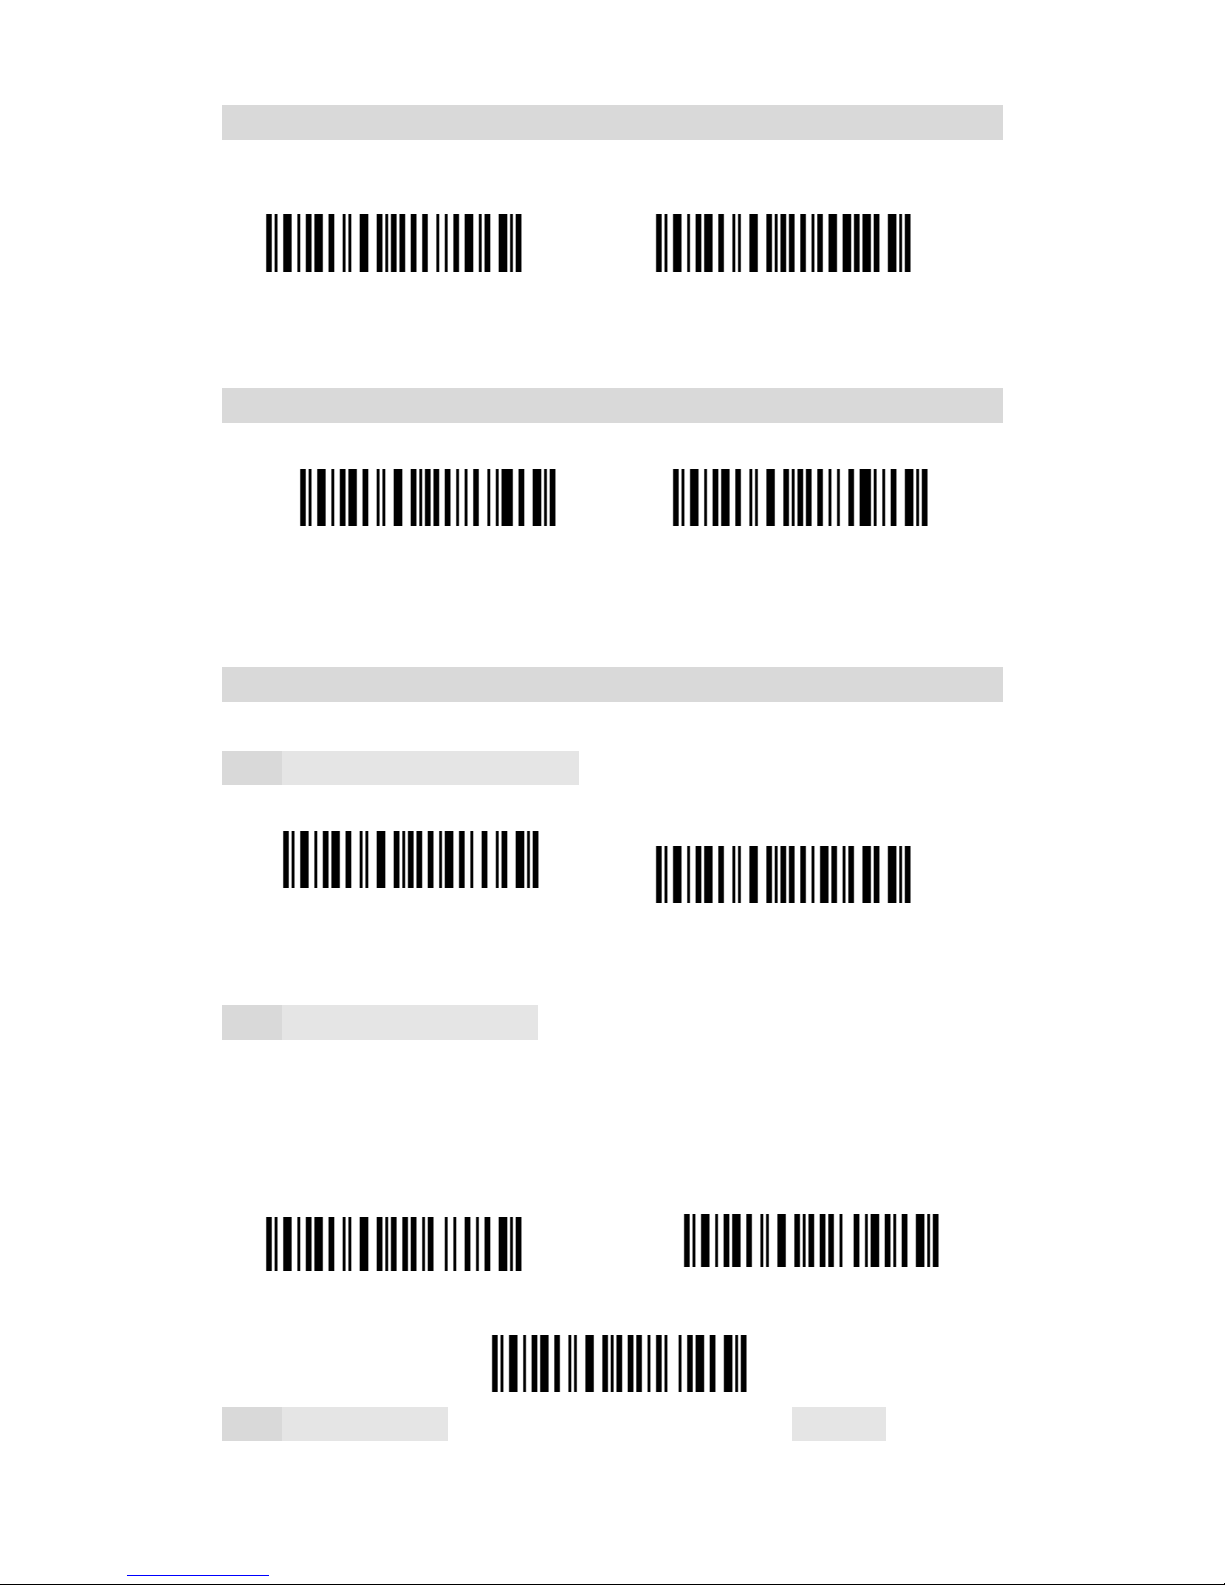
(*)Disable Code93
Enable Code93
(*)Enable Code128
Disable Code128
Enable EAN-8
(*)Disable EAN-8
(*)Do not Convert
Convert to EAN-13
Add "0" ahead and ID is not change
Page 8
3.10 EAN-13
3.10.1 Enable/Disable EAN-13
3.10.2 Convert to ISBN
3.10.3 Checksum output
3.11 UPC-A
3.11.1 UPC-A Output ‘0’
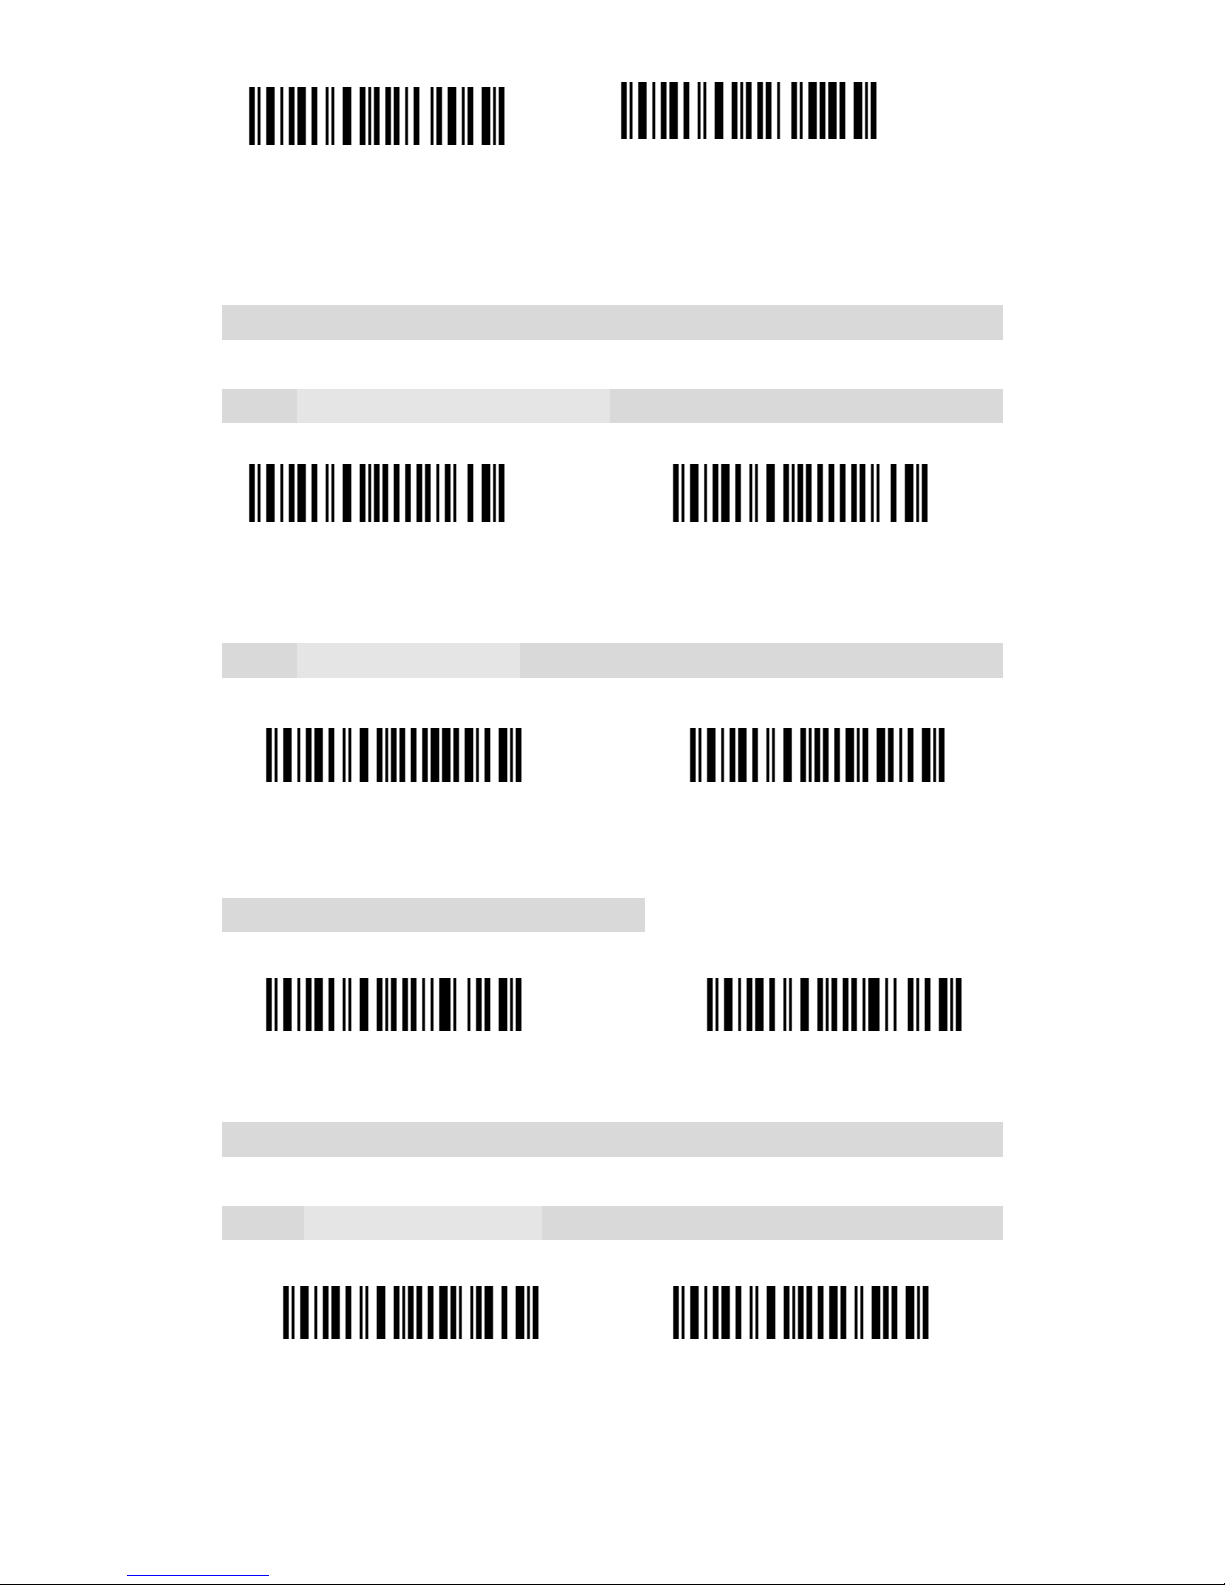
(*)Output CHECKSUM
Without output CHECKSUM
(*)Enable EAN-13
Disable EAN-13
Convert EAN-13 to ISBN
( * ) Do Not Convert
EAN-13 to ISBN
(*)Output checksum
Without output checksum
UPC-A Output ‘0’
(*)UPC-A Do Not
Output "0"
Page 9
3.11.2 UPC-A Checksum Transmission
3.12 UPC-E
3.12.1 Enable/Disable UPC-E
3.12.2 UPC-E Checksum Transmission
3.12.3 Converting UPC-E to UPC-A
Enable the function of converting UPC-E to UPC-A
Disable the function of converting UPC-E to UPC-A
3.13 MSI
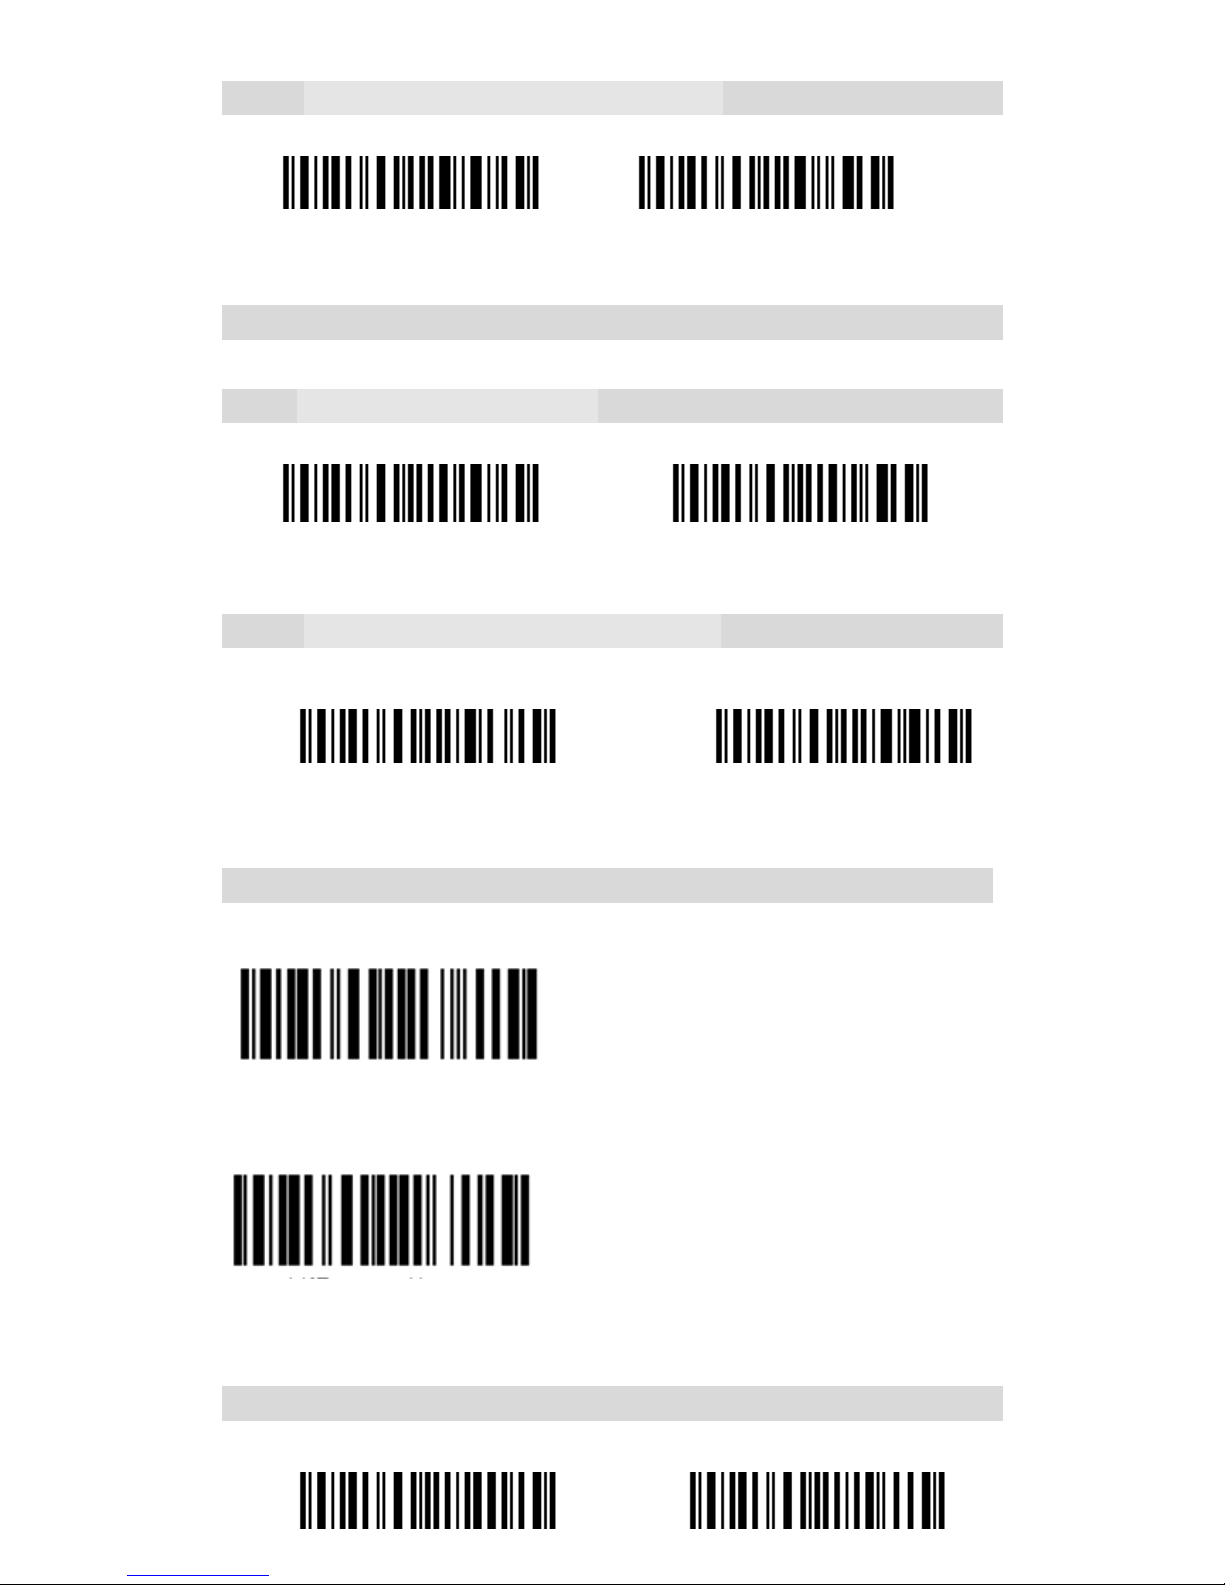
(*)Enable UPC-E
Disable UPC-E
(*)Output checksum
Without output checksum
(*)Output checksum
Without output checksum
Page 10
3.14 CODE 11
3.15 Suffix Code of Barcode Settings
Apply Tab
3.16 CAPS ON And LOCK
The Alpha-characters in upper case will be entered as lower case, the Alpha-characters in
lower case will be entered as upper case, and numbers are unchanged.
Enable Code11
(*)Disable Code11
(*) Apply Enter for suffix
Do not Apply Enter for suffix
(*)Apply Alt for suffix
Do not Apply Alt for suffix
Page 11
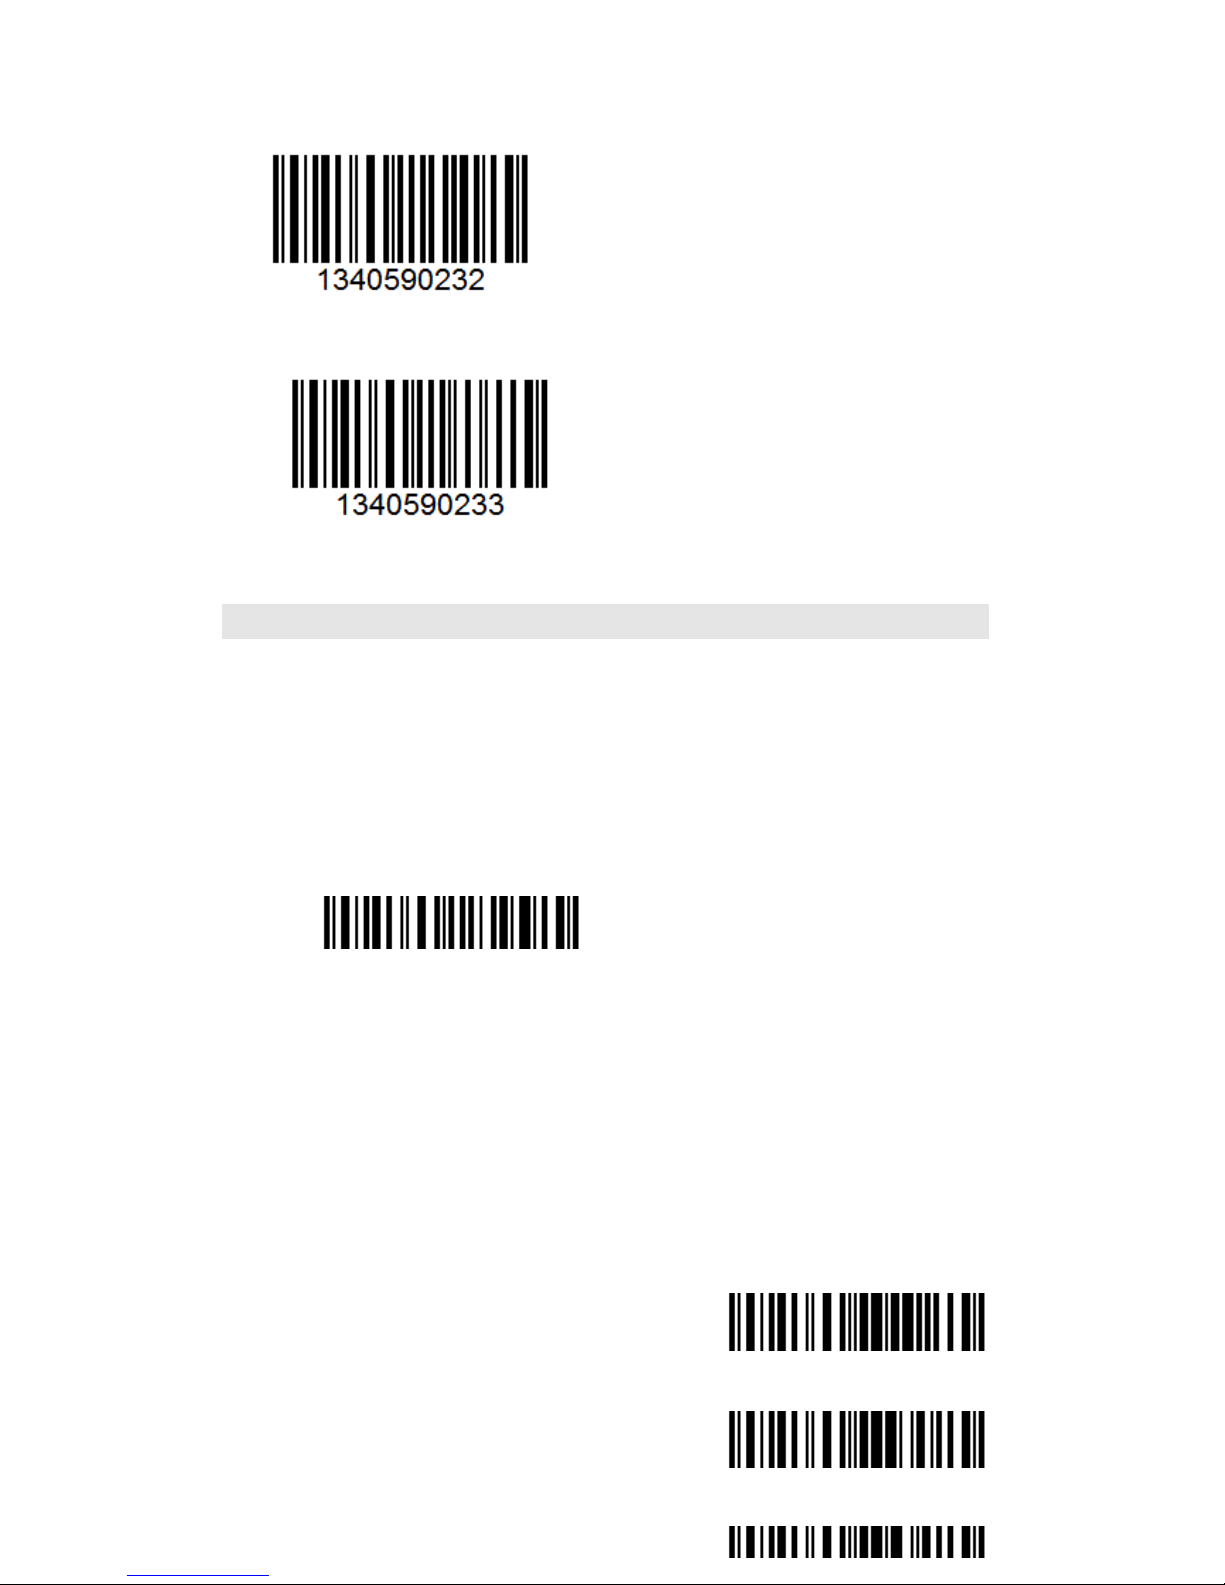
The Alpha-characters in upper case will be entered as upper case, the Alpha-characters in
lower case will be entered as lower case, and numbers are unchanged.
All Alpha-characters will be entered as upper case, numbers are unchanged.
All Alpha-characters will be entered as lower case, numbers are unchanged
Manual Mode
By default, the scan mode is set to Manual Mode. If the user keeps press the Scan Key,
the TMCT-10 Scanner will emit a red light line. This indicates the scanner could scan; the
scanning will not stop until the scanner under the following situation.
* Read a barcode successfully;
* Release the Scan Key.
Manual Mode
Enter Setup
Exit with Save
Page 12
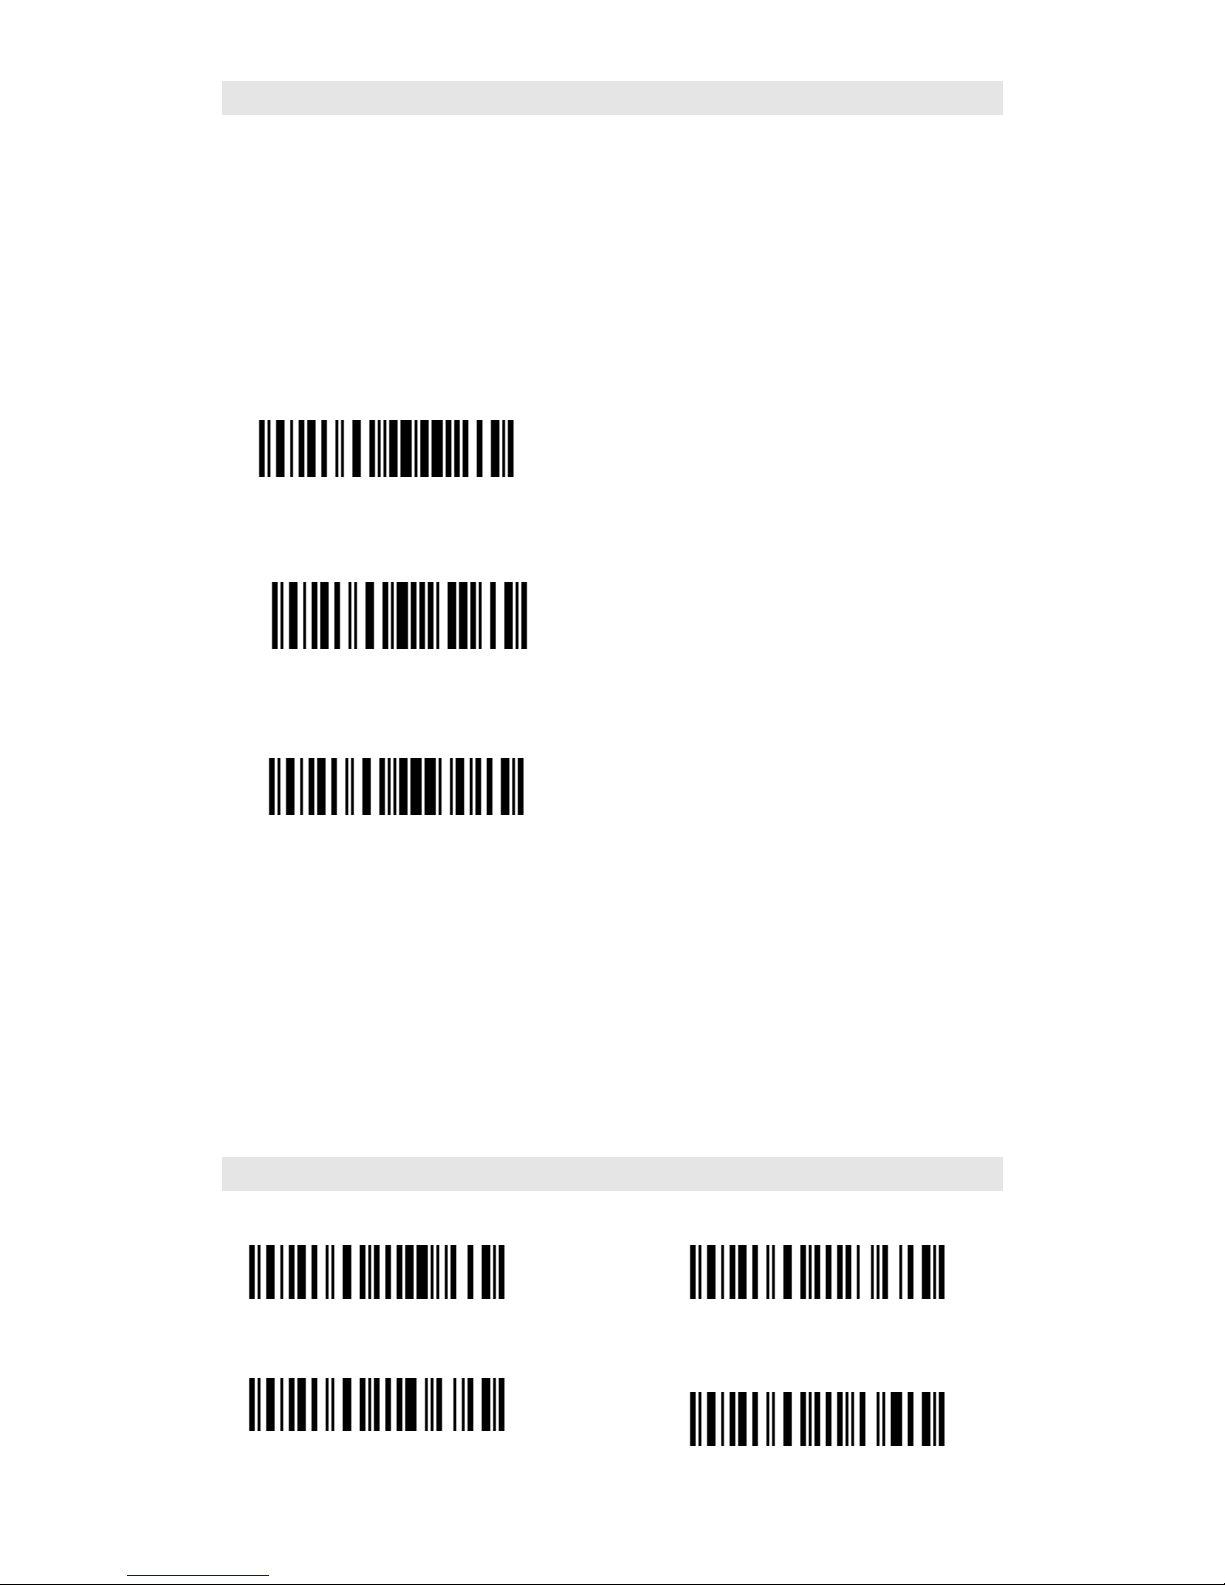
Automatic scanning Mode
Under the Automatic scanning Mode, the users just need to move the barcodes to be
scanned in front of the light band of TMCT-10, no need press the Scan Key, there will
show a red light line. This indicates the scanner could scan; the scanning will not stop until
the scanner under the following situation.
* Read a barcode successfully;
*The pre-set timeout expires (the default time is 2s).
The steps to activate the automatic scanning mode are as follows:
1. Read the "Enter Setup" barcode;
2. Read the "Automatic scanning Mode" barcode;
Automatic scanning Mode
3. Read the "Exit with Save" barcode.
Beeper Volume
Enter Setup
Exit with Save
Mute
Minimum Volume
(*)Medium Volume
Maximum Volume
Page 13
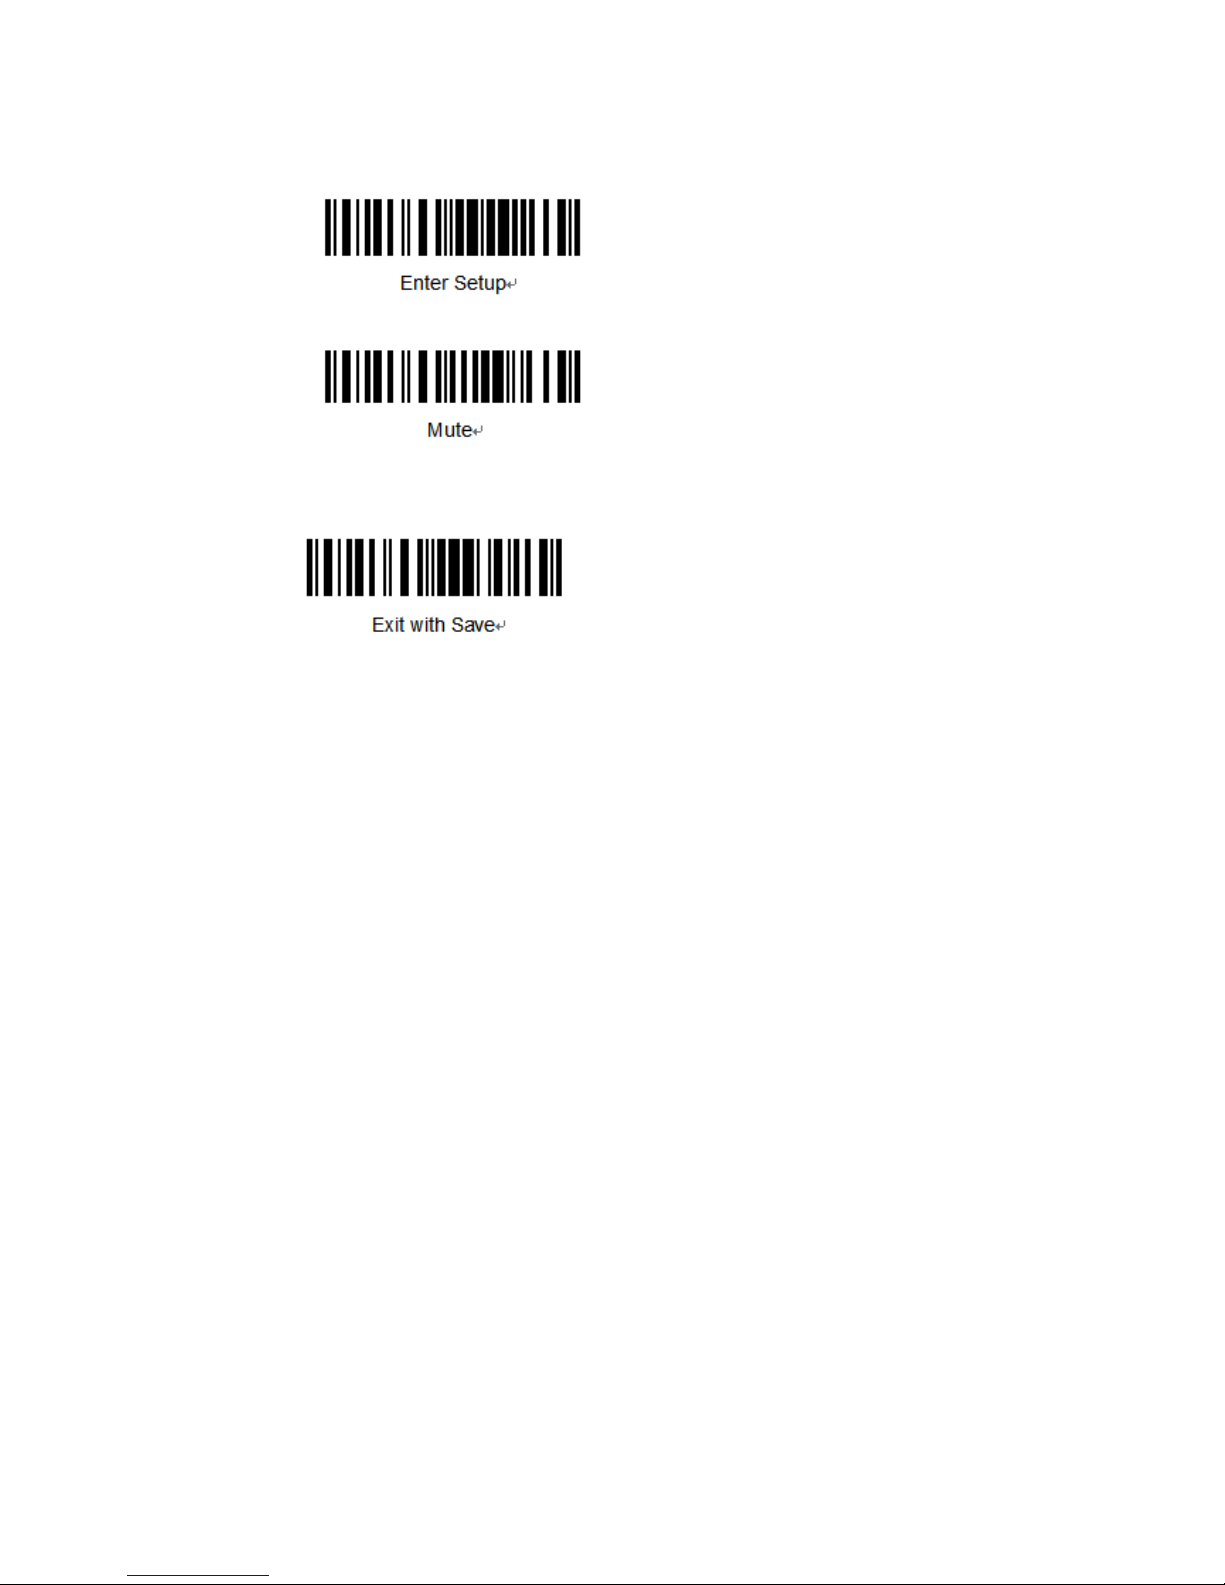
For example: Set Mute Volume for beeper.
1. Read the "Enter Setup" barcode;
2. Read the "Mute" barcode;
3. Read the "Exit with Save" barcode.
Page 14
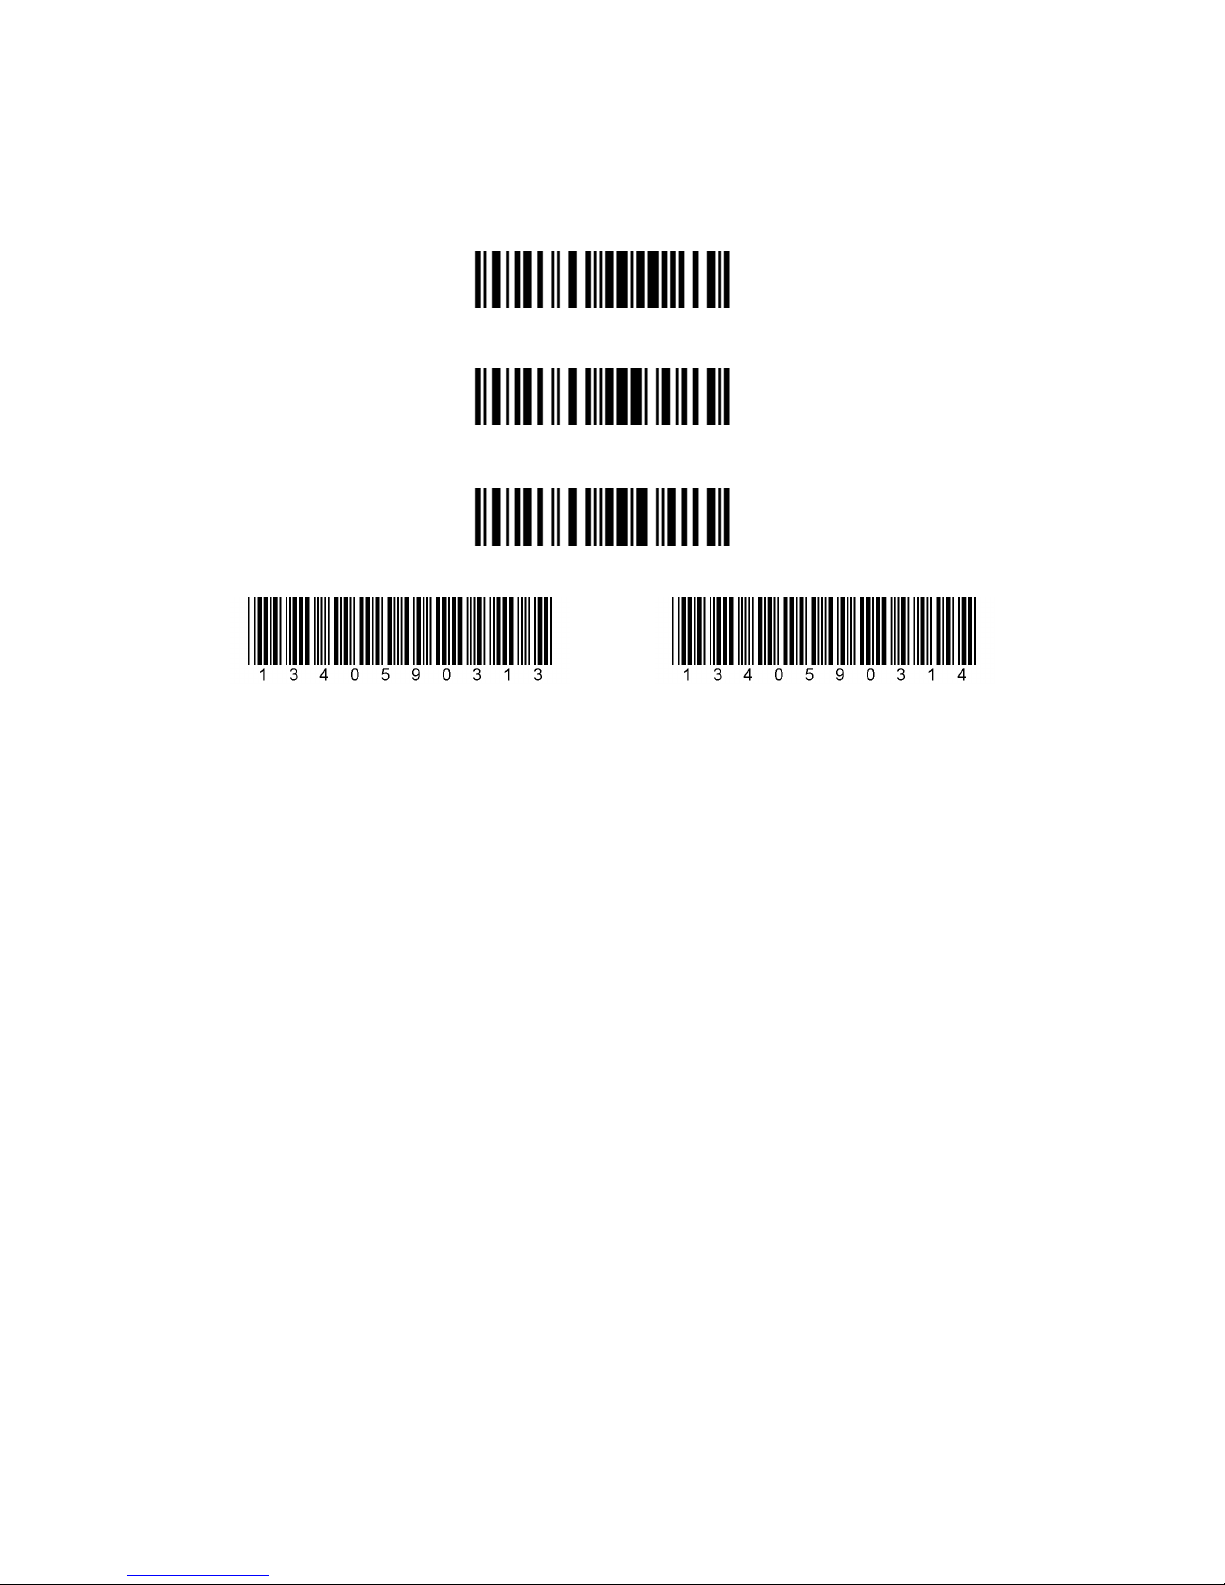
STEPS TO SET UP PREFIX AND SUFFIX:
1. Scan “Enter setup”
2. Scan “add prefix” or “add suffix”
3. Find the ASCII value of the character you want to add in the list and
scan the appropriately numbered barcode(s).
4. Scan “exit and save”
Add prefix
Add suffix
Numeric Barcodes
Enter Setup
Exit with Save
Exit without Save
Page 15
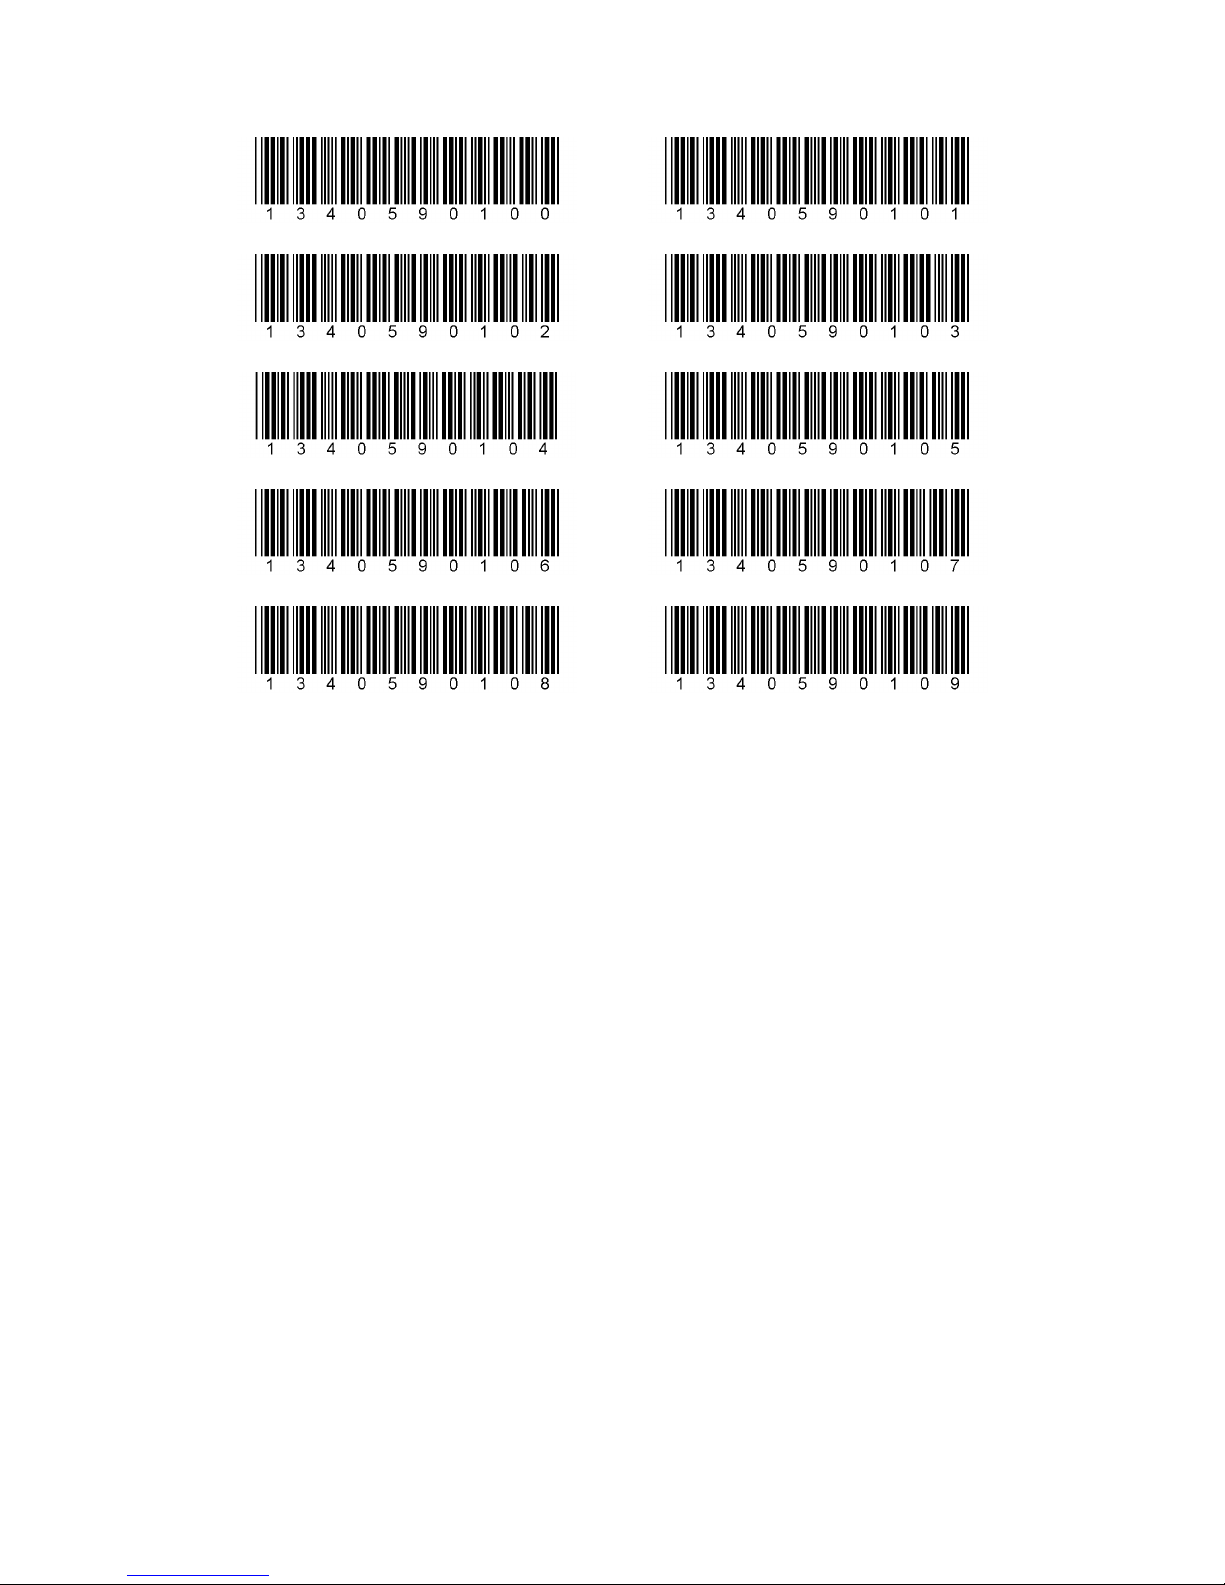
15
0
2
4
6
8
1
3
5
7
9
ASCII Value Keystroke
0 NUL(null)
1 SOH(start of headline)
2 STX (start of text)
3 ETX(end of text)
4 EOT (end of transmission)
5 ENQ (enquiry)
6 ACK (acknowledge)
7 BEL (bell)
8 BS (backspace)
9 HT (horizontal tab)
10 LF (NL line feed, new line)
Page 16

16
11 VT (vertical tab)
12 FF (NP form feed, new page)
13 CR (carriage return)
14 SO (shift out)
15 SI (shift in)
16 DLE (data link escape)
17 DC1 (device control 1)
18 DC2 (device control 2)
19 DC3 (device control 3)
20 DC4 (device control 4)
21 NAK (negative acknowledge)
22 SYN (synchronous idle)
ASCII Value Keystroke
23 ETB (end of trans. block)
24 CAN (cancel)
25 EM (end of medium)
26 SUB (substitute)
27 ESC (escape)
28 FS (file separator)
29 GS (group separator)
30 RS (record separator)
31 US (unit separator)
32 space
Page 17

17
33 !
34 "
35 #
36 $
37 %
38 &
39 '
40 (
41 )
42 *
43 +
44 ,
45 -
ASCII Value Keystroke
46 .
47 /
48 0
49 1
50 2
51 3
52 4
53 5
54 6
Page 18

18
55 7
56 8
57 9
58 :
59 ;
60 <
61 =
62 >
63 ?
64 @
65 A
66 B
67 C
68 D
ASCII Value Keystroke
69 E
70 F
71 G
72 H
73 I
74 J
75 K
76 L
Page 19

19
77 M
78 N
79 O
80 P
81 Q
82 R
83 S
84 T
85 U
86 V
87 W
88 X
89 Y
90 Z
91 [
ASCII Value Keystroke
92 \
93 ]
94 ^
95 _
96 `
97 a
98 b
Page 20

20
99 c
100 d
101 e
102 f
103 g
104 h
105 i
106 j
107 k
108 l
109 m
110 n
111 o
112 p
113 q
114 r
ASCII Value Keystroke
115 s
116 t
117 u
118 v
119 w
120 x
Page 21

21
121 y
122 z
123 {
124 |
125 }
126 ~
127 DELdelete
 Loading...