

Page 1
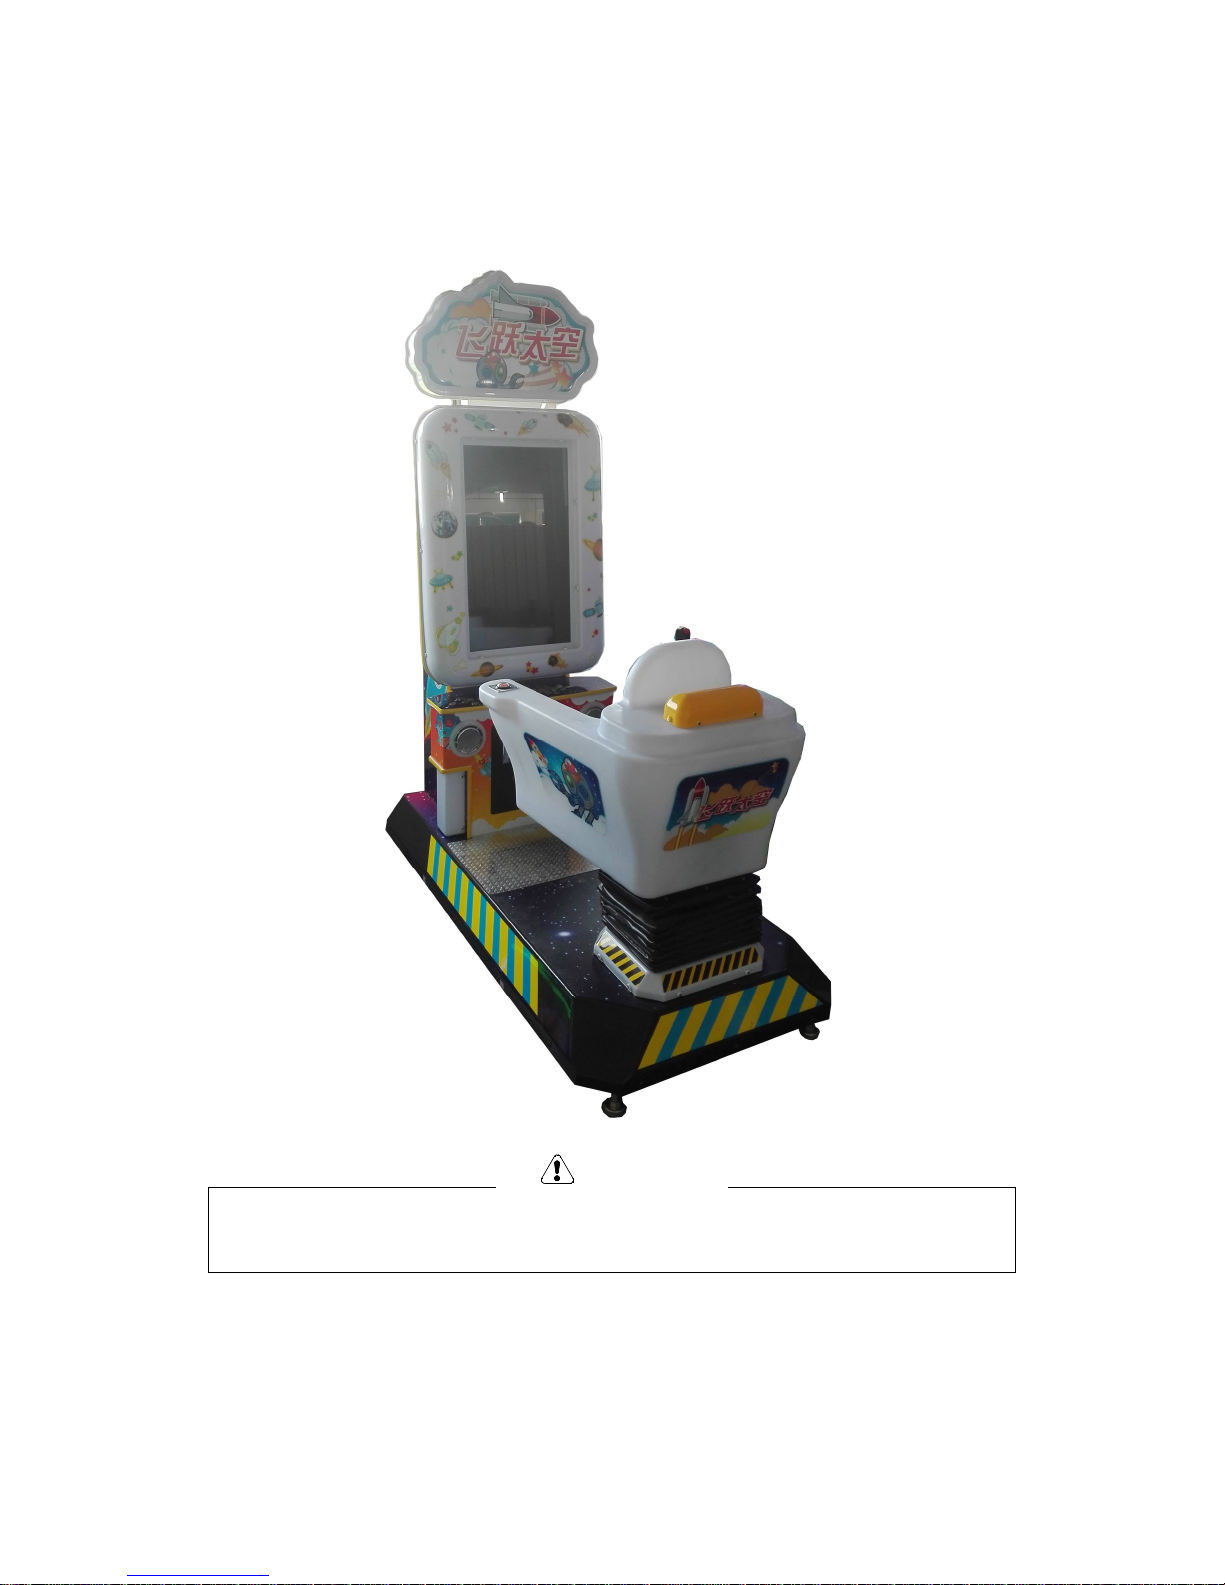
Space Shooting
Instruction Manual
Before using or installing this machine, be sure to read this manual thoroughly.
Warning
Page 2

Space Shooting instruction
Content
1、Spec and technical parameters....................................1
2、Parts list.......................................................2
3、Movement and placement...........................................3
3-1 Movement method .............................................3
3-2 How to fix the machine ......................................4
3-3 Do not use machine in the following places ..................4
3-4 Placement ...................................................4
3-5 The range of placement ......................................5
3-6 Notes before starting the machine ...........................5
4、Wiring.........................................................6-7
5、Installation and maintenance...................................8-9
6、Troubleshooting.................................................10
7、Game instruction................................................11
7-1 How to play ................................................11
7-2 Interface ..................................................11
7-3 Control signals and instruction ............................12
7-4 Use and repair .............................................13
8、Parts list......................................................14
8-1 Mechanism parts .........................................14-16
8-2 Coin selector assembly .....................................17
8-3 Coin selector instruction ..................................18
8-4 Speaker assembly ...........................................19
8-5 Fuse and power components ..................................19
8-6 Electrical installation components ......................20-21
8-7 Artwork .................................................22-24
8-8 Electrical parts ...........................................25
Page 3
Space Shooting instruction
1
1、Spec and technical parameters
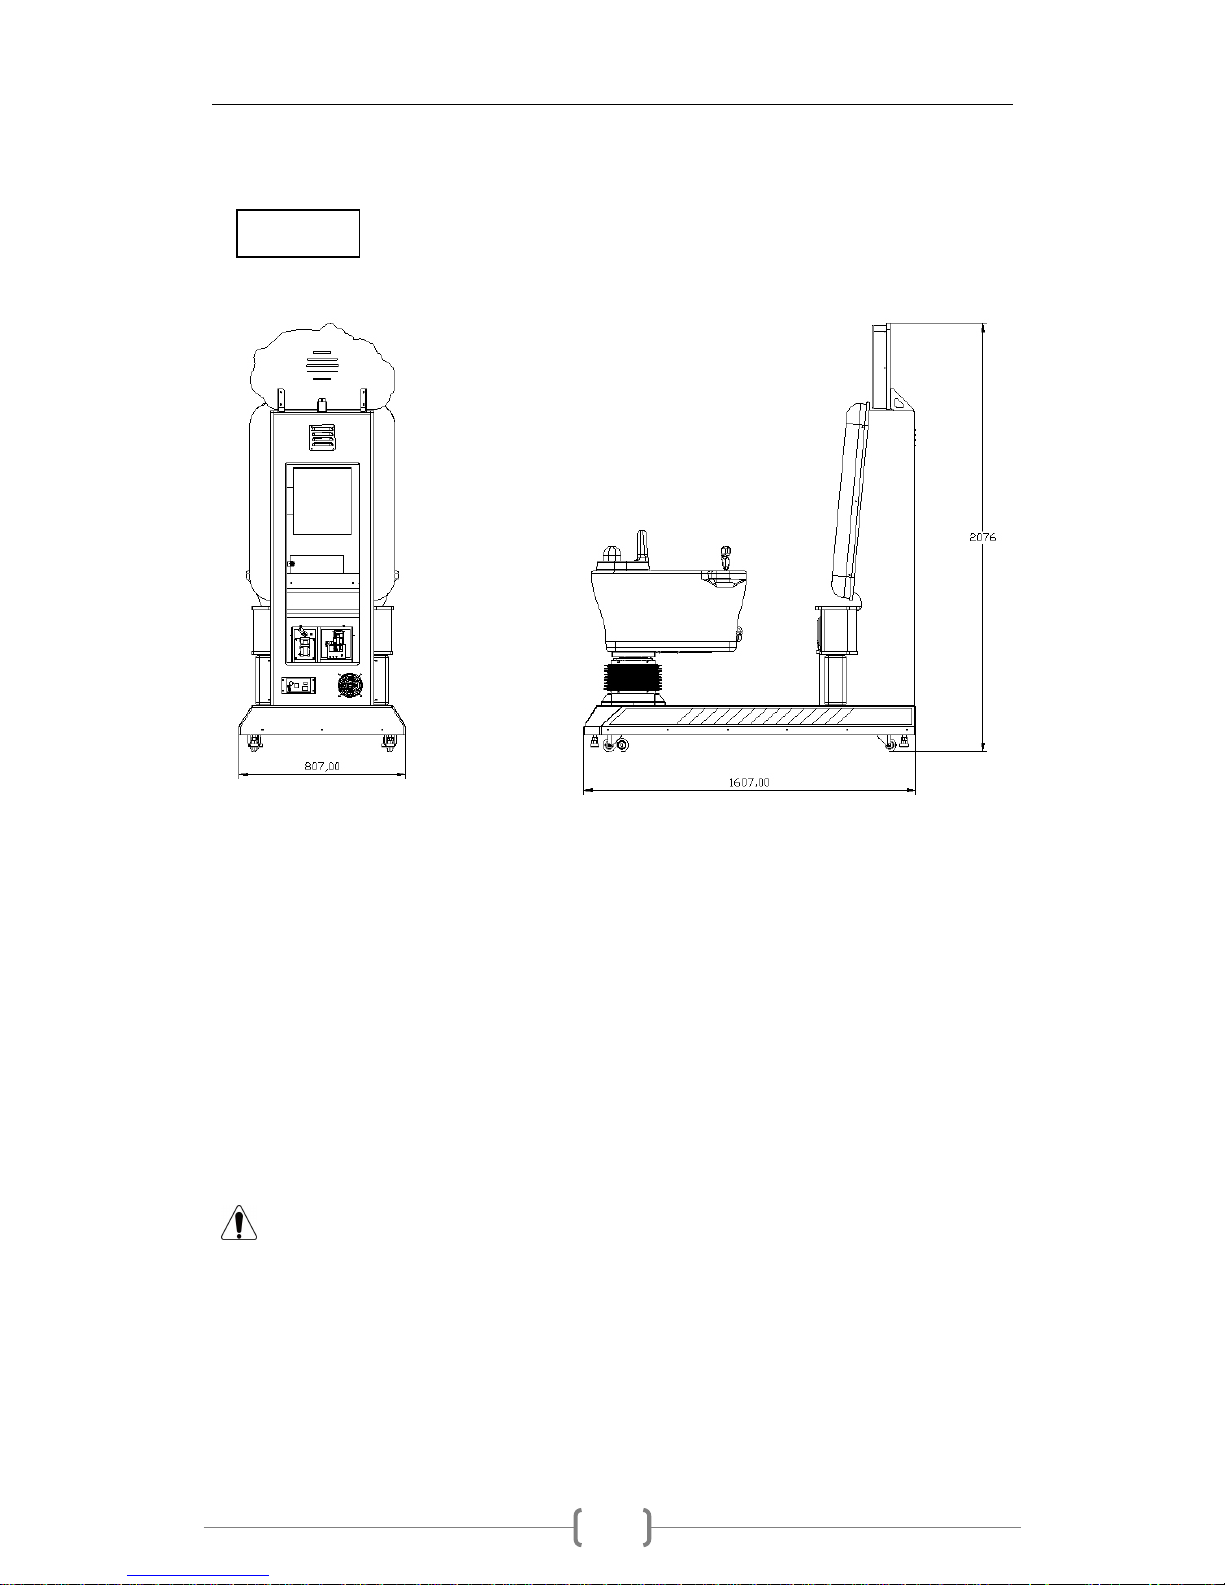
1) Working voltage: AC 220V±10% 50Hz
2) Power consumption:mix 150W ~ max455 W
3) Dimension:L1607×W807×H2076(mm)
4) Weight :Around 204kg
5) Environmental conditions:Temp.(indoor): -10℃~+40℃;
Humidity:≤90%;
Atmospheric pressure:86Pa~106Pa。
Warning: After turning off machine, please wait for 1 min and
re-start.
Unit:mm
Page 4
Space Shooting instruction
2
2、Parts list
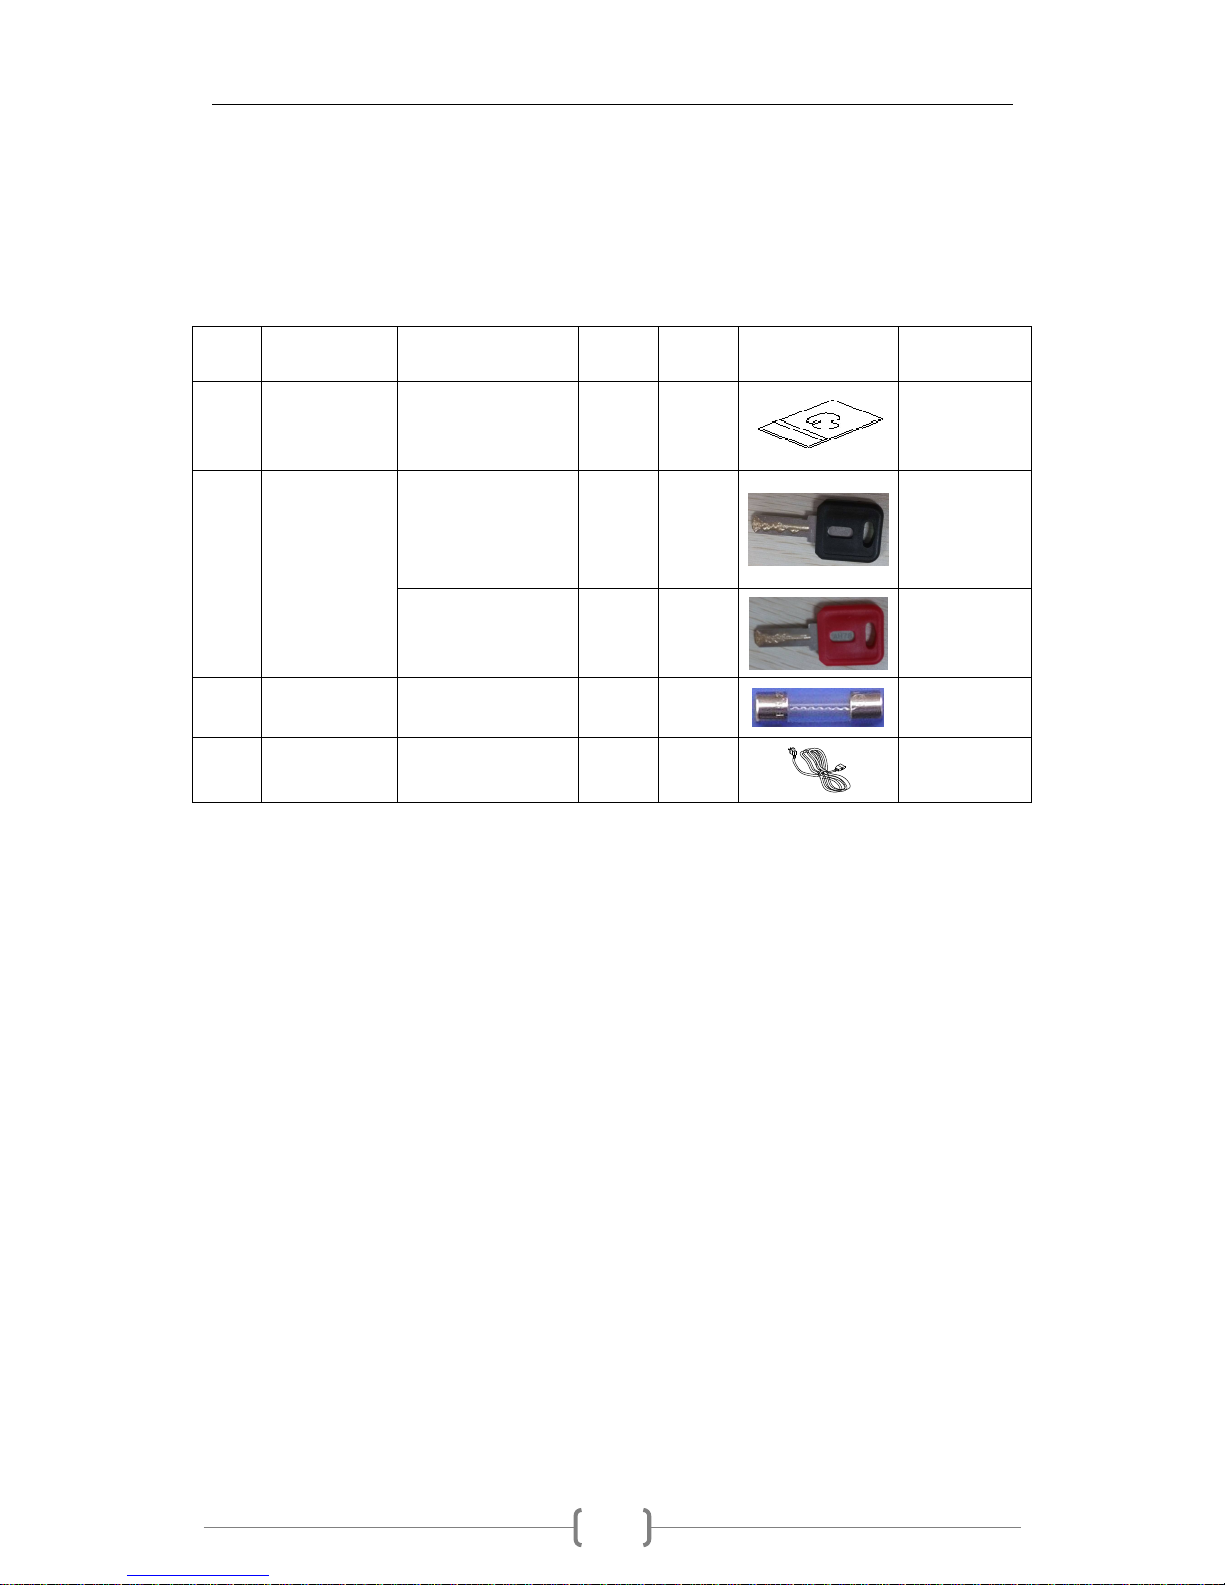
To use machine properly, please check the parts list below.
No. Name Spec/Material Qty. Unit Picture Remark
1 Manual A4 1
PC
Per
shipment
request
AH57 1
PC
Ticket
door, coin
door,
repair door
2 Key
AH78 1
PC
Coin box
door
3 Fuse 6.3A 1 PC
4 Power cable
1.5M 1 PC
If there is anything missing, please contact us.
Page 5
Space Shooting instruction
3
3、Movement and placement
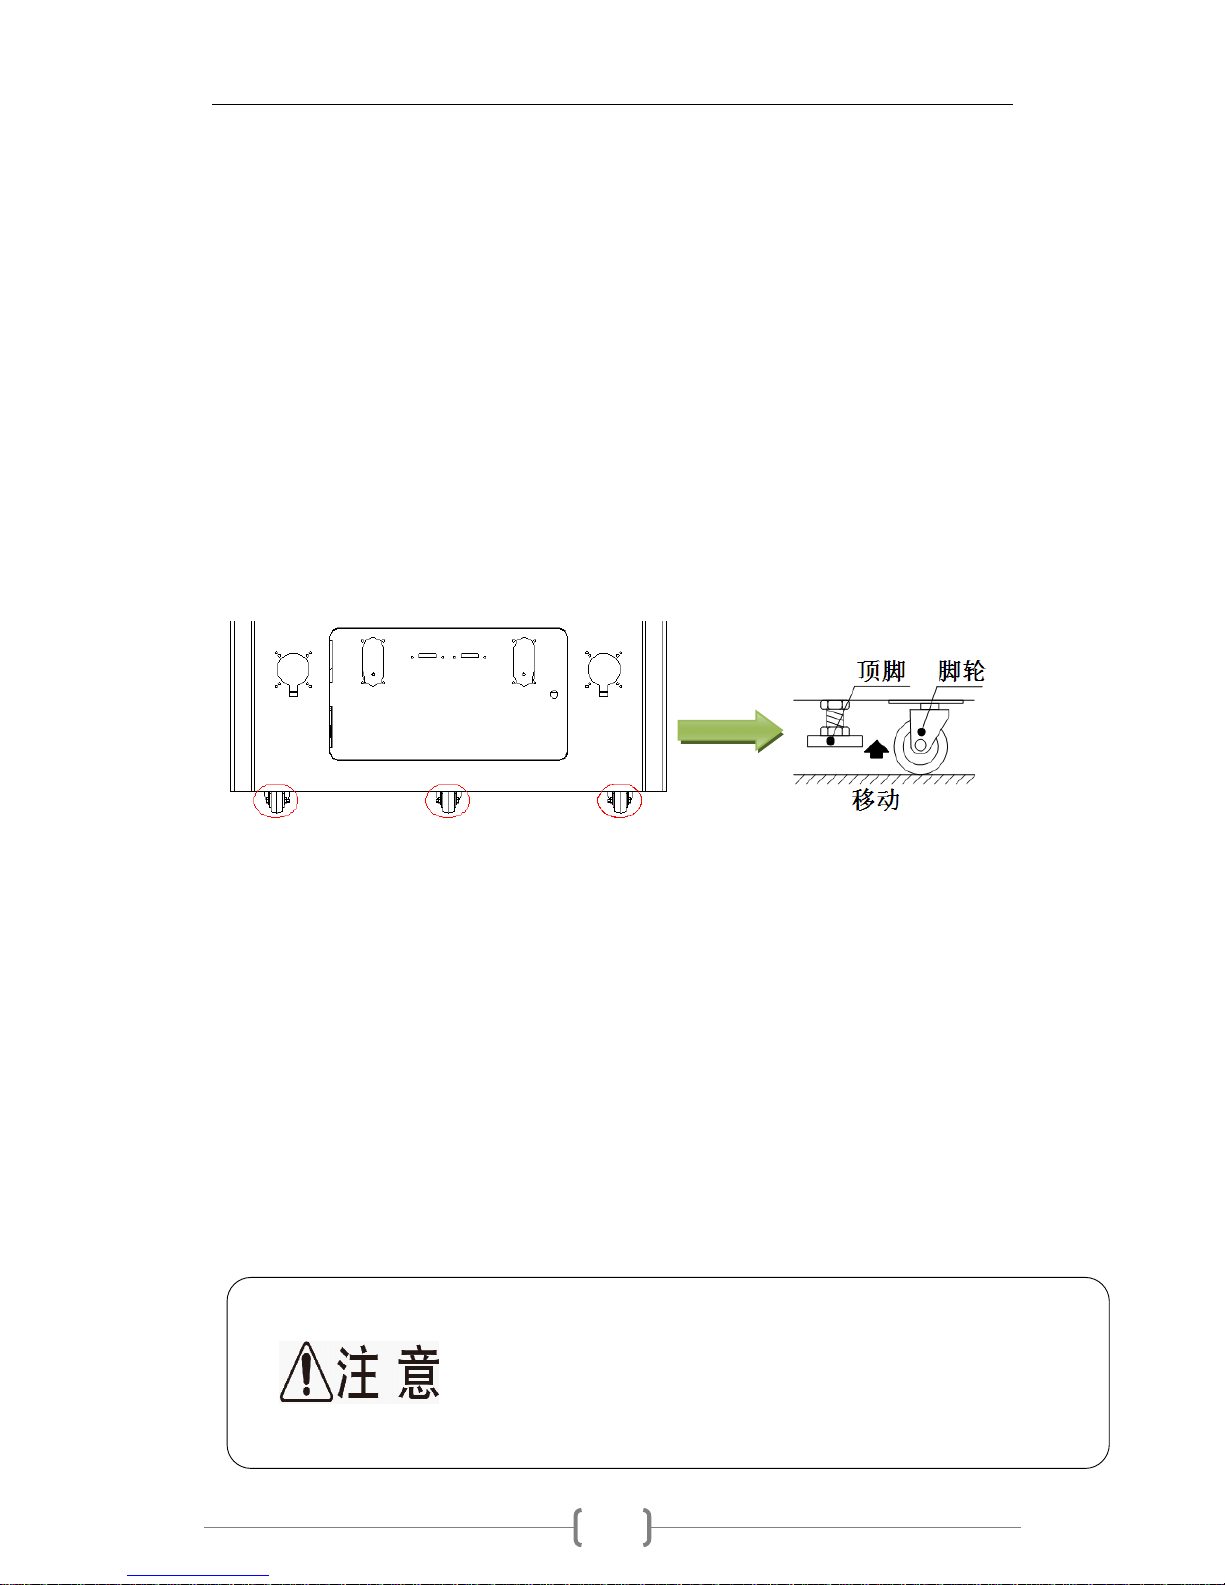
3-1 Movement method
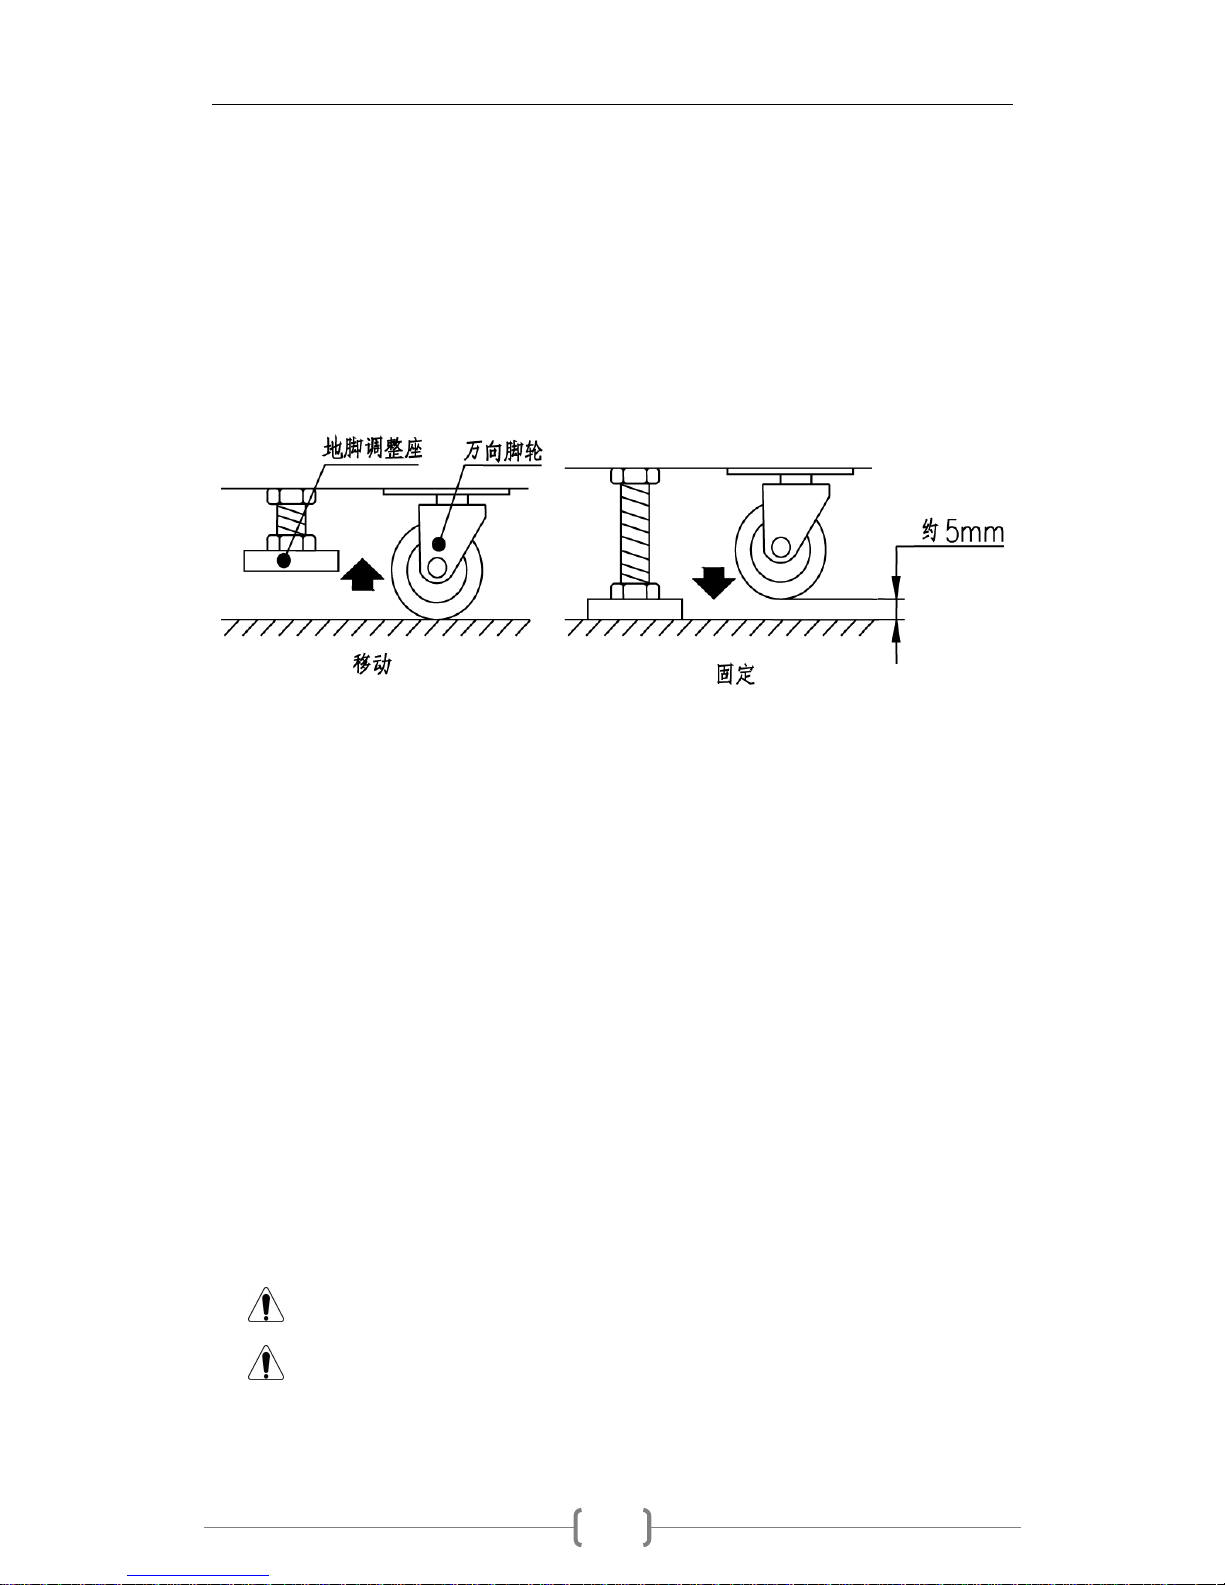
The machine is equipped with caster below. Move the machine for short
distance by adjusting the foundation, so that the caster wheel can be
touched to the ground to move the machine. When the foundation touches
the barrier on the ground, there is a risk of falling over. Therefore,
when moving machine along the ground, move the foundation upward to the
maximum extent and pay attention to the obstacles and the uneven places
on the road.
Move the machine for short distance by adjusting the foundation, so
that the caster wheel can be touched to the ground to move the machine.
When moving the machine and passing uneven floor or stepped position,
4 or more people are required to lift the machine to ensure safety.
When moving for a long distance, please pack or bundle to fix machine,
and need a layer of protection on the surface of the machine to avoid any
scratch.
To avoid any accidence and damage, please unplug the power before
moving.
To avoid any accidence and damage, please do not damage the power
cable and move the foundation upward to the maximum.
At least over 2 people to move machine to avoid any accidence.
Page 6
Space Shooting instruction
4
3-2 How to fix the machine
Please be placed on a flat and not easy to slide the ground.
Please use the foundations to fix machine.(refer to the photos below)
① Loosen the nut of foundation and tighten the screw to make the castor about
5mm from the ground.
② Tighten the lock nut clockwise and fix.
3-3 Do not use machine in the following places
The place which will cause condensation on machine or condensed place with high humidity.
The place close to high-temperature objects;
The place close to dangerous objects;
Slippery or unstable place;
The place near the equipment that is prone to sparking;
The place in severe vibration;
Dusty environment
3-4 Placement
Warning: This machine is only suitable for indoor use, not outdoor.
Warning: Do not use a forklift to move machine, which may
result in damage to the machine.
Page 7
Space Shooting instruction
5
◎ When installing the machine do not change or replace the parts to avoid fire or short
3-5 The range of placement
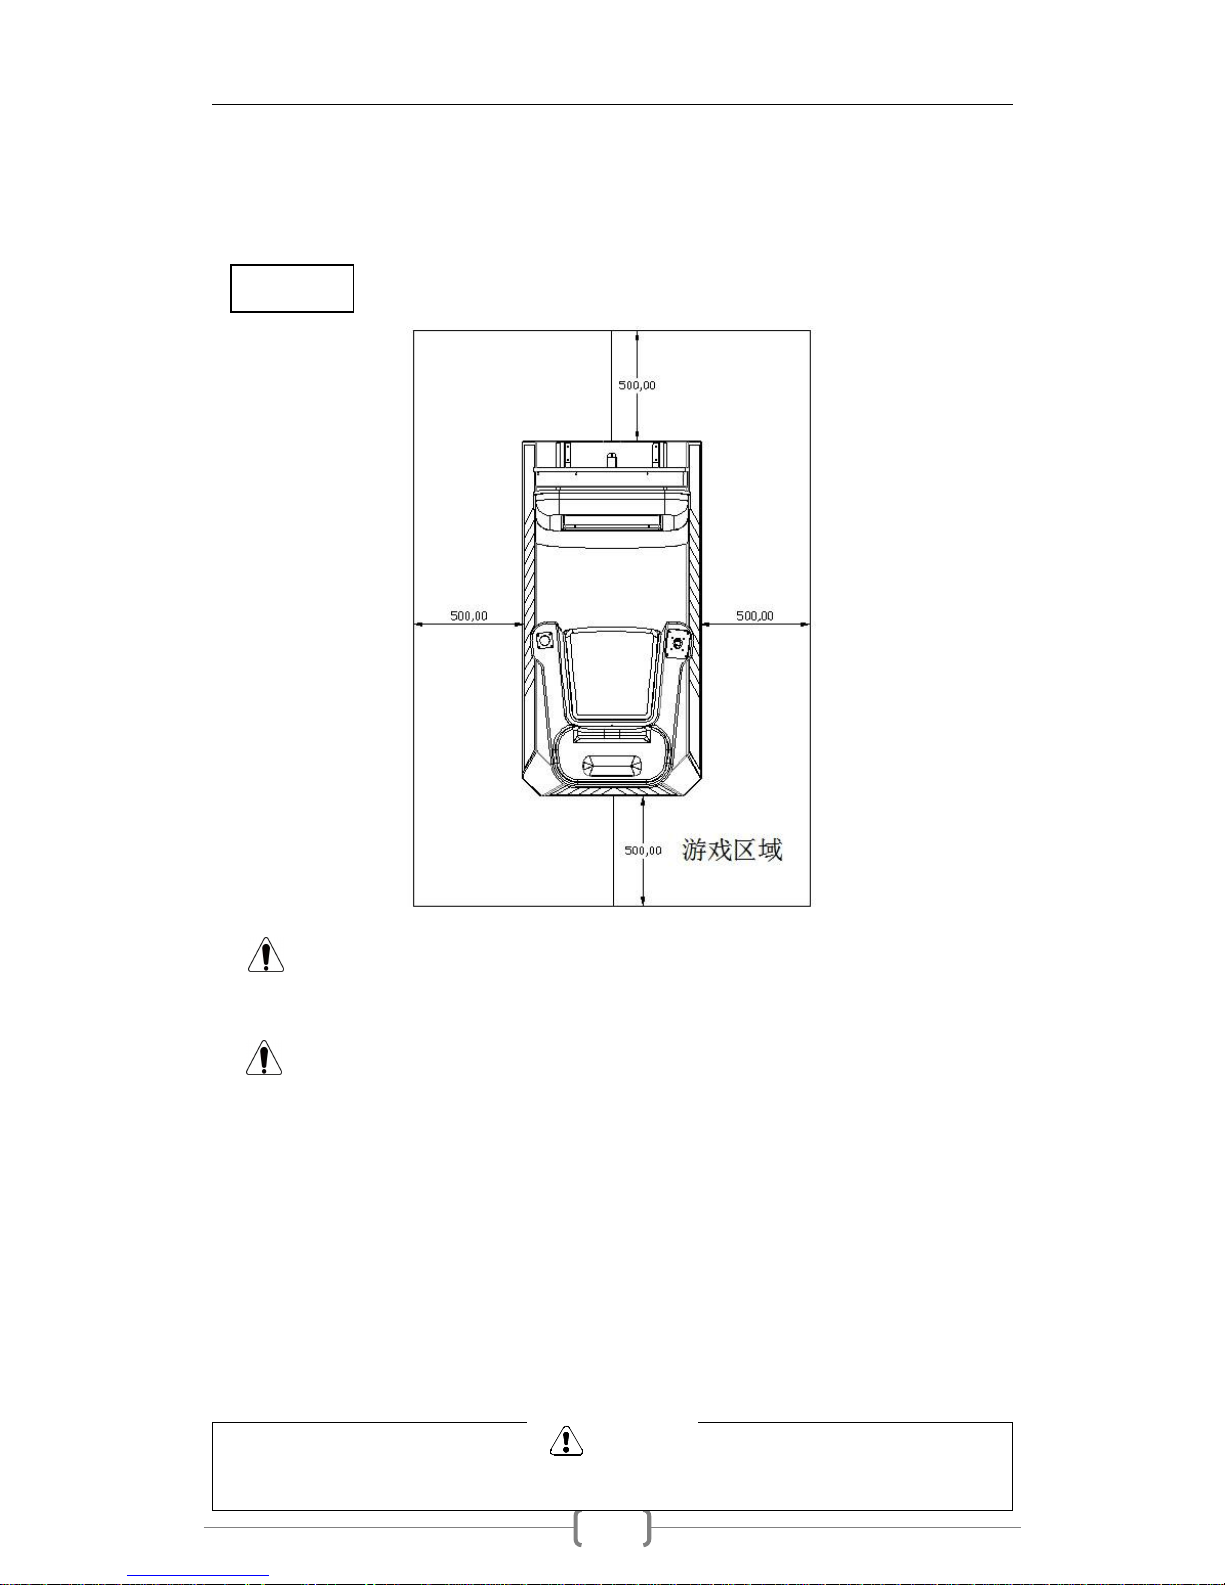
Machine should be placed in the following dimensions to make enough space for
running the machine and ensure customer safety.
Attention:Do not place on a sloping position, that may easily lead
to accidents.
Attention:Division of game area depends on label of machine.
3-6 Notes before starting the machine
1) Check the parameters of the power supply voltage. Make sure the machine's electrical
parameters are consistent with the machine's requirements, or may cause burning the
machine or a fire.
2) Connecting too many wires to the same power jack may cause the connector to overheat and
cause a fire.
Warnin
Unit:mm
Page 8
Space Shooting instruction
6
四、Wiring
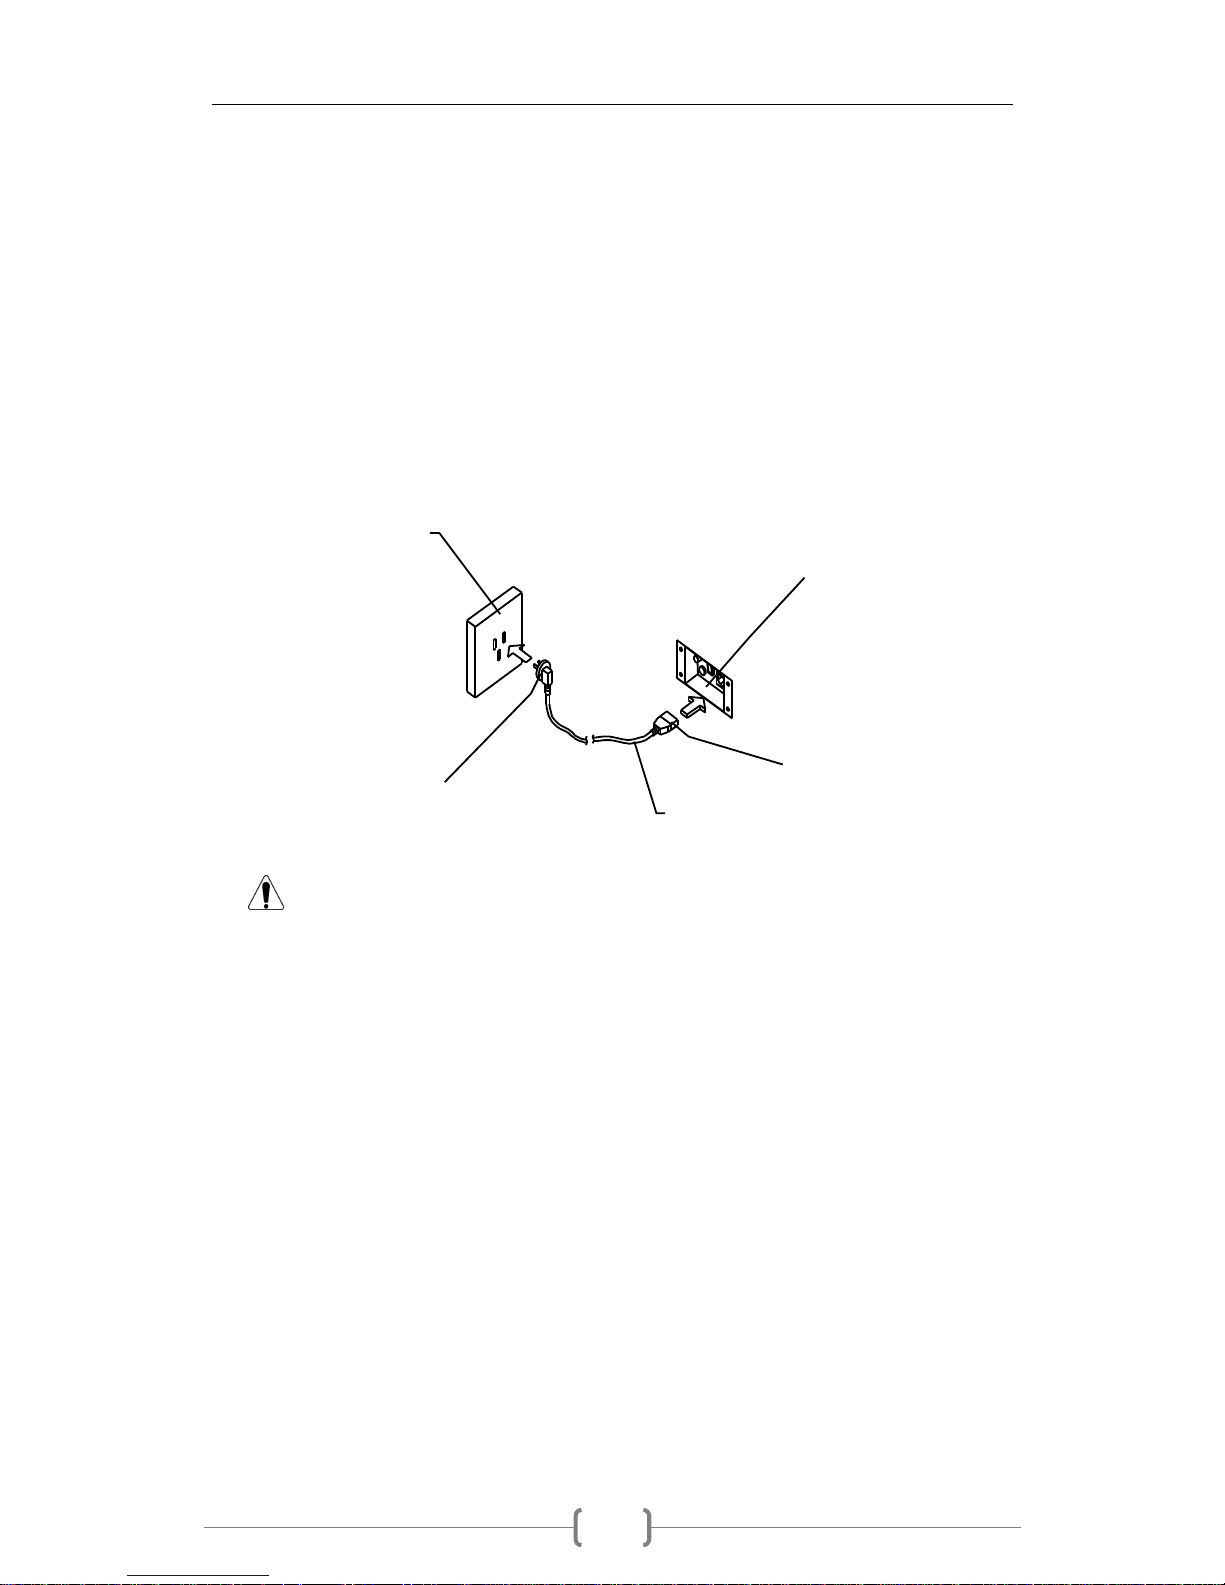
Connect one end of the power cable to the junction box and the other end connects to
a power outlet.
Please refer to the suggested voltage, or may cause any damage.
To avoid unnecessary damage, be sure to check whether the socket has grounding
function.
If grounding is not possible through the socket, use another route to ground.
警告:Warning:Working voltage of machine is 220V, please refer
to the suggested voltage to connect, or may cause any damage.
Plug
Socket
Power
cable
Plug
Junction
box
Page 9
Space Shooting instruction
7
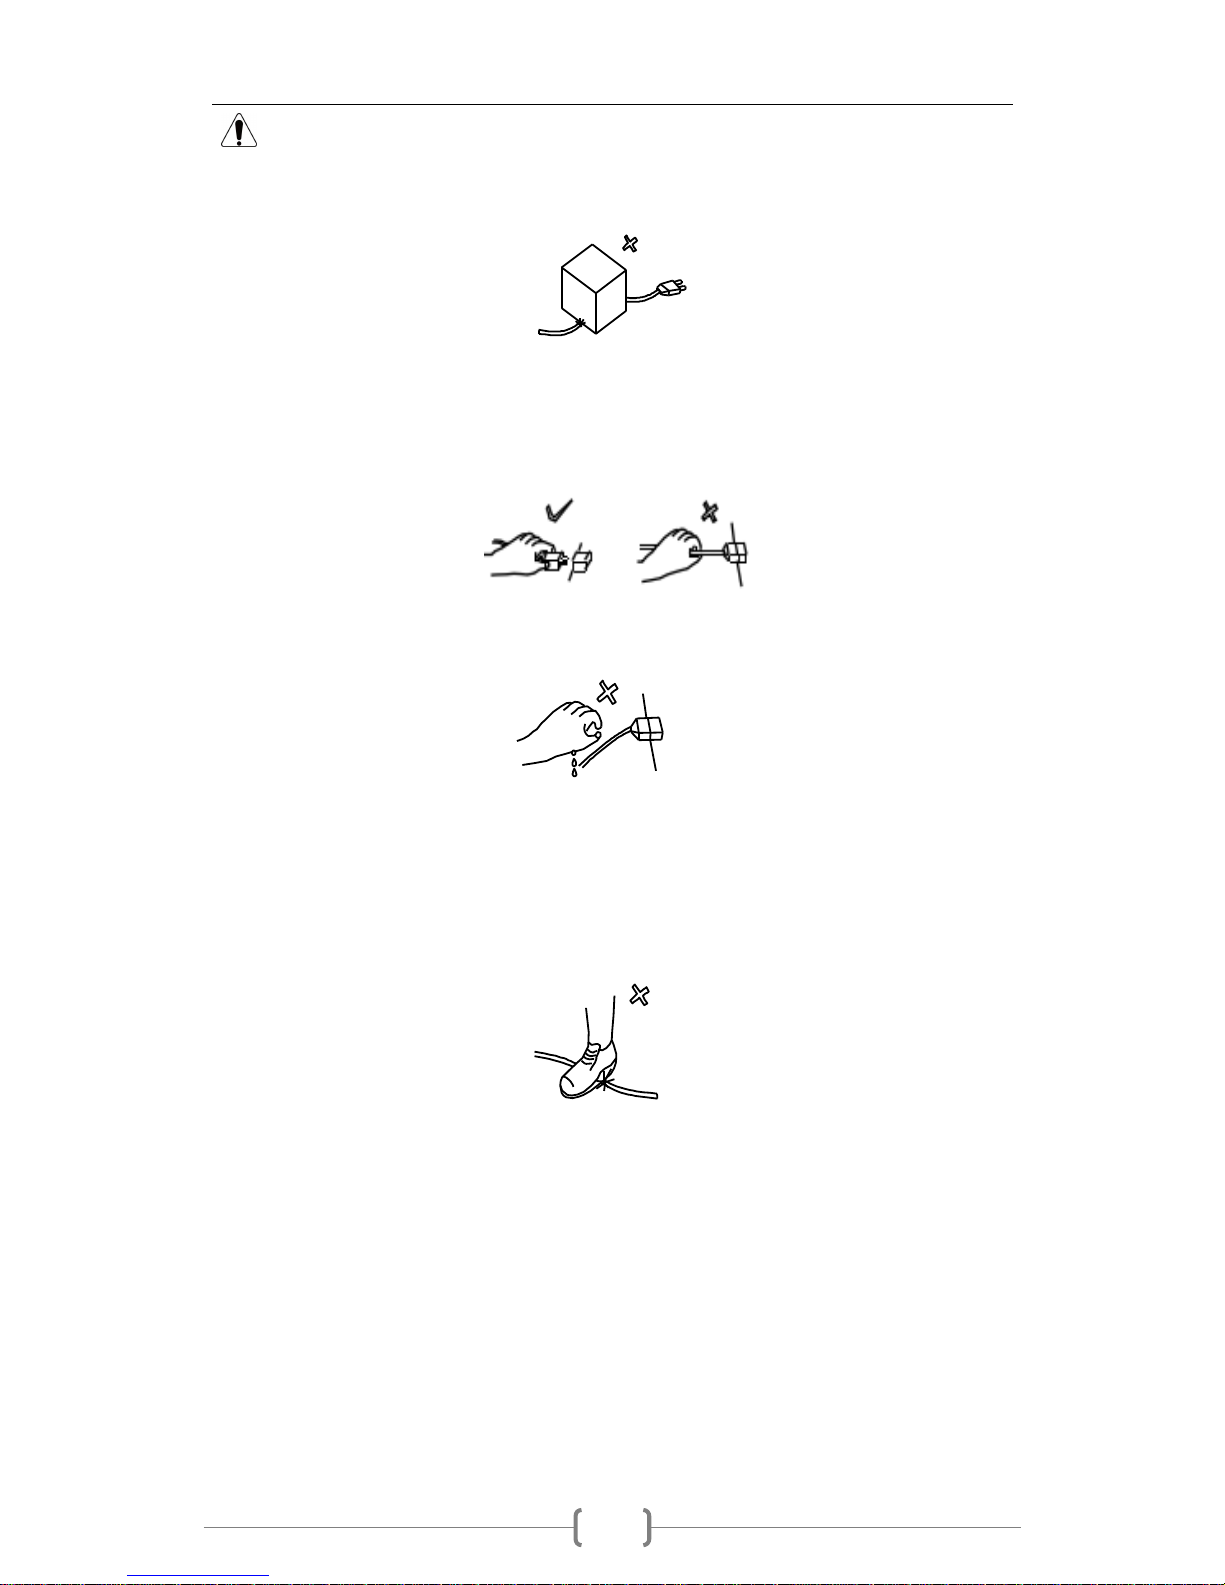
Attention:
Do not put heavy stuff on the power cable. That could cause a short circuit, even a fire.
When unplugging the power cable from the socket, please pull out by holding the plug,
do not hold the wire.
Do not pull the plug with wet hands.
The wire cannot be forced to stretch and bend. Do not expose the wire to near the stuff
with high temp.
Do not put wire where to be kicked or touched easily.
Use the right voltage and fuse (refer to technical parameters)
Page 10

Space Shooting instruction
8
5、Installation and maintenance
Install and adjust
Before installation, please check the parts list and do the assembly.
The using site must be flat and firm. After the machine is placed, the adjustment
seat should be adjusted horizontally to the ground.
After installation, plug in the power cord and turn on the power to check the
machine can work properly. If any problem, stop the machine in time and check
troubleshooting.
Visual inspection
To ensure the safety of the machine, be sure to check the following before turning
on the machine:
"Warning signs" are intact, clearly visible, paste the correct location.
Connected power parameters are consistent with the machine.
Check if the screws or steering wheel assembly are loose or not.
Check if each connector or terminal is loose or not.
Machine is placed stable. Casters and foundations are adjusted appropriately.
The area of placing machine is appropriate.
Operation check
Speaker can work properly.
All lights can work.
The image is clear and normal.
Maintenance
Test machine can work properly every day before the business.
Use soft cotton cloth with detergent to wipe clean the dirt on machine.
After running new machine for a month, check all the components are normal.
Check the machine frequently.
Page 11

Space Shooting instruction
9
Clean
Machine appearance
Use soft cotton cloth to clean the stains on machine.
Exhaust fan
Exhaust fan is one of main tools for cooling the machine, must keep the fan clean
and work properly.
Warning:
Machine must be powered off when it is under maintenance or repair.
In order to avoid short circuit, the personnel should turn off the power before
touching the internal components of the machine. If this operation requires the
power to be turned on, the operation must meet the requirements on manual.
Ensure use proper parts when exchanging.
Use incorrect parts may cause electrical short circuits, damage to main board
and its components.
Do not disassemble, assemble, change the equipment
This may cause electrical short circuit, mechanical failure, etc., serious cases
may result in fire.
Do not place vases, cups, containers on the machine, and also do not
place chemicals and heavy objects.
Spilled liquid can cause short circuits in the appliance to damage the device,
and falling objects can damage the human body and damage the machine.
Do not place any objects on the exhaust port of the machine
Exhaust vents are blocked will cause the internal temperature of the machine
increases, affecting the game operation, or even damage the device.
Do not repair the machine at will.
This may cause short circuits or uncontrolled malfunctions.
Page 12
Space Shooting instruction
10
6、Troubleshooting
Situation Caused reason Troubleshooting
Can not insert
the coin
Coin selector is not adjusted well.
There’s a fake coin stuck in coin selector
Adjust coin selector, token tolerance
Take out the fake coin
No ticket out
No input 12V
driver signal or cancellation signal line
loose
Ticket dispenser’s wheel didn’t down to
suppress the ticket
Main board’s ticket driver or ticket port
failure
Main board is not set for ticket out
Check power supplier’s voltage output and
wiring
Check the voltage change and the line of
the drive ticketing signal
Put down the wheel and suppress the
ticket
Change the main board
Set the mode to be ticket out
No sound
Volume is adjusted too low
Sound output signal wire is disconnected
Speaker fault
Sound amplifier failure
Circuit board failure
Audio connector is loose or damaged
The speaker is connected or not
Adjust the volume higher
Re-connect the wire
Change the speaker
Change the main board
Change the circuit board
Reconnect the audio connector
Turn on the speaker switch and connect to
the power
Machine has
no reaction
No input
The power switch is not turned on
Fuse burn out
No voltage output from power supply
No power supply voltage on main board
Main board fault
Turn on the power switch and plug in the
power cord
Turn on the power switch
Exclude short circuits and replace with
new fuses.
Change the power supply
Connect the power connection
Change main board
Page 13
Space Shooting instruction
11
7、Game instruction
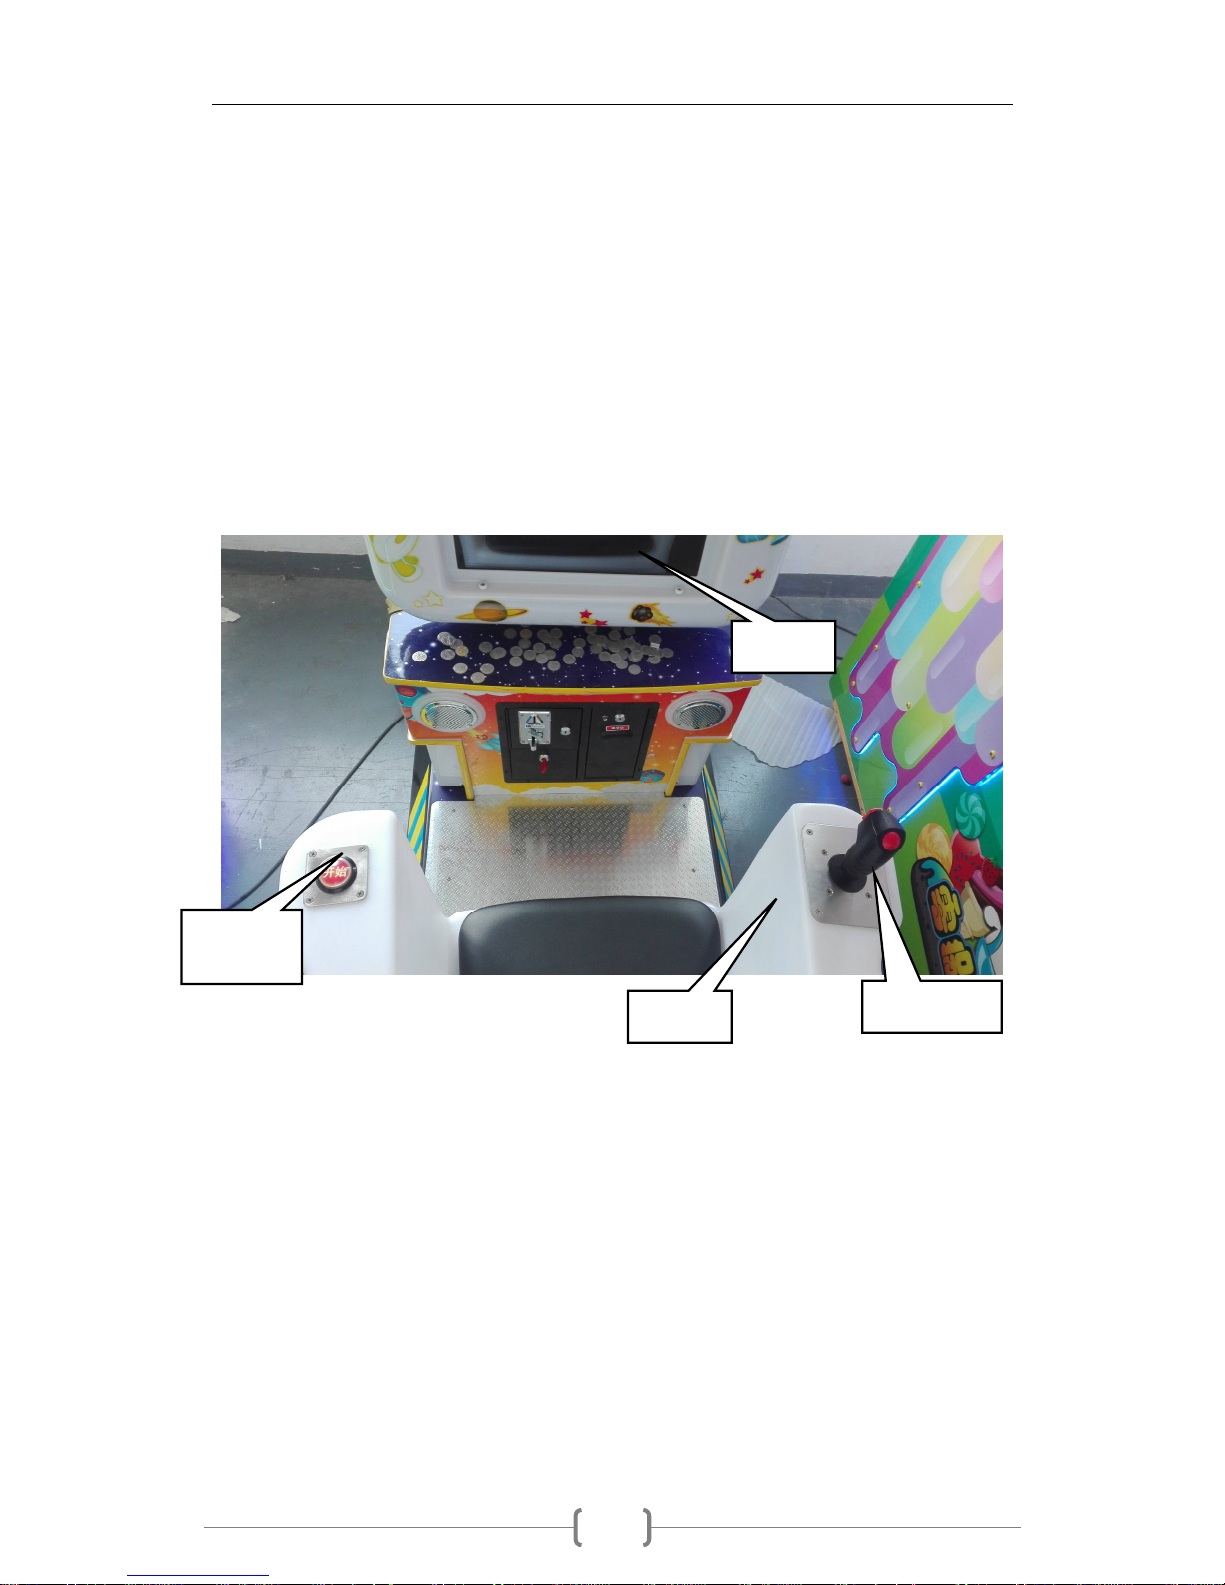
7-1 How to play
1. Insert the coin, press button to start the game.
2. Move the handle (up/down/left/right) to aim scoring target. Hit the
target can score.
3. Within required time, get more scores for more tickets.
7-2 Interface
Monitor
Start
button
Console
Handle
Page 14
Space Shooting instruction
12
7-3 Control signals and instruction
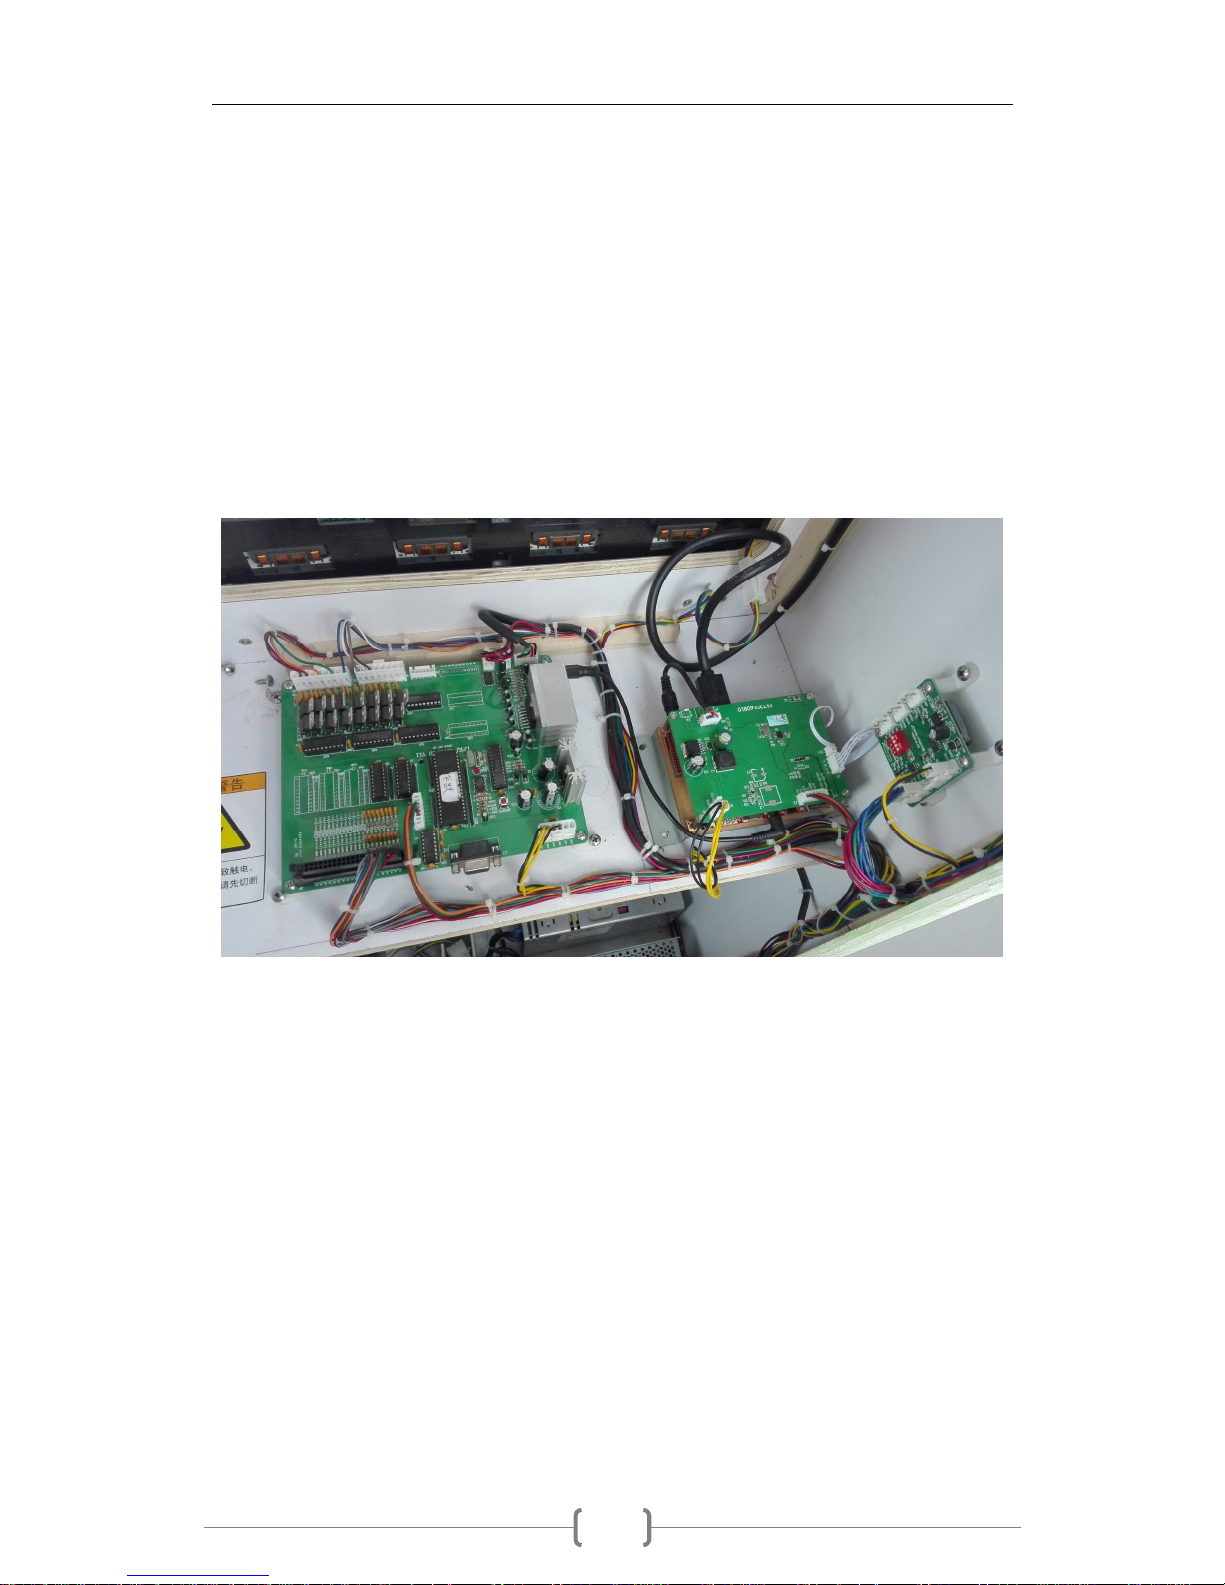
1. Check the attached IO table, schematic diagram and the main board plan
to see machine input and output corresponding to the wiring position.
2. DIP adjustment refer to IO table. Capital letters are for the factory
settings, users can adjust their own operating conditions.
3. Main board plan:
Page 15

Space Shooting instruction
13
7-4 Use and repair
1.The machine must be powered off while it is being serviced and repaired.
In order to avoid short circuit, the personnel need to turn off the
machine before touching the device.
If this operation requires power-on, it must comply with the operating
instructions.
2.Use proper component when exchanging the parts.
Using improper component may caused short circuit, the damage of main
board and component.
3.Do not disassemble, assemble, change equipment.
This may cause electrical short circuit, mechanical failure, etc.,
serious cases may result in fire.
4. Do not place vases, cups, containers on the machine, and also do not
place chemicals and heavy objects.
Spilled liquid can cause short circuits in the appliance to damage the
device, and falling objects can damage the human body and damage the
machine.
5. Do not place any objects on the exhaust port of the machine
Exhaust vents are blocked will cause the internal temperature of the
machine increases, affecting the game operation, or even damage the device
6. Do not repair the machine at will.
This may cause short circuits or uncontrolled malfunctions.
Page 16
Space Shooting instruction
14
8、Parts list
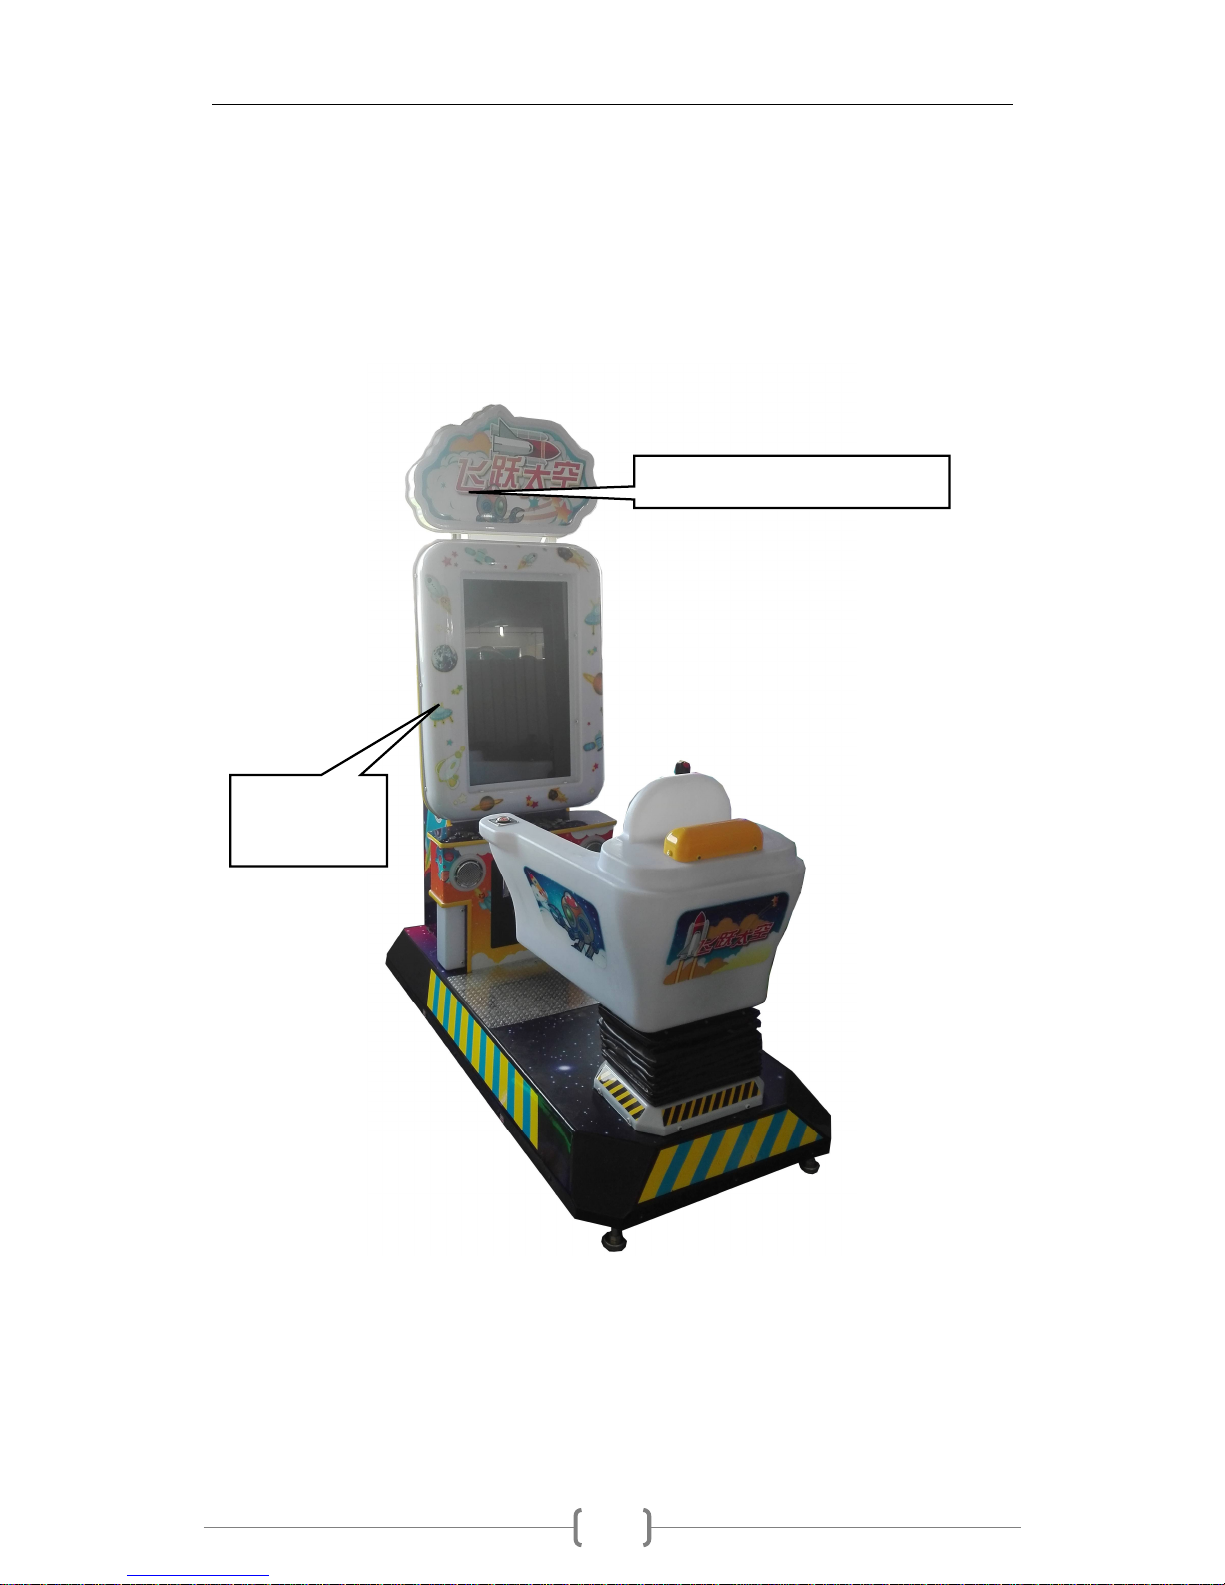
8-1 Mechanism parts
Monitor
Assembly
Light box assembly
Page 17
Space Shooting instruction
15
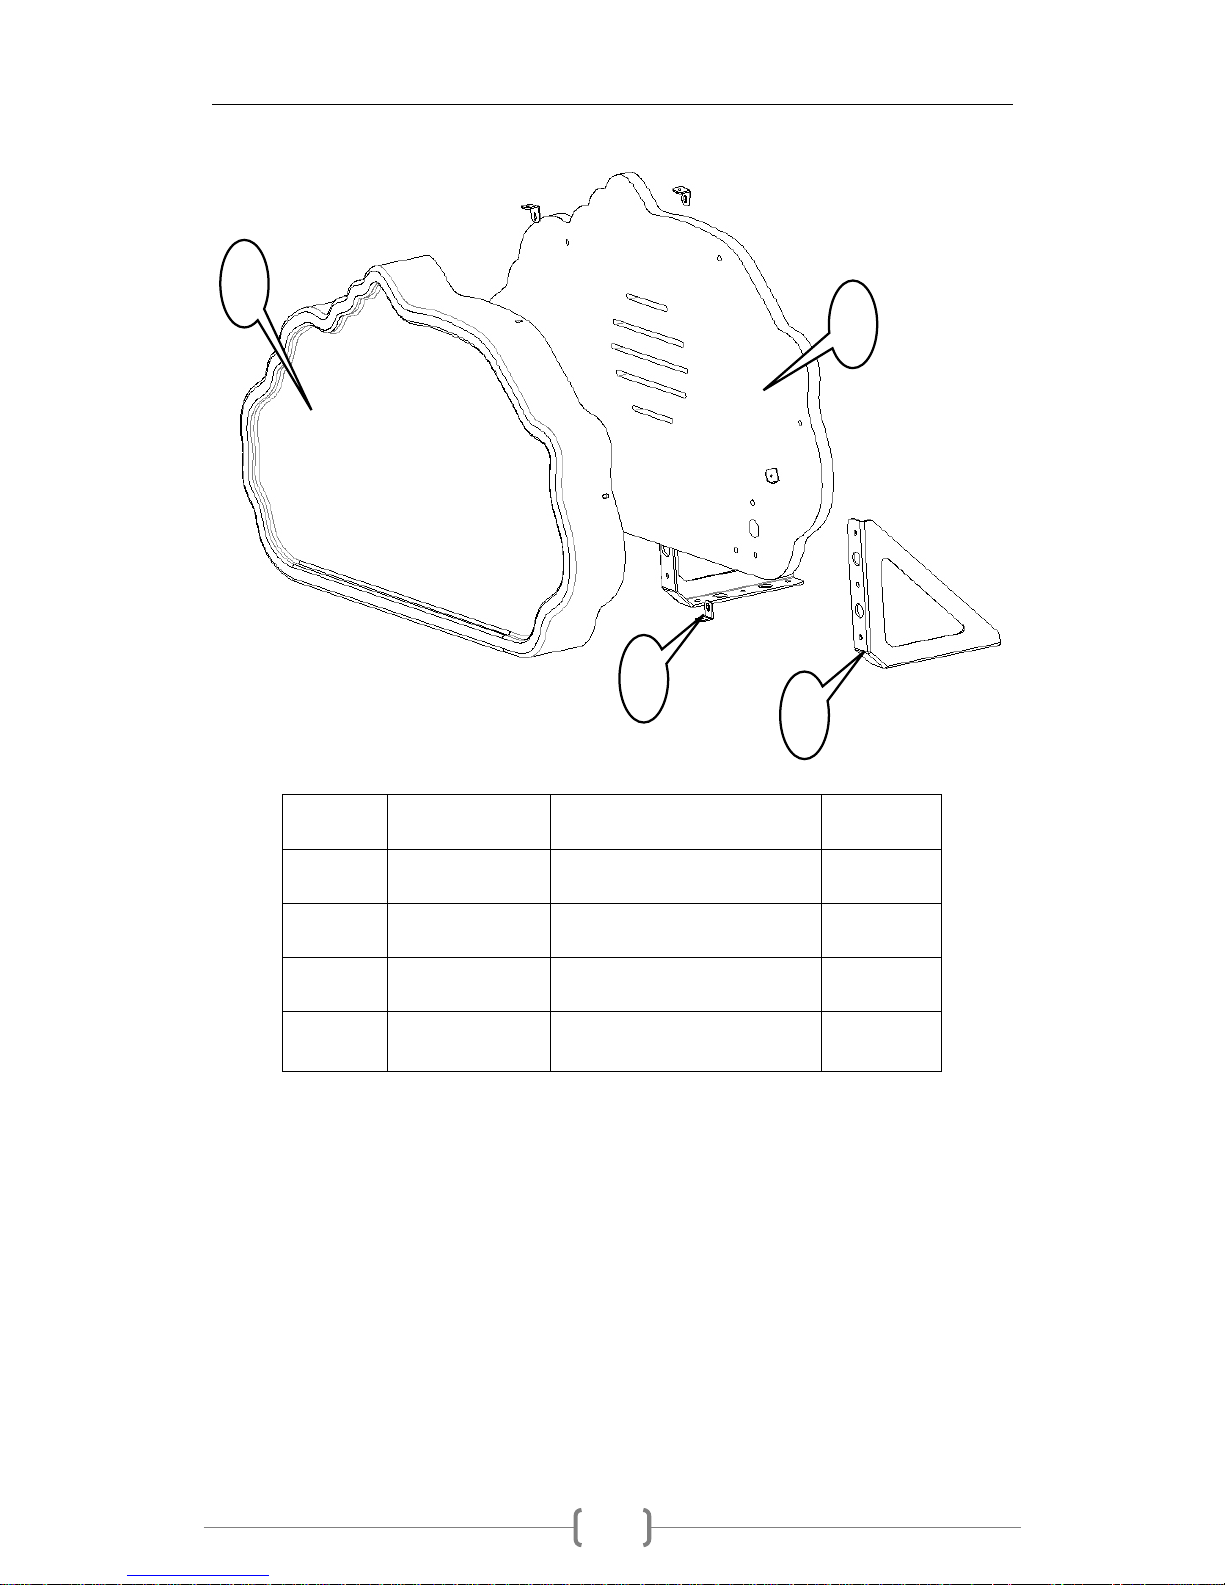
Light box assembly
No Name Spec/Material Qty.
1 Light cover White plastic cover
1
2 Light box fixer
Stainless steel 201 6
3 Back plate 15mm Black 1
4 Light box holder
Q235
Left -1
Right -1
1
2 4 3
Page 18
Space Shooting instruction
16
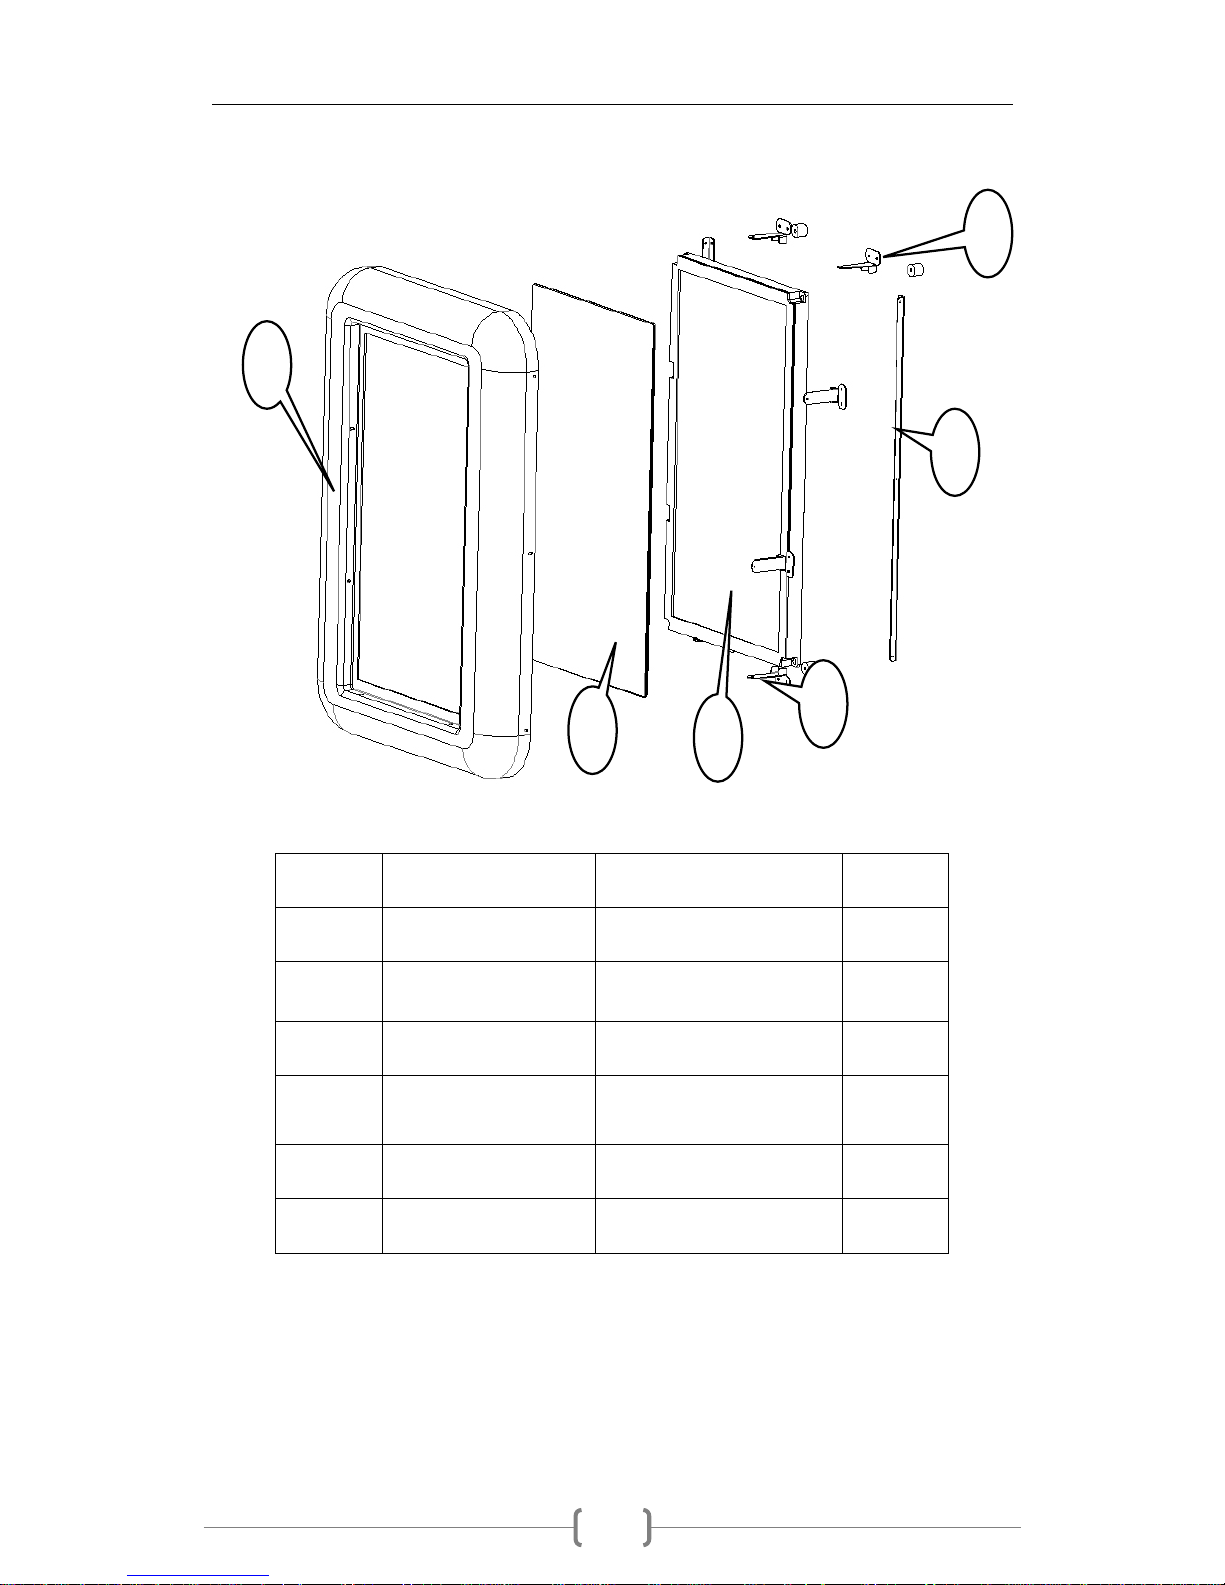
Monitor assembly
No Name Spec/Material Qty.
1 Monitor Frame White plastic 1
2 Monitor glass
Transparent glass
(toughened)
1
3 Monitor 32 inch 1
4 Monitor hooks Q235 8
5 Monitor holder Q235
6 Rubber cylinder 4
1
2
3
4
6 5
Page 19
Space Shooting instruction
17
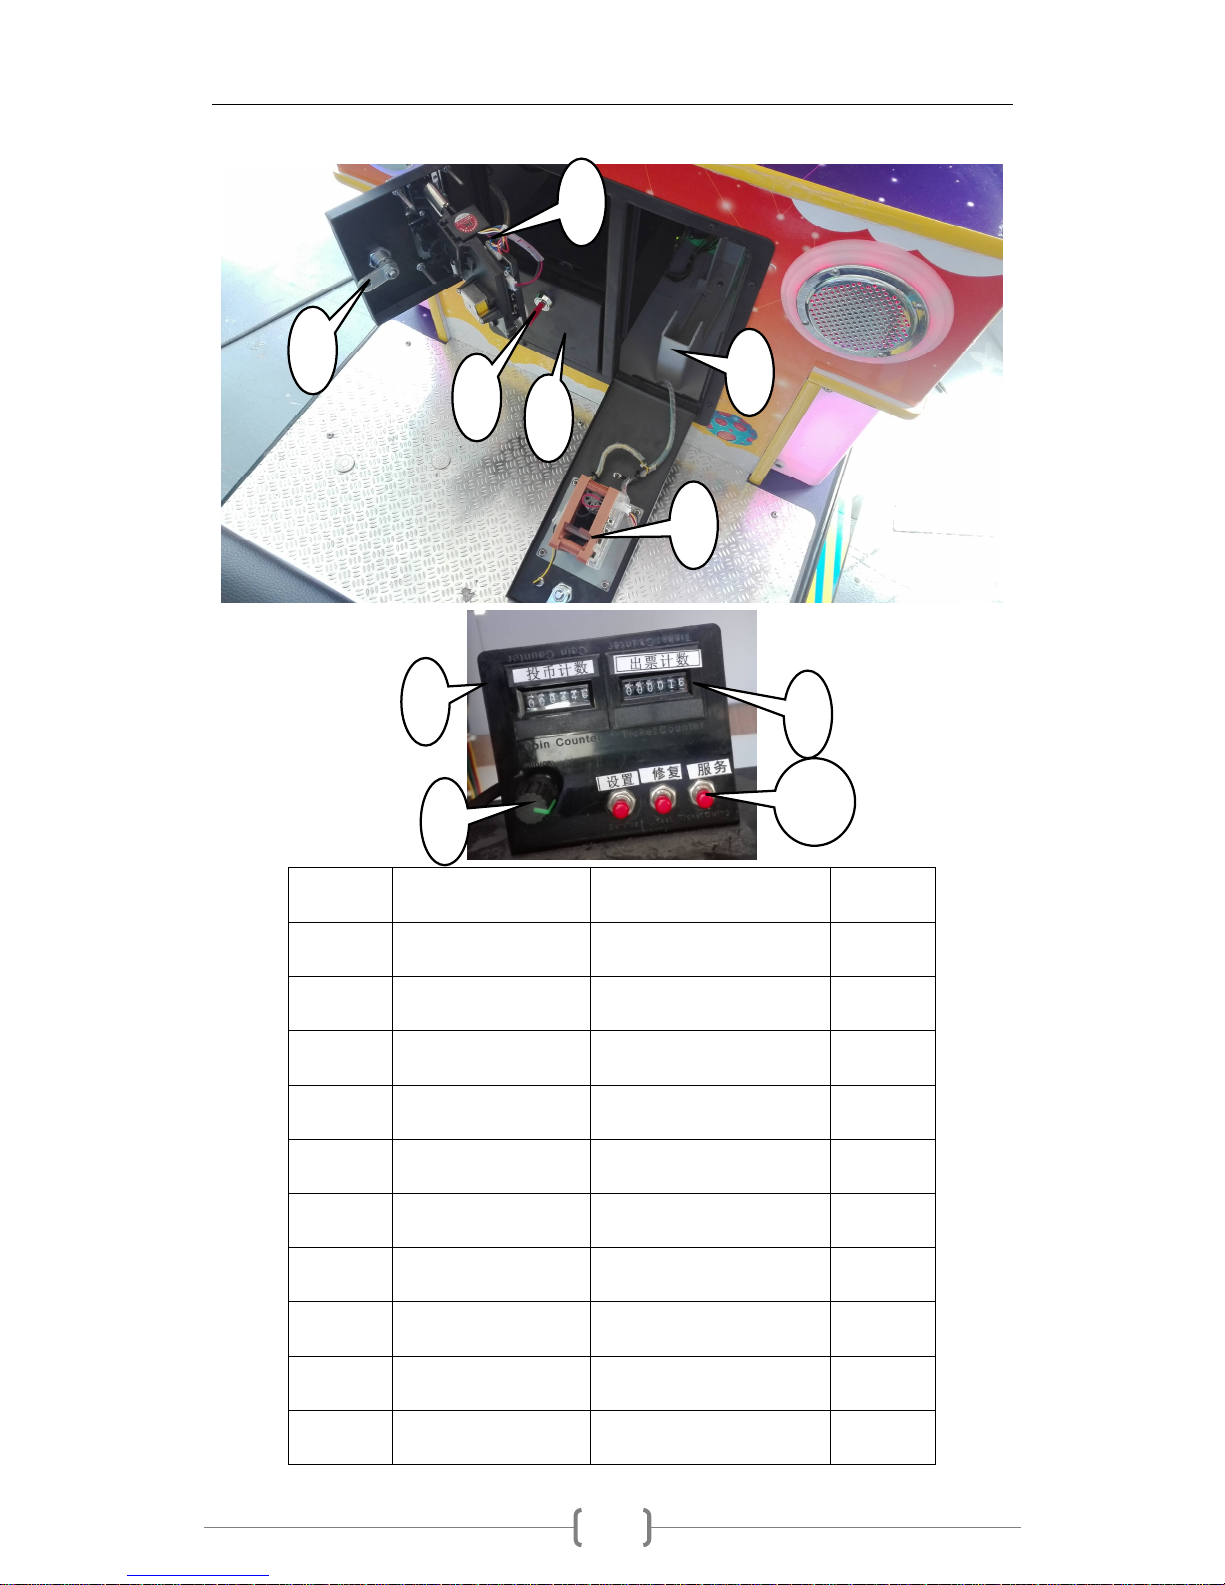
8-2 Coin selector assembly
No Name Spec/Material Qty
1 AH57 Lock
57 Long lock 1
2 Coin Selector LK100M 1
3 Coin box Iron 1
4 AH78 Lock
78 Short lock
1
5 Ticket dispensor LK003C Ver2.42 1
6 Ticket box White plastic 1
7 Counter bracket
Black plastic
1
8 6 bit counter
C-012 2
9 Volume potentiometer
50K 1
10 Service button Red button 3
10
3
5 4 6 7 8 9 1 2
Page 20
Space Shooting instruction
18
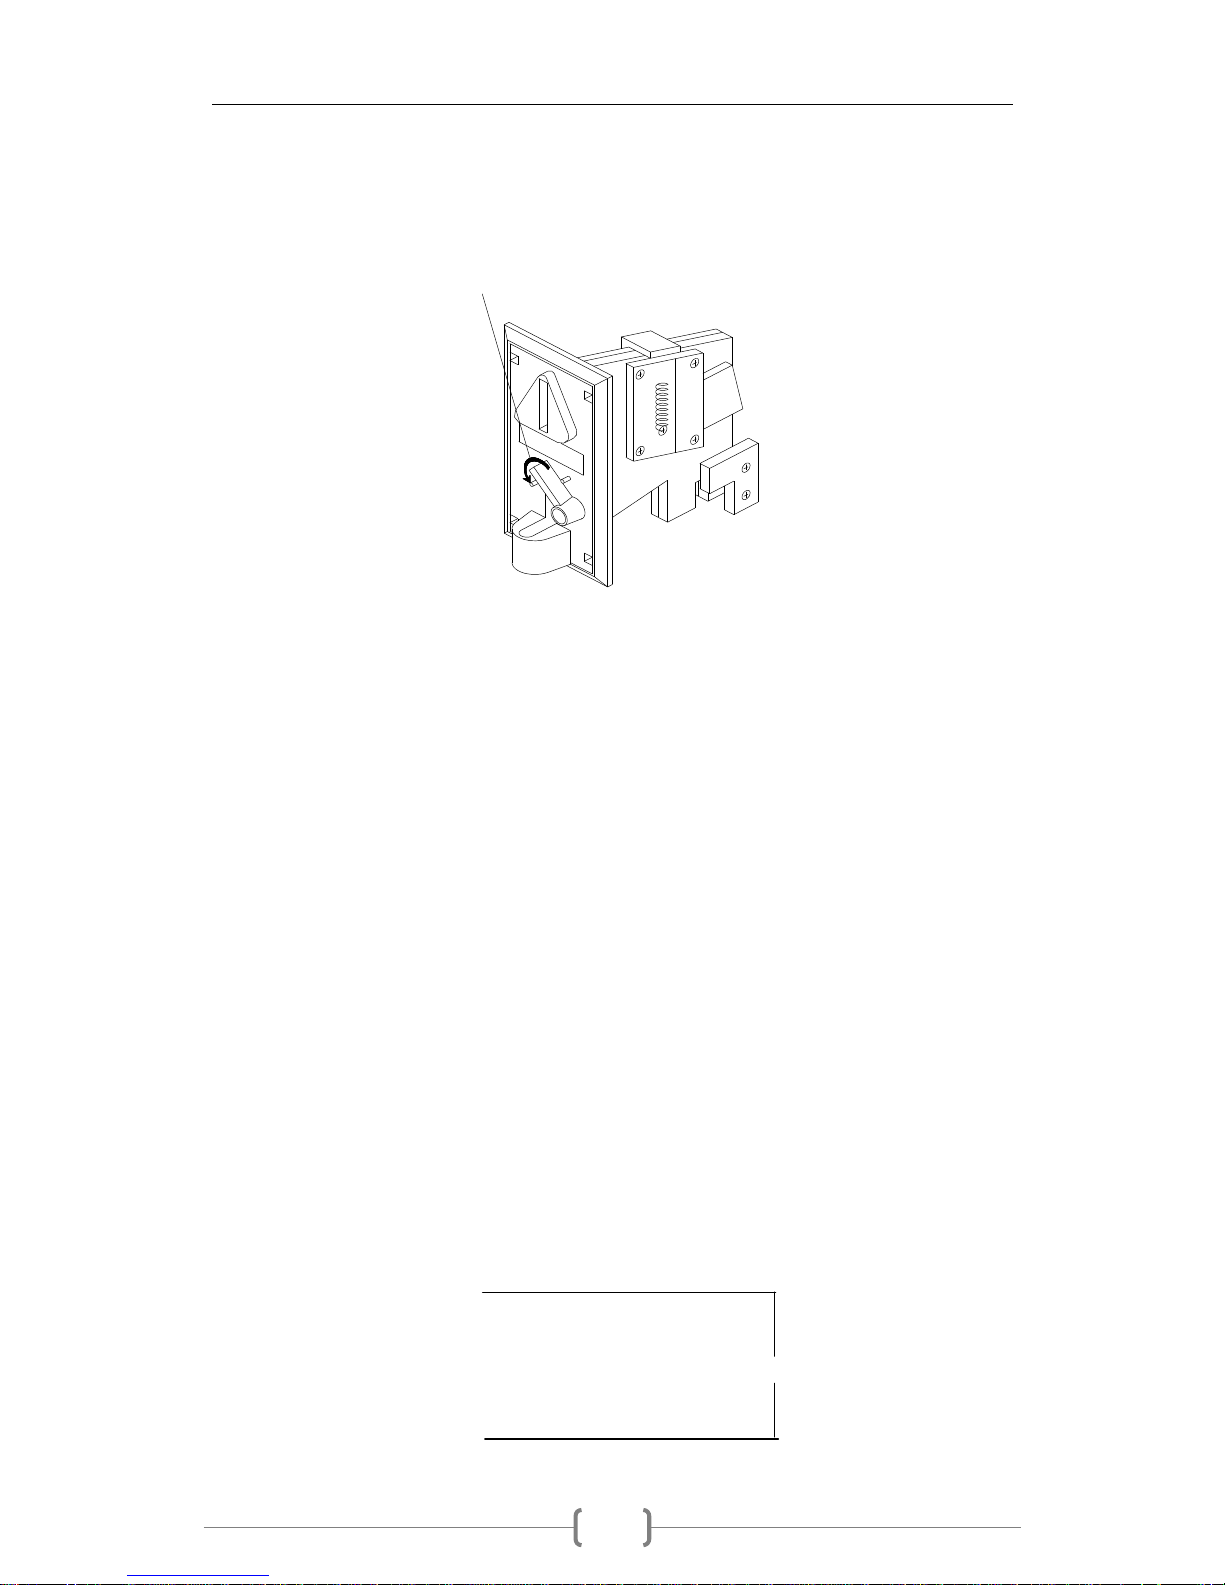
8-3 Coin selector instruction
When the coin stuck in coin selector, pull button as shown in photo, the
coin will be withdrawn from it. If the coin can not be withdrawn, it is
necessary to open the coin acceptor and remove the coin.
Electronic operated coin selector instruction:
A. Please first remove the plastic coins in the coin slot and
replace with the coin you want to use.
B. Loosen the screws on the back of the coin slot and adjust the
fixing tabs on the back of the coin slot according to the
diameter of the coin.
C. Select N.O (normally open) and N.C (normally closed) switch;
the general use is N.O (normally open).
D. Select COIN length / speed switch (TIMER SWITCH): 30MS (short
fast signal) /50MS (middle fast signal) /100MS (long slow
signal), general use is 50MS.
E. The VR knob is used to adjust the sensitivity of the coin
selection. Adjusting clockwise (+), the range of acceptable
coin tolerances is large and the counterclockwise adjustment
(-) allows for a smaller range of tolerances for coins, which
means the screening is more stringent.
F. Wiring instruction:
1. Gray wire
Red wire -DC+12V
2. White wire –COIN Signal
meter
3. Black wire-ground wire
4. Gray wire
Page 21
Space Shooting instruction
19
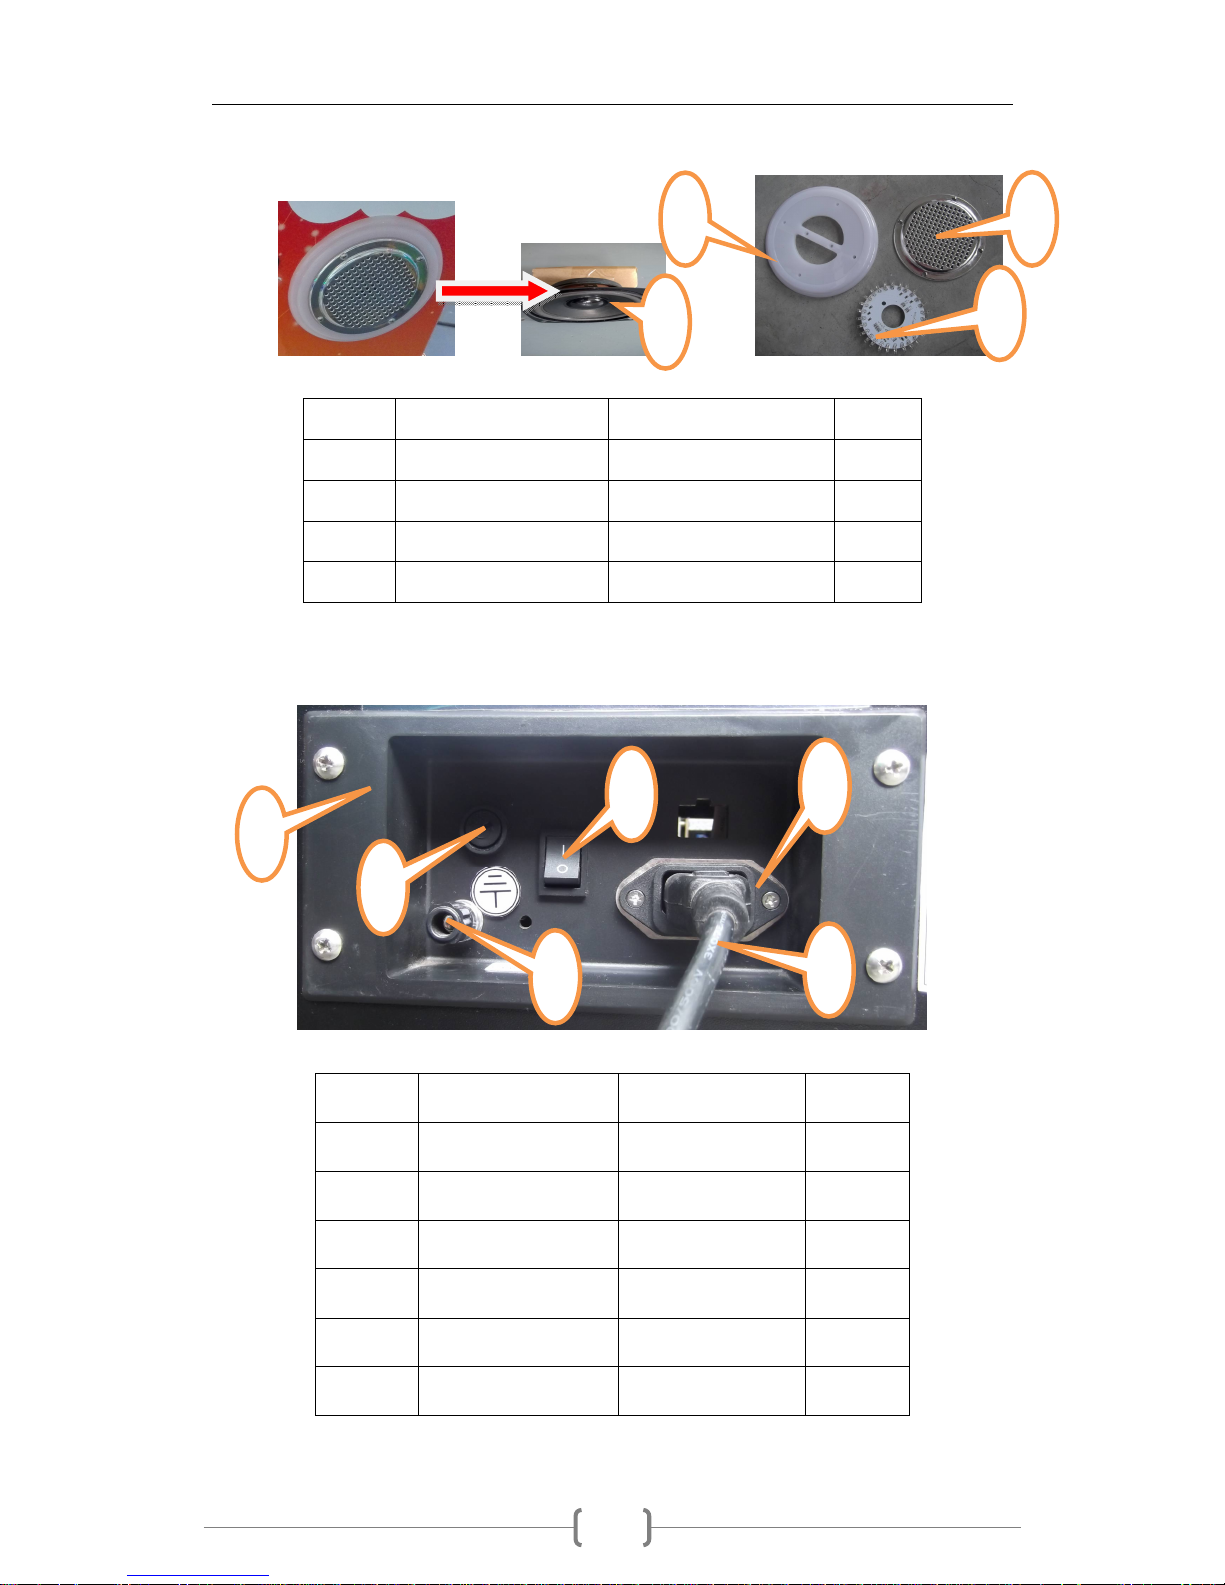
8-4 Speaker assembly
No Name Spec/Material Qty
1 Round speaker 4 inch 8Ω15W 2
2 White plastic cover
Plastic 2
3 Speaker light board
12V RGB 2
4 Speaker net Silver 2
8-5 Fuse and power components
No Name Spec/Material Qty
1 Wire box 1
2 Fuse base HJMF-527 1
3 Ground terminal 1
4 Switch 1
5 Power outlet 1
6 Power cable 6.3A 1
1
2 3 4 1 3 4 5 6 2
Page 22
Space Shooting instruction
20
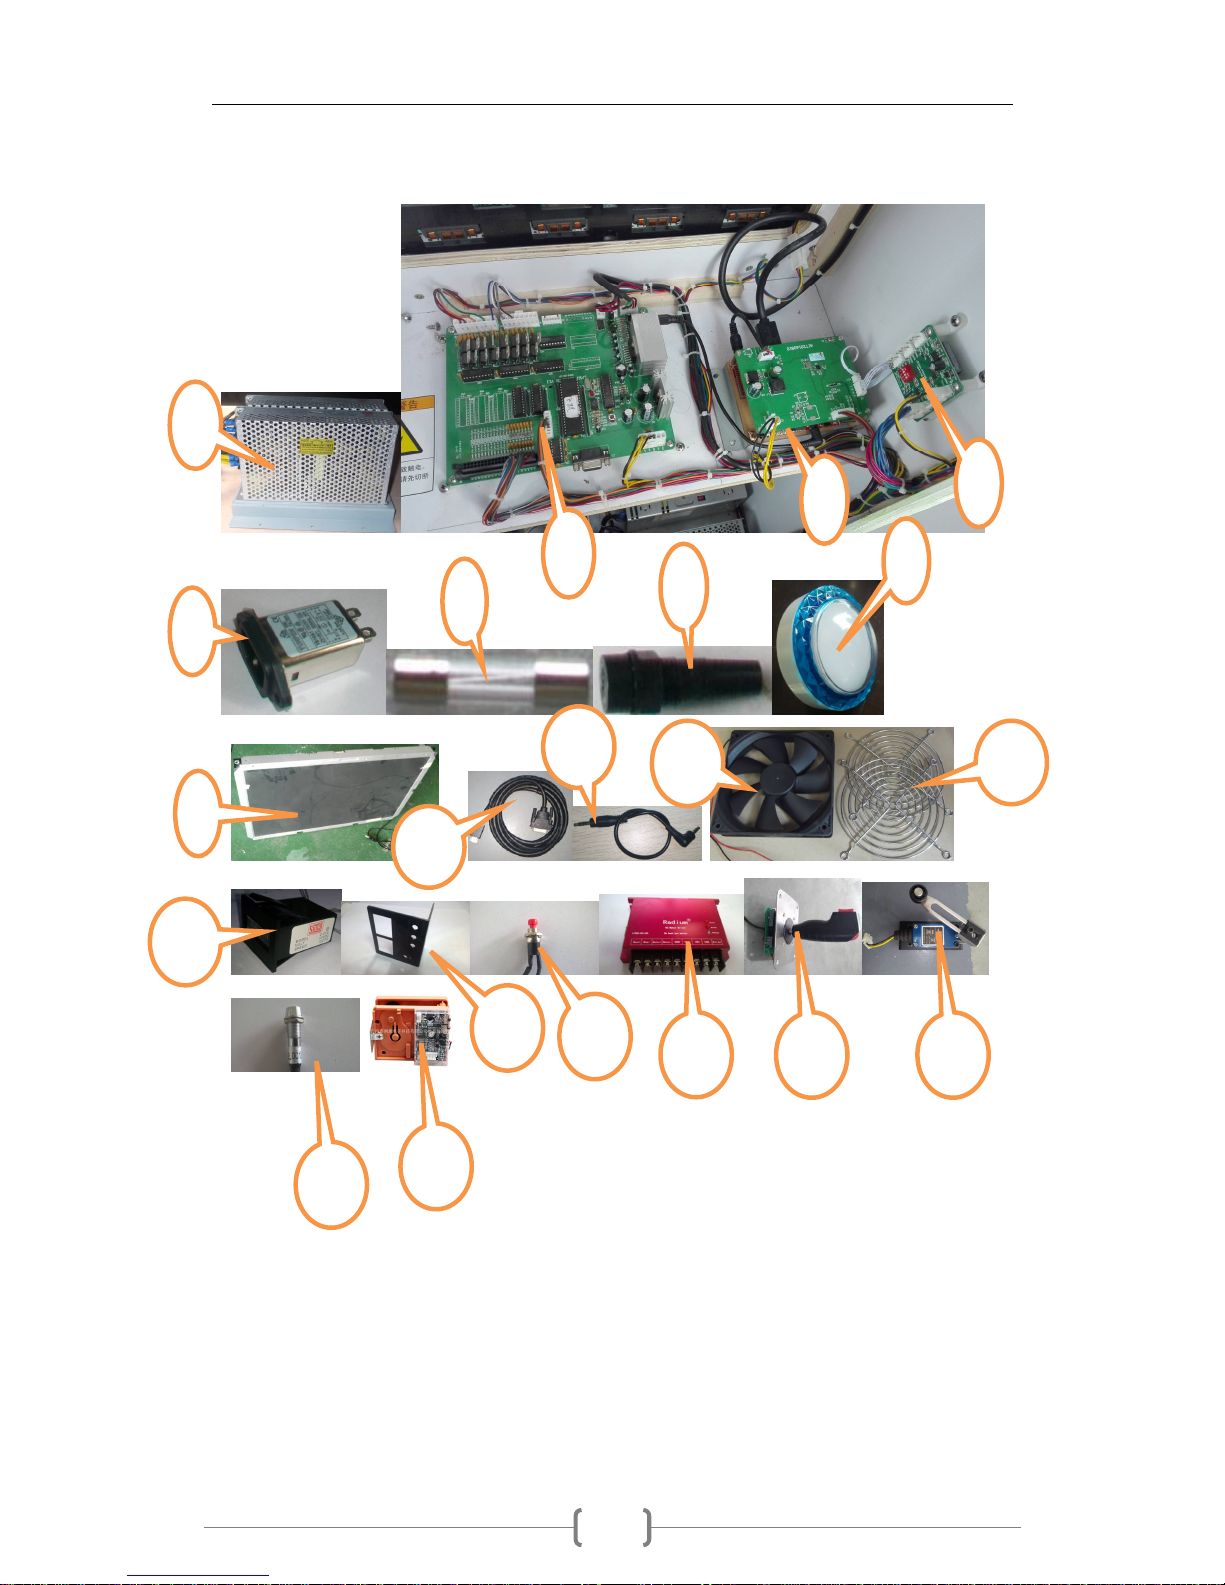
8-6 Electrical installation components
1
5 2 6 7 9
4
3
10 12 13 14 16 18
8
11
15
19 17 20 21
Page 23
Space Shooting instruction
21
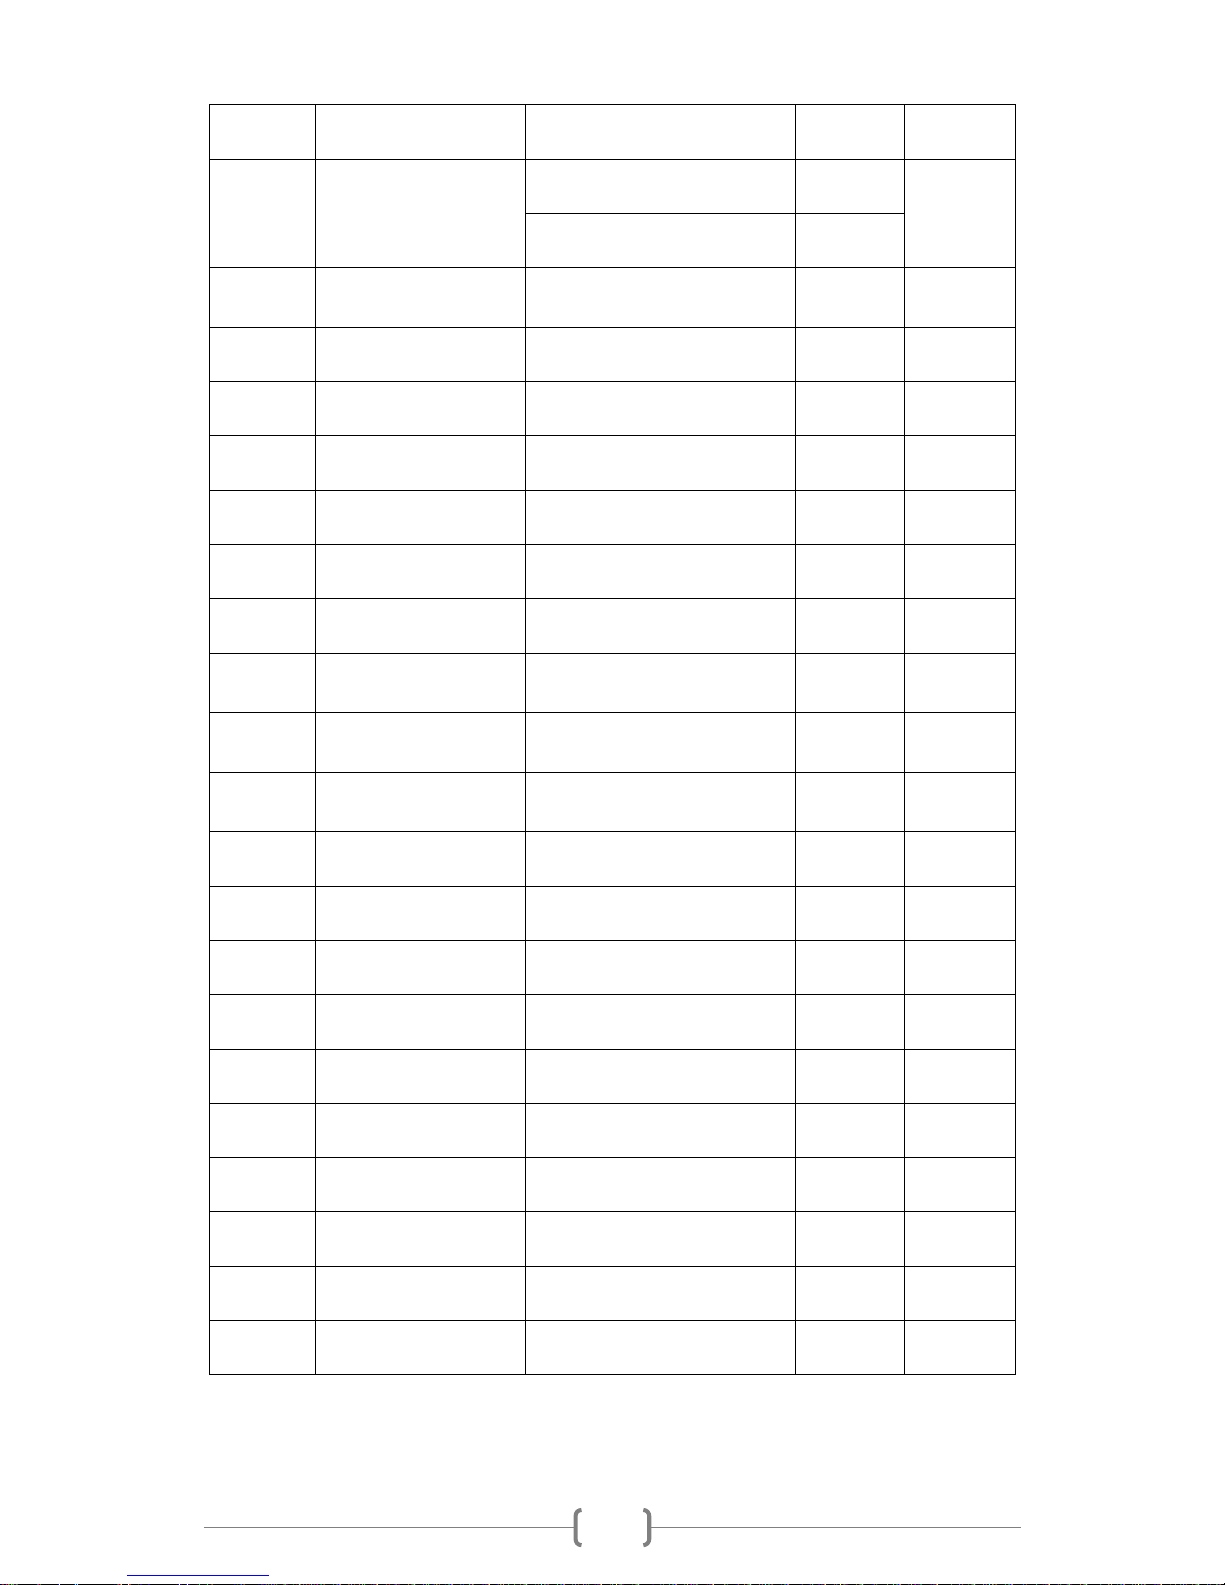
No Name Spec/Material Qty Unit
12V 150W 1
1 Power Supply
24V 350W 1
pc
2
12V Light control
board
XXH-150703A 1 pc
3 Main board AIT20160810 1 pc
4 Pc host MB-A31S(V1.0) 2 pc
5 Filter XXH-150703A 1 pc
6 Fuse Y101124/A1 5*20 6.3A 1 pc
7 Fuse base HJMF-527 1 pc
8 Button White Diameter 45mm 1 set
9 Monitor
220V 50HZ
HV320WHB-N82-58PF
1 pc
10
HDMI to DVI video
cable
1 pc
11 Audio line
3.5 bend to 3.5 straight
head, 25 cm
1 pc
12 Exhaust fan 1804U3A 001 12V 2 pc
13 Exhaust fan net 4 pc
14 Counter C-012 2 pc
15 Counter bracket 1 pc
16 Small button 3 pc
17 Motor controller 1 pc
18 Handle with plate 1 pc
19 Limit switch 2 pc
20 Lack-ticket light 1 pc
21 Ticket dispenser LK003C Ver2.42 1 pc
Page 24
Space Shooting instruction
22
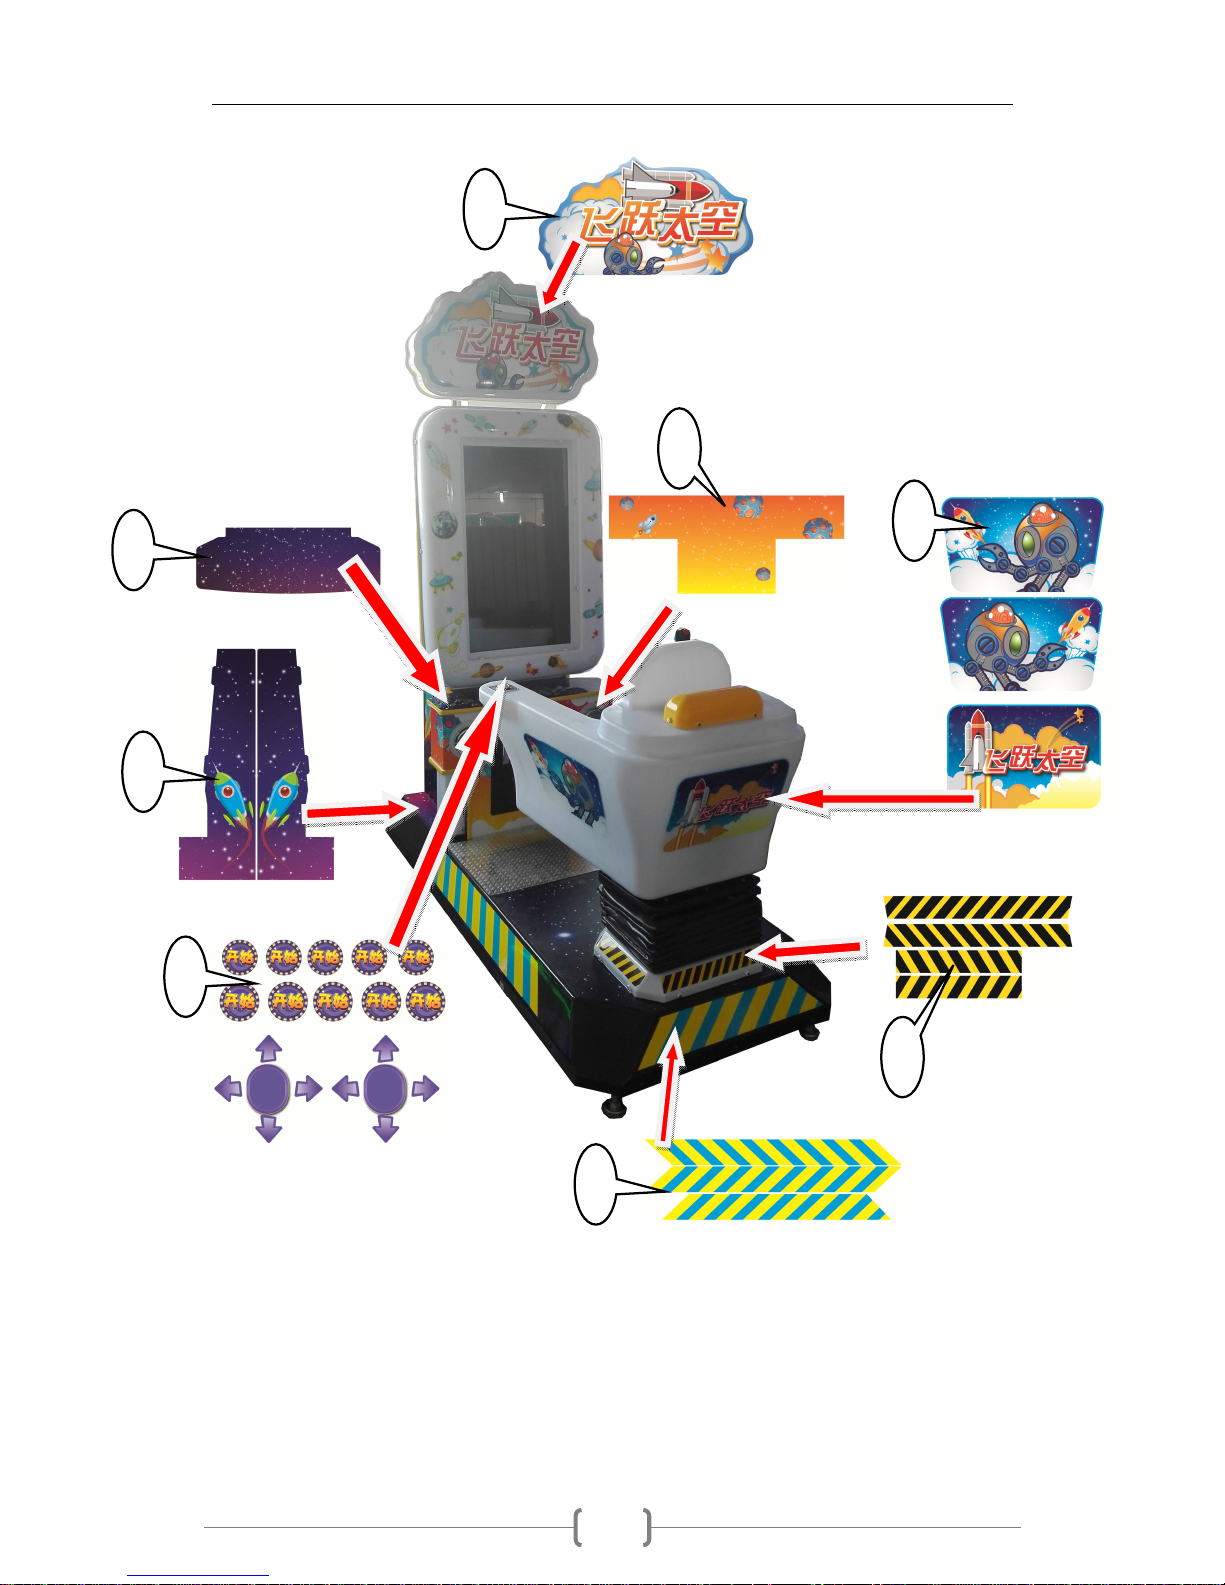
8-7 Artwork
1
7
8 2 3 5 7 6
Page 25
Space Shooting instruction
23
No. Name Spec/Material Qty
1 Light box Sticker 1
2 button Sticker 1
3 Side of base Sticker 1
4 Base Sticker 1
5 Warning at the base Sticker 1
6 Console Sticker 1
7 Back of the seat Sticker 1
8 Side plate Sticker
2
Bilateral
2
1
3
5
4
8
6 7
Page 26
Space Shooting instruction
24
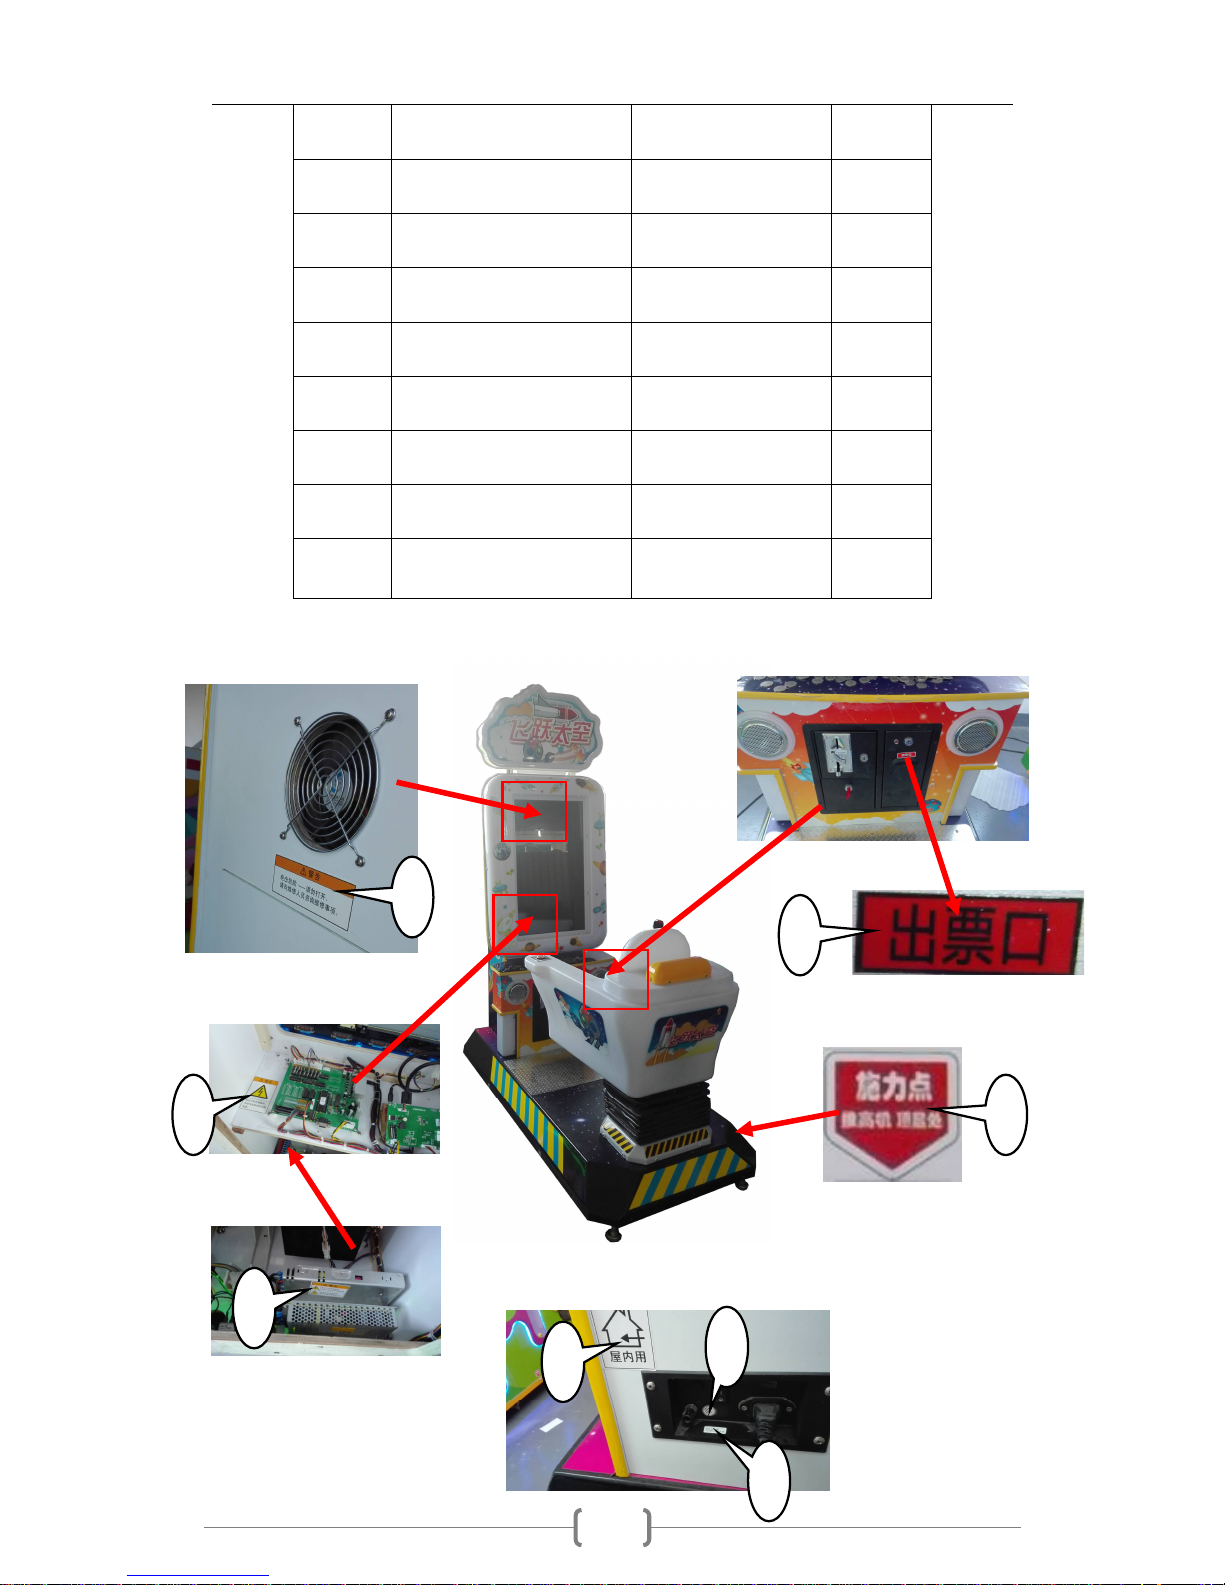
No Name Spec/Material Qty
1 Ticket gate White sticker 1
2 Fork label White sticker 4
3 Repair door label White sticker 1
4
High temp./voltage
label
White sticker 1
5 High voltage label White sticker 1
6 Ground wire label White sticker 1
7 Fuse current label White sticker 1
8 Indoor use label White sticker 1
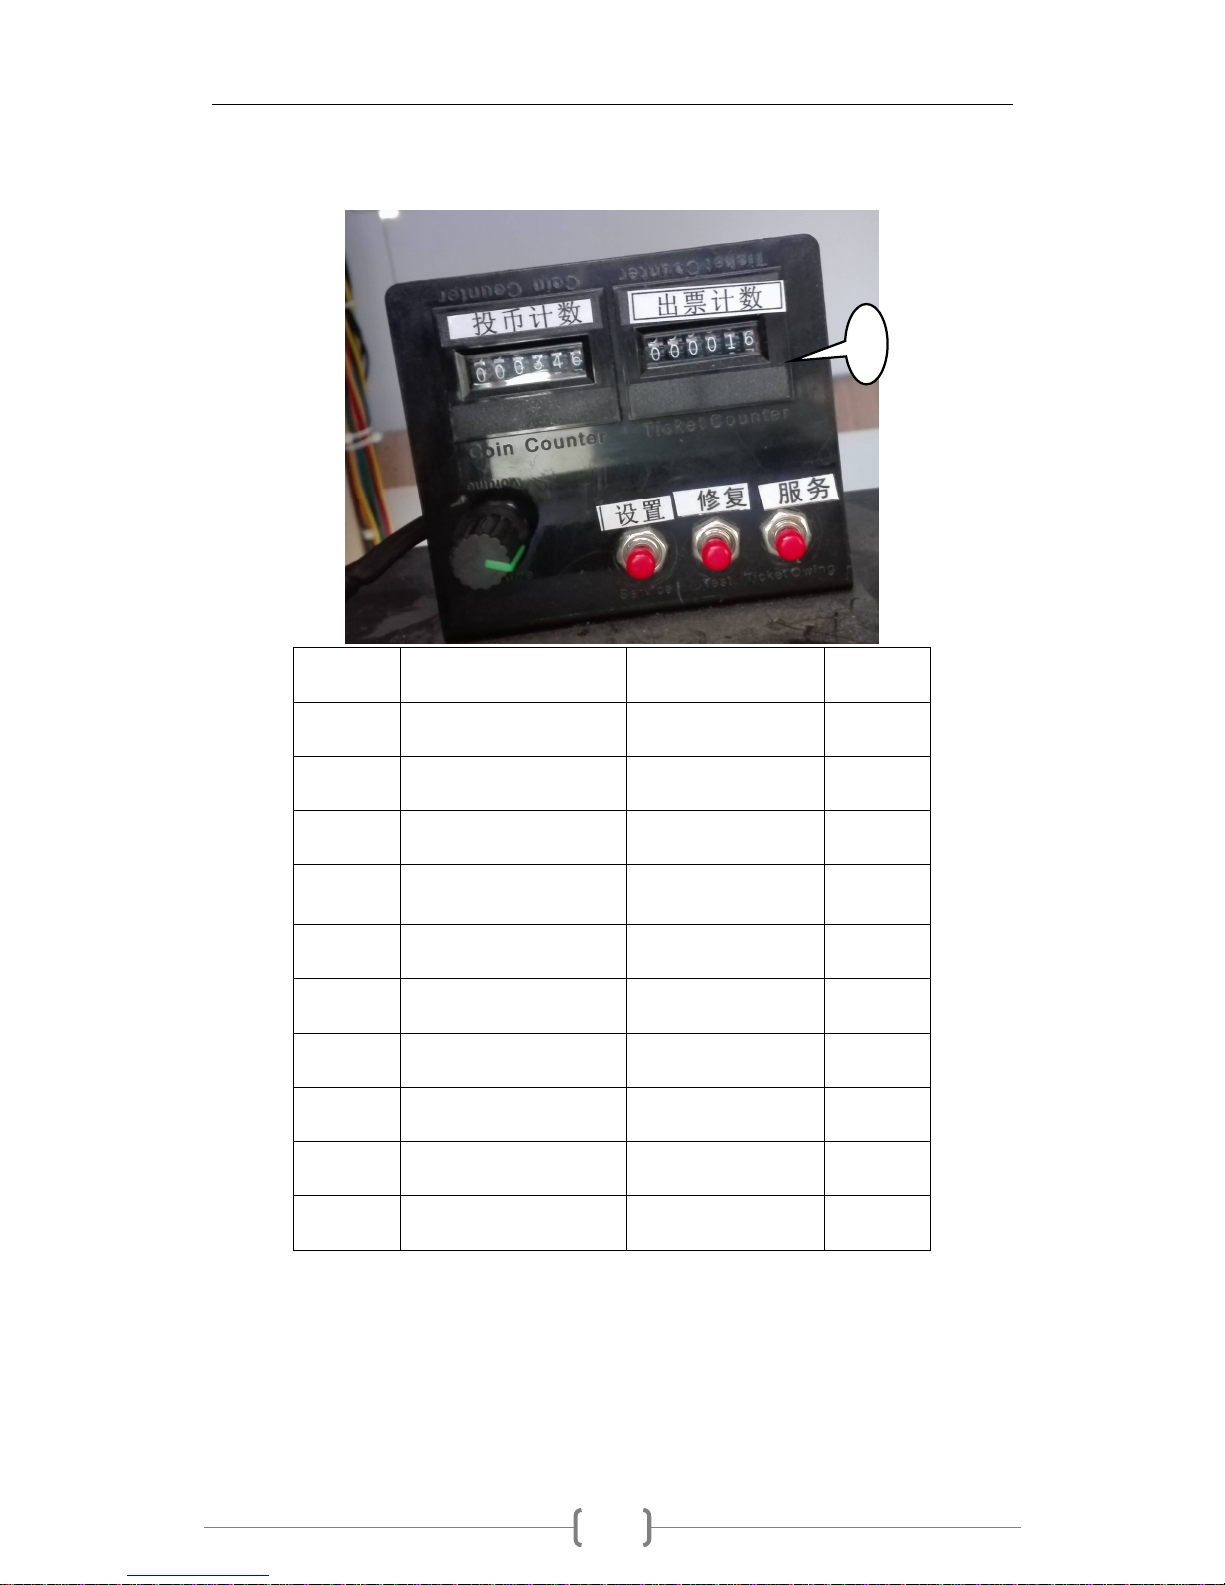
9 Counter label White sticker 1
10 Name plate 1
9
Page 27
Space Shooting instruction
25
8-8 Electrical parts
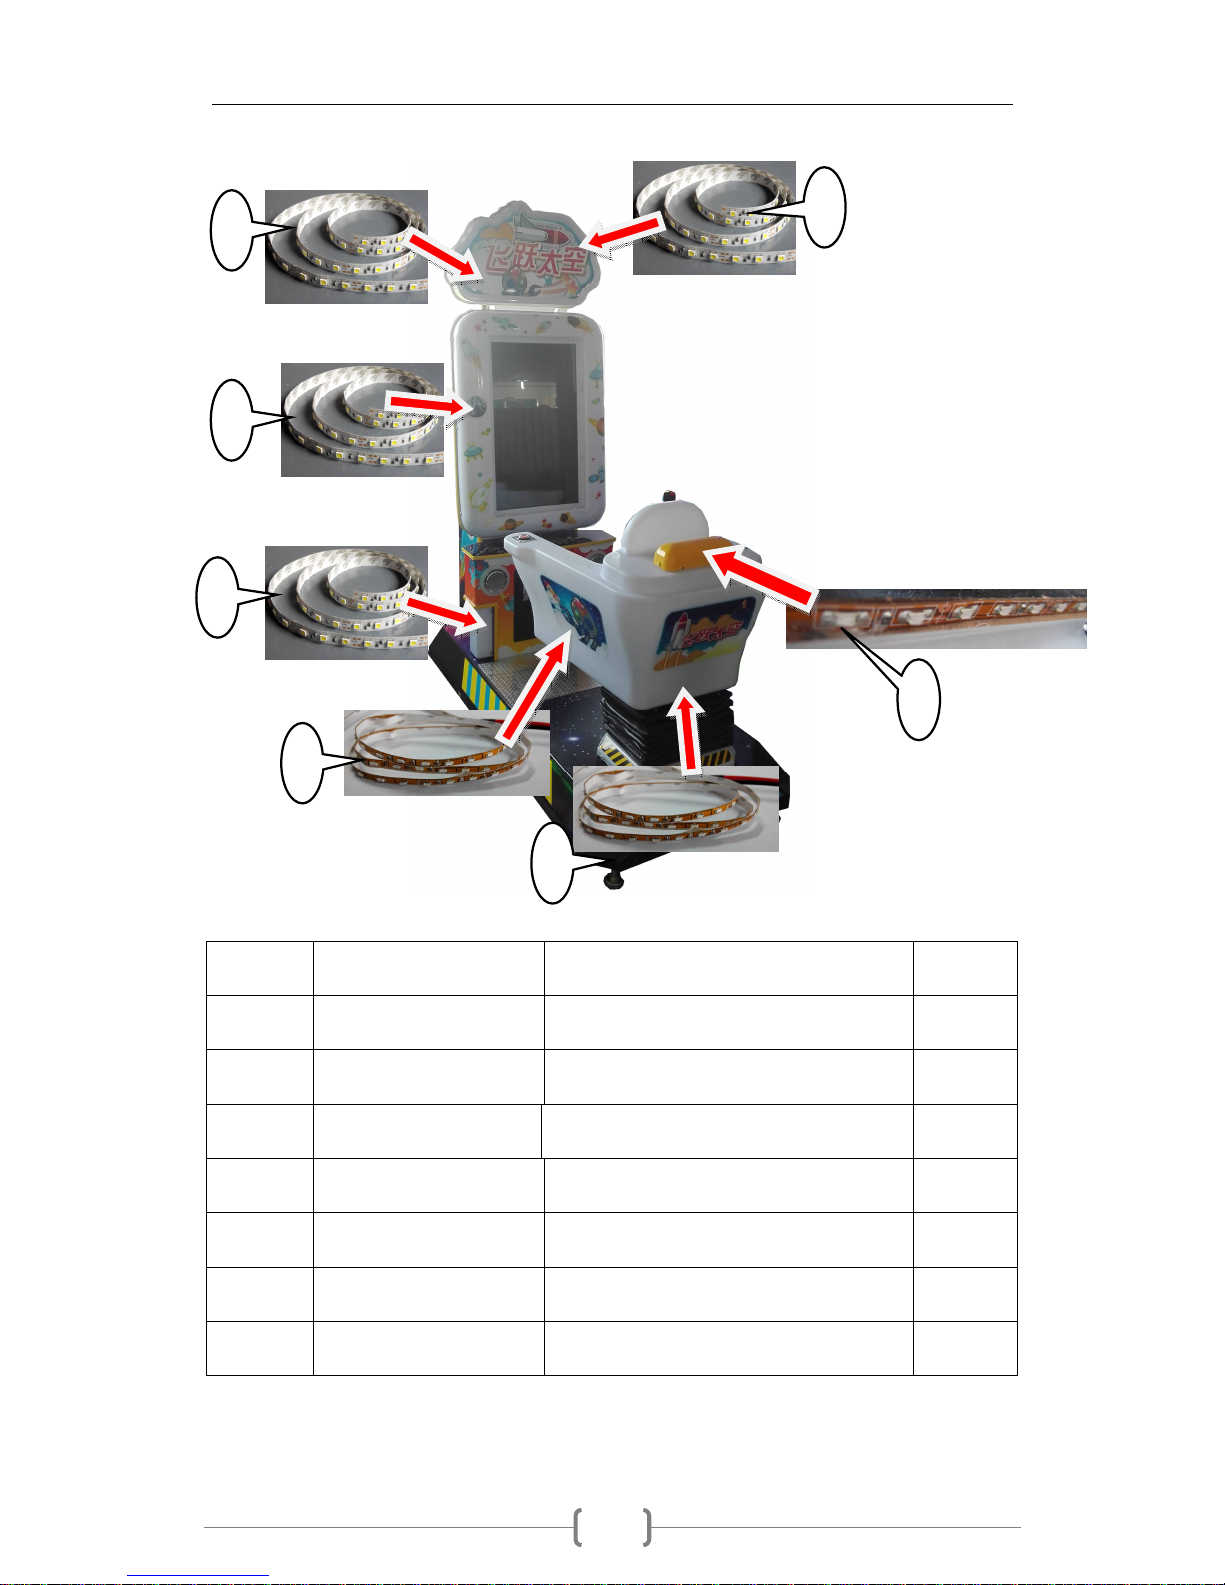
No Name Spec/Material Qty
1 Monitor frame light 5050 RGB light belt 60 beads 2.8m 12V
1
2 Two side light of console 5050 RGB light belt 60 beads 15cm 12V
2
3 Light belt A on light box 5050B RGB light belt 60 beads 1.45m 12V
1
4 Light belt B on light box 5050 RGB light belt 60 beads 40cm 12V
2
5 Light at top of seat 1206 white light 20 cm 1
6 Light at bottom of seat
1206 blue light 40 cm 1
7 Light at sides of seat
1206 blue light 1.2 m 4
3
1 2 7
6
5
4
 Loading...